Installationshandbok WiFimodul art 1020 / Installation ... · OBS! Det kan ta upp till 5 minuter...
2
Installaonshandbok WiFi-modul art 1020 / Installaon Guide WiFi-module art 1020 RoHS Powertell Electronics AB [email protected] www.powertell.se 2017-03-20 Installera WiFi-modul WiFi-modulen ansluts ll värmepumpen via flash- porten. Denna port sier under locket (2). Modulen ansluts ll porten via en av de två medföljande kablarna (D/E), vilken kabel som passar ll vilken värmepump framgår av bilden ovan. 1. Bryt strömförsörjningen ll värmepumpen via huvudbrytaren. 2. Demontera eller vinkla upp panelen (1). 3. Demontera locket (2) som sier under panelen (1). Använd en skruvmejsel för a försikgt bända loss locket (2) i överkant. 4. Anslut en av de två medföljande kablarna (D/E) ll värmepum- pens flash-port. 5. Anslut andra änden av kabeln ll WiFi-modulens kontakt (A). 6. Placera modulen på lämpligt ställe inne i facket, säkerställ a modulen inte är i kontakt med metaller eller andra ledande material. OBS! För Bosch EHP 5.0/6.0-1 och IVT PR-N/LR-N måste hela frontpanelen monteras av, flash-porten sitter direkt på huvudkretskortet. Anslut till internet För a ansluta modulen ll internet måste modulen känna ll namn och lösenord ll aktuellt WiFi-nätverk. Programmera modu- len med denna informaon genom a logga in på modulen via e lokalt nätverk skapat av modulen. Följ instrukonerna på baksidan steg för steg för a konfigurera modulen. Install the WiFi-module The WiFi module connects to the heat pump through the flash-port. This port is located under lid (2). The module connects to the port with one of the two cables. Use the cable (D/E) that fits to your heat pump, indicated in the figure above. 1. Turn off the power to the heat pump using the main power switch. 2. Remove the panel (1). 3. Remove the lid (2) by carefully bending the lid in the upper edge using a screwdriver. 4. Connect one of the two cables (D/E) to the flash port located under the lid (2) 5. Connect the other end of the cable to the connector (A) on the WiFi-module. 6. Place the module inside the cavity and make sure the module is not in contact with any meatal or other conducve materials. Note! For Bosch EHP 5.0/6.0-1 and IVT PR-N/LR-N the whole front panel has to be dismounted, the flash port is located on the main controller board. Connect to Internet To connect the heat pump to internet, the module needs to know the name and password of the WiFi network. Program the module by accessing a local network created by the module. Follow the instrucons, step by step, on the next page to connect to internet. SE ENG IVT THR-N / Bosch EHP 8,5 IVT PHR-N, KHR-N, PR-N, LR-N Bosch EHP 5.0, 6.0-1, 6,5 Kompabel med / Compable with Bosch EHP 5.0, EHP 6.0-1, EHP 6.5, EHP 8.5 IVT THR-N, PHR-N, KHR-N, PR-N, LR-N 1x 2x D/E D E
Transcript of Installationshandbok WiFimodul art 1020 / Installation ... · OBS! Det kan ta upp till 5 minuter...

Installationshandbok WiFi-modul art 1020 / Installation Guide WiFi-module art 1020
RoHS
Powertell Electronics AB [email protected] www.powertell.se
2017-03-20
Installera WiFi-modul WiFi-modulen ansluts till värmepumpen via flash-porten. Denna port sitter under locket (2). Modulen
ansluts till porten via en av de två medföljande kablarna (D/E), vilken kabel som passar till vilken värmepump framgår av bilden ovan.
1. Bryt strömförsörjningen till värmepumpen via huvudbrytaren.
2. Demontera eller vinkla upp panelen (1).
3. Demontera locket (2) som sitter under panelen (1). Använd en
skruvmejsel för att försiktigt bända loss locket (2) i överkant.
4. Anslut en av de två medföljande kablarna (D/E) till värmepum-
pens flash-port.
5. Anslut andra änden av kabeln till WiFi-modulens kontakt (A).
6. Placera modulen på lämpligt ställe inne i facket, säkerställ att
modulen inte är i kontakt med metaller eller andra ledande
material.
OBS! För Bosch EHP 5.0/6.0-1 och IVT PR-N/LR-N måste hela frontpanelen
monteras av, flash-porten sitter direkt på huvudkretskortet.
Anslut till internet
För att ansluta modulen till internet måste modulen känna till
namn och lösenord till aktuellt WiFi-nätverk. Programmera modu-
len med denna information genom att logga in på modulen via ett
lokalt nätverk skapat av modulen. Följ instruktionerna på baksidan
steg för steg för att konfigurera modulen.
Install the WiFi-module
The WiFi module connects to the heat pump through the flash-port. This port is located under lid (2). The
module connects to the port with one of the two cables. Use the cable (D/E) that fits to your heat pump, indicated in the figure above.
1. Turn off the power to the heat pump using the main power
switch.
2. Remove the panel (1).
3. Remove the lid (2) by carefully bending the lid in the upper edge
using a screwdriver.
4. Connect one of the two cables (D/E) to the flash port located
under the lid (2)
5. Connect the other end of the cable to the connector (A) on the
WiFi-module.
6. Place the module inside the cavity and make sure the module is
not in contact with any meatal or other conductive materials.
Note! For Bosch EHP 5.0/6.0-1 and IVT PR-N/LR-N the whole front panel has
to be dismounted, the flash port is located on the main controller board.
Connect to Internet
To connect the heat pump to internet, the module needs to know
the name and password of the WiFi network. Program the module
by accessing a local network created by the module. Follow the
instructions, step by step, on the next page to connect to internet.
SE ENG
IVT THR-N / Bosch EHP 8,5 IVT PHR-N, KHR-N, PR-N, LR-N
Bosch EHP 5.0, 6.0-1, 6,5
Kompatibel med / Compatible with Bosch EHP 5.0, EHP 6.0-1, EHP 6.5, EHP 8.5 IVT THR-N, PHR-N, KHR-N, PR-N, LR-N
1x 2x D/E
D E
Powertell Electronics AB [email protected] www.powertell.se
2017-03-20
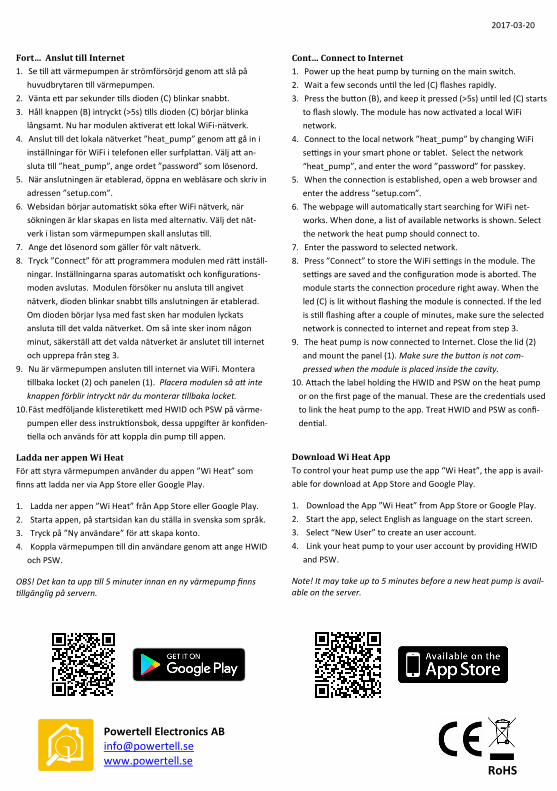
Fort… Anslut till Internet
1. Se till att värmepumpen är strömförsörjd genom att slå på
huvudbrytaren till värmepumpen.
2. Vänta ett par sekunder tills dioden (C) blinkar snabbt.
3. Håll knappen (B) intryckt (>5s) tills dioden (C) börjar blinka
långsamt. Nu har modulen aktiverat ett lokal WiFi-nätverk.
4. Anslut till det lokala nätverket ”heat_pump” genom att gå in i
inställningar för WiFi i telefonen eller surfplattan. Välj att an-
sluta till ”heat_pump”, ange ordet ”password” som lösenord.
5. När anslutningen är etablerad, öppna en webläsare och skriv in
adressen ”setup.com”.
6. Websidan börjar automatiskt söka efter WiFi nätverk, när
sökningen är klar skapas en lista med alternativ. Välj det nät-
verk i listan som värmepumpen skall anslutas till.
7. Ange det lösenord som gäller för valt nätverk.
8. Tryck ”Connect” för att programmera modulen med rätt inställ-
ningar. Inställningarna sparas automatiskt och konfigurations-
moden avslutas. Modulen försöker nu ansluta till angivet
nätverk, dioden blinkar snabbt tills anslutningen är etablerad.
Om dioden börjar lysa med fast sken har modulen lyckats
ansluta till det valda nätverket. Om så inte sker inom någon
minut, säkerställ att det valda nätverket är anslutet till internet
och upprepa från steg 3.
9. Nu är värmepumpen ansluten till internet via WiFi. Montera
tillbaka locket (2) och panelen (1). Placera modulen så att inte
knappen förblir intryckt när du monterar tillbaka locket.
10. Fäst medföljande klisteretikett med HWID och PSW på värme-
pumpen eller dess instruktionsbok, dessa uppgifter är konfiden-
tiella och används för att koppla din pump till appen.
Ladda ner appen Wi Heat
För att styra värmepumpen använder du appen ”Wi Heat” som
finns att ladda ner via App Store eller Google Play.
1. Ladda ner appen ”Wi Heat” från App Store eller Google Play.
2. Starta appen, på startsidan kan du ställa in svenska som språk.
3. Tryck på ”Ny användare” för att skapa konto.
4. Koppla värmepumpen till din användare genom att ange HWID
och PSW.
OBS! Det kan ta upp till 5 minuter innan en ny värmepump finns tillgänglig på servern.
Cont… Connect to Internet
1. Power up the heat pump by turning on the main switch.
2. Wait a few seconds until the led (C) flashes rapidly.
3. Press the button (B), and keep it pressed (>5s) until led (C) starts
to flash slowly. The module has now activated a local WiFi
network.
4. Connect to the local network ”heat_pump” by changing WiFi
settings in your smart phone or tablet. Select the network
“heat_pump”, and enter the word ”password” for passkey.
5. When the connection is established, open a web browser and
enter the address ”setup.com”.
6. The webpage will automatically start searching for WiFi net-
works. When done, a list of available networks is shown. Select
the network the heat pump should connect to.
7. Enter the password to selected network.
8. Press ”Connect” to store the WiFi settings in the module. The
settings are saved and the configuration mode is aborted. The
module starts the connection procedure right away. When the
led (C) is lit without flashing the module is connected. If the led
is still flashing after a couple of minutes, make sure the selected
network is connected to internet and repeat from step 3.
9. The heat pump is now connected to Internet. Close the lid (2)
and mount the panel (1). Make sure the button is not com-
pressed when the module is placed inside the cavity.
10. Attach the label holding the HWID and PSW on the heat pump
or on the first page of the manual. These are the credentials used
to link the heat pump to the app. Treat HWID and PSW as confi-
dential.
Download Wi Heat App
To control your heat pump use the app “Wi Heat”, the app is avail-
able for download at App Store and Google Play.
1. Download the App ”Wi Heat” from App Store or Google Play.
2. Start the app, select English as language on the start screen.
3. Select “New User” to create an user account.
4. Link your heat pump to your user account by providing HWID
and PSW.
Note! It may take up to 5 minutes before a new heat pump is avail-able on the server.
RoHS