CAAP 215-1(2) – Guide to the preparation of Operations Manuals

1
Installation Preparation – STI, Inc. Internet Explorer
Microsoft Internet Explorer version 7.0 is required. Step 1: Open a Microsoft Internet Explorer browser to check the version installed on the applicable computer. Step 2: Select About Internet Explorer from the Help drop-down menu.
The version will be located under the Microsoft Internet Explorer logo on the About Internet Explorer dialog box.

2
Step 3: Click OK to close the window.
Internet Options GENERAL SETTINGS Step 1: From an open Microsoft Internet Explorer browser, select Internet Options from the Tools drop-down menu. Step 2: From the General tab, click Settings under Browsing history.

3
Step 3: From the Settings dialog box, ensure Every time I visit the web page is selected.

4
TRUSTED SITE SETTINGS The SISTRS (STI Image Storage & Retrieval System) web site must be setup Step 1: From an open Microsoft Internet Explorer browser, select Tools, Internet Options drop-down menu. Step 2: Click the Security tab from the Internet Options dialog box. Step 3: Click the Trusted Sites icon. Step 4: Click the Sites button to display the Trusted Sites dialog box.

5
(Steps 3 & 4)
Step 5: From the Trusted Sites dialog box, remove the checkmark from the Require server verification (https:) for all sites in this zone box.

6
Step 6: Type http://image.spectransinc.com in the Add this Web site to the zone field. Step 7: Click Add. Step 8: Type http://scan.spectransinc.com in the Add this Web site to the zone field. Step 9: Click Add. Step 10: Type http://scan.image.spectransinc.com in the Add this Web site to the zone field. Step 11: Click Add.
(Steps 6 thru11)
Step 11: Click Close
Browser Settings The Microsoft Internet Explorer browser settings need to be set in accordance with SISTRS. Step 1: With Trusted Sites selected (highlighted), click Custom Level on the Security tab to display the Security Settings dialog box.

7
(Step 1)

8
Step 3: Click the OK button to close the Security Settings dialog box. Step 4: Click the Yes button when prompted to accept the changes. Step 5: Click the OK button to close the Internet Options dialog box.
Advanced Settings Step 1: From an open Microsoft Internet Explorer browser, select Internet Options from the Tools drop-down menu.

9
Step 2: Click the Advanced tab from the Internet Options dialog box. Step 3: Ensure there is a checkmark for Display a notification about every script error under the Browsing Category.
(Step 3)
Step 4: Uncheck the Enable third-party browser extensions checkbox.

10
(Step 4)
Step 5: Scroll to the bottom of the screen to the Security settings. Step 6: Ensure there is a checkmark for Empty Temporary Internet Files Folder when browser is closed.

11
(Steps 6 & 7)
Step 7: Click OK, and then reboot the computer.
Download Image Viewer

12
In order to view scanned images, an image viewer must be installed. AlternaTIFF is an application that enables .tif documents to be viewed. Step 1: Type the following address in the Address field of a Microsoft Internet Explorer browser and press Enter.
http://www.alternatiff.com Step 2: From the AlternaTIFF website, click the Click here to go to the Installation Page link.
(Step 2)
Step 3: Click the Auto-install AlternaTIFF ActiveX Control link to begin the application download.

13
(Step 3)
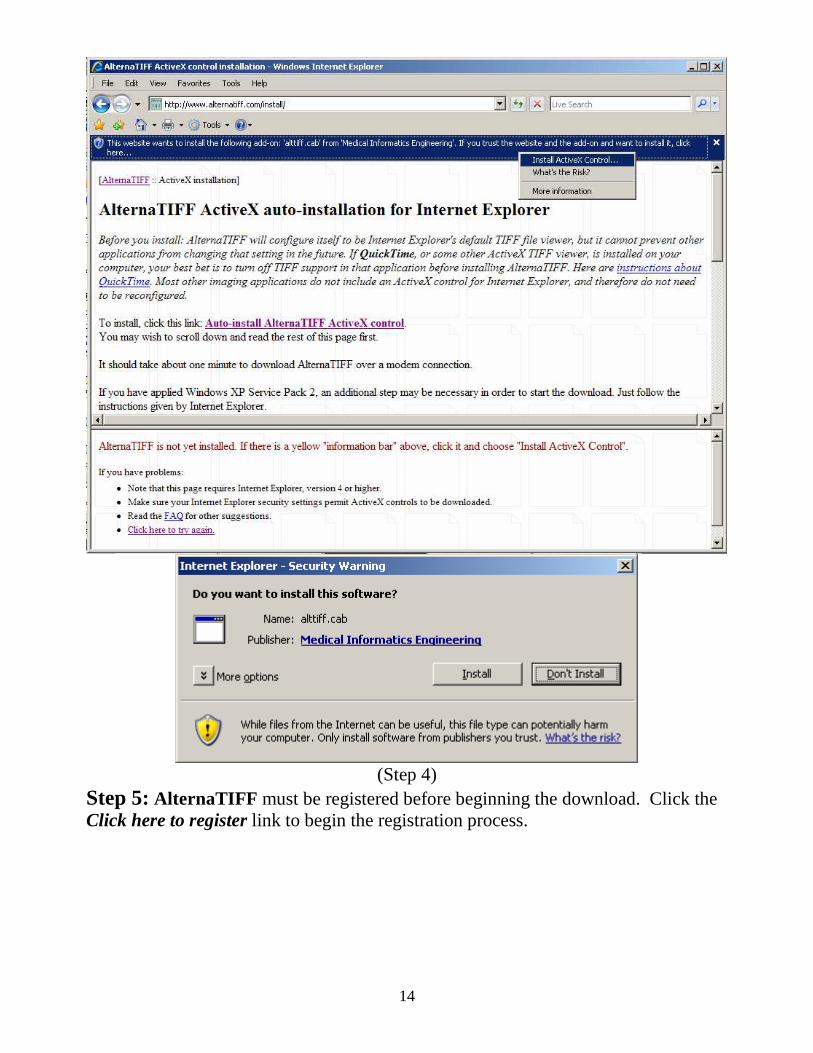
Step 4: Click the Yes button on the Security Warning dialog box. Or Click on the brown information bar to allow install.
14
(Step 4)
Step 5: AlternaTIFF must be registered before beginning the download. Click the Click here to register link to begin the registration process.

15
(Step 5)
Step 6: select Automatic Registration from the AlternaTIFF plug-in registration dialog box. Click Next.
(Step 6)

16
Step 7: On the AlternaTIFF plug-in automatic registration dialog box, fill in the following required fields: Name, Company and E-mail address and click Next, which will become available once the required fields are completed.
(Step 7)
Step 8: Click Send Registration.
(Step 8)

17
Step 9: After the registration is successfully sent, the AlternaTIFF registration dialog box will display. Click OK.
(Step 9)

![ACCESSORIES & N A V I...øæ 2 ª km wMc T ÒQ pqs b{y STI ³ã¿Ós |t -  0 Å ¼ -  º 0 s~ x STI × ÜÖ ´¢ w£µÙ ÀÍ À - ÂÖ ´ ] aXi^M{SAA × SAA wGLUK ¼xz SUBARU](https://static.fdocuments.in/doc/165x107/60a6cbae4b16e65f4b486780/accessories-n-a-v-i-2-km-wmc-t-q-pqs-by-sti-s-t-.jpg)