Installation & Operation Manual for...
12
For Driving Safety and Convenience Installation & Operation Manual for AT-38OD Unit The Leader in Heated Washer Systems AT-38 On-Demand
Transcript of Installation & Operation Manual for...

For Driving Safety and Convenience
Installation & Operation Manual
for AT-38OD Unit
T h e L e a d e r i n H e a t e d W a s h e r S y s t e m s
AT-38 On-Demand

Our Warmest Congratulations!
You are now the Owner of
a Heated Washer Fluid Unit !
Driving in today’s congested traffic is an
experience filled with unpredictable weather and
split second decisions, sometimes leading to
accidents.
The Heated Washer Fluid Unit is a patented
windshield cleaning device that puts you back in
control, providing clear road vision throughout
every season, even in the worst weather
conditions.
Thank you for purchasing our Heated Washer
Fluid Unit.
Enjoy clear driving in the seasons ahead.
1

AlphaTherm Copyright Information
The AT-38OD incorporates proprietary technology that is protected by
worldwide patents and is the exclusive property of AlphaTherm.
Warnings and NotesWarning: When operating the AT-38OD unit, do not place
hands, face or other body parts in or near the heated washer
fluid spray.
Before InstallationBefore installing the AT-38OD unit, please read this manual
thoroughly and retain it for future reference.
Package Components
►Installation Manual (this booklet)
►AT-38OD unit w/attached cables
► Installation bracket
► Red power cable with inline fuse
(60 amps) (attached to unit)
► Black power cables (ground)
(attached to unit)
► 8 cable ties
► 6 self tapping screws
► 2 hose splicers
►1 rubber tube (length 48 inch) or 2
rubber tubes (length 24 inch each) to
connect the unit to the washer
system, if needed
Installation Tools
Needed
(not supplied)
► Flathead Screwdriver
► Wrench to fit vehicle
battery positive and
negative terminals
► Drill with 1/4” socket or
1/8 inch drill bit for self
tapping screws
► Side Cutter (dykes)
► Flashlight ( if needed)
AlphaTherm reserves the right to change the contents of the above
list without notice.
2

Contents
Disclaimer 4
Introduction 5
Installation Diagrams 6
Installation Steps 7
Operation 9
Troubleshooting 10
Warranty 11
3
Disclaimer
Although AlphaTherm has taken all reasonable care to ensure that the
information contained in this Installation Manual was accurate in all
material respects at the time of publication, AlphaTherm PROVIDES
NO ASSURANCE, REPRESENTATION, WARRANTY OR
GUARANTEE, expressed or implied (including third party liability), with
regard to this manual.
The entire information contained in this Installation Manual is provided
by AlphaTherm "AS IS" and without warranty of any kind, express or
implied, including (but not limited to) any implied warranties of
merchantability, fitness for any particular purpose, or non-infringement.
Accordingly, by using the AT-38OD unit and this information to the
extent permitted by law, you agree that AlphaTherm (including, without
limitation, its subsidiaries, affiliates, agents, officers, directors,
employees and insurers) is not and will not be liable for losses or
damages resulting from this Installation Manual, its use, any information
contained therein or the installation of the AT-38OD unit.
All product illustrations and specifications are based upon
current information at the time of publication. Although
descriptions are believed correct, complete accuracy cannot be
guaranteed. AlphaTherm reserves the right to make changes of
any kind at any time, without notice or obligation, to the
information contained in this Installation Manual. All data and
information are subject to change without notice and AlphaTherm
assumes no obligation to update or correct the information in this
manual.
4

Introduction
The AT-38OD unit is designed to enhance the driver’s all-season
safety and convenience by increasing over all performance of a
vehicle washer system. Unit works with virtually all existing
washer / wiper systems.
During winter months heated washer fluid helps to:
• Remove light frost and ice from the windshield
• Unblock partially frozen washer nozzles
• Minimize ice build-up on the wiper blades while driving
• Reduce wear and tear of the wiper blades
During warmer months heated washer fluid helps to:
• Eliminate summer glare by removing haze and streaks
• Dissolve and remove mud, dirt, insects and sap
NOTE: The efficiency of the AT-38OD unit will depend on factors such as the condition
of the wiper blades, the type and condition of the nozzles, the quality of the washing
fluid, and the severity of the existing weather conditions. In addition, the unit must be
mounted within the parameters as outlined on the following page.
5
Positioning Limitations
WARNING: The unit must be installed in a system with the proper rated washer fluid to prevent freezing or the unit might be damaged and the warranty will be void.

Unit Installation Diagram For: Sedan’s, Coupe’s, SUV’s Light Truck’s
6
Unit Installation Diagram For: Heavy Truck’s, Semi-Truck’s, Buses
Unit
Driver Side Passenger Side
Inlet
Outlet
Washer Fluid
Reservoir
Fuse
Pump
Ground (GND)
Battery 12V (+)
Unit 2
Inlet Inlet
Outlet Outlet
Washer Fluid
Reservoir
Fuse Fuse
Pump
Driver Side Passenger Side
Unit 1
Ground (GND)
Battery 12V (+)

1. Attach bracket to the unit. The plastic coated “L” shaped tab is the top of the bracket. Slide the upside down “T” at the bottom of the bracket into the slots located on the bottom of the unit. Then snap the “L” tab over the top of the unit. Use the bracket/unit to find the proper mounting location. In some cases it will be easier to mount the bracket to the vehicle without the unit attached. If this is the case, use the screwdriver to gently pry the “L” off the top of the unit being careful not to bend the bracket.
2. Attach the supplied bracket to the desired vehicle location using four of the six screws (provided). You will need a drill and ¼” socket or the 1/8 inch drill bit. If there is no access to the lower part of the bracket, use only two screws at the top. If the installation surface is not flat, bend the bracket to fit the curved area. Do not bend the bracket in the surface area that makes contact with the unit. Be sure that there is nothing directly behind the mounting surface that the screws can puncture or damage. If necessary, re-install the unit to the bracket after the bracket is mounted.
Warning: In case of heavy truck, semi-truck or bus installation the bracket must be attached at the top and the bottom using all four screws.
Installation StepsImportant:
The AT-38OD unit should be located in the engine compartment based on the
following guidelines:
• As close as possible to the nozzles, preferably on the firewall.
• As far as possible from the hottest areas of the engine.
• Vertically positioned according to the specifications shown in the illustration
titled "Positioning Limitations" on the previous page.
7
3. Remove yellow protective caps from the unit’s input andoutput ports. Cut or separate the hose between the washer pump and nozzles. Some vehicles may have a hose splice close to the area you chose to mount the unit. If not, use the side cuter to cut the hose.
4. Connect the hose coming from the washer pump to theunit’s input port (indicated by an arrow ).If necessary, use a piece of hose and a splicer (provided) toextend the hose length.
Warning: Some washer fluid may flow from the unit when you remove the yellow caps. The unit was primed with a standard washer fluid to prevent any damages during the initial installation.

7. Using the correct size wrench, connect the ring terminal of the opposite end of the black thick cable to any negative (-) body ground. This connection must be free of paint and rust. This connection could be made at the battery, alternator bracket, vehicle frame, etc.
WARNING: High current cables attached to the unit must not be removed. All four (4) 10 mm nuts securing the high current cables to the unit must remain at the specified torque of 70 in/lb.
8. Secure all cables and wires with the provided cable ties to avoid contact with hot engine parts or moving objects.
The installation is complete.
6. Using the correct size wrench, connect the ring terminal of the opposite end of the red thick cable (with 60 Amps in-line fuse) to the positive side of the battery. This connection must be made to a high current positive terminal at the battery , jump post, etc.
Mount the fuse with provided screws or cable ties to an openlocation in the engine compartment.
Installation Steps
Note: Although AlphaTherm has taken all reasonable care to ensure that the
information contained in this Installation Manual is accurate and complete, installation
may vary for each model and certain vehicles may require additional adjustments for
proper installation. In the event you face any installation issues or concerns, please
call us at 248-489 2400 for further instructions and assistance.
8
5. Connect the hose coming from the nozzles to the unit’soutput port (indicated by an arrow ).If necessary, use a piece of hose and a splicer (provided) to extend the hose length.
Warning: Prior to proceeding to the next step the unit must be primed. To do this, turn the ignition key to the on position and activate vehicle washer switch until washer fluid starts to spray out of nozzles. Connecting power to the unit without fluid can cause permanent damage to the unit and void the warranty. Once the unit is primed it should remain primed for unit life as long as the unit is not inverted.

Operation
The AT-38OD operates in “On-Demand” mode.
The unit starts to operate when the ignition is on (engine running) and the
battery voltage level is higher than 13.0 volts. Once the unit is activated, the
washer fluid inside its heating chamber will be heated and kept within pre-
determined temperature limits (125 – 135°F) so there is always hot fluid inside
the unit’s heating chamber which can be used by a driver for cleaning the
windshield.
Each time the driver activates the factory installed washer system, heated
washer fluid is applied to the windshield for approximately the first 3 seconds
of spray. Three seconds of the spray delivers approximately 50-60 cc of fluid
that is considered sufficient amount of fluid for one spray. The next portion of
heated washer fluid is available in 10-20 seconds (depending on ambient
conditions).
The unit uses full power of 50 Amps for 30 seconds to heat the washer fluid to
the pre-determined temperature limits (125 – 135°F) and minimal power to
keep it within these limits. The unit’s power consumption is less than 2 Amps
per hour.
Once the unit starts to operate (engine is running), it will heat the washer
fluid in approx. 30 seconds. Driver operates the washer system manually
to spray the heated fluid onto the windshield. Recommended duration of
spray is 3 seconds. Driver can spray as many times as he wants. Best
results are achieved when time intervals between sprays are
approximately 20 seconds.
NOTE: The washer fluid expands due to the heating process thus some
dripping during the unit operation is normal.
The engine must be running in order to have the AT-38OD unit in
operation.
NOTE: In order to protect your vehicle from electrical overload the AT-38OD is designed to
only operate at 13.0 or more volts. If your vehicle has a weak battery or a defective alternator
and produces less than the required voltage at idle, the unit will not operate properly. This may
indicate the need to replace your vehicle’s battery or alternator. To test this problem, rev your
vehicle and measure the battery voltage. If voltage is higher than 13.0 volts, and the unit still
does not heat the washer fluid, contact technical assistance.
9
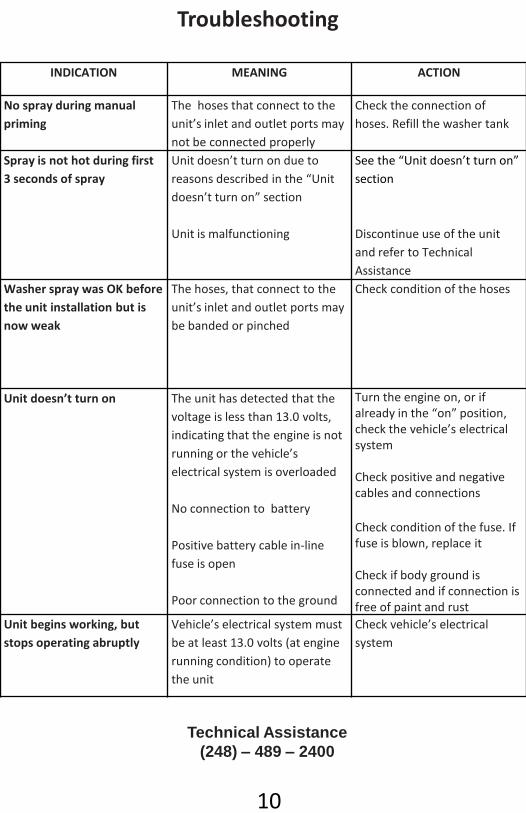
INDICATION MEANING ACTION
No spray during manual
priming
The hoses that connect to the
unit’s inlet and outlet ports may
not be connected properly
Check the connection of
hoses. Refill the washer tank
Spray is not hot during first
3 seconds of spray
Unit doesn’t turn on due to
reasons described in the “Unit
doesn’t turn on” section
Unit is malfunctioning
See the “Unit doesn’t turn on”
section
Discontinue use of the unit
and refer to Technical
Assistance
Washer spray was OK before
the unit installation but is
now weak
The hoses, that connect to the
unit’s inlet and outlet ports may
be banded or pinched
Check condition of the hoses
Unit doesn’t turn on The unit has detected that the
voltage is less than 13.0 volts,
indicating that the engine is not
running or the vehicle’s
electrical system is overloaded
No connection to battery
Positive battery cable in-line
fuse is open
Poor connection to the ground
Turn the engine on, or ifalready in the “on” position, check the vehicle’s electrical system
Check positive and negative cables and connections
Check condition of the fuse. If fuse is blown, replace it
Check if body ground is connected and if connection is free of paint and rust
Unit begins working, but
stops operating abruptly
Vehicle’s electrical system must
be at least 13.0 volts (at engine
running condition) to operate
the unit
Check vehicle’s electrical
system
Troubleshooting
Technical Assistance
(248) – 489 – 2400
10

Limited WarrantyAlphaTherm hereby warrants this product against any defects in the material or
workmanship of the product for a period of 12 months from the date of purchase.
Upon notification of a defect, AlphaTherm agrees, at its option, to either have
AlphaTherm technicians or other authorized agents repair the defect, if any, or
replace the defective unit or parts thereof. You will not be charged for the price of the
new unit, parts or the cost of repair. This warranty does not cover the cost of
installation or reinstallation of the defective unit.
This warranty does not cover defects, damage or defacement resulting from acts of
God or other external causes, improper installation, vehicle accidents, misuse, abuse,
negligence, uses of the device other than originally intended, or modification of or to
any part of this product. This warranty does not cover defects, damage or defacement
due to improper operation or connection to improper voltage supply or attempting
repairs by anyone other than AlphaTherm technicians or authorized repair agents.
This warranty applies only to the original purchaser of the unit. A copy of the original
purchase receipt must be available.
To obtain warranty service, you must contact an AlphaTherm Customer Service
Representative at the company’s number: (248) 489-2400.
Upon reaching a customer service representative, you will be provided with
instructions for returning your defective unit.
REPAIR OR REPLACEMENT AS PROVIDED UNDER THIS WARRANTY IS THE
EXCLUSIVE REMEDY OF THE CONSUMER.AlphaTherm SHALL NOT BE
LIABLE FOR ANY INCIDENTAL OR CONSEQUENTIAL DAMAGES FOR BREACH
OF ANY EXPRESSED OR IMPLIED WARRANTY ON THIS PRODUCT. EXCEPT TO
THE EXTENT PROHIBITED BY APPLICABLE PURPOSE ON THIS PRODUCT IS
LIMITED IN DURATION TO THE ONE-YEAR, ANY IMPLIED WARRANTY OF
MERCHANTABILITY OR FITNESS FOR A PARTICULAR YEAR DURATION OF
THIS WARRANTY.
Some states and provinces do not allow the exclusion or limitation of incidental or
consequential damages or allow limitations on how long an implied warranty lasts.
Therefore, the above limitations or exclusions may not apply to you. This warranty
gives you specific legal rights, and you may have other rights which might vary from
state to state or province to province.
AlphaThermFarmington Hills, Michigan
48331, USA
Phone: (248) 489-2400
Web : www.alphathermusa.com
E-Mail: [email protected]