Installation Manual 292
26
Revision E 8/26/2019 www.flightlight.com Ph:1.800.806.3548 916‐394‐2800 Fax:916‐394‐2809 2708 47 th Avenue, Sacramento, CA 95822 Installation Manual 292
Transcript of Installation Manual 292

Revision E 8/26/2019
www.flightlight.com
Ph:1.800.806.3548 916‐394‐2800
Fax:916‐394‐2809
2708 47th Avenue, Sacramento, CA 95822
Installation Manual 292

1 8/11/2017

2 8/11/2017
Your Flight Light HL292 light fixtures have been designed to provide you years of service if you
follow the recommendations outlined in this guide. Flight Light recommends that any
installation of our heliport or helideck fixtures follow NEC (National Electrical Code) 2014 and
any other applicable local electrical codes.
Our fixture is compliant with:
FAA AC 150/5390‐2C Heliport Design Guide
Exceeds FAA Engineering Brief 87 Specifications
ICAO Annex 14, Volume II for TLOF
Transport Canada TP14371, AGA 7.16
IP 67 Rated
Our newest feature: Night Vision Compatibility, allows pilots to see the lights while wearing
Night Vision Goggles due to the IR (infrared) LED. The light is compatible with all generation
goggles.
3 8/11/2017
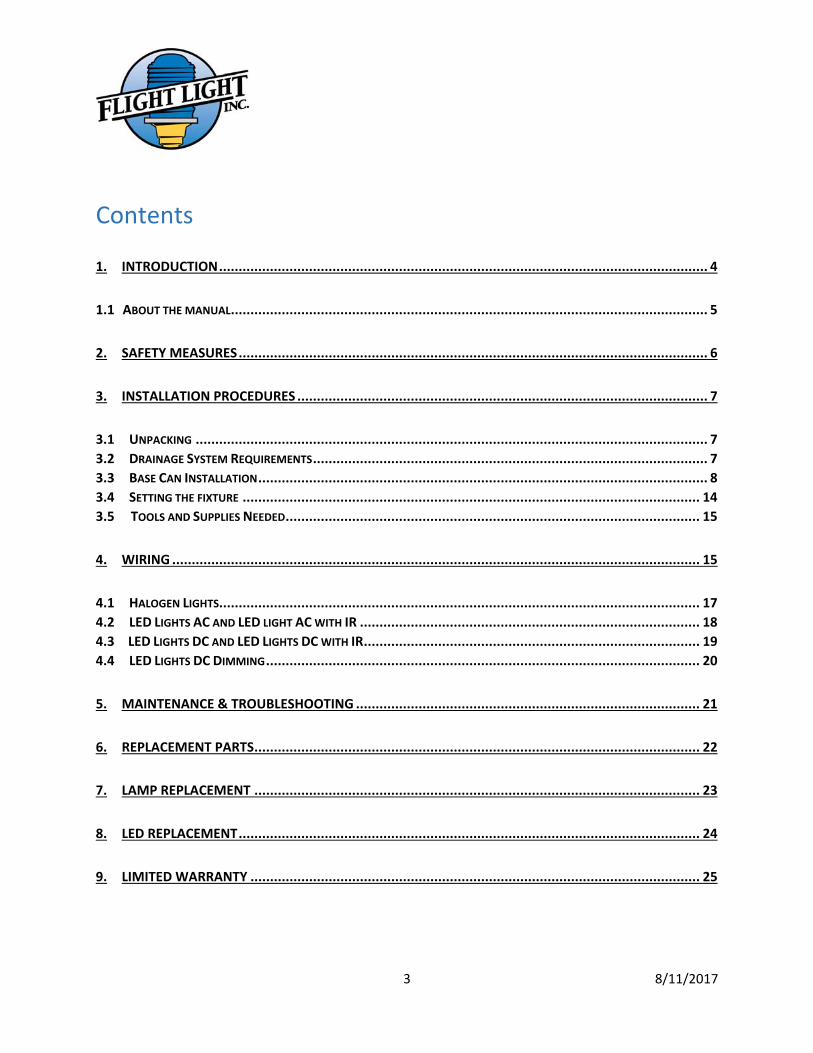
Contents
1. INTRODUCTION ............................................................................................................................. 4
1.1 ABOUT THE MANUAL .......................................................................................................................... 5
2. SAFETY MEASURES ........................................................................................................................ 6
3. INSTALLATION PROCEDURES ......................................................................................................... 7
3.1 UNPACKING ................................................................................................................................... 7
3.2 DRAINAGE SYSTEM REQUIREMENTS ..................................................................................................... 7
3.3 BASE CAN INSTALLATION ................................................................................................................... 8
3.4 SETTING THE FIXTURE ..................................................................................................................... 14
3.5 TOOLS AND SUPPLIES NEEDED .......................................................................................................... 15
4. WIRING ....................................................................................................................................... 15
4.1 HALOGEN LIGHTS........................................................................................................................... 17
4.2 LED LIGHTS AC AND LED LIGHT AC WITH IR ....................................................................................... 18
4.3 LED LIGHTS DC AND LED LIGHTS DC WITH IR ...................................................................................... 19
4.4 LED LIGHTS DC DIMMING ............................................................................................................... 20
5. MAINTENANCE & TROUBLESHOOTING ........................................................................................ 21
6. REPLACEMENT PARTS .................................................................................................................. 22
7. LAMP REPLACEMENT .................................................................................................................. 23
8. LED REPLACEMENT ...................................................................................................................... 24
9. LIMITED WARRANTY ................................................................................................................... 25

4 8/11/2017
1. Introduction
The Flight Light model 292 is a cast aluminum fixture initially designed and used for taxiways.
Now the 292 light is available for use as a helipad light in order to ensure proper visual
guidance. Tested at 1,000 PSI (pounds per square inch) the light conforms to FAA requirements.
The helipad inset lights should always be installed using the Flight Light 8” OD base can and
following the below instructions as well as the local NEC codes.
The Base Can must be purchased separately.
The light comes with a male cord attached to the fixture and the matching female cord packed
in the box with the light.
The installation and maintenance should be done by authorized personnel only.
For questions or guidance during the installation process, please contact our office as engineers
and technician are always available to help you.
Phone number: 1‐800‐806‐3458
916‐394‐2800
OR send an email request to [email protected]

5 8/11/2017
1.1 About the manual
This manual contains the needed instructions to complete a successful installation. Failure to install the system properly will negatively impact the performance of the system, shorten its life and may void the manufacturer’s warranty. The proper installation and operation of your system is our top priority. For that reason this installation manual has been designed to guide you through each of the major steps of the in‐pavement and electrical installation of the system. We recommend that a copy of the manual be given to both the design engineer and the installer of your system, well in advance of the actual installation. The major steps covered in this manual include:
In‐pavement Installation 1. Proper Placement of Fixtures 2. Drainage System Requirements and Design 3. Base Can Installation guidelines

6 8/11/2017
2. Safety Measures
You must know whether your heliport lighting system is powered by AC or DC before installing
the fixture. AC Halogen models work on either 120VAC or 240VAC, or on a range of 100 to
240VAC if LED. DC models operate from 10 to 30VDC. The lights are designed to be installed in a
parallel circuit, which maintains a constant voltage and brightness for all lights.
Ensure power is off before installing or servicing heliport fixtures!
Follow the local electrical code!
Make sure the equipment is rated and approved for the environment in which you are
intending to use it. Do not operate this equipment in humid, flammable, or explosive
environments unless it has been rated for safe operation in these environments.
Use only electrical wire of sufficient gauge and insulation to handle the rated current and
voltage demand.
Route electrical wiring along a protected path. Make sure they will not be damaged by moving
equipment.
Protect components from harsh environment conditions.
Protect equipment with safety devices as specified by applicable safety regulations.
Before starting this equipment, check all safety interlocks, fire –detection systems, and
protective devices such as panels and covers. Make sure all devices are fully functional. Do not
operate the system if these devices are not working properly.
Never operate equipment with a known malfunction.
Do not attempt to operate or service electrical equipment if standing water is present.
Do not touch exposed electrical connections on equipment while the power is ON!
Wiring and electrical design should be authorized by an electrical contractor.
Wiring connections and wire splices must be done in a waterproof junction box.

7 8/11/2017
3. Installation Procedures
3.1 Unpacking
Each inset light is packed in its own box 9”x 9” x 5”, together with the additional female plug.
Carefully remove the light from its box and inspect for damages. If any damages are found, file
a claim with the carrier. Also remove the female plug from the box, if this is missing please
contact Flight Light Inc. Installing the light without the matching plug will void the warranty.
Removal of the L823 male plug from the light will allow water to get into the lighting fixture and
void the warranty.
3.2 Drainage System Requirements
The truism that water and electricity don’t mix holds for Aviation Installations. Helipads pavement is subject to many sources of moisture, the most serious of which is ground water. The Flight Light lighting system is designed to prevent water and water vapor from making contact with electrical conductors, contacts and connections. Fixtures used in the FL system employ seals that prevent moisture from entering the light fixture. F ixtures are IP67 rated. The connectors used are waterproof and provide connection between the fixture, and control system without fear of electrical shorting to ground. However, water within the base cans, left for long periods of time, may create problems. Standing water in the base can is especially undesirable in colder climates because of damage that can be done when water freezes and expands. To prevent problems caused by standing water in the base cans a proper drainage system must be designed and prior to the electrical installation of the fixtures and pouring of concrete. Failure to install a proper drainage system may result in damage to the system components.

8 8/11/2017
3.3 Base Can Installation
There is no standard way to build a helipad. Each project includes its own individual variables.
Some of these are:
The type of paving material to use
Anticipated loads and traffic
The kind of subsoil
The kind of subbase to use
The need for special treatment of the subsoil
Water conditions at the site
Other environmental conditions
The need for concurrent operations during construction
Funds available
Only the consultant familiar with all the variables of a given site can properly design the project.
Once the specific design is produce appropriate methods can be followed to successfully install
the in‐pavement lighting system.
The purpose of the following procedure is to provide installers with guidance on how to install
the base cans.
The base cans comes with the following accessories:
The plywood cover imitates the height of the casting of the 292 fixture, which is 0.75”.
1. The base cans comes with the cover bolted into the base can and the accessories inside.
Remove the cover and get the accessories out. The plywood cover has to be placed back
on the base can for concrete pouring and protection.
Plywood cover 8” Diameter ¾”Thick
2 x Bolts
Gasket
2 x Grommets
2 x PVC Fittings for the drain hole

9 8/11/2017
For existing pavements:
2. To install base cans, begin by core drilling (typically 12"‐14” in diameter and the depth
will be per terrain and/or suggestion of civil engineer/contractor) holes in the locations
specified by the project engineer. Saw cuts should then be made to allow room for the
fixture power cables (typically 3" deep x 1/2" wide). Saw cuts are typically made in line
with the centers of the conduit holes.
3. Prepare the drainage system specified by the design engineer. (see figure 1 on page 11
and notes)
4. Install the rubber grommets in each of the side holes.
5. Install the base can drain fittings provided (pictured below) into each base can drain
hole. Run 1‐1/2" size pipe, schedule 40 PVC, into the fittings of the base can. Pipe length
should be cut so the pipe, when positioned over the drain, extends approximately 3" to
4" into the drain rock
External Fitting (Left) and Internal Fitting (Right)
BaseCan with Fittings installed

10 8/11/2017
6. Use of a mounting jig is recommended for proper alignment of base cans. First, place
the plywood cover on the base can, and then mount the mounting jig to the base can
with the two bolts that fit into the base can bolt holes.
7. After the mounting jig is attached, suspend the base can so the top of the plywood
cover is flush with the surface of the pavement. Note: When the fixture is installed the
top of the fixture will mount flush with the surface of the pavement.
8. After the base cans are installed, test the drainage system by pouring water into the
installed base can at each fixture location. Pour enough water to verify that the
underlying ground is absorbing the water. If the base can is not draining properly,
modifications to the drainage system will be necessary. In this case, consult with your
project engineer before proceeding.
FAILING TO HAVE PROPER DRAINAGE WILL DAMAGE THE LIGHT. FLIGHT LIGHT INC WILL
NOT COVER SUCH WATER DAMAGES UNDER WARRANTY.
9. Once satisfied with drainage system, move on to the installation of the fixture power
cables.
10. Install the fixture cables. Run fixture power cables to each base can, one black wire, one white wire, and one green wire (grounding) to each can.
11. Make all wire connection and splices in a secure waterproof enclosure/junction box. The base can provided by Flight Light is not considered a waterproof enclosure. Failure to secure the connections of the wires will allow water to infiltrate and damage the complete light assembly.
12. After all cabling has been completed, encase the base cans and drainage system in
concrete. It is recommended that at least 6" of concrete be used below the base. Fill
saw cuts with Traffic Loop Sealant, or equivalent.

11 8/11/2017
Notes:
1. Drain rock shall be graded from 1 inch to ¼ inch. 2. Drain rock shall be encased in a filter fabric material to avoid soil infiltration into the drain rock. 3. Recommended depth of drain rock unit varies dependent upon the type of existing soils.
a. Where existing soils are granular and permeable the depth of the drain rock unit can be limited to 1 foot. b. Where existing soils are fine graded and have low permeability the depth of the drain rock unit should be increased to 3 feet or greater to provide a reservoir for short term retention. Refer to engineering plans for the requirements specified by the project engineer.
4. Concrete shall be 3/8 inch maximum aggregate mix, use a minimum of seven sacks of cement
per cubic yard of concrete and poured from a height of approximately 5 inches above the can. Concrete should only be poured from one side. Vibrate or rod concrete to completely fill the area below and on all sides of the base can. When concrete is visible on the side opposite to the side that concrete is being poured from, pouring can commence from alternate locations.
5. Abbreviations: Asphalt Concrete (AC), Aggregate Base (AB).
12 8/11/2017
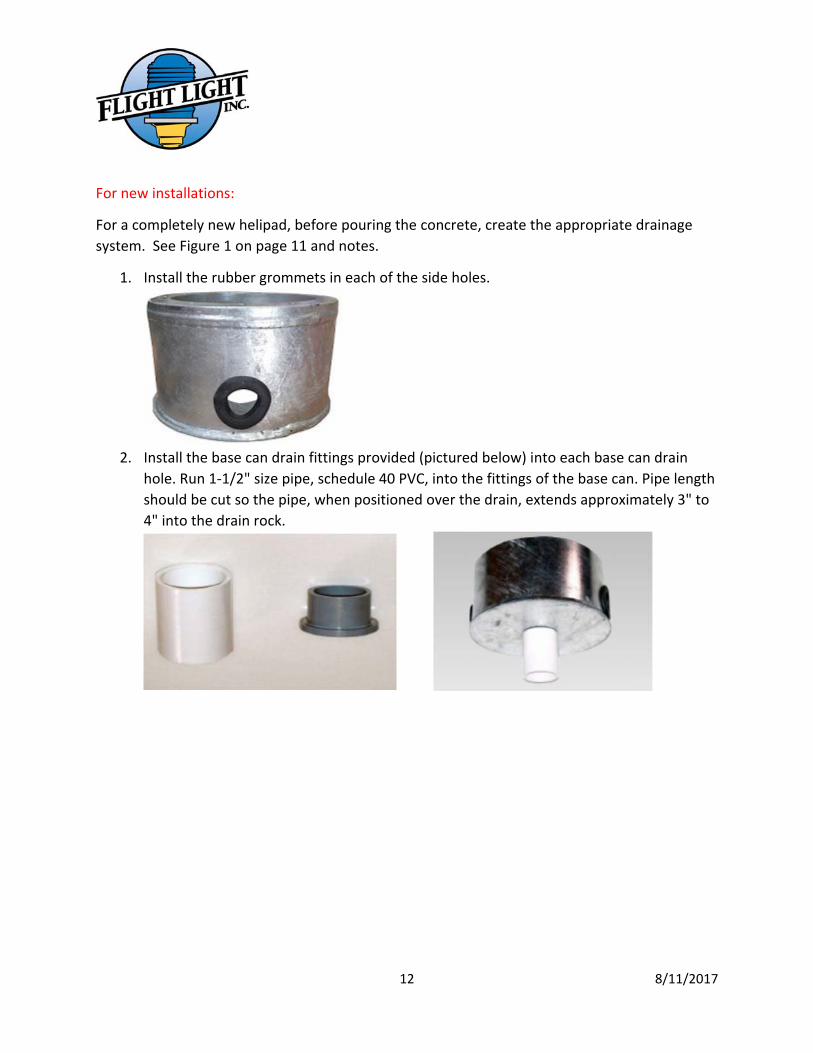
For new installations:
For a completely new helipad, before pouring the concrete, create the appropriate drainage
system. See Figure 1 on page 11 and notes.
1. Install the rubber grommets in each of the side holes.
2. Install the base can drain fittings provided (pictured below) into each base can drain
hole. Run 1‐1/2" size pipe, schedule 40 PVC, into the fittings of the base can. Pipe length
should be cut so the pipe, when positioned over the drain, extends approximately 3" to
4" into the drain rock.
13 8/11/2017
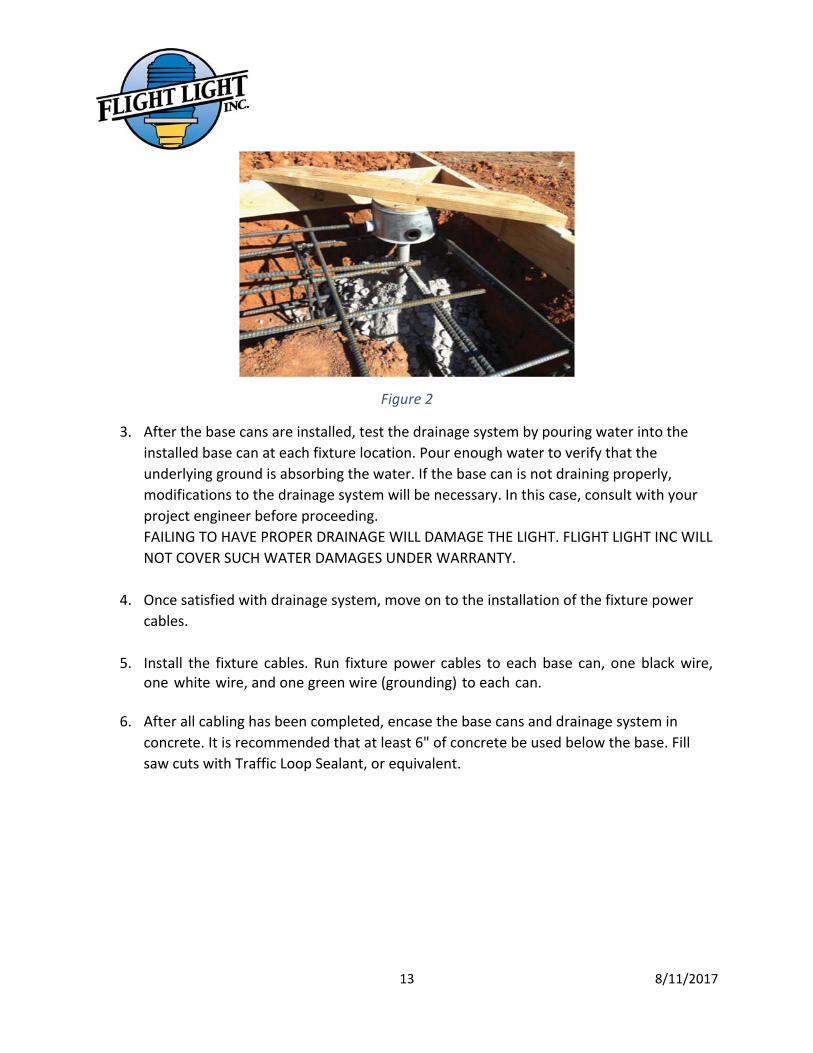
Figure 2
3. After the base cans are installed, test the drainage system by pouring water into the
installed base can at each fixture location. Pour enough water to verify that the
underlying ground is absorbing the water. If the base can is not draining properly,
modifications to the drainage system will be necessary. In this case, consult with your
project engineer before proceeding.
FAILING TO HAVE PROPER DRAINAGE WILL DAMAGE THE LIGHT. FLIGHT LIGHT INC WILL
NOT COVER SUCH WATER DAMAGES UNDER WARRANTY.
4. Once satisfied with drainage system, move on to the installation of the fixture power
cables.
5. Install the fixture cables. Run fixture power cables to each base can, one black wire, one white wire, and one green wire (grounding) to each can.
6. After all cabling has been completed, encase the base cans and drainage system in
concrete. It is recommended that at least 6" of concrete be used below the base. Fill
saw cuts with Traffic Loop Sealant, or equivalent.

14 8/11/2017
3.4 Setting the fixture
Once the base can is position in concrete, remove the bolts and plywood cover and install the
gasket. The same bolts will be used for the installation of the light.
1. Using electrician's tape, make three wraps around the pigtail connector and fixture plug.
2. Prior to bolting down the fixtures, coat the mounting flange of each base can and bolt treads with marine grade anti‐seize grease, like Corrosion Block or equivalent.
3. Bolt the fixtures to the base cans using the stainless steel bolts provided
4. Fill‐in both, the area between the fixture and base can wall and the area in the bolt well,
with a silicon sealant such as RTV silicon sealant, or equivalent.
The 292 is a FAA style 2 (semi flush) fixture with the
glass .39” above the surface of the casting. This will
stand above the level of the pad.
Flight Light Inc. base cans are
galvanized steel and comply
with FAA L868AA regulations

15 8/11/2017
3.5 Tools and Supplies Needed
Besides the accessories Flight Light Inc. is providing, the following items may be needed to
complete a successful installation:
1. Mounting Jig
2. Grease for the connectors
3. Junction box
4. Electrical tape
4. Wiring
Make sure the male and female plug are
properly connected so a water seal is being
created!
Wrap the mated connectors inside the can
with electrical tape for added moisture
protection.

16 8/11/2017
The installation of lights is to be done in a parallel circuit with the splice in a secure,
waterproof junction box. Junction boxes are not provided with the lights. The Flight Light base
cans are not a waterproof enclosure.
The gauge of the electrical wire is to be calculated by the electrical engineer and should be
sufficient to handle the rated current and voltage demand.
5 ft. long cable

17 8/11/2017
4.1 Halogen Lights
There is a ground lug inside the base can for your earth/ground connection (green or
green/yellow wire).

18 8/11/2017
4.2 LED Lights AC and LED light AC with IR
AC
Lin
eN
eutr
al
HL-292 LIGHT
FIXTURES
AC Output Connections
EA
RT
H
GN
D
Blk
Wht
Grn
L N G
100‐240VAC

19 8/11/2017
4.3 LED Lights DC and LED Lights DC with IR
DC
+D
C -
HL-292 LIGHT
FIXTURES
DC Output Connections
Blk
Wht
+ ‐ N/A
DC Volt

20 8/11/2017
4.4 LED Lights DC Dimming
‐ + Dim + ‐ Dim
DC Volt
Brown
Blue
GRN/YEL

21 8/11/2017
5. Maintenance & Troubleshooting
The following general maintenance procedures will help ensure maximum performance and
long component life:
• Lenses should be cleaned periodically as an accumulation of dirt, can decrease light output.
• Line voltage should be checked at the fixture and compared with the power supply to be sure
it is within the prescribed limits.
• Make certain polarity is correct for DC light fixtures
• Be sure the fixtures are properly grounded.

22 8/11/2017
6. Replacement Parts
LED Replacement KIT for Infrared Lights is not available. Infrared Lights need to be returned
to factory for repair/retrofit.

23 8/11/2017
7. Lamp Replacement
To properly replace the lamp and to insure correct seal, follow the below instructions:
Turn the light upside down and remove the four bottom cover screws
Remove the lamp holder (socket)
Remove the two screws holding the lamp in order to avoid damaging the lamp
clip
Take the lamp out
Install the new lamp and make sure the lamp gasket is flat and in place
Place the lamp clip back on and the screws
Install the lamp holder (socket)
Make sure the bottom cover gasket is seated properly, see picture above
Install the four bottom cover screws back in place
Lamp Holder or
Socket
Lamp
Bottom cover

24 8/11/2017
8. LED Replacement
The LED Replacement Kit consist on the following:
Bottom casting, Cord Grip and Male cord sealed in the bottom casting, LED Driver and LED
Board.
To properly replace the LED board and to insure correct seal, follow the below instructions:
Turn the light upside down and remove the four bottom screws
Unplug connectors coming from the power converter to the LED board
Remove the two screws holding the LED board
Remove LED board
Discard the LED board, the bottom casting with the existing cord and the power
converter
Remove the blue film from the new LED board and put it in place
Reinstall mounting screws for the LED board
Connect the LED board to the power converter
Make sure the bottom cover gasket is seated properly
Install the four bottom cover screws back in place
LED Board
LED Power Converter Connectors
Mounting screws
Bottom Casting
LED board mounting
screws
25 8/11/2017
9. Limited Warranty Duration of the Warranty: Flight Light Inc. warrants all of the goods which it has manufactured
to be free of material defects for the following durations.
Lamps: For a period of 90 days from the date of shipment to Buyer. Product liability is limited to
lamp replacement and does not include incidental labor.
FAA products: For a period of one year from the date of installation or two years from the date
of shipment to Buyer.
LED Light Fixtures: For a period of 2 years from the date of shipment to Buyer. Complete
Systems: Systems including at least one Flight Light Inc. Controller and one Flight Light Inc. LED
Light Fixture, for a period of 5 years from the date of shipment to Buyer.
Buyer’s Remedies: If any such goods are found to be materially defective within the warranty
period, Flight Light Inc. agrees to attempt to repair, and if unable to repair, to replace the
defective goods without charge to Buyer.
Buyer’s remedy with respect to such goods is limited to repair or replacement. For goods not
manufactured by FLI, Buyer agrees to accept as its sole remedy the warranty, if any, offered by
the manufacturer or manufacturers of such goods. FLI makes no warranties, express or implied,
other than those stated in this paragraph.
Warranty Exclusions: Flight Light Inc. shall not be liable under this warranty if any of the
following conditions apply:
1) Unauthorized personnel attempt any repairs to Flight Light Inc. products without
Flight Light Inc. consent.
2) Products are damaged by natural phenomenon, misuse, abuse, accident, alteration,
or incorrect electrical current or voltage.
3) Products are improperly installed, or damaged in shipping.
Warranty Limitations
FLI makes no warranties, express or implied, other than those stated herein. FLI does not
warranty the workmanship of the installer, damage caused by acts of nature, vandalism,
improper installation, or damage caused by improper maintenance. The warranty period of LED
fixtures covered under the 5‐year system warranty is reduced to two years when fixtures are
subjected to abrasive materials or chemicals. FLI reserves the right to either repair or replace
any defective component covered under the terms of any of its warranties. FLI is not an
engineering firm and makes no expressed or implied warranty as to the applicability of its
products or systems in any specific situation, application or location: such decisions are the
responsibility of the owner, design engineer and/ or others. Therefore, as to all goods sold by
FLI, FLI hereby disclaims any implied warranty of merchantability or implied warranty of fitness
for a particular purpose and Buyer agrees that FLI shall not be liable for any special, indirect,
incidental, consequential or liquidated damages of any kind, whether the Buyer’s or any other
claim is based upon contract, tort or any other legal theory.