Installation Instructions : Porsche 991 Turbo : Page 1 · Installation Instructions : Porsche 991...
9
Installation Instructions : Porsche 991 Turbo : Page 1 1. We will start by removing the stock airbox. To get to the airbox your rear bumper must be removed. We recommend that this is done by a trained professional. Once the rear bumper and ancillaries have been removed, this guide may be followed for the installation of the intake system. 2. Pull the vacuum lines away from the airbox. 3. Remove the module at the rear of the airbox located on the left side. There is a clip in the airbox which needs to be depressed to release this module. 4. Remove the module on the right side of the airbox.
Transcript of Installation Instructions : Porsche 991 Turbo : Page 1 · Installation Instructions : Porsche 991...

Installation Instructions : Porsche 991 Turbo : Page 1
1. We will start by removing the stock airbox. To get to the airbox your
rear bumper must be removed. We recommend that this is done by a
trained professional. Once the rear bumper and ancillaries have been
removed, this guide may be followed for the installation of the intake
system.
2. Pull the vacuum lines away from the airbox.
3. Remove the module at the rear of the airbox located on the left side. There is a clip in the
airbox which needs to be depressed to release this module.
4. Remove the module on the right side of the airbox.

Installation Instructions : Porsche 991 Turbo: Page 2
5. Remove the Vacuum connector from the right side of the airbox. It will pull out. 6. Remove the intake duct by simply pulling it upwards. It is held in place with rubber
grommets which are circled above.
7. Remove the 2 rubber grommets which the duct was pushed into. 8. Remove the rubber surround from the top of the duct. We will use this later.

9. Loosen the 2 hose clamps on each side of the airbox at the outlets and then the airbox can be
removed from the engine bay.
11. Slot the left side module into the bracket as shown.
12. Push the right side module onto the bracket and push the vacuum connector into the outlet
on the filter housing.
10. Take the filter housing assembly and position the brackets on top of the stock airbox
mounts. Push the stock inlet tubes onto each intake housing. Don’t tighten yet.
Installation Instructions : Porsche 991 Turbo: Page 3

\
Installation Instructions : Porsche 991 Turbo: Page 4
13. Rotate the 2 drain tubes under the filter housings so that they are positioned as shown.
.
14 Take the 2 longer M6 screws from the pack along with 4 washers and 2 lock nuts.
15. Insert the screws through each bracket and through the stock airbox mounts. The washers
should be on each side as shown. Don’t tighten yet.
.
16. Take the stock duct rubber surround and the provided mesh insert.
.

Installation Instructions : Porsche 991 Turbo: Page 5
17. Insert the mesh into the rubber surround at the base. The Eventuri logo should be at the
top (not shown here). Back of the rubber surround shown above.
18. Take the carbon duct and now push the rubber surround with mech into the top of the new
duct.
19. The rubber surround should secure around the rim at the top of the new duct. Logo on
the mesh should be positioned as indicated by the circle.
.
20. Now place the duct on top of the filter housings. We will now line up the housings to the
duct.

Installation Instructions : Porsche 991 Turbo: Page 6
21. Take the remaining shorter M6 screws with 2 washers and lock nuts.
22. Insert the 2 screws through the mounts on the top rear of the duct and through the stock
mounting locations. We removed the rubber grommets from these holes in step 7. Do not
tighten yet.
23. Secure the vac lines onto the clips on the duct. 24. Loosen the large clamps around the top of each housing – just enough to allow you to
rotate the housings within the brackets. These clamps hold the brackets onto the housings.
.
Installation Instructions : Porsche 991 Turbo: Page 7
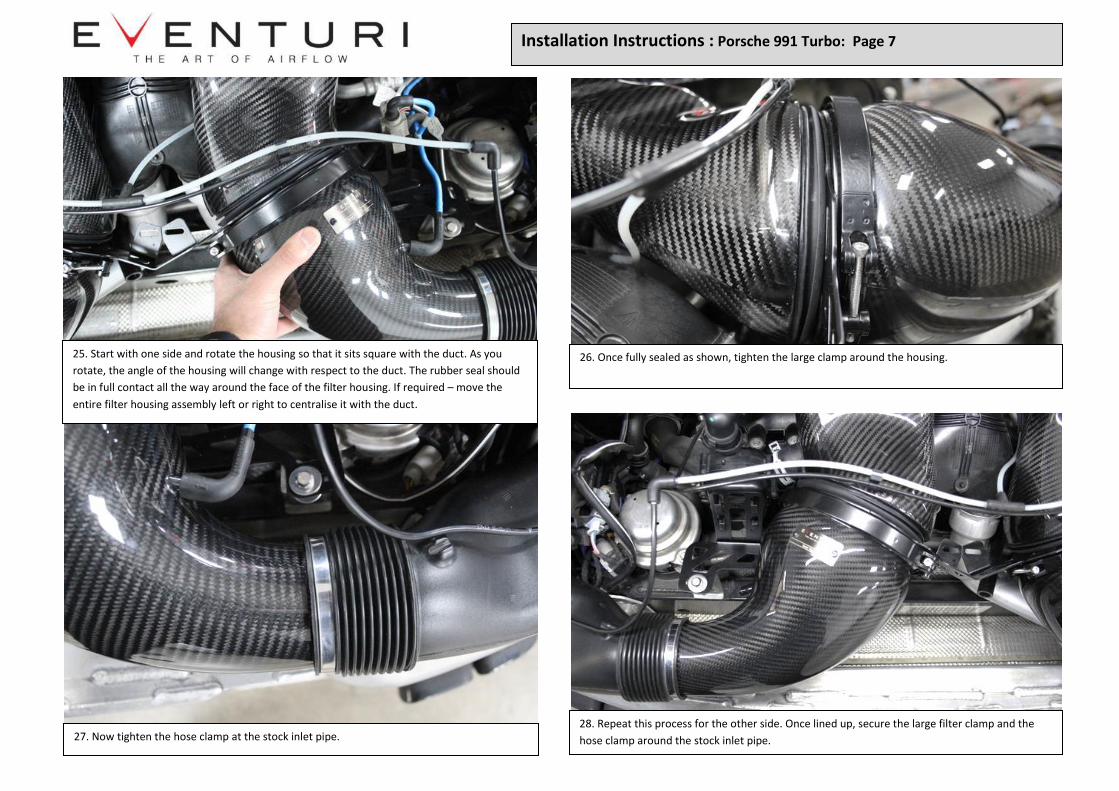
25. Start with one side and rotate the housing so that it sits square with the duct. As you
rotate, the angle of the housing will change with respect to the duct. The rubber seal should
be in full contact all the way around the face of the filter housing. If required – move the
entire filter housing assembly left or right to centralise it with the duct.
.
26. Once fully sealed as shown, tighten the large clamp around the housing.
27. Now tighten the hose clamp at the stock inlet pipe. 28. Repeat this process for the other side. Once lined up, secure the large filter clamp and the
hose clamp around the stock inlet pipe.

Installation Instructions : Porsche 991 Turbo: Page 8
29. Now tighten the screws on both the left and right brackets for the filter housings.
.
30. You will need some help for this step – the duct needs to be pulled forwards so that the
rubber seals compress onto the filter housings.
31. While the duct is being pulled forwards – tighten the 2 screws on the mounts to secure
the duct into position.
32. The fully secured system should now have a good seal between the duct and the filter
housings.

You have now completed the installation of the Eventuri Porsche 991 Turbo Intake System.
Eventuri cannot take responsibility for an incorrectly installed intake or any damage caused
during installation.
Installation Instructions : Porsche 991 Turbo: Page 9
33. For extra clearance – unclip the connector from the underside of the metal frame which
holds the spoiler motors.
.
34. With the connector unclipped, remove the bracket for the connector from the frame.
35. When this frame is back into position – secure the connector to the bootlid release cable
with the supplied cable tie. This allows the required clearance between the duct and the
frame.