Installation Instructions for Kit IX for R1200RT...
9
Hello! My name is Genna. I believe that having the confidence of knowing where you are on the road at any given time and being able to navigate through unknown territory is what adventure cycling is all about. Using a GPS (Global Positioning System) is the way to go, my friends. There are lots of them in the market. My personal preference is the GARMIN STREET PILOT. Regardless of what suits your fancy, a word of advice - stick with a unit offering the largest display. On the move, you need to be able to read the display as quickly as possible. Here's where I come in. GPS mounting hardware for motorcycles are very limited. For a long time I was looking for a product that would satisfy my finicky tastes. No such luck, so I decided to make my own mounting bracket. If you need help in fabricating one to custom fit on your bike, just e-mail me at: [email protected] Top 10 reasons to have a GPS on your bike: 1. Show off to your buddies. 2. Play James Bond. 3. Humbly explain to a curious crowd at a bikers' lot that some people (like you) simply have to have the best toys, otherwise life would be so unbearably boring. 4. Take a back road scenic route rather than racing ten wheelers on a boring interstate, while making sure not to take the same road twice. 5. Never again try to unfold a map wrestling in the wind over deserted road side with your hands wrapped in top of the line leather designed for protecting your digits from damages much more severe then paper cuts. 6. Compare the speed-readings between your speedometer and actual speed shown on your GPS. Even the roadrunner would be impressed with your ACME like device. 7. Use the GPS computer to monitor your driving distance, time and average speed so you can boast to fellow speed mongers or just to your average bike fanatics. 8. Register the top speed you ever achieved on your crotch rocket (Be ready to pay with your driving privileges and constitutional rights for blatantly disregarding the safety of your fel- low citizens and your own). This is guaranteed to inflate your ego even more and give goose bumps to the opposite sex. 9. If you're a bit on the nerdy side, monitor satellites and their signal strength in the sky and wonder what else they can do for or to you. 10. Never get lost in the 21 st century.
Transcript of Installation Instructions for Kit IX for R1200RT...

Hello! My name is Genna. I believe that having the confidence of knowing where you are on the road at any given time and being able to navigate through unknown territory is what adventure cycling is all about. Using a GPS (Global Positioning System) is the way to go, my friends. There are lots of them in the market. My personal preference is the GARMIN STREET PILOT. Regardless of what suits your fancy, a word of advice - stick with a unit offering the largest display. On the move, you need to be able to read the display as quickly as possible. Here's where I come in. GPS mounting hardware for motorcycles are very limited. For a long time I was looking for a product that would satisfy my finicky tastes. No such luck, so I decided to make my own mounting bracket. If you need help in fabricating one to custom fit on your bike, just e-mail me at: [email protected]
Top 10 reasons to have a GPS on your bike:
1. Show off to your buddies. 2. Play James Bond. 3. Humbly explain to a curious crowd at a bikers' lot that some people (like you) simply have
to have the best toys, otherwise life would be so unbearably boring. 4. Take a back road scenic route rather than racing ten wheelers on a boring interstate, while
making sure not to take the same road twice. 5. Never again try to unfold a map wrestling in the wind over deserted road side with your
hands wrapped in top of the line leather designed for protecting your digits from damages much more severe then paper cuts.
6. Compare the speed-readings between your speedometer and actual speed shown on your GPS. Even the roadrunner would be impressed with your ACME like device.
7. Use the GPS computer to monitor your driving distance, time and average speed so you can boast to fellow speed mongers or just to your average bike fanatics.
8. Register the top speed you ever achieved on your crotch rocket (Be ready to pay with your driving privileges and constitutional rights for blatantly disregarding the safety of your fel-low citizens and your own). This is guaranteed to inflate your ego even more and give goose bumps to the opposite sex.
9. If you're a bit on the nerdy side, monitor satellites and their signal strength in the sky and wonder what else they can do for or to you.
10. Never get lost in the 21st century.

Bracket Kit IX Installation Minimum tools required:
1. 3/16 Hex Key (included in the kit) 2. T-25 Torx Key (included in the kit) 3. 5 mm. Hex Key 4. 7/16 drill bit with electric or hand drill 5. Phillips and flat screwdriver Installation of Bracket Kit IV starts with preparing the work area - good lighting and plenty of space to walk around the bike, couple of small containers to arrange the screws that you will take off the bike. It will help you to put the screws back to where they came from. Installation of the Bracket Kit IX starts with removal of the windshield. 1.Place the windshield in lower position. 2.Remove the windshield from the lifter mechanism.
3.Remove left and right mirrors.
4.Remove left and right fairing panels by removing four screws in each of them and disconnecting electrical plug from auxiliary socket in left panel.

5. Remove dashboard cover.

6. Remove neoprene gasket from dashboard. Remove dashboard by snapping off three “E” clips and disconnecting power

7. Remove threaded clamps from the top of the fairing. Place rectangular clamp as shown on the picture.
8. Loosely attach “T” bracket 9. Use two M6 Phillips Head screws (included in the kit) to align the screw holes in the bracket with screw holes in upper fairing.

10. Tighten four M6 screws clamping “T” bracket to motorcycle frame. Push the “T” bracket down so the two upper claming screws (my hand is tightening one of them) would touch the cross section of the motorcycle frame.
11. This is a good time to run the wires for the gadgets you are installing. It is up to the installer to decide how the wiring will be done—internally or externally. For internal wiring you will find three rubber grommets in the kit. Installation of the grommets will require 7/16 hole(s) drilled in the dashboard panel. Sample of wiring shown on the picture above. Make sure there is enough space between the T-bracket, neoprene gasket, upper fairing and dashboard cover for wiring. Common place to get 12VDC is harness for auxiliary power plug inside left fairing panel. Behind left mirror there is a god place to place fuses for your wiring.
12. Remove two M6 Phillips Head screws aligning screws. Install the dashboard cover and all the external components of the bracket tree along with your gadget. Note that clamping screws in Swivel Joints are 1/4 - 20 Socket Head Cap Screws and require 3/16 Hex Key. Two 19mm OD x 6mm ID x 2.5mm thick Nylon Wash-ers goes between each Swivel Joints and Dashboard cover.
13. Adjust the length of the wires between the dashboard cover and your gadget. 14. Remove your gadget, all the external components of the bracket tree and dashboard cover. 15. Attach power plug to the back of dashboard.
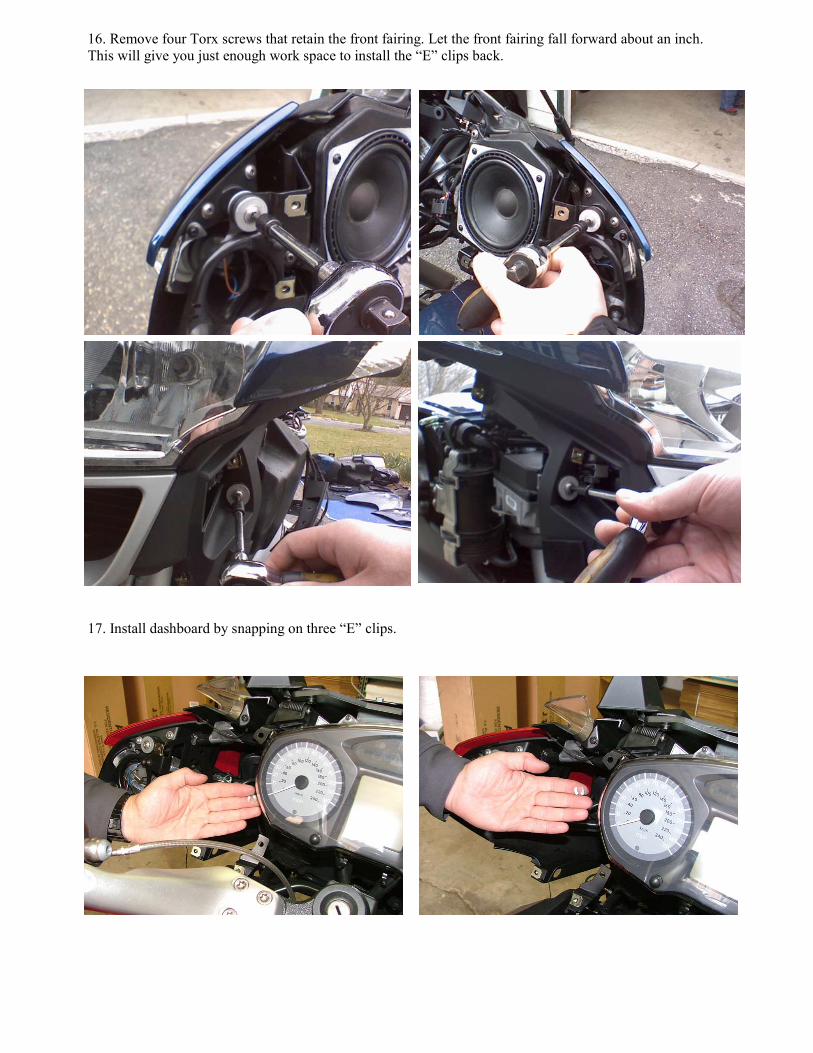
16. Remove four Torx screws that retain the front fairing. Let the front fairing fall forward about an inch. This will give you just enough work space to install the “E” clips back.
17. Install dashboard by snapping on three “E” clips.

18. Install four screws retaining the front fairing (reverse step #16) 19. Install neoprene gasket on the dashboard. 20. Install dashboard cover along with it’s part of internal wiring.
21. Install left and right fairing pans. Don’t forget to connect the auxiliary power plug in the left fairing panel. 22. Install left and right fairing mirrors. 23. Install all the external components of the bracket tree along with your gadget(s). 24. Adjust Viewing angle and tighten screws in Swivel Joints. 25. Reinstall the windshield. 26. Stand Back and admire your creation.

Bracket Kit IX components
ATTENTION!!! DO NOT attempt to program or switch functions
in your GPS while driving!!!
Thank you for your purchase. I hope you enjoy your trips even more, and be safe!
T-Bracket (R1200RT) Black Zink Coated …………………1 T-Bracket Clamp (R1200RT) Black Zink Coated ………… 1 19mm OD x 6mm ID x 2.5mm thick Nylon Washer ………. 4 R1200RT Left Swivel Joint (anodized black) ……………… 1 R1200RT Right Swivel Joint (anodized black) ……………. 1 1/2" dia x 10.5" Aluminum Rod (anodized black) ……….. 1 7/16 x 3/16 x 1/8 Rubber Grommet………………………… 3 M6 x 1 x 12 Phillips Head Machine Screw…………………. 2 M6x1x16 SHCS SS. …….……………………………………. 4 M6x1x30 SHCS SS …….……………………………………..2 1/4-20x3/4 SHCS SS………………………………………….. 2 T-25 S.A. Torx Key…………………………………………... 1 3/16" S.A. Hex Key………………………………….…...……1 5mm S.A. Hex Key Installation Instruction………………………………………. 1