Installation Guide: Workgroup for Microsoft SQL Server...
37
ArcGIS ® 9 Installation Guide: Workgroup for Microsoft ® SQL Server Express
Transcript of Installation Guide: Workgroup for Microsoft SQL Server...

ArcGIS®
9Installation Guide: Workgroup for Microsoft® SQL Server Express

Copyright © 2006 ESRI All Rights Reserved. Printed in the United States of America.
The information contained in this document is the exclusive property of ESRI. This work is protected under United States copyright law and the copyright laws of the given countries of origin and applicable international laws, treaties, and/or conventions. No part of this work may be reproduced or transmitted in any form or by any means, electronic or mechanical, including photocopying or recording, or by any information storage or retrieval system, except as expressly permitted in writing by ESRI. All requests should be sent to Attention: Contracts Manager, ESRI, 380 New York Street, Redlands, CA 92373, USA.
The information contained in this document is subject to change without notice.
RESTRICTED/LIMITED RIGHTS LEGEND
U.S. Government Restricted/Limited Rights: Any software, documentation, and/or data delivered hereunder is subject to the terms of the License Agreement. In no event shall the Government acquire greater than RESTRICTED/LIMITED RIGHTS. At a minimum, use, duplication, or disclosure by the Government is subject to restrictions as set forth in FAR §52.227-14 Alternates I, II, and III (JUN 1987); FAR §52.227-19 (JUN 1987); and/or FAR §12.211/12.212 [Commercial Technical Data/Computer Software]; DFARS §252.227-7015 (NOV 1995) [Technical Data]; and/or DFARS §227.7202 [Computer Software], as applicable. Contractor/Manufacturer is ESRI, 380 New York Street, Redlands, CA 92373-8100, USA. ESRI, MapObjects, ArcView, ArcIMS, ArcSDE, ArcInfo, ArcEditor, ArcGIS, ArcMap, ArcCatalog, ArcToolbox, ArcObjects, MapObjects, SDE, and the ESRI globe logo are trademarks of ESRI, registered in the United States and the European Community, or certain other jurisdictions. www.esri.com is a service mark of ESRI.
The names of other companies and products mentioned herein are trademarks or registered trademarks of their respective trademark owners.

iii
Table Of Contents Introduction ....................................................................................................1
Features of Workgroup geodatabases...............................................................1
Troubleshooting ...............................................................................................3
Enabling the TCP/IP protocol...........................................................................3
Start the SQL Server Configuration Manager ..................................................3
Check the Network Configuration..................................................................3
Ensuring the services are running....................................................................3
Check the SQL Server 2005 services .............................................................3
Making sure a user has permission to add the database server ...........................4
Minimum system requirements ..........................................................................7
Microsoft SQL Server Express requirements ......................................................7
Accessing documentation for the next steps ........................................................9
Installation overview ......................................................................................11
Obtain an authorization file...........................................................................11
Start the setup program...............................................................................11
Complete the Microsoft SQL Server 2005 Express Edition SP1 setup. .................11
Complete the postinstallation setup to enable Workgroup geodatabases.............11
Installing SQL Server Express ..........................................................................13
How to prepare to install ..............................................................................13
How to install SQL Server Express SP1...........................................................13
Enabling Workgroup geodatabases ...................................................................21
Choose the instance and add an administrator ................................................21
Authorize the software .................................................................................22
Upgrading Workgroup geodatabases.................................................................27
Upgrading SQL Server Express.........................................................................29
Updating license keys .....................................................................................31
Update the license key on the database server................................................31
Update the license keys on the geodatabases .................................................31
Uninstalling SQL Server Express.......................................................................33


1
Introduction This installation guide includes information on installing Microsoft® SQL Server 2005 Express Edition SP1 and enabling it for use with Workgroup geodatabases. (Note: ArcSDE Workgroup licensing is part of ArcGIS® Server Workgroup edition.)
The CD/DVD contains:
Install_sqlexpress.htm—This is the file you are reading now. It contains instructions for installation and setup on Windows systems.
Support—This is a folder that contains files to support the Microsoft SQL Server 2005 Express Edition SP1 installation.
The installation is a two step process. Both steps are included in the installation wizard:
1. Install Microsoft SQL Server 2005 Express Edition SP1.
2. Perform the postinstallation setup, which configures optional user security, enables the SQL Server Express instance to use Workgroup geodatabases, authorizes the software, and configures SQL Server Express to support remote connections.
The setup program will install the Microsoft Windows Installer if required and check the computer for Microsoft .Net 2.0 before continuing with the Microsoft SQL Server Express installation. If you do not have Microsoft .Net 2.0 installed on your computer, the setup program will close. You can download .Net 2.0 from the Microsoft site. Once it is installed, rerun the ArcSDE Workgroup installation file.
When the SQL Server Express installation is complete, the installation wizard automatically continues with the postinstallation setup.
Features of Workgroup geodatabases
Workgroup geodatabases have the following characteristics:
Allow you to take advantage of ArcSDE technology, such as versioned editing, history tracking, and geodatabase replication, at your desk or in the field without having to install and manage an Enterprise geodatabase.
Are intended for small organizations and projects for which departmental management of GIS database services is desired
Are accessed and administered through ArcCatalog by creating connections to a database server instance (local or on the network)
Use Microsoft SQL Server Express
Are preconfigured for optimal performance
Use Windows authenticated users and direct connections
Are limited to 4GB of data per instance

Installation Guide: Workgroup Basic
2
Require an ArcGIS Server Workgroup license key for installation
3
Troubleshooting To successfully run database servers, the SQL Server Express TCP/IP network protocol must be enabled and both the SQL Server and SQL Server Browser services must be started. In addition, to use a particular database server, your login must be recognized by the SQL Server Express instance. These topics are covered below.
Enabling the TCP/IP protocol
Upon completion of the installation, if you have trouble making remote connections to the database server, please do the following to ensure that SQL Server Express has been correctly configured.
Start the SQL Server Configuration Manager
1. Click the Start button on the Windows task bar, point to All Programs, point to Microsoft SQL Server 2005, point to Configuration Tools, and click SQL Server Configuration Manager.
Check the Network Configuration
1. In the left-hand Table of Contents, expand SQL Server 2005 Network Configuration.
2. Click Protocols for <instance_name>. If you used the default instance name when installing, this will be SQLEXPRESS.
3. Verify that TCP/IP status is Enabled. If it is not enabled:
a. Right-click TCP/IP and click Properties.
b. On the Protocol tab, click Enabled and choose Yes from the drop-down list on the right.
c. Click OK.
d. Click OK when the message "Any changes made will be saved; however, they will not take effect until the service is stopped and restarted" appears. You will restart the service shortly.
Ensuring the services are running
Check the SQL Server 2005 services
1. In the left-hand Table of Contents, click SQL Server 2005 Services.
2. Verify that the SQL Server service and the SQL Server Browser service have both been started. If the services are started, their State will be Running and the service icon will have a green arrow on the lower right corner. (A red square indicates that the service is stopped.) If they have not been started:

Installation Guide: Workgroup Basic
4
a. Right-click the service and click Start. If no Start item appears on the context menu and the Start Mode is listed as 'Other' or 'Disabled', you will need to enable the service before it can start. To enable the service:
Right-click the service and click Properties.
On the Service tab, change the Start Mode to Automatic by clicking Start Mode and choosing Automatic from the drop-down list.
Click OK.
Now you can start the service by right-clicking it and clicking Start.
o If you have enabled the TCP/IP protocol, you must restart the SQL Server service before this change will take effect. If the SQL Server service is already running, right-click it and click Restart. This will stop and then restart the service.
o If a service will not start due to a timeout error, verify that the Start Mode is Automatic and reboot the computer. An Automatic Start Mode means that the service will start automatically on boot.
If the TCP/IP network protocol and both the SQL Server and SQL Server Browser services have been started, close the SQL Server Configuration Manager. SQL Server has been configured correctly and you can now begin working with the database server.
Making sure a user has permission to add the database server
Users who are Windows administrators on the computer on which the SQL Server Express instance is installed are automatically administrators in the database server. Since you must be a Windows administrator to install SQL Server Express, the user who does the installation will always automatically be a database server administrator. If additional users need to access the database server, either locally or remotely, their logins must be added to the database server.
To do this, a database server administrator user can be added during the postinstallation setup. If you do this, there will be at least two database server administrators: the user who installed SQL Server Express and the user added during postinstallation.
To add additional users (both administrative and nonadministrative) to the database server, a database server administrator can add users through ArcCatalog after postinstallation is complete.
1. With either a Windows administrator login or the login that was added during postinstallation, log into the computer where SQL Server Express is installed.
2. Open ArcCatalog.
3. Expand the Database Servers folder in the Catalog tree and double-click Add Database Server.

Troubleshooting
5
4. Type the name of the server and the name of the SQL Server Express instance in the Database Server text box; for example, COMP\sqlexpress. Click OK.
5. The database server will be added to the Database Servers list in the Catalog tree. Right-click it and click Permissions.
6. Click Add User and browse to the login you want to add as a user. Since database servers use Windows logins, a local or network login must already exist for the user. Note: A user's local login (such as, CANINE\rocky) is not the same as his or her network login (such as, GLOBAL\rocky). If a user needs to connect to the database server with his/her local login—for instance, if the database server is installed on a laptop that will be used detached from the network—you need to be sure to add the user's local login to the database server. Be sure not to use cached domain logins when you are disconnected from the network; the database server will not recognize them if you are not actually connected to the network.
7. Click OK.
For additional troubleshooting tips, see the topic Troubleshooting connections to the database server in the ArcGIS Desktop or ArcGIS Server help.


7
Minimum system requirements
Microsoft SQL Server Express requirements
A list of the prerequisite software and minimum and recommended hardware and software requirements for running Microsoft SQL Server Express Edition can be found at the Microsoft support site.
If you will be running both ArcGIS Desktop (which is required to administer Workgroup geodatabases) and Microsoft SQL Server Express Edition on the same computer, at a minimum, you should have:
1 GB of RAM
A Pentium III compatible 1GHz processor that supports cache prefetching
Microsoft Internet Explorer 6.0 SP1
Operating system options:
o Microsoft Windows 2000 Professional with service pack 4
o Microsoft Windows XP Professional with service pack 2
o Microsoft Windows Server 2003
If you will be running SQL Server Express on a computer separate from the ArcGIS Desktop software, follow the individual requirements for each product.
You can check the ESRI support site for the latest information on supported platforms. Click on the Software tab, choose the software in which you are interested, then choose System Requirements.


9
Accessing documentation for the next steps Documentation on using Workgroup database servers and geodatabases is included in the ArcGIS Desktop online help (http://webhelp.esri.com/arcgisdesktop/9.2). This documentation can also be found in the help that is installed with ArcGIS Desktop and ArcGIS Server, which (on Windows) can be accessed from the Start menu on the machine where ArcGIS Desktop or ArcGIS Server are installed.
To launch the ArcGIS Server help on UNIX machines, open the index.htm file in the documentation folder that is installed with ArcGIS Server.
After you finish the postinstallation setup, you're ready to add the database server (the SQL Server Express instance) to ArcCatalog and connect to the geodatabases, add other users, and add data to your geodatabase. The following is a list of help topics to assist you in these tasks. Topics can be found in the ArcGIS Desktop online help or the help system installed with ArcGIS Server or ArcGIS Desktop. Use the links below to open the online topics, or open the help and search for the titles.
TASK RELATED TOPICS
Adding a database server and connecting to geodatabases
An overview of database server connections
Adding an ArcSDE database server
Saving a geodatabase connection
Troubleshooting connections to the database server
Geodatabase users Adding and removing users or groups for ArcSDE database servers
Administering user permissions for ArcSDE database servers
Adding data An overview of adding datasets to the geodatabase


11
Installation overview The installation wizard for the ArcSDE component of ArcGIS Server Workgroup installs SQL Server Express on your computer and enables the SQL Server Express instance (referred to as a database server) to use Workgroup geodatabases. (Note: You must have ArcGIS Desktop to administer the database server and its geodatabases.)
To perform the installation, you must have system administrator privileges on the computer on which SQL Server Express is to be installed and enabled for use.
The installation procedure includes the following steps:
Obtain an authorization file.
Each server machine on which SQL Server Express will be installed and enabled to use Workgroup geodatabases requires an authorization file.
There are several ways to obtain an authorization file and register the software. You can visit https://service.esri.com to obtain an authorization file (by email, fax, phone, or mail) before installing ArcGIS Server Workgroup. You can also obtain an authorization file and register ArcGIS Server Workgroup using the Post Installation setup wizard (this is the recommended method). See the Software authorization section of Enabling Workgroup geodatabases for available registration methods.
Start the setup program.
Insert the ArcGIS Server Workgroup Edition CD or DVD into the drive, browse to the ArcSDESqlExpressWorkGroup.exe, and follow the installation instructions in the wizard. Also read the detailed installation instructions in the topic Installing SQL Server Express.
Complete the Microsoft SQL Server 2005 Express Edition SP1 setup.
This creates the SQL Server Express instance that you will use for your Workgroup geodatabases. Note: If you were using ArcSDE Workgroup as a beta or prerelease user, please see Upgrading SQL Server Express.
Complete the postinstallation setup to enable Workgroup geodatabases.
The Post Installation setup wizard will add an additional database server administrator (optional), authorize Workgroup on your new SQL Server Express instance, and configure SQL Server Express for remote connections. The Post Installation wizard will automatically launch after installation is complete. Postinstallation must be completed to successfully enable your SQL Server Express

Installation Guide: Workgroup Basic
12
instance to use Workgroup geodatabases. For detailed instructions, see the topic Enabling Workgroup geodatabases.

13
Installing SQL Server Express Follow the "How to prepare to install" and the "How to install SQL Server Express SP1" steps below to install SQL Server Express on your computer. After installing SQL Server Express, you will proceed to the postinstallation, which will enable your SQL Server Express instance to use Workgroup geodatabases.
How to prepare to install
1. Obtain your authorization file.
2. Log into the computer as a user with administrative privileges.
3. Close all applications on your computer.
4. Insert the ArcGIS Server Workgroup DVD (or CD) and follow the directions below on How to install SQL Server Express. (If you already have an instance of SQL Server Express installed that you want to use, uncheck the Microsoft SQL Server 2005 Express Edition option checked on the ArcSDE Workgroup Installation Options dialog box and skip to the postinstallation portion of the wizard, which will enable SQL Server Express to create Workgroup geodatabases..
How to install SQL Server Express SP1
1. Navigate to the Windows folder on the Workgroup installation media and launch ArcSDESqlExpressWorkGroup.exe to begin the installation.
2. Install SQL Server 2005 Express by leaving the Microsoft SQL Server 2005 Express Edition option checked on the ArcSDE Workgroup Installation Options dialog box and clicking Install.
3. To install Microsoft SQL Server 2005 Express Edition SP1, do the following:
a. Accept the Microsoft SQL Server 2005 Express Edition license agreement. If you do not accept, the setup will exit and you will not install SQL Server Express.

Installation Guide: Workgroup Basic
14
b. Next, the setup checks your computer for the Microsoft Windows Installer 3.1 and .NET 2.0 Framework, which are required by SQL Server 2005 Express. If the Windows Installer 3.1 is not installed, the setup will install it for you. If you do not have the .NET 2.0 Framework, the setup will exit. You must install the .NET 2.0 Framework separately then restart the ArcSDE Workgroup installation. If your computer has all the required files, it will pass this check. Click Next to proceed to the next dialog box.
c. On the Microsoft SQL Server 2005 Setup dialog box, click Next.

Installing
15
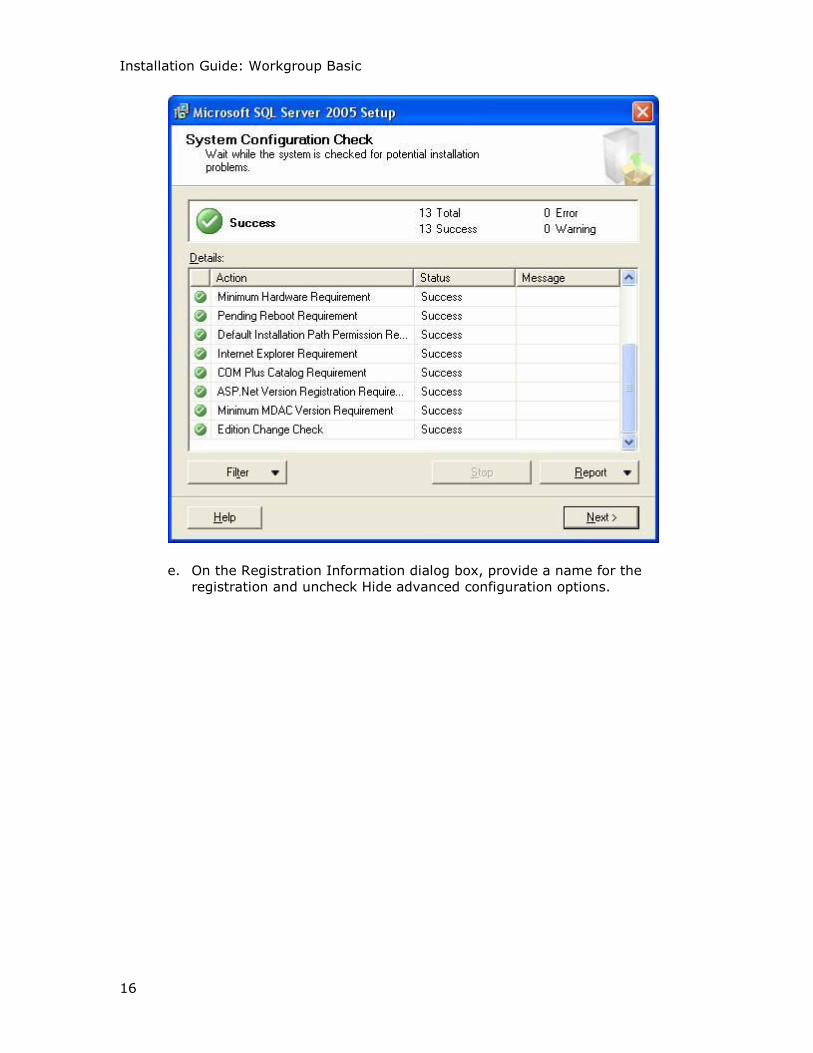
d. Microsoft will do another system configuration check. When it completes, click Next.
Installation Guide: Workgroup Basic
16
e. On the Registration Information dialog box, provide a name for the registration and uncheck Hide advanced configuration options.

Installing
17
f. Accept the default features on the Feature Selection dialog box and click Next.
g. On the Instance Name dialog box, use a Named instance. The default name is SQLExpress. You can accept this name (recommended) or type a different name and click Next. Note that the instance name cannot exceed 16 characters, must start with a letter, cannot contain spaces or special characters, and must be unique.

Installation Guide: Workgroup Basic
18
h. Click Next on the Existing Components dialog box.
i. For the Service Account, keep Use the built-in System account selected. From the drop-down list, choose the Local system account. Make sure the SQL Server and SQL Browser services remain checked to be started automatically at the end of the setup. Click Next.

Installing
19
j. By default, Microsoft SQL Server 2005 uses Windows Authentication Mode. Workgroup database servers only accept Windows logins; therefore, there is no need to change the authentication mode. Click Next.

Installation Guide: Workgroup Basic
20
k. If you need to alter the collation settings to use a different collation, you can do so on the Collation Settings dialog box. Click Next.
l. Accept the default on the User Instances dialog box and click Next.
m. On the Error and Usage Report settings dialog box, you can optionally choose to send information to Microsoft.
n. Click Install to proceed with the SQL Server Express installation. When the installation completes, click Finish.
The Post Installation wizard will launch automatically after the SQL Server Express installation completes. See the topic Enabling Workgroup geodatabases for instructions.

21
Enabling Workgroup geodatabases The postinstallation setup designates the SQL Server Express instance to be used as the database server, optionally adds an additional administrator login to the database server, enables the SQL Server Express instance to work with Workgroup geodatabases, and authorizes the software.
Choose the instance and add an administrator
1. For SQL Server instance name, choose from the drop-down list the name of the SQL Server Express instance you just installed; for example, MyServer\SQLExpress. If you are using a previously installed SQL Server Express instance, choose it from the drop-down list. Be sure to choose the correct instance! If you mistakenly choose, for instance, a SQL Server Enterprise Edition instance, you will not be able to create any Workgroup geodatabases.
2. If the person who will be administering the database server is not a member of the local Windows Administrators group, you must add his or her login to the SQL Server Express instance you just installed. This user will not have any additional permissions at the operating system level but will be able to perform the necessary administrative functions on the database server.
Alternatively, if you are logged into the computer with your network login when you run the postinstallation but plan to sometimes use the database server offline, you can add a local user login during the postinstallation. (Note: If you add that login during postinstallation, the user will be a database server administrator. If you don't want the local user to be an administrator, you will need to connect to the database server through ArcCatalog after you complete the postinstallation and add the user login there. Be aware that if you do not add a local login to the database server and use that login when working offline, you may not be able to connect to the database server when not connected to your network.)
You can add the login for the database server administrator by typing the domain or machine name followed by a backslash (\) and the login name; for example, rocketjay\kim, as shown below.

Installation Guide: Workgroup Basic
22
If you do not need to add a database server administrator user to the SQL Server Express instance, don't type anything in the Windows Login field.
3. Click Next.
Authorize the software
1. Click Next to proceed with the authorization.
2. On the Registration Options dialog box, choose the option that applies to your situation.
If you have not registered ArcGIS Server, choose the first option and click Next.

Enabling Workgroup geodatabases
23
This option will take you to the Registration Method dialog box. From here, choose the method you want to use to register your software and click Next. (Note: To use either the first or second option, you must have Internet access on the machine where you are registering the product.)

Installation Guide: Workgroup Basic
24
Option 1: Register now using the Internet—You must have Internet access on the machine on which you are installing the software to use this option. When you use this option, registering the software automatically authorizes it for use.
Option 2: Register at ESRI's Web site—This option also requires you have Internet access on the machine where you are installing the software. The Web site will open as soon as you click Next. Follow the instructions on the Web site to complete your registration. Once registered, your authorization file will be emailed to you.
Option 3: Register by email—To use this option, you must have email access on the computer where you are performing the installation. Your registration request will be emailed to ESRI and your authorization file will be emailed back to you.
Option 4: Fax or mail your registration—When you use this option, your registration information will be saved on your computer. You can then print the information and either fax or mail it to ESRI. You can choose to receive your authorization file via either email or fax.

Enabling Workgroup geodatabases
25
For all options, you will need to provide your registration information, including the registration number that you received when you purchased the software.
If you choose options 2, 3, or 4, once you receive your authorization file, you will need to rerun the Post Installation wizard to authorize ArcGIS Server Workgroup. To open the Post Installation wizard at a later time, rerun the ArcSDESqlExpressWorkGroup.exe. When you get to the Workgroup Edition Installation Options dialog box, uncheck Microsoft SQL Server 2005 Express Edition, but leave the ArcSDE Workgroup Edition Post Installation option checked, and click Install.
If you already received an authorization file from ESRI support, choose the second registration option and click Next.

Installation Guide: Workgroup Basic
26
On the Software Authorization dialog box, you will either choose to browse to the location of the license file that was sent to you by ESRI, or choose to manually input the authorization information. The information you will need to manually authorize the software can be found in the authorization file.
To complete the authorization, click Finish.
Your database server (SQL Server Express instance) is now ready for use. Consult the ArcGIS Server help for information on adding the database server to ArcCatalog and creating geodatabases.

27
Upgrading Workgroup geodatabases There are three steps to follow to upgrade a Workgroup geodatabase.
1. Before installing a new version of ArcGIS Desktop, create backups of your Workgroup geodatabases. You can do this through ArcCatalog by right-clicking each geodatabase, pointing to Administration, clicking Backup, and providing the requested information.
2. Follow the instructions provided with ArcGIS Desktop for installing a newer version of the Desktop software. Note: If the ArcGIS Desktop installation on the computer on which the database server resides is upgraded, any client PCs that make a remote connection to the geodatabases on that database server must have their ArcGIS Desktop applications upgraded as well. If they do not, they will not be able to connect to the upgraded geodatabases.
3. Upgrade your geodatabases. To do this, you must log into the computer where the database server (the SQL Server Express instance) is installed with a login that is a Windows administrator. As the Windows administrator, open ArcCatalog and click on each geodatabase. For each geodatabase, you will be prompted to upgrade. There can be two parts to the upgrade: an upgrade to the ArcSDE schema and an upgrade to the geodatabase schema.
a. When you attempt to connect to a geodatabase, the first part of the upgrade is the ArcSDE schema upgrade. Clicking Yes on the upgrade message box upgrades the ArcSDE schema.
b. If the geodatabase schema also needs to be upgraded, a second message box appears. This message box is strictly informational; clicking OK on this box does not perform the geodatabase schema upgrade. To upgrade the geodatabase schema, right-click the geodatabase and click Properties. On the general tab, if the geodatabase schema needs upgrading, the Update Geodatabase button will be active. Clicking this will upgrade the geodatabase schema. Note: You are not required to upgrade the geodatabase schema; however, if you do not, you will not be able to use any new geodatabase functionality the upgrade would allow.


29
Upgrading SQL Server Express The SQL Server Express instances installed with ArcSDE Workgroup prior to ArcGIS 9.2 final release were not SQL Server Express SP1. To move your SQL Server Express instance and Workgroup geodatabases to SQL Server Express SP1, you can upgrade the SQL Server Express instance. Note: You must be a Windows administrator on the computer where SQL Server Express is installed to perform this upgrade.
1. Before upgrading the SQL Server Express instance, create backups of all your Workgroup geodatabases. You can do this through the database server connection in ArcCatalog by right-clicking each geodatabase, pointing to Administration, clicking Backup, and providing the requested information.
2. Follow the instructions for installing SQL Server Express through to step 3g under "How to install SQL Server Express SP1".
3. On the Instance Name dialog box, click the Installed instances button. Choose the instance you want to upgrade and click OK. Be sure to choose the correct instance! This will take you back to the Instance Name dialog box. Click Next to continue.

Installation Guide: Workgroup Basic
30
4. The next dialog box—the Existing Components dialog box—will indicate you will be upgrading the SQL Server Express instance. Check all the existing components to upgrade then click Next to proceed with the upgrade.
5. If the upgrade completes successfully, your instance now has the fixes of Microsoft's service pack 1 (SP1) installed.
If the SQL Server Express upgrade did not successfully complete, you will need to uninstall your existing SQL Server Express instance and do a new installation of SQL Server Express SP1. To remove the SQL Server Express instance, see Uninstalling SQL Server Express.
Once you have finished uninstalling the old SQL Server Express instance, do the following:
a. Proceed with the new installation of SQL Server Express SP1 by following the instructions in Installing SQL Server Express.
b. Add the new SQL Server Express SP1 instance (database server) to ArcCatalog by double-clicking Add database server and typing the machine and instance name of the new instance.
c. Restore the geodatabases of which you made a backup in step 1 by right-clicking the database server, clicking Restore, browsing to the location of the backup file, and clicking OK.
d. You will likely be prompted to upgrade your geodatabase schema. Follow the instructions in Upgrading Workgroup geodatabases to upgrade your geodatabases.

31
Updating license keys If you want to move from using Personal SQL Server Express geodatabases to using Workgroup geodatabases or if your ArcGIS Server Workgroup license key expires, you will need to update the license key on your database server and on each existing geodatabase.
Update the license key on the database server
To update the license key on a database server, you can rerun the Post Installation wizard.
1. As a Windows Administrator, log onto the computer on which the SQL Server Express instance is installed.
2. Navigate to the Windows folder on the ArcGIS Server Workgroup DVD (or CD) and launch the ArcSDESqlExpressWorkGroup.exe file to access the Post Installation wizard.
3. On the Workgroup Edition Installation Options dialog box, uncheck Microsoft SQL Server 2005 Express Edition and click Install.
4. From the drop-down menu, choose the name of the SQL Server Express instance for which you want to change the license key and click Next.
5. You will now authorize the Workgroup software by navigating to the ArcSDE Workgroup license key or manually entering the authorization number you received from ESRI. See the instructions on software authorization in the topic Enabling Workgroup geodatabases.
6. When the postinstallation setup is finished, click Finish.
Update the license keys on the geodatabases
To update the license keys of the geodatabases on the database server for which you just changed license keys, you will need to detach and attach each geodatabase.
1. Open ArcCatalog.
2. Connect to the database server for which you changed license keys.
3. Right-click a geodatabase on the database server, point to Administration, and click Detach.
4. Make note of where the database file is stored, then confirm you want to detach the geodatabase by clicking Yes. The geodatabase should disappear from the database server connection in the ArcCatalog tree. Note: There can be no other existing connections to a geodatabase when you detach it; if there are, the detach will fail.
5. Right-click the database server, and click Attach. Note: You must be a Windows administrator to attach a geodatabase to the database server.

Installation Guide: Workgroup Basic
32
6. In the Attach Geodatabase dialog box, browse to the .mdf file of the geodatabase you just detached. (This is the location you took note of in step 4; usually C:\Program Files\Microsoft SQL Server\MSSQL\Data.) Click OK on the Browse dialog box.
7. Click OK on the Attach Geodatabase dialog box.
8. Repeat steps 3 through 7 above to update the license key of all other geodatabases on the database server.
If you do not update the license key on the geodatabases, they will retain their original license key. That means, if you changed the database server from Personal for SQL Server Express to Workgroup, the geodatabases will still be Personal for SQL Server Express and will only allow three concurrent connections until you update the license keys in the geodatabases.

33
Uninstalling SQL Server Express
1. Open the Windows Control Panel and double-click the Add/Remove Programs icon.
2. Choose Microsoft SQL Server 2005 from the program list, and click the Remove button. Note: You must be a Windows administrator to remove programs.
3. For Component Selection, choose the correct instance to remove. For example, if you used the default instance name of SQLExpress, choose SQLEXPRESS:Database Engine.
4. Click Next.
5. Confirm you want to uninstall this instance by clicking Finish.
Uninstalling SQL Server Express removes the SQL Server Express software but the geodatabase files you created remain. If you reinstall SQL Server Express and want to use the geodatabase files you had previously created, you will need to attach them.