Installation and Operating Manual - oelschlaeger.de and Operating Manual ... OMT Sit/Stand Work Desk...
23
Installation and Operating Manual LIVE.STAND Software for operation of the electrical OMT Sit/Stand Work Desk from version 1.0.0:
-
Upload
nguyendung -
Category
Documents
-
view
215 -
download
0
Transcript of Installation and Operating Manual - oelschlaeger.de and Operating Manual ... OMT Sit/Stand Work Desk...

Installation and Operating Manual
LIVE.STAND
Software for operation of the electrical
OMT Sit/Stand Work Desk
from version 1.0.0:

2
Table of Contents 1 Foreword ......................................................................................................................................................... 3
1.1 Purpose-conformant use ............................................................................................................................. 3
1.2 Target group and previous knowledge ........................................................................................................ 3
1.3 Symbols used in the safety instructions ...................................................................................................... 4
1.4 Safety warnings ........................................................................................................................................... 4
1.4.1 General safety notes ............................................................................................................................. 4
1.4.2 Before installation of the LIVE.STAND software ................................................................................... 6
2 System requirements ....................................................................................................................................... 6
3 Assembly and Installation ................................................................................................................................ 7
3.1 Assembly of the wiring..................................................................................................................................... 7
3.2 Installation of the software ............................................................................................................................... 7
3.2.1 Standard installation .................................................................................................................................... 7
3.2.2 Installation via automatic software distribution ............................................................................................ 7
3.2.3 Individual steps for the installation .............................................................................................................. 8
4 The first program start of the LIVE.STAND app ............................................................................................ 13
5 Operation elements in the program ............................................................................................................... 14
6 Operating the program .................................................................................................................................. 14
7 Configuration / Settings ................................................................................................................................. 15
8 Reminders and calories ................................................................................................................................. 18
9 About ............................................................................................................................................................. 19
10 Troubleshooting ............................................................................................................................................. 20
11 Error Messages ............................................................................................................................................. 21
12 Address ......................................................................................................................................................... 23

3
1 Foreword
Dear Customer, We are delighted that you have purchased our product. This manual explains how you can install and operate our LIVE.STAND software. The LIVE.STAND software makes it possible to operate your OMT Sit/Stand Work Desk and reminds you about regular use for the sake of your health. Your success, in the form of additionally burned calories, will be displayed and statistically recorded. You can define your personal goal yourself at any time, and observe it over the long term. This software is currently only available for Microsoft Windows 7, 8, 8.1 and 10; other operating systems are not supported at this time. Despite taking the greatest care as well as conducting extensive tests within the framework of development, we cannot – due to the multiplicity of hardware and software combinations – exclude the possibility of problems in conjunction with our software or its use. If you encounter any problems, you can, of course, get in touch with us at any time and we will attend to it and strive to find a solution. For operating your Sit/Stand Work Desk, please also adhere to the operating manual of the table-top support frame. Oelschläger Metalltechnik GmbH
1.1 Purpose-conformant use
OMT Sit/Stand Work Desks may be used exclusively as office desks in office environments. Changes to the table-top support frame or to the software provided by us are not permitted. The Sit/Stand Work Desks must be assembled and commissioned, and their operation checked by competent technicians. Use of this Sit/Stand Work Desk for any purpose other than that specified above is only permitted with the consent of Oelschläger Metalltechnik. Our LIVE.STAND software may be used exclusively for operating OMT table-top support frames. If a manual switch and our LIVE.STAND software are used simultaneously, then only manual switches without a display may be used at present.
1.2 Target group and previous knowledge
This operating manual targets the following groups of persons:
• Commissioning personnel who assemble the Sit/Stand Work Desk and commission it.
• Furniture installers or maintenance personnel who set up the Sit/Stand Work Desk in salesrooms or at the final customer’s site.
• Administrators of the IT departments for the software installation.
The following previous knowledge is a precondition for being able to commission and assemble the FREE.STAND Sit/Stand Work Desks:
• Fundamentals of mechanical and electrical engineering (corresponding educational qualification)
• Reading the operating manual

4
1.3 Symbols used in the safety instructions
Danger: This safety symbol indicates the threat of danger to the life and health of persons. Not heeding this indication can result in harm to health, life-threatening injuries and damage to property! Attention: This safety warning indicates the possible danger of an electric shock. Not heeding this warning can result in injuries and damage to property! Note: This safety warning points to important information which you must heed for safe operation of the FREE.STAND Sit/Stand Work Desk. Danger: This safety warning indicates a possible danger of crushing or jamming that might exist in exceptional circumstances. Not heeding this indication can result in harm to health, life-threatening injuries and damage to property! Note: Notice of the obligation to read the operating manual! Note: Pull the mains plug before the next activity.
1.4 Safety warnings
This operating manual contains safety warnings that draw your attention to possible hazards and thus facilitate safe operation of the FREE.STAND Sit/Stand Work Desk. Pay attention to these safety instructions without fail! This section contains general safety instructions that do not refer to any particular operation step. The activity-specific safety warnings are present in the respective sections of the operating manual. There are other safety warnings on the actual individual parts of the FREE.STAND Sit/Stand Work Desk.
1.4.1 General safety notes
Note: Before assembly/commissioning of the FREE.STAND Sit/Stand Work Desk, read the operating manual and follow it closely. Attention: Do not open the motor controller under any circumstances! There is a danger of an electric shock!
Attention: The FREE.STAND Sit/Stand Work Desks are not designed for continuous operation. Adjustment of the table-top height must not take longer (continuously) than the power-on duration specified on the type plate.

5
Attention: The motor controller must always only be operated with the rated voltage specified on the type plate. Check before commissioning that the mains voltage on the type plate of the motor controller tallies with your mains voltage.
Danger: This device can be used by children above the age of 8 and by persons with reduced physical, sensory or mental abilities or lack of experience and knowledge if they are monitored or have been instructed in the safe use of the device and understand the hazards that are involved.
Danger: Children may not play with the device!
Danger: Cleaning and user’s maintenance may not be done by children without supervision.
Attention: Be sure to use the accompanying power supply cord. Ensure that the power supply cord is not damaged. Operating the FREE.STAND Sit/Stand Work Desk with a damaged power supply cord is prohibited.
Attention: Before plugging in or disconnecting drives, manual switches or other accessories at the motor controller, you must disconnect the power supply cord from the mains.
Attention: Use only original FREE.STAND accessories from Oelschläger Metalltechnik GmbH. The use of components and parts from third parties is prohibited. The use of unsuitable accessories can result in damage or destruction of the table-top support frame.
Attention: If there is a malfunction (for example, unintended movement of the table-top or if a button of the manual switch gets jammed), immediately pull the mains plug.
Danger: Protect the table-top support frame, and especially all the electrical components in it, from moisture, dripping and splashing water.
Danger: There is a danger of crushing or jamming when changing the table-top position. Therefore, ensure that there are no objects or persons in the danger zone and that nobody reaches into the danger zone. The optional anti-collision protection generally detects solid objects, but the danger of crushing for persons is still present. The anti-collision protection is a system safeguard and NOT protection for persons.
Attention: Modifications to the components of the table-top support frame including the motor controller and operation elements are prohibited.
Danger: The electrically driven FREE.STAND Sit/Stand Work Desk may not be used in an explosive atmosphere.
6
Danger: In case of a fault, the table-top can move a bit with every attempt to change position before the safety cut-off comes into play. Keep in mind the possible danger of crushing.
Danger: The optionally available anti-collision protection is disabled during all reset procedures (section 5). Keep in mind the possible danger of crushing.
Attention: If the product is visibly damaged, it must not be installed or used any further!
1.4.2 Before installation of the LIVE.STAND software
• The installation of the table-top support frame in accordance with the operating manual must have been completed.
Note: Switch off the power supply and pull the mains plug.
2 System requirements
To be able to use our LIVE.STAND software, the following preconditions must be satisfied:
• A standard workplace computer with at least one free USB 2.0 port.
• Operating system: Microsoft Windows 7, 8, 8.1 or 10®
• Microsoft .NET Framework 4.5®
• Administrator rights on the computer are required for the installation. If there are any questions, please contact your system administrator.
• OMT Sit/Stand Work Desk with a motor controller COMPACT, SMART or STAND.CONTROL C2 and firmware 1.8.7, 1.9.14 or higher

7
3 Assembly and Installation
3.1 Assembly of the wiring
To use the LIVE.STAND app, you need a special USB connecting cable for setting up the connection between your computer and the motor controller of the table-top support frame. Optionally, a Y-cable can be procured for parallel use of a manual switch and the LIVE.STAND software. However, at present, this option is only possible in conjunction with simple on/off manual switches without a display. Before assembling the wiring, the motor controller must be isolated from the power supply; to do so, pull the mains plug. Now, if applicable, the optional Y-cable is deployed directly on the motor controller; use it to set up the connection to the “HV” connector of the motor controller. Now, if required, a simple up/down manual switch (without a display) can be connected to any free socket of the Y-cable. The USB connecting cable with the RJ45 connector is connected to the “HV” port of the motor controller or at the optional Y-cable on one of the two sockets. Insert the USB plug in any free USB slot (min. 2.0) on your computer. As soon as all the cables are connected as described, the voltage supply to the motor controller can be restored.
3.2 Installation of the software
Administrator rights to the computer are absolutely essential for installing the software on your computer. Installing the LIVE.STAND software is only possible on computers with Microsoft Windows 7, 8, 8.1 or 10 as the operating system.
3.2.1 Standard installation
Installation is started with a double-click, or a right click and the option “Install”, on the file < LIVE.STAND.x.x.x.msi >. Follow the instructions displayed during the installation ... (for the individual steps, see 3.2.3 onwards) The software is currently available in German and English. If neither of these languages is the operating system language, the English version is activated.
3.2.2 Installation via automatic software distribution Distribution of the software in companies through group directives or a software distribution tool is basically possible; a complete silent mode is currently not possible owing to the required driver installation of a third party. For software distribution tools, the installation call is as follows: msiexec /i %Path%\Live.Stand.0.x.x.msi /quiet /qn /norestart /log C:\Temp\install.Live.Stand.log %Path% must be suitably replaced by the correct path/directory on/in which the installation file is located or saved on your computer.

8
3.2.3 Individual steps for the installation
You can continue the installation with “Continue” ...
In the next step, you must indicate your consent to the end user licence agreement. You can continue the installation with “Continue” ...

9
Here, you can change the installation directory if required. We recommend retaining the default directory. You can use the “Change ...” button to select a directory on your computer. You can continue the installation with “Continue” ...
By selecting the option “Create desktop shortcut for this program”, a shortcut is created on the desktop during installation.

10
The second selection “Automatically launch this program at startup” automatically launches the program when the computer is started, so that the table-top support frame can be operated immediately again after every system restart. You can continue the installation with “Continue” ...
A click on “Installation” starts the installation of the program. This is followed by a query about Administrator rights for the program installation, which must be confirmed. If these rights are not available or if the Administrator password is not known, the installation is aborted here. After the LIVE.STAND software has been installed, the Setup program automatically starts the driver installation for the USB connecting cable.

11
Here too, you must agree to the SILICON LABS end user license agreement. Installation of the driver is started with “Continue” ...

12
The installation program reports whether the installation was successful. Clicking on “Finish” takes you back to the LIVE.STAND software installation program.
Upon selecting the option “Launch LIVE.STAND Application”, the program is started automatically upon clicking “Finish”. In rare cases, you may need to restart your computer so that the driver is loaded correctly. This completes installation of the program.

13
4 The first program start of the LIVE.STAND app
Immediately upon starting, the program automatically tries to connect to the motor controller of the table-top support frame. The program needs a short while to do so. If the connection is set up successfully, a time indication appears in the middle of the circle. In addition, the current table height is displayed in the lower information line of the program and the LIVE.STAND symbol in the Windows taskbar becomes green.
The current height is always displayed in the unit of measure that was set in the motor controller. Switching must be carried out as described in the operating manual of the table-top support frame, from the “S 5” menu of the motor controller. If the connection is not set up automatically, the COM port must be manually selected in the settings of the program. The manual selection always overrides the automatic detection. A new icon for the LIVE.STAND software now appears in the information area of the taskbar.
If “LS” is grey, there is no connection to a motor controller. “LS” in green signals that the program is active. “LS” in red indicates an error.
Depending on the Microsoft Windows version, the visibility of the icon can be controlled with the settings in the operating system (for example, for Windows 10, with Settings -> System -> Notifications and actions -> Select which icons are to be shown on the taskbar – then, there, if required for LIVE.STAND – set the option for always showing all the icons in the notification area to “ON”). The program can be closed or the main window can be displayed with a right-click on the icon. The latter can also be achieved with by double-clicking on the action icon. ATTENTION! Before restarting, the LIVE.STAND program must first be ended using the action icon in the taskbar (right-click and select “Close application”). Upon restarting the software, the connection to the controller is also set up again.

14
5 Operation elements in the program
6 Operating the program
About / Info - Information about the program and the manufacturer - Error log file can be sent if required - FAQ for the program and for table operation Move up Moves the table up as long as the button or the corresponding shortcut keys are pressed (standard shortcut = Shift + Ctrl + Up arrow). Move down Moves the table down as long as the button or the corresponding shortcut keys are pressed (standard shortcut = Shift + Ctrl + Down arrow). Day’s success The personal day’s success symbolised by sweets. One sweet corresponds to 20 kcal. Home Displays the Home screen Information line Time: Duration of the last action / Duration up to the next scheduled action Calories: Calories burned owing to standing time / self-defined daily goal in kcal
Height: Display of the current table height. The unit of measure is controlled solely through the settings in the motor controller and cannot be changed in the program.
History Overview of the number of calories burned of the currently logged-in Windows user. This information is stored in encrypted form per Windows user. Settings Displays all the settings of the program (see Settings).
About / Info Close
Move up
Move down
Day’s success
Home
Move to the standing
Move to the sitting
Settings
Information
Time Calories Height
History
Time up to the next planned activity

15
Move to the sitting position As long as the button or the corresponding shortcut keys are pressed, the table moves up to the saved sitting position.
ATTENTION! If the current height is below the saved sitting position, the table moves up (standard shortcut = Shift + Ctrl + Page down).
Move to the standing position As long as the button or the corresponding shortcut keys are pressed, the table moves up to the saved standing position.
ATTENTION! If the current height is above the saved standing position, the table moves up (standard shortcut = Shift + Ctrl + Page up).
Display central Displays the time up to the next planned action “Standing” or “Sitting” in text form and as
a piechart. Close Closes only the display window of the program. The application continues to remain active and the height of the table can continue to be adjusted, for example, using the. shortcut. Information on the next activity is displayed in a popup window. The program is closed with a right-click on the LIVE.STAND quick action icon in the taskbar.
7 Configuration / Settings
The user can make personal settings here. These settings are saved separately for every logged-in Windows user and can only be displayed and changed if the user has logged in with the corresponding user account. The sitting and standing height is the saved height for the personal sitting and standing height of a user. The buttons below each of these values (sitting or standing) can be used to set the current table height as the new sitting or standing height. These heights are also saved in the controller as memory position 1 and 2 respectively. CM / INCH Toggle for the unit of measure in this program. This does not change the unit of measure of the controller; that has to be done from the menu of the controller. You can get additional information on this in the operating manual of the table-top support frame: Threshold This height serves to detect whether the user is currently standing or sitting. KG / LBS Toggle for the unit of weight in the program Weight The weight of the user is required for calculating the additional calories burned while standing.

16
Standing / hrs. Amount of time in which the user wishes to work standing per hour Standing min/hr Number of minutes during which the user wishes to work standing per hour In the next line, the program shows you how many additional calories you are likely to have burned. Correspondingly, you can set a daily goal with the “Calories” slider. The optimum value would be the displayed calories / hour x the daily working time. Connecting with “COMx” At the time of the first start, the program tries to automatically detect the correct COM port that is made available by the driver of the USB connecting cable. If this is not possible, or if there are several identical or similar communications cables connected, the correct COM port must be selected here manually if required. “Change” takes care of the setting of the COM port. An attempt is made to set up a connection to the motor controller. If it is successful, the current table height is displayed and the icon in the taskbar becomes “green”.
“CHANGE KEYS” This can be used to change the key combinations for moving the table. To change a key combination, delete the entry by clicking on the “x” in the respective line; then, place the cursor in the field with the text “Input key combination here” and press a new key combination. At least one of the keys “Ctrl”, “Alt” or “Shift” must be pressed here. One or two of these keys in combination with a letter, a number or the arrow keys are permitted. These key combinations are also active when the interface of the LIVE.STAND software is not being displayed, but its icon on the taskbar is being shown to be “active”. A key combination must not be assigned multiple times for different functions. This also applies to combinations assigned in other programs.
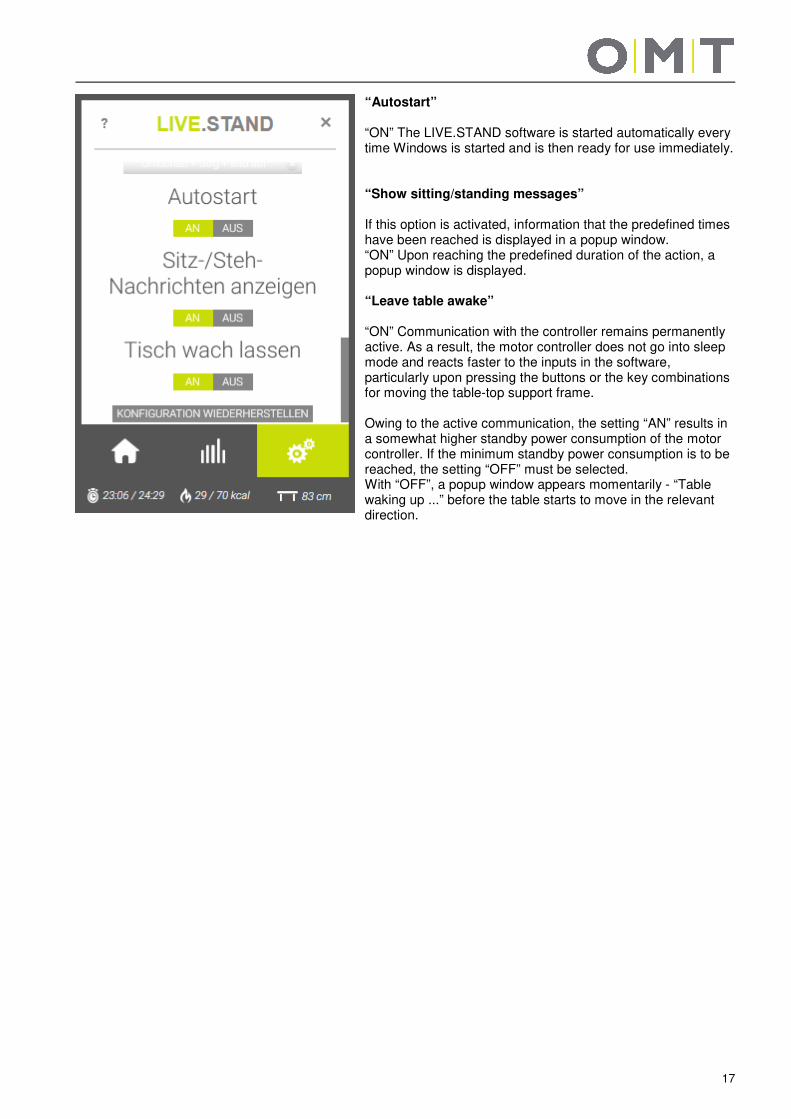
17
“Autostart” “ON” The LIVE.STAND software is started automatically every time Windows is started and is then ready for use immediately. “Show sitting/standing messages” If this option is activated, information that the predefined times have been reached is displayed in a popup window. “ON” Upon reaching the predefined duration of the action, a popup window is displayed. “Leave table awake” “ON” Communication with the controller remains permanently active. As a result, the motor controller does not go into sleep mode and reacts faster to the inputs in the software, particularly upon pressing the buttons or the key combinations for moving the table-top support frame. Owing to the active communication, the setting “AN” results in a somewhat higher standby power consumption of the motor controller. If the minimum standby power consumption is to be reached, the setting “OFF” must be selected. With “OFF”, a popup window appears momentarily - “Table waking up ...” before the table starts to move in the relevant direction.

18
8 Reminders and calories
The circular display provides information about the time left till the next planned action (standing of sitting) as has been specified in the settings. One segment of the circle corresponds to one minute.
A popup window opens at 0 minutes and reminds the user about the action to be carried out (sitting or standing).
If the action is NOT executed as expected, the counters continue to tick till an action is carried out. Now, the time up to the next action is not counted any more, but instead, the time from which the predefined period for the last action was exceeded. The calculation of the goals continues to run in the background. If the user remains standing for a longer time than planned, he earns himself additional sweets. Moreover, the time up to the next reminder for standing is extended accordingly.

19
The weekly and annual values of the additional calories burned are depicted in the history. These values are saved in a local database under the respective Windows user and therefore, can only be viewed by that user. There is no disclosure of these data to third parties.
9 About
Information on the program The button “SEND ERROR LOG BY EMAIL” generates an email which contains a file with the most recent errors detected by the program. This information could help our customer service, if applicable, for rectifying a possible problem. The “FAQ” button provides extended information on the program and for operating the table-top support frame.

20
10 Troubleshooting
Error Cause Remedy
The table does not move
No power supply Insert the mains plug if required, check the connector at the controller
No contact or loose contact to the drives/side parts
Check and if required, make the plug connections of the motor cables at the controller and at the drives.
No connection to the manual switch
Check and if required, make the plug connection at the controller.
Max. lifting force exceeded
Reduce weight
Max. power-on duration exceeded
Controller re-activates itself automatically after 3 minutes ATTENTION! The maximum movement time of 2 minutes is available again only after a resting period of 18 minutes.
Drive faulty Contact Customer Service
Controller faulty Contact Customer Service
Operating element faulty
Replace operating element
Software not connected to the controller any more
Check whether the LIVE.STAND icon in the taskbar is “green”. If not, restore the connection. Wrong COM port selected. Select the correct COM port in the settings. Check the standby / sleep state / Windows disabling of the USB ports The virtual COM port is not correctly activated again after a standby or sleep state. Adjust the power saving settings in Windows.
The table only moves down slowly
Controller expects re-initialisation
see page 11
The table only moves slowly
Max. lifting force exceeded
Reduce weight
The table only moves briefly in one direction and comes to a standstill
No contact or loose contact to the drives/side parts
Check and, if required, make the plug connections of the motor cables at the controller and at the drives.
Drive faulty Contact Customer Service
No USB connection to the controller of the table-top support frame In the settings of LIVE.STAND, check the virtual COM port of the USB cable and if required, set it correctly. If that is not possible, with the help of the device manager, under “Connections”, check whether the USB cable has been correctly detected. If this is not the case, repeat the driver installation.
Under certain conditions, Windows may not correctly restore the USB devices if they’ve been in standby or sleep mode. This behaviour can be controlled with the power settings in Windows. Pull the USB plug of the connecting cable from the PC and reinsert it, or restart the PC.

21
11 Error Messages
The following error messages can be displayed when operating the table-top support frame with the Compact, Smart or the STAND.CONTROL C2.
Display Cause Remedy
HOT The controller monitors the power-on duration (time-controlled) and its maximum temperature. A value was exceeded.
Wait till the controller has cooled and the indication “HOT” on the display goes off. Then, the table is ready for operation once again. ATTENTION! The power-on duration is only calculated if there is a mains voltage present at the controller. If the controller is disconnected from the mains, the last value is saved in the controller.
E00 M1 – Internal fault Pull the mains plug. Contact Customer Service. E01 M2 – Internal fault
E02 M3 – Internal fault
E12 M1 – Fault
Pull the mains plug. Correct the external short-circuit, check the cables to the motors for damage or connect the correct motor at the relevant socket. Start the controller again.
E13 M2 – Fault
E14 M3 – Fault
E24 M1 – Overcurrent
Collision? -> rectify if required Max. load exceeded -> remove the load from the table. If the fault continues to exist, contact Customer Service.
E25 M2 – Overcurrent
E26 M3 – Overcurrent
E36 M1 – Not connected Motor not connected Check the cable/plug connection to the motors and carry out a reset
E37 M2 – Not connected
E38 M3 – Not connected
E48 Overcurrent Motor group 1
Collision? -> rectify if required Max. Load exceeded -> remove the load from the table. E49 Overcurrent
Motor group 2
E55 Motor group 1 - Synchronisation lost
Motor position too different if required, reduce the load on the table Re-initialise the table (RESET)
E56 Motor group 2 - Synchronisation lost
E60 Collision detected Optional ISP and sensor function Rectify the cause
E61 Motor replaced Connection to the motor interrupted or new motor connected Re-initialise the table (RESET)
E62 Overcurrent Controller – Total overcurrent, overload
E63 External sensor or cable not connected
External crushing protection strip or other additional module not connected; if required, check the plug connection
E64 Authentication error Re-initialise the table (RESET)
E65 Overcurrent or short-circuit
If a fault occurs during the movement. Collision? Load too big?
E67 Overvoltage Pull the mains plug. Contact Customer Service. Mains or power supply fluctuations?
E70 Changes to the drive configuration
Pull the mains plug and wait for at least 5 seconds; then re-initialise the table (RESET)

22
(Motor = drive in the mounting leg or in the side part)
Display Cause Remedy
E71 Sensor – configuration changed
An (optional) installed sensor was removed or the connection has been lost. Follow the separate instructions for the sensor.
E81 Internal fault Re-initialise the table (RESET) Pull the power cord and insert it again after a few seconds. If this fault occurs regularly, pull the power cord and inform Customer Service.
E93 Connection error in cascaded composite of several controllers The error is shown for 15 seconds on the display, after which, if required, the controller switches to the reset mode with the flashing display 000.
Occurs only in conjunction with the optional function “Cascading”; in this context, see the separate operating manual for this function. Check all the cable connections and carry out a drive reset. If the drive reset is not possible, disconnect the power supply to all the controllers. Wait for at least 5 seconds and once again connect all the controllers to the power supply. Carry out a drive reset again. If it is still not possible to carry out the drive reset, contact Customer Service.
Table 1: Fault descriptions for Compact, Smart and STAND.CONTROL C2 (Motor = drive in the mounting leg or in the side part)
Note: Further information on cascading is available in the operating manual for cascading motor controllers. Operating manuals can be found in the download area of the homepage www.oelschlaeger.de
Note: The PowerFail Detection of the motor controller detects power failures and saves all the relevant data before the voltage drops below a critical level. In a few exceptional cases, this saving is not possible. The next time the controller is switched on, an error for re-initialisation is displayed and the controller clicks three times. A manual reset is required for rectifying this fault (see Section 5).
Note: If there is a power failure during the height adjustment, or the mains plug is pulled, a manual reset may be required.
If a fault cannot be rectified as described, pull the mains plug, wait for a few minutes and try to initialise the table afresh. If the fault continues to occur, disconnect the table from the mains and contact Customer Service. This fault list applies to firmware 1.9.14 and higher. For older firmware versions, ask for a separate fault list from us if required.
23
12 Address
Oelschläger Metalltechnik GmbH Hertzstraße 1-3 27318 Hoya - Germany Tel.: +49 (0) 4251 - 816 - 0 E-mail: [email protected] Internet: www.oelschlaeger.de Registered office of the company: Hoya District Court of Walsrode HRB 31030 CEO: Andreas Spreen Anleitung_LIVE.STAND_App_Rev3.docx - As on: 11-01-2018 - MR / SB / TS / JH