Installation and Configuration...
173
Lionbridge Connector for Sitecore Installation and Configuration Guide Version 4.1.1 March 23, 2020
Transcript of Installation and Configuration...
Lionbridge Connector for Sitecore
Installation and Configuration Guide Version 4.1.1March 23, 2020

Copyright© Copyright 2020 Lionbridge Technologies, Inc. All rights reserved.
Lionbridge and the Lionbridge logotype are registered trademarks or trademarks of Lionbridge Technologies, Inc. in the United States and other countries. All other trademarks used herein are the property of their respective owners. The opinions of third-party contributors remain theirs alone and do not necessarily represent the views of Lionbridge Technologies.
Lionbridge Connector for Sitecore Installation and Configuration Guide Page 2Version 4.1.1 March 23, 2020

Contents
1 Welcome to the Lionbridge Connector for Sitecore 7
1.1 Terminology 7
1.2 About the Clay Tablet Platform 9
1.3 How the Connector Works with Sitecore 10
1.4 Using this Guide 10
1.5 How to Contact Lionbridge Connector Support 11
1.5.1 Submitting a Support Ticket 11
1.5.2 Information to Include in a Support Ticket 12
1.5.3 Viewing and Updating Your Support Ticket in Zendesk 12
1.5.4 Signing Up for a Zendesk Account for Lionbridge Connectors 13
1.5.5 Getting a Zendesk Password if You Previously Emailed Lionbridge Connectors 15
2 Before You Install 18
2.1 System Requirements 18
2.2 Setting Your System Date, Time, and Time Zone Correctly 18
2.3 Downloading the Delivery Package 19
2.4 Setting Up the Translation Database 20
2.4.1 Translation Database Size Requirements 20
2.4.2 Setting Up a Microsoft SQL Server-Based Translation Database 20
2.4.3 Setting Up an Oracle-Based Translation Database 21
2.4.4 Setting Up a Microsoft Azure SQL-Based Translation Database 22
2.4.5 Configuring Database Settings 23
2.5 Preparing the Connector for Scheduled Tasks (Upgrade only from version 4.0.8 or lower) 24
3 Installing the Lionbridge Connector for Sitecore 27
3.1 Installing a Language Package for the Connector 28
4 Configuring the Lionbridge Connector for Sitecore 30
4.1 Configuring Your License ID and New Translation Providers 31
4.2 Upgrading Account Keys for Current Translation Providers 37
Lionbridge Connector for Sitecore Installation and Configuration Guide Page 3Version 4.1.1 March 23, 2020

4.3 Updating the Configuration Settings of Translation Providers 43
4.4 Configuring the Connector with the Azure App Service for Blue/Green Deployment 44
4.5 Configuring Content Encryption 46
4.6 Importing Content into a Local Translation Memory (TM) 48
4.7 Configuring the Connector to Run in a Clustered Environment of Multiple Load-Balanced Sitecore Servers 50
4.8 Configuring Network Settings for a Firewall 52
4.9 Configuring Global Translation Settings 52
4.9.1 Configuring Bulk Translation Settings 53
4.9.1.1 Configuring Bulk Translation Settings in the Configuration File 54
4.9.1.2 Configuring Bulk Translation Settings in Sitecore 56
4.9.2 Configuring Email-Notification Settings 61
4.9.2.1 Configuring Email Notifications in the Configuration File 62
4.9.2.2 Configuring Email Notifications in Sitecore 65
4.9.3 Configuring Logging Settings 66
4.9.4 Configuring Platform Settings 67
4.9.5 Configuring SEO-Field Settings 67
4.9.6 Configuring Target Translation Data Settings 70
4.9.7 Configuring Translation Settings 71
4.9.7.1 Configuring Translation Settings in the Configuration File 71
4.9.7.2 Configuring Translation Settings in Sitecore 74
4.9.8 Configuring Update-TM Settings 75
4.9.9 Configuring Job-Metadata Settings 76
4.9.10 Configuring the Sitecore User for Connector Background Processes 78
4.9.11 Configuring the Behavior of the Send Dependent Items Check Box 80
4.9.11.1 Configuring the Behavior of the Send Dependent Items Check Box in the Configuration File 80
4.9.11.2 Configuring the Behavior of the Send Dependent Items Check Box in the Sitecore User Interface 82
Lionbridge Connector for Sitecore Installation and Configuration Guide Page 4Version 4.1.1 March 23, 2020
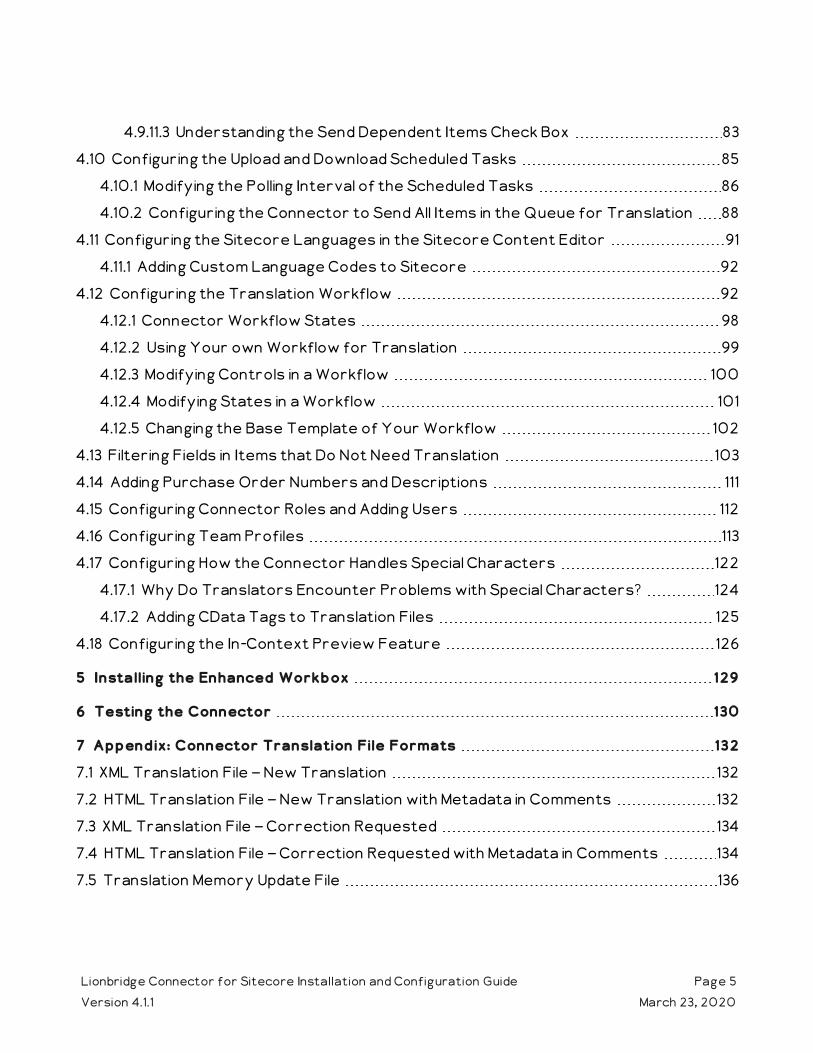
4.9.11.3 Understanding the Send Dependent Items Check Box 83
4.10 Configuring the Upload and Download Scheduled Tasks 85
4.10.1 Modifying the Polling Interval of the Scheduled Tasks 86
4.10.2 Configuring the Connector to Send All Items in the Queue for Translation 88
4.11 Configuring the Sitecore Languages in the Sitecore Content Editor 91
4.11.1 Adding Custom Language Codes to Sitecore 92
4.12 Configuring the Translation Workflow 92
4.12.1 Connector Workflow States 98
4.12.2 Using Your own Workflow for Translation 99
4.12.3 Modifying Controls in a Workflow 100
4.12.4 Modifying States in a Workflow 101
4.12.5 Changing the Base Template of Your Workflow 102
4.13 Filtering Fields in Items that Do Not Need Translation 103
4.14 Adding Purchase Order Numbers and Descriptions 111
4.15 Configuring Connector Roles and Adding Users 112
4.16 Configuring Team Profiles 113
4.17 Configuring How the Connector Handles Special Characters 122
4.17.1 Why Do Translators Encounter Problems with Special Characters? 124
4.17.2 Adding CData Tags to Translation Files 125
4.18 Configuring the In-Context Preview Feature 126
5 Installing the Enhanced Workbox 129
6 Testing the Connector 130
7 Appendix: Connector Translation File Formats 132
7.1 XML Translation File – New Translation 132
7.2 HTML Translation File – New Translation with Metadata in Comments 132
7.3 XML Translation File – Correction Requested 134
7.4 HTML Translation File – Correction Requested with Metadata in Comments 134
7.5 Translation Memory Update File 136
Lionbridge Connector for Sitecore Installation and Configuration Guide Page 5Version 4.1.1 March 23, 2020
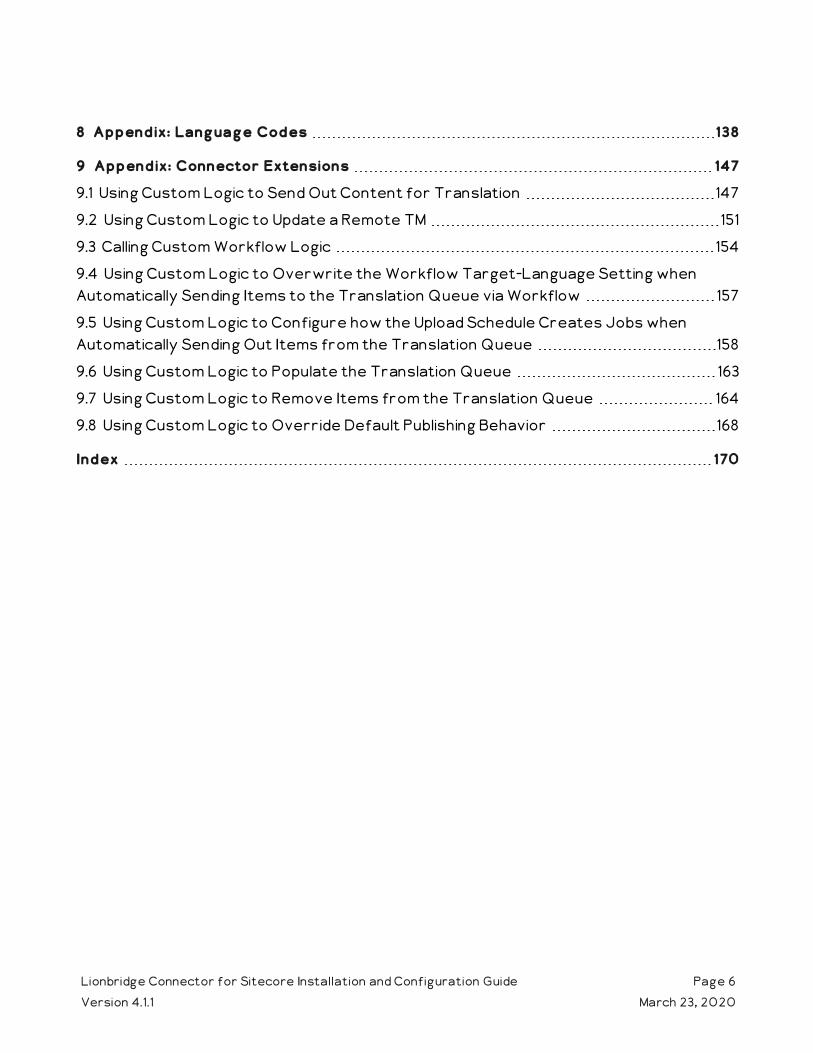
8 Appendix: Language Codes 138
9 Appendix: Connector Extensions 147
9.1 Using Custom Logic to Send Out Content for Translation 147
9.2 Using Custom Logic to Update a Remote TM 151
9.3 Calling Custom Workflow Logic 154
9.4 Using Custom Logic to Overwrite the Workflow Target-Language Setting when Automatically Sending Items to the Translation Queue via Workflow 157
9.5 Using Custom Logic to Configure how the Upload Schedule Creates Jobs when Automatically Sending Out Items from the Translation Queue 158
9.6 Using Custom Logic to Populate the Translation Queue 163
9.7 Using Custom Logic to Remove Items from the Translation Queue 164
9.8 Using Custom Logic to Override Default Publishing Behavior 168
Index 170
Lionbridge Connector for Sitecore Installation and Configuration Guide Page 6Version 4.1.1 March 23, 2020

1 Welcome to the Lionbridge Connector for SitecoreWelcome to the Lionbridge Connector for Sitecore ("Connector"). This is Lionbridge’s connector between Sitecore and the Clay Tablet Platform.
If you configure Freeway as a translation provider, you can automate sending and retrieving content from Sitecore directly to and from Freeway.
If you have configure onDemand as a translation provider, you can automate sending and retrieving content from Sitecore directly to and from onDemand.
1.1 Terminology
Amazon AWS Amazon Web Services. A suite of web application products developed and sold by Amazon.com. Clay Tablet uses various AWS offerings in order to leverage their infrastructure and build rich, dynamic solutions for its customers, specifically, the Clay Tablet Platform. For details, see http://aws.amazon.com.
Amazon S3 Amazon Simple Storage Service. For details, see: http://aws.amazon.com/s3/. The Connector and the Clay Tablet Platform use Amazon S3 to provide temporary storage services for the content sent to and from translation.
Amazon SQS Amazon Simple Queue Service. For details, see: http://aws.amazon.com/sqs/. The Connector uses Amazon SQS to provide Message Queue Services.
Asset Any content or document being sent for translation, including metadata. Assets are created by the Connector.
Clay Tablet (CTT)
Clay Tablet Technologies, a Lionbridge company, and the corporate entity that publishes the Connector and the Clay Tablet Platform.
Clay Tablet Platform
The hosted (IaaS) connectivity platform that receives and routes content from content systems, including content management systems (CMSs), to translation providers and back during implementation. The Lionbridge Connector Team configures the Platform based on the number and nature of systems involved in your system architecture.
CT3 Legacy branding term that refers to the Connector.
Freeway The name of the Lionbridge translation portal for submitting content to and retrieving content from the Lionbridge translation provider.
Lionbridge Connector for Sitecore Installation and Configuration Guide Page 7Version 4.1.1 March 23, 2020
1 Welcome to the Lionbridge Connector for Sitecore 1 Welcome to the Lionbridge Connector for Sitecore
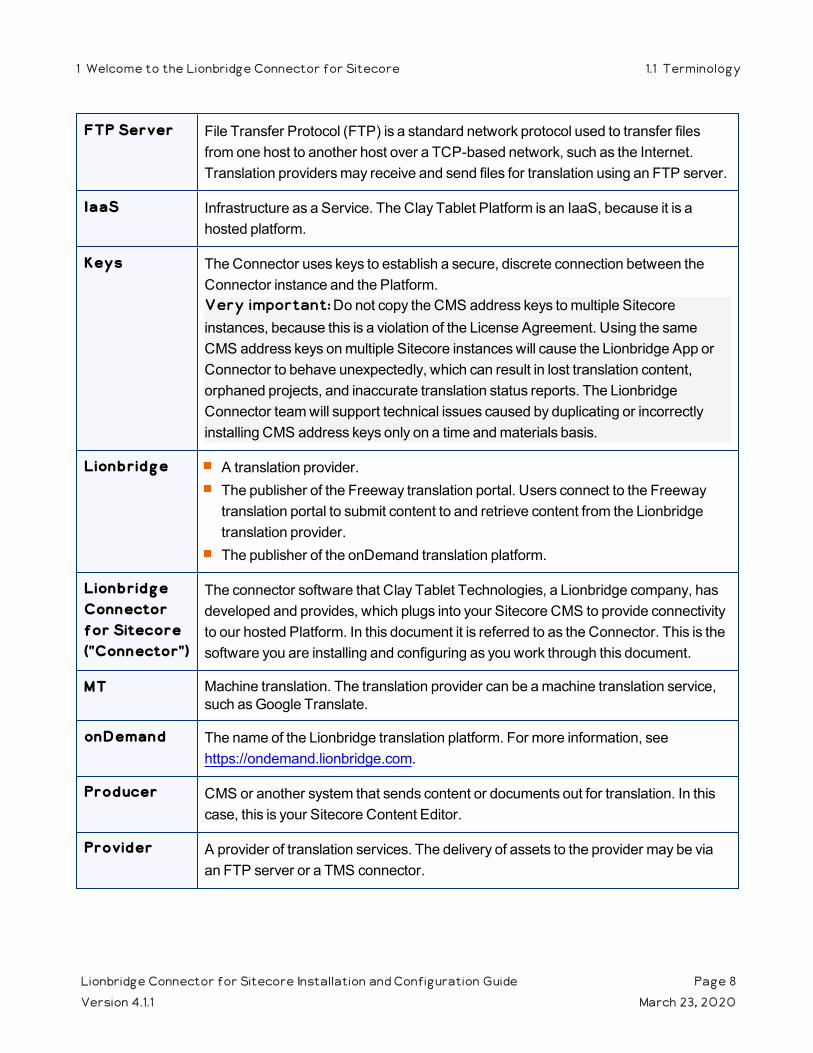
FTP Server File Transfer Protocol (FTP) is a standard network protocol used to transfer files from one host to another host over a TCP-based network, such as the Internet. Translation providers may receive and send files for translation using an FTP server.
IaaS Infrastructure as a Service. The Clay Tablet Platform is an IaaS, because it is a hosted platform.
Keys The Connector uses keys to establish a secure, discrete connection between the Connector instance and the Platform.Very important: Do not copy the CMS address keys to multiple Sitecore instances, because this is a violation of the License Agreement. Using the same CMS address keys on multiple Sitecore instances will cause the Lionbridge App or Connector to behave unexpectedly, which can result in lost translation content, orphaned projects, and inaccurate translation status reports. The Lionbridge Connector team will support technical issues caused by duplicating or incorrectly installing CMS address keys only on a time and materials basis.
Lionbridge A translation provider.The publisher of the Freeway translation portal. Users connect to the Freeway translation portal to submit content to and retrieve content from the Lionbridge translation provider.The publisher of the onDemand translation platform.
Lionbridge Connector for Sitecore ("Connector")
The connector software that Clay Tablet Technologies, a Lionbridge company, has developed and provides, which plugs into your Sitecore CMS to provide connectivity to our hosted Platform. In this document it is referred to as the Connector. This is the software you are installing and configuring as you work through this document.
MT Machine translation. The translation provider can be a machine translation service, such as Google Translate.
onDemand The name of the Lionbridge translation platform. For more information, see https://ondemand.lionbridge.com.
Producer CMS or another system that sends content or documents out for translation. In this case, this is your Sitecore Content Editor.
Provider A provider of translation services. The delivery of assets to the provider may be via an FTP server or a TMS connector.
Lionbridge Connector for Sitecore Installation and Configuration Guide Page 8Version 4.1.1 March 23, 2020
1 Welcome to the Lionbridge Connector for Sitecore 1.1 Terminology
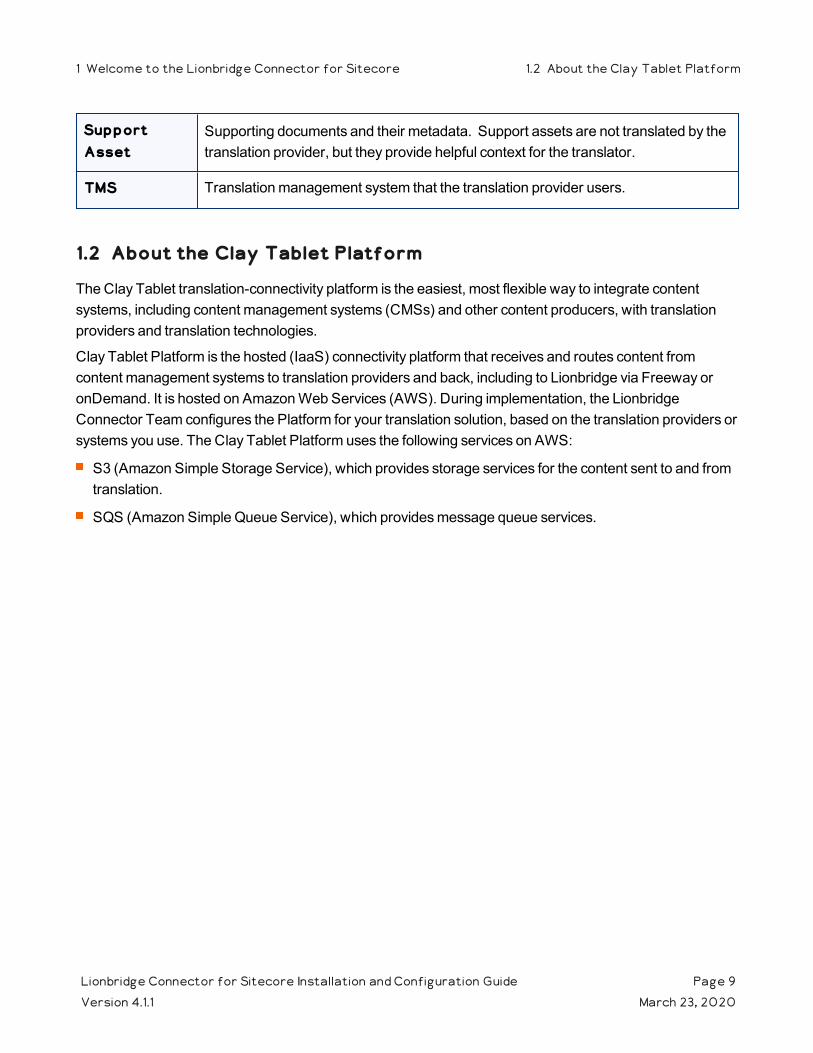
Support Asset
Supporting documents and their metadata. Support assets are not translated by the translation provider, but they provide helpful context for the translator.
TMS Translation management system that the translation provider users.
1.2 About the Clay Tablet Platform
The Clay Tablet translation-connectivity platform is the easiest, most flexible way to integrate content systems, including content management systems (CMSs) and other content producers, with translation providers and translation technologies.
Clay Tablet Platform is the hosted (IaaS) connectivity platform that receives and routes content from content management systems to translation providers and back, including to Lionbridge via Freeway or onDemand. It is hosted on Amazon Web Services (AWS). During implementation, the Lionbridge Connector Team configures the Platform for your translation solution, based on the translation providers or systems you use. The Clay Tablet Platform uses the following services on AWS:
S3 (Amazon Simple Storage Service), which provides storage services for the content sent to and from translation.
SQS (Amazon Simple Queue Service), which provides message queue services.
Lionbridge Connector for Sitecore Installation and Configuration Guide Page 9Version 4.1.1 March 23, 2020
1 Welcome to the Lionbridge Connector for Sitecore 1.2 About the Clay Tablet Platform
1.3 How the Connector Works with Sitecore
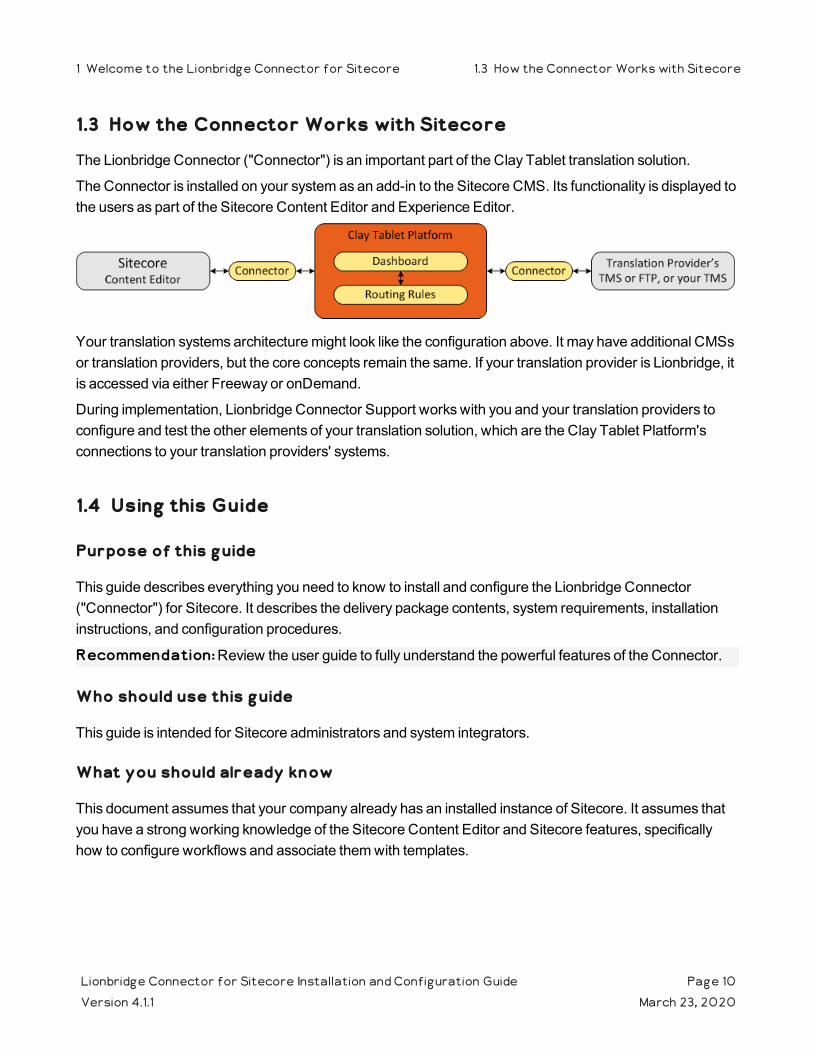
The Lionbridge Connector ("Connector") is an important part of the Clay Tablet translation solution.
The Connector is installed on your system as an add-in to the Sitecore CMS. Its functionality is displayed to the users as part of the Sitecore Content Editor and Experience Editor.
Your translation systems architecture might look like the configuration above. It may have additional CMSs or translation providers, but the core concepts remain the same. If your translation provider is Lionbridge, it is accessed via either Freeway or onDemand.
During implementation, Lionbridge Connector Support works with you and your translation providers to configure and test the other elements of your translation solution, which are the Clay Tablet Platform's connections to your translation providers' systems.
1.4 Using this Guide
Purpose of this guide
This guide describes everything you need to know to install and configure the Lionbridge Connector ("Connector") for Sitecore. It describes the delivery package contents, system requirements, installation instructions, and configuration procedures.
Recommendation: Review the user guide to fully understand the powerful features of the Connector.
Who should use this guide
This guide is intended for Sitecore administrators and system integrators.
What you should already know
This document assumes that your company already has an installed instance of Sitecore. It assumes that you have a strong working knowledge of the Sitecore Content Editor and Sitecore features, specifically how to configure workflows and associate them with templates.
Lionbridge Connector for Sitecore Installation and Configuration Guide Page 10Version 4.1.1 March 23, 2020
1 Welcome to the Lionbridge Connector for Sitecore 1.3 How the Connector Works with Sitecore
If Lionbridge is your company's translation provider, it assumes that either Freeway or onDemand is already set up for your company.
How to find out more about the Lionbridge Connector for Sitecore
For information on using the Lionbridge Connector to send and receive content for translation from Sitecore, read the Lionbridge Connector for Sitecore User Guide.
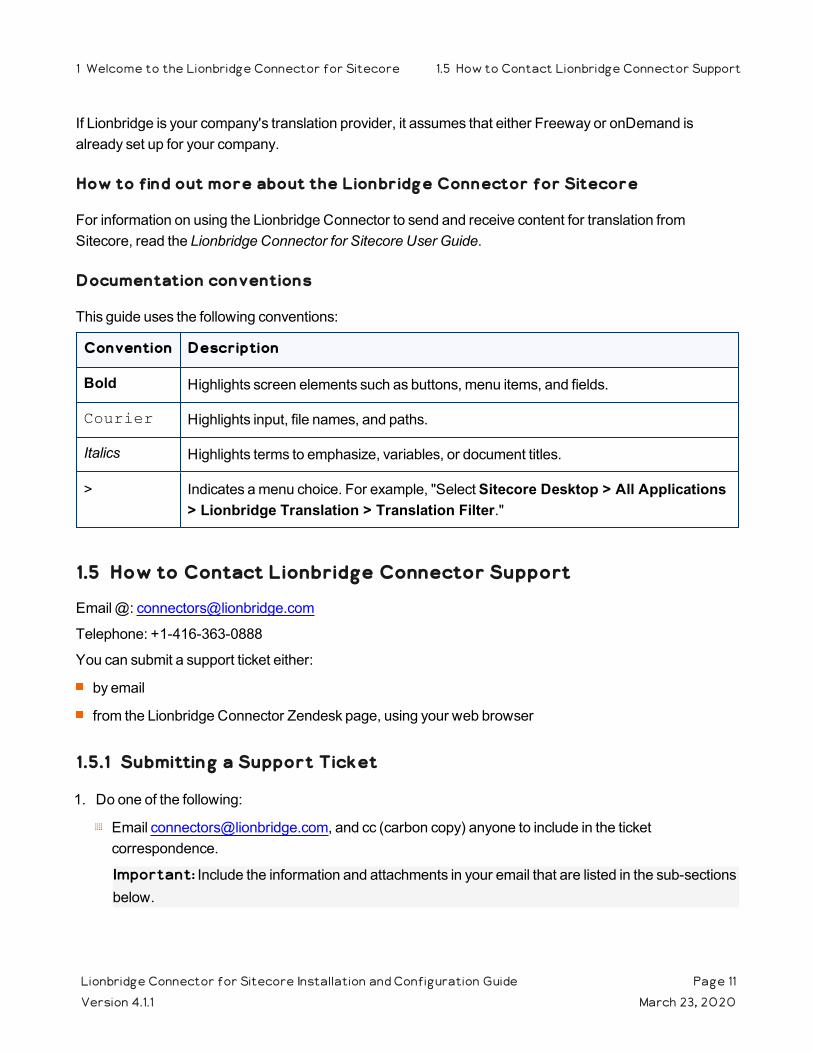
Documentation conventions
This guide uses the following conventions:
Convention Description
Bold Highlights screen elements such as buttons, menu items, and fields.
Courier Highlights input, file names, and paths.
Italics Highlights terms to emphasize, variables, or document titles.
> Indicates a menu choice. For example, "Select Sitecore Desktop > All Applications > Lionbridge Translation > Translation Filter."
1.5 How to Contact Lionbridge Connector Support
Email @: [email protected]
Telephone: +1-416-363-0888
You can submit a support ticket either:
by email
from the Lionbridge Connector Zendesk page, using your web browser
1.5.1 Submitting a Support Ticket
1. Do one of the following:
Email [email protected], and cc (carbon copy) anyone to include in the ticket correspondence.
Important: Include the information and attachments in your email that are listed in the sub-sections below.
Lionbridge Connector for Sitecore Installation and Configuration Guide Page 11Version 4.1.1 March 23, 2020
1 Welcome to the Lionbridge Connector for Sitecore 1.5 How to Contact Lionbridge Connector Support

Create a ticket in Zendesk:
a. Open the Lionbridge Connector Zendesk page in your browser: https://connectors.zendesk.com.
b. Sign in to Zendesk.
Note: If you do not have sign-in credentials yet, then click either Sign up or Get a password, and follow the onscreen instructions.
Important: Include the information and attachments that are listed in the sub-sections below.
c. Click Submit a request. d. In the CCs field, add anyone to include in the ticket correspondence.
Zendesk automatically creates a ticket and responds to everyone included in the cc field.
2. Everyone in the original cc receives updates unless they request to be removed from the ticket.
Important: Check your email spam folder (especially first-time Zendesk users) as sometimes email notifications from Zendesk are marked as spam.
When the issue is resolved, Lionbridge closes the ticket.
1.5.2 Information to Include in a Support Ticket
client name
CMS or content system name and version
Connector or App version installed
name of job for which the issue occurs
date of job submission
detailed description of the issue
any error text–copy and paste, if applicable
Files to attach to the support ticket:
CMS log files for the date the issue occurred
Connector or App log files for the date the issue occurred
screen capture of the issue
1.5.3 Viewing and Updating Your Support Ticket in Zendesk
Important: You must log into Zendesk to view your support tickets there.
Lionbridge Connector for Sitecore Installation and Configuration Guide Page 12Version 4.1.1 March 23, 2020
1 Welcome to the Lionbridge Connector for Sitecore 1.5.2 Information to Include in a Support Ticket

1. Open the Lionbridge Connector Zendesk page in your browser: https://connectors.zendesk.com.
2. Enter your credentials, and click Sign in.
Note: If you do not have sign-in credentials yet, then click either Sign up or Get a password, and follow the onscreen instructions.
3. After signing in, click My activities to view the tickets you opened or where you are cc’d.
4. To update tickets, you can reply or attach files.
For more information, refer to "Submitting and tracking support requests" in Zendesk's Help Center guide for end-users, at: https://support.zendesk.com/hc/en-us/articles/203664386-Help-Center-guide-for-agents-and-end-users.
Important: Zendesk refers to a support ticket as a support request. These terms are interchangeable.
1.5.4 Signing Up for a Zendesk Account for Lionbridge Connectors
You can create a new Zendesk account for Lionbridge Connectors.
Lionbridge Connector for Sitecore Installation and Configuration Guide Page 13Version 4.1.1 March 23, 2020
1 Welcome to the Lionbridge Connector forSitecore
1.5.4 Signing Up for a Zendesk Account for LionbridgeConnectors

Note: If you have previously emailed Lionbridge Connectors Support at [email protected] to create a support ticket, you can get a password for your email account. For detailed instructions, see "How to Get a Password if You Have Previously Emailed Lionbridge Connectors."
To sign up for a Zendesk account:
1. Open the Lionbridge Connector Zendesk page in your browser: https://connectors.zendesk.com.
2. Click Sign up link.
Lionbridge Connector for Sitecore Installation and Configuration Guide Page 14Version 4.1.1 March 23, 2020
1 Welcome to the Lionbridge Connector forSitecore
1.5.4 Signing Up for a Zendesk Account for LionbridgeConnectors
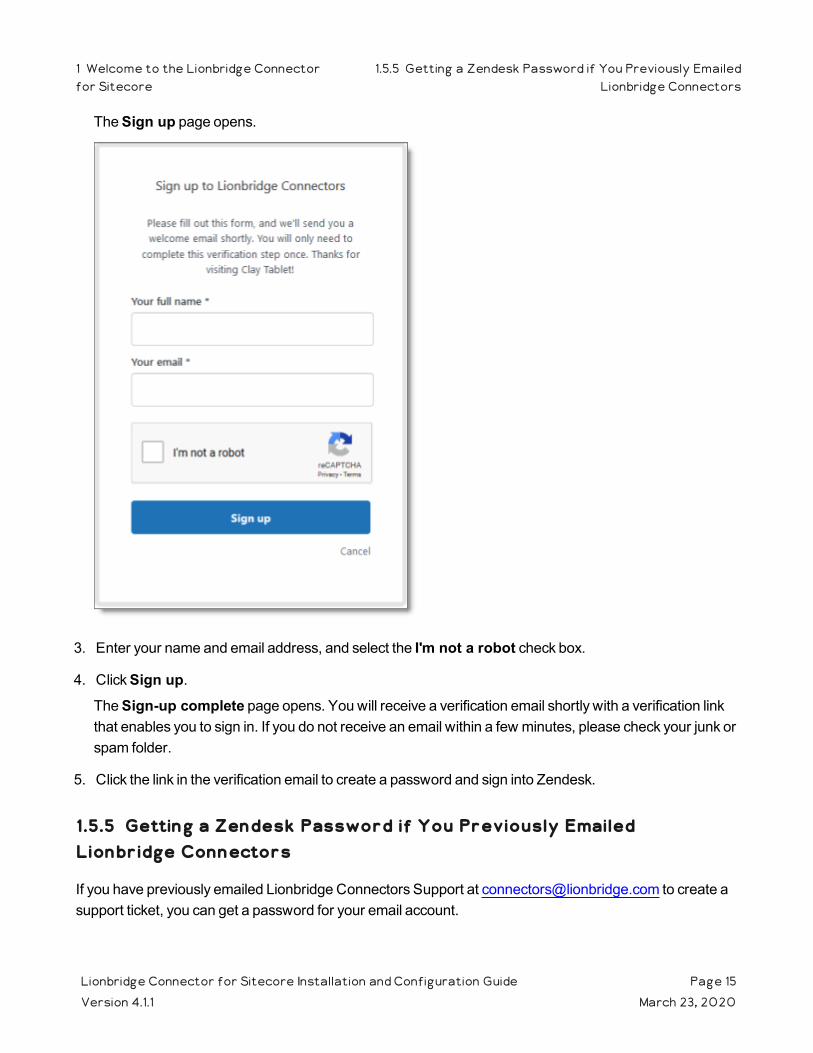
The Sign up page opens.
3. Enter your name and email address, and select the I'm not a robot check box.
4. Click Sign up.The Sign-up complete page opens. You will receive a verification email shortly with a verification link that enables you to sign in. If you do not receive an email within a few minutes, please check your junk or spam folder.
5. Click the link in the verification email to create a password and sign into Zendesk.
1.5.5 Getting a Zendesk Password if You Previously Emailed Lionbridge Connectors
If you have previously emailed Lionbridge Connectors Support at [email protected] to create a support ticket, you can get a password for your email account.
Lionbridge Connector for Sitecore Installation and Configuration Guide Page 15Version 4.1.1 March 23, 2020
1 Welcome to the Lionbridge Connectorfor Sitecore
1.5.5 Getting a Zendesk Password if You Previously EmailedLionbridge Connectors

To get a password:
1. Open the Lionbridge Connector Zendesk page in your browser: https://connectors.zendesk.com.
2. Click the Get a password link.
Lionbridge Connector for Sitecore Installation and Configuration Guide Page 16Version 4.1.1 March 23, 2020
1 Welcome to the Lionbridge Connectorfor Sitecore
1.5.5 Getting a Zendesk Password if You Previously EmailedLionbridge Connectors

The Please set me up with a new password page opens.
3. Enter the email address from which you emailed Lionbridge Connectors Support ([email protected]).
4. Click Submit.Zendesk sends you an email with instructions for creating your password.
5. Follow the instructions in the email from Zendesk to create your password.
You can now sign in to Zendesk to create, view and update your support tickets.
Lionbridge Connector for Sitecore Installation and Configuration Guide Page 17Version 4.1.1 March 23, 2020
1 Welcome to the Lionbridge Connectorfor Sitecore
1.5.5 Getting a Zendesk Password if You Previously EmailedLionbridge Connectors
2 Before You InstallBefore you begin to install the Lionbridge Connector for Sitecore, please review the system requirements, described below, and perform the following pre-installation procedures:
1. "Setting Your System Date, Time, and Time Zone Correctly" on page 18.
2. "Downloading the Delivery Package" on page 19. This describes the contents of the Connector delivery package Lionbridge sends you.
3. "Setting Up the Translation Database" on page 20. This section includes information about database size requirements as well as detailed instructions for Oracle and Microsoft SQL Server databases.
4. "Preparing the Connector for Scheduled Tasks (Upgrade only from version 4.0.8 or lower)" on page 24. This is required only if upgrading from version 4.0.8 or lower of the Connector. This section includes required steps for upgrading from the UploadService and DownloadService services, which were used in versions 4.0.8 and lower of the Connector to the Upload Schedule and Download Schedule Sitecore scheduled tasks, supported in versions 4.1.0 and higher of the Connector.
2.1 System Requirements
The Lionbridge Connector for Sitecore (Connector) must be installed on the machine where Sitecore is installed. The Connector supports Sitecore versions 8.0 to 9.3.
The Connector has no additional hardware or software requirements beyond those of Sitecore CE. For detailed requirements, refer to the appropriate version of the Sitecore CMS Installation Guide. This guide is available in the documentation section of the Sitecore Developer Network (SDN) site, at http://sdn.sitecore.net/Reference.aspx. You must log in to this site to access the documentation.
Note about Sitecore Azure: The Connector installation is supported for Sitecore installed via the Sitecore Azure Toolkit 8.2 and higher. The Connector installation on Sitecore installed with the Sitecore Azure Module (Sitecore 8.1 and lower) is not fully supported. For guidance on installing the Connector with the Sitecore Azure Module, please contact Lionbridge Connector Support.
The Connector supports the Mozilla Firefox, Google Chrome, and Microsoft Internet Explorer 11 web browsers.
2.2 Setting Your System Date, Time, and Time Zone Correctly
The Connector sends content to and receives content from the Clay Tablet Platform, which is hosted in the Amazon Web Services (AWS) environment. AWS requires any machines that connect to its applications to have the correct system time and date settings.
Lionbridge Connector for Sitecore Installation and Configuration Guide Page 18Version 4.1.1 March 23, 2020
2 Before You Install 2 Before You Install

Important: Before proceeding, ensure that the system date, time, and time zone are set correctly on any systems that will run the Connector. If these settings are incorrect, the following error message is displayed: Error. The difference between the request time and the current time is too large.
2.3 Downloading the Delivery Package
1. Download the Lionbridge Connector ("Connector") delivery package from the link that Lionbridge sends you. This is a .zip file, and it contains the following folders:
Folder Name
Description
Lionbridge Documents
Lionbridge Connector for Sitecore Installation and Configuration Guide (this document)Lionbridge Connector for Sitecore User GuideCT3_LanguageCodes.txt: The Connector language codes. Later you will set up these codes for each Sitecore language your company uses for translation, both source and target languages. These language codes are also listed in "Appendix: Language Codes" on page 138.
Lionbridge License ID
The License_ID.txt file, which contains the license ID that you will enter in "Configuring Your License ID and New Translation Providers" on page 31.
Lionbridge Sitecore Package
LB_Sitecore-x.x.xx.zip, where x.x.xx is the current version number of the Connector for Sitecore. This the installation package that you will install into your Sitecore Content Editor system.Notes about updating your Connector installation: If you are installing an update to an installation of the Connector for Sitecore, you install the LB_Sitecore_DLL_Update-x.x.xx.zip package instead.
Lionbridge Workbox
The Advanced Workbox installation package. This is an optional feature, which replaces the standard Sitecore Workbox. It enables much more powerful management of large lists of items, including by language. You can sort by different column headings, approve many items at once, and manage the display of long lists easily. For detailed installation instructions, see "Installing the Enhanced Workbox" on page 129.Important: Install this feature only if you are comfortable with replacing the standard Sitecore workbox.
2. Unzip the delivery package file you downloaded, and save its contents to a convenient location.
Lionbridge Connector for Sitecore Installation and Configuration Guide Page 19Version 4.1.1 March 23, 2020
2 Before You Install 2.3 Downloading the Delivery Package

2.4 Setting Up the Translation Database
You set up the database so that the Connector can use it to store translation-related data.
For instruction on setting up a Microsoft SQL Server database, see page 20.
For instructions on setting up an Oracle database, see page 21.
For instructions on setting up a Microsoft Azure SQL database, see page 22.
2.4.1 Translation Database Size Requirements
The required size of the database depends on the volume of translation you anticipate. When the database is used only for translation-related data, 100MB is usually adequate. However, by default, the Lionbridge Connector backs up translation data, which it uses to support the Translation Correction and Update Remote TM features. For descriptions of these features, refer to the Lionbridge Connector for Sitecore User Guide.
If you keep the default setting of backing up data so that you can use these features, you may need to increase the size of the database by 50 to 100 percent to support the backup.
If you do not want to back up data, you do not need to increase the size of the database.
Note: To prevent the Connector from backing up translation-related data, you modify the ClayTablet.BackupTranslationData setting, described in "Configuring Database Settings" on page 23.
You can use the Connector to delete the translation-backup database at any time from the Sitecore Content Editor, however the relevant Connector features will not work properly. For instructions on deleting the backup, refer to the Lionbridge Connector for Sitecore User Guide.
2.4.2 Setting Up a Microsoft SQL Server-Based Translation Database
This section describes how to set up a Microsoft SQL Server database to use with the Connector. For information on database size requirements, see "Translation Database Size Requirements" on page 20.
1. Use Microsoft SQL Server Management Studio to create an empty database. For detailed instructions, refer to the Microsoft SQL Server documentation.
Recommendation: Name the new database CT3Translation.
Note: Set your default database collation to SQL_Latin1_General_CP1_CI_AS.
2. Configure the Connector database connection string. The Website_root/App_Config/ConnectionStrings.config file defines the database connections.
Lionbridge Connector for Sitecore Installation and Configuration Guide Page 20Version 4.1.1 March 23, 2020
2 Before You Install 2.4 Setting Up the Translation Database

Important: The database part of the connection string must match the database name you created in the previous step.
Typically, it should be:
<?xml version="1.0" encoding="utf-8"?>
<connectionStrings>
<!--
Sitecore connection strings.
All database connections for Sitecore are configured here.
-->
<add name="core" connectionString="user id=xxx;password=xxxt;Data Source=xxx;Database=XXX_Core"/>
<add name="master" connectionString="user id=xxx;password=xxxt;Data Source=xxxx;Database=XXX_Master"/>
<add name="web" connectionString="user id=xx;password=xxx;Data Source=xxx;Database=XXX_Web"/>
</connectionStrings>
You must add one more connection string called CT3Translation for the Connector database. This is the name of the database from above:
<add name="CT3Translation" connectionString="user id=xxx;password=xxx;Data Source=xxx;Database= CT3Translation "/>
Note: Do not use any name other than CT3Translation for the connection string.
The User ID, password, and Data Source values are usually the same as those used for the other connection strings.
Note: The user specified in the connection string must have permission to modify the table structure in the database. This user must have permission to run ALTER TABLE statements.
2.4.3 Setting Up an Oracle-Based Translation Database
This section describes how to set up an Oracle database to use with the Connector. For information on database size requirements, see "Translation Database Size Requirements" on page 20.
Recommendation: Create a separate Oracle database user for Clay Tablet data. Alternatively, you can use an existing Oracle database user for Clay Tablet data.
Lionbridge Connector for Sitecore Installation and Configuration Guide Page 21Version 4.1.1 March 23, 2020
2 Before You Install 2.4.3 Setting Up an Oracle-Based Translation Database

1. Optional. Create a Oracle database user for Clay Tablet data, using SQL statements similar to the following:
CREATE USER ctttrans IDENTIFIED BY xxxxxxxx
DEFAULT TABLESPACE users TEMPORARY TABLESPACE temp;
GRANT UNLIMITED TABLESPACE TO ctttrans;
GRANT CONNECT, CREATE TABLE TO ctttrans;
2. Add a CT3Translation.Oracle connection to the Sitecore connection string configuration. Add the following to the Sitecore connection string configuration:
<add name="CT3Translation.Oracle" connectionString="user id=ctttrans;password=xxxxxxxx;Data Source=XE"/>
Depending on the active configuration in the user's setup, this is one of the following:
Website/App_Config/ConnectionStrings.config
Website/App_Config/ConnectionStringsOracle.config
Note: The user specified in the connection string must have permission to modify the table structure in the database. This user must have permission to run ALTER TABLE statements.
3. Ensure that the right version of Oracle.DataAccess.dll is in the Website/bin directory or in the right path. The DLL should match the Oracle database that the user is using. If the user is already using Oracle as the database for the Sitecore content, this should already be set up correctly.
2.4.4 Setting Up a Microsoft Azure SQL-Based Translation Database
This section describes how to set up a Microsoft Azure SQL database to use with the Connector. For information on database size requirements, see "Translation Database Size Requirements" on page 20.
1. Create an empty Azure database. For detailed instructions, refer to the Microsoft Azure documentation.
Recommendation: Name the new database CT3Translation.
Note: Set your default database collation to SQL_Latin1_General_CP1_CI_AS.
2. Configure the Connector database connection string. The Website_root/App_Config/ConnectionStrings.config file defines the database connections.
Important: The database part of the connection string must match the database name you created in the previous step.
Typically, it should be:
<?xml version="1.0" encoding="utf-8"?>
<connectionStrings>
Lionbridge Connector for Sitecore Installation and Configuration Guide Page 22Version 4.1.1 March 23, 2020
2 Before You Install 2.4.4 Setting Up a Microsoft Azure SQL-Based Translation Database

<!--
Sitecore connection strings.
All database connections for Sitecore are configured here.
-->
<add name="core" connectionString="user id=xxx;password=xxxt;Data Source=xxx;Database=XXX_Core"/>
<add name="master" connectionString="user id=xxx;password=xxxt;Data Source=xxxx;Database=XXX_Master"/>
<add name="web" connectionString="user id=xx;password=xxx;Data Source=xxx;Database=XXX_Web"/>
</connectionStrings>
You must add one more connection string called CT3Translation for the Connector database. This is the name of the database from above:
<add name="CT3Translation" connectionString="Data Source=tcp:SERVER.database.windows.net;Initial Catalog=DB_NAME;Integrated Security=False;User ID=USER_NAME@SERVER;Password=PASSWORD;Encrypt=True"/>
For example:
<add name="CT3Translation" connectionString="Data Source=tcp:mpr0fb9mzh.database.windows.net;Initial Catalog=CTT;Integrated Security=False;User ID=CTT@mpr0fb9mzh;Password=csct@blet99;Encrypt=True"/>
Note: Do not use any name other than CT3Translation for the connection string.
The User ID, Password, and Data Source values are usually the same as those used for the other connection strings.
Note: The user specified in the connection string must have permission to modify the table structure in the database. This user must have permission to run ALTER TABLE statements.
2.4.5 Configuring Database Settings
You configure the Connector's database settings by modifying the following configuration file: Website_root/Website/App_Config/Include/CT3Translation.config. You can specify the following settings:
Lionbridge Connector for Sitecore Installation and Configuration Guide Page 23Version 4.1.1 March 23, 2020
2 Before You Install 2.4.5 Configuring Database Settings

Setting Name
DescriptionSupported Values
Default Value
ClayTablet.TranslationDatabase
The location of your Sitecore content. If your Sitecore content is not in the master database, then you must change this value to match the name of your content database.
a database name
master
ClayTablet.BackupTranslationData
Determines whether or not the Connector stores backup translation data on the Content Editor server to support the Translation Correction and Update Remote TM features. For descriptions of these features, refer to the Lionbridge Connector for Sitecore User Guide. If you do not want to use these features, you can change this setting to False. This prevents substantial amounts of data from being stored on your Sitecore server, but it also prevents your company from accessing these useful features. Recommendation: Initially keep the default setting of True in case you want to use any of the features that rely on this data.
TrueFalse
True
2.5 Preparing the Connector for Scheduled Tasks (Upgrade only from version 4.0.8 or lower)
Version 4.1.0 or higher of the Connector uses the Upload Schedule and Download Schedule Sitecore scheduled tasks to send content for translation to the Clay Tablet Platform and to retrieve translated content from there. These scheduled tasks replace the UploadService and DownloadService services, which were used in versions 4.0.8 and lower of the Connector.
Important: If you are upgrading from versions 4.0.8 or lower of the Connector to version 4.1.0 or higher, you must complete the following steps before installing the Connector package.
To prepare the Connector for scheduled tasks during an upgrade:
1. Open Sitecore.Processing.config for editing.
In Sitecore 8.x, this file is in the following location: \Website\App_Config\Include.
In Sitecore 9.x, this file is in the following location: \App_Config\Sitecore\CMS.Core.
2. Locate the following section in the file:
Lionbridge Connector for Sitecore Installation and Configuration Guide Page 24Version 4.1.1 March 23, 2020
2 Before YouInstall
2.5 Preparing the Connector for Scheduled Tasks (Upgrade only from version 4.0.8 orlower)

<!-- An agent that processes scheduled tasks embedded as items in the master database. -->
<agent type="Sitecore.Tasks.DatabaseAgent" method="Run" interval="00:10:00" name="Master_Database_Agent">
<param desc="database">master</param>
<param desc="schedule root">/sitecore/system/tasks/schedules</param>
<LogActivity>true</LogActivity>
</agent>
3. Modify the run interval of the Master_Database_Agent, bolded in the sample above, to the same or less than the interval previously configured for the UploadService and DownloadService services. For example, if the previously configured interval for these services was every two minutes (the Connector default setting), then change:
interval="00:10:00"
to
interval="00:02:00"
4. Save your changes.
Recommendation: Open Website_root/Website/App_Config/Include/CT3Translation.config for editing. Remove the entire <scheduling> section from the file. This step will prevent obsolete entries in the Connector log files. Save your changes.
Important notes about previous configurations of the Upload Service and Download Service in CT3Translation.config in version 4.0.8 or lower of the Connector
Polling interval: Any previous modifications to the default polling intervals of the Upload Service and Download Service in CT3Translation.config are not automatically upgraded. To change the polling interval, you must configure the Upload Schedule and Download Schedule scheduled tasks in:
/sitecore/system/Tasks/Schedules/Lionbridge/Download Schedule
/sitecore/system/Tasks/Schedules/Lionbridge/Upload Schedule
For detailed instructions, see "Modifying the Polling Interval of the Scheduled Tasks" on page 86.
Lionbridge Connector for Sitecore Installation and Configuration Guide Page 25Version 4.1.1 March 23, 2020
2 Before YouInstall
2.5 Preparing the Connector for Scheduled Tasks (Upgrade only from version 4.0.8 orlower)
Configuring the Connector to send all items in the Queue for translation: Any previous configuration in CT3Translation.config to automatically send out items in the Translation Queue for translation is not automatically upgraded. You must configure the /sitecore/system/Tasks/Schedules/Lionbridge/Upload Schedule/Upload Service Options item to recreate this functionality. For detailed instructions, see "Configuring the Connector to Send All Items in the Queue for Translation" on page 88.
Lionbridge Connector for Sitecore Installation and Configuration Guide Page 26Version 4.1.1 March 23, 2020
2 Before YouInstall
2.5 Preparing the Connector for Scheduled Tasks (Upgrade only from version 4.0.8 orlower)

3 Installing the Lionbridge Connector for SitecoreThis section describes how to install the Connector installation package you downloaded earlier into your Sitecore system.
Before you install the Lionbridge Connector ("Connector"), verify that you have reviewed the system requirements and followed all the pre-installation procedures described in "Before You Install" on page 18.
Note: If you will install the Connector with the Azure App Service into two Sitecore instances for Blue/Green Deployment, both Sitecore instances must be hosted on the same server or local machine, so that they have the same IP address. For detailed instructions, see "Configuring the Connector with the Azure App Service for Blue/Green Deployment" on page 44.
To install the Connector into Sitecore:
1. In the Sitecore Launchpad, click Desktop.
2. On the Sitecore Desktop, on the Sitecore Start menu, select Sitecore > Development Tools > Installation Wizard.The Install a Package wizard opens.
3. Click Upload package.The Upload Files wizard opens.
4. Click Browse, and locate the installation package that you downloaded earlier. For details, see "Downloading the Delivery Package" on page 19.
Tip: The installation package is in the following location in the delivery package: <Delivery Package/Lionbridge Sitecore Package/>.
5. In the wizard, click Next.
6. In the next page of the wizard, select the Overwrite existing files check box, and then click Upload.
7. After the file uploads, click Close.
8. In the Install a Package wizard, click Choose package.The Choose Package dialog box opens.
9. Select the package you uploaded, so that its name is displayed in the File name field, and click Open.In the Install a Package wizard, the Name field displays the name of the package you selected.
10. Click Next.
11. Follow any on-screen instructions to finish installing the Connector package into Sitecore.
Lionbridge Connector for Sitecore Installation and Configuration Guide Page 27Version 4.1.1 March 23, 2020
3 Installing the Lionbridge Connector for Sitecore 3 Installing the Lionbridge Connector for Sitecore

12. If you installed an update package (LB_Sitecore_DLL_Update-x.x.xx.zip ) and you plan to import content into a local translation memory (TM), as described in "Importing Content into a Local Translation Memory (TM)" on page 48, then add the following lines to the Website_root/Website/App_Config/Include/CT3Translation.config configuration file:
<!-- Import LocalTM Job -->
<agent type="ClayTablet.CT3Agent.LocalTMImportService, ClayTablet.SC" method="Run" interval="00:04:00">
</agent>
Next you configure Connector parameters, as described in "Configuring the Lionbridge Connector for Sitecore" on page 30.
Note: If you are installing the Connector on multiple Sitecore instances with the Azure App Service, see "Configuring the Connector with the Azure App Service for Blue/Green Deployment" on page 44 for additional configuration instructions.
3.1 Installing a Language Package for the Connector
By default the Connector user interface is displayed in English. However, you can install a language package to display the Connector user interface in another supported language.
This section describes how to install a language package for the Connector that you downloaded earlier into your Sitecore system. This language package displays the Connector user interface in the supported language.
Note: You can use any language version of the Sitecore user interface to install the Connector language package.
Currently, a language package is available for Japanese. To obtain a language package, please contact Lionbridge Connector Support, as described in "How to Contact Lionbridge Connector Support" on page 11.
To install the Connector language package into Sitecore:
1. On the Sitecore Desktop, on the Sitecore Start menu, select Sitecore > Development Tools > Installation Wizard.The Install a Package wizard opens.
2. Click Upload package.The Upload Files wizard opens.
Lionbridge Connector for Sitecore Installation and Configuration Guide Page 28Version 4.1.1 March 23, 2020
3 Installing the Lionbridge Connector for Sitecore 3.1 Installing a Language Package for the Connector

3. Click Browse, and locate the language package that you received from Clay Tablet. This package has the following format: LB_Sitecore_Language_Pack-language-code-x.x.xx.zip, where x.x.xx is the current version number of the Connector for Sitecore, and language-code is the language code of the language package, for example: LB_Sitecore_Language_Pack-ja-JP-3.10.0.zip. For details, see "Downloading the Delivery Package" on page 19.
4. In the wizard, click Next.
5. In the next page of the wizard, select the Overwrite existing files check box, and then click Upload.
6. After the file uploads, click Close.
7. In the Install a Package wizard, click Choose package.The Choose Package dialog box opens.
8. Select the package you uploaded, so that its name is displayed in the File name field, and click Open.In the Install a Package wizard, the Name field displays the name of the package you selected.
9. Click Next.
10. Follow any on-screen instructions to finish installing the language package into Sitecore.
Important: If the lionbridgeteams domain needs to be created manually error is displayed during installation, you either ignore this message (if you are not using the team profile feature), or you can add the lionbridgeteams domain manually. If you cannot add this domain from the Sitecore user interface, you add <domain name="lionbridgeteams" /> to the domains node in \Website\App_Config\Security\Domains.config.
Lionbridge Connector for Sitecore Installation and Configuration Guide Page 29Version 4.1.1 March 23, 2020
3 Installing the Lionbridge Connector for Sitecore 3.1 Installing a Language Package for the Connector

4 Configuring the Lionbridge Connector for SitecoreYou perform the following steps to configure your Connector installation:
1. "Configuring Your License ID and New Translation Providers" on page 31. In a new Connector installation, you must enter your license ID and configure one or more translation providers.
2. "Upgrading Account Keys for Current Translation Providers" on page 37. Required if you are upgrading the Connector from version 3.x to version 4.x.
3. "Configuring Content Encryption" on page 46. Optional.
4. "Importing Content into a Local Translation Memory (TM)" on page 48. Required if you have a new Connector installation and you want to leverage previously translated content from your website.
5. "Configuring the Connector to Run in a Clustered Environment of Multiple Load-Balanced Sitecore Servers" on page 50. Required only if you are using the Connector in a clustered environment of multiple load-balanced Sitecore servers.
6. "Configuring Network Settings for a Firewall" on page 52. Optional.
7. "Configuring Global Translation Settings" on page 52.
8. Configuring fields in items that need translation. You do this in the Bulk Translation section of /sitecore/system/Settings/Lionbridge Settings/Lionbridge Connector Settings/ in the content tree, in the Content Editor. For detailed instructions, see "Configuring Bulk Translation Settings in Sitecore" on page 56.
9. "Configuring the Upload and Download Scheduled Tasks" on page 85. Optional.
10. "Configuring the Sitecore Languages in the Sitecore Content Editor" on page 91.
11. "Configuring the Translation Workflow" on page 92.
12. "Filtering Fields in Items that Do Not Need Translation" on page 103.
13. "Adding Purchase Order Numbers and Descriptions" on page 111. Optional.
14. "Configuring Connector Roles and Adding Users" on page 112.
15. "Configuring Team Profiles" on page 113. Optional.
16. "Configuring How the Connector Handles Special Characters" on page 122. Optional.
17. "Configuring the Behavior of the Send Dependent Items Check Box" on page 80. Optional.
18. "Configuring the In-Context Preview Feature" on page 126.
Lionbridge Connector for Sitecore Installation and Configuration Guide Page 30Version 4.1.1 March 23, 2020
4 Configuring the Lionbridge Connector for Sitecore 4 Configuring the Lionbridge Connector for Sitecore

Important: This feature is currently in alpha testing. It is not currently generally available for production usage.
4.1 Configuring Your License ID and New Translation Providers
Your company's license ID is your company's license for the Clay Tablet Platform.
Important: If you do not install the license ID, the Connector will run. However, an Upgrade button will be displayed in the Lionbridge Translation tab in the Sitecore Content Editor ribbon, and many user interfaces will display errors.
The Connector uses account keys to control communicate with translation providers. If you are using multiple translation providers, you require one account key for each provider.
Very important: Do not use the same account keys on multiple instances, because this is a violation of the License Agreement. Using the same account keys on multiple Sitecore instances will cause the Connector to behave unexpectedly, which can result in lost translation content, orphaned projects, and inaccurate translation status reports. The Lionbridge Connector team will support technical issues caused by duplicating or incorrectly installing CMS address keys only on a time and materials basis.
Before you can send assets for translation, you must set up your license ID and configure your translation providers with account keys.
Important: Before starting, ensure you obtain your license ID and account keys from the Lionbridge Connector team. Verify that the Lionbridge Connector team has set up your account keys for each of your translation providers.
Note: If you are upgrading from the Connector version 3.x to version 4.x, you must upgrade your translation provider configurations. For detailed instructions, see "Upgrading Account Keys for Current Translation Providers" on page 37.
To configure your license ID and new translation providers:
1. In the Content Editor, in the content tree, navigate to /sitecore/system/Settings/Lionbridge Settings/Translation Providers Configuration.
Lionbridge Connector for Sitecore Installation and Configuration Guide Page 31Version 4.1.1 March 23, 2020
4 Configuring the Lionbridge Connector forSitecore
4.1 Configuring Your License ID and New TranslationProviders
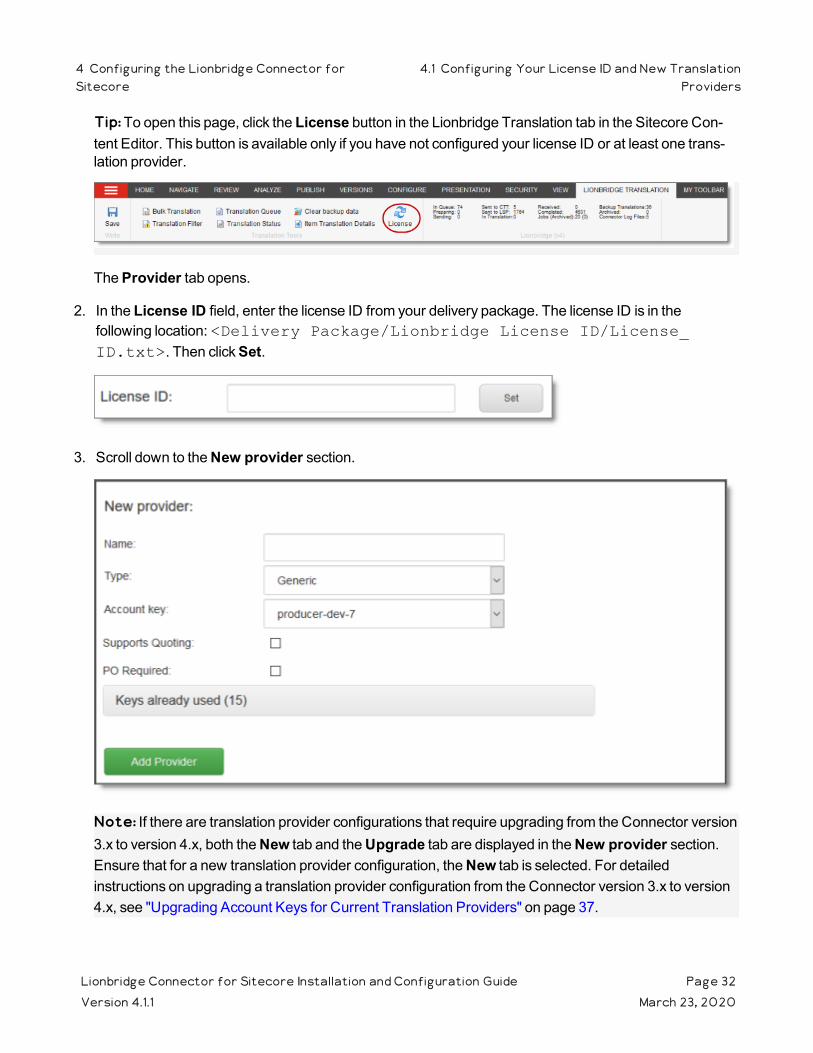
Tip: To open this page, click the License button in the Lionbridge Translation tab in the Sitecore Con-tent Editor. This button is available only if you have not configured your license ID or at least one trans-lation provider.
The Provider tab opens.
2. In the License ID field, enter the license ID from your delivery package. The license ID is in the following location: <Delivery Package/Lionbridge License ID/License_ID.txt>. Then click Set.
3. Scroll down to the New provider section.
Note: If there are translation provider configurations that require upgrading from the Connector version 3.x to version 4.x, both the New tab and the Upgrade tab are displayed in the New provider section. Ensure that for a new translation provider configuration, the New tab is selected. For detailed instructions on upgrading a translation provider configuration from the Connector version 3.x to version 4.x, see "Upgrading Account Keys for Current Translation Providers" on page 37.
Lionbridge Connector for Sitecore Installation and Configuration Guide Page 32Version 4.1.1 March 23, 2020
4 Configuring the Lionbridge Connector forSitecore
4.1 Configuring Your License ID and New TranslationProviders

4. In this section, enter the following information about your translation provider:
Setting Description
Name Enter your name for the translation provider. If you configure multiple translation providers, this is the name that will be displayed when selecting a translation provider while sending out content for translation.
Type Select the type of translation provider. This supports sending translation metadata to specific translation providers. If you do not see your translation provider, select Generic. If you select onDemand or Freeway, additional fields are displayed, as described in the following steps.
Account key
Select the account key for the translation provider. There is one account key for each of your translation providers, as specified by your license ID. Installing your license automatically downloads your account keys. Note: Only unused keys are available for selection. To view the keys that are already in use, click the Keys already used link below.
Supports quoting
If this translation provider supports providing quotes before the translation process starts, and you want to enable users to request a quote before sending content for translation, select this check box.Important: The Request Quote feature is available only when sending content for translation to a translation provider (LSP) that supports this feature. When enabled, this feature displays the Send for Quote check box in:the Bulk Translation wizard the Automatic Item export for translation dialog boxthe Send Items Out for Translation dialog box, which opens from Translation Queue
Selecting the Send for Quote check box informs the translation provider that you want to receive a quote before the translation process starts.
PO Required
You can configure this translation provider so that the PO Reference field is required when submitting content for translation to this provider.
Lionbridge Connector for Sitecore Installation and Configuration Guide Page 33Version 4.1.1 March 23, 2020
4 Configuring the Lionbridge Connector forSitecore
4.1 Configuring Your License ID and New TranslationProviders
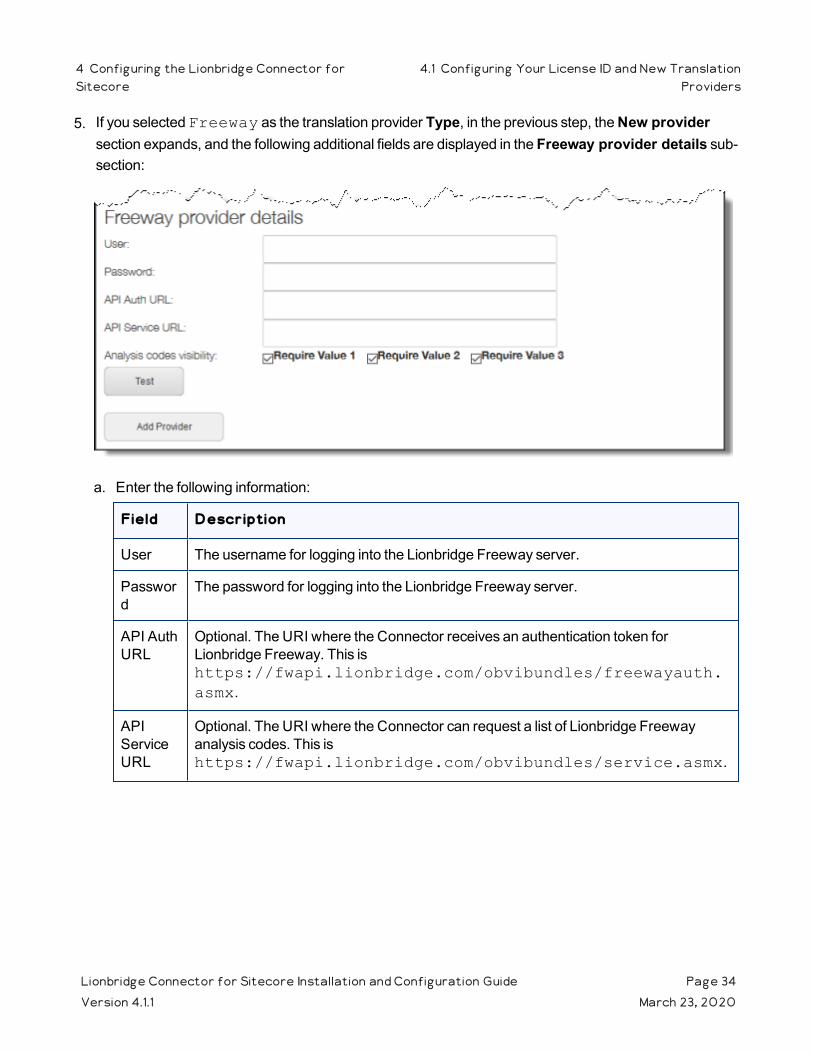
5. If you selected Freeway as the translation provider Type, in the previous step, the New provider section expands, and the following additional fields are displayed in the Freeway provider details sub-section:
a. Enter the following information:
Field Description
User The username for logging into the Lionbridge Freeway server.
Password
The password for logging into the Lionbridge Freeway server.
API Auth URL
Optional. The URI where the Connector receives an authentication token for Lionbridge Freeway. This is https://fwapi.lionbridge.com/obvibundles/freewayauth.asmx.
API Service URL
Optional. The URI where the Connector can request a list of Lionbridge Freeway analysis codes. This is https://fwapi.lionbridge.com/obvibundles/service.asmx.
Lionbridge Connector for Sitecore Installation and Configuration Guide Page 34Version 4.1.1 March 23, 2020
4 Configuring the Lionbridge Connector forSitecore
4.1 Configuring Your License ID and New TranslationProviders
Field Description
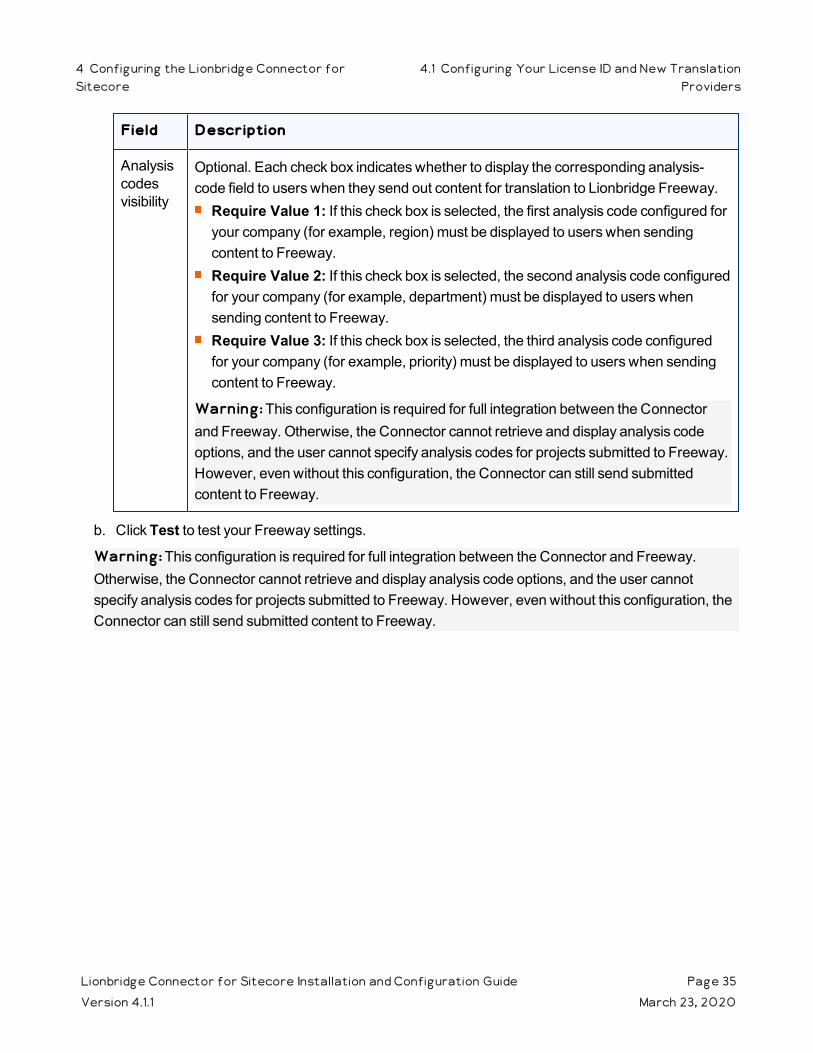
Analysis codes visibility
Optional. Each check box indicates whether to display the corresponding analysis-code field to users when they send out content for translation to Lionbridge Freeway.
Require Value 1: If this check box is selected, the first analysis code configured for your company (for example, region) must be displayed to users when sending content to Freeway.Require Value 2: If this check box is selected, the second analysis code configured for your company (for example, department) must be displayed to users when sending content to Freeway.Require Value 3: If this check box is selected, the third analysis code configured for your company (for example, priority) must be displayed to users when sending content to Freeway.
Warning: This configuration is required for full integration between the Connector and Freeway. Otherwise, the Connector cannot retrieve and display analysis code options, and the user cannot specify analysis codes for projects submitted to Freeway. However, even without this configuration, the Connector can still send submitted content to Freeway.
b. Click Test to test your Freeway settings.
Warning: This configuration is required for full integration between the Connector and Freeway. Otherwise, the Connector cannot retrieve and display analysis code options, and the user cannot specify analysis codes for projects submitted to Freeway. However, even without this configuration, the Connector can still send submitted content to Freeway.
Lionbridge Connector for Sitecore Installation and Configuration Guide Page 35Version 4.1.1 March 23, 2020
4 Configuring the Lionbridge Connector forSitecore
4.1 Configuring Your License ID and New TranslationProviders
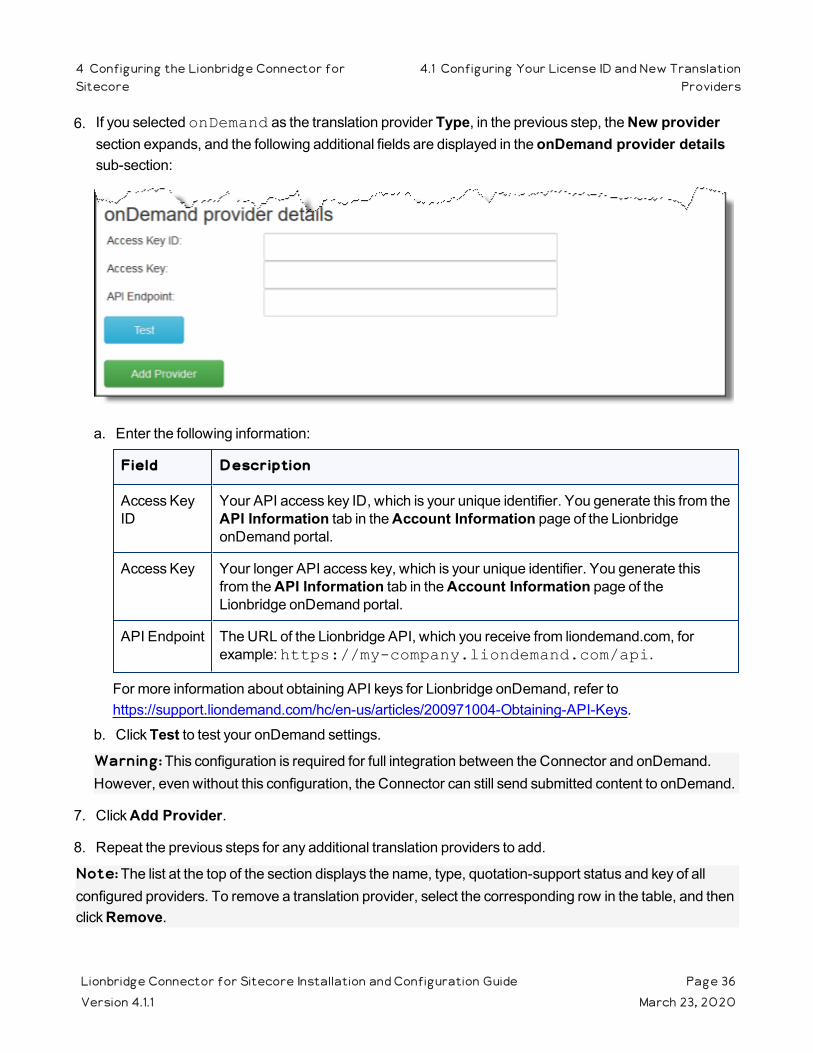
6. If you selected onDemand as the translation provider Type, in the previous step, the New provider section expands, and the following additional fields are displayed in the onDemand provider details sub-section:
a. Enter the following information:
Field Description
Access Key ID
Your API access key ID, which is your unique identifier. You generate this from the API Information tab in the Account Information page of the Lionbridge onDemand portal.
Access Key Your longer API access key, which is your unique identifier. You generate this from the API Information tab in the Account Information page of the Lionbridge onDemand portal.
API Endpoint The URL of the Lionbridge API, which you receive from liondemand.com, for example: https://my-company.liondemand.com/api.
For more information about obtaining API keys for Lionbridge onDemand, refer to https://support.liondemand.com/hc/en-us/articles/200971004-Obtaining-API-Keys.
b. Click Test to test your onDemand settings.
Warning: This configuration is required for full integration between the Connector and onDemand. However, even without this configuration, the Connector can still send submitted content to onDemand.
7. Click Add Provider.
8. Repeat the previous steps for any additional translation providers to add.
Note: The list at the top of the section displays the name, type, quotation-support status and key of all configured providers. To remove a translation provider, select the corresponding row in the table, and then click Remove.
Lionbridge Connector for Sitecore Installation and Configuration Guide Page 36Version 4.1.1 March 23, 2020
4 Configuring the Lionbridge Connector forSitecore
4.1 Configuring Your License ID and New TranslationProviders

4.2 Upgrading Account Keys for Current Translation Providers
If you are upgrading your Connector installation from version 3.x to 4.x, you must upgrade the account keys for your current translation providers. To obtain your new account keys, contact Lionbridge Connector Support. For details, see "How to Contact Lionbridge Connector Support" on page 11.
Very important: Do not use the same account keys on multiple instances, because this is a violation of the License Agreement. Using the same account keys on multiple Sitecore instances will cause the Connector to behave unexpectedly, which can result in lost translation content, orphaned projects, and inaccurate translation status reports. The Lionbridge Connector team will support technical issues caused by duplicating or incorrectly installing CMS address keys only on a time and materials basis.
Note: During the upgrade process, the Connector does not remove the XML and configuration files from the previous configuration. You can back up these files and remove them later, after the upgrade process is complete.
To update your account key for your translation providers:
1. In the Content Editor, in the content tree, navigate to /sitecore/system/Settings/Lionbridge Settings/Translation Providers Configuration.
The Provider tab opens, displaying the New sub-tab and the Upgrade sub-tab.
Lionbridge Connector for Sitecore Installation and Configuration Guide Page 37Version 4.1.1 March 23, 2020
4 Configuring the Lionbridge Connector forSitecore
4.2 Upgrading Account Keys for Current TranslationProviders
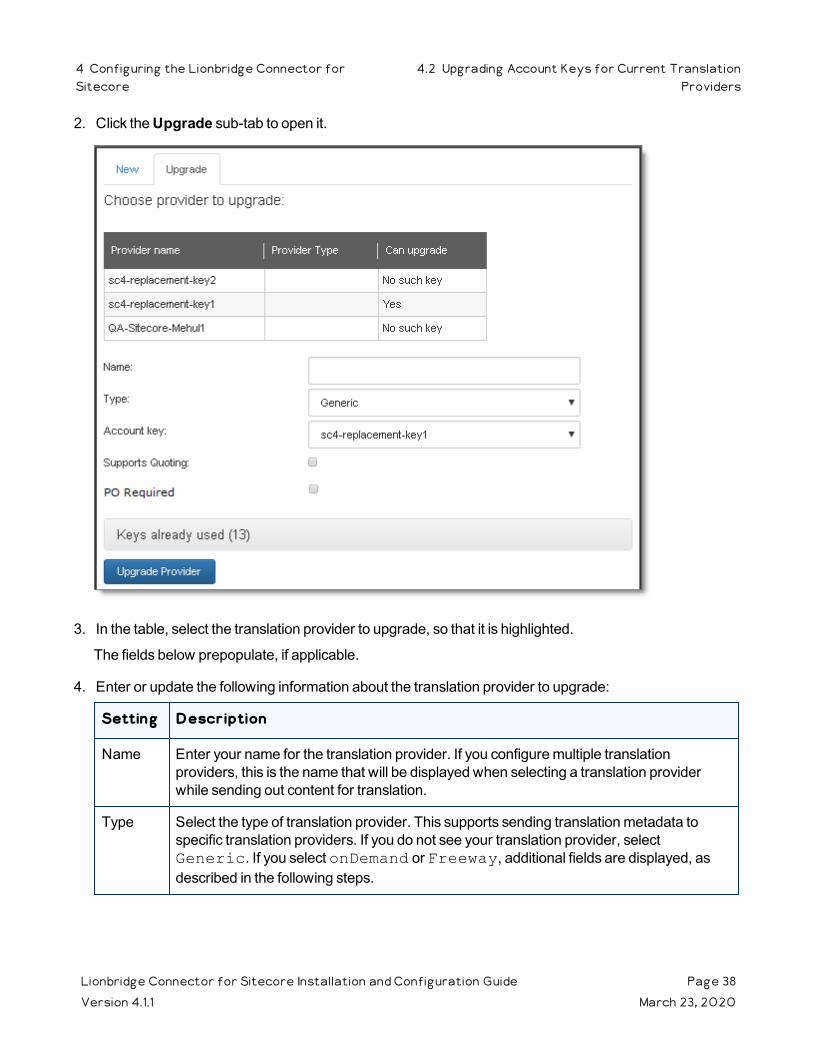
2. Click the Upgrade sub-tab to open it.
3. In the table, select the translation provider to upgrade, so that it is highlighted.
The fields below prepopulate, if applicable.
4. Enter or update the following information about the translation provider to upgrade:
Setting Description
Name Enter your name for the translation provider. If you configure multiple translation providers, this is the name that will be displayed when selecting a translation provider while sending out content for translation.
Type Select the type of translation provider. This supports sending translation metadata to specific translation providers. If you do not see your translation provider, select Generic. If you select onDemand or Freeway, additional fields are displayed, as described in the following steps.
Lionbridge Connector for Sitecore Installation and Configuration Guide Page 38Version 4.1.1 March 23, 2020
4 Configuring the Lionbridge Connector forSitecore
4.2 Upgrading Account Keys for Current TranslationProviders

Setting Description
Account key
Select the account key for the translation provider. There is one account key for each of your translation providers, as specified by your license ID. Installing your license automatically downloads your account keys. Note: Only unused keys are available for selection. To view the keys that are already in use, click the Keys already used link below.
Supports quoting
If this translation provider supports providing quotes before the translation process starts, and you want to enable users to request a quote before sending content for translation, select this check box.Important: The Request Quote feature is available only when sending content for translation to a translation provider (LSP) that supports this feature. When enabled, this feature displays the Send for Quote check box in:the Bulk Translation wizard the Automatic Item export for translation dialog boxthe Send Items Out for Translation dialog box, which opens from Translation Queue
Selecting the Send for Quote check box informs the translation provider that you want to receive a quote before the translation process starts.
PO Required
You can configure this translation provider so that the PO Reference field is required when submitting content for translation to this provider.
Lionbridge Connector for Sitecore Installation and Configuration Guide Page 39Version 4.1.1 March 23, 2020
4 Configuring the Lionbridge Connector forSitecore
4.2 Upgrading Account Keys for Current TranslationProviders
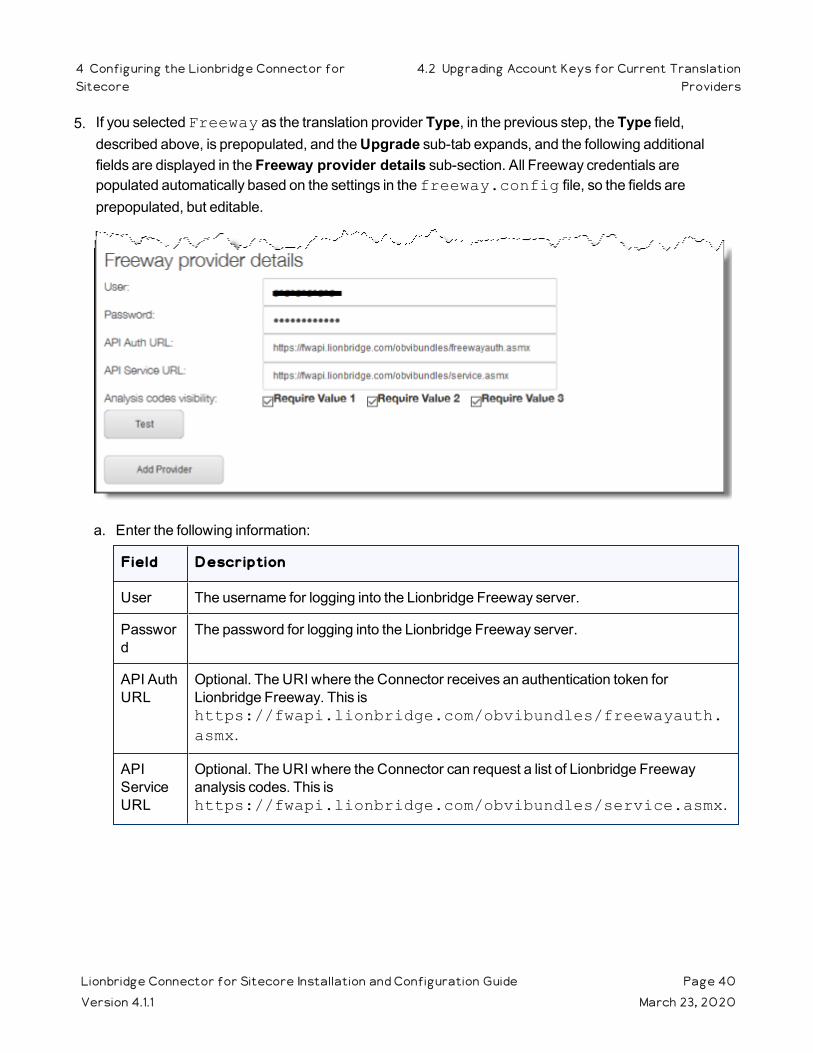
5. If you selected Freeway as the translation provider Type, in the previous step, the Type field, described above, is prepopulated, and the Upgrade sub-tab expands, and the following additional fields are displayed in the Freeway provider details sub-section. All Freeway credentials are populated automatically based on the settings in the freeway.config file, so the fields are prepopulated, but editable.
a. Enter the following information:
Field Description
User The username for logging into the Lionbridge Freeway server.
Password
The password for logging into the Lionbridge Freeway server.
API Auth URL
Optional. The URI where the Connector receives an authentication token for Lionbridge Freeway. This is https://fwapi.lionbridge.com/obvibundles/freewayauth.asmx.
API Service URL
Optional. The URI where the Connector can request a list of Lionbridge Freeway analysis codes. This is https://fwapi.lionbridge.com/obvibundles/service.asmx.
Lionbridge Connector for Sitecore Installation and Configuration Guide Page 40Version 4.1.1 March 23, 2020
4 Configuring the Lionbridge Connector forSitecore
4.2 Upgrading Account Keys for Current TranslationProviders

Field Description
Analysis codes visibility
Optional. Each check box indicates whether to display the corresponding analysis-code field to users when they send out content for translation to Lionbridge Freeway.
Require Value 1: If this check box is selected, the first analysis code configured for your company (for example, region) must be displayed to users when sending content to Freeway.Require Value 2: If this check box is selected, the second analysis code configured for your company (for example, department) must be displayed to users when sending content to Freeway.Require Value 3: If this check box is selected, the third analysis code configured for your company (for example, priority) must be displayed to users when sending content to Freeway.
Warning: This configuration is required for full integration between the Connector and Freeway. Otherwise, the Connector cannot retrieve and display analysis code options, and the user cannot specify analysis codes for projects submitted to Freeway. However, even without this configuration, the Connector can still send submitted content to Freeway.
b. Click Test to test your Freeway settings.
Warning: This configuration is required for full integration between the Connector and Freeway. Otherwise, the Connector cannot retrieve and display analysis code options, and the user cannot specify analysis codes for projects submitted to Freeway. However, even without this configuration, the Connector can still send submitted content to Freeway.
Lionbridge Connector for Sitecore Installation and Configuration Guide Page 41Version 4.1.1 March 23, 2020
4 Configuring the Lionbridge Connector forSitecore
4.2 Upgrading Account Keys for Current TranslationProviders

6. If you selected onDemand as the translation provider Type, in the previous step, the Upgrade sub-tab expands, and the following additional fields are displayed in the onDemand provider details sub-section:
a. Enter the following information:
Field Description
Access Key ID
Your API access key ID, which is your unique identifier. You generate this from the API Information tab in the Account Information page of the Lionbridge onDemand portal.
Access Key Your longer API access key, which is your unique identifier. You generate this from the API Information tab in the Account Information page of the Lionbridge onDemand portal.
API Endpoint The URL of the Lionbridge API, which you receive from liondemand.com, for example: https://my-company.liondemand.com/api.
For more information about obtaining API keys for Lionbridge onDemand, refer to https://support.liondemand.com/hc/en-us/articles/200971004-Obtaining-API-Keys.
b. Click Test to test your onDemand settings.
Warning: This configuration is required for full integration between the Connector and onDemand. However, even without this configuration, the Connector can still send submitted content to onDemand.
7. Click Upgrade Provider.
Lionbridge Connector for Sitecore Installation and Configuration Guide Page 42Version 4.1.1 March 23, 2020
4 Configuring the Lionbridge Connector forSitecore
4.2 Upgrading Account Keys for Current TranslationProviders

The list at the top of the page updates, displaying the upgraded translation provider.
Note: If there are no remaining translation providers to upgrade, the New and Upgrade sub-tabs are no longer displayed, and the page looks like the one described in "Configuring Your License ID and New Translation Providers" on page 31.
8. Repeat the previous steps for any additional translation providers to upgrade.
Note: The list at the top of the section displays the name, type, quotation-support status and key of all configured providers. To remove a translation provider, select the corresponding row in the table, and then click Remove.
4.3 Updating the Configuration Settings of Translation Providers
You can update the configuration settings for translation providers that were created in versions 4.0 or higher of the Connector, or were already upgraded from an earlier version of the Connector. For information on upgrading account keys, see "Upgrading Account Keys for Current Translation Providers" on page 37.
You can update the following configuration settings for your translation provider:
whether a quote is required before the translation job starts (not supported for all translation providers)
whether a purchase order number (PO number) is required when submitting a job for translation
To update configuration settings for your translation provider:
1. In the Content Editor, in the content tree, navigate to the /sitecore/system/Settings/Lionbridge Settings/Translation Providers Configuration/<translation provider> item.
Lionbridge Connector for Sitecore Installation and Configuration Guide Page 43Version 4.1.1 March 23, 2020
4 Configuring the Lionbridge Connector forSitecore
4.3 Updating the Configuration Settings of TranslationProviders

2. Scroll down to the bottom of the Item parameters section:
3. Update the values of the following options:
Setting Description
Supports quoting
If this translation provider supports providing quotes before the translation process starts, and you want to enable users to request a quote before sending content for translation, select this check box.Important: The Request Quote feature is available only when sending content for translation to a translation provider (LSP) that supports this feature. When enabled, this feature displays the Send for Quote check box in:the Bulk Translation wizard the Automatic Item export for translation dialog boxthe Send Items Out for Translation dialog box, which opens from Translation Queue
Selecting the Send for Quote check box informs the translation provider that you want to receive a quote before the translation process starts.
PO Required
You can configure this translation provider so that the PO Reference field is required when submitting content for translation to this provider.
4. In the top-left corner, click theSave icon .
4.4 Configuring the Connector with the Azure App Service for Blue/Green Deployment
This section describes how to configure the Connector installation with the Azure App Service for Blue/Green Deployment. In this scenario, you install the Connector on multiple Sitecore instances that have the same IP address. These Sitecore instances share the same Sitecore database and they will share the same Connector database. Each instance has its own settings.
Prerequisites
Both Sitecore instances, where you will install the Connector, must be hosted on the same server or local machine, so that they have the same IP address.
Both Sitecore instances must share the same Sitecore database.
Note: These instances will share the same Connector database.
Lionbridge Connector for Sitecore Installation and Configuration Guide Page 44Version 4.1.1 March 23, 2020
4 Configuring the Lionbridge Connectorfor Sitecore
4.4 Configuring the Connector with the Azure App Service forBlue/Green Deployment
Both Sitecore instances must have the same license ID, which is configured in sitecore/System/Settings/Lionbridge Settings/Translation Providers Configuration. For detailed instructions, see "Configuring Your License ID and New Translation Providers" on page 31.
To configure the Connector into Azure on Sitecore with the Azure App Service:
1. On the first Sitecore instance, configure the translation provider. For detailed instructions, see Configuring Your License ID and New Translation Providers.
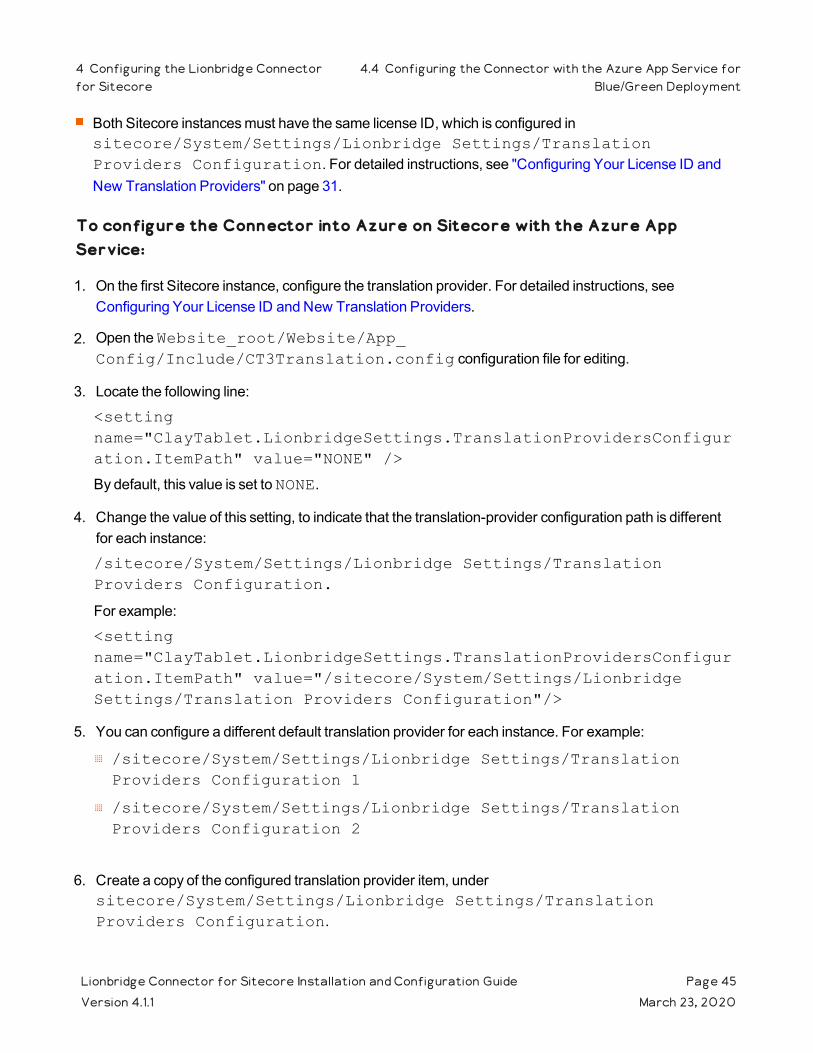
2. Open the Website_root/Website/App_Config/Include/CT3Translation.config configuration file for editing.
3. Locate the following line:
<setting name="ClayTablet.LionbridgeSettings.TranslationProvidersConfiguration.ItemPath" value="NONE" />
By default, this value is set to NONE.
4. Change the value of this setting, to indicate that the translation-provider configuration path is different for each instance:
/sitecore/System/Settings/Lionbridge Settings/Translation Providers Configuration.
For example:
<setting name="ClayTablet.LionbridgeSettings.TranslationProvidersConfiguration.ItemPath" value="/sitecore/System/Settings/Lionbridge Settings/Translation Providers Configuration"/>
5. You can configure a different default translation provider for each instance. For example:
/sitecore/System/Settings/Lionbridge Settings/Translation Providers Configuration 1
/sitecore/System/Settings/Lionbridge Settings/Translation Providers Configuration 2
6. Create a copy of the configured translation provider item, under sitecore/System/Settings/Lionbridge Settings/Translation Providers Configuration.
Lionbridge Connector for Sitecore Installation and Configuration Guide Page 45Version 4.1.1 March 23, 2020
4 Configuring the Lionbridge Connectorfor Sitecore
4.4 Configuring the Connector with the Azure App Service forBlue/Green Deployment

7. On the second instance, navigate to sitecore/System/Settings/Lionbridge Settings/Translation Providers Configuration in the Content Tree. Ensure that you can see the same copy of the configured translation provider item. This validates that both instances are sharing the Connector database.
8. On the second instance, modify the copy of the configured translation provider, so that it has a different value than on the first instance. For detailed instructions, see "Updating the Configuration Settings of Translation Providers" on page 43.
9. From each instance, send jobs to translation to validate that the complete translation round trip is successful.
Next you configure additional Connector parameters, as described in "Configuring the Lionbridge Connector for Sitecore" on page 30.
4.5 Configuring Content Encryption
You can configure content encryption and decryption. You can generate your own keys to encrypt and decrypt content you send for translation from the Connector to any translation provider.
When this feature is enabled:
The Connector automatically encrypts the files before submitting them for translation.
The Connector automatically decrypts encrypted translated files that it receives.
Important: Before sending encrypted content for translation, ask your translation provider to contact the Lionbridge Connector Support Team to obtain the encryption utility for the Connector. For details, see "How to Contact Lionbridge Connector Support" on page 11.
Before translation:
1. You enable content encryption in the Connector, and you generate the encryption key and export it as an .xml file, as described below.
2. When you submit a job for translation, the Connector automatically encrypts the files for translation before sending them to your translation provider.
3. You send the encryption key to your translation provider, for example, by email.
4. The Connector sends the encrypted files to your translation provider via the Clay Tablet Platform and the translation connector.
5. Your translation provider uses the encryption utility to decrypt the encrypted files it receives.
Lionbridge Connector for Sitecore Installation and Configuration Guide Page 46Version 4.1.1 March 23, 2020
4 Configuring the Lionbridge Connector for Sitecore 4.5 Configuring Content Encryption

After translation:
1. Your translation provider uses the encryption key and the encryption utility to encrypt the translated files.
2. Your translation provider sends the encrypted files to the Connector via the translation connector and the Clay Tablet Platform.
3. The Connector automatically decrypts the encrypted translated files it receives before importing them into Sitecore and processing them further.
To enable content encryption in the Connector:
1. In the Content Editor, in the content tree, navigate to the /sitecore/system/Settings/Lionbridge Settings/Lionbridge Connector Settings/Encryption item.
2. Click the Encryption item in the folder to open it in the content area.
3. Select the Enable Encryption check box.
4. Click Generate Key.
Lionbridge Connector for Sitecore Installation and Configuration Guide Page 47Version 4.1.1 March 23, 2020
4 Configuring the Lionbridge Connector for Sitecore 4.5 Configuring Content Encryption

The Encryption item updates and displays the generated key.
5. Click Export Key.A browser dialog prompts you to open or save the key in an .xml file.
6. Send the Key.xml key file to your translation provider, for example, by email.
4.6 Importing Content into a Local Translation Memory (TM)
Suppose that most of your website has been translated before installing Sitecore and the Connector. You want to leverage your current translations by storing both the source and the target content in a local translation memory (TM), which is a type of database. This enables you to use the Connector's Use Local TM feature, which helps you reduce translation costs by reducing the quantity of content that Connector sends to translation providers. With this feature, the Connector sends only new and changed content fields out for translation. To do this, it checks each field of the source version for any content changes.
Note: Importing content into a local TM overwrites any previous content that already exists there in the corresponding source and target languages.
Important: Do not use this feature in bulk, on all languages on your site. Use this feature only where:
Source-item content and target-item content are in sync.
The target content is fully translated.
For information about best practices, please contact Lionbridge Connector Support. For details, see page 11.
Lionbridge Connector for Sitecore Installation and Configuration Guide Page 48Version 4.1.1 March 23, 2020
4 Configuring the Lionbridge Connector forSitecore
4.6 Importing Content into a Local Translation Memory(TM)

To import content into a local translation memory (TM):
1. In the Content Editor, in the content tree, navigate to /sitecore/system/Settings/Lionbridge Settings/Import to local TM/.
2. Click the Import to local TM tab to select it.
The Import to local TM tab opens.
In the Import items to Local TM section, you specify the source and target languages and the content items to import into the local TM. The Connector will import the content items in the specified source and target languages into the local TM.
a. In the Source Language dropdown list, select the source language of the content items to import to the local TM.
b. Under Target Languages, select the check boxes for one or more target languages of the content items to import to the local TM.
c. Specify which branches or items to import to the local TM. By default, no branches or items are selected.
Use the blue arrows to move the content items from the Select branches to import to Local TM pane to the Branches selected for import to Local TM pane.
Note: Selecting a branch also selects all items and sub-items in the branch recursively.
Lionbridge Connector for Sitecore Installation and Configuration Guide Page 49Version 4.1.1 March 23, 2020
4 Configuring the Lionbridge Connector forSitecore
4.6 Importing Content into a Local Translation Memory(TM)

Click the Expand icon to expand a branch.
Click the Collapse icon to collapse a branch.
d. In the top-right corner, click the Import icon .
3. Scroll down to the Status of items to import section.
a. Click the Expand icon next to a status to view the items being imported to the local TM. You can view content items with the following statuses:
Pending: These content items have not been imported yet.
In Progress: These content items are currently being imported.
Completed: These content items have been imported. b. To update the displayed import status of the content items, in the top-right corner, click the Refresh
icon .
4.7 Configuring the Connector to Run in a Clustered Environment of Multiple Load-Balanced Sitecore Servers
In a clustered environment of multiple load-balanced Sitecore servers, all servers can provide the Connector's user-interface features. However, only one server can send and receive translation jobs. This server is the primary server. You can specify which Sitecore server is the primary server.
Notes: In a single-server environment with one Sitecore server, this setting is not relevant, so do not configure it. You only need to configure this setting on one Sitecore server in the cluster, because it is shared with the other servers.
To configure the Connector to run in a clustered environment:
1. On any Sitecore server in the cluster, in the Content Editor, in the content tree, navigate to /sitecore/system/Settings/Lionbridge Settings/Lionbridge
Lionbridge Connector for Sitecore Installation and Configuration Guide Page 50Version 4.1.1 March 23, 2020
4 Configuring the LionbridgeConnector for Sitecore
4.7 Configuring the Connector to Run in a Clustered Environment ofMultiple Load-Balanced Sitecore Servers
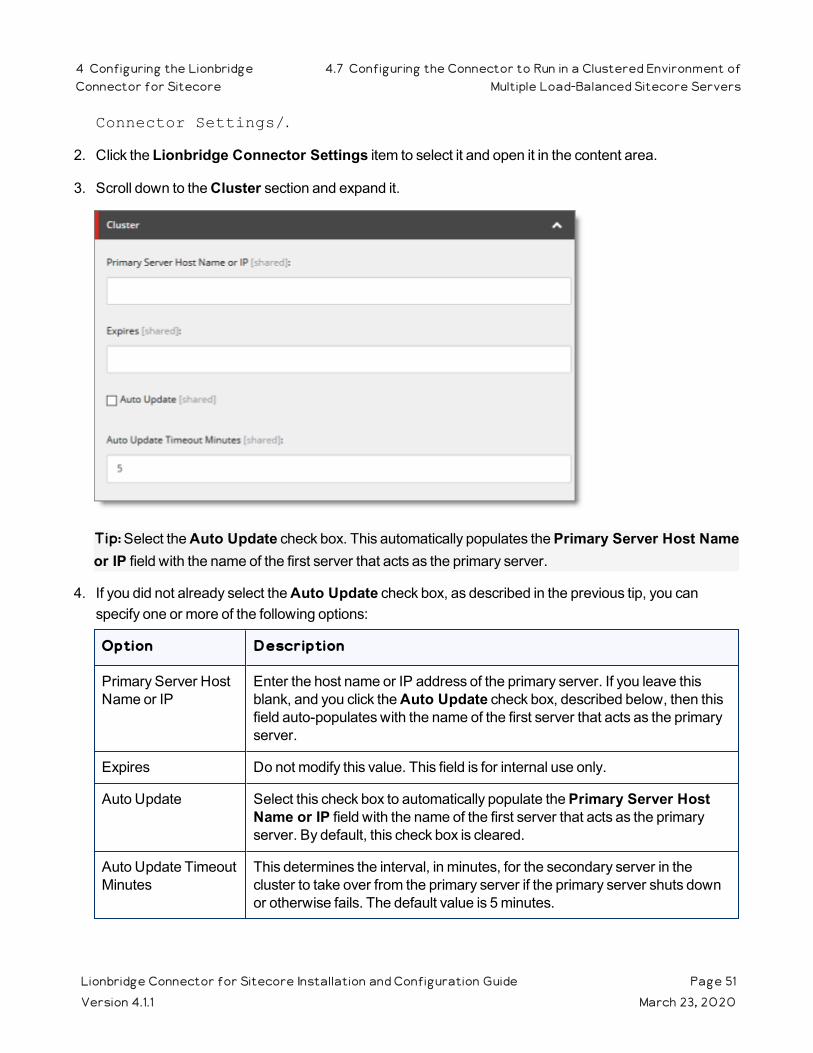
Connector Settings/.
2. Click the Lionbridge Connector Settings item to select it and open it in the content area.
3. Scroll down to the Cluster section and expand it.
Tip: Select the Auto Update check box. This automatically populates the Primary Server Host Name or IP field with the name of the first server that acts as the primary server.
4. If you did not already select the Auto Update check box, as described in the previous tip, you can specify one or more of the following options:
Option Description
Primary Server Host Name or IP
Enter the host name or IP address of the primary server. If you leave this blank, and you click the Auto Update check box, described below, then this field auto-populates with the name of the first server that acts as the primary server.
Expires Do not modify this value. This field is for internal use only.
Auto Update Select this check box to automatically populate the Primary Server Host Name or IP field with the name of the first server that acts as the primary server. By default, this check box is cleared.
Auto Update Timeout Minutes
This determines the interval, in minutes, for the secondary server in the cluster to take over from the primary server if the primary server shuts down or otherwise fails. The default value is 5 minutes.
Lionbridge Connector for Sitecore Installation and Configuration Guide Page 51Version 4.1.1 March 23, 2020
4 Configuring the LionbridgeConnector for Sitecore
4.7 Configuring the Connector to Run in a Clustered Environment ofMultiple Load-Balanced Sitecore Servers
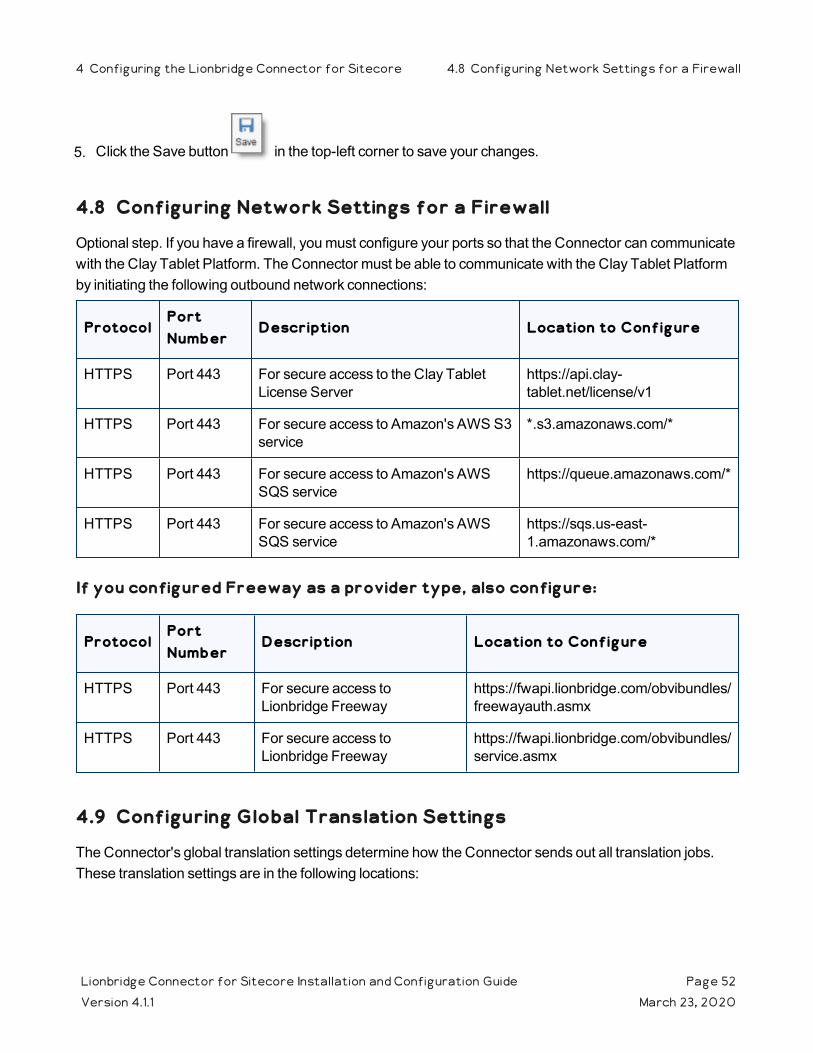
5. Click the Save button in the top-left corner to save your changes.
4.8 Configuring Network Settings for a Firewall
Optional step. If you have a firewall, you must configure your ports so that the Connector can communicate with the Clay Tablet Platform. The Connector must be able to communicate with the Clay Tablet Platform by initiating the following outbound network connections:
ProtocolPort Number
Description Location to Configure
HTTPS Port 443 For secure access to the Clay Tablet License Server
https://api.clay-tablet.net/license/v1
HTTPS Port 443 For secure access to Amazon's AWS S3 service
*.s3.amazonaws.com/*
HTTPS Port 443 For secure access to Amazon's AWS SQS service
https://queue.amazonaws.com/*
HTTPS Port 443 For secure access to Amazon's AWS SQS service
https://sqs.us-east-1.amazonaws.com/*
If you configured Freeway as a provider type, also configure:
ProtocolPort Number
Description Location to Configure
HTTPS Port 443 For secure access to Lionbridge Freeway
https://fwapi.lionbridge.com/obvibundles/freewayauth.asmx
HTTPS Port 443 For secure access to Lionbridge Freeway
https://fwapi.lionbridge.com/obvibundles/service.asmx
4.9 Configuring Global Translation Settings
The Connector's global translation settings determine how the Connector sends out all translation jobs. These translation settings are in the following locations:
Lionbridge Connector for Sitecore Installation and Configuration Guide Page 52Version 4.1.1 March 23, 2020
4 Configuring the Lionbridge Connector for Sitecore 4.8 Configuring Network Settings for a Firewall

the following configuration file: Website_root/Website/App_Config/Include/CT3Translation.config
configuration settings in the Content Editor in: /sitecore/System/Settings/Lionbridge Settings/Lionbridge Connector Settings
You can perform the following configuration steps:
"Configuring Bulk Translation Settings" on page 53
"Configuring Email-Notification Settings" on page 61
"Configuring Logging Settings" on page 66
"Configuring Platform Settings" on page 67
"Configuring SEO-Field Settings" on page 67
"Configuring Target Translation Data Settings" on page 70
"Configuring Translation Settings" on page 71
"Configuring Update-TM Settings" on page 75
"Configuring Job-Metadata Settings" on page 76
"Configuring the Sitecore User for Connector Background Processes" on page 78
"Configuring the Behavior of the Send Dependent Items Check Box" on page 80
4.9.1 Configuring Bulk Translation Settings
There are multiple places to configure settings for the Bulk Translation wizard:
Lionbridge Connector for Sitecore Installation and Configuration Guide Page 53Version 4.1.1 March 23, 2020
4 Configuring the Lionbridge Connector for Sitecore 4.9.1 Configuring Bulk Translation Settings

Setting Where to ConfigureFor Details, See...
the default value of the Use Local TM check box in the Advanced Translation Options section of the Translation Options page in the wizardwhich target languages to display in the Settings page the default value of the Send Dependent Items check box in the Choose Items page of the wizard
whether to collect Sitecore items in specific templates, including item buckets, to send out for translation
the sort order of languages in all user interfaces when sending out content items for translation
the Sitecore user interface "Configuring Bulk Translation Settings in Sitecore" on page 56
all other settings the Website_root/Website/App_Config/Include/CT3Translation.config configuration file
"Configuring Bulk Translation Settings in the Configuration File" on page 54
Note: You can also create an extension to modify the behavior of the Send Dependent Items check box in the Choose Items page of the wizard. For details, see "Configuring the Behavior of the Send Dependent Items Check Box" on page 80.
4.9.1.1 Configuring Bulk Translation Settings in the Configuration File
You can specify the following settings in the Website_root/Website/App_Config/Include/CT3Translation.config configuration file:
Lionbridge Connector for Sitecore Installation and Configuration Guide Page 54Version 4.1.1 March 23, 2020
4 Configuring the Lionbridge Connector forSitecore
4.9.1.1 Configuring Bulk Translation Settings in theConfiguration File

Setting Name DescriptionSupported Values
Default Value
ClayTablet.BulkTranslationRootID
This sets the /Sitecore/content directory (ID: {0242E282-E7B0-4C57-98D1-B63F0C4F2F76}) as the default root from which the Connector collects items for translation for the Bulk Translation feature. This feature collects large batches of content from the site tree for bulk export. If you want content from only one site to be translated, then you must change the value of this item's ID to that path. For example if you want to translate items only from Sitecore/Content/home/site1/, then you must change the value of this item's ID to Sitecore/Content/home/site1/.
Note: There can be only one root directory.
either the default ID or a path
{0DE95AE4-41AB-4D01-9EB0-67441B7C2450}
ClayTablet.MaximumItemsInOneTranslationFile
This setting determines the maximum number of Sitecore items to pack into a single file for translation. You can adjust the number to better suit your translation requirements. Recommendation: Discuss this with your translation provider.
an integer 100
Lionbridge Connector for Sitecore Installation and Configuration Guide Page 55Version 4.1.1 March 23, 2020
4 Configuring the Lionbridge Connector forSitecore
4.9.1.1 Configuring Bulk Translation Settings in theConfiguration File

Setting Name DescriptionSupported Values
Default Value
ClayTablet.PreventSentingItemsWithoutWorkflow
When using the Bulk Translation wizard, determines whether or not the Connector sends out items for translation that are not assigned to a workflow.If you set this value to True, then when using the Bulk Translation wizard to send out content for translation, the Connector does not send out items not assigned to a workflow.If you set this value to False, then using the Bulk Translation wizard sends out all selected items for translation, even if they are not assigned to a workflow.
Warning: This creates a target version with source language content, which becomes publishable immediately.
TrueFalse
True for new Connector installationsFalse for upgraded Connector installations
ClayTablet.StateToAssignInBulkTranslation
Determine the default translation workflow displayed in Workflow Option: applied to all items selected > With state dropdown list in the Translation Options page of the Bulk Translation wizard. This is the default workflow to assign to source items without a workflow when sending them out for translation from the wizard. Note: For backwards compatibility with the Connector versions 4.0.8 and lower, the configured value can be either a workflow state or a workflow. If the configured value is a workflow state, it specifies the workflow that the state belongs to.
a workflow or a workflow state
4B7E2DA9-DE43-4C83-88C3-02F042031D04
4.9.1.2 Configuring Bulk Translation Settings in Sitecore
You can specify some settings for the Bulk Translation wizard in the Sitecore user interface.
Lionbridge Connector for Sitecore Installation and Configuration Guide Page 56Version 4.1.1 March 23, 2020
4 Configuring the Lionbridge Connector forSitecore
4.9.1.2 Configuring Bulk Translation Settings inSitecore
Note: Some of the settings in this section are also relevant to other methods of sending content for translation.
To configure settings for the Bulk Translation wizard:
1. In the Content Editor, in the content tree, navigate to /sitecore/system/Settings/Lionbridge Settings/Lionbridge Connector Settings/.
2. Click the Lionbridge Connector Settings item to select it and open it in the content area.
Lionbridge Connector for Sitecore Installation and Configuration Guide Page 57Version 4.1.1 March 23, 2020
4 Configuring the Lionbridge Connector forSitecore
4.9.1.2 Configuring Bulk Translation Settings inSitecore

3. Scroll down to the Bulk Translation section.
Lionbridge Connector for Sitecore Installation and Configuration Guide Page 58Version 4.1.1 March 23, 2020
4 Configuring the Lionbridge Connector forSitecore
4.9.1.2 Configuring Bulk Translation Settings inSitecore

4. Specify one or more of the following options:
Option Description
Use Local TM Only send fields with changed content
Select or clear this check box to specify the default value of the Use Local TM check box in the Advanced Translation Options section of the Translation Options page in the wizard. For a detailed explanation of this option, refer to "Sending Multiple Content Items for Translation" in the Lionbridge Connector for Sitecore User Guide.
Send Media Content
Select or clear this check box to allow or prevent sending binary files of any file type for translation.
Field Types Need Translation
Determines which types of fields the Connector can send out for translation when it sends an item for translation. This is relevant for all templates. If you create a custom field type, you must add it to this list so that you can send it out for translation.Note: You cannot set Shared Fields to be sent out for translation, because these fields are shared across all versions and languages of an item.To change these fields:
1. Click the Edit button above the list.
2. In the dialog box that opens, select the field types to add, and use the blue arrow to copy them to the Selected column. When you are done, click OK.Tip: You can use the Shift key to select multiple adjacent field types.
By default, the Connector sends out fields of the following field types for translation:
textRich TexthtmlSingle-Line TextMulti-Line Text
Default Target Languages
In this section, you can select which target languages to select by default in the Settings page of the wizard by selecting the corresponding check boxes. If you do not select any target languages, then all the check boxes for the target languages are blank.
Lionbridge Connector for Sitecore Installation and Configuration Guide Page 59Version 4.1.1 March 23, 2020
4 Configuring the Lionbridge Connector forSitecore
4.9.1.2 Configuring Bulk Translation Settings inSitecore

Option Description
Send dependent items
Select or clear this check box to specify the default value of the Send Dependent Items check box in the Choose Items page of the wizard.Note: This also specifies the default value of the Send Dependent Items check box in the Automatic Item Export for Translation dialog box.
Templates Excluded from Bulk Translation
Use the arrows to move items to exclude to the Selected list. This instructs the wizard to exclude Sitecore items with the corresponding templates when it collects items for translation. By default, Bucket and Folder are selected, so that the wizard excludes item buckets and folders from items that it collects to send out for translation.
Sort Languages Alphabetically
You can specify the sort order of languages displayed in all user interfaces when sending out content items for translation.To sort languages alphabetically, select this check box.To sort languages in the order specified in sitecore/System/Languages, clear this check box (default setting).
Hide Specify Source Filters page in bulk translation wizard
You can configure the Connector to hide the Specify Source Filters page of the Bulk Translation wizard for all users.To hide this page, select this check box.To display this page, clear this check box (default setting).
Hide Excluding Items page in bulk translation wizard
You can configure the Connector to hide the Excluding Item(s) page of the Bulk Translation wizard for all users.To hide this page, select this check box.To display this page, clear this check box (default setting).
Hide Excluding Items page in bulk translation wizard
You can configure the Connector to hide the final page of the Bulk Translation wizard for all users.To hide this page, select this check box.To display this page, clear this check box (default setting).
Hide SEO Fields in Translation Options page in bulk translation wizard
You can configure the Connector to hide the SEO Fields section in the Translation Options page of the Bulk Translation wizard for all users.To hide this section, select this check box.To display this section, clear this check box (default setting).
Lionbridge Connector for Sitecore Installation and Configuration Guide Page 60Version 4.1.1 March 23, 2020
4 Configuring the Lionbridge Connector forSitecore
4.9.1.2 Configuring Bulk Translation Settings inSitecore

Option Description
Hide Use Local TM in Translation Options page in bulk translation wizard
You can configure the Connector to hide the Use Local TM check box in the Translation Options page of the Bulk Translation wizard for all users.To hide the Use Local TM check box, select this check box.To display the Use Local TM check box, clear this check box (default setting).
Languages Display Format
You can configure how the Connector displays languages in the user interfaces for sending out content for translation. You can use any language item’s field name as a string. You can view these fields in sitecore/System/Languages/<individual language>.Type a # at the beginning and end of the string, for example:#DisplayName#, which can display French (Canada) | français(Canada). This is the default setting.#Name#, which can display fr.#iso#, which can display fr-CA.
You can include a combination of multiple fields, for example #DisplayName# - #iso#.
5. Click the Save button in the top-left corner to save your changes.
4.9.2 Configuring Email-Notification Settings
There are multiple places to configure email-notification settings:
Lionbridge Connector for Sitecore Installation and Configuration Guide Page 61Version 4.1.1 March 23, 2020
4 Configuring the Lionbridge Connector for Sitecore 4.9.2 Configuring Email-Notification Settings
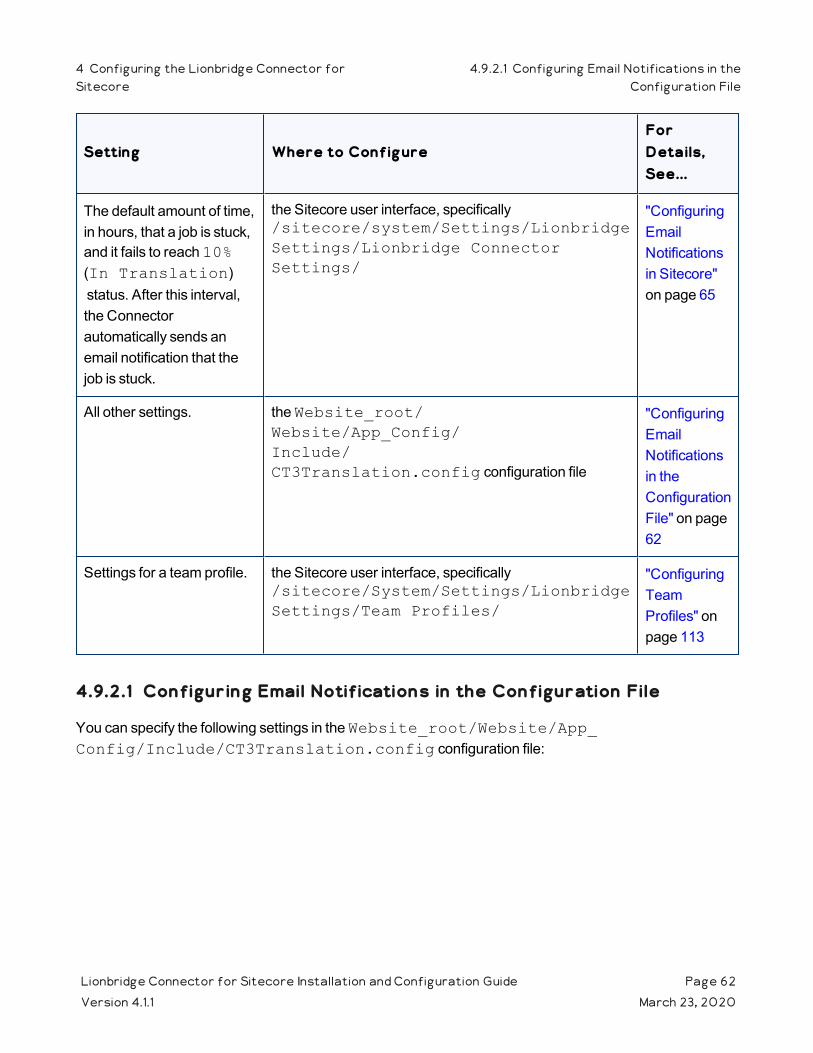
Setting Where to ConfigureFor Details, See...
The default amount of time, in hours, that a job is stuck, and it fails to reach 10% (In Translation) status. After this interval, the Connector automatically sends an email notification that the job is stuck.
the Sitecore user interface, specifically /sitecore/system/Settings/Lionbridge Settings/Lionbridge Connector Settings/
"Configuring Email Notifications in Sitecore" on page 65
All other settings. the Website_root/Website/App_Config/Include/CT3Translation.config configuration file
"Configuring Email Notifications in the Configuration File" on page 62
Settings for a team profile. the Sitecore user interface, specifically /sitecore/System/Settings/Lionbridge Settings/Team Profiles/
"Configuring Team Profiles" on page 113
4.9.2.1 Configuring Email Notifications in the Configuration File
You can specify the following settings in the Website_root/Website/App_Config/Include/CT3Translation.config configuration file:
Lionbridge Connector for Sitecore Installation and Configuration Guide Page 62Version 4.1.1 March 23, 2020
4 Configuring the Lionbridge Connector forSitecore
4.9.2.1 Configuring Email Notifications in theConfiguration File

Setting Name
DescriptionSupported Values
Default Value
ClayTablet.EmailNotification.SendEmail
Determines whether or not the Connector sends email notifications when it sends items out for translation or it receives translated items back from translation.To receive email notifications, keep this setting as True. To prevent receiving email notifications, change this setting to False.
TrueFalse
True
ClayTablet.EmailNotification.WaitMinutes
The Connector does not send a separate email notification for each item sent for translation. This setting determines the interval, in minutes, that the Connector waits to send one notification email. That email contains information about all the items that were sent for translation since the previous notification.
integer 4
ClayTablet.LOCAL.SMTP.Server
The IP address of the local SMTP service that sends notification emails. Relevant only if the value of the ClayTablet.EmailNotification.SmtpService setting, described above, is LocalSmtp.
an IP address
127.0.0.1
ClayTablet.LOCAL.SMTP.Port
The port number of the local SMTP service that sends notification emails. Relevant only if the value of the ClayTablet.EmailNotification.SmtpService setting, described above, is LocalSmtp.
a port number
25
ClayTablet.LOCAL.SMTP.EnableSSL
Determines whether the SMTP server uses SSL. TrueFalse
False
Lionbridge Connector for Sitecore Installation and Configuration Guide Page 63Version 4.1.1 March 23, 2020
4 Configuring the Lionbridge Connector forSitecore
4.9.2.1 Configuring Email Notifications in theConfiguration File

Setting Name
DescriptionSupported Values
Default Value
ClayTablet.LOCAL.SMTP.FromAddress
The "From" email address that the local SMTP service uses to send notification emails. Relevant only if the value of the ClayTablet.EmailNotification.SmtpService setting, described above, is LocalSmtp.
an email address
ClayTablet.LOCAL.SMTP.User
The username for authentication for the SMTP server, if required.Note: To use SMTP authentication, uncomment this section.
username blank
ClayTablet.LOCAL.SMTP.Password
The password for authentication for the SMTP server, if required.Note: To use SMTP authentication, uncomment this section.
password blank
ClayTablet.EmailNotification.NotifySentOut
Determines whether or not the Connector sends email notifications when it sends items out for translation.To receive email notifications, keep this setting as True.Note: You must also set the ClayTablet.EmailNotification.SendEmail setting, described above, to True.To prevent receiving email notifications, change this setting to False.
TrueFalse
True
ClayTablet.EmailNotification.NotifySentOut.Users.RoleName
The Connector sends email notifications when it sends items out for translation to all users that have been added to this role.This role is installed by default. You must add users to this role, or change the role name and this setting to fit your requirements. For information about roles, see "Configuring Connector Roles and Adding Users" on page 112.
a role name sitecore\Translation ItemSentNotification Receiver
Lionbridge Connector for Sitecore Installation and Configuration Guide Page 64Version 4.1.1 March 23, 2020
4 Configuring the Lionbridge Connector forSitecore
4.9.2.1 Configuring Email Notifications in theConfiguration File
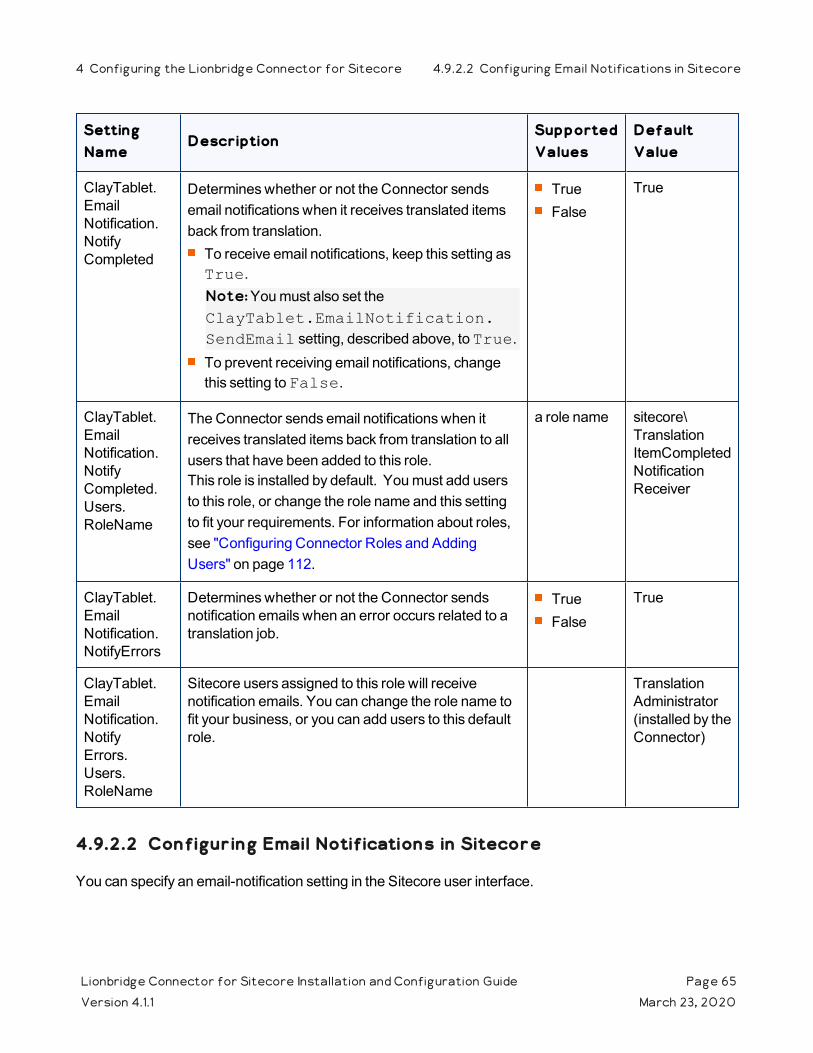
Setting Name
DescriptionSupported Values
Default Value
ClayTablet.EmailNotification.NotifyCompleted
Determines whether or not the Connector sends email notifications when it receives translated items back from translation.To receive email notifications, keep this setting as True.Note: You must also set the ClayTablet.EmailNotification.SendEmail setting, described above, to True.To prevent receiving email notifications, change this setting to False.
TrueFalse
True
ClayTablet.EmailNotification.NotifyCompleted.Users.RoleName
The Connector sends email notifications when it receives translated items back from translation to all users that have been added to this role.This role is installed by default. You must add users to this role, or change the role name and this setting to fit your requirements. For information about roles, see "Configuring Connector Roles and Adding Users" on page 112.
a role name sitecore\Translation ItemCompletedNotification Receiver
ClayTablet.EmailNotification.NotifyErrors
Determines whether or not the Connector sends notification emails when an error occurs related to a translation job.
TrueFalse
True
ClayTablet.EmailNotification.NotifyErrors.Users.RoleName
Sitecore users assigned to this role will receive notification emails. You can change the role name to fit your business, or you can add users to this default role.
Translation Administrator (installed by the Connector)
4.9.2.2 Configuring Email Notifications in Sitecore
You can specify an email-notification setting in the Sitecore user interface.
Lionbridge Connector for Sitecore Installation and Configuration Guide Page 65Version 4.1.1 March 23, 2020
4 Configuring the Lionbridge Connector for Sitecore 4.9.2.2 Configuring Email Notifications in Sitecore

To configure an email-notification setting:
1. In the Content Editor, in the content tree, navigate to /sitecore/system/Settings/Lionbridge Settings/Lionbridge Connector Settings/.
2. Click the Lionbridge Connector Settings item to select it and open it in the content area.
3. Scroll down to the Notification section.
4. Specify the following option:
Option Description
Delay Threshold Hours
Enter the number of hours after which sending out a translation job is considered "stuck." If a job is still not at 10% (In Translation) status after this interval, the Connector sends out an email notification.
5. Click the Save button in the top-left corner to save your changes.
4.9.3 Configuring Logging Settings
You configure the Connector's logging settings by modifying the following configuration file: Website_root/Website/App_Config/Include/CT3Translation.config. You can specify the following settings:
Setting Name
DescriptionSupported Values
Default Value
ClayTablet.LogFolder
By default, the Connector logs are in the same folder as the Sitecore logs. This enables you to use the Sitecore Log Viewer tool to view Connector logs as well. Connector log files use the following file-name format: log.CTTLOG.yyyymmdd.txt.
a path $(dataFolder/Logs/
Lionbridge Connector for Sitecore Installation and Configuration Guide Page 66Version 4.1.1 March 23, 2020
4 Configuring the Lionbridge Connector for Sitecore 4.9.3 Configuring Logging Settings
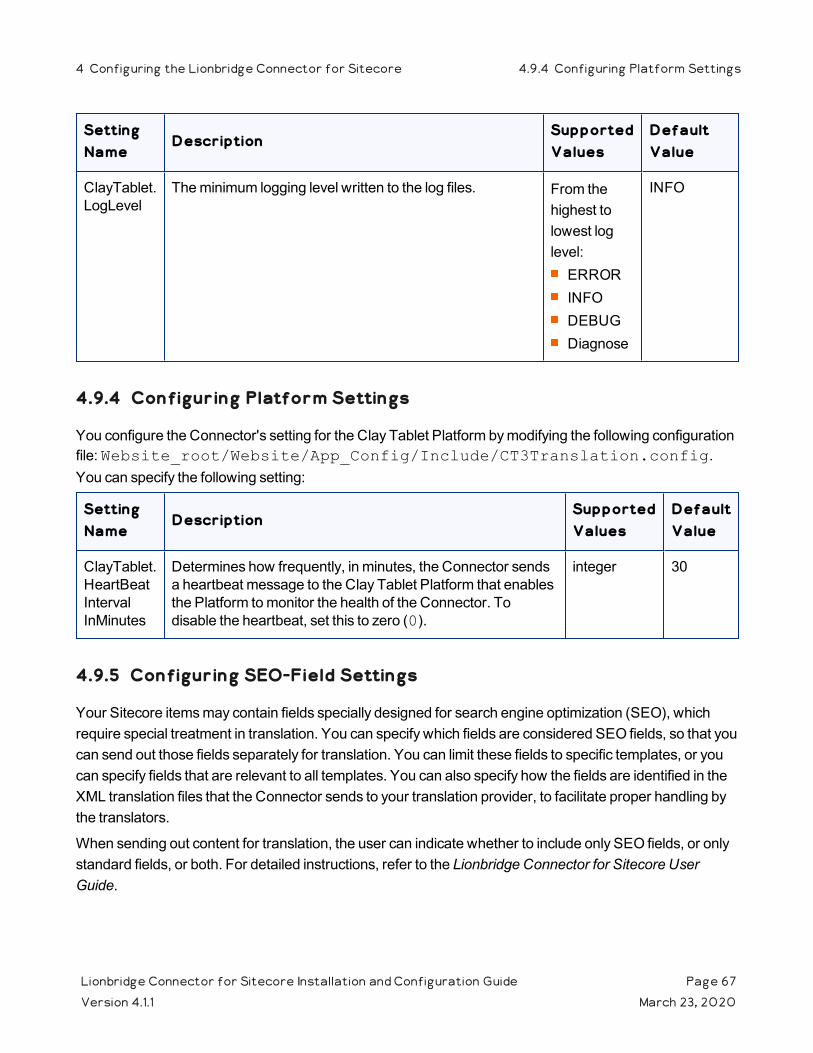
Setting Name
DescriptionSupported Values
Default Value
ClayTablet.LogLevel
The minimum logging level written to the log files. From the highest to lowest log level:ERRORINFODEBUGDiagnose
INFO
4.9.4 Configuring Platform Settings
You configure the Connector's setting for the Clay Tablet Platform by modifying the following configuration file: Website_root/Website/App_Config/Include/CT3Translation.config. You can specify the following setting:
Setting Name
DescriptionSupported Values
Default Value
ClayTablet.HeartBeatIntervalInMinutes
Determines how frequently, in minutes, the Connector sends a heartbeat message to the Clay Tablet Platform that enables the Platform to monitor the health of the Connector. To disable the heartbeat, set this to zero (0).
integer 30
4.9.5 Configuring SEO-Field Settings
Your Sitecore items may contain fields specially designed for search engine optimization (SEO), which require special treatment in translation. You can specify which fields are considered SEO fields, so that you can send out those fields separately for translation. You can limit these fields to specific templates, or you can specify fields that are relevant to all templates. You can also specify how the fields are identified in the XML translation files that the Connector sends to your translation provider, to facilitate proper handling by the translators.
When sending out content for translation, the user can indicate whether to include only SEO fields, or only standard fields, or both. For detailed instructions, refer to the Lionbridge Connector for Sitecore User Guide.
Lionbridge Connector for Sitecore Installation and Configuration Guide Page 67Version 4.1.1 March 23, 2020
4 Configuring the Lionbridge Connector for Sitecore 4.9.4 Configuring Platform Settings

To configure SEO-field settings:
1. In the Content Editor, in the content tree, navigate to /sitecore/system/Settings/Lionbridge Settings/Lionbridge Connector Settings/.
2. Click the Lionbridge Connector Settings item to select it and open it in the content area.
3. Scroll down to the SEO Fields section.
4. Specify the following options:
Lionbridge Connector for Sitecore Installation and Configuration Guide Page 68Version 4.1.1 March 23, 2020
4 Configuring the Lionbridge Connector for Sitecore 4.9.5 Configuring SEO-Field Settings
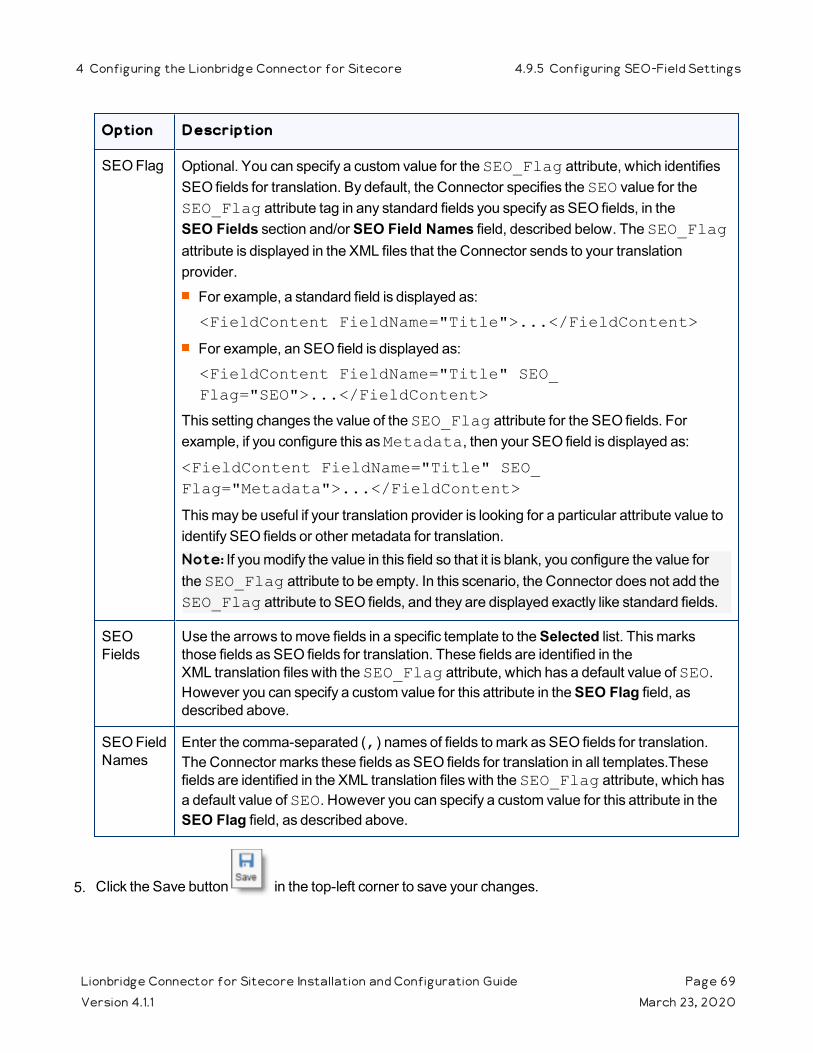
Option Description
SEO Flag Optional. You can specify a custom value for the SEO_Flag attribute, which identifies SEO fields for translation. By default, the Connector specifies the SEO value for the SEO_Flag attribute tag in any standard fields you specify as SEO fields, in the SEO Fields section and/or SEO Field Names field, described below. The SEO_Flag attribute is displayed in the XML files that the Connector sends to your translation provider.
For example, a standard field is displayed as:
<FieldContent FieldName="Title">...</FieldContent>
For example, an SEO field is displayed as:
<FieldContent FieldName="Title" SEO_Flag="SEO">...</FieldContent>
This setting changes the value of the SEO_Flag attribute for the SEO fields. For example, if you configure this as Metadata, then your SEO field is displayed as:
<FieldContent FieldName="Title" SEO_Flag="Metadata">...</FieldContent>
This may be useful if your translation provider is looking for a particular attribute value to identify SEO fields or other metadata for translation.Note: If you modify the value in this field so that it is blank, you configure the value for the SEO_Flag attribute to be empty. In this scenario, the Connector does not add the SEO_Flag attribute to SEO fields, and they are displayed exactly like standard fields.
SEO Fields
Use the arrows to move fields in a specific template to the Selected list. This marks those fields as SEO fields for translation. These fields are identified in the XML translation files with the SEO_Flag attribute, which has a default value of SEO. However you can specify a custom value for this attribute in the SEO Flag field, as described above.
SEO Field Names
Enter the comma-separated (,) names of fields to mark as SEO fields for translation. The Connector marks these fields as SEO fields for translation in all templates.These fields are identified in the XML translation files with the SEO_Flag attribute, which has a default value of SEO. However you can specify a custom value for this attribute in the SEO Flag field, as described above.
5. Click the Save button in the top-left corner to save your changes.
Lionbridge Connector for Sitecore Installation and Configuration Guide Page 69Version 4.1.1 March 23, 2020
4 Configuring the Lionbridge Connector for Sitecore 4.9.5 Configuring SEO-Field Settings
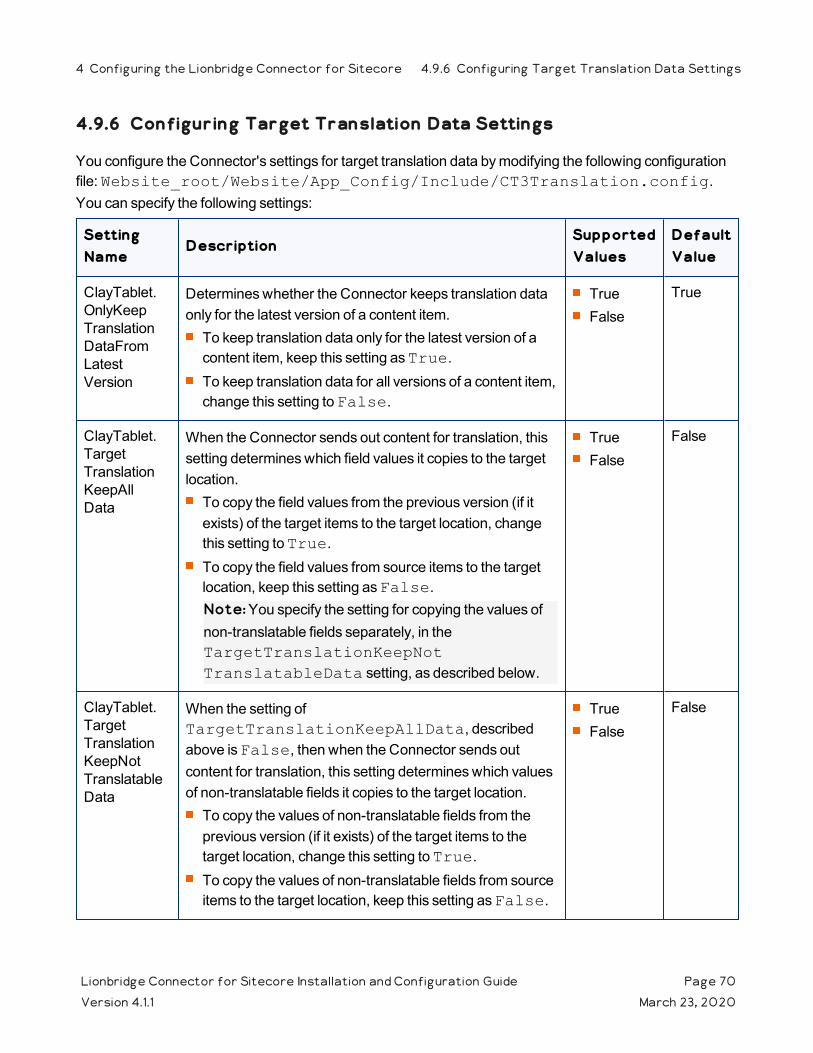
4.9.6 Configuring Target Translation Data Settings
You configure the Connector's settings for target translation data by modifying the following configuration file: Website_root/Website/App_Config/Include/CT3Translation.config. You can specify the following settings:
Setting Name
DescriptionSupported Values
Default Value
ClayTablet.OnlyKeepTranslationDataFromLatestVersion
Determines whether the Connector keeps translation data only for the latest version of a content item. To keep translation data only for the latest version of a content item, keep this setting as True. To keep translation data for all versions of a content item, change this setting to False.
TrueFalse
True
ClayTablet.TargetTranslationKeepAllData
When the Connector sends out content for translation, this setting determines which field values it copies to the target location. To copy the field values from the previous version (if it exists) of the target items to the target location, change this setting to True. To copy the field values from source items to the target location, keep this setting as False.Note: You specify the setting for copying the values of non-translatable fields separately, in the TargetTranslationKeepNotTranslatableData setting, as described below.
TrueFalse
False
ClayTablet.TargetTranslationKeepNotTranslatableData
When the setting of TargetTranslationKeepAllData, described above is False, then when the Connector sends out content for translation, this setting determines which values of non-translatable fields it copies to the target location. To copy the values of non-translatable fields from the previous version (if it exists) of the target items to the target location, change this setting to True. To copy the values of non-translatable fields from source items to the target location, keep this setting as False.
TrueFalse
False
Lionbridge Connector for Sitecore Installation and Configuration Guide Page 70Version 4.1.1 March 23, 2020
4 Configuring the Lionbridge Connector for Sitecore 4.9.6 Configuring Target Translation Data Settings
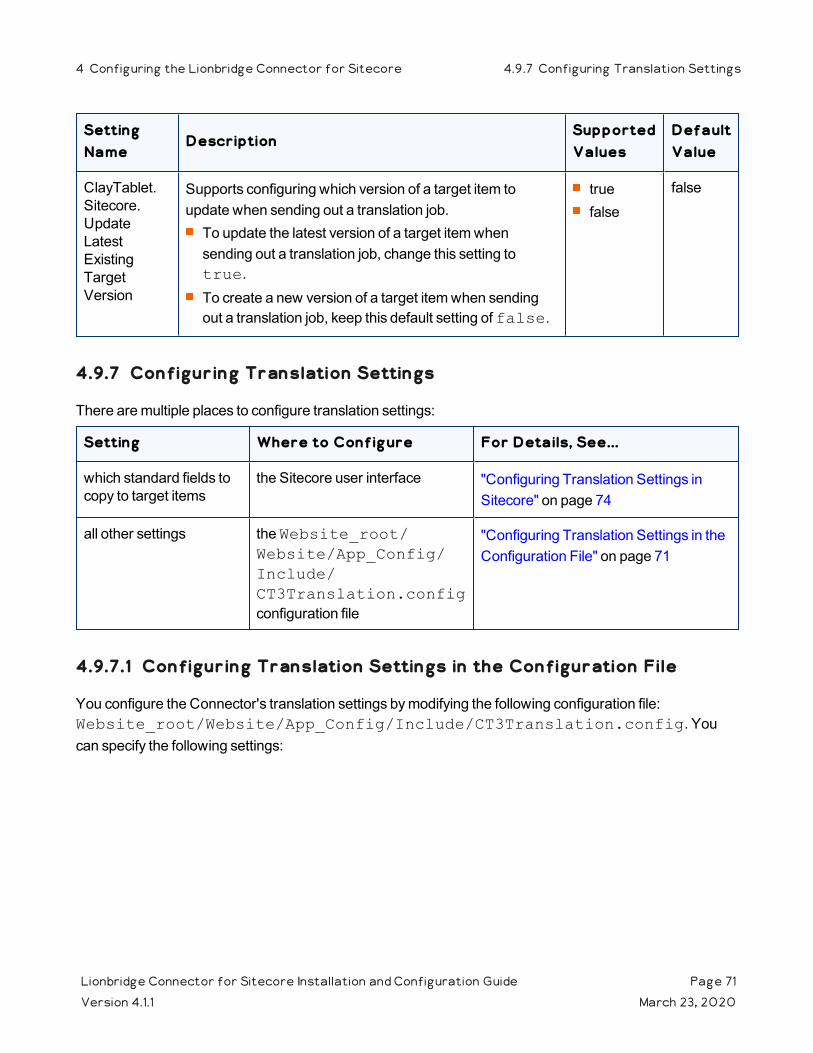
Setting Name
DescriptionSupported Values
Default Value
ClayTablet.Sitecore.UpdateLatestExistingTargetVersion
Supports configuring which version of a target item to update when sending out a translation job. To update the latest version of a target item when sending out a translation job, change this setting to true.To create a new version of a target item when sending out a translation job, keep this default setting of false.
truefalse
false
4.9.7 Configuring Translation Settings
There are multiple places to configure translation settings:
Setting Where to Configure For Details, See...
which standard fields to copy to target items
the Sitecore user interface "Configuring Translation Settings in Sitecore" on page 74
all other settings the Website_root/Website/App_Config/Include/CT3Translation.config configuration file
"Configuring Translation Settings in the Configuration File" on page 71
4.9.7.1 Configuring Translation Settings in the Configuration File
You configure the Connector's translation settings by modifying the following configuration file: Website_root/Website/App_Config/Include/CT3Translation.config. You can specify the following settings:
Lionbridge Connector for Sitecore Installation and Configuration Guide Page 71Version 4.1.1 March 23, 2020
4 Configuring the Lionbridge Connector for Sitecore 4.9.7 Configuring Translation Settings

Setting Name
DescriptionSupported Values
Default Value
ClayTablet.ProjectIdentifier
This creates the prefix for identifying the client in translation projects. For example, if the "ABC" client sets this to ABC and sends out the marketing_post_Aug08 item for translation, the name of the translation project is ABC_marketing_post_Aug08.Note: Relevant only when either Lionbridge Freeway or Lionbridge onDemand is the translation provider.
a text string ClientName
ClayTablet.PackedFileFormat
The Connector can export Sitecore content (field content) in two different formats: XML and HTML. XML is the default format, which is acceptable to most translation providers. If your translation provider has difficulties handling XML files and can handle only HTML files, then you can change this setting to HTML.
either XML or HTML
XML
ClayTablet.TranslateCommonFolderItem
Determines whether or not the Connector sends out for translation content items that are based on a common-folder template, located in: Templates/Common/Folder. This determines whether the Connector sends out the folder's fields, including the folder name, for translation.
TrueFalse
False
Lionbridge Connector for Sitecore Installation and Configuration Guide Page 72Version 4.1.1 March 23, 2020
4 Configuring the Lionbridge Connector forSitecore
4.9.7.1 Configuring Translation Settings in theConfiguration File
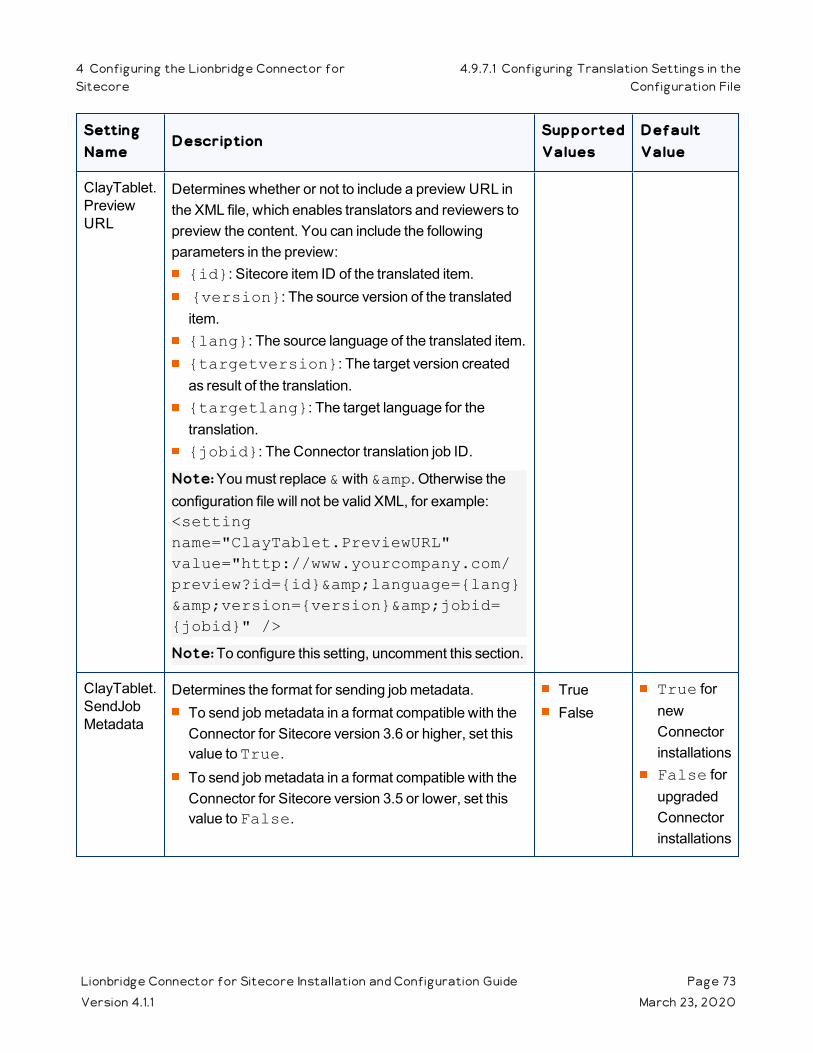
Setting Name
DescriptionSupported Values
Default Value
ClayTablet.PreviewURL
Determines whether or not to include a preview URL in the XML file, which enables translators and reviewers to preview the content. You can include the following parameters in the preview:{id}: Sitecore item ID of the translated item. {version}: The source version of the translated item.{lang}: The source language of the translated item.{targetversion}: The target version created as result of the translation. {targetlang}: The target language for the translation. {jobid}: The Connector translation job ID.
Note: You must replace & with &. Otherwise the configuration file will not be valid XML, for example: <setting name="ClayTablet.PreviewURL" value="http://www.yourcompany.com/ preview?id={id}&language={lang}&version={version}&jobid={jobid}" />
Note: To configure this setting, uncomment this section.
ClayTablet.SendJobMetadata
Determines the format for sending job metadata.To send job metadata in a format compatible with the Connector for Sitecore version 3.6 or higher, set this value to True.To send job metadata in a format compatible with the Connector for Sitecore version 3.5 or lower, set this value to False.
TrueFalse
True for new Connector installationsFalse for upgraded Connector installations
Lionbridge Connector for Sitecore Installation and Configuration Guide Page 73Version 4.1.1 March 23, 2020
4 Configuring the Lionbridge Connector forSitecore
4.9.7.1 Configuring Translation Settings in theConfiguration File
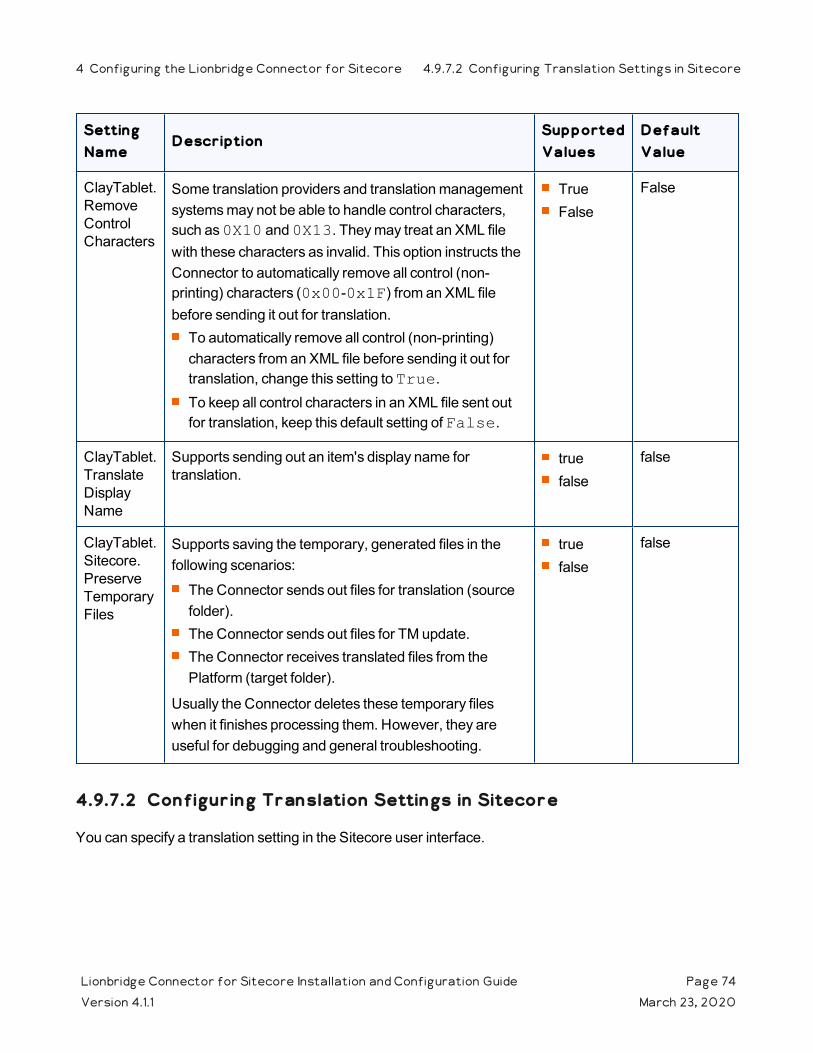
Setting Name
DescriptionSupported Values
Default Value
ClayTablet.RemoveControlCharacters
Some translation providers and translation management systems may not be able to handle control characters, such as 0X10 and 0X13. They may treat an XML file with these characters as invalid. This option instructs the Connector to automatically remove all control (non-printing) characters (0x00-0x1F) from an XML file before sending it out for translation. To automatically remove all control (non-printing) characters from an XML file before sending it out for translation, change this setting to True.To keep all control characters in an XML file sent out for translation, keep this default setting of False.
TrueFalse
False
ClayTablet.TranslateDisplayName
Supports sending out an item's display name for translation.
truefalse
false
ClayTablet.Sitecore.PreserveTemporaryFiles
Supports saving the temporary, generated files in the following scenarios:
The Connector sends out files for translation (source folder).The Connector sends out files for TM update.The Connector receives translated files from the Platform (target folder).
Usually the Connector deletes these temporary files when it finishes processing them. However, they are useful for debugging and general troubleshooting.
truefalse
false
4.9.7.2 Configuring Translation Settings in Sitecore
You can specify a translation setting in the Sitecore user interface.
Lionbridge Connector for Sitecore Installation and Configuration Guide Page 74Version 4.1.1 March 23, 2020
4 Configuring the Lionbridge Connector for Sitecore 4.9.7.2 Configuring Translation Settings in Sitecore

To configure a translation setting:
1. In the Content Editor, in the content tree, navigate to the /sitecore/system/Settings/Lionbridge Settings/Lionbridge Connector Settings/Advanced Settings item.
Tip: Scroll down to the bottom of the Settings folder to locate the Lionbridge Settings sub-folder.
2. Click the Advanced Settings item in the folder to open it in the content area.
3. Locate the Standard fields to copy to target item section.
4. If there are standard fields to copy to target items, select them in the All list and user the arrow to move them to the Selected list.
Note: The standard fields are usually shared and therefore identical in all versions. Therefore, they are not usually copied or sent for translation.
5. Click the Save button in the top-left corner to save your changes.
4.9.8 Configuring Update-TM Settings
You can specify an Update-TM (translation memory) setting in the Sitecore user interface.
Lionbridge Connector for Sitecore Installation and Configuration Guide Page 75Version 4.1.1 March 23, 2020
4 Configuring the Lionbridge Connector for Sitecore 4.9.8 Configuring Update-TM Settings

To configure Update-TM settings:
1. In the Content Editor, in the content tree, navigate to /sitecore/system/Settings/Lionbridge Settings/Lionbridge Connector Settings/.
2. Click the Lionbridge Connector Settings item to select it and open it in the content area.
3. Scroll down to the Update TM section.
4. Specify the following option:
Option Description
Always Update TM using latest target version
This determines which target version the Connector uses to send to update a remote TM (translation memory) server. If this check box is cleared (default value), then the Connector always sends the target version that is the translation to the remote TM server. If the target version was edited post translation, then the Connector sends the version from the translation provider to the remote TM server.If this check box is selected, then the Connector always sends the latest available target version to the remote TM server. If the target version was edited post translation, then the Connector sends this update of the translation to the remote TM server.
5. Click the Save button in the top-left corner to save your changes.
4.9.9 Configuring Job-Metadata Settings
You can which, if any, user information the Connector includes as job metadata when it sends out jobs for translation. You can configure the Connector to include the following job metadata:
the name of the logged-in Sitecore user who creates the translation job
the email address of the logged-in Sitecore user who creates the translation job
Lionbridge Connector for Sitecore Installation and Configuration Guide Page 76Version 4.1.1 March 23, 2020
4 Configuring the Lionbridge Connector for Sitecore 4.9.9 Configuring Job-Metadata Settings

By default, the Connector does not include either the name or the email address of the logged-in Sitecore user who creates the translation job. However, you can configure the Connector to include either or both of these.
Tip: Including the name and email address in the job metadata facilitates communication with the translation provider.
To configure which job metadata to include:
1. In the Content Editor, in the content tree, navigate to /sitecore/system/Settings/Lionbridge Settings/Lionbridge Connector Settings/.
2. Click the Lionbridge Connector Settings item to select it and open it in the content area.
3. Scroll down to the Job metadata section.
4. Specify the following option:
Option Description
Send out email of job creator
This determines whether the email address of the Sitecore user is included in the job metadata that the Connector sends to the translation provider. This feature supports the EU's General Data Protection Regulation.If this check box is cleared (default value), then the Connector does not include the user's email address in the job metadata.If this check box is selected, then the Connector includes the logged-in Sitecore user's email address as job metadata.
Lionbridge Connector for Sitecore Installation and Configuration Guide Page 77Version 4.1.1 March 23, 2020
4 Configuring the Lionbridge Connector for Sitecore 4.9.9 Configuring Job-Metadata Settings
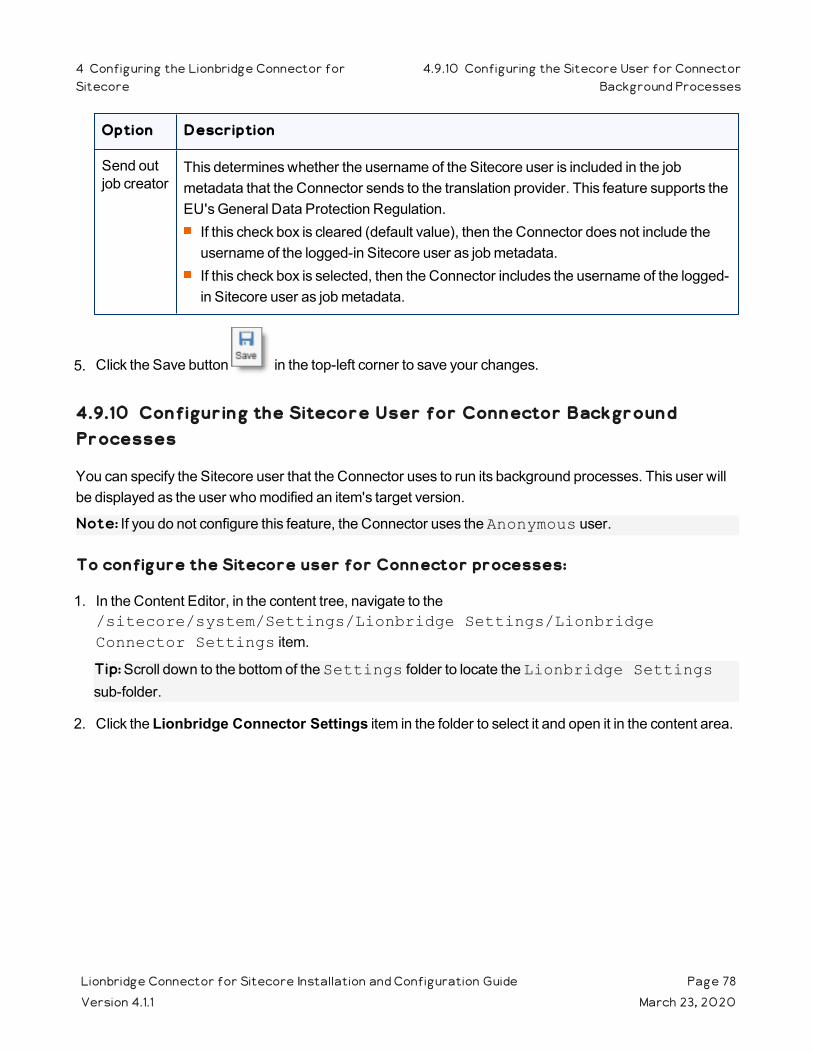
Option Description
Send out job creator
This determines whether the username of the Sitecore user is included in the job metadata that the Connector sends to the translation provider. This feature supports the EU's General Data Protection Regulation.If this check box is cleared (default value), then the Connector does not include the username of the logged-in Sitecore user as job metadata.If this check box is selected, then the Connector includes the username of the logged-in Sitecore user as job metadata.
5. Click the Save button in the top-left corner to save your changes.
4.9.10 Configuring the Sitecore User for Connector Background Processes
You can specify the Sitecore user that the Connector uses to run its background processes. This user will be displayed as the user who modified an item's target version.
Note: If you do not configure this feature, the Connector uses the Anonymous user.
To configure the Sitecore user for Connector processes:
1. In the Content Editor, in the content tree, navigate to the /sitecore/system/Settings/Lionbridge Settings/Lionbridge Connector Settings item.
Tip: Scroll down to the bottom of the Settings folder to locate the Lionbridge Settings sub-folder.
2. Click the Lionbridge Connector Settings item in the folder to select it and open it in the content area.
Lionbridge Connector for Sitecore Installation and Configuration Guide Page 78Version 4.1.1 March 23, 2020
4 Configuring the Lionbridge Connector forSitecore
4.9.10 Configuring the Sitecore User for ConnectorBackground Processes

3. Locate the Security - User context for services section, and click the arrow in the top-right corner to expand it.
4. Click Select.
The Associated Sitecore User dialog box opens.
5. Click to select the Sitecore user to run the Connector background processes.
Recommendation: Select the LionbridgeTranslationAgent user. This user is installed by default when installing the full Connector package.
Lionbridge Connector for Sitecore Installation and Configuration Guide Page 79Version 4.1.1 March 23, 2020
4 Configuring the Lionbridge Connector forSitecore
4.9.10 Configuring the Sitecore User for ConnectorBackground Processes

6. Click OK to save your selection.
7. Click the Save button in the top-left corner to save your changes.
4.9.11 Configuring the Behavior of the Send Dependent Items Check Box
There are multiple places to configure the behavior of the Send Dependent Items check box, which is displayed in:
the Choose Items page of the Bulk Translation wizard
the Automatic Item Export for Translation dialog boxFor a description of the default behavior of this check box, see "Understanding the Send Dependent Items Check Box" on page 83.
Setting Where to Configure For Details, See...
include dependent items based on item templateexclude dependent items based on item pathinclude branches of dependent items
the Sitecore user interface "Configuring the Behavior of the Send Dependent Items Check Box in the Sitecore User Interface" on page 82
develop your own pipeline to determine which dependent items the Connector sends for translation when this check box is selected
the Website_root/Website/App_Config/Include/CT3Translation.config configuration file
"Configuring the Behavior of the Send Dependent Items Check Box in the Configuration File" on page 80
4.9.11.1 Configuring the Behavior of the Send Dependent Items Check Box in the Configuration File
The Send Dependent Items check box is displayed in:
the Choose Items page of the Bulk Translation wizard
the Automatic Item Export for Translation dialog box
Lionbridge Connector for Sitecore Installation and Configuration Guide Page 80Version 4.1.1 March 23, 2020
4 Configuring the Lionbridge Connector forSitecore
4.9.11 Configuring the Behavior of the Send Dependent ItemsCheck Box
By default, if the Send Dependent Items check box is selected, the Connector sends out data source items from the layout and final layout of the item itself. For a detailed illustration and scenarios of the default behavior of the Send Dependent Items check box, see "Understanding the Send Dependent Items Check Box" on page 83.
Alternatively, you can develop your own pipeline to determine which dependent items the Connector sends for translation when this check box is selected. You configure this pipeline in the <pipelines> section of the Website_root/Website/App_Config/Include/CT3Translation.config configuration file. If the Send Dependent Items check box is selected and the pipeline is defined, then when you run the Bulk Translation wizard:
1. The Connector calls the pipeline for each selected item.
2. On its own, the pipeline finds dependent items recursively.
Important: The pipeline overrides the default Connector behavior of sending out only data source items of the item itself. The Connector does not call the pipeline again using a dependent item as a source for recursively searching for additional dependent items.
3. The Connector adds the results to the list of items to send out for translation.
To develop a pipeline:
1. Insert the logic to recursively determine all dependent items of an item to send out for translation, similar to the following example:
<CustomRecursiveDependentItemsPipeline>
<!-- Insert the logic to recursively determine all dependent items of an item to send out for translation.
-->
<processor type="Your.Class, Your.Assembly" method="getDependentItems"/>
</CustomRecursiveDependentItemsPipeline>
2. Ensure that the processor method has the following signature:
public void getDependentItems(ClayTablet.SC.Pipelines.DependentItemsPipelineArgs args);
3. Use the args parameter to retrieve information about a source item. You will search for dependent items of this source:
public class DependentItemsPipelineArgs {
String ItemDatabase { get; }
Lionbridge Connector for Sitecore Installation and Configuration Guide Page 81Version 4.1.1 March 23, 2020
4 Configuring the LionbridgeConnector for Sitecore
4.9.11.1 Configuring the Behavior of the Send Dependent Items CheckBox in the Configuration File

String ItemId { get; }
String SourceLanguage { get; }
String SourceVersion { get; }
String[] TargetLanguages { get; }
List<String> DependentItems { get; }
}
4. Insert the item IDs of all dependent items of the source item into the DependentItems that the pipeline returns.
Sample code: This sample code contains the same pipeline logic from the Connector: https://bitbucket.org/liox-ondemand/lionbridge-connector-sitecore-examples/src/master/. You can use this sample as a basis to develop your own custom pipeline code.
4.9.11.2 Configuring the Behavior of the Send Dependent Items Check Box in the Sitecore User Interface
The Send Dependent Items check box is displayed in:
the Choose Items page of the Bulk Translation wizard
the Automatic Item Export for Translation dialog boxBy default, if the Send Dependent Items check box is selected, the Connector sends out data source items from the layout and final layout of the item itself. For a detailed illustration and scenarios of the default behavior of the Send Dependent Items check box, see "Understanding the Send Dependent Items Check Box" on page 83.
You can configure the Connector to exclude dependent content items by their paths or templates if the Send Dependent Items check box is selected.
To configure the behavior of the Send Dependent Items check box:
1. In the Content Editor, in the content tree, navigate to /sitecore/system/Settings/Lionbridge Settings/Lionbridge Connector Settings/.
2. Click the Lionbridge Connector Settings item to select it and open it in the content area.
Lionbridge Connector for Sitecore Installation and Configuration Guide Page 82Version 4.1.1 March 23, 2020
4 Configuring the LionbridgeConnector for Sitecore
4.9.11.2 Configuring the Behavior of the Send Dependent Items CheckBox in the Sitecore User Interface

3. Scroll down to the Dependent items section.
4. Specify one or more of the following options:
Option Description
Templates Enter the ID of each template whose content items you want to include as dependent items, if the Send Dependent Items check box is selected. Separate multiple template IDs with a pipe ( | ). If this field is blank, then all templates are included.Tip: The template ID is located in the Item ID field of the Quick Info section of the template.
Excluded Paths
Enter the paths of content items you want to exclude as dependent items, if the Send Dependent Items check box is selected. Separate multiple paths with a pipe ( | ).
Include children of dependent items
Select this check box to automatically include branches under dependent items.Note: This setting applies only to items not excluded by the Templates or Excluded Paths fields, described above.
5. Click the Save button in the top-left corner to save your changes.
4.9.11.3 Understanding the Send Dependent Items Check Box
The Send Dependent Items check box is displayed in:
the Choose Items page of the Bulk Translation wizard
the Automatic Item Export for Translation dialog box
Lionbridge Connector for Sitecore Installation and Configuration Guide Page 83Version 4.1.1 March 23, 2020
4 Configuring the Lionbridge Connector forSitecore
4.9.11.3 Understanding the Send Dependent Items CheckBox
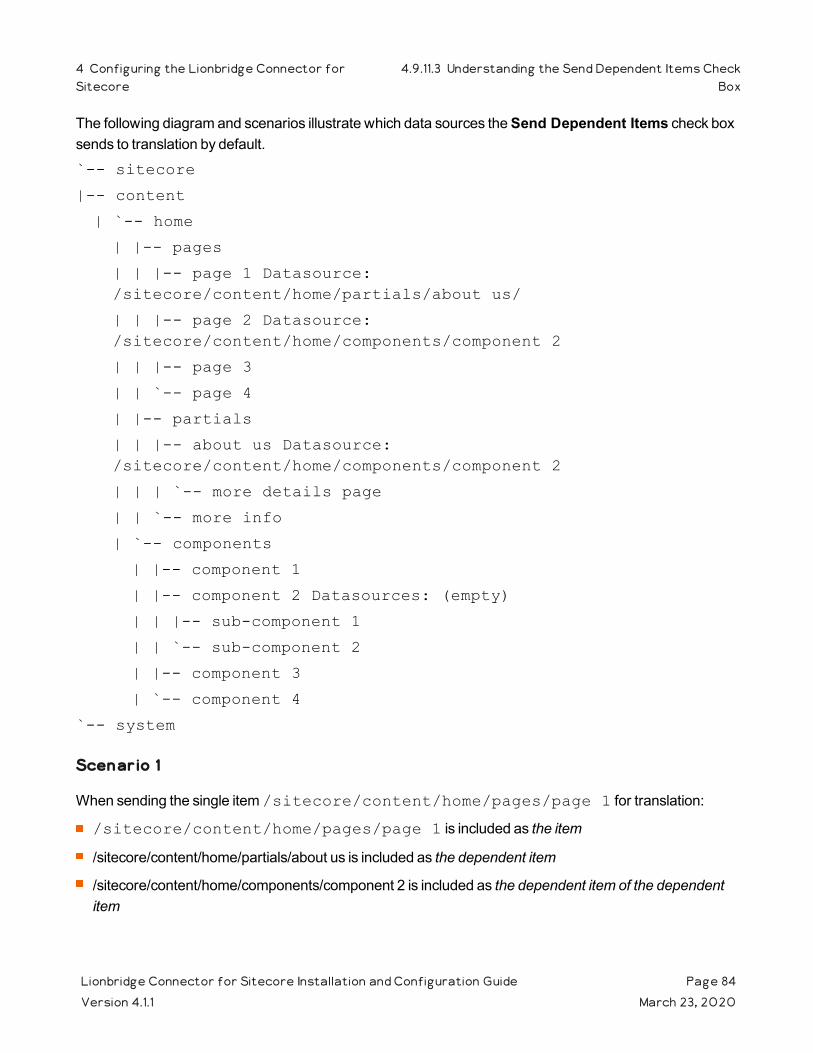
The following diagram and scenarios illustrate which data sources the Send Dependent Items check box sends to translation by default.
`-- sitecore
|-- content
| `-- home
| |-- pages
| | |-- page 1 Datasource: /sitecore/content/home/partials/about us/
| | |-- page 2 Datasource: /sitecore/content/home/components/component 2
| | |-- page 3
| | `-- page 4
| |-- partials
| | |-- about us Datasource: /sitecore/content/home/components/component 2
| | | `-- more details page
| | `-- more info
| `-- components
| |-- component 1
| |-- component 2 Datasources: (empty)
| | |-- sub-component 1
| | `-- sub-component 2
| |-- component 3
| `-- component 4
`-- system
Scenario 1
When sending the single item /sitecore/content/home/pages/page 1 for translation:
/sitecore/content/home/pages/page 1 is included as the item
/sitecore/content/home/partials/about us is included as the dependent item
/sitecore/content/home/components/component 2 is included as the dependent item of the dependent item
Lionbridge Connector for Sitecore Installation and Configuration Guide Page 84Version 4.1.1 March 23, 2020
4 Configuring the Lionbridge Connector forSitecore
4.9.11.3 Understanding the Send Dependent Items CheckBox

Children of about us and component 2are not included, because these are not dependent items of dependent items: rather, they are children of dependent items.
Scenario 2
When sending the single item /sitecore/content/home/pages/page 2 for translation:
/sitecore/content/home/pages/page 2 is included as the item
/sitecore/content/home/components/component 2 is included as the dependent item
Children of component 2are not included, because these are not dependent items of dependent items: rather, they are children of dependent items.
Scenario 3
When sending the branch /sitecore/content/home/pages for translation:
/sitecore/content/home/pages/page 1 is included as the item
/sitecore/content/home/partials/about us is included as the dependent item
/sitecore/content/home/components/component 2 is included as the dependent item of the dependent item
/sitecore/content/home/pages/page 2 is included as the item
/sitecore/content/home/pages/page 3 is included as the item
/sitecore/content/home/pages/page 4 is included as the item
Children of component 2are not included, because the branch of /sitecore/content/home/pages is sent for translation: the branch of component 2 is not sent for translation.
4.10 Configuring the Upload and Download Scheduled Tasks
The Connector uses two Sitecore scheduled tasks:
The Upload Schedule task uploads files for translation to the Clay Tablet Platform.
The Download Schedule task downloads translated files from the Clay Tablet Platform.
Running these scheduled tasks has minimal impact on the performance of the Clay Tablet Platform server, because if there are no active jobs when they contact the server, they just wait until the next scheduled invocation before contacting the server again. If the network is unavailable temporarily, these tasks log error messages on each invocation.
Lionbridge Connector for Sitecore Installation and Configuration Guide Page 85Version 4.1.1 March 23, 2020
4 Configuring the Lionbridge Connector forSitecore
4.10 Configuring the Upload and Download ScheduledTasks

The default polling interval for these scheduled tasks is 2 minutes.
You can configure the following aspects of these scheduled tasks:
You can modify the polling interval of the Upload Schedule and Download Schedule tasks. For detailed instructions, see "Modifying the Polling Interval of the Scheduled Tasks" on page 86.
You can configure the Upload Schedule task to automatically send out all items in Translation Queue at regular intervals, as a single translation job. For detailed instructions, see "Configuring the Connector to Send All Items in the Queue for Translation" on page 88.
Note: For instructions on configuring how the Upload Schedule creates translation jobs when automatically sending out items in the Translation Queue, see "Using Custom Logic to Configure how the Upload Schedule Creates Jobs when Automatically Sending Out Items from the Translation Queue" on page 158.
4.10.1 Modifying the Polling Interval of the Scheduled Tasks
You can modify the polling interval of the Connector's two Sitecore scheduled tasks:
The Upload Schedule task uploads files for translation to the Clay Tablet Platform.
The Download Schedule task downloads translated files from the Clay Tablet Platform.
The default polling interval for these scheduled tasks is 2 minutes.
Note: The Sitecore Scheduler controls all scheduled tasks, and therefore it schedules and triggers both these tasks. The polling frequency of the tasks cannot be more frequent than the Sitecore Scheduler's own frequency, because it will not have an impact.
Recommended polling intervals for these scheduled tasks:
Lowest = 1 minute
Optimal = 5 minute
To change the polling interval:
1. In the Content Editor, in the content tree, navigate to either:
/sitecore/system/Tasks/Schedules/Lionbridge/Download Schedule
/sitecore/system/Tasks/Schedules/Lionbridge/Upload Schedule
Lionbridge Connector for Sitecore Installation and Configuration Guide Page 86Version 4.1.1 March 23, 2020
4 Configuring the Lionbridge Connector forSitecore
4.10.1 Modifying the Polling Interval of the ScheduledTasks
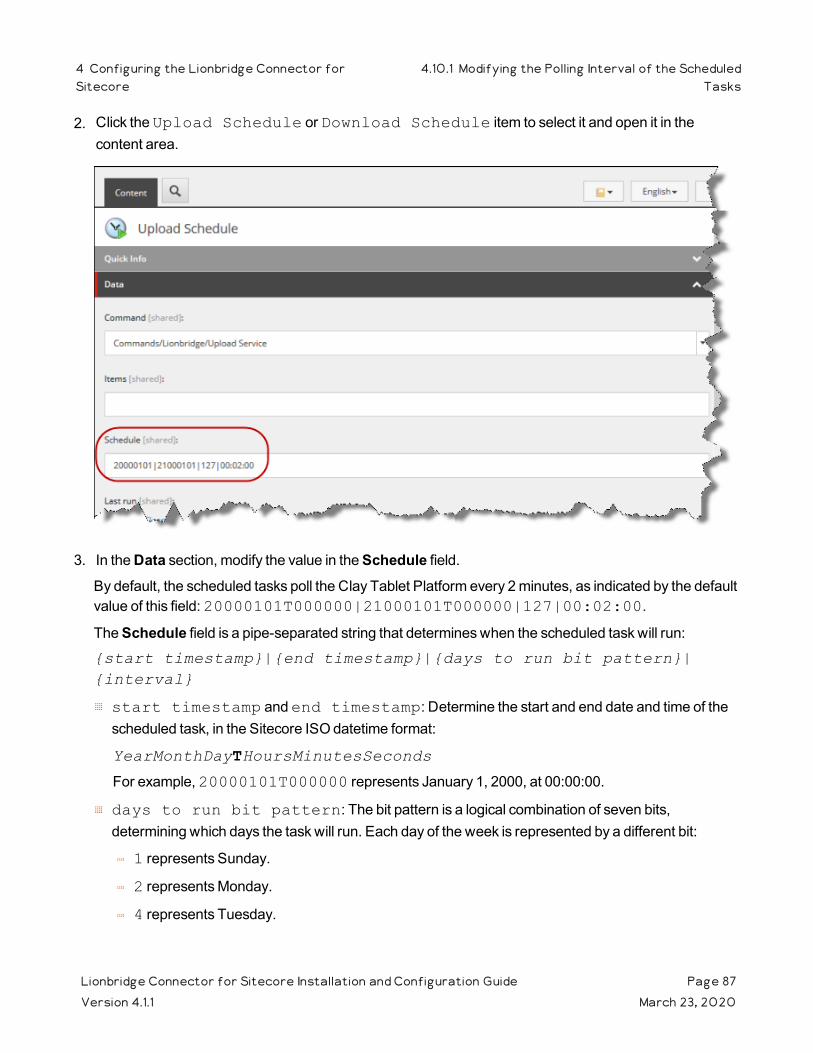
2. Click the Upload Schedule or Download Schedule item to select it and open it in the content area.
3. In the Data section, modify the value in the Schedule field.By default, the scheduled tasks poll the Clay Tablet Platform every 2 minutes, as indicated by the default value of this field: 20000101T000000|21000101T000000|127|00:02:00.
The Schedule field is a pipe-separated string that determines when the scheduled task will run:{start timestamp}|{end timestamp}|{days to run bit pattern}|{interval}
start timestamp and end timestamp: Determine the start and end date and time of the scheduled task, in the Sitecore ISO datetime format:
YearMonthDayTHoursMinutesSeconds
For example, 20000101T000000 represents January 1, 2000, at 00:00:00.
days to run bit pattern: The bit pattern is a logical combination of seven bits, determining which days the task will run. Each day of the week is represented by a different bit:
1 represents Sunday.
2 represents Monday.
4 represents Tuesday.
Lionbridge Connector for Sitecore Installation and Configuration Guide Page 87Version 4.1.1 March 23, 2020
4 Configuring the Lionbridge Connector forSitecore
4.10.1 Modifying the Polling Interval of the ScheduledTasks
8 represents Wednesday.
16 represents Thursday.
32 represents Friday.
64 represents Saturday.
For each day you want to run the scheduled task, add the value of the corresponding bit. For example:
If you want to run the task every day, you add the bits for each day, and you enter 127.
If you want to run the task only on Saturdays and Sundays, you add 1 and 64, and you enter 65.
interval: Determines the interval that the scheduled task runs, in hh:mm:ss format. For example, if you want the scheduled task to run every five minutes, you enter 00:05:00.
4. Click the Save button in the top-left corner to save your changes.
4.10.2 Configuring the Connector to Send All Items in the Queue for Translation
You can configure the Upload Schedule task, described in "Configuring the Upload and Download Scheduled Tasks" on page 85, so that the Connector automatically sends all items in the Translation Queue for translation.
Note: For instructions on configuring how the Upload Schedule creates translation jobs when automatically sending out items in the Translation Queue, see "Using Custom Logic to Configure how the Upload Schedule Creates Jobs when Automatically Sending Out Items from the Translation Queue" on page 158.
To configure this setting:
1. In the Content Editor, in the content tree, navigate to: /sitecore/system/Tasks/Schedules/Lionbridge/Upload Schedule/Upload Service Options
Lionbridge Connector for Sitecore Installation and Configuration Guide Page 88Version 4.1.1 March 23, 2020
4 Configuring the Lionbridge Connectorfor Sitecore
4.10.2 Configuring the Connector to Send All Items in the Queuefor Translation
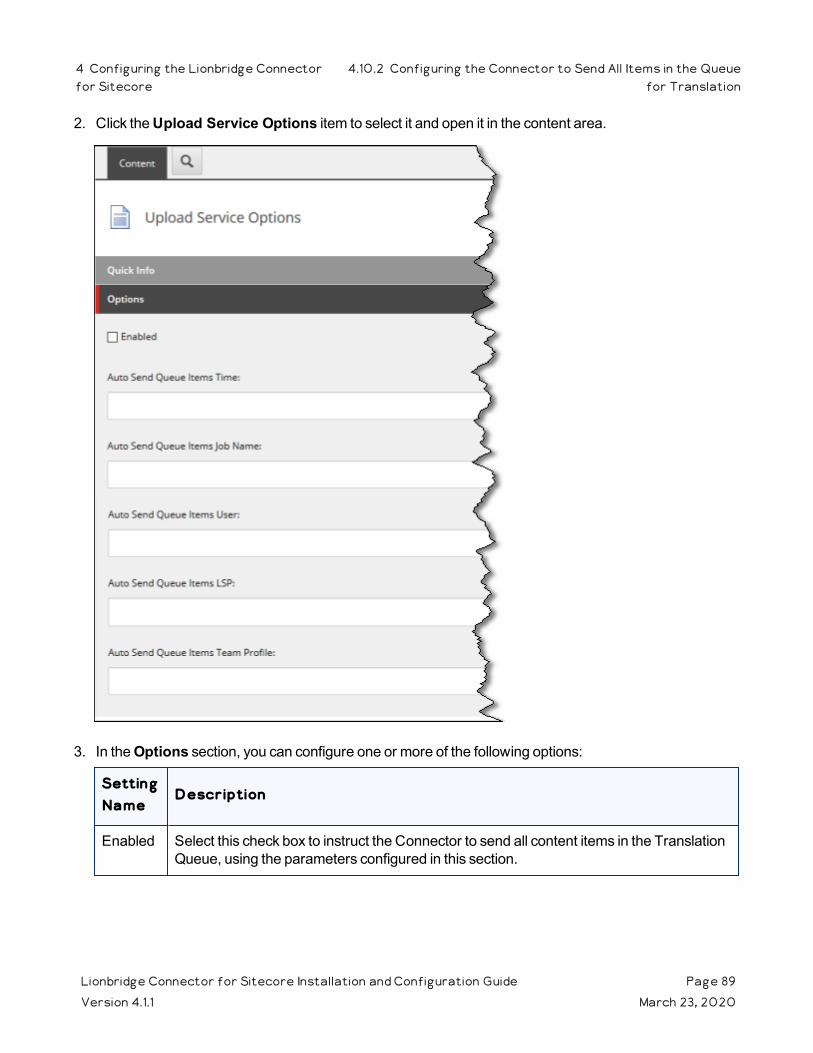
2. Click the Upload Service Options item to select it and open it in the content area.
3. In the Options section, you can configure one or more of the following options:
Setting Name
Description
Enabled Select this check box to instruct the Connector to send all content items in the Translation Queue, using the parameters configured in this section.
Lionbridge Connector for Sitecore Installation and Configuration Guide Page 89Version 4.1.1 March 23, 2020
4 Configuring the Lionbridge Connectorfor Sitecore
4.10.2 Configuring the Connector to Send All Items in the Queuefor Translation

Setting Name
Description
Auto Send Queue Items Time
This field is a pipe-separated string that determines the day of the week and the time (or times) when the Connector sends the content items in the Translation Queue out for translation as a single job.
{days to run bit pattern}|{time(s)}
Note: To send out a job every day, you specify only the {time(s)} parameter, as described below. You omit the optional {days to run bit pattern} parameter and the pipe ( | ).days to run bit pattern: Optional. The bit pattern is a logical combination of seven bits, determining which days the Connector will send out a job from the Translation Queue. Each day of the week is represented by a different bit:1 represents Sunday.2 represents Monday.4 represents Tuesday.8 represents Wednesday.16 represents Thursday.32 represents Friday.64 represents Saturday.
For each day you want to send out the content items in the Translation Queue as a single job, add the value of the corresponding bit. For example:
If you want to send out a job every day, you add the bits for each day, and you enter 127. If you want to send out a job only on Saturdays and Sundays, you add 1 and 64, and you enter 65.
time(s): You specify the time in the following format: hh:mm.
You can use a delimiter to specify multiple times. The following example includes only the time parameter, so it sends a new job at 6 AM and 6 PM daily: 06:00;18:00.Note: For each time entry, specify the day parameter. For example, if you want to send out a job every Sunday at 14:00 and 23:00, enter: 1|14:00;1|23:00.
Auto Send Queue Items Job Name
Specifies the job name. {d} is a placeholder for the day the job is sent.{t} is a placeholder for the time the job is sent.
Lionbridge Connector for Sitecore Installation and Configuration Guide Page 90Version 4.1.1 March 23, 2020
4 Configuring the Lionbridge Connectorfor Sitecore
4.10.2 Configuring the Connector to Send All Items in the Queuefor Translation

Setting Name
Description
Auto Send Queue Items User
Optional. Specifies the username for sending the job. If this is not configured, the user is Anonymous.
Auto Send Queue Items LSP
Optional. Specifies the translation provider where the Connector sends the job. If this is not configured, then the Connector sends the job to the default translation provider, which is the first provider configured in /sitecore/system/Settings/Lionbridge Settings/Translation Providers Configuration.
Auto Send Queue Items Team Profile
Optional. Specifies the team profile for sending the job.
4. Click the Save button in the top-left corner to save your changes.
4.11 Configuring the Sitecore Languages in the Sitecore Content Editor
The Connector uses the Regional ISO code field of the language item in Sitecore to define the Connector language codes. You must set up the correct Connector language codes for every Sitecore language your company uses for translation, both source and target languages. The Connector language codes are in the following location in the delivery package: <Delivery Package/Lionbridge Documents/CT3_LanguageCodes.txt>. These language codes are also listed in "Appendix: Language Codes" on page 138.
1. Log into the Sitecore Content Editor as an administrator.
2. Navigate to sitecore/System/Languages. This is where Sitecore languages are defined.
Note: If a source or target language is not defined, you must add it to Sitecore. For detailed instructions, refer to the Sitecore CMS Content Cookbook. This guide is available in the documentation section of the
Lionbridge Connector for Sitecore Installation and Configuration Guide Page 91Version 4.1.1 March 23, 2020
4 Configuring the Lionbridge Connector forSitecore
4.11 Configuring the Sitecore Languages in the SitecoreContent Editor

Sitecore Developer Network (SDN) site, at http://sdn.sitecore.net/Reference.aspx. You must log in to this site to access the documentation.
3. For each source or target language, in the Regional Iso Code field, enter the Connector language code from the <Delivery Package/Lionbridge Documents/CT3_LanguageCodes.txt> file.
Note: The Connector includes error trapping for improperly configured language codes. If you make a mistake or forget to configure a language, when you try to send out content for translation, the language is not available for selection, and the CT Language code is misconfigured error is displayed beside the language.
4.11.1 Adding Custom Language Codes to Sitecore
You can also add custom language codes into Sitecore by editing the Website/bin/CTAddedLanguageCodes.xml file. However you must also contact Clay Tablet and your translation provider to ensure the custom languages are set up appropriately in the Clay Tablet Provider Connector as well as in the Translation Management systems.
Note: If your company sends content to your translation provider via the Clay Tablet FTP Connector on the translation side, it is not necessary to contact Clay Tablet, because the FTP Connector automatically creates folders based on the job name and language pairs, even for a custom language pair. However, you must inform your translation provider about the standard language code into which to translate the content.
4.12 Configuring the Translation Workflow
Sitecore uses workflows to control when a content item is published. The Connector uses workflows to control the translation process for a content item.
The Connector translation package installs a sample translation workflow, which you access in the Sitecore Content Editor as an administrator by navigating to sitecore/System/Workflows/Lionbridge Sample Workflow. Although you use this workflow to manage translation, you can duplicate, modify, or extend it to support additional requirements.
For general information about workflows, refer to the appropriate version of the Sitecore CMS Content Author's Reference and Cookbook. This guide is available in the documentation section of the Sitecore Developer Network (SDN) site, at http://sdn.sitecore.net/Reference.aspx. You must log in to this site to access the documentation.
The Connector supports translating Sitecore items that have been configured in the following ways:
Lionbridge Connector for Sitecore Installation and Configuration Guide Page 92Version 4.1.1 March 23, 2020
4 Configuring the Lionbridge Connector for Sitecore 4.11.1 Adding Custom Language Codes to Sitecore

with the Connector Sample workflow attached
with a custom workflow that includes the Connector configuration section and the associated workflow states, which are listed and described in "Connector Workflow States" on page 98
with a custom workflow that does not have the Connector configuration section (see the following notes)
without a workflow (see the following notes)
Note: You can use the Bulk Translation feature to submit all the above types of item for translation. However, if you want to send items for translation individually, the Translate button in the Workflow section of the Review tab is displayed only for Sitecore items attached to Lionbridge Sample Workflow or to another workflow whose base template is TranslationWorkflow, as described in "Using Your own Workflow for Translation" on page 99.
Note: You must use a translation workflow that includes the basic Connector translation steps, which are implemented through workflow states. This ensures that the Connector can send out your content and retrieve it from your translation provider(s). For information on Connector workflow states, see "Connector Workflow States" on page 98.
To configure the following settings, navigate to sitecore/System/Workflows/Lionbridge Sample Workflow or your designated translation workflow. The settings are in the LionbridgeTranslation section.
Tip: Hover over each setting for extended help text.
You use the following settings to configure a workflow and the items attached to the workflow:
Note: For instructions on attaching items to a workflow, refer to the Lionbridge Connector for Sitecore User Guide.
Parameter Description Default Value
Translate From (Source Language)
The source language from which to translate the items. Select a language from the list.
Usually this is the Sitecore default language.
Translate To (Target Language)
The target languages that are available for translating the items attached to the workflow. To translate into specific target languages, select the corresponding check boxes.
n/a
Lionbridge Connector for Sitecore Installation and Configuration Guide Page 93Version 4.1.1 March 23, 2020
4 Configuring the Lionbridge Connector for Sitecore 4.12 Configuring the Translation Workflow

Parameter Description Default Value
Use Local TM (detect changed content and resend)
Determines whether the Use Local TM feature is available when translating items attached to this workflow. This feature checks each field of the source version for any content changes, and it sends only changed content fields out for translation, to ensure that all target versions reflect these changes.When this check box is selected, you can activate this feature by selecting a check box in either the Bulk Translation wizard or the Automatic Item Export for Translation dialog box. The Use Local TM feature may reduce translation costs, but it needs the Connector translation backup data, and it increases the Connector processing time before the Connector sends out the items for translation.When this check box is cleared, you cannot activate this feature, because the related user interface is not displayed. The Connector sends all specified source content for translation, even if it has not changed since it was previously sent for translation.
check box is cleared
Lionbridge Connector for Sitecore Installation and Configuration Guide Page 94Version 4.1.1 March 23, 2020
4 Configuring the Lionbridge Connector for Sitecore 4.12 Configuring the Translation Workflow
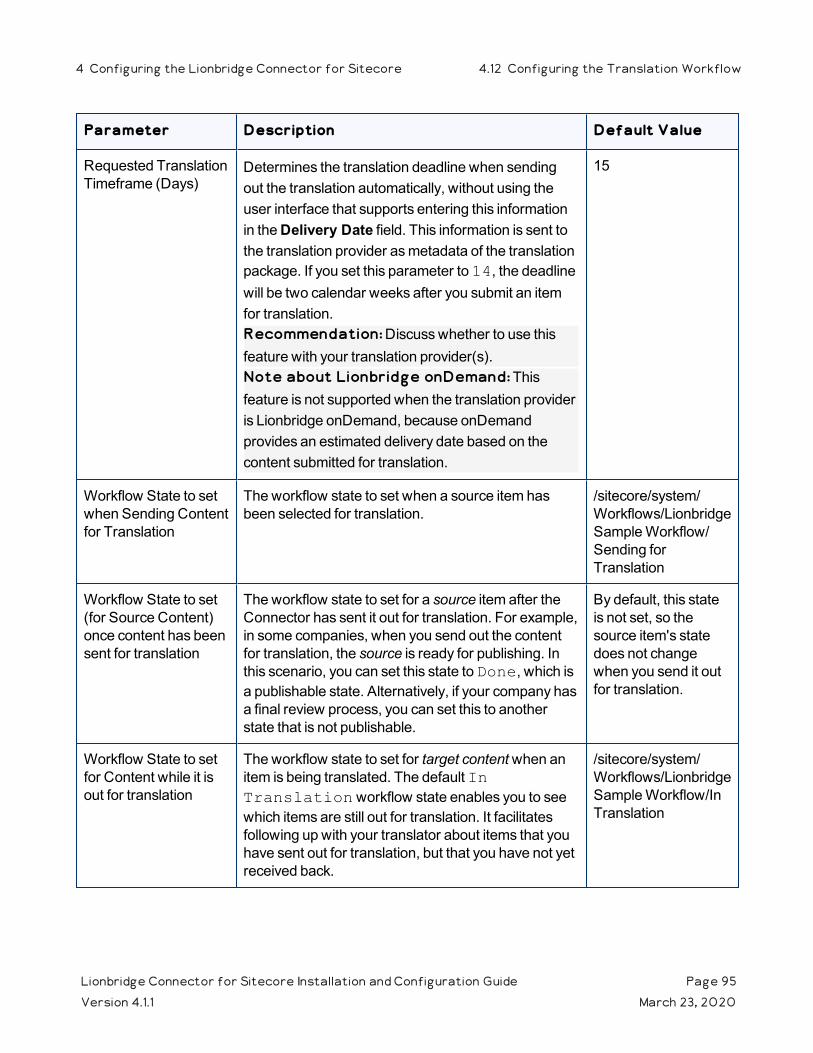
Parameter Description Default Value
Requested Translation Timeframe (Days)
Determines the translation deadline when sending out the translation automatically, without using the user interface that supports entering this information in the Delivery Date field. This information is sent to the translation provider as metadata of the translation package. If you set this parameter to 14, the deadline will be two calendar weeks after you submit an item for translation. Recommendation: Discuss whether to use this feature with your translation provider(s).Note about Lionbridge onDemand: This feature is not supported when the translation provider is Lionbridge onDemand, because onDemand provides an estimated delivery date based on the content submitted for translation.
15
Workflow State to set when Sending Content for Translation
The workflow state to set when a source item has been selected for translation.
/sitecore/system/Workflows/Lionbridge Sample Workflow/Sending for Translation
Workflow State to set (for Source Content) once content has been sent for translation
The workflow state to set for a source item after the Connector has sent it out for translation. For example, in some companies, when you send out the content for translation, the source is ready for publishing. In this scenario, you can set this state to Done, which is a publishable state. Alternatively, if your company has a final review process, you can set this to another state that is not publishable.
By default, this state is not set, so the source item's state does not change when you send it out for translation.
Workflow State to set for Content while it is out for translation
The workflow state to set for target content when an item is being translated. The default In Translation workflow state enables you to see which items are still out for translation. It facilitates following up with your translator about items that you have sent out for translation, but that you have not yet received back.
/sitecore/system/Workflows/Lionbridge Sample Workflow/In Translation
Lionbridge Connector for Sitecore Installation and Configuration Guide Page 95Version 4.1.1 March 23, 2020
4 Configuring the Lionbridge Connector for Sitecore 4.12 Configuring the Translation Workflow

Parameter Description Default Value
Workflow State to set when a translation has been cancelled
The workflow state to set when an item’s translation request has been cancelled.A user can cancel translation from the Translation Queue. A translation request is automatically cancelled if a fatal error occurs while sending out an item for translation, such as an incorrect language code, or insufficient user permissions.
/sitecore/system/Workflows/Lionbridge Sample Workflow/Reviewing
Workflow State to set for target items when no translation is required
The workflow state to set for all items that do not require translation. This is useful in when using the following features:
Copy source to target only Use local TM
Tip: Set this state to Done, and select the Automatically Publish content when it reaches the Final State check box, described below.
field is blank
Workflow State to set when content Translation is complete
The workflow state to set when an item translation has been completed, and it is back in Sitecore for review and publishing.
/sitecore/system/Workflows/Lionbridge Sample Workflow/Editing Translated Version
Lionbridge Connector for Sitecore Installation and Configuration Guide Page 96Version 4.1.1 March 23, 2020
4 Configuring the Lionbridge Connector for Sitecore 4.12 Configuring the Translation Workflow

Parameter Description Default Value
Send Content automatically using pre-configured language settings
Enables sending all items to the Translation Queue without further user action. That is, the Connector automatically uses the Translate from, Translate to and Requested Translation Timeframe information, defined above, to immediately send content to the Translation Queue without enabling the user to change these parameters: the Language Selection pop-up window does not open. If this check box is selected, the Language Selection pop-up window does not open when you send content to the Translation Queue: you cannot select the target languages or the destination, but sending items for translation is streamlined. If this check box is cleared, the Language Selection pop-up window opens when you send content out for translation: you can select the target languages, so the process is less streamlined. However, this provides greater control for the user.
check box is cleared
Automatically Publish content when it reaches the Final State
Determines whether the Connector automatically publishes the content when an item reaches the final state of the translation workflow.If this check box is selected, the Connector automatically publishes the content when an item reaches the final state. If this check box is cleared, the Connector does not automatically publish the content when an item reaches the final state.
check box is cleared
Publish to which Database?
The target databases for publishing content if the Connector needs to publish an item.
n/a
Lionbridge Connector for Sitecore Installation and Configuration Guide Page 97Version 4.1.1 March 23, 2020
4 Configuring the Lionbridge Connector for Sitecore 4.12 Configuring the Translation Workflow

Parameter Description Default Value
Publish child items? Determines whether the Connector publishes child items when it publishes their parent item.If this check box is selected, the Connector publishes child items when it publishes their parent item. If this check box is cleared, the Connector does not publish child items when it publishes their parent item.
check box is selected
Keep final state for source items?
Determines whether the workflow state of the source item changes during the translation process if it was in a final workflow state before that process started. When you translate published source items into other language versions, this setting prevents Sitecore from unpublishing those source items.
check box is selected
For a list and description of Connector workflow states, see "Connector Workflow States" on page 98, below.
4.12.1 Connector Workflow States
The sitecore/System/Workflows/Lionbridge Sample Workflow workflow contains all required states for the Connector translation management process.
By default, it has the following seven states, which are listed, in order, below. Your company can modify this translation workflow to meet your business requirements. Your company can also create your own translation workflow, removing some of these states or adding additional states as required.
Workflow StateRelevant for Source Content
Relevant for Target Content
Editing ü
Reviewing ü
Sending for Translation ü
In Translation ü
Editing Translated Version ü
Lionbridge Connector for Sitecore Installation and Configuration Guide Page 98Version 4.1.1 March 23, 2020
4 Configuring the Lionbridge Connector for Sitecore 4.12.1 Connector Workflow States
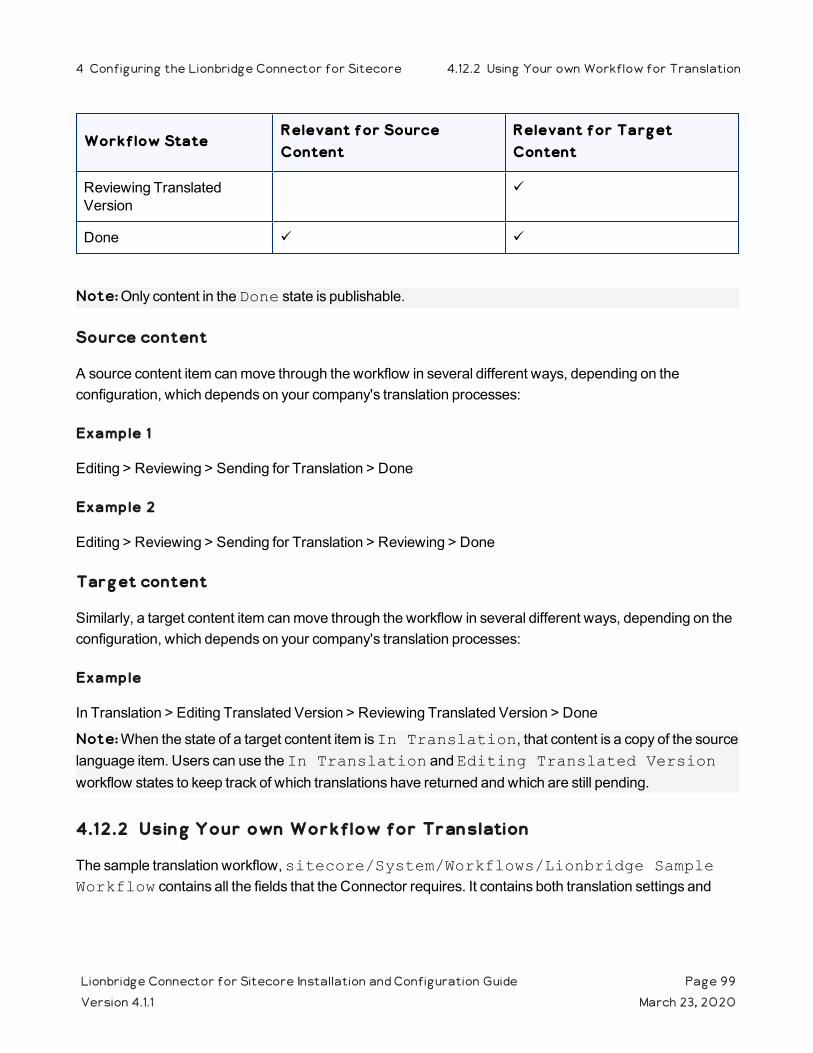
Workflow StateRelevant for Source Content
Relevant for Target Content
Reviewing Translated Version
ü
Done ü ü
Note: Only content in the Done state is publishable.
Source content
A source content item can move through the workflow in several different ways, depending on the configuration, which depends on your company's translation processes:
Example 1
Editing > Reviewing > Sending for Translation > Done
Example 2
Editing > Reviewing > Sending for Translation > Reviewing > Done
Target content
Similarly, a target content item can move through the workflow in several different ways, depending on the configuration, which depends on your company's translation processes:
Example
In Translation > Editing Translated Version > Reviewing Translated Version > Done
Note: When the state of a target content item is In Translation, that content is a copy of the source language item. Users can use the In Translation and Editing Translated Version workflow states to keep track of which translations have returned and which are still pending.
4.12.2 Using Your own Workflow for Translation
The sample translation workflow, sitecore/System/Workflows/Lionbridge Sample Workflow contains all the fields that the Connector requires. It contains both translation settings and
Lionbridge Connector for Sitecore Installation and Configuration Guide Page 99Version 4.1.1 March 23, 2020
4 Configuring the Lionbridge Connector for Sitecore 4.12.2 Using Your own Workflow for Translation

some information about states and how the workflow proceeds between states. For a detailed description of these fields, see "Connector Workflow States" on page 98.
There is a hierarchy of templates in Sitecore:
The sample translation workflow is actually a template for the workflow provided in the Connector. It links to its parent template in the Quick info section:
The parent of this is the /sitecore/templates/System/Workflow/TranslationWorkflow base template. If you click the link and navigate to that template, you can see its base templates:
Standard template -- This is a standard Sitecore template.
Lionbridge Workflow Config -- This is the Connector's top-level workflow template. It is at the top of the hierarchy.
4.12.3 Modifying Controls in a Workflow
The Templates/Lionbridge Settings/Lionbridge Workflow Config/ Workflow Config template defines the controls in the Lionbridge Sample Workflow workflow.
For example:
The Translate from leaf in the tree represents the control for defining source languages for translation.
The Type field represents the type of user-interface control used to specify the source languages.
The Source field defines the location where the Connector retrieves source languages in Sitecore.
Lionbridge Connector for Sitecore Installation and Configuration Guide Page 100Version 4.1.1 March 23, 2020
4 Configuring the Lionbridge Connector for Sitecore 4.12.3 Modifying Controls in a Workflow

There are multiple ways to modify controls in a workflow:
You can modify the Templates/Lionbridge Settings/Lionbridge Workflow Config template.
You can copy the values from the Templates/Lionbridge Settings/Lionbridge Workflow Config template into your own template.
There are many ways to implement modifications:
You can remove a control. For example, if you decide you do not need a particular field, you can remove it from Lionbridge Workflow Config, using the Builder tab. (The Content tab is the default tab.)
You can modify a control. For example, if you want to change a control, make a copy of the Templates/Lionbridge Settings/Lionbridge Workflow Config template, and then make the modifications you want.
You can modify your own workflow by selecting Insert > Insert from template in the context menu, selecting the Templates/Lionbridge Settings/Lionbridge Workflow Config template, and then selecting a control.
4.12.4 Modifying States in a Workflow
You can modify the states in a workflow and the linkages between states, which determines the workflow.
Warning: Do not modify the values in the Data section, Type string field of states in Lionbridge Sample Workflow or in states that originate from there. Otherwise, the Connector will not work property. The values in that field are Clay Tablet classes that call the Connector functionality.
Lionbridge Connector for Sitecore Installation and Configuration Guide Page 101Version 4.1.1 March 23, 2020
4 Configuring the Lionbridge Connector for Sitecore 4.12.4 Modifying States in a Workflow

You can add or remove states from the template, or modify how the linkages between states, such as which state follows another state. There are two recommended ways to do this:
Modify states in Lionbridge Sample Workflow: In the Lionbridge Sample Workflow folder, right-click and select Insert > Insert from template in the context menu. Navigate to the Workflow/State template. All the states are based on this template. Then, after you create the state within the workflow, you create an action. For example:
To specify the next state, in the Data section, select the next state in the Next state dropdown list.
To specify the final state, in the Data section, select the Final check box. By default, the final state is the Publish state.
Tip: First create all the states and then link them, as described above.
Copy a state to a new workflow: You can create a new state based on an existing state. To do this, select the state you want to want to copy. Right-click and select Copying > Copy To in the context menu. Then select the workflow where you want to copy this state, and click Copy. The copied state has the same settings as the original state.
For more information, refer to the Sitecore CMS Workflow Cookbook. This guide is available in the documentation section of the Sitecore Developer Network (SDN) site, at http://sdn.sitecore.net/Reference.aspx. You must log in to this site to access the documentation.
Note: Your custom workflow must include the required translation statuses.
4.12.5 Changing the Base Template of Your Workflow
To change the base template of your workflow, so that you can use it with the Connector to manage translations:
1. In the content tree, select your workflow that you want to use as a translation workflow. For example, select sitecore\System\Workflow\MyWorkflow.
2. In the ribbon, click the Configure tab.
3. In the Template section of the Configure tab, click Change.
Lionbridge Connector for Sitecore Installation and Configuration Guide Page 102Version 4.1.1 March 23, 2020
4 Configuring the Lionbridge Connector for Sitecore 4.12.5 Changing the Base Template of Your Workflow
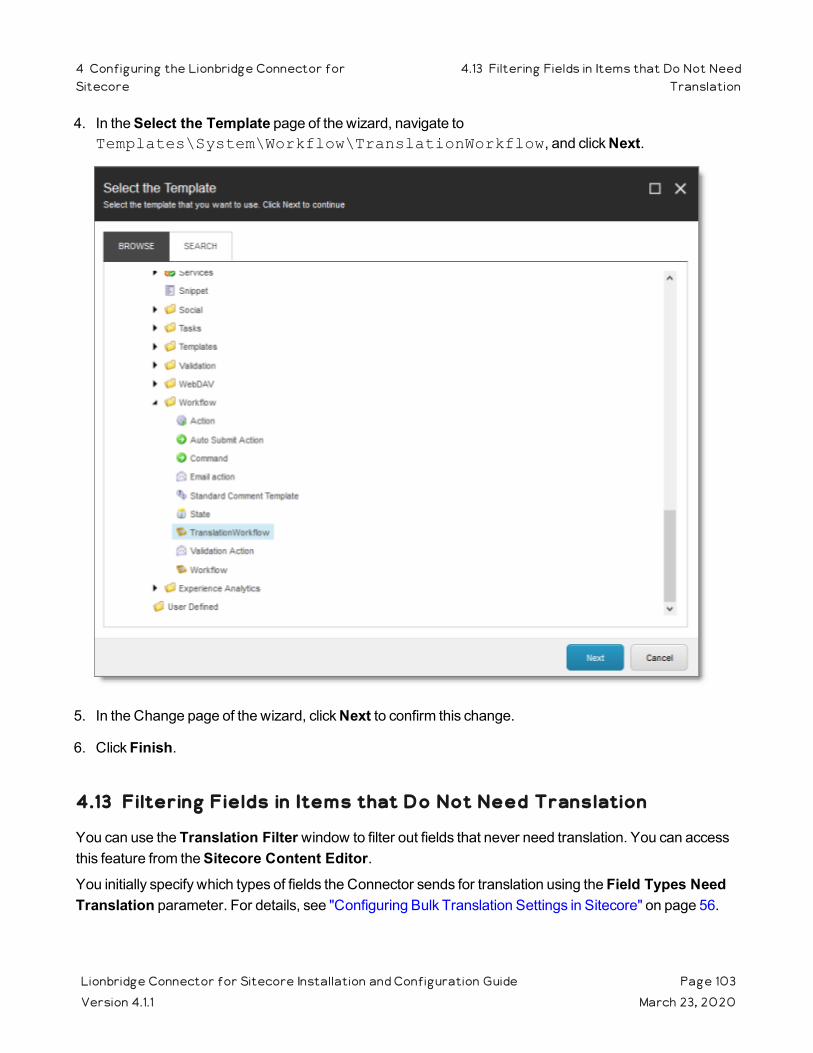
4. In the Select the Template page of the wizard, navigate to Templates\System\Workflow\TranslationWorkflow, and click Next.
5. In the Change page of the wizard, click Next to confirm this change.
6. Click Finish.
4.13 Filtering Fields in Items that Do Not Need Translation
You can use the Translation Filter window to filter out fields that never need translation. You can access this feature from the Sitecore Content Editor.You initially specify which types of fields the Connector sends for translation using the Field Types Need Translation parameter. For details, see "Configuring Bulk Translation Settings in Sitecore" on page 56.
Lionbridge Connector for Sitecore Installation and Configuration Guide Page 103Version 4.1.1 March 23, 2020
4 Configuring the Lionbridge Connector forSitecore
4.13 Filtering Fields in Items that Do Not NeedTranslation

You use the Translation Filter feature to further exclude certain types of fields from content that the Connector sends for translation, per the template. You can create filters when initially configuring the Connector, or you can create or update the filters at any time.
When a user sends out an item for translation, the Connector collects the content from all fields in the item with the field types specified in that parameter, in preparation for sending them out for translation. Then, if there are some fields that you do not want to send for translation, even though they belong to field types that the Connector sends out for translation, you can use the Translation Filter to exclude them.
1. Do one of the following to open the Translation Filter window:
In the Sitecore Content Editor ribbon, click the Lionbridge Translation tab, and then in the Translation Tools section, click Translation Filter.
In the Sitecore Desktop, click the Sitecore menu, and then select All Applications > Lionbridge Translation > Translation Filter from the menu.
The Translation Filter window opens.
2. Click the Add button to add a new filter.
The Welcome page of the Field Filter wizard opens.
3. Click Next.
Lionbridge Connector for Sitecore Installation and Configuration Guide Page 104Version 4.1.1 March 23, 2020
4 Configuring the Lionbridge Connector forSitecore
4.13 Filtering Fields in Items that Do Not NeedTranslation
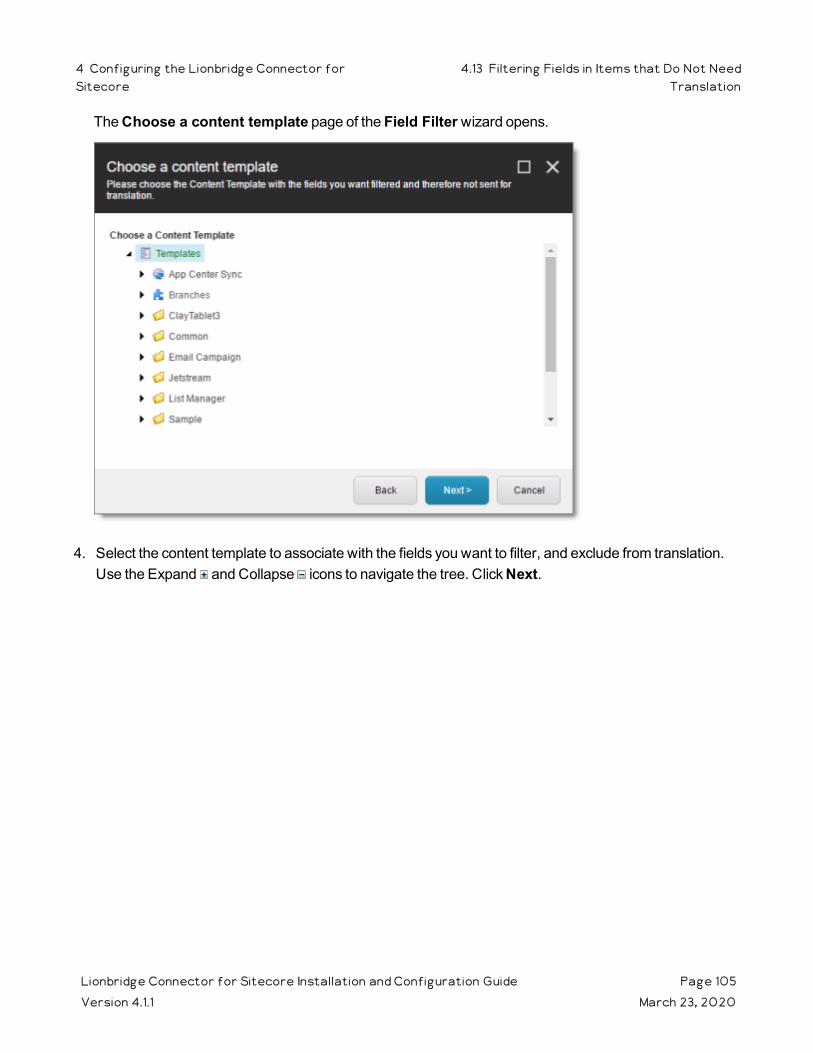
The Choose a content template page of the Field Filter wizard opens.
4. Select the content template to associate with the fields you want to filter, and exclude from translation. Use the Expand and Collapse icons to navigate the tree. Click Next.
Lionbridge Connector for Sitecore Installation and Configuration Guide Page 105Version 4.1.1 March 23, 2020
4 Configuring the Lionbridge Connector forSitecore
4.13 Filtering Fields in Items that Do Not NeedTranslation
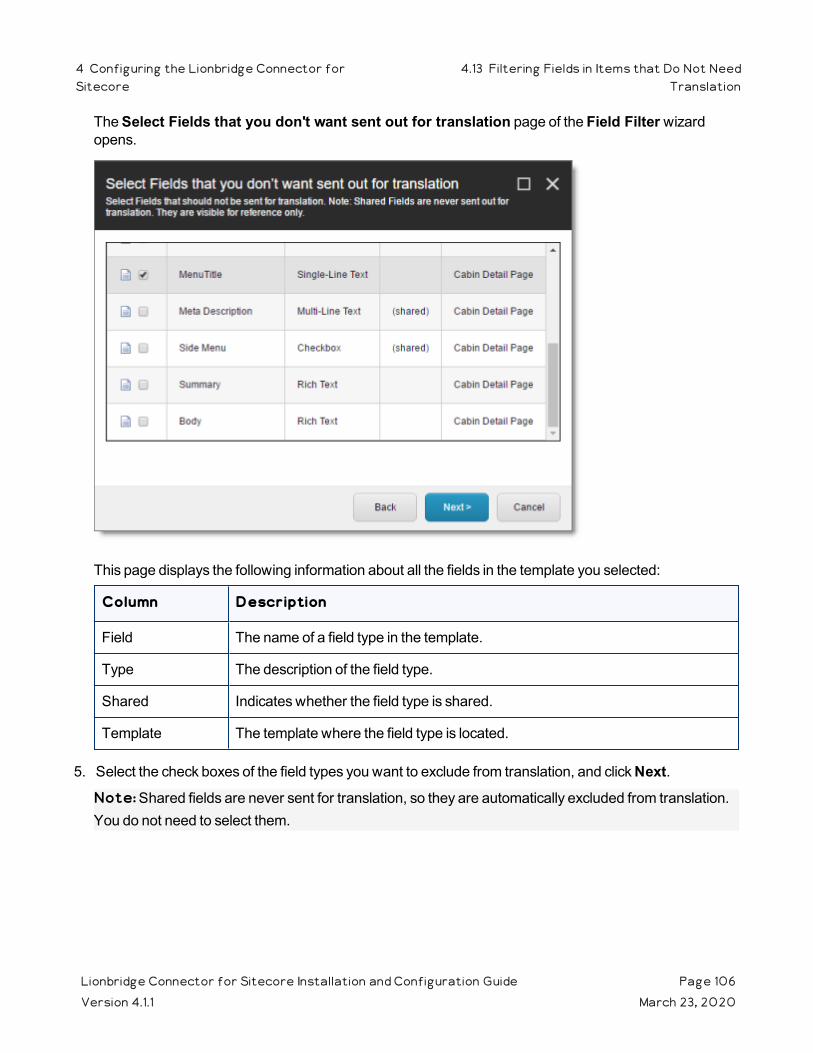
The Select Fields that you don't want sent out for translation page of the Field Filter wizard opens.
This page displays the following information about all the fields in the template you selected:
Column Description
Field The name of a field type in the template.
Type The description of the field type.
Shared Indicates whether the field type is shared.
Template The template where the field type is located.
5. Select the check boxes of the field types you want to exclude from translation, and click Next.
Note: Shared fields are never sent for translation, so they are automatically excluded from translation. You do not need to select them.
Lionbridge Connector for Sitecore Installation and Configuration Guide Page 106Version 4.1.1 March 23, 2020
4 Configuring the Lionbridge Connector forSitecore
4.13 Filtering Fields in Items that Do Not NeedTranslation

The Don't transfer field value page of the Field Filter wizard opens.
This page displays only the field types you selected in the previous page of the wizard.
6. For each field type, indicate whether you want the Connector to copy the source-language content to the target version.
If you do not want the Connector to copy the source-language content of a field type to the target version, select the corresponding check box. This field type will be excluded from the target content.
If you want the Connector to copy the source-language content of a field type to the target version, clear the corresponding check box. This field type will be included in the target content; however, the content will be in the source language.
Click Next.
Lionbridge Connector for Sitecore Installation and Configuration Guide Page 107Version 4.1.1 March 23, 2020
4 Configuring the Lionbridge Connector forSitecore
4.13 Filtering Fields in Items that Do Not NeedTranslation

The summary page of the wizard opens.
This page displays the following information about the fields to exclude in the new filter.
Column Description
Template The name of the template where the field type to exclude from translation is located.
Field The name of the field type to exclude from translation.
Type The type of field to exclude from translation.
Don't transfer field value
Indicates whether the Connector copies the source-language content to the target version for this field type.Blank indicates that the Connector does copy the source-language content of a field to the target version, select the corresponding check box. This field will be included in the target content; however, it will be in the source language.yes indicates that the Connector does not copy the source-language content of a field type to the target version. The Connector does not automatically transfer the value of the field in the source version to the field in the target version.
Lionbridge Connector for Sitecore Installation and Configuration Guide Page 108Version 4.1.1 March 23, 2020
4 Configuring the Lionbridge Connector forSitecore
4.13 Filtering Fields in Items that Do Not NeedTranslation

7. Click Finish.
8. A message box opens, confirming that you want to close the wizard. Click OK.
The wizard closes, and the Translation Filter window displays each filter you created in a separate row:
This window displays the following information about the filters:
Column Description
Template Path
The path and name of the template. Field types in this template can be excluded from translations.
Field Name
When the Connector sends out content items based the specified template for translation, it does not send out this field's content for translation.
Field Type
The type of this field to exclude from translation. When [ALL] is displayed, then all types of this field are excluded from translation.
Don't transfer field value
Indicates whether the Connector copies the source-language content to the target version for this field type.false indicates that the Connector does copy the source-language content of a field type to the target version, select the corresponding check box. This field will be included in the target content, however it will be in the source language.true indicates that the Connector does not copy the source-language content of a field to the target version. The Connector does not automatically transfer the value of the field in the source version to the field in the target version.
Lionbridge Connector for Sitecore Installation and Configuration Guide Page 109Version 4.1.1 March 23, 2020
4 Configuring the Lionbridge Connector forSitecore
4.13 Filtering Fields in Items that Do Not NeedTranslation
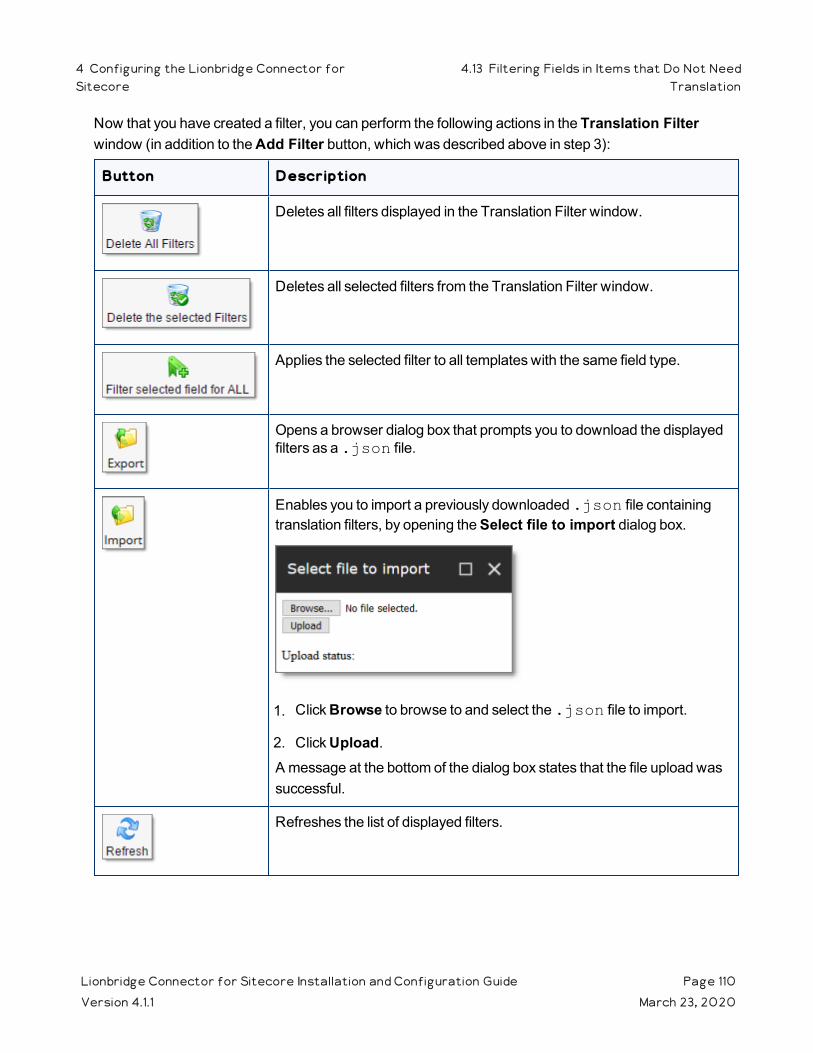
Now that you have created a filter, you can perform the following actions in the Translation Filter window (in addition to the Add Filter button, which was described above in step 3):
Button Description
Deletes all filters displayed in the Translation Filter window.
Deletes all selected filters from the Translation Filter window.
Applies the selected filter to all templates with the same field type.
Opens a browser dialog box that prompts you to download the displayed filters as a .json file.
Enables you to import a previously downloaded .json file containing translation filters, by opening the Select file to import dialog box.
1. Click Browse to browse to and select the .json file to import.
2. Click Upload.A message at the bottom of the dialog box states that the file upload was successful.
Refreshes the list of displayed filters.
Lionbridge Connector for Sitecore Installation and Configuration Guide Page 110Version 4.1.1 March 23, 2020
4 Configuring the Lionbridge Connector forSitecore
4.13 Filtering Fields in Items that Do Not NeedTranslation
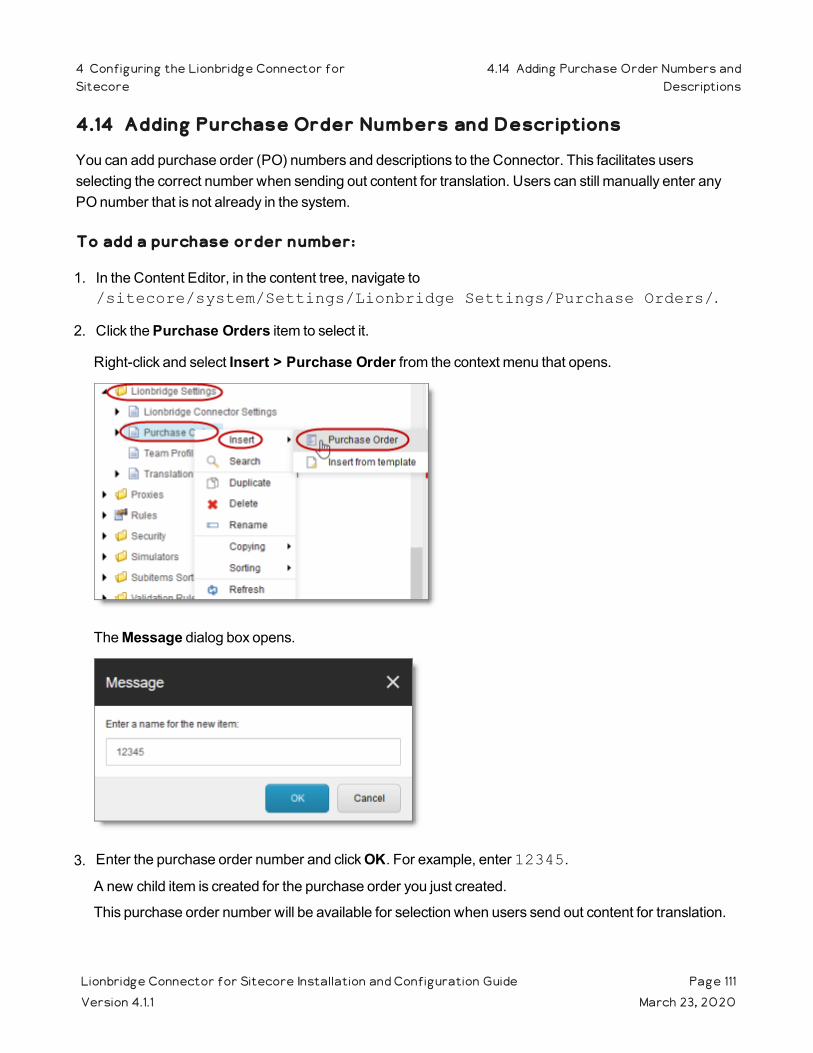
4.14 Adding Purchase Order Numbers and Descriptions
You can add purchase order (PO) numbers and descriptions to the Connector. This facilitates users selecting the correct number when sending out content for translation. Users can still manually enter any PO number that is not already in the system.
To add a purchase order number:
1. In the Content Editor, in the content tree, navigate to /sitecore/system/Settings/Lionbridge Settings/Purchase Orders/.
2. Click the Purchase Orders item to select it.
Right-click and select Insert > Purchase Order from the context menu that opens.
The Message dialog box opens.
3. Enter the purchase order number and click OK. For example, enter 12345.
A new child item is created for the purchase order you just created.
This purchase order number will be available for selection when users send out content for translation.
Lionbridge Connector for Sitecore Installation and Configuration Guide Page 111Version 4.1.1 March 23, 2020
4 Configuring the Lionbridge Connector forSitecore
4.14 Adding Purchase Order Numbers andDescriptions

4. Optional. You can enter a description for the purchase order number you just created. This description will be displayed beside the purchase order number when it is available for selection.
a. In the content tree, navigate to the purchase order you just created, and select it.
b. In the content area, scroll down to the Information section and expand it.
c. In the Information section, in the Description field, enter the description of the purchase order.
d. Click the Save button in the top-left corner to save your changes.
4.15 Configuring Connector Roles and Adding Users
The Connector installs the roles described below into Sitecore:
Role Description
sitecore\Translation Administrator
Users added to this role can set translation filters, remove completed job status, and delete the Connector backup data. Users can submit content to the translation queue or send it out immediately to translation.
sitecore\Translation Operator
Users added to this role can submit content to the translation queue. They can also send items from the queue for translation and remove items from the queue. When using the Bulk Translation feature, these users can skip the translation queue. They cannot send out individual content items directly to translation.
Lionbridge Connector for Sitecore Installation and Configuration Guide Page 112Version 4.1.1 March 23, 2020
4 Configuring the Lionbridge Connector for Sitecore 4.15 Configuring Connector Roles and Adding Users
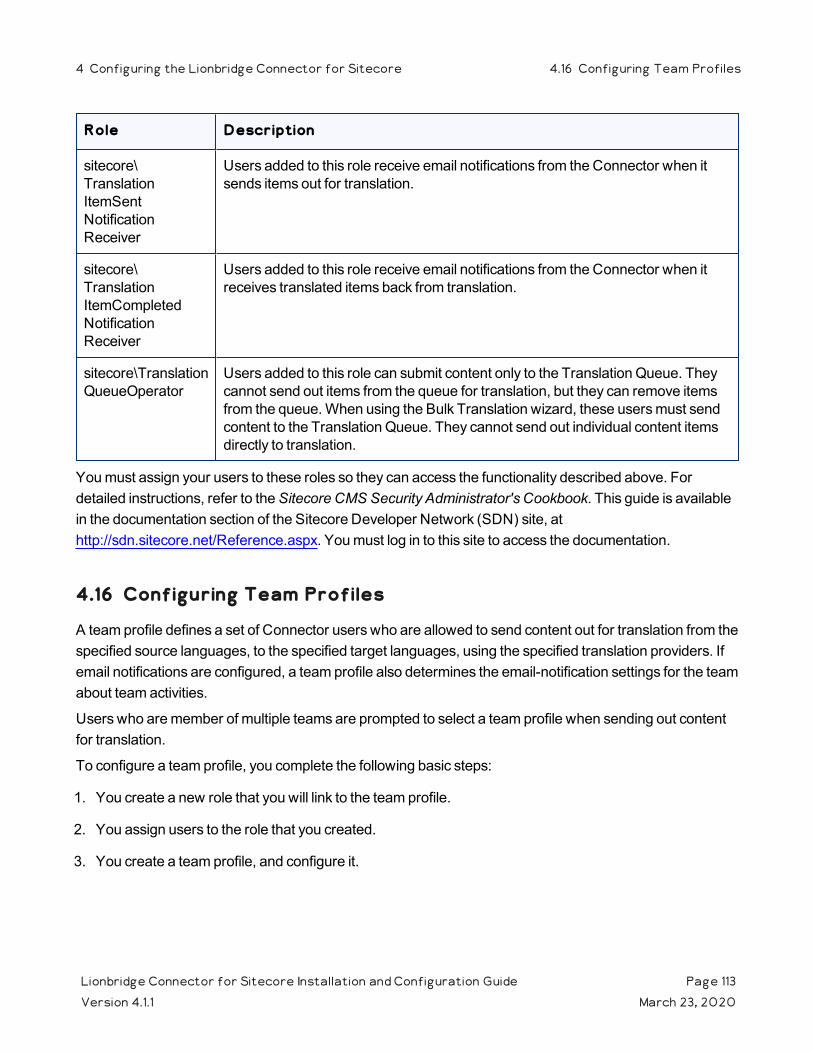
Role Description
sitecore\Translation ItemSentNotification Receiver
Users added to this role receive email notifications from the Connector when it sends items out for translation.
sitecore\Translation ItemCompletedNotification Receiver
Users added to this role receive email notifications from the Connector when it receives translated items back from translation.
sitecore\TranslationQueueOperator
Users added to this role can submit content only to the Translation Queue. They cannot send out items from the queue for translation, but they can remove items from the queue. When using the Bulk Translation wizard, these users must send content to the Translation Queue. They cannot send out individual content items directly to translation.
You must assign your users to these roles so they can access the functionality described above. For detailed instructions, refer to the Sitecore CMS Security Administrator's Cookbook. This guide is available in the documentation section of the Sitecore Developer Network (SDN) site, at http://sdn.sitecore.net/Reference.aspx. You must log in to this site to access the documentation.
4.16 Configuring Team Profiles
A team profile defines a set of Connector users who are allowed to send content out for translation from the specified source languages, to the specified target languages, using the specified translation providers. If email notifications are configured, a team profile also determines the email-notification settings for the team about team activities.
Users who are member of multiple teams are prompted to select a team profile when sending out content for translation.
To configure a team profile, you complete the following basic steps:
1. You create a new role that you will link to the team profile.
2. You assign users to the role that you created.
3. You create a team profile, and configure it.
Lionbridge Connector for Sitecore Installation and Configuration Guide Page 113Version 4.1.1 March 23, 2020
4 Configuring the Lionbridge Connector for Sitecore 4.16 Configuring Team Profiles

To configure a team profile:
1. In the Sitecore Content Editor ribbon, click the Security tab, and then in the Tools section, click User Manager.
The User Manager window opens.
2. In the ribbon, click Role Manager.
The Role Manager window opens.
3. In the ribbon, click New to create a new role.
Lionbridge Connector for Sitecore Installation and Configuration Guide Page 114Version 4.1.1 March 23, 2020
4 Configuring the Lionbridge Connector for Sitecore 4.16 Configuring Team Profiles

The New Role dialog box opens.
4. Create your role:
a. In the Role name field, enter a name for your role, for example Team A. b. In the Domain dropdown list, select lionbridgeteams. c. Click OK.
The Role Manager window reopens, and the role you just created is displayed in the list.
Lionbridge Connector for Sitecore Installation and Configuration Guide Page 115Version 4.1.1 March 23, 2020
4 Configuring the Lionbridge Connector for Sitecore 4.16 Configuring Team Profiles
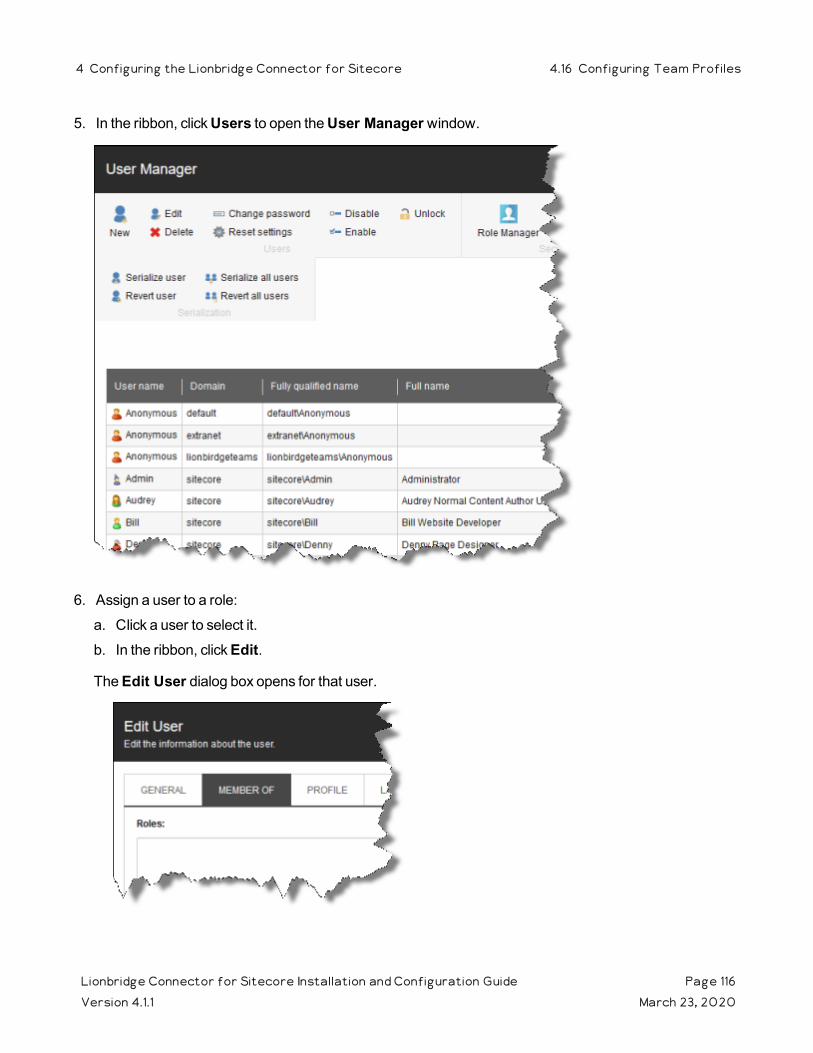
5. In the ribbon, click Users to open the User Manager window.
6. Assign a user to a role:
a. Click a user to select it.
b. In the ribbon, click Edit.
The Edit User dialog box opens for that user.
Lionbridge Connector for Sitecore Installation and Configuration Guide Page 116Version 4.1.1 March 23, 2020
4 Configuring the Lionbridge Connector for Sitecore 4.16 Configuring Team Profiles

c. Click the Member Of tab. d. Click the Edit button in the bottom-left corner.
The Edit User Roles dialog box opens.
e. Click the role you just created to select it.
f. Click Add, and then click OK to close the Edit User Roles dialog box.
The Edit User dialog box now displays the role you assigned.
g. Click OK to close the Edit User dialog box. h. Repeat the previous sub-steps for each user to assign to the role.
i. When you are done, close the User Manager window.
7. In the Content Editor, in the content tree, navigate to /sitecore/System/Settings/Lionbridge Settings/Team Profiles/.
8. Click the Team Profiles item to select it and to open it in the content area.
Lionbridge Connector for Sitecore Installation and Configuration Guide Page 117Version 4.1.1 March 23, 2020
4 Configuring the Lionbridge Connector for Sitecore 4.16 Configuring Team Profiles

9. Click the Custom Editor tab.
10. In the New profile name field, enter your name for the team profile and click Add.
11. In the content tree, the new team profile is added under /sitecore/system/Settings/Lionbridge Settings/Team Profiles/.
Tip: In the content tree , close the Lionbridge Settings folder and reopen it to display the team profile you just created under /Lionbridge Settings/Team Profiles/.
12. Click the new team profile item to select it and to open it in the content area.
Lionbridge Connector for Sitecore Installation and Configuration Guide Page 118Version 4.1.1 March 23, 2020
4 Configuring the Lionbridge Connector for Sitecore 4.16 Configuring Team Profiles

13. Click the Custom Editor tab.
14. Enter the following settings for your team profile:
Setting Description
Team Profile Role
In the dropdown list, select the role you created earlier. Selecting a role populates the Team Members list, described below, with the users assigned to this role.
Lionbridge Connector for Sitecore Installation and Configuration Guide Page 119Version 4.1.1 March 23, 2020
4 Configuring the Lionbridge Connector for Sitecore 4.16 Configuring Team Profiles

Setting Description
Team Members
Read only. This list is populated with the users assigned to the role selected in Team Profile Role, above.
LSPs Select the translation providers (LSPs) to assign to the team profile. All the configured translation providers are available for selection.
Source Languages
Select the check boxes of the source languages in which team members can send out content for translation. The list of available languages is based on the configured languages. For details, see "Configuring the Sitecore Languages in the Sitecore Content Editor" on page 91.
Target Languages
Select the check boxes of the target languages for which team members can send out content for translation. The list of available languages is based on the configured languages. For details, see "Configuring the Sitecore Languages in the Sitecore Content Editor" on page 91.
Lionbridge Connector for Sitecore Installation and Configuration Guide Page 120Version 4.1.1 March 23, 2020
4 Configuring the Lionbridge Connector for Sitecore 4.16 Configuring Team Profiles

Setting Description
Email Notifications
For each type of email notification, select one of the following settings:Use Connector settings: (Default selection) The Connector sends email notifications to the users assigned to a role for receiving specific email notifications, as defined by the configuration option described in the list below.Don't send: The Connector does not send any email notifications.Email address list: The Connector sends email notifications to the email addresses listed in the corresponding text box.Note: Separate email addresses by a comma ( , ) or a semicolon ( ; ).Team members: The Connector sends email notifications to all team members.
You can configure the following types of email notifications for the team profile:
"Sent" notifications: The Connector sends email notifications when it sends items out for translation. The Use Connector setting option, above, is defined by the ClayTablet.EmailNotification.NotifySentOut.Users.RoleName option in the CT3Translation.config file. "Completed" notifications: The Connector sends email notifications when it receives translated items back from translation. The Use Connector setting option, above, is defined by the ClayTablet.EmailNotification.NotifyCompleted.Users.RoleName option in the CT3Translation.config file. "Errors" notifications: The Connector sends email notifications when an error occurs related to a translation job. The Use Connector setting option, above, is defined by the ClayTablet.EmailNotification.NotifyErrors.Users.RoleName option in the CT3Translation.config file.
For more information about the configuration options in the CT3Translation.config file, see "Configuring Email Notifications in the Configuration File" on page 62.
15. When you are done, scroll up to the top of this page, and then click Save Team Profile.A message box confirms that the team profile was successfully saved.
Lionbridge Connector for Sitecore Installation and Configuration Guide Page 121Version 4.1.1 March 23, 2020
4 Configuring the Lionbridge Connector for Sitecore 4.16 Configuring Team Profiles

4.17 Configuring How the Connector Handles Special Characters
You can configure how the Connector handles special characters. This is important because it determines how special characters are displayed for your translators.
Background
The Connector exports your content from Sitecore and sends it for translation as XML files. A valid XML file cannot contain any of the special characters listed in the table below. Instead, a valid XML file must use the following entity references to represent special characters:
Special Character Represented by This Entity Reference
< <
> >
& &
' '
" "
Escaping is the term that describes creating valid XML by converting any XML special characters to their entity references.
How does Sitecore handle special characters?
There are two types of text within Sitecore:
plain text
rich text, which can contain HTML formatting, links. etc.
You can use the HTML editor in Sitecore's Content Editor to view how Sitecore stores content.
Lionbridge Connector for Sitecore Installation and Configuration Guide Page 122Version 4.1.1 March 23, 2020
4 Configuring the Lionbridge Connector forSitecore
4.17 Configuring How the Connector Handles SpecialCharacters

Sitecore handles special characters differently, depending on whether they are in a plain text title, or a rich text paragraph.
In plain text, Sitecore does not escape special characters. It displays them as the actual characters. For example, it displays & as &.
In rich text, Sitecore escapes special characters. It displays them as their corresponding entity references. For example, it displays & as &.
How does the Connector handle special characters?
When the Connector prepares content for translation, it packages all content into XML translation files. This necessitates escaping all special characters into their corresponding entity references. However, the Connector does not differentiate between plain text (which displays the actual special characters) and rich text (which displays the entity references instead of the special characters). Therefore, the Connector escapes all special characters.
As a result, the rich text that the translator receives may contain a combination of special characters and entity references.
For example:
Lionbridge Connector for Sitecore Installation and Configuration Guide Page 123Version 4.1.1 March 23, 2020
4 Configuring the Lionbridge Connector forSitecore
4.17 Configuring How the Connector Handles SpecialCharacters
Suppose that the rich-text paragraph contains the text that is rendered as follows in the Sitecore Content Editor: &.
Sitecore actually stores this rich-text content as its corresponding entity reference: &.
When the Connector processes this rich-text content to create XML files to send out for translation, it escapes this content as follows:
& becomes &
amp; remains amp;
As a result, this content is escaped twice (once by Sitecore and then by the Connector).
The Connector then stores this content as &amp; in the XML translation file, which it sends to the translator.
However, some translation systems cannot handle double-escaped special characters such as &amp; or a mix of single-escaped and double-escaped special characters.
4.17.1 Why Do Translators Encounter Problems with Special Characters?
Some translation systems can handle double-escaped special characters, such as &amp;, by displaying them as & or &. However, some translation systems cannot handle double-escaped special characters, such as &amp;.
There are several ways to handle this.
Recommendation 1 – Same as Source option
If your translator's translation system supports the "Same as Source" option, then instruct your translator to select this option. This converts and returns all special characters–actual characters, escaped characters, and double-escaped characters–as they were received.
However, this feature is not supported by all translation systems or they may not be able to change this setting. In those scenarios, or if you see a combination of single- and double-escaped characters, consider one of the following recommendations.
Recommendation 2 – All single encoded
Your translator should handle each type of special character consistently. For example, in the target XML:
Your translator can return the following special characters as single escaped:
<
>
Lionbridge Connector for Sitecore Installation and Configuration Guide Page 124Version 4.1.1 March 23, 2020
4 Configuring the Lionbridge Connector forSitecore
4.17.1 Why Do Translators Encounter Problems with SpecialCharacters?

&
Your translator can return the following special characters as the actual characters:
'
"
Recommendation 3 – Use CData tags
Selecting the Add CData to Output check box instructs the Connector to wrap content in CData tags, which prevents the Connector from escaping special characters, and avoids the scenario of double-escaped characters. However, this setting does not prevent Sitecore from single-escaping special characters in rich text.
Note: The Connector adds and removes the CData tags, so they are not displayed within Sitecore's Content Editor.
Important: If you change this setting, your translators must return the translated content in CData tags, just as they received the source content in CData tags. They should not run any post-translation scripts to escape the special characters before returning the content.
Warning: If you change this setting in the middle of a translation job, it can interfere with the integrity of the translation memory.
For detailed instructions on selecting the Add CData to Output check box, see "Adding CData Tags to Translation Files" on page 125.
4.17.2 Adding CData Tags to Translation Files
You can select the Add CData to Output check box to add CData tags to translation files, which prevents your translators from viewing double-escaped special characters, such as &amp;.
To configure this setting:
1. In the Content Editor, in the content tree, navigate to /sitecore/system/Settings/Lionbridge Settings/Lionbridge Connector Settings/.
2. Click the Lionbridge Connector Settings item to select it and open it in the content area.
Lionbridge Connector for Sitecore Installation and Configuration Guide Page 125Version 4.1.1 March 23, 2020
4 Configuring the Lionbridge Connector for Sitecore 4.17.2 Adding CData Tags to Translation Files
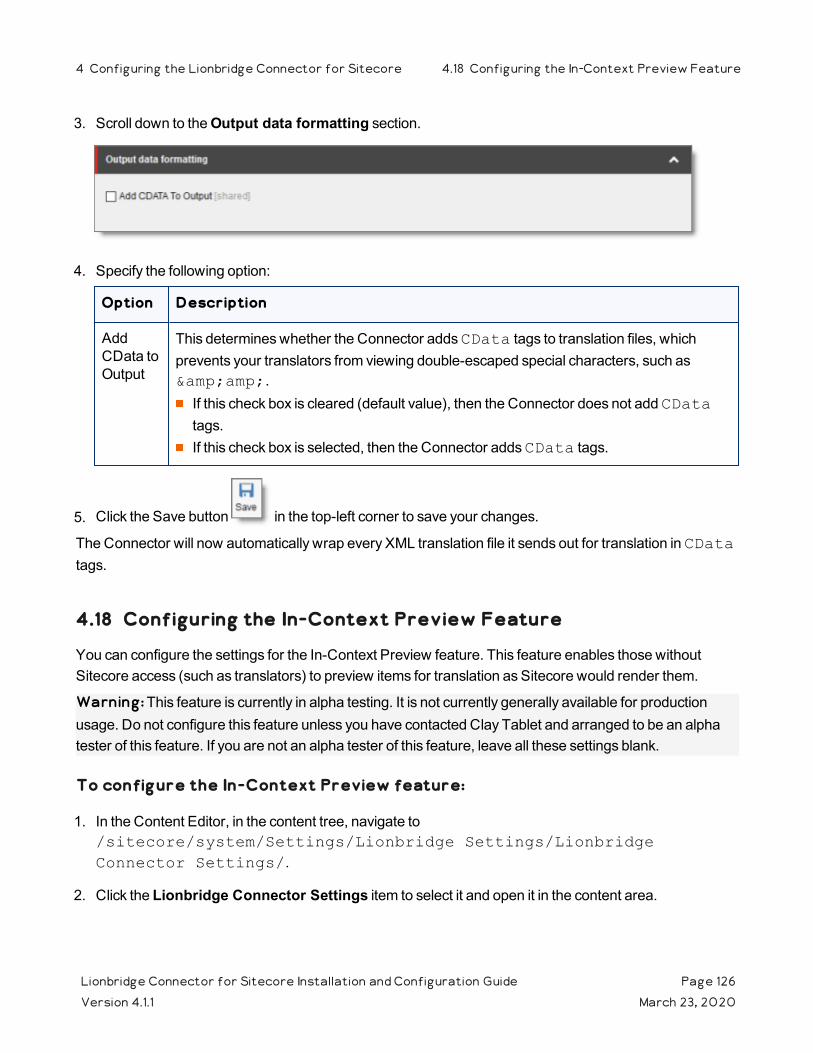
3. Scroll down to the Output data formatting section.
4. Specify the following option:
Option Description
Add CData to Output
This determines whether the Connector adds CData tags to translation files, which prevents your translators from viewing double-escaped special characters, such as &amp;. If this check box is cleared (default value), then the Connector does not add CData tags.If this check box is selected, then the Connector adds CData tags.
5. Click the Save button in the top-left corner to save your changes.
The Connector will now automatically wrap every XML translation file it sends out for translation in CData tags.
4.18 Configuring the In-Context Preview Feature
You can configure the settings for the In-Context Preview feature. This feature enables those without Sitecore access (such as translators) to preview items for translation as Sitecore would render them.
Warning: This feature is currently in alpha testing. It is not currently generally available for production usage. Do not configure this feature unless you have contacted Clay Tablet and arranged to be an alpha tester of this feature. If you are not an alpha tester of this feature, leave all these settings blank.
To configure the In-Context Preview feature:
1. In the Content Editor, in the content tree, navigate to /sitecore/system/Settings/Lionbridge Settings/Lionbridge Connector Settings/.
2. Click the Lionbridge Connector Settings item to select it and open it in the content area.
Lionbridge Connector for Sitecore Installation and Configuration Guide Page 126Version 4.1.1 March 23, 2020
4 Configuring the Lionbridge Connector for Sitecore 4.18 Configuring the In-Context Preview Feature

3. Scroll down to the Preview section.
4. Specify the following settings:
Tip: You can use the parameters listed in the table below this table to configure the URLs.
Setting Description Sample Value
Preview URL
The URL that the Clay Tablet Preview server uses to access the Sitecore instance and preview the source version of the item sent to translation. Typically this server needs access through your firewall to access the URL and credentials to log into your Sitecore instance.
http://yoursitecoreurl/?sc_itemid={id}&sc_mode=preview&sc_lang={lang}
Preview URL for Target Language
The URL that the Clay Tablet Preview server uses to access the Sitecore instance and preview the target version of the item sent to translation. Typically this server needs access through your firewall to access the URL and credential to log into your Sitecore instance.
http://yoursitecoreurl/?sc_itemid={id}&sc_mode=preview&sc_lang={targetlang}
External Preview URL
The URL that enables translators or external reviewers to preview the source item on the Clay Tablet Preview server. For instructions on configuring this setting, contact Lionbridge Connector Support, as described in "How to Contact Lionbridge Connector Support" on page 11.
https://ct-preview-server-url?chunk={chunkid}&lang={lang}
Lionbridge Connector for Sitecore Installation and Configuration Guide Page 127Version 4.1.1 March 23, 2020
4 Configuring the Lionbridge Connector for Sitecore 4.18 Configuring the In-Context Preview Feature

Setting Description Sample Value
External Preview URL for Target Language
The URL that enables translators or external reviewers to preview the target item the Clay Tablet Preview server. For instructions on configuring this setting, contact Lionbridge Connector Support, as described in "How to Contact Lionbridge Connector Support" on page 11.
https://ct-preview-server-url?chunk={chunkid}&lang={targetlang}
You can use the following parameters listed in the table below to configure the URLs described above:
Parameter Description
{id} The identifier of the source Sitecore item sent for translation.
{version} The version of the source Sitecore item sent for translation.
{lang} The source language of the Sitecore item sent for translation.
{targetversion} The version of the translated Sitecore item.
{targetlang} The target language of the translated Sitecore item.
{jobid} The Connector translation job ID.
{chunkid} The globally unique ID generated by the Connector, which identifies each translatable field (chunk) in the XML file generated by Clay Tablet. Note: This parameter is relevant only to the External Preview URL and External Preview URL for Target Language settings, described above.
5. Click the Save button in the top-left corner to save your changes.
Lionbridge Connector for Sitecore Installation and Configuration Guide Page 128Version 4.1.1 March 23, 2020
4 Configuring the Lionbridge Connector for Sitecore 4.18 Configuring the In-Context Preview Feature
5 Installing the Enhanced WorkboxThe Connector provides an optional enhanced Workbox, which has more features than the standard Sitecore Workbox. Installing the Connector's enhanced Workbox updates and replaces the original Sitecore Workbox.
This Workbox supports much more powerful management of large lists of items in a workflow. You can sort by different column headings, approve many items at once and manage the display of long lists easily.
Note: Installing the Connector's enhanced Workbox automatically configures it to replace the original Sitecore Workbox.
Important: Install the Connector's enhanced Workbox only if you are comfortable with modifying the standard Sitecore Workbox.
To install the enhanced Workbox:
1. On the Sitecore Desktop, on the Windows Start menu, select Sitecore > Development Tools > Installation Wizard.The Welcome page of the Sitecore Install Package wizard opens.
2. Click Next. The Select Package page of the Sitecore Install Package wizard opens.
3. Click Browse, and locate the Workbox installation package, LB_Sitecore_WorkBox_update-x.y.z.zip, where x.y.z is the current version number of the Connector for Sitecore.
Tip: The installation package is in the following location in the delivery package: <Delivery Package/Lionbridge Workbox/LB_Sitecore_WorkBox_update-x.y.z.zip>.
4. Click Upload to upload the package.
5. After the package is uploaded, click Next.
6. Follow any on-screen instructions to finish installing the Workbox package into Sitecore.
Sitecore restarts.
For information on using the enhanced Workbox, refer to the Lionbridge Connector for Sitecore User Guide.
Lionbridge Connector for Sitecore Installation and Configuration Guide Page 129Version 4.1.1 March 23, 2020
5 Installing the Enhanced Workbox 5 Installing the Enhanced Workbox

6 Testing the ConnectorAfter you complete the configuration, your Lionbridge Connector for Sitecore installation is ready for testing. We recommend sending only a few pages for translation in one language as an initial test. For detailed instructions, refer to the Lionbridge Connector for Sitecore User Guide. Once successful, you can send as many languages as required. Please coordinate with your translation provider for this test process.
If you have any concerns or questions, please contact Lionbridge Connector Support. For details, see "How to Contact Lionbridge Connector Support" on page 11.
From a testing perspective, do not treat the Connector as merely standalone software. It integrates into Sitecore and your overall translation workflow. You must test the end-to-end process, from content creation to publishing, to ensure that the Connector is working as expected and configured to support your business needs.
In addition to following the guidelines below, you should also include any internal test or use cases that would normally be applied to any software that is deployed to Sitecore. You must robustly test the Connector and the translation process against the (non-production) MT (machine translation) service. This saves time and project costs, because trying to solve issues during the production phase is costly and delays your translation timelines.
Recommendations: Complete your testing in a pre-production environment before deploying the Connector to your production environment. If you must perform testing in your production environment, you should create test content that can be deleted after completing the tests. The connector database translation memory must also be cleared in your production environment. For detailed instructions, contact Lionbridge Connector Support, as described in "How to Contact Lionbridge Connector Support" on page 11. Consider any changes in functionality, configuration, or customization between pre-production and production environments in this final test pass.
Testing the connector
1. Verify that the Connector is configured to send all required content types for all required languages.
2. Ensure that the Connector sends only translatable content for translation.
3. Configure email notifications set and ensure that they are generated at the appropriate step in the translation workflow.
Integration with Sitecore
1. Ensure that the content authors how to interact with the Connector and send content to translation. For detailed instructions, refer them to the Lionbridge Connector for Sitecore User Guide.
Lionbridge Connector for Sitecore Installation and Configuration Guide Page 130Version 4.1.1 March 23, 2020
6 Testing the Connector 6 Testing the Connector

2. Select a method of sending content to translation that aligns with how content authors work in Sitecore.
3. Ensure that the Connector users have the correct rights to access the Connector within Sitecore.
Testing the translation workflow
1. Ensure that the Connector translation workflow integrates with your overall strategy of managing source and translated content.
2. Validate how the translated content will be reviewed during the translation process.
3. Verify that the translation process integrates correctly with the publishing process.
Lionbridge Connector for Sitecore Installation and Configuration Guide Page 131Version 4.1.1 March 23, 2020
6 Testing the Connector 6 Testing the Connector

7 Appendix: Connector Translation File Formats
7.1 XML Translation File – New Translation
The following is an example of new content that the Connector sends for translation:
<TranslationContent CT2ProjectId="5ab2e78e-e427-4b89-9629-562c13584d94" CT2AssetId="9250c3ee-da56-47d8-880e-2514052d7a58" CT2SourceLanguageCode="en-US" CT2TargetLanguageCode="fr-FR" SitecoreSourceLanguageCode="en" SitecoreTargetLanguageCode="fr-FR">
<SitecoreItem DatabaseName="master" ItemId="{E6F3AA2D-3E5B-47A5-8B4A-1EA603C9A3FA}" ItemSourceVersion="1" ItemTargetVersion="1" TranslationDeadline="">
<FieldContent FieldName="Title">Demo content to translate</FieldContent>
<FieldContent FieldName="Body">
<p>This is content that google will try to translate</p>
</FieldContent>
</SitecoreItem>
</TranslationContent>
7.2 HTML Translation File – New Translation with Metadata in Comments
The following is an example of new content that the Connector sends for translation, with metadata in the comments:
<!--CT2Translation:[From:en-US To:fr-FR]-->
<!--CT2SharedMeta:92d2c042-2bcf-41cd-8a04-fe4d327f2157|45525ffe-fdf1-403f-be6a-43bcd99e3373|en|fr-FR|en-US|fr-FR:SharedMetaEnd-->
<!--CT2FieldMeta:master|{C069745D-63F6-4EB1-868F-EF1AE7C0BB76}|2|10|Title:Begin-->
Title of demo2
<!--CT2MetaField::End-->
Lionbridge Connector for Sitecore Installation and Configuration Guide Page 132Version 4.1.1 March 23, 2020
7 Appendix: Connector Translation File Formats 7 Appendix: Connector Translation File Formats
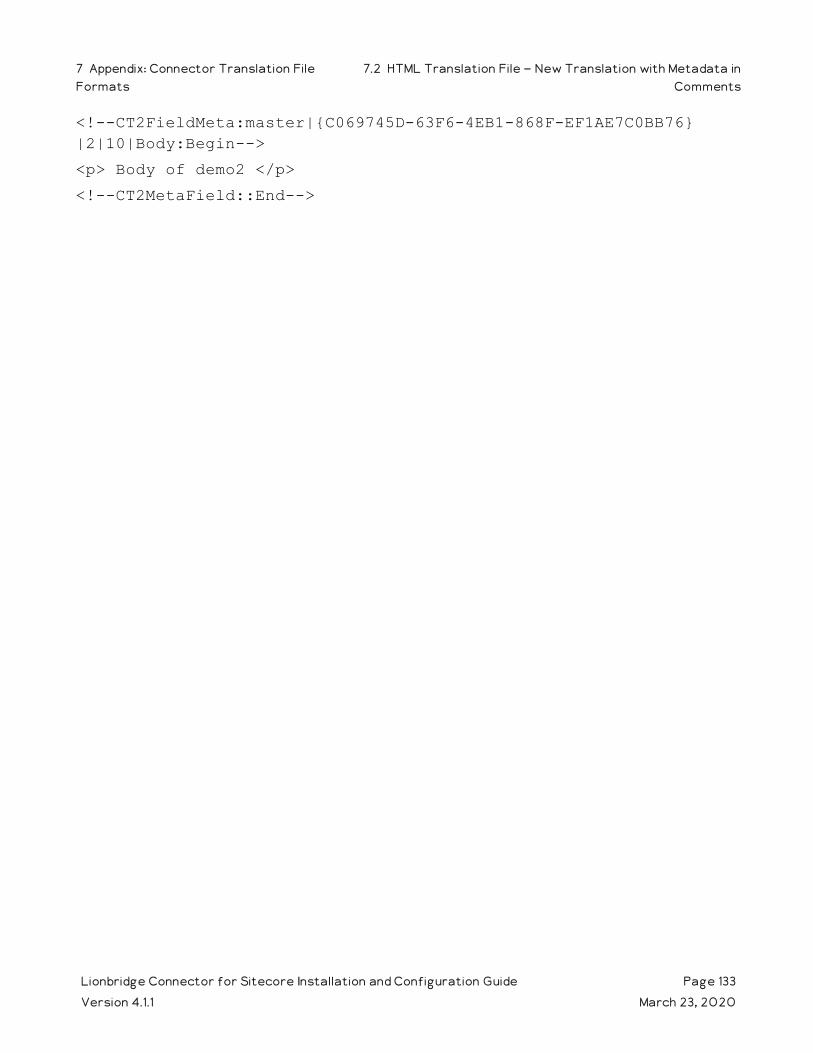
<!--CT2FieldMeta:master|{C069745D-63F6-4EB1-868F-EF1AE7C0BB76}|2|10|Body:Begin-->
<p> Body of demo2 </p>
<!--CT2MetaField::End-->
Lionbridge Connector for Sitecore Installation and Configuration Guide Page 133Version 4.1.1 March 23, 2020
7 Appendix: Connector Translation FileFormats
7.2 HTML Translation File – New Translation with Metadata inComments

7.3 XML Translation File – Correction Requested
The following is an example of a request to correct the translation:
<TranslationCorrectionContent CT2ProjectId="3149ca06-64f8-4e07-afb1-57a7c3539670" CT2AssetId="08a44fe1-a650-4dc7-bca5-c63e6cd0a4f7" CT2SourceLanguageCode="en-US" CT2TargetLanguageCode="el-GR" SitecoreSourceLanguageCode="en" SitecoreTargetLanguageCode="el-GR" DatabaseName="master" ItemId="{6C95A5D0-30D1-4329-95BD-E9C8FF71FD07}" ItemSourceVersion="1" ItemTargetVersion="4">
<Notes>
</Notes>
<ItemFields>
<ItemField FieldName="Title">
<SourceContent>Smartphone traffic is up 193% in a year</SourceContent>
<TargetContent>Smartphone κίνηση είναι επάνω 193% σε ένα χρόνο</TargetContent>
</ItemField>
</ItemFields>
</TranslationCorrectionContent>
7.4 HTML Translation File – Correction Requested with Metadata in Comments
The following is an example of a request to correct the translation with metadata in the comments:
<!--CT2TranslationCorrection:[From:en-US To:de-DE]-->
<!--CT2SharedMeta:95e71b0c-5e75-4a34-8cf7-e706d7edff2d|f366b6e9-78c9-438a-b67a-37a938257889|en|de-DE|en-US|de-DE:SharedMetaEnd-->
<!--CT2ItemMeta:master|{333E5B70-BA26-402B-A3CE-5A5FBAFF7D66}|4|9:ItemMetaEnd-->
<!--CT2Note::Begin-->
The translation of the title needs correction
Lionbridge Connector for Sitecore Installation and Configuration Guide Page 134Version 4.1.1 March 23, 2020
7 Appendix: Connector Translation File Formats 7.3 XML Translation File – Correction Requested
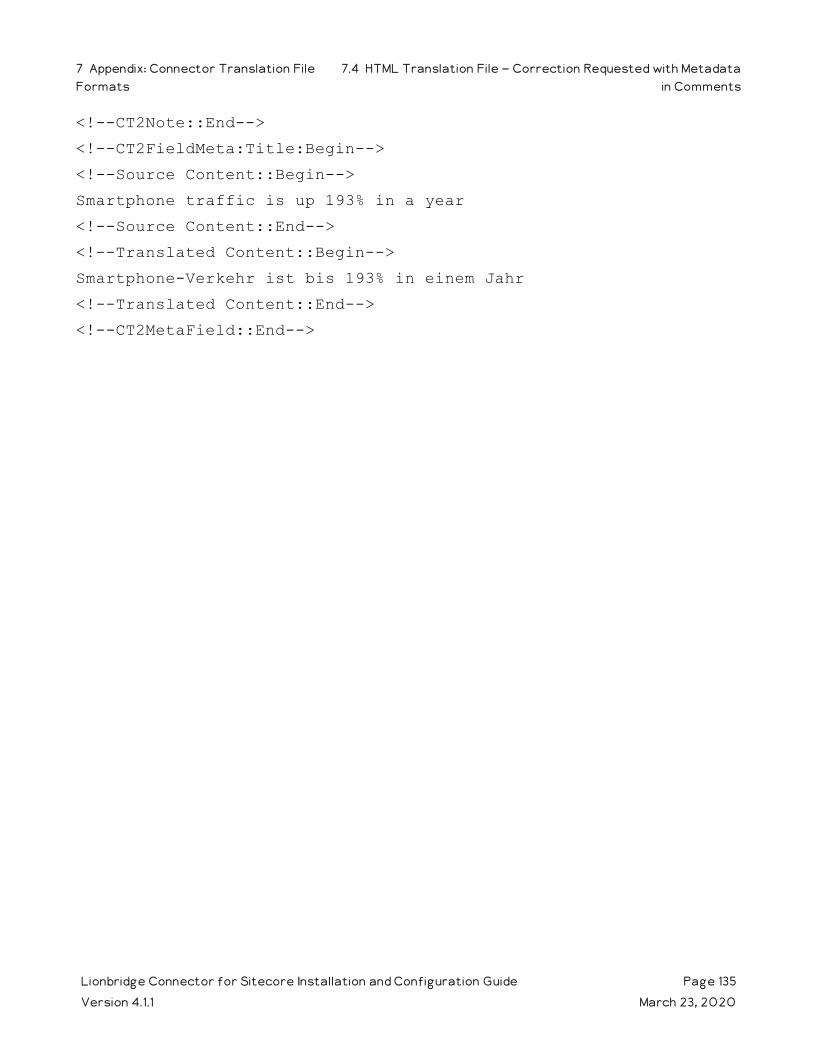
<!--CT2Note::End-->
<!--CT2FieldMeta:Title:Begin-->
<!--Source Content::Begin-->
Smartphone traffic is up 193% in a year
<!--Source Content::End-->
<!--Translated Content::Begin-->
Smartphone-Verkehr ist bis 193% in einem Jahr
<!--Translated Content::End-->
<!--CT2MetaField::End-->
Lionbridge Connector for Sitecore Installation and Configuration Guide Page 135Version 4.1.1 March 23, 2020
7 Appendix: Connector Translation FileFormats
7.4 HTML Translation File – Correction Requested with Metadatain Comments

7.5 Translation Memory Update File
In the following example, a user corrected the translation and it must be sent back to the translation provider to update the remote translation memory (TM):
<UpdateTMContent CT2SourceLanguageCode="en-US" CT2TargetLanguageCode="da-DK" SitecoreSourceLanguageCode="en" SitecoreTargetLanguageCode="da-DK">
<ContentCorrections>
<ContentCorrection>
<SourceContent>Smartphone traffic is up 193% in a year</SourceContent>
<TargetContent>Smartphone trafik er op 193% på et år</TargetContent>
</ContentCorrection>
<ContentCorrection>
<SourceContent>
<p>Smartphone traffic is up. Feature phone share is down. And traffic from mobile Internet devices (like the iPod touch) that don't have built-in phones is booming — even before Apple releases the iPad.</p>
<p>That's the thrust of the the latest report by AdMob, the mobile advertising network snapped up last fall by Google (<a href="http://money.cnn.com/quote/quote.html?symb=GOOG" rel="external">GOOG</a>) before Apple (<a href="http://money.cnn.com/quote/quote.html?symb=AAPL" rel="external">AAPL</a>) could buy it.</p></SourceContent>
<TargetContent><p> Smartphone trafik er op. Feature telefon andel er nede. Og trafik fra det mobile internet-enheder (ligesom iPod touch), der ikke har indbygget telefoner boomer - selv før Apple frigiver IPAD. </p><p> Det er essensen af den seneste rapport fra admob, det mobile annoncenetværk snapped op sidste efterår af Google ( <a
Lionbridge Connector for Sitecore Installation and Configuration Guide Page 136Version 4.1.1 March 23, 2020
7 Appendix: Connector Translation File Formats 7.5 Translation Memory Update File

href="http://money.cnn.com/quote/quote.html?symb=GOOG" rel="external">GOOG</a> ) før Apple ( <a href="http://money.cnn.com/quote/quote.html?symb=AAPL" rel="external">AAPL</a> ) kunne købe det. </p></TargetContent>
</ContentCorrection>
</ContentCorrections>
</UpdateTMContent>
Lionbridge Connector for Sitecore Installation and Configuration Guide Page 137Version 4.1.1 March 23, 2020
7 Appendix: Connector Translation File Formats 7.5 Translation Memory Update File
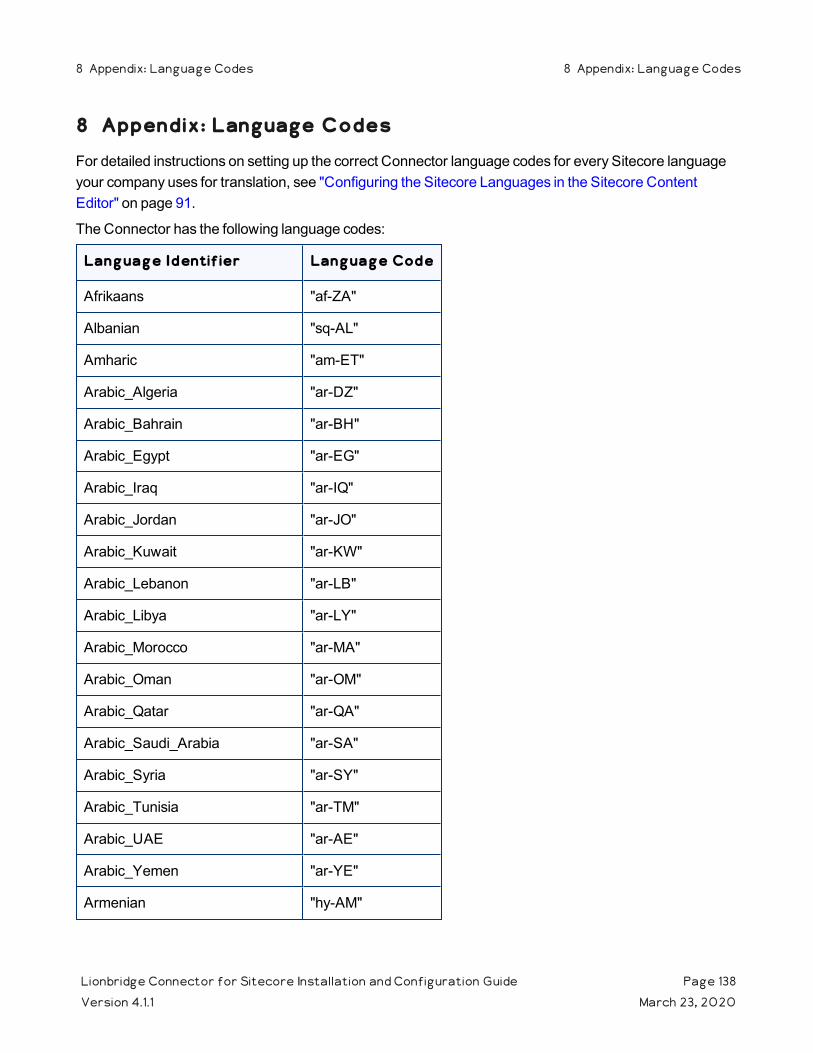
8 Appendix: Language CodesFor detailed instructions on setting up the correct Connector language codes for every Sitecore language your company uses for translation, see "Configuring the Sitecore Languages in the Sitecore Content Editor" on page 91.
The Connector has the following language codes:
Language Identifier Language Code
Afrikaans "af-ZA"
Albanian "sq-AL"
Amharic "am-ET"
Arabic_Algeria "ar-DZ"
Arabic_Bahrain "ar-BH"
Arabic_Egypt "ar-EG"
Arabic_Iraq "ar-IQ"
Arabic_Jordan "ar-JO"
Arabic_Kuwait "ar-KW"
Arabic_Lebanon "ar-LB"
Arabic_Libya "ar-LY"
Arabic_Morocco "ar-MA"
Arabic_Oman "ar-OM"
Arabic_Qatar "ar-QA"
Arabic_Saudi_Arabia "ar-SA"
Arabic_Syria "ar-SY"
Arabic_Tunisia "ar-TM"
Arabic_UAE "ar-AE"
Arabic_Yemen "ar-YE"
Armenian "hy-AM"
Lionbridge Connector for Sitecore Installation and Configuration Guide Page 138Version 4.1.1 March 23, 2020
8 Appendix: Language Codes 8 Appendix: Language Codes

Language Identifier Language Code
Assamese "as-IN"
Basque "eu-ES"
Belarusian "be-BY"
Bengali_Bangladesh "bn-BD"
Bengali_India "bn-IN"
Bosnian_Bosnia_Herzegovina "bs-BA"
Bulgarian "bg-BG"
Burmese "my-MM"
Catalan "ca-ES"
Chinese_Hong_Kong "zh-HK"
Chinese_Macao "zh-MO"
Chinese_PRC "zh-CN"
Chinese_Singapore "zh-SG"
Chinese_Taiwan "zh-TW"
Croatian "hr-HR"
Croatian_Bosnia_Herzegovina "hr-BA"
Czech "cs-CZ"
Danish "da-DK"
Divehi "dv-MV"
Dutch "nl-NL"
Dutch_Belgium "nl-BE"
English_Australia "en-AU"
English_Belize "en-BZ"
English_Canada "en-CA"
Lionbridge Connector for Sitecore Installation and Configuration Guide Page 139Version 4.1.1 March 23, 2020
8 Appendix: Language Codes 8 Appendix: Language Codes

Language Identifier Language Code
English_HongKong "en-HK"
English_India "en-IN"
English_Indonesia "en-ID"
English_Ireland "en-IE"
English_Jamaica "en-JM"
English_Malaysia "en-MY"
English_New_Zealand "en-NZ"
English_Philippines "en-PH"
English_Singapore "en-SG"
English_South_Africa "en-ZA"
English_Trinidad "en-TT"
English_UK "en-GB"
English_US "en-US"
English_Zimbabwe "en-ZW"
Estonian "et-EE"
Faroese "fo-FO"
Farsi "fa-IR"
Filipino "fil-PH"
Finnish "fi-FI"
French "fr-FR"
French_Belgium "fr-BE"
French_Cameroon "fr-CM"
French_Canada "fr-CA"
French_Cote_d_Ivoire "fr-CI"
Lionbridge Connector for Sitecore Installation and Configuration Guide Page 140Version 4.1.1 March 23, 2020
8 Appendix: Language Codes 8 Appendix: Language Codes

Language Identifier Language Code
French_Democratic_Rep_Congo "fr-CD"
French_Haiti "fr-HT"
French_Luxembourg "fr-LU"
French_Mali "fr-ML"
French_Monaco "fr-MC"
French_Morocco "fr-MA"
French_Reunion "fr-RE"
French_Senegal "fr-SN"
French_Switzerland "fr-CH"
Frisian_Netherlands "fy-NK"
Fulfulde_Nigeria "ff-NG"
FYRO_Macedonian "mk-MK"
Gaelic_Ireland "gd-IE"
Gaelic_Scotland "gd-GB"
Gallegan "gl-ES"
Georgian "ka-GE"
German "de-DE"
German_Austria "de-AT"
German_Liechtenstein "de-LI"
German_Luxembourg "de-LU"
German_Switzerland "de-CH"
Greek "el-GR"
Guarani "gn-PY"
Gujarati "gu-IN"
Lionbridge Connector for Sitecore Installation and Configuration Guide Page 141Version 4.1.1 March 23, 2020
8 Appendix: Language Codes 8 Appendix: Language Codes
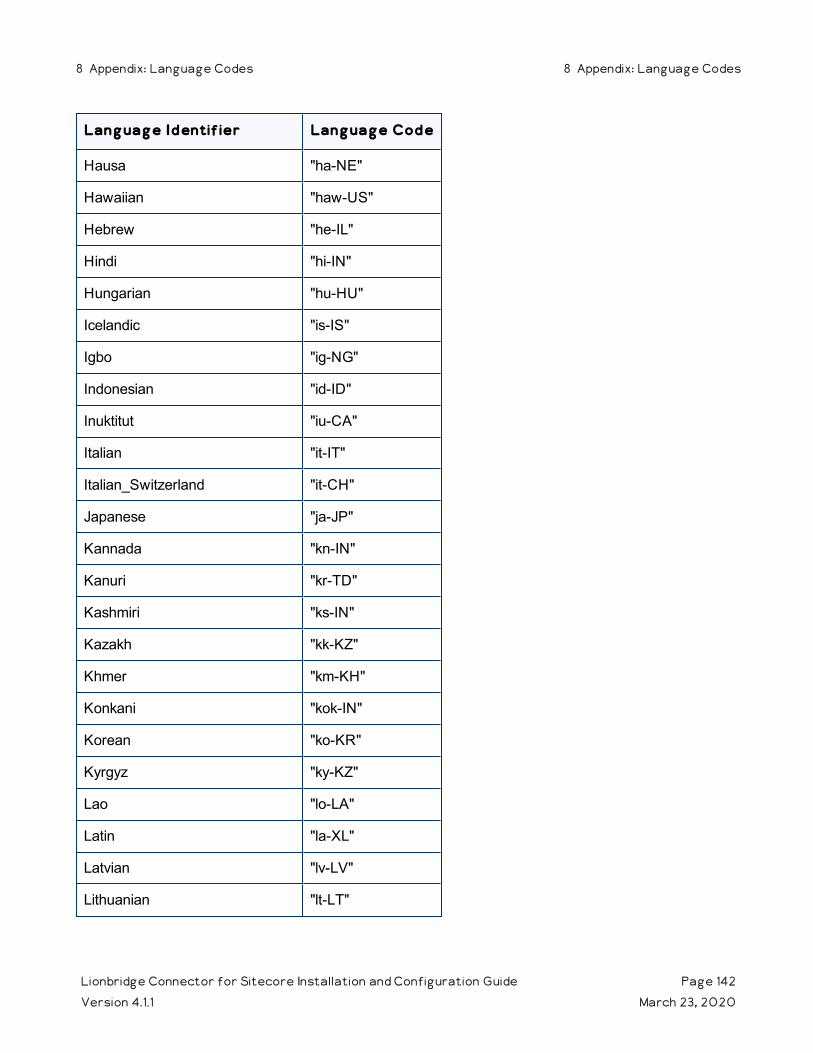
Language Identifier Language Code
Hausa "ha-NE"
Hawaiian "haw-US"
Hebrew "he-IL"
Hindi "hi-IN"
Hungarian "hu-HU"
Icelandic "is-IS"
Igbo "ig-NG"
Indonesian "id-ID"
Inuktitut "iu-CA"
Italian "it-IT"
Italian_Switzerland "it-CH"
Japanese "ja-JP"
Kannada "kn-IN"
Kanuri "kr-TD"
Kashmiri "ks-IN"
Kazakh "kk-KZ"
Khmer "km-KH"
Konkani "kok-IN"
Korean "ko-KR"
Kyrgyz "ky-KZ"
Lao "lo-LA"
Latin "la-XL"
Latvian "lv-LV"
Lithuanian "lt-LT"
Lionbridge Connector for Sitecore Installation and Configuration Guide Page 142Version 4.1.1 March 23, 2020
8 Appendix: Language Codes 8 Appendix: Language Codes

Language Identifier Language Code
Malay "ms-MY"
Malay_Brunei_Darussalam "ms-BN"
Malayalam "ml-IN"
Maltese "mt-MT"
Maori "mi-NZ"
Marathi "mr-IN"
Mongolian "mn-MN"
Nepali "ne-NP"
Nepali_India "ne-IN"
Norwegian "nb-NO"
Norwegian_Nynorsk "nn-NO"
Oriya "or-IN"
Oromo "om-ET"
Panjabi "pa-PK"
Polish "pl-PL"
Portuguese "pt-PT"
Portuguese_Brazil "pt-BR"
Punjabi_Pakistan "pa-PK"
Pushto "ps-AF"
Quechua_Ecuador "qu-EC"
Quechua_Peru "qu-PE"
Rhaeto_Romance "rm-IT"
Romanian "ro-RO"
Romanian_Moldova "ro-MD"
Lionbridge Connector for Sitecore Installation and Configuration Guide Page 143Version 4.1.1 March 23, 2020
8 Appendix: Language Codes 8 Appendix: Language Codes

Language Identifier Language Code
Russian "ru-RU"
Russian_Moldava "ru-MD"
Sami "se-NO"
Sanskrit "sa-IN"
Serbian_Cyrillic "sr-RS"
Serbian_Latin "sr-SP"
Sindhi_India "sd-IN"
Sindhi_Pakistan "sd-PK"
Sinhala "si-LK"
Slovak "sk-SK"
Slovenian "sl-SI"
Somali "so-ET"
Sorbian "wen-DE"
Spanish "es-ES"
Spanish_Argentina "es-AR"
Spanish_Bolivia "es-BO"
Spanish_Chile "es-CL"
Spanish_Colombia "es-CO"
Spanish_Costa_Rica "es-CR"
Spanish_Dominican_Republic "es-DO"
Spanish_Ecuador "es-EC"
Spanish_El_Salvador "es-SV"
Spanish_Honduras "es-HN"
Spanish_LatinAmerica "es-XL"
Lionbridge Connector for Sitecore Installation and Configuration Guide Page 144Version 4.1.1 March 23, 2020
8 Appendix: Language Codes 8 Appendix: Language Codes
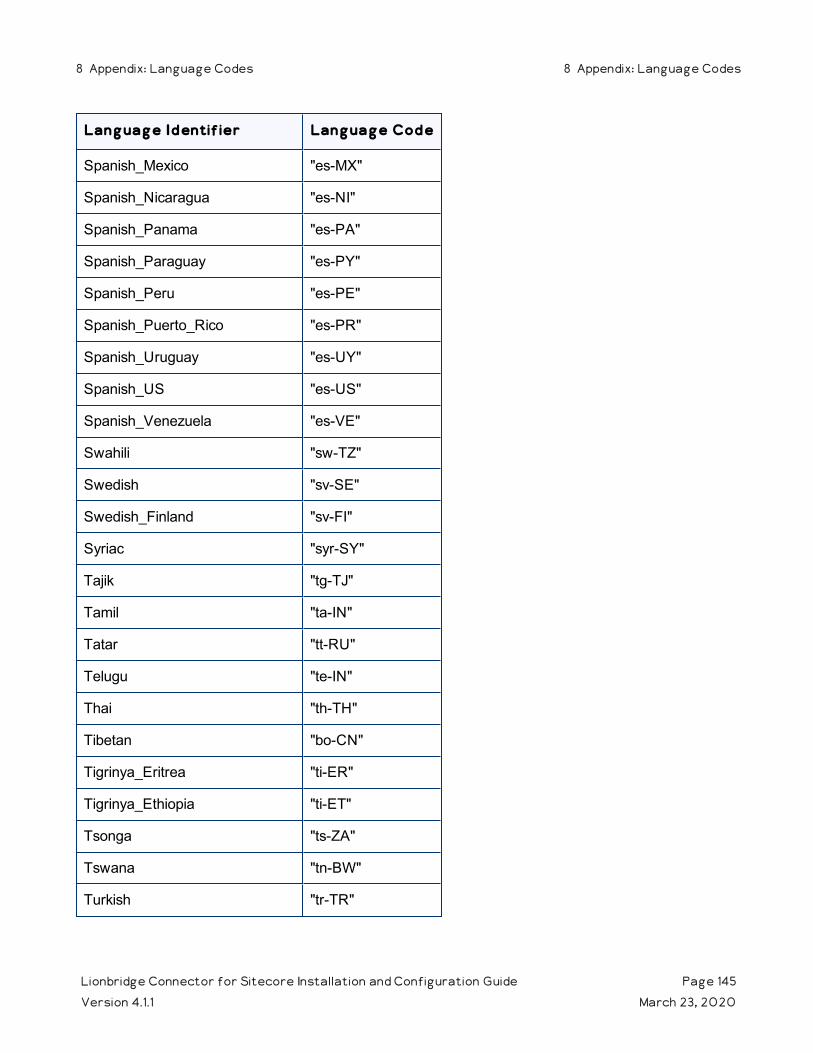
Language Identifier Language Code
Spanish_Mexico "es-MX"
Spanish_Nicaragua "es-NI"
Spanish_Panama "es-PA"
Spanish_Paraguay "es-PY"
Spanish_Peru "es-PE"
Spanish_Puerto_Rico "es-PR"
Spanish_Uruguay "es-UY"
Spanish_US "es-US"
Spanish_Venezuela "es-VE"
Swahili "sw-TZ"
Swedish "sv-SE"
Swedish_Finland "sv-FI"
Syriac "syr-SY"
Tajik "tg-TJ"
Tamil "ta-IN"
Tatar "tt-RU"
Telugu "te-IN"
Thai "th-TH"
Tibetan "bo-CN"
Tigrinya_Eritrea "ti-ER"
Tigrinya_Ethiopia "ti-ET"
Tsonga "ts-ZA"
Tswana "tn-BW"
Turkish "tr-TR"
Lionbridge Connector for Sitecore Installation and Configuration Guide Page 145Version 4.1.1 March 23, 2020
8 Appendix: Language Codes 8 Appendix: Language Codes

Language Identifier Language Code
Turkmen "tk-TM"
Uighur "ug-CN"
Ukrainian "uk-UA"
Urdu "ur-PK"
Urdu_India "ur-IN"
Uzbek "uz-UZ"
Venda "ve-ZA"
Vietnamese "vi-VN"
Welsh "cy-GB"
Xhosa "xh-ZA"
Yi "ii-CN"
Yiddish "yi-MD"
Yoruba "yo-NG"
Zulu "zu-ZA"
Lionbridge Connector for Sitecore Installation and Configuration Guide Page 146Version 4.1.1 March 23, 2020
8 Appendix: Language Codes 8 Appendix: Language Codes

9 Appendix: Connector ExtensionsYou can create the following extensions to the Connector:
"Configuring the Behavior of the Send Dependent Items Check Box" on page 80
"Using Custom Logic to Send Out Content for Translation" on page 147
"Using Custom Logic to Update a Remote TM" on page 151
"Calling Custom Workflow Logic" on page 154
"Using Custom Logic to Overwrite the Workflow Target-Language Setting when Automatically Sending Items to the Translation Queue via Workflow" on page 157
"Using Custom Logic to Configure how the Upload Schedule Creates Jobs when Automatically Sending Out Items from the Translation Queue" on page 158
"Using Custom Logic to Populate the Translation Queue" on page 163
"Using Custom Logic to Remove Items from the Translation Queue" on page 164
"Using Custom Logic to Override Default Publishing Behavior" on page 168
9.1 Using Custom Logic to Send Out Content for Translation
You can call the <SendTranslationJobPipeline> pipeline to send out content for translation. This enables you to send out translation jobs using your own custom logic.
To call the pipeline:
You create an instance of the ClayTablet.SC.Pipelines.SendTranslationJobPipelineArgs class to pass to the <SendTranslationJobPipeline> pipeline as an argument.
The SendTranslationJobPipelineArgs class is defined in ClayTablet.SC.dll as:
public class SendTranslationJobPipelineArgs : PipelineArgs
{
public string JobName { get; set; }
public string SourceLanguage { get; set; }
public IEnumerable<string> TargetLanguages { get; set; }
public string SitecoreUser { get; set; }
public string TeamProfile { get; set; }
public string UselocalTM { get; set; }
Lionbridge Connector for Sitecore Installation and Configuration Guide Page 147Version 4.1.1 March 23, 2020
9 Appendix: Connector Extensions 9 Appendix: Connector Extensions

public void AddItemsLatestVersionToTranslation(params string[] pathOrIdToItems) {}
public void AddItemsLatestPublishedVersionToTranslation(params string[] pathOrIdToItems) {}
public void AddItemVersionToTranslation(string pathOrId, int version) {}
public void SendCopyOnly() {}
public void SendToGenericProvider(string providerName, string jobDescription = "",
DateTime ? dueDate = null. string purchaseOrder = "", bool forQuote = false) {}
public void SendToOnDemandProvider(string providerName, string specialInstructions = "",
string purchaseOrder = "", bool forQuote = false, string serviceName = "") {}
public void SendToFreewayProvider(string providerName, string specialInstructions = "",
DateTime ? dueDate = null. string purchaseOrder = "", bool forQuote = false) {}
public void SetFreewayAnalysisCode(int level, string name, string value) {}
}
After instantiating this class, you perform the following steps:
1. Specify the following information about the job:
job name
source language
target languages
2. Add Sitecore items, and specify the source versions of those items to translate. You can choose to translate:
the latest version of items
the latest published version of items
choose a specific version for each item
Lionbridge Connector for Sitecore Installation and Configuration Guide Page 148Version 4.1.1 March 23, 2020
9 Appendix: Connector Extensions 9.1 Using Custom Logic to Send Out Content for Translation

3. Specify the translation provider to which the Connector will the send the translation job, and provider-specific job metadata, such as:
job description or special instructions
due date
whether the job requires a quote
the service name (if the translation provider is Lionbridge onDemand)
analysis codes (if the translation provider is Lionbridge Freeway)
the Sitecore user account for sending the job should be submitted
the team profile to which the job belongs
whether or not to use the local TM when sending out the job
The following code examples demonstrate how to send copy-only translation jobs, or how to send out jobs to a generic provider, to Lionbridge onDemand, or to Lionbridge Freeway, using the ClayTablet.SC.Pipelines.SendTranslationJobPipelineArgs class:
...
static public void TestJobSendCopyOnly()
{
SendTranslationJobPipelineArgs args = new SendTranslationJobPipelineArgs();
args.JobName = "TestJobSendCopyOnly";
args.SourceLanguage = "en-US";
args.TargetLanguages = new string[] { "fr-FR", "de-DE" };
args.AddItemsLatestVersionToTranslation("path/to/item1", "id-of-item2", "path/to/item3");
args.AddItemsLatestPublishedVersionToTranslation("path/to/item4", "id-of-item5", "path/to/item6");
args.AddItemVersionToTranslation("path/to/item7", 2);
args.SendCopyOnly();
CorePipeline.Run("SendTranslationJobPipeline", args);
}
static public void TestJobSendToGenericProvider()
{
Lionbridge Connector for Sitecore Installation and Configuration Guide Page 149Version 4.1.1 March 23, 2020
9 Appendix: Connector Extensions 9.1 Using Custom Logic to Send Out Content for Translation

SendTranslationJobPipelineArgs args = new SendTranslationJobPipelineArgs();
args.JobName = "TestJobSendToGenericProvider";
args.SourceLanguage = "en-US";
args.TargetLanguages = new string[] { "fr-FR", "de-DE" };
args.AddItemsLatestVersionToTranslation("path/to/item1", "id-of-item2", "path/to/item3");
args.AddItemsLatestPublishedVersionToTranslation("path/to/item4", "id-of-item5", "path/to/item6");
args.AddItemVersionToTranslation("path/to/item7", 2);
args.SendToGenericProvider("MyGenericProvider", "Test job send to generice provider", DateTime.Now.AddDays(7), "PO1234", false);
CorePipeline.Run("SendTranslationJobPipeline", args);
}
static public void TestJobSendToOnDemandProvider()
{
SendTranslationJobPipelineArgs args = new SendTranslationJobPipelineArgs();
args.JobName = "TestJobSendToOnDemandProvider";
args.SourceLanguage = "en-US";
args.TargetLanguages = new string[] { "fr-FR", "de-DE" };
args.AddItemsLatestVersionToTranslation("path/to/item1", "id-of-item2", "path/to/item3");
args.AddItemsLatestPublishedVersionToTranslation("path/to/item4", "id-of-item5", "path/to/item6");
args.AddItemVersionToTranslation("path/to/item7", 2);
args.SendToOnDemandProvider("MyOnDemandProvider", "Special instructions for OnDemand provider", "PO1234", false, "MyOnDemandService");
CorePipeline.Run("SendTranslationJobPipeline", args);
}
static public void TestJobSendToFreewayProvider()
{
Lionbridge Connector for Sitecore Installation and Configuration Guide Page 150Version 4.1.1 March 23, 2020
9 Appendix: Connector Extensions 9.1 Using Custom Logic to Send Out Content for Translation

SendTranslationJobPipelineArgs args = new SendTranslationJobPipelineArgs();
args.JobName = "TestJobSendToFreewayProvider";
args.SourceLanguage = "en-US";
args.TargetLanguages = new string[] { "fr-FR", "de-DE" };
args.AddItemsLatestVersionToTranslation("path/to/item1", "id-of-item2", "path/to/item3");
args.AddItemsLatestPublishedVersionToTranslation("path/to/item4", "id-of-item5", "path/to/item6");
args.AddItemVersionToTranslation("path/to/item7", 2);
args.SendToFreewayProvider("MyFreewayProvider", "Special instructions for Freeway provider", DateTime.Now.AddDays(7), "PO1234", false);
args.SetFreewayAnalysisCode(1, "Region", "North America");
args.SetFreewayAnalysisCode(2, "Department", "Accounting");
args.SetFreewayAnalysisCode(3, "Severity", "Critical");
CorePipeline.Run("SendTranslationJobPipeline", args);
}
9.2 Using Custom Logic to Update a Remote TM
You can call the <SendTmUpdatePipeline> pipeline to send out updates to a remote TM (translation memory) of selected items and versions for which the translated versions were updated.
To call this pipeline:
1. Create an instance of ClayTablet.SC.Pipelines.SendTmUpdatePipelineArgs class to pass to the pipeline as an argument. The SendTmUpdatePipelineArgs class is defined in ClayTablet.SC.dll as:
public class SendTmUpdatePipelineArgs : PipelineArgs
{
public String SourceLanguage { get; set; }
public String TargetLanguage { get; set; }
public void AddTmUpdateItem(string itemId, int sourceVersion, int targetVersion);
Lionbridge Connector for Sitecore Installation and Configuration Guide Page 151Version 4.1.1 March 23, 2020
9 Appendix: Connector Extensions 9.2 Using Custom Logic to Update a Remote TM

public List<TmUpdateItem> TmUpdateItems { get; }
}
2. In SendTmUpdatePipelineArgs, specify the following information:
Information Description
ItemId The Sitecore item ID of each updated item to send to the remote TM.
SourceLanguage The source language of the updated items to send to the remote TM.
TargetLanguage The target language of the updated items to send to the remote TM.
AddTmUpdateItem Call this one or more times to add a set of ItemId/SourceVersion/TargetVersion to the list.
SourceVersion The source-language version of the updated items to send to the remote TM.
TargetVersion The target-language version of the updated items to send to the remote TM.
Note: Invoking the pipeline once can update the remote TM for multiple Sitecore items with the same source and target languages.
3. Invoke the pipeline to send the specified Sitecore items with the same source and target languages to update the remote TM.
4. Use the SendTmUpdatePipelineArgs.TmUpdateItems class to verify that an item has actually been sent out to update a remote TM. class is defined in ClayTablet.SC.dll as:
public class TmUpdateItem
{
public string ItemId { get; }
public int SourceVersion { get; }
public int TargetVersion { get; i}
public int TargetVersionUsedForTmUpdate { get; }
public bool Updated { get; }
}
You specify the following information:
Information Description
ItemId The Sitecore item ID of each updated item to send to the remote TM.
Lionbridge Connector for Sitecore Installation and Configuration Guide Page 152Version 4.1.1 March 23, 2020
9 Appendix: Connector Extensions 9.2 Using Custom Logic to Update a Remote TM

Information Description
SourceVersion The source-language version of the updated items to send to the remote TM.
TargetVersion The target-language version of the updated items to send to the remote TM.
TargetVersionUsedForTmUpdate The version of the updated target items to send to the remote TM.
5. Inspect the TmUpdateItem.Updated property to verify that an item has actually been sent out to update a remote TM.
6. If an item was not actually sent out to update a remote TM, investigate the following possible reasons:
The target version was not updated after the translation was received.
The Connector did not find a translation record associated for the Sitecore item ID and the specified source and target version combination.
7. If neither of the reasons in the previous step is relevant, then check the Clay Tablet and Sitecore log files to determine whether any unexpected errors occurred during the TM update process.
8. To verify which target version was sent to update the remote TM, inspect the TmUpdateItem.TargetVersionUsedForTmUpdate property. Typically the Connector uses the target version specified in the arguments to update the remote TM.
However, if the Always Update TM using latest target version check box is selected in the /sitecore/system/Settings/Lionbridge Settings/Lionbridge Connector Settings item, Update TM section, the pipeline uses the latest target version instead of the specified target version, and TmUpdateItem.TargetVersionUsedForTmUpdate returns that version number. If the Connector does not send out item to update a remote TM, then TmUpdateItem.TargetVersionUsedForTmUpdate is not specified.
Note: When you use the pipeline to send out multiple items to update a remote TM, then the Connector groups the items in the same way that it grouped the original items for translation in an XML file. Items that were originally in the same XML file (asset task file) are sent out in the same TM update file.
Sample code for calling the pipeline:
SendTmUpdatePipelineArgs pArgs = new SendTmUpdatePipelineArgs();
pArgs.SourceLanguage = _itemSourceLanguageName;
pArgs.TargetLanguage = _itemTargetLanguageName;
Lionbridge Connector for Sitecore Installation and Configuration Guide Page 153Version 4.1.1 March 23, 2020
9 Appendix: Connector Extensions 9.2 Using Custom Logic to Update a Remote TM
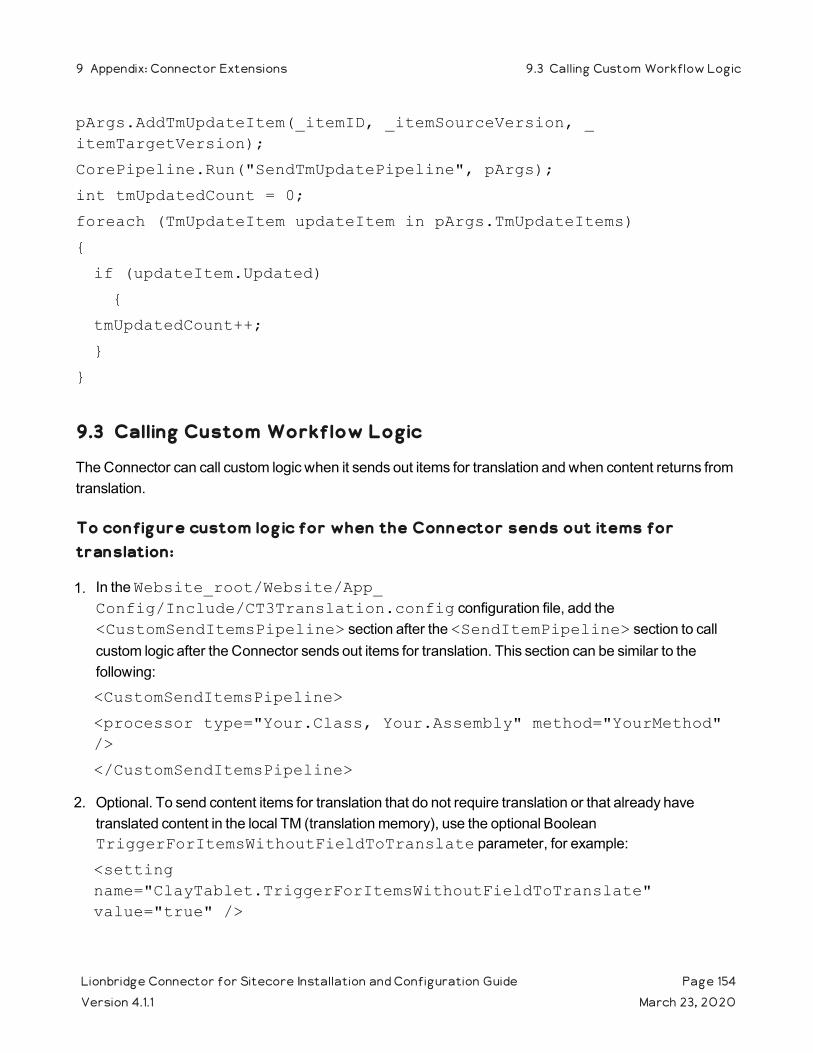
pArgs.AddTmUpdateItem(_itemID, _itemSourceVersion, _itemTargetVersion);
CorePipeline.Run("SendTmUpdatePipeline", pArgs);
int tmUpdatedCount = 0;
foreach (TmUpdateItem updateItem in pArgs.TmUpdateItems)
{
if (updateItem.Updated)
{
tmUpdatedCount++;
}
}
9.3 Calling Custom Workflow Logic
The Connector can call custom logic when it sends out items for translation and when content returns from translation.
To configure custom logic for when the Connector sends out items for translation:
1. In the Website_root/Website/App_Config/Include/CT3Translation.config configuration file, add the <CustomSendItemsPipeline> section after the <SendItemPipeline> section to call custom logic after the Connector sends out items for translation. This section can be similar to the following:
<CustomSendItemsPipeline>
<processor type="Your.Class, Your.Assembly" method="YourMethod" />
</CustomSendItemsPipeline>
2. Optional. To send content items for translation that do not require translation or that already have translated content in the local TM (translation memory), use the optional Boolean TriggerForItemsWithoutFieldToTranslate parameter, for example:
<setting name="ClayTablet.TriggerForItemsWithoutFieldToTranslate" value="true" />
Lionbridge Connector for Sitecore Installation and Configuration Guide Page 154Version 4.1.1 March 23, 2020
9 Appendix: Connector Extensions 9.3 Calling Custom Workflow Logic
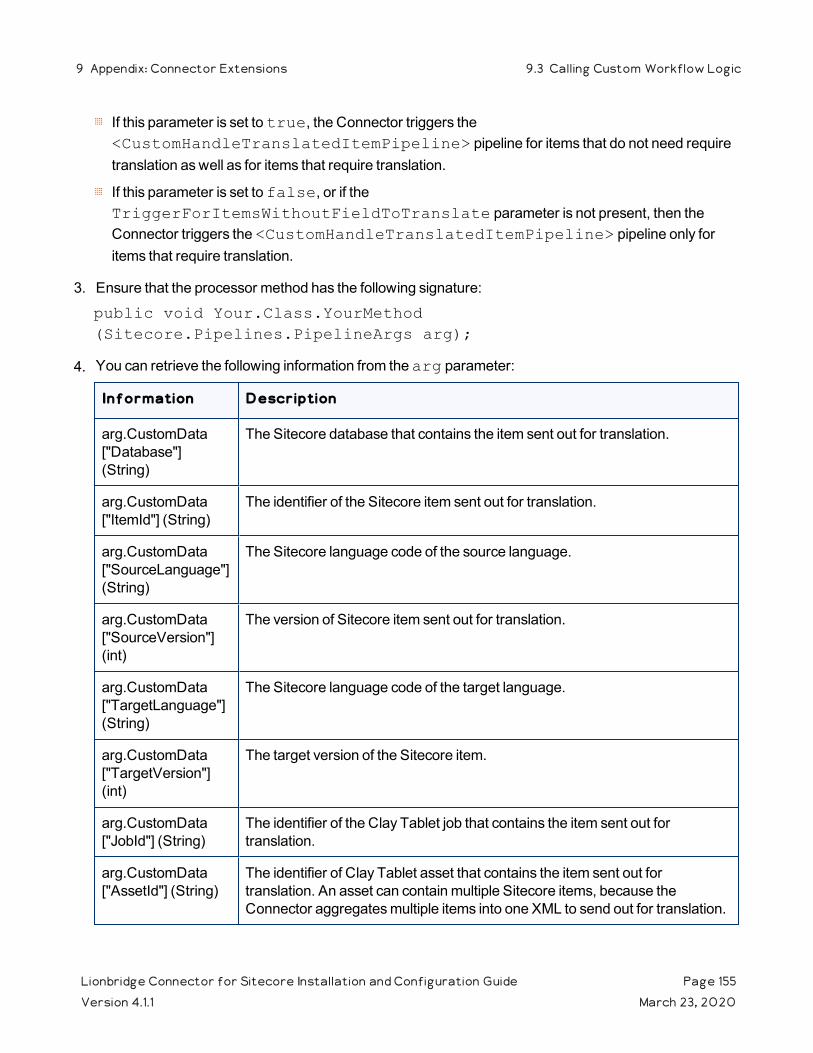
If this parameter is set to true, the Connector triggers the <CustomHandleTranslatedItemPipeline> pipeline for items that do not need require translation as well as for items that require translation.
If this parameter is set to false, or if the TriggerForItemsWithoutFieldToTranslate parameter is not present, then the Connector triggers the <CustomHandleTranslatedItemPipeline> pipeline only for items that require translation.
3. Ensure that the processor method has the following signature:
public void Your.Class.YourMethod (Sitecore.Pipelines.PipelineArgs arg);
4. You can retrieve the following information from the arg parameter:
Information Description
arg.CustomData["Database"] (String)
The Sitecore database that contains the item sent out for translation.
arg.CustomData["ItemId"] (String)
The identifier of the Sitecore item sent out for translation.
arg.CustomData["SourceLanguage"] (String)
The Sitecore language code of the source language.
arg.CustomData["SourceVersion"] (int)
The version of Sitecore item sent out for translation.
arg.CustomData["TargetLanguage"] (String)
The Sitecore language code of the target language.
arg.CustomData["TargetVersion"] (int)
The target version of the Sitecore item.
arg.CustomData["JobId"] (String)
The identifier of the Clay Tablet job that contains the item sent out for translation.
arg.CustomData["AssetId"] (String)
The identifier of Clay Tablet asset that contains the item sent out for translation. An asset can contain multiple Sitecore items, because the Connector aggregates multiple items into one XML to send out for translation.
Lionbridge Connector for Sitecore Installation and Configuration Guide Page 155Version 4.1.1 March 23, 2020
9 Appendix: Connector Extensions 9.3 Calling Custom Workflow Logic

To configure custom logic for when the Connector receives translated content:
1. In the Website_root/Website/App_Config/Include/CT3Translation.config configuration file, add the <CustomHandleTranslatedItemPipeline> (after existing <SendItemPipeline> section to call custom logic after the Connector receives the translated content. This section can be similar to the following:
<CustomHandleTranslatedItemPipeline>
<processor type="Your.Class2, Your.Assembly" method="YourMethod2" />
</CustomHandleTranslatedItemPipeline>
2. Ensure that the processor method has the following signature:
public void Your.Class2.YourMethod2 (Sitecore.Pipelines.PipelineArgs arg);
3. You can retrieve the following information from the arg parameter:
Information Description
arg.CustomData["Database"] (String)
The Sitecore database that contains the item sent out for translation.
arg.CustomData["ItemId"] (String)
The identifier of the Sitecore item sent out for translation.
arg.CustomData["TargetLanguage"] (String)
The Sitecore language code of the target language.
arg.CustomData["TargetVersion"] (int)
The target version of the Sitecore item.
arg.CustomData["JobId"] (String)
The identifier of the Clay Tablet job that contains the item sent out for translation.
arg.CustomData["AssetId"] (String)
The identifier of Clay Tablet asset that contains the item sent out for translation. An asset can contain multiple Sitecore items, because the Connector aggregates multiple items into one XML to send out for translation.
Lionbridge Connector for Sitecore Installation and Configuration Guide Page 156Version 4.1.1 March 23, 2020
9 Appendix: Connector Extensions 9.3 Calling Custom Workflow Logic
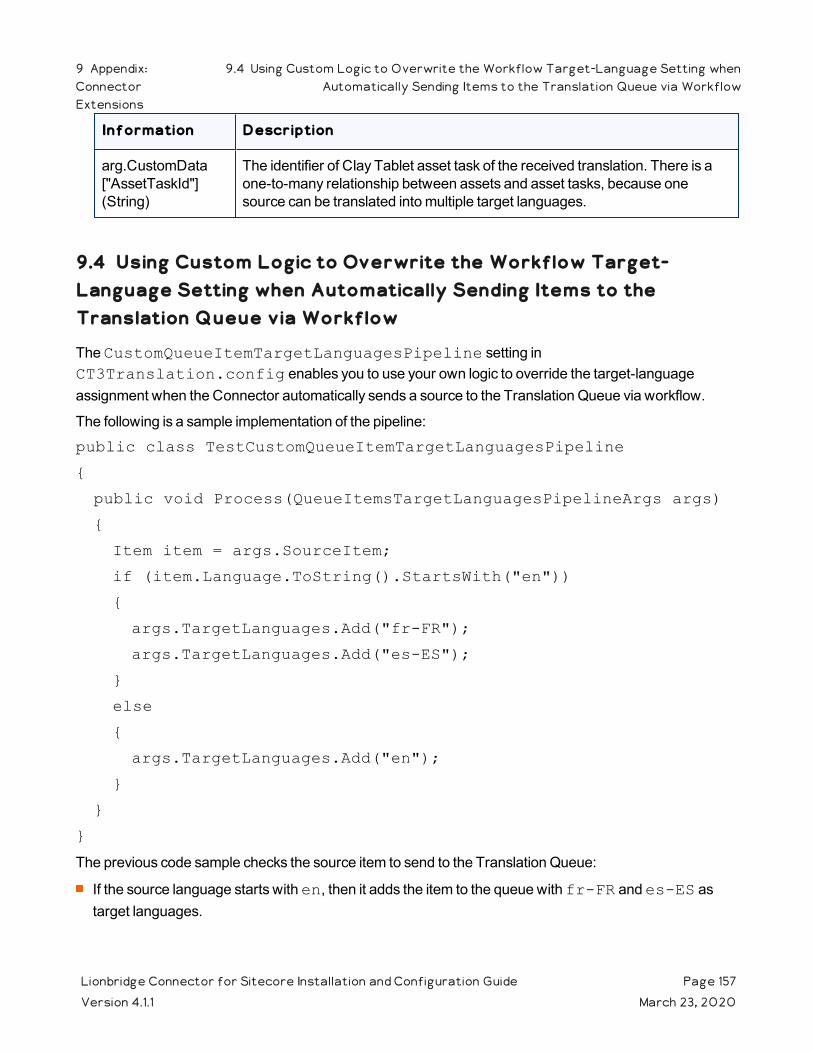
Information Description
arg.CustomData["AssetTaskId"] (String)
The identifier of Clay Tablet asset task of the received translation. There is a one-to-many relationship between assets and asset tasks, because one source can be translated into multiple target languages.
9.4 Using Custom Logic to Overwrite the Workflow Target-Language Setting when Automatically Sending Items to the Translation Queue via Workflow
The CustomQueueItemTargetLanguagesPipeline setting in CT3Translation.config enables you to use your own logic to override the target-language assignment when the Connector automatically sends a source to the Translation Queue via workflow.
The following is a sample implementation of the pipeline:
public class TestCustomQueueItemTargetLanguagesPipeline
{
public void Process(QueueItemsTargetLanguagesPipelineArgs args)
{
Item item = args.SourceItem;
if (item.Language.ToString().StartsWith("en"))
{
args.TargetLanguages.Add("fr-FR");
args.TargetLanguages.Add("es-ES");
}
else
{
args.TargetLanguages.Add("en");
}
}
}
The previous code sample checks the source item to send to the Translation Queue:
If the source language starts with en, then it adds the item to the queue with fr-FR and es-ES as target languages.
Lionbridge Connector for Sitecore Installation and Configuration Guide Page 157Version 4.1.1 March 23, 2020
9 Appendix:ConnectorExtensions
9.4 Using Custom Logic to Overwrite the Workflow Target-Language Setting whenAutomatically Sending Items to the Translation Queue via Workflow

Otherwise, it adds the item to the queue with en as the target language.
Any implementation should have a method with the signature like:
public void Process(QueueItemsTargetLanguagesPipelineArgs args)
The parameter is of ClayTablet.SC.Pipelines.QueueItemsTargetLanguagesPipelineArgs type:
public class QueueItemsTargetLanguagesPipelineArgs : PipelineArgs
{
public Item SourceItem { get; }
public List<String> TargetLanguages { get; }
}
The implementation can get the SourceItem from the argument, and it can insert target language codes into the TargetLanguages list of the QueueItemsTargetLanguagesPipelineArgs object.
9.5 Using Custom Logic to Configure how the Upload Schedule Creates Jobs when Automatically Sending Out Items from the Translation Queue
The CustomAutoSendQueuesPipeline setting in CT3Translation.config enables you to use your own logic to determine how to automatically create jobs from the Translation Queue. It works in conjunction with the Auto Send Queue Items Time setting in the /sitecore/system/Tasks/Schedules/Lionbridge/Upload Schedule/Upload Service Options item, which is described in "Configuring the Connector to Send All Items in the Queue for Translation" on page 88.
The following is a sample implementation of the pipeline:
public class TestCustomAutoSendQueuesPipeline
{
public void Process(AutoSendQueueJobsArgs args)
{
string frJobId = null;
string otherJobId = null;
foreach (TranslationQueueInfo queueItem in args.TranslationQueueItems)
Lionbridge Connector for Sitecore Installation and Configuration Guide Page 158Version 4.1.1 March 23, 2020
9 Appendix:ConnectorExtensions
9.5 Using Custom Logic to Configure how the Upload Schedule Creates Jobs whenAutomatically Sending Out Items from the Translation Queue
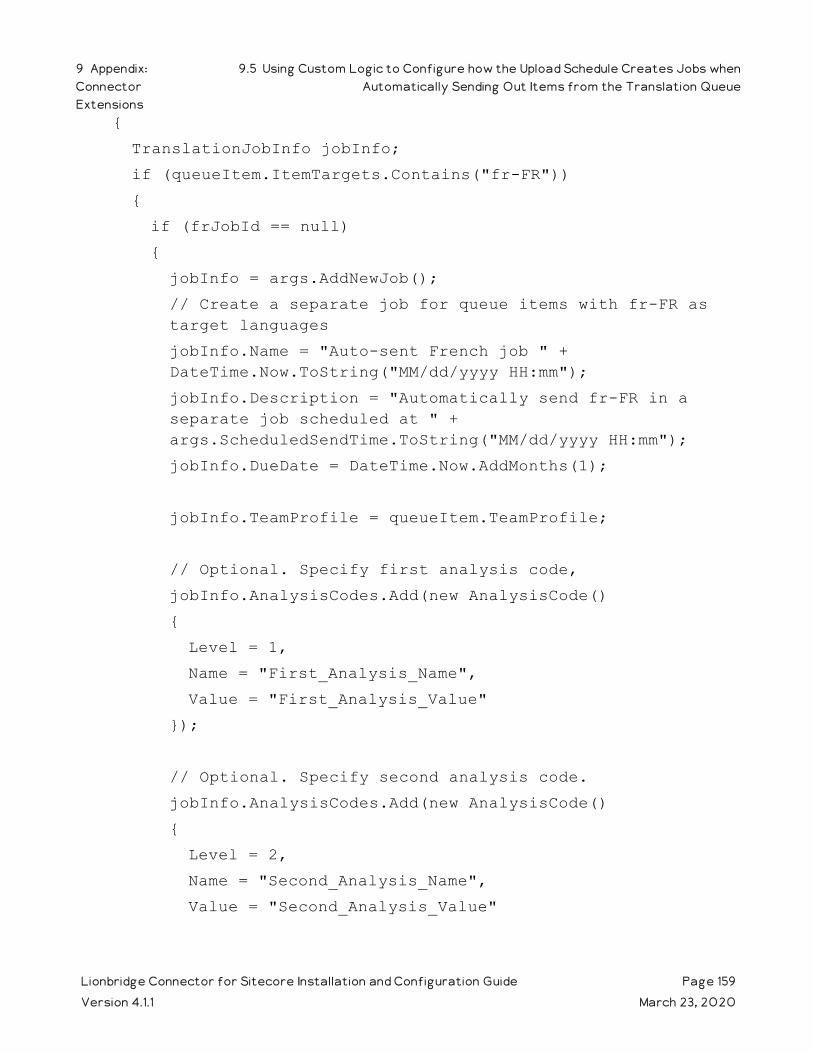
{
TranslationJobInfo jobInfo;
if (queueItem.ItemTargets.Contains("fr-FR"))
{
if (frJobId == null)
{
jobInfo = args.AddNewJob();
// Create a separate job for queue items with fr-FR as target languages
jobInfo.Name = "Auto-sent French job " + DateTime.Now.ToString("MM/dd/yyyy HH:mm");
jobInfo.Description = "Automatically send fr-FR in a separate job scheduled at " + args.ScheduledSendTime.ToString("MM/dd/yyyy HH:mm");
jobInfo.DueDate = DateTime.Now.AddMonths(1);
jobInfo.TeamProfile = queueItem.TeamProfile;
// Optional. Specify first analysis code,
jobInfo.AnalysisCodes.Add(new AnalysisCode()
{
Level = 1,
Name = "First_Analysis_Name",
Value = "First_Analysis_Value"
});
// Optional. Specify second analysis code.
jobInfo.AnalysisCodes.Add(new AnalysisCode()
{
Level = 2,
Name = "Second_Analysis_Name",
Value = "Second_Analysis_Value"
Lionbridge Connector for Sitecore Installation and Configuration Guide Page 159Version 4.1.1 March 23, 2020
9 Appendix:ConnectorExtensions
9.5 Using Custom Logic to Configure how the Upload Schedule Creates Jobs whenAutomatically Sending Out Items from the Translation Queue

});
// Optional. Specify third analysis code.
jobInfo.AnalysisCodes.Add(new AnalysisCode()
{
Level = 3,
Name = "Third_Analysis_Name",
Value = "Third_Analysis_Value"
});
// Optional. Specify PO Reference.
jobInfo.PoReference = "PO_Reference_Value";
// You can also specify a certain LSP account to send the job to
// jobInfo.SendAccount = "FR LSP";
frJobId = jobInfo.ID;
}
else
{
jobInfo = args.GetJob(frJobId);
}
}
else
{
if (otherJobId == null)
{
// Create a job for all other queued items
jobInfo = args.AddNewJob();
// Not specify job meta information, the connector will automatically fill in the information based on AutoSendQueueItems* configurations
Lionbridge Connector for Sitecore Installation and Configuration Guide Page 160Version 4.1.1 March 23, 2020
9 Appendix:ConnectorExtensions
9.5 Using Custom Logic to Configure how the Upload Schedule Creates Jobs whenAutomatically Sending Out Items from the Translation Queue
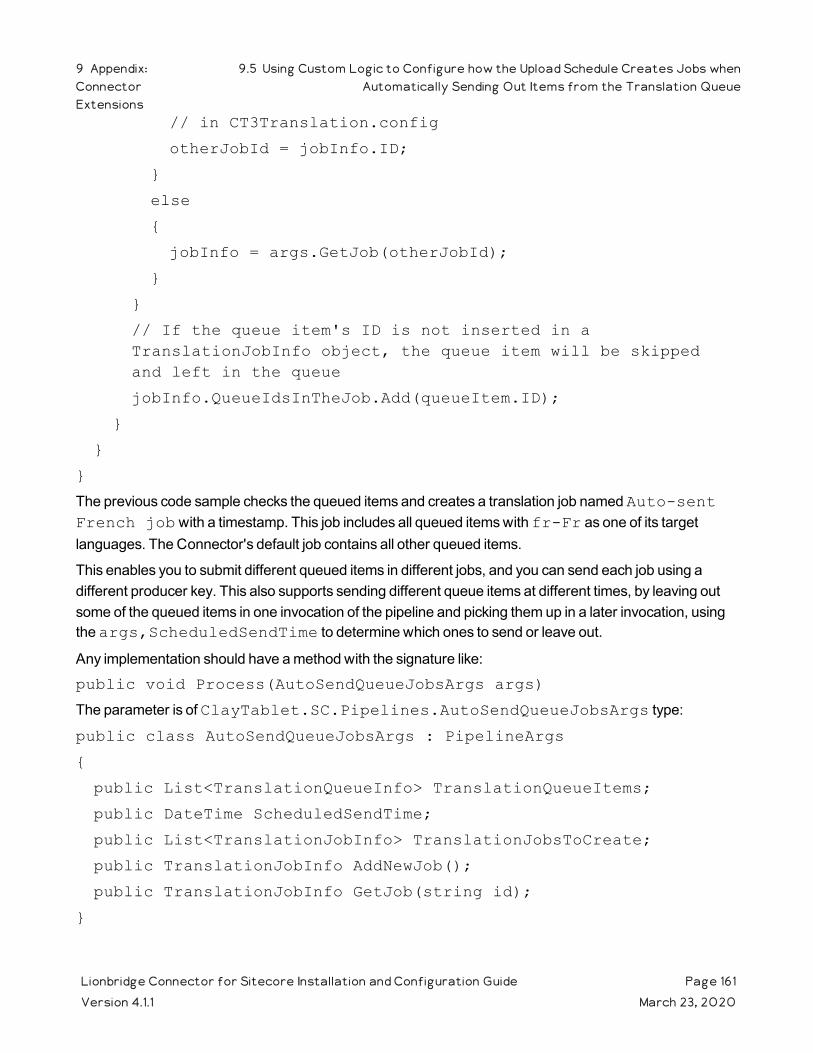
// in CT3Translation.config
otherJobId = jobInfo.ID;
}
else
{
jobInfo = args.GetJob(otherJobId);
}
}
// If the queue item's ID is not inserted in a TranslationJobInfo object, the queue item will be skipped and left in the queue
jobInfo.QueueIdsInTheJob.Add(queueItem.ID);
}
}
}
The previous code sample checks the queued items and creates a translation job named Auto-sent French job with a timestamp. This job includes all queued items with fr-Fr as one of its target languages. The Connector's default job contains all other queued items.
This enables you to submit different queued items in different jobs, and you can send each job using a different producer key. This also supports sending different queue items at different times, by leaving out some of the queued items in one invocation of the pipeline and picking them up in a later invocation, using the args,ScheduledSendTime to determine which ones to send or leave out.
Any implementation should have a method with the signature like:
public void Process(AutoSendQueueJobsArgs args)
The parameter is of ClayTablet.SC.Pipelines.AutoSendQueueJobsArgs type:
public class AutoSendQueueJobsArgs : PipelineArgs
{
public List<TranslationQueueInfo> TranslationQueueItems;
public DateTime ScheduledSendTime;
public List<TranslationJobInfo> TranslationJobsToCreate;
public TranslationJobInfo AddNewJob();
public TranslationJobInfo GetJob(string id);
}
Lionbridge Connector for Sitecore Installation and Configuration Guide Page 161Version 4.1.1 March 23, 2020
9 Appendix:ConnectorExtensions
9.5 Using Custom Logic to Configure how the Upload Schedule Creates Jobs whenAutomatically Sending Out Items from the Translation Queue

Implementation can iterate over TranslationQueueItems to check all the queued items waiting to be sent out. The type of ClayTablet.SC.Pipelines.TranslationQueueInfo provides information about the queued item:
public class TranslationQueueInfo
{
public String ID { get; }
public String ItemID { get; }
public String ItemDatabase { get; }
public String ItemSource { get; }
public int ItemSourceVersion { get; }
public String ItemPath { get; }
public List<String> ItemTargets { get; }
public DateTime CreateTime { get; }
public String SitecoreUser { get; }
}
The implementation should either:
Insert each queued item into a ClayTablet.SC.Pipelines.TranslationJobInfo object, which will cause it to be sent out as part of the job.
Leave a queued item alone, so it will remain in the Translation Queue for this scheduled automatic sending invocation.
public class TranslationJobInfo
{
public string ID { get; }
public string Name { get; set; }
public string Description { get; set; }
public string SendAccount { get; set; }
public DateTime? DueDate { get; set; }
public string SendUser { get; set; }
public string TeamProfile { get; set; }
public string PoReference { get; set; }
public List<String> QueueIdsInTheJob { get; }
public List<AnalysisCode> AnalysisCodes { get; }
Lionbridge Connector for Sitecore Installation and Configuration Guide Page 162Version 4.1.1 March 23, 2020
9 Appendix:ConnectorExtensions
9.5 Using Custom Logic to Configure how the Upload Schedule Creates Jobs whenAutomatically Sending Out Items from the Translation Queue

}
public class AnalysisCode
{
public int Level { get; set; }
public string Name { get; set; }
public string Value { get; set; }
}
A new TranslationJobInfo is created by AutoSendQueueJobsArgs.AddNewJob(). The implementation can set the job's metadata, including name, description, sending account (producer key), sending user (the Sitecore user in the Creator metadata of the job), and due date. Insert the queue item's ID into TranslationJobInfo.QueueIdsInTheJob. After creating a TranslationJobInfo, the implementation should typically save it or its ID for reuse when iterating over other queued items that should be added into the same job. The AutoSendQueueJobsArgs.GetJob (string) enables the implementation to retrieve a previously created TranslationJobInfo so that it can add more queued items into the same job.
9.6 Using Custom Logic to Populate the Translation Queue
You can call the <SendToTranslationQueuePipeline> pipeline to put Sitecore items into the Translation Queue. The items are displayed in the queue only for the Context.User.
Prerequisite:
You must set the Context.User to a user with Sitecore access. This must be the user who will review and send out the queued items. If you do not set the context user, then the default user is sitecore\Anonymous, which prevents the items from being displayed in the queue.
To call the pipeline:
You create an instance of the ClayTablet.SC.Pipelines.SendToTranslationQueuePipelineArgs class to pass to the pipeline as argument.
The SendToTranslationQueuePipelineArgs class is defined in ClayTablet.SC.dll as:
public class SendToTranslationQueuePipelineArgs : PipelineArgs
{
public String SourceLanguage { get; set; }
Lionbridge Connector for Sitecore Installation and Configuration Guide Page 163Version 4.1.1 March 23, 2020
9 Appendix: Connector Extensions 9.6 Using Custom Logic to Populate the Translation Queue
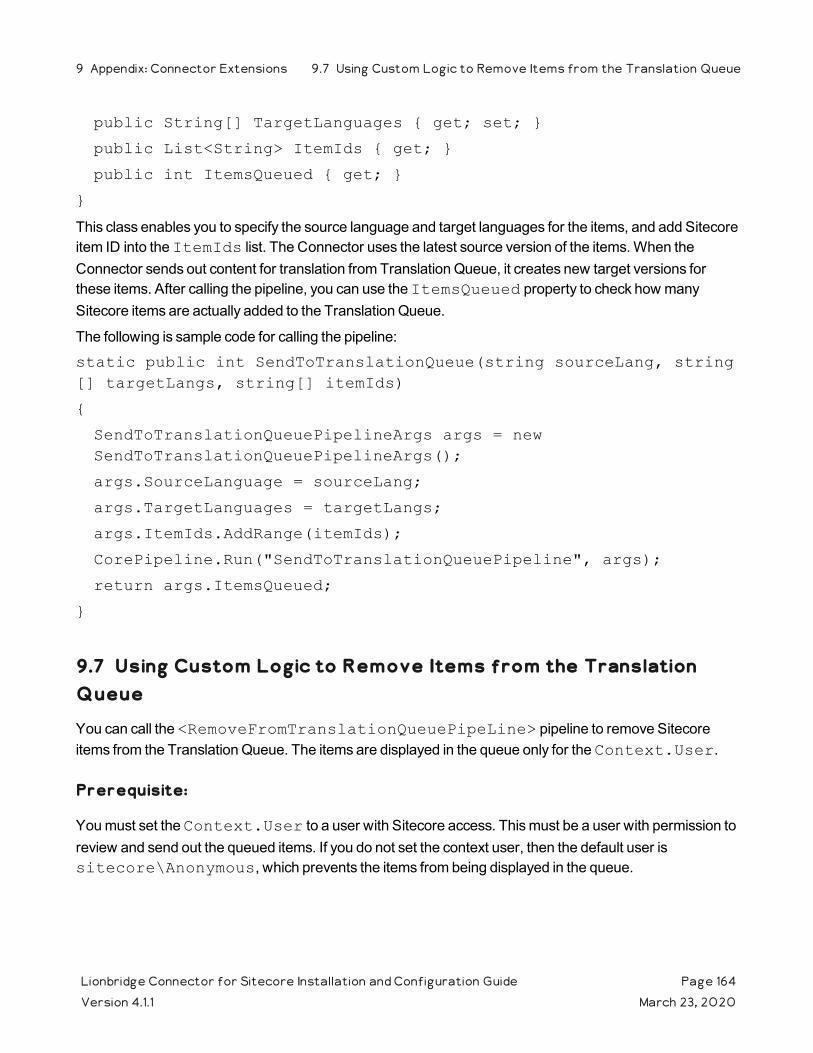
public String[] TargetLanguages { get; set; }
public List<String> ItemIds { get; }
public int ItemsQueued { get; }
}
This class enables you to specify the source language and target languages for the items, and add Sitecore item ID into the ItemIds list. The Connector uses the latest source version of the items. When the Connector sends out content for translation from Translation Queue, it creates new target versions for these items. After calling the pipeline, you can use the ItemsQueued property to check how many Sitecore items are actually added to the Translation Queue.
The following is sample code for calling the pipeline:
static public int SendToTranslationQueue(string sourceLang, string[] targetLangs, string[] itemIds)
{
SendToTranslationQueuePipelineArgs args = new SendToTranslationQueuePipelineArgs();
args.SourceLanguage = sourceLang;
args.TargetLanguages = targetLangs;
args.ItemIds.AddRange(itemIds);
CorePipeline.Run("SendToTranslationQueuePipeline", args);
return args.ItemsQueued;
}
9.7 Using Custom Logic to Remove Items from the Translation Queue
You can call the <RemoveFromTranslationQueuePipeLine> pipeline to remove Sitecore items from the Translation Queue. The items are displayed in the queue only for the Context.User.
Prerequisite:
You must set the Context.User to a user with Sitecore access. This must be a user with permission to review and send out the queued items. If you do not set the context user, then the default user is sitecore\Anonymous, which prevents the items from being displayed in the queue.
Lionbridge Connector for Sitecore Installation and Configuration Guide Page 164Version 4.1.1 March 23, 2020
9 Appendix: Connector Extensions 9.7 Using Custom Logic to Remove Items from the Translation Queue

Identifying the content items to remove
Since the same item may have been added multiple times to the Translation Queue (particularly from the Bulk Translation wizard), the Sitecore item ID (SitecoreID) may identify multiple content items to remove, instead of identifying a single content item to remove.
Recommendation: Use the SourceLanguage, TargetLanguages, or SourceVersion parameters to identify which items with the same Sitecore item ID to remove.
If the SourceLanguage or TargetLanguages are null, the pipeline removes items with any value, which means it removes items in all source or target languages.
If the SourceVersion is 0 (the default value), the pipeline removes items with any value, which means it removes items for all source versions.
To call the pipeline:
1. Create an instance of the ClayTablet.SC.Pipelines.RemoveFromTranslationQueuePipeLineArgs class to pass to the pipeline as argument.
The RemoveFromTranslationQueuePipelineArgs class is defined in ClayTablet.SC.dll as:
public class RemoveFromTranslationQueuePipelineArgs : PipelineArgs
{
public List<ItemToRemove> ItemsToRemove { get; set; } = new List<ItemToRemove>();
public int RemovedItems { get; internal set; } = 0;
public int Errors { get; internal set; } = 0;
}
2. In ItemsToRemove, specify the list of items to remove from the Translation Queue.
The ItemToRemove class is defined as:
public class ItemToRemove
{
public String ID { get; set; }
public String SourceLanguage { get; set; }
public String TargetLanguages { get; set; }
public int SourceVersion { get; set; }
Lionbridge Connector for Sitecore Installation and Configuration Guide Page 165Version 4.1.1 March 23, 2020
9 Appendix: Connector Extensions 9.7 Using Custom Logic to Remove Items from the Translation Queue

public String ErrorMessage { get; internal set; }
public List<ItemDetails> ItemsDetails { get; internal set; } = new List<ItemDetails>();
public int RemovedItems { get; internal set; } = 0;
public bool HasError { get; internal set; } = false;
}
Parameter Description
SourceLanguage The language code of the source language of the item to remove from the queue. For example, to remove an item whose source language is English, specify en.Note: If this is null (blank), the pipeline will remove items in all source languages.
TargetLanguages The language code of the target language(s) of the item(s) to remove from the queue. For example:
To remove an item whose target language is French, specify 'fr-FR'.
To remove an item whose target language is French, and an item whose target language is German, specify 'fr-FR,de-DE’. Use a comma ( , ) as a separator of multiple language codes.
Note: If this is null (blank), the pipeline will remove items in all target languages.
SourceVersion The source-language version of the item(s) to remove from the queue. For example, to remove an item whose source-language version is 1, specify 1.Note: If this is 0 (the default value), the pipeline will remove all source-language versions of the item.
ErrorMessage Information about any error that occurs when removing items from the queue.
ItemsDetails A detailed list of items removed from the queue.
RemovedItems The number of removed items from the queue with the specified Sitecore ID.
HasError A Boolean value indicating whether an error occurred.
ItemsDetails model with information about removed items, as described below.
Lionbridge Connector for Sitecore Installation and Configuration Guide Page 166Version 4.1.1 March 23, 2020
9 Appendix: Connector Extensions 9.7 Using Custom Logic to Remove Items from the Translation Queue

The ItemDetails class is defined as:
public class ItemDetails
{
public String SitecoreID { get; internal set; }
public String DatabaseID { get; internal set; }
public String SourceLanguage { get; internal set; }
public String TargetLanguages { get; internal set; }
public String ItemDeadLine { get; internal set; }
public String SiteCoreUser { get; internal set; }
public DateTime CreateTime { get; internal set; }
public int Version { get; internal set; }
public bool IsRemoved { get; internal set; } = false;
}
3. Invoke the pipeline to remove the specified Sitecore items from the Translation Queue.
4. Use the IsRemoved property to check how many Sitecore items were removed from the Translation Queue.
The following is sample code for calling the pipeline:
private void RemoveFromQueue(string itemId, string sourceLanguage = null, string targetLanguage = null, int sourceVersion = 0)
{
// Create list of objects to remove.
var args = new RemoveFromTranslationQueuePipelineArgs();
args.ItemsToRemove.Add(new ItemToRemove()
{
ID = itemId,
SourceLanguage = sourceLanguage,
TargetLanguages = targetLanguage,
SourceVersion = sourceVersion
});
// Invoke pipeline.
Lionbridge Connector for Sitecore Installation and Configuration Guide Page 167Version 4.1.1 March 23, 2020
9 Appendix: Connector Extensions 9.7 Using Custom Logic to Remove Items from the Translation Queue
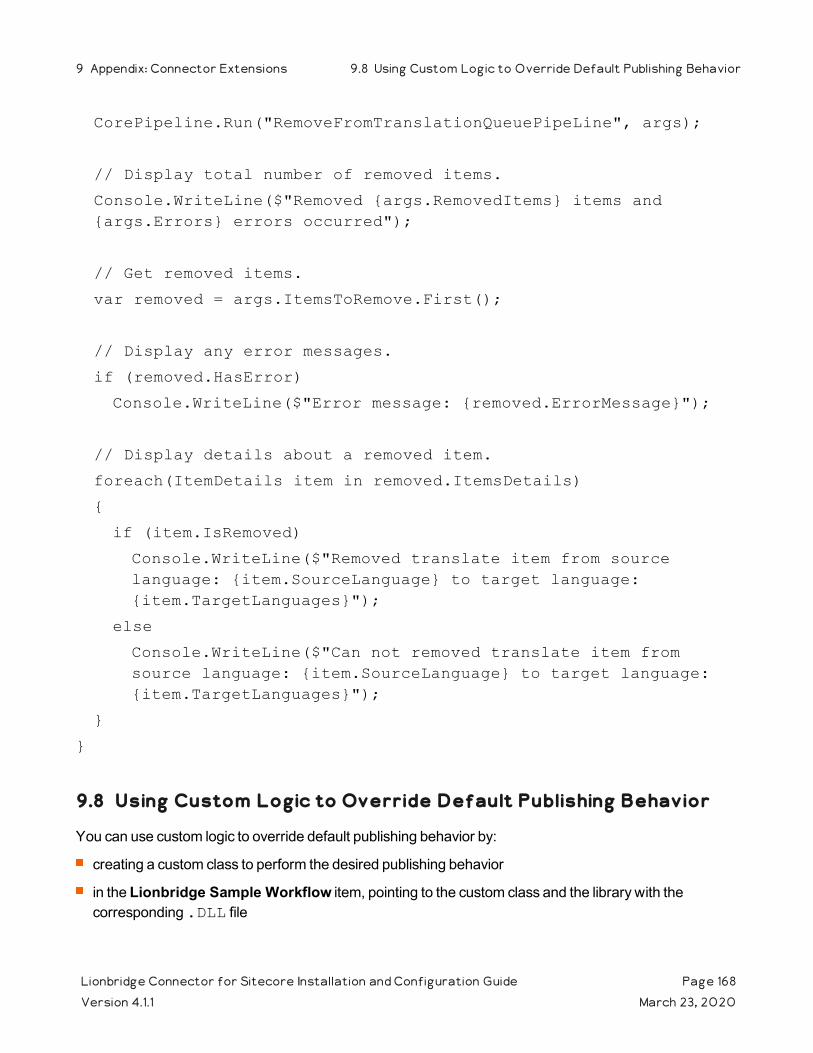
CorePipeline.Run("RemoveFromTranslationQueuePipeLine", args);
// Display total number of removed items.
Console.WriteLine($"Removed {args.RemovedItems} items and {args.Errors} errors occurred");
// Get removed items.
var removed = args.ItemsToRemove.First();
// Display any error messages.
if (removed.HasError)
Console.WriteLine($"Error message: {removed.ErrorMessage}");
// Display details about a removed item.
foreach(ItemDetails item in removed.ItemsDetails)
{
if (item.IsRemoved)
Console.WriteLine($"Removed translate item from source language: {item.SourceLanguage} to target language: {item.TargetLanguages}");
else
Console.WriteLine($"Can not removed translate item from source language: {item.SourceLanguage} to target language: {item.TargetLanguages}");
}
}
9.8 Using Custom Logic to Override Default Publishing Behavior
You can use custom logic to override default publishing behavior by:
creating a custom class to perform the desired publishing behavior
in the Lionbridge Sample Workflow item, pointing to the custom class and the library with the corresponding .DLL file
Lionbridge Connector for Sitecore Installation and Configuration Guide Page 168Version 4.1.1 March 23, 2020
9 Appendix: Connector Extensions 9.8 Using Custom Logic to Override Default Publishing Behavior
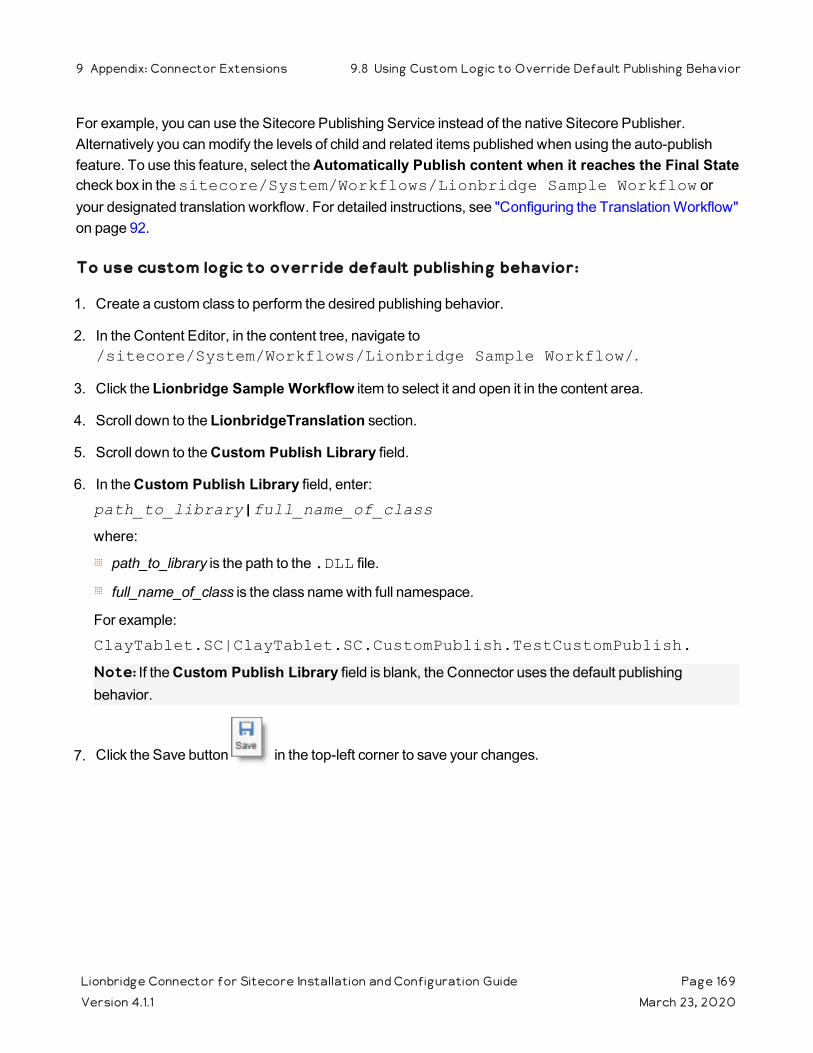
For example, you can use the Sitecore Publishing Service instead of the native Sitecore Publisher. Alternatively you can modify the levels of child and related items published when using the auto-publish feature. To use this feature, select the Automatically Publish content when it reaches the Final State check box in the sitecore/System/Workflows/Lionbridge Sample Workflow or your designated translation workflow. For detailed instructions, see "Configuring the Translation Workflow" on page 92.
To use custom logic to override default publishing behavior:
1. Create a custom class to perform the desired publishing behavior.
2. In the Content Editor, in the content tree, navigate to /sitecore/System/Workflows/Lionbridge Sample Workflow/.
3. Click the Lionbridge Sample Workflow item to select it and open it in the content area.
4. Scroll down to the LionbridgeTranslation section.
5. Scroll down to the Custom Publish Library field.
6. In the Custom Publish Library field, enter: path_to_library|full_name_of_class
where:
path_to_library is the path to the .DLL file.
full_name_of_class is the class name with full namespace.
For example:
ClayTablet.SC|ClayTablet.SC.CustomPublish.TestCustomPublish.
Note: If the Custom Publish Library field is blank, the Connector uses the default publishing behavior.
7. Click the Save button in the top-left corner to save your changes.
Lionbridge Connector for Sitecore Installation and Configuration Guide Page 169Version 4.1.1 March 23, 2020
9 Appendix: Connector Extensions 9.8 Using Custom Logic to Override Default Publishing Behavior

Index
A
account keys, configuring 31account keys, upgrading 37Add CData to Output check box 125Azure App Service, installing with 44
B
Blue/Green deployment 44Bulk Translation wizardconfiguration settings 53in CT3Translation.config 54in Sitecore 56
C
CData, configuring 125Clay Tablet Platform 9configuration settings 67
clustered environment, configuring for 50configurationBulk Translation wizard settings 53in CT3Translation.config 54in Sitecore 56Send Dependent Items check box 80
Clay Tablet Platform settings 67database settings 23email notification settings 61in CT3Translation.config 62in Sitecore 65
In-Context Preview feature 126Job Metadata settings 76logging settings 66Send Dependent Items check box 80in CT3Translation.config 80in Sitecore 82
SEO Fields settings 67target translation data settings 70translation settings 71, 74Update TM settings 75
configuration overview 30Connector testing 130
Content Editor, configuring Sitecore languages 91
content, filtering items that do not need translation 103
custom language codes, adding 92custom logiccalling for workflow 154for overriding default publishing settings 168for populating the Translation Queue 163for removing items from the Translation
Queue 164for sending out content for translation 147for updating a remote TM 151overwriting workflow setting when
automatically sending items to the Queue 157
when automatically sending jobs from the Queue 158
custom workflow logic, calling 154CustomAutoSendQueuesPipeline pipeline 158CustomQueueItemTargetLanguagesPipeline
pipeline 157
D
databaseconfiguration settings 23Microsoft Azure SQL setup 22Microsoft SQL Server setup 20Oracle setup 21setup overview 20size requirements 20
delivery package, downloading 19Download Schedule task, configuring 85-86
E
email notificationsconfiguration settings 61in CT3Translation.config 62in Sitecore 65
encryption, configuring 46examplesHTML translation filecorrection requested with metadata in
comments 134
Lionbridge Connector for Sitecore Installation and Configuration Guide Page 170Version 4.1.1 March 23, 2020

new translation with metadata in comments 132
translation memory update file 136XML translation filecorrection requested 134new translation 132
extensions 147
F
Field Filter wizard 103Choose a Content Template page 105Don't transfer field value page 107Select Fields that you don’t want sent out for
translation page 106summary page 108
firewall, configuring network settings 52
G
global translation settings, configuring 52guide 10
H
HTML translation fileexample of correction requested with
metadata in comments 134example of new translation with metadata in
comments 132
I
In-Context Preview feature, configuration 126installation instructions 27Azure App Service 44language pack 28
introduction 7
J
job metadata settings 76
jobs, customizing how Upload Schedule creates jobs 158
L
language codes 138language pack, installation instructions 28license ID, configuring 31Lionbridge Connector for Sitecore User
Guide 11Lionbridge Connector Support 11getting a Zendesk password 15information to include in a ticket 12signing up for a Zendesk account 13submit a ticket 11viewing and updating your ticket 12
Lionbridge Sample Workflow 99Lionbridge Workflow Config template 100load-balanced environment, configuring for 50local TM, importing content 48logging, configuration settings 66
M
Microsoft Azure SQL database, setup 22Microsoft SQL Server database, setup 20
N
network settings, configuring for a firewall 52notifications, configuring 61
O
Oracle database, setup 21overview 10configuration 30pre-installation 18
P
package, downloading 19
Lionbridge Connector for Sitecore Installation and Configuration Guide Page 171Version 4.1.1 March 23, 2020

PO numbers, adding 111pre-installation overview 18publishing settingsusing custom logic to override default 168
purchase order numbers, adding 111
R
RemoveFromTranslationQueuePipeLine pipeline 164
roles, configuring 112
S
scheduled tasksfor sending content to translation from the
Queue 88scheduled tasks, configuring 85-86scheduled tasks, pre-installation upgrade
tasks 24Security - User context for services section of
Lionbridge Connector Settings item 78Send Dependent Items check boxconfiguration settings 80in Sitecore 82
configuringin CT3Translation.config 80
understanding 83SendTmUpdatePipeline pipeline 151SendToTranslationQueuePipeline pipeline 163SendTranslationJobPipeline pipeline 147SEO-field settings 67Sitecore languages, configuring 91Sitecore user for Connector background
processes, configuring 78special characters 124special characters, background 122statesmodifying in a workflow 101workflow 98
support 11getting a Zendesk password 15information to include in a ticket 12signing up for a Zendesk account 13submit a ticket 11viewing and updating your ticket 12
system date, setting 18system requirements 18system time zone, setting 18system time, setting 18
T
target translation data, configuration settings 70team profiles, configuring 113template, changing the base template of your
workflow 102terminology 7testing, Connector 130translated content, importing into the
Connector 48translationconfiguration settings 71, 74using custom logic to send out content 147
translation data, configuration settings 70Translation Filter window 103translation memory update file, example 136translation memory, importing content 48Translation Providers Configuration pageNew tab 37Upgrade tab 31
translation providers, configuring 31translation providers, updating configuration 43translation providers, upgrading 37Translation Queuesending content items for translation with a
scheduled task 88using custom logic to populate 163using custom logic to remove items from 164
translation settings, configuring global 52translation workflow, configuring 92translation, configuration settings 71translations, importing into the Connector 48TranslationWorkflow base template 100
U
update TM configuration settingsusing custom logic 151
Update TM configuration settings 75Upload Schedulecustomizing job creation 158
Lionbridge Connector for Sitecore Installation and Configuration Guide Page 172Version 4.1.1 March 23, 2020
Upload Schedule task, configuring 85-86users, adding 112
W
Workbox, installing 129workflowcalling custom logic 154changing the base template 102configuring 92modifying controls 100modifying states 101overwriting target-language settings 157states 98using your own 99
X
XML translation fileexample of correction requested 134example of new translation 132
XML, special characters in 124XML, special characters in, background 122
Lionbridge Connector for Sitecore Installation and Configuration Guide Page 173Version 4.1.1 March 23, 2020