Creative Decision-Makers Introduction to InformationNOW and STIClassroom.
Quick Reference Guide Chalkable_0714171413 InformationNOW – Discipline •••• 1
InformationNOW – Discipline
About this Guide This Quick Reference Guide provides an overview of the discipline options available in InformationNOW.
Discipline Setup The following lookups pertain to discipline and should be created before student discipline records may be
entered:
Note: Refer to State Guidelines for a list of all codes which are necessary to meet state
reporting requirements.
For complete instructions regarding lookups, please refer to the InformationNOW –
Lookups Quick Reference Guide.
• Actions: The follow-up action taken when a student commits a discipline infraction. Ex. Letter
Sent, Phone Call.
• Board Violation: The violations committed by a student against board policy.
• Discipline Locations: The location where an infraction was committed. Ex. Bus, Football
Field, Hallway.
• Dispositions: The disciplinary action taken against a student who commits an infraction. Ex.
Detention, Suspension.
• Infractions: The violation committed by the student. Ex. Fighting, Clothing Policy Violation.
• Injury: One or more injuries inflicted by the student if applicable. Ex. Broken Bone, Minor
Abrasions.
• Statute Violation: The law violation committed by a student. Ex. Forgery, Larceny, Arson.
• Weapon Type: The weapon used in conjunction with a discipline record.
Add Lookup
• To add discipline codes, select Discipline | Setup from the menu tree at left.
• From the Lookup drop-list, choose the code to create and click Refresh. Existing codes for the
selected category will display.
• To insert a new record, click the blue Add icon on the right. The screen will vary slightly
depending on the code selected.
Quick Reference Guide Chalkable_0714171413 InformationNOW – Discipline •••• 2
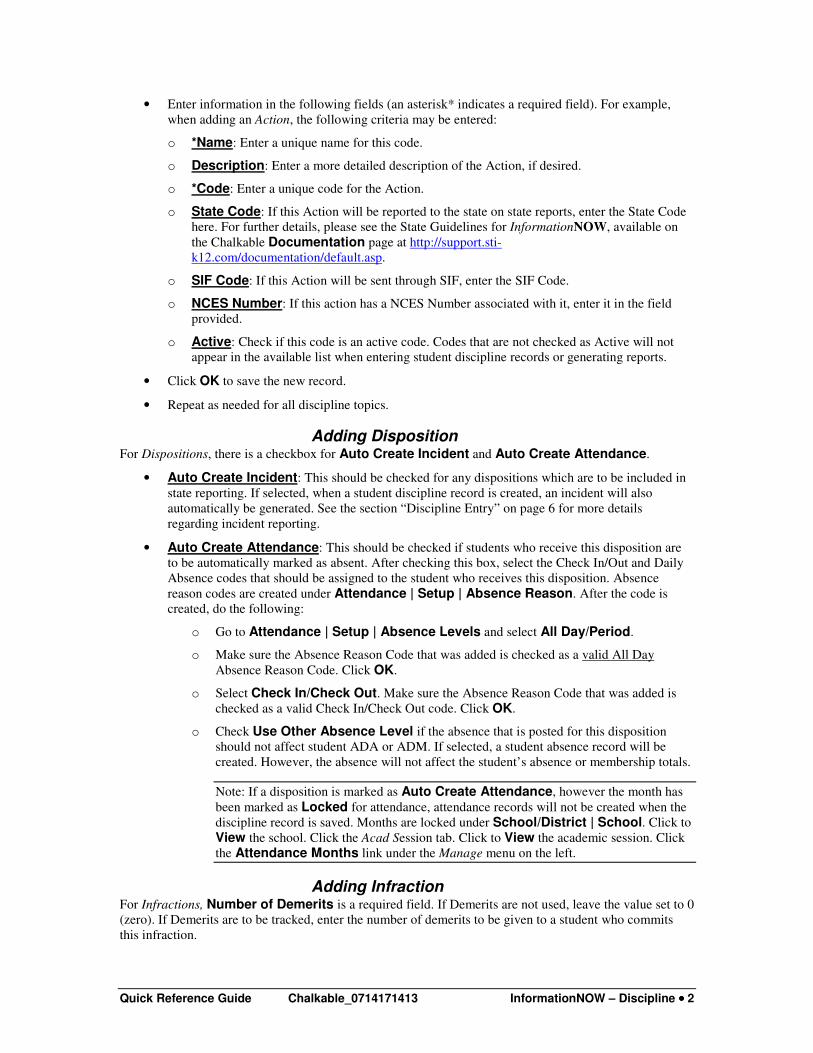
• Enter information in the following fields (an asterisk* indicates a required field). For example,
when adding an Action, the following criteria may be entered:
o *Name: Enter a unique name for this code.
o Description: Enter a more detailed description of the Action, if desired.
o *Code: Enter a unique code for the Action.
o State Code: If this Action will be reported to the state on state reports, enter the State Code
here. For further details, please see the State Guidelines for InformationNOW, available on
the Chalkable Documentation page at http://support.sti-
k12.com/documentation/default.asp.
o SIF Code: If this Action will be sent through SIF, enter the SIF Code.
o NCES Number: If this action has a NCES Number associated with it, enter it in the field
provided.
o Active: Check if this code is an active code. Codes that are not checked as Active will not
appear in the available list when entering student discipline records or generating reports.
• Click OK to save the new record.
• Repeat as needed for all discipline topics.
Adding Disposition For Dispositions, there is a checkbox for Auto Create Incident and Auto Create Attendance.
• Auto Create Incident: This should be checked for any dispositions which are to be included in
state reporting. If selected, when a student discipline record is created, an incident will also
automatically be generated. See the section “Discipline Entry” on page 6 for more details
regarding incident reporting.
• Auto Create Attendance: This should be checked if students who receive this disposition are
to be automatically marked as absent. After checking this box, select the Check In/Out and Daily
Absence codes that should be assigned to the student who receives this disposition. Absence
reason codes are created under Attendance | Setup | Absence Reason. After the code is
created, do the following:
o Go to Attendance | Setup | Absence Levels and select All Day/Period.
o Make sure the Absence Reason Code that was added is checked as a valid All Day
Absence Reason Code. Click OK.
o Select Check In/Check Out. Make sure the Absence Reason Code that was added is
checked as a valid Check In/Check Out code. Click OK.
o Check Use Other Absence Level if the absence that is posted for this disposition
should not affect student ADA or ADM. If selected, a student absence record will be
created. However, the absence will not affect the student’s absence or membership totals.
Note: If a disposition is marked as Auto Create Attendance, however the month has
been marked as Locked for attendance, attendance records will not be created when the
discipline record is saved. Months are locked under School/District | School. Click to
View the school. Click the Acad Session tab. Click to View the academic session. Click
the Attendance Months link under the Manage menu on the left.
Adding Infraction For Infractions, Number of Demerits is a required field. If Demerits are not used, leave the value set to 0
(zero). If Demerits are to be tracked, enter the number of demerits to be given to a student who commits
this infraction.
Quick Reference Guide Chalkable_0714171413 InformationNOW – Discipline •••• 3
View Lookup To view a code, place a check next to the code and click View. Make necessary modifications and click
OK to save or click Close to exit the code without saving.
Delete Lookup To remove a code, place a check next to the code to remove and click Delete.
Note: The program will allow codes to be deleted even though they may be attached to
student records. It is recommended to set codes inactive, rather than deleting, if they have
been assigned to a student discipline record.
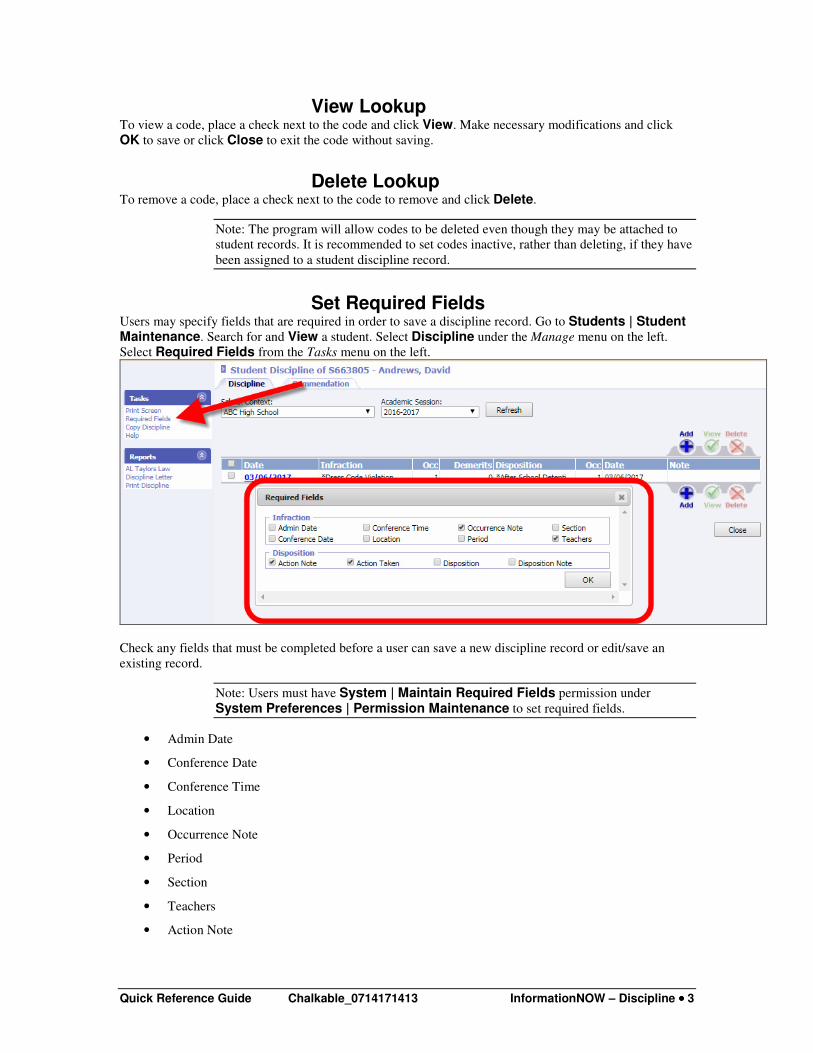
Set Required Fields Users may specify fields that are required in order to save a discipline record. Go to Students | Student Maintenance. Search for and View a student. Select Discipline under the Manage menu on the left.
Select Required Fields from the Tasks menu on the left.
Check any fields that must be completed before a user can save a new discipline record or edit/save an
existing record.
Note: Users must have System | Maintain Required Fields permission under
System Preferences | Permission Maintenance to set required fields.
• Admin Date
• Conference Date
• Conference Time
• Location
• Occurrence Note
• Period
• Section
• Teachers
• Action Note

Quick Reference Guide Chalkable_0714171413 InformationNOW – Discipline •••• 4
• Action Taken
• Disposition
• Disposition Note
Special Education Disposition Thresholds A threshold may be set for the number of days a Special Education student can have for specific
dispositions.
To set this threshold, go to School/District | School. Search for and View the school. Click the Setup
tab.
Under the Discipline Threshold for Special Ed Student section, select the dispositions that are to be
considered towards the total days. Use Ctrl+click to select multiple dispositions. Enter the maximum total
number of dispositions that a Special Education student may have. The threshold is a maximum day total
for all selected dispositions. For example, if the user selects in-school suspension and out-of-school
suspension and enters a four (4), a student will not be allowed to have more than a total of four days for
either in-school and/or out-of-school. So if a student has 1 day of in-school suspension and 3 days of out-
of-school suspension, a user will not be able to save a discipline records where a student receives any
number of in-school or out-of-school suspensions.
If a record is added to a student that exceeds the threshold, a warning message will display and the user will
not be able to save the record. Also, if the user copies an existing discipline record from one student to a
Special Education student and the copy of the record would exceed the threshold a warning message will
display and the record will not be copied.
• This is a per school setting.
• The system will not allow the user to save a record that exceeds the allowable number of
dispositions.

Quick Reference Guide Chalkable_0714171413 InformationNOW – Discipline •••• 5
• When the user selects the disposition start/end date and time on a Special Education student’s
discipline record the system will calculate the sum to determine if it exceeds the allowable number
of disposition days for the current school/academic session.
• If the student exits Special Education, and then re-enters Special Education, the threshold
checking will not occur until the first discipline event is entered after the student becomes an
active Special Education student.
Overwrite Attendance An Overwrite existing attendance when posting from discipline option is available on the School
Setup screen. To access the option, go to School/District | School. Search for and select to View a
school. Click the Setup tab.
If selected, when posting attendance from discipline, the program will overwrite any daily absence, period
absence, and/or check in/out records that exist on or between the disposition start date and end date.
Quick Reference Guide Chalkable_0714171413 InformationNOW – Discipline •••• 6
Discipline Entry After discipline setup has been completed, discipline may be entered by student or by incident.
Student Discipline After discipline setup has been completed, discipline may be entered by student or by incident.
• Select Students | Student Maintenance and search for the student for which a discipline
record is to be entered.
• Select the student by clicking on the student’s File No. blue link or placing a check next to the
student and clicking View.
• Click the Discipline link under the Manage menu at left.
• A list of the student’s existing discipline records for the selected school and academic session will
display. To modify the view, do one of the following:
o Click the School Context drop-list and select a different school or select All. Click Refresh.
If All is selected, the Academic Session option becomes inactive; or,
o Click the Academic Session drop-list and select a different Academic Session or select All. Click Refresh.
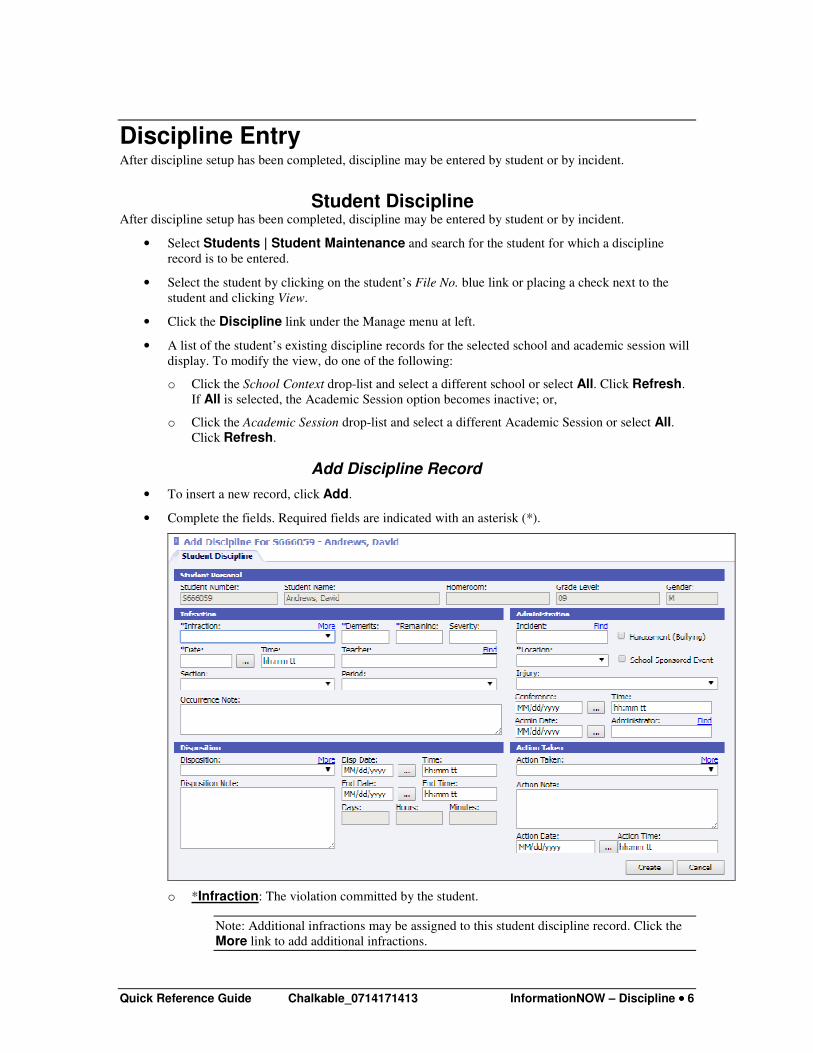
Add Discipline Record
• To insert a new record, click Add.
• Complete the fields. Required fields are indicated with an asterisk (*).
o *Infraction: The violation committed by the student.
Note: Additional infractions may be assigned to this student discipline record. Click the
More link to add additional infractions.

Quick Reference Guide Chalkable_0714171413 InformationNOW – Discipline •••• 7
o *Demerits: The number of demerits the student has received for this infraction. This will
pull the number of demerits that were entered on the Infraction Code under Discipline | Setup. This may be left at 0 (zero) if not using demerits.
o *Remaining (Demerits): The number of demerits the student has remaining to accrue. This
may be left at 0 (zero) if not using demerits.
o Severity: Enter a numeric value indicating the severity of this infraction. Reports may be
generated based on a range of severity.
o *Date: The date on which the violation occurred.
Note: Once an infraction date has been selected, users may choose any other date field
and press the F12 key to copy the infraction date to that date field.
o Time: The time at which the violation occurred.
o Teacher: Click Find to search for and select the teacher and/or staff member who observed
the violation or who presented the student for disciplinary action.
Note: The teacher is automatically selected when a section is selected.
o Section: If the violation occurred during a class, select the course number for the available
list. Only the courses that exist in the student’s schedule for the selected school and academic
session will appear.
Note: The section will automatically be populated when a date and period are selected if
the student has a scheduled course.
o Period: If the violation occurred during school hours, select the period of the day.
Note: The period will automatically be populated when a section is selected.
o Occurrence Notes: Enter applicable notes regarding the violation (ex. Student was
observed shouting threats.)
o Incident: If the violation is to be associated with an existing incident, click Find to search
for and select the existing incident. If the incident does not already exist and the selected
disposition for this record is indicated in the setup menu as an Auto Create Incident
disposition, when the record is saved, an incident will automatically be generated.
o Harassment (Bullying): Check if this infraction is considered a harassment offense.
o Location: Select the location at which the violation occurred.
o School Sponsored Event: Check if this infraction occurred during a school sponsored
event.
o Injury: If an injury was inflicted in the commission of this infraction, select the injury that
this student inflicted (not the injury this student may have received during this infraction).
o Conference Date/Time: Enter the date and time at which a conference with the student
and/or guardian took place.
o Admin Date: Enter the date of the disposition administration.
o Administrator: Defaults to the user who is logged in. Click Find to search for and select the
staff member who administered the disposition.
o Disposition: Select the disposition which is the result of this infraction. If a disposition is
selected, Disposition Date is a required field.
Quick Reference Guide Chalkable_0714171413 InformationNOW – Discipline •••• 8
Note: Additional dispositions may be assigned to this student discipline record. Click the
More link to add additional dispositions.
If a disposition is selected that has been set up as Auto-Create Incident = Yes, when the
student discipline record is saved, a corresponding incident record will also be created.
o Disp. Date/Time: If applicable, enter the starting date and/or time of the disposition. For
example, if a student is suspended Tuesday through Friday for a violation that occurred on
Monday, enter Tuesday’s date as the Disposition Start Date.
Note: If a disposition has been marked to Auto-Create Attendance = Yes, when the record
is saved, the student will be marked with the appropriate Reason Code for the range of
disposition dates.
o End Date/Time: If applicable, enter the ending date and/or time of the disposition.
Note: The Days, Hours and Minutes fields will automatically be calculated based on the
start and end date and time for the disposition as well as the calendar and the student’s
instructional minutes. If a time is not entered, only days will be calculated.
o Disposition Note: Enter any applicable notes pertaining to the disposition (ex. Student was
absent from detention and will serve the following Saturday.).
o Zero Tolerance: Check if this disposition is considered zero tolerance. Consult state
guidelines to determine if this is required for state reporting purposes.
o Duration Modified: Check if this disposition duration was modified. Consult state
guidelines to determine if this is required for state reporting purposes.
o Action Taken: Select any additional action taken pertaining to this violation (ex. Letter Sent,
Phone Call).
Note: Additional actions taken may be assigned to this student discipline record. Click
the More link to add additional actions taken.
o Action Note: Enter any applicable notes pertaining to the action taken (ex. Left voice mail
message).
o Action Date/Time: Enter the date and/or time of the action taken.
• Click Create to save the record or click Cancel to exit the screen without saving.
Note: If the disposition assigned has been set to automatically create an incident, the
incident has been created and may be viewed under Discipline | Incidents. If the
disposition was set to automatically mark the student absent, the student absence
record(s) has been created and may be viewed under Students | Student Maintenance. Select to View the student and click the Attendance link on the left.
View Discipline Record To View or modify an existing record, perform the following steps:
• Place a check next to the discipline record and click View.
• Click OK to save the changes or click Cancel to exit the screen without saving.
Delete Discipline Record To Delete an existing record, perform the following steps:
• Place a check next to the discipline record and click Delete.
Quick Reference Guide Chalkable_0714171413 InformationNOW – Discipline •••• 9
• Click OK to delete the record or click Cancel to exit without saving.
Copy Discipline To Copy this infraction record to another student, place a check next to the incident and click the Copy Discipline link under the Tasks menu on the left.
Note: Details such as Action Taken will not be copied to the other student. Those details
should be entered on the student to which the record was copied.
Discipline Letter
Click the Discipline Letter link under the Manage menu on the left to print a discipline letter for the
selected student. For more details regarding letters, please refer to the InformationNOW – Letters Quick
Reference Guide, which is available from the Chalkable support web site.
Print Discipline
Click the Print Discipline link under the Manage menu on the left to print a Discipline Report for the
selected student.
Incidents An incident is defined as a more severe infraction which may or may not involve multiple students.
Incidents may be used to track information regarding statute (law) and board violations and may be
reported to the state depending on reporting requirements. Refer to State Guidelines for discipline state
reporting requirements.
To Add, View or Delete incidents, go to Discipline | Incidents.
Note: To view all incidents, from the Search screen delete the date and click Search. All
incidents for this academic session and school will display, regardless of date.
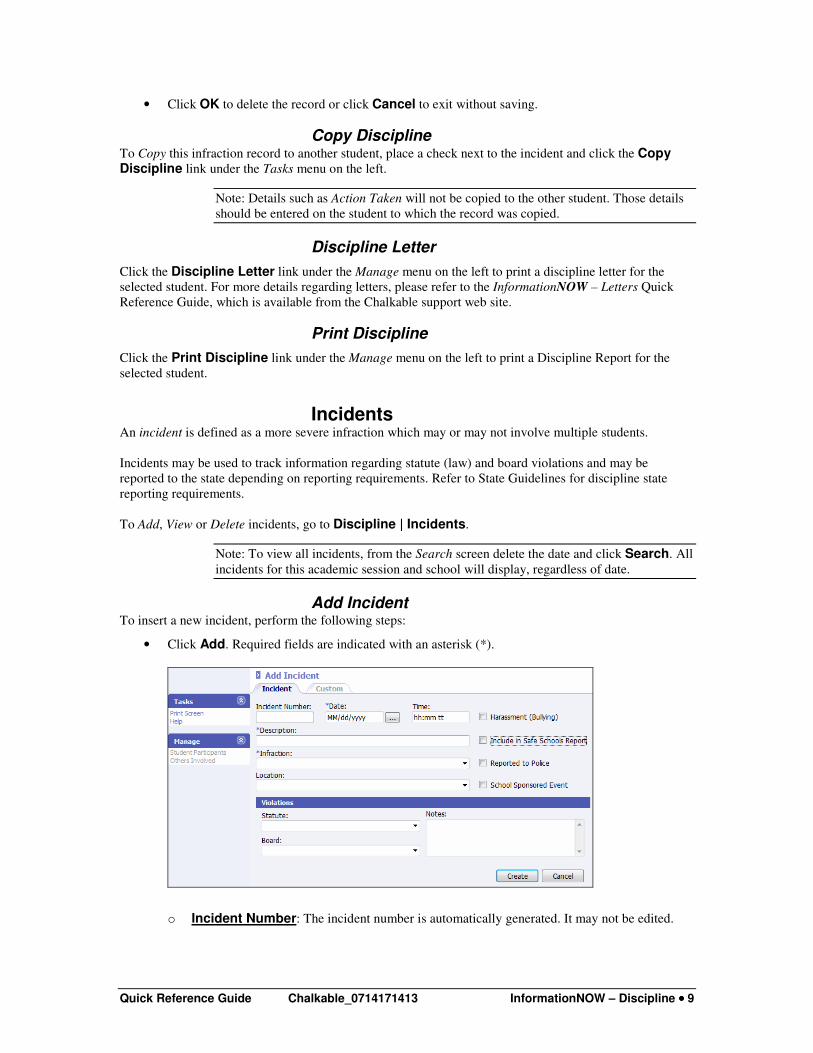
Add Incident To insert a new incident, perform the following steps:
• Click Add. Required fields are indicated with an asterisk (*).
o Incident Number: The incident number is automatically generated. It may not be edited.

Quick Reference Guide Chalkable_0714171413 InformationNOW – Discipline •••• 10
o *Date: Enter the date of the incident. Enter the date as mm/dd/yyyy or click the Ellipsis button
to select the date from a calendar.
o Time: Enter the time of the incident.
o *Description: Enter a brief description of the incident.
o *Infraction: Select the Infraction.
o Location: Select the Location at which the incident took place.
o Harassment (Bullying): Check if this infraction is considered a harassment offense.
o Include In Safe Schools Report: Check if this incident is to be included for state
reporting purposes.
o Reported To Police: Check if the police were notified concerning this incident.
o School Sponsored Event: Check if this infraction occurred during a school sponsored
event.
o Statute: Select the law violation that was committed (Ex. Forgery, Stolen Property). These
are generally defined for state reporting purposes. Refer to State Guidelines for a possible list
of state mandated statute violations.
o Board: Select the board violation that was committed (Ex. Cheating, Profanity). These are
generally defined for state reporting purposes. Refer to State Guidelines for a possible list of
state mandated statute violations.
o Notes: Enter any extra notes associated with this incident.
• Click Create to save the record or Cancel to exit without saving.
• To access additional information regarding this incident (Student Participants, Others Involved),
click the Incident number of the record to change, which appears as a blue link, or place a check
next to the record and click View.
Student Participants
• Click the Student Participants link at left on the incident view screen.
• The list of students already attached to the incident will display.
o To view a student already listed, either click the File No. blue link at left or place a check next
to the student and click View.
o To delete a student already listed, place a check next to the student and click Delete.
Quick Reference Guide Chalkable_0714171413 InformationNOW – Discipline •••• 11
o Add additional students to the selected incident.
o If the student to be added already has a discipline record entered on their discipline screen that
corresponds with this incident, click Attach Student Infraction at left.
� Enter the Search criteria for the student to be added and click Search.
� Select the student by either clicking the blue File No. link or clicking the circle and
clicking OK.
� The list of the students existing discipline records will display. Either click the blue Date
link or click the circle bullet next to the discipline record and click OK.
� The student’s discipline infraction record will now be tied to the selected incident record.
o If the student to be added to the infraction does not already have an existing discipline record
entered on their discipline screen that coincides with this incident, click Add.
o Enter the search criteria and click Search.
� Click the blue File No. link next to the student to be added or bullet the circle next to the
student and click OK.
� The Add Discipline screen will display. Enter the infraction details for this incident for
this student. Click Create. A discipline record has been generated for the selected
student who has also been attached to this incident.
Others Involved
• Click the Others Involved link at left on the incident view screen. Others involved are classified
as either Participant (non-student), Victim or Witness.
Note: The Others Involved option should not be used to add student participants to an
incident. If a student is to be added to an incident, please refer to “Student Participants”
on page 10. The Others Involved option is used to add non-student participants, victims
or witnesses.
• The list of others involved will display.
o To add additional persons, click Add. Insert the Name and Role. An optional Notes field is
provided. Click Create to add the person to the incident.
o To view additional persons, click the Name blue link or check the box next to the name and
click View.
o To delete an additional person, check the box next to the name and click Delete.
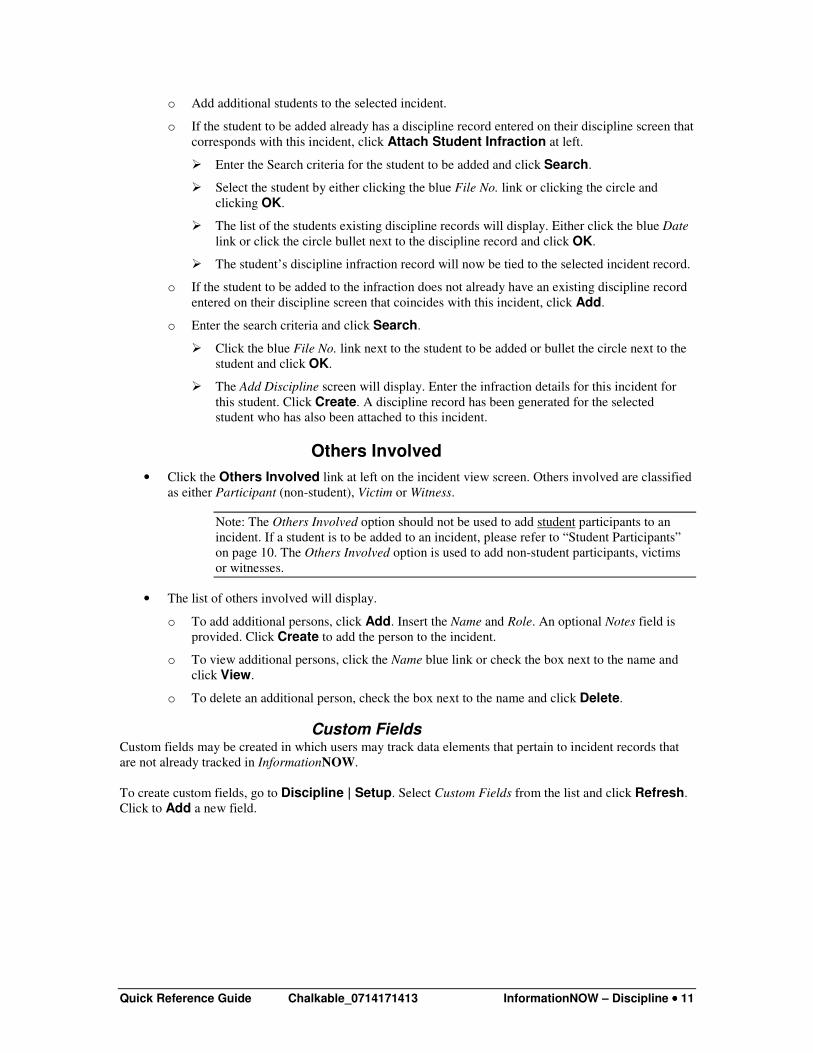
Custom Fields Custom fields may be created in which users may track data elements that pertain to incident records that
are not already tracked in InformationNOW.
To create custom fields, go to Discipline | Setup. Select Custom Fields from the list and click Refresh.
Click to Add a new field.
Quick Reference Guide Chalkable_0714171413 InformationNOW – Discipline •••• 12
• Complete the fields and click Create.
• To enter custom data on an incident, go to Discipline | Incidents. Search for and select to View
the incident. Click the Custom tab.
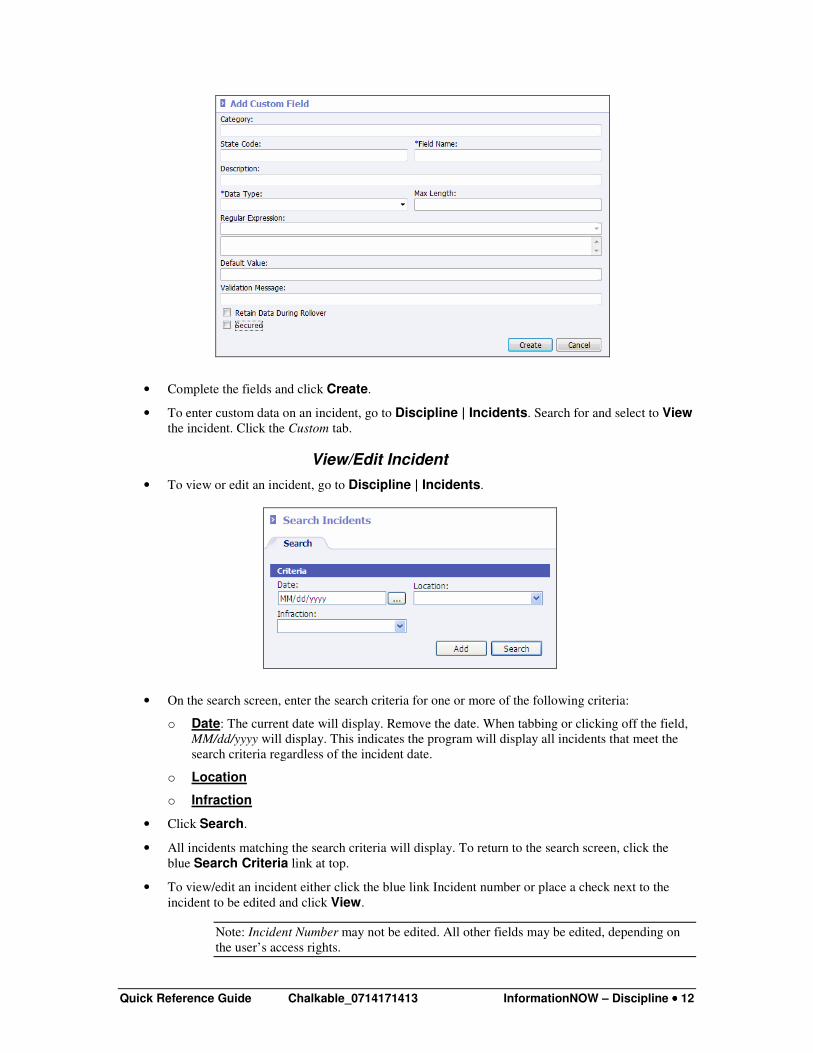
View/Edit Incident
• To view or edit an incident, go to Discipline | Incidents.
• On the search screen, enter the search criteria for one or more of the following criteria:
o Date: The current date will display. Remove the date. When tabbing or clicking off the field,
MM/dd/yyyy will display. This indicates the program will display all incidents that meet the
search criteria regardless of the incident date.
o Location
o Infraction
• Click Search.
• All incidents matching the search criteria will display. To return to the search screen, click the
blue Search Criteria link at top.
• To view/edit an incident either click the blue link Incident number or place a check next to the
incident to be edited and click View.
Note: Incident Number may not be edited. All other fields may be edited, depending on
the user’s access rights.
Quick Reference Guide Chalkable_0714171413 InformationNOW – Discipline •••• 13
Delete Incident
• To delete an incident, go to Discipline | Incidents.
• On the search screen, enter the search criteria for one or more of the following criteria:
o Date: The current date will display. Remove the date. When tabbing or clicking off the field,
MM/dd/yyyy will display. This indicates the program will display all incidents that meet the
search criteria regardless of the incident date.
o Location
o Infraction
• Click Search.
• All incidents matching the search criteria will display. To return to the search screen, click the
blue Search Criteria link at top.
• To delete an incident, place a check next to the incident to be deleted and click Delete.
Note: Deleting an incident record will not delete the discipline infraction records from the
participating students. If the student’s discipline infraction record is also to be deleted,
edit the incident and delete the student from the incident before deleting the incident
itself. Once an incident is deleted, discipline infraction records must be deleted from the
student’s individual discipline screen. See the instructions on deleting a student from an
incident in the section “Student Participants” on page 10.
Discipline Reports
Discipline Letters For instructions regarding creating letters, please refer to the InformationNOW – Letters Quick Reference
Guide, available from the Chalkable support web site at http://support.sti-k12.com.
To generate letters that have already been set up, perform the following steps:
• Go to Discipline | Reports.
Note: Reports may also be generated from the Reports menu.
Quick Reference Guide Chalkable_0714171413 InformationNOW – Discipline •••• 14
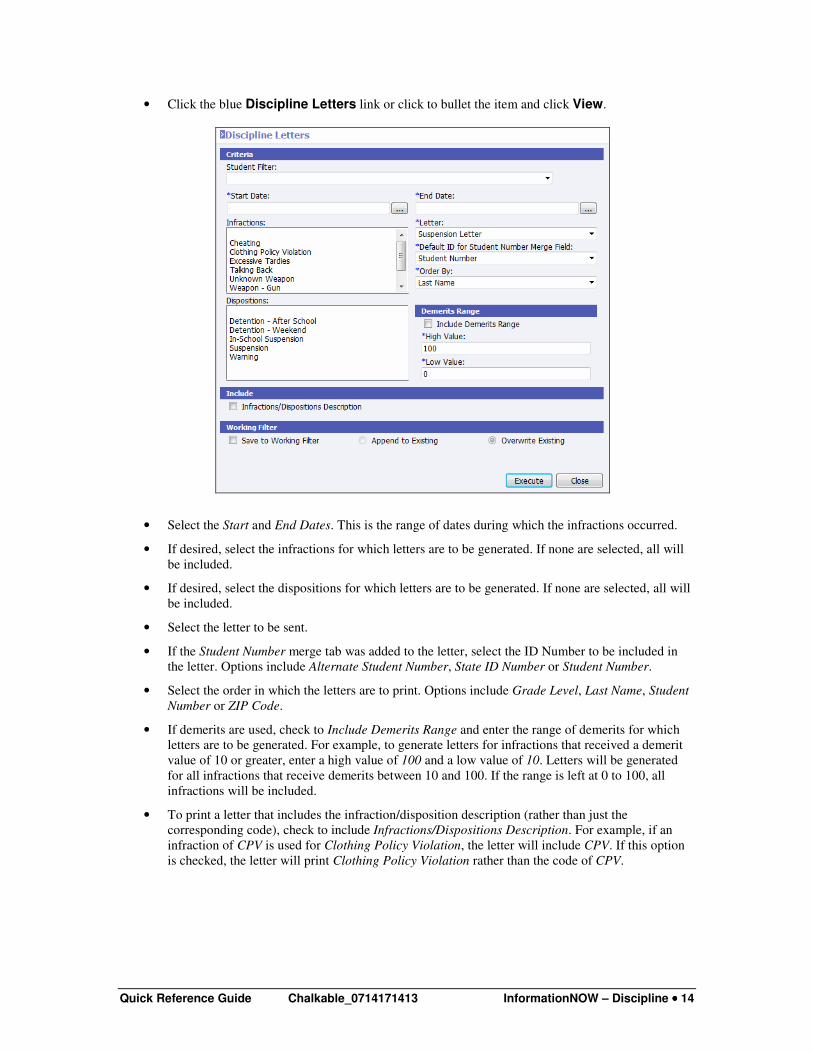
• Click the blue Discipline Letters link or click to bullet the item and click View.
• Select the Start and End Dates. This is the range of dates during which the infractions occurred.
• If desired, select the infractions for which letters are to be generated. If none are selected, all will
be included.
• If desired, select the dispositions for which letters are to be generated. If none are selected, all will
be included.
• Select the letter to be sent.
• If the Student Number merge tab was added to the letter, select the ID Number to be included in
the letter. Options include Alternate Student Number, State ID Number or Student Number.
• Select the order in which the letters are to print. Options include Grade Level, Last Name, Student
Number or ZIP Code.
• If demerits are used, check to Include Demerits Range and enter the range of demerits for which
letters are to be generated. For example, to generate letters for infractions that received a demerit
value of 10 or greater, enter a high value of 100 and a low value of 10. Letters will be generated
for all infractions that receive demerits between 10 and 100. If the range is left at 0 to 100, all
infractions will be included.
• To print a letter that includes the infraction/disposition description (rather than just the
corresponding code), check to include Infractions/Dispositions Description. For example, if an
infraction of CPV is used for Clothing Policy Violation, the letter will include CPV. If this option
is checked, the letter will print Clothing Policy Violation rather than the code of CPV.
Quick Reference Guide Chalkable_0714171413 InformationNOW – Discipline •••• 15
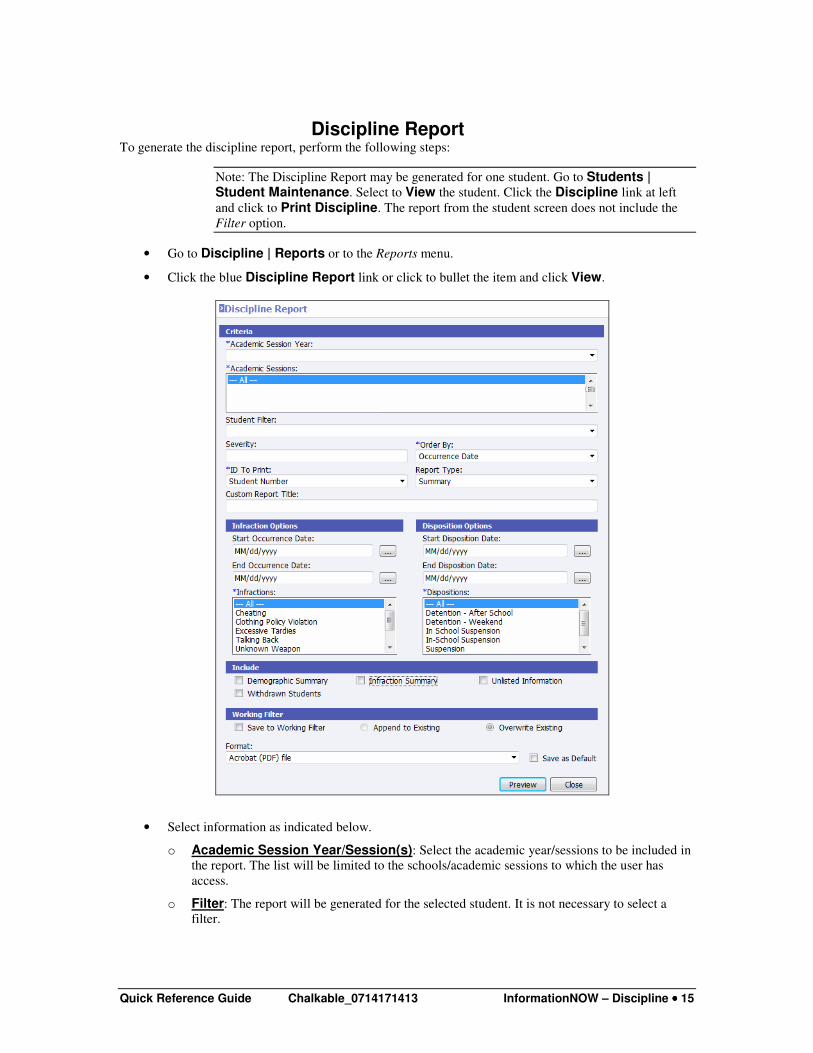
Discipline Report To generate the discipline report, perform the following steps:
Note: The Discipline Report may be generated for one student. Go to Students | Student Maintenance. Select to View the student. Click the Discipline link at left
and click to Print Discipline. The report from the student screen does not include the
Filter option.
• Go to Discipline | Reports or to the Reports menu.
• Click the blue Discipline Report link or click to bullet the item and click View.
• Select information as indicated below.
o Academic Session Year/Session(s): Select the academic year/sessions to be included in
the report. The list will be limited to the schools/academic sessions to which the user has
access.
o Filter: The report will be generated for the selected student. It is not necessary to select a
filter.
Quick Reference Guide Chalkable_0714171413 InformationNOW – Discipline •••• 16
o Severity: To filter the report to only those infractions within a specific severity range, enter
the range value.
o *Order By: Select to order the report by Occurrence Date, Occurrence Primary Infraction,
Occurrence Primary Disposition, Student Display Name, Student Number, Student Grade
Level, Student Homeroom, Full Section Number or Severity.
o *ID To Print: Select to include the Student Number, State Student ID, Alternate Student ID,
Social Security Number or no ID.
o Report Type: Select a report type of Summary or Detail.
o Custom Report Title: Enter a custom report title to print at the top of the report. If nothing
is entered, Discipline Report will print at the top of the report.
o Start/End Occurrence Date: To filter the report to infractions that occurred within a date
range, enter the range here. If nothing is selected, all discipline records will be included
regardless of the infraction occurrence date.
o *Infractions: Select the infractions to include on the report or select ---All---. Use the
Ctrl+click or Shift+click options to select multiple infractions.
o Start/End Disposition Date: To filter the report to dispositions (punishments) that
occurred within a date range, enter the range here. If nothing is selected, all discipline records
will be included regardless of the disposition date.
Note: If the discipline report does not display the expected results, try leaving the
disposition start and end dates blank. As disposition dates are not required for discipline
record entry, it may not be necessary to enter a start/end disposition date.
o *Dispositions: Select the dispositions to include on the report or select ---All---. Use the
Ctrl+click or Shift+click options to select multiple dispositions.
o Demographic Summary: Check to include basic student demographic information on the
report.
o Infraction Summary: Check to include a breakdown of infractions by gender and race.
o Unlisted Information: Check to include unlisted address or phone number.
o Withdrawn Students: Check to include currently withdrawn students on report.
o Save to Working Folder: If printing for the one selected student, this option is not
necessary.
o Format: Select the desired format for the report. Options include Acrobat (PDF) File, CSV
(comma delimited), Excel, HTML, TIFF file, or XML file with report data.
o Save as Default: After selecting the format, check this box to save this format as the default
format for all reports.
Note: Selecting the Save As Default option will affect all other report printing, not just the
selected report.
• Click Preview.
Quick Reference Guide Chalkable_0714171413 InformationNOW – Discipline •••• 17
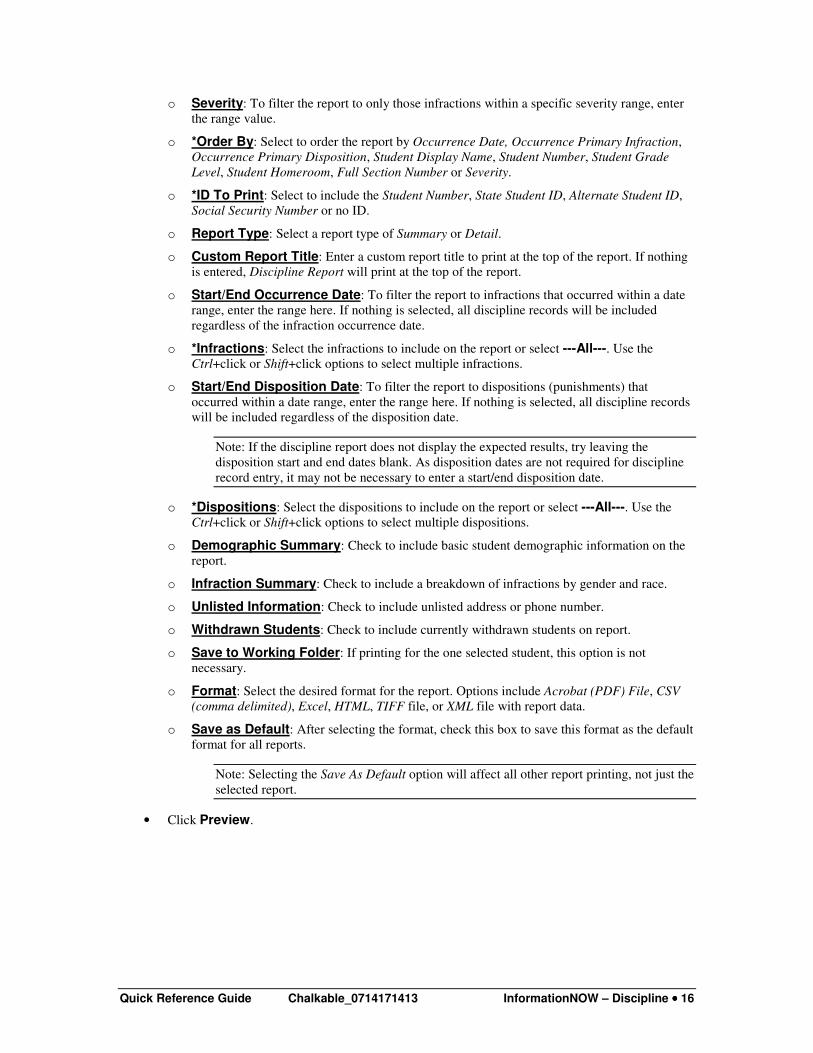
Discipline Statistics This report is designed to break down discipline infractions by Ethnicity and Gender. It includes aggregate
counts with percentage breakdowns by type and groups selected for each racial and gender category.
Enrolled, Re-enrolled and Withdrawn students will be included.
To generate the discipline statistics report, perform the following steps:
• Go to Discipline | Reports or to the Reports menu.
• Click the blue Discipline Statistics link or click to bullet the item and click View.
• *Start/End Date: To filter the report to occurrences within a date range, enter the range here. If
nothing is selected, all discipline records will be included regardless of the disposition date.
• *Grade Level: Select the current grade level of the students to be included in the report. Use
Ctrl+click or Shift+click to select multiple grade levels.
• Student Filter: To filter the report to a select group of students, select the appropriate filter.
• Teacher Filter: To filter the report to a select group of staff, select the appropriate filter.
• *Infractions: Select the infractions to be included on the report or select ---All---. Use Ctrl+click
or Shift+click option to select multiple codes.
• *Dispositions: Select the dispositions to be included on the report or select ---All---. Use
Ctrl+click or Shift+click option to select multiple codes.
• Order Report By: Select the order in which to print: Grade Level By Infraction, Infraction by
Grade Level, Teacher by Grade Level by Infraction, Grade Level by Disposition, Disposition by
Grade Level, or Teacher by Grade Level by Disposition.
• Format: Select the desired format for the report. Options include Acrobat (PDF) File, CSV
(comma delimited), Excel, HTML, TIFF file, or XML file with report data.
Quick Reference Guide Chalkable_0714171413 InformationNOW – Discipline •••• 18
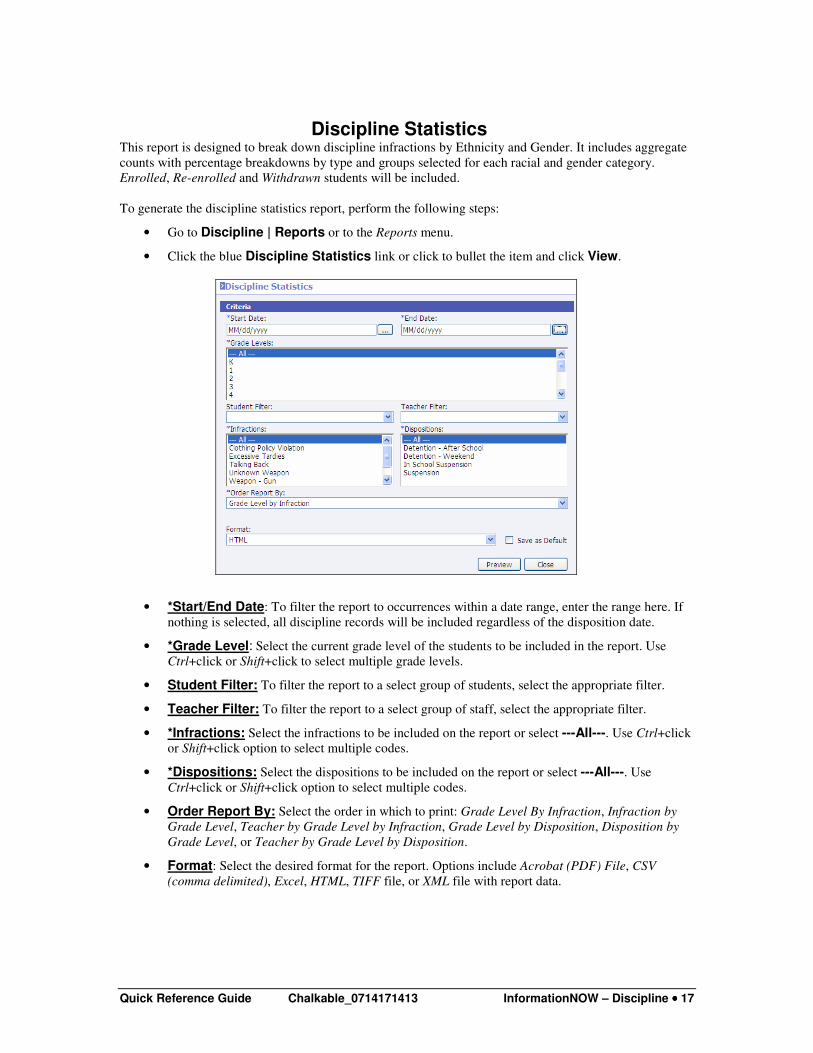
Incident Detail This report will include Incident #, Date, Time, Location and Infraction Name (like the Discipline Incident
Summary Report). The report will also include the following information if Include Students Involved is
selected: Statute Violations, Board Violations, Actions Taken, Incident Notes and Students Involved.
To generate the incident detail report, perform the following steps:
• Go to Discipline | Reports or to the Reports menu.
• Click the blue Incident Detail link or click to bullet the item and click View.
• *Start/End Date: To filter the report to incidents within a date range, enter the range here. If
nothing is selected, all incident records will be included regardless of the date.
• Incident Numbers: Select the incident to be included or select ---All---. Use Ctrl+click or
Shift+click option to select multiple incident numbers.
• Students Involved: Check whether or not to print the names of the students involved.
• Format: Select the desired format for the report. Options include Acrobat (PDF) File, CSV
(comma delimited), Excel, HTML, TIFF file, or XML file with report data.
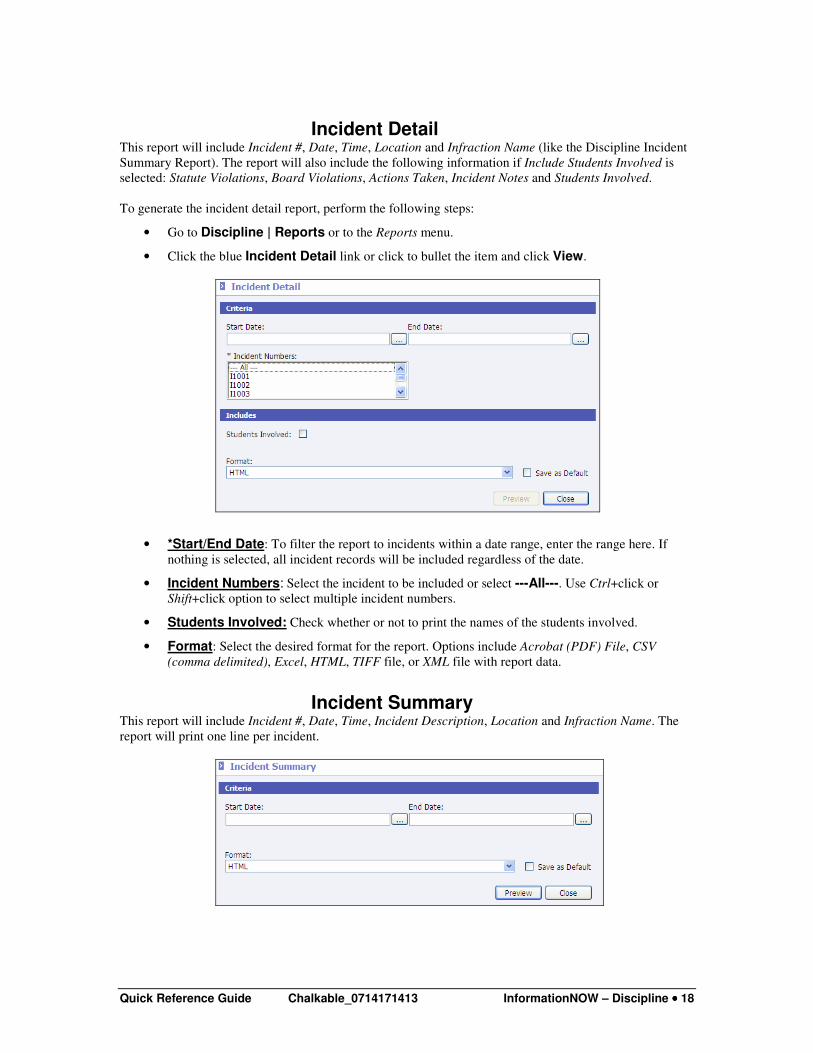
Incident Summary This report will include Incident #, Date, Time, Incident Description, Location and Infraction Name. The
report will print one line per incident.
Quick Reference Guide Chalkable_0714171413 InformationNOW – Discipline •••• 19
To generate the incident summary report, perform the following steps:
• Go to Discipline | Reports or to the Reports menu.
• Click the blue Incident Summary link or click to bullet the item and click View.
• *Start/End Date: To filter the report to incidents within a date range, enter the range here. If
nothing is selected, all incident records will be included regardless of the date.
• Format: Select the desired format for the report. Options include Acrobat (PDF) File, CSV
(comma delimited), Excel, HTML, TIFF file, or XML file with report data.