IN A VIRTUAL MACHINE IN ORACLE VM VIRTUALBOX IN · PDF fileIN A VIRTUAL MACHINE IN "ORACLE VM...
210
1 RUNNING "ANDROID" IN A VIRTUAL MACHINE IN "ORACLE VM VIRTUALBOX" IN "WINDOWS.."
Transcript of IN A VIRTUAL MACHINE IN ORACLE VM VIRTUALBOX IN · PDF fileIN A VIRTUAL MACHINE IN "ORACLE VM...

1
RUNNING "ANDROID"
IN A
VIRTUAL MACHINE
IN
"ORACLE VM VIRTUALBOX"
IN "WINDOWS.."

2
Web location for this
presentation:
http://aztcs.orgClick on
“Meeting Notes”

3
SUMMARYYou can install and run a free copy of "Android 4.3" in a virtual machine inside the free "Oracle VM VirtualBox" program in a "Windows.." computer. This gives you a chance to learn about the "Android" flavor of Linux without or prior to spending money for an "Android" phone or tablet.

"Oracle VM VirtualBox" (free)
Virtual Machine Program
"Android" (free)
running in a
virtual machine
Real Physical Computer running
Windows XP, Windows Vista,
Windows 7, Windows 8 or 8.1 OS

5
"ANDRIOD" IN "ORACLE VM
VIRTUALBOX" IN "WINDOWS.."• It is harder to run "Android" in
"..VirtualBox" relative to "VMware Player"
because "..VirtualBox" does not offer
mouse integration for "Android":
In "..VirtualBox", you cannot click inside
the virtual machine windows to get your
mouse to work inside the virtual machine.
Instead, you have to use the "Devices"
menu option to "connect" your mouse to
the "Android" virtual machine.

6
"ANDRIOD" IN "ORACLE VM VIRTUALBOX" IN
"WINDOWS.." (continued)• After doing this, your mouse's cursor will
be stuck inside the virtual machine.
To free the mouse cursor from the virtual
machine, you have to physically
disconnect and reconnect the mouse's
USB plug from the USB port of the
computer. After you do this, the mouse
will work outside the virtual machine
window but it will not work inside the
virtual machine until you use the
"Devices" menu again.

7
"ANDRIOD" IN "ORACLE VM VIRTUALBOX" IN
"WINDOWS.." (continued)
• To reduce wear on the USB port
of your computer, we recommend
that you use a USB extension
cable so that you can do the
disconnects and reconnects your
mouse with the equipment end of
the USB extension cable:

8

9
"ANDRIOD" IN "ORACLE VM VIRTUALBOX" IN
"WINDOWS.." (continued)
• See
http://www.pcworld.com/article/20
48220/hybrid-hijinks-how-to-
install-android-on-your-pc.html
for the hyperlink for downloading
the ISO file that is an image of
the installation CD for "Android
4.3".

10
"ANDRIOD" IN "ORACLE VM VIRTUALBOX" IN
"WINDOWS.." (continued)
• Download the .ISO file for the CD
installation image for "Android
4.3".
• Create a new virtual machine and
attach the .ISO to it.
• Start up the virtual machine and
follow the instructions inside
Android's installation program.

11
"ANDRIOD" IN "ORACLE VM VIRTUALBOX" IN
"WINDOWS.." (continued)
• During the installation process,
skip the setup of a wireless
access point since the Andriod
will automatically connect to
the virtual wired network
adapter that "VMware Player"
provides for it.

12
"ANDRIOD" IN "ORACLE VM VIRTUALBOX" IN
"WINDOWS.." (continued)
• During the installation process,
skip the setup of a Google
account since your Google
account will fail to recognize your
Android virtual machine as a
legitimate device to synchronize
files, settings, and favorites
anyway.

13
"ANDRIOD" IN "ORACLE VM VIRTUALBOX" IN
"WINDOWS.." (continued)
• Click on the "New" button:

14
"ANDRIOD" IN "ORACLE VM VIRTUALBOX" IN
"WINDOWS.." (continued)
• Click on the "New" button:

15

16
"ANDRIOD" IN "ORACLE VM VIRTUALBOX" IN
"WINDOWS.." (continued)
• Provide a name for the virtual
machine:
17

18
"ANDRIOD" IN "ORACLE VM VIRTUALBOX" IN
"WINDOWS.." (continued)
• In this example, we named the
virtual machine
"Android 4.3"

19

20
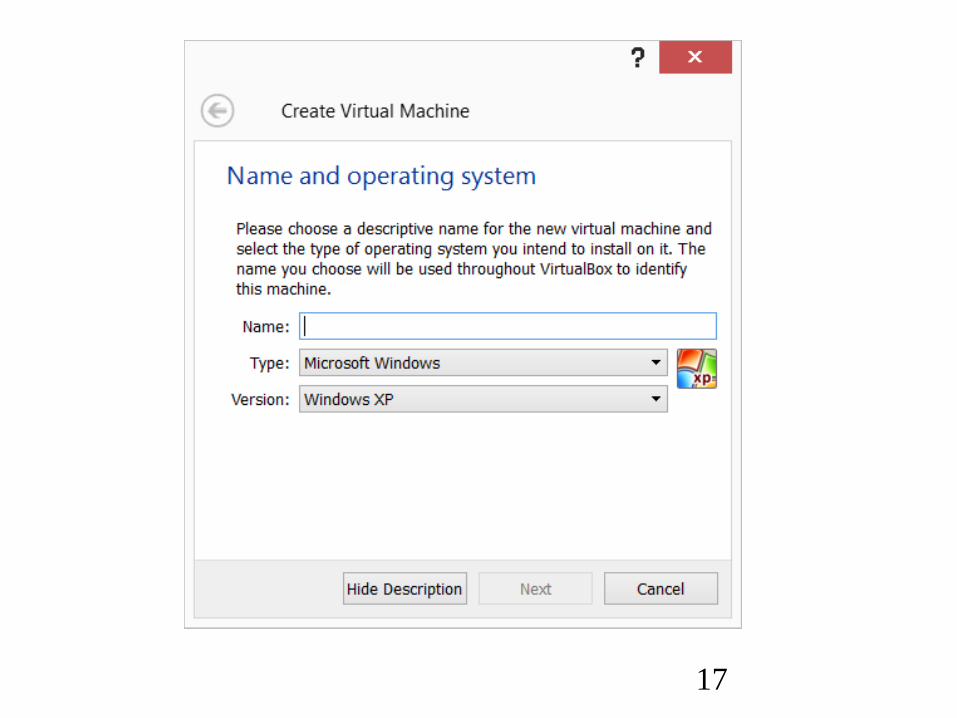
"ANDRIOD" IN "ORACLE VM VIRTUALBOX" IN
"WINDOWS.." (continued)
• Select "Linux" for the type of
virtual machine:

21

22
"ANDRIOD" IN"ORACLE VM VIRTUALBOX" IN
"WINDOWS.." (continued)
• Select "Other Linux" for the
version:

23
24
"ANDRIOD" IN "ORACLE VM VIRTUALBOX" IN
"WINDOWS.." (continued)
• Click on the "Next" button:

25

26
"ANDRIOD" IN "ORACLE VM VIRTUALBOX" IN
"WINDOWS.." (continued)
• Click

27

28
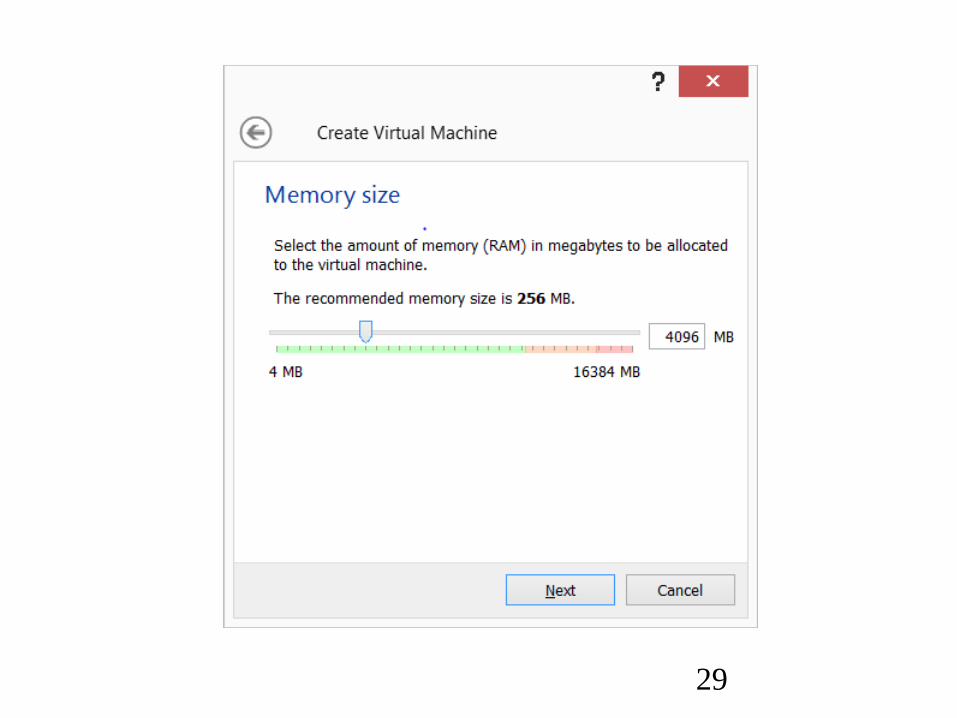
"ANDRIOD" IN "ORACLE VM VIRTUALBOX" IN
"WINDOWS.." (continued)
• Drag the slider to select the
amount of virtual RAM for the
virtual machine:
29

30
"ANDRIOD" IN "ORACLE VM VIRTUALBOX" IN
"WINDOWS.." (continued)
• Click on the "Next" button:

31

32
"ANDRIOD" IN "ORACLE VM VIRTUALBOX" IN
"WINDOWS.." (continued)
• Make sure that "Create a hard
drive.." is selected.
Then click on the "Create" button:

33

34
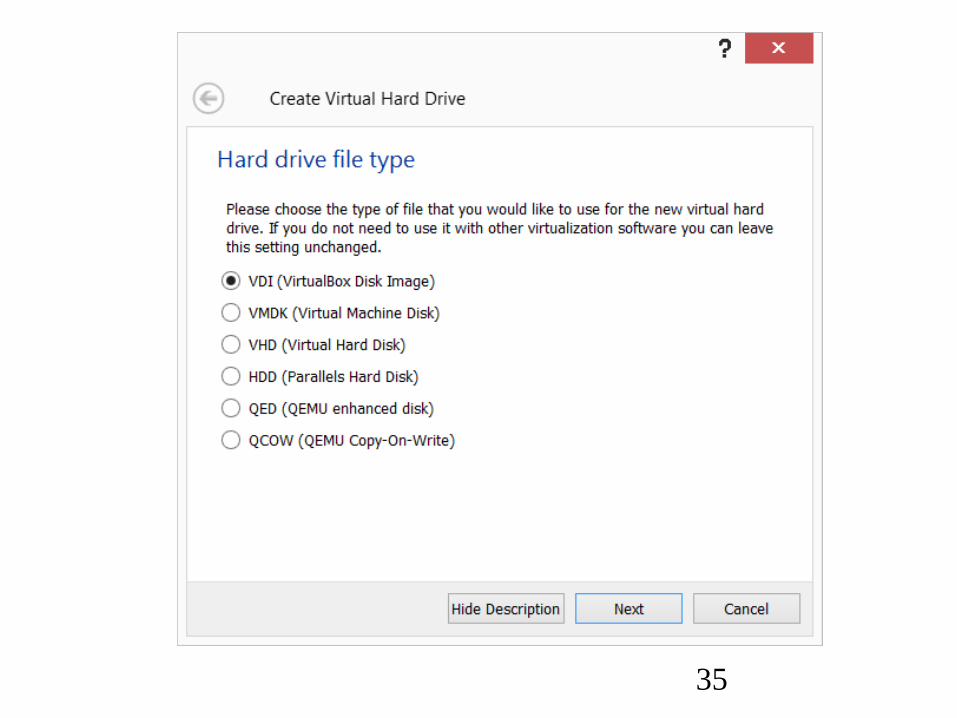
"ANDRIOD" IN "ORACLE VM VIRTUALBOX" IN
"WINDOWS.." (continued)
• Leave the hard drive type set to the top
default setting. Then click on the "Next"
button:
35

36
"ANDRIOD" IN "ORACLE VM VIRTUALBOX" IN
"WINDOWS.." (continued)
• Make sure that "Dynamically
allocated" is selected. Then click
on the "Continue" button.

37

38
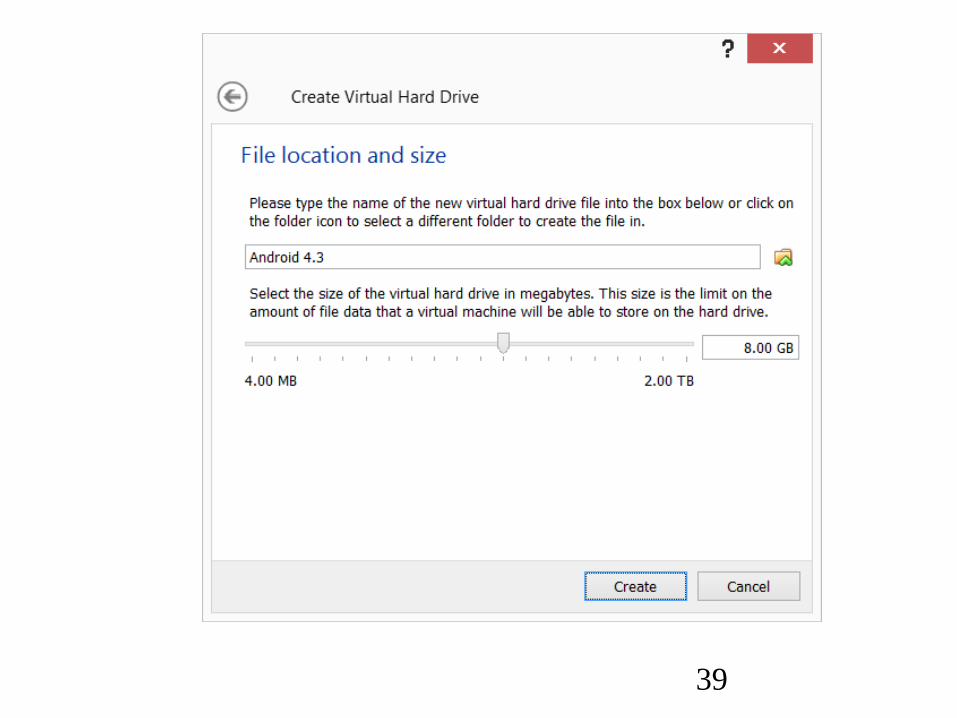
"ANDRIOD" IN "ORACLE VM VIRTUALBOX" IN
"WINDOWS.." (continued)
• Click and drag the slider to
determine the size of the virtual
hard drive:
39

40
"ANDRIOD" IN "ORACLE VM VIRTUALBOX" IN
"WINDOWS.." (continued)
• Click on the "Create" button:

41

42
"ANDRIOD" IN "ORACLE VM VIRTUALBOX" IN
"WINDOWS.." (continued)
• Click on the "Settings" button:

43

44
"ANDRIOD" IN "ORACLE VM VIRTUALBOX" IN
"WINDOWS.." (continued)
• A "..Settings" box will be
displayed:

45

46
"ANDRIOD" IN "ORACLE VM VIRTUALBOX" IN
"WINDOWS.." (continued)
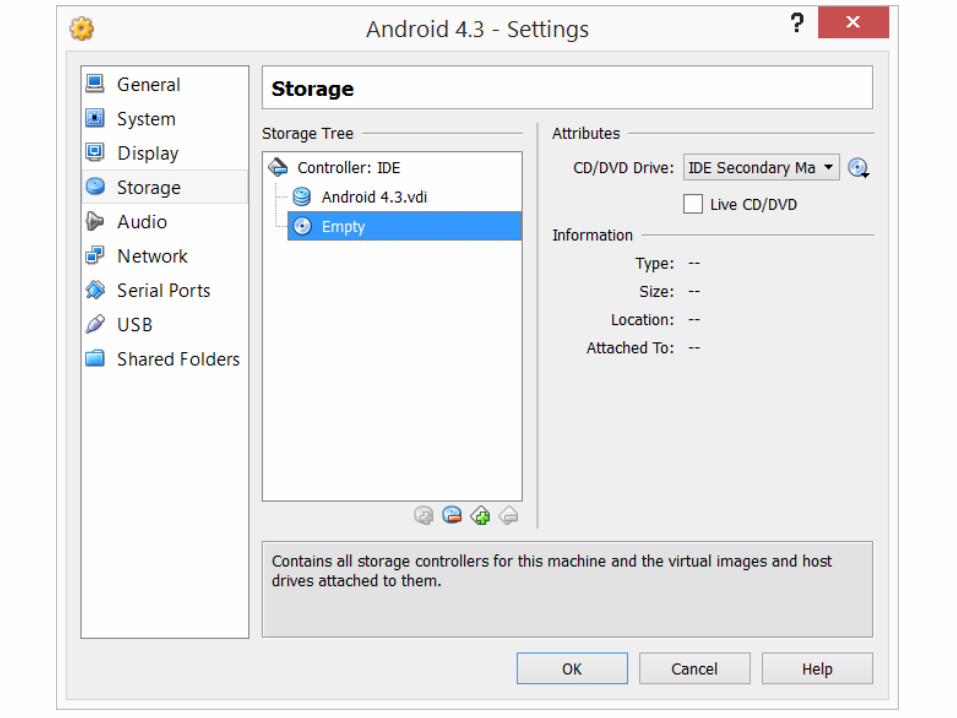
• Click on "Storage":

47

48
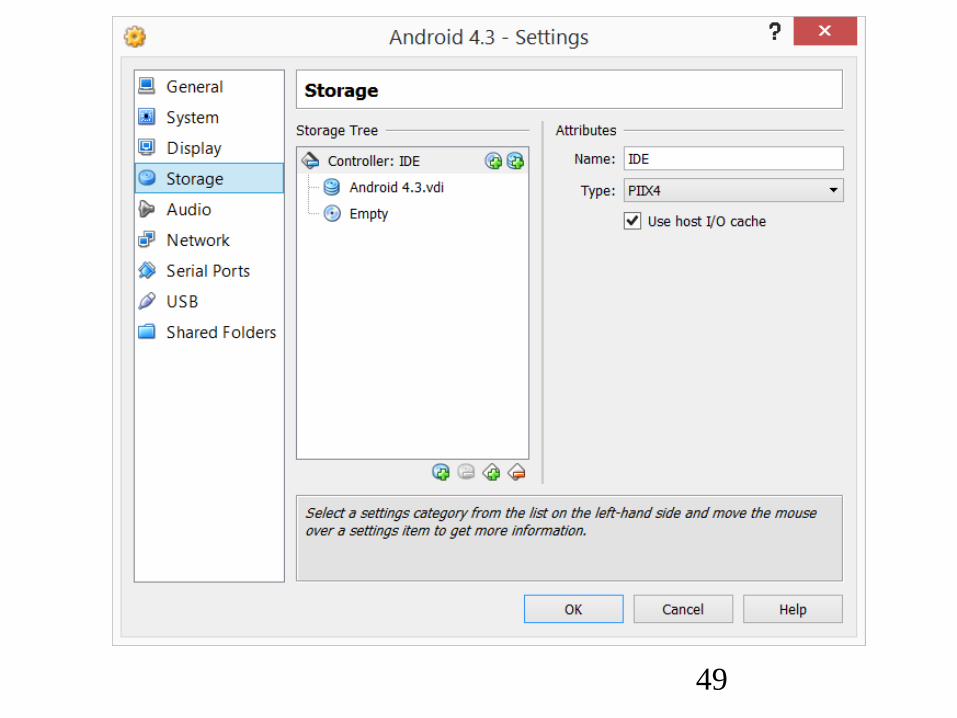
"ANDRIOD" IN "ORACLE VM VIRTUALBOX" IN
"WINDOWS.." (continued)
• The virtual IDE controller will be
displayed in the "Storage Tree":
49

50
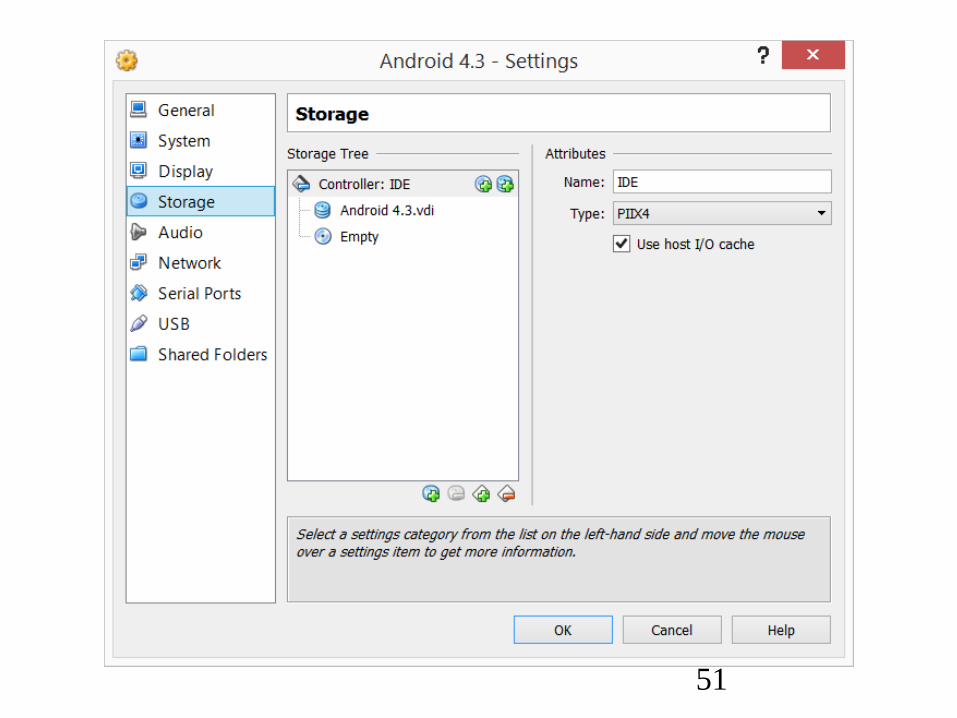
"ANDRIOD" IN "ORACLE VM VIRTUALBOX" IN
"WINDOWS.." (continued)
• Click on the "Empty" CD image:
51

52
"ANDRIOD" IN "ORACLE VM VIRTUALBOX" IN
"WINDOWS.." (continued)
• The CD image will now be
highlighted:

53

54
"ANDRIOD" IN "ORACLE VM VIRTUALBOX" IN
"WINDOWS.." (continued)
• Click on the CD icon near the
right edge of the box:

55

56
"ANDRIOD" IN "ORACLE VM VIRTUALBOX" IN
"WINDOWS.." (continued)
• Click on "Choose a virtual
CD/DVD image file" in the pop-up
context menu.

57

58
"ANDRIOD" IN "ORACLE VM VIRTUALBOX" IN
"WINDOWS.." (continued)
• A "Please choose.." dialog box
will be displayed:

59
60
"ANDRIOD" IN "ORACLE VM VIRTUALBOX" IN
"WINDOWS.." (continued)
• Click on the .ISO file of "Android
4.3" that you downloaded earlier:

61

62
"ANDRIOD" IN "ORACLE VM VIRTUALBOX" IN
"WINDOWS.." (continued)
• The .ISO file of "Android 4.3" will
now be shown in the "File Name"
box:

63

64
"ANDRIOD" IN "ORACLE VM VIRTUALBOX" IN
"WINDOWS.." (continued)
• Click on the "Open" button:

65

66
"ANDRIOD" IN "ORACLE VM VIRTUALBOX" IN
"WINDOWS.." (continued)
• Click on the "OK" button:

67

68
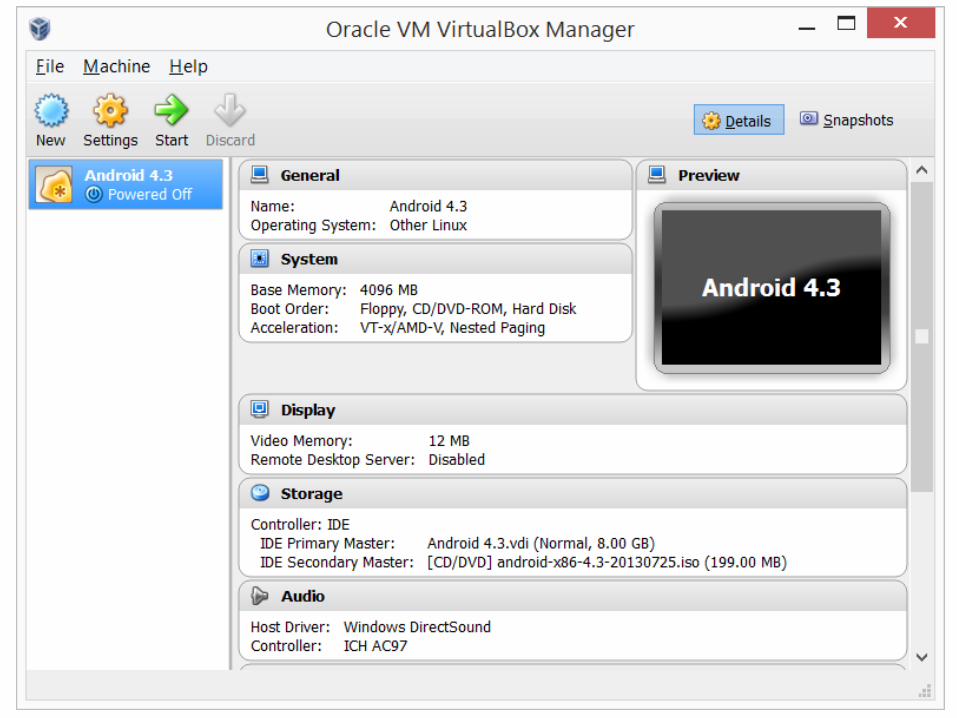
"ANDRIOD" IN "ORACLE VM VIRTUALBOX" IN
"WINDOWS.." (continued)
• The new "Andriod 4.3" virtual
machine will be listed in the
"Oracle VM VirtualBox Manager"
window:

69

70
"ANDRIOD" IN "ORACLE VM VIRTUALBOX" IN
"WINDOWS.." (continued)
• Click on the "Start" button:
71

72
"ANDRIOD" IN "ORACLE VM VIRTUALBOX" IN
"WINDOWS.." (continued)
• The following box is totally
incorrect but click on its "OK"
button anyway:

73

74

75
"ANDRIOD" IN "ORACLE VM VIRTUALBOX" IN
"WINDOWS.." (continued)
• Click

76

77

78
"ANDRIOD" IN "ORACLE VM VIRTUALBOX" IN
"WINDOWS.." (continued)
• The following notice is also totally
incorrect but click on its "OK"
button anyway"

79
80
"ANDRIOD" IN "ORACLE VM VIRTUALBOX" IN
"WINDOWS.." (continued)
• Click

81
"ANDRIOD" IN "ORACLE VM VIRTUALBOX" IN
"WINDOWS.." (continued)
• Click

82
83
"ANDRIOD" IN "ORACLE VM VIRTUALBOX" IN
"WINDOWS.." (continued)
• The "Grub 2" bootup menu of
"Android 4.3" will be displayed:

84

85
86
"ANDRIOD" IN "ORACLE VM VIRTUALBOX" IN
"WINDOWS.." (continued)
• Use the down arrow key to select
the bottom option:

87

88

89
"ANDRIOD" IN "ORACLE VM VIRTUALBOX" IN
"WINDOWS.." (continued)
• Press the Enter key once:

90

91
"ANDRIOD" IN "ORACLE VM VIRTUALBOX" IN
"WINDOWS.." (continued)
• Click
92

93
"ANDRIOD" IN "ORACLE VM VIRTUALBOX" IN
"WINDOWS.." (continued)
• Click

94

95
"ANDRIOD" IN "ORACLE VM VIRTUALBOX" IN
"WINDOWS.." (continued)
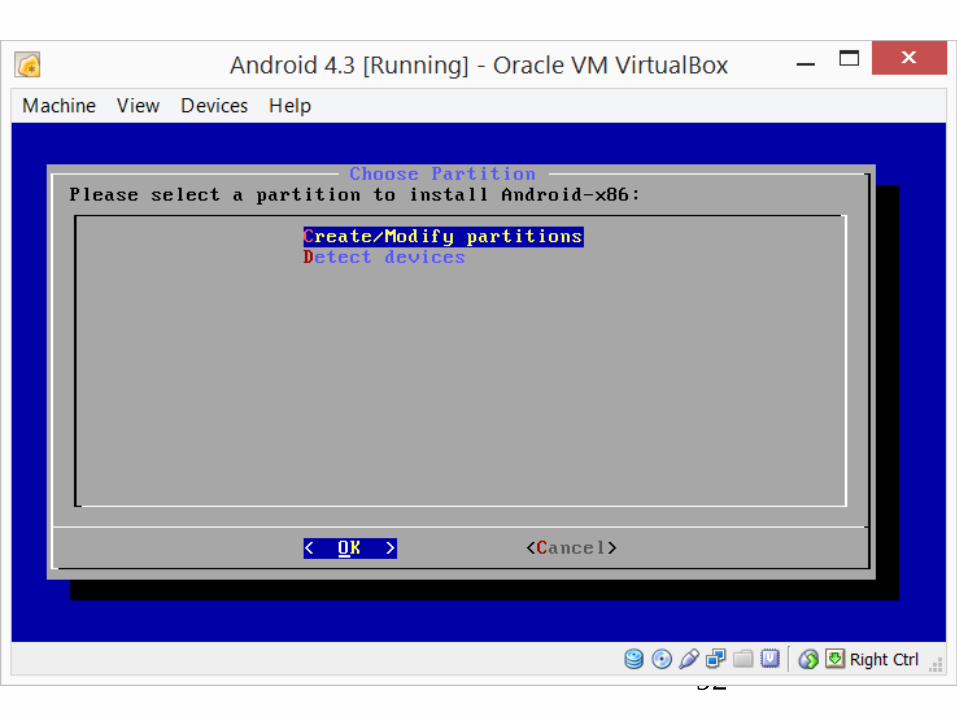
• Tab or right arrow key to "New".
Then press the "Enter" key once:

96

97
"ANDRIOD" IN "ORACLE VM VIRTUALBOX" IN
"WINDOWS.." (continued)
• Leave "Primary" selected. Then
press the Enter key once:

98

99
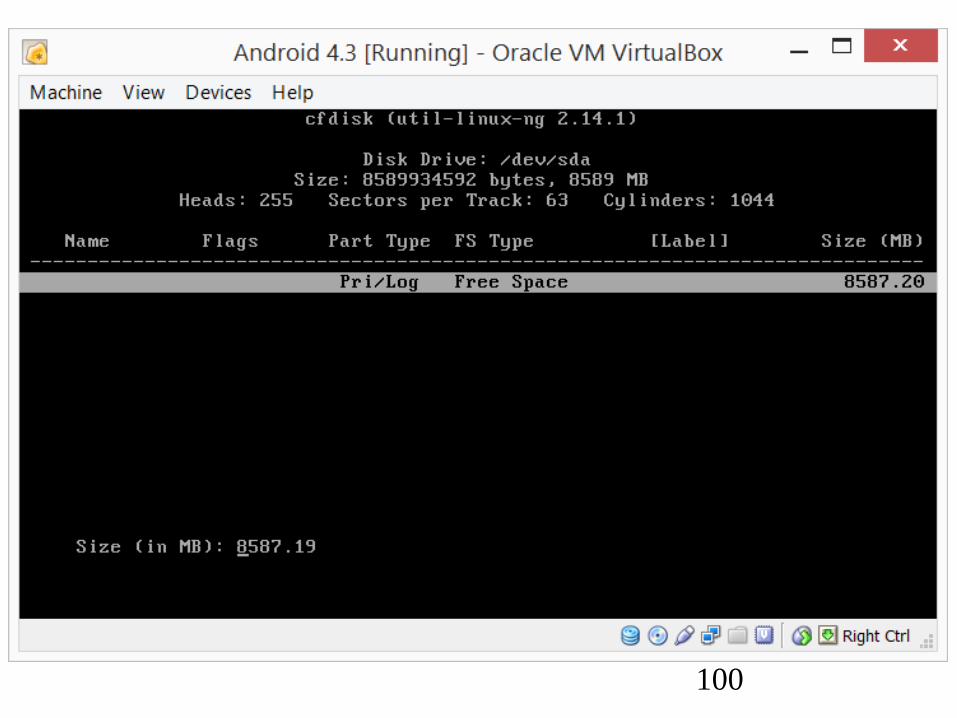
"ANDRIOD" IN "ORACLE VM VIRTUALBOX" IN
"WINDOWS.." (continued)
• Adjust the size of the virtual hard
drive partition. Then press the
Enter key once:
100

101
"ANDRIOD" IN "ORACLE VM VIRTUALBOX" IN
"WINDOWS.." (continued)
• Leave "Bootable" selected. Then
press the Enter key once:

102

103
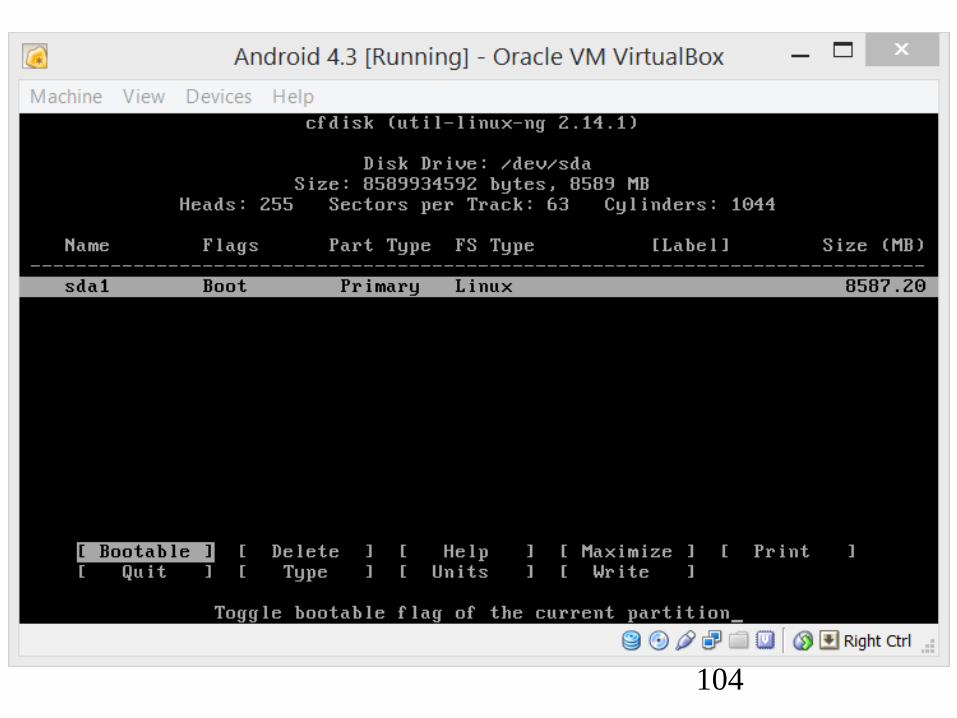
"ANDRIOD" IN "ORACLE VM VIRTUALBOX" IN
"WINDOWS.." (continued)
• The "Boot" flag will be displayed:
104

105
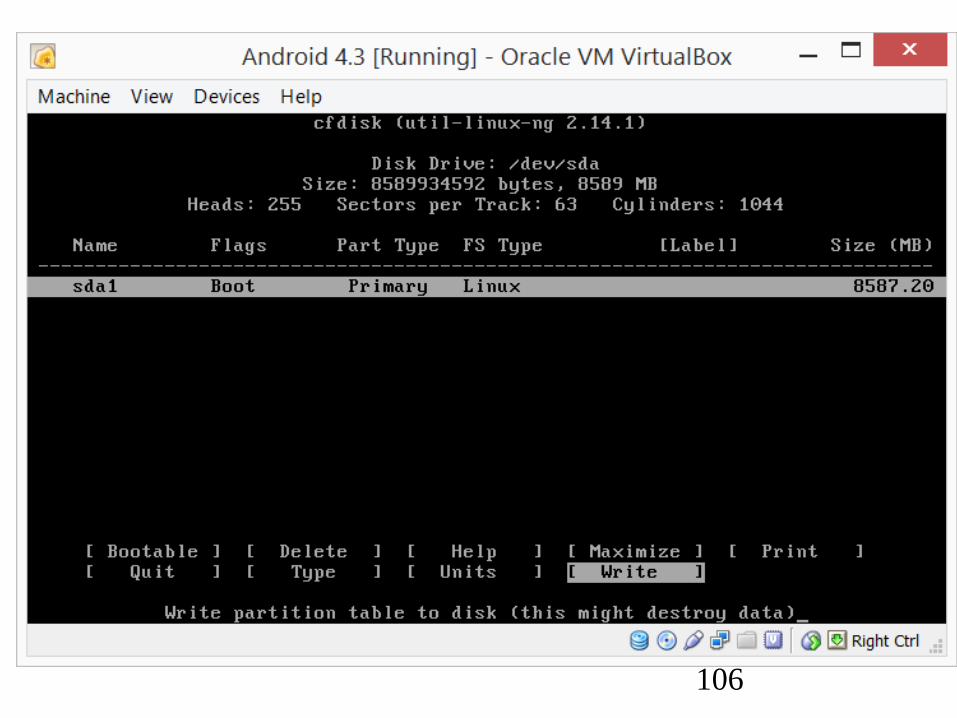
"ANDRIOD" IN "ORACLE VM VIRTUALBOX" IN
"WINDOWS.." (continued)
• Tab or right arrow key to "Write"
and then press the Enter key
once:
106

107
"ANDRIOD" IN "ORACLE VM VIRTUALBOX" IN
"WINDOWS.." (continued)
• An "Are you sure?" message will be
displayed:

108
109
"ANDRIOD" IN "ORACLE VM VIRTUALBOX" IN
"WINDOWS.." (continued)
• Type in
yes
and then press the Enter key
once:

110

111
"ANDRIOD" IN "ORACLE VM VIRTUALBOX" IN
"WINDOWS.." (continued)
• The bottom of the box will say
"Writing partition to disk...":

112

113
"ANDRIOD" IN "ORACLE VM VIRTUALBOX" IN
"WINDOWS.." (continued)
• When "Writing partition table to disk..." goes
away, your new virtual hard drive partition is
initialized and ready formatting in a future
step..
• Tab or right arrow key to "Quit" and then press
the Enter key once:

114

115
"ANDRIOD" IN "ORACLE VM VIRTUALBOX" IN
"WINDOWS.." (continued)
• Tab or right arrow key to make
sure that "OK" is selected, then
press the "Enter" key once.

116

117
"ANDRIOD" IN "ORACLE VM VIRTUALBOX" IN
"WINDOWS.." (continued)
• Down arrow key to select "EXT3"
file format:

118

119

120
"ANDRIOD" IN "ORACLE VM VIRTUALBOX" IN
"WINDOWS.." (continued)
• Enter key with "OK" highlighted.

121

122
"ANDRIOD" IN "ORACLE VM VIRTUALBOX" IN
"WINDOWS.." (continued)
• Press the "Enter" key once:

123

124
"ANDRIOD" IN "ORACLE VM VIRTUALBOX" IN
"WINDOWS.." (continued)
• Left arrow key to select "Yes":

125

126

127
"ANDRIOD" IN "ORACLE VM VIRTUALBOX" IN
"WINDOWS.." (continued)
• Press the Enter key once:

128
"ANDRIOD" IN "ORACLE VM VIRTUALBOX" IN
"WINDOWS.." (continued)
• Click

129

130
"ANDRIOD" IN "ORACLE VM VIRTUALBOX" IN
"WINDOWS.." (continued)
• Press the Enter key again:

131

132
"ANDRIOD" IN "ORACLE VM VIRTUALBOX" IN
"WINDOWS.." (continued)
• A horizontal status bar shows
you the progress of the format
process for the virtual hard
drive:

133

134
"ANDRIOD" IN "ORACLE VM VIRTUALBOX" IN
"WINDOWS.." (continued)
• At this point, you will be stuck in
an endless cycle of installing
"Android 4.3" into your virtual
machine unless you first shut
down the virtual machine and
disconnect the .ISO file that
represents the installation CD for
"Android 4.3":

135

136
"ANDRIOD" IN "ORACLE VM VIRTUALBOX" IN
"WINDOWS.." (continued)
• Click once on the red "X" button
in the upper-right corner of the
virtual machine window:

137

138
139
"ANDRIOD" IN "ORACLE VM VIRTUALBOX" IN
"WINDOWS.." (continued)
• Select the "Power off the
machine" option:

140

141
"ANDRIOD" IN "ORACLE VM VIRTUALBOX" IN
"WINDOWS.." (continued)
• Click on the "OK" button:

142

143
"ANDRIOD" IN "ORACLE VM VIRTUALBOX" IN
"WINDOWS.." (continued)
• Click on the "Settings" button:

144

145
"ANDRIOD" IN "ORACLE VM VIRTUALBOX" IN
"WINDOWS.." (continued)
• Click on "Storage":

146

147
"ANDRIOD" IN "ORACLE VM VIRTUALBOX" IN
"WINDOWS.." (continued)
• The virtual IDE controller will
be displayed in the "Storage
Tree":

148

149
"ANDRIOD" IN "ORACLE VM VIRTUALBOX" IN
"WINDOWS.." (continued)
• Click on the Android 4.3 ISO
file:

150

151
"ANDRIOD" IN "ORACLE VM VIRTUALBOX" IN
"WINDOWS.." (continued)
• Click on the CD icon on the
right edge of the window:

152

153
"ANDRIOD" IN "ORACLE VM VIRTUALBOX" IN
"WINDOWS.." (continued)
• Click on "Remove disk from
virtual drive" in the popup context
menu.

154

155
"ANDRIOD" IN "ORACLE VM VIRTUALBOX" IN
"WINDOWS.." (continued)
• Click on the "OK" button:

156
"ANDRIOD" IN "ORACLE VM VIRTUALBOX" IN
"WINDOWS.." (continued)
• The virtual CD will not be
shown as "Empty":
157

158
"ANDRIOD" IN "ORACLE VM VIRTUALBOX" IN
"WINDOWS.." (continued)
• Start the virtual machine by
clicking on the "Start" button:

159

160

161

162
"ANDRIOD" IN "ORACLE VM VIRTUALBOX" IN
"WINDOWS.." (continued)
• Press the "Enter" key once:

163

164
"ANDRIOD" IN "ORACLE VM VIRTUALBOX" IN
"WINDOWS.." (continued)
• Press the tab key until the
Start button turns blue and
then press the Enter key:

165

166
"ANDRIOD" IN "ORACLE VM VIRTUALBOX" IN
"WINDOWS.." (continued)
• Unlike other virtual machine
programs, in "Oracle VM
Virtualbox", you cannot make the
mouse cursor go inside the virtual
machine window by clicking
inside the virtual machine
window.

167
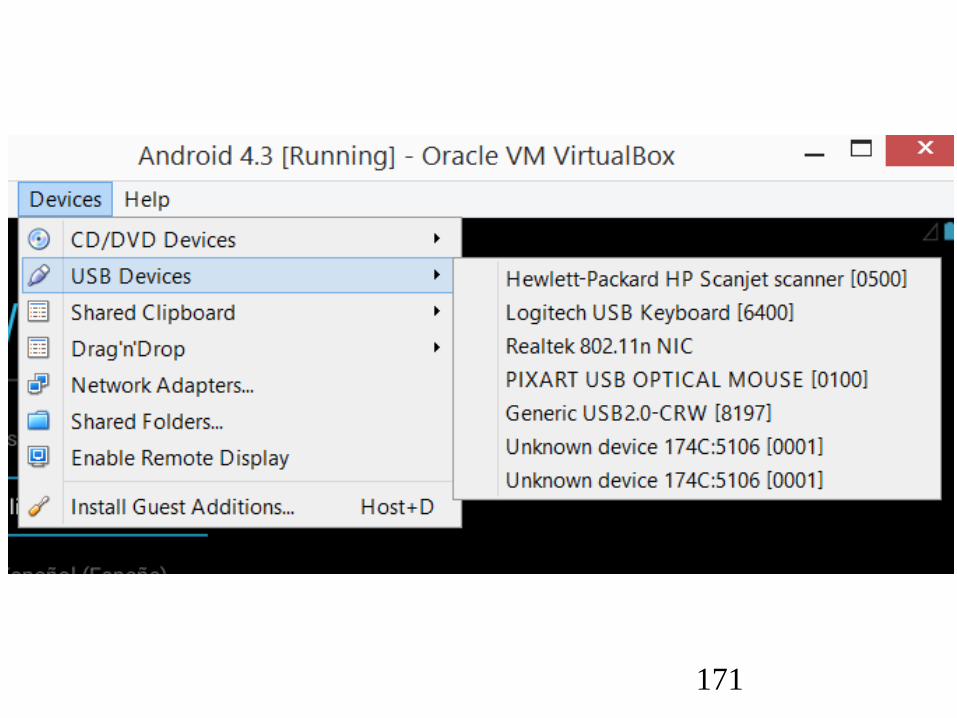
"ANDRIOD" IN "ORACLE VM VIRTUALBOX" IN
"WINDOWS.." (continued)
• To put the mouse cursor inside the
virtual machine for use there:
Click on "Devices" in the Menu Bar
of the virtual machine.
Click on "USB Devices" in the pull-
down menu.
Click on the listing for your mouse in
the pop-up context menu.

168

169
"ANDRIOD" INSIDE "ORACLE VM
VIRTUALBOX" IN "WINDOWS.." (continued)
• Click on "Devices" in the Menu
Bar of the virtual machine.
Click on "USB Devices" in the
pull-down menu.
Click on the listing for your
mouse in the pop-up context
menu.

170
171

172
"ANDRIOD" IN "ORACLE VM VIRTUALBOX" IN
"WINDOWS.." (continued)
• Click on the "Start" button:

173

174
"ANDRIOD" INSIDE "ORACLE VM
VIRTUALBOX" IN "WINDOWS.." (continued)
• A "Welcome" banner will be
displayed for 20 to 50
seconds:

175

176
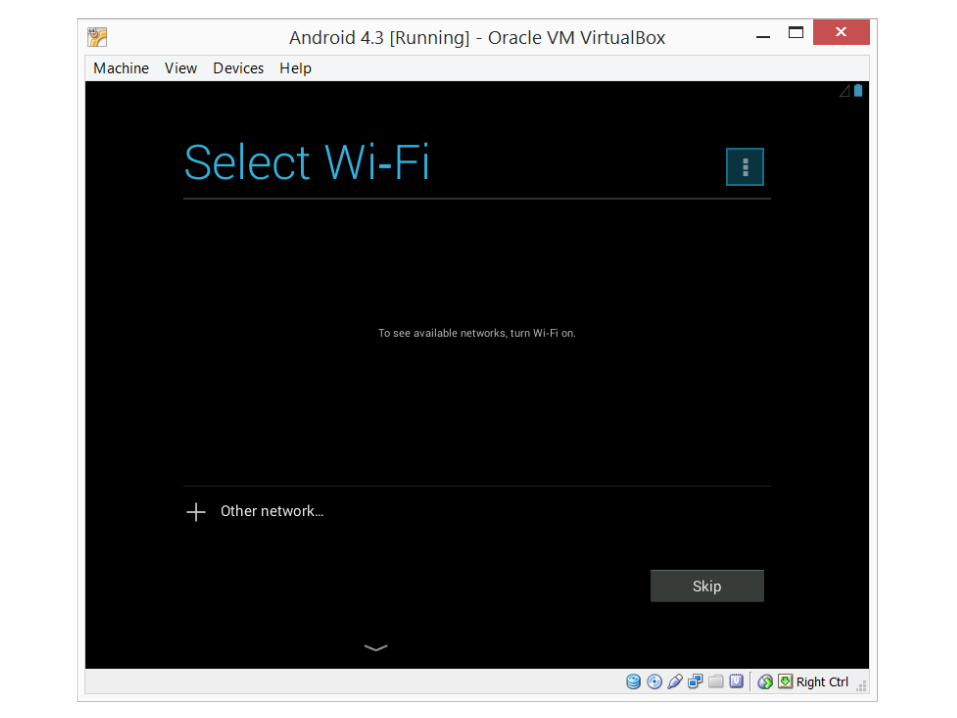
"ANDRIOD" IN "ORACLE VM VIRTUALBOX" IN
"WINDOWS.." (continued)
• When asked to "Select Wi-Fi",
you do not need to and doing
so will not work anyway, so
click on the "Skip" button:
177

178
"ANDRIOD" IN "ORACLE VM VIRTUALBOX" IN
"WINDOWS.." (continued)
• Click on "Skip anyway":

179

180
"ANDRIOD" IN "ORACLE VM VIRTUALBOX" IN
"WINDOWS.." (continued)
• When asked if you have a
Google account, click on the "No"
button:

181

182
"ANDRIOD" IN "ORACLE VM VIRTUALBOX" IN
"WINDOWS.." (continued)
• Click on "Not now":

183

184
"ANDRIOD" IN "ORACLE VM VIRTUALBOX" IN
"WINDOWS.." (continued)
• Click on the right pointing
triangle button to move
forward:

185
186
"ANDRIOD" IN "ORACLE VM VIRTUALBOX" IN
"WINDOWS.." (continued)
• Click on the right pointing
triangle button to move
forward:

187

188
"ANDRIOD" IN "ORACLE VM VIRTUALBOX" IN
"WINDOWS.." (continued)
• Click on the right pointing
triangle button to move
forward:

189

190
"ANDRIOD" IN "ORACLE VM VIRTUALBOX" IN
"WINDOWS.." (continued)
• Click on the "Finish" button:

191

192
"ANDRIOD" IN "ORACLE VM VIRTUALBOX" IN
"WINDOWS.." (continued)
• Click on the "Apps Button".
It looks like a circle with six
white squares inside it:

193

194
"ANDRIOD" IN "ORACLE VM VIRTUALBOX" IN
"WINDOWS.." (continued)
• Click on the "OK" button:

195

196
"ANDRIOD" IN "ORACLE VM VIRTUALBOX" IN
"WINDOWS.." (continued)
• The apps screen includes a
"Settings" button and a
"Terminal Emulator" button:

197

198
"ANDRIOD" IN "ORACLE VM VIRTUALBOX" IN
"WINDOWS.." (continued)
• If you encounter a lock screen,
unlock the Android virtual
machine by dragging the lock
out of the circle:

199

200
"ANDRIOD" IN "ORACLE VM VIRTUALBOX" IN
"WINDOWS.." (continued)
• Then you can click on the
"Apps button" to get to a
usable screen:

201
202
"ANDRIOD" IN "ORACLE VM VIRTUALBOX" IN
"WINDOWS.." (continued)
• This is the highest level usable
screen:

203

204
"ANDRIOD" IN "ORACLE VM VIRTUALBOX" IN
"WINDOWS.." (continued)
• If your "Android 4.3" virtual
machine goes to sleep, the only
way that you can wake it is to
press on the "Context Menu Key"
of the keyboard. The "Context
Menu Key" is sometimes called
the "Menu Key".

205

206
"ANDRIOD" IN "ORACLE VM VIRTUALBOX" IN
"WINDOWS.." (continued)
• If your "Android" virtual machine falls
asleep and you cannot remember
about the "Context Menu" key, your
other alternative is to disconnect the
mouse from the USB port, wait 5
seconds, and then resert the
mouse's USB plug back into the USB
port. Then close the virtual machine
by clicking on the red "x" button.

207
"ANDRIOD" IN "ORACLE VM VIRTUALBOX" IN
"WINDOWS.." (continued)
• To get your mouse cursor out of the virtual machine, you have to do the following: Disconnect the USB plug of the mouse from the USB port of the computer. Wait 5 seconds. Reconnect the USB plug of the mouse by inserting it into the USB port of the computer.

208
"ANDRIOD" IN "ORACLE VM VIRTUALBOX" IN
"WINDOWS.." (continued)
• To close down the virtual
machine if the mouse cursor is
working:
Use your mouse cursor to drag
the right half of the top "Status
Bar" downward.
Then click on the "Power Off"
button:

209

210
"ANDRIOD" IN "ORACLE VM VIRTUALBOX" IN
"WINDOWS.." (continued)
• To close down the virtual machine if the
mouse cursor is not working:
Follow the previous procedure to get the
mouse cursor out of the virtual machine.
Then click on the red "X" button in the
upper-right corner of the virtual machine.
Select "Power off the machine" from the
"Close Virtual Machine?" dialog box.
Finally, click on the "OK" button of the
"Close Virtual Machine?" dialog box.