

Implementing Salesforce at New Eyes for the Needy Magdalena Adamczuk, Megan Dyckman, David...
25
Implementing Salesforce at New Eyes for the Needy Magdalena Adamczuk, Megan Dyckman, David Kaplowitz, Victoria Leong, Ali Skoutelas
-
Upload
virgil-watts -
Category
Documents
-
view
218 -
download
0
Transcript of Implementing Salesforce at New Eyes for the Needy Magdalena Adamczuk, Megan Dyckman, David...

Implementing Salesforce at New Eyes for the Needy
Magdalena Adamczuk, Megan Dyckman, David Kaplowitz, Victoria Leong, Ali
Skoutelas

Agenda
• Description of the Client• Needs and Approach• What We Created• Diagrams• Documentation Overview

Description of the Client
• Non-profit organization located in Short Hills, NJ.
• Prior volunteer management system included an Excel file and binders.– No longer effective due to growth.
• Three distinct groups of volunteers:– Regular (everyday, older)– Summer (students)– Groups (corporate, college)

Needs and Approach
• Decrease the time it takes to reach out to volunteers.
• Personalize volunteer outreach.• Increase volunteer outreach from zero to all
250 volunteers.• Improve accessibility to volunteer information.• Eliminate outdated volunteer data and keep
the current information up to date.

Diagrams

Entity-Relationship Diagram (ERD)

Salesforce ERD

Data Flow Diagram (DFD)

Context Diagram

Custom Report Creation and Client Documentation

Requirements and SolutionsWhat the client needed • New Eyes for the Needy wanted custom reporting that would allow it to make granular
reports on its data in Salesforce. For instance, Jean Gajano, the Community Relations Coordinator for New Eyes wanted to be able to quickly generate reports on the force of volunteers on which New Eyes relies, increasing her job efficiency and helping her maintain relationships with volunteers.
What our team delivered• To fulfill the client’s needs in a way that would allow them to work independently, we had to
take into consideration that they had no prior experience with Salesforce, which they did not. We wanted to make no assumptions that anyone reading our documentation had any technical significant expertise.
• As experts on Salesforce, the VU New Eyes team provided guidance to the organization in the form of personal training and tangible documentation in the form of a manual that any user logging into Salesforce could easily follow.

Report Documentation• The VU implementation team drew up a user guide for New Eyes to use when Jean and Sue
want to create custom reports. We used simple screen shots with easy-to-follow steps written out in text, accompanied by easy-to-see arrow callouts to help the end-user get a visual perspective on each of the steps in Salesforce’s five-step process for creating custom reports.

Report Documentation (Cont.)• Each step of the process was covered with one of these images, in order to
minimize any confusion for the user following the guide.

Success!• After going over the process with Jean and the team at New Eyes, they were very
pleased with the results. They found the instructions simple and feel comfortable that they can run reports on their data, using any filter they wish to help them run their organization.

Documentation Overview

How To
• How to Upload to Salesforce• How to Add Fields• How to Create An Event and Send Email
Invitations• How to Backup Salesforce

How to Upload to Salesforce
1. Save each updated volunteer file as a CSV.2. Login to Salesforce.com at:
http://www.salesforce.com/.3. Go to Setup.

4. Expand Data Management and go to Import Custom Objects.

5. Start the Import Wizard!

6. Step 1: Choose Record. Select the Regular Volunteer.
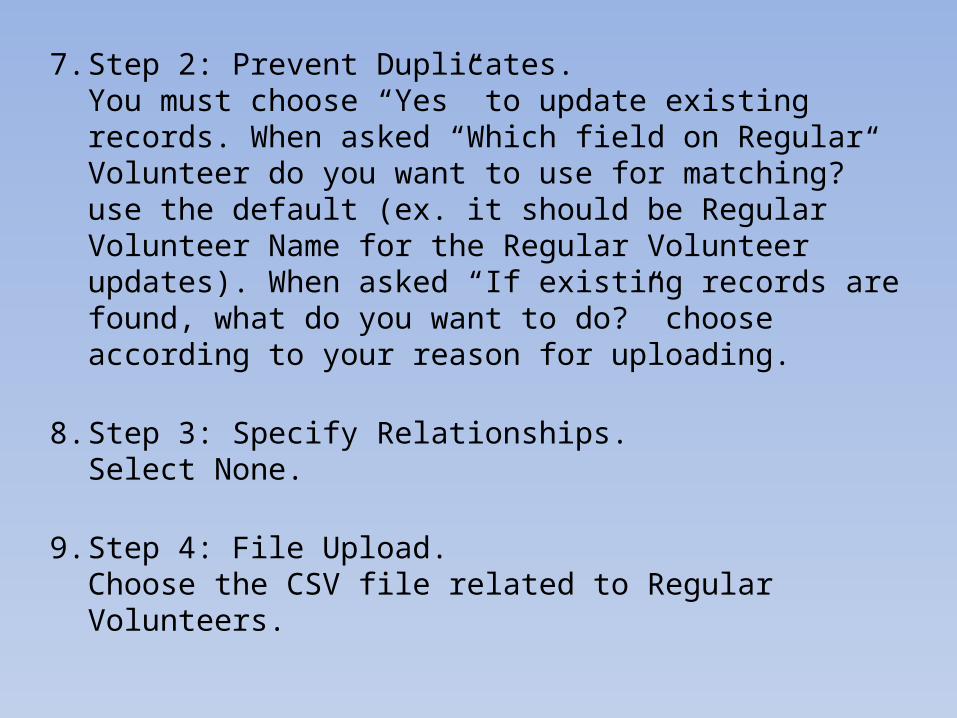
7. Step 2: Prevent Duplicates.You must choose “Yes” to update existing records. When asked “Which field on Regular Volunteer do you want to use for matching?” use the default (ex. it should be Regular Volunteer Name for the Regular Volunteer updates). When asked “If existing records are found, what do you want to do?” choose according to your reason for uploading.
8. Step 3: Specify Relationships.Select None.
9. Step 4: File Upload.Choose the CSV file related to Regular Volunteers.
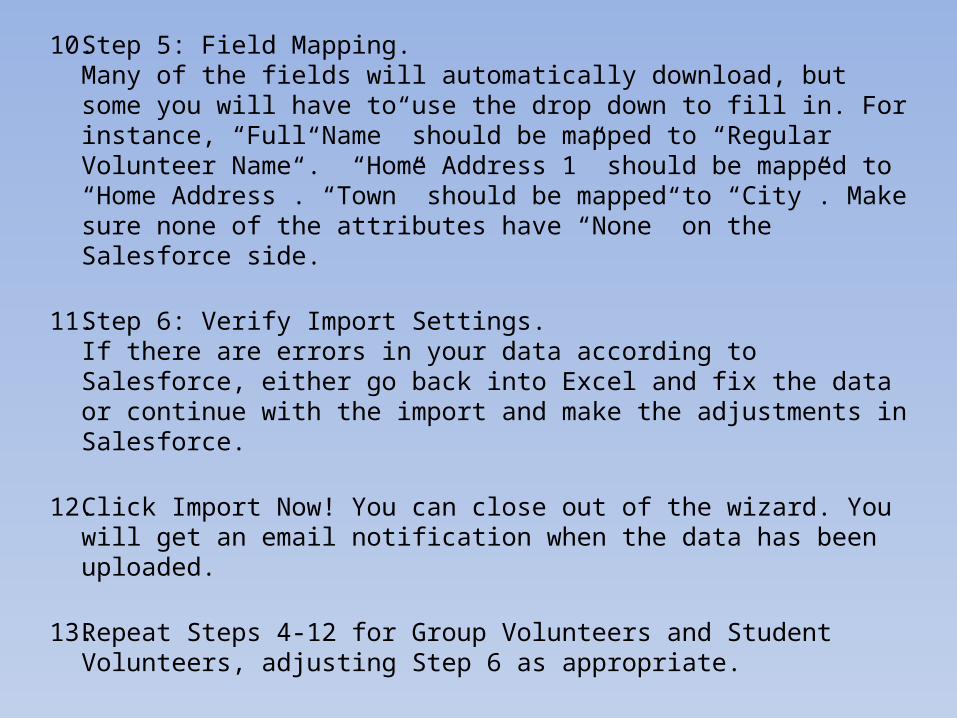
10. Step 5: Field Mapping.Many of the fields will automatically download, but some you will have to use the drop down to fill in. For instance, “Full Name” should be mapped to “Regular Volunteer Name”. “Home Address 1” should be mapped to “Home Address”. “Town” should be mapped to “City”. Make sure none of the attributes have “None” on the Salesforce side.
11. Step 6: Verify Import Settings.If there are errors in your data according to Salesforce, either go back into Excel and fix the data or continue with the import and make the adjustments in Salesforce.
12. Click Import Now! You can close out of the wizard. You will get an email notification when the data has been uploaded.
13. Repeat Steps 4-12 for Group Volunteers and Student Volunteers, adjusting Step 6 as appropriate.

What’s Next
• Megan will be meeting with Jean and Sue over Winter Break to train them in Salesforce.
• Jean has seen the system, and she is thrilled. She even sent out birthday cards last week.

Any questions?


![Buchholzia Coriacea Exhibited Antinecrotic, Antioxidant ...digestion, and it also acts as a storage unit Kaplowitz [1]. The liver is ... 6 each received 14.28mg/kg b.w of paracetamol](https://static.fdocuments.in/doc/165x107/5f82fc17c6122c31c6505dfc/buchholzia-coriacea-exhibited-antinecrotic-antioxidant-digestion-and-it-also.jpg)


![UNDERCOVER POLICING INQUIRY...4/14 UNDERCOVER POLICING INQUIRY No. Core participant Category Sub-category Representatives Contact 48. David Kaplowitz [K] Political activists Bindmans](https://static.fdocuments.in/doc/165x107/5ec7bb6513c2b83d4b19f665/undercover-policing-inquiry-414-undercover-policing-inquiry-no-core-participant.jpg)


