IMCI ADAPTATION GUIDE - WHO
32
INTEGRATED MANAGEMENT OF CHILDHOOD ILLNESS IMCI ADAPTATION GUIDE A guide to identifying necessary adaptations of clinical policies and guidelines, and to adapting the charts and modules for the WHO/UNICEF course PART 4 H. Modifying the Generic Chart Booklet: Using Microsoft Publisher November 2001 DEPARTMENT OF CHILD AND ADOLESCENT HEALTH AND DEVELOPMENT WORLD HEALTH ORGANIZATION unicef IMCI INTEGRATED MANAGEMENT OF CHILDHOOD ILLNESS
Transcript of IMCI ADAPTATION GUIDE - WHO

INTEGRATED MANAGEMENT OF CHILDHOOD ILLNESS
IMCI ADAPTATION GUIDE
A guide to identifying necessary adaptations of clinical policiesand guidelines, and to adapting the charts and modules
for the WHO/UNICEF course
PART 4
H. Modifying the Generic Chart Booklet:Using Microsoft Publisher�
November 2001
DEPARTMENT OF CHILD
AND ADOLESCENT HEALTH
AND DEVELOPMENT
WORLD HEALTH ORGANIZATION
unicef
IMC
IIN
TE
GR
AT
ED
MA
NA
GE
ME
NT
OF
CH
ILD
HO
OD
IL
LN
ES
S

For further information please contact:
Department of Child and Adolescent Health and Development
World Health Organization
20 Avenue Appia1211 Geneva 27Switzerland
Tel: 41 22 791 26 32Fax: 41 22 791 48 53Email: [email protected]: http://www.who.int/chd
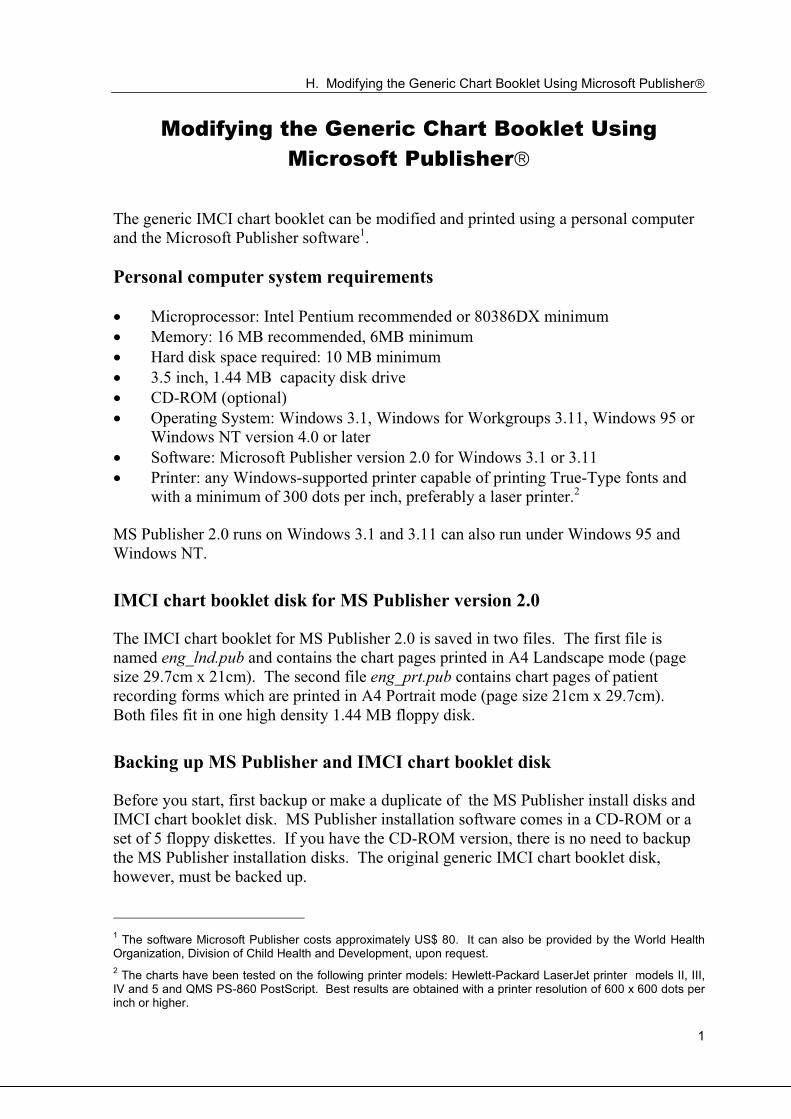
H. Modifying the Generic Chart Booklet Using Microsoft Publisher�
1
Modifying the Generic Chart Booklet Using
Microsoft Publisher�
The generic IMCI chart booklet can be modified and printed using a personal computer
and the Microsoft Publisher software1.
Personal computer system requirements
� Microprocessor: Intel Pentium recommended or 80386DX minimum
� Memory: 16 MB recommended, 6MB minimum
� Hard disk space required: 10 MB minimum
� 3.5 inch, 1.44 MB capacity disk drive
� CD-ROM (optional)
� Operating System: Windows 3.1, Windows for Workgroups 3.11, Windows 95 or
Windows NT version 4.0 or later
� Software: Microsoft Publisher version 2.0 for Windows 3.1 or 3.11
� Printer: any Windows-supported printer capable of printing True-Type fonts and
with a minimum of 300 dots per inch, preferably a laser printer.2
MS Publisher 2.0 runs on Windows 3.1 and 3.11 can also run under Windows 95 and
Windows NT.
IMCI chart booklet disk for MS Publisher version 2.0
The IMCI chart booklet for MS Publisher 2.0 is saved in two files. The first file is
named eng_lnd.pub and contains the chart pages printed in A4 Landscape mode (page
size 29.7cm x 21cm). The second file eng_prt.pub contains chart pages of patient
recording forms which are printed in A4 Portrait mode (page size 21cm x 29.7cm).
Both files fit in one high density 1.44 MB floppy disk.
Backing up MS Publisher and IMCI chart booklet disk
Before you start, first backup or make a duplicate of the MS Publisher install disks and
IMCI chart booklet disk. MS Publisher installation software comes in a CD-ROM or a
set of 5 floppy diskettes. If you have the CD-ROM version, there is no need to backup
the MS Publisher installation disks. The original generic IMCI chart booklet disk,
however, must be backed up.
1 The software Microsoft Publisher costs approximately US$ 80. It can also be provided by the World Health
Organization, Division of Child Health and Development, upon request.
2 The charts have been tested on the following printer models: Hewlett-Packard LaserJet printer models II, III,
IV and 5 and QMS PS-860 PostScript. Best results are obtained with a printer resolution of 600 x 600 dots perinch or higher.

H. Modifying the Generic Chart Booklet Using Microsoft Publisher�
2
To backup the disks:
� Prepare 6 blank floppy diskettes or one if you have MS Publisher
in CD-ROM.
� Insert the disk to backup in drive A: (start with MS-Publisher Disk 1)
� Run the File Manager program. This is usually found under the Mainprogram group.
� In File Manager, click on Disk then Copy Disk.
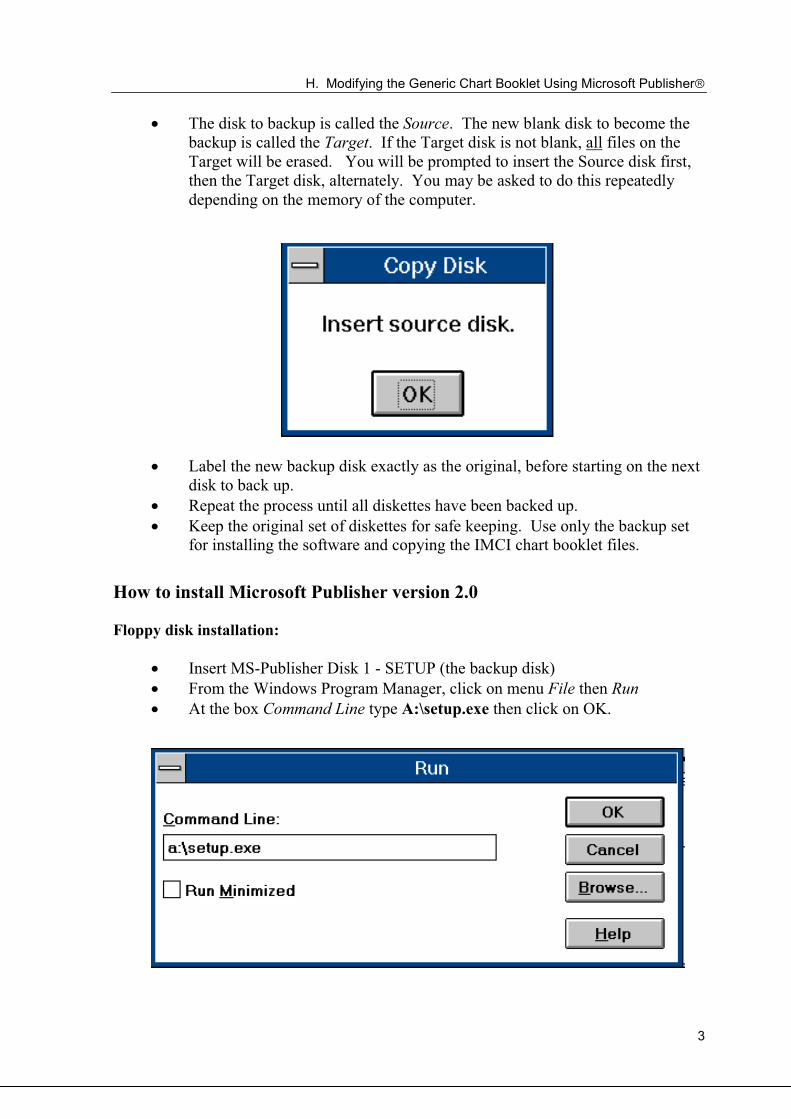
H. Modifying the Generic Chart Booklet Using Microsoft Publisher�
3
� The disk to backup is called the Source. The new blank disk to become the
backup is called the Target. If the Target disk is not blank, all files on the
Target will be erased. You will be prompted to insert the Source disk first,
then the Target disk, alternately. You may be asked to do this repeatedly
depending on the memory of the computer.
� Label the new backup disk exactly as the original, before starting on the next
disk to back up.
� Repeat the process until all diskettes have been backed up.
� Keep the original set of diskettes for safe keeping. Use only the backup setfor installing the software and copying the IMCI chart booklet files.
How to install Microsoft Publisher version 2.0
Floppy disk installation:
� Insert MS-Publisher Disk 1 - SETUP (the backup disk)
� From the Windows Program Manager, click on menu File then Run
� At the box Command Line type A:\setup.exe then click on OK.

H. Modifying the Generic Chart Booklet Using Microsoft Publisher�
4
CD-ROM installation:
If a CD-ROM exists, the drive identifier is usually the letter D: or E:. This can be
verified by running File Manager. The drive letter identifier appears with a CDROM
icon. (See example of the File Manager picture where drive D: is illustrated as a
CD-ROM icon.)
Follow the same procedure as the floppy disk installation replacing the drive letter
identifier A: with either D: or E:.
Choosing type of installation
MS Publisher can be installed in 3 ways: Complete, Custom and Minimum. Full
installation installs all MS-Publisher files and requires 13 MB of disk space. Minimum
installation installs a working version of MS Publisher however some features such as
Spell Check, Sample Layout programs, Wizards and other options are not installed.
Minimum install requires about 7MB of disk space. Custom installation allows the user
to choose features to install. It is recommended to do the Complete installation.

H. Modifying the Generic Chart Booklet Using Microsoft Publisher�
5
After choosing the type of installation, specify the directory where MS Publisher will be
installed. It is recommended to use the default directory C:\MSPUB.
Insert the floppy disks as requested. Fill in the software registration form and post it.
This entitles you to product upgrade information. When the installation procedure is
finished, a screen will indicate if the installation succeeded.
If the installation did not finish or failed, check for the following:
� Is there enough free hard disk space available? 13 MB is required for acomplete installation. Use the File Manager to verify that enough space is
available.
� Does the computer have enough memory? Close other open applications
then run SETUP again (e.g. word processing programs like Word or
WordPerfect).
� Was there any problem with the installation disks? Did a “cannot read disk”
error occurred? Ask a computer expert to check that the installation disks are
not damaged.

H. Modifying the Generic Chart Booklet Using Microsoft Publisher�
6
Starting MS Publisher program
From the Windows Program Manager, select the program group Microsoft Publisher.
Double click on the icon Microsoft Publisher.
Tutorial: Introduction to Microsoft Publisher
The first time MS Publisher is run, a short tutorial called Introduction to Microsoft
Publisher automatically starts, explaining the basic concepts of the software. It is
recommended to follow this tutorial. Click on the Next button to continue the tutorial.
The tutorial will introduce the fundamental concepts of a desktop layout program (also
known as DTP). DTP creates documents by placing “objects” in a page. There are
9 different object types in MS Publisher and each object has its own tool:
1. Text frame tool - used for entering text
2. Table frame tool - used for entering text in table format
3. Word Art frame tool - used for entering fancy text (ex. curved, slanted, etc.)
4. Picture frame tool - used for placing pictures
5. Page Wizard tool - automated design assistants
6. Drawing tools (3) - creates drawings of various shapes

H. Modifying the Generic Chart Booklet Using Microsoft Publisher�
7
To modify the IMCI chart booklet, only the Text and Table frame tools will be used
since most of the chart elements are already laid out.
The Introduction to MS Publisher tutorial can be run at any time by clicking on the Help
menu. Other topics and demonstration programs helpful to beginners are also available
on the Help menu.
Modifying the generic IMCI chart booklets
Start the MS Publisher program if you have not already done so. The Start Up options
will automatically start. These are small programs that assist users in the preparation of
documents. For modifying the generic IMCI chart booklet, these options will not be
necessary. Click on Cancel to close the Start Up options.

H. Modifying the Generic Chart Booklet Using Microsoft Publisher�
8
Opening the IMCI chart booklet publication
Insert the IMCI chart booklet disk in drive A:
Click on File - Open Existing Publication.
Click on Drives and change it to drive letter A.
Under Publication Name click on the file name eng_lnd.pub the click OK.
Wait while the publication loads from the floppy disk. This can take some time. You
will notice that the green or red light on the drive will flash while the computer reads the
files.
If you are not using an HP LaserJet III printer, a warning that the printer has changed
will appear. This is a minor warning. Read the warning then click on OK to proceed.

H. Modifying the Generic Chart Booklet Using Microsoft Publisher�
9
Saving the IMCI chart booklet files to the hard disk
You will notice that working off a floppy disk is a very slow process. Therefore before
starting to modify the charts, first save the IMCI chart booklet files to the hard disk.
To save IMCI chart booklet files to the hard disk, click on the File menu, then click on
Save as.
Make sure there is an “X” in the check box Backup. If there is none, click on it. This
ensures that a backup file will be created each time the publication is saved.
Click on Drives and change it to drive letter C.
Under Directories change the directory to C:/mspub, then click on OK.

H. Modifying the Generic Chart Booklet Using Microsoft Publisher�
10
Controlling what you see using Zoom
DTP software such as MS Publisher shows as much as possible of the printed page on
the screen. Because the screen size is normally smaller than the printed page, the screen
image is usually too small for normal reading. Showing the full page, however, allows
you to view how the page is laid out. To increase the viewing size of the words, use
the Zoom control.
Click on the Zoom box at the bottom left of the screen. Choose the desired
magnification level. Selecting Full Page fits the whole page in one screen. Selecting
Fit to Selection shows only the currently selected area (i.e. blocked or shaded) in one
screen.
You may also click on the “+” or “-” buttons to increase or reduce magnification.
H. Modifying the Generic Chart Booklet Using Microsoft Publisher�
11
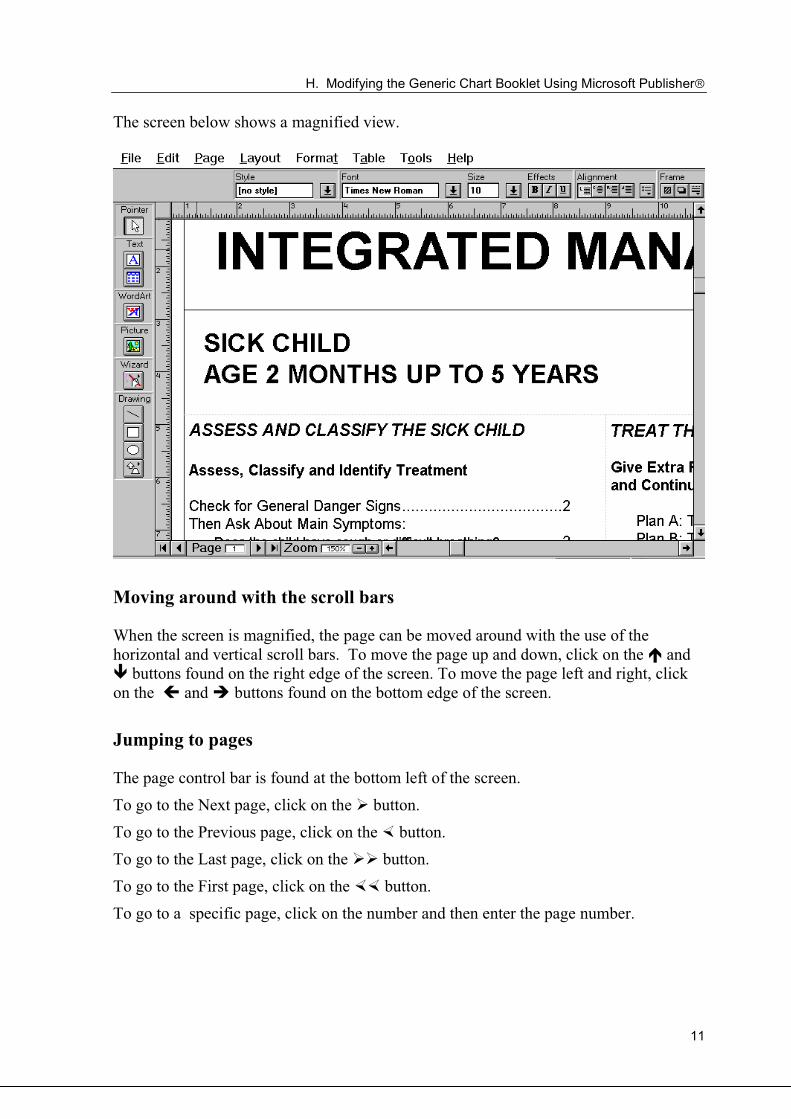
The screen below shows a magnified view.
Moving around with the scroll bars
When the screen is magnified, the page can be moved around with the use of the
horizontal and vertical scroll bars. To move the page up and down, click on the � and
� buttons found on the right edge of the screen. To move the page left and right, click
on the � and � buttons found on the bottom edge of the screen.
Jumping to pages
The page control bar is found at the bottom left of the screen.
To go to the Next page, click on the � button.
To go to the Previous page, click on the � button.
To go to the Last page, click on the �� button.
To go to the First page, click on the �� button.
To go to a specific page, click on the number and then enter the page number.
H. Modifying the Generic Chart Booklet Using Microsoft Publisher�
12
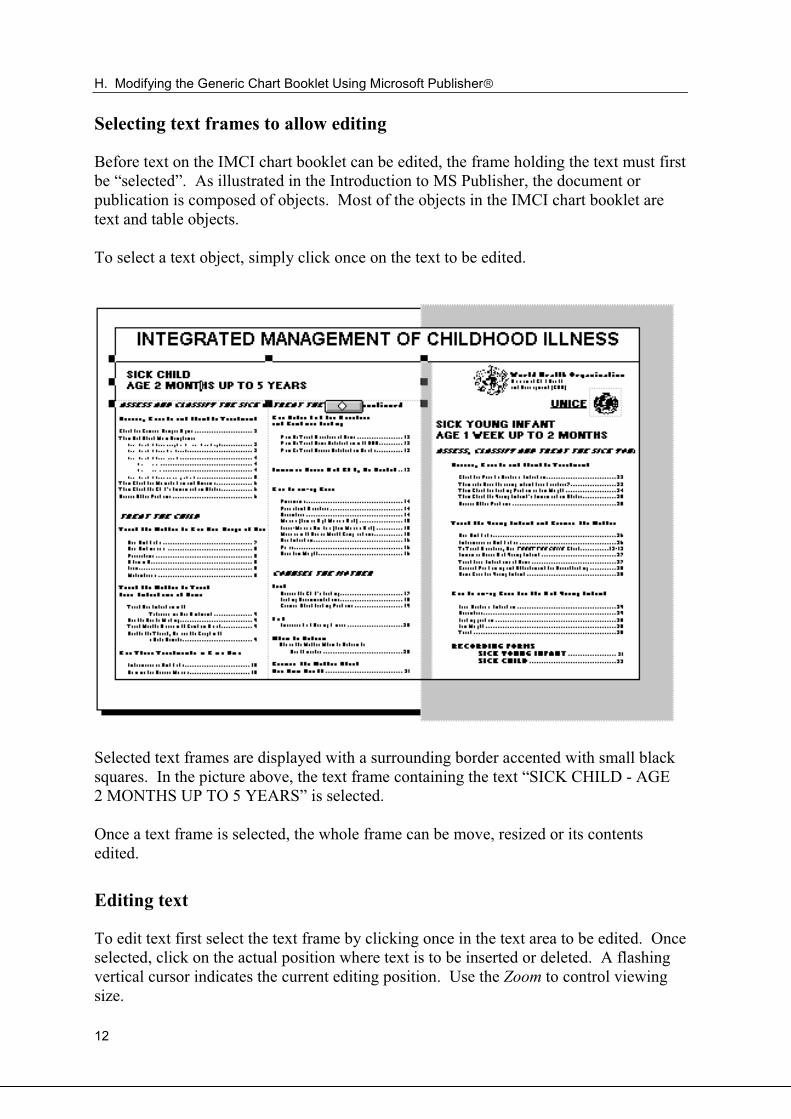
Selecting text frames to allow editing
Before text on the IMCI chart booklet can be edited, the frame holding the text must first
be “selected”. As illustrated in the Introduction to MS Publisher, the document or
publication is composed of objects. Most of the objects in the IMCI chart booklet are
text and table objects.
To select a text object, simply click once on the text to be edited.
Selected text frames are displayed with a surrounding border accented with small black
squares. In the picture above, the text frame containing the text “SICK CHILD - AGE
2 MONTHS UP TO 5 YEARS” is selected.
Once a text frame is selected, the whole frame can be move, resized or its contents
edited.
Editing text
To edit text first select the text frame by clicking once in the text area to be edited. Once
selected, click on the actual position where text is to be inserted or deleted. A flashing
vertical cursor indicates the current editing position. Use the Zoom to control viewing
size.

H. Modifying the Generic Chart Booklet Using Microsoft Publisher�
13
How to Undo your mistakes
If you make a mistake do not panic. Do not click the mouse or press the keyboard
wildly. You can undo a mistake by clicking on Edit-Undo. This command must be
given immediately after the mistake is done. If you continue working after the mistake,
it cannot be undone.
How to save your work
To save your work so far, click on the File menu then Save or press Ctrl+S.
How to set automatic reminder to save your work
It is recommended to save your work at periodic intervals, for example, every 15
minutes or so. This ensures that in the event of a power failure or a computer problem,
only a maximum of the last 15 minutes of your work is lost. To set automatic
reminders, click on the Tool-Options menu.
Click to put an “X” in the check box Remind To Save Publications. The time interval of
the reminder can be set by the user. The default 15 minute interval is sufficient. Note
that this option does not actually automatically save the file. It is simply a reminder that
work done in the last 15 minutes has not been saved. To save the file, click on the File
menu then Save or by pressing Ctrl+S.

H. Modifying the Generic Chart Booklet Using Microsoft Publisher�
14
Modifying the Generic IMCI Chart Booklet
Practicing how to change specific pages: List of changes to be made
# Page Heading / Location Change from Change to
1 1 left of WHO logo Add “HMG/NEPAL”
2 4 LOW MALARIA RISK table,row 1 column 3, last line
“Refer URGENTLY to hospital” “Refer URGENTLY to hospital with theslide”
3 6 THEN CHECK THECHILD’S IMMUNIZATIONSTATUS - VACCINE
Remove “OPV-0”
4 7 FOR DYSENTERY table,row 2 column 3
TABLET250 mg
TABLET500 mg
5 7 FOR CHOLERA table, row2, column 2
TABLET CAPSULE
6 7 FOR CHOLERA table, row4, column 2
“1/2” Delete “1/2” and shade cell
7 7 FOR DYSENTERY table Add column 4:
SYRUP300 mg per 5 ml
2-5 ml2.5 ml5.0 ml
8 8 Give Paracetamol... table,column 2
Delete whole column 2
9 8 Give Paracetamol... table Add column 3:
SYRUP(125 mg per 5 ml)
5 ml7.5 ml
10 10 Give Quinine... “Give Quinine for SevereMalaria”
“Give Quinine for Severe Malaria in HighMalaria Risk Areas”
11 10 Give Quinine... last bullet “If low risk of malaria, do notgive quinine to a child lessthan 4 months of age.”
Delete “If low risk of malaria, do not givequinine to a child less than 4 months ofage.”
12 18 2 Years and Older “Give family foods...” On the dotted lines, add “puffed rice withoil, roti, papaya, mango, popcorn,beans"
13 23 DYSENTERY, 3rd table,column 3
“Treat for 5 days with an oralantibiotic recommended forShigella in your area.
Follow-up in 2 days.”
Delete "Treat for 5 days with an oralantibiotic recommended for Shigella inyour area.
Follow-up in 2 days” and replace with“Refer URGENTLY to hospital”
14 26 Give First Dose... “Give first dose of bothbenzylpenicillin andgentamicin intramuscular.”
Delete “both benzylpenicillin and”
15 26 Give First Dose...table Delete whole third column“BENZYLPENICILLIN”
16 29 DYSENTERY box Delete whole DYSENTERY box
17 33 DOES THE CHILD HAVEFEVER
“Decide Malaria Risk: HighLow”
Add “No” to read “Decide Malaria Risk:High Low No”
18 33 CHECK THE CHILD’SIMMUNIZATION STATUS
“CHECK THE CHILD’SIMMUNIZATION STATUS”
Add text to read “CHECK THECHILD’S IMMUNIZATION, VITAMIN AAND DEWORMING STATUS”
19 33 CHECK THE CHILD’SIMMUNIZATION STATUS
Delete “OPV 0”

H. Modifying the Generic Chart Booklet Using Microsoft Publisher�
15
Modifying the Generic IMCI Chart Booklet
Practicing how to change specific pages: Step-by-step instructions
Change #1
1 left of WHO logo Add “HMG/NEPAL”
� Click on the Text Frame tool. The pointer should change to a “+” when pointed
inside the document.
� Position the pointer to the left of the WHO logo.
� Press mouse button and do not release. Draw a box then release mouse button.
� Type “HMS/NEPAL”.
� Block the newly typed text “HMS/NEPAL by pointing before the letter “H”, then
press mouse without releasing and drag up to after the letter “L”.
� Change the font to Arial 14 by pointing to the Font icon. Select Arial from the
Font list and type 14 in the Size box.
� If the text “HMS/NEPAL” does not fit in the text box, resize the text box by
pointing in one of the “ears” of the text box. There are 6 ears in every text box.
The pointer will change to a “RESIZE” icon. Pull the ears outward until the text
“HMS/NEPAL” fit properly in the text box.
� If the “HMS/NEPAL” text box is blocking some text or logo or border, move the
text box into an unoccupied area.
� To move a text box, point in any of the lines connecting the ears. The pointer will
change into a TRUCK icon with the word MOVE. Press mouse button and drag
the text box into an unoccupied area.
Change #2
4 LOW MALARIA RISKtable, row 1 column 3,last line
“Refer URGENTLY tohospital”
“Refer URGENTLY to hospital with theslide”
� Go to page 4. Click on the right arrow sign of the Page Button found at the lower
left part of the screen .
� Click on the LOW MALARIA RISK table, row 1, column 3.
� If the characters are not visible, increase the zoom by clicking on the “+” sign in
the Zoom button found at the lower left part of the screen.
� Position the cursor after the text “Refer URGENTLY to hospital” and type “withthe slide”.

H. Modifying the Generic Chart Booklet Using Microsoft Publisher�
16
Change #3
6 THEN CHECK THECHILD’S IMMUNIZATIONSTATUS – VACCINE
Remove “OPV-0”
� Go to page 6.
� Click on the THEN CHECK THE CHILD’S IMMUNIZATION STATUS -
VACCINE box.
� Position the cursor just before the text “OPV-O” then delete this text by pressingthe <Delete> key. If the text becomes disarranged you can “undo” the last action
by clicking on <Edit-Undo>.
Change #4
7 FOR DYSENTERY table,row 2 column 3
TABLET250 mg
TABLET500 mg
� Go to page 7.
� Click on the FOR DYSENTERY table, row 2, column 3 cell.
� Change the text “250” to “500”.

H. Modifying the Generic Chart Booklet Using Microsoft Publisher�
17
Change #7
7 FOR DYSENTERY table Add column 4:
SYRUP300 mg per 5 ml
2-5 ml2.5 ml5.0 ml
� Go to page 7.
� Click on the FOR DYSENTERY table.
� Point anywhere the 3rd column then click once.
� To add a 4th column click on <Table> <Insert Row or Columns>
� On the selection box, click on <Columns> and <After Selected Cells>, then
<OK>.
� A 4th column will be added. It may spill over the printable page. This can be
adjusted later.
� Type the contents of the cells as indicated above.

H. Modifying the Generic Chart Booklet Using Microsoft Publisher�
18
To make 4th column fit on the printable page, adjust the column widths of the other
columns. When selected, a table is bounded by a gray colored boundary on both axes.
The divisions on the gray axes determine the column widths and row heights which can
be dragged to adjust them.
� Point anywhere on the horizontal gray border. The arrow icon changes into ahand.
� Move the hand so that it points into the first column division. The hand changesinto a double sided arrow with the words “ADJUST”.
� Press mouse then drag to left or right to adjust column width.
� Do the same for the other columns so that all 4 columns fit into the printable page.
Change #8
8 Give Paracetamol...table, column 2
Delete whole column 2
� Go to page 8.
� Point to Give Paracetamol... table, column 2.
� To delete the 2nd column click on <Table> <Delete Rows or Columns> <CurrentColumn>.
...oOo...

The 2001 working draft of the IMCI Adaptation Guide consists of the followingsections:
Section A. The Adaptation Process
Section B. Procedures for Adapting the Charts and Modules
Section C. Technical Basis for Adapting the Clinical Guidelines,Feeding Recommendations and Local Terms
Section D. Protocol for Adapting the Feeding Recommendations
Section E. Protocol for Identifying and Validating Local Terms
Section F. Protocol for Designing and Pretesting an Adapted Mother’s Card
Section H. Modifying the Generic Chart Booklet: Using Microsoft Publisher�
Please provide comments and further input to WHO/CAH, Geneva, Switzerland.

19
HMG/NEPAL

20
4
with the slide
4

21
6

22
SYRUP
300 mg per 5 ml
2.5 ml
2.5 ml
5.0 ml

23 8
SYRUP (125/5 ml)
5 ml
7.5 ml

24
10
i,n High MalariaRisk Areas

25
18
PUFFED RICE WITH OIL
ROTI, PAPAYA,
MANGO, POPCORN,BEANS

26
23
Refer URGENTLYto hospital

27
26
( )

28
29

29
33
No
IMMUNIZATION, VITAMIN A ANDDEWORMING STATUS