ThinkPad T40ps-2.kev009.com/pccbbs/mobiles_pdf/39t2358.pdf · ibm . .: .: ( .. . . .

1


iii

Note
Before using this information and the product it supports, be sure to read the general information under “Notices”on page 153.
First Edition (August 1997)
The following paragraph does not apply to the United Kingdom or any country where such provisions areinconsistent with local law:INTERNATIONAL BUSINESS MACHINES CORPORATION PROVIDES THIS PUBLICATION “AS IS” WITHOUT ANYWARRANTY OF ANY KIND, EITHER EXPRESS OR IMPLIED, INCLUDING, BUT NOT LIMITED TO, THE LIMITEDWARRANTIES OF MERCHANTABILITY OR FITNESS FOR A PARTICULAR PURPOSE. Some states do not allowdisclaimers or express or implied warranties in certain transactions; therefore, this statement may not apply to you.
This publication could include technical inaccuracies or typographical errors. Changes are periodically made to theinformation herein; these changes will be incorporated in new editions of the publication. IBM may makeimprovements or changes in the products or the programs described in this publication at any time.
Requests for technical information about IBM products should be made to your IBM Authorized Dealer or your IBMMarketing Representative.
Copyright International Business Machines Corporation 1997. All rights reserved. Note to US GovernmentUsers – Documentation related to restricted rights – Use, duplication or disclosure is subject to restrictions set forth inGSA ADP Schedule Contract with IBM Corp.

Thank You for Selectingan IBM ThinkPad 560X Computer
The thin and light IBM ThinkPad 560X computeris designed to be convenient
for your mobile computing needs.We hope you enjoy its fast processing power,
brilliant and colorful TFT LCD display,audio capabilities, and infrared communication.
v

Functional Highlights
Ultra portabilityThe slim 1.9 kilogram computer has excellently portability, especiallywhen you are traveling. The computer can assist you in yourbusiness anytime and anywhere.
High-speed processorThe Intel MMX Pentium processor enables high-speed dataprocessing and advanced performance.
Large-capacity Hard Disk DriveThe 2.5-inch 4.0 GB* hard disk drive can respond to a wide variety ofyour business demands.
Large SVGA color LCDThe 12.1-inch TFT (thin-film transistor) display offers 256,144 colorsat 800-by-600 resolution.
Lithium-Ion battery packThe large-capacity lithium-ion battery pack further extends theoperating time of the computer, further contributing to ultra portability.
AudioThe audio feature supports the following:
Wave audio recording and playback of up to 16 bits, stereo, and44 KHz sampling.DOS games using the Sound Blaster** interface.
PC Card SupportThe computer provides two PC Card slots that accept a 16-bit PCCard, CardBus Card, and Zoomed Video Card.
* Gigabyte, one billion (10 ) bytes.
vi IBM ThinkPad 560X User's Guide

Icons Used in This Book
For procedures or information unique to the operating systeminstalled in your computer:
Information for IBMOperating System/2(OS/2) users.
Information for IBM DOSusers.
Information for MicrosoftWindows 3.11 users.
Information for MicrosoftWindows NT users.
Information for MicrosoftWindows 95 users.
vii

Safety Information
DANGER
Do not disassemble, incinerate, or short-circuit therechargeable battery pack. Do not put it in trash that isdisposed of in landfills. Dispose of it as required bylocal ordinances or regulations. In the United States,call IBM at 1-800-IBM-4333 for information on disposal.
CAUTION:The lithium battery (IBM P/N 12J1695 UL-recognizedcomponent—File No. MH12210) can be replaced only by yourdealer or an IBM service representative. It contains lithium andcan explode if not properly used, handled, or disposed of. Donot: (1) throw or immerse into water, (2) heat to more than100°C (212°F), or (3) repair or disassemble. Dispose of it asrequired by local ordinances or regulations.
CAUTION:The fluorescent lamp in the liquid crystal display (LCD) containsmercury. Do not put it in trash that is disposed of in landfills.Dispose of it as required by local ordinances or regulations.
The LCD is made of glass, and rough handling or dropping thecomputer can cause the LCD to break. If the LCD breaks andthe internal fluid gets into your eyes or on your hands,immediately wash the affected areas with water for at least 15minutes; then get medical care if any symptoms are presentafter washing.
viii IBM ThinkPad 560X User's Guide

ix

x IBM ThinkPad 560X User's Guide

Contents
Functional Highlights . . . . . . . . . . . . . . . . . . . . . . . . . . viSafety Information . . . . . . . . . . . . . . . . . . . . . . . . . . viii
Chapter 1. Getting Familiar with Your Computer . . . . . . . 1Identifying the Hardware Features . . . . . . . . . . . . . . . . . . 2System-Status Indicators . . . . . . . . . . . . . . . . . . . . . . . 6ThinkPad Features . . . . . . . . . . . . . . . . . . . . . . . . . . . 8
Attaching the External Diskette Drive . . . . . . . . . . . . . . . 8Keyboard Functions . . . . . . . . . . . . . . . . . . . . . . . . 10ThinkPad Utilities . . . . . . . . . . . . . . . . . . . . . . . . . 15Online Book . . . . . . . . . . . . . . . . . . . . . . . . . . . . 25
Backing Up Your System . . . . . . . . . . . . . . . . . . . . . . 26Recovery CD (Windows 95 Only) . . . . . . . . . . . . . . . . 26Diskette Factory . . . . . . . . . . . . . . . . . . . . . . . . . . 26
Keeping Your Computer from Being Damaged . . . . . . . . . . 26
Chapter 2. Using Battery Power . . . . . . . . . . . . . . . . . 28Using the Battery Pack . . . . . . . . . . . . . . . . . . . . . . . 29
Charging the Battery Pack . . . . . . . . . . . . . . . . . . . . 29Monitoring the Battery Status . . . . . . . . . . . . . . . . . . 29
Saving Battery Power . . . . . . . . . . . . . . . . . . . . . . . . 33Using the Power-Saving Modes . . . . . . . . . . . . . . . . . 33Customizing the Power Management . . . . . . . . . . . . . . 38Considerations When Using a Power Management Mode . . 40Using Other Battery Saving Methods . . . . . . . . . . . . . . 45
Replacing the Battery Pack . . . . . . . . . . . . . . . . . . . . . 46
Chapter 3. Protecting Your Computer . . . . . . . . . . . . . 49Using Passwords . . . . . . . . . . . . . . . . . . . . . . . . . . . 50
Entering a Password . . . . . . . . . . . . . . . . . . . . . . . 50Setting a Password . . . . . . . . . . . . . . . . . . . . . . . . 51Changing and Removing a Password . . . . . . . . . . . . . 54
Using the Personalization Editor . . . . . . . . . . . . . . . . . . 60Using Locks . . . . . . . . . . . . . . . . . . . . . . . . . . . . . . 64
Chapter 4. Using the Advanced Features of Your ThinkPad 65Increasing Memory . . . . . . . . . . . . . . . . . . . . . . . . . . 66
Installing the Memory Option . . . . . . . . . . . . . . . . . . 66Using an External Pointing Device . . . . . . . . . . . . . . . . . 70
Disabling the TrackPoint III . . . . . . . . . . . . . . . . . . . 74
Copyright IBM Corp. 1997 xi
Switching between the LCD and an External Monitor . . . . . . 75Attaching the Monitor . . . . . . . . . . . . . . . . . . . . . . . 75Using SVGA Video Mode . . . . . . . . . . . . . . . . . . . . 79
Using a PC Card . . . . . . . . . . . . . . . . . . . . . . . . . . . 81Installing the PC Card . . . . . . . . . . . . . . . . . . . . . . 82Installing the PC Card Modem . . . . . . . . . . . . . . . . . . 87Using CardWorks** . . . . . . . . . . . . . . . . . . . . . . . . 90
Using the Audio Features . . . . . . . . . . . . . . . . . . . . . . 98Using the 3D Sound Retrieval System (SRS) Function . . . 99
Using Infrared Communication . . . . . . . . . . . . . . . . . . . 101
Chapter 5. Solving Computer Problems . . . . . . . . . . . . 103Frequently Asked Questions . . . . . . . . . . . . . . . . . . . . 104Hints, Tips, and Limitations . . . . . . . . . . . . . . . . . . . . . 105Troubleshooting Guide . . . . . . . . . . . . . . . . . . . . . . . . 106Troubleshooting Charts . . . . . . . . . . . . . . . . . . . . . . . 107
Error Codes or Screen Messages . . . . . . . . . . . . . . . . 108No Error Codes or Screen Messages . . . . . . . . . . . . . 112Input Problems . . . . . . . . . . . . . . . . . . . . . . . . . . 113Suspend or Hibernation Problems . . . . . . . . . . . . . . . 114LCD Problems . . . . . . . . . . . . . . . . . . . . . . . . . . . 117Indicator Problems . . . . . . . . . . . . . . . . . . . . . . . . 118Battery Problems . . . . . . . . . . . . . . . . . . . . . . . . . 118Infrared Communication Problems . . . . . . . . . . . . . . . 119A Universal Serial Bus (USB) Problem . . . . . . . . . . . . . 120PC Card Problems . . . . . . . . . . . . . . . . . . . . . . . . 120Printer Problems . . . . . . . . . . . . . . . . . . . . . . . . . . 122External Monitor Problems . . . . . . . . . . . . . . . . . . . . 122Other Option Problems . . . . . . . . . . . . . . . . . . . . . . 124Software Problems . . . . . . . . . . . . . . . . . . . . . . . . 125Other Problems . . . . . . . . . . . . . . . . . . . . . . . . . . 125
Testing Your Computer . . . . . . . . . . . . . . . . . . . . . . . 126Recovering Lost or Damaged Software . . . . . . . . . . . . . . 128
Using the Diskette Factory . . . . . . . . . . . . . . . . . . . . 128Using the Recovery CD (Windows 95 Only) . . . . . . . . . . 130
Chapter 6. Getting Service . . . . . . . . . . . . . . . . . . . . 131Information on Your ThinkPad . . . . . . . . . . . . . . . . . . . 132
Option List . . . . . . . . . . . . . . . . . . . . . . . . . . . . . 132Identification Numbers . . . . . . . . . . . . . . . . . . . . . . 132
xii IBM ThinkPad 560X User's Guide
Problem Recording Sheet . . . . . . . . . . . . . . . . . . . . 133HelpWare Customer Support and Service . . . . . . . . . . . 134
Help by Telephone . . . . . . . . . . . . . . . . . . . . . . . . 134ThinkPad EasyServ . . . . . . . . . . . . . . . . . . . . . . . . 135Getting Help around the World . . . . . . . . . . . . . . . . . 135Fax Information . . . . . . . . . . . . . . . . . . . . . . . . . . 135Electronic Support Services . . . . . . . . . . . . . . . . . . . 136
Purchasing Additional Services . . . . . . . . . . . . . . . . . . . 137Enhanced PC Support Line . . . . . . . . . . . . . . . . . . . 137Client Support Line . . . . . . . . . . . . . . . . . . . . . . . . 138Network and Server Support Line . . . . . . . . . . . . . . . . 138Ordering Support Line Services . . . . . . . . . . . . . . . . . 138Warranty and Repair Services . . . . . . . . . . . . . . . . . . 139
Obtaining IBM Operating System Updates . . . . . . . . . . . . 140Getting Update Diskettes . . . . . . . . . . . . . . . . . . . . . 140Ordering Publications . . . . . . . . . . . . . . . . . . . . . . . 140
Appendix A. Features and Specifications . . . . . . . . . . . 141Features . . . . . . . . . . . . . . . . . . . . . . . . . . . . . . . . 141Specifications . . . . . . . . . . . . . . . . . . . . . . . . . . . . . 143IBM Power Cords . . . . . . . . . . . . . . . . . . . . . . . . . . . 144
Appendix B. Ergonomics Information . . . . . . . . . . . . . 147
Appendix C. Product Warranties and Notices . . . . . . . . 149Notices . . . . . . . . . . . . . . . . . . . . . . . . . . . . . . . . . 153
Trademarks . . . . . . . . . . . . . . . . . . . . . . . . . . . . 153Electronic Emission Notice . . . . . . . . . . . . . . . . . . . . . 154
Glossary . . . . . . . . . . . . . . . . . . . . . . . . . . . . . . . 156
Index . . . . . . . . . . . . . . . . . . . . . . . . . . . . . . . . . . 160
Contents xiii

xiv IBM ThinkPad 560X User's Guide

Chapter 1. Getting Familiar with Your Computer
This chapter provides basic information about your computer.
Identifying the Hardware Features . . . . . . . . . . . . . . . . . . 2System-Status Indicators . . . . . . . . . . . . . . . . . . . . . . . 6ThinkPad Features . . . . . . . . . . . . . . . . . . . . . . . . . . . 8
Attaching the External Diskette Drive . . . . . . . . . . . . . . . 8Keyboard Functions . . . . . . . . . . . . . . . . . . . . . . . . 10
TrackPoint III . . . . . . . . . . . . . . . . . . . . . . . . . . 10Fn Key Function . . . . . . . . . . . . . . . . . . . . . . . . 12Numeric Keypad . . . . . . . . . . . . . . . . . . . . . . . . 14
ThinkPad Utilities . . . . . . . . . . . . . . . . . . . . . . . . . 15ThinkPad Configuration Program . . . . . . . . . . . . . . 15Easy-Setup . . . . . . . . . . . . . . . . . . . . . . . . . . . 21
Online Book . . . . . . . . . . . . . . . . . . . . . . . . . . . . 25Backing Up Your System . . . . . . . . . . . . . . . . . . . . . . 26
Recovery CD (Windows 95 Only) . . . . . . . . . . . . . . . . 26Diskette Factory . . . . . . . . . . . . . . . . . . . . . . . . . . 26
Keeping Your Computer from Being Damaged . . . . . . . . . . 26
Copyright IBM Corp. 1997 1

Getting Familiar with Your Computer
Identifying the Hardware Features
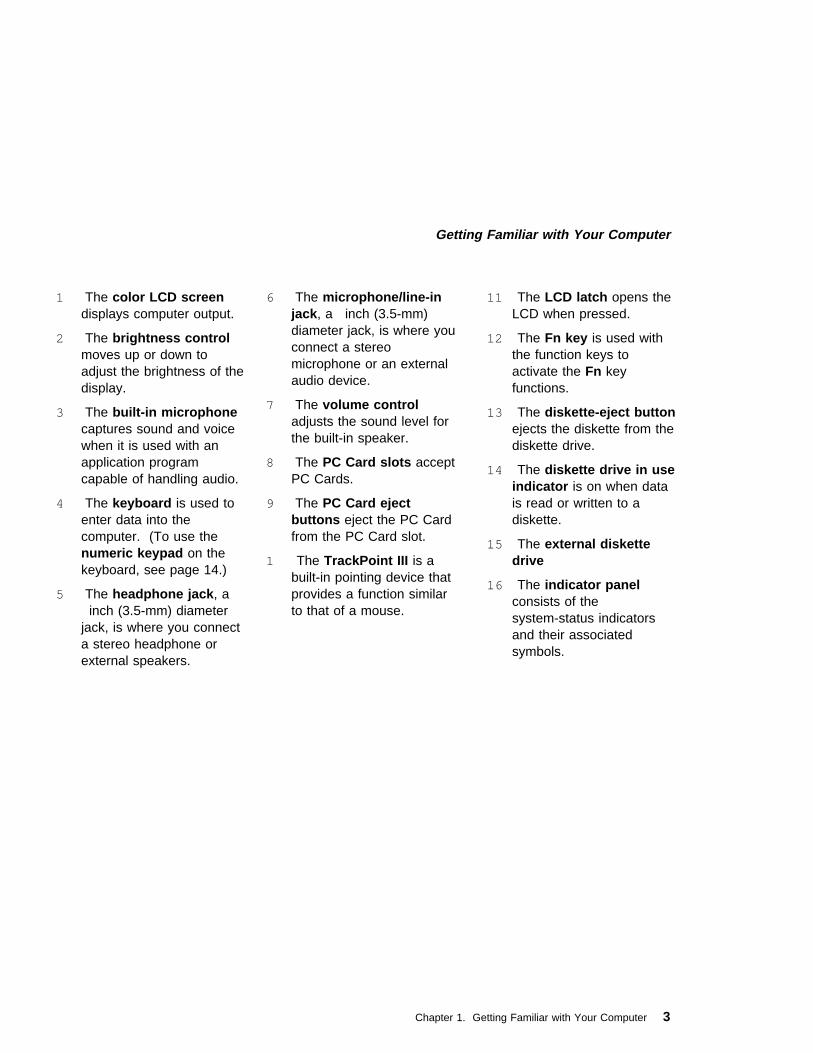
Front View
2 IBM ThinkPad 560X User's Guide
Getting Familiar with Your Computer
1 The color LCD screendisplays computer output.
2 The brightness controlmoves up or down toadjust the brightness of thedisplay.
3 The built-in microphonecaptures sound and voicewhen it is used with anapplication programcapable of handling audio.
4 The keyboard is used toenter data into thecomputer. (To use thenumeric keypad on thekeyboard, see page 14.)
5 The headphone jack , ainch (3.5-mm) diameter
jack, is where you connecta stereo headphone orexternal speakers.
6 The microphone/line-injack , a inch (3.5-mm)diameter jack, is where youconnect a stereomicrophone or an externalaudio device.
7 The volume controladjusts the sound level forthe built-in speaker.
8 The PC Card slots acceptPC Cards.
9 The PC Card ejectbuttons eject the PC Cardfrom the PC Card slot.
1 The TrackPoint III is abuilt-in pointing device thatprovides a function similarto that of a mouse.
11 The LCD latch opens theLCD when pressed.
12 The Fn key is used withthe function keys toactivate the Fn keyfunctions.
13 The diskette-eject buttonejects the diskette from thediskette drive.
14 The diskette drive in useindicator is on when datais read or written to adiskette.
15 The external diskettedrive
16 The indicator panelconsists of thesystem-status indicatorsand their associatedsymbols.
Chapter 1. Getting Familiar with Your Computer 3
Getting Familiar with Your Computer
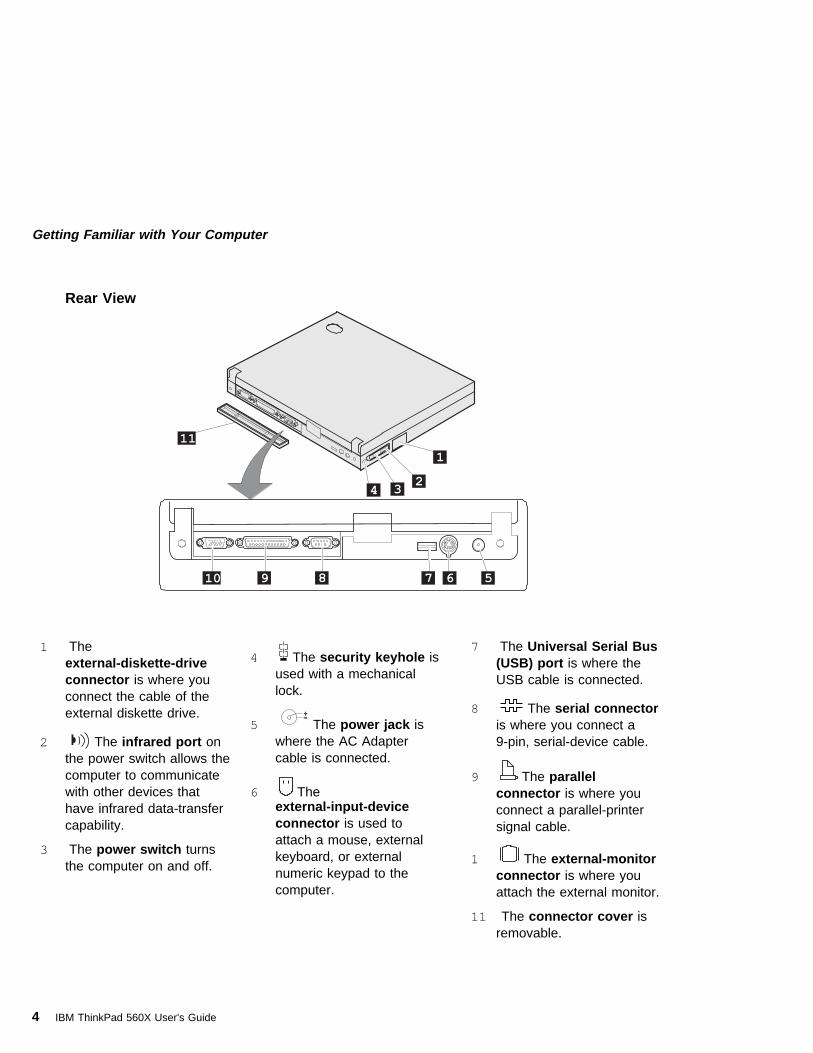
Rear View
1 Theexternal-diskette-driveconnector is where youconnect the cable of theexternal diskette drive.
2 The infrared port onthe power switch allows thecomputer to communicatewith other devices thathave infrared data-transfercapability.
3 The power switch turnsthe computer on and off.
4 The security keyhole isused with a mechanicallock.
5 --++ The power jack is
where the AC Adaptercable is connected.
6 Theexternal-input-deviceconnector is used toattach a mouse, externalkeyboard, or externalnumeric keypad to thecomputer.
7 The Universal Serial Bus(USB) port is where theUSB cable is connected.
8 The serial connectoris where you connect a9-pin, serial-device cable.
9 The parallelconnector is where youconnect a parallel-printersignal cable.
1 The external-monitorconnector is where youattach the external monitor.
11 The connector cover isremovable.
4 IBM ThinkPad 560X User's Guide

Getting Familiar with Your Computer
Bottom View (with Battery Installed)
1 The expansion connectoris where you attach a portreplicator (available as anoption).
2 The power shutdownswitch is used to turn thecomputer off when anapplication locks up or thecomputer will not acceptany input. Use the tip of apen to press this switch.
3 The memory slot acceptsa dual inline memorymodule (DIMM) option.
4 The memory-slot covercovers the memory slot.
5 The battery pack is abuilt-in power source forthe computer.
6 The battery-pack latchlocks or releases thebattery pack.
Chapter 1. Getting Familiar with Your Computer 5
Getting Familiar with Your Computer
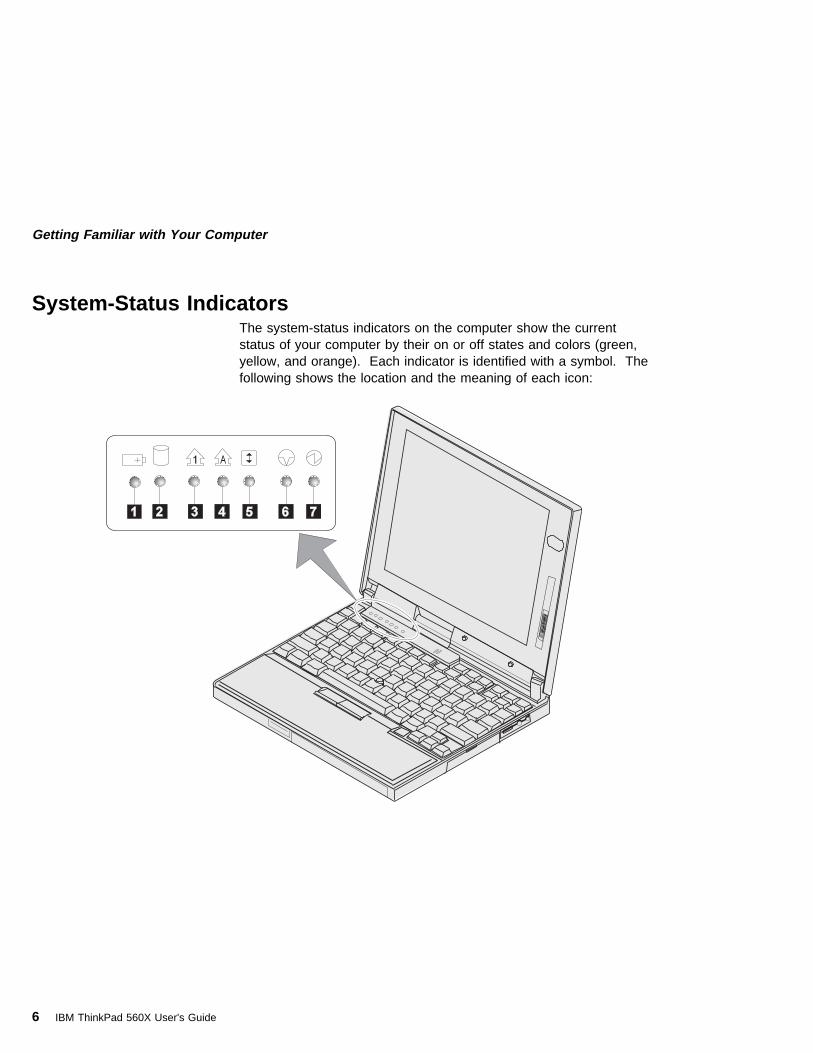
System-Status IndicatorsThe system-status indicators on the computer show the currentstatus of your computer by their on or off states and colors (green,yellow, and orange). Each indicator is identified with a symbol. Thefollowing shows the location and the meaning of each icon:
6 IBM ThinkPad 560X User's Guide

Getting Familiar with Your Computer
Symbol Color Meaning
1 Battery Green Enough battery power remains for operation.
Orange The battery pack is being charged.
Blinkingorange
The battery pack needs charging. If the indicatorstarts blinking orange, the computer beeps threetimes.
2 Hard disk in use Orange Data is being read from or written to the hard disk.Do not enter suspend mode or turn off the computerwhen this indicator is on.
3 Numeric lock Green The numeric keypad on the keyboard is enabled. Youenable or disable the keypad by pressing and holdingthe Shift key, and pressing the NumLk key. Fordetails, see “Numeric Keypad” on page 14.
4 Caps lock Green The Caps Lock mode is enabled. All alphabeticcharacters (A–Z) are entered in capital letters withoutusing the Shift key. You enable or disable the CapsLock mode by pressing the Caps Lock key.
5 Scroll lock Green Scroll Lock mode is enabled. The Arrow keys can beused as screen-scroll function keys. The cursorcannot be moved with the Arrow keys. Not allapplication programs support this function. Youenable or disable Scroll Lock mode by pressing theScrLk key.
6 Suspend mode Green The computer is in suspend mode. (See page 33 fordetails.)
Blinkinggreen
The computer is entering suspend mode orhibernation mode, or is resuming normal operation.
7 Power on Green Indicates that the computer is operational. Thisindicator is on when the computer is on and not insuspend mode.
Chapter 1. Getting Familiar with Your Computer 7
Getting Familiar with Your Computer
ThinkPad FeaturesYour ThinkPad Model 560X computer features a diskette drive that isattached externally. Your computer also has unique keyboardfunctions and utility programs for easy configuration. This sectiondescribes the following features:
External diskette drive
Keyboard
ThinkPad utilities
Online book
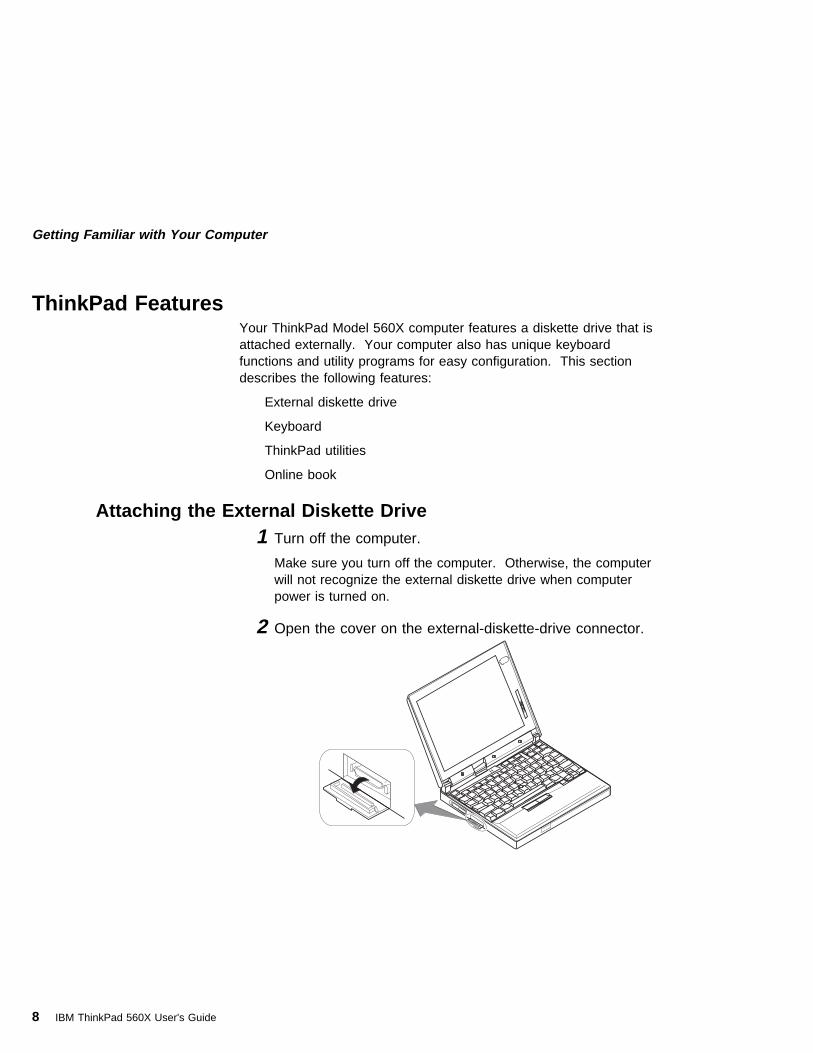
Attaching the External Diskette Drive1 Turn off the computer.
Make sure you turn off the computer. Otherwise, the computerwill not recognize the external diskette drive when computerpower is turned on.
2 Open the cover on the external-diskette-drive connector.
8 IBM ThinkPad 560X User's Guide

Getting Familiar with Your Computer
3 Attach the cable to the external diskette drive; then to theexternal-diskette-drive connector on the side of thecomputer.
Press the sides of the connector 1 as you connect it to thedevices 2 .
4 Turn on the computer.
Chapter 1. Getting Familiar with Your Computer 9

Getting Familiar with Your Computer
Keyboard FunctionsYour ThinkPad computer's keyboard has the following functions:
TrackPoint IIIFn key Function
Numeric Keypad
TrackPoint IIIThe keyboard contains a unique cursor-pointing device called theTrackPoint III. Pointing, selecting, and dragging all become part of asingle process you can perform without moving your fingers fromtheir typing position.
The TrackPoint III consists of a stick on the keyboard and a pair ofclick buttons below the keyboard. Movement of the pointer on thescreen is controlled by the amount of pressure you apply to thenonslip cap on the stick in any direction parallel to the keyboard; thestick itself does not move. The speed at which the pointer movescorresponds to the applying pressure you apply to the stick. Thefunction of the click buttons depends on the software you are using.
Note: No other software is required for the TrackPoint III; it works with the PS/2mouse driver.
10 IBM ThinkPad 560X User's Guide

Getting Familiar with Your Computer
If you are not familiar with using the TrackPoint III, these instructionswill help you get started:
1 Place your hands in the typing position and press gentlyon the stick with either index finger in the direction youwant the pointer to move.
Pressing the stick away from you moves the pointer up thescreen; pressing it toward you moves the pointer down thescreen. You can also move the pointer side to side bypressing sideways.
2 Press the click buttons with either thumb to select anddrag as required by your software, as with any otherpointing device.
Note: The pointer may drift. This is not a defect. Do not use the TrackPointIII until the pointer stops moving.
Chapter 1. Getting Familiar with Your Computer 11

Getting Familiar with Your Computer
Changing the Cap
The cap 1 on the end of the TrackPoint III is removable. Youcan replace it with one of the spares shipped with your computer.
Fn Key FunctionThe Fn key function allows you to change operational featuresinstantly. When you use the following functions, press and hold theFn key 1 ; then press the appropriate function key 2 (F1 to F12).
1
2
12 IBM ThinkPad 560X User's Guide

Getting Familiar with Your Computer
The Fn Key Lock Function
You can set up your computer so that you need to press Fn onlyonce to get the same effect as when you press and hold Fn.With this setup, after you press a function key in the top row, Fnreturns to its normal state. Set up the Fn key this way, select the
Accessibility ( ) button in the ThinkPad Configurationprogram window, or type PS2 FNS E at the command prompt.
Function keys not shown in the following table have no function.
KeyCombination
Feature Meaning
Fn + F2
(Only for OS/2or Windowsusers)
Fuel-Gaugedisplay on or off
The Fuel-Gauge program must be activated before you can use thiskey combination.
If you press this key combination, the window for the battery powerstatus appears or disappears. You can set parameters for powerstatus in the window.
Fn + F 3 Standby mode The computer enters standby mode. For more information aboutthis mode, see “Using the Power-Saving Modes” on page 33.
Fn + F4 Suspend mode The computer enters suspend mode. For more information aboutthis mode, see “Using the Power-Saving Modes” on page 33.
Fn + F 7LCD/externalmonitor switching
Computer output is displayed in the following order when anexternal monitor is attached.
Fn + Power modeswitching
During battery-power operation, the power mode changes asfollows:
Fn + F12 Hibernation mode The computer enters hibernation mode. See “Using thePower-Saving Modes” on page 33 for more information.
Chapter 1. Getting Familiar with Your Computer 13

Getting Familiar with Your Computer
Numeric KeypadThe keyboard has some keys that, when enabled, work as if theywere a 10-key numeric keypad. (The numeric keypad on thekeyboard is not active when the external keyboard or the externalnumeric keypad is attached to the computer.)
To enable or disable the numeric keypad, press and hold Shift andthen press NumLk .
//
..00
11 22 33
44 55 66
77 88 99
++
--
*
NumLk
6
Y
F8 F9 F10
Shift
Alt Ctrl
F11 F12
H
N <
_
{
"
When the numeric keypad is enabled, press and hold Shift totemporarily use the cursor- and screen-control keys.
NumLk
DelDelInsIns
EndEnd
HomeHome
PgDnPgDn
PgUpPgUp //
--
++
*
6
Y
F8 F9 F10
Shift
Alt Ctrl
F11 F12
H
N <
_
{
"
Note: The functions of the numeric keypad are printed on the front of the keys.
Note: The functions of the cursor- and screen-control keys are not printed on thekeys.
14 IBM ThinkPad 560X User's Guide

Getting Familiar with Your Computer
ThinkPad UtilitiesYour ThinkPad computer has the following utility programs for easyconfiguration:
ThinkPad Configuration program Easy-Setup
This section summarizes these utilities.
ThinkPad Configuration ProgramThe ThinkPad Configuration program allows you to set up andcustomize the computer's built-in devices to your needs, for example,you can enable or disable a port, switch between your computer'sLCD and an external monitor, and set the power management mode.
This section describes how to start the ThinkPad Configurationprogram.
For Windows 95:
To start the ThinkPad Configuration program for Windows 95:
1 Click on Start .
2 Move the cursor on Programs , ThinkPad ; then click onThinkPad Configuration .
The following window appears:
Chapter 1. Getting Familiar with Your Computer 15

Getting Familiar with Your Computer
1 The Power Mode buttonsClick on one of these buttons to set the power mode to highperformance mode, automatic mode, or customized mode.
2 The Display Device buttonsClick on one of these buttons to set the display output type tothe LCD, external monitor, or both. When making apresentation, you can click on the presentation button to disableany system timers, such as the LCD turn-off timer or the powermanagement mode timers.
3 The Help button displays online help.
4 The View Angle buttonsClick on the front view or rear view buttons to display thehardware feature locations.
5 The Device buttonsClick on the button of your choice from the window.When the device is enabled, the red indicator next to the buttonis lit. Otherwise, it stays off.
Only the top portion of the window is displayed if you click on thetriangular minimize button in the top-right corner.
16 IBM ThinkPad 560X User's Guide
Getting Familiar with Your Computer
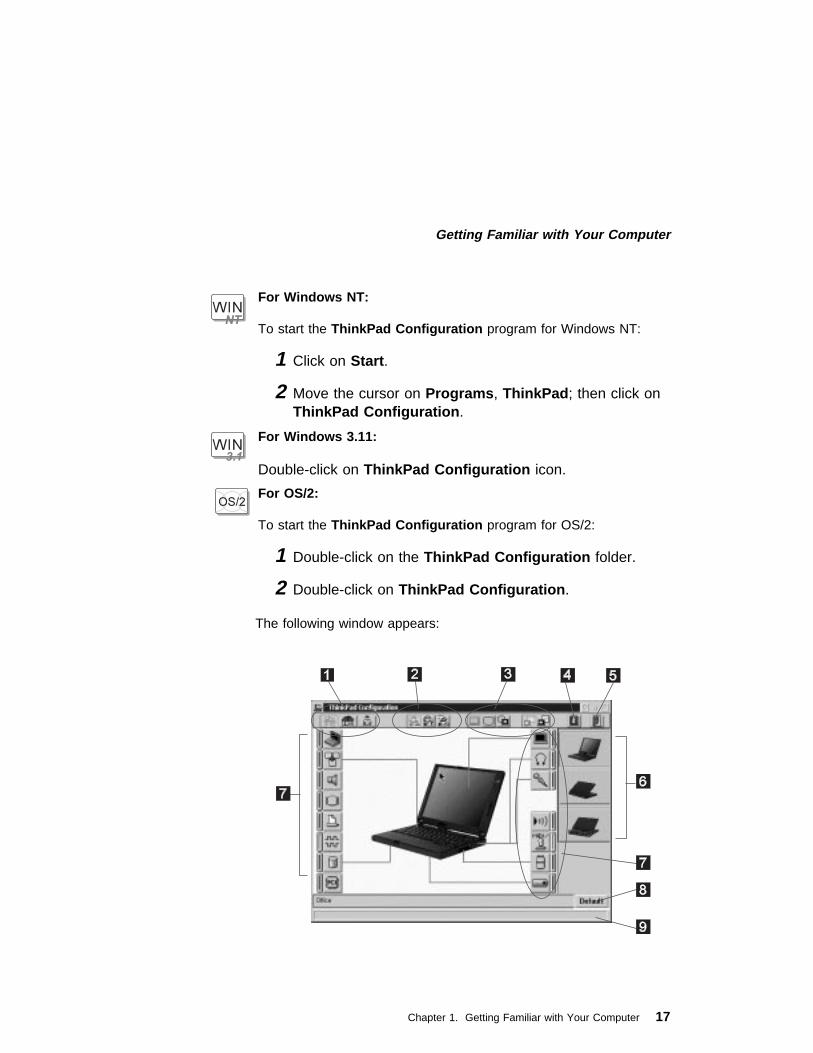
For Windows NT:
To start the ThinkPad Configuration program for Windows NT:
1 Click on Start .
2 Move the cursor on Programs , ThinkPad ; then click onThinkPad Configuration .
For Windows 3.11:
Double-click on ThinkPad Configuration icon.
For OS/2:
To start the ThinkPad Configuration program for OS/2:
1 Double-click on the ThinkPad Configuration folder.
2 Double-click on ThinkPad Configuration .
The following window appears:
Chapter 1. Getting Familiar with Your Computer 17

Getting Familiar with Your Computer
1 The One-Touch Setup buttonsClick on one of these buttons to set the system configuration.
2 The Power Mode buttonsClick on one of these buttons to set the power mode to highperformance mode, automatic mode, or customized mode.
3 The Display Device buttonsClick on one of these buttons to set the display output type tothe LCD, external monitor, or both. When making apresentation, you can click on the presentation button to disableany system timers, such as the LCD turn-off timer or the powermanagement mode timers.
4 The Help button displays online help.
5 The Exit buttonClick on this button to save the changes made and to exit theThinkPad Configuration window.
6 The View Angle buttonsClick on the front view or rear view buttons to display thehardware feature locations.
7 The Device buttonsClick on the button of your choice from the window; then set theoptions for that device from the window that appears.
If the device is enabled, the red indicator next to the button islit. Otherwise, it stays off.
8 The Default buttonClick on this button to set the default values for each option andto cancel the changes you just made.
9 The Status barThe device name and its status appears in the status bar whenyou place the cursor on a device button.
Only the top portion of the window is displayed when you click on thetriangular minimize button in the top-right corner.
18 IBM ThinkPad 560X User's Guide
Getting Familiar with Your Computer
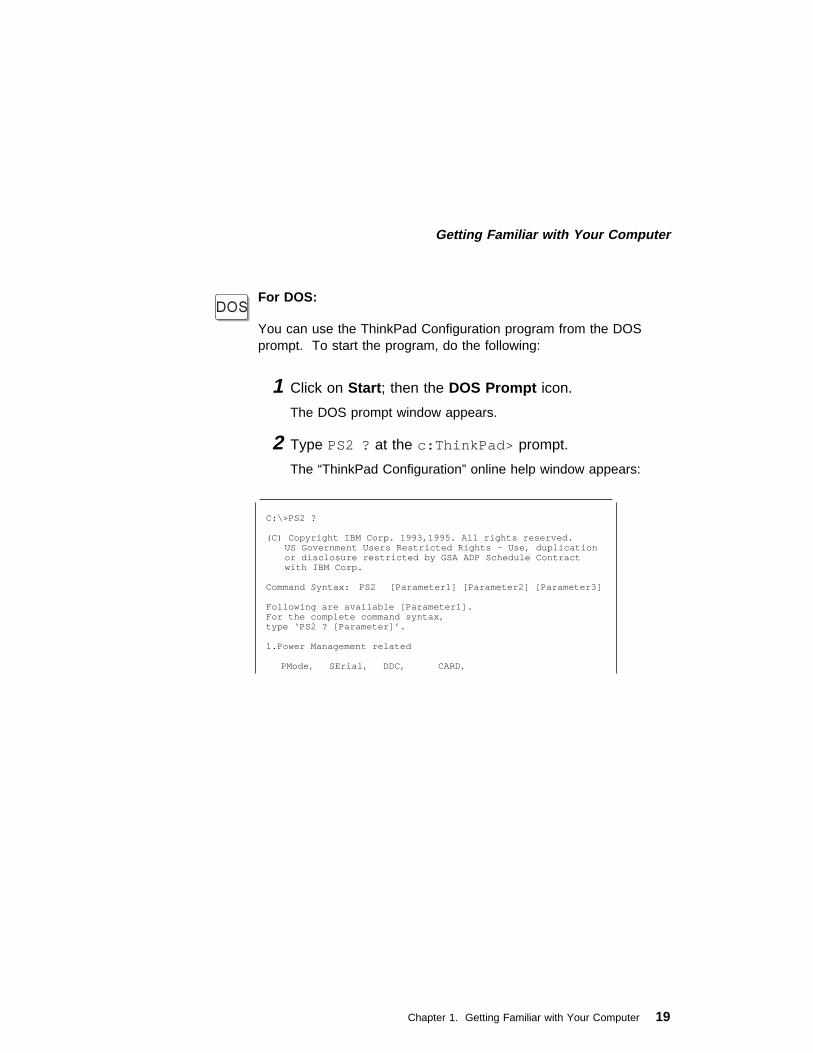
For DOS:
You can use the ThinkPad Configuration program from the DOSprompt. To start the program, do the following:
1 Click on Start ; then the DOS Prompt icon.
The DOS prompt window appears.
2 Type PS2 ? at the c:ThinkPad> prompt.
The “ThinkPad Configuration” online help window appears:
C: \ >PS2 ?
(C) Copyright IBM Corp. 1993,1995. All rights reserved.US Government Users Restricted Rights - Use, duplicationor disclosure restricted by GSA ADP Schedule Contractwith IBM Corp.
Command Syntax: PS2 [ Parameter1 ] [ Parameter2 ] [ Parameter3 ]
Following are available [ Parameter1 ] .For the complete command syntax,type ‘PS2 ? [ Parameter ] ’.
1.Power Management related
PMode, SErial, DDC, CARD,
Chapter 1. Getting Familiar with Your Computer 19

Getting Familiar with Your Computer
3 Select an item from the menu and follow the instructionson the screen to set the features.
You can also create a batch file like the one shown to matchyour operating environment. The following sample batch filesets a longer battery operating time.
@Echo Off
Rem SAMPLE:Set the parameters to provide maximum power utilization.
Rem =============================================================
PS2 PMode Custom DC > NulPS2 LCd 3 > NulPS2 DISK 3 > NulPS2 POwer 5 > NulPS2 SPeed Fixed MIN > NulPS2 STandby 3 > NulPS2 IR OFf > NulPS2 SErial OFf > Nul
20 IBM ThinkPad 560X User's Guide
Getting Familiar with Your Computer
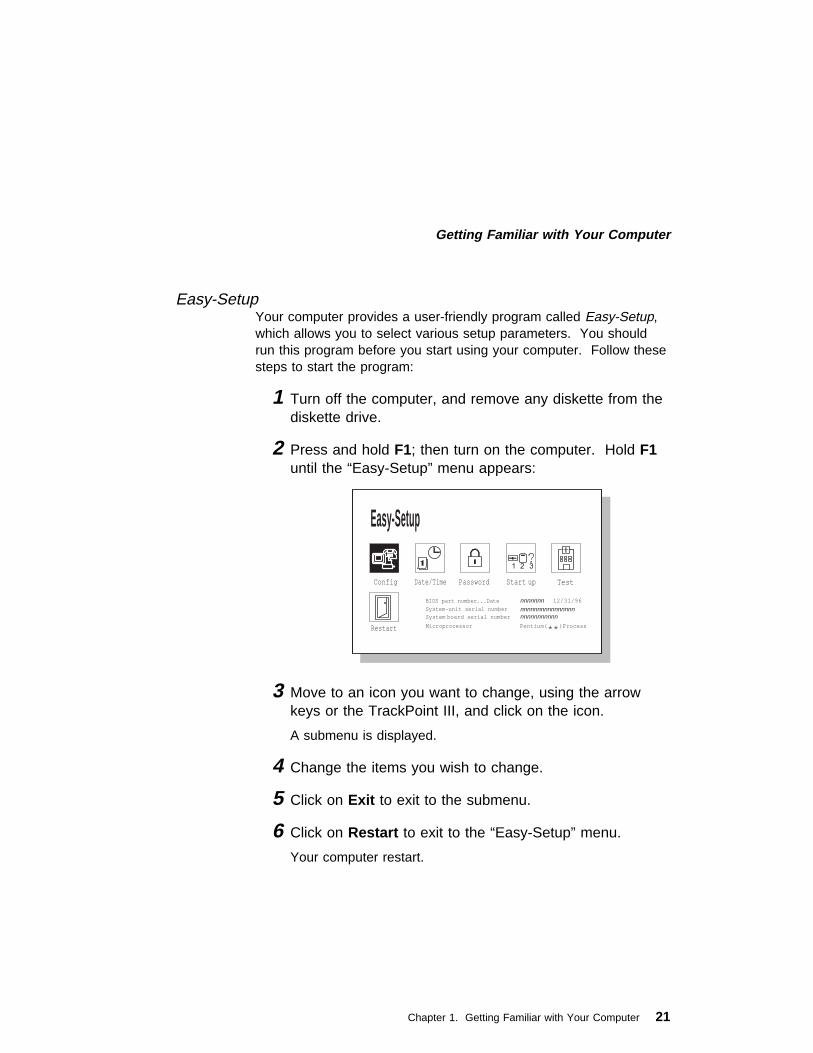
Easy-SetupYour computer provides a user-friendly program called Easy-Setup,which allows you to select various setup parameters. You shouldrun this program before you start using your computer. Follow thesesteps to start the program:
1 Turn off the computer, and remove any diskette from thediskette drive.
2 Press and hold F1; then turn on the computer. Hold F1until the “Easy-Setup” menu appears:
Dat e/ Ti me Passwor d
Easy-Setup
St ar t up Test
Rest ar t
Conf i g
BI OS part number ,. .D at e
Syst em-u ni t se ri al numberSyst emboar d se ri al number
Mi cr opro ce ss or
nnnnnnnnnnnnnnnnnnnnnnnnnnn
Pent iu m( )P ro ce ss* *
nnnnnnn 12/3 1/ 96
3 Move to an icon you want to change, using the arrowkeys or the TrackPoint III, and click on the icon.
A submenu is displayed.
4 Change the items you wish to change.
5 Click on Exit to exit to the submenu.
6 Click on Restart to exit to the “Easy-Setup” menu.
Your computer restart.
Chapter 1. Getting Familiar with Your Computer 21

Getting Familiar with Your Computer
Changing the Screen Color
You can change the color of the “Easy-Setup” menu by pressingthe Ctrl +PgUp keys or by pressing the Ctrl +PgDn keys.
To return to the original color, press the Ctrl +Home keys.
Easy-Setup Menus
Pressing the Config button displays the following “Config” submenu.It shows information about the installed memory and system board.
The Memory button shows the amount of memory installed andavailable.
The System Board button provides information on the system boardinstalled.
Initialize sets all device settings to the default values.
22 IBM ThinkPad 560X User's Guide

Getting Familiar with Your Computer
Pressing the Date/Time button displays the following “Date andTime” submenu. It is used to set the current date and time.
To change the date and time, do the following:
1 Move the cursor to any field (Year, Month, Day, Hour,Minute, or Second) and place the pointer on any of thearrow icons ( , , , or ) to adjust the date andtime.
Clicking on the double-arrow icon scrolls the numbers faster.
2 Click on OK to save the changes or on Cancel to cancelthem.
Pressing the Password button displays the “Password” submenu. Itis used to set the power-on password, hard disk password, andsupervisor password. Go to “Using Passwords” on page 50.
Note: An open lock icon shows that a password has not been set yet.
Chapter 1. Getting Familiar with Your Computer 23

Getting Familiar with Your Computer
Pressing the Start up button displays the “Start up” submenu. It isused to change the startup sequence of your computer.
You can change the startup sequence of the drives in yourcomputer. For example, if you have different operating systems ondifferent replaceable hard disk drives or PC cards, you can have thesystem boot up from one of these devices.
Attention
You must be extremely careful not to specify a wrong deviceduring a copy, save, or a format operation after you change yourstartup sequence. If you specify a wrong device, your data andprograms might be erased or overwritten.
To change the startup sequence, do the following:
1 Reset the current startup sequence by moving the cursorto the Reset icon; and click on it.
The sequence is reset, and all available device icons appearat the bottom of the screen.
2 Select the first device you want for the startup sequence;then click on it.
Repeat this step to set the other devices for the startupsequence. You can set up to four devices.
3 Click on OK or press Enter to save the changes.
24 IBM ThinkPad 560X User's Guide

Getting Familiar with Your Computer
Pressing the Test button displays the “Test” submenu. It is used torun diagnostic tests on your computer to check for hardware errors.Go to “Testing Your Computer” on page 126.
Pressing the Restart button ends the Easy-Setup program andrestarts the computer.
Online BookYour ThinkPad computer has an online book containing the followingadvanced information:
Using PC CardResolving system resource conflictsSolving computer problems
Installing software
To start the online book, double-click on ThinkPad Information ;then ThinkPad 560X Online Book .
The online book appears. Go to the section you want, and make aprintout if necessary.
Chapter 1. Getting Familiar with Your Computer 25

Getting Familiar with Your Computer
Backing Up Your SystemTo back up your system or reinstall the operating system, yourThinkPad computer has the following features:
Recovery CD
Diskette Factory program
Recovery CD (Windows 95 Only)If you accidentally erase your hard disk, you can use the RecoveryCD to restore the contents of the preloaded hard disk to what it wasat the time of purchase. (Refer to “Using the Recovery CD(Windows 95 Only)” on page 130.)
Diskette FactoryWith the Diskette Factory program, you can create the utility anddevice driver diskettes for Windows 95, Windows NT, Windows 3.11,DOS, or OS/2. (Refer to “Using the Diskette Factory” on page 128.)
Keeping Your Computer from Being DamagedYour computer is a delicate device that requires careful handling. Tokeep it from being damaged, keep these precautions in mind:
Do not force the LCD to open flat.Do not allow your computer to be subject to any physical shock.Do not place anything heavy on your computer.Do not pour liquid onto your computer.Keep the computer at least 13 cm (5 in.) away from anyelectrical appliance that generates a strong magnetic field, suchas a motor, magnet, TV, refrigerator, or large audio speakers.Use your computer only when temperatures are between 5°C to35°C (41°F to 95°F). When operating with diskettes, use yourcomputer only between 10°C to 35°C (50°F to 95°F)Do not disassemble the computer.Do not scratch, twist, hit, or push the LCD surface.If you will not be using the computer for a long period of time,the battery pack and keep it in a cool place.Insert diskettes straight into the external diskette drive. Insertingthem at an angle can damage the front of the drive.
26 IBM ThinkPad 560X User's Guide

Getting Familiar with Your Computer
Do not place more than one diskette label on a diskette. Two ormore labels can cause a label to tear apart inside the externaldiskette drive and damage the drive.
Occasionally clean your computer as follows:
Use a soft cloth moistened with nonalkaline detergent to wipe theexterior of the computer.Gently wipe the LCD with a dry, soft cloth. Do not use alcohol ordetergent.
Carrying the Computer
When carrying your computer, you need not power it off.
When carrying it a short time, put the computer in suspendmode.
When carrying it a long time, put the computer in hibernationmode.
There is an optional carrying bag for your ThinkPad 560Xcomputer.
Chapter 1. Getting Familiar with Your Computer 27

Chapter 2. Using Battery Power
This chapter describes battery pack operations.
Using the Battery Pack . . . . . . . . . . . . . . . . . . . . . . . 29Charging the Battery Pack . . . . . . . . . . . . . . . . . . . . 29Monitoring the Battery Status . . . . . . . . . . . . . . . . . . 29
Using the Battery Status Indicator . . . . . . . . . . . . . . 30Using the Fuel-Gauge Program . . . . . . . . . . . . . . . 32
Saving Battery Power . . . . . . . . . . . . . . . . . . . . . . . . 33Using the Power-Saving Modes . . . . . . . . . . . . . . . . . 33Customizing the Power Management . . . . . . . . . . . . . . 38
Setting the Suspend Timer . . . . . . . . . . . . . . . . . . 38Enabling Hibernation Mode . . . . . . . . . . . . . . . . . . 39
Considerations When Using a Power Management Mode . . 40Considerations for Suspend Mode . . . . . . . . . . . . . . 40Considerations for Hibernation Mode . . . . . . . . . . . . 42Notes for Reinstalling or Installing the Operating System 43
Using Other Battery Saving Methods . . . . . . . . . . . . . . 45Replacing the Battery Pack . . . . . . . . . . . . . . . . . . . . . 46
28 Copyright IBM Corp. 1997

Using Battery Power
Using the Battery PackThis section describes how to charge your battery pack, display itsstatus. or replace it.
Charging the Battery PackYou can charge the battery pack when the AC Adapter is connectedto the computer and the battery pack is installed. You must chargethe battery pack in any of the following conditions:
If you purchase a new battery pack.If the battery status indicator starts blinkingIf the battery pack has not been used for a long time.
Notes:
1. Before you charge the battery pack, ensure that its temperature is atleast 10°C (50°F).
2. If the battery pack has not been used for a long time, it will not be fullycharged with only a single charging. You will have to completelydischarge it; then recharge it three to six times to maximize batteryoperating time.
Monitoring the Battery StatusYou can monitor the battery status through the battery statusindicator and the Fuel-Gauge program.
Chapter 2. Using Battery Power 29
Using Battery Power
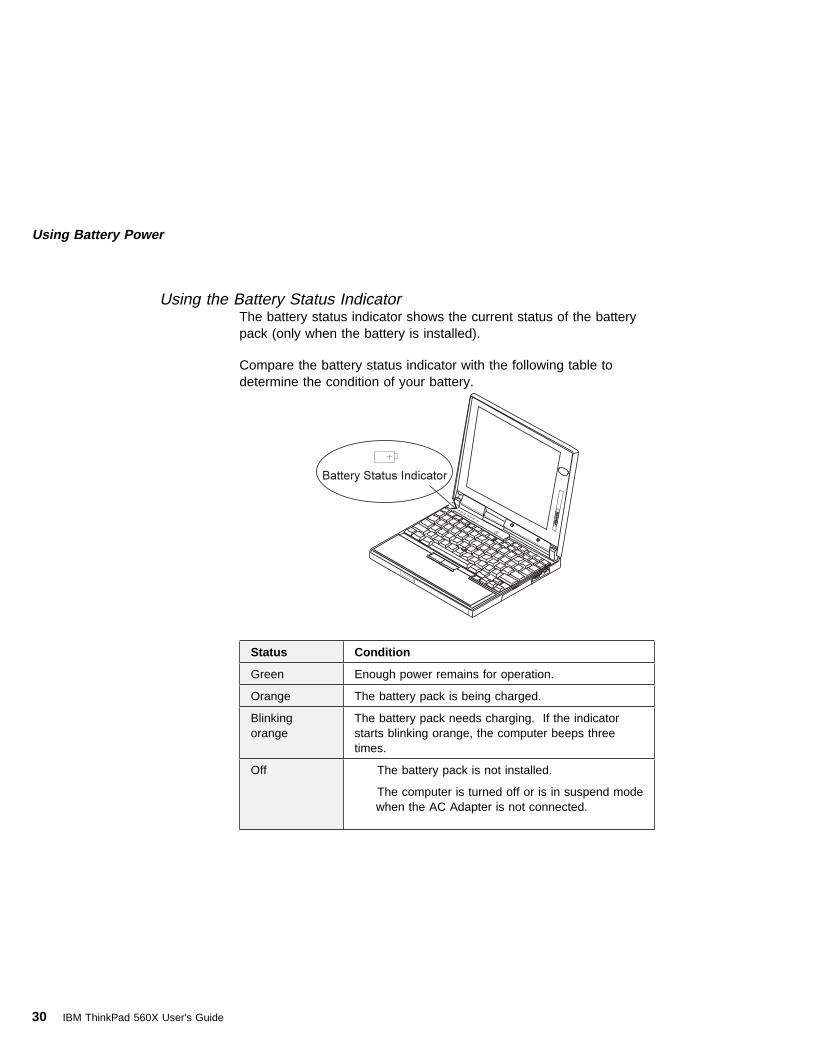
Using the Battery Status IndicatorThe battery status indicator shows the current status of the batterypack (only when the battery is installed).
Compare the battery status indicator with the following table todetermine the condition of your battery.
Status Condition
Green Enough power remains for operation.
Orange The battery pack is being charged.
Blinkingorange
The battery pack needs charging. If the indicatorstarts blinking orange, the computer beeps threetimes.
Off The battery pack is not installed.
The computer is turned off or is in suspend modewhen the AC Adapter is not connected.
30 IBM ThinkPad 560X User's Guide

Using Battery Power
Attention
You should take corrective actions when the battery statusindicator is blinking orange, and your computer sounds threeconsecutive beeps. (If your computer enters suspend modebecause of a low-battery condition, data in memory might belost.)
Immediately connect the AC Adapter to the computer .
Then take either of the following actions:
To continue your work with AC Adapter, press the Fn key.
or:
To continue your work with a fully charged battery pack, dothe following:
1. Replace the battery pack with a fully charged one. (See“Replacing the Battery Pack” on page 46.)
2. Press the Fn key.
3. Disconnect the AC Adapter from the computer.
If you do not take corrective actions within about 30 seconds, thecomputer will enter suspend mode.
Do not leave the computer in this condition for an extendedtime. Data in memory will be lost.
Chapter 2. Using Battery Power 31
Using Battery Power
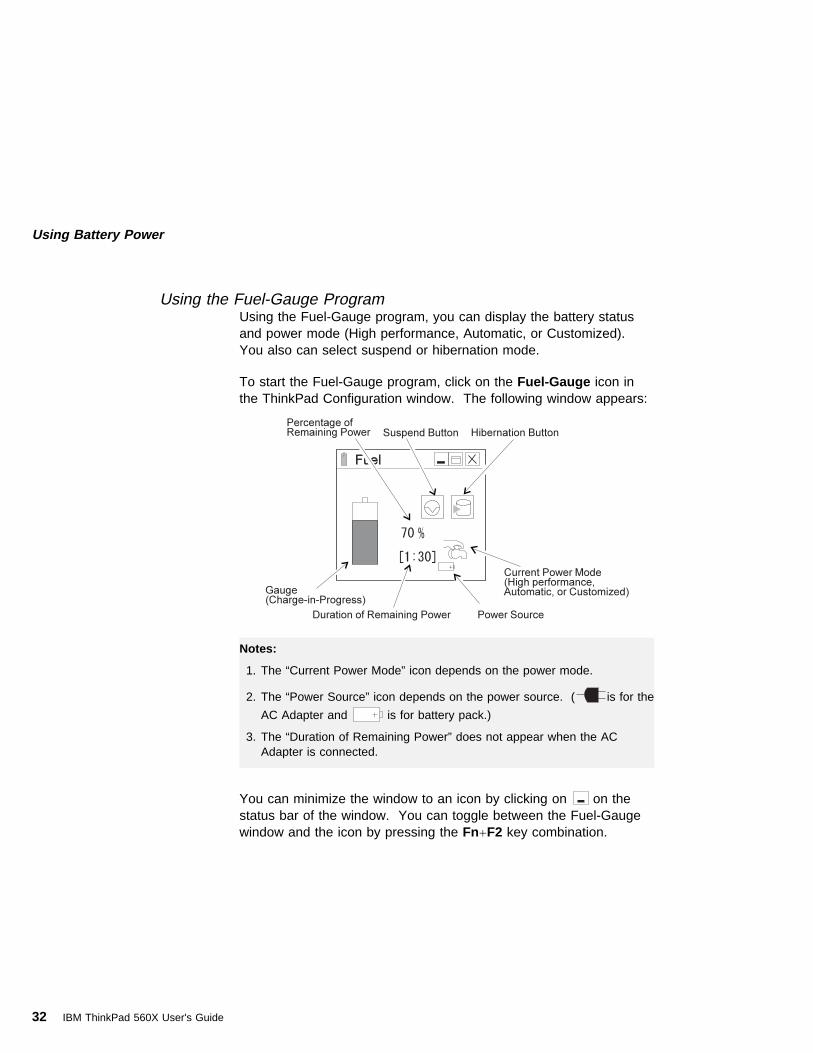
Using the Fuel-Gauge ProgramUsing the Fuel-Gauge program, you can display the battery statusand power mode (High performance, Automatic, or Customized).You also can select suspend or hibernation mode.
To start the Fuel-Gauge program, click on the Fuel-Gauge icon inthe ThinkPad Configuration window. The following window appears:
You can minimize the window to an icon by clicking on on thestatus bar of the window. You can toggle between the Fuel-Gaugewindow and the icon by pressing the Fn+F2 key combination.
Notes:
1. The “Current Power Mode” icon depends on the power mode.
2. The “Power Source” icon depends on the power source. ( is for the
AC Adapter and is for battery pack.)
3. The “Duration of Remaining Power” does not appear when the ACAdapter is connected.
32 IBM ThinkPad 560X User's Guide

Using Battery Power
Saving Battery PowerYour battery pack should be useful for approximately 3 years or 300charge-discharge cycles. The number of years or charge-dischargecycles may vary depending on how efficiently you use yourcomputer. This section describes the following:
How to use the power management modes.How to use other battery saving methods.
Using the Power-Saving ModesYour ThinkPad computer has three power management modes tosave power. You can use your computer under battery power for aconsiderable length of time by using these power managementmodes:
CAUTION
It is not recommended to enter suspend or hibernation modewhen your computer is working the following applications:
Playing or recording audioPlaying a moviePlaying a gameOther multimedia application
Stop these application before entering suspend or hibernationmode.
Chapter 2. Using Battery Power 33

Using Battery Power
Standby ModeIn standby mode, the LCD turns off. Also, if a power-savingmonitor (Energy Star Monitor) is in use when the computerenters standby mode, the computer activates the monitor'slow-power mode.
Your computer enters this mode by default when there isinactivity on your computer for a set duration of time. You canalso enter this mode by pressing the Fn+F3 keys.
To return to normal operation, press any key or move theTrackPoint.
Suspend ModeIn this mode, your computer stops all tasks and stores all data inmemory. You can enter suspend mode by:
– Pressing the Fn+F4 keys
– Closing the cover
– Selecting the Suspend button ( ) in the Fuel-Gaugeprogram
34 IBM ThinkPad 560X User's Guide

Using Battery Power
RediSafe
To prevent loss of data during suspend mode when thebattery is critically low, the ThinkPad has a RediSafefunction. Once you set this function, the hibernation file isactivated each time the computer enters suspend mode, andis ready to enter hibernation mode from suspend modewhenever the battery is low.
Set RediSafe as following:
Windows 95:
1. Start the ThinkPad Configuration program.
2. Click on Power Management button ( ).3. Select Hibernation tab.4. Enable hibernation mode if it is disabled.
a) Click on the Enable Hibernation.. button.b) Click on Create Now ; then Close .
5. Select RediSafe .6. Click on OK.
Windows NT, Windows 3.11, or OS/2:
1. Start the ThinkPad Configuration program.
2. Click on Power Management button ( ).3. Select Suspend/Hibernation/Resume Options button
( ).4. Enable the hibernation if it is disabled.
a) Click on the Enable Hibernation.. button.b) Click on OK.
5. Select RediSafe .6. Click on OK.
Chapter 2. Using Battery Power 35

Using Battery Power
Hibernation ModeIn this mode, your computer stops all tasks and stores all data inthe hard disk; then it powers off. You should set your computerto this mode when you want to maintain the present operatingcondition until the next day, for instance.
To use this mode, you have to create a hibernation file with theThinkPad Configuration program. (See “Enabling HibernationMode” on page 39.)
For Windows NT Users
You cannot create a hibernation file in a Windows NT systemthat uses the NTFS format, the Windows NT default. If youwant to use hibernation mode, you should reinstall WindowsNT with FAT format.
You can set hibernation mode by doing any of the following:
– Pressing the Fn+F12 keys.
– Selecting the Hibernation button ( ) in the Fuel-Gaugeprogram.
Notes:
1. You cannot enter hibernation mode when you are using thecommunication network.
2. Hibernation mode might be terminated if you connect your computer to aport replicator or if you use a particular PC Card.
36 IBM ThinkPad 560X User's Guide

Using Battery Power
The following table shows how the indicator behaves in each powermanagement mode:
The following figure shows the relationship between different powermanagement modes, how to switch between them and battery powerconsumption:
Current Status
Indicator
Suspend Mode Power-On
Normal operationor standby mode
Off Green
Suspend mode Green Off
Entering or resuming fromsuspend mode
Blinking green Off
Power off orhibernation mode
Off Off
Chapter 2. Using Battery Power 37
Using Battery Power
Customizing the Power ManagementThis section describes how to customize the power management.Use the power management mode appropriate to your operation.
Setting the Suspend TimerTo set the suspend timer, do the following:
For Windows 95:
1 Start the ThinkPad Configuration program.
2 Click on the Power Management ( ) button.
The “Power Properties” window appears.
3 Select the Power Mode tab.
The “Power Mode” window appears.
4 Select Customized .
The bottom gray portion is displayed in black, and you canspecify the timeout value in minutes in the Suspend Timerbox.
5 Click on OK.
For Windows NT, Windows 3.11, or OS/2:
1 Start the ThinkPad Configuration program.
2 Click on the Power Management ( ) button.
Three buttons appear on the right.
3 Click on the Power Mode Settings ( ) button.
The “Power Mode Settings” window appears.
4 Specify the timeout value in minutes in the SuspendTimer box.
5 Click on OK.
38 IBM ThinkPad 560X User's Guide

Using Battery Power
Enabling Hibernation ModeTo enable hibernation mode, do the following:
For Windows 95:
1 Start the ThinkPad Configuration program.
2 Click on the Power Management ( ) button.
The “Power Properties” window appears.
3 Select the Hibernation tab.
The “Hibernation” subwindow appears.
4 Click on Enable Hibernation . (If you have alreadycreated a hibernation file, this button appears in gray andyou cannot click on it.)
The “Enable Hibernation” subwindow appears.
5 Click on Create Now .
6 Click on Close ; then OK.
For Windows NT, Windows 3.11, or OS/2:
1 Start the ThinkPad Configuration program.
2 Click on the Power Management ( ) button.
3 Click on the Suspend/Resume Options ( ) button.
The “Suspend/Resume Options” window appears.
4 Click on the Enable Hibernation.. button.
5 Click on OK.
Chapter 2. Using Battery Power 39
Using Battery Power
Considerations When Using a Power Management ModeWhen you use a power management mode, you need to consider afew points, especially if you are using the network.
Considerations for Suspend ModeConsider the following before using suspend mode:
The computer can enter suspend mode when used with thefollowing operating systems:
– DOS Version 7.0– OS/2 Warp Version 4– Microsoft Windows Version 3.11 with DOS Version 7.0– Microsoft Windows 95– Microsoft Windows NT 4.0
Important
If you use Windows Version 3.11, ensure that AdvancedPower Management (APM) is installed according to theinstructions in page 44.
Attached devices, such as a printer or serial device, stop runningwhen the computer enters suspend mode. When you resumenormal operation, the output might differ from what you expect,because the device might be reset or lose its configurationsettings.
Sometimes you might want to use the computer with the LCDclosed —for example, when an external monitor and keyboardare used. In such a case, turn on the computer with the LCDclosed or use the ThinkPad Configuration program to set thecomputer to not enter suspend mode when the LCD is closed.
If the computer resumes normal operation by reaching theThinkPad Configuration timer setting or because of an incomingcall, only a blank screen is displayed. To display a power-onpassword prompt, press any key or move your pointing device.
If the computer is powered with ac power and is using one of thefollowing IBM PC Cards, it enters standby mode:
– IBM 3270 Emulation Credit Card Adapter– IBM Token-Ring 16/4 Credit Card Adapter
40 IBM ThinkPad 560X User's Guide

Using Battery Power
– IBM Credit Card Adapter for Ethernet– IBM 5250 Emulation Credit Card Adapter
If other PC Cards are used and the computer enters suspendmode, all application programs stop. Communication also stopsfor communication PC Cards not in the preceding list. For somePC Cards, power to the PC Cards might also turn off.
If the computer is powered with battery power, the computerturns power off to the PC Card, and communication stops forcommunication PC Cards, so the duration of suspend mode islonger.
If communication for a PC Card is not reestablished afterresuming normal operation, remove and then reinstall the PCCard before restarting the system or application program. Forother kinds of PC Cards, if the PC Card or computer does notoperate, restart the application or computer.
If the computer is using one of the following IBM modem cardsand detects an incoming call while in suspend mode, thecomputer automatically resumes normal operation:
– IBM 28.8/14.4 Data/FAX Modem– IBM PCMCIA Data/FAX Modem– IBM High Speed PCMCIA Data/FAX Modem– IBM Microelectronics 2.4/9.6 Data/FAX Modem– IBM Microelectronics 14.4/14.4 Data/FAX Modem– IBM Wireless Modem for ARDIS– IBM Wireless Modem for Mobitex– IBM Wireless Modem for Cellular/CDPD
While a communication link is active, the computer does notenter suspend mode.
Chapter 2. Using Battery Power 41
Using Battery Power
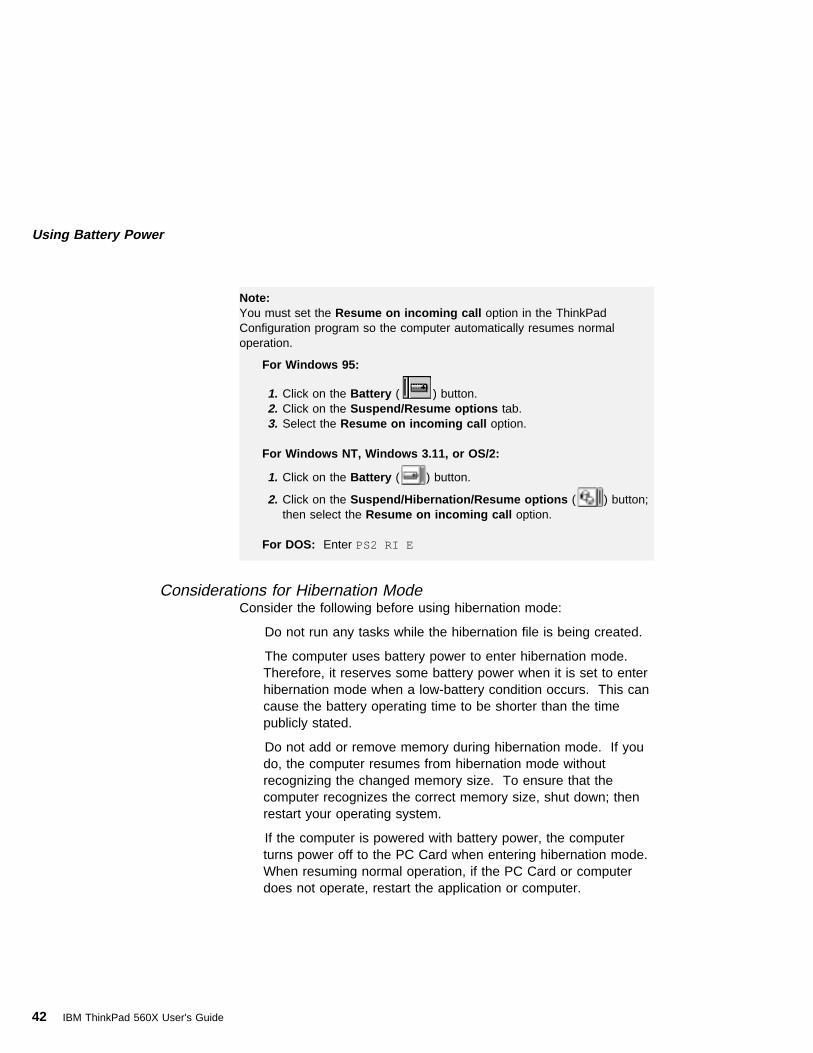
Note: You must set the Resume on incoming call option in the ThinkPadConfiguration program so the computer automatically resumes normaloperation.
For Windows 95:
1. Click on the Battery ( ) button.2. Click on the Suspend/Resume options tab.3. Select the Resume on incoming call option.
For Windows NT, Windows 3.11, or OS/2:
1. Click on the Battery ( ) button.
2. Click on the Suspend/Hibernation/Resume options ( ) button;then select the Resume on incoming call option.
For DOS: Enter PS2 RI E
Considerations for Hibernation ModeConsider the following before using hibernation mode:
Do not run any tasks while the hibernation file is being created.
The computer uses battery power to enter hibernation mode.Therefore, it reserves some battery power when it is set to enterhibernation mode when a low-battery condition occurs. This cancause the battery operating time to be shorter than the timepublicly stated.
Do not add or remove memory during hibernation mode. If youdo, the computer resumes from hibernation mode withoutrecognizing the changed memory size. To ensure that thecomputer recognizes the correct memory size, shut down; thenrestart your operating system.
If the computer is powered with battery power, the computerturns power off to the PC Card when entering hibernation mode.When resuming normal operation, if the PC Card or computerdoes not operate, restart the application or computer.
42 IBM ThinkPad 560X User's Guide
Using Battery Power
If the computer is powered with ac power, it does not enterhibernation mode if it is using one of the following IBM PCCards:
– IBM 28.8/14.4 Data/FAX Modem– IBM PCMCIA Data/FAX Modem– IBM High Speed PCMCIA Data/FAX Modem– IBM 3270 Emulation Credit Card Adapter– IBM Token-Ring 16/4 Credit Card Adapter– IBM Credit Card Adapter for Ethernet– IBM 5250 Emulation Credit Card Adapter– IBM Microelectronics 2.4/9.6 Data/FAX Modem– IBM Microelectronics 14.4/14.4 Data/FAX Modem– IBM Wireless Modem for ARDIS– IBM Wireless Modem for Mobitex– IBM Wireless Modem for Cellular/CDPD
This prevents possible problems from occurring withcommunication application programs after the computer returnsto normal operation.
Note: If the communication links are still not reestablished, remove and thenreinstall the PC Card before restarting the system or application program.
Notes for Reinstalling or Installing the Operating SystemWhen you install an operating system, install it with Advanced PowerManagement (APM). Also install the ThinkPad Configurationprogram with the Utility Diskette to use power management mode.
Note: To install the software, see the online book.
If you are using Windows 95 or OS/2, APM is automatically installedin your computer.
Chapter 2. Using Battery Power 43

Using Battery Power
If you are using DOS, APM is automatically installed in yourcomputer. To verify that the computer has installed APM correctly,type power at the command prompt and press Enter . If a screensimilar to the following appears, APM is successfully installed.
Power Management Status ----------------------- Setting = ADV: REG
CPU: idle 32% of time.
AC Line Status : OFFLINE
Battery status : High
If not, add the following line to your CONFIG.SYS file, using a texteditor such as the DOS Editor:
DEVICE=C: \ DOS\ POWER.EXE
If you are using Windows 3.11, follow these instructions to checkand install APM for Windows:
1 Start the computer.
Make sure that the current directory is Windows (usuallyC:\WINDOWS>).
2 Type SETUP at the command prompt and press Enter .
The following appears:
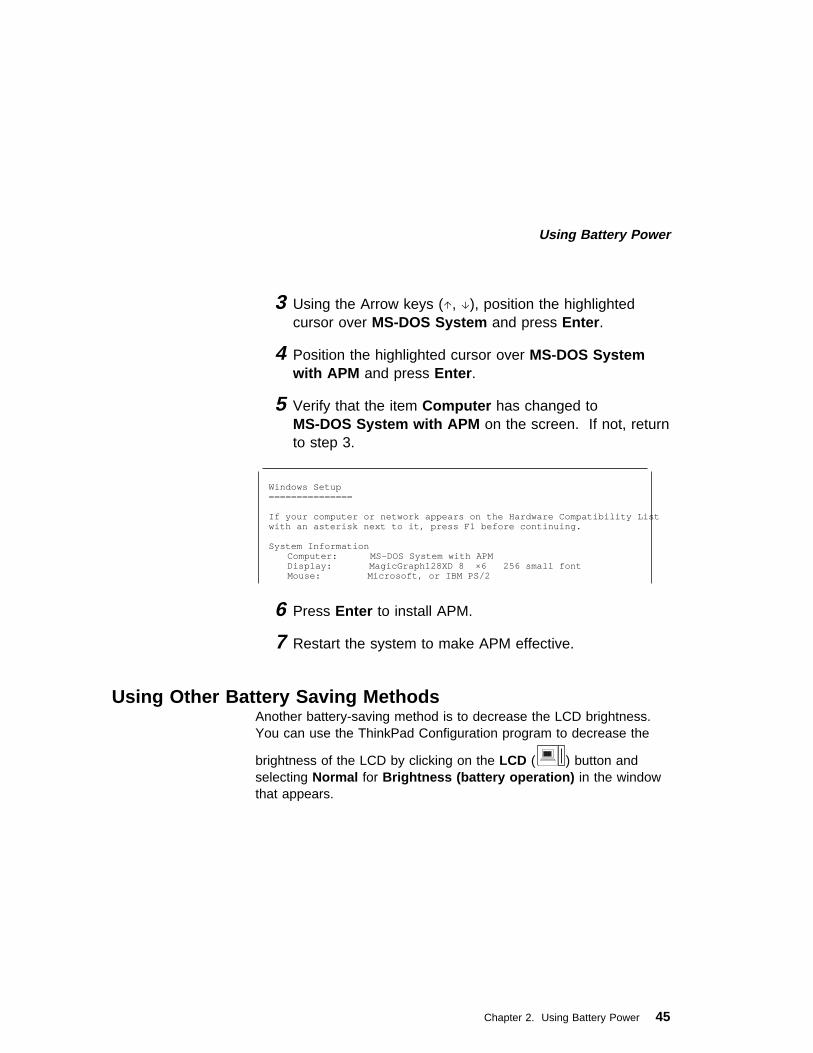
Windows Setup===============
If your computer or network appears on the Hardware Compatibility Listwith an asterisk next to it, press F1 before continuing.
System Information Computer: MS-DOS System
Display: MagicGraph128XD 8 ×6 256 small fontMouse: Microsoft, or IBM PS/2
If MS-DOS System with APM appears for the item Computer: ,APM is already installed. Press F3 to exit the setup.
44 IBM ThinkPad 560X User's Guide
Using Battery Power
3 Using the Arrow keys (↑ , ↓ ), position the highlightedcursor over MS-DOS System and press Enter .
4 Position the highlighted cursor over MS-DOS Systemwith APM and press Enter .
5 Verify that the item Computer has changed toMS-DOS System with APM on the screen. If not, returnto step 3.
Windows Setup===============
If your computer or network appears on the Hardware Compatibility Listwith an asterisk next to it, press F1 before continuing.
System InformationComputer: MS-DOS System with APMDisplay: MagicGraph128XD 8 ×6 256 small fontMouse: Microsoft, or IBM PS/2
6 Press Enter to install APM.
7 Restart the system to make APM effective.
Using Other Battery Saving MethodsAnother battery-saving method is to decrease the LCD brightness.You can use the ThinkPad Configuration program to decrease the
brightness of the LCD by clicking on the LCD ( ) button andselecting Normal for Brightness (battery operation) in the windowthat appears.
Chapter 2. Using Battery Power 45

Using Battery Power
Replacing the Battery PackTo replace the battery pack, do as follows:
1 Power off your computer or connect the AC Adapter.
2 Close the LCD and turn the computer over.
46 IBM ThinkPad 560X User's Guide
Using Battery Power
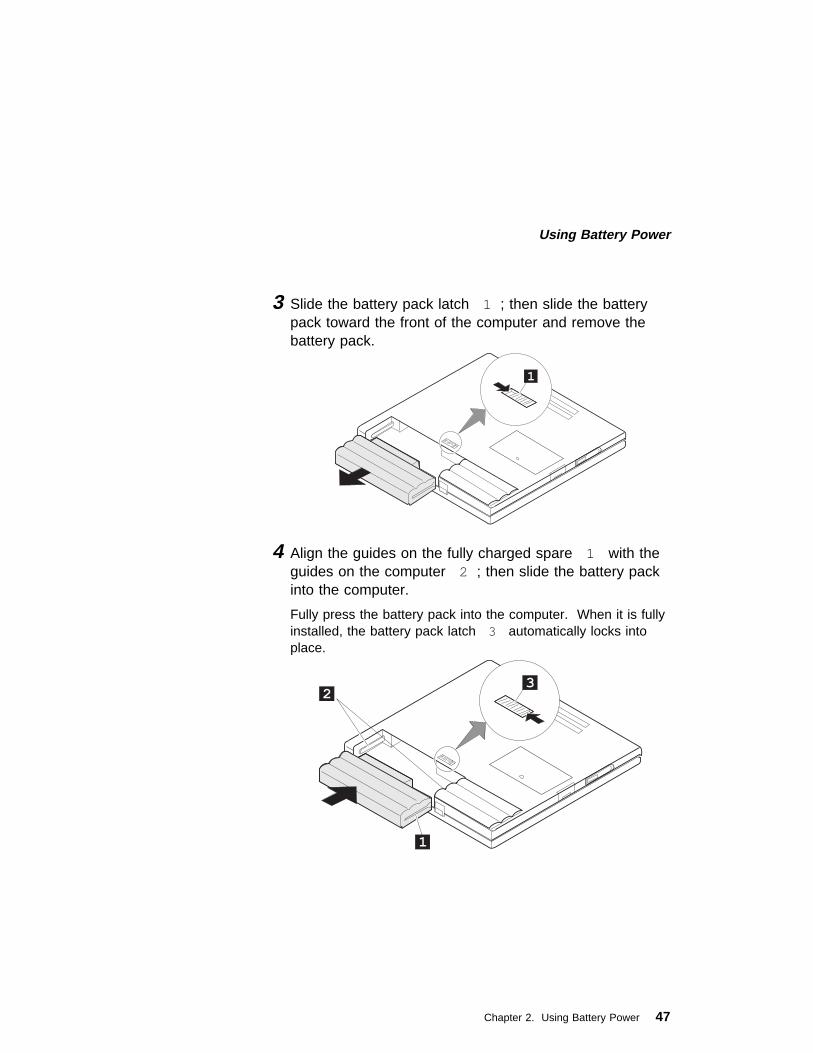
3 Slide the battery pack latch 1 ; then slide the batterypack toward the front of the computer and remove thebattery pack.
4 Align the guides on the fully charged spare 1 with theguides on the computer 2 ; then slide the battery packinto the computer.
Fully press the battery pack into the computer. When it is fullyinstalled, the battery pack latch 3 automatically locks intoplace.
Chapter 2. Using Battery Power 47

Using Battery Power
5 Turn the computer over again; then open the LCD.
You have finished replacing the battery pack.
Note: You can replace the battery when the computer is in hibernationmode. When you use the PC Card, the computer might not be ableto enter hibernation mode. If this happens, power off the computer.
48 IBM ThinkPad 560X User's Guide

Chapter 3. Protecting Your Computer
This chapter provides information about how to protect yourcomputer from theft or unauthorized use. It also describes how todisplay your personal information, such as your name or address, onthe password prompt screen.
Using Passwords . . . . . . . . . . . . . . . . . . . . . . . . . . . 50Entering a Password . . . . . . . . . . . . . . . . . . . . . . . 50Setting a Password . . . . . . . . . . . . . . . . . . . . . . . . 51Changing and Removing a Password . . . . . . . . . . . . . 54
For a Power-On Password or HDD Password . . . . . . . 54For a Supervisor Password . . . . . . . . . . . . . . . . . . 56
Using the Personalization Editor . . . . . . . . . . . . . . . . . . 60Using Locks . . . . . . . . . . . . . . . . . . . . . . . . . . . . . . 64
Copyright IBM Corp. 1997 49
Protecting Your Computer
Using PasswordsThe password-setting feature prevents your computer from beingused by others. Once you set a password, a prompt appears on thescreen each time you turn on the computer. You must enter yourpassword at the prompt. You will not be able to use the computerunless you type the correct password. You can set the followingpasswords on your computer:
The power-on password protects your computer from beingused by unauthorized persons.
The hard disk password protects the data on your hard diskfrom being accessed by unauthorized persons.
The supervisor password protects the system informationstored in Easy-Setup and also makes your computertamper-resistant.
Entering a PasswordOnce you set a password, a password prompt appears at the top leftcorner of the screen. This prompt appears each time you turn onyour computer or when your computer returns from suspend mode tonormal operation.
However, a password prompt is not displayed if the computer returnsto normal operation by a preset timer or an incoming call on themodem, in which case you will have to display it by pressing a key ormoving the pointing device.
To enter a password, do the following:
1 Type your password.
The symbol appears each time you press a key. Don't holddown a key too long, since the same character will be enteredcontinuously.
2 Press the Enter key.
An OK appears if you enter the correct password, and an Xappears if you enter the wrong password. If you fail to enterthe correct password in three tries, you must turn off thecomputer, wait 5 seconds, and then turn it on again and retry.
50 IBM ThinkPad 560X User's Guide

Protecting Your Computer
Setting a PasswordTo set a password, do the following:
1 Start Easy-Setup.
a) Press and hold F1; then turn on the computer.b) Hold F1 until the “Easy-Setup” menu appears.
2 Click on Password in the “Easy-Setup” menu. The“Password” submenu appears:
Note: An unlocked keylock icon indicates a password that isnot yet set.
3 Click on the type of password you want to set:Power-On , HDD, or Supervisor .
Selecting this icon displays a submenu for setting thepower-on password.
Selecting this icon displays a submenu for setting thehard disk drive (HDD) password.
Selecting this icon displays a submenu for setting thesupervisor password.
Chapter 3. Protecting Your Computer 51

Protecting Your Computer
4 Type your desired appropriate password.
Note: You can type a maximum of 7 random characters usinga combination of letters (A to Z) and numbers (0 to 9).Uppercase and lowercase letters (for example, A and a)are treated as the same characters.
If you type a wrong character, use the Backspace keyto erase it and then type the correct one.
5 Press Enter . The “Password Confirmation” submenuappears:
52 IBM ThinkPad 560X User's Guide

Protecting Your Computer
6 Type your password again to verify it; then press Enteragain.
Note: The following submenu appears if you are setting thehard disk or the supervisor password, reminding you towrite down the password on a piece of paper and tokeep it in a safe place.
Your password is set.
Do Not Forget Your Password
If you forget your hard disk or supervisor password, there is noway to reset your password or recover data from the harddisk . You have to take your computer to an IBM authorizedreseller or an IBM marketing representative to have the hard diskor the system board replaced. Proof of purchase is required, andan additional charge might be required for the service. Neitheran IBM authorized reseller nor IBM marketing representative canmake the hard disk drive usable.
Chapter 3. Protecting Your Computer 53
Protecting Your Computer
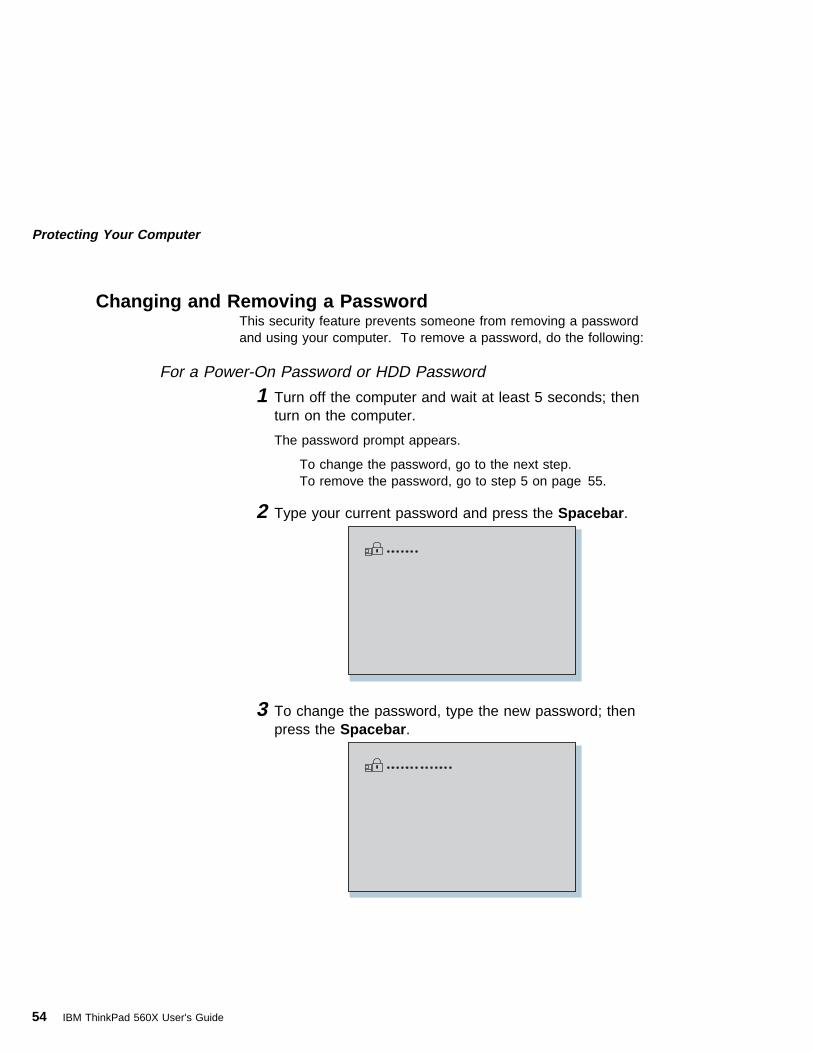
Changing and Removing a PasswordThis security feature prevents someone from removing a passwordand using your computer. To remove a password, do the following:
For a Power-On Password or HDD Password
1 Turn off the computer and wait at least 5 seconds; thenturn on the computer.
The password prompt appears.
To change the password, go to the next step.To remove the password, go to step 5 on page 55.
2 Type your current password and press the Spacebar .
3 To change the password, type the new password; thenpress the Spacebar .
54 IBM ThinkPad 560X User's Guide

Protecting Your Computer
4 Type the new password again to verify it; then pressEnter .
The following submenu appears and system starts.
Note: Write down the password on a piece of paper and keepit in a safe place.
You have changed your password. Skip the remaining steps.
5 Type your current password and press the Spacebar .
Chapter 3. Protecting Your Computer 55

Protecting Your Computer
6 Press Enter .
The following submenu appears and system starts.
You have removed your password.
For a Supervisor Password
1 Start Easy-Setup.
a) Press and hold F1; then turn on the computer.b) Hold F1 until the password prompt appears.
2 Enter the supervisor password.
The “Easy-Setup” menu appears.
3 Select Password on the menu.
56 IBM ThinkPad 560X User's Guide

Protecting Your Computer
4 Select Supervisor .
To change the password, go to the next step.To remove the password, go to step 10 on page 58.
5 Enter the current password and press the Spacebar .
6 Type the new password; then press the Spacebar .
Chapter 3. Protecting Your Computer 57
Protecting Your Computer
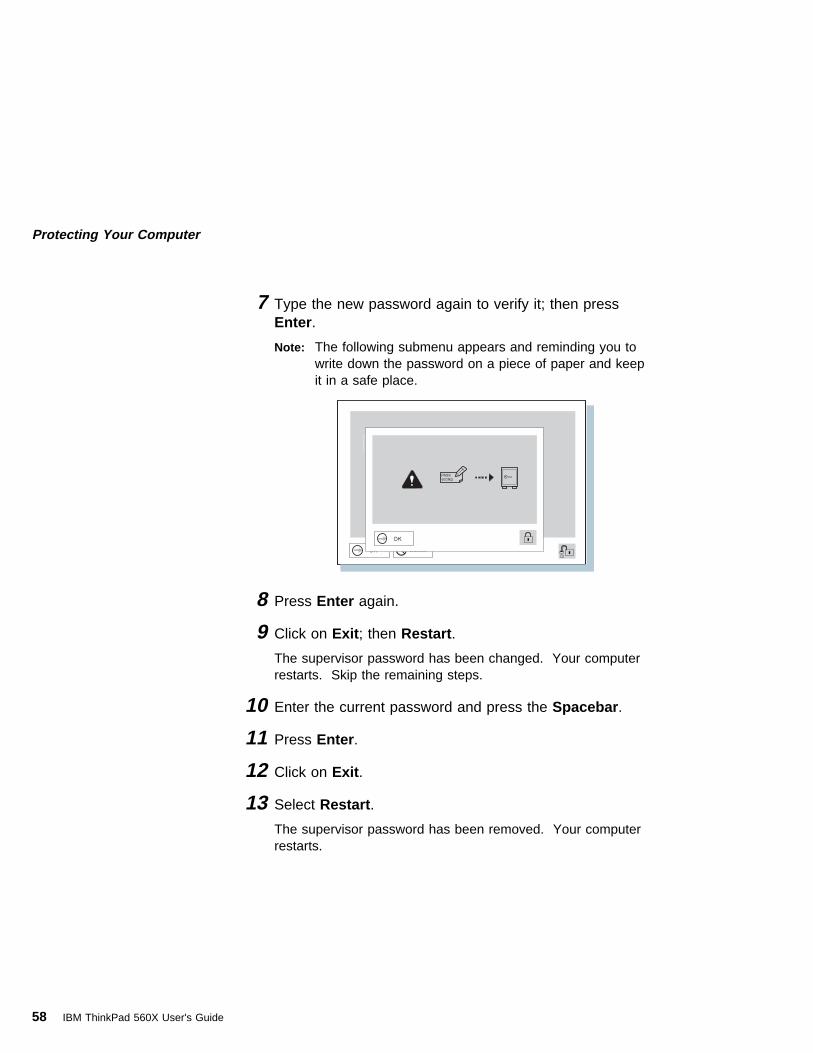
7 Type the new password again to verify it; then pressEnter .
Note: The following submenu appears and reminding you towrite down the password on a piece of paper and keepit in a safe place.
8 Press Enter again.
9 Click on Exit ; then Restart .
The supervisor password has been changed. Your computerrestarts. Skip the remaining steps.
10 Enter the current password and press the Spacebar .
11 Press Enter .
12 Click on Exit .
13 Select Restart .
The supervisor password has been removed. Your computerrestarts.
58 IBM ThinkPad 560X User's Guide

Protecting Your Computer
Power-on Password with Supervisor Authority
You can remove a power on password (even if you don't know it)if you know the supervisor password.
1. Power on the computer by pressing F1.
The password prompt appears.
2. Enter the supervisor password. The “Easy-Setup” menuappears.
3. Select Password on the menu.
4. Select Power on on the menu.
5. Type the supervisor password; then press Spacebar .
6. Press Enter . The “Password Confirmation” submenuappears:
7. Press Enter again.
8. Click on Exit ; then select Restart . Your computer restarts.The power-on password has been removed.
Chapter 3. Protecting Your Computer 59

Protecting Your Computer
Using the Personalization EditorWith the Personalization Editor, you can display such personalinformation as your name and address on the screen each time youpower on your computer. This feature helps you to identify yourcomputer when identical computers are being used in your location,or to deter theft.
A personalized password-prompt screen consists of two parts: thepersonal data area 1 and the background bitmap area 2 .
ThinkPad
ThinkPad
ThinkPad
ThinkPad
ThinkPad
ThinkPad
ThinkPad
ThinkPad
ThinkPad
ThinkPad
ThinkPad
ThinkPad
John SmithIBM Corporation123-456-7891234-56 Big Road, New York
If you find this computer,please contact the above address.
60 IBM ThinkPad 560X User's Guide

Protecting Your Computer
To register your name, address, and company on the PersonalizationEditor, do the following:
1 Turn on the computer.
2 Make a backup copy of the DOS, Personalization UtilityDiskette using your operating system's diskcopycommand.
3 Insert the backup copy of the DOS, Personalization UtilityDiskette into the diskette drive.
4 Open the Personalization Editor
a) Click on Start .b) Move the cursor to Programs , ThinkPad : then click on
Personalization Editor .
The following window appears:
Help Exit
Personalization Editor Personal Data Background Preview
Note: To display this information, the power-on password must alreadyhave been set.
Chapter 3. Protecting Your Computer 61

Protecting Your Computer
5 Click on Personal Data and type in the necessaryinformation into the boxes.
If you want to create the background bitmap, do as follows,otherwise, go to step 10.
6 Select Background in the “Personalization Editor”window.
Windows Paintbrush automatically opens.
7 Draw an image or color the background.
Your bitmap size must be 160 by 100 pels. To change thesize, select Open and then Image Attribute . Specify a Widthof 160, Height of 100, and set Unit to pels.
8 Select File and save Save As to save the and nameyour drawing as a 16-color bitmap file on the backupcopy of the DOS, Personalization Utility Diskette.
9 Press Enter to return the previous window.
10 Turn off the computer.
Note: For preview the actual full-size of the screen, select Preview .
62 IBM ThinkPad 560X User's Guide
Protecting Your Computer
11 Insert the backup copy of the DOS, Personalization UtilityDiskette into the diskette drive; then turn on thecomputer.
12 Select Update personalization data at the menuwindow; then follow the instruction on the window.
Your data will be copied from DOS, Personalization UtilityDiskette and stored in the nonvolatile memory in the computer.
13 After the data is stored, turn off the computer.
14 Set your password if you have not set yet.
Click on Help for more information.
The information that you typed in will be displayed the next time youpower on.
Delete a Personalization Screen
To delete a personalization screen from the password-promptscreen as follows:
1. Turn off the computer.
2. Insert the backup copy of the DOS, Personalization UtilityDiskette into the diskette drive; then turn on the computer.
3. Select Delete personalization data from the menu; thenfollow the instructions on the screen.
4. After the data is updated, restart the computer.
Chapter 3. Protecting Your Computer 63
Protecting Your Computer
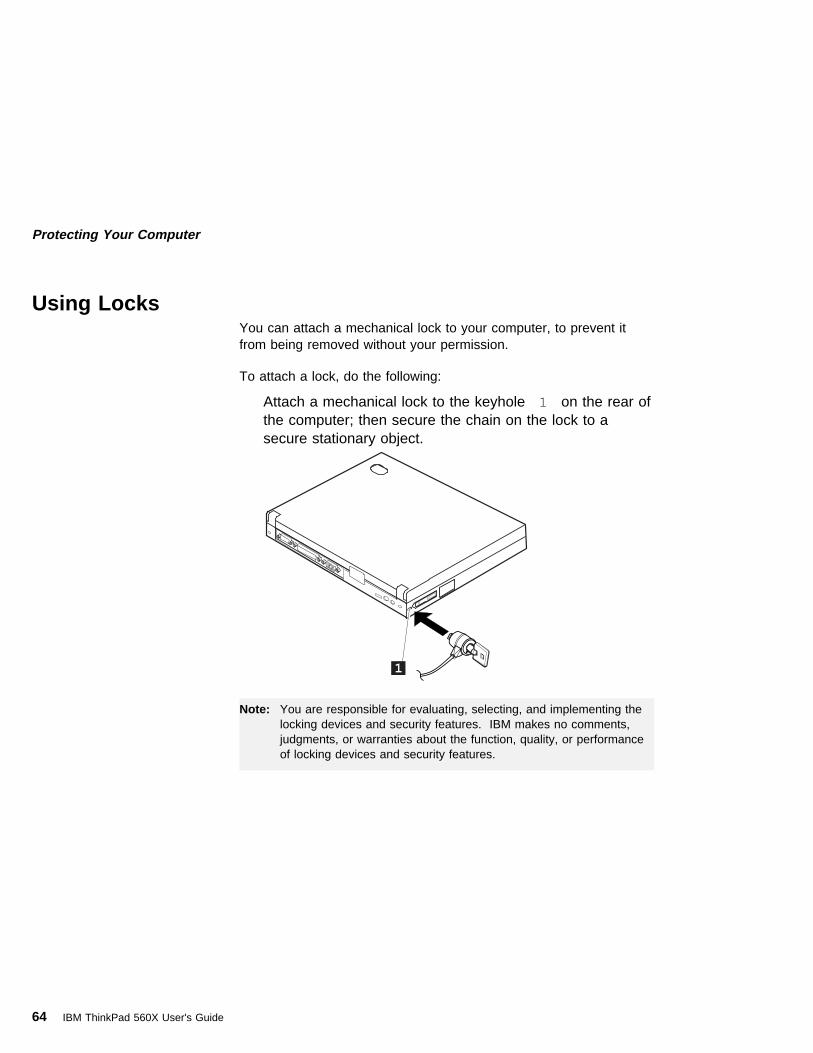
Using LocksYou can attach a mechanical lock to your computer, to prevent itfrom being removed without your permission.
To attach a lock, do the following:
Attach a mechanical lock to the keyhole 1 on the rear ofthe computer; then secure the chain on the lock to asecure stationary object.
Note: You are responsible for evaluating, selecting, and implementing thelocking devices and security features. IBM makes no comments,judgments, or warranties about the function, quality, or performanceof locking devices and security features.
64 IBM ThinkPad 560X User's Guide

Chapter 4. Using the Advanced Features of Your ThinkPad
This chapter provides information about how to attach externaldevices or to increase memory.
Increasing Memory . . . . . . . . . . . . . . . . . . . . . . . . . . 66Installing the Memory Option . . . . . . . . . . . . . . . . . . 66
Using an External Pointing Device . . . . . . . . . . . . . . . . . 70Disabling the TrackPoint III . . . . . . . . . . . . . . . . . . . 74
Switching between the LCD and an External Monitor . . . . . . 75Attaching the Monitor . . . . . . . . . . . . . . . . . . . . . . . 75Using SVGA Video Mode . . . . . . . . . . . . . . . . . . . . 79
Using a PC Card . . . . . . . . . . . . . . . . . . . . . . . . . . . 81Installing the PC Card . . . . . . . . . . . . . . . . . . . . . . 82
Installing the PC Card Device Driver . . . . . . . . . . . . 85Installing the PC Card Modem . . . . . . . . . . . . . . . . . . 87Using CardWorks** . . . . . . . . . . . . . . . . . . . . . . . . 90
Wizard Button . . . . . . . . . . . . . . . . . . . . . . . . . 91PC Card Properties Window . . . . . . . . . . . . . . . . . 92Stop . . . . . . . . . . . . . . . . . . . . . . . . . . . . . . . 95Slot Management . . . . . . . . . . . . . . . . . . . . . . . 97Help . . . . . . . . . . . . . . . . . . . . . . . . . . . . . . . 97
Using the Audio Features . . . . . . . . . . . . . . . . . . . . . . 98Using the 3D Sound Retrieval System (SRS) Function . . . 99
Using Infrared Communication . . . . . . . . . . . . . . . . . . . 101
Copyright IBM Corp. 1997 65
Using Advanced Features of Your ThinkPad
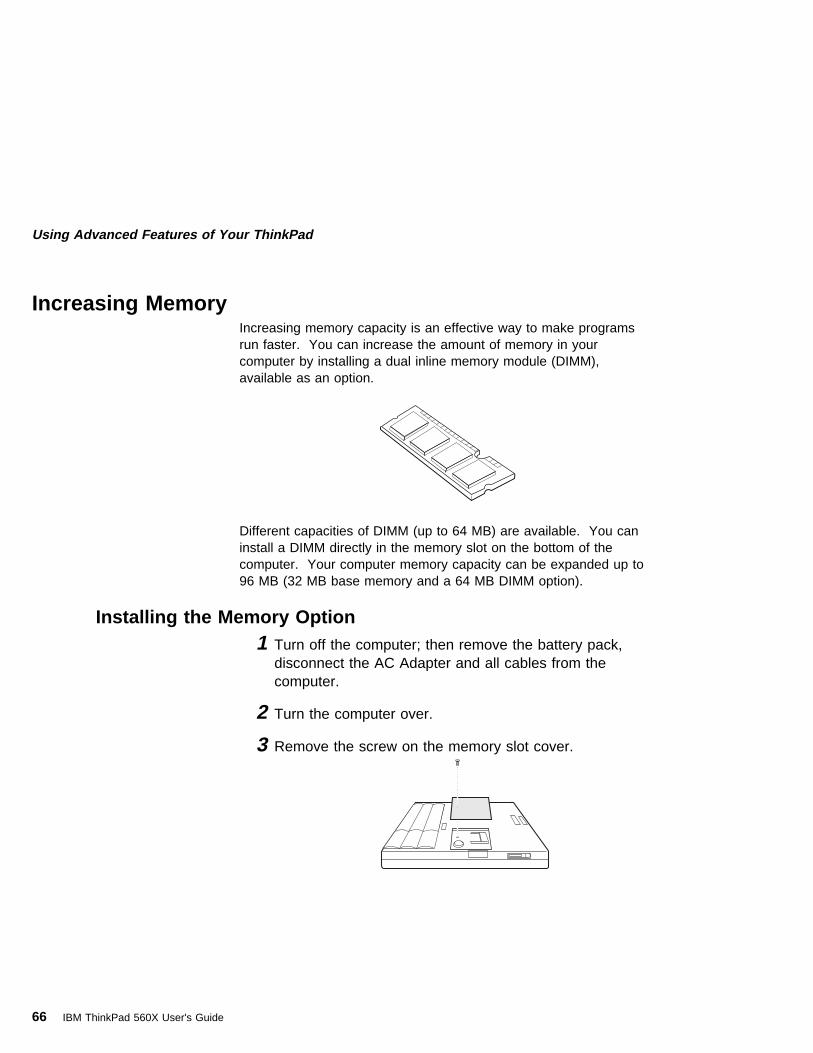
Increasing MemoryIncreasing memory capacity is an effective way to make programsrun faster. You can increase the amount of memory in yourcomputer by installing a dual inline memory module (DIMM),available as an option.
Different capacities of DIMM (up to 64 MB) are available. You caninstall a DIMM directly in the memory slot on the bottom of thecomputer. Your computer memory capacity can be expanded up to96 MB (32 MB base memory and a 64 MB DIMM option).
Installing the Memory Option1 Turn off the computer; then remove the battery pack,
disconnect the AC Adapter and all cables from thecomputer.
2 Turn the computer over.
3 Remove the screw on the memory slot cover.
66 IBM ThinkPad 560X User's Guide

Using Advanced Features of Your ThinkPad
4 Install the DIMM into the memory slot.
Attention
To avoid damaging the DIMM, do not touch its contactedge.
a Find the notch on the side of the DIMM.
b With the notched end of the DIMM toward the right sideof the socket, insert the DIMM, at an angle ofapproximately 20°, into the socket; then press it firmly
1 .
c Pivot the DIMM until it snaps into place 2 .
Chapter 4. Using the Advanced Features of Your ThinkPad 67

Using Advanced Features of Your ThinkPad
5 Place the memory slot cover over the memory slot; theninstall the screw back into its place.
6 Turn the computer over again and confirm that the newmemory size appears at the upper left corner of thescreen.
For example, if you install the 32 MB DIMM you should see thefollowing:
6496 KB OK
You have finished installing the DIMM. Reconnect all cables.
Notes:
1. For the following status, turn off the computer and go to page 66 toreinstall the DIMM and do the memory test with Easy-Setup (see page25).
If a 2 1 error code appears under the memory count.
48576 KB OK 2 1
If the total memory size is not the same as the value you calculated.2. If you changed the memory installed in the computer, you need to create
a new hibernation file.
68 IBM ThinkPad 560X User's Guide
Using Advanced Features of Your ThinkPad
How to Calculate Total Memory Size
Calculate your total memory size in kilobytes (KB) by adding theDIMM memory size to the base memory size (32192 KB).
For example, if you installed a 32 MB DIMM, calculate the totalmemory size as follows.
Note: 1MB=1024KB
[ 32(MB) x 1 24(KB)/(MB) ] + 32192(KB) = 6496 (KB)
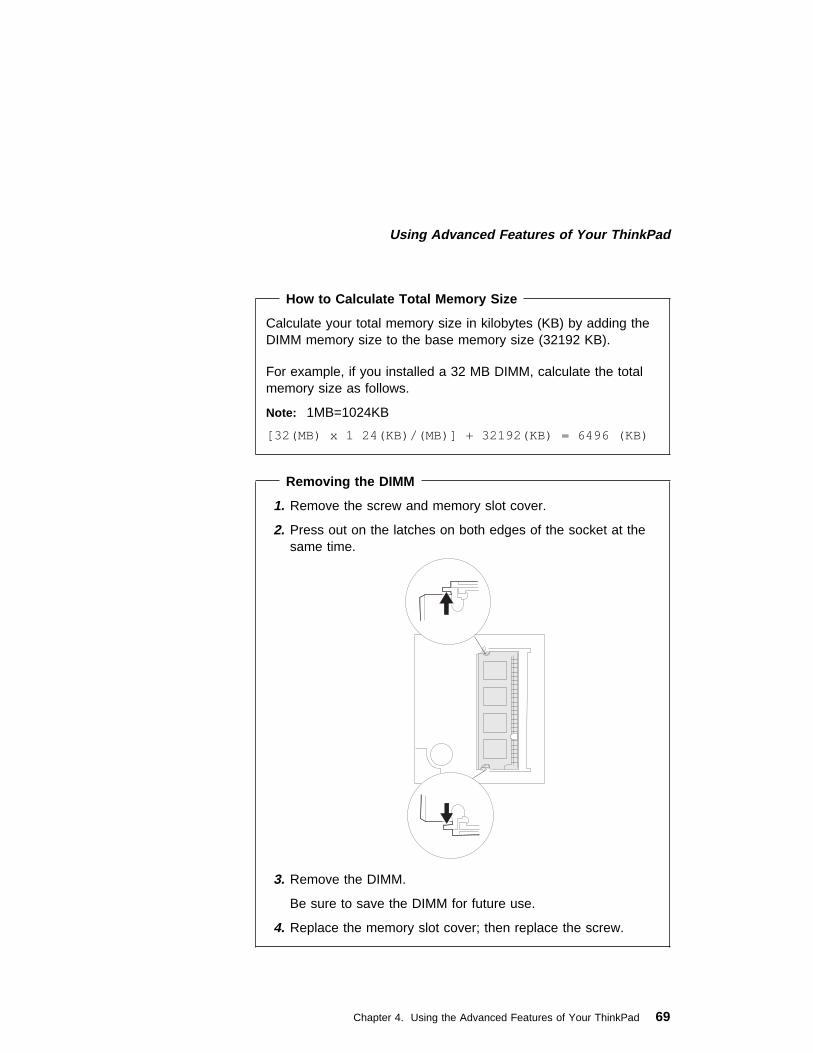
Removing the DIMM
1. Remove the screw and memory slot cover.
2. Press out on the latches on both edges of the socket at thesame time.
3. Remove the DIMM.
Be sure to save the DIMM for future use.
4. Replace the memory slot cover; then replace the screw.
Chapter 4. Using the Advanced Features of Your ThinkPad 69
Using Advanced Features of Your ThinkPad
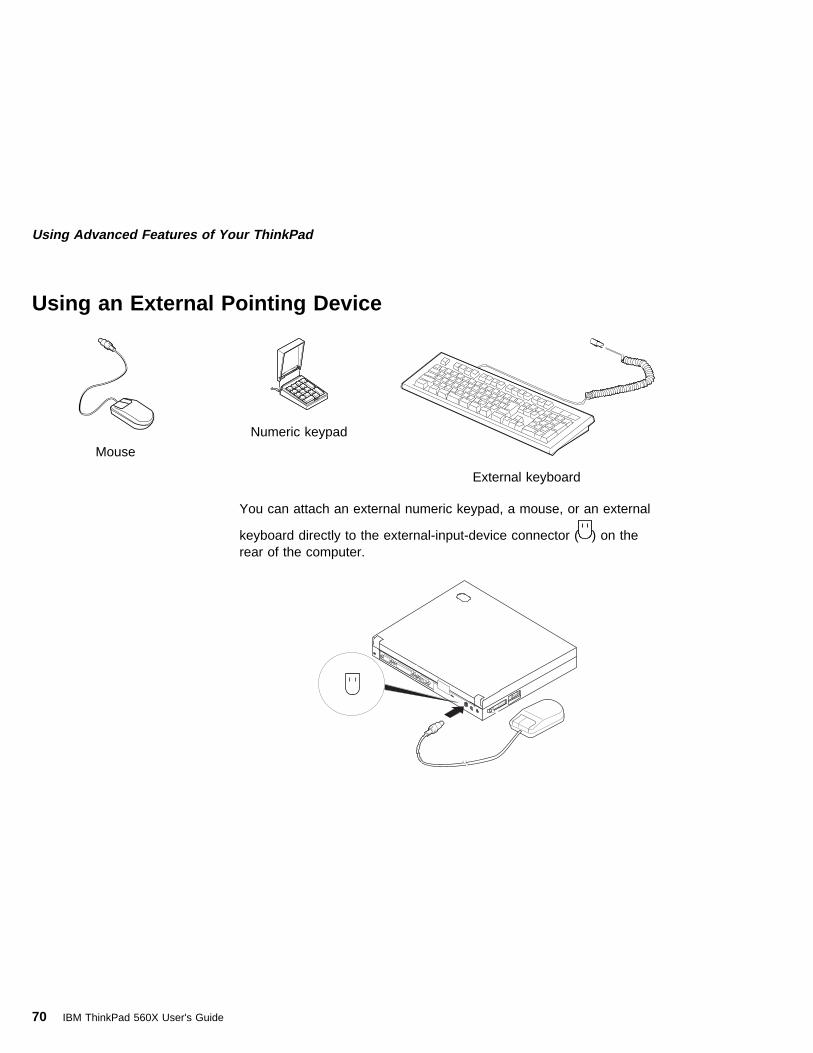
Using an External Pointing Device
Mouse
Numeric keypad
External keyboard
You can attach an external numeric keypad, a mouse, or an external
keyboard directly to the external-input-device connector ( ) on therear of the computer.
70 IBM ThinkPad 560X User's Guide

Using Advanced Features of Your ThinkPad
Attaching a Mouse
You can use both the IBM PS/2 Miniature Mouse and TrackPointIII as the pointing device. For other mouse types, see thefollowing attention note.
Attention
When you connect a mouse other than an IBM PS/2 MiniatureMouse, turn off the computer. Then go to “Disabling theTrackPoint III” on page 74.
If you want to use the external numeric keypad and mouse at thesame time, first connect the keypad cable to the computer; thenconnect the mouse cable 1 to the connector at the rear of thekeypad.
Chapter 4. Using the Advanced Features of Your ThinkPad 71
Using Advanced Features of Your ThinkPad
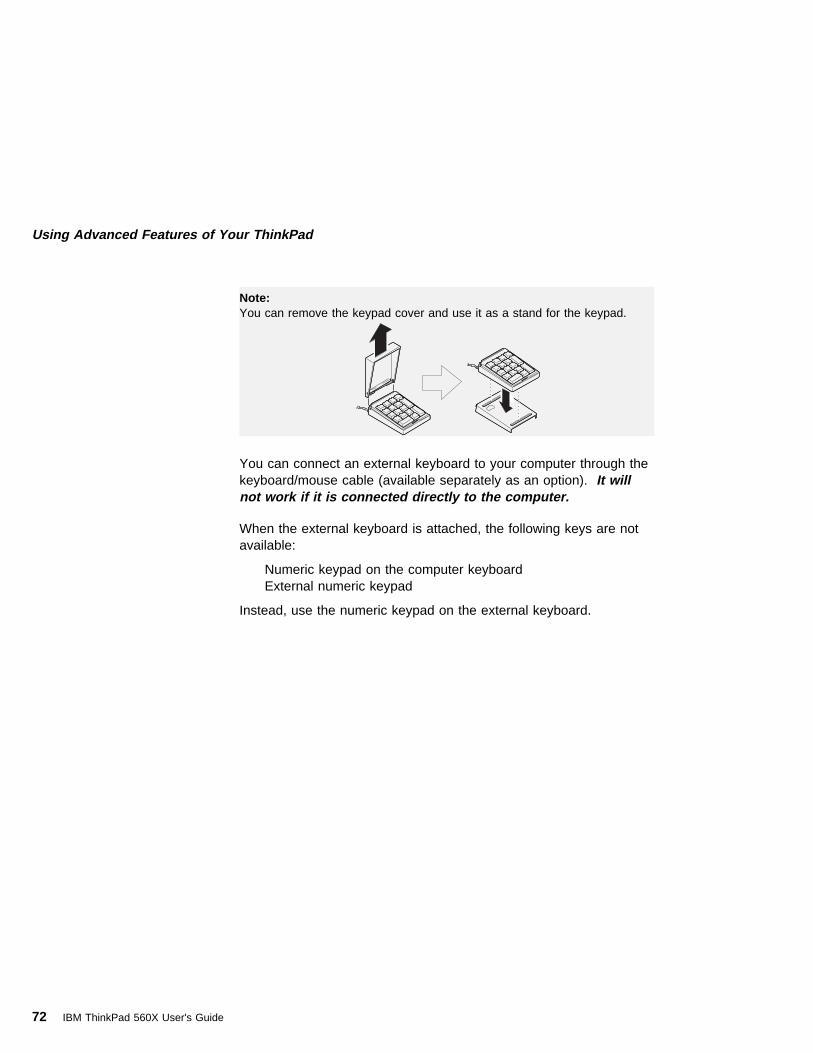
You can connect an external keyboard to your computer through thekeyboard/mouse cable (available separately as an option). It willnot work if it is connected directly to the computer.
When the external keyboard is attached, the following keys are notavailable:
Numeric keypad on the computer keyboardExternal numeric keypad
Instead, use the numeric keypad on the external keyboard.
Note: You can remove the keypad cover and use it as a stand for the keypad.
72 IBM ThinkPad 560X User's Guide

Using Advanced Features of Your ThinkPad
When you attach the external keyboard, turn off the computer, attachthe keyboard to the keyboard port of the keyboard/mouse cable 1 ,and then attach the keyboard/mouse cable to the computer 2 .
Chapter 4. Using the Advanced Features of Your ThinkPad 73

Using Advanced Features of Your ThinkPad
Disabling the TrackPoint IIIA serial mouse connected to the serial port or a device that is notcompatible with the PS/2 Mouse can be connected to theexternal-input-device connector. Some mouse types require theTrackPoint III to be disabled before you can use them.
To disable the TrackPoint III:
For Windows 95:
1 Start the ThinkPad Configuration program.
2 Click on the TrackPoint ( ) button.
3 Click on Disable for the TrackPoint.
These changes become effective when computer power isturned off and then on again.
For Windows NT, Windows 3.11, and OS/2:
1 Start the ThinkPad Configuration program.
2 Click on the Keyboard/Pointing Device ( ) button.
3 Click on Disable for the TrackPoint.
These changes become effective when computer power isturned off and then on again.
Using the IBM ThinkPad Space Saver Keyboard
When using the IBM ThinkPad Space Saver Keyboard, do notinstall the device driver supplied with the Space Saver Keyboard.When the Space Saver Keyboard is used, the device driver onthe computer's utility diskette automatically enables or disablesthe TrackPoint III of the computer when power is turned on.
74 IBM ThinkPad 560X User's Guide

Using Advanced Features of Your ThinkPad
Switching between the LCD and an External MonitorThis section provides information about using the computer LCD andan external monitor. It also provides considerations when using DOSapplications. The computer LCD output with SVGA (800-by-600resolution) video mode and 256K colors.
When you attach an external monitor that supports resolution higherthan VGA mode, you can get a maximum of 1024-by-768 videoresolution.
Attaching the MonitorThe following summarizes how to attach an external monitor:
1 Turn off the computer.
2 Connect the external monitor to the external monitor
connector ( ) on the rear of the computer; then connectit to an electrical outlet.
3 Turn on the external monitor and the computer.
4 Start the ThinkPad Configuration program.
5 Change the display output type by clicking on the Both
( ) button or the External Display ( ) button.
Note: If you select the Both button, do not attach an external monitor thatsupports only VGA mode (640-by-480 resolution). Otherwise, theexternal monitor screen is scrambled and the output is not displayed,or the screen might be damaged. Use External Display instead.
Chapter 4. Using the Advanced Features of Your ThinkPad 75

Using Advanced Features of Your ThinkPad
6 Set your monitor type and display device driver asfollows.
If you are attaching an SVGA monitor, refer to “Using SVGAVideo Mode” on page 79 for information on the supported colordepth or resolution.
a) Click on the Display ( or ) button.
b) Click on the Advanced Properties.. button.
You can select your display type from the monitor list, orclick on a new resolution or refresh rate.
7 Restart the computer to make the changes effective.
Note: Refer to the specifications for your external monitor to determine itssupported resolutions and refresh rates.
76 IBM ThinkPad 560X User's Guide

Using Advanced Features of Your ThinkPad
CAUTION
It is not recommended tochange the LCD type while amoving picture is beingdrawn, for example, playing amovie or a game. Stop theapplication before changingthe LCD type.
Changing the LCD Type
You can change the display output type with ThinkPadConfiguration program. Select one of the following displayoutput types:
LCD ( ): The computer output is displayed only on theLCD of the computer.
External Display ( ): The computer output is displayedonly on the attached external monitor.
If no external monitor is attached to the computer and thedisplay output type is set to External Display, the output isdisplayed on the LCD.
Both ( ): The computer output is displayed on both theLCD and the external monitor.
You can also change the display output type as follows:
Using the Fn key function:
Press and hold the Fn key; then press the F7 key. Theoutput is displayed sequentially as follows:
External Both Display LCD
Using PS2 Command:
For DOS, use the PS2 Command to change the displayoutput type.
– Type PS2 SC BOTH to display information on both the LCDand external monitor.
– Type PS2 SC External Display to display information onthe external monitor.
– Type PS2 SC LCD to display information on the LCD.
Chapter 4. Using the Advanced Features of Your ThinkPad 77

Using Advanced Features of Your ThinkPad
Important
If you are using OS/2 Warp, do not use System in the SystemSetup folder to change the resolution or color depth. Use theThinkPad Configuration program to configure the monitor.
Do not disconnect the external monitor while the computeris in suspend mode or hibernation mode. If no externalmonitor is attached when the computer resumes, the LCDremains blank and the output is not displayed. Thisrestriction does not depend on the resolution value.
Virtual Screen Function
The virtual screen function is available with the ThinkPadConfiguration program. It is used to display a part of thehigh-resolution screen image that is produced by your computer.Other parts can be seen by moving the screen with theTrackPoint III or other pointing device. The virtual screen can bedisabled on Windows 3.11 with ThinkPad Configuration program.In this case, restart your computer to make screen size fit thedisplay.
78 IBM ThinkPad 560X User's Guide

Using Advanced Features of Your ThinkPad
Considerations for DOS Screen on the LCD
When you use a DOS application that supports only VGA mode(640-by-480 resolution) with your computer, the screen imagemight appear smaller than the display size, as shown:
640 x 480
This is to maintain compatibility with DOS applications. Toexpand the screen image to the same size as the actual screen,you can use the screen expansion function. You can expand the
screen image by clicking on the Display button ( ) in theThinkPad Configuration program or by entering the PS2 HVEXP ONcommand. However, the image may look slightly distorted.
Using SVGA Video ModeYour ThinkPad 560X computer has an LCD that supports an SVGAvideo mode with 800x600 resolution. You can also displayinformation in higher resolutions by attaching an external monitor thatsupports higher resolutions. The following table shows the variousdisplay modes (resolution and color depth) available with yourcomputer or external monitor. Use this table to set the display output(LCD, External Display , or Both ).
Note: When installing an operating system, you must install the displaydriver supplied with the computer to use SVGA mode.
Chapter 4. Using the Advanced Features of Your ThinkPad 79
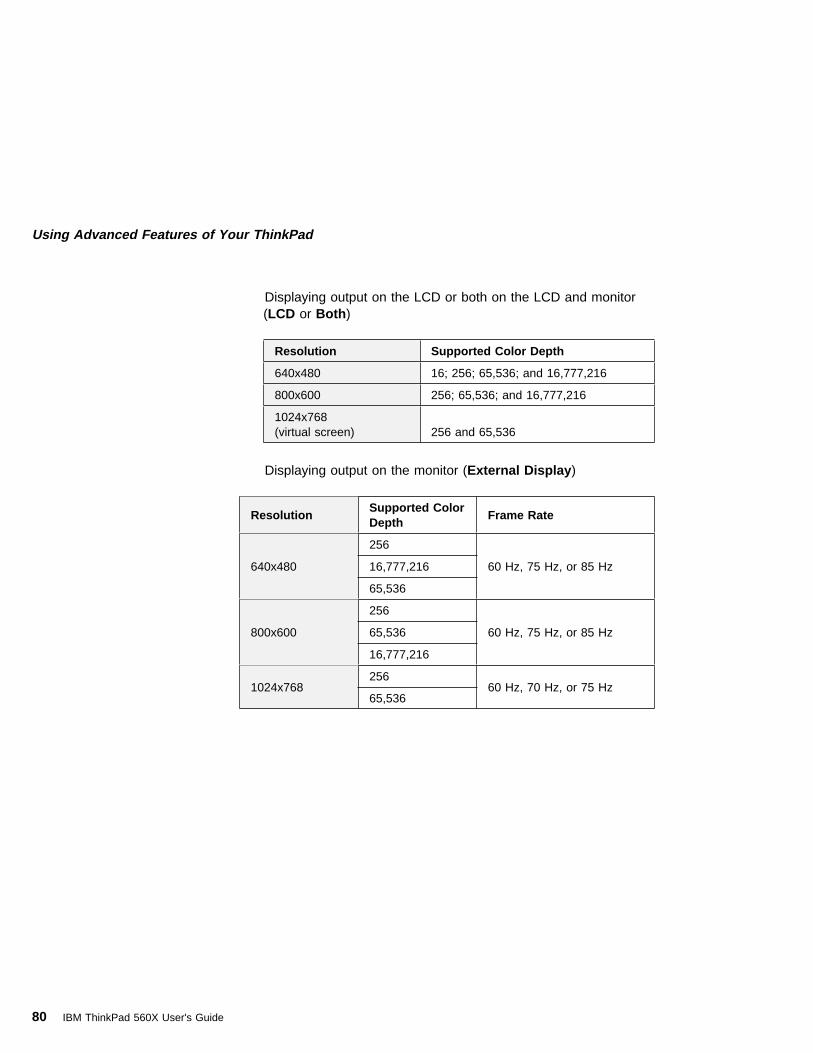
Using Advanced Features of Your ThinkPad
Displaying output on the LCD or both on the LCD and monitor(LCD or Both )
Displaying output on the monitor (External Display )
Resolution Supported Color Depth
640x480 16; 256; 65,536; and 16,777,216
800x600 256; 65,536; and 16,777,216
1024x768(virtual screen) 256 and 65,536
ResolutionSupported ColorDepth
Frame Rate
640x480
256
60 Hz, 75 Hz, or 85 Hz16,777,216
65,536
800x600
256
60 Hz, 75 Hz, or 85 Hz65,536
16,777,216
1024x768256
60 Hz, 70 Hz, or 75 Hz65,536
80 IBM ThinkPad 560X User's Guide

Using Advanced Features of Your ThinkPad
Using a PC CardThis section describes how to insert a PC Card.
Your computer has two PC Card slots (upper slot and lower slot) andsupports the following types of cards:
PC Card (Type I, Type II, and Type III)
CardBus
Zoomed Video (ZV)
You can insert a Type I or Type II PC Card one in either slot (youcan insert cards in both slots), or a single Type III PC Card in thelower slot.
Chapter 4. Using the Advanced Features of Your ThinkPad 81

Using Advanced Features of Your ThinkPad
Installing the PC Card1 Find the notched edge 1 of the PC Card as shown.
2 Open the the PC Card slot cover.
3 Insert the PC Card into the appropriate slot according toyour PC Card type.
Note:
If you are using a PC Card with a XJACK** connector, insert it intothe upper slot.
If you are using a Type I or Type II PC Card, insert it into eitherthe upper slot or the lower slot.
If you are using a Type III PC Card, insert the card into the lowerslot.
82 IBM ThinkPad 560X User's Guide

Using Advanced Features of Your ThinkPad
4 Press the PC Card firmly into the connector until the ejectbutton pops out. Then, pull the eject button out slightly
1 and fold it to the left. 2 .
Chapter 4. Using the Advanced Features of Your ThinkPad 83
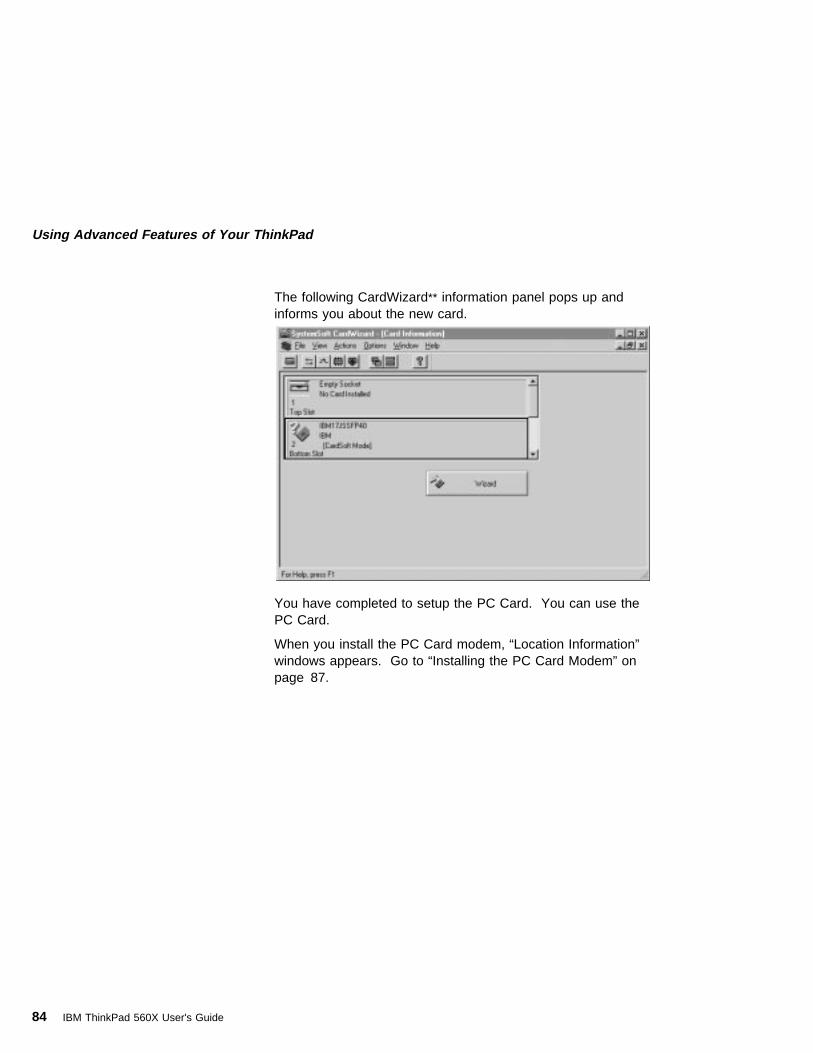
Using Advanced Features of Your ThinkPad
The following CardWizard** information panel pops up andinforms you about the new card.
You have completed to setup the PC Card. You can use thePC Card.
When you install the PC Card modem, “Location Information”windows appears. Go to “Installing the PC Card Modem” onpage 87.
84 IBM ThinkPad 560X User's Guide

Using Advanced Features of Your ThinkPad
Note
When the CardWizard does not have the device driver ofthe PC Card, the following “Select Installation Preference”window appears and you have to install the PC Card devicedriver. Go to “Installing the PC Card Device Driver .”
Installing the PC Card Device DriverInstall the device driver as follows:
1 Click on OK in the “Select Installation Preference”window.
The following window appears.
2 Insert the device driver (or option) diskette for the PCCard into the diskette drive.
Chapter 4. Using the Advanced Features of Your ThinkPad 85
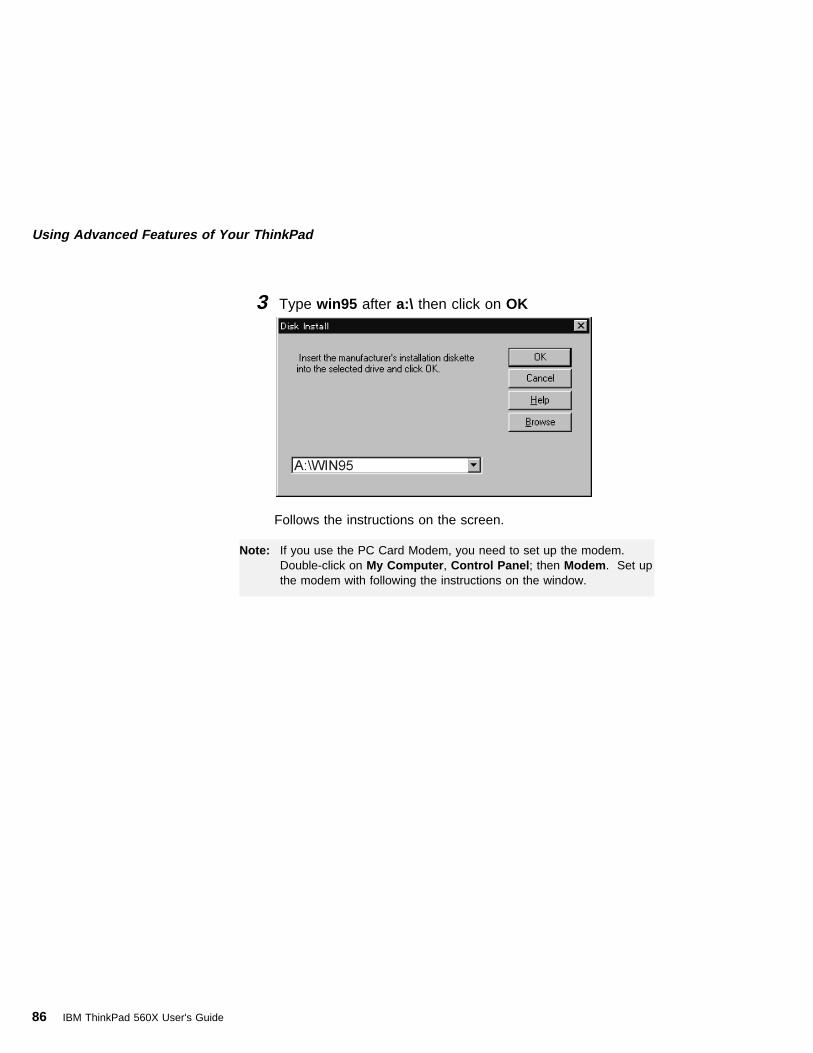
Using Advanced Features of Your ThinkPad
3 Type win95 after a:\ then click on OK
Follows the instructions on the screen.
Note: If you use the PC Card Modem, you need to set up the modem.Double-click on My Computer , Control Panel ; then Modem . Set upthe modem with following the instructions on the window.
86 IBM ThinkPad 560X User's Guide
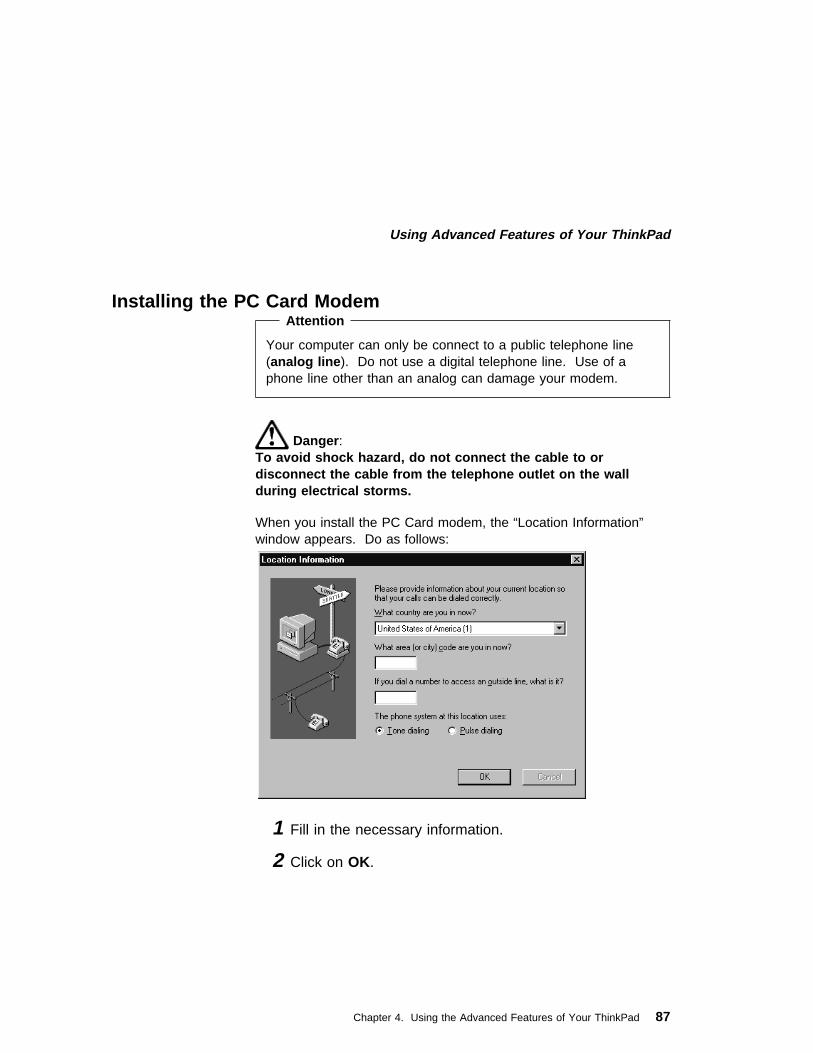
Using Advanced Features of Your ThinkPad
Installing the PC Card Modem Attention
Your computer can only be connect to a public telephone line(analog line ). Do not use a digital telephone line. Use of aphone line other than an analog can damage your modem.
Danger :To avoid shock hazard, do not connect the cable to ordisconnect the cable from the telephone outlet on the wallduring electrical storms.
When you install the PC Card modem, the “Location Information”window appears. Do as follows:
1 Fill in the necessary information.
2 Click on OK.
Chapter 4. Using the Advanced Features of Your ThinkPad 87
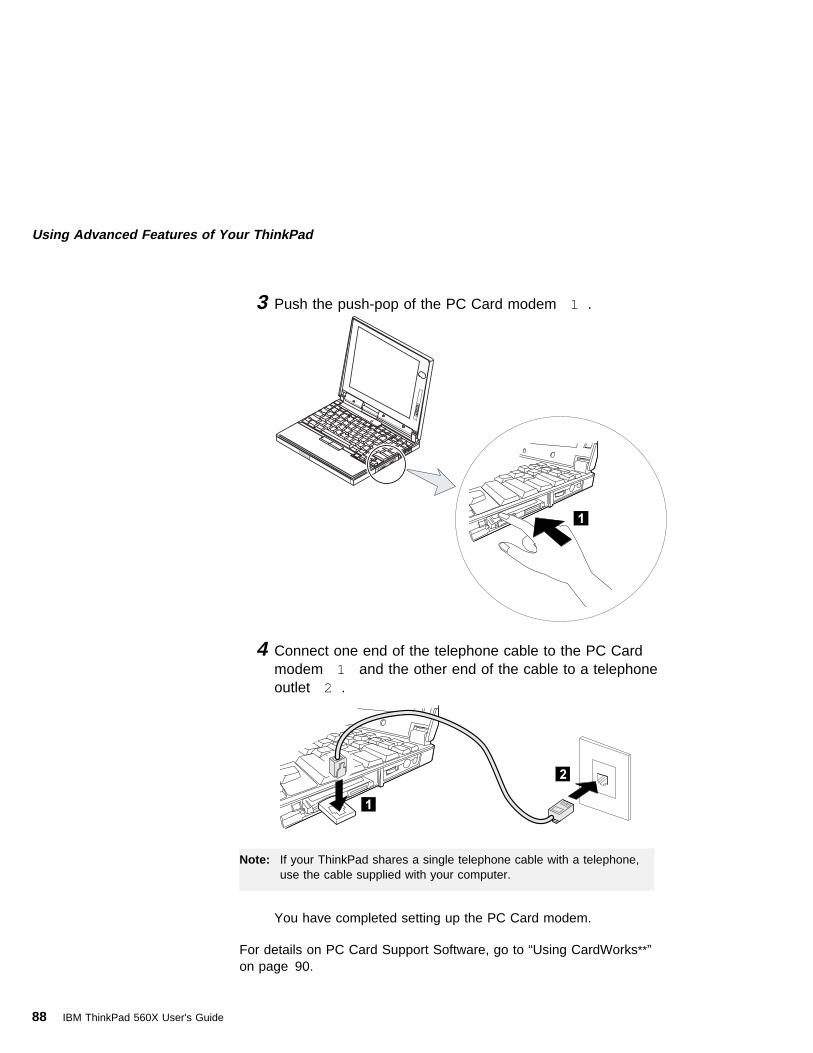
Using Advanced Features of Your ThinkPad
3 Push the push-pop of the PC Card modem 1 .
4 Connect one end of the telephone cable to the PC Cardmodem 1 and the other end of the cable to a telephoneoutlet 2 .
You have completed setting up the PC Card modem.
For details on PC Card Support Software, go to “Using CardWorks**”on page 90.
Note: If your ThinkPad shares a single telephone cable with a telephone,use the cable supplied with your computer.
88 IBM ThinkPad 560X User's Guide

Using Advanced Features of Your ThinkPad
Removing the PC Card
For a network modem, stop the PC Card before removing the PCCard from the PC Card slot (see “Stop” on page 95).
Raise the PC Card eject button 1 for the PC Card youwant to remove. Then, press the PC Card eject button 2until the PC Card pops out.
Remove the PC Card and save it for future use.
Chapter 4. Using the Advanced Features of Your ThinkPad 89

Using Advanced Features of Your ThinkPad
Using CardWorks **
The CardWorks application features a PC Card expert system thataddresses advanced configurations.
CardWorks extends the PC Card support for Windows 95 in thefollowing ways:
It minimizes user intervention in configuring many PC Cards.It supports cards using device driver for Windows 95 (Plug andPlay mode).It supports cards using existing PC Card device driver anddevice driver for Windows 3.11 (CardSoft mode).
The CardWizard application of CardWorks acts as a computer-basedtechnical advisor to help you diagnose and correct such problems as:
Incorrect or missing PC Card device drivers
Resource conflicts (I/O address, IRQ, and memory address)
Improperly installed (CardSoft) software
Conflicts between PC Card programs and extended memorymanager (EMM386)
90 IBM ThinkPad 560X User's Guide

Using Advanced Features of Your ThinkPad
To start the CardWizard, do as follows:
1 Click on Start .
2 Move the cursor over Programs and CardWorks . Thenclick on CardWizard .
The CardWizard information panel appears.
The information panel displays up-to-date information about the PCCards and PC Card slots using in your computer.
It also displays up to three lines of card information, which it readsdirectly from the card:
The first line shows the card nameThe second line shows the manufacturerThe third line shows the card's function or type
Wizard ButtonIf there are any problems, click on Wizard . Wizard solves suchproblems as incorrect or missing PC Card device drivers, systemresource conflicts (IRQ, memory, or I/O ports), and unconfigured PCCards, as well as memory conflicts.
Chapter 4. Using the Advanced Features of Your ThinkPad 91

Using Advanced Features of Your ThinkPad
Each time you press the Wizard button, a series of self-checks is runto assure that all necessary components are installed and workingproperly. CardWizard then analyzes the computer to verify that thereare resources available for PC Card configuration.
Even if CardWizard cannot automatically solve a problem, it canpinpoint the problem exactly so that you or a technical supportengineer can fix the problem more easily.
PC Card Properties WindowThe PC Card Properties window displays information about theattributes, resources, drivers, and memory card utilities that areloaded for PC Card support. CardWizard extracts importantinformation from the PC Card software device drivers and lists it in apanel.
To open the PC Card Properties window of the PC Card that you areusing, do the following:
1 Select the PC Card in the information panel by clickingon it.
2 Click on View in the menu bar of the information panel.
3 Click on Properties.. in the pop-up menu.
The “PC Card Properties” window appears.
92 IBM ThinkPad 560X User's Guide
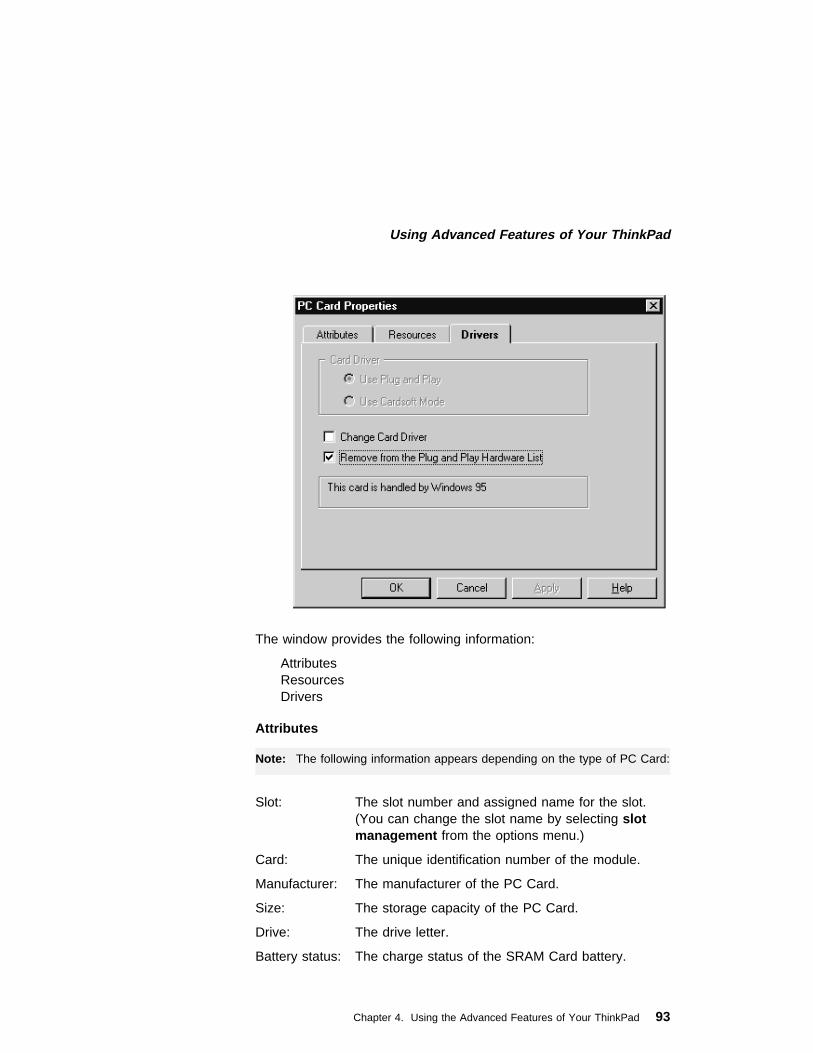
Using Advanced Features of Your ThinkPad
The window provides the following information:
Attributes Resources Drivers
Attributes
Slot: The slot number and assigned name for the slot.(You can change the slot name by selecting slotmanagement from the options menu.)
Card: The unique identification number of the module.
Manufacturer: The manufacturer of the PC Card.
Size: The storage capacity of the PC Card.
Drive: The drive letter.
Battery status: The charge status of the SRAM Card battery.
Note: The following information appears depending on the type of PC Card:
Chapter 4. Using the Advanced Features of Your ThinkPad 93
Using Advanced Features of Your ThinkPad
Write protect: The write protect status—either enabled or disabled.
File system: The file system used by the PC storage or hard diskcard.
Port: The communication port used by this PC modemcard.
Resources
IRQ: The interrupt request being used.
I/O: The starting and ending addresses of theinput/output range for the PC Card.
Memory range: The range of physical memory.
Drivers
Card driver: Indicates whether Plug&Play mode or CardSoftmode is used in configuring the PC Card. This fieldis enabled only if the Change card driver box ischecked. You should not change drivers if yourcard has been identified and configuredsuccessfully.
Change card driver:When this item is enabled (checked), you can selecteither Plug and Play (if available) or the CardWorksdevice drivers.
Remove from the Plug and Play hardware list:When this item is enabled (checked), you can deletethe Plug and Play device driver assigned to a card.This applies only when a card is handled byWindows 95 (Plug and Play mode). Later, when
Note: Some resource information is not relevant to all types of PC Cards.These nonrelevant resources are displayed as “Not Applicable.”
Note: CardWizard determines the type of device driver being used. It alsodisplays whether the card is configured by Windows 95 or byCardWorks.
94 IBM ThinkPad 560X User's Guide

Using Advanced Features of Your ThinkPad
you reinsert the same PC Card, CardWorksconfigures the card as if it were the first insertion.
Memory Card Utility:This item appears only when you insert the SRAMcard or Flash memory card. You can format theSRAM card or Flash memory card as follows:
Note: You can also format these card from the filesystem with the DOS FORMAT command.
1. Open the PC Card Properties window.
2. Select Memory Card Utility tab.
3. Enter a Volume Label (if desired).
4. Click on Format Drive/Partition .
5. Click on Start .
This function enables you to completely erase aSRAM/Flash memory card, especially a brand-newcard. Make sure to save the data on the cardbefore erasing it.
StopThis function stops cards configured as Windows 95 Plug and Playdevices. Stop is used by Windows 95 to flush all buffers and makesure no application is using or accessing the card.
Attention
If you are removing a PC Card, you must use stop. The systemmay freeze or data may be lost if a PC Card is removed before itis stopped.
Note: You can only stop one card at a time. After invoking stop, youcannot stop another card until the first stop has either completed orfailed.
Chapter 4. Using the Advanced Features of Your ThinkPad 95

Using Advanced Features of Your ThinkPad
You can stop a card in one of the following ways:
Stop (Method 1):
1 Click the left mouse button on on the SystemTray Cardlocated at the bottom right corner of the desktop:
One of the following messages appears:
Stop <manufacturer name> Card <slot number>Stop card <slot number>
2 Click on OK; then the following message appears:
The card has been stopped. You can safely remove thecard.
If the stop fails, no message appears.
Stop (Method 2):You can stop a card also by pressing the right mouse button on thecard icon in the information panel.
1 Click the right mouse button on the card icon andselecting stop in the pop up menu.
One of the following messages appears:
Stop <manufacturer name> Card <slot number>Stop card <slot number>
Note: The stop option appears in gray when you are inCardSoft mode or when the card is already stopped.
2 Click on OK; then the following message appears:
The card has been stopped. You can safely remove thecard.
If the stop fails, no message appears.
The card has been stopped. You can safely remove thecard.
96 IBM ThinkPad 560X User's Guide
Using Advanced Features of Your ThinkPad
Slot ManagementSlot management enables you to choose the first slot number (either1 or 2) to represent the top or bottom slot as the first slot, and toassign names to each available slot supported by your computer.Select slot management from the options menu. The SlotManagement window appears.
First slot number:This box enables you to decide whether CardWizard should refer toyour first slot as slot 1 or slot 2. Your selection becomes effectiveimmediately. The default setting of the first slot number is slot 1.
Slot representation:CardWizard displays your computer's PC Card slots one on top ofthe other. This box enables you to decide whether the top displayedslot or the bottom displayed slot is your first slot. Your selectionbecomes effective immediately. The default slot setting is that thetop slot is the first slot.
Slot name:You can enter a slot name for each slot on your computer.
HelpBy pressing F1 or selecting the HELP button, You can get help formost of the windows. A glossary of terms and an index of Helpitems are also available.
Chapter 4. Using the Advanced Features of Your ThinkPad 97

Using Advanced Features of Your ThinkPad
Using the Audio FeaturesYour computer is equipped with the following:
A -inch (3.5-mm) diameter external stereo line-in or monauralmicrophone/line-in jack.
A -inch (3.5-mm) diameter stereo headphone or anexternal-powered speaker jack.
A MIDI/joystick port on the port replicator. To use a MIDI device,you should first connect your computer to a port replicator; thenconnect an external MIDI device to the port replicator. Afterdocking your computer in the port replicator, you should enablethis port using the ThinkPad Configuration program.
Your computer also has an audio chip that enables you to enjoyvarious multimedia audio features. This audio chip provides thefollowing features:
Recording and playing back of PCM and WAV files in 8-bit or16-bit format.
Sampling of various rates from 8 KHz to 44 KHz for the WAVfile.
Playback of MIDI files through an FM synthesizer.
Recording from various sound sources, such as an integratedmicrophone, an external microphone, or an audio deviceattached to a line-in jack or an integrated CD-ROM drive.
DOS game compatibility. You should select Sound Blaster Pro**for the audio adapter in the sound setup of the game.
The 3D Sound Retrieval System (SRS) function compensates forthe flat, two dimensional sound image limitations byreestablishing the necessary information that allows the humanear to hear in three dimensions.
CAUTION
Do not enter suspend or hibernation mode when you are usingaudio features. You need to restart or resetup the application forcontinuous use.
98 IBM ThinkPad 560X User's Guide

Using Advanced Features of Your ThinkPad
Using the 3D Sound Retrieval System (SRS) FunctionTo use the SRS function, do the following:
1 Double-click on the small speaker icon ( ) at thebottom right of the Windows desktop.
or
Click on the Start button, and then select Programs ,Accessories , Multimedia , and Volume Control .
The “Master Out” window appears:
2 Make sure that the SRS Balance column is displayedand the Mute checkbox is unchecked.
If the column is displayed and the checkbox is not checked,exit the window. You can use the SRS function; skip theremaining steps.
If the column is not displayed, select Options on the upper leftcorner of the window and select Properties . The “Properties”window appears:
Chapter 4. Using the Advanced Features of Your ThinkPad 99

Using Advanced Features of Your ThinkPad
3 Put a check mark on SRS and press OK.
You return to the “Master Out” window.
4 Make sure that the Mute checkbox is unchecked.
5 Exit the “Master Out” window.
Now you can use the SRS function.
100 IBM ThinkPad 560X User's Guide
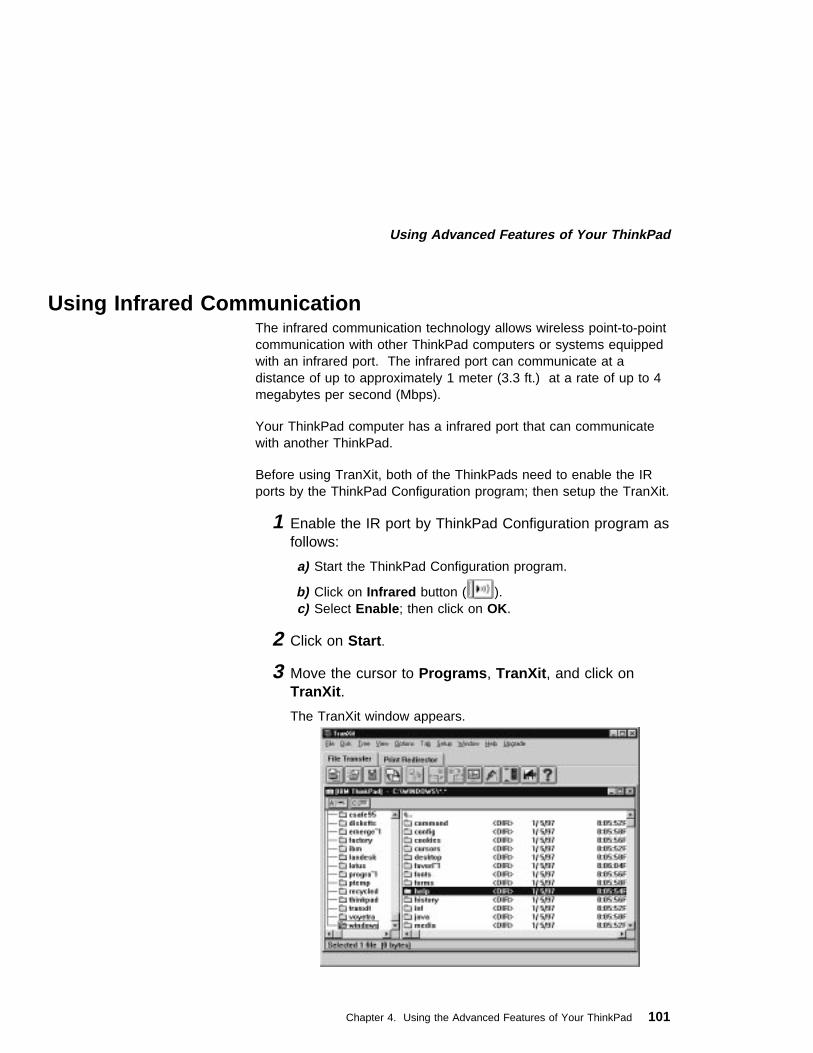
Using Advanced Features of Your ThinkPad
Using Infrared CommunicationThe infrared communication technology allows wireless point-to-pointcommunication with other ThinkPad computers or systems equippedwith an infrared port. The infrared port can communicate at adistance of up to approximately 1 meter (3.3 ft.) at a rate of up to 4megabytes per second (Mbps).
Your ThinkPad computer has a infrared port that can communicatewith another ThinkPad.
Before using TranXit, both of the ThinkPads need to enable the IRports by the ThinkPad Configuration program; then setup the TranXit.
1 Enable the IR port by ThinkPad Configuration program asfollows:
a) Start the ThinkPad Configuration program.
b) Click on Infrared button ( ).c) Select Enable ; then click on OK.
2 Click on Start .
3 Move the cursor to Programs , TranXit , and click onTranXit .
The TranXit window appears.
Chapter 4. Using the Advanced Features of Your ThinkPad 101

Using Advanced Features of Your ThinkPad
4 Place the two ThinkPads so that the infrared ports faceeach other.
Remove all obstacles between the two ThinkPads. When thetwo IR ports are lined up properly, the TranXit windowseparates into two sub windows, one is for your ThinkPad andthe other is for the other ThinkPad.
5 Click and drag the file you want to send from yourThinkPad window to the other ThinkPad window.
You can send the file.
102 IBM ThinkPad 560X User's Guide

Chapter 5. Solving Computer Problems
Frequently Asked Questions . . . . . . . . . . . . . . . . . . . . 104Hints, Tips, and Limitations . . . . . . . . . . . . . . . . . . . . . 105Troubleshooting Guide . . . . . . . . . . . . . . . . . . . . . . . . 106Troubleshooting Charts . . . . . . . . . . . . . . . . . . . . . . . 107
Error Codes or Screen Messages . . . . . . . . . . . . . . . . 108No Error Codes or Screen Messages . . . . . . . . . . . . . 112Input Problems . . . . . . . . . . . . . . . . . . . . . . . . . . 113Suspend or Hibernation Problems . . . . . . . . . . . . . . . 114LCD Problems . . . . . . . . . . . . . . . . . . . . . . . . . . . 117Indicator Problems . . . . . . . . . . . . . . . . . . . . . . . . 118Battery Problems . . . . . . . . . . . . . . . . . . . . . . . . . 118Infrared Communication Problems . . . . . . . . . . . . . . . 119A Universal Serial Bus (USB) Problem . . . . . . . . . . . . . 120PC Card Problems . . . . . . . . . . . . . . . . . . . . . . . . 120Printer Problems . . . . . . . . . . . . . . . . . . . . . . . . . . 122External Monitor Problems . . . . . . . . . . . . . . . . . . . . 122Other Option Problems . . . . . . . . . . . . . . . . . . . . . . 124Software Problems . . . . . . . . . . . . . . . . . . . . . . . . 125Other Problems . . . . . . . . . . . . . . . . . . . . . . . . . . 125
Testing Your Computer . . . . . . . . . . . . . . . . . . . . . . . 126Recovering Lost or Damaged Software . . . . . . . . . . . . . . 128
Using the Diskette Factory . . . . . . . . . . . . . . . . . . . . 128Using the Recovery CD (Windows 95 Only) . . . . . . . . . . 130
Copyright IBM Corp. 1997 103

Solving Computer Problems
Frequently Asked QuestionsHow can I expand my hard disk space?
Most preloaded applications in the hard disk can be uninstalled to make more room forother applications. Check whether the application you want to delete has its own deletionicon.
After you create the necessary driver diskettes using the Diskette Factory, delete the files.
How can I get the operating system or the device driver diskettes?You can restore Windows 95 using the Recovery CD, which is shipped with your computer.For details, refer to the online book.
You can make a backup copy of your device drivers by using the Diskette Factory program asfollows:
1. Click on Start .2. Move the cursor on ThinkPad Tool .3. Click on Diskette Factory .
How can I resolve a resource conflict (such as an IRQ or a COM port setting) occurring duringthe installation of a new option or a new application?
See “Solving the Hardware Conflict” in the online book to obtain information on hardwareresources used by the devices in the computer.
Why doesn't my computer perform as I expected?Your computer's performance varies depending on the hardware and software installed, suchas memory size, swapper file size, and smart drive settings.
Also, close all windows you are not using; for example, close the “Media Player” window whenyou play a CD in the CD-ROM drive.
104 IBM ThinkPad 560X User's Guide

Solving Computer Problems
Hints, Tips, and LimitationsThis chapter describes hints, tips, and limitations.
For Windows 95:
When the the system cannot enter suspend mode due toon-going activities, the Intel USB camera attached to the systemwill be disabled. To enable the USB camera, unplug it and plugit in again.
For OS/2 Warp:
When you have formatted the drive in HPFS which has morethan 64 MB memory, hibernation is not supported.
If the COM port does not work even if you have set it upcorrectly with the ThinkPad Configuration program, do asfollows:
1. Open System Setup .2. Select Hardware Manager .3. Select a folder from the menu.
4. Select Properties .5. Under the default pull down menu, select No Hardware
Detection . If it has already been selected, change thesetting.
6. Open the ThinkPad Configuration program.7. Set the COM port as desired.8. Reboot the system.
For Windows NT:
For Windows NT 3.51 and 4.0, hibernation is not supportedwhen the drive is formatted by NTFS.
Chapter 5. Solving Computer Problems 105

Solving Computer Problems
Troubleshooting GuideThe following chart shows how to find or solve a problem.
When a beep sounds, when a message appears, or when afunction-related problem occurs:
1 Find your symptom from the tableand try solving the problem.
“TroubleshootingCharts” onpage 107
2 If you can't solve the problem, runtest and make sure the hardwareand the device drivers are OK.
“Testing YourComputer” onpage 126
3 Note the error code and have thecomputer serviced.
Chapter 6
When you accidentally lose or damage software in yourcomputer:
Recover it by using the Recovery CD orthe Diskette Factory.
“Recovering Lostor DamagedSoftware” onpage 128.
106 IBM ThinkPad 560X User's Guide

Solving Computer Problems
Troubleshooting ChartsIf your computer has an error, it often displays a message or an errorcode, or a beep sounds when you power it on. Go through thecharts and look for your problem. If you find the problem, go to thepage indicated and do the specified action.
Troubleshooting Chart Page
Error codes or screen messages 108
No error codes or screen messages 112
Input problems 113
Suspend or hibernation problems 114
LCD problems 117
Indicator problems 118
Battery problems 118
Infrared communication problems 119
A universal serial bus problem 120
PC Card problems 120
Printer problems 122
External monitor problems 122
Other option problems 124
Software problems 125
Other problems 125
Chapter 5. Solving Computer Problems 107
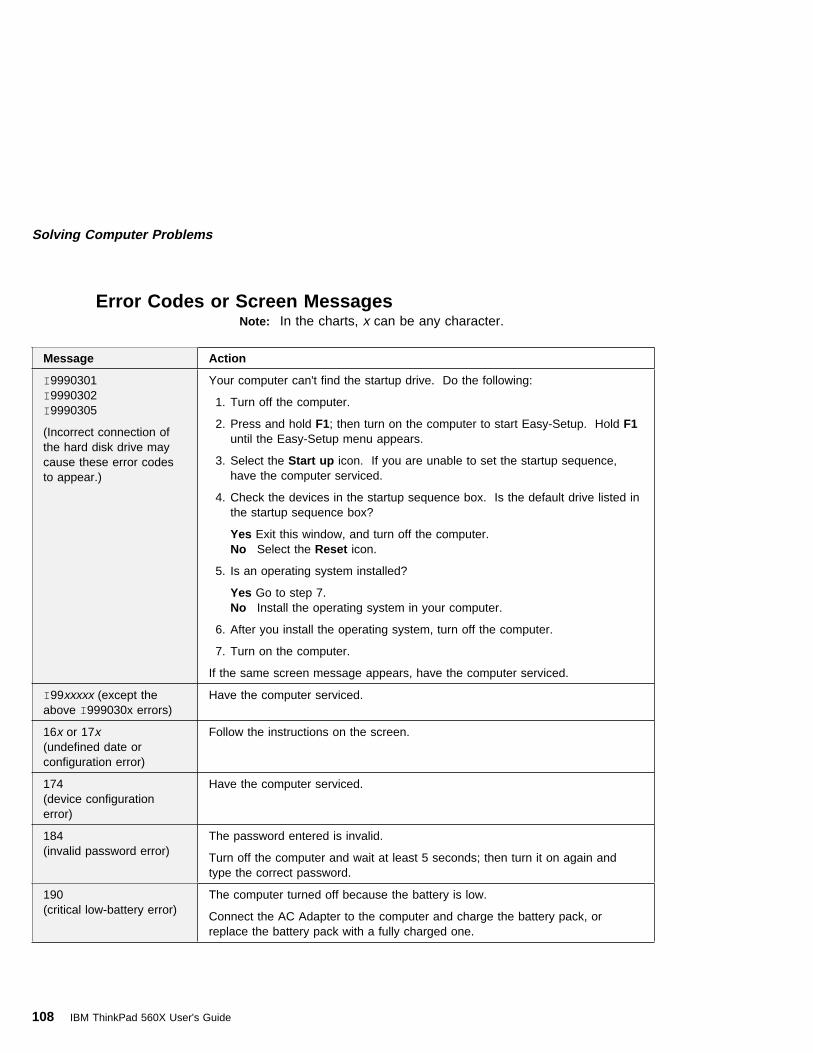
Solving Computer Problems
Error Codes or Screen MessagesNote: In the charts, x can be any character.
Message Action
I 9990301I 9990302I 9990305
(Incorrect connection ofthe hard disk drive maycause these error codesto appear.)
Your computer can't find the startup drive. Do the following:
1. Turn off the computer.
2. Press and hold F1; then turn on the computer to start Easy-Setup. Hold F1until the Easy-Setup menu appears.
3. Select the Start up icon. If you are unable to set the startup sequence,have the computer serviced.
4. Check the devices in the startup sequence box. Is the default drive listed inthe startup sequence box?
Yes Exit this window, and turn off the computer.No Select the Reset icon.
5. Is an operating system installed?
Yes Go to step 7.No Install the operating system in your computer.
6. After you install the operating system, turn off the computer.
7. Turn on the computer.
If the same screen message appears, have the computer serviced.
I 99xxxxx (except theabove I 999030x errors)
Have the computer serviced.
16x or 17x(undefined date orconfiguration error)
Follow the instructions on the screen.
174(device configurationerror)
Have the computer serviced.
184(invalid password error)
The password entered is invalid.
Turn off the computer and wait at least 5 seconds; then turn it on again andtype the correct password.
190(critical low-battery error)
The computer turned off because the battery is low.
Connect the AC Adapter to the computer and charge the battery pack, orreplace the battery pack with a fully charged one.
108 IBM ThinkPad 560X User's Guide

Solving Computer Problems
Message Action
195(hibernation error)
The system configuration differs between the time your computer enteredhibernation mode and the time it exited this mode, and your computer cannotresume normal operation.
Change the system configuration to what it was before your computerentered hibernation mode.If the memory size was changed, re-create the hibernation file.
196(hibernation error)
The computer cannot read the hibernation file.
Have the computer serviced.
2xx(memory error)
Make sure that the DIMM option is correctly installed.
30x(keyboard error)
Make sure that no object is placed on the keyboard or on the external keyboard,if you have one. Power off the computer and power off all attached devices.Power on the computer first; then power on the attached devices.
If you still have a problem, do the following:
If an external keyboard is connected, do the following:– Turn off the computer and disconnect the external keyboard; then turn
on the computer. Make sure that your keyboard operation is correct. Ifit is, have the external keyboard serviced.
– Make sure that the external keyboard is connected to the correctconnector.
Test the computer by selecting the Start icon in the Easy-Setup “Test”submenu.
– If the computer stops during the test, have the computer serviced.
Diskette and F1 prompts
F2 F10
F1
Make sure that the self-starting diskette is inserted correctly (with the labelfacing up and metal-shutter end first) in the diskette drive.
If it is, press F1. If both prompts remain, have the computer serviced.
Chapter 5. Solving Computer Problems 109
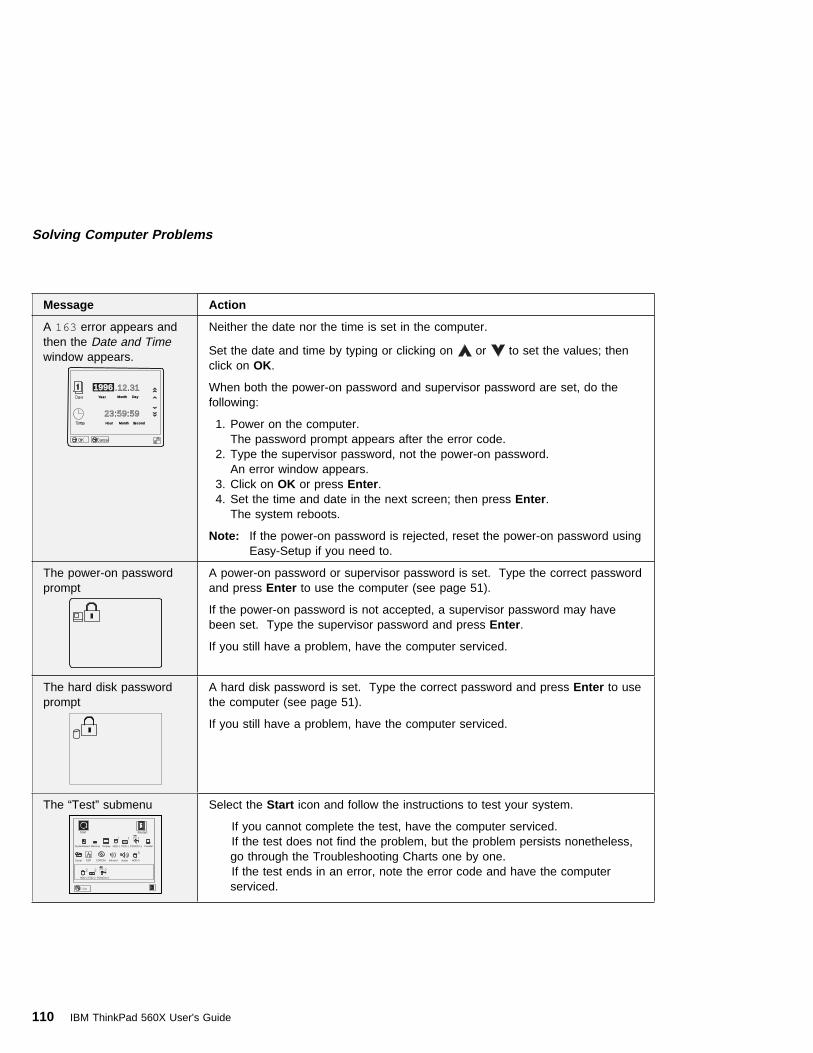
Solving Computer Problems
Message Action
A 163 error appears andthen the Date and Timewindow appears.
.12.31
23:59:59
Month Day
Hour Month Second
Year
19961996
Neither the date nor the time is set in the computer.
Set the date and time by typing or clicking on or to set the values; thenclick on OK.
When both the power-on password and supervisor password are set, do thefollowing:
1. Power on the computer.The password prompt appears after the error code.
2. Type the supervisor password, not the power-on password.An error window appears.
3. Click on OK or press Enter .4. Set the time and date in the next screen; then press Enter .
The system reboots.
Note: If the power-on password is rejected, reset the power-on password usingEasy-Setup if you need to.
The power-on passwordprompt
A power-on password or supervisor password is set. Type the correct passwordand press Enter to use the computer (see page 51).
If the power-on password is not accepted, a supervisor password may havebeen set. Type the supervisor password and press Enter .
If you still have a problem, have the computer serviced.
The hard disk passwordprompt
A hard disk password is set. Type the correct password and press Enter to usethe computer (see page 51).
If you still have a problem, have the computer serviced.
The “Test” submenu
Exit
RestartStart
SystemBoard Memory Display HDD-1 FDD-1 ParallelPCMCIA-1
PCMCIA-2FDD-2HDD-2
HDD-3Serial CDROMDSP AudioInfrared
Select the Start icon and follow the instructions to test your system.
If you cannot complete the test, have the computer serviced.If the test does not find the problem, but the problem persists nonetheless,go through the Troubleshooting Charts one by one.If the test ends in an error, note the error code and have the computerserviced.
110 IBM ThinkPad 560X User's Guide

Solving Computer Problems
Message Action
A POST error prompt
ERROR
OK Cancel
An error was found during POST. Press Enter ; then select Start from the“Test” submenu and run the test.
If the test ends in an error, note the error code and have the computer serviced.
An error prompt Turn off the computer and start Easy-Setup; then select Test to test thecomputer.
If the test ends in an error, note the error code and have the computer serviced.
You can start the operating system by pressing F1 instead, and ignore the error.
The DOS full-screen lookssmaller.
640 x 480
When you use a DOS application that supports only the 640x480 resolution(VGA mode), the screen image might look slightly distorted or might appearsmaller than the display size. This is to maintain compatibility with the otherDOS applications. To expand the screen image to the same size as the actual
screen, start the ThinkPad Configuration program and click on LCD ( );then select the Screen expansion function. (The image may still look slightlydistorted.)
Note: You can use the Fn+F8 keys to do the same thing.
A panel or message thatis not listed.
Turn off the computer and start Easy-Setup; then select Test to test thecomputer.
If the test ends in an error, note the error code and have the computer serviced.
If you cannot start Easy-Setup, have the computer serviced.
xxxxx KB OK appearsand the computer stops.
Have the computer serviced.
Chapter 5. Solving Computer Problems 111
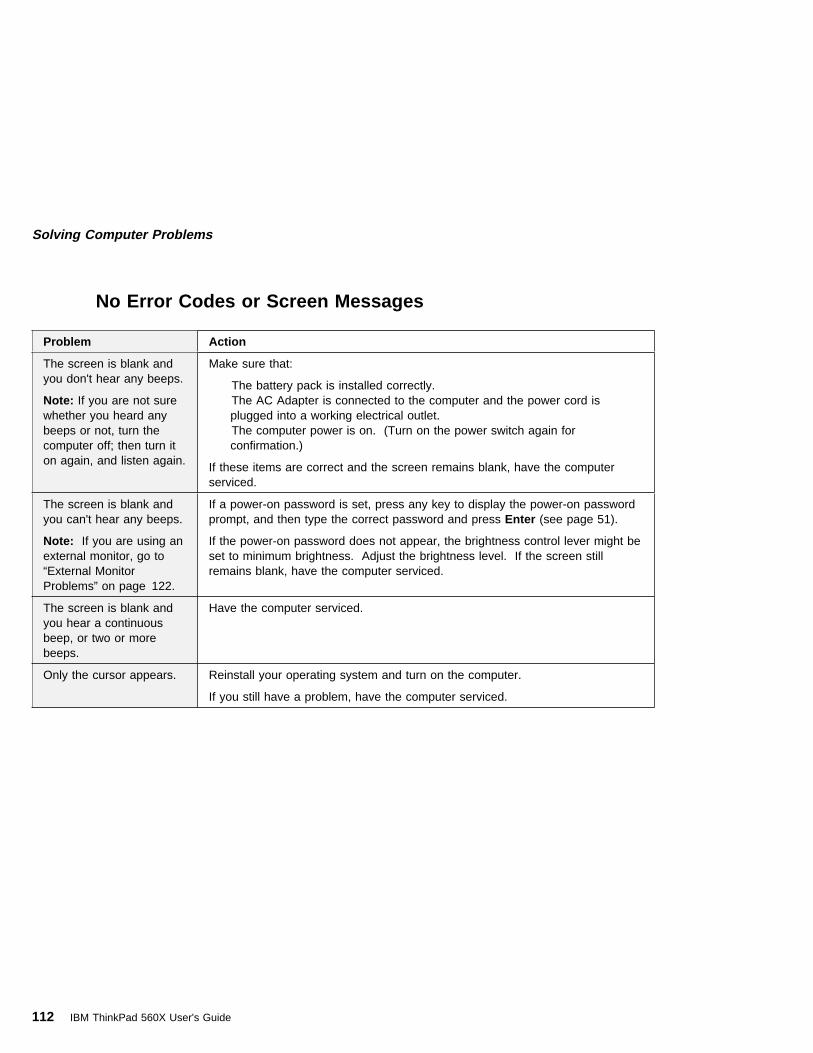
Solving Computer Problems
No Error Codes or Screen Messages
Problem Action
The screen is blank andyou don't hear any beeps.
Note: If you are not surewhether you heard anybeeps or not, turn thecomputer off; then turn iton again, and listen again.
Make sure that:
The battery pack is installed correctly.The AC Adapter is connected to the computer and the power cord isplugged into a working electrical outlet.The computer power is on. (Turn on the power switch again forconfirmation.)
If these items are correct and the screen remains blank, have the computerserviced.
The screen is blank andyou can't hear any beeps.
Note: If you are using anexternal monitor, go to“External MonitorProblems” on page 122.
If a power-on password is set, press any key to display the power-on passwordprompt, and then type the correct password and press Enter (see page 51).
If the power-on password does not appear, the brightness control lever might beset to minimum brightness. Adjust the brightness level. If the screen stillremains blank, have the computer serviced.
The screen is blank andyou hear a continuousbeep, or two or morebeeps.
Have the computer serviced.
Only the cursor appears. Reinstall your operating system and turn on the computer.
If you still have a problem, have the computer serviced.
112 IBM ThinkPad 560X User's Guide

Solving Computer Problems
Input Problems
Problem Action
The pointer does notmove after the computerawakens from one of thepower managementmodes.
Make sure you followed the instructions in the online book correctly when youinstalled Windows with the Advanced Power Management (APM) option.
All or some keys on thekeyboard do not work.
If the problem occurred immediately after the computer returned fromsuspend mode, enter the power-on password if it is set.If an external keyboard is connected, the numeric keypad on your computerwill not work. This is not a defect.If an external numeric keypad or a mouse is connected:1. Turn off the computer.2. Remove the external numeric keypad or the mouse.3. Turn on the computer and try using the keyboard again.
If the keyboard problem is resolved, check the connection of the externalnumeric keypad, external keyboard, or the mouse.
If you still have a problem, have the computer serviced.
The pointer drifts whenthe computer is turned onor after it resumes normaloperation.
The pointer may drift when you are not using the TrackPoint III during normaloperation. This is a normal characteristic of the TrackPoint III and is not adefect. Pointer drifting may occur for several seconds under the followingconditions:
When the computer is turned on.When the computer resumes normal operation.When the TrackPoint III is pressed for a long time.When the temperature changes.
The mouse or pointingdevice does not work.
Make sure that the mouse or pointing-device cable is securely connected tothe computer.Try using the TrackPoint III. If the TrackPoint III works, the error might bedue to the mouse.If your mouse is incompatible with the IBM PS/2 mouse, disable theTrackPoint III using the ThinkPad Configuration program.
Note: See the manual supplied with the mouse for more information.
The mouse buttons don'twork.
Change the mouse driver to Standard PS/2 Port Mouse , and then change toPS/2 TrackPoint III .
A number appears whenyou type a letter.
The numeric lock function is on. To disable it, press and hold Shift ; then pressNumLk .
Chapter 5. Solving Computer Problems 113

Solving Computer Problems
Suspend or Hibernation Problems
Problem Action
The computer enterssuspend modeautomatically.
The computer enters suspend mode automatically when the processortemperature reaches a certain level. This is not a defect.
Performance degradeswhen the computer getshot during use.
The processor speed might decrease under the following conditions:
Use in a hot environmentHigh-powered processing that requires high-power consumption
This is not a defect.
The computer enterssuspend modeimmediately after POST(the suspend lamp turnson).
Make sure that:
The battery pack is charged.The operating temperature is within the acceptable range. Refer toAppendix A.
If these items are correct, have the computer serviced.
Error 19 appears and thecomputer immediatelyturns off.
The battery pack power is getting low. Connect the AC Adapter to thecomputer, or replace the battery pack with a fully charged one.
The computer does notreturn from suspendmode, or the suspendlamp stays on and thecomputer does not work.
The computer automatically enters suspend or hibernation mode when thebattery power is empty. Do one of the following:
Replace the battery pack with a fully charged one and then press Fn.Connect the AC Adapter to the computer; then press Fn.
The LCD is blank afterresuming.
Check if an external display was not connected before entering suspend mode.Do not disconnect the external monitor while the computer is in suspendmode or hibernation mode. If no external monitor is attached when thecomputer resumes, the LCD remains blank and the output is notdisplayed. This restriction does not depend on the resolution value.
114 IBM ThinkPad 560X User's Guide
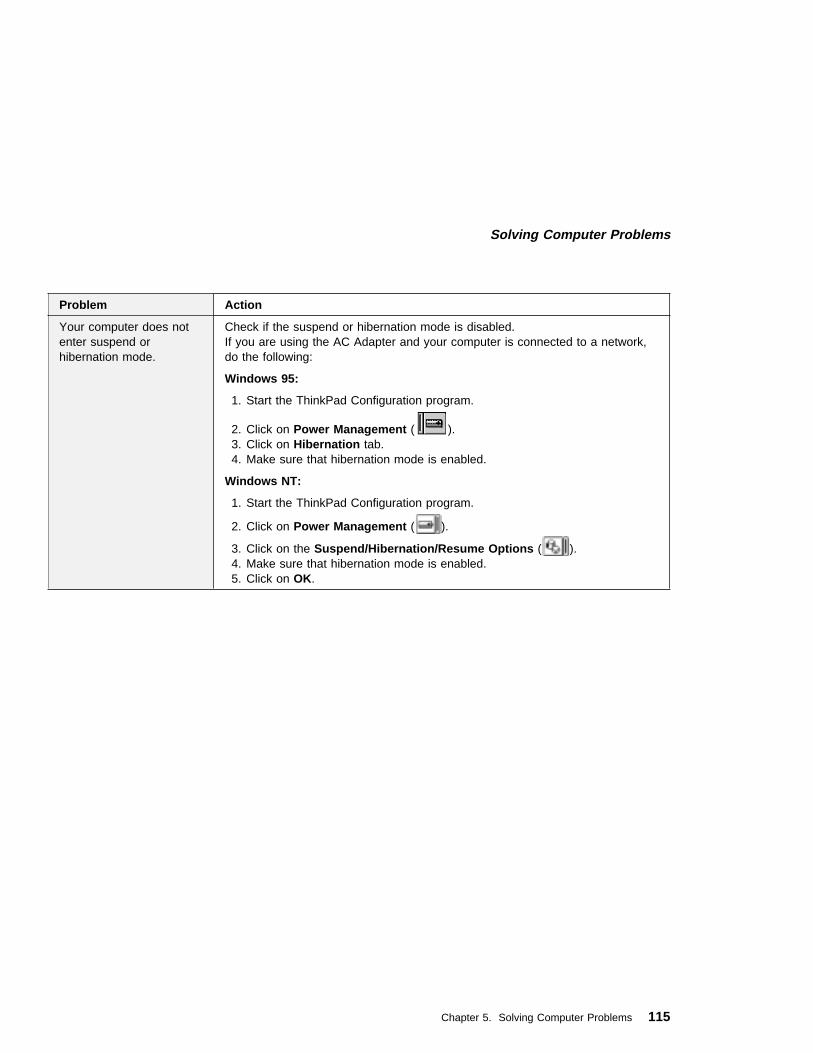
Solving Computer Problems
Problem Action
Your computer does notenter suspend orhibernation mode.
Check if the suspend or hibernation mode is disabled.If you are using the AC Adapter and your computer is connected to a network,do the following:
Windows 95:
1. Start the ThinkPad Configuration program.
2. Click on Power Management ( ).3. Click on Hibernation tab.4. Make sure that hibernation mode is enabled.
Windows NT:
1. Start the ThinkPad Configuration program.
2. Click on Power Management ( ).
3. Click on the Suspend/Hibernation/Resume Options ( ).4. Make sure that hibernation mode is enabled.5. Click on OK.
Chapter 5. Solving Computer Problems 115

Solving Computer Problems
Problem Action
The computer does notenter hibernation modewith the Fn+F12 keycombination.
Enable hibernation mode as follows:
For Windows 95:
1. Start the ThinkPad Configuration program.
2. Click on Power Management ( ).3. Click on the Hibernation tab.4. Click on Enable Hibernation .
Note: If you have already created the hibernation file, this button isdisplayed in gray and you cannot click on it.
5. Click on Create Now .6. Click on OK.
The computer cannot enter hibernation mode when you are using one of theIBM communication PC Cards.
To enter hibernation mode, stop the communication program, and then removethe PC Card or turn off power on the PC Card slot using the Control Panel .
For Windows NT:
Note: You must format your hard disk with the FAT format system to usehibernation mode in Windows NT. When you format your hard disk withNTFS, the Windows NT default format, you will not be able to usehibernation mode.
1. Start the ThinkPad Configuration program.
2. Click on Power Management ( ).
3. Click on Suspend/Hibernation/Resume Options ( ).4. Click on Enable Hibernation .5. Click on OK.
The computer cannot enter hibernation mode when you are using one of theIBM communication PC Cards.
116 IBM ThinkPad 560X User's Guide

Solving Computer Problems
LCD Problems
Problem Action
The screen is unreadableor distorted.
Make sure that:
The display driver is installed correctly by doing the following:1. Double-click on My Computer , Control Panel , and then Display2. Select the Settings tab.3. Click on Advanced Properties . The “Adapter/Driver Information”
window appears. Make sure the display driver information in thewindow is correct.
The refresh rate setting is set to your display resolution and color depth bydoing the following:
1. Start the ThinkPad Configuration program.
2. Click on LCD ( ).3. (For Windows 95) Click on Properties... .
(For Windows NT) Click on Advanced... .4. Make sure that the setting in the next window is correct.5. Click on OK.
Incorrect charactersappear on the screen.
Did you install the operating system or application program correctly?
If they are installed and configured correctly, have the computer serviced.
The screen stays on evenafter you power off yourcomputer.
Press the reset switch with the tip of a pen and turn off your computer; then turnit on again.
Missing, discolored, orbright dots appear on thescreen every time youpower on your computer.
This is not a problem. It is an intrinsic characteristic of the TFT technology.Your computer display contains multiple thin-film transistors (TFTs). A smallnumber of missing, discolored, or bright dots on the screen might exist all thetime.
Chapter 5. Solving Computer Problems 117

Solving Computer Problems
Indicator Problems
Problem Action
The battery statusindicator does not go oneven though a batterypack is installed in thecomputer.
The over-current protection device inside the battery pack has been activated.Wait several hours and try again. If the indicator does not appear, replace thebattery pack or have the computer serviced.
The diskette-drive-in-useicon stays on.
If a diskette is in the drive, make sure that:– The externally diskette drive is firmly connected to the computer.– The diskette contains the necessary files to start the system.– There is nothing wrong with your application program.– There is nothing wrong with the diskette.– The diskette is inserted correctly (label facing up and the metal-shutter
end first) in the diskette drive.
If these items are correct, have the computer serviced.
If there is no diskette in the drive, have the computer serviced.
Battery Problems
Problem Action
The battery pack cannotbe fully charged in 3hours by the power-offcharging method.
The battery pack might be over-discharged. Do the following:
1. Turn off the computer.2. Make sure that the over-discharged battery pack is in the computer.3. Connect the AC Adapter to the computer and let it charge.
If the battery pack cannot be fully charged in 24 hours, use a new battery pack.
If the optional Quick Charger is available, use it to charge the over-dischargedbattery pack.
Your computer shutsdown before the batterystatus indicator showsempty,–or–Your computer operatesafter the battery statusindicator shows empty.
Repeat discharging and charging the battery pack at least three times.
118 IBM ThinkPad 560X User's Guide

Solving Computer Problems
Problem Action
The operating time for afully charged battery packis short.
Repeat discharging and charging of the battery pack three to six times. If youstill have a problem, use a new battery pack.
The computer does notoperate with a fullycharged battery pack.
The over-current protective function in the battery pack might be activated. Turnoff the computer for 1 minute to reset this function; then turn it back on again.
Infrared Communication Problems
Problem Action
Your computer cannotcommunicate with otherdevices using the infraredport.
Make sure that:
The communication speeds are the same.The infrared ports are clean and do not have any spots.No objects are between the computer and the communicating device.The distance and angle between your computer and the device is within theset range.The other computer is the same model as yours.You are not operating under direct sunlight.The infrared port is not directly facing the other communicating port.Communication can be affected by the light from the display on thecomputer. To avoid this, open the display to a wide angle.The same communication application has to be run on your computer andthe other computer. Refer to the application manuals for more information.
ThinkPad mode cannot be used if you are using a conventional communicationapplication that uses the serial port and cable for data exchange. In this case,the infrared port is a substitute for them.
Incorrect data is sentbetween your computerand a communicatingdevice.
Make sure that:
The distance and angle between your computer and the device is within theset range.The communication speeds are the same.There are no other devices that radiate infrared rays, such asremote-controlled devices or wireless headphones, near your computer orthe communicating device.You are not operating under direct sunlight.No fluorescent lamps are near your computer or the communicating device.
Chapter 5. Solving Computer Problems 119
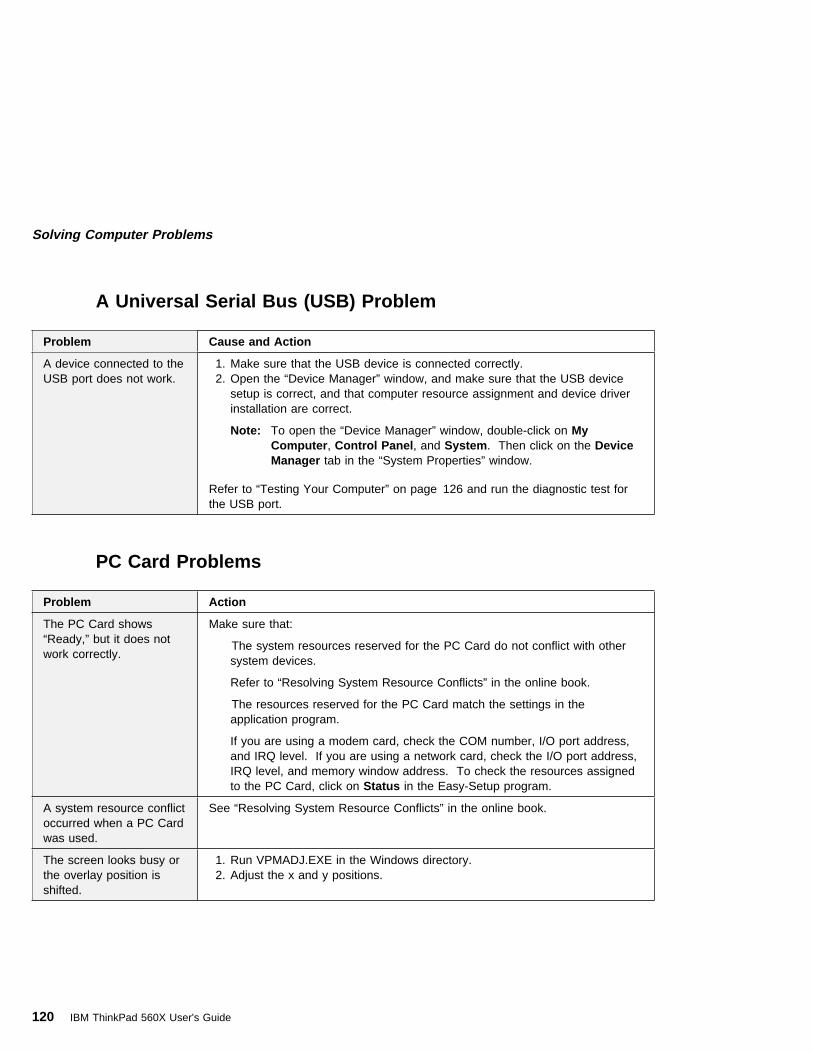
Solving Computer Problems
A Universal Serial Bus (USB) Problem
Problem Cause and Action
A device connected to theUSB port does not work.
1. Make sure that the USB device is connected correctly.2. Open the “Device Manager” window, and make sure that the USB device
setup is correct, and that computer resource assignment and device driverinstallation are correct.
Note: To open the “Device Manager” window, double-click on MyComputer , Control Panel , and System . Then click on the DeviceManager tab in the “System Properties” window.
Refer to “Testing Your Computer” on page 126 and run the diagnostic test forthe USB port.
PC Card Problems
Problem Action
The PC Card shows“Ready,” but it does notwork correctly.
Make sure that:
The system resources reserved for the PC Card do not conflict with othersystem devices.
Refer to “Resolving System Resource Conflicts” in the online book.
The resources reserved for the PC Card match the settings in theapplication program.
If you are using a modem card, check the COM number, I/O port address,and IRQ level. If you are using a network card, check the I/O port address,IRQ level, and memory window address. To check the resources assignedto the PC Card, click on Status in the Easy-Setup program.
A system resource conflictoccurred when a PC Cardwas used.
See “Resolving System Resource Conflicts” in the online book.
The screen looks busy orthe overlay position isshifted.
1. Run VPMADJ.EXE in the Windows directory.2. Adjust the x and y positions.
120 IBM ThinkPad 560X User's Guide

Solving Computer Problems
Problem Action
My PC Card modem doesnot work
Make sure that the infrared port is disabled and the modem is set up correctly.
Make sure that the COM port you set for modem by the ThinkPad Configurationprogram is same in the following procedure and there is not resource conflict.
For Windows 95:
To set up the modem, do the following:
1. Double-click on My Computer , Control Panel , and then Modem .The “Modem Properties” window appears.
2. Make sure the PC Card (PCMCIA) modem is in the window.3. Click on Properties , not Dialing Properties .4. Click on the Connection tab.5. Remove the check mark ( ) in the Wait for dial tone before dialing box if
it is checked.6. Click on Advanced .7. If there is a check mark ( ) in the Use error control box, click and remove
it.8. Add a check mark ( ) to the Use flow control by clicking on the box and
make sure that the Hardware (RTS/CTS) is selected.9. Close the window by clicking on OK.
10. Return to the “Modem Properties” window by clicking on OK.11. Click on Dialing Properties in the “Modem Properties” window, and fill in all
boxes.
Note: Click on either Tone dialing or Pulse dialing . Most telephonestoday use tone dialing.
12. Click on OK.13. Click on Close to close the window.14. Close all active windows.
Run your modem application again.
Chapter 5. Solving Computer Problems 121

Solving Computer Problems
Printer Problems
Problem Action
The printer does not work. Make sure that:
The parallel port is enabled.1. Start the ThinkPad Configuration program.
2. Click on Parallel Port ( ). 3. Select Enable .
4. Click on OK.The printer is turned on and ready to print.The printer signal cable is connected to the correct connector of yourcomputer.
If these items are correct and the printer still does not work, run the testsdescribed in the printer manual. If the tests show that the printer is OK, havethe computer serviced.
External Monitor Problems
Problem Action
The external monitor isblank.
Do the following:
1. Connect the external monitor to another computer to make sure it works.2. Reconnect the external monitor to your computer.3. Start the ThinkPad Configuration program.
4. Click on External Display ( ) or LCD + External Display ( ) on thetoolbar in the ThinkPad Configuration.
If nothing appears on the external monitor, have the external monitor serviced.
122 IBM ThinkPad 560X User's Guide

Solving Computer Problems
Problem Action
You cannot set a higherresolution than thepresent one on yourexternal monitor.
Make sure that:
The ThinkPad display driver is installed correctly.1. Double-click on My Computer , Control Panel , and then Display .2. Select the Settings tab in the “Display Properties” window.3. Click on Advanced Properties . The “Adapter/Driver Information”
window appears. Make sure that the ThinkPad display driver isinstalled.
If you are not sure that the ThinkPad display driver is installed correctly,reinstall it.An appropriate display type or refresh rate is selected.1. Start the ThinkPad Configuration program.
2. Click on LCD ( ).3. (For Windows 95) Click on Properties... .
(For Windows NT) Click on Advanced... .4. Make sure the setting in the next window is correct.5. Click on OK to close the window.
The screen is unreadableor distorted.
Make sure that:
The ThinkPad display driver is installed correctly by doing the following:1. Double-click on My Computer , Control Panel , and then Display .2. Select the Settings tab in the “Display Properties” window.3. Click on Advanced Properties . The “Adapter/Driver Information”
window appears. Make sure that the ThinkPad display driver isinstalled.
The display is set correctly.1. Start the ThinkPad Configuration program.
2. Click on LCD ( ).3. (For Windows 95) Click on Properties... .
(For Windows NT) Click on Advanced... .4. Make sure the setting in the next window is correct.5. Click on OK to close the window.
If the settings are correct, run the tests described in the manual supplied withthe external monitor. If the tests show that the external monitor is OK, have thecomputer serviced.
Wrong characters appearon the screen.
Did you install the operating system or application program with the correctprocedure?
If you did, have the external monitor serviced.
Chapter 5. Solving Computer Problems 123

Solving Computer Problems
Other Option Problems
Problem Action
An IBM option that youjust installed does notwork.
Make sure that:
The option is designed for your computer.The option was installed following to the instructions supplied with the optionor this book.Other installed options or cables are not loose.There is no I/O address or interrupt level (IRQ) DMA channel conflict. Tosee the system resource status, start the ThinkPad Configuration programand click on the respective device buttons.
If the test program for the option did not find the problem, have the computerand option serviced.
An IBM option that usedto work no longer works.
Make sure that:
The option is securely connected to your computer.If the option came with its own test instructions, use those instructions totest the option.There is no system resource conflict (see “Resolving System ResourceConflicts” in the online book).
If these items are correct and the test program did not find the problem, havethe computer and option serviced.
The serial port does notwork.
Make sure that the serial port is enabled by doing the following:
For Windows 95:
1. Start the ThinkPad Configuration program.
2. Click on Serial Port ( ). 3. Select Enable .
4. Click on Device Manager .5. Set up the port in the “Device Manager” window.6. Click on OK.
For Windows NT:
1. Start the ThinkPad Configuration program.
2. Click on Serial Port ( ).3. Select Enable ; then select COM1, COM2, COM3, or COM4.4. Click on OK.
124 IBM ThinkPad 560X User's Guide

Solving Computer Problems
Software Problems
Problem Action
An application does notrun correctly.
Check the following to make sure that the problem is not being caused by theapplication:
Your computer has the minimum required memory to run the application.Refer to the manuals supplied with the application.The application is designed to operate with your operating system.Other applications run correctly on your computer.The necessary device drivers are installed (see the online book).The application works OK when it is run on some other computer.
If an error message appears when you are using the application program, referto the manuals supplied with the application.
If these items are correct and you still have a problem, contact your place ofpurchase or the service representative for help.
You cannot install OS/2Warp.
See the online book.
Other Problems
Problem Cause or Action
The computer locks ordoes not accept any input.
Your computer might lock when it enters suspend mode during acommunication operation. You should disable the Suspend Timer when youare working on the network.When you turn on the computer with OS/2 Warp installed, make sure nocompact disc (CD) is in the CD-ROM drive. If there is, remove the CD, turnoff the computer, and turn it on again.To turn off the computer, press the reset switch using the tip of a ballpointpen.
The computer does notturn off with the powerswitch.
If the suspend lamp is on and you are working under battery power, change thebattery to a fully charged one or change your power source to ac power.
If you still have a problem, press the reset switch using the tip of a ballpointpen.
The computer does notstart from a diskette.
Make sure that the startup sequence in Easy-Setup is set so that the computerboots from the diskette drive (see page 24).
Chapter 5. Solving Computer Problems 125

Solving Computer Problems
Testing Your ComputerIf you still have a problem with your computer after using theTroubleshooting Charts, test the computer using the Easy-SetupTest function.
To test your computer, do the following:
1 Make sure that the speaker volume control is in themiddle position.
2 Press and hold F1; then turn on the computer to startEasy-Setup. Hold F1 until the “Easy-Setup” menuappears:
Dat e/ Ti me Passwor d
Easy-Setup
St ar t up Test
Rest ar t
Conf i g
BI OS part number ,. .D at e
Syst em-u ni t se ri al numberSyst emboar d se ri al number
Mi cr opro ce ss or
nnnnnnnnnnnnnnnnnnnnnnnnnnn
Pent iu m( )P ro ce ss* *
nnnnnnn 12/3 1/ 96
You will hear a short beep. If you are not sure whetheryou heard a beep or not, turn off the computer and tryagain. If you still don't hear a beep, the speaker is notworking. Have your computer serviced.
126 IBM ThinkPad 560X User's Guide

Solving Computer Problems
3 Select the Test icon; then select the Start icon or pressEnter .
Note: Do not touch the keyboard or the pointing device duringthe test.
If you cannot go to the next menu, have the computerserviced.If an X appears to the left of a device with an error codeappears below it, make a note of the error code and havethe computer serviced.
Chapter 5. Solving Computer Problems 127

Solving Computer Problems
Recovering Lost or Damaged SoftwareThis section describes how to recover lost or damaged software. Ifyou want to recover one or several pieces of software, use theDiskette Factory. If you want to restore your system to what it wasat the time of purchase, and if you are using Windows 95, use theRecovery CD.
Using the Diskette FactoryTo recover a particular device driver or utility, create the backupdiskettes for it with the Diskette Factory; then reinstall it.
To create the backup diskettes, do the following:
1 Double-click on ThinkPad Tools . ( )
The following window appears.
128 IBM ThinkPad 560X User's Guide

Solving Computer Problems
2 Double-click on Diskette Factory .
The “Diskette Factory” window appears.
3 Select the operating system you are installing and clickon Yes.
The following window appears.
4 Click on the diskette group for the backup copy you wantto create. Then click on Build .
You need to create all the diskettes for each group.
Note
You need blank diskettes. The number of diskettes required isshown beside the diskette group.
For details on how to install software, see the online book.
Chapter 5. Solving Computer Problems 129

Solving Computer Problems
Using the Recovery CD (Windows 95 Only)The Recovery CD package consists of a boot diskette and aCD-ROM containing the original preload image.
Attention
This CD deletes all personal data and your customizedconfiguration setting. Resetting your computer to most of thefactory-shipped default values. You should back up yourpersonal files before you use this CD.
You need an external CD-ROM drive.
Note: Use the CD-ROM drive supplied with IBM or CNF.
1 Connect the CD-ROM drive to your computer.
2 Insert the Recovery CD Boot Diskette into the diskettedrive.
3 Turn on or restart the computer.
Your hard disk is formatted.
4 Insert the CD-ROM into the CD-ROM drive.
5 Follow the instruction that appears on the screen.
6 When the process is complete, remove the RecoveryCD-ROM Boot Diskette from the diskette drive.
7 Press Restart .
Your computer restarts with the original preloaded software andhardware configuration.
130 IBM ThinkPad 560X User's Guide

Chapter 6. Getting Service
Preparation
If you need further assistance, call your IBM authorized reselleror IBM marketing representative.
You will need to know the following information when requestingrepair service:
Identification number of your computerOptions installed in your system
Note: Use the checklist on page 132.
Error message or problem
Note: Error messages can help identify which service actionis required and help the service representative providequick and efficient service.
Use the record sheet on page 133
About Your Warranty
During the warranty period, you may be responsible for repaircosts if the product damage was due to misuse, accident,modification, unsuitable physical or operating environment, orimproper maintenance.
For full information on product warranties, see Appendix C.
For your convenience, write the service phone numbers here:
Copyright IBM Corp. 1997 131
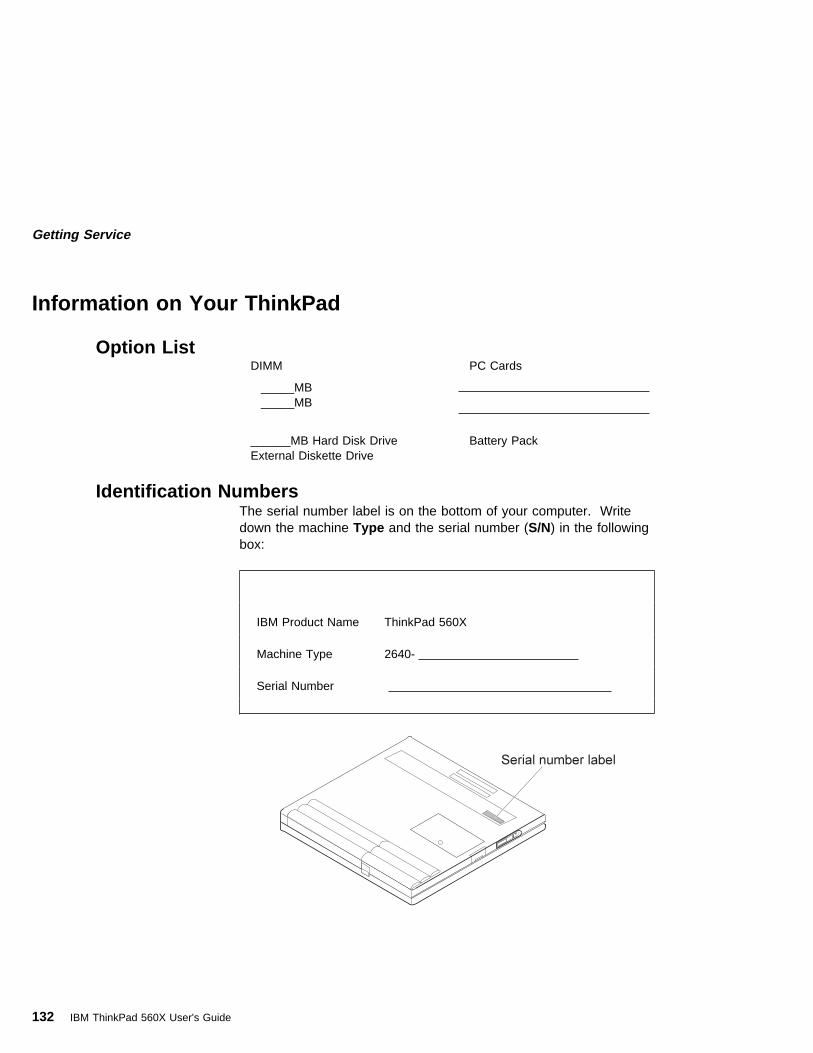
Getting Service
Information on Your ThinkPad
Option List DIMM
_____MB _____MB
PC Cards
______MB Hard Disk Drive Battery Pack External Diskette Drive
Identification NumbersThe serial number label is on the bottom of your computer. Writedown the machine Type and the serial number (S/N) in the followingbox:
IBM Product Name ThinkPad 560X
Machine Type 2640-
Serial Number
132 IBM ThinkPad 560X User's Guide

Getting Service
Problem Recording Sheet Computer information:
Machine type:_________
Serial number:_________
Date of purchase:___/___/___
Type of problem:
Continuous problem Intermittent problem
Error code:
The operating system and its version number, if available:
Application programs running at the time of the problem:
Problem symptom:
Describe the problem more specifically.
Can the system be reproduced?:
Yes No
If yes, describe how it can be reproduced:
DOS Version______ OS/2 Version______ Windows 3.11 Windows 95 Windows NT Version______
Chapter 6. Getting Service 133
Getting Service
HelpWare Customer Support and ServicePurchasing an IBM PC hardware product entitles you to receivesupport and services during the limited warranty period. If you needadditional support and services, a wide variety of extended solutionsthat addresses most needs are available for purchase.
Help by TelephoneYou can get support and information by telephone during the limitedwarranty period at no additional charge, through the IBM PC SupportLine. Experienced technical-support representatives will be on handto assist you in answering any questions you might have, such as:
How to set up your computerHow to install and set up your IBM options purchased directlyfrom IBM or through an IBM resellerHow to use the 30-day support for the preloaded operatingsystemHow to get service
Please have the following information ready when you call:
Serial number of your computer and proof of purchaseDescription of the problemExact wording of the error messageHardware and software configuration information for your system
If possible, be at your computer when you call:
In the U.S. and Puerto Rico, call 1-800-772-2227.In Canada, call 1-800-565-3344.
These lines are available 24 hours a day, 7 days a week. Theanswering technical-support representative can also fax or mailyou technical or product information, such as:
Sales information Product brochures
Location of IBM resellersServices available from IBM
134 IBM ThinkPad 560X User's Guide

Getting Service
ThinkPad EasyServThinkPad EasyServ is a courier repair service for IBM mobileproducts whereby your ThinkPad computer will be picked up, sent toIBM for repair, and then returned to the location of your choice. Thisservice is available at no additional charge during the limitedwarranty period. Most computers can be repaired the day that itarrives at the IBM repair location.
Support personnel first try to solve your problem over the phone. Ifthey are unsuccessful, you can arrange for EasyServ service bycalling the PC Support Line.
If possible, you should use the original ThinkPad shipping materialsthat your computer came in, for re-sending it to IBM. If the box isnot available, the courier will deliver a shipping carton and will returnlater to pick it up. This service is available only in the U.S. andCanada.
Getting Help around the WorldIf you make frequent overseas trips or you are residing abroad, youcan register with the International Warranty Service Office. Theoffice will issue an International Warranty Service Certificate, whichyou can use wherever IBM or IBM resellers sell and service IBM PCproducts.
For more information on registering with the InternationalWarranty Service Office, call 1-800-497-7426 in the U.S. orCanada.
Fax InformationIn the U.S. and Canada, if you have a touch-tone telephone andaccess to a fax machine, you can receive marketing and technicalinformation on such topics as computer hardware, operatingsystems, and local area networks (LANs) by fax. You can call theIBM PC Company Automated Fax System 24 hours a day, 7 days aweek. Follow the recorded instructions, and the information that yourequest will be sent your fax machine.
Chapter 6. Getting Service 135

Getting Service
To access the IBM PC Company Automated Fax System, call:
In the U.S., 1-800-426-3395In Canada, 1-800-465-3299
Electronic Support ServicesIf you have a modem, you can access such public informationservices as the electronic bulletin boards and messaging areas,electronic conferences, and searchable databases available inseveral of the most popular online information services.
Bulletin boards and online services contain information on manytopics such as:
PC user groupsPC questions and answers
OS/2 topics Problem solving Technical information
Hardware and software configurations Networking
The IBM PC Company Bulletin Board System (BBS) can be reached24 hours a day, 7 days a week. Modem speeds of up to 14,400baud are supported. Long-distance telephone charges may apply.
Commercial online services that have information on IBM productsare:
CompuServe:Use the GO word ThinkPad .
To access the PC Company BBS, call:
In the U.S., 1-919-517-0001For Canada, call the center closest to you:– 905-316-4255 (Markham; Ontario)
– 514-938-3022 (Montreal) – 416-492-1823 (Toronto) – 604-664-6466 (Vancouver)
136 IBM ThinkPad 560X User's Guide
Getting Service
Prodigy:Use the Jump command; type IBM and select PC ProductSupport.
America Online:Use the Go to keyword IBM.
You can also contact us on the internet for answers to your technicalsupport questions. When you link to our support home page, youcan search for technical tips, download up date drivers and find outabout many other things. You can visit the site at the URL:
http://www.us.pc.ibm.com/support
Purchasing Additional ServicesDuring and after the limited warranty period, you can purchaseadditional services, such as:
Support for IBM and non-IBM hardware, operating systems, andapplication programsNetwork setup and configurationUpgraded or extended hardware repair services
Custom installation
The availability of the service and its name might vary by country.
Enhanced PC Support LineEnhanced PC Support is available for desktop and mobile IBMcomputers that are not connected to a network. Technical support isprovided for IBM computers and IBM or non-IBM options, operatingsystems, and application programs on the supported products list.
This service includes technical support for the following:
Installing and configuring your out-of-warranty IBM computerInstalling and configuring non-IBM options in IBM computersAssistance with the preloaded operating systemUsing selected application software and gamesTuning performance, such as memory managementInstalling device drivers remotelySetting up and using multimedia devicesIdentifying system problems
Chapter 6. Getting Service 137
Getting Service
Interpreting documentation
You can purchase this service for a single incident or for multipleincidents. For more information about purchasing the Enhanced PCSupport, see “Ordering Support Line Services.”
Client Support LineClient support is available to provide assistance with the following:
Installation and configuration of clients.
Identification of system problems related to the client in anetwork environment.
Assistance with client network interface cards and options.
You can purchase this service as a single incident.
Network and Server Support LineNetwork and Server Support includes all the features of theEnhanced PC Support Line and is available for simple and complexnetworks made up of IBM workstations and servers using majornetwork operating systems. This line also supports the manypopular non-IBM adapters and network interface cards.
This service includes technical support for the following:
Installing and configuring client workstations and servers
Identifying system problems and correcting problems on theclient or the server
Using IBM and non-IBM network operating systems
Interpreting documentation
You can purchase this service for a single incident or for multipleincidents. For more information about purchasing Network andServer Support, see “Ordering Support Line Services.”
Ordering Support Line ServicesEnhanced PC Support Line, Client Support Line, and the Networkand Server Support Line services are available for products on theSupported Products list.
138 IBM ThinkPad 560X User's Guide
Getting Service
To receive a Supported Products list,
In the U.S: – Call 1-800-772-2227.
– Select the automated fax system option.– Select the service for which you would like a Supported
Products list:- For Enhanced PC Support Line, select document
11682.- For Network and Server Support Line, select
document 11683. In Canada:
– Call 1-800-465-7999 or 1-800-465-3299In other countries, contact your IBM reseller or IBMmarketing representative.
For more information on how to purchase the Support LineServices:
In the U.S.: call 1-800-772-2227.In Canada: call 1-800-465-7999.In other countries, contact your IBM reseller or IBMmarketing representative.
Warranty and Repair ServicesYou can upgrade your ThinkPad EasyServ/Customer Carry-Inwarranty services or extend their period of service.
Upgradable warranties for the U.S. include:
Overnight service option. You can upgrade your currentwarranty that provides ThinkPad EasyServ/Carry-in repairservice. Your warranty provides ThinkPad EasyServ/Carry-inrepair service.
You can also extend your period of warranty. The “Warranty andRepair Services” offers a ThinkPad EasyServ MaintenanceAgreement.
Chapter 6. Getting Service 139

Getting Service
For more information on warranty upgrades and extensions:
In the U.S.: call 1-800-426-7697.In Canada: call 1-800-465-7999.In other countries, contact your IBM reseller or IBMmarketing representative.
Obtaining IBM Operating System UpdatesIBM provides update diskettes, called ServicePaks or correctiveservice diskettes (CSDs), to customers who report a DOS or OS/2problem for which there is or will be a corrective program.
Getting Update DiskettesYou can obtain update diskettes from:
IBM PC Company BBSIBM Software Solutions Center (1-800-992-4777 for the U.S. andCanada)An IBM authorized reseller or an IBM marketing representative
Ordering PublicationsAdditional publications are available for purchase from IBM. For alist of publications available in your country:
In the U.S. and Puerto Rico: call IBM PC Books at1-800-426-7282.In Canada: call 1-800-465-1234.In other countries, contact your IBM authorized reseller or IBMmarketing representative.
140 IBM ThinkPad 560X User's Guide

Appendix A. Features and Specifications
This appendix describes features and specifications for the computer.For more information, refer to the Technical Reference manual.
FeaturesMicroprocessor
Intel Pentium processor with MMX
Memory
Built-in: 32 MBOptional: Max. 96 MB
Storage devices
2.5-inch hard disk drive
Display
The color LCD display uses TFT technology and support
TFT color LCD
Width of 12.1 inches (when measured diagonally)Up to 262,144 colorsUp to 800-by-600 resolution on the LCDUp to 1024-by-768 resolution on the external monitor
Brightness control
Keyboard
84-key, 85-key, or 89-key TrackPoint III
Fn key function
Copyright IBM Corp. 1997 141

Features and Specifications
External Diskette Drive
To get the best performance from your diskette drives, usehigh-quality diskettes (such as IBM diskettes) that meet or exceedthe following standards:
1-MB, 3.5-inch, unformatted diskette:
ANSI (American National Standards Institute) X3.137ISO (International Standards Organization) 8860ECMA (European Computer Manufacturers Association) 100
2-MB, 3.5-inch, unformatted diskette:
ANSI X3.171 ISO 9529 ECMA 125
External interface
Serial connector (EIA-RS232D)
Parallel connector (Centronics)
External input-device connector
External-monitor connector
External-diskette-drive connector
Expansion connector
PC Card slots (two Type I or Type II PC Cards, or one Type IIIPC Card)
Headphone jack
Microphone/line-in jack (supports a dynamic microphone or aself-battery-powered condenser microphone)
Infrared port
Universal Serial Bus (USB) port
142 IBM ThinkPad 560X User's Guide

Features and Specifications
SpecificationsSize
Width: 297 mm (11.7 in.)Depth: 222 mm (8.7 in.)Height: 31.0 mm (1.22 in.)
Weight
Minimum configuration with battery pack:With a TFT display: 1.9 kg (4.2 lb)
Environment
Note: When you charge the battery pack,its temperature must be at least 10°C(50°F).
Temperature (at altitudes less than 2438 m [8000 ft]):
– Operating with no diskette: 5° to 35°C (41° to 95°F)– Operating with a diskette: 10° to 35°C (50° to 95°F)– Nonoperating: 5° to 43°C (41° to 109°F)
Relative humidity:
– Operating with no diskette in the drive: 8% to 95%– Operating with a diskette in the drive: 8% to 80%
Maximum altitude: 3048 m (10 000 ft) in unpressurizedconditions
– Maximum temperature at 3048 m (10 000 ft): 31.3°C(88° F)
Heat output
Approximately 30 Kcal per hour
Electrical (AC Adapter)
Sine-wave input, at 50 to 60 Hz, is requiredThe input rating of the AC Adapter: 100–240 V ac, 50/60 Hz
Lithium-ion battery pack
Nominal voltage: 10.8 V dcCapacity: 2.2 AH
Appendix A. Features and Specifications 143
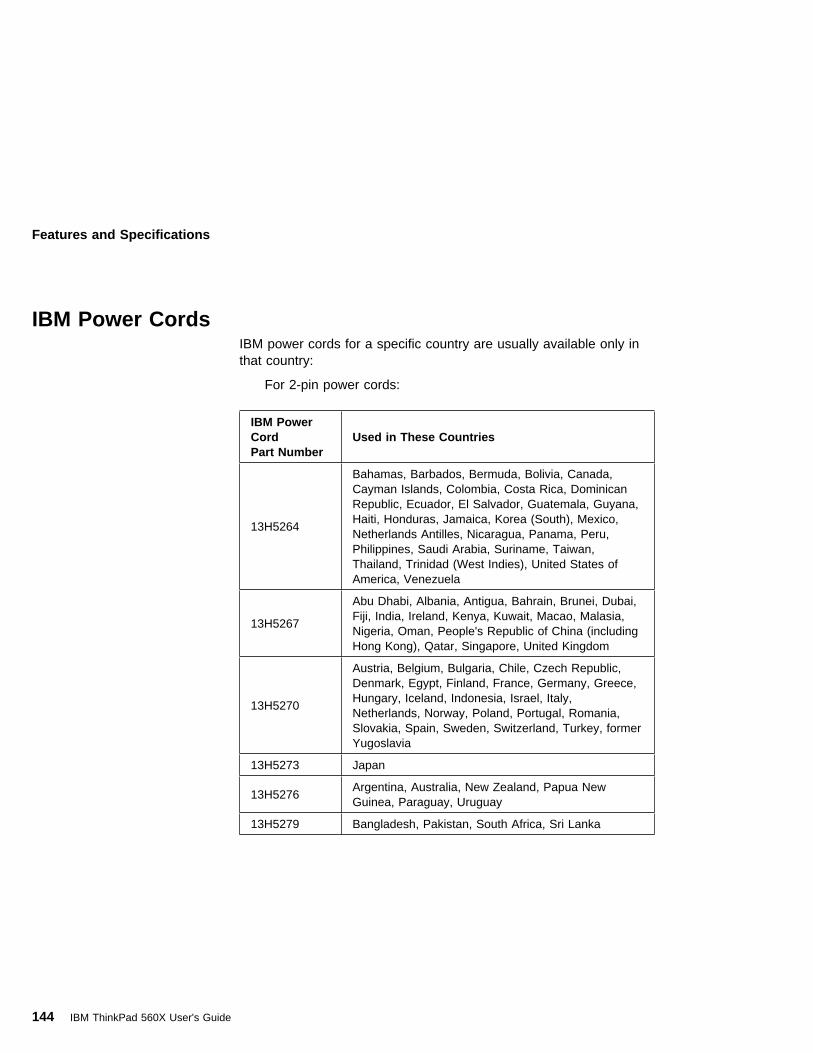
Features and Specifications
IBM Power CordsIBM power cords for a specific country are usually available only inthat country:
For 2-pin power cords:
IBM PowerCordPart Number
Used in These Countries
13H5264
Bahamas, Barbados, Bermuda, Bolivia, Canada,Cayman Islands, Colombia, Costa Rica, DominicanRepublic, Ecuador, El Salvador, Guatemala, Guyana,Haiti, Honduras, Jamaica, Korea (South), Mexico,Netherlands Antilles, Nicaragua, Panama, Peru,Philippines, Saudi Arabia, Suriname, Taiwan,Thailand, Trinidad (West Indies), United States ofAmerica, Venezuela
13H5267
Abu Dhabi, Albania, Antigua, Bahrain, Brunei, Dubai,Fiji, India, Ireland, Kenya, Kuwait, Macao, Malasia,Nigeria, Oman, People's Republic of China (includingHong Kong), Qatar, Singapore, United Kingdom
13H5270
Austria, Belgium, Bulgaria, Chile, Czech Republic,Denmark, Egypt, Finland, France, Germany, Greece,Hungary, Iceland, Indonesia, Israel, Italy,Netherlands, Norway, Poland, Portugal, Romania,Slovakia, Spain, Sweden, Switzerland, Turkey, formerYugoslavia
13H5273 Japan
13H5276Argentina, Australia, New Zealand, Papua NewGuinea, Paraguay, Uruguay
13H5279 Bangladesh, Pakistan, South Africa, Sri Lanka
144 IBM ThinkPad 560X User's Guide

Features and Specifications
For 3-pin power cords:
Note
The grounded adapter is required for full MPRII compliance.
IBM PowerCordPart Number
Used in These Countries
25H2205Argentina, Australia, New Zealand, Papua NewGuinea, Paraguay, Uruguay
25H2207
Bahamas, Barbados, Bermuda, Bolivia, Canada,Cayman Islands, Colombia, Costa Rica, DominicanRepublic, Ecuador, El Salvador, Guatemala, Guyana,Haiti, Honduras, Jamaica, Korea (South), Mexico,Netherlands Antilles, Nicaragua, Panama, Peru,Philippines, Saudi Arabia, Suriname, Taiwan, Trinidad(West Indies), United States of America, Venezuela
25H2209
Austria, Belgium, Bulgaria, Czech Republic, Egypt,Finland, France, Germany, Greece, Hungary, Iceland,Indonesia, Netherlands, Norway, Poland, Portugal,Romania, Slovakia, Spain, Sweden, Turkey, formerYugoslavia
25H2211 Denmark
25H2213 Bangladesh, Pakistan, South Africa, Sri Lanka
25H2215
Abu Dhabi, Albania, Antigua, Bahrain, Brunei, Dubai,Fiji, India, Ireland, Kenya, Kuwait, Macao, Malaysia,Nigeria, Oman, People's Republic of China (includingHong Kong), Qatar, Singapore, United Kingdom
25H2219 Thailand
25H2221 Switzerland
25H2223 Chile, Italy
25H2225 Israel
Appendix A. Features and Specifications 145

Features and Specifications
Electrical Safety Notice
Important
If a 3-pin power cord camewith your computer, you mustfollow the following safetynotice.
DANGER
Electrical current from power, telephone, andcommunication cable is hazardous. To avoid shockhazard, connect and disconnect cables as shown belowwhen installing, moving, or opening the covers of thisproduct or attached devices. The 3-pin power cordmust be used with a properly grounded outlet.
Turn everything OFF.Turn everything OFF.
First, attach all cables to devices. First, remove the power cord fromthe outlet.
Attach the signal cables toreceptacles.
Remove signal cables from receptacles.
Attach the power cord to an outlet.
Remove all cables from devices.
Turn the device ON.
To Connect To Disconnect
Note: In the U.K., by law:
The telephone line cable must beconnected after the power cord.The power cord must bedisconnected after the telephoneline cable.
146 IBM ThinkPad 560X User's Guide

Appendix B. Ergonomics Information
This is important information you should read before using yourportable ThinkPad notebook computer in your “virtual office.”
Working in the virtual office may mean adapting to frequent changesin your environment. Following some simple “rules of the road” willmake things easier and bring you the maximum benefits of yourThinkPad computer. Keeping in mind such basics as good lightingand proper seating, for example, can go a long way in helping youenhance your performance and achieve greater comfort whereveryou are.
What if I am traveling?
It may not be possible to observe the best ergonomic practices whenyou are using the ThinkPad computer while on the move or in a“casual” setting. Regardless of the setting, try to observe as many ofthe tips for proper usage as possible. Sitting properly and usingadequate lighting, for example, will help you maintain desirablecomfort and performance levels.
Questions about vision?
IBM's visual display screens are designed to meet the higheststandards and to provide you with clear, crisp images and large,bright displays that are easy to see, yet easy on the eyes. Ofcourse, any concentrated and sustained visual activity can be tiring.If you have questions on eye fatigue or visual discomfort, consult avision care specialist for advice.
Note: The example shown here of someone in a traditional setting. Evenwhen not in such a setting, you can follow many of these tips.Develop good habits, and they will serve you well.
Copyright IBM Corp. 1997 147

Ergonomics Information
1 HeadKeep your head in acomfortable and verticalposition.
2 ViewMaintain a comfortable viewingdistance of 510–760 mm(20–30 in.).
3 DisplayPosition the display to avoidglare or reflections fromoverhead lighting or outsidesources of light.
Keep the display screen cleanand set the contrast andbrightness to levels that allowyou to see the screen clearly.
4 ThighsKeep your thighs parallel tothe floor and your feet flat onthe floor or on a footrest.
5 ArmsKeep your forearms, wrists,and hands in a relaxed andneutral position. Don't poundthe keys; type with a softtouch.
6 ChairUse a chair that gives yougood back support.
148 IBM ThinkPad 560X User's Guide

Appendix C. Product Warranties and Notices
Statement of Limited Warranty
The warranties provided by IBM in this Statement of Limited Warranty apply only to Machines you originally purchase for youruse, and not for resale, from IBM or an IBM authorized reseller. The term “Machine” means an IBM machine, its features,conversions, upgrades, elements, or accessories, or any combination of them. Machines are subject to these terms only ifpurchased in the United States or Puerto Rico, or Canada, and located in the country of purchase. If you have any questions,contact IBM or your reseller.
Machine: IBM ThinkPad 560X except the Battery Pack Warranty Period*: One Year*Elements and accessories are warranted for three months. Contact your place of purchase for warranty service information.
Production StatusEach Machine is manufactured from new parts, or new and serviceable used parts (which perform like new parts). In somecases, the Machine may not be new and may have been previously installed. Regardless of the Machine's production status,IBM's warranty terms apply.
The IBM WarrantyIBM warrants that each Machine 1) is free from defects in materials and workmanship and 2) conforms to IBM's Official PublishedSpecifications. IBM calculates the expiration of the warranty period from the Machine's Date of Installation. The date on yourreceipt is the Date of Installation, unless IBM or your reseller informs you otherwise.
During the warranty period, IBM or your reseller will provide warranty service under the type of service designated for theMachine and will manage and install engineering changes that apply to the Machine. IBM or your reseller will specify the type ofservice.
For a feature, conversion, or upgrade, IBM or your reseller may require that the Machine on which it is installed be 1) thedesignated, serial-numbered Machine and 2) at an engineering-change level compatible with the feature, conversion, or upgrade.Some of these transactions (called “Net-Priced” transactions) may include additional parts and associated replacement parts thatare provided on an exchange basis. All removed parts become the property of IBM and must be returned to IBM.
Replacement parts assume the remaining warranty of the parts they replace.
If a Machine does not function as warranted during the warranty period, IBM or your reseller will repair or replace it (with aMachine that is at least functionally equivalent) without charge. If IBM or your reseller is unable to do so, you may return it toyour place of purchase and your money will be refunded.
If you transfer a Machine to another user, warranty service is available to that user for the remainder of the warranty period. Youshould give your proof of purchase and this Statement to that user.
Warranty ServiceTo obtain warranty service for the Machine, you should contact your reseller or call IBM. In the United States, call IBM at1-800-772-2227. In Canada, call IBM at 1-800-565-3344. You may be required to present proof of purchase.
Depending on the Machine, the service may be 1) a “Repair” service at your location (called “On-site”) or at one of IBM's or areseller's service locations (called “Carry-in”) or 2) an “Exchange” service, either On-site or Carry-in.
When a type of service involves the exchange of a Machine or part, the item IBM or your reseller replaces becomes its propertyand the replacement becomes yours. The replacement may not be new, but will be in good working order and at leastfunctionally equivalent to the item replaced.
It is your responsibility to:1. obtain authorization from the owner (for example, your lessor) to have IBM or your reseller service a Machine that you do not
own;2. where applicable, before service is provided —
a) follow the problem determination, problem analysis, and service request procedures that IBM or your reseller provide,b) secure all programs, data, and funds contained in a Machine,c) inform IBM or your reseller of changes in a Machine's location, and
International Business Machines Corporation Armonk, New York 10504
Copyright IBM Corp. 1997 149

Product Warranties and Notices
d) for a Machine with exchange service, remove all features, parts, options, alterations, and attachments not under warrantyservice. Also, the Machine must be free of any legal obligations or restrictions that prevent its exchange; and
3. be responsible for loss of, or damage to, a Machine in transit when you are responsible for the transportation charges.
Extent of WarrantyIBM does not warrant uninterrupted or error-free operation of a Machine.
Unless IBM specifies otherwise, IBM provides non-IBM machines on an “AS IS” basis. However, non-IBM manufacturers mayprovide their own warranties to you.
Misuse, accident, modification, unsuitable physical or operating environment, improper maintenance by you, removal of productlabels or parts identification labels, or failure caused by a product for which IBM is not responsible may void the warranties.
THESE WARRANTIES REPLACE ALL OTHER WARRANTIES, EXPRESS OR IMPLIED, INCLUDING, BUT NOTLIMITED TO, THE IMPLIED WARRANTIES OF MERCHANTABILITY AND FITNESS FOR A PARTICULARPURPOSE. HOWEVER, SOME LAWS DO NOT ALLOW THE EXCLUSION OF IMPLIED WARRANTIES. IFTHESE LAWS APPLY, THEN ALL EXPRESS AND IMPLIED WARRANTIES ARE LIMITED IN DURATION TO THEWARRANTY PERIOD. NO WARRANTIES APPLY AFTER THAT PERIOD.
In Canada, warranties include both warranties and conditions.
Some jurisdictions do not allow limitations on how long an implied warranty lasts, so the above limitation may not apply to you.
Limitation of LiabilityCircumstances may arise where, because of a default on IBM's part (including fundamental breach) or other liability (includingnegligence and misrepresentation), you are entitled to recover damages from IBM. In each such instance, regardless of the basison which you are entitled to claim damages, IBM is liable only for:
1. bodily injury (including death), and damage to real property and tangible personal property; and2. the amount of any other actual loss or damage, up to the greater of $100,000 or the charge for the Machine that is the
subject of the claim.
Under no circumstances is IBM liable for any of the following:1. third-party claims against you for losses or damages (other than those under the first item listed above);2. loss of, or damage to, your records or data; or3. economic consequential damages (including lost profits or savings) or incidental damages, even if IBM is informed of their
possibility.Some jurisdictions do not allow the exclusion or limitation of incidental or consequential damages, so the above limitation orexclusion may not apply to you.
This warranty gives you specific legal rights and you may also have other rights which vary from jurisdiction to jurisdiction.
150 IBM ThinkPad 560X User's Guide

Product Warranties and Notices
Statement of Limited Warranty
The warranties provided by IBM in this Statement of Limited Warranty apply only to Machines you originally purchase for youruse, and not for resale, from IBM or an IBM authorized reseller. The term “Machine” means an IBM machine, its features,conversions, upgrades, elements, or accessories, or any combination of them. Machines are subject to these terms only ifpurchased in the United States or Puerto Rico, or Canada, and located in the country of purchase. If you have any questions,contact IBM or your reseller.
Machine: Battery Pack Warranty Period*: One Year*Elements and accessories are warranted for three months. Contact your place of purchase for warranty service information.
Production StatusEach Machine is manufactured from new parts, or new and serviceable used parts (which perform like new parts). In somecases, the Machine may not be new and may have been previously installed. Regardless of the Machine's production status,IBM's warranty terms apply.
The IBM WarrantyIBM warrants that each Machine 1) is free from defects in materials and workmanship and 2) conforms to IBM's Official PublishedSpecifications. IBM calculates the expiration of the warranty period from the Machine's Date of Installation. The date on yourreceipt is the Date of Installation, unless IBM or your reseller informs you otherwise.
During the warranty period, IBM or your reseller will provide warranty service under the type of service designated for theMachine and will manage and install engineering changes that apply to the Machine. IBM or your reseller will specify the type ofservice.
For a feature, conversion, or upgrade, IBM or your reseller may require that the Machine on which it is installed be 1) thedesignated, serial-numbered Machine and 2) at an engineering-change level compatible with the feature, conversion, or upgrade.Some of these transactions (called “Net-Priced” transactions) may include additional parts and associated replacement parts thatare provided on an exchange basis. All removed parts become the property of IBM and must be returned to IBM.
Replacement parts assume the remaining warranty of the parts they replace.
If a Machine does not function as warranted during the warranty period, IBM or your reseller will repair or replace it (with aMachine that is at least functionally equivalent) without charge. If IBM or your reseller is unable to do so, you may return it toyour place of purchase and your money will be refunded.
If you transfer a Machine to another user, warranty service is available to that user for the remainder of the warranty period. Youshould give your proof of purchase and this Statement to that user.
Warranty ServiceTo obtain warranty service for the Machine, you should contact your reseller or call IBM. In the United States, call IBM at1-800-772-2227. In Canada, call IBM at 1-800-565-3344. You may be required to present proof of purchase.
Depending on the Machine, the service may be 1) a “Repair” service at your location (called “On-site”) or at one of IBM's or areseller's service locations (called “Carry-in”) or 2) an “Exchange” service, either On-site or Carry-in.
When a type of service involves the exchange of a Machine or part, the item IBM or your reseller replaces becomes its propertyand the replacement becomes yours. The replacement may not be new, but will be in good working order and at leastfunctionally equivalent to the item replaced.
It is your responsibility to:1. obtain authorization from the owner (for example, your lessor) to have IBM or your reseller service a Machine that you do not
own;2. where applicable, before service is provided —
a) follow the problem determination, problem analysis, and service request procedures that IBM or your reseller provide,b) secure all programs, data, and funds contained in a Machine,c) inform IBM or your reseller of changes in a Machine's location, and
International Business Machines Corporation Armonk, New York 10504
Appendix C. Product Warranties and Notices 151

Product Warranties and Notices
d) for a Machine with exchange service, remove all features, parts, options, alterations, and attachments not under warrantyservice. Also, the Machine must be free of any legal obligations or restrictions that prevent its exchange; and
3. be responsible for loss of, or damage to, a Machine in transit when you are responsible for the transportation charges.
Extent of WarrantyIBM does not warrant uninterrupted or error-free operation of a Machine.
Unless IBM specifies otherwise, IBM provides non-IBM machines on an “AS IS” basis. However, non-IBM manufacturers mayprovide their own warranties to you.
Misuse, accident, modification, unsuitable physical or operating environment, improper maintenance by you, removal of productlabels or parts identification labels, or failure caused by a product for which IBM is not responsible may void the warranties.
THESE WARRANTIES REPLACE ALL OTHER WARRANTIES, EXPRESS OR IMPLIED, INCLUDING, BUT NOTLIMITED TO, THE IMPLIED WARRANTIES OF MERCHANTABILITY AND FITNESS FOR A PARTICULARPURPOSE. HOWEVER, SOME LAWS DO NOT ALLOW THE EXCLUSION OF IMPLIED WARRANTIES. IFTHESE LAWS APPLY, THEN ALL EXPRESS AND IMPLIED WARRANTIES ARE LIMITED IN DURATION TO THEWARRANTY PERIOD. NO WARRANTIES APPLY AFTER THAT PERIOD.
In Canada, warranties include both warranties and conditions.
Some jurisdictions do not allow limitations on how long an implied warranty lasts, so the above limitation may not apply to you.
Limitation of LiabilityCircumstances may arise where, because of a default on IBM's part (including fundamental breach) or other liability (includingnegligence and misrepresentation), you are entitled to recover damages from IBM. In each such instance, regardless of the basison which you are entitled to claim damages, IBM is liable only for:
1. bodily injury (including death), and damage to real property and tangible personal property; and2. the amount of any other actual loss or damage, up to the greater of $100,000 or the charge for the Machine that is the
subject of the claim.
Under no circumstances is IBM liable for any of the following:1. third-party claims against you for losses or damages (other than those under the first item listed above);2. loss of, or damage to, your records or data; or3. economic consequential damages (including lost profits or savings) or incidental damages, even if IBM is informed of their
possibility.Some jurisdictions do not allow the exclusion or limitation of incidental or consequential damages, so the above limitation orexclusion may not apply to you.
This warranty gives you specific legal rights and you may also have other rights which vary from jurisdiction to jurisdiction.
152 IBM ThinkPad 560X User's Guide

Product Warranties and Notices
NoticesReferences in this publication to IBM products, programs, or servicesdo not imply that IBM intends to make these available in all countriesin which IBM operates. Any reference to an IBM product, program,or service is not intended to state or imply that only that IBM product,program, or service may be used. Any functionally equivalentproduct, program, or service that does not infringe any of theintellectual property rights of IBM may be used instead of the IBMproduct, program, or service. The evaluation and verification ofoperation in conjunction with other products, except those expresslydesignated by IBM, are the responsibility of the user.
IBM may have patents or pending patent applications coveringsubject matter in this document. The furnishing of this documentdoes not give you any license to these patents. You can sendlicense inquiries, in writing, to the IBM Director of Licensing, IBMCorporation, 500 Columbus Avenue, Thornwood, NY 10594, U.S.A.
TrademarksThe following terms, in this publication, are trademarks of the IBMCorporation in the United States or other countries or both:
Microsoft, Windows, Windows NT, and the Windows 95 flag logo aretrademarks or registered trademarks of Microsoft Corporation.
Pentium and MMX are trademarks or registered trademarks ofIntel Corporation in the U.S. and other countries.
Other company, product, and service names, which may be denotedby a double asterisk (**), may be trademarks or service marks ofothers.
IBMMMPM/2Multimedia Presentation Manager/2Operating System/2OS/2PC Card Director
PS/2RediSafeThinkPadTrackPoint IIIWIN-OS/2
Appendix C. Product Warranties and Notices 153

Product Warranties and Notices
Electronic Emission Notice
Federal Communications Commission (FCC) Statement
ThinkPad 560X, 2640
This equipment has been tested and found to comply with the limits for a Class Bdigital device, pursuant to Part 15 of the FCC Rules. These limits are designed toprovide reasonable protection against harmful interference in a residential installation.This equipment generates, uses, and can radiate radio frequency energy and, if notinstalled and used in accordance with the instructions, may cause harmful interferenceto radio communications. However, there is no guarantee that interference will notoccur in a particular installation. If this equipment does cause harmful interference toradio or television reception, which can be determined by turning the equipment offand on, the user is encouraged to try to correct the interference by one or more of thefollowing measures:
Reorient or relocate the receiving antenna.Increase the separation between the equipment and receiver.Connect the equipment into an outlet on a circuit different from that to which thereceiver is connected.Consult an IBM authorized dealer or service representative for help.
Properly shielded and grounded cables and connectors must be used in order to meetFCC emission limits. Proper cables and connectors are available from IBM authorizeddealers. IBM is not responsible for any radio or television interference caused byunauthorized changes or modifications to this equipment. Unauthorized changes ormodifications could void the user's authority to operate the equipment.
This device complies with Part 15 of the FCC Rules. Operation is subject to thefollowing two conditions: (1) this device may not cause harmful interference, and (2)this device must accept any interference received, including interference that maycause undesired operation.
Responsible Party:
International Business Machines CorporationOld Orchard RoadArmonk, NY 10504Telephone 1-919-543-2193
154 IBM ThinkPad 560X User's Guide

Product Warranties and Notices
Canadian Department of Communications Compliance StatementThis equipment does not exceed Class B limits per radio noise emissions for digitalapparatus, set out in the Radio Interference Regulation of the Canadian Department ofCommunications.
Avis de conformité aux normes du ministère des Communications duCanada
Cet équipement ne dépasse pas les limites de Classe B d'émission de bruitsradioélectriques pour les appareils numériques, telles que prescrites par le Règlementsur le brouillage radioélectrique établi par le ministère des Communications duCanada.
European Community Directive Conformance StatementThis product is in conformity with the protection requirements of EC Council Directive89/336/EEC on the approximation of the laws of the Member States relating toelectro-magnetic compatibility.
A declaration of Conformity with the requirements of the Directive has been signed byIBM United Kingdom Limited, PO BOX 30 Spango Valley Greenock ScotlandPA160AH.This product satisfies the Class B limits of EN 55022.

Glossary
This glossary includes terms anddefinitions from the IBM Dictionary ofComputing (New York: McGraw-Hill,1994).
ac. Alternating current.
ac power . Power that is supplied to thecomputer through an electrical outlet.
Advanced Power Management (APM) .A facility consisting of one or more layersof software that support powermanagement in computers with powermanageable hardware. The APMsoftware interface allows applications,operating systems, device drivers, andthe APM BIOS to work together toreduce power consumption, withoutreducing system performance.
APM. Advanced Power Management
ANSI. American National StandardsInstitute.
application program . A program thatperforms specific tasks on yourcomputer, such as word processing orcreating spreadsheets.
ASCII. American National StandardCode for Information Interchange.
ATA PC Card . A PC Card with an ATattachment hard disk drive interface suchas a storage device PC Card.
AUTOEXEC.BAT . A file that contains astartup procedure of DOS. Each timeyou start your system, DOS performs thecommands that are stored in this file.
backup copy . A copy, usually of a fileor group of files, that is kept in case theoriginal file or files are unintentionallychanged or destroyed.
batch . A process method in which aprogram or programs records with little orno operator action.
BIOS (Basic Input/Output System) .Microcode that contains such basichardware operations as interactions withdiskette drives, hard disk drives, and thekeyboard.
bitmap graphics . (1) A form of graphicsin which all points on the display aredirectly addressable. (2) In multimediaapplications, a form of graphics in anarea of computer memory or storage thatcan be displayed as an image.
boot . To prepare a computer system foroperation by loading an operatingsystem.
bps . Bits per second. In serialtransmission, the instantaneous bit speedwith which a device or channel transmitsa character.
bus . A facility for transferring databetween several devices located betweentwo end points, only one device beingable to transmit at a given moment.
cache memory . A special memory,smaller and faster than main memory,that is used to hold a copy of instructionsand data in main memory that are likelyto be needed next by the processor, andthat have been obtained automaticallyfrom main memory.
CD-I. Compact disc-interactive.
combination keys . Keys that havespecific functions when you hold themdown at the same time.
CONFIG.SYS. A file that contains agroup of commands to load installabledevice drivers and reserve space insystem memory for informationprocessing. This file is referred to byDOS during system startup.
configuration . (1) The manner in whichthe hardware and software of an
156 Copyright IBM Corp. 1997

Glossary
information processing system areorganized and interconnected. (2) Thephysical and logical arrangement ofdevices and programs that make up adata processing system. (3) The devicesand programs that make up a system,subsystem, or network.
CRT. Cathode ray tube display.
device driver . (1) A file that containsthe code needed to use an attacheddevice. Operating system loads devicedrivers for screens, (2) A program thatenables a computer to communicate witha specific peripheral device—forexample, a printer, a video disc player, ora CD drive. (3) A collection ofsubroutines that control the interfacebetween I/O device adapters andprocessors.
DIMM. Dual inline memory module.
directory . A type of file containing thenames and controlling information forother files or other directories.
DMA. Direct memory access. Thetransfer of data between memory andinput/output units without processorintervention.
double-click . To press and release amouse button twice within a time framedefined by the user, without moving thepointer off the choice.
ECP. Extended Capability Port.
EGA. Enhanced graphics adapter.
EIA. Electronics Industries Association.
EIA-232D. An EIA interface standardthat defines the physical, electronic, andfunctional characteristics of an interfaceline that connects a communicationdevice and associated workstation. Ituses a 25-pin connector and anunbalanced line voltage.
EMS. Expanded memory specification.
FAQ. Frequently asked questions.
fax . (1) Facsimile machine. (2) Atransmitted document from a facsimilemachine.
fixed disk . In personal computing, fixeddisk is synonymous with hard disk.
Flash memory . Electrically rewritablestorage.
folder . A file used to store and organizedocuments.
fuel gauge . An indicator on the screenthat constantly shows the current powerstatus of the battery pack.
HHR. Half-horizontal resolution.
hibernation . One of the power-savingmethods that stores data andapplications running in the computer'smemory on the hard disk. Duringhibernation, the computer is automaticallyturned off to save power. When power isturned on again, the computerimmediately restores the same data andapplications as when hibernation started,without restarting the operating system.
high-resolution mode . Videoresolutions that are greater than 640 by480 pels.
icon . A graphic symbol, displayed on ascreen, that a user can point to with apointing device such as a TrackPoint IIIor mouse to select a particular function orsoftware application.
IDE. Integrated device electronics.
IR. Infrared.
ISA. Industry standard architecture.
Glossary 157

Glossary
ISO. International Organization forStandardization.
JEIDA . Japan Electronics IndustryDevelopment Association.
kilobyte (KB) . 1024 bytes.
LAN . Local area network.
MCI. Media Control Interface.
megabyte (MB) . 1024 kilobytes. About1 million bytes.
memory . Often referred to asrandom-access memory (RAM),measured in kilobytes (KB) or megabytes(MB) of information.
MHz. Megahertz.
microcode . One or moremicroinstructions used in a product as analternative to hard-wired circuitry toimplement functions of a processor orother system component.
MIDI. Musical Instrument DigitalInterface.
modem . A device that connects yourcomputer to a telephone line, allowing itto communicate with another computer atanother location.
parallel port . A port used to attachsuch devices as dot-matrix printers andinput/output units; it transmits data 1 byteat a time.
partial suspend mode . A kind ofsuspend mode where only a part of thesystem components uses power.
password . A series of letters ornumbers that you designate to restrictaccess to your computer.
PC Card . A card that is based on thePC Card standard.
PCMCIA. Personal Computer MemoryCard International Association.
pel . Picture element.
picture element . In computer graphics,the smallest element of a display surfacethat can be independently assigned colorand intensity.
pixel . Picture element.
pointing device . An instrument, suchas a mouse, TrackPoint III, or joystick,that is used to move a pointer on thescreen.
pop-up menu . On the display screen, amenu that emerges in an upwarddirection from a particular point or line ona display screen.
POST. Power-on self-test.
prompt . A visual or audible messagesent by a program to request the user'sresponse.
pull-down menu . On the displayscreen, a menu that emerges in adownward direction from a point or line ator near the top of the screen.
reboot . To restart all operations of thecomputer as if the power had just beenturned on.
resume . To begin computer operationsagain from suspend mode.
ROM. Read-only memory.
serial port . A port used to attach suchdevices as display devices, letter-qualityprinters, modems, plotters, and suchpointing devices as light pens and mice;it transmits data 1 bit at a time.
158 IBM ThinkPad 560X User's Guide

Glossary
suspend . To stop all operations of thecomputer to reduce power drain andrestrict access to the files.
SVGA. Super video graphics adapter.
TFT. Thin-film transistor.
TSRs. Terminate-and-stay-residentprograms, memory-resident programsthat are loaded into memory and staythere so you can conveniently accessthem whenever you need to.
vertical expansion . A video displaytechnique in character-display mode to fit
video images on the whole LCD screenby adjusting the number of character dotsvertically.
VESA. Video Electronics StandardsAssociation.
VGA. Video graphics adapter, a videomode that produces up to 640-by-480resolution.
VSYNC. Vertical synchronizationfrequency.
XMS. Extended memory specification.
Glossary 159

Index
AAmerica Online 137APM (advanced power
management) 43audio viaudio features, using 98
Bbattery pack
charging 29fuel-gauge program, using 32low-battery condition 31monitoring battery power
battery status indicator, using 29fuel-gauge program, using 32
problems 118replacing 46status indicator 7, 30
battery save method 33, 45brightness control 4bulletin boards 136
Ccaps lock indicator 7CardWorks for Windows 95 90charging, battery pack 29click buttons (TrackPoint III) 10CompuServe 136corrective service diskette (CSD) 140
Ddealer locations 134diagnostic diskette 140DIMM, installing 66diskette standards 142display
output type 75problems 75, 117switching, using Fn key 13using 75
EEasy-Setup
changing drive startup sequence 24knowing your configuration 22setting date and time 23using 21
EasyServ 135electronic support 136enhanced PC support line 137ergonomics information 147error codes 108external display
problems 122external keyboard
attaching 72external monitor
attaching 75display driver
setting 76problems 75SVGA modes, using 79using 75
external numeric keypadattaching 71problems 113
external-input-device connector 4
Ffeatures 141fee, services 137Fn key
function 12location 4lock 12
fuel-gauge programFn key function, using 13monitoring battery status 32using 32
function keysFn + F12 36Fn + F3 34Fn + F4 34
functional highlights
160 Copyright IBM Corp. 1997

Index
functional highlights (continued)audio vi
Hhard disk drive
in use, indicator 7hard disk password 50hardware features 2—5hardware specifications 143heat output, machine specifications 143hibernation
considerations 42using
Fn key function 13hibernation mode
enabling 39problems 114
humidity, machine specifications 143
II99xxxxx
See error codesidentification numbers, recording 132indicator panel 6infrared communication 101infrared port
location 4problems 119
input voltage 143installing
DIMM 66external keyboard 72external numeric keypad 71mouse 71PC Card 81
Kkeyboard
external, attaching 72location 4problems 113specifications 141
keyboard/mouse connector 72
LLCD
location 4problems 79, 117using 75
lock, mechanical 64using 64
low-battery condition 31
Mmemory
increasing capacity 66slot
cover 5location 5
specifications 141memory module (DIMM) 66messages on screen 108microprocessor, specifications 141monitor
See external monitormouse
attaching 71space saver keyboard 74using with
TrackPoint III 71
NNetwork and Server Support fee 138notices and warranties, product 149numeric keypad 14numeric lock indicator 7
Ooperating system
updates 140options
DIMM 66external keyboard 72
Index 161
Index
options (continued)external monitor 75external numeric keypad 71mouse 71PC Card
installing 81problems 124
Ppart numbers, power cords 144password 50
entering 50hard disk password 50power-on password 50setting 51supervisor password 50
PC CardCardWorks for Windows 95 90eject button 4installing 81keyhole 4problems 120removing 88slot 4suspend mode, using with 40
personalization editor 60pointing device
attaching 71problems 113
POST error prompt 108power command 43power cords 144power management
hibernation mode 36standby mode 34suspend mode 34
power modeswitching, using Fn key 13
power-on indicator 7power-on password 50printer
problems 122problems
battery pack 118
problems (continued)display 75error codes 108external display 122external numeric keypad 113hibernation mode 114infrared 119keyboard 113LCD 79, 117messages on screen 108options 124PC Card 120pointing device 113printer 122serial port 124software 125suspend mode 114testing the computer 126TrackPoint III 113troubleshooting charts 104, 125
Prodigy 136publications
ordering 140
Rrepair services 140
getting service 140identification numbers 132
Ssafety notice viiisales information 134screen expansion 79scroll lock indicator 7security
mechanical lock 64security features
password 50personalization editor 60
send a file 102serial number 132serial port
problems 124
162 IBM ThinkPad 560X User's Guide
Index
service 140how to get 140
ServicePak 140size, machine specifications 143software
problems 125space saver keyboard 74specifications 141
battery pack 143heat output 143humidity, environment 143input voltage 143power cords 144size 143temperature, environment 143weight 143
SRS function, using 99standards, diskette 142standby mode
Fn key function, using 13supervisor password 50suspend mode
considerations 40Fn key function, using 13problems 114timer 38
suspend-mode indicator 7SVGA monitor 75system-status indicators
battery lamp 7caps lock 7hard disk in use 7location 6numeric lock 7power on 7scroll lock 7suspend mode indicator 7
Ttechnical support 134
fee 137telephone assistance 134temperature, machine
specifications 143
testing the computer 126ThinkPad Configuration for DOS 19ThinkPad Configuration for OS/2 17ThinkPad Configuration for Windows
3.11 17ThinkPad Configuration for Windows
95 15ThinkPad Configuration for Windows
NT 17ThinkPad EasyServ 139TrackPoint III
changing the cap 11location 4problems 113using 10
TranXit 101troubleshooting
charts 104USB port 120
Uupdating, operating system 140
Vvolume control
location 4
Wwarranty
extensions and upgrades 139product 149service, international 135
weight, machine specifications 143
Index 163