iDigi User’s Guide - northstardatasheet.com · 2.1.2 iDigi Production Account The iDigi...
107
iDigi ® User’s Guide 90001150_C
Transcript of iDigi User’s Guide - northstardatasheet.com · 2.1.2 iDigi Production Account The iDigi...

iDigi® User’s Guide
90001150_C

©2011 Digi International Inc. All Rights Reserved.Digi, Digi International, the Digi logo, the Digi website, iDigi, the iDigi logo, iDigi Manager Pro, iDigi Web Services API, Digi Connect, Digi Connect WAN, Digi Connect WAN VPN, ConnectPort X, ConnectPort Display, Anywhere USB, Digi Transport, Digi Transport DR, Digi Transport WR, Digi Transport WR44, DigiTransport VC7400, ConnectCore 9C, ConnectCore Wi-9C, ConnectCore 9P, ConnectCore 7U, ConnectCore 3G, Digi Connect, Digi Connect ME, Digi Connect Wi-ME, Digi Connect EM, Digi Connect Wi-EM, Digi Connect Wi-EM 9210, Digi Connect SP, Digi Connect Wi-SP, NS9750, NS9360, NS9210, NS7520 NET+OS, XBee, and XBee-PRO are trademarks or registered trademarks of Digi International, Inc. in the United States and other countries world wide.
All other trademarks mentioned in this document are the property of their respective owners.
Information in this document is subject to change without notice and does not represent acommitment on the part of Digi International.
Digi provides this document “as is,” without warranty of any kind, either expressed or implied, including, but not limited to, the implied warranties of fitness or merchantability for a particular purpose. Digi may make improvements and/or changes in this manual or in the product(s) and/or the program(s) described in this manual at any time.
This product could include technical inaccuracies or typographical errors. Changes areperiodically made to the information herein; these changes may be incorporated in new editions of the publication.

Table of Contents
Chapter 1: Introduction to iDigi® ..................................................................................6
Overview ....................................................................................................................... 6
Why iDigi....................................................................................................................... 6
Additional iDigi Documentation ..................................................................................... 7
iDigi Support Information .............................................................................................. 8
Chapter 2: Getting Started with iDigi® .........................................................................9
iDigi User Accounts....................................................................................................... 9
iDigi Developer Account ................................................................................................ 9
iDigi Production Account ............................................................................................... 9
Creating your iDigi Developer Account....................................................................... 10
Chapter 3: iDigi Manager Pro™ Overview .................................................................11
Minimum Requirements .............................................................................................. 12
About menu................................................................................................................. 12
Log Off menu .............................................................................................................. 12
Welcome menu ........................................................................................................... 12
Resources menu......................................................................................................... 13
Devices menu ............................................................................................................. 13
XBee Networks menu ................................................................................................. 13
Storage menu ............................................................................................................. 14
Web Services Console menu...................................................................................... 14
Summary menu........................................................................................................... 14
Details menu ............................................................................................................... 14
My Account menu ....................................................................................................... 15
Operations menu ........................................................................................................ 15
1

Chapter 4: Managing iDigi® Devices ..........................................................................16
Devices page overview ............................................................................................... 16
Devices page navigation............................................................................................. 17
Cellular Modem ID....................................................................................................... 17
Device ID...................................................................................................................... 17
Extended Address ......................................................................................................... 18
Device Type.................................................................................................................. 18
Description, Location, and Contact .............................................................................. 18
Status............................................................................................................................. 18
Last Connect Time........................................................................................................ 18
Latitude, and Longitude................................................................................................ 18
Vendor ID ..................................................................................................................... 18
Devices page toolbar .................................................................................................. 18
Devices page search bar ............................................................................................ 19
Devices page Management Tools .............................................................................. 20
Refresh .......................................................................................................................... 22
Export Device List ........................................................................................................ 22
Add iDigi Devices to your inventory............................................................................ 22
Remove Devices ........................................................................................................... 23
Upload Files to the Device............................................................................................ 23
Exporting a Device’s Configuration file....................................................................... 23
Import a Device’s Configuration file............................................................................ 23
Import Customization Files to the Device .................................................................... 23
Reboot the Device......................................................................................................... 24
Reset the Device to Factory Defaults ........................................................................... 24
Disconnect the Device from iDigi ................................................................................ 24
Update the Device’s Firmware ..................................................................................... 24
Update the Device’s XBee Firmware ........................................................................... 24
Update XBee Node Firmware....................................................................................... 24
Displaying a Device’s Configuration ........................................................................... 24
Chapter 5: iDigi® SMS .................................................................................................28
Overview ..................................................................................................................... 28
Enabling SMS support on your iDigi User Account..................................................... 28
Configuring your iDigi Devices.................................................................................... 29
2

Set Device-Level SMS Settings.................................................................................... 29
Set Device-Level iDigi SMS Settings .......................................................................... 30
Add the Digi Device’s Phone Number to iDigi............................................................ 31
Managing Device Level iDigi SMS Subscriptions ....................................................... 31
Enabling Device Level iDigi SMS Subscriptions......................................................... 31
Terminating a Device Level iDigi SMS Subscription .................................................. 33
Metering........................................................................................................................ 33
Sending iDigi SMS Messages from iDigi Manager Pro............................................... 34
Request Connect ........................................................................................................... 34
Reboot........................................................................................................................... 36
Ping ............................................................................................................................... 36
Command Line ............................................................................................................. 37
Provision ....................................................................................................................... 38
Configure ...................................................................................................................... 38
Troubleshooting for iDigi SMS Users.......................................................................... 38
Find the Device’s Phone Number................................................................................. 38
Ping the Device from a Cell Phone............................................................................... 39
Confirm iDigi SMS Settings......................................................................................... 39
Chapter 6: Managing XBee® Nodes ...........................................................................40
XBee Networks page overview ................................................................................... 40
XBee Networks page navigation................................................................................. 41
Node Address................................................................................................................ 41
Network Gateway ......................................................................................................... 41
Node ID......................................................................................................................... 42
Module Type................................................................................................................. 42
Product Type................................................................................................................. 42
Type .............................................................................................................................. 42
Role............................................................................................................................... 42
Network Address .......................................................................................................... 42
Parent ............................................................................................................................ 42
Last Updated ................................................................................................................. 42
XBee Networks page toolbar ...................................................................................... 43
XBee Networks page search bar ................................................................................ 43
XBee Networks page Management Tools .................................................................. 43
3
Refresh .......................................................................................................................... 43
Discover ........................................................................................................................ 43
Rediscover (Clear Cache) ............................................................................................. 44
Export Networks Information....................................................................................... 44
Displaying an XBee Node’s Configuration .................................................................. 44
Chapter 7: iDigi® Device Storage ...............................................................................46
Storage menu overview .............................................................................................. 46
Storage page toolbar .................................................................................................. 46
Storage page Search bar............................................................................................ 47
Managing Device Folders ........................................................................................... 47
Chapter 8: iDigi® Subscriptions .................................................................................49
Subscriptions Summary page overview...................................................................... 49
iDigi Services................................................................................................................ 50
Subscriptions Summary page toolbar ......................................................................... 51
Subscriptions Summary page search bar ................................................................... 51
Subscriptions Details page overview .......................................................................... 51
Details page search bar ................................................................................................. 52
Chapter 9: iDigi® User Account Administration .......................................................53
My Account menu ....................................................................................................... 53
Operations menu ........................................................................................................ 54
Security Menu ............................................................................................................. 55
Overview....................................................................................................................... 55
Role Descriptions.......................................................................................................... 55
User Management ......................................................................................................... 56
Security Policy Management ........................................................................................ 59
Chapter 10: iDigi® Device Support .............................................................................61
Chapter 11: Examples ..................................................................................................64
Add a Device to the iDigi inventory manually.............................................................. 64
Deploy Python files to multiple Devices ...................................................................... 69
Export the iDigi Device configuration .......................................................................... 71
Upload, download, and delete Python files to or from an iDigi Device ....................... 72
4
Change the Device’s system’s description ................................................................. 75
Change the Device’s Ethernet configuration............................................................... 77
Configure the Device’s IP Host Name ........................................................................ 79
Manage the Device’s Python files and Auto-Start settings ......................................... 80
Configure secure iDigi Device connections using SSL ............................................... 82
Examples using the search bar................................................................................... 85
Scan for XBee Nodes in the network .......................................................................... 87
Determine the Gateway Device for Remote Nodes .................................................... 91
Configure the XBee Node ID ...................................................................................... 93
Enable 128-bit AES encryption on an XBee network.................................................. 95
Configure the XBee Gateway with an Extended PAN ID and to block network joins . 98
Update iDigi Device Firmware .................................................................................. 100
Find the iDigi Device's IP Address when using a Primary Cellular Connection ........ 102
Chapter 12: Glossary of iDigi® Definitions and Terms ...........................................103
5

1. Introduction to iDigi®
1.1 OverviewThe iDigi platform is an on-demand hosted service platform with no infrastructure requirements for the user. iDigi provides device management, real-time device messaging, and data storage services for a net-work comprised of both wired and wireless Digi and third-party Gateways (called iDigi devices). iDigi provides easy integration with M2M and mesh networking devices. iDigi is based upon a cloud computing model that provides on-demand scalability so you can be assured that when you need additional computing and storage iDigi will scale to meet your needs. iDigi is designed using a high-availability architecture, with redundancy and failover characteristics in mind. iDigi is monitored 24 hours a day, 365 days a year by Digi Operations staff which is able to respond to issues if and when they arise.
1.2 Why iDigiIn contrast to the one-user-to-one device model of other Digi device interfaces, iDigi uses a one-user-to-many devices interface model. By providing a central point of access for all the iDigi devices in your inventory, iDigi makes it easy to manage many devices. The iDigi devices initiate the connection to iDigi via the Internet, and maintain the connection so you always have access to your remote assets. This con-nection allows for end-to-end communications between the iDigi devices and the end-user iDigi client applications.
By leveraging the Python support provided by the iDigi devices, customers can develop and deploy cus-tomized Python programs throughout their network in order to collect data from the iDigi devices and their attached devices and sensors. Once the data is collected, the Python programs can send the data up to iDigi where it will be stored and can be retrieved by iDigi client applications issuing iDigi Web Service requests.
iDigi is a secure, publicly accessible platform allowing iDigi devices to access it with little or no configu-ration. There is no need for connections to be opened through your DMZ in order for the iDigi devices access iDigi. Users can access their iDigi device inventory using iDigi Manager Pro, so by using a stan-dard Web browser you can configure your iDigi devices, track device performance, monitor device con-nections, device status and statistics, reboot devices, reset defaults, and remotely upgrade firmware for all the devices in your iDigi devices in your inventory.
Enterprise business applications connect to iDigi’s Web Service API and customers pay only for the iDigi devices that subscribe to iDigi. Digi also provides access to a free iDigi developer account, which provides access to all the iDigi features so you can develop your own iDigi solutions.
Appendix B: iDigi Documentation
6

1.3 Additional iDigi DocumentationThe following Digi documents are available on the Digi Website. Go to www.digi.com and in the Search field provided, enter the document number for the appropriate document you wish to download.
Document Title Document Number
Anywhere USB 2/5/5(G2)/14 Installation Guide 90001085
Anywhere USB TS-44 Installation Guide 90001086
ConnectCore 9C/Wi-9C Hardware Reference Manual
90000789
ConnectCore 9P 9215, Wi-9P 9215, and 3G 9P 9215 Hardware Reference Manual
90000879
ConnectCore 9P 9360 Hardware Reference Manual
90000769
ConnectCore 7U Hardware Reference Manual 90000798
ConnectPort X Family User’s Guide 90000832
ConnectPort X5 Family User’s Guide 90001100
ConnectPort X3 Family User’s Guide 90001190
ConnectPort Display User’s Guide 90000750
Customization and Integration Guide: Digi Connect Family
90000734
Digi Cellular Family User’s Guide 90000753
Digi Connect Family User’s Guide 90000565
Digi Connect EM and Digi Connect Wi-EM Hardware Reference Manual
90000632
Digi Connect ME, Digi Connect Wi-ME and Digi Connect ME 9210 Hardware Reference Manual
90000897
Digi Connect SP and Digi Connect Wi-SP Hardware Reference Manual
90000540
Digi Connect Wi-EM 9210 Hardware Reference Manual
90000955
Digi TransPort Family User’s Guide 90001019
iDigi Web Services Programming Guide 90002008
NS7520 Hardware Reference Manual 90000353
NS9210 Hardware Reference Manual 90000846
NS9360 Hardware Reference Manual 90000675
7

1.4 iDigi Support InformationFor iDigi Technical Support contact us at:
NS9750 Hardware Reference Manual 90000624
Product Manual: XBee/XBee-Pro ZB RF Modules
90000976
Remote Command Interface (RCI) Specification 90000569
User’s Guide: XBee/XBee-Pro Drop-In Networking Adapters and Accessories
90000891
To contact Digi International by Use
Digi InternationalWorld Headquarters11001 Bren Road EastMinnetonka, MN 55343
Phone 1-877-434-4439 or1-952-912-3456
Web www.digi.com/support
Document Title Document Number
8

2. Getting Started with iDigi®
The features provided by iDigi are made available by the iDigi Services subscribed to by your iDigi User Account. As an iDigi Developer, you have free access to an iDigi Developer Account that enables all the iDigi features and functionality except for its limitation to supporting a maximum of only 5 iDigi devices (or a list of supported iDigi devices, see Chapter 10 - iDigi® Device support on page 52).
This User’s Guide will focus on helping the new iDigi Developer manage his iDigi device inventory.
2.1 iDigi User AccountsiDigi supports several types of User Accounts. The details of the accounts are described in the following sections.
2.1.1 iDigi Developer AccountThe iDigi developer account is a free, password protected iDigi User Account that provides access to a limited number of iDigi devices. The iDigi developer account enables developers to create and deploy Python programs and iDigi Client Applications that will leverage the functionality provided by both iDigi and the iDigi devices.
The iDigi Developer services are accessed at: https://developer.idigi.com
2.1.2 iDigi Production AccountThe iDigi production account is a fee-based, password protected iDigi User Account that provides access to all the iDigi devices in your inventory within the limits of the iDigi Services and Rate Plans specified by your User Account.
The iDigi Production services are accessed at: https://my.idigi.com
9

2.1.3 Creating your iDigi Developer AccountTo create your iDigi Developer account, click Are you a new user?, then follow the steps provided.
Figure 1: iDigi Developer Login Page
After you create your iDigi Developer Account and Log in to iDigi, you will be using iDigi Manager Pro, and since the iDigi services are cloud-based, the iDigi Manager Pro view of your iDigi device inventory will be consistent whether you use iDigi Manager Pro from your home or office.
After you complete your iDigi Developer evaluation, you can setup an iDigi Production account by con-tacting us at:
Phone: 1-877-IDIGI-EZ
or1-877-434-4439
Web: www.idigi.com/contactus
10

3. iDigi Manager Pro™ Overview
iDigi Manager Pro is the graphical user interface of iDigi. The first time you Log in to iDigi, iDigi Man-ager Pro will display the Welcome page; otherwise it will display the last page visited during your previous iDigi management session. The iDigi Manager Pro sessions have a 30-minute inactivity time limit.
The iDigi Manager Pro screens displayed throughout this User’s Guide are based on the iDigi 2.1.10.1 ver-sion.
Figure 2: iDigi Manager Pro Welcome page
11

iDigi Manager Pro provides menus in the left navigation bar and banner. These menus provide access to all the Management, Subscriptions, and Administration functions of iDigi Manager Pro.
Most of the menus display a toolbar at the top of the selected page as well as a list of devices or entries to be displayed or configured in the body of the page. The toolbars allow quick-access to the management functions for the given page. You can also bring up a tools menu by right-clicking one of the entries on the page; this will allow you to see the available tools available for the item or items selected.
The columns displayed by the iDigi Manager Pro are configurable. You can select which columns should be included or excluded from view, as well as arrange the order of the columns to suit your needs. If you choose to display all the available columns for some of the pages, you may wish to user your Web browser’s Zoom-In and Zoom-Out functions (Ctrl++, and Ctrl+-) in order to display the page’s informa-tion more effectively.
3.1 Minimum RequirementsiDigi Manager Pro connects to iDigi using a standard Web Browser. iDigi Manager Pro supports the fol-lowing Web Browsers:
* The Device Discovery function in the Add Devices tool is not currently supported on Mac OS X.
3.2 About menuThe About menu is displayed in the iDigi Manager Pro banner, and it provides version information for iDigi Manager Pro and contact information for Digi.
3.3 Log Off menuThe Log Off menu is in the iDigi Manger Pro banner, and it opens a dialog box allowing you to exit your iDigi management session.
3.4 Welcome menuThe Welcome page is the page displayed when you first log into iDigi. It provides a brief overview of some of the iDigi features.
Web Browser Version Requirements
Microsoft Internet Explorer Versions 7 through 8Note: IE 9 is not currently supported
Mozilla Firefox Version 3 or newer
Google Chrome Version 4 or newer
Apple Safari Version 4 or newer*
12

3.5 Resources menuClicking the Resources menu provides a list of iDigi resources including documents, applications, and helpful links in order to help you better understand the iDigi environment. As new versions of iDigi are released, these resources may be updated, so it is a good practice to check out this page from time to time to ensure you are aware of the latest iDigi resources available.
3.6 Devices menuClicking the Devices menu displays the list of iDigi Devices in your inventory. The Devices menu allows for the:
• Displaying of the Device ID, IP Address, and connection status of your iDigi Devices
• Selecting of the columns to be displayed by the Devices page
• Adding and removing iDigi Devices from your inventory
• Configuring of iDigi Devices
• Uploading of Python files to iDigi Devices
• Updating of Device and XBee Node firmware to the iDigi Devices,
• Exporting and Importing iDigi Device configuration files
• Importing of iDigi Device customization files
• Rebooting of the iDigi Device
• Restoring of the Factory Defaults of an iDigi Device
• Exporting of the iDigi Device information displayed by the Devices page
• Performing of management tasks on a group of iDigi Devices
3.7 XBee Networks menuClicking the XBee Networks menu allows you to manage all the XBee devices in your inventory. The XBee Networks menu allows for the:
• Displaying of the Node Address, Network Gateway, Type, and Role of all the XBee devices in the net-work
• Refreshing of the list of devices on any XBee network
• Configuring of the XBee devices in the network
• Exporting of the XBee network information
• Performing of management tasks on a group of XBee devices
13
3.8 Storage menuClicking the Storage menu displays a folder for each of the iDigi Devices in your inventory. The name of the folder is the fully qualified Device ID of the iDigi Device. When the Python program running on the iDigi Device sends data to iDigi for storage, these folders represent the location where the data is stored on iDigi. Each iDigi Device only has access to its own folder, and any subfolder created under its root folder. The Storage menu allows for the:
• Displaying of the folders associated with your iDigi Devices
• Creating and deleting of folders
• Displaying of the contents of the folders and the size of the files in them
• Uploading of files to the folders from your PC
• Download of files from folders to your PC
3.9 Web Services Console menuClicking the Web Services Console menu opens a page providing tools for the iDigi developer. This page allows you to perform any iDigi Web Service request and view the response data. The Web Services Con-sole page is intended to be a tool for developers writing applications that will call iDigi Web Services, although it can also be useful to administrators as a diagnostic tool. For information regarding this menu, please refer to the iDigi Web Services Programming Guide.
3.10 Summary menuClicking the Summary menu displays subscription information including the iDigi Services and iDigi Rate Plans assigned to your account. By default, an iDigi Developer account subscribes to all the iDigi Services. The Summary menu allows for the:
• Displaying of all the iDigi Services subscribed to by your User Account
• Displaying of the Rate Plan associated with each iDigi Service
• Displaying of the number of subscriptions and usage for each of the iDigi Services
• Displaying of the usage limit and any overage for each of the iDigi Services
• Exporting of iDigi Service usage for the current month or previous months
3.11 Details menuClicking the Details menu displays detailed information about your subscriptions including the iDigi Ser-vices and Rate Plans subscribed to by your User Account. The Details menu allows for the:
• Terminating of the Subscription to a Service
• Activating and Deactivating of a Subscription to a Service
• Displaying of the Services subscribed to by each of the iDigi Devices
• Displaying of the usage consumed by each of the iDigi Devices
• Exporting of Service usage for the current, or previous months
14

3.12 My Account menuClicking the My Account menu displays your User Account information and allows you to edit your User Account and Password information.
3.13 Operations menuClicking the Operations menu displays a list of the iDigi operations (management tasks) your have per-formed over the last 24 hours.
15

4. Managing iDigi® Devices
4.1 Devices page overviewClicking the Devices menu opens the Devices page. The Devices page allows you to manage the iDigi Devices in your inventory. In order to manage an iDigi Device, it must be added to your inventory, see the Add iDigi Devices to your inventory section on page 22 for more details.
The Devices page provides a toolbar and search bar to simplify your management tasks. You can also add or remove individual columns from being displayed on the page, as well as arranging the columns in any order you wish. You can even sort the columns. For more information see the Devices page navigation sec-tion on page 17.
Common device management tasks include:
• Adding and removing devices from the network
• Importing and exporting configuration files from the devices
• Updating firmware in the devices
• Changing the configuration of a device
Figure 3: The Device List on the Devices page
16

4.2 Devices page navigationThe columns displayed are configurable in a variety of ways. Right-Click in one of the column headings and iDigi Manager Pro will list all the columns available for the particular page, as well as which columns are currently displayed on the page. Simply check and uncheck the appropriate columns to update the list to suit your needs.
The columns can be rearranged by left-clicking the column you wish to move, and dragging it to its new location. Sorting a column is performed by left-clicking the column heading. This will reverse the search order of the selected column, left-clicking it again will set the search order back to where it was when you started.
Although many of the columns provided on the Devices page are self explanatory, some of them are explained in more detail below:
4.2.1 Cellular Modem IDFor iDigi Devices with cellular support, the Cellular Modem ID is the serial number of the cellular modem.
4.2.2 Device IDThe Device ID is a 16-Byte address that uniquely identifies the iDigi Device in iDigi. An iDigi Device will create its Device ID based on its primary communication interface. Usually this will be based on the Device’s Ethernet MAC address, but for Devices that do not have an Ethernet interface another interface like its cellular interface will be chosen instead. The format of the Device ID is as follows:
XXXXXXXX-XXXXXXXX-XXXXXXXX-XXXXXXXX
17

An example of a Device ID based on a Devices Ethernet interface with a MAC Address of 0004F3:01F974 is:
00000000-00000000-0004F3FF-FF01F974
In many cases, the leading 8-bytes of the Device ID are zeros, the iDigi Manager Pro may skip displaying the leading “00000000-00000000” in order to minimize screen usage.
4.2.3 Extended AddressFor iDigi Devices with XBee support, the Extended Address is the Device’s XBee MAC Address.
4.2.4 Device TypeThe Device Type is the iDigi Device’s model information.
4.2.5 Description, Location, and ContactThe Description, Location, and Contact fields are user configurable and allow descriptive device informa-tion to be assigned to the each of the iDigi Devices.
4.2.6 StatusThe Status field indicates whether the given iDigi Device is currently connected or disconnected to iDigi.
4.2.7 Last Connect TimeThe Last Connect Time indicates the last time the iDigi Device established its connection with iDigi.
4.2.8 Latitude, and LongitudeFor iDigi Devices with Cellular GPS support, the Latitude and Longitude values provided from the Device are displayed.
4.2.9 Vendor IDThe Vendor ID is a 4-Byte value indicating the manufacturer of the selected iDigi Device.
4.3 Devices page toolbarThe Devices page toolbar provides quick access to all the management tasks that can be performed on the Devices page. The Tool-Bar provides the following buttons (maybe we can add tool-bar pictures for each of the following items):
• Refresh - Clicking the Refresh button refreshes the list of iDigi Devices displayed.
• Export Device List – Clicking the Export Device List button opens a dialog allowing you to export device information for all the iDigi Devices in your network in a Microsoft Excel file.
• Add Devices – Clicking the Add Devices button opens a dialog allowing you to add devices to your iDigi inventory. The Add Devices dialog includes an applet that discovers iDigi Devices on your local
18

network. If your Devices are not on your local network, you can also add them manually by supplying the necessary information.
• Remove Devices – Clicking the Remove Devices button will allow you to remove the selected iDigi Device from your network.
• Administration – Clicking the Administration button will allow you to upload files, import and export configuration and customization files, Reboot, Reset to Factory defaults, or disconnect your iDigi Device from iDigi.
• Firmware – Clicking the Firmware button allows you to update the firmware in the selected iDigi Device.
• Properties – Clicking the Properties button will open the Properties page for the iDigi Device or Devices selected. The Properties page displays the Device configuration, state, and statistics informa-tion
4.4 Devices page search barThe search bar allows you to search for entries in the Device List that match the search criteria entered. The search bar provides the Search, Clear, and Advanced buttons.
Clicking the Search button starts the search using the criteria entered in the Search field, searching only in the columns called out in the Advanced button. The resulting search will display all the devices that meet the search criteria in the Device List.
Clicking the Clear button clears the Search field and updates the Device List to display all the iDigi Devices in your inventory.
Clicking the Advanced button will allow you to select the search columns to be used during subsequent searches.
19

4.5 Devices page Management ToolsPerforming management tasks on a Device is a two-step process. First select the Device or Devices, and then select the management function to be performed.
Selecting Devices in the Device List is a simple as clicking on a Device. Once a Device has been selected, its row will turn blue (as shown below).
Figure 4: Selecting a Device to be managed
Selecting multiple Devices can be done by holding down the Ctrl key while selecting the Devices, or you can also select a series of Devices by first selecting the top-most Device, and then Shift-Click on the bot-tom-most Device to select all the Devices in the series (as shown on the next page).
20

Figure 5: Selecting Multiple Devices to Configure
Once the Devices have been selected, either click the desired Tool-Bar button, or right-click on one of the selected Devices and select the desired management function from the menu displayed.
21

4.5.1 RefreshClicking the Refresh button will refresh the information displayed on the Devices page.
4.5.2 Export Device ListClicking the Export Device List button will open a dialog box that will allow you to save the information displayed in the Devices page to a Microsoft Excel file.
4.5.3 Add iDigi Devices to your inventoryTo communicate with iDigi, the Device needs to be added to your iDigi inventory, and the Device needs its Remote Management configuration updated in order to establish a connection with iDigi. The Add Devices dialog can perform these tasks for you.
Updating the Remote Management configuration of the iDigi Device entails the following:
1. Enable Remote Management via iDigi
2. Provide the address of iDigi (www.developer.idigi.com in this case)
3. Have the Device connect to iDigi automatically at startup
4. Have the Device reconnect to iDigi in the event of a disconnection
5. Click the Add Devices button in order to open the dialog.
22
The first step is to discover your iDigi Device on your local network. Normally the Add Devices applet will discover all your iDigi Devices automatically as soon as you open it.
NOTE: The Add Devices Auto Discovery discovers iDigi Devices on your local network and requires the Java Runtime Environment (JRE 1.6 or newer). If this is not installed, or your iDigi Devices is not discover, or is not on your local net-work, you must add the iDigi Devices manually. For more information on how to add iDigi Devices manually, see the Add a Device to the iDigi inventory man-ually section on page 55.
Once your Device has been discovered on your local network, click on the Device you wish to add to your iDigi inventory. If the iDigi Device is not discovered, or is not on your local network, you can add the Device manually. Once all the Devices have been selected, determine whether or not you want the Add Devices applet to auto-configure the iDigi Device’s Remote Management settings (this is the default option and will reboot the Device in order to apply the updated configuration settings).
Click OK to add the Devices to your iDigi inventory.
4.5.4 Remove DevicesSelecting Remove Devices will allow you to delete the selected Device or Devices from the inventory.
4.5.5 Upload Files to the DeviceiDigi Manager Pro allows you to upload files to either the Devices root folder, or the Devices root Python folder. Selecting Administration > Upload Files opens a dialog that allows you to upload files to the root directory of the Device or Devices selected.
Selecting Administration > Upload Python Files opens a dialog box that allows you to upload Python files to the root “python” directory of the Device or Devices specified.
4.5.6 Exporting a Device’s Configuration fileSelecting Administration > Export opens a dialog box that allows you export the XML configuration file of the selected Device. Exporting a Device’s configuration file is a simple way to store a copy of the Device’s configuration for later use.
4.5.7 Import a Device’s Configuration fileSelecting Administration > Import opens a dialog box that allows you import a configuration file for the selected Device. The configuration file is an RCI file.
4.5.8 Import Customization Files to the DeviceSelecting Administration > Customization opens a dialog box that allows you to download customiza-tion files. For the iDigi Devices that support this, customization files are used to private-label and custom-ize the iDigi Device. Customization usually takes the form of importing a few files to the Device and rebooting the Device in order to apply the new defaults. For more information see Appendix B.
23
4.5.9 Reboot the DeviceSelecting Administration > Reboot from allows you to reboot the Device or Devices selected.
4.5.10 Reset the Device to Factory DefaultsSelecting Administration > Restore Factory Defaults will open a dialog where you can restore the fac-tory default configuration to the Device or Devices selected. The dialog allows you to select whether you want to reset all the configuration items, or everything except the Device’s network configuration.
4.5.11 Disconnect the Device from iDigiSelecting Administration > Disconnect will result in iDigi sending a command instructing the Device to disconnect. If the Device is configured to automatically reconnect to iDigi, it will re-establish the connec-tion to iDigi after its reconnection timeout period has expired.
4.5.12 Update the Device’s FirmwareSelecting Update Firmware will open a dialog box where you can select a Firmware file to upload to the selected Device or Devices. Once the Firmware file is downloaded to the Device, the Device will be rebooted automatically.
4.5.13 Update the Device’s XBee FirmwareSelecting Update Gateway XBee Radio Firmware will open a dialog box where you can select a XBee Radio Firmware file to upload to the selected Device or Devices.
Once the XBee Radio Firmware file is downloaded to the Device, the Device will be rebooted automati-cally.
4.5.14 Update XBee Node FirmwareSelecting Update XBee Node Firmware will open a dialog box where you can download XBee Radio Firmware to all the Remote Nodes connected to the selected iDigi Device. Once the XBee Radio Firmware file is downloaded to the Remote Node, the Remote Node will be rebooted automatically.
4.5.15 Displaying a Device’s ConfigurationThe configuration information for an iDigi Device is displayed by opening its Properties. This can be done by either double-clicking on the Device in the Device List, or by selecting one or more Devices and then clicking the Properties button in the Tool-Bar. iDigi Manager Pro displays the Properties with a menu-tree on the left and the corresponding Properties page information on the right.
24
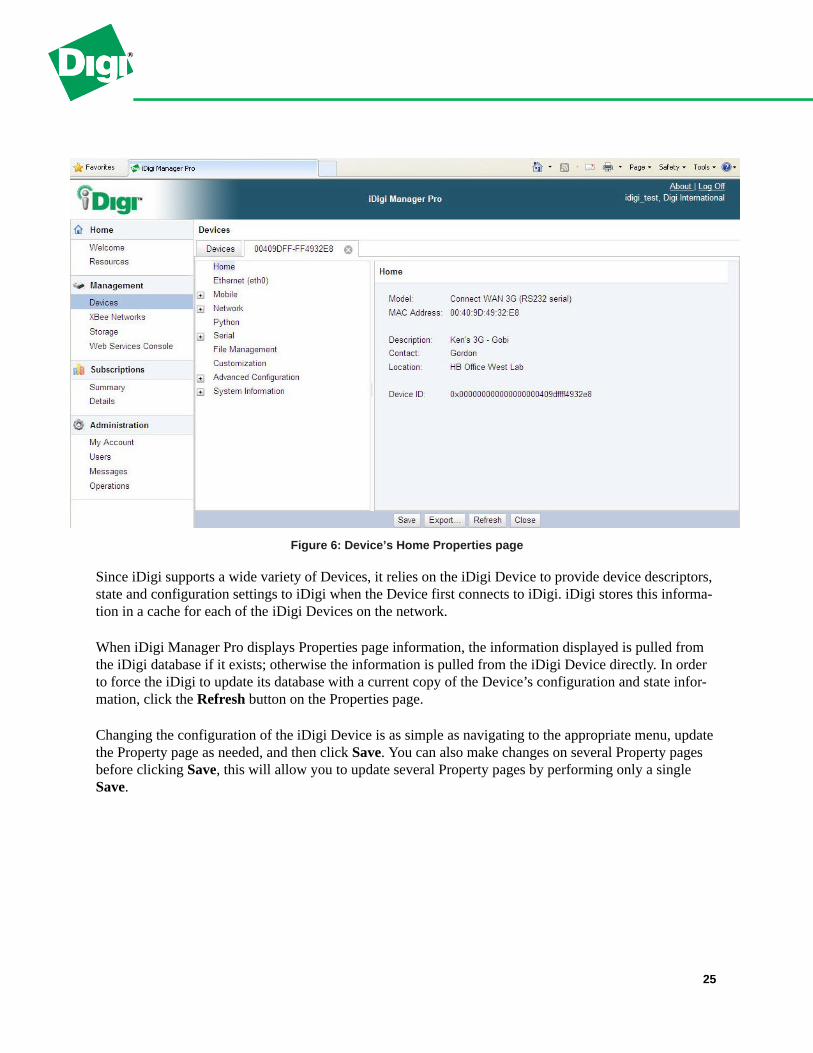
Figure 6: Device’s Home Properties page
Since iDigi supports a wide variety of Devices, it relies on the iDigi Device to provide device descriptors, state and configuration settings to iDigi when the Device first connects to iDigi. iDigi stores this informa-tion in a cache for each of the iDigi Devices on the network.
When iDigi Manager Pro displays Properties page information, the information displayed is pulled from the iDigi database if it exists; otherwise the information is pulled from the iDigi Device directly. In order to force the iDigi to update its database with a current copy of the Device’s configuration and state infor-mation, click the Refresh button on the Properties page.
Changing the configuration of the iDigi Device is as simple as navigating to the appropriate menu, update the Property page as needed, and then click Save. You can also make changes on several Property pages before clicking Save, this will allow you to update several Property pages by performing only a single Save.
25

Figure 7 Example of a Device’s Ethernet Properties page
Figure 8: Example of a Device’s XBee Properties page
26

Figure 9: Example of a Device’s Python Properties page
27
5. iDigi® SMS
5.1 OverviewThe iDigi SMS feature supports sending and receiving SMS messages between iDigi and an iDigi device. iDigi SMS can be used to:
• Send an SMS message to the iDigi device in order to have the iDigi device dynamically establish its EDP connection with iDigi
• Send user defined data to and from iDigi and iDigi devices
• Perform limited device management such as Pinging the iDigi device, as well as provisioning it prop-erly for SMS functionality with iDigi
With iDigi devices that support the iDigi SMS feature, iDigi can send an SMS message to the iDigi device instructing the device to establish its EDP connection to iDigi. Once the iDigi device has uploaded its data to iDigi, iDigi can then disconnect the EDP connection resulting in lower cellular data usage since the EDP connection non longer needs to be maintained around the clock.
iDigi SMS support makes sending data between iDigi devices and iDigi easy and reliable. This new iDigi feature augments and overcomes the limitations of using basic SMS messages in several ways:
• Send request/response pairs allowing confirmation of messages, as well as allowing iDigi devices to respond to user commands sent though iDigi
• Send messages larger than a single SMS message. iDigi will automatically split up and re-assemble large messages into a multi-part message without requiring any user intervention..
• Send binary messages (basic SMS messages are limited to text only)
• Guarantee data integrity (basic SMS messages do not guarantee integrity)
iDigi supports SMS Communication through both the Devices page within iDigi Manager Pro and through the Web Services console. For more information about using the Web Services Console, see the iDigi Web Services Programming Guide. The iDigi functionality available in the Devices page is detailed further in this chapter.
5.2 Enabling SMS support on your iDigi User AccountIn order to use the iDigi SMS feature, you must first subscribe to this service in your iDigi account. This feature is disabled by default as it may cause you to incur additional charges on your cellular data plan. Check with your cellular service provider to ensure you have an appropriate SMS option as part of your plan.
Contact your Digi sales representative to get started, or call iDigi at 1-877-IDIGI-EZ or 1-877-434-4439.
28

5.3 Configuring your iDigi Devices
5.3.1 Set Device-Level SMS SettingsPrior to using the iDigi SMS feature set, you must first configure your iDigi device to enable the iDigi SMS feature. The instructions below assume you have an iDigi device with a working cellular connection already.
NOTE: You can also edit these settings through the device's local web UI if you have the iDigi device connected locally, and it would be called the global SMS setting in that interface. You can find this under Configuration > Mobile > Short Message Service (SMS) Settings.
1. From the Devices page, double-click on your iDigi device to access the properties details.
2. Under the Advanced Configuration heading, explode by clicking on + to see subheadings, and click on Cellular SMS.
3. Edit the Enabled setting to On.
4. Remove the Password if one is shown (you may edit this later after establishing the SMS service).
5. Click Save to finalize changes.
29
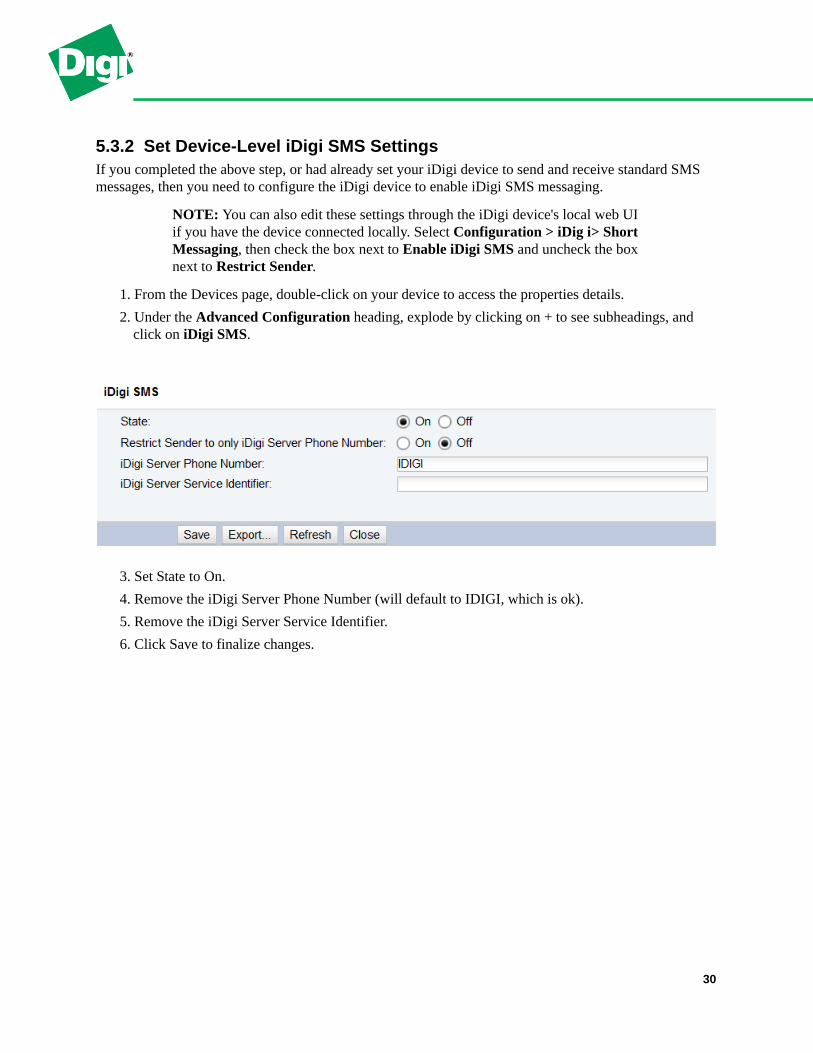
5.3.2 Set Device-Level iDigi SMS Settings If you completed the above step, or had already set your iDigi device to send and receive standard SMS messages, then you need to configure the iDigi device to enable iDigi SMS messaging.
NOTE: You can also edit these settings through the iDigi device's local web UI if you have the device connected locally. Select Configuration > iDig i> Short Messaging, then check the box next to Enable iDigi SMS and uncheck the box next to Restrict Sender.
1. From the Devices page, double-click on your device to access the properties details.
2. Under the Advanced Configuration heading, explode by clicking on + to see subheadings, and click on iDigi SMS.
3. Set State to On.
4. Remove the iDigi Server Phone Number (will default to IDIGI, which is ok).
5. Remove the iDigi Server Service Identifier.
6. Click Save to finalize changes.
30

5.3.3 Add the Digi Device’s Phone Number to iDigi1. Return to the Devices Page and locate the SMS pull-down menu. Select Configure… from the
menu.
2. A dialog box will appear, and let you to enter up to 2 device phone numbers. Enter your phone num-ber(s) and click Ok.
3. Once this configuration step is complete, you should try to ping the iDigi device using an SMS mes-sage from iDigi Manager Pro to confirm success. See further instructions in this chapter.
5.4 Managing Device Level iDigi SMS Subscriptions
5.4.1 Enabling Device Level iDigi SMS SubscriptionsFrom the Management > Devices page in iDigi Manager Pro, highlight a device in your inventory, then move your mouse over the new SMS menu to see if this is currently enabled for the selected iDigi device. If a red circle with a diagonal line through it appears, this is not currently available. Assuming you've already added an iDigi SMS subscription to your account, this can easily be fixed.
1. Navigate to Subscriptions > Details and locate the iDigi device's other subscriptions in your inven-tory list. Select it.
2. Click on the add button with the associated Subscribe to Service pull-down menu. Select iDigi SMS messaging.
NOTE: These subscriptions are all explained in more detail in the Subscriptions chapter of this book.
31

3. A dialog box prompting you to confirm this change to your device will appear. Though this example shows only one iDigi device, you may have multiple devices added and should double-check that you're activating iDigi SMS on the correct iDigi device. Click OK.
32

5.4.2 Terminating a Device Level iDigi SMS Subscription1. From the Management > Devices page in iDigi Manager Pro, highlight the line showing the iDigi
device and subscription you want to terminate. Then click on the delete button in the toolbar to terminate.
2. Confirm your selection by clicking Yes. The change is effective immediately.
5.4.3 MeteringWithin the iDigi Manager Pro interface, go to Subscriptions > Summary to display the subscriptions active on your account. If iDigi SMS messaging is on your account, you will see it listed here, along with your usage to date in the active month and any usage limits that may apply to your account.
Please note that in the example account used throughout this chapter, iDigi SMS messaging is highlighted. We have sent 71 messages to our device(s) and received 44 response messages. This count includes only those messages sent between your devices and iDigi. The usage will reflect each individual message that makes up a multipart message between the device and iDigi. Example: If a request from iDigi takes 1 message to send to the device and the device requires 4 messages to send back the response, you will see your 'sent' usage increase by 1 while your 'received' usage will increase by 4.
33

5.5 Sending iDigi SMS Messages from iDigi Manager Pro
5.5.1 Request ConnectNavigate to the iDigi Manager Pro Devices Page. Click on the device, then use the pull-down menu at the
top to access iDigi SMS commands.
The Request Connect command sends an iDigi SMS to the iDigi device to instruct it to establish an EDP connection back to iDigi. If you plan to keep your device offline, this command will allow you to dynami-cally establish the EDP between the iDigi device and iDigi in order to perform extended communications (SCI/RCI, firmware upgrades, etc.) that are either not supported or nor practical via iDigi SMS. The Con-nect Request itself does not communicate any parameters to the iDigi device other than instruct it to estab-lish a paged connection with iDigi..
34

The only option for this command is whether or not you select Request response. If you select it, you will get a success or failure message, from the iDigi device indicating it has received and understood this SMS message.
Whichever option you choose, you should refresh the Devices page afterward to confirm your device's status.
If the iDigi device is already connected, this command will not make any changes. If not, this command will attempt to establish a connection. However, if your iDigi device (via the local device configuration UI) is configured with Disconnect the current iDigi connection before making a paged connection selected, then this command will first disconnect it from iDigi and then attempt to re-establish connection.
NOTE: The Request Connect SMS command is also supported under the Web Services Console. To learn more about this feature, see the iDigi Web Services Programming Guide.
At the end of your iDigi session, you may easily disconnect your iDigi device's EDP connection, using the Administration > Disconnect selection, also available on this menu.
35
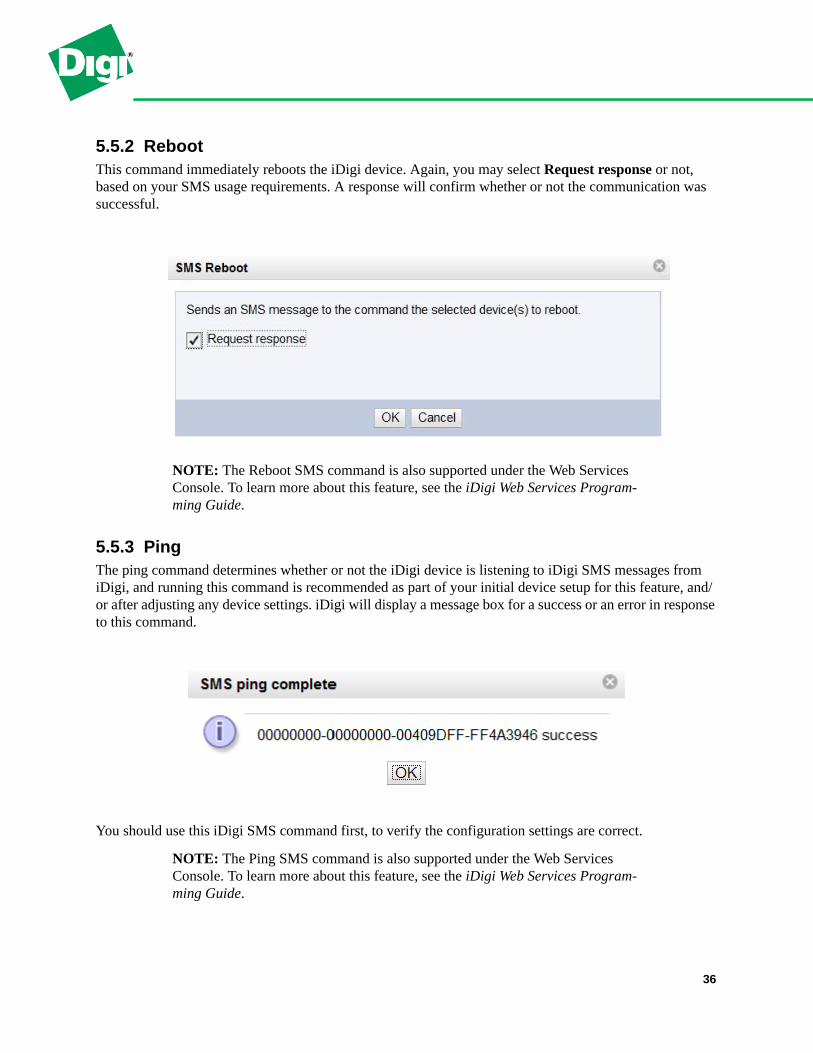
5.5.2 RebootThis command immediately reboots the iDigi device. Again, you may select Request response or not, based on your SMS usage requirements. A response will confirm whether or not the communication was successful.
NOTE: The Reboot SMS command is also supported under the Web Services Console. To learn more about this feature, see the iDigi Web Services Program-ming Guide.
5.5.3 PingThe ping command determines whether or not the iDigi device is listening to iDigi SMS messages from iDigi, and running this command is recommended as part of your initial device setup for this feature, and/or after adjusting any device settings. iDigi will display a message box for a success or an error in response to this command.
You should use this iDigi SMS command first, to verify the configuration settings are correct.
NOTE: The Ping SMS command is also supported under the Web Services Console. To learn more about this feature, see the iDigi Web Services Program-ming Guide.
36
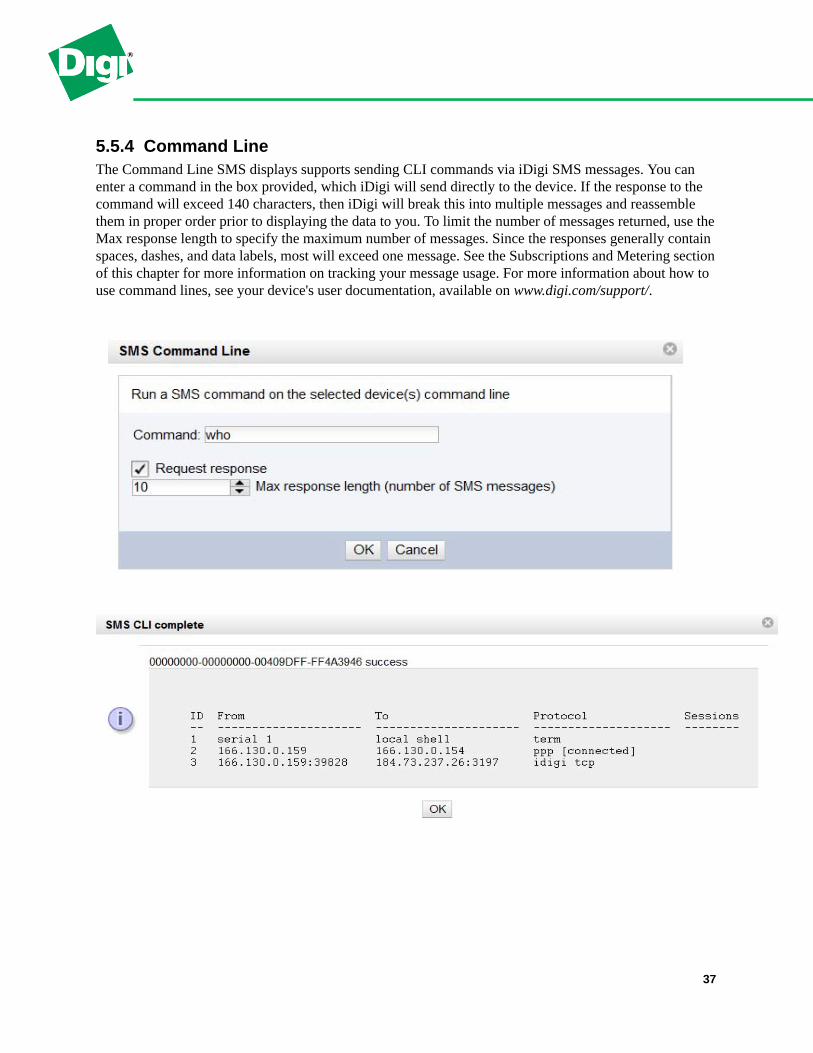
5.5.4 Command LineThe Command Line SMS displays supports sending CLI commands via iDigi SMS messages. You can enter a command in the box provided, which iDigi will send directly to the device. If the response to the command will exceed 140 characters, then iDigi will break this into multiple messages and reassemble them in proper order prior to displaying the data to you. To limit the number of messages returned, use the Max response length to specify the maximum number of messages. Since the responses generally contain spaces, dashes, and data labels, most will exceed one message. See the Subscriptions and Metering section of this chapter for more information on tracking your message usage. For more information about how to use command lines, see your device's user documentation, available on www.digi.com/support/.
37

5.5.5 ProvisionSends a special "config" command to the iDigi device via iDigi SMS that sets the iDigi server phone num-ber and service ID. This will populate the fields if left blank, but will also overwrite incorrect data entered in these fields. Prior to sending the command, be sure to use the device's local web UI to enable global SMS and iDigi SMS. The only option for this command is whether or not you select Request response. If you select it, you will get a success or failure message, confirming the communication was successful.
To verify the provisioning was successful, simply navigate back to the device's local web UI and select Configuration > iDigi. Then look under the section Short Messaging to confirm the phone number and service identifier have been populated or corrected.
5.5.6 ConfigureConfigures the phone number of the iDigi device for up to two SIMs; also allows the user to select the active SIM. Unlike the above commands, configure is not an iDigi SMS message sent to the device. It's a menu option to support setting up the iDigi SMS capabilities on your device.
5.6 Troubleshooting for iDigi SMS Users
5.6.1 Find the Device’s Phone Number1. Make sure the global SMS capabilities on iDigi your device are enabled. Use the navigation links
along the left side of the device's local UI to select Configuration > Mobile.
2. You will see a section for Short Message Service (SMS) Settings. Be sure that you have checked the box next to Enable cellular Short Message Service (SMS) capabilities. Also check the set-tings under Build-In Command Settings, verifying the checkbox next to #ping is checked and the password field is blank.
3. To verify the device is connected to iDigi, navigate to the Devices page under Management > Devices. Locate your iDigi device on the list, using the MAC Address to match the physical device to the one in the list. Take note of the IP Address shown on that line. In this example, 10.8.16.55.
NOTE: If your iDigi device is not in your iDigi inventory, see the Examples section of this document to add via the Discovery tool, or to add the iDigi device manually.
38

4. Open a telnet session by doing one of the following.
a. From a command prompt in Windows, type in telnet 10.8.16.55 and hit enter.
b. From MAC or UNIX environments, open a terminal window.
5. Type the command smscell sendmsg=18774344439,"hello", where smscell sendmsg is an NDS command to speak with the device directly, 18774344439 is the phone number you want a text mes-sage to go to (your cell phone would be ideal), and hello is the actual message being sent.
6. Now simply read the phone number from the text message that just went to your phone.
7. If you haven't already used the SMS > Configure feature to tell iDigi the iDigi device's phone num-ber, do that now. See the Configuring your iDigi Devices section on page 29 for instructions.
5.6.2 Ping the Device from a Cell Phone1. Send a text message from a cell phone to the device with just #ping. If the iDigi device's global
SMS settings are correct and the SIM card supports sending SMS, your iDigi device will reply with Pong!
2. If this test goes well, then you know the device's global SMS settings are working correctly and that the device is able to send and receive these messages.
5.6.3 Confirm iDigi SMS Settings1. Check your iDigi device configuration settings in the local device UI. Navigate to Configuration >
iDigi.
2. Under Connection Settings > Server-Initiated iDigi Connection, uncheck all of these options. With these checked, the iDigi device will be stuck in listening mode and is unlikely to ever connect to iDigi (SMS or otherwise).
3. Under Paged iDigi Connection > Enable Paged iDigi Connection should be checked if you want to be able to establish a connection using iDigi SMS. You will not be able to use Request Connect commands or complete configuration.
4. Now, within the Configuration > iDigi page, select the section called Short Messaging.
5. Enable iDigi SMS must be checked to use the iDigi SMS feature set. During setup and trouble-shooting, you may want to uncheck Restrict Sender since it limits the device's communications.
6. If you know the Phone Number and Service Identifier information for your iDigi SMS subscrip-tion account, enter those here and click Apply. If not, see the detailed instructions for using an iDigi SMS Provision command in the Sending iDigi SMS Messages from iDigi Manager Pro section on page 34.
39

6. Managing XBee® Nodes
6.1 XBee Networks page overviewThe XBee Networks page allows you to manage all the XBee Nodes in your inventory.
Figure 10: XBee Node List in the XBee Networks page
40

6.2 XBee Networks page navigationThe columns displayed are configurable in a variety of ways. Right-Click in one of the column headings and iDigi Manager Pro will list all the columns available for the particular page, as well as which columns are currently included in the display. Simply check and uncheck the appropriate columns to update the list to suit your needs.
The columns can be rearranged by left-clicking the column you wish to move, and dragging it to its new location. Sorting a column is performed by left-clicking the column heading. This will reverse the search order of the selected column, left-clicking it again will set the search order back to where it was when you started.
6.2.1 Node AddressThe Node Address column displays an icon for the type of XBee Node as well as the XBee Extended Address of the device selected. The icon usually displays the type of XBee device selected: XBee Router, XBee Coordinator, XBee, End Node, but it may also display the “Discover” icon suggesting that you per-form an XBee Discovery in order to find all the XBee devices connected to the selected Node’s XBee net-work.
6.2.2 Network GatewayThe Network Gateway is the iDigi Device ID of the Device that contains the XBee Gateway for the net-work that this XBee Node belongs to.
41

6.2.3 Node IDThe Node ID is a user configurable field that allows a descriptive name to be provided to the XBee Node.
6.2.4 Module TypeDescribes the XBee module type used in this device. This is not supported on all XBee devices.
6.2.5 Product TypeThe Product Type describes the physical device that contains the XBee radio. This is not supported on all XBee devices.
6.2.6 TypeThis is the Device Type identifier (or the XBee module’s DD setting). This is not supported on all XBee devices. For more information on XBee Node settings, see Appendix B.
6.2.7 RoleThe Role field describes the Node’s role in the XBee network: Coordinator, Router, End Node, or Unknown.
6.2.8 Network AddressThe Network Address column displays the 16-bit network address (or the MY setting) of the XBee mod-ule. A value of 0xFFFE means the module has not joined an XBee network. For more information on XBee Node settings, see Appendix B.
6.2.9 ParentThe Parent column displays the 16-bit network address of the XBee module’s parent (or the MP setting). A value of 0xFFFE means the module does not have a parent. For more information on XBee Node set-tings, see Appendix B.
6.2.10 Last UpdatedFor Smart Energy devices, the Last Updated column displays the last time iDigi detected the Node’s status change. This allows you to tell how long a Node has been active or inactive.
For non Smart Energy devices, the Last Update column displays the last time iDigi discovered the Node.
42

6.3 XBee Networks page toolbarThe toolbar provides quick access to all the management tasks available on the XBee Networks page. The toolbar provides the following buttons (maybe we can add toolbar pictures for each of the following tool-bar items):
6.4 XBee Networks page search barThe search bar allows you to search for entries in the XBee Networks Node List that match the search cri-teria entered. The search bar provides the Search, Clear, and Advanced buttons. For more information about how to use the search bar refer to the Devices page search bar section on page 19.
6.5 XBee Networks page Management Tools
6.5.1 RefreshClicking the Refresh button will refresh the information displayed on the XBee Networks page.
6.5.2 DiscoverClicking the Discover button sends an XBee Discover to the XBee Coordinator or XBee Gateway selected. This command instructs the Device to search for all its connected XBee Nodes. If you happen to select an XBee End Node, the Discover will be sent to the End Node’s XBee Gateway instead.
Button Name Description
RefreshClicking the Refresh button refreshes the list of XBee Devices displayed.
DiscoverSends an XBee Discover request to the XBee Gateway or Router.
Rediscover (clear cache)
Clicking the Rediscover (clear cache) button clears the list of XBee devices before sending the XBee Discover request to the XBee Gateway or Router.
Export Network Information
Clicking the Export Network Information button opens a dialog allowing you to export XBee Network information similar to what is displayed on the XBee Networks page into a Microsoft Excel file.
Properties Clicking the Properties button will open the Properties page
for the selected XBee device. The Properties pagedisplays all the device configuration, state, and statistics information for the selected device.
43

6.5.3 Rediscover (Clear Cache)The Rediscover (clear cache) button instructs the XBee Gateway to clear its attached XBee Node cache before performing the Discover. If you happen to select an XBee End Node, the Discover will be sent to the End Node’s XBee Gateway instead.
6.5.4 Export Networks InformationClicking the Export Network Information button opens a dialog box that allows you to save the informa-tion displayed in the XBee Networks page to a Microsoft Excel file.
6.5.5 Displaying an XBee Node’s ConfigurationThe configuration information for an XBee Node is displayed by opening its Properties. This can be done by either double-clicking on the Node in the XBee Networks Node List, or by selecting one or more XBee Nodes and then clicking the Properties button in the toolbar. iDigi Manager Pro displays the XBee Node’s Properties with a menu-tree on the left and the corresponding Properties page information on the right.
iDigi relies on the iDigi Device to generate device descriptors that will describe all the configurable set-tings the iDigi Device supports. When a Properties page is displayed, the information is populated from the iDigi Database (instead of retrieving it from the iDigi Device directly). In order to force the iDigi Data-base to be updated with a current copy of the iDigi Device’s XBee configuration, click the Refresh button at the bottom of the Properties page. Now the information displayed will reflect the current configuration information from the selected iDigi Device.
To change the configuration of the XBee Node, navigate to the appropriate Properties page, update the configuration item or items as needed, and the click Save.
Figure 11: XBee Node’s Basic Properties page
44
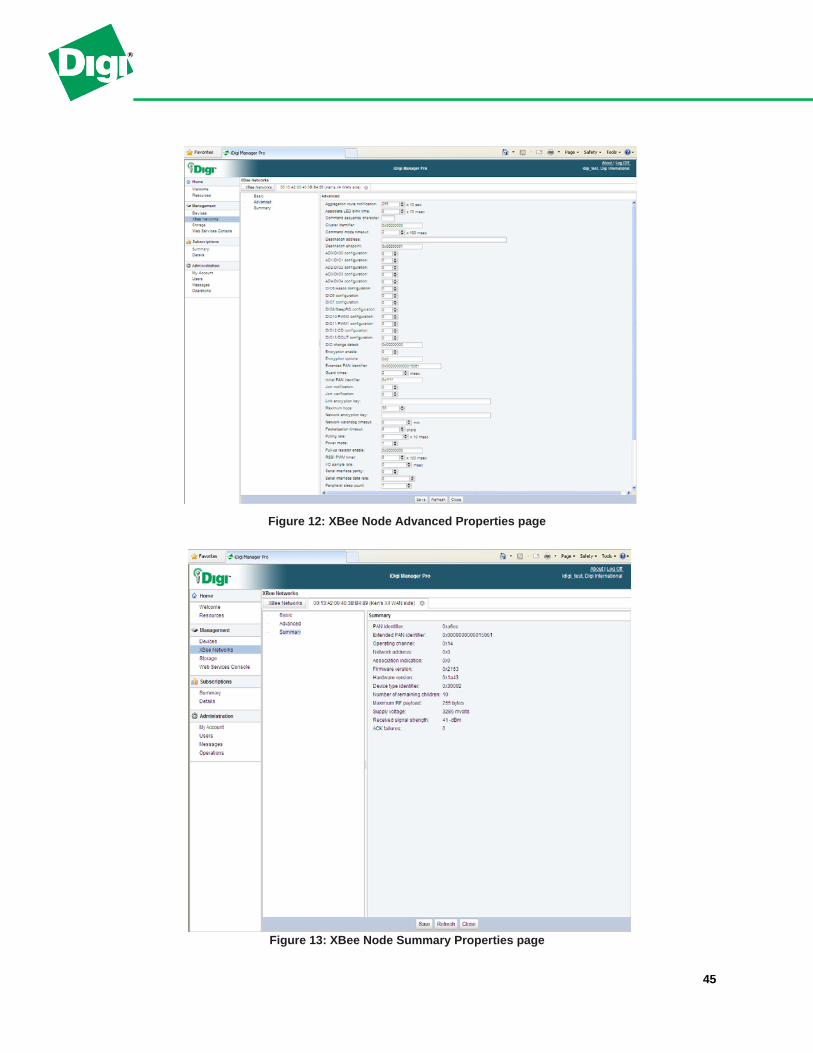
Figure 12: XBee Node Advanced Properties page
Figure 13: XBee Node Summary Properties page
45
7. iDigi® Device Storage
7.1 Storage menu overviewThe Storage menu shows a list of folders for each of the iDigi Devices in your inventory as well as any folders the user may have created using the New Folder button in the toolbar. When you add an iDigi Device to your Device List, a root folder (named using the Device’s fully qualified Device ID) will auto-matically be created for it. These folders are where the iDigi Devices store their data sent to iDigi for stor-age. iDigi stores data received from the iDigi Devices in either the iDigi Device’s root folder, or a sub-folder under its root folder (the iDigi Device specifies this folder location when it sends data to iDigi for storage).
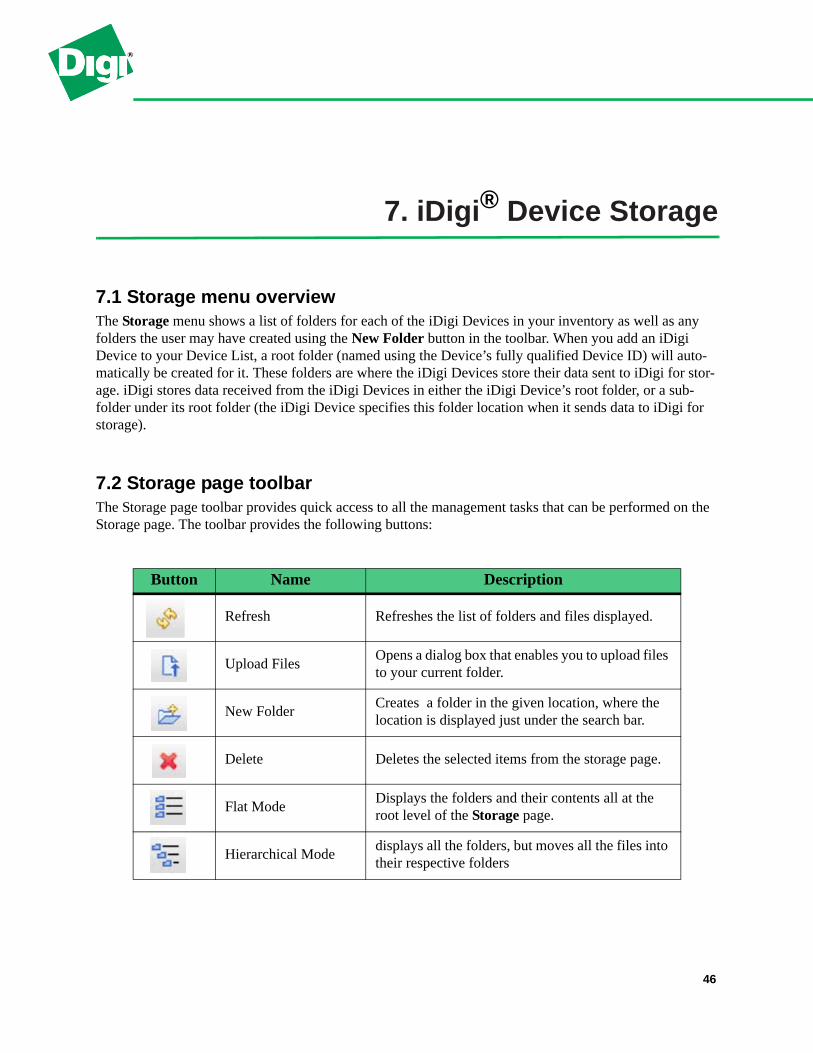
7.2 Storage page toolbarThe Storage page toolbar provides quick access to all the management tasks that can be performed on the Storage page. The toolbar provides the following buttons:
Button Name Description
Refresh Refreshes the list of folders and files displayed.
Upload FilesOpens a dialog box that enables you to upload files to your current folder.
New FolderCreates a folder in the given location, where the location is displayed just under the search bar.
Delete Deletes the selected items from the storage page.
Flat ModeDisplays the folders and their contents all at the root level of the Storage page.
Hierarchical Modedisplays all the folders, but moves all the files into their respective folders
46
7.3 Storage page Search barThe search bar allows you to search for entries in the Storage page that match the search criteria entered in the Search field. The search bar provides the Search, Clear, and Advanced buttons.
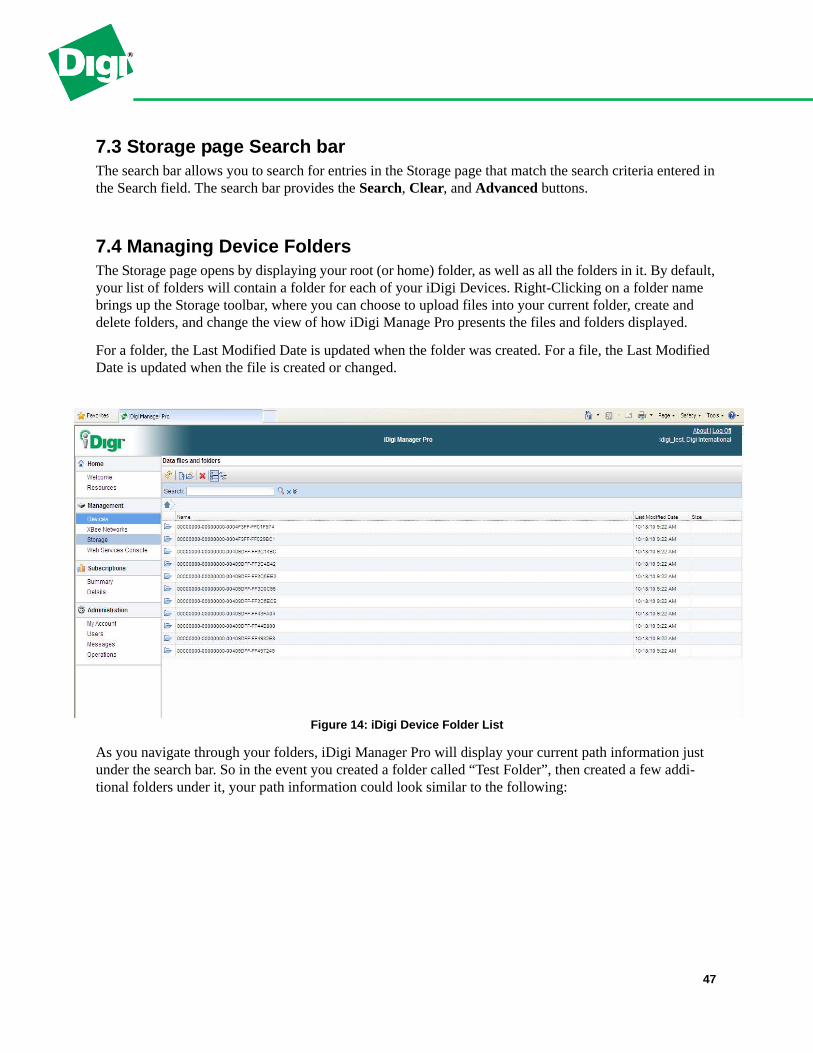
7.4 Managing Device FoldersThe Storage page opens by displaying your root (or home) folder, as well as all the folders in it. By default, your list of folders will contain a folder for each of your iDigi Devices. Right-Clicking on a folder name brings up the Storage toolbar, where you can choose to upload files into your current folder, create and delete folders, and change the view of how iDigi Manage Pro presents the files and folders displayed.
For a folder, the Last Modified Date is updated when the folder was created. For a file, the Last Modified Date is updated when the file is created or changed.
Figure 14: iDigi Device Folder List
As you navigate through your folders, iDigi Manager Pro will display your current path information just under the search bar. So in the event you created a folder called “Test Folder”, then created a few addi-tional folders under it, your path information could look similar to the following:
47

Where the “LICENSE” file has a path of “Test Folder > Level 2 > Level 3”. Clicking the Up-Arrow
will bring you to your root folder as shown below.
48
8. iDigi® Subscriptions
iDigi provides Services and Rate Plans for each User Account. The pairing of an iDigi Service with an associated Rate Plan is called an iDigi Subscription. The Subscriptions assigned to a User Account are determined when the iDigi User Account is created.
By default, an iDigi Developer Account subscribes to all the iDigi Services. This allows you to better evaluate which iDigi Services and Rate Plans you will need when you sign up for an iDigi Production Account. The Subscriptions Summary and Details menus allow you to view and manage your iDigi Subscriptions.
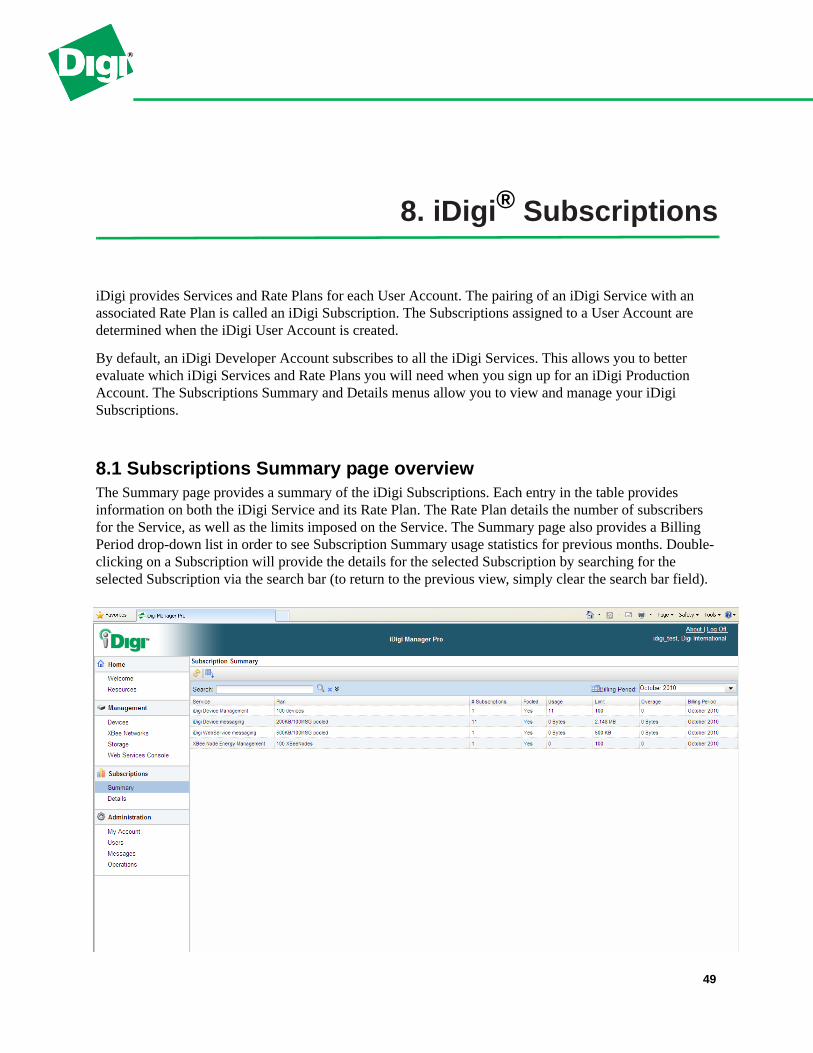
8.1 Subscriptions Summary page overviewThe Summary page provides a summary of the iDigi Subscriptions. Each entry in the table provides information on both the iDigi Service and its Rate Plan. The Rate Plan details the number of subscribers for the Service, as well as the limits imposed on the Service. The Summary page also provides a Billing Period drop-down list in order to see Subscription Summary usage statistics for previous months. Double-clicking on a Subscription will provide the details for the selected Subscription by searching for the selected Subscription via the search bar (to return to the previous view, simply clear the search bar field).
49

8.1.1 iDigi Services
8.1.1.1 iDigi Device Management Service
This Service provides access to, and monitors the iDigi Devices in the inventory. Without this service enabled, a user will not have access to any of his iDigi Device.
8.1.1.2 iDigi Device Messaging Services
This Service tracks the bytes and messages between the iDigi Devices and iDigi.
8.1.1.3 iDigi WebService Messaging Service
The iDigi WebService Messaging Service tracks bytes and messages between iDigi Client Applications and iDigi.
8.1.1.4 XBee Smart Energy Management Service
The XBee Smart Energy Management Service enables Smart Energy support within your iDigi User Account. Subscribing to this Service allows iDigi to process Smart Energy requests and responses to and from the Smart Energy Devices in your network.
This Service allows for aggregation of data within iDigi. iDigi Client applications can query iDigi for the aggregated information which is a much more efficient way to work with large numbers of Smart Energy Devices than sending SCI requests directly to all of your Devices individually. It also allows you to query for information in ways that you just could not do if you were querying your Devices individually. For example, you could query iDigi for all thermostats that have a current temperature reading less than 70 degrees Fahrenheit.
8.1.1.5 iDigi SMS Messaging
This service provides the ability to send and receive iDigi SMS messages between iDigi and devices. iDigi SMS may be used for very basic device management tasks as well as exchanging application data between iDigi and the gateway. Individual gateways may subscribe to this service so you may choose to activate iDigi SMS messaging on a per device basis, once the service has been added to your global account-level subscriptions.
For instructions on setting up iDigi SMS features on your account and device, see the SMS chapter in this book.
8.1.1.6 Embedded Device Customization
This service provides the option for a device manufacturer, utilizing Digi embedded components, to enable access of their custom device(s) for management and data access via iDigi. This provides the ability for 3rd party device vendors to register the manufacturer ID on iDigi and dynamically presenting appropriate configuration options specific to those devices. This is a global account-level service available at no charge.
50
8.1.1.7 iDigi Dia API™
This resource interface is for creation of custom remote sampling solutions that report data through the DIA idigi_db presentation. The presentation data will be stored in the database's Dia tables instead of being stored as files. This will allow web services client applications to directly query the Dia tables. Access to this API is available through a subscription of iDigi Web Services. iDigi Dia API is also called Dia Data Management within the user interface.
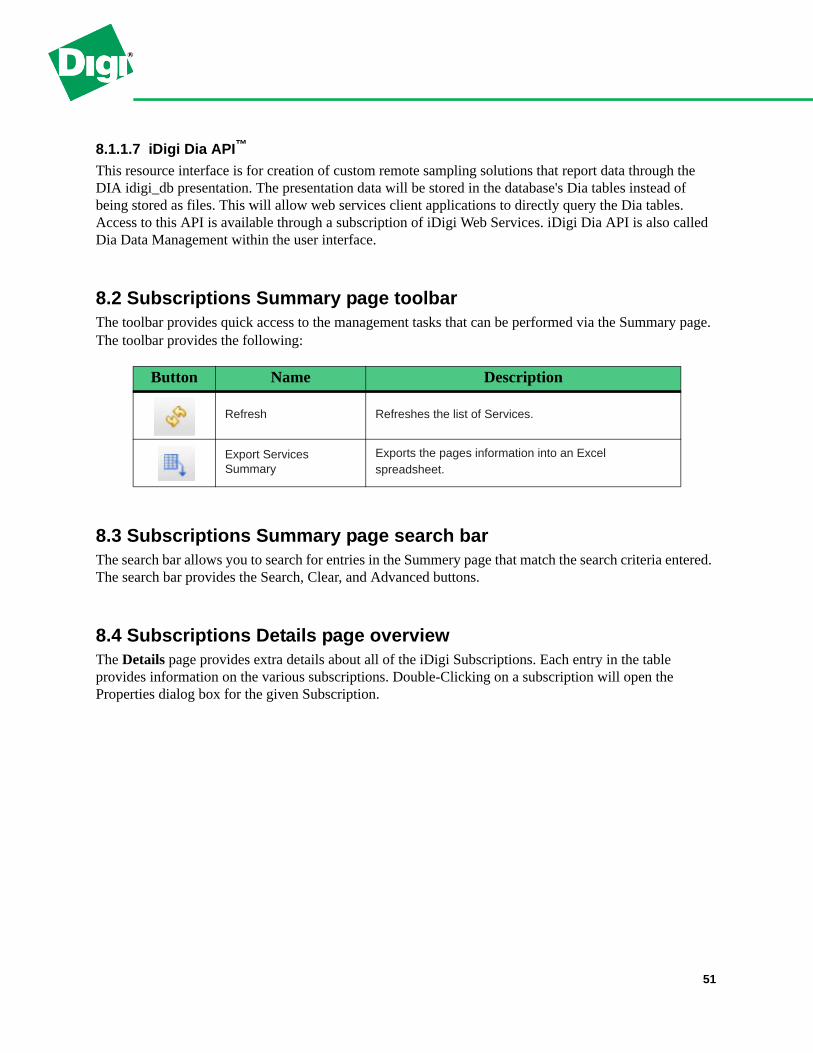
8.2 Subscriptions Summary page toolbarThe toolbar provides quick access to the management tasks that can be performed via the Summary page. The toolbar provides the following:
8.3 Subscriptions Summary page search barThe search bar allows you to search for entries in the Summery page that match the search criteria entered. The search bar provides the Search, Clear, and Advanced buttons.
8.4 Subscriptions Details page overviewThe Details page provides extra details about all of the iDigi Subscriptions. Each entry in the table provides information on the various subscriptions. Double-Clicking on a subscription will open the Properties dialog box for the given Subscription.
Button Name Description
Refresh Refreshes the list of Services.
Export Services Summary
Exports the pages information into an Excel spreadsheet.
51

Figure 15: Subscriptions Details page
8.4.1 Details page search barThe search bar allows you to search for entries in the Details page that match the search criteria entered. The search bar provides the Search, Clear, and Advanced buttons.
52

9. iDigi® User Account Administration
9.1 My Account menuThe My Account menu allows you to view the iDigi User Account information. You can also update both your iDigi Contact information and change your iDigi password.
Figure 16: My Account page
53

9.2 Operations menuThe Operations page allows you to view a summary of the iDigi operations over the last 24 hours. iDigi operations include any management tasks performed by iDigi Manager Pro on multiple iDigi Devices. Firmware downloads and file transfers are also considered operations. Any asynchronous SCI Web Service requests performed using your iDigi user credentials will also be displayed in the Operations page (for more information on SCI requests, see the iDigi Web Services Programming Guide). The Operations page displays the percentage of completion for the operations displayed. When an operation is performed against multiple devices the completion percentage represents the number of iDigi Devices that have completed the given task.
54

9.3 Security Menu
9.3.1 OverviewiDigi supports role-based access control, enabling the admin user to maintain security appropriate to an organization. This section assumes you are the administrator of your iDigi account and will be maintaining users for your account. Any user on the account should see you first when experiencing access problems. In the event that you experience an access problem, please contact Digi Technical Support.
Any number of users may exist in a customer account, each with an assigned role. Only users with the administrator role can create, edit or remove other users. There must always be at least 1 user with an administrator role within a customer account. To enforce this, an administrator cannot remove their own user account.
Role-Based Access Controls are supported only in an iDigi Manager Pro Production Account and will not be available within a developer account.
9.3.2 Role Descriptions
9.3.2.1 Administrator Role
This user has full permission to all resources within the customer account. They can create and edit users, security profiles, customer account settings, etc. These modifications can take place within the web interface as well as by use of the REST APIs. See the iDigi Web Services Programming Guide for more details about the APIs.
9.3.2.2 User Role
This user has read/write access to everything except some of the administrator only features (creating/editing users, security profiles, customer account settings, etc.). This user can use the web interface or the REST APIs.
9.3.2.3 Web Services Application Role
This role is the same as the user role, except that a web services application role user can only access resources using the REST APIs (and not the web interface). This role is intended for the creation of accounts used by client applications with access via REST APIs only. This type of user cannot log in to the web interface, and only an administrator can change the password of this user.
9.3.2.4 Read-Only User Role
This role is the same as the user role, except that a read-only user has read-only access to resources. This user can use the web interface or the REST APIs.
9.3.2.5 Read-Only Web Services Application Role
This role is the same as the web services application role, except that a read-only web services application user has read-only access to resources.
55
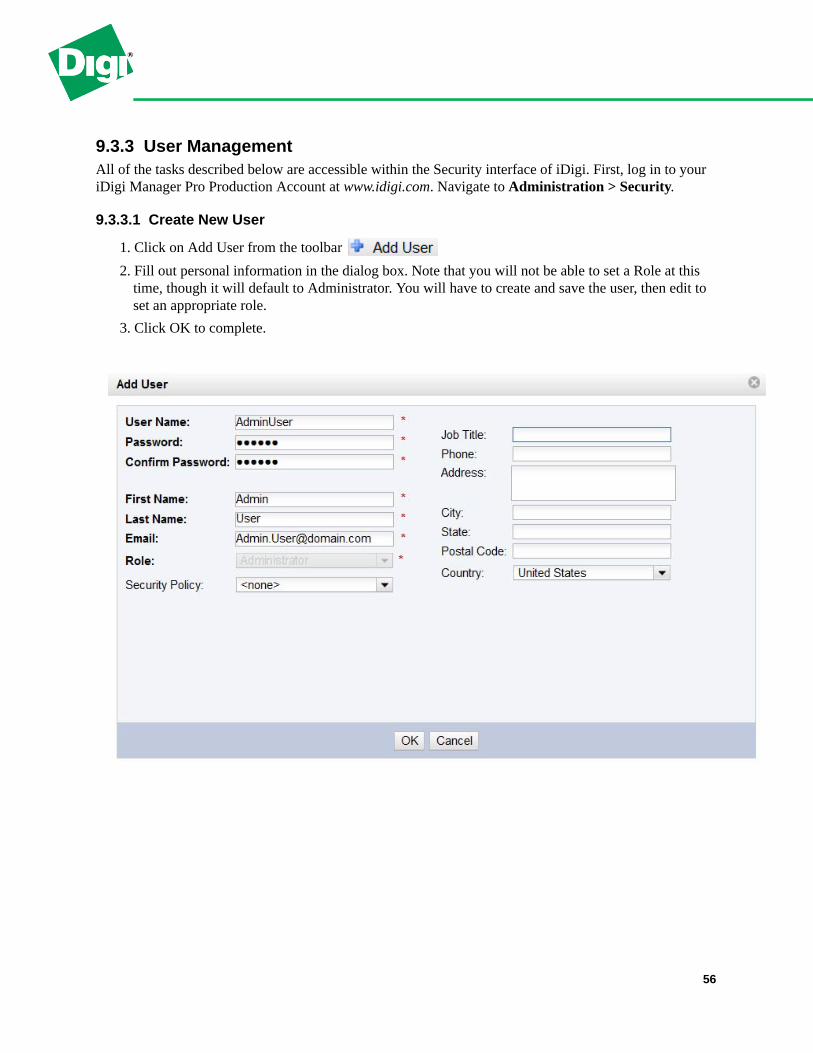
9.3.3 User ManagementAll of the tasks described below are accessible within the Security interface of iDigi. First, log in to your iDigi Manager Pro Production Account at www.idigi.com. Navigate to Administration > Security.
9.3.3.1 Create New User
1. Click on Add User from the toolbar
2. Fill out personal information in the dialog box. Note that you will not be able to set a Role at this time, though it will default to Administrator. You will have to create and save the user, then edit to set an appropriate role.
3. Click OK to complete.
56

9.3.3.2 Edit User
1. Select the user to edit.
2. Click on Edit User from the toolbar . Make any changes and select OK. In this example, everything available about the user, including the assigned role and Security Policy, have been changed. The only fields not available for change here are the user name and password. The user name is permanent and cannot be changed. The password can be changed using the Change Password feature.
3. Click OK to confirm changes.
57

9.3.3.3 Change User Password
1. Select the user to edit.
2. Click on Change Password from the toolbar .
3. Create a new password in the dialog box and click OK.
9.3.3.4 Remove User
1. Select the user to edit.
2. Click on Remove Users from the toolbar .
3. Confirm the removal of a user by clicking yes in the Dialog Box.
58

9.3.4 Security Policy Management
9.3.4.1 Create, Modify or Remove Security Profiles
1. From the Administration > Security page, click on Policies.
2. Under Policies, click on Add, then create a name and description for the policy.
3. Click Add; this policy will now show up in your policy list, though it currently has no rules associ-ated with it.
59
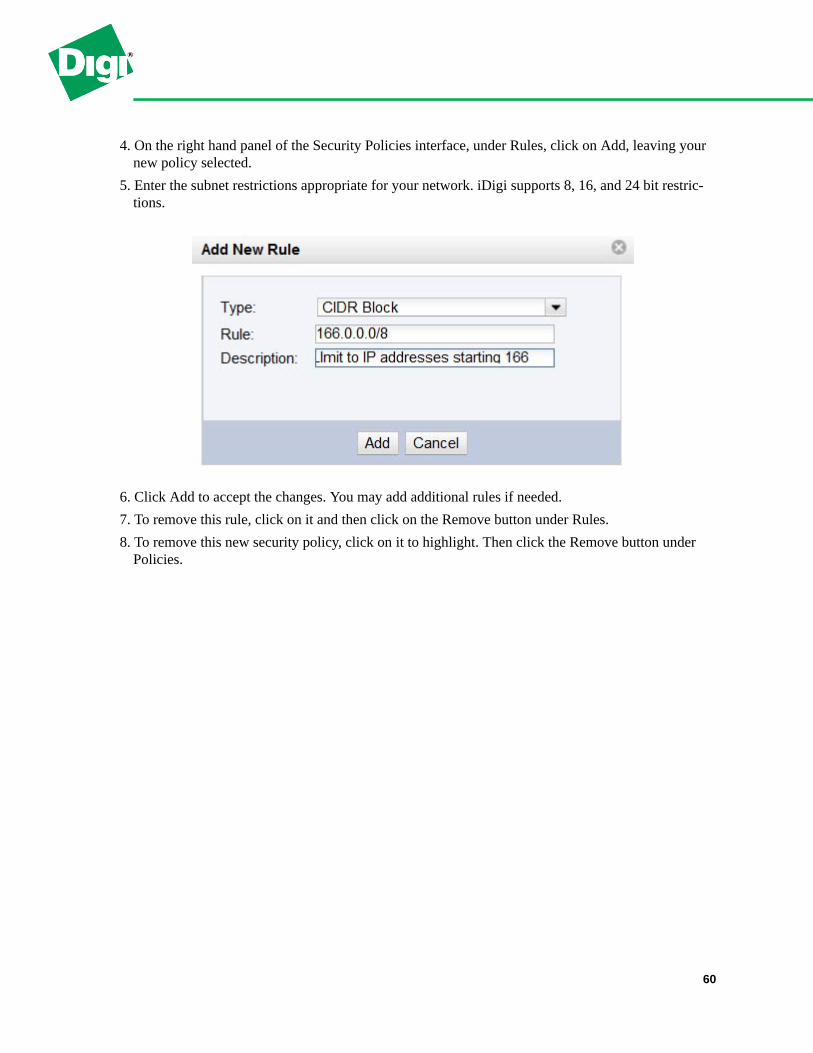
4. On the right hand panel of the Security Policies interface, under Rules, click on Add, leaving your new policy selected.
5. Enter the subnet restrictions appropriate for your network. iDigi supports 8, 16, and 24 bit restric-tions.
6. Click Add to accept the changes. You may add additional rules if needed.
7. To remove this rule, click on it and then click on the Remove button under Rules.
8. To remove this new security policy, click on it to highlight. Then click the Remove button under Policies.
60

10. iDigi® Device Support
A list of the Digi devices supported by iDigi is as follows:
Product ManufacturerMinimum Firmware
Product Type
Digi Connect WAN Family (16MB RAM)
Digi Connect WAN Digi 2.10 Cellular Gateway
Digi Connect WAN VPN Digi 2.10 Cellular Gateway
Digi Connect WAN IA Digi 2.10 Cellular Gateway
Digi Connect WAN 3G Family (16/32MB RAM)
Digi Connect WAN 3G Digi 2.10 Cellular Gateway
Digi Connect WAN 3G IA Digi 2.10 Cellular Gateway
Digi Connect WAN 3G L Digi 2.10 Cellular Gateway
Digi ConnectPort WAN Family (16MB RAM)
ConnectPort WAN VPN Digi 2.10 Cellular Gateway
ConnectPort WAN VPN (Verizon) Digi 2.10 Cellular Gateway
Digi ConnectPort X8 Family (16/32MB RAM)
ConnectPort X8 Digi 2.9.0.5 Gateway
ConnectPort WAN Wi Digi 2.9.0.5 Gateway
ConnectPort WAN GPS Digi 2.9.0.5 Gateway
Connectport X8 (Verizon) Digi 2.9.0.5 Gateway
Digi ConnectPort X5 Family (32MB RAM)
ConnectPort X5 R Digi 2.9.1.7 Gateway
ConnectPort X5 Fleet Digi 2.9.1.7 Gateway
61

Digi ConnectPort X4 Family (16MB RAM)
ConnectPort X4 Digi 2.9.0.5 Gateway
ConnectPort X4 NEMA Digi 2.9.0.5 Gateway
Digi ConnectPort X2 Family
ConnectPort X2 Ethernet Digi 2.9.0.5 Gateway
ConnectPort X2 Wi-Fi Digi 2.9.0.5 Gateway
ConnectPort X2 Python Ethernet Digi 2.9.0.5 Gateway
ConnectPort X2 Python Wi-Fi Digi 2.9.0.5 Gateway
ConnectPort X2B Ethernet Digi 2.9.0.5 Gateway
ConnectPort X2 Python Ethernet Digi 2.9.0.5 Gateway
ConnectPort X2 SE Digi 2.9.0.5 Gateway
Digi ConnectPort Display Family
ConnectPort Display Digi All Remote Display Connectivity
ConnectPort Display M-Series Digi All Remote Display Connectivitiy
AnywhereUSB Family
AnywhereUSB/2 Digi All Network Attached USB Hub
AnywhereUSB/5 G2 Digi All Network Attached USB Hub
AnywhereUSB/14 Digi All Network Attached USB Hub
AnywhereUSB TS Digi All Network Attached USB Hub
Digi TransPort Family
Digi TransPort WR41 Digi 5101 Cellular Gateway
Digi TransPort WR41v2 Digi 5101 Cellular Gateway
Digi TransPort WR44 Digi 5101 Cellular Gateway
Digi TransPort DR64 Digi 5101 Cellular Gateway
Digi TransPort VC7400 Digi 5101 Cellular Gateway
62
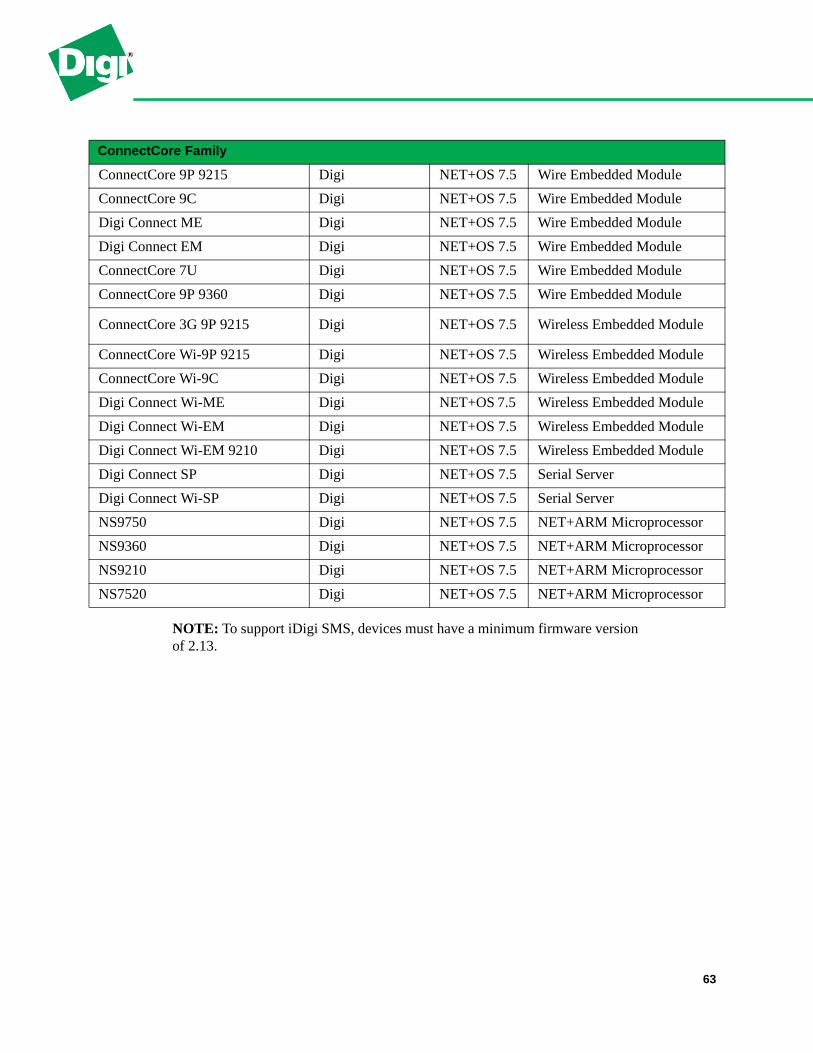
NOTE: To support iDigi SMS, devices must have a minimum firmware version of 2.13.
ConnectCore Family
ConnectCore 9P 9215 Digi NET+OS 7.5 Wire Embedded Module
ConnectCore 9C Digi NET+OS 7.5 Wire Embedded Module
Digi Connect ME Digi NET+OS 7.5 Wire Embedded Module
Digi Connect EM Digi NET+OS 7.5 Wire Embedded Module
ConnectCore 7U Digi NET+OS 7.5 Wire Embedded Module
ConnectCore 9P 9360 Digi NET+OS 7.5 Wire Embedded Module
ConnectCore 3G 9P 9215 Digi NET+OS 7.5 Wireless Embedded Module
ConnectCore Wi-9P 9215 Digi NET+OS 7.5 Wireless Embedded Module
ConnectCore Wi-9C Digi NET+OS 7.5 Wireless Embedded Module
Digi Connect Wi-ME Digi NET+OS 7.5 Wireless Embedded Module
Digi Connect Wi-EM Digi NET+OS 7.5 Wireless Embedded Module
Digi Connect Wi-EM 9210 Digi NET+OS 7.5 Wireless Embedded Module
Digi Connect SP Digi NET+OS 7.5 Serial Server
Digi Connect Wi-SP Digi NET+OS 7.5 Serial Server
NS9750 Digi NET+OS 7.5 NET+ARM Microprocessor
NS9360 Digi NET+OS 7.5 NET+ARM Microprocessor
NS9210 Digi NET+OS 7.5 NET+ARM Microprocessor
NS7520 Digi NET+OS 7.5 NET+ARM Microprocessor
63

11. Examples
The following examples show some common Device and XBee Node management and configuration tasks, and how they are performed using iDigi Manager Pro.
11.1 Add a Device to the iDigi inventory manuallyIf your iDigi Device is not on your local network or you don’t have the Java Run Time Environment installed, you can add the iDigi Devices to the inventory manually.
1. If Java 1.6 is not installed, the Add Devices Applet will provide a warning message similar to the following:
64

2. Click OK, and the Add Devices Dialog will appear as it is below:
3. If no devices appear on your network, click the Add Manually button. The following dialog box will appear:
65

4. Adding Devices manually requires you to provide an address for the iDigi Device. The address can be the Device’s MAC Address, IMEI Number, or Device ID (as shown below).
5. Once the MAC Address, IMEI Number, or Device ID has been entered. Click Add. Your device will appear in the field on the window:
66

6. Either add more Devices to the search list, or click OK when finished.
Figure 18: Newly added iDigi Device in a Disconnected State
7. iDigi will add the Device to your inventory, but the Device will not connect to iDigi until you configure its Remote Management configuration parameters manually. Updating the Remote Management configuration of the iDigi Device entails the following:
1. Enable Remote Management via iDigi2. Provide the address of iDigi (developer.idigi.com in this case)3. Have the Device connect to iDigi automatically at startup4. Have the Device reconnect to iDigi in the event of a disconnection
Figure 19: Remote Management Configurations Options for a Digi ConnectPort X4
67
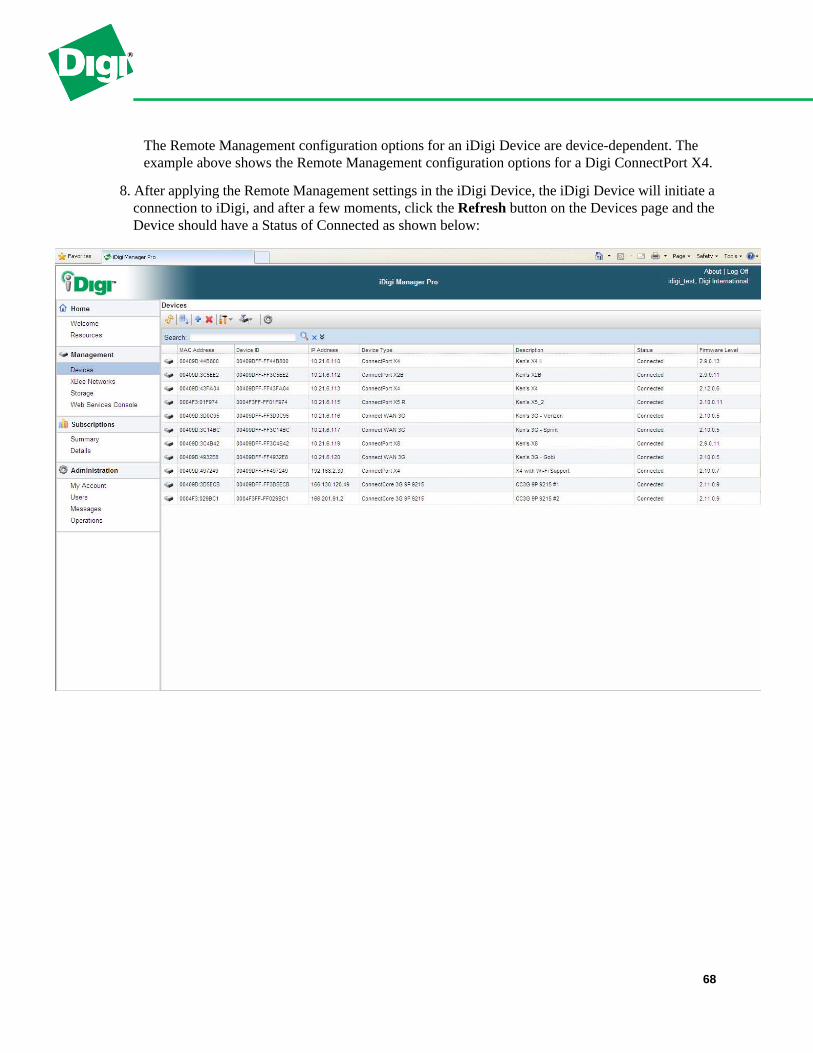
The Remote Management configuration options for an iDigi Device are device-dependent. The example above shows the Remote Management configuration options for a Digi ConnectPort X4.
8. After applying the Remote Management settings in the iDigi Device, the iDigi Device will initiate a connection to iDigi, and after a few moments, click the Refresh button on the Devices page and the Device should have a Status of Connected as shown below:
68

11.2 Deploy Python files to multiple DevicesDeploying Python files to your iDigi Devices using iDigi Manager Pro is very easy.
1. Select the iDigi Devices to receive the Python files by clicking the desired Devices in the Device List.
2. Select the Administration > Upload Python Files menu and select the file you would like uploaded to the root Python folder of all the Devices selected. You can also select the Browse button again to add multiple Python files to be included in the upload.
3. After you select the file or files to upload, click OK to start the Python file uploads. iDigi Manager Pro will display a confirmation message when Python file are uploaded.
69

4. View the Python files on the Device by opening the Device Properties, and then selecting the Python Property page as shown below.
70

11.3 Export the iDigi Device configurationThis example shows how to make a backup copy of the Device’s configuration.
1. Open the Devices page and select the Device you wish obtain configuration files from.
2. Select the Administration > Export menu and you should see a screen similar to the following:
3. You can choose to export the Device’s entire configuration, or just the non-networking portion of the configuration. The former allows you to export the entire configuration including the IP address information and provides you with a complete backup configuration for the Device. You can also choose to upload the Device’s configuration excluding its network configuration information if you wish to use this Device’s configuration as a template to apply to a group of iDigi Devices in the future.
4. In this example we will export the entire configuration, so click OK to open the following dialog box.
5. Now choose whether you want to Open or Save the file, and click OK.
71

11.4 Upload, download, and delete Python files to or from an iDigi DeviceThe Python Properties page also allows you to upload, download, and delete Python files to or from the Device selected.
1. To upload a Python file to a Device, open a Device’s Python Properties page and click the Upload a file button. It will display a dialog box similar to the following:
2. After you select the file or files to upload, click OK to start the Python file uploads. iDigi Manager Pro will display a confirmation message when Python file are uploaded.
72
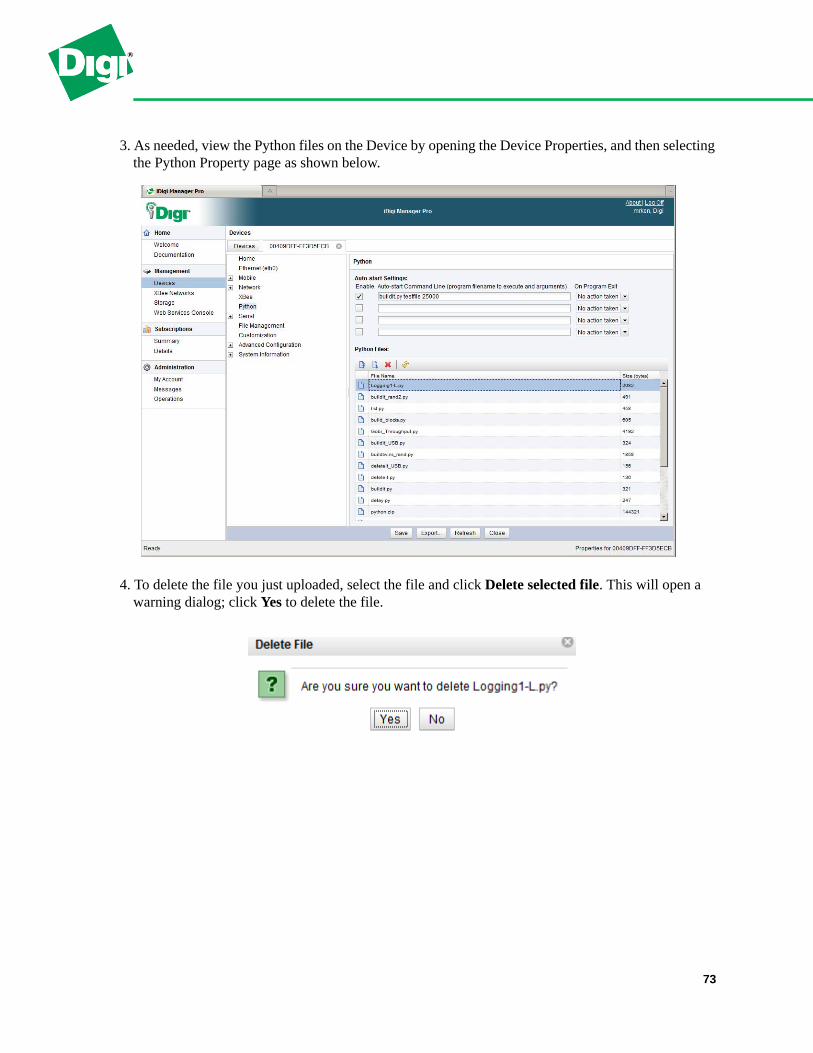
3. As needed, view the Python files on the Device by opening the Device Properties, and then selecting the Python Property page as shown below.
4. To delete the file you just uploaded, select the file and click Delete selected file. This will open a warning dialog; click Yes to delete the file.
73

5. The Python Properties page also allows you to download Python files from the iDigi Device to your PC. Select the file you wish to download from the Python Files list, and then click the Download selected file button. This will open a dialog similar to the following where you can Open or Save the file as desired.
NOTE: The first file download of a session in Internet Explorer will have to be re-downloaded due to limitations within Internet Explorer.
74

11.5 Change the Device’s system’s descriptionAdding a System Description to your iDigi Device can make it easier to identify on the network. In this example, we will add a System Description to a Device that does not have one.
1. Double-Click on a Device that does not have a System Description in order to open its Properties.
2. Select the Advanced Configuration > System Properties page and you should see something similar to the following:
75

3. Add in the Contact, Location, and Description fields as appropriate for your Device and then click Save.
Return to the Device List and you should see the updated System Description displayed as shown below.
76

11.6 Change the Device’s Ethernet configurationMost of the iDigi Devices will ship configured to obtain their IP address via DHCP. In the this example we will change the IP address to a Static IP address and configure the Ethernet Interface for 100Mbps Full Duplex.
1. Select the Devices menu and double-click on the Device in order to open its Properties.
2. Select the Ethernet (eth0) Properties page as shown below.
3. Click Use the following IP address and configure the IP address appropriate for your network.
77

4. Set the Ethernet speed to “100”, and the Ethernet duplex to “full”, resulting in the Ethernet Properties page looking something similar to the following:
5. Click Save to apply the changes.
6. Click the Device tab. Click the Refresh button, and the new IP address of the Device should be displayed in the Device List.
78

11.7 Configure the Device’s IP Host NameConfigure the IP Hostname for the iDigi Device by performing the following steps:
1. After opening the Properties pages for the Device, click the Advanced Configuration > Host name menu and a screen similar to the following will be displayed:
This example has selected a Device that already has an IP Host name. Change the field as needed and click Save in order to save the changes to the Device.
79
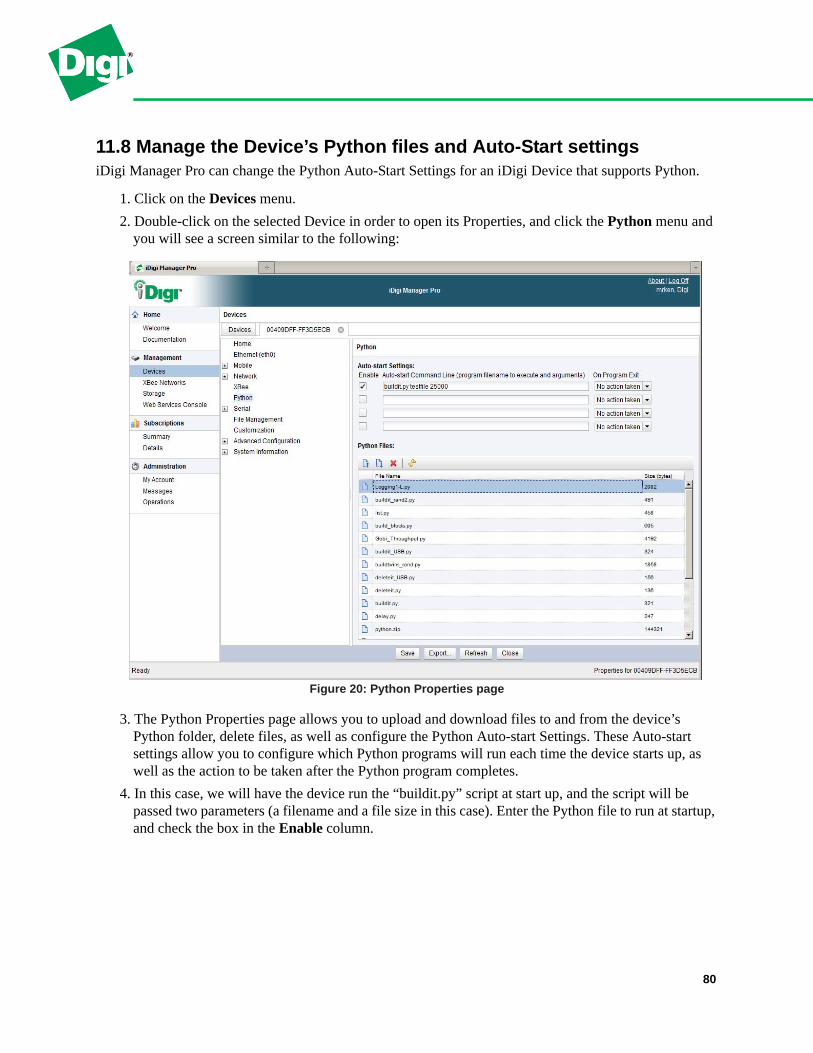
11.8 Manage the Device’s Python files and Auto-Start settingsiDigi Manager Pro can change the Python Auto-Start Settings for an iDigi Device that supports Python.
1. Click on the Devices menu.
2. Double-click on the selected Device in order to open its Properties, and click the Python menu and you will see a screen similar to the following:
Figure 20: Python Properties page
3. The Python Properties page allows you to upload and download files to and from the device’s Python folder, delete files, as well as configure the Python Auto-start Settings. These Auto-start settings allow you to configure which Python programs will run each time the device starts up, as well as the action to be taken after the Python program completes.
4. In this case, we will have the device run the “buildit.py” script at start up, and the script will be passed two parameters (a filename and a file size in this case). Enter the Python file to run at startup, and check the box in the Enable column.
80
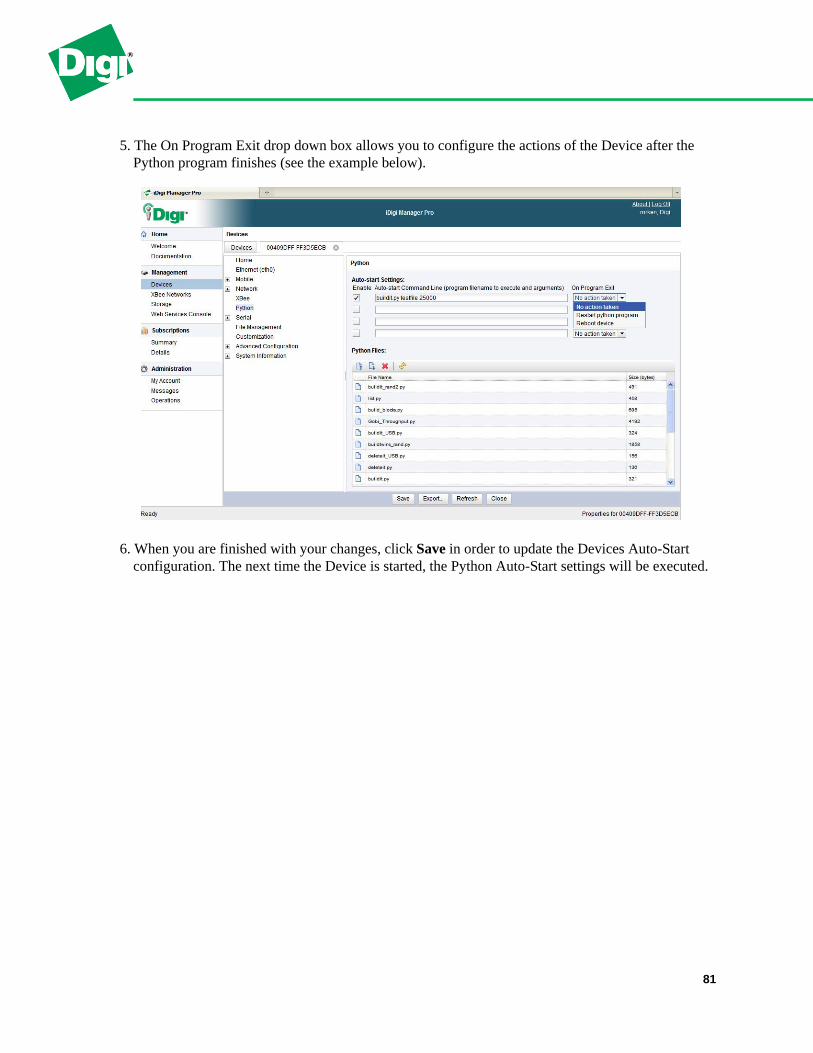
5. The On Program Exit drop down box allows you to configure the actions of the Device after the Python program finishes (see the example below).
6. When you are finished with your changes, click Save in order to update the Devices Auto-Start configuration. The next time the Device is started, the Python Auto-Start settings will be executed.
81

11.9 Configure secure iDigi Device connections using SSLThe Add Devices dialog can configure the Device’s Remote Management settings to automatically con-nect to iDigi at startup. These options include the following:
• Exchange Keep-Alives every 60 seconds
• Select TCP as the connection protocol between the Device and iDigi
• Wait 60 seconds after a connection disconnection before reconnecting with iDigi
This example will demonstrate how to:
• Change the connection protocol to use SSL
• Change the reconnect timeout to 30 seconds
• Configure the Keep-Alives for 600 second intervals.
1. Select the Device from the Device list and display its properties.
2. Select the Advanced Configuration > Remote management network type page and you screen should look similar to the following:
82
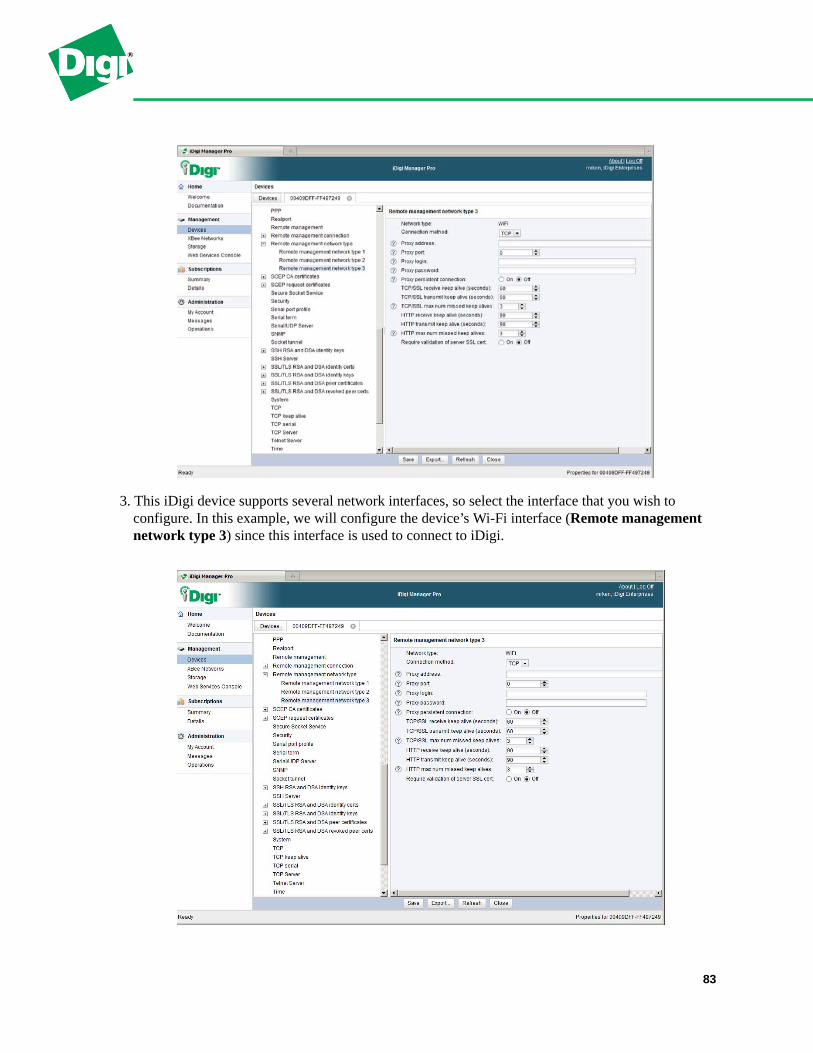
3. This iDigi device supports several network interfaces, so select the interface that you wish to configure. In this example, we will configure the device’s Wi-Fi interface (Remote management network type 3) since this interface is used to connect to iDigi.
83

4. Change the Connection method from TCP -> SSL, change the TCP/SSL receive keep alive (seconds): option from 60 seconds to 600 seconds, and change the TCP/SSL transmit keep alive (seconds): option from 60 seconds to 600 seconds.
5. Click Save to update the Device configuration.
6. Now we need to change the Device’s Reconnect Timeout.Select the Remote management connection > Remote management connection 1 page and your screen should look similar to the following:
7. Change the Connection reconnect timeout (seconds): from 60 seconds to 30 seconds, and click Save to apply the changes to the Device.
8. Now that the Device’s configuration has been updated, it will use these settings the next time it establishes a connection with iDigi.
84

11.10 Examples using the search barThis example will demonstrate how to locate all the devices with a 192.x.x.x IP Network Address.
1. Using the Devices page, you can search for all the Devices with a 192.x.x.x IP Address by entering a “192” into the search bar.
2. After the search completes, the Device List will look like the following:
3. You can also search for all the Devices with an “11” in their Firmware Version by first clicking the Advanced button to add the “Firmware Level” column to be included in the displayed columns.
85

4. Next, enter “11” into the search bar, and click the Search button. After the search completes, the Device List will look like the following:
5. Click the Clear button to remove any of the previous search results and the Device List will look like the following:
86

11.11 Scan for XBee Nodes in the networkiDigi Manager Pro provides a separate menu to manage the XBee Nodes in the inventory. The XBee Net-works page will display XBee Node information for any of the iDigi Devices that support XBee as well as all the remote XBee Nodes connected to them.
Figure 21: Device List with a single device
The XBee Networks page will display information for the XBee Node in the ConnectPort X2B, as well as all its remote XBee Nodes.
Figure 22: ConnectPort X2B with remote XBee Nodes
87

1. As you add more Devices to your iDigi inventory, your Device List may look like the following:
Clicking the XBee Networks menu may display something like the following:
Figure 23: XBee Node List with one Node requiring a “Discover”
88

2. Notice in the above screen that there is a new XBee Node displayed, but since we added three new iDigi Device with XBee Nodes in Step 1, there should be three new XBee Nodes displayed. Click the Refresh button in order to update the XBee Networks page. After clicking the Refresh button, your screen could look similar to the following:
Notice that the three XBee Nodes all have the Discover icon displayed in the Extended Node Address column and their Last Updated columns indicating that a Discovery is needed for these XBee Nodes.
3. Select the three new XBee Nodes by holding Ctrl and clicking on all three of them. They should now be highlighted.
4. Click the Discover button to discover the remote XBee Nodes attached to these Devices, and while iDigi Manager Pro is searching for the remote XBee Nodes your screen should look similar to the following:
89

After a few moments the XBee Networks Node list will be updated similar to the following:
90

11.12 Determine the Gateway Device for Remote NodesNormally iDigi Devices acting as a Gateway/XBee PAN Coordinator ship with a default configuration that makes it easier for remote XBee Node to join their networks. Similarly Digi XBee Adapters and Routers ship with default configurations that make it easier for them to join an XBee network.
As you add iDigi Devices and XBee Adapters and Routers to your inventory, it may be helpful to deter-mine which remote XBee Nodes have connected to which Gateways. This information can be determined by the XBee Networks page.
1. Click the XBee Networks menu and your XBee Networks Device List might look similar to the following:
2. Sort the Gateway Device ID column and your screen will look similar to the following:
91

3. By sorting the Gateway Device ID column, you can see that several groups of XBee Nodes have the same Gateway Device ID. The PAN Coordinators for these three XBee networks is highlighted in Blue below.
4. By looking more closely at the Gateway Device ID values, you can see the following:
• Six entries have a Gateway Device ID Address of: 00409DFF-FF3C5EE2
• Three entried have a Gateway Device ID Address of : 00409DFF-FF43FA04
• Two entries have a Gateway Device ID Address of:00409DFF-FF44B800
5. Match the Gateway Device IDs listed in Step #4, to their respective Device IDs on the Devices page. The three Devices highlighted in blue below are the XBee Gateways in this network that have remote XBee Nodes attached.
92
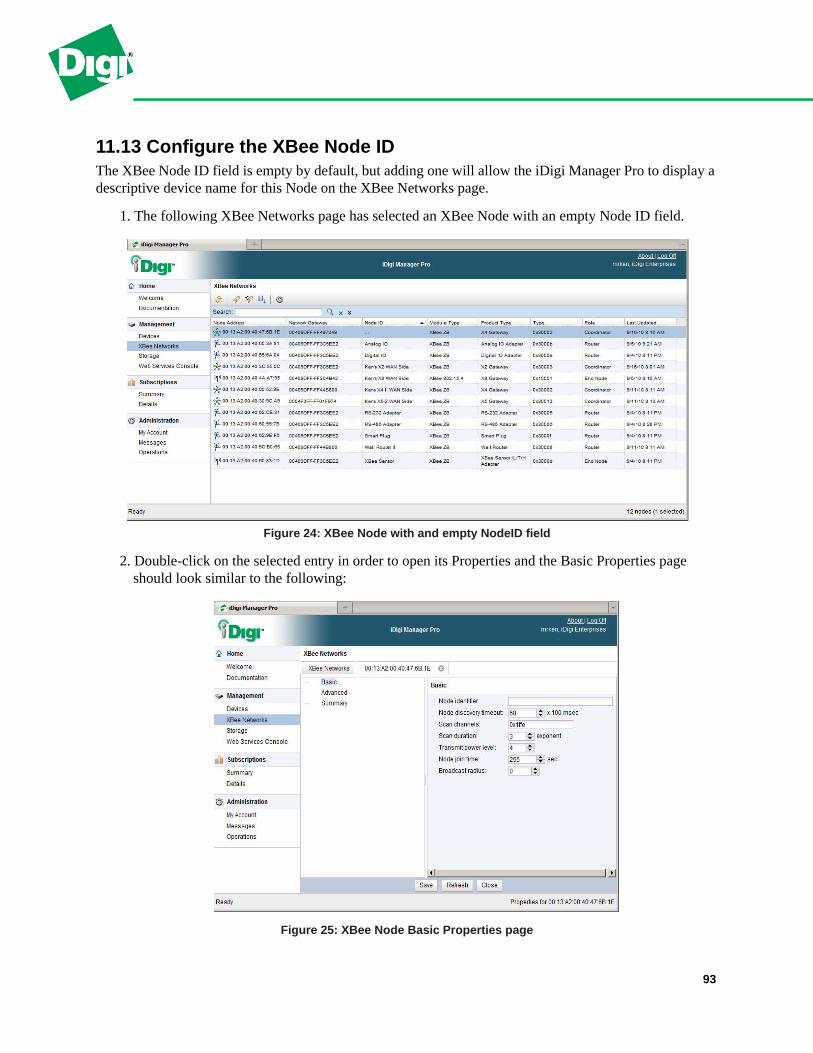
11.13 Configure the XBee Node IDThe XBee Node ID field is empty by default, but adding one will allow the iDigi Manager Pro to display a descriptive device name for this Node on the XBee Networks page.
1. The following XBee Networks page has selected an XBee Node with an empty Node ID field.
Figure 24: XBee Node with and empty NodeID field
2. Double-click on the selected entry in order to open its Properties and the Basic Properties page should look similar to the following:
Figure 25: XBee Node Basic Properties page
93

3. This XBee Node has a Basic, Advanced, and Summary Properties page, and the Node identifier field is provided on the Basic Properties page as displayed above. Add an appropriate entry for this XBee Node in the Node identifier field. Then click Save to apply the changes.
4. After clicking Save, the tab will be updated with the Node ID string as shown above.
5. Click the XBee Networks tab and you screen should look similar to the following:
Figure 26: XBee Node with updated Node ID field
94

11.14 Enable 128-bit AES encryption on an XBee networkDigi XBee devices ship with settings making it easy for them to setup and connect to an XBee network. For the iDigi Device acting as a PAN Coordinators this configuration means that they will allow XBee Nodes to join their networks, and for Digi XBee Routers and End Nodes their configurations allow them to easily join existing XBee networks. These settings are helpful for initial product evaluations, but the lack of security makes them less desirable to run in a production environment.
This example enables 128-bit AES encryption on the two devices that comprise a simple XBee network.
Enabling 128-bit AES encryption requires that all the devices on the network:
• Use same Extended PAN-ID
• Enable Encryption
• Use the same Link Encryption Key
1. Identify all the devices on the XBee network to be configured. In this example, we will configure the devices using the 00409DFF-FF44B800 Gateway Device ID address (a Digi ConnectPort X4 and a Digi Wall Router highlighted below).
95

2. Update the configuration the Remote Node first. So we will open the properties for the Node ID called “Wall Router II” which displays the following:
3. Open the Advanced Properties page:
4. Notice that this XBee network is already using an Extended PAN Identifier of 0x0000000000015063, so we will not update this field.
5. To enabled encryption, set Encryption enable = 1.
96

6. Set the Link encryption key to a value of “0x123456”, and then click Save to apply the changes.
7. Now that the “Wall Router II” device has been updated, it will not be able to communicate with the XBee Gateway until the Gateway’s configuration has been updated to match.
8. Click on the XBee Networks menu.
9. Open the Properties for the X4 Gateway with a Node ID = “Kens X4 II WAN Side”:
10. Click the Advanced and update the Encryption enable, and Link encryption key values to match those that were provided to the “Wall Router II” device. The screen will look similar to the following:
97

11. Click Save to apply the changes.
12. Now the both devices have been reconfigured, push the Commissioning Pushbutton on the Wall Router to have it rejoin the XBee network. For more information on XBee/XBee-Pro Drop-in Networking Adapters and Accessories see documents referred to in Appendix B.
NOTE: For security reasons, the Link encryption and Network encryption keys will not display on the Advanced Properties page once they are configured.
11.15 Configure the XBee Gateway with an Extended PAN ID and to block network joinsBy default, Digi XBee Gateways acting as PAN Coordinators are not configured with an Extended PAN ID, and they allow XBee nodes to freely join their networks. This configuration is fine if you are setting up your first XBee network, but if you wish to setup multiple XBee networks it is advisable to configure an Extended PAN-ID for each XBee network, and then once all the XBee Remote Nodes have joined the net-work, configure the PAN-Coordinator to block subsequent network joins.
Updating these two settings will do the following.
• The Remote Nodes will only connect to the PAN Coordinator with a matching Extended PAN-ID.
• The PAN Coordinator will block new remote XBee Nodes from attaching to its XBee network.
This combination allows for better control over the remote XBee Nodes that associate with a given XBee Gateway.
NOTE: This example only shows how to configure these XBee parameters on the XBee Gateway device. For this to work in practice, all the remote XBee Nodes on the network will need to be configured with a matching Extended PAN-ID, and the remote XBee Nodes will need to be given this updated config-uration before you update the configuration of the XBee Gateway device.
1. Open the XBee Networks page.
2. Select the desired XBee Coordinator, and open its Properties. Ascreen similar to the following is displayed:
98

3. Open the Advanced Properties page. The display will be similar to the following:
4. Configure the Extended PAN identifier with something like the following: “0x000012345B”, then click Save to apply the changes.
5. Now this Gateway is configured to only allow Remote Nodes requesting an Extended PAN-ID of “0x000012345B” to join its network.
6. Once all the desired Remote Nodes have connected to this network, open the Basic Properties page, and configure the Node join time to “0”, and click Save to apply the changes.
7. Now the Gateway will not accept new Remote Node to join its network.
99

11.16 Update iDigi Device FirmwareiDigi Manager Pro makes it easy to upload Device firmware to multiple Devices at the same time, but the Devices must all be the same Device Type.
1. Select the Devices to receive the firmware update. In this example we have selected three ConnectPort X4 Devices.
2. Click the Firmware button and select Update Firmware:
A dialog similar to the following is displayed:
100

3. Click Browse to select the appropriate firmware file for the Devices, and then click Update Firmware.
4. The Devices will automatically reboot when the firmware update completes.
101

11.17 Find the iDigi Device's IP Address when using a Primary Cellular Connection
1. Using the Devices Page, double click on your iDigi Device to view properties.
2. Scroll down to the section System Information and explode the choices there. Select Primary Interface.
102

Glossary of iDigi® Definitions and Terms
Client Application
iDigi client applications connect to the iDigi platform and use the iDigi Web Services API to manage and retrieve data from iDigi devices. iDigi client applications do not communicate directly with iDigi devices, they instruct the iDigi platform and iDigi Web Services API to communicate with the iDigi devices on their behalf.
Device ID
A 16-Byte ID that uniquely identifies an iDigi device on the network; the iDigi device will create its own device ID based on its primary communication interface.
EDP Protocol
The protocol used by the iDigi device to establish and maintain its connection with the iDigi platform.
Extended Address
The 64-bt IEEE XBee address, also referred to as the XBee MAC Address.
Gateway Device ID
The device ID of the iDigi device that contains that XBee Gateway for the XBee network.
iDigi®
The iDigi platform is a machine-to-machine cloud-based network operating platform that includes a vari-ety of application programming Interfaces (API’s).
iDigi® account
Any iDigi user account – please see further in this glossary and document for more information on differ-ent account types.
iDigi® developer account
A full service iDigi user account providing access to a limited number of iDigi devices; it allows iDigi developers to set up a maximum of five iDigi devices in order to develop Python programs and iDigi client applications that will leverage the functionality provided by both iDigi and the iDigi devices.
103
iDigi® device
A device that connects to the iDigi platform which implements the EDP protocol in order to establish and maintain this connection.
iDigi Manager Pro™
A web based device management application that allows a user to manage their inventory of iDigi devices.
iDigi® operations
List of management activities (like firmware updates, file uploads, XBee network discoveries, etc.) that are either in progress or have completed within the past 24 hours.
iDigi® production account
A full service iDigi user account providing access to all the devices in your inventory within the limits of the iDigi services and rate plans specified by your iDigi user account.
iDigi® rate plan
Defines a set of capabilities associated with the iDigi subscription.
iDigi® service
Provides access to a specific iDigi feature where the usage level is determined by the associated iDigi rate plan.
iDigi® subscription
An iDigi service and rate plan pairing is called an iDigi subscription.
iDigi Web Services API ™
A set of interfaces defined for providing access to iDigi and iDigi connected devices and third party appli-cations.
RCI
RCI (Remote Command Interface) is a method for iDigi client applications to control, configure, and gather statistics from iDigi devices. RCI uses XML and HTTP to exchange data between the iDigi client applications and the iDigi devices.
Remote Node
An XBee device that has joined a network established by an iDigi device with an XBee gateway.
104

SCI
SCI (Server Command Interface) is an iDigi Web Services API interface that allows iDigi client applica-tions to access information and perform commands that relate to the iDigi devices in their inventory.
Vendor ID
A unique identifier for an embedded device manufacturer.
XBee® node ID
A user-configurable term identifying the XBee Node in the network.
105