© 2009 IBM Corporation IBM BPM BlueWorks Overview & Key Features.

ISV & Developer Relations IBM
IBM Blueworks Live
Business Process Management
Workshop
Lab Exercises

Contents
IBM BLUEWORKS LIVE INTRODUCTION.................................................................................................................3 SUBSCRIBE AND LOGIN................................ .............................................................................................................4 FIRST STEPS................................................................................................................................................................7
STEP 1: CONFIGURE YOUR ACCOUNT ......................................................................................................7 STEP 2: CONFIGURE SECURITY OPTIONS [ OPTIONAL ] .............................................................................8 STEP 3: MANAGING NEW USERS............................................................................................................10 STEP 4: MANAGING SPACES .................................................................................................................13
MANAGING A CHECKLIST............................... .........................................................................................................20 STEP 1: CREATE A TEMPLATE ...............................................................................................................20 STEP 2: LAUNCH AN INSTANCE OF A CHECKLIST .....................................................................................22 STEP 3: COMPLETE THE CHECKLIST INSTANCE .......................................................................................24 STEP 4: CANCEL A CHECKLIST INSTANCE ...............................................................................................26 STEP 5: ADMINISTRATE A PROCESS ......................................................................................................27
MANAGING A WORKFLOW ................................ ......................................................................................................29 STEP 1: CREATE A TEMPLATE ...............................................................................................................29 STEP 2: LAUNCH AN INSTANCE OF A WORKFLOW ....................................................................................30 STEP 3: COMPLETE THE WORKFLOW INSTANCE......................................................................................32
STARTING "BLUEPRINT" A PROCESS ..................... ..............................................................................................40 STEP 1: THE DISCOVERY MAP PRESENTATION .......................................................................................40 STEP 2: MANAGING MILESTONES AND ACTIVITIES ...................................................................................43 STEP 3: ADDING PROCESS DETAILS......................................................................................................46 STEP 4: THE GOVERNANCE ...................................................................................................................51 STEP 5: THE "NON EDITION" MODE ........................................................................................................53
THE DOCUMENTATION VIEW...................................................................................................................................56 STEP 1: THE ONLINE DOCUMENTATION ..................................................................................................56 STEP 2: DOWNLOAD DOCUMENTATION ..................................................................................................58
THE ANALYZE VIEW................................... ...............................................................................................................61 STEP 1: RESTORE THE EXAMPLE SPACE................................................................................................61 STEP 2: ANALYZING YOUR PROJECT .....................................................................................................62
MANAGE A PROCESS DIAGRAM USING B.P.M.N. 2.0 ....... ..................................................................................65 STEP 1: THE FIRST DIAGRAM.................................................................................................................65 STEP 2: MANAGE B.P.M.N. ITEMS ........................................................................................................66 STEP 3: SUB-PROCESS AND PROCESS LINK ...........................................................................................69 STEP 4: EXPORT A PROCESS ................................................................................................................72 STEP 5: PROCESS PLAYBACK................................................................................................................74 STEP 6: TRAIN YOURSELF .....................................................................................................................77
MORE ABOUT THE COMMUNITY........................... ..................................................................................................81 STEP 1: STREAMS ................................................................................................................................81 STEP 2: BLOGS ....................................................................................................................................82 STEP 3: TEMPLATES.............................................................................................................................83
SUMMARY...................................................................................................................................................................87

ISV & Developer Relations
IBM Blueworks Live Workshop Page 3
IBM BlueWorks Live Introduction
This workshop helps you to take your first steps with IBM® BlueWorks Live. It includes an introduction to Business Management and detailed instructions to different ways of creating a Business Process within BlueWorks Live.
This workshop is for Project Architects, Business Analysts and possibly Developers. A knowledge of BPMN 2.0 is helpful but not mandatory. During the workshop, short briefings can be done on specific points.
BlueWorks Live provides many features, this module helps to discover the following:
• Administration: manages users, roles and security, and workspaces • Collaboration: takes each role available for each exercise to identify features. Uses collaboration tools such as chat, feeds service and templates. • Checklist : creates, manages and launches instances of checklists. • Workflow : creates, manages and launches instances of workflows • The discovery Map : starts a "Blueprint" process, updates the discovery map managing activities, milestones and properties, but the real added value of the discovery map is its analyst view. • The Process documentation : Once a process is described, the user can export it for documentation purpose in several formats. • The Process Diagram : May be the most powerful feature of BlueWorks Live. Describes a process using the BPMN notation .
During the workshop, attendees should answer questions. It is advised to compare answers.
Each steps are required to perform next one.
lab status Because IBM Blueworks Live is constantly changing, the screenshots shown in this lab might not correspond exactly with the ones you will see on live site.
The last version of this workbook was updated after the april 2011 web site update.
To perform the workshop, attendees should have a computer with:
• A fast Internet connection
• Mozilla Firefox
• Internet Explorer
• Microsoft® Office Word 2003 or later
• Microsoft® Office PowerPoint 2003 or later

ISV & Developer Relations
Page 4 IBM BlueWorksLive Workshop
Subscribe and login
In this workshop, you are starting from scratch. You will need two valid email addresses to create two different accounts. One will be used as the administrative account to invite the other account.
1. Firstly, open an internet browser and the following URL: http://www.blueworkslive.com
2. Once the page is loaded, click on the button Sign Up for a 30 Day Free Trial
.
3. Fill all fields and pay special attention to fill in a valid email address as you will be requested to check mail regularly.
Choosing an email account. During this workshop you will have to check your inbox so please choose an email account you can access directly fro m this browser and not only with Lotus, Outlook or with your smart phone.
If you don't have such an address ask the trainer to provide you with one.
Don't tick the checkbox in Privacy Preference . When it is done please click the button Review and
Create My Account
4. The following page is a summary of all previously entered information. Check the Billing Information: it is a free trial version for 30 days. After this period you will not loose your work but you will no longer be able to add new processes or to add new users. Only the administrator is able to upgrade the account or to recover data.
5. Now click on the Place Order button . You should obtain a view as this one:
then:
ISV & Developer Relations
IBM Blueworks Live Workshop Page 5
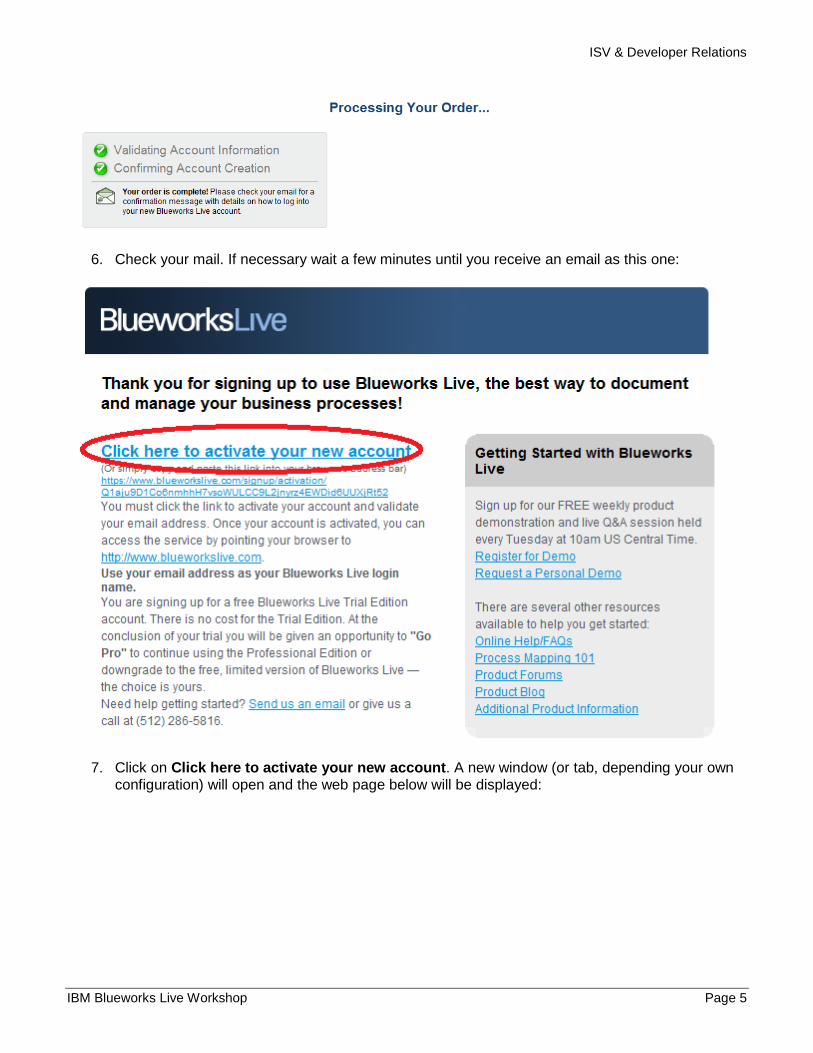
6. Check your mail. If necessary wait a few minutes until you receive an email as this one:
7. Click on Click here to activate your new account . A new window (or tab, depending your own configuration) will open and the web page below will be displayed:
ISV & Developer Relations
Page 6 IBM BlueWorksLive Workshop
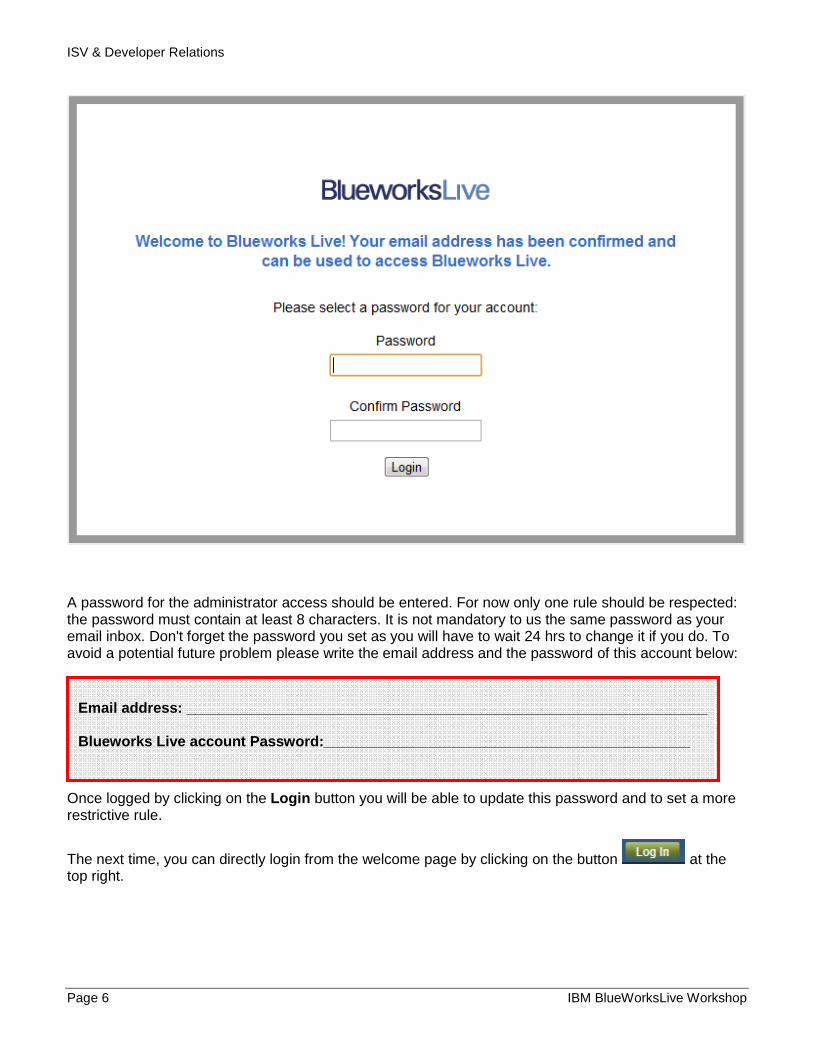
A password for the administrator access should be entered. For now only one rule should be respected: the password must contain at least 8 characters. It is not mandatory to us the same password as your email inbox. Don't forget the password you set as you will have to wait 24 hrs to change it if you do. To avoid a potential future problem please write the email address and the password of this account below:
Once logged by clicking on the Login button you will be able to update this password and to set a more restrictive rule.
The next time, you can directly login from the welcome page by clicking on the button at the top right.
Email address: ____________________________________ ____________________________
Blueworks Live account Password:___________________ __________________________

ISV & Developer Relations
IBM Blueworks Live Workshop Page 7
First Steps
To start this workshop, you should be registered and logged as an administrator. You can refer to the first part above if necessary.
Just after login you should view the following page
The first thing to do is to configure your account, then you will invite new users and prepare the Space to work on it.
Step 1: Configure your account
1. At the top right, click on the Admin button .
2. You should be on the "User Management" tab, if not move to it. Then click on your name. A popup should appears:

ISV & Developer Relations
Page 8 IBM BlueWorksLive Workshop
You can change information or upload an avatar. It is advised to upload one but it is not mandatory: choose any picture from your computer.
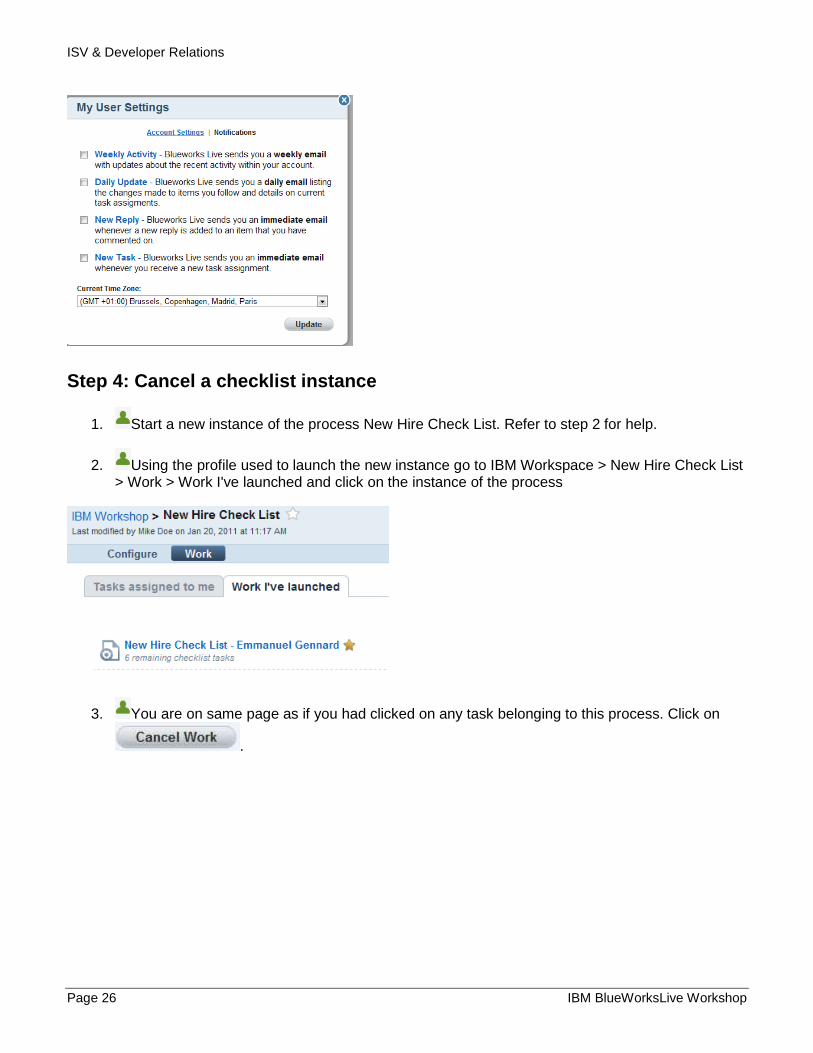
3. Click now on Notifications at the top of this popup and then keep only "Weekly Activity" selected and set the Current Time Zone correctly.
If you keep all notifications you will receive an impressive amount of email, in fact one for each action you will do in this workshop.
4. Click on the Update button to save and close the popup.
Step 2: Configure security options [ optional ]
Click on the Security tab: .
1. Set the password policies to High
2. If you have knowledge concerning network configuration you can uncheck the unrestricted access and then add a range of IP compliant with your network. Be very careful with that option because if you make a mistake here or if your network configuration changes you will not be able to login again, even with an administrative account!
3. Tick all other boxes.
Once done the view should looks like the one below:
ISV & Developer Relations
IBM Blueworks Live Workshop Page 9
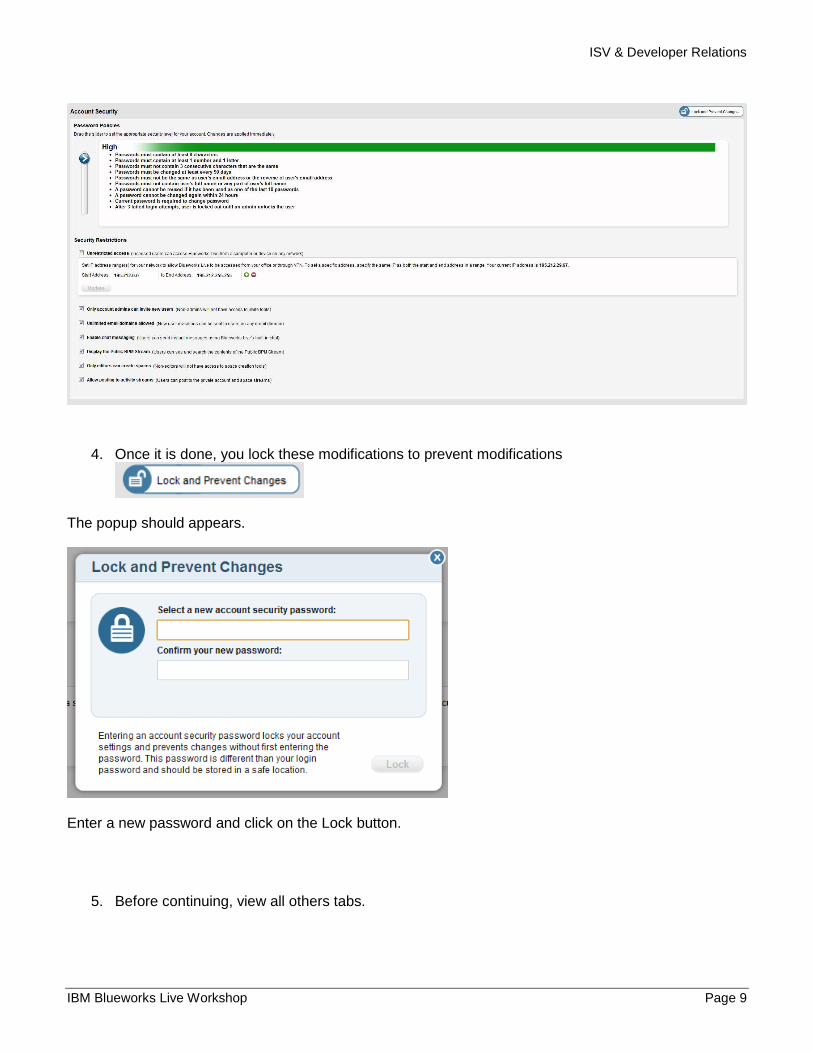
4. Once it is done, you lock these modifications to prevent modifications
The popup should appears.
Enter a new password and click on the Lock button.
5. Before continuing, view all others tabs.
ISV & Developer Relations
Page 10 IBM BlueWorksLive Workshop
o The "Glossary" tab contains all key that a "Task" could contains. You will have to fill some of those properties later in the workshop, but try to remember that you can here remove or add predefined properties. This view provides a quick overview of all values set for each of the properties. It also allows you to merge some values if needed.
o The "File Management" part contains for the moment no file even if you have uploaded an avatar.
Step 3: Managing new users
BlueWorks Live is a collaborative tool. To demonstrate this important feature we need to add new users. The first user we add will be managed by you in this workshop. It will help you to understand the different
user roles which will be indicated by different colored icons as shown here: . When this icon
appears: , the tasks should be done by the administrative role (the current one) and this icon means it should be done by the user role you are going to create. Sometimes a task could be carried out either by both roles or by only one of them. In all cases, please carefully read the task to do which should contain the necessary information for the profile.
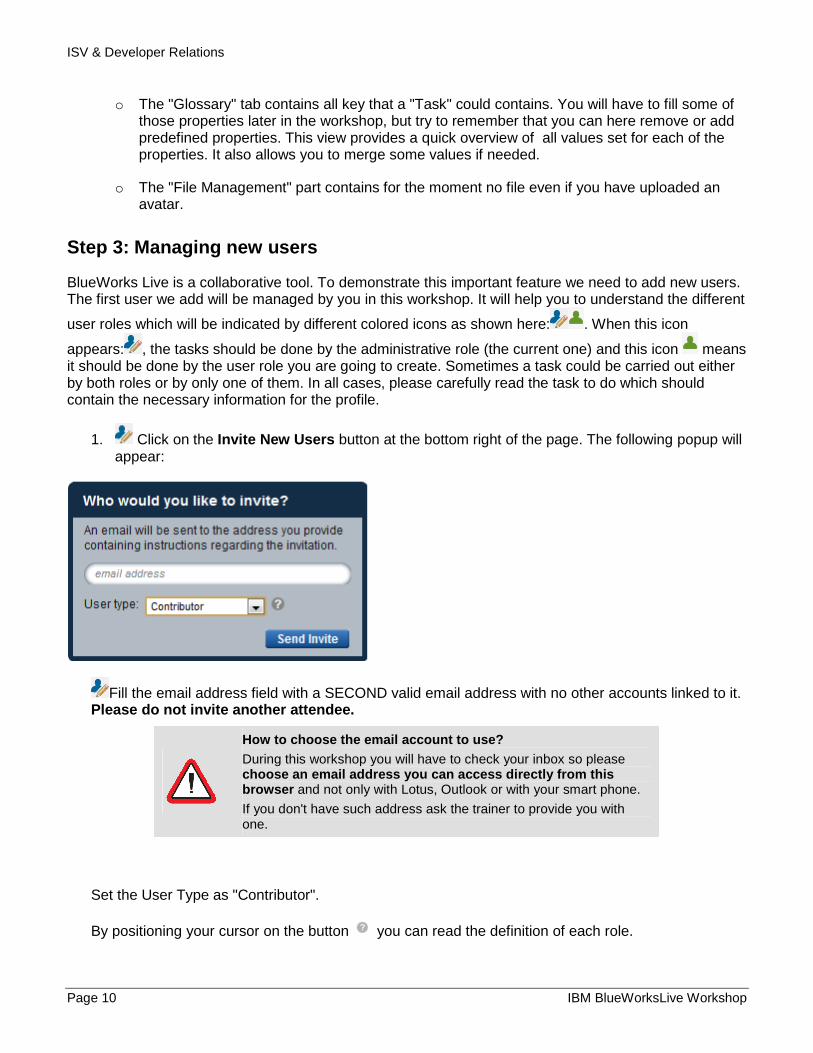
1. Click on the Invite New Users button at the bottom right of the page. The following popup will appear:
Fill the email address field with a SECOND valid email address with no other accounts linked to it. Please do not invite another attendee.
How to choose the email account to use? During this workshop you will have to check your inbox so please choose an email address you can access directly fro m this browser and not only with Lotus, Outlook or with your smart phone.
If you don't have such address ask the trainer to provide you with one.
Set the User Type as "Contributor".
By positioning your cursor on the button you can read the definition of each role.

ISV & Developer Relations
IBM Blueworks Live Workshop Page 11
2. Seconds after clicking on the Invite button the following messages will appear
and then quickly disappear. Now, type in a non-existent email address correctly formatted(eg: [email protected]) and then click on the Invite button again. The same confirmation message will appear even though the address doesn't exist.
3. Check your email message using a different internet browser (If you are currently using Explorer use Firefox or vice-versa. Do not use the same browser even if you use two separate windows). You should receive an email titled Invitation to collaborate using Blueworks Live. Open it and click on Click here to activate your new account. The following page will be displayed:
4. This time certain information are not requested. Fill the first field with "Mike Doe". Enter a password respecting the policy you just set before. For security reasons changing the password will take 24 hrs so enter it below to avoid loosing it.
ISV & Developer Relations
Page 12 IBM BlueWorksLive Workshop
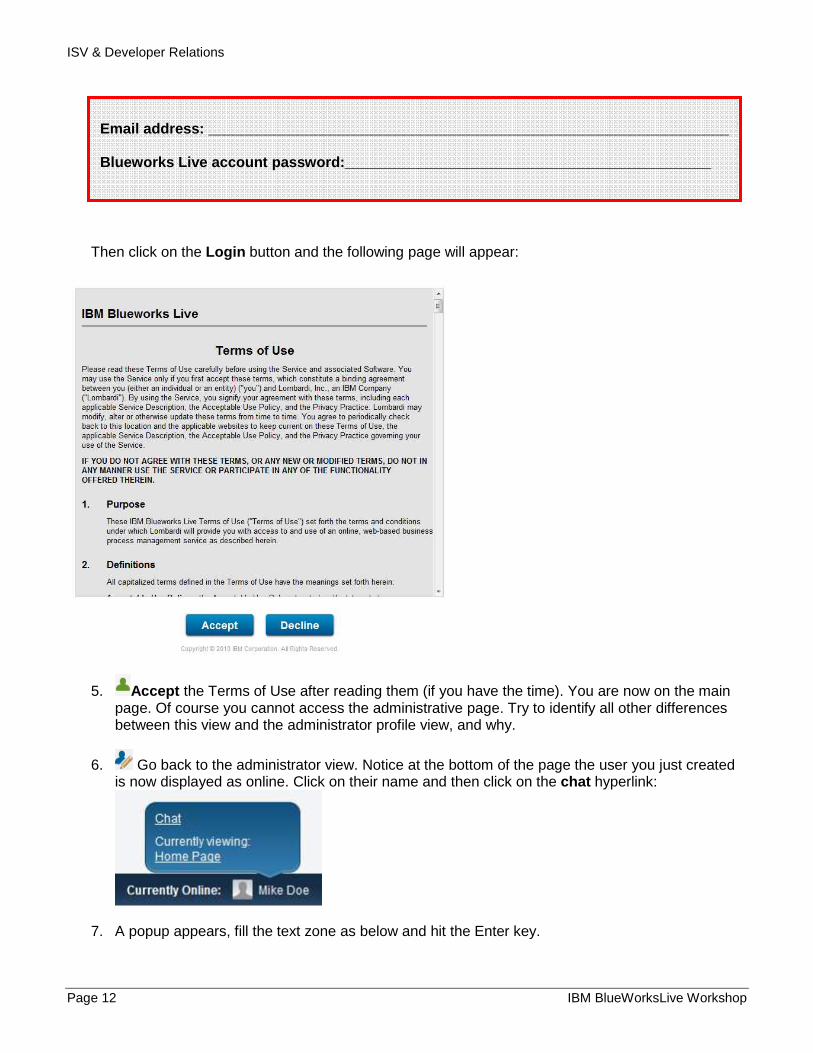
Then click on the Login button and the following page will appear:
5. Accept the Terms of Use after reading them (if you have the time). You are now on the main page. Of course you cannot access the administrative page. Try to identify all other differences between this view and the administrator profile view, and why.
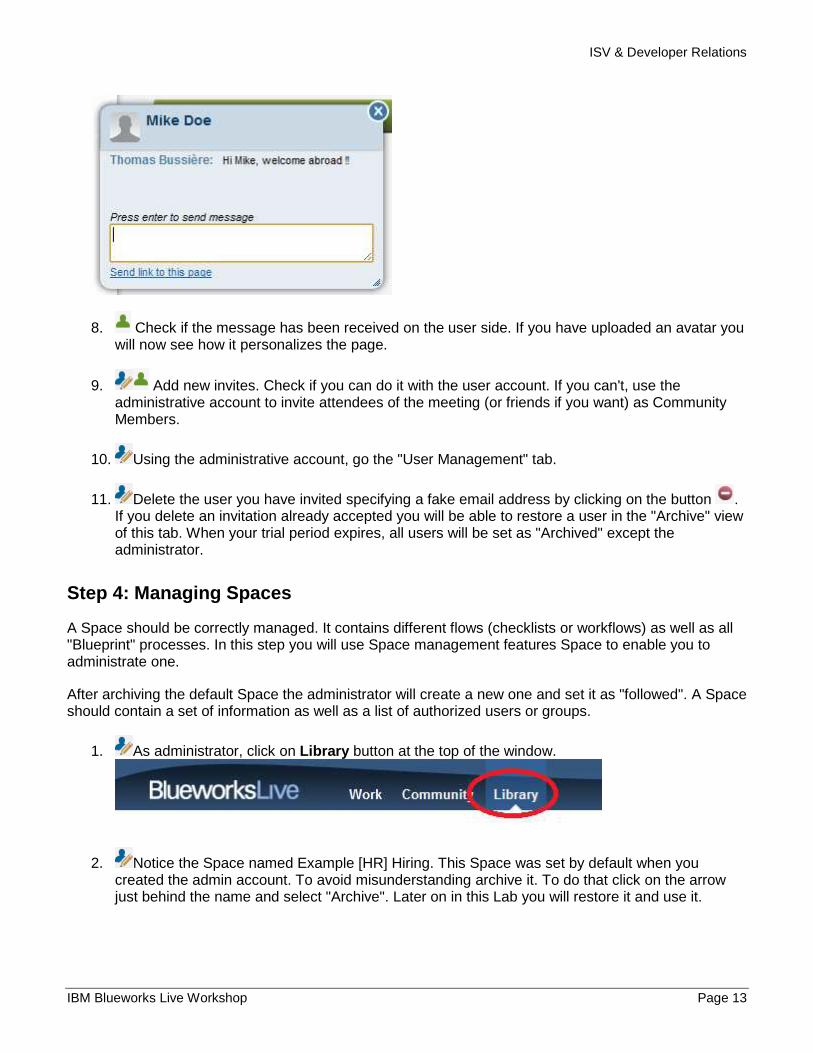
6. Go back to the administrator view. Notice at the bottom of the page the user you just created is now displayed as online. Click on their name and then click on the chat hyperlink:
7. A popup appears, fill the text zone as below and hit the Enter key.
Email address: ____________________________________ ____________________________
Blueworks Live account password:___________________ __________________________
ISV & Developer Relations
IBM Blueworks Live Workshop Page 13
8. Check if the message has been received on the user side. If you have uploaded an avatar you will now see how it personalizes the page.
9. Add new invites. Check if you can do it with the user account. If you can't, use the administrative account to invite attendees of the meeting (or friends if you want) as Community Members.
10. Using the administrative account, go the "User Management" tab.
11. Delete the user you have invited specifying a fake email address by clicking on the button . If you delete an invitation already accepted you will be able to restore a user in the "Archive" view of this tab. When your trial period expires, all users will be set as "Archived" except the administrator.
Step 4: Managing Spaces
A Space should be correctly managed. It contains different flows (checklists or workflows) as well as all "Blueprint" processes. In this step you will use Space management features Space to enable you to administrate one.
After archiving the default Space the administrator will create a new one and set it as "followed". A Space should contain a set of information as well as a list of authorized users or groups.
1. As administrator, click on Library button at the top of the window.
2. Notice the Space named Example [HR] Hiring. This Space was set by default when you created the admin account. To avoid misunderstanding archive it. To do that click on the arrow just behind the name and select "Archive". Later on in this Lab you will restore it and use it.

ISV & Developer Relations
Page 14 IBM BlueWorksLive Workshop
3. Active Space is no longer defined, notice the menu which has appeared to view Space archived. In fact, a Space cannot be definitely removed. Now click on the Create new Space
button to create a new active Space, Space .
4. Fill the popup as below and click on the Create Space button.
5. The view should look like:
6. First, click on the star next to Space the name of the Space to set if as a favorite.
The star becomes yellow

ISV & Developer Relations
IBM Blueworks Live Workshop Page 15
7. Start to write a Space description and Goals definitions to get the same result as below:
Any image in this demo, including the IBM logo, is linked to an image Url you should therefore find it on Internet. Try to change the logo size.
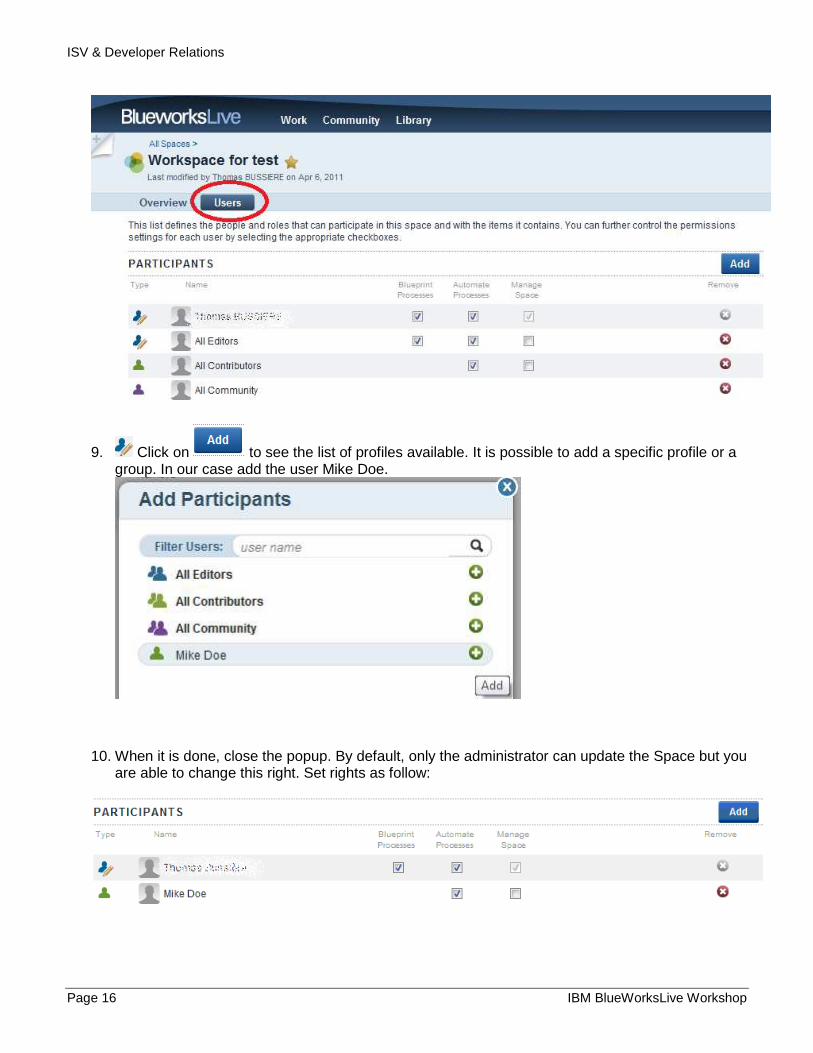
8. Open the "Users" tab of the Space and remove All Editors, All Contributors and All Community by clicking the delete button in front of each of them.
ISV & Developer Relations
Page 16 IBM BlueWorksLive Workshop
9. Click on to see the list of profiles available. It is possible to add a specific profile or a group. In our case add the user Mike Doe.
10. When it is done, close the popup. By default, only the administrator can update the Space but you are able to change this right. Set rights as follow:
ISV & Developer Relations
IBM Blueworks Live Workshop Page 17
11. Go back within the User profile and check that you see the Space (as necessary refresh your current page). Click on it and notice that you cannot update descriptions and goals.
12. Identify where the user is able to view updates done on the Space. The user can add new
posts for anyone accessing this Space. Click on the button .
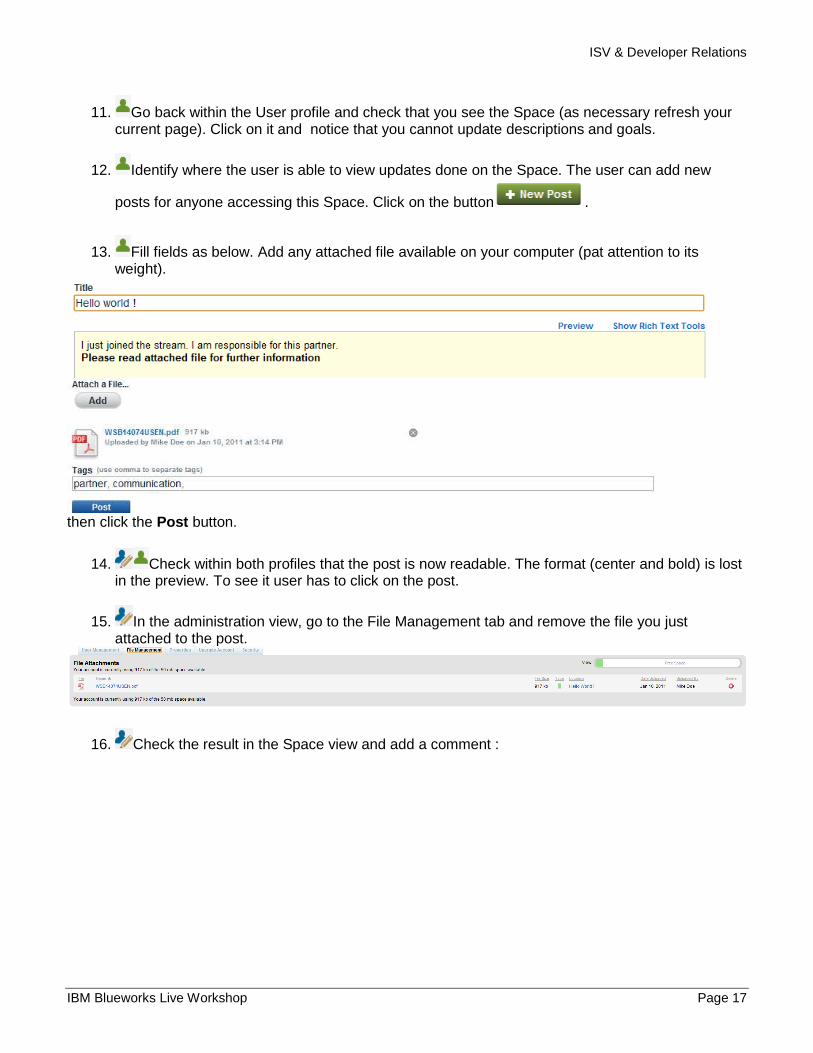
13. Fill fields as below. Add any attached file available on your computer (pat attention to its weight).
then click the Post button.
14. Check within both profiles that the post is now readable. The format (center and bold) is lost in the preview. To see it user has to click on the post.
15. In the administration view, go to the File Management tab and remove the file you just attached to the post.
16. Check the result in the Space view and add a comment :
ISV & Developer Relations
Page 18 IBM BlueWorksLive Workshop
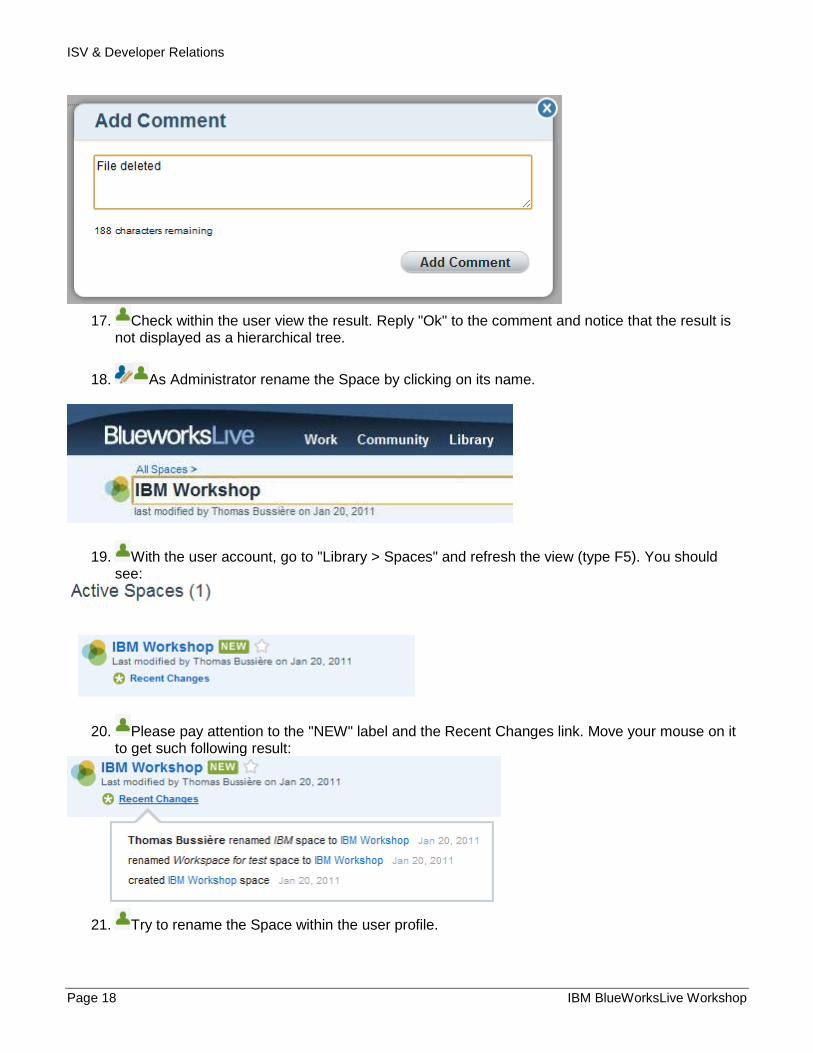
17. Check within the user view the result. Reply "Ok" to the comment and notice that the result is not displayed as a hierarchical tree.
18. As Administrator rename the Space by clicking on its name.
19. With the user account, go to "Library > Spaces" and refresh the view (type F5). You should see:
20. Please pay attention to the "NEW" label and the Recent Changes link. Move your mouse on it to get such following result:
21. Try to rename the Space within the user profile.
ISV & Developer Relations
IBM Blueworks Live Workshop Page 19
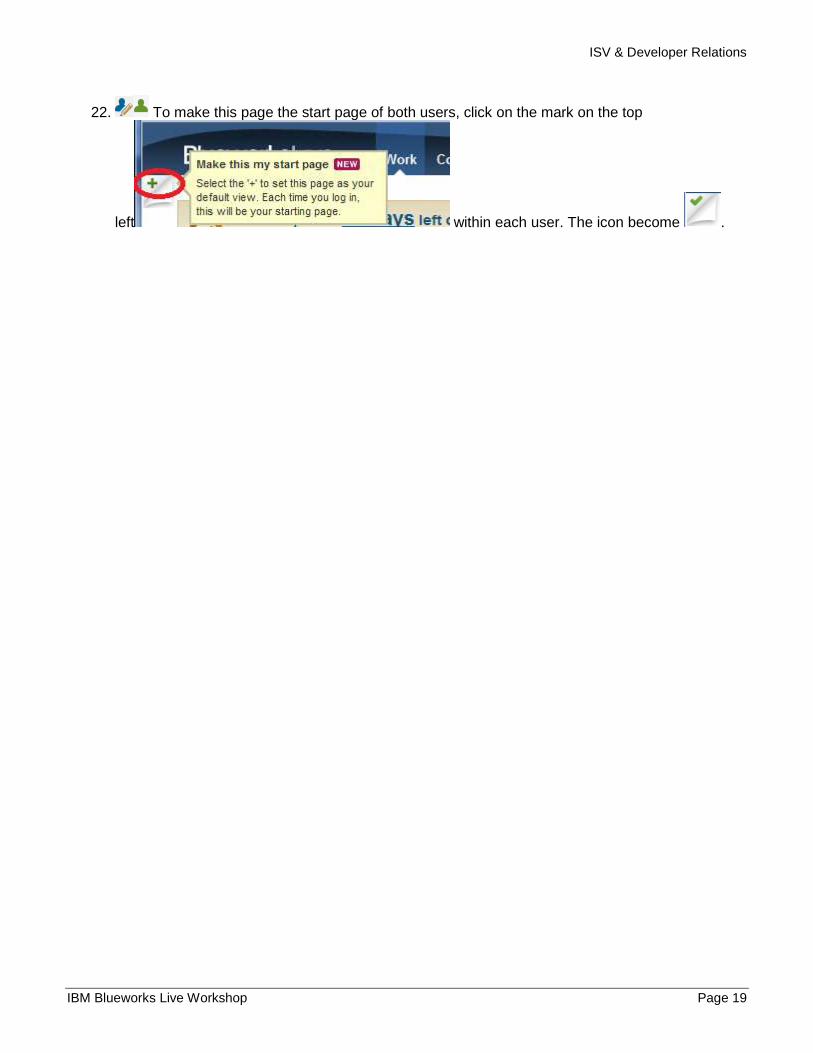
22. To make this page the start page of both users, click on the mark on the top
left within each user. The icon become .
ISV & Developer Relations
Page 20 IBM BlueWorksLive Workshop
Managing a Checklist
A checklist is a list of tasks to do. A template must be created in a Space and then an instance of this template is launched. Each task is assigned to a user and until all tasks are completed the flow is not finish. It can also be canceled. The task itself is just a name and its description and not an independent process, in other words the task itself is out of the scope of BlueWorks Live, it is an external reference.
Step 1: Create a template
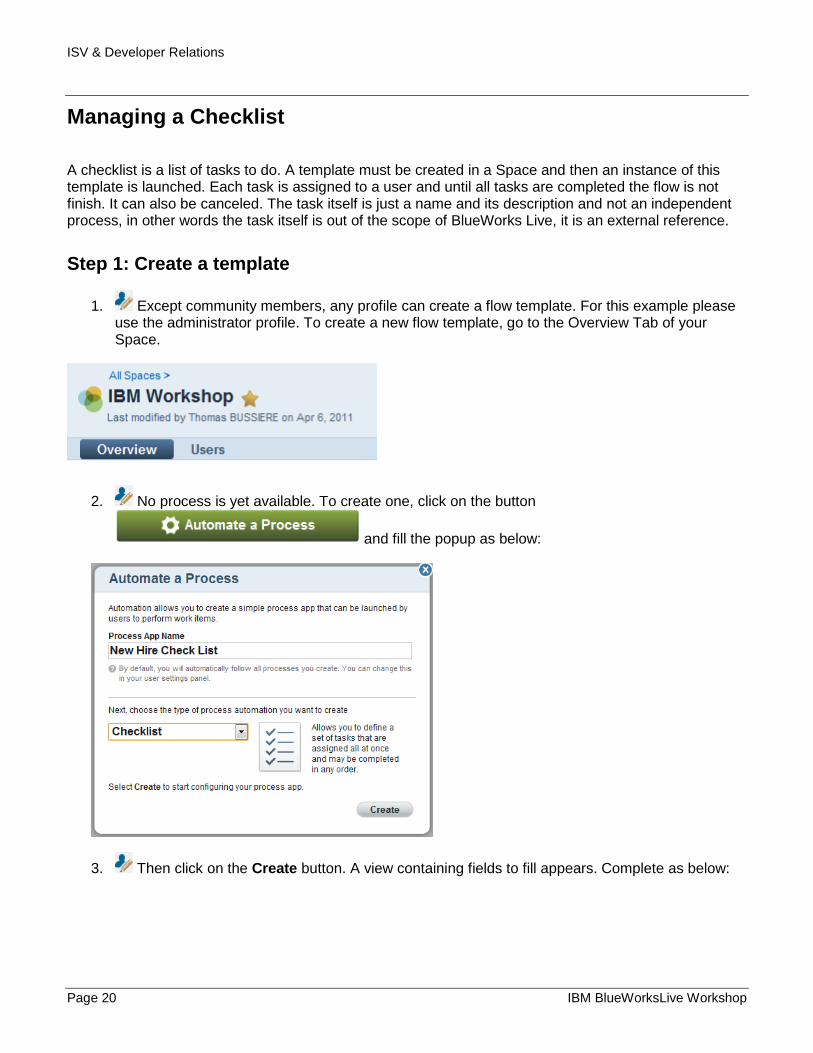
1. Except community members, any profile can create a flow template. For this example please use the administrator profile. To create a new flow template, go to the Overview Tab of your Space.
2. No process is yet available. To create one, click on the button
and fill the popup as below:
3. Then click on the Create button. A view containing fields to fill appears. Complete as below:

ISV & Developer Relations
IBM Blueworks Live Workshop Page 21
4. Do not click on the Share with Participants button yet.
5. Go back to the Space view. Find the notification that a process has been created. You can continue configuring a process of a Space by clicking on the button " New Hire Check List "
and by then clicking on the tab "Configure" at the top left.
ISV & Developer Relations
Page 22 IBM BlueWorksLive Workshop
Step 2: Launch an instance of a checklist
You have only created a template, moreover, not all tasks are assigned by default. You will now launch an instance using this template. You will change some information, add others, and see how the checklist instance works.
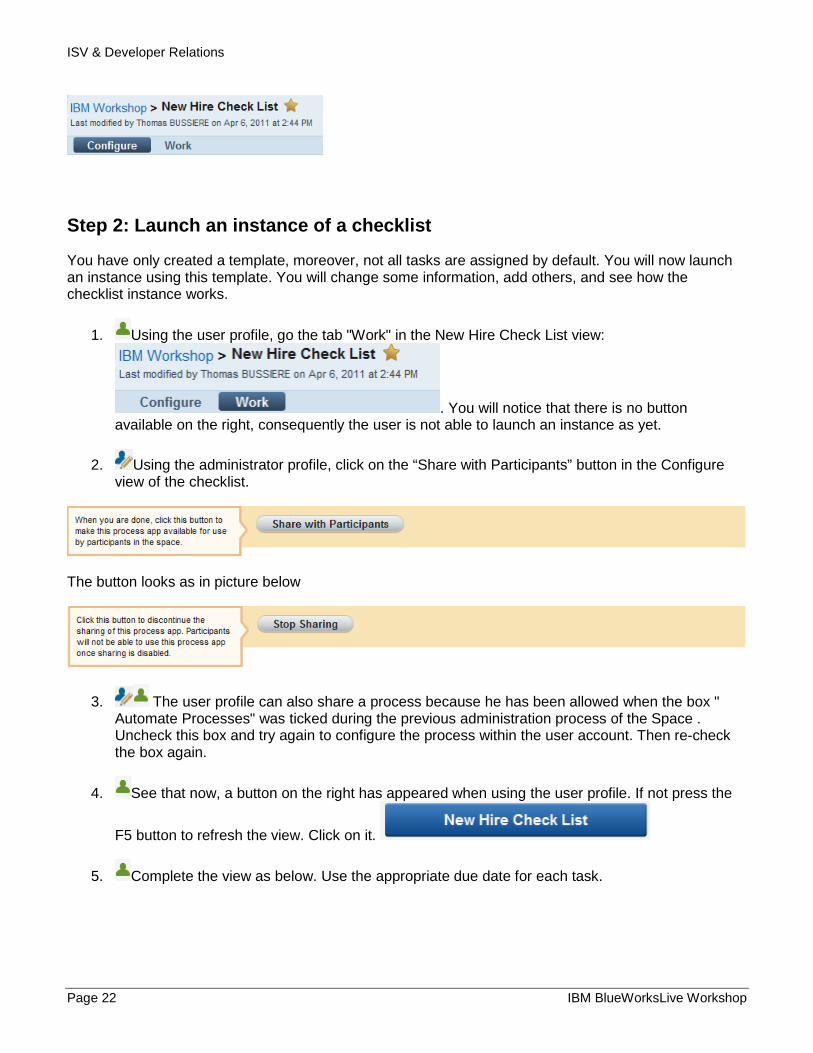
1. Using the user profile, go the tab "Work" in the New Hire Check List view:
. You will notice that there is no button available on the right, consequently the user is not able to launch an instance as yet.
2. Using the administrator profile, click on the “Share with Participants” button in the Configure view of the checklist.
The button looks as in picture below
3. The user profile can also share a process because he has been allowed when the box " Automate Processes" was ticked during the previous administration process of the Space . Uncheck this box and try again to configure the process within the user account. Then re-check the box again.
4. See that now, a button on the right has appeared when using the user profile. If not press the
F5 button to refresh the view. Click on it.
5. Complete the view as below. Use the appropriate due date for each task.

ISV & Developer Relations
IBM Blueworks Live Workshop Page 23
6. When it is done click on the Launch button.
7. You should get an error message, fix it by assigning Mike Doe for the Enable salesforce.com Access task and start an instance instead of all due date are not set. You get the message
and the page changes.

ISV & Developer Relations
Page 24 IBM BlueWorksLive Workshop
8. Check that an instance is currently running. Go to the IBM workspace>New Hire Check List
> Work and notice all tasks "Assigned to me". By clicking the Work button at the top you see all tasks assigned to the participant whatever the Space or process.
9. The number of tasks assigned to you and the statistic of completed tasks on time is found at the bottom of the page.
10. Check the email box of each profile: you should have received one specific mail for each task assigned to the user profile and none for tasks assigned to the admin profile. Try to understand why.
11. Start a second parallel checklist instance using the same template and hiring someone else. Identify useful gaps to immediately specify on which instance of process belong a task. Identify the gaps which will help you to immediately specify which task belongs to which process.
Step 3: Complete the checklist instance
There are two ways to complete a task: reassign it to someone else or just click on the "complete" button. It is the user's responsibility to check the task has been correctly carry out. Once again, the task itself is not in the scope of BlueWorks Live.
1. Using the user profile, click on any task assigned to you. You should in all cases get the same
view summarizing the checklist. Click on on the right and then type in the following comment: Hi Admin, can I reassign the Order Badge task to you, I am not authorized to perform it.
2. Using the administrator profile, read the question and answer it with an affirmative.

ISV & Developer Relations
IBM Blueworks Live Workshop Page 25
3. Within the user profile read the confirmation and reassign the task Order Building Access
Badge to the administrator by clicking on
4. Check this task is assigned to the administrator, if not refresh the page( typing F5).
5. Complete all tasks for both profiles by clicking on .
6. Using the user profile go to "New Hire Check List >Work > Work I've launched" and select the closed process view. Check the check-list is completed.
7. Click on the "New Hire Check List - Jeremy Sirour" link. The history of each tasks appears.
8. Using the Administrator profile, get the same view by clicking on the tab "All work" instead of "Work I've launched".
9. As receiving an email for each tasks can be annoying, you should update the user setting to avoid this type of notification. Click on the Mike Doe link (top right), select "Notifications", untick all options as below and then click on the Update button.
ISV & Developer Relations
Page 26 IBM BlueWorksLive Workshop
Step 4: Cancel a checklist instance
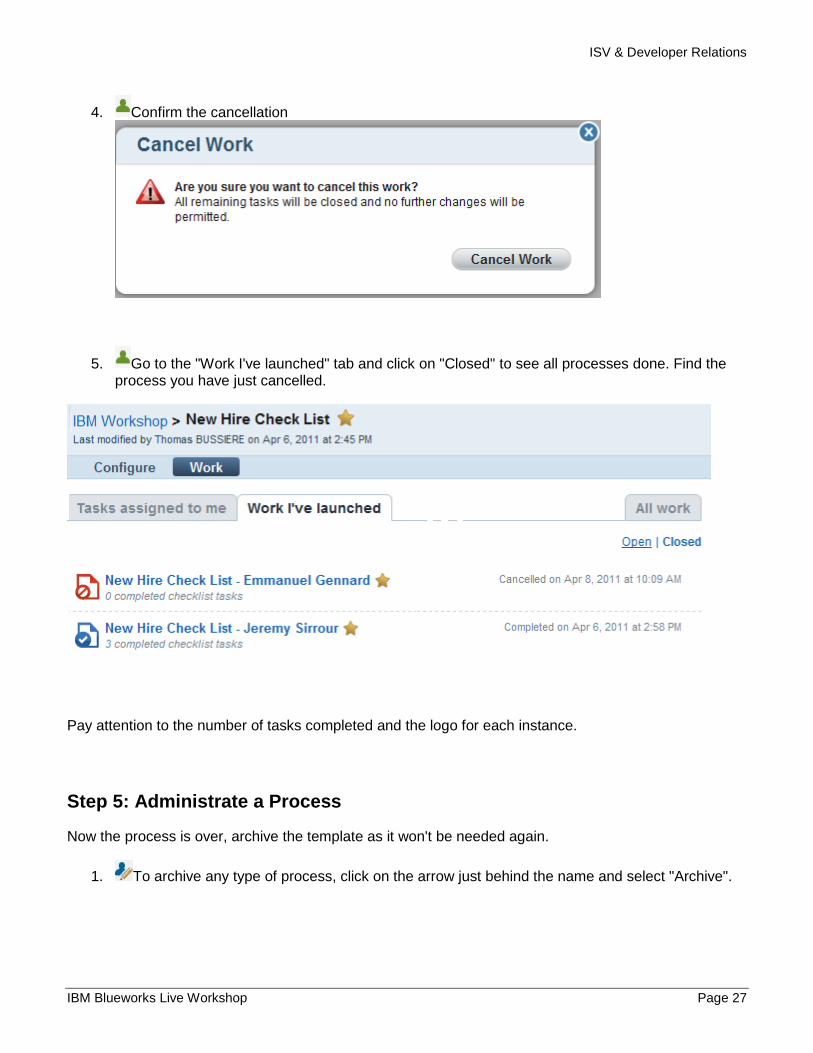
1. Start a new instance of the process New Hire Check List. Refer to step 2 for help.
2. Using the profile used to launch the new instance go to IBM Workspace > New Hire Check List > Work > Work I've launched and click on the instance of the process
3. You are on same page as if you had clicked on any task belonging to this process. Click on
.
ISV & Developer Relations
IBM Blueworks Live Workshop Page 27
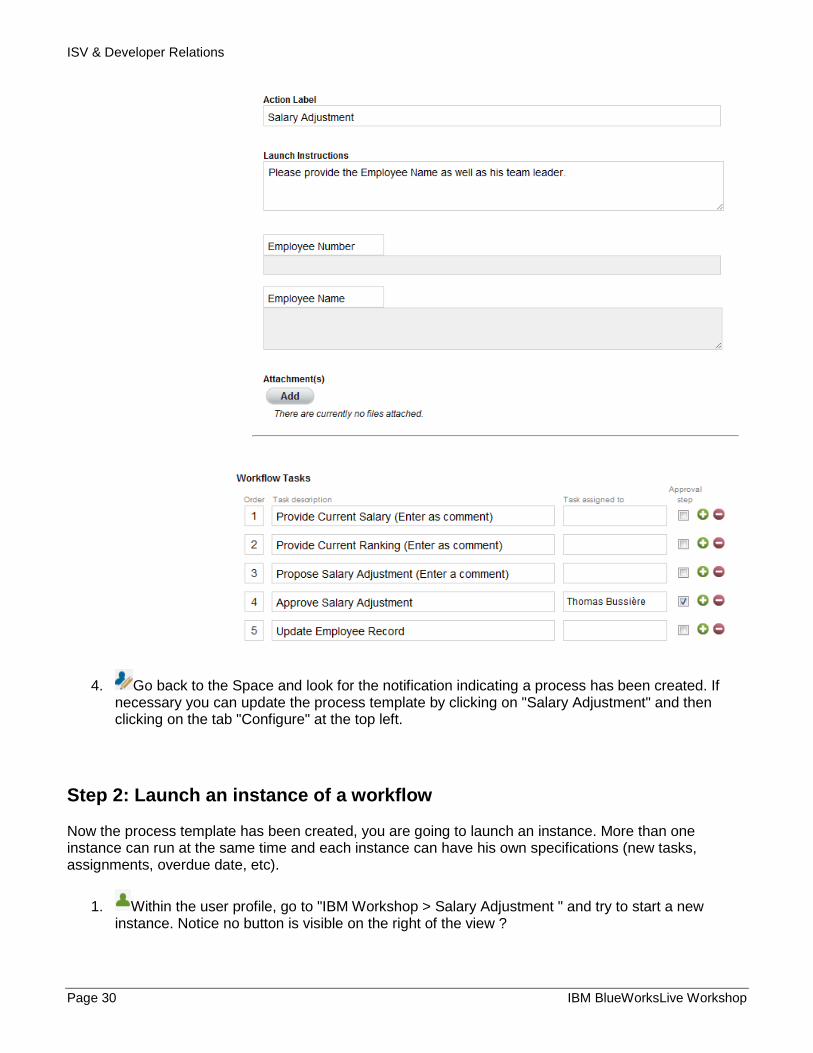
4. Confirm the cancellation
5. Go to the "Work I've launched" tab and click on "Closed" to see all processes done. Find the process you have just cancelled.
Pay attention to the number of tasks completed and the logo for each instance.
Step 5: Administrate a Process
Now the process is over, archive the template as it won't be needed again.
1. To archive any type of process, click on the arrow just behind the name and select "Archive".

ISV & Developer Relations
Page 28 IBM BlueWorksLive Workshop
As soon as a process is archived in a Space, a list will appear showing only "Active" processes or only "Archived" processes
The main reason for archiving a process is to remove unused components from the Space. However a process can be restored if required.
2. Select "Archived" process, then identify the process to restore. Click on the arrow to get the menu and click on "Restore"
When you restore a process template, its history, comments, and favorite options are restored too.

ISV & Developer Relations
IBM Blueworks Live Workshop Page 29
Managing a Workflow
A workflow is a list of tasks similar to a checklist but the chronological order of performing the tasks is mandatory. As with a checklist, a template must be created in a Space and then instances launched. Each task is assigned to a user and the flow is not finish until all tasks are completed. However it could be cancelled if required. The task itself is just a name and its description and not an independent process, in other words the task itself is out of the scope of BlueWorks Live, it is an external reference.
Step 1: Create a template
1. Except for community members, any profile can create a flow template . For this example please use the administrator profile. To create a new flow template, go to the Overview tab of the Space.
2. You can see the previous checklist if you didn't archived it. To create a new process click on
the button and fill in the popup as below:
3. Then click on the Create button. A view containing fields to fill in appears. Complete as below:
ISV & Developer Relations
Page 30 IBM BlueWorksLive Workshop
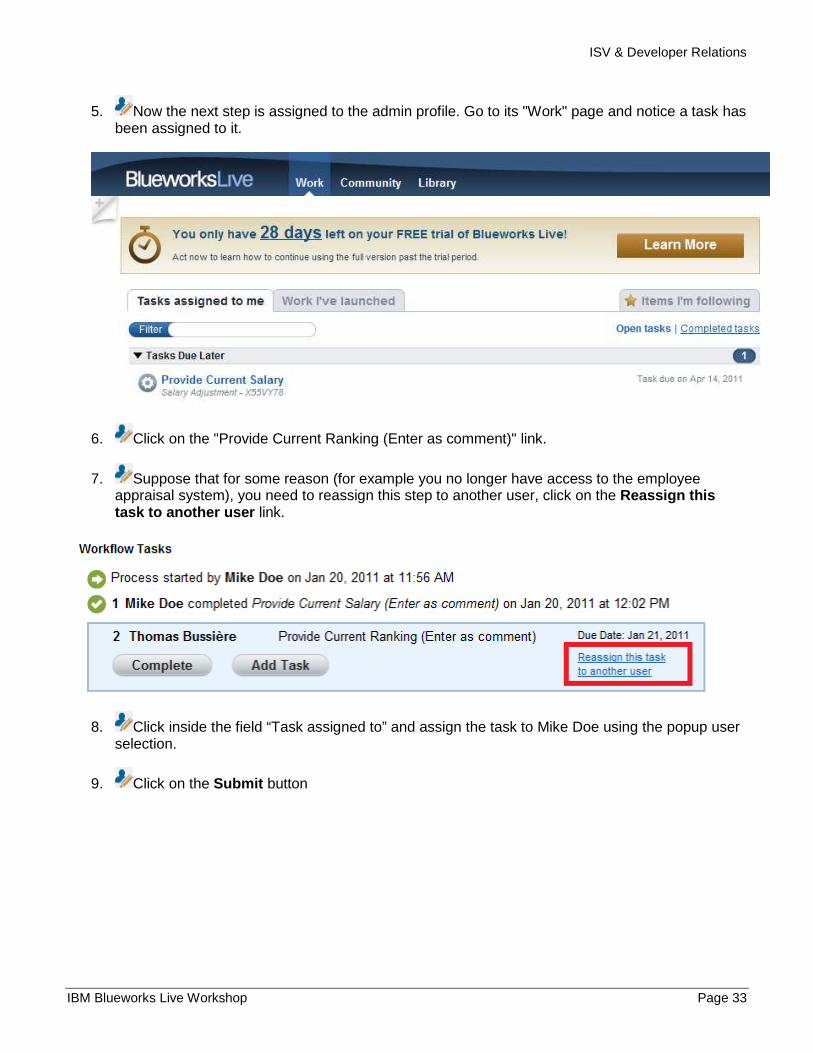
4. Go back to the Space and look for the notification indicating a process has been created. If necessary you can update the process template by clicking on "Salary Adjustment" and then clicking on the tab "Configure" at the top left.
Step 2: Launch an instance of a workflow Now the process template has been created, you are going to launch an instance. More than one instance can run at the same time and each instance can have his own specifications (new tasks, assignments, overdue date, etc).
1. Within the user profile, go to "IBM Workshop > Salary Adjustment " and try to start a new instance. Notice no button is visible on the right of the view ?

ISV & Developer Relations
IBM Blueworks Live Workshop Page 31
2. Share the process with participants using the user profile. It can share a process because it has been allowed when the " Automate Processes" box was ticked during a previous step. When
the button appears, click on it with the administrator profile.
3. Using the administrator profile, complete the view as below. Use appropriate due date for each task. Pay attention to the fact that a new task has been added for this instance only.
4. Click on launch , get the message and then the page will change automatically.
5. Check an instance is currently running. Go to the "IBM workspace> Salary Adjustment > Work" and notice that no task has been assigned to you. However, by going to the tab "Work I've launched" you can see the process you have just launched.

ISV & Developer Relations
Page 32 IBM BlueWorksLive Workshop
6. ,Click on the button at the top of the window within the user profile. See the first task of the workflow has been assigned to you.
1. If you have time, start a second parallel workflow using the same template.
Step 3: Complete the workflow instance
1. Identify the first task and click on it. The view displays the entire flow but notice only one task is running:
2. Click on the Add Comments button on the right . A popup appears.
3. Enter 77,170.66 and click on the Add Comment button.
4. Click on the Complete button to complete your task.
ISV & Developer Relations
IBM Blueworks Live Workshop Page 33
5. Now the next step is assigned to the admin profile. Go to its "Work" page and notice a task has been assigned to it.
6. Click on the "Provide Current Ranking (Enter as comment)" link.
7. Suppose that for some reason (for example you no longer have access to the employee appraisal system), you need to reassign this step to another user, click on the Reassign this task to another user link.
8. Click inside the field “Task assigned to” and assign the task to Mike Doe using the popup user selection.
9. Click on the Submit button

ISV & Developer Relations
Page 34 IBM BlueWorksLive Workshop
10. Check the task is no longer assigned to the administrator profile on its "Work" page.
11. Check the task "Provide Current Ranking (Enter as comment)" is now assigned to the user profile.
12. Click on the task. The flow opens as below.
13. Click on the Add Comment button and type in "Ranking: 1". The COMMENTS section looks similar to this:

ISV & Developer Relations
IBM Blueworks Live Workshop Page 35
14. Complete the task by clicking on the Complete button. The current task is now "Propose Salary Adjustment".
15. Click on the Add Task button.
16. Type in "Please increase if any of our competitors pay more. " for task description. Assign the task to the user profile and specify any date in the “Task due date” field.
17. Click on the Submit button
18. Check the new task has appeared in the flow and has been assigned to the user profile.

ISV & Developer Relations
Page 36 IBM BlueWorksLive Workshop
19. Enter the following as new comment: "One of our competitors recently offered 101.098.00 .I recommend 103,000.00 ." and complete task 5.
20. Check the user has no more tasks assigned to him on the "Work" page.
ISV & Developer Relations
IBM Blueworks Live Workshop Page 37
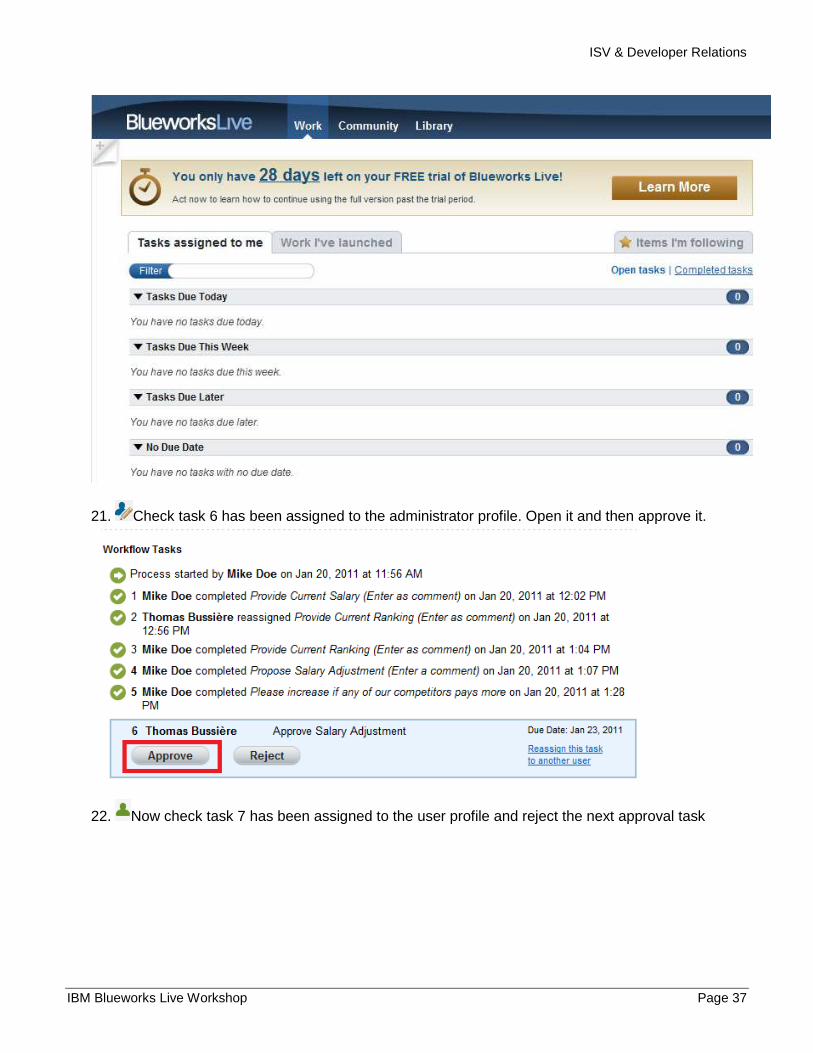
21. Check task 6 has been assigned to the administrator profile. Open it and then approve it.
22. Now check task 7 has been assigned to the user profile and reject the next approval task

ISV & Developer Relations
Page 38 IBM BlueWorksLive Workshop
The workflow has been stopped and all further steps will not be activated.
23. Using the administrator profile, go to the tab "Work I've launched", filter it by clicking on the link "Closed" and then check your instance of the process has been finished correctly.

ISV & Developer Relations
IBM Blueworks Live Workshop Page 39
ISV & Developer Relations
Page 40 IBM BlueWorksLive Workshop
Starting "Blueprint" a Process
The reason Blueworks Live is such a powerful tool is because every company needs to understand and document its processes. Whether for a process improvement project, to create visibility, or train new employees, process documentation is an essential part of a company’s process excellence. But why is it so difficult to document those processes? Today’s tools aren’t designed to be simple, structured, and usable by the average person. Blueworks Live changes that with a tool that documents just like outlining in PowerPoint or Word. Blueworks Live brings a simple no-hassle method to process documentation and discovery. Workflows and Checklists are strictly internal to BlueWorks Live. Neither task information nor flow instance summary runs can be exported for documentation or for external analysis.. BlueWorks Live manages a third type of process called "Blueprint process", which describes a business process. It can be exported for documentation in some Microsoft® formats as well as in an Adobe® one. It can also be formalized into a universal notation called Business Process Modeling Notation, version 2.0. and exported in some IBM solution formats. When a user starts "Blueprinting" a process he begins by describing milestones and their activities. An activity could contain a predefined list of properties, for example the participant, the cycle time, the risk, the added value etc. Users should try to specify the maximum amount of data for all activities. BlueWorks Live offer a view to analyze content and to make decisions easier. Once all activities have been defined, a process diagram, respecting the BPMN 2.0 notation, can be generated, updated and then upgraded with specific types of information such as events, decision branches,etc. It's the best way to describe real business processes. The work done can be exported in several differents formats. An IBM solution called "Websphere Lombardi Edition" can connect to BlueWorks Live and download the process diagram with all the information relating to each activity and then run the picture as a process! This last part is out of the scope of this workbook.
Step 1: The discovery Map presentation
You have previously done some administrative work, and run instances of checklists and workflows. In the same Space you will now describe a business process starting by using the discovery map.
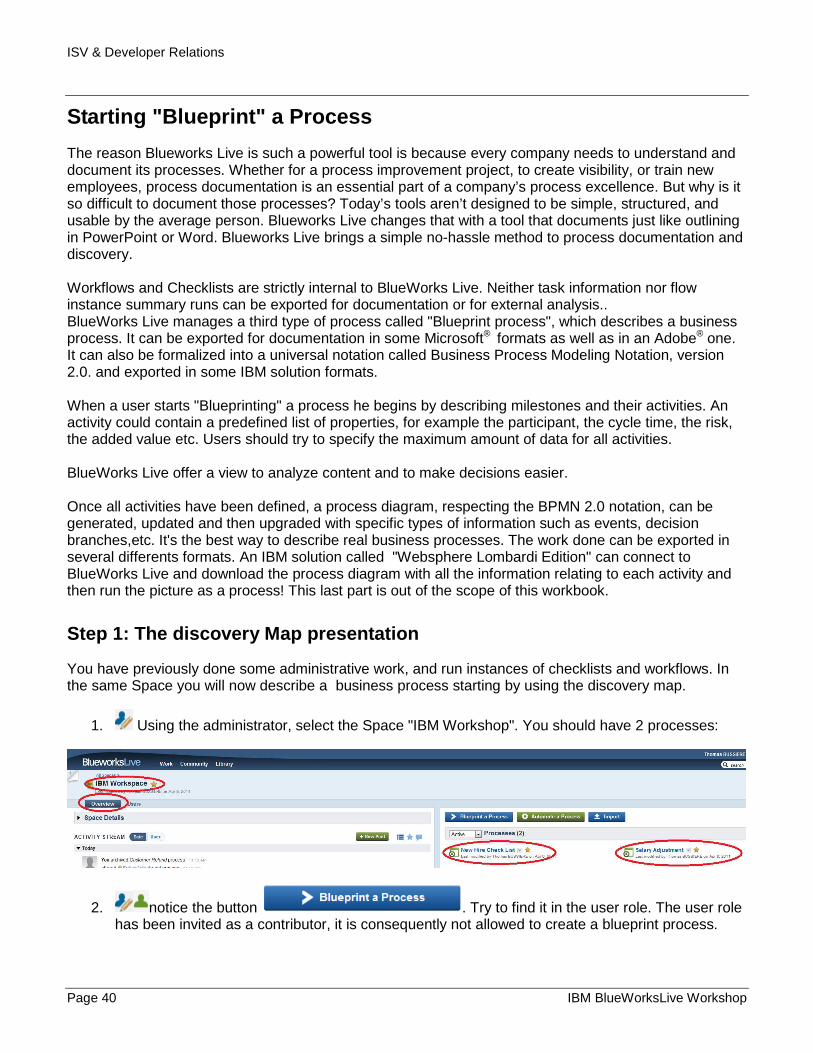
1. Using the administrator, select the Space "IBM Workshop". You should have 2 processes:
2. notice the button . Try to find it in the user role. The user role has been invited as a contributor, it is consequently not allowed to create a blueprint process.
ISV & Developer Relations
IBM Blueworks Live Workshop Page 41
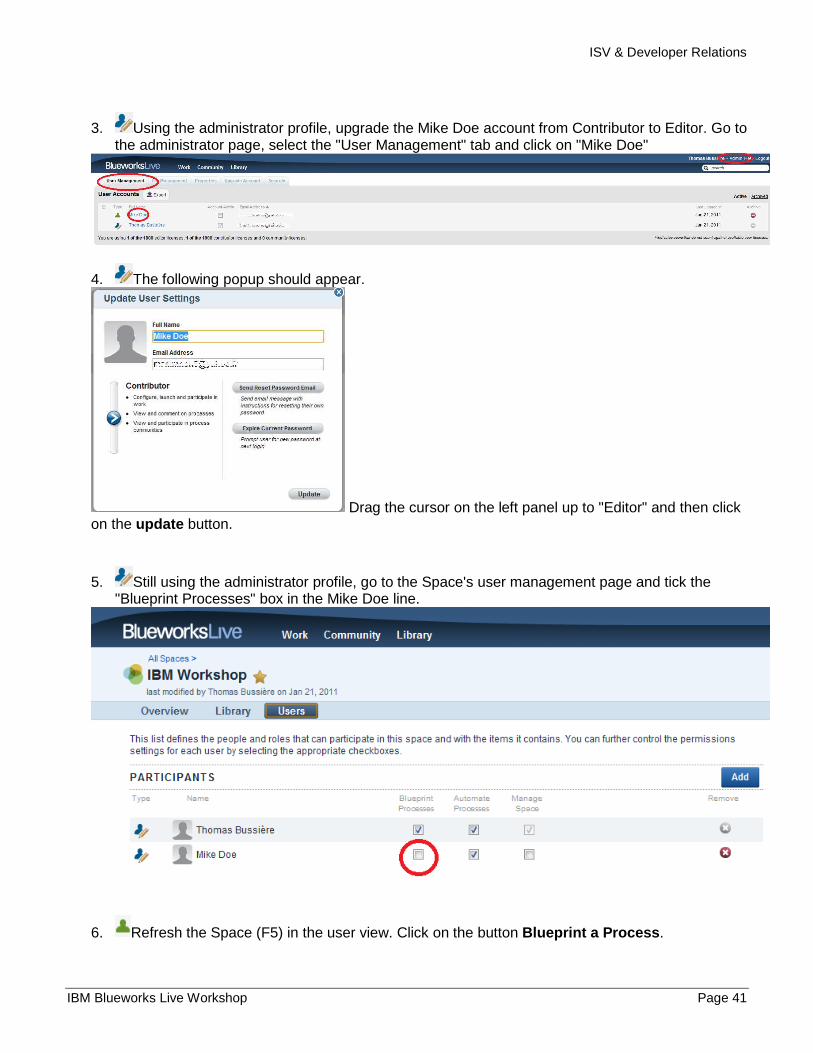
3. Using the administrator profile, upgrade the Mike Doe account from Contributor to Editor. Go to the administrator page, select the "User Management" tab and click on "Mike Doe"
4. The following popup should appear.
Drag the cursor on the left panel up to "Editor" and then click on the update button.
5. Still using the administrator profile, go to the Space's user management page and tick the "Blueprint Processes" box in the Mike Doe line.
6. Refresh the Space (F5) in the user view. Click on the button Blueprint a Process .

ISV & Developer Relations
Page 42 IBM BlueWorksLive Workshop
7. A popup appears. Fill it in as below and click on the Create button.
8. Check the view is similar to this one:
The first view you are brought to is called the “Discovery Map.” This is your building block view, meant to be very easy for anybody, regardless of experience in creating processes. This view supports “white boarding” of a process with the various members of the project team to get its initial structure mapped out. The Discovery Map view is not very concerned with process flow details such as decision branches and exceptions handling.
9. Notice the “View” list. You have a choice between the Discovery Map, the Process Diagram or the Documentation view. Keep the Discovery Map selected. Other views will be discovered later on in this lab.

ISV & Developer Relations
IBM Blueworks Live Workshop Page 43
Note : Each of the views supports a different type of activity. After you’ve worked with BlueWorks Live you will be comfortable with selecting the view appropriate to your immediate need. Here is a brief guide:
● The “Discovery Map” is great for documenting the higher-level process information.
● The “Process Diagram” contains lower-level swim lane details.
● The “Documentation” view focuses on the textual documentation that describes how the process is supposed to run.
10. Share the process with participants: to allow other potential editors to work on it with you.
Step 2: Managing milestones and activities
1. The panel on the left side of the Discovery Map allows you to view your process as a bulleted list. It is organized into “milestones” and “activities”. A good best practice is to have somewhere between 5 and 8 milestones. You can edit the label for the milestones and activities in the left hand panel with the bulleted list, or by clicking on the milestone or activity where it is displayed in the main viewing pane to the right. Rename the milestones with the following:
o Open a Request.
o Close a Request.
o Get Customer Information.
o Manager Approval.
o Issue a Refund.
o Email Notification Needed.

ISV & Developer Relations
Page 44 IBM BlueWorksLive Workshop
o More Customer Information Needed.
Note : The Discovery Map helps you define your major milestones and the activities that need to be done to complete the process. For now, process milestones are not necessarily in the correct order. The editors all support drag-and-drop.
2. Organize your own windows in your display so that you can see both the administrator view and the user view. It is advised to reserve the top half of your screen for the administrator view and the rest for the user view. Each view should display the Discovery map you have just created.
3. Using the user view, rename Activity to Research. Has the view been updated in the administrator view? Has a refresh been necessary?
4. Still simultaneously viewing all user pages, drag and drop milestones to look like the image below using the user role. When you drag a box under a milestone it becomes an activity. This is also represented by the outline on the left. Has the view been automatically updated in the administrator role?
5. Using the administrator view, use the Undo button . You will notice it will not work. Now undo everything using the user profile. Then redo all of them.
ISV & Developer Relations
IBM Blueworks Live Workshop Page 45
6. You can now expand the window of each profile using the entire space available.
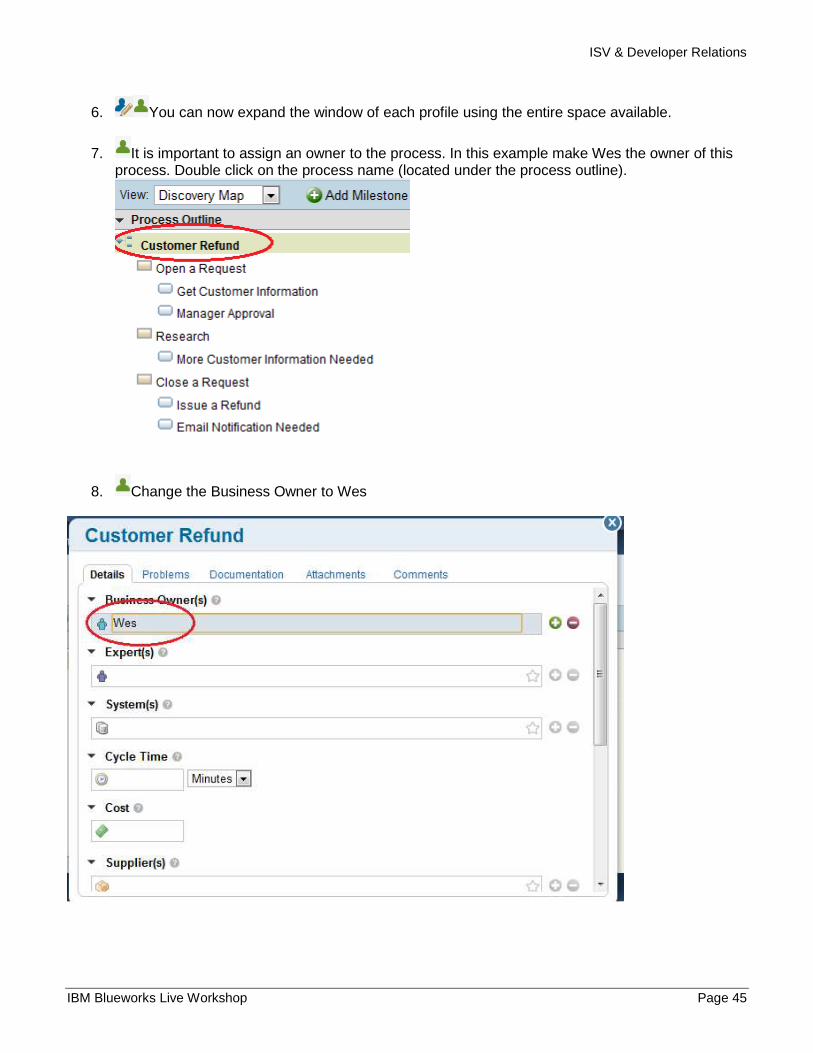
7. It is important to assign an owner to the process. In this example make Wes the owner of this process. Double click on the process name (located under the process outline).
8. Change the Business Owner to Wes

ISV & Developer Relations
Page 46 IBM BlueWorksLive Workshop
Step 3: Adding Process Details
Imagine yourself in a conference room doing the sessions that you will do today. This is where you would use BlueWorks Live as a whiteboard to map out the process. Participants in the meeting can call out different pieces of information and BlueWorks Live allows you to easily capture the information live. In this part of the exercise you will add some details to the process map.
1. You can double-click on an activity to open it. Double-click on “Get Customer Information.”
2. Once the activity is open, the details tab provides fields to hold answers to the questions that are outlined here. These questions are important to ask yourself when filling out an activity. For this example, enter the answers into the blank fields for the activity “Get Customer Information.” (See figure above.)
a. Participant:
Q: Who is doing this?
A: Teller.
b. Business Owner:
Q: Is there a rollup from the participant to a higher role?
A: Business owner.
c. Expert(s):
Q: Are there any experts on the project?
A: Subject Matter Experts.

ISV & Developer Relations
IBM Blueworks Live Workshop Page 47
d. System(s):
Q: What systems, technologies or devices are you using to capture information in this activity?
A: SAP.
e. Cycle Time:
Q: What is the Cycle Time for this activity?
A: 2 minutes.
f. Cost:
Q: Is there a cost associated with this process?
A: Yes, 20
g. Input(s):
Q: What information is needed as an input to this activity?
A: For this example activity, we specify that two inputs are needed.
The first input is “Account Information.”
the second is “Driver’s Licence.”
ISV & Developer Relations
Page 48 IBM BlueWorksLive Workshop
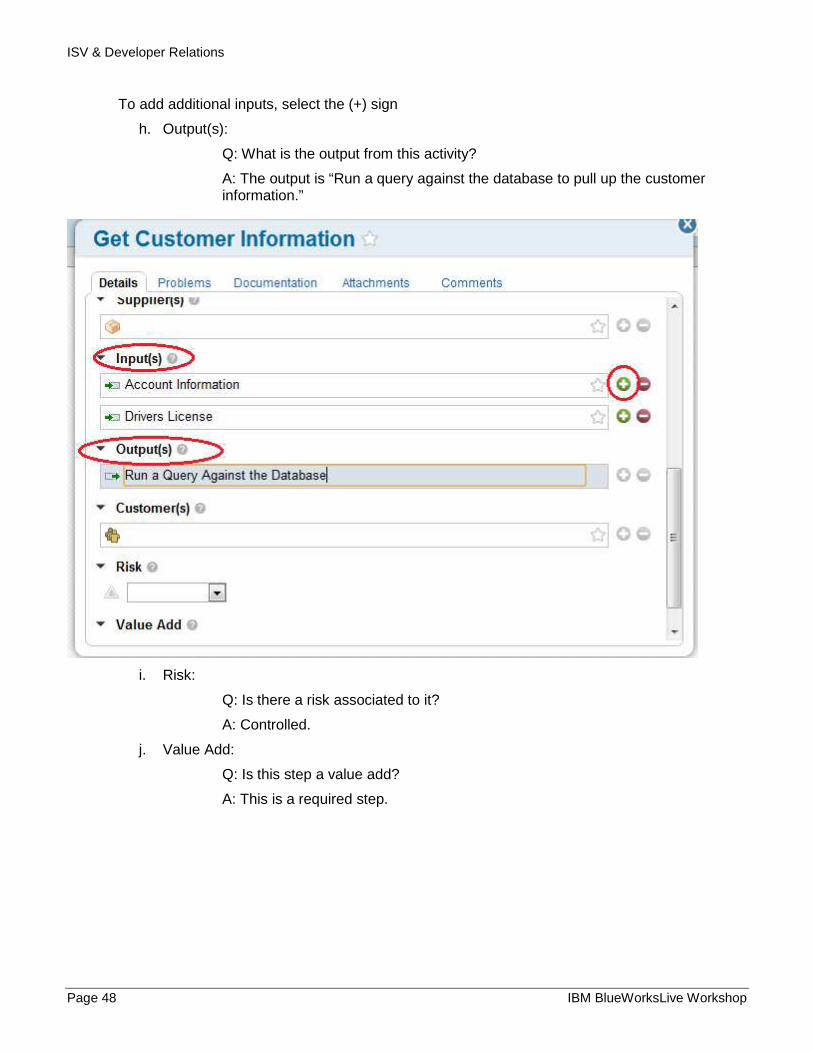
To add additional inputs, select the (+) sign
h. Output(s):
Q: What is the output from this activity?
A: The output is “Run a query against the database to pull up the customer information.”
i. Risk:
Q: Is there a risk associated to it?
A: Controlled.
j. Value Add:
Q: Is this step a value add?
A: This is a required step.

ISV & Developer Relations
IBM Blueworks Live Workshop Page 49
k. Select the Problems tab
l. Problem(s):
Q: What types of problems typically occur when doing this?
A: The customer doesn’t remember the account number.
Click the frequency button until it says “High.”
3. Select the “Documentation” tab
Q: What else do you know about the documentation of this process? What else do you care about?
A: Fill out the details.
This may be an area that you can delegate to technical writers so they can detail out exactly what the process is.
ISV & Developer Relations
Page 50 IBM BlueWorksLive Workshop
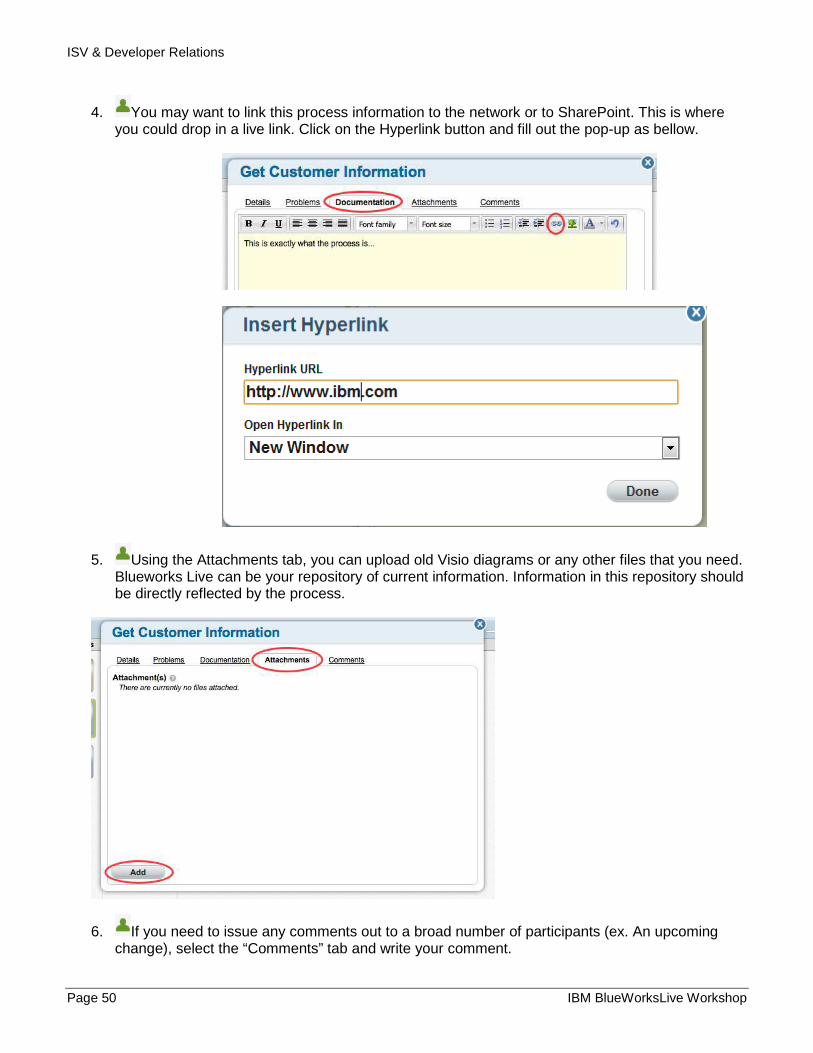
4. You may want to link this process information to the network or to SharePoint. This is where you could drop in a live link. Click on the Hyperlink button and fill out the pop-up as bellow.
5. Using the Attachments tab, you can upload old Visio diagrams or any other files that you need. Blueworks Live can be your repository of current information. Information in this repository should be directly reflected by the process.
6. If you need to issue any comments out to a broad number of participants (ex. An upcoming change), select the “Comments” tab and write your comment.

ISV & Developer Relations
IBM Blueworks Live Workshop Page 51
Step 4: the governance
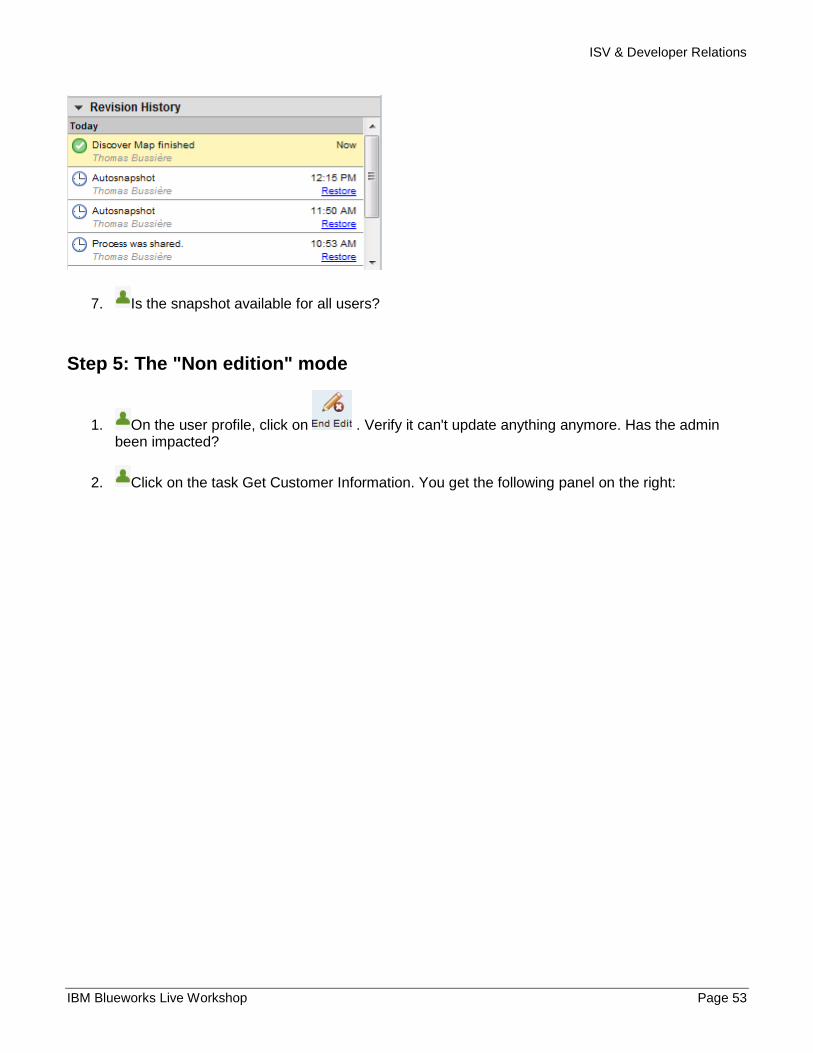
1. As soon as you have finished an important step, you should do "a snapshot". An automatic save is regularly done, a snapshot is a manual one. At the bottom left click on "Revision History"
2. You should get a view similar to this one, . Of course names and timestamps should differ. Click on the "Process was shared" snapshot link.
3. You get the following view

ISV & Developer Relations
Page 52 IBM BlueWorksLive Workshop
The process is the same as one of the first steps. A yellow panel at the top indicates you are looking at a snapshot. By clicking on the restore link (at the bottom left) you can recover your work in this previous
step. Keep what you did just before by clicking on . The process is now back to what you just designed.
4. Click on the "Snapshot" button at the upper right of the screen.
5. A pop-up appears. Fill it in as below and press the Enter key.
6. Check the Revision History, you should see the following:
ISV & Developer Relations
IBM Blueworks Live Workshop Page 53
7. Is the snapshot available for all users?
Step 5: The "Non edition" mode
1. On the user profile, click on . Verify it can't update anything anymore. Has the admin been impacted?
2. Click on the task Get Customer Information. You get the following panel on the right:

ISV & Developer Relations
Page 54 IBM BlueWorksLive Workshop
You can read the task's most important fields. Navigate in Docs and Changes tabs.
3. Click on "Add Comment" and fill in the pop-up as below before clicking on the Add Comment button.

ISV & Developer Relations
IBM Blueworks Live Workshop Page 55
4. You should get the following result:
5. Click on any other task. Is the comment still readable? So the comment is associated to a task.
6. End to edit the process within the admin account. Have a look at the task Get Customer
Information .
7. If you click on another task, the blue bubble "1" will not re-appear. Click on the Get Customer task to read the previous comment and reply to it. Try to get a result similar to this one:
8. The admin should now go to edit mode by clicking on the button.

ISV & Developer Relations
Page 56 IBM BlueWorksLive Workshop
The documentation View
Step 1: The online documentation
1. Open the documentation view in edition mode by using the menu list at the upper left of the
window:
2. ,Open the documentation view in non edition mode by clicking on documentation:
3. Identify the structure and compare it to the discovery map organization.
You should obtain the following result by default:
4. Click on "Edit Documentation" next to the title and get a result similar to the screenshot below (the warning icon must be sourced from Internet). The pencil button
is available only if you are in edition mode.
ISV & Developer Relations
IBM Blueworks Live Workshop Page 57
5. Using the admin profile (in edition mode), change the Email Notification Needed task into a milestone just after the task Close a Request. Is the documentation view automatically updated in the user view?
6. Undo the previous modification.
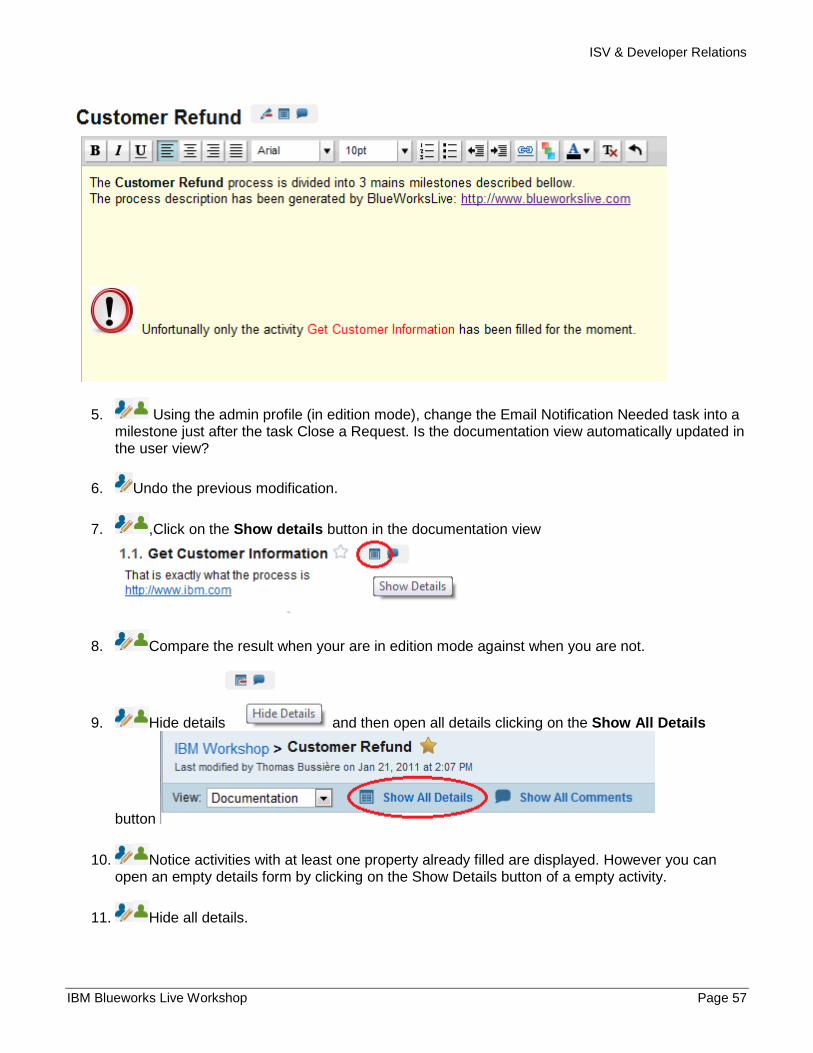
7. ,Click on the Show details button in the documentation view
8. Compare the result when your are in edition mode against when you are not.
9. Hide details and then open all details clicking on the Show All Details
button
10. Notice activities with at least one property already filled are displayed. However you can open an empty details form by clicking on the Show Details button of a empty activity.
11. Hide all details.

ISV & Developer Relations
Page 58 IBM BlueWorksLive Workshop
12. You can add a comment in or not in edition mode. First click on the display comment button
13. Notice you can still read previous comments
14. Add "Going to export documentation still in edition" as comment using the admin profile by clicking on the Add Comment button. You should get a view like this one:
15. Close this comments zone and then open all comments using the Show All Comments button.
16. Notice the same comments zone appears because it is the only activity with comments defined at this moment. Hide all comments.
Step 2: Download documentation
Any "BluePrint" process can be exported for documentation in two formats:
• Microsoft® Office PowerPoint
ISV & Developer Relations
IBM Blueworks Live Workshop Page 59
• Microsoft® Office Word
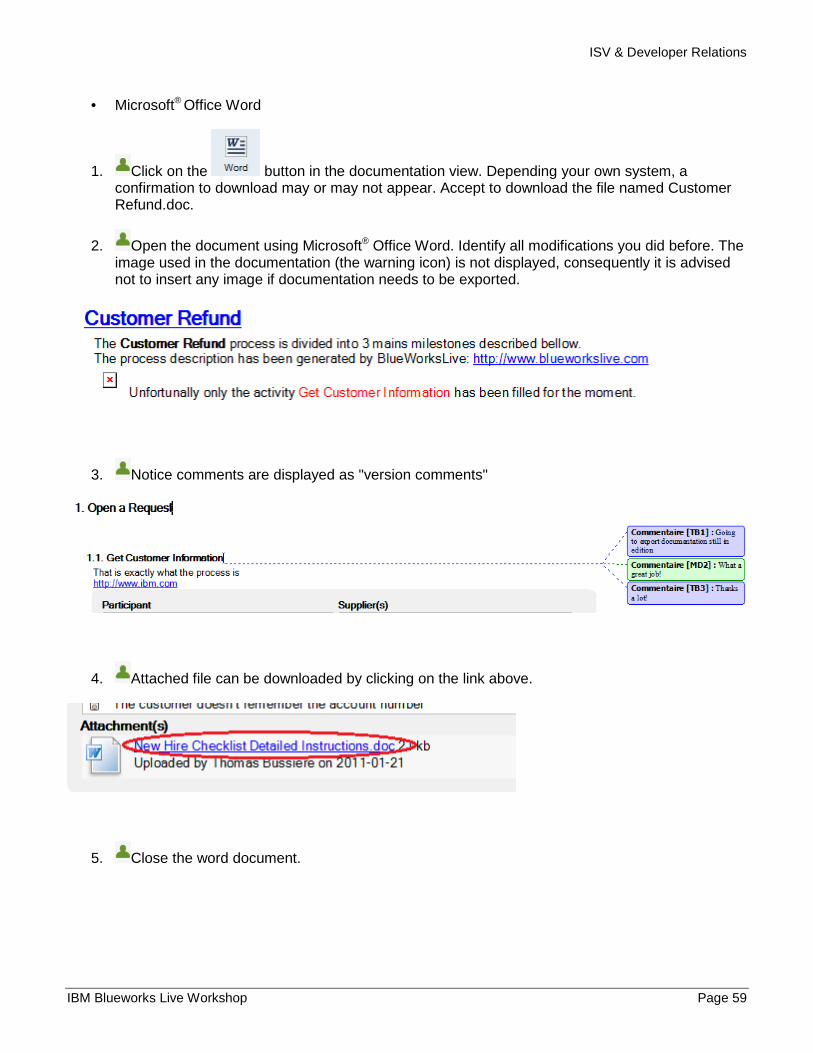
1. Click on the button in the documentation view. Depending your own system, a confirmation to download may or may not appear. Accept to download the file named Customer Refund.doc.
2. Open the document using Microsoft® Office Word. Identify all modifications you did before. The image used in the documentation (the warning icon) is not displayed, consequently it is advised not to insert any image if documentation needs to be exported.
3. Notice comments are displayed as "version comments"
4. Attached file can be downloaded by clicking on the link above.
5. Close the word document.

ISV & Developer Relations
Page 60 IBM BlueWorksLive Workshop
6. ,Click on the button in the documentation view. Once more, depending your own system, a confirmation to download may or may not appear. Accept to download the file named Customer Refund.ppt.
7. Open the document using Microsoft® Office PowerPoint. Identify all modification you did before. Notice the issue with the icon this time. Which information displayed in the word document is not present in this one?
ISV & Developer Relations
IBM Blueworks Live Workshop Page 61
The Analyze View
The analyze view is a very powerful view, but to really understand its added-value a completed process is needed. To avoid wasting time, the demonstration Space will be used. At the beginning of the lab, the Space created by default containing examples has been archived. The first thing to do is to restore it and then to analyze one of its processes.
Step 1: Restore the example Space.
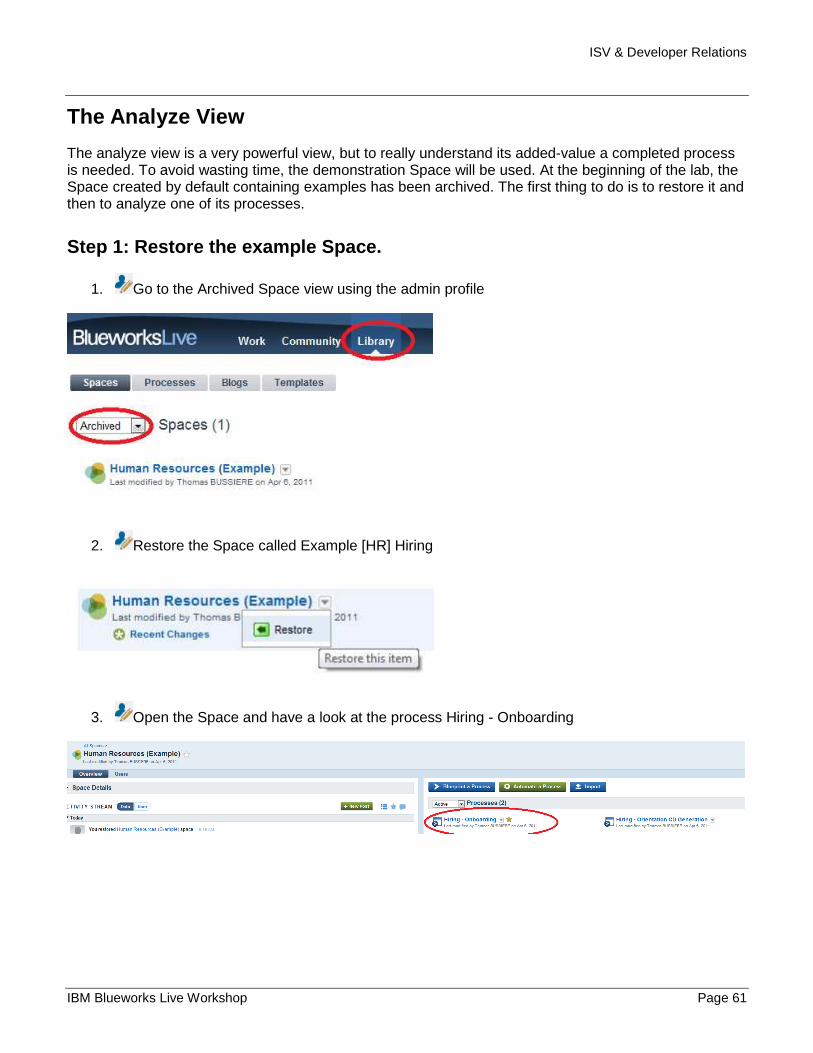
1. Go to the Archived Space view using the admin profile
2. Restore the Space called Example [HR] Hiring
3. Open the Space and have a look at the process Hiring - Onboarding

ISV & Developer Relations
Page 62 IBM BlueWorksLive Workshop
You will get:
Step 2: Analyzing Your Project
We are now at the point where the process has more detail, activities, and decision points. This part of the exercise describes what you can do in the Analyze Mode.
1. Click on the Analyze button .
2. By default you should see the participants for each tasks. The IT service wants to know which activities will be impacted if it decides to migrate from the Oracle system to the IBM System. The first thing to do is to identify all activities impacted. Select Systems as below.
ISV & Developer Relations
IBM Blueworks Live Workshop Page 63
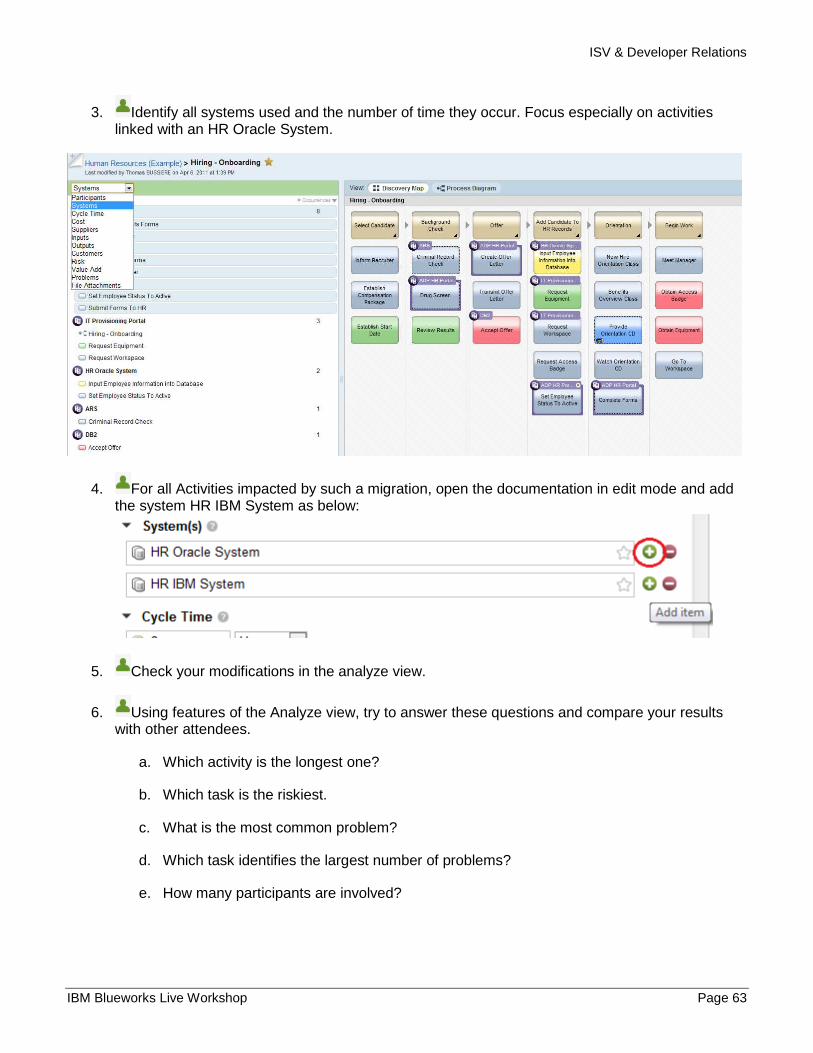
3. Identify all systems used and the number of time they occur. Focus especially on activities linked with an HR Oracle System.
4. For all Activities impacted by such a migration, open the documentation in edit mode and add the system HR IBM System as below:
5. Check your modifications in the analyze view.
6. Using features of the Analyze view, try to answer these questions and compare your results with other attendees.
a. Which activity is the longest one?
b. Which task is the riskiest.
c. What is the most common problem?
d. Which task identifies the largest number of problems?
e. How many participants are involved?

ISV & Developer Relations
Page 64 IBM BlueWorksLive Workshop
7. Try to answer the following questions without using the analyze view, but don't waste too much time on them.
a. Which activity is the shortest one?
b. Which task(es) has a controlled risk?
c. Give an example of a unique identified problem related to an activity
d. Which task has 4 different problems identified?
e. How many different Business owners are involved?
ISV & Developer Relations
IBM Blueworks Live Workshop Page 65
Manage a Process Diagram using B.P.M.N. 2.0
The “Process Diagram” is the third and final view examined in this lab. The diagram will respect the Business Process Modeling Notation but not all these notation features are available. This view should be done last because some components inserted cannot be synchronized in other views.
Step 1: The first diagram
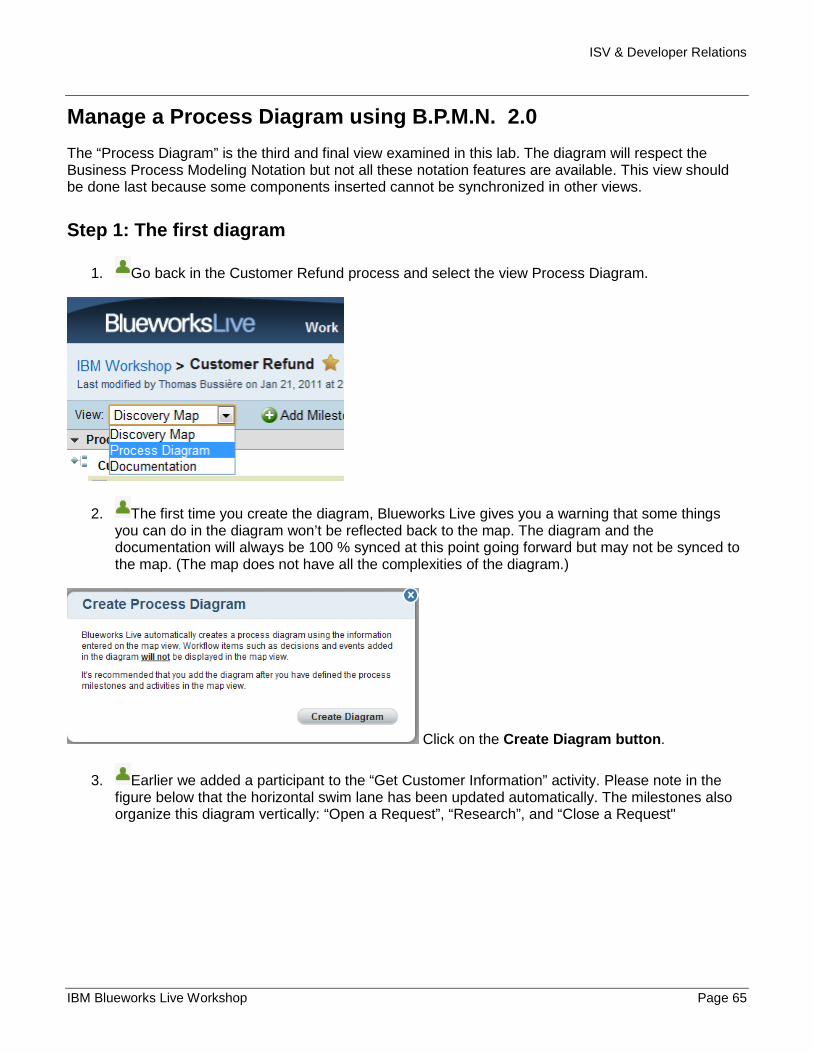
1. Go back in the Customer Refund process and select the view Process Diagram.
2. The first time you create the diagram, Blueworks Live gives you a warning that some things you can do in the diagram won’t be reflected back to the map. The diagram and the documentation will always be 100 % synced at this point going forward but may not be synced to the map. (The map does not have all the complexities of the diagram.)
Click on the Create Diagram button .
3. Earlier we added a participant to the “Get Customer Information” activity. Please note in the figure below that the horizontal swim lane has been updated automatically. The milestones also organize this diagram vertically: “Open a Request”, “Research”, and “Close a Request"

ISV & Developer Relations
Page 66 IBM BlueWorksLive Workshop
Step 2: Manage B.P.M.N. items
1. The “Process Diagram” is where you need to go if a decision has to be added in this process. Ask yourself if you are going to go down this path or if you are going to create a quick loopback to another activity. The Process Diagram makes it very easy for you to come in and make changes on the fly. Hover the mouse between the "Manager Approval" and the "More Customer Information" activities. Click the (+) symbol and select the diamond.
2. Insert an Activity: hover the mouse where you would like to insert an activity. Click the (+) symbol and select the square.

ISV & Developer Relations
IBM Blueworks Live Workshop Page 67
3. Create a Loopback. To create the loopback select the arrow icon and then draw the line from the new activity back to the “Manager Approval” activity.
4. Delete the "End" next to the new activity. Right click on it and select "Delete"

ISV & Developer Relations
Page 68 IBM BlueWorksLive Workshop
5. Add a messaging event. Hover the mouse where you would like to insert a messaging event. Click the (+) symbol and click on the “message event” button.
6. Type in email as the message event description.
7. You can also color activities so they, for example, reflect hand off points or problem areas for people to refer to. Right click on the “Get Customer Information” activity.

ISV & Developer Relations
IBM Blueworks Live Workshop Page 69
Select the red color.
Step 3: Sub-process and process Link
1. You realize that “More Customer Information” isn’t one activity at all. You can right click and convert this to a sub-process and go over all the details with your team.

ISV & Developer Relations
Page 70 IBM BlueWorksLive Workshop
2. If you are working with other teams and do not need to discuss the sub-process you can collapse this by clicking on the (-) button.
3. And if you need to link out to another process you can do so very easily. Right click on the activity you created a few minutes ago and select “Link to Process”.
4. Select any process available. For example select Example [HR] Hiring - Onboarding.
5. Notice an icone has appeared on the task. Click on it.
ISV & Developer Relations
IBM Blueworks Live Workshop Page 71
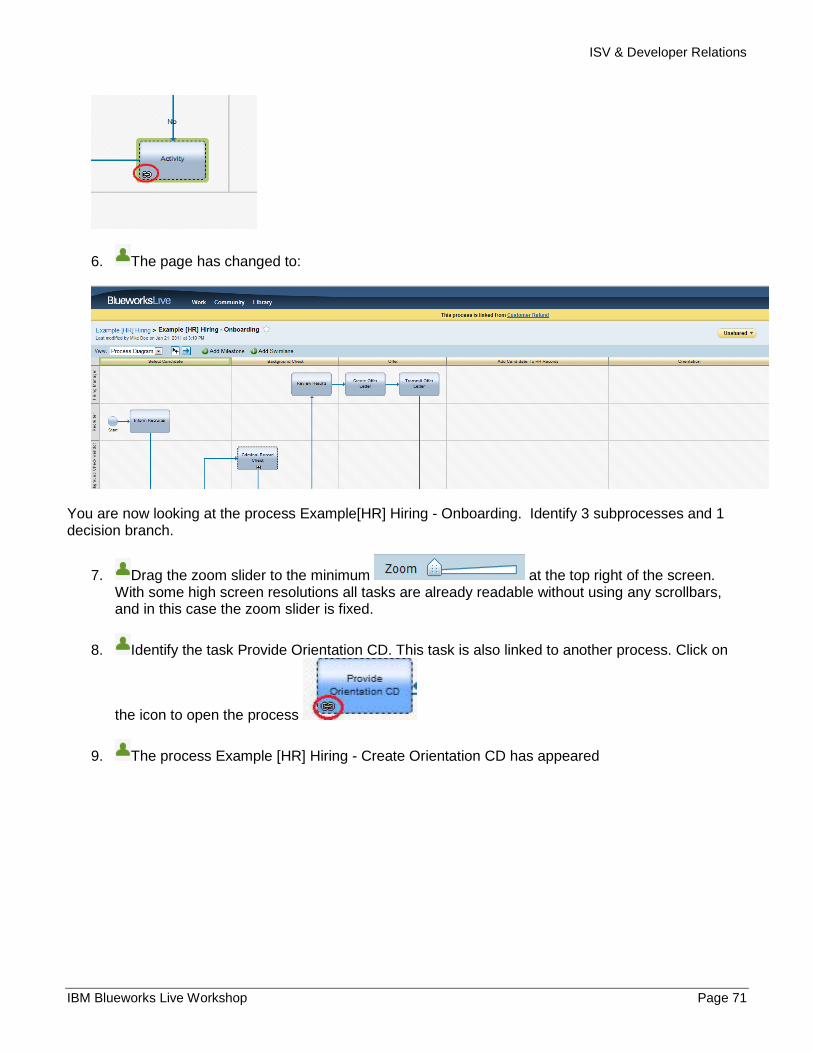
6. The page has changed to:
You are now looking at the process Example[HR] Hiring - Onboarding. Identify 3 subprocesses and 1 decision branch.
7. Drag the zoom slider to the minimum at the top right of the screen. With some high screen resolutions all tasks are already readable without using any scrollbars, and in this case the zoom slider is fixed.
8. Identify the task Provide Orientation CD. This task is also linked to another process. Click on
the icon to open the process
9. The process Example [HR] Hiring - Create Orientation CD has appeared
ISV & Developer Relations
Page 72 IBM BlueWorksLive Workshop
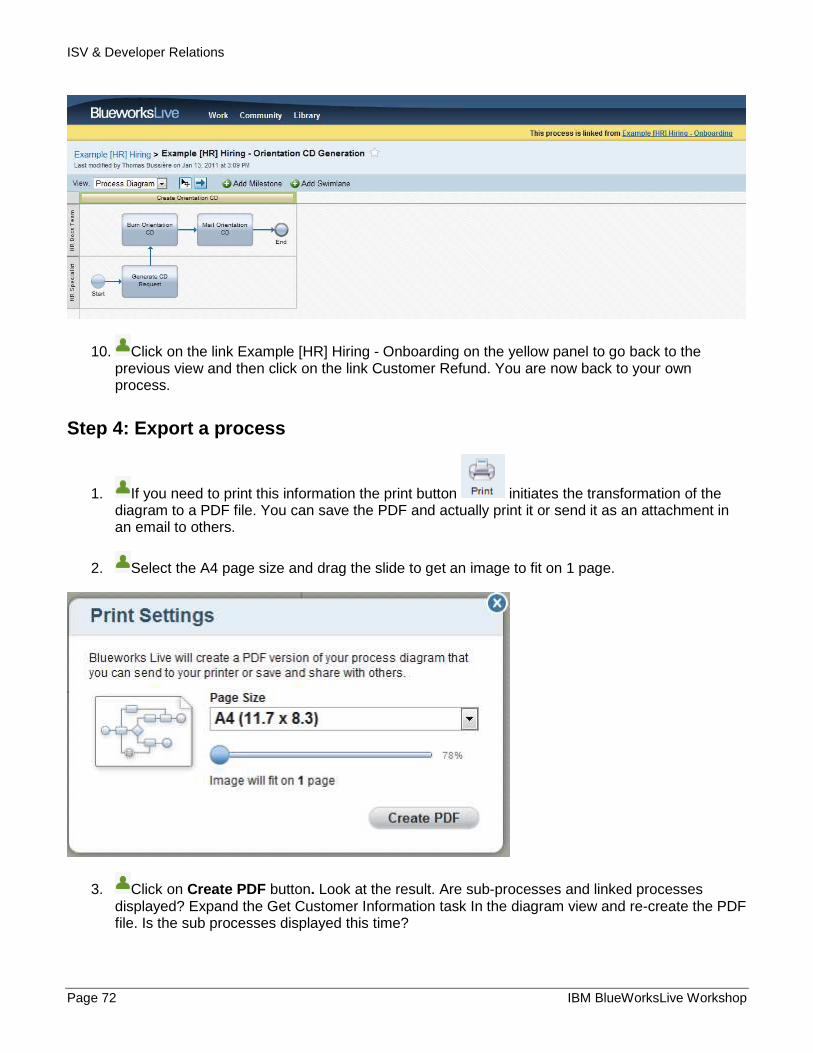
10. Click on the link Example [HR] Hiring - Onboarding on the yellow panel to go back to the previous view and then click on the link Customer Refund. You are now back to your own process.
Step 4: Export a process
1. If you need to print this information the print button initiates the transformation of the diagram to a PDF file. You can save the PDF and actually print it or send it as an attachment in an email to others.
2. Select the A4 page size and drag the slide to get an image to fit on 1 page.
3. Click on Create PDF button. Look at the result. Are sub-processes and linked processes displayed? Expand the Get Customer Information task In the diagram view and re-create the PDF file. Is the sub processes displayed this time?

ISV & Developer Relations
IBM Blueworks Live Workshop Page 73
4. Because a PDF file is a static file in a non opened format it is used only for documentation. It is necessary to be able to export processes in certain specifics formats. Go to the view below to see all shared processes available:
5. Notice that all processes, whatever their Spaces are, are accessible here only if they are shared with participants (You can of courses do the following steps in the Space view). Click on the arrow to get the "Customer Refund" process menu.
6. You get the following result:
You can open the process from this menu in any view and you can also export it to some Microsoft® Office formats. Click on Export Process .
7. A pop up appears
ISV & Developer Relations
Page 74 IBM BlueWorksLive Workshop
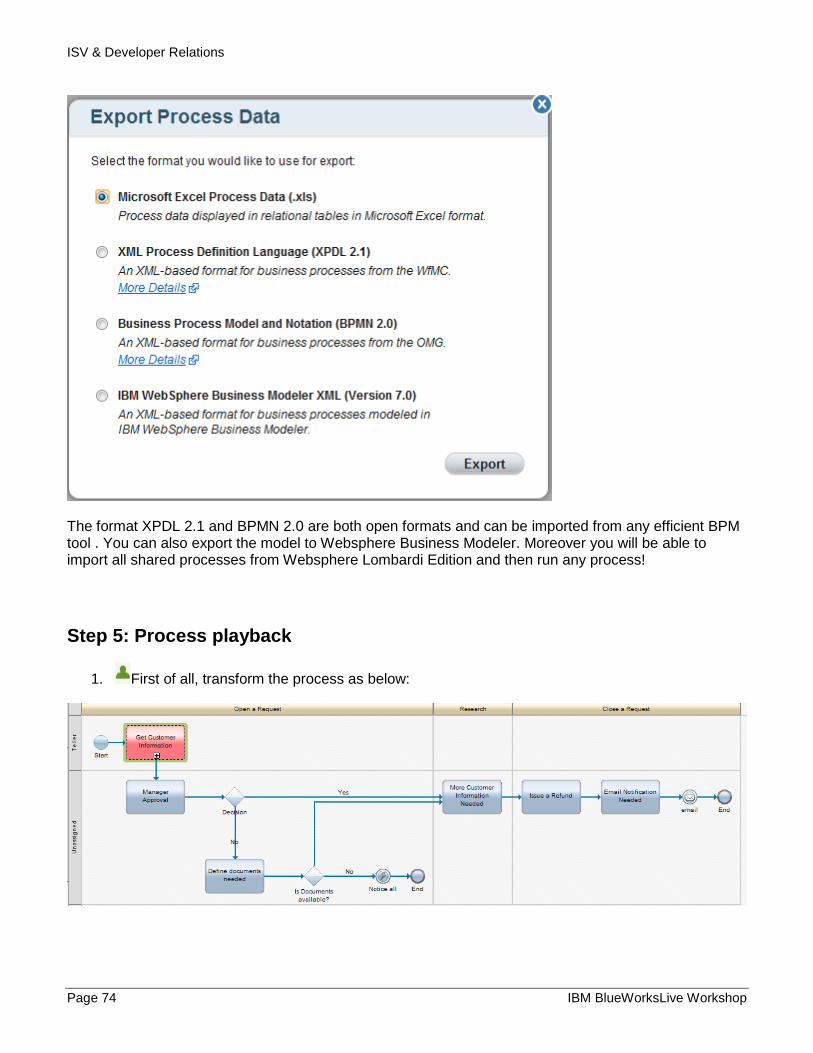
The format XPDL 2.1 and BPMN 2.0 are both open formats and can be imported from any efficient BPM tool . You can also export the model to Websphere Business Modeler. Moreover you will be able to import all shared processes from Websphere Lombardi Edition and then run any process!
Step 5: Process playback
1. First of all, transform the process as below:

ISV & Developer Relations
IBM Blueworks Live Workshop Page 75
2. Click on the button
The view changes and a few control buttons appear at the bottom of the page.
You can now record up to 6 different scenarios to replay when you want. These scenarios are shared with other authorized users.
3. Type "Happy Path" in the "Playback 1 Name" field :
4. Click on the BPMN "Start" event. It is now underlined:
5. Click on the "Get Customer Information" task. It is now underlined, and the start event has a green border around it:
6. Click on the "Manager Approval" task, then on the Decision, then on "More Customer Information Needed" and continue the flow until you reach the end event. You should get the following view:
ISV & Developer Relations
Page 76 IBM BlueWorksLive Workshop
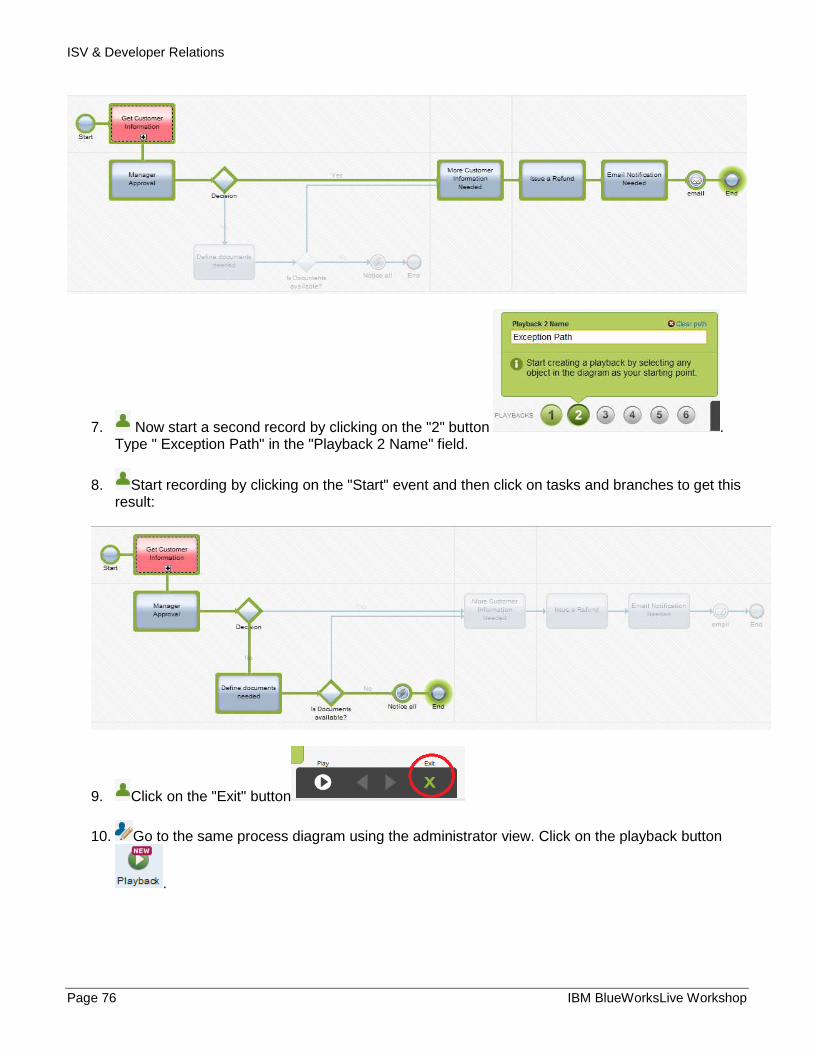
7. Now start a second record by clicking on the "2" button . Type " Exception Path" in the "Playback 2 Name" field.
8. Start recording by clicking on the "Start" event and then click on tasks and branches to get this result:
9. Click on the "Exit" button
10. Go to the same process diagram using the administrator view. Click on the playback button
.

ISV & Developer Relations
IBM Blueworks Live Workshop Page 77
11. Select the first recording by clicking on "1" and then click on "Play"
12. The "Start" event is underlined in green. Click on the button as often as necessary to see the complete recording.
13. Play the second recording.
14. Try to figure out a third path and record it.
Step 6: Train yourself
If you want to become more confident using the BPM notation and using the Blueworks Live tool, try to redo the following processes. This step is optional and you should do it only if you have the time.

ISV & Developer Relations
Page 78 IBM BlueWorksLive Workshop
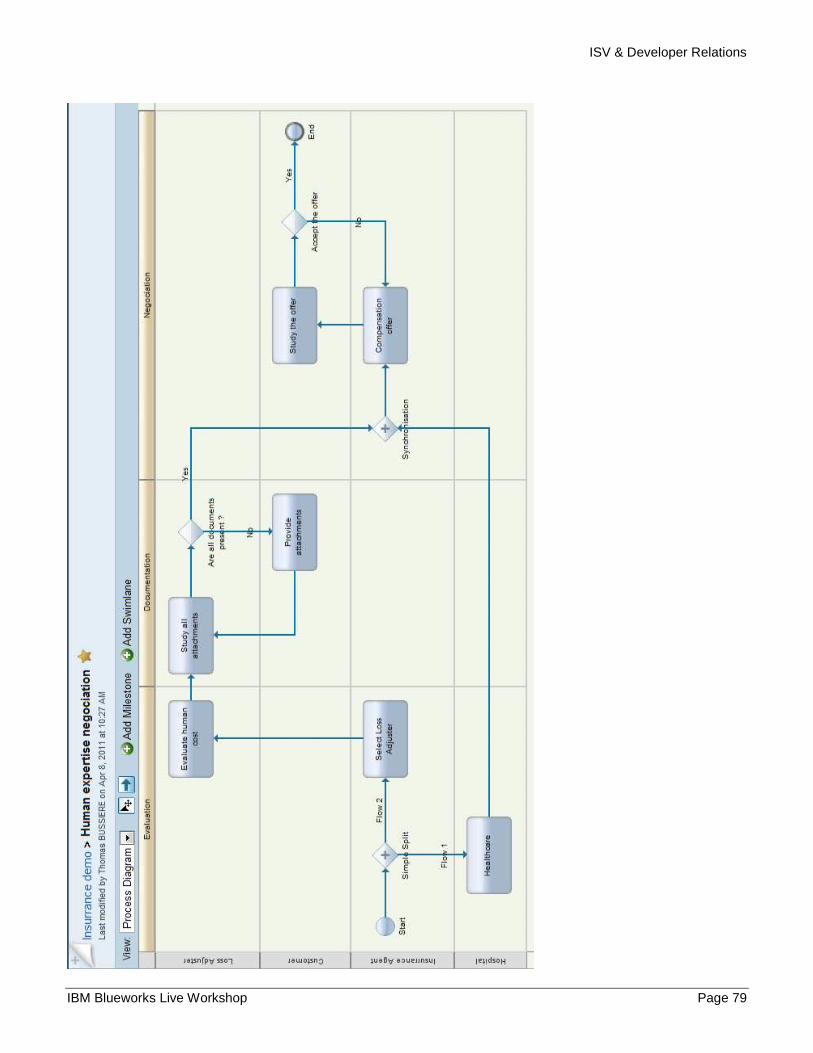
ISV & Developer Relations
IBM Blueworks Live Workshop Page 79
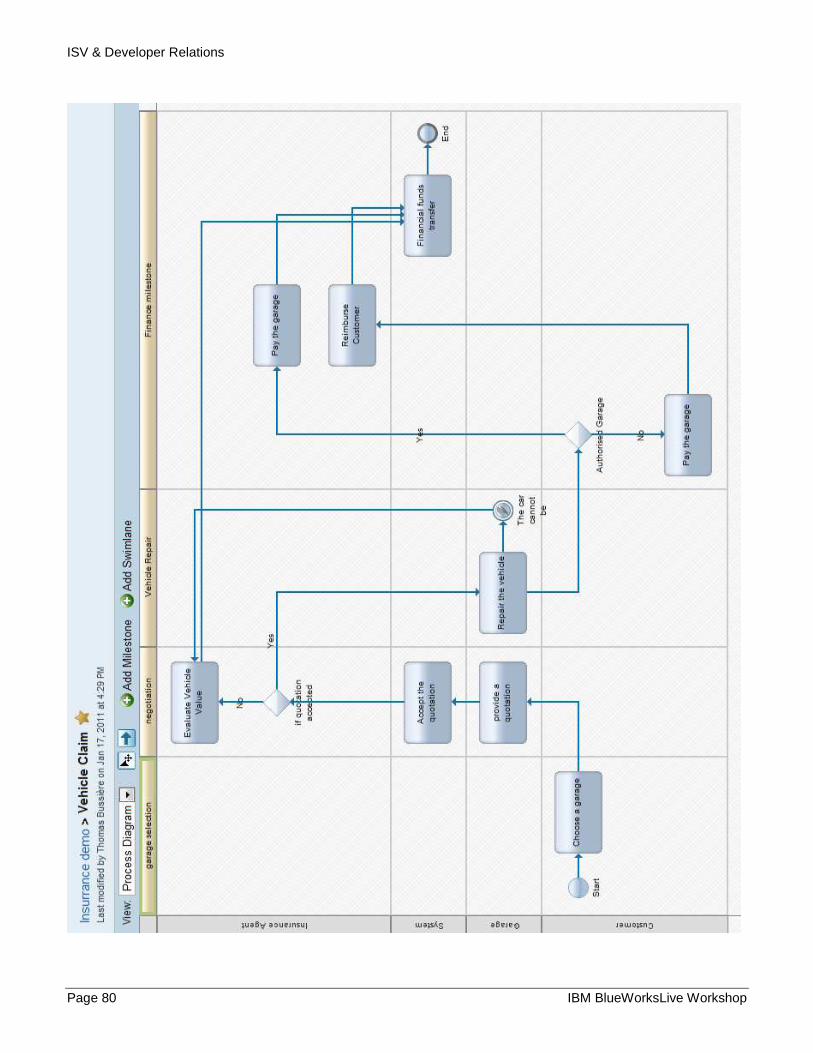
ISV & Developer Relations
Page 80 IBM BlueWorksLive Workshop

ISV & Developer Relations
IBM Blueworks Live Workshop Page 81
More about the community
Blueworks Live is focused on participation. Several users can work together on the same model, they can even chat to each other using the internal system. The collaborative aspect is not all to this tool, there are also other features that deserve to be discovered.
Step 1: Streams
Two types of streams are available. The first one, perhaps the most important for the maturity of your project, is the private stream of your activity.
1. Click on Community at the top of the window
2. You should be confident using this view. At the beginning of the Lab you added a post to a "Space" stream. Here is the concatenation of all Space streams. Try to identify comments you left during the course of the Lab. Can you add a comment or reply to one?
3. You can group a stream by Date, User, Process or Space. Click on the Space button. Except restoring and archiving, how many changes have been done on the Space Example [HR] Hiring?
4. Click on the I'm Following link. You have just filtered all data to get only those that have impacted the favorite processes or the favorite Spaces. Can you read updates done on the Space Example [HR] Hiring? Filter the view by User.
5. Click on the link Posts . You can see only the post you did with the Mike Doe profile and you can reply or leave your own comment. Click on the Process filter. No more post are available. Try to identify why? Click on the Space filter. You get back the Mike Doe post.
6. On the right hand side of the view, you can see the Public BPM Stream. Based on Twitter you need to have an account to access to the entire stream. Without it, you can only read titles and click on some of the links.

ISV & Developer Relations
Page 82 IBM BlueWorksLive Workshop
7. On the left hand side you can find a cloud of words. Click on one. All feeds are filtered by the selected word. You cannot decide which word are displayed here. Any user posting in stream has to choose tags to apply on his message. These tags are used for the cloud of words filter.
Step 2: Blogs
1. Click on Library and then on Blogs .
2. All public blogs linked to Blueworks Lives are displayed here. You cannot add any blog but you can find important news concerning the Business Process Management. All followings screenshots should be different to your own view because the content are regularly updated.
3. Click on the title of the first article.
4. The entire blog is now displayed. Notice the two arrows on the upper right corner. The left one
is disabled, the right one is enabled. Click on the right one.

ISV & Developer Relations
IBM Blueworks Live Workshop Page 83
5. The second article is displayed. In fact you can use arrows to navigate through articles without going back to the main blog page. Return to the main blog page (refer to the first step if needed or use history button in your web browser).
6. Notice that the two first articles are no longer tagged as
7. Notice the "cloud of words" on the left. Click on anyone of them: blogs are filtered as per their tags. Try to find the latest news concerning Blueworks Live.
Step 3: Templates
1. Click on the Library button and then on the Templates button.
Wait the page is entirely displayed.
ISV & Developer Relations
Page 84 IBM BlueWorksLive Workshop
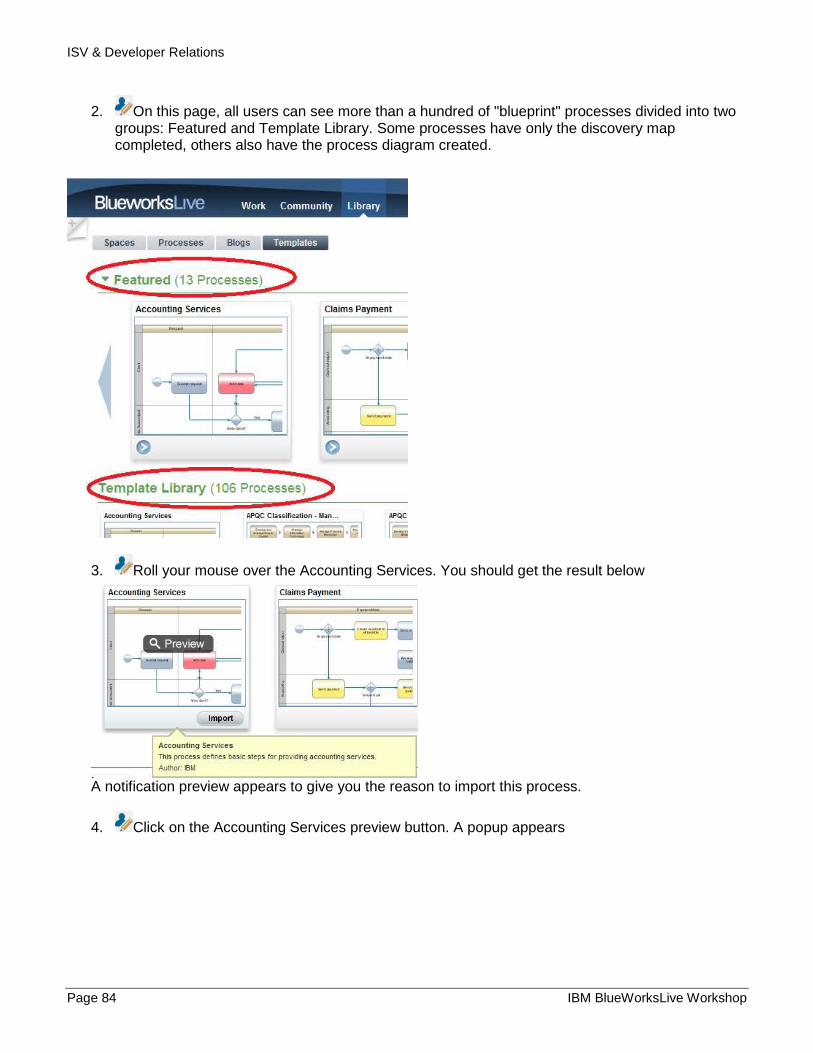
2. On this page, all users can see more than a hundred of "blueprint" processes divided into two groups: Featured and Template Library. Some processes have only the discovery map completed, others also have the process diagram created.
3. Roll your mouse over the Accounting Services. You should get the result below
A notification preview appears to give you the reason to import this process.
4. Click on the Accounting Services preview button. A popup appears

ISV & Developer Relations
IBM Blueworks Live Workshop Page 85
5. Click on the button. You can now see the diagram map preview.
6. Double-click on a task to open the properties popup. Can you see the properties of the task?
7. Click on the Import button.
8. A popup appears. Fill it in as below and click on the Import button

ISV & Developer Relations
Page 86 IBM BlueWorksLive Workshop
9. The new Space is created and the process has open.
10. Go back to the template page. Change the zoom using the slider to see the maximum number
of templates
11. You can also filter templates using the menu. Select Process Patterns and import the Parallel Flow with a Simple Split process. Try to understand the process.
Summary
Congratulations! You have completed the Blueworks Live Workshop.
During this Workshop you have become familiar to administrate a project containing Spaces, users, roles and processes. You should now be able to create a workflow, a checklist and to manage instances of these flows.
You are also familiar with all views of "blueprint" processes including map discovery, documentation view and process view.
You can now understand the power of BlueWorks Live.
And What Now?
The process diagram can be exported in various formats, if you have time check the XML formats and try to import your model in Websphere Integration Developer or in the Lombardi Solution.