IBM Bluemix Architecture Series: Web Application Hosting ... · x IBM Bluemix Architecture Series:...
78
Redpaper Front cover IBM Bluemix Architecture Series: Web Application Hosting on Java Liberty Leveraging best practice and reference architectures for cloud Jordan T Moore Mamoun A Hirzalla Richard Osowski Srinivas Chowdhury Vasfi Gucer
Transcript of IBM Bluemix Architecture Series: Web Application Hosting ... · x IBM Bluemix Architecture Series:...
Redpaper
Front cover
IBM Bluemix Architecture Series: Web Application Hosting on Java LibertyLeveraging best practice and reference architectures for cloud
Jordan T Moore
Mamoun A Hirzalla
Richard Osowski
Srinivas Chowdhury
Vasfi Gucer


International Technical Support Organization
IBM Bluemix Architecture Series: Web Application Hosting on Java Liberty
February 2015
REDP-5184-00

© Copyright International Business Machines Corporation 2015. All rights reserved.Note to U.S. Government Users Restricted Rights -- Use, duplication or disclosure restricted by GSA ADP ScheduleContract with IBM Corp.
First Edition (February 2015)
This edition applies to IBM Bluemix Version 1.0.
This document was created or updated on February 13, 2015.
Note: Before using this information and the product it supports, read the information in “Notices” on page v.
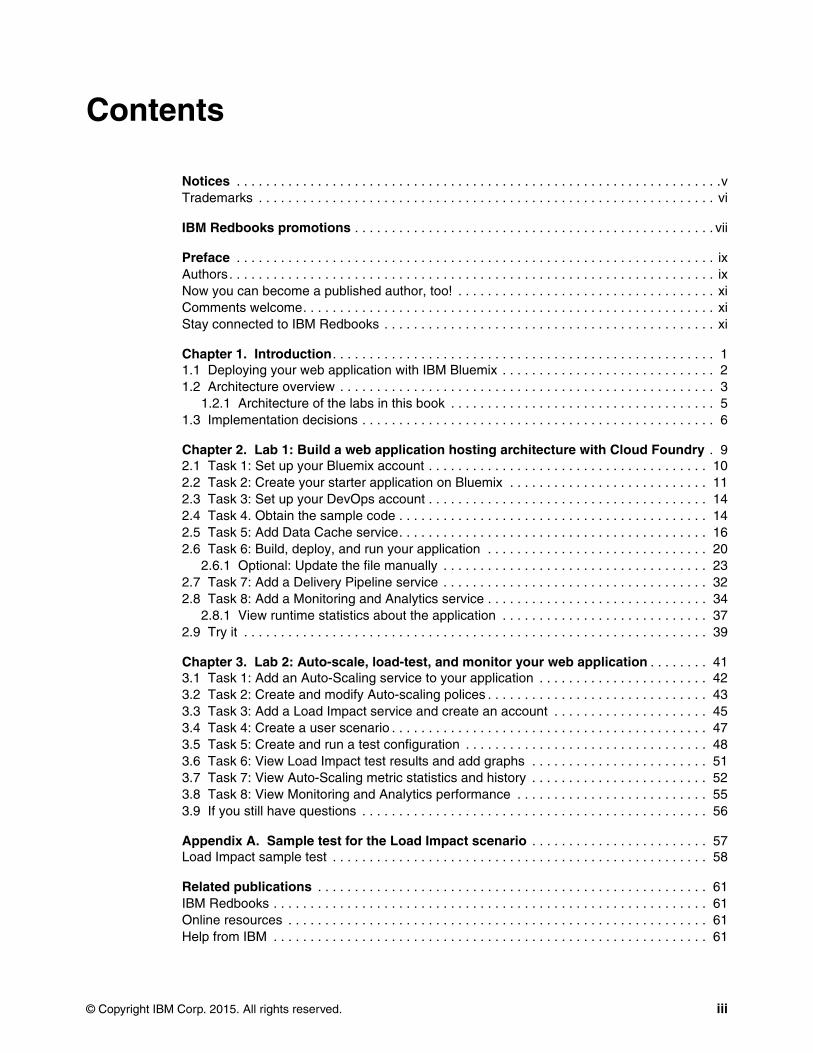
Contents
Notices . . . . . . . . . . . . . . . . . . . . . . . . . . . . . . . . . . . . . . . . . . . . . . . . . . . . . . . . . . . . . . . . . .vTrademarks . . . . . . . . . . . . . . . . . . . . . . . . . . . . . . . . . . . . . . . . . . . . . . . . . . . . . . . . . . . . . . vi
IBM Redbooks promotions . . . . . . . . . . . . . . . . . . . . . . . . . . . . . . . . . . . . . . . . . . . . . . . . . vii
Preface . . . . . . . . . . . . . . . . . . . . . . . . . . . . . . . . . . . . . . . . . . . . . . . . . . . . . . . . . . . . . . . . . ixAuthors. . . . . . . . . . . . . . . . . . . . . . . . . . . . . . . . . . . . . . . . . . . . . . . . . . . . . . . . . . . . . . . . . . ixNow you can become a published author, too! . . . . . . . . . . . . . . . . . . . . . . . . . . . . . . . . . . . xiComments welcome. . . . . . . . . . . . . . . . . . . . . . . . . . . . . . . . . . . . . . . . . . . . . . . . . . . . . . . . xiStay connected to IBM Redbooks . . . . . . . . . . . . . . . . . . . . . . . . . . . . . . . . . . . . . . . . . . . . . xi
Chapter 1. Introduction. . . . . . . . . . . . . . . . . . . . . . . . . . . . . . . . . . . . . . . . . . . . . . . . . . . . 11.1 Deploying your web application with IBM Bluemix . . . . . . . . . . . . . . . . . . . . . . . . . . . . . 21.2 Architecture overview . . . . . . . . . . . . . . . . . . . . . . . . . . . . . . . . . . . . . . . . . . . . . . . . . . . 3
1.2.1 Architecture of the labs in this book . . . . . . . . . . . . . . . . . . . . . . . . . . . . . . . . . . . . 51.3 Implementation decisions . . . . . . . . . . . . . . . . . . . . . . . . . . . . . . . . . . . . . . . . . . . . . . . . 6
Chapter 2. Lab 1: Build a web application hosting architecture with Cloud Foundry . 92.1 Task 1: Set up your Bluemix account . . . . . . . . . . . . . . . . . . . . . . . . . . . . . . . . . . . . . . 102.2 Task 2: Create your starter application on Bluemix . . . . . . . . . . . . . . . . . . . . . . . . . . . 112.3 Task 3: Set up your DevOps account . . . . . . . . . . . . . . . . . . . . . . . . . . . . . . . . . . . . . . 142.4 Task 4. Obtain the sample code . . . . . . . . . . . . . . . . . . . . . . . . . . . . . . . . . . . . . . . . . . 142.5 Task 5: Add Data Cache service. . . . . . . . . . . . . . . . . . . . . . . . . . . . . . . . . . . . . . . . . . 162.6 Task 6: Build, deploy, and run your application . . . . . . . . . . . . . . . . . . . . . . . . . . . . . . 20
2.6.1 Optional: Update the file manually . . . . . . . . . . . . . . . . . . . . . . . . . . . . . . . . . . . . 232.7 Task 7: Add a Delivery Pipeline service . . . . . . . . . . . . . . . . . . . . . . . . . . . . . . . . . . . . 322.8 Task 8: Add a Monitoring and Analytics service . . . . . . . . . . . . . . . . . . . . . . . . . . . . . . 34
2.8.1 View runtime statistics about the application . . . . . . . . . . . . . . . . . . . . . . . . . . . . 372.9 Try it . . . . . . . . . . . . . . . . . . . . . . . . . . . . . . . . . . . . . . . . . . . . . . . . . . . . . . . . . . . . . . . 39
Chapter 3. Lab 2: Auto-scale, load-test, and monitor your web application . . . . . . . . 413.1 Task 1: Add an Auto-Scaling service to your application . . . . . . . . . . . . . . . . . . . . . . . 423.2 Task 2: Create and modify Auto-scaling polices . . . . . . . . . . . . . . . . . . . . . . . . . . . . . . 433.3 Task 3: Add a Load Impact service and create an account . . . . . . . . . . . . . . . . . . . . . 453.4 Task 4: Create a user scenario . . . . . . . . . . . . . . . . . . . . . . . . . . . . . . . . . . . . . . . . . . . 473.5 Task 5: Create and run a test configuration . . . . . . . . . . . . . . . . . . . . . . . . . . . . . . . . . 483.6 Task 6: View Load Impact test results and add graphs . . . . . . . . . . . . . . . . . . . . . . . . 513.7 Task 7: View Auto-Scaling metric statistics and history . . . . . . . . . . . . . . . . . . . . . . . . 523.8 Task 8: View Monitoring and Analytics performance . . . . . . . . . . . . . . . . . . . . . . . . . . 553.9 If you still have questions . . . . . . . . . . . . . . . . . . . . . . . . . . . . . . . . . . . . . . . . . . . . . . . 56
Appendix A. Sample test for the Load Impact scenario . . . . . . . . . . . . . . . . . . . . . . . . 57Load Impact sample test . . . . . . . . . . . . . . . . . . . . . . . . . . . . . . . . . . . . . . . . . . . . . . . . . . . 58
Related publications . . . . . . . . . . . . . . . . . . . . . . . . . . . . . . . . . . . . . . . . . . . . . . . . . . . . . 61IBM Redbooks . . . . . . . . . . . . . . . . . . . . . . . . . . . . . . . . . . . . . . . . . . . . . . . . . . . . . . . . . . . 61Online resources . . . . . . . . . . . . . . . . . . . . . . . . . . . . . . . . . . . . . . . . . . . . . . . . . . . . . . . . . 61Help from IBM . . . . . . . . . . . . . . . . . . . . . . . . . . . . . . . . . . . . . . . . . . . . . . . . . . . . . . . . . . . 61
© Copyright IBM Corp. 2015. All rights reserved. iii

iv IBM Bluemix Architecture Series: Web Application Hosting on Java Liberty

Notices
This information was developed for products and services offered in the U.S.A.
IBM may not offer the products, services, or features discussed in this document in other countries. Consult your local IBM representative for information on the products and services currently available in your area. Any reference to an IBM product, program, or service is not intended to state or imply that only that IBM product, program, or service may be used. Any functionally equivalent product, program, or service that does not infringe any IBM intellectual property right may be used instead. However, it is the user's responsibility to evaluate and verify the operation of any non-IBM product, program, or service.
IBM may have patents or pending patent applications covering subject matter described in this document. The furnishing of this document does not grant you any license to these patents. You can send license inquiries, in writing, to: IBM Director of Licensing, IBM Corporation, North Castle Drive, Armonk, NY 10504-1785 U.S.A.
The following paragraph does not apply to the United Kingdom or any other country where such provisions are inconsistent with local law: INTERNATIONAL BUSINESS MACHINES CORPORATION PROVIDES THIS PUBLICATION "AS IS" WITHOUT WARRANTY OF ANY KIND, EITHER EXPRESS OR IMPLIED, INCLUDING, BUT NOT LIMITED TO, THE IMPLIED WARRANTIES OF NON-INFRINGEMENT, MERCHANTABILITY OR FITNESS FOR A PARTICULAR PURPOSE. Some states do not allow disclaimer of express or implied warranties in certain transactions, therefore, this statement may not apply to you.
This information could include technical inaccuracies or typographical errors. Changes are periodically made to the information herein; these changes will be incorporated in new editions of the publication. IBM may make improvements and/or changes in the product(s) and/or the program(s) described in this publication at any time without notice.
Any references in this information to non-IBM websites are provided for convenience only and do not in any manner serve as an endorsement of those websites. The materials at those websites are not part of the materials for this IBM product and use of those websites is at your own risk.
IBM may use or distribute any of the information you supply in any way it believes appropriate without incurring any obligation to you.
Any performance data contained herein was determined in a controlled environment. Therefore, the results obtained in other operating environments may vary significantly. Some measurements may have been made on development-level systems and there is no guarantee that these measurements will be the same on generally available systems. Furthermore, some measurements may have been estimated through extrapolation. Actual results may vary. Users of this document should verify the applicable data for their specific environment.
Information concerning non-IBM products was obtained from the suppliers of those products, their published announcements or other publicly available sources. IBM has not tested those products and cannot confirm the accuracy of performance, compatibility or any other claims related to non-IBM products. Questions on the capabilities of non-IBM products should be addressed to the suppliers of those products.
This information contains examples of data and reports used in daily business operations. To illustrate them as completely as possible, the examples include the names of individuals, companies, brands, and products. All of these names are fictitious and any similarity to the names and addresses used by an actual business enterprise is entirely coincidental.
COPYRIGHT LICENSE:
This information contains sample application programs in source language, which illustrate programming techniques on various operating platforms. You may copy, modify, and distribute these sample programs in any form without payment to IBM, for the purposes of developing, using, marketing or distributing application programs conforming to the application programming interface for the operating platform for which the sample programs are written. These examples have not been thoroughly tested under all conditions. IBM, therefore, cannot guarantee or imply reliability, serviceability, or function of these programs.
© Copyright IBM Corp. 2015. All rights reserved. v
Trademarks
IBM, the IBM logo, and ibm.com are trademarks or registered trademarks of International Business Machines Corporation in the United States, other countries, or both. These and other IBM trademarked terms are marked on their first occurrence in this information with the appropriate symbol (® or ™), indicating US registered or common law trademarks owned by IBM at the time this information was published. Such trademarks may also be registered or common law trademarks in other countries. A current list of IBM trademarks is available on the Web at http://www.ibm.com/legal/copytrade.shtml
The following terms are trademarks of the International Business Machines Corporation in the United States, other countries, or both:
Redbooks (logo) ®Bluemix™
developerWorks® IBM®
Redbooks®Redpaper™
The following terms are trademarks of other companies:
ITIL is a registered trademark, and a registered community trademark of The Minister for the Cabinet Office, and is registered in the U.S. Patent and Trademark Office.
Java, and all Java-based trademarks and logos are trademarks or registered trademarks of Oracle and/or its affiliates.
Other company, product, or service names may be trademarks or service marks of others.
vi IBM Bluemix Architecture Series: Web Application Hosting on Java Liberty
IBM REDBOOKS PROMOTIONS
Find and read thousands of IBM Redbooks publications
Search, bookmark, save and organize favorites
Get up-to-the-minute Redbooks news and announcements
Link to the latest Redbooks blogs and videos
DownloadNow
Get the latest version of the Redbooks Mobile App
iOS
Android
Place a Sponsorship Promotion in an IBM Redbooks publication, featuring your business or solution with a link to your web site.
Qualified IBM Business Partners may place a full page promotion in the most popular Redbooks publications. Imagine the power of being seen by users who download millions of Redbooks publications each year!
®
®
Promote your business in an IBM Redbooks publication
ibm.com/RedbooksAbout Redbooks Business Partner Programs
IBM Redbooks promotions

THIS PAGE INTENTIONALLY LEFT BLANK
Preface
Many types of web applications are running on the Internet today. There are also as many ways to manage and maintain the infrastructure that powers those applications. IBM® Bluemix™ delivers quick and easy cloud capabilities to deploy and maintain your web application, with minimal hassle and overhead. As you follow along with two lab-style scenarios, this IBM Redpaper™ publication demonstrates how to create and deploy a web-based collaboration application on IBM Bluemix.
� Lab 1 features a Java Liberty Profile application that uses the Delivery Pipeline, Data Cache, and Monitoring and Analytics services. The lab focuses on quickly getting an application started, importing some existing code, and using a Data Cache service from IBM Bluemix, Delivery Pipeline, and Monitoring and Analytics services.
� Lab 2 extends functionality of Lab 1 by adding Auto-Scaling and Load Impact services to load-test the application and watch the behavior of auto-scaling service in action.
The target audience for this paper is technical cloud specialists who are familiar with technology of enterprise applications, but might be new to IBM Bluemix. This paper provides a good foundation to help you discover some of the powerful application development capabilities that are available in IBM Bluemix.
Authors
This paper was produced by a team of specialists from around the world working at the International Technical Support Organization, Raleigh Center.
Jordan T Moore is a Software Engineer within IBM Systems – Middleware as a member of the Client Job Rotation Program. He and his team are responsible for working to help clients leverage the value of our solutions as the clients work across our technical client facing roles within Enablement, SWAT, Technical Support and Services job roles while focusing on key areas of our portfolio.
Mamoun A Hirzalla is a Senior Certified Executive Architect on the Worldwide Architect Leadership team, advising global customers about enterprise and digital transformation initiatives to employ cloud, analytics, mobile and social media into existing business models. Mamoun has extensive experience in IT strategy, software development, technical leadership, service-oriented architecture, and consulting. Mamoun holds a PhD degree in Computer Science.
© Copyright IBM Corp. 2015. All rights reserved. ix
Thanks to the following people for their contributions to this project:
IBM USA Chad MontgomeryHeather KregerJames MoodyJenifer SchlotfeldtKyle BrownManav GuptaMoe AbdulaPatrick M RyanRachel ReinitzRajeev SikkaSeth PackhamSundar Venkatraman
IBM Canada Kathryn Fryer
IBM Japan Takehiko Amano
IBM India Sundar Venkatraman
Thanks to the following contributors for helping to publish this project:
Diane Sherman, Ella Buslovich, Erica Wazewski
Richard Osowski is a Technical Product Manager for IBM Cloud. With over 10 years of deep technical experience in IBM middleware and business process management capabilities, Rick now focuses on next-generation cloud platforms to deliver both hosted and on-premises solutions to the company’s expanding client base. He has a bachelor’s degree in Computer Science from Penn State University and considers himself hopelessly addicted to architecting, scripting, and automating in work and everyday life.
Srinivas Chowdhury is a Senior IT Specialist in the Advanced Technology Group of IBM. In his current role he works for the WorldWide Cloud Software Technical Sales, and helps organizations use cloud technologies to transform their business, with the main focus on on-premises and hosted solutions. Srinivas spent several years in product development in various roles including Designer, Developer, Leader, Chief Programmer, and in integration testing. He is a subject matter expert in cloud computing, systems integration, automation, ITIL, and application development.
Vasfi Gucer is an IBM Redbooks® Project Leader with the IBM International Technical Support Organization. He has more than 20 years of experience in the areas of systems management, networking hardware, and software. He writes extensively and teaches IBM classes worldwide about IBM products. His focus has been on cloud computing for the last four years. Vasfi is also an IBM Certified Senior IT Specialist, PMP, ITIL V2 Manager and ITIL V3 Expert.
x IBM Bluemix Architecture Series: Web Application Hosting on Java Liberty
Now you can become a published author, too!
Here’s an opportunity to spotlight your skills, grow your career, and become a published author—all at the same time! Join an ITSO residency project and help write a book in your area of expertise, while honing your experience using leading-edge technologies. Your efforts will help to increase product acceptance and customer satisfaction, as you expand your network of technical contacts and relationships. Residencies run from two to six weeks in length, and you can participate either in person or as a remote resident working from your home base.
Find out more about the residency program, browse the residency index, and apply online at:
ibm.com/redbooks/residencies.html
Comments welcome
Your comments are important to us!
We want our papers to be as helpful as possible. Send us your comments about this paper or other IBM Redbooks publications in one of the following ways:
� Use the online Contact us review Redbooks form found at:
ibm.com/redbooks
� Send your comments in an email to:
� Mail your comments to:
IBM Corporation, International Technical Support OrganizationDept. HYTD Mail Station P0992455 South RoadPoughkeepsie, NY 12601-5400
Stay connected to IBM Redbooks
� Find us on Facebook:
http://www.facebook.com/IBMRedbooks
� Follow us on Twitter:
http://twitter.com/ibmredbooks
� Look for us on LinkedIn:
http://www.linkedin.com/groups?home=&gid=2130806
� Explore new Redbooks publications, residencies, and workshops with the IBM Redbooks weekly newsletter:
https://www.redbooks.ibm.com/Redbooks.nsf/subscribe?OpenForm
� Stay current on recent Redbooks publications with RSS Feeds:
http://www.redbooks.ibm.com/rss.html
Preface xi

xii IBM Bluemix Architecture Series: Web Application Hosting on Java Liberty
Chapter 1. Introduction
Many types of web applications are running on the Internet today. There are also as many ways to manage and maintain the infrastructure that powers those applications. IBM Bluemix delivers quick and easy cloud capabilities to deploy and maintain your web application, with minimal hassle and overhead. Applying industry-adopted standard architecture capabilities into our application deployments allows us to confidently advance and grow our infrastructure.
Hosting applications on Bluemix provides users with many advantages. Bluemix is an end-to-end offering that provides developers with a complete set of DevOps tools and integrated services to simplify development, test, build, and deploy applications. Moreover, applications that are hosted by Bluemix have access to the capabilities of the underlying cloud infrastructure. Such an infrastructure provides the best support for non-functional requirements (such as scalability, performance, availability, security) that are needed for enterprise applications. Furthermore, Bluemix provides a rich set of services to extend your application through incorporation of sophisticated analytics, social, and mobile capabilities as needed. Finally, the Bluemix platform frees developers and organizations from worrying about infrastructure-related “plumbing” details and focus on what matters to their organizations: business scenarios that drive better values for their customers.
This chapter discusses the main considerations for deploying your web application with IBM Bluemix, and provides an architecture overview and implementation decisions. We suggest that you read this chapter first before implementing the scenarios that are in this book.
This chapter contains the following topics:
� 1.1, “Deploying your web application with IBM Bluemix” on page 2� 1.2, “Architecture overview” on page 3� 1.3, “Implementation decisions” on page 6
1
© Copyright IBM Corp. 2015. All rights reserved. 1

1.1 Deploying your web application with IBM Bluemix
In these lab exercises, you deploy an existing web cache application, taking advantage of certain architecture elements of a web application hosting pattern, and extend it by using some of the services that are available on Bluemix. The primary objective of extending this application’s capabilities is to show how a web application can scale significantly and easily by employing a set of easy-to-use services that are provided as part of the Bluemix platform. We also show demonstrate how third-party services are used to load-test the application, and we show how scaling capabilities react to load changes over time. The following services are used in the labs:
� Data Cache: This IBM Bluemix service supports distributed caching scenarios for web and mobile applications. The caching service uses the technology of a data grid in which you can store key-value objects. Data Cache offers a business-ready, in-memory data grid (IMDG) that places data close to the logic and keeps it there as the business scales up.
� Auto-Scaling: In IBM Bluemix, you can automatically manage your application capacity depending on incoming loads and policies. With the Auto-Scaling for Bluemix service, you can automatically increase or decrease the compute capacity of your application. The number of application instances are adjusted dynamically based on the Auto-Scaling policy you define. The service also provides metric statistics for the instances of your application. You can see the average statistics and select specific instance statistics.
� Monitoring and Analytics: This IBM Bluemix service that provides users with the visibility and control you need over your application. Determine the response time your users see, understand the performance and availability of the application components, and use analytics to keep your application up and performing well. The service also provides capabilities for diagnosing problems faster by quickly identifying the root cause of application problems with line of code diagnostics. The service also provides intelligent searches through logs and metrics data to help you find answers to application problems.
� Delivery Pipeline: With this IBM Bluemix service, developers can automate builds and deployments, test execution, configure build scripts, and automate execution of unit tests. It also provides capabilities for automatically building and deploying your application to IBM cloud platform, Bluemix.
� Load Impact: This third-party service provides for unlimited testing, on-demand from multiple geographic locations, where you can create sophisticated tests by using our simple GUI or connect directly to Bluemix through our API.
This Redpaper publication shows you how we get an existing web application to run on Bluemix. The steps are straightforward and can be completed within hours. Moreover, extending the application’s capabilities to scale is another quick exercise, because of the use of existing Bluemix services. Furthermore, with Bluemix, we can deploy the application instantly to multiple environments such as test, development, preproduction and production, multiple versions, or releases with agile, pipeline and DevOps-oriented integration. Finally, with Bluemix, we can integrate with on-premises enterprise resources through the built-in hybrid integration capabilities, targeting with an API or host name and port behind our firewall.
To say it simply, building our application on Bluemix enables us to grow quickly and securely, while also realizing cost and time savings, and at the same time build on industry-proven architectures. Now we are ready to get to it.
2 IBM Bluemix Architecture Series: Web Application Hosting on Java Liberty
1.2 Architecture overview
Through the lab series, we incrementally grow our capabilities to adapt a standard web application into an architecture more in line with an industry-proven architecture for web application hosting. This web application hosting reference architecture covers the details from the user requesting the initial URL all the way through to the back-end data calls. It is described in the following document:
http://www.cloudstandardscustomercouncil.org/web-app-hosting-wp/index.htm
See the Cloud Standards Customer Council Resource Hub website:
http://www.cloud-council.org/resource-hub.htm
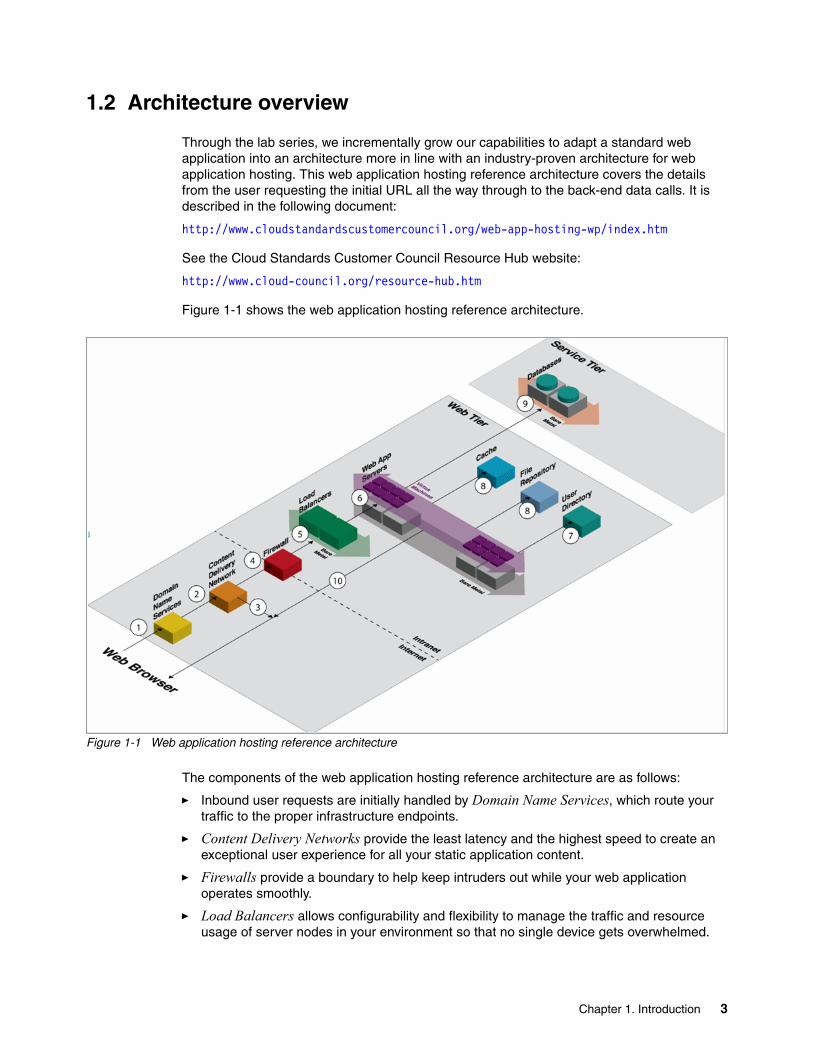
Figure 1-1 shows the web application hosting reference architecture.
Figure 1-1 Web application hosting reference architecture
The components of the web application hosting reference architecture are as follows:
� Inbound user requests are initially handled by Domain Name Services, which route your traffic to the proper infrastructure endpoints.
� Content Delivery Networks provide the least latency and the highest speed to create an exceptional user experience for all your static application content.
� Firewalls provide a boundary to help keep intruders out while your web application operates smoothly.
� Load Balancers allows configurability and flexibility to manage the traffic and resource usage of server nodes in your environment so that no single device gets overwhelmed.
Chapter 1. Introduction 3

� The Web App Server component is the heart of your web application, serving up your core application to users. Build your server infrastructure by using high performance containers, virtual machines, or Cloud Foundry based run times, all of which can be similarly integrated across the architecture.
� User Registry Services enable authorization and authentication to secure resources across your application.
� Session and Data Caching ensure low latency data access and prevent data loss for a robust user experience. In addition, with storage services, you can customize and have total control over a SAN or NAS solution that fits your storage needs.
� Managed Database Services deliver high-performance database support, while allowing you to focus on your application and not database maintenance. These databases range from standard SQL databases to newer NoSQL databases to big data services.
This referenced architecture has multiple tiers and multiple components in each tier that are critical to the optimal performance of your web application. The labs in this book specifically focus on the Web and Service tiers, with the Web App Server, Cache, and Load Balancer components.
Basic rules exist that are best followed when developing, deploying, and maintaining cloud applications, in addition to the reference architecture. These rules are described in Top 9 rules for cloud applications, by Kyle Brown and Mike Capern, and which is available at the IBM developerWorks® library:
http://www.ibm.com/developerworks/websphere/techjournal/1404_brown/1404_brown.html
Here is an overview of the rules:
� Rule 1: Do not code your application directly to a specific topology. So far, we are talking about only components. There is no mention of specific hardware, software, or hosting capabilities. The key here is to keep your application flexible.
� Rules 2 - 4: These all center around the ephemeral, or non-permanent, natures of cloud applications. Do not assume the local file system is permanent. Do not keep session state inside your application. Do not log to the file system. Many run times that power cloud applications today are ephemeral, or non-permanent. Therefore the application instances and their underlying file systems can disappear and be rewritten when the application scales or an instance is restarted. Overall, these are not new concepts for web applications, but they are critical for successful cloud applications.
� Rules 5 - 6: These focus on infrastructure and on what you are building your application. Do not assume any specific infrastructure dependency. Do not use infrastructure APIs from within your application. You do not want to tie your application to the infrastructure it is running on for these reasons:
– It might be moved to another platform by you or the hosting provider.
– It might run on multiple platforms at the same time.
– Platform APIs and dependencies change at a different lifecycle than your application code, so adding another requirement is unnecessary.
A preferred practice is to abstract the infrastructure needs outside of your application and handle them through management and operation interfaces that are available on the cloud platform.
4 IBM Bluemix Architecture Series: Web Application Hosting on Java Liberty
� Rules 7 - 8: These are common across application development to keep your long term sanity. Do not use obscure protocols. Do not rely on features that are specific to the operating system. You do not know with which services your application will need to integrate in the future. You do not know which operating system your application will run on. Use as many standards-supported APIs as possible when developing your application, so you are not locked into a certain run time.
� Rule 9: Do not manually install your application. Automate, automate, automate. Whether in development, test, staging, or production, automate your application installation as much as possible. This promotes reuse, saves time, and vastly reduces errors in the long run. That means better application quality and more uptime for users.
You are probably already adopting many of these rules in your applications today. If not, you read Kyle and Mike's post for broader detail about what and how to accomplish these goals. The exercises we describe in the following labs exemplify these rules and demonstrate capabilities to deliver cloud applications that follow the rules.
1.2.1 Architecture of the labs in this book
We simplified the original reference architecture to map it to the needs of the labs in this book. Figure 1-2 on page 6 shows that we will deploy our application Bluemix-Java-CacheLab in the Web Tier and incorporating the Auto-Scaling service. As part of the Service tier, we are incorporating the capabilities of the Data Cache service and the Load Impact service. In the Dev Tier, we are using the Delivery Pipeline and Monitoring and Analytics services to help in the automatic build and deploy steps, and also monitoring the health status of our Bluemix application.
Figure 1-2 on page 6 shows the overall architecture of the application that we develop as part of the following two labs.
� Lab 1 (Chapter 2, “Lab 1: Build a web application hosting architecture with Cloud Foundry” on page 9)
Creates a Java Liberty Profile application that uses the Delivery Pipeline service, Data Cache, and Monitoring and Analytics services. The lab focuses on getting a quick application started, importing some existing code, and using a Data Cache service from Bluemix, and Delivery Pipeline and Monitoring and Analytics services.
� Lab 2 (in Chapter 3, “Lab 2: Auto-scale, load-test, and monitor your web application” on page 41)
Extends the functionality of Lab 1 by adding Auto-Scaling and Load Impact services to load-test the application and watch the behavior of the Auto-Scaling service in action because the policies that we create as part of this lab will be triggered based on the load-test that we perform by using the Load Impact service.
Chapter 1. Introduction 5
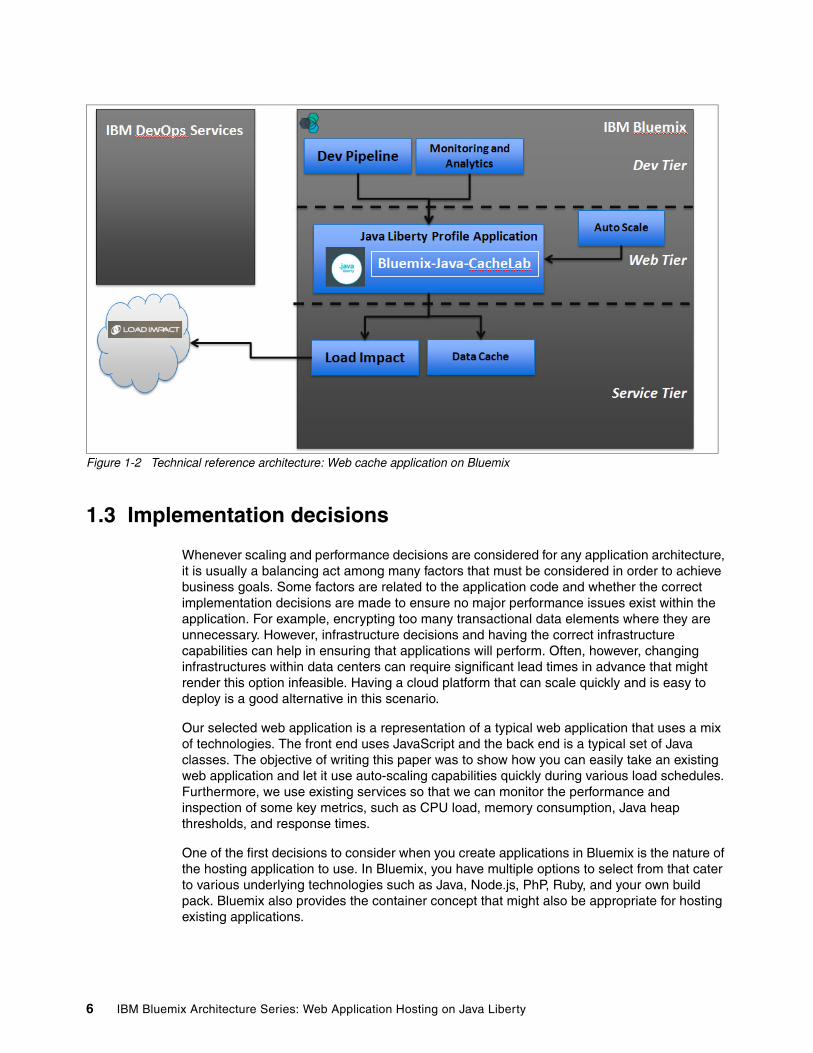
Figure 1-2 Technical reference architecture: Web cache application on Bluemix
1.3 Implementation decisions
Whenever scaling and performance decisions are considered for any application architecture, it is usually a balancing act among many factors that must be considered in order to achieve business goals. Some factors are related to the application code and whether the correct implementation decisions are made to ensure no major performance issues exist within the application. For example, encrypting too many transactional data elements where they are unnecessary. However, infrastructure decisions and having the correct infrastructure capabilities can help in ensuring that applications will perform. Often, however, changing infrastructures within data centers can require significant lead times in advance that might render this option infeasible. Having a cloud platform that can scale quickly and is easy to deploy is a good alternative in this scenario.
Our selected web application is a representation of a typical web application that uses a mix of technologies. The front end uses JavaScript and the back end is a typical set of Java classes. The objective of writing this paper was to show how you can easily take an existing web application and let it use auto-scaling capabilities quickly during various load schedules. Furthermore, we use existing services so that we can monitor the performance and inspection of some key metrics, such as CPU load, memory consumption, Java heap thresholds, and response times.
One of the first decisions to consider when you create applications in Bluemix is the nature of the hosting application to use. In Bluemix, you have multiple options to select from that cater to various underlying technologies such as Java, Node.js, PhP, Ruby, and your own build pack. Bluemix also provides the container concept that might also be appropriate for hosting existing applications.
6 IBM Bluemix Architecture Series: Web Application Hosting on Java Liberty
Because we have a simple web application, we selected the Java Liberty profile application. The Java Liberty profile allows for run times that are typically built using a small footprint (less than 54 MB), which provides for faster updates during builds. The Liberty profile also provides more advantages for small memory overheads, startup times, instance creation, and easier migration for the cloud.
Because we show auto-scaling that might require creating extra instances to handle potential new loads, the Liberty profile can provide great support for what we are trying to accomplish.
After you decide on the application, additional considerations that are related to which services to use with the application are required. In certain times, the choice of available services to your Bluemix application can affect the selection of the appropriate application or container. In our sample application, we wanted to provide some elastic caching capabilities and the ability to auto-scale during various loads. We also wanted to have a quick way to simulate loads to load-test the application, while monitoring the health status of the application in real time. By browsing the Bluemix catalog, we found the services that we needed (such as Data Cache, Auto-Scaling, Load Testing, and Monitoring) and that were were ready to use in helping us achieve our objectives.
To incorporate the services into the application, deployment decisions are required. Bluemix provides a Delivery Pipeline service that automates the aspects of build and deploy operations. This service is provided through IBM DevOps capabilities that are exposed as services through the Bluemix platform. This simplifies the overall process of modifying the code, building, and deploying to Bluemix. Other build and deployment alternatives include using the Cloud Foundry command-line interface to push code to Bluemix.
Additional alternatives also include using IBM Eclipse Tools for Bluemix. For more information, see part 4 at the following web page:
http://www.ibm.com/developerworks/library/d-bluemix-javadevops/index.html
The approach we use in this book is close to what our clients will be considering in the future. The labs are set up to use GitHub and JazzHub repositories to access the source code of the application to be deployed to Bluemix. Moreover, we use many of the Bluemix services that render the build and deploy procedures to be easy and clear. Also, we used only a fraction of the services that are offered in Bluemix. The Bluemix catalog, which continues to grow, provides many services that are available for immediate access; you are encouraged to experiment with these services to realize their full benefits in your organizations.
Chapter 1. Introduction 7

8 IBM Bluemix Architecture Series: Web Application Hosting on Java Liberty
Chapter 2. Lab 1: Build a web application hosting architecture with Cloud Foundry
In this chapter, we create a Java Liberty Profile application that uses the Delivery Pipeline, Data Cache, and Monitoring and Analytics services. The lab focuses on quickly getting an application started, importing some existing code, and using a Data Cache service from Bluemix, and Delivery Pipeline and Monitoring and Analytics services.
For this lab, complete the following tasks:
� 2.1, “Task 1: Set up your Bluemix account” on page 10� 2.2, “Task 2: Create your starter application on Bluemix” on page 11� 2.3, “Task 3: Set up your DevOps account” on page 14� 2.4, “Task 4. Obtain the sample code” on page 14� 2.5, “Task 5: Add Data Cache service” on page 16� 2.6, “Task 6: Build, deploy, and run your application” on page 20� 2.7, “Task 7: Add a Delivery Pipeline service” on page 32� 2.8, “Task 8: Add a Monitoring and Analytics service” on page 34� 2.9, “Try it” on page 39
2
Note: These labs were documented to be as accurate as possible at the time of publication. However, Bluemix is an actively evolving development platform, therefore capabilities, services, and user interfaces do change. For the most recent and accurate labs, see the following web page:
https://ibm.biz/bluemix_labs
© Copyright IBM Corp. 2015. All rights reserved. 9

2.1 Task 1: Set up your Bluemix account
IBM Bluemix is an open-standards, cloud-based platform for building, managing, and running all types of applications: mobile, smart devices, web, and big data. The Bluemix capabilities include Java, mobile back-end development, application monitoring, and features from ecosystem partners and open source, all through an as-a-service model in the cloud.
Complete the following steps:
1. Before you can use the Bluemix capabilities, you must register for an account. Sign up at the following website, which gives you a 30-day no-charge trial. After the trial, you will need to provide a credit card to pay as you go for your resource usage.
https://bluemix.net/
For more helpful information about Bluemix, see the DOCS section of this web page:
https://www.ng.bluemix.net/docs/#overview/overview.html
2. Log in to Bluemix at the following web page. The dashboard opens (Figure 2-1).
https://console.ng.bluemix.net/
Figure 2-1 Bluemix dashboard
The dashboard shows an overview of the active Bluemix space for your organization. By default, the space is dev and the organization is the project creator’s user name. For example, if [email protected] logs in to Bluemix for the first time, the active space is dev and the organization is [email protected]. If you create more organizations or spaces in Bluemix, be sure to use the same ones throughout the labs. Use the default selections.
Note: You can run the steps in this paper on any operating system. All you need is access to a browser and the correct set of login information on Bluemix and IBM DevOps.
10 IBM Bluemix Architecture Series: Web Application Hosting on Java Liberty
2.2 Task 2: Create your starter application on Bluemix
As indicated in the 1.3, “Implementation decisions” on page 6, creating the right application to run on Bluemix is one of the early decisions to make. For the purposes of this sample application, we chose the Java Liberty profile application for the benefits that we outlined in that section.
Complete the following steps:
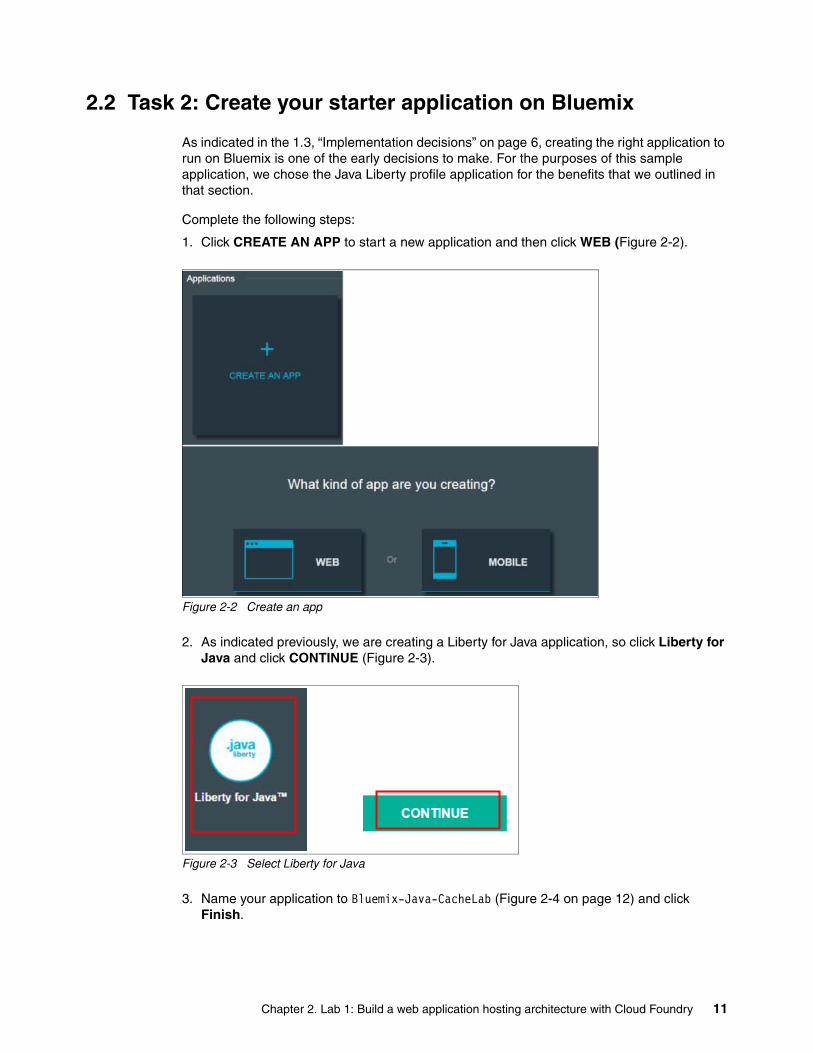
1. Click CREATE AN APP to start a new application and then click WEB (Figure 2-2).
Figure 2-2 Create an app
2. As indicated previously, we are creating a Liberty for Java application, so click Liberty for Java and click CONTINUE (Figure 2-3).
Figure 2-3 Select Liberty for Java
3. Name your application to Bluemix-Java-CacheLab (Figure 2-4 on page 12) and click Finish.
Chapter 2. Lab 1: Build a web application hosting architecture with Cloud Foundry 11

Figure 2-4 Name your application
Your Bluemix dashboad now looks like Figure 2-5.
Figure 2-5 Bluemix dashboad
At the right side of the pane, in the APP HEALTH section, your application initially indicates that it is stopped. But then Bluemix stages your application and attempts to run it.
After Bluemix runs your application, the APP HEALTH message indicates it is running (Figure 2-6).
Figure 2-6 App is running
Tip: You might receive the following message:
Someone already used that name
If you do receive the message, add your initials to this name and then use that new name in the remaining instructions instead of using the Bluemix-Java-CacheLab name.
Tip: Make a note of this name, you will need it for later tasks.
12 IBM Bluemix Architecture Series: Web Application Hosting on Java Liberty

4. Click the Routes link in the Bluemix Dashboard tab (Figure 2-7).
Figure 2-7 Routes link
Your shell application shows the “Hi World!” page (Figure 2-8) in a new browser tab.
Figure 2-8 Hi World!
You now have an empty Java application created in your workspace that creates a simple Hi World! message. We can now do something interesting with it.
We next import some code into our simple Java application that we created and use a service to make it more interesting. To import code into our application, IBM uses JazzHub repository, which is similar to GitHub, but provides additional integration and build services for Bluemix. To get started with JazzHub, you register for a no-cost account in Task 3.
Keep the dashboard open: Do not close the Bluemix Dashboard tab. If you accidentally close it, log in to Bluemix again and click the Dashboard.
Chapter 2. Lab 1: Build a web application hosting architecture with Cloud Foundry 13
2.3 Task 3: Set up your DevOps account
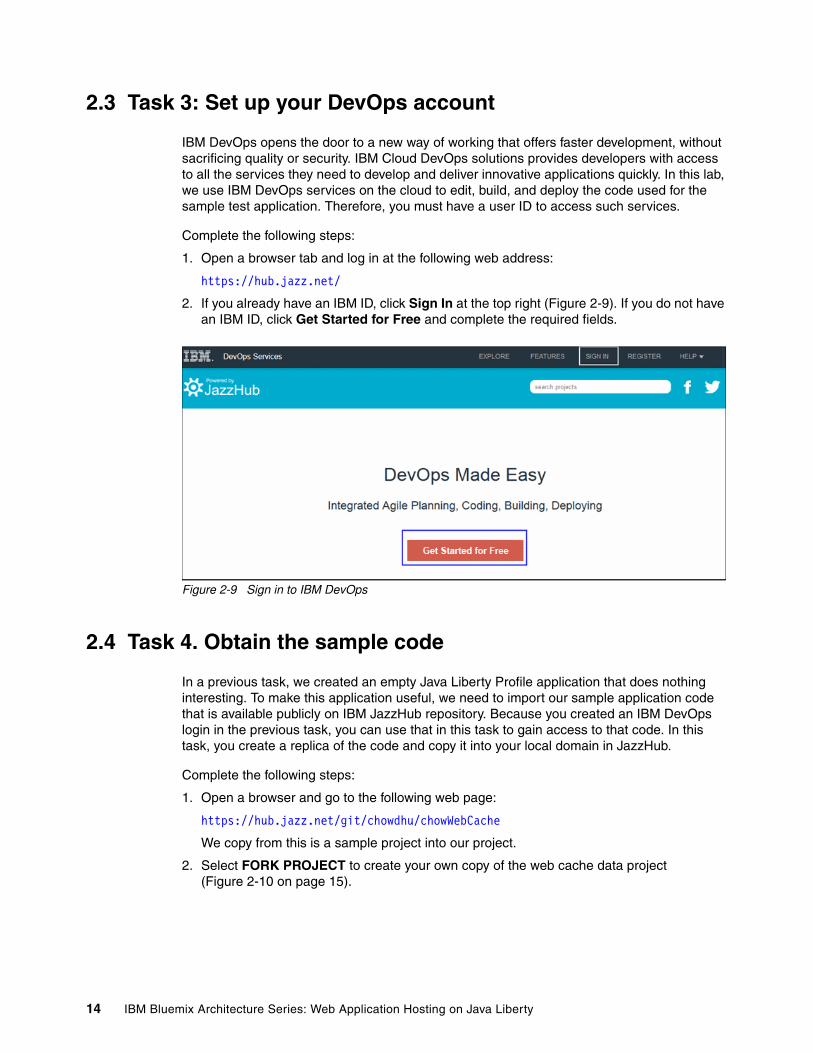
IBM DevOps opens the door to a new way of working that offers faster development, without sacrificing quality or security. IBM Cloud DevOps solutions provides developers with access to all the services they need to develop and deliver innovative applications quickly. In this lab, we use IBM DevOps services on the cloud to edit, build, and deploy the code used for the sample test application. Therefore, you must have a user ID to access such services.
Complete the following steps:
1. Open a browser tab and log in at the following web address:
https://hub.jazz.net/
2. If you already have an IBM ID, click Sign In at the top right (Figure 2-9). If you do not have an IBM ID, click Get Started for Free and complete the required fields.
Figure 2-9 Sign in to IBM DevOps
2.4 Task 4. Obtain the sample code
In a previous task, we created an empty Java Liberty Profile application that does nothing interesting. To make this application useful, we need to import our sample application code that is available publicly on IBM JazzHub repository. Because you created an IBM DevOps login in the previous task, you can use that in this task to gain access to that code. In this task, you create a replica of the code and copy it into your local domain in JazzHub.
Complete the following steps:
1. Open a browser and go to the following web page:
https://hub.jazz.net/git/chowdhu/chowWebCache
We copy from this is a sample project into our project.
2. Select FORK PROJECT to create your own copy of the web cache data project (Figure 2-10 on page 15).
14 IBM Bluemix Architecture Series: Web Application Hosting on Java Liberty
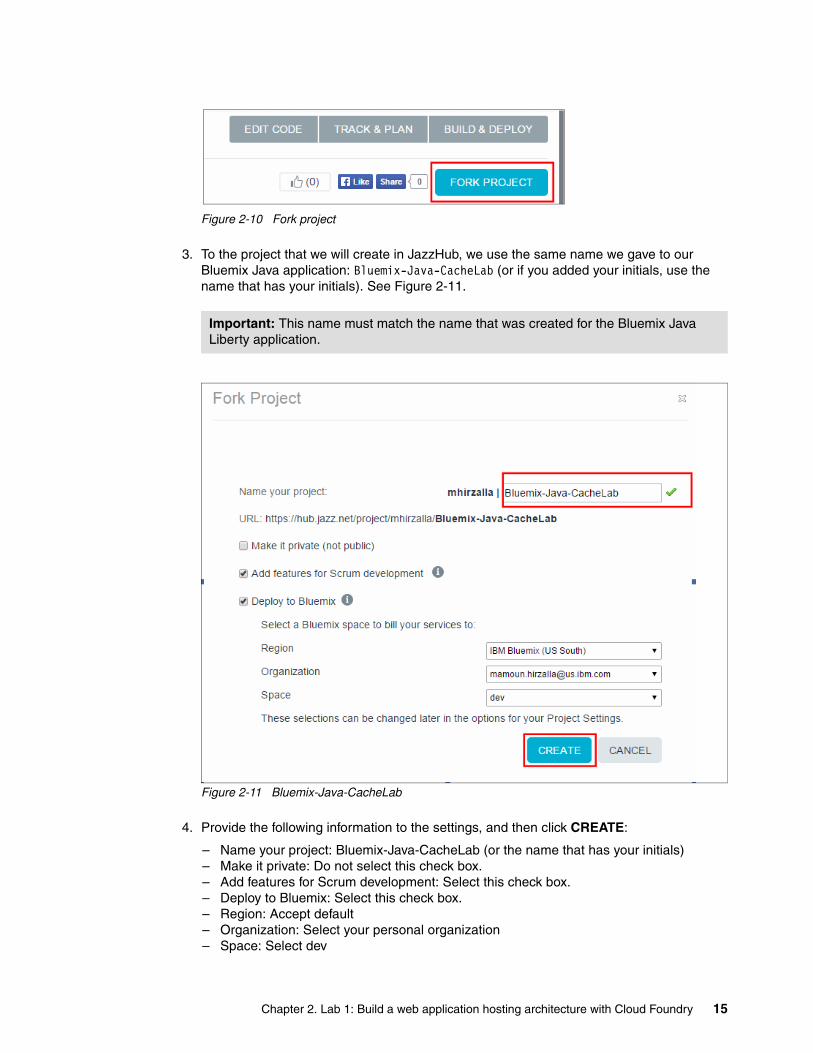
Figure 2-10 Fork project
3. To the project that we will create in JazzHub, we use the same name we gave to our Bluemix Java application: Bluemix-Java-CacheLab (or if you added your initials, use the name that has your initials). See Figure 2-11.
Figure 2-11 Bluemix-Java-CacheLab
4. Provide the following information to the settings, and then click CREATE:
– Name your project: Bluemix-Java-CacheLab (or the name that has your initials)– Make it private: Do not select this check box.– Add features for Scrum development: Select this check box.– Deploy to Bluemix: Select this check box.– Region: Accept default – Organization: Select your personal organization– Space: Select dev
Important: This name must match the name that was created for the Bluemix Java Liberty application.
Chapter 2. Lab 1: Build a web application hosting architecture with Cloud Foundry 15
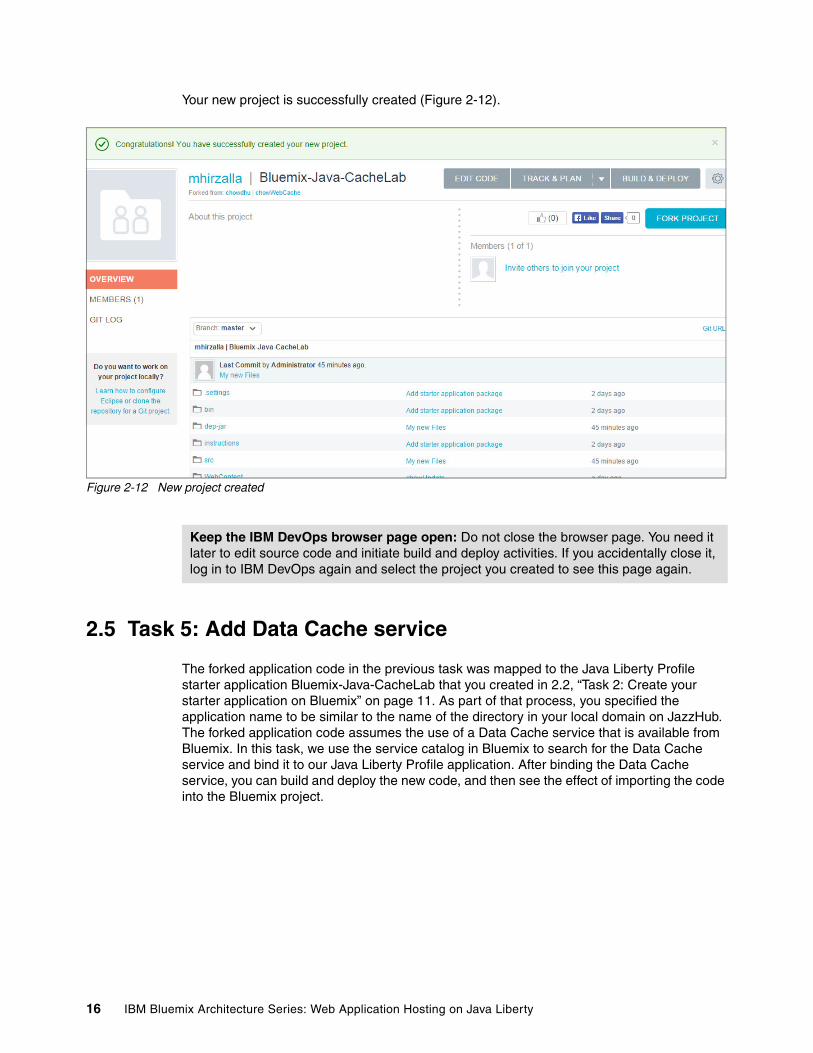
Your new project is successfully created (Figure 2-12).
Figure 2-12 New project created
2.5 Task 5: Add Data Cache service
The forked application code in the previous task was mapped to the Java Liberty Profile starter application Bluemix-Java-CacheLab that you created in 2.2, “Task 2: Create your starter application on Bluemix” on page 11. As part of that process, you specified the application name to be similar to the name of the directory in your local domain on JazzHub. The forked application code assumes the use of a Data Cache service that is available from Bluemix. In this task, we use the service catalog in Bluemix to search for the Data Cache service and bind it to our Java Liberty Profile application. After binding the Data Cache service, you can build and deploy the new code, and then see the effect of importing the code into the Bluemix project.
Keep the IBM DevOps browser page open: Do not close the browser page. You need it later to edit source code and initiate build and deploy activities. If you accidentally close it, log in to IBM DevOps again and select the project you created to see this page again.
16 IBM Bluemix Architecture Series: Web Application Hosting on Java Liberty

Complete the following steps:
1. In your browser, go to the Bluemix Dashboard tab. Click ADD A SERVICE (Figure 2-13).
Figure 2-13 Add a service
2. Search for Data Cache by typing part or all of the words in the search field (Figure 2-14), and then click Data Cache.
Figure 2-14 Search for Data Cache
Chapter 2. Lab 1: Build a web application hosting architecture with Cloud Foundry 17
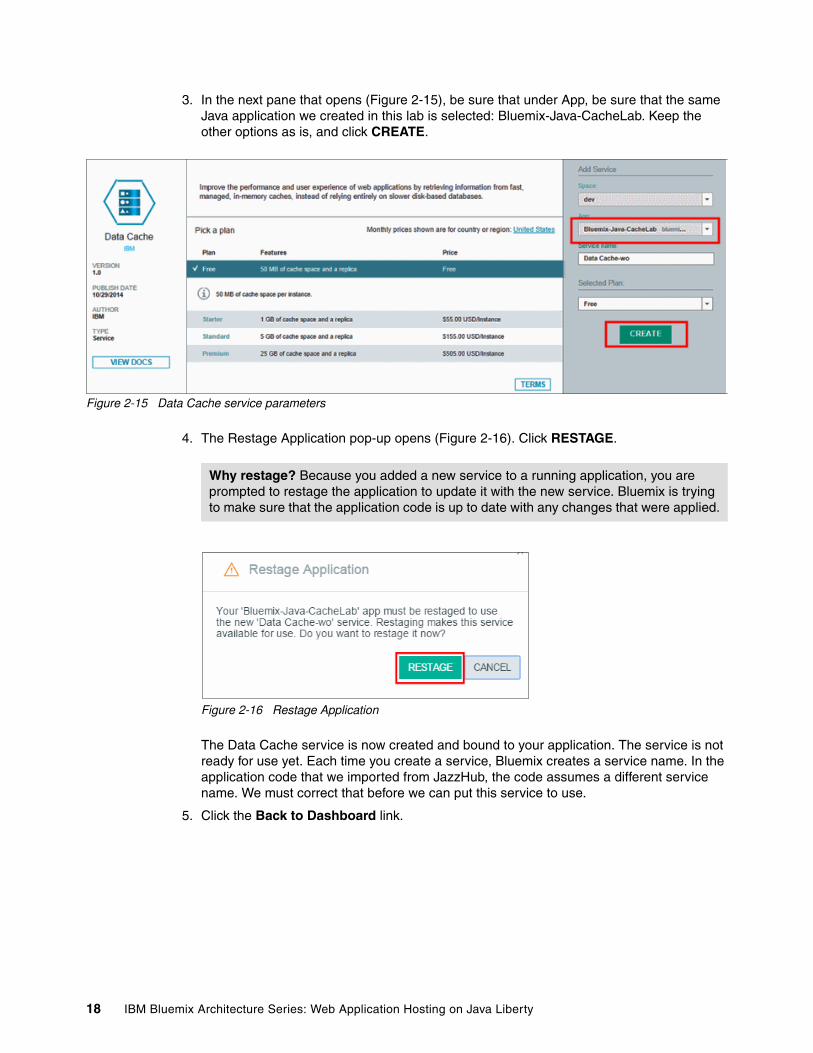
3. In the next pane that opens (Figure 2-15), be sure that under App, be sure that the same Java application we created in this lab is selected: Bluemix-Java-CacheLab. Keep the other options as is, and click CREATE.
Figure 2-15 Data Cache service parameters
4. The Restage Application pop-up opens (Figure 2-16). Click RESTAGE.
Figure 2-16 Restage Application
The Data Cache service is now created and bound to your application. The service is not ready for use yet. Each time you create a service, Bluemix creates a service name. In the application code that we imported from JazzHub, the code assumes a different service name. We must correct that before we can put this service to use.
5. Click the Back to Dashboard link.
Why restage? Because you added a new service to a running application, you are prompted to restage the application to update it with the new service. Bluemix is trying to make sure that the application code is up to date with any changes that were applied.
18 IBM Bluemix Architecture Series: Web Application Hosting on Java Liberty
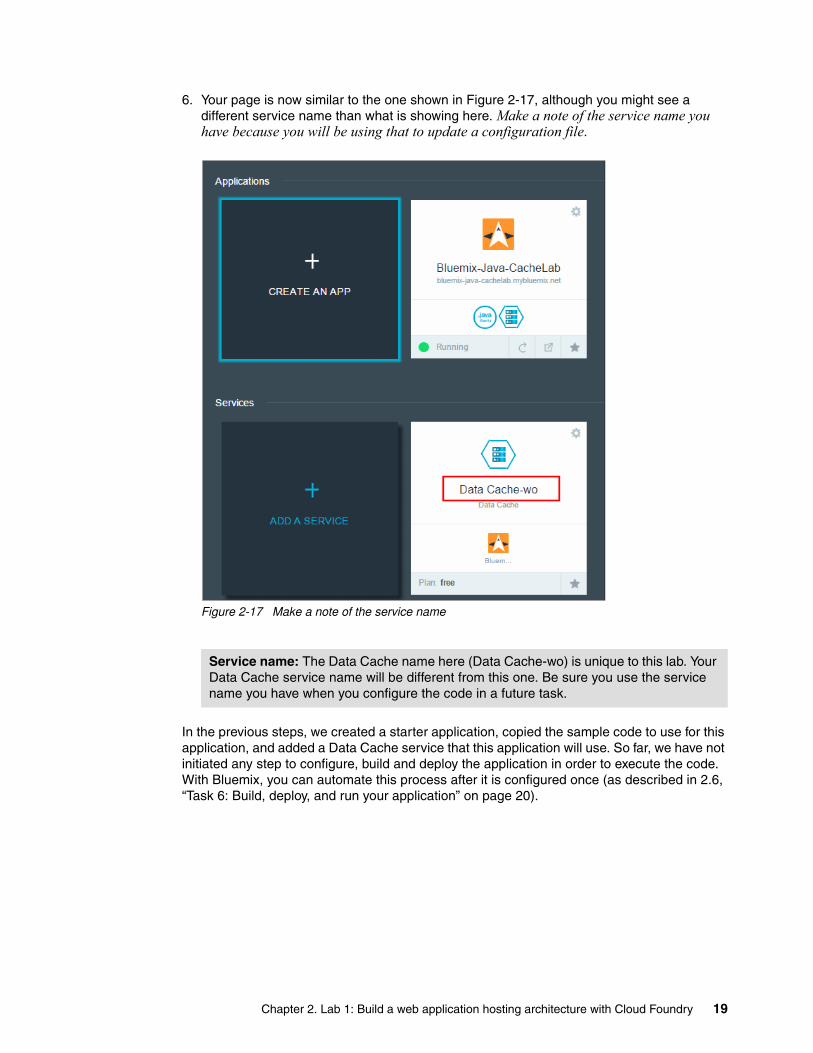
6. Your page is now similar to the one shown in Figure 2-17, although you might see a different service name than what is showing here. Make a note of the service name you have because you will be using that to update a configuration file.
Figure 2-17 Make a note of the service name
In the previous steps, we created a starter application, copied the sample code to use for this application, and added a Data Cache service that this application will use. So far, we have not initiated any step to configure, build and deploy the application in order to execute the code. With Bluemix, you can automate this process after it is configured once (as described in 2.6, “Task 6: Build, deploy, and run your application” on page 20).
Service name: The Data Cache name here (Data Cache-wo) is unique to this lab. Your Data Cache service name will be different from this one. Be sure you use the service name you have when you configure the code in a future task.
Chapter 2. Lab 1: Build a web application hosting architecture with Cloud Foundry 19
2.6 Task 6: Build, deploy, and run your application
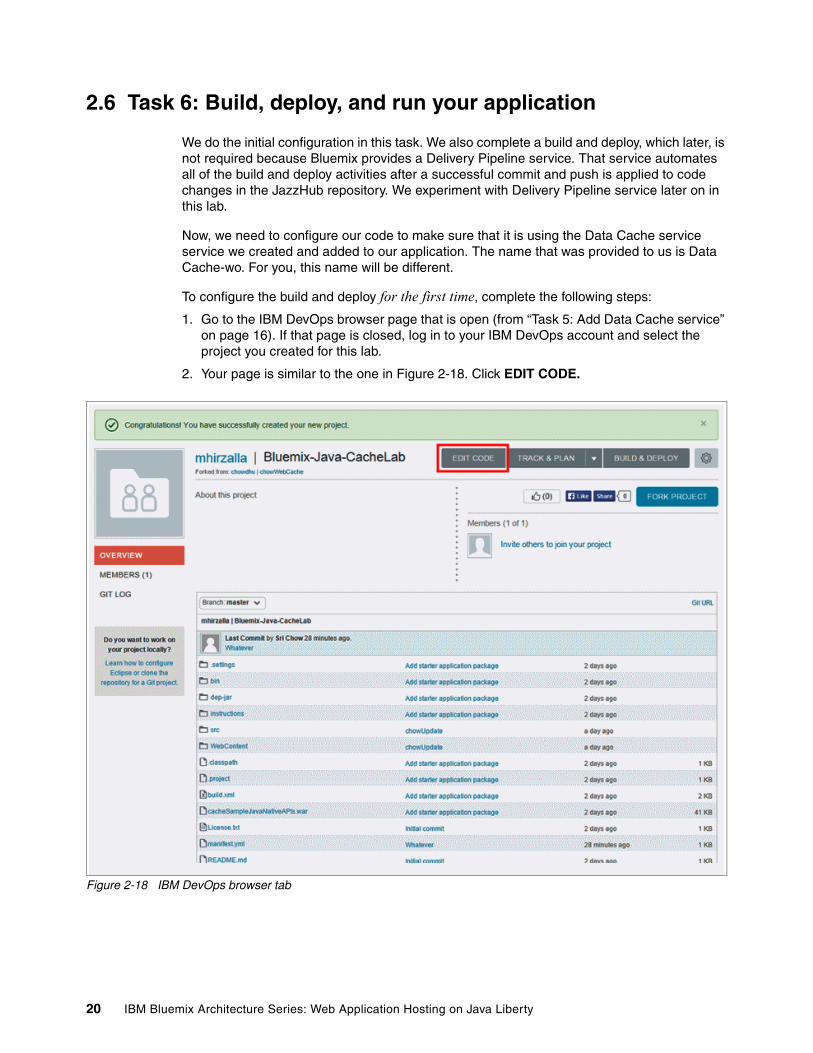
We do the initial configuration in this task. We also complete a build and deploy, which later, is not required because Bluemix provides a Delivery Pipeline service. That service automates all of the build and deploy activities after a successful commit and push is applied to code changes in the JazzHub repository. We experiment with Delivery Pipeline service later on in this lab.
Now, we need to configure our code to make sure that it is using the Data Cache service service we created and added to our application. The name that was provided to us is Data Cache-wo. For you, this name will be different.
To configure the build and deploy for the first time, complete the following steps:
1. Go to the IBM DevOps browser page that is open (from “Task 5: Add Data Cache service” on page 16). If that page is closed, log in to your IBM DevOps account and select the project you created for this lab.
2. Your page is similar to the one in Figure 2-18. Click EDIT CODE.
Figure 2-18 IBM DevOps browser tab
20 IBM Bluemix Architecture Series: Web Application Hosting on Java Liberty

3. Click the drop-down list (Figure 2-19). Make sure that you select the name you created in the Application Name and Host fields. Select CREATE NEW
Figure 2-19 Select CREATE NEW
4. Select your values that map to your application. Be sure your page looks like the page on the right side in Figure 2-20. Then, click NEXT.
Figure 2-20 Configure Application Deployment menu
Chapter 2. Lab 1: Build a web application hosting architecture with Cloud Foundry 21

5. Be sure that the Data Cache service that you created previously is selected in the Bound services column (Figure 2-21). Follow the numbered steps shown in the Before (left side) of the figure. That is, switch the available service and bound service, save to the manifest file, and then click DEPLOY. The result is shown in the After side of the figure. Be sure that the Save to manifest file check box is selected.
Figure 2-21 Follow the highlighted steps (1 - 5)
6. Wait until the application deploys. This can take several minutes. After it deploys successfully, notice the green circle next to the application name and the running status (Figure 2-22).
Figure 2-22 Application deploying
7. Open the Bluemix dashboard (Figure 2-23 on page 23). Click the application link to see the run time.
The manifest.yml file: This file dictates what services to use when building and deploying your application. Because your app has its own services and information separate from the forked application, an important aspect is that our app builds and uses its own resources.
22 IBM Bluemix Architecture Series: Web Application Hosting on Java Liberty
.
Figure 2-23 Application route
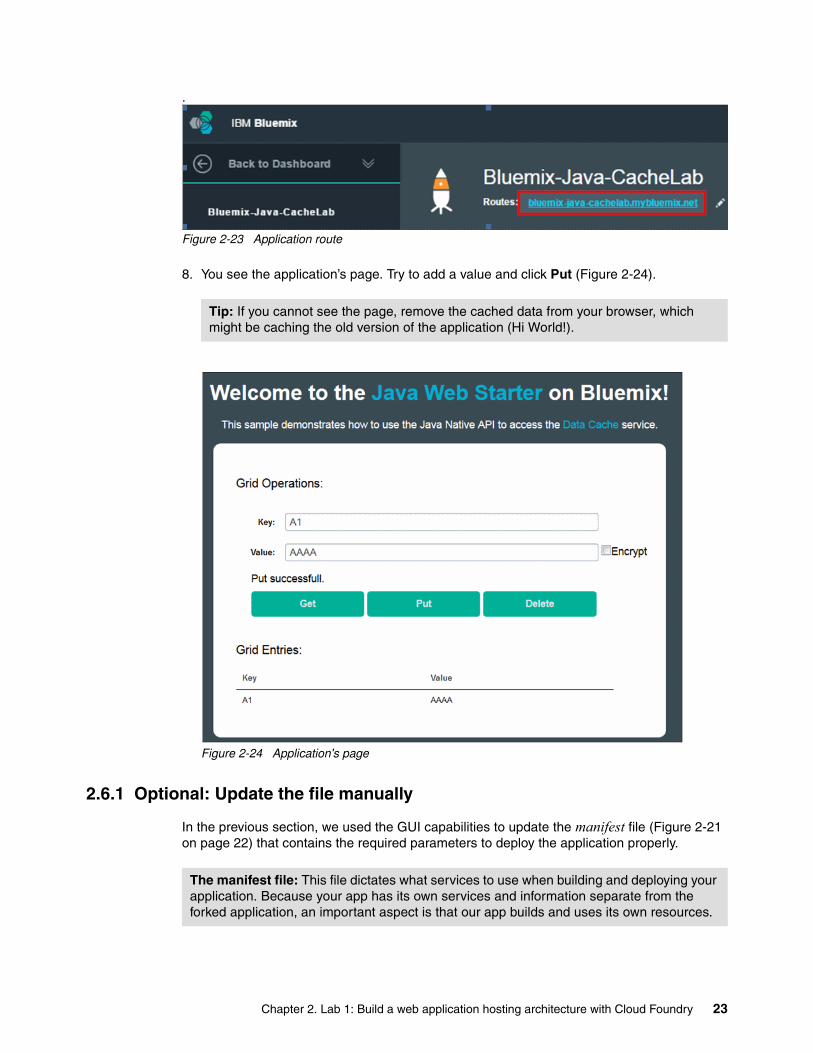
8. You see the application’s page. Try to add a value and click Put (Figure 2-24).
Figure 2-24 Application's page
2.6.1 Optional: Update the file manually
In the previous section, we used the GUI capabilities to update the manifest file (Figure 2-21 on page 22) that contains the required parameters to deploy the application properly.
Tip: If you cannot see the page, remove the cached data from your browser, which might be caching the old version of the application (Hi World!).
The manifest file: This file dictates what services to use when building and deploying your application. Because your app has its own services and information separate from the forked application, an important aspect is that our app builds and uses its own resources.
Chapter 2. Lab 1: Build a web application hosting architecture with Cloud Foundry 23
In this optional task, we show how to update the manifest file manually. If you do not want to see how to do this task manually, go to Step 2.7, “Task 7: Add a Delivery Pipeline service” on page 32.
Complete the following steps:
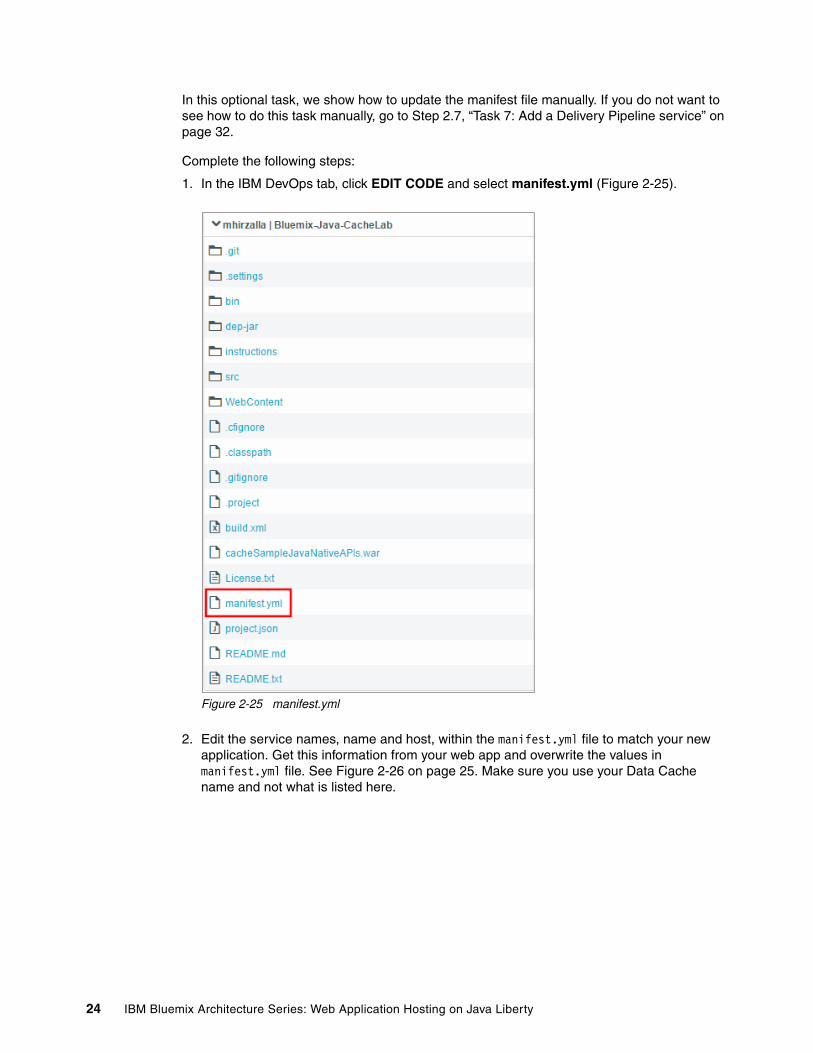
1. In the IBM DevOps tab, click EDIT CODE and select manifest.yml (Figure 2-25).
Figure 2-25 manifest.yml
2. Edit the service names, name and host, within the manifest.yml file to match your new application. Get this information from your web app and overwrite the values in manifest.yml file. See Figure 2-26 on page 25. Make sure you use your Data Cache name and not what is listed here.
24 IBM Bluemix Architecture Series: Web Application Hosting on Java Liberty

Figure 2-26 Before and after
3. Select File → Save (Figure 2-27).
Figure 2-27 Save your file
4. Click the Git icon in the left navigation bar in the IBM DevOps page as shown in Figure 2-28.
Figure 2-28 Git icon
5. In the page that opens (Figure 2-29 on page 26), complete these steps:
a. Select the Select All check box.b. Provide a comment to the change you made.c. Click COMMIT.
Chapter 2. Lab 1: Build a web application hosting architecture with Cloud Foundry 25
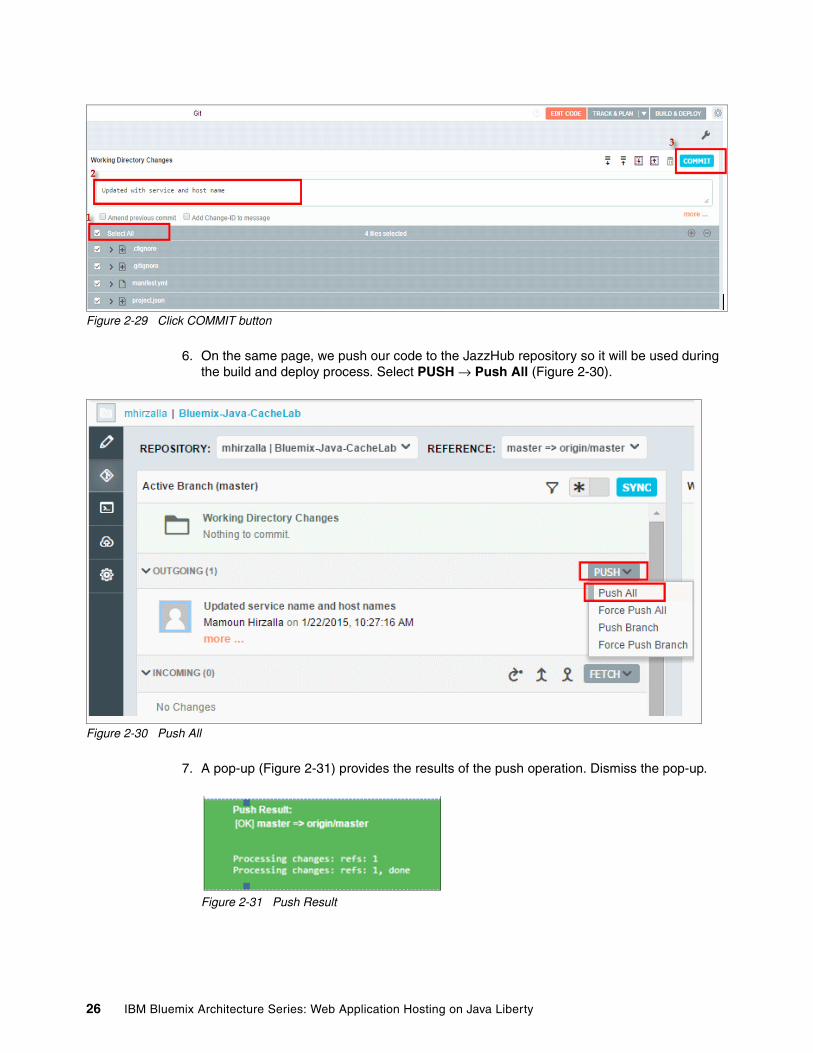
Figure 2-29 Click COMMIT button
6. On the same page, we push our code to the JazzHub repository so it will be used during the build and deploy process. Select PUSH → Push All (Figure 2-30).
Figure 2-30 Push All
7. A pop-up (Figure 2-31) provides the results of the push operation. Dismiss the pop-up.
Figure 2-31 Push Result
26 IBM Bluemix Architecture Series: Web Application Hosting on Java Liberty
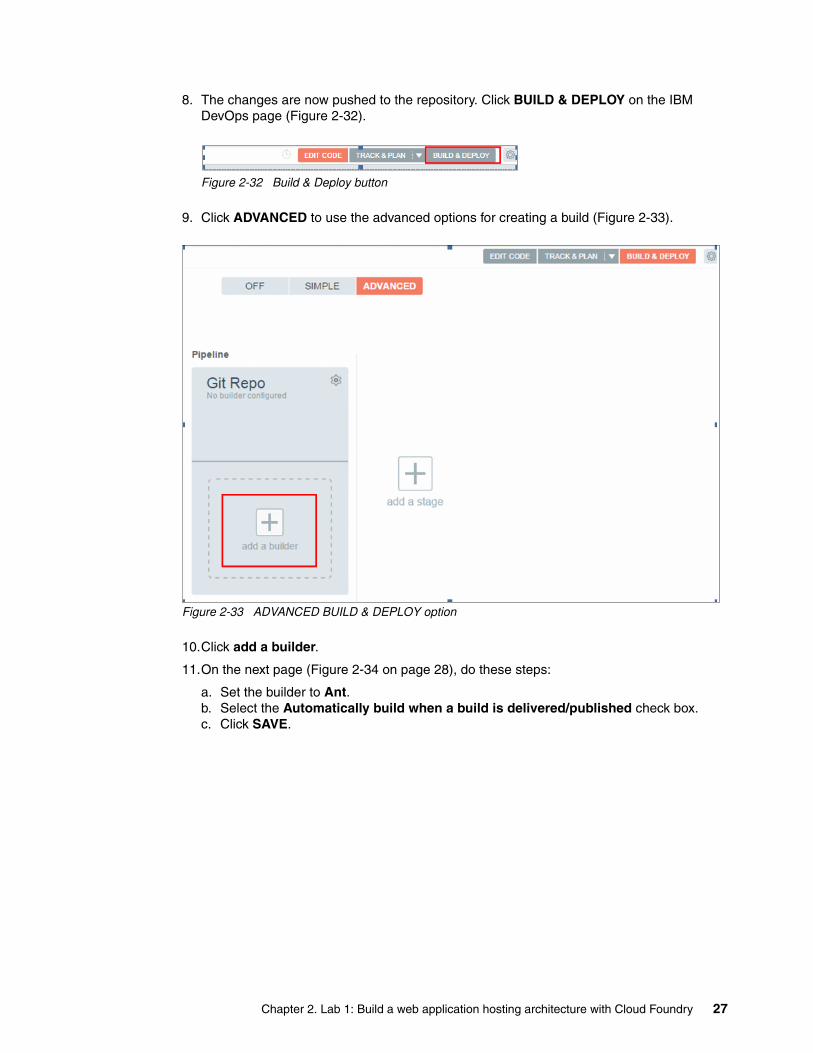
8. The changes are now pushed to the repository. Click BUILD & DEPLOY on the IBM DevOps page (Figure 2-32).
Figure 2-32 Build & Deploy button
9. Click ADVANCED to use the advanced options for creating a build (Figure 2-33).
Figure 2-33 ADVANCED BUILD & DEPLOY option
10.Click add a builder.
11.On the next page (Figure 2-34 on page 28), do these steps:
a. Set the builder to Ant.b. Select the Automatically build when a build is delivered/published check box. c. Click SAVE.
Chapter 2. Lab 1: Build a web application hosting architecture with Cloud Foundry 27
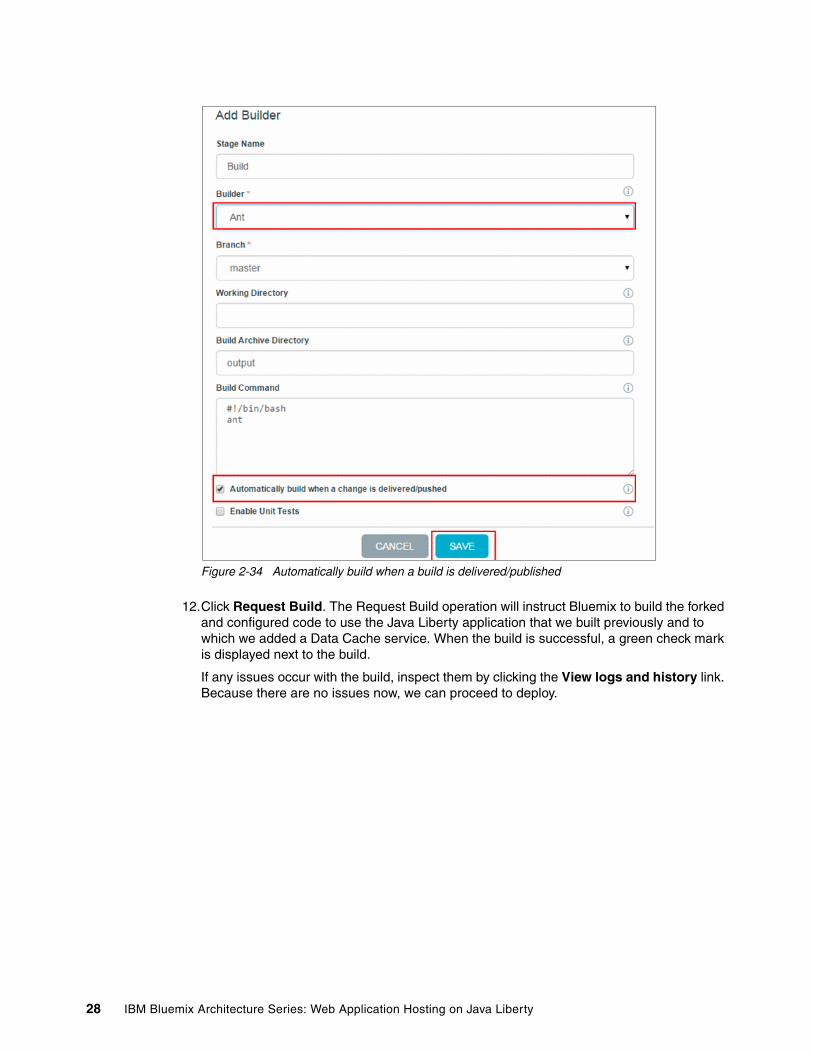
Figure 2-34 Automatically build when a build is delivered/published
12.Click Request Build. The Request Build operation will instruct Bluemix to build the forked and configured code to use the Java Liberty application that we built previously and to which we added a Data Cache service. When the build is successful, a green check mark is displayed next to the build.
If any issues occur with the build, inspect them by clicking the View logs and history link. Because there are no issues now, we can proceed to deploy.
28 IBM Bluemix Architecture Series: Web Application Hosting on Java Liberty
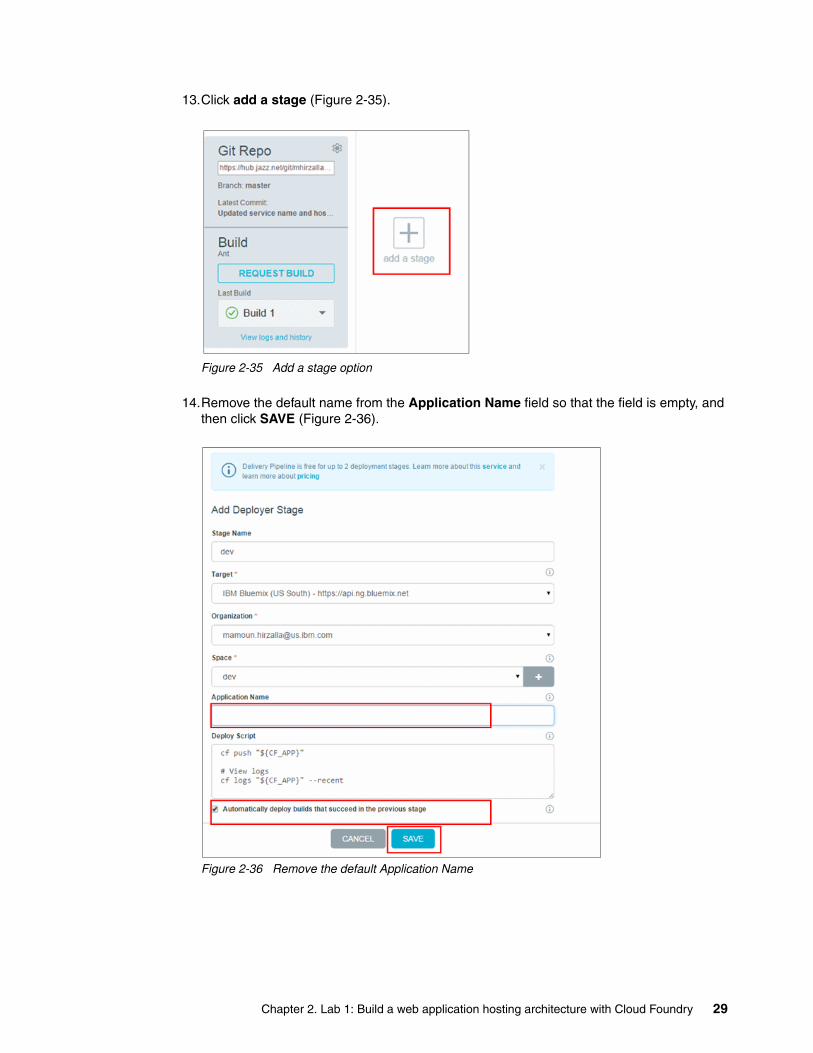
13.Click add a stage (Figure 2-35).
Figure 2-35 Add a stage option
14.Remove the default name from the Application Name field so that the field is empty, and then click SAVE (Figure 2-36).
Figure 2-36 Remove the default Application Name
Chapter 2. Lab 1: Build a web application hosting architecture with Cloud Foundry 29

15.Drag your build to the stage on the right side, where it says “Drop a build to deploy” (Figure 2-37).
Figure 2-37 Drop a build to deploy
Your app automatically starts deploying.
16.When it completes, click the website URL in the deploy stage to run your application (Figure 2-38).
Figure 2-38 Click the application link
Tip: After you drop the build, an entry that says “No build info” is displayed under the app route, but it resolves to “Build 1” when the deployment completes.
30 IBM Bluemix Architecture Series: Web Application Hosting on Java Liberty
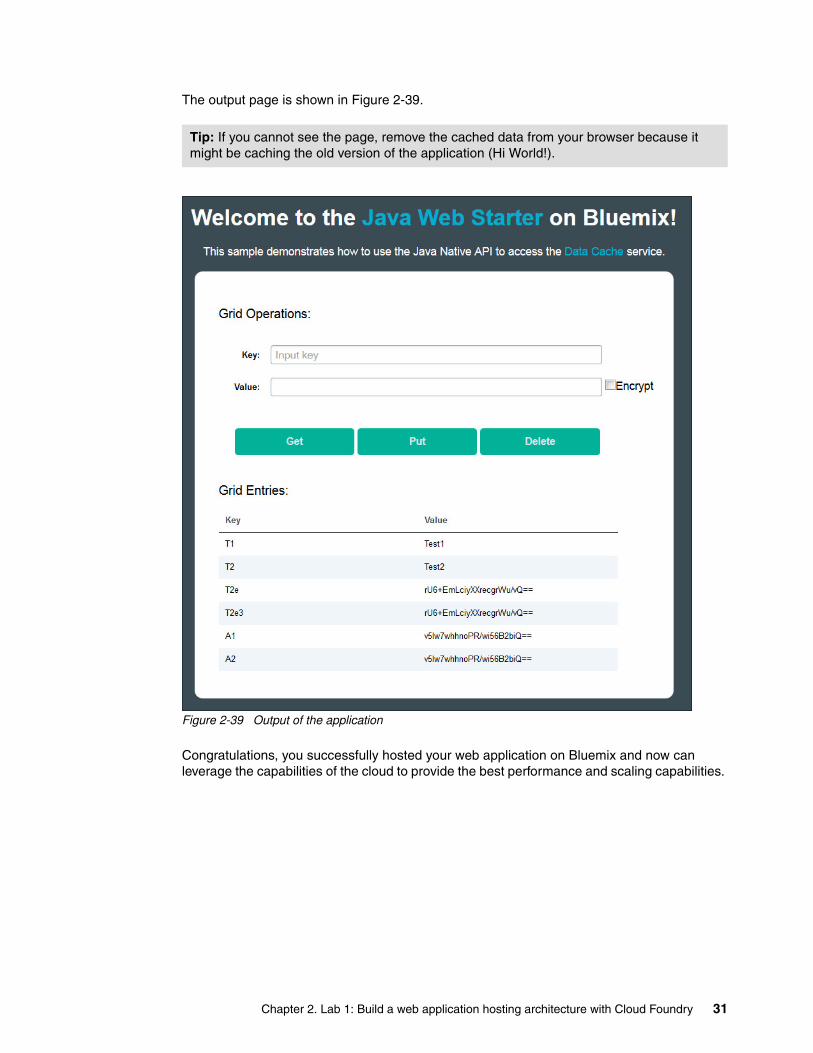
The output page is shown in Figure 2-39.
Figure 2-39 Output of the application
Congratulations, you successfully hosted your web application on Bluemix and now can leverage the capabilities of the cloud to provide the best performance and scaling capabilities.
Tip: If you cannot see the page, remove the cached data from your browser because it might be caching the old version of the application (Hi World!).
Chapter 2. Lab 1: Build a web application hosting architecture with Cloud Foundry 31
2.7 Task 7: Add a Delivery Pipeline service
In the previous tasks, we added a Data Cache service to our simple application. In this section we add two more services to the application:
� Delivery Pipeline� Monitoring and Analytics
These services are described in 1.1, “Deploying your web application with IBM Bluemix” on page 2.
Complete the following steps to add Delivery Pipeline service:
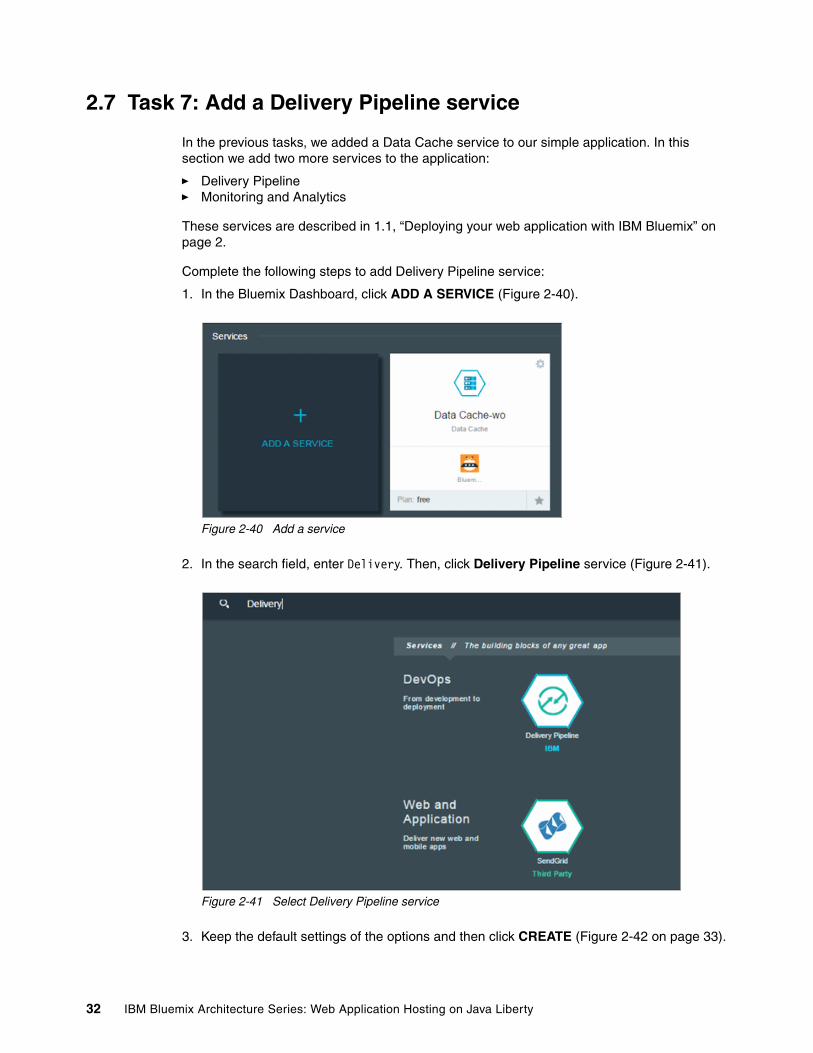
1. In the Bluemix Dashboard, click ADD A SERVICE (Figure 2-40).
Figure 2-40 Add a service
2. In the search field, enter Delivery. Then, click Delivery Pipeline service (Figure 2-41).
Figure 2-41 Select Delivery Pipeline service
3. Keep the default settings of the options and then click CREATE (Figure 2-42 on page 33).
32 IBM Bluemix Architecture Series: Web Application Hosting on Java Liberty
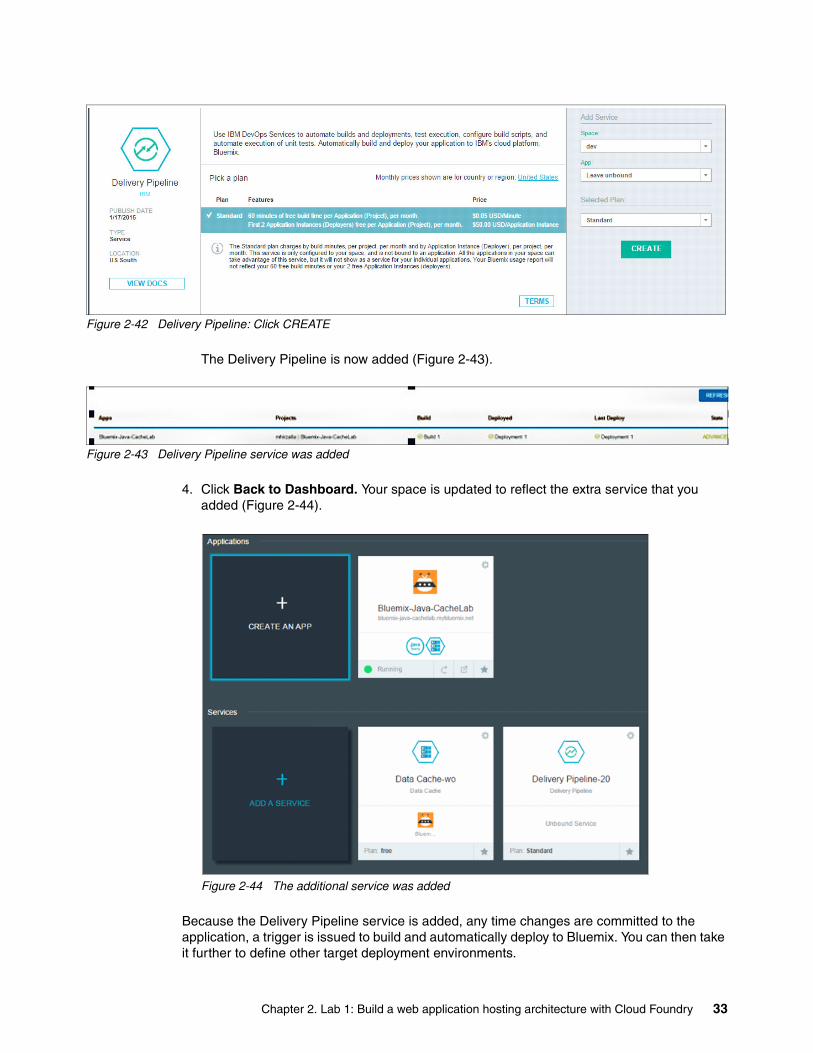
Figure 2-42 Delivery Pipeline: Click CREATE
The Delivery Pipeline is now added (Figure 2-43).
Figure 2-43 Delivery Pipeline service was added
4. Click Back to Dashboard. Your space is updated to reflect the extra service that you added (Figure 2-44).
Figure 2-44 The additional service was added
Because the Delivery Pipeline service is added, any time changes are committed to the application, a trigger is issued to build and automatically deploy to Bluemix. You can then take it further to define other target deployment environments.
Chapter 2. Lab 1: Build a web application hosting architecture with Cloud Foundry 33

2.8 Task 8: Add a Monitoring and Analytics service
Complete the following steps to add a Monitoring and Analytics service to your application:
1. In the Bluemix Dashboard, click ADD A SERVICE.
2. In the search field, enter Monitoring. Then, click Monitoring and Analytics (Figure 2-45).
Figure 2-45 Select Monitoring and Analytics
3. Select your application in the App field, and then click CREATE (Figure 2-46).
Figure 2-46 Click CREATE
34 IBM Bluemix Architecture Series: Web Application Hosting on Java Liberty
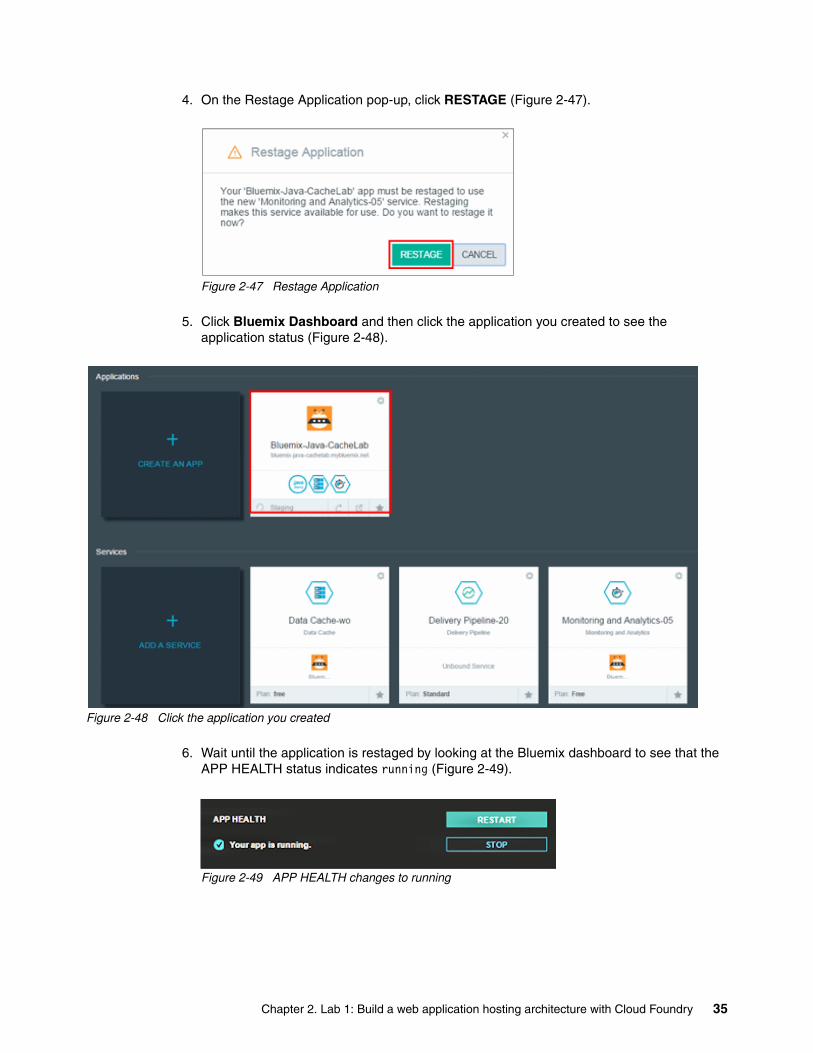
4. On the Restage Application pop-up, click RESTAGE (Figure 2-47).
Figure 2-47 Restage Application
5. Click Bluemix Dashboard and then click the application you created to see the application status (Figure 2-48).
Figure 2-48 Click the application you created
6. Wait until the application is restaged by looking at the Bluemix dashboard to see that the APP HEALTH status indicates running (Figure 2-49).
Figure 2-49 APP HEALTH changes to running
Chapter 2. Lab 1: Build a web application hosting architecture with Cloud Foundry 35
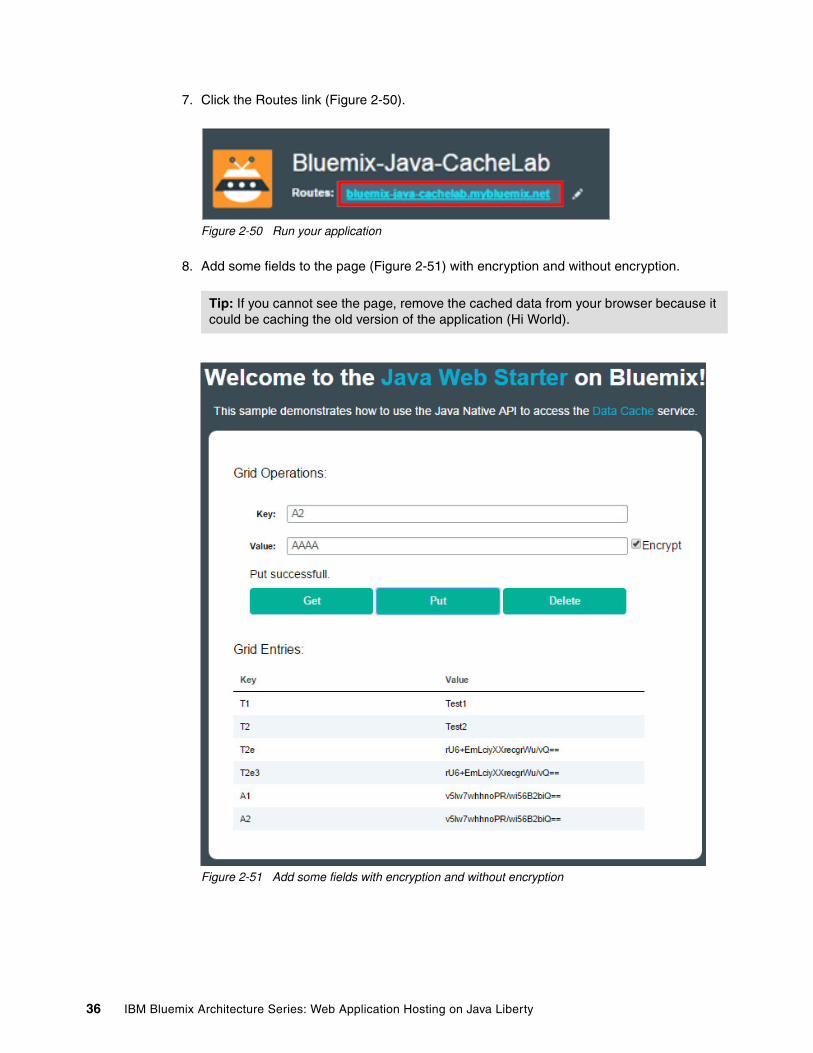
7. Click the Routes link (Figure 2-50).
Figure 2-50 Run your application
8. Add some fields to the page (Figure 2-51) with encryption and without encryption.
Figure 2-51 Add some fields with encryption and without encryption
Tip: If you cannot see the page, remove the cached data from your browser because it could be caching the old version of the application (Hi World).
36 IBM Bluemix Architecture Series: Web Application Hosting on Java Liberty
2.8.1 View runtime statistics about the application
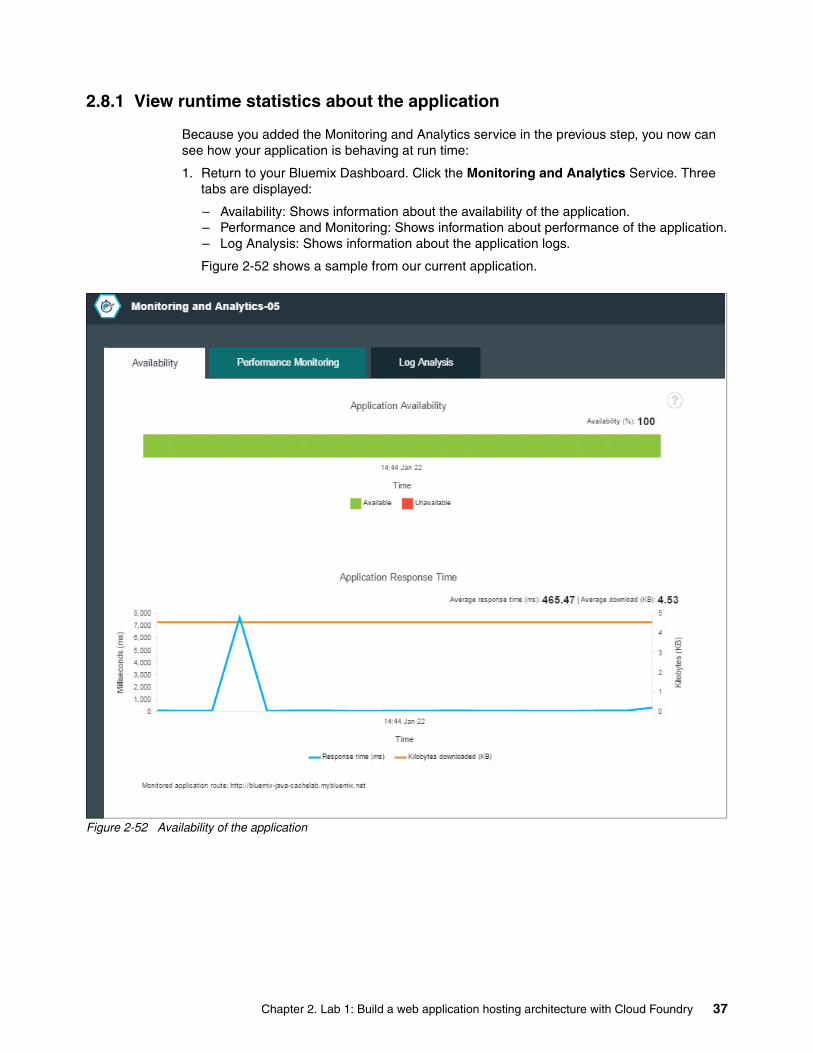
Because you added the Monitoring and Analytics service in the previous step, you now can see how your application is behaving at run time:
1. Return to your Bluemix Dashboard. Click the Monitoring and Analytics Service. Three tabs are displayed:
– Availability: Shows information about the availability of the application. – Performance and Monitoring: Shows information about performance of the application.– Log Analysis: Shows information about the application logs.
Figure 2-52 shows a sample from our current application.
Figure 2-52 Availability of the application
Chapter 2. Lab 1: Build a web application hosting architecture with Cloud Foundry 37
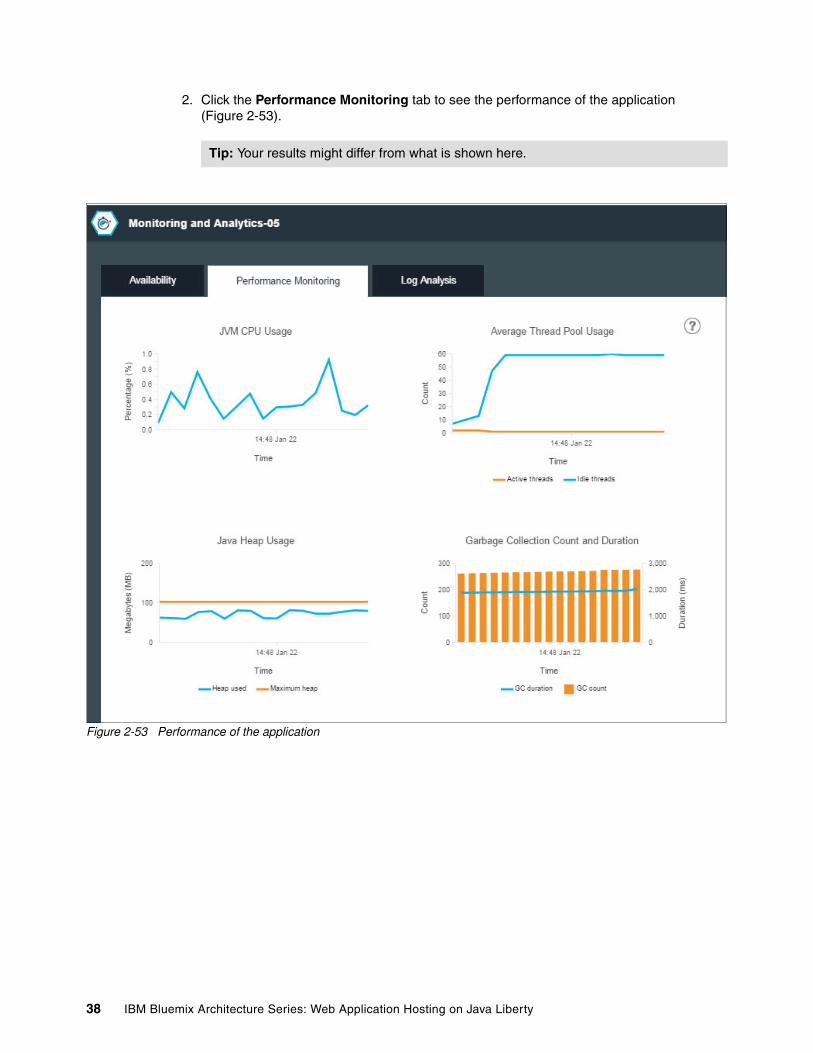
2. Click the Performance Monitoring tab to see the performance of the application (Figure 2-53).
Figure 2-53 Performance of the application
Tip: Your results might differ from what is shown here.
38 IBM Bluemix Architecture Series: Web Application Hosting on Java Liberty
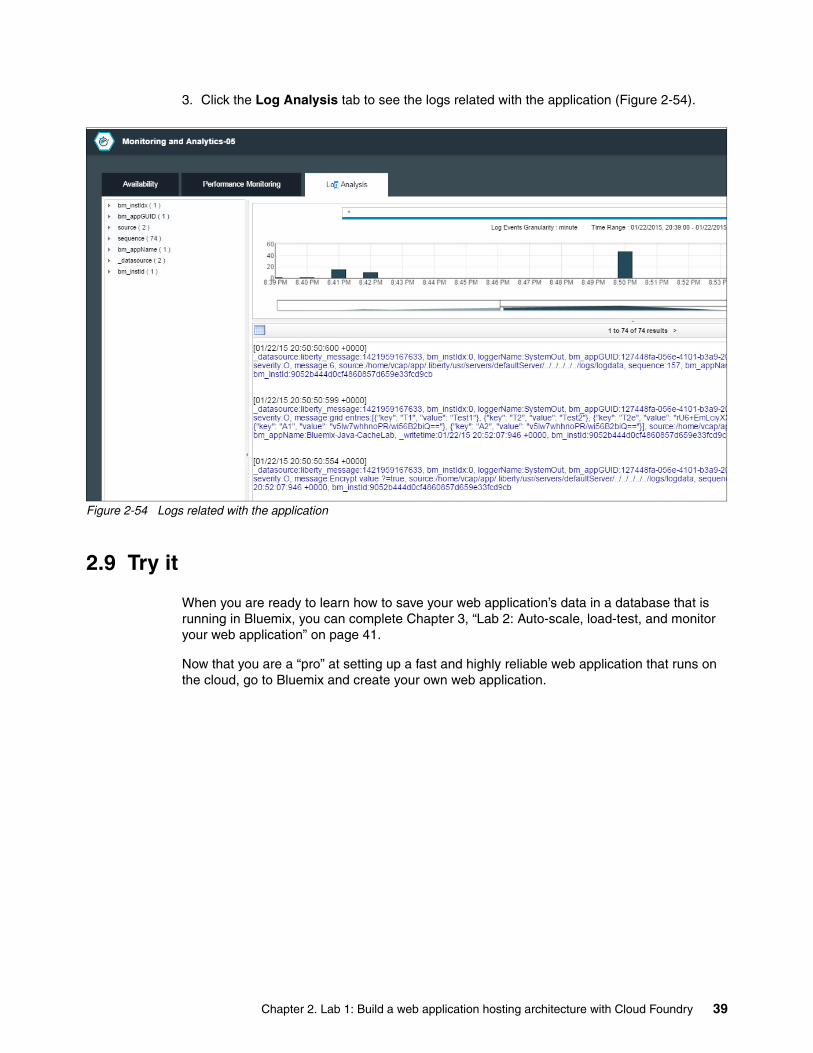
3. Click the Log Analysis tab to see the logs related with the application (Figure 2-54).
Figure 2-54 Logs related with the application
2.9 Try it
When you are ready to learn how to save your web application’s data in a database that is running in Bluemix, you can complete Chapter 3, “Lab 2: Auto-scale, load-test, and monitor your web application” on page 41.
Now that you are a “pro” at setting up a fast and highly reliable web application that runs on the cloud, go to Bluemix and create your own web application.
Chapter 2. Lab 1: Build a web application hosting architecture with Cloud Foundry 39

40 IBM Bluemix Architecture Series: Web Application Hosting on Java Liberty
Chapter 3. Lab 2: Auto-scale, load-test, and monitor your web application
In Chapter 2, “Lab 1: Build a web application hosting architecture with Cloud Foundry” on page 9, you created the application, bound a Data Cache service to it, and verified that it is running.
In this chapter, you add some scaling capability to the application. In real-life situations, web applications are often associated with business services that generate revenue for organizations. A critical function is that such applications scale up to the demand when needed. Also equally important is to have the application not consume too many resources that are tied to this application in anticipation of peak demand. At times where demand is not high, having the ability to free up resources that might have been tied to applications that are not using them is useful. This Auto Scaling service will allow you to establish such behavior through policies that you can customize for your application.
For this lab, complete the following tasks, and then get help if you still have questions:
� 3.1, “Task 1: Add an Auto-Scaling service to your application” on page 42� 3.2, “Task 2: Create and modify Auto-scaling polices” on page 43� 3.3, “Task 3: Add a Load Impact service and create an account” on page 45� 3.4, “Task 4: Create a user scenario” on page 47� 3.5, “Task 5: Create and run a test configuration” on page 48� 3.6, “Task 6: View Load Impact test results and add graphs” on page 51� 3.7, “Task 7: View Auto-Scaling metric statistics and history” on page 52� 3.8, “Task 8: View Monitoring and Analytics performance” on page 55� 3.9, “If you still have questions” on page 56
3
Note: These labs were documented to be as accurate as possible at the time of publication. However, Bluemix is an actively evolving development platform, therefore capabilities, services, and user interfaces do change. For the most recent and accurate labs, see the following web page:
https://ibm.biz/bluemix_labs
© Copyright IBM Corp. 2015. All rights reserved. 41
3.1 Task 1: Add an Auto-Scaling service to your application
Complete the following steps:
1. Go to Bluemix Dashboard and click the Bluemix-Java-CacheLab application.
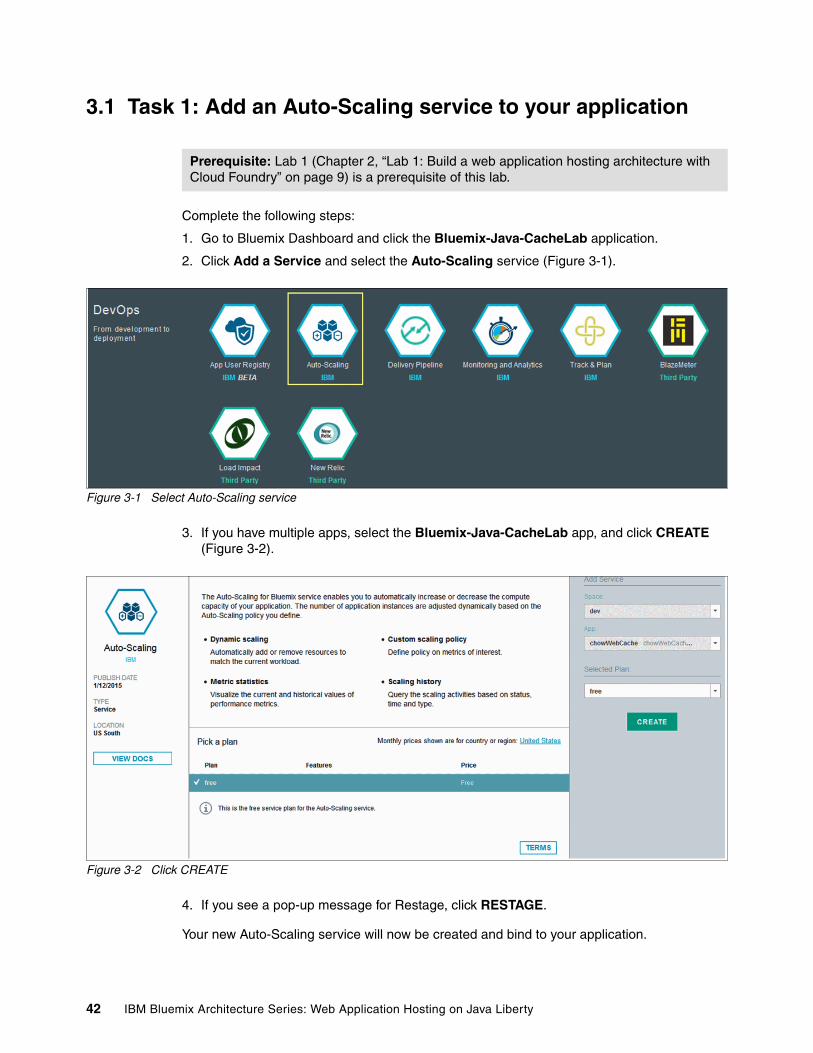
2. Click Add a Service and select the Auto-Scaling service (Figure 3-1).
Figure 3-1 Select Auto-Scaling service
3. If you have multiple apps, select the Bluemix-Java-CacheLab app, and click CREATE (Figure 3-2).
Figure 3-2 Click CREATE
4. If you see a pop-up message for Restage, click RESTAGE.
Your new Auto-Scaling service will now be created and bind to your application.
Prerequisite: Lab 1 (Chapter 2, “Lab 1: Build a web application hosting architecture with Cloud Foundry” on page 9) is a prerequisite of this lab.
42 IBM Bluemix Architecture Series: Web Application Hosting on Java Liberty
3.2 Task 2: Create and modify Auto-scaling polices
With an Auto-scaling policy, you can create rules that determine when the Auto-Scaling service will increase or decrease the number of instances of your application. In this task, you create and modify rules for your Java Liberty application.
Complete the following steps:
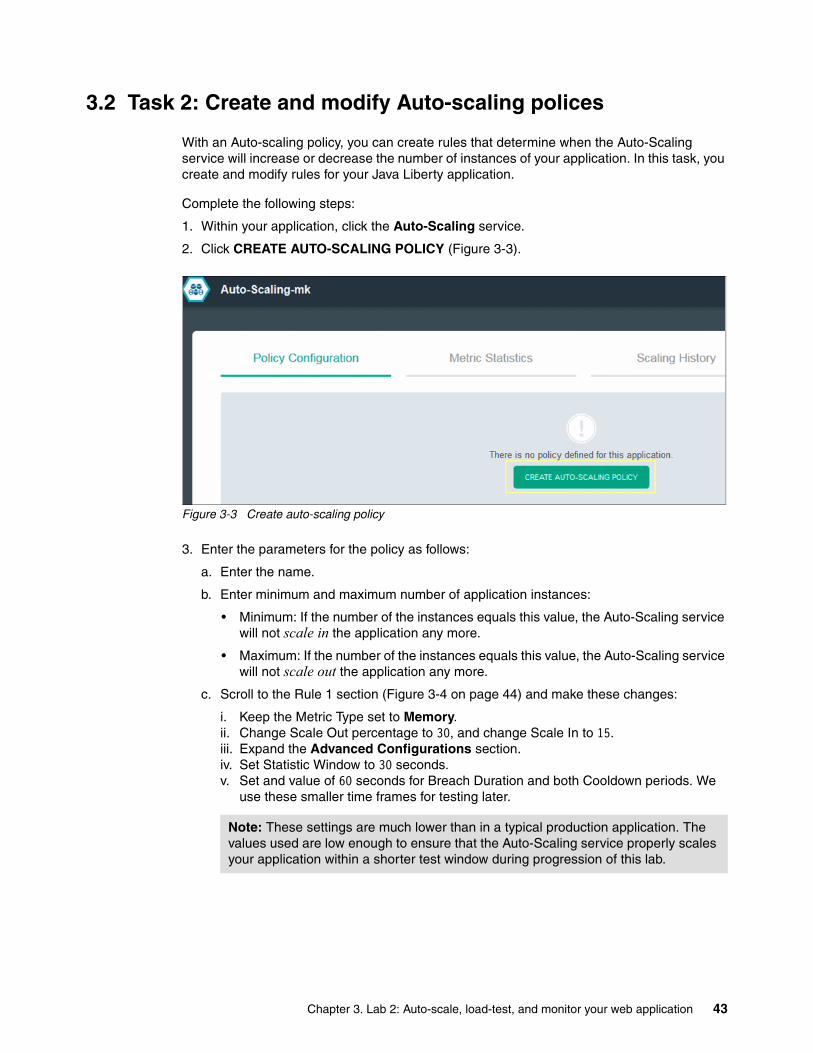
1. Within your application, click the Auto-Scaling service.
2. Click CREATE AUTO-SCALING POLICY (Figure 3-3).
Figure 3-3 Create auto-scaling policy
3. Enter the parameters for the policy as follows:
a. Enter the name.
b. Enter minimum and maximum number of application instances:
• Minimum: If the number of the instances equals this value, the Auto-Scaling service will not scale in the application any more.
• Maximum: If the number of the instances equals this value, the Auto-Scaling service will not scale out the application any more.
c. Scroll to the Rule 1 section (Figure 3-4 on page 44) and make these changes:
i. Keep the Metric Type set to Memory.ii. Change Scale Out percentage to 30, and change Scale In to 15. iii. Expand the Advanced Configurations section.iv. Set Statistic Window to 30 seconds.v. Set and value of 60 seconds for Breach Duration and both Cooldown periods. We
use these smaller time frames for testing later.
Note: These settings are much lower than in a typical production application. The values used are low enough to ensure that the Auto-Scaling service properly scales your application within a shorter test window during progression of this lab.
Chapter 3. Lab 2: Auto-scale, load-test, and monitor your web application 43
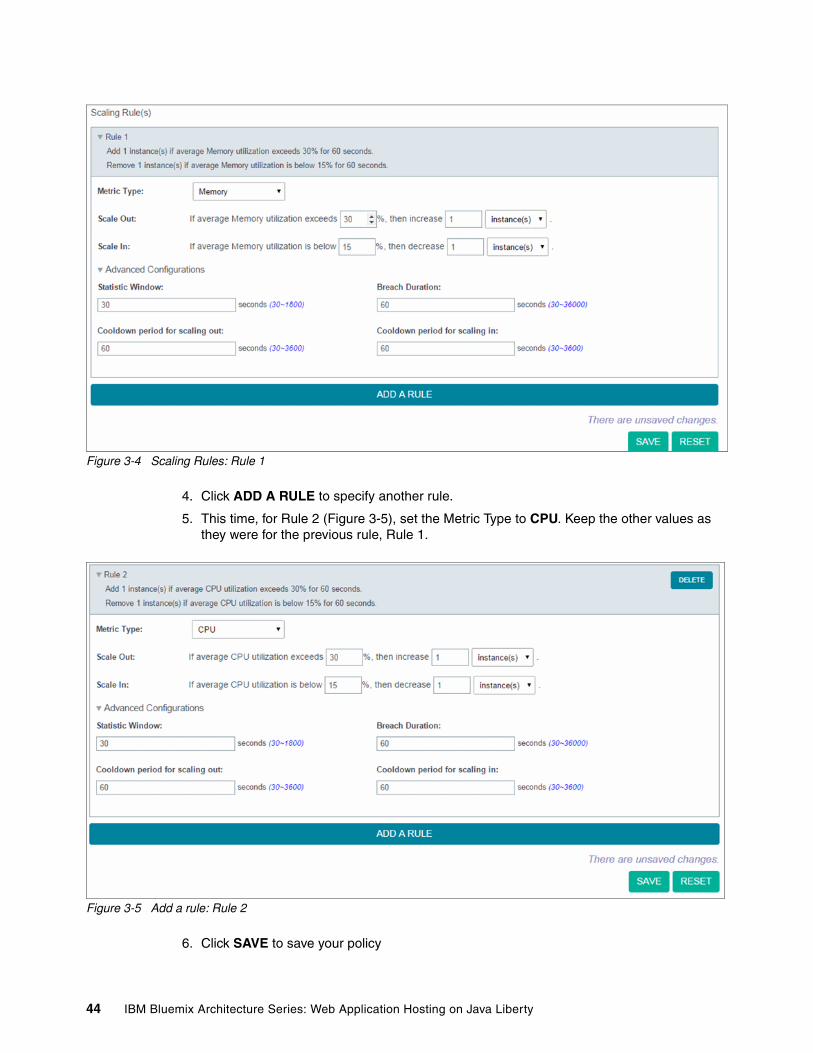
Figure 3-4 Scaling Rules: Rule 1
4. Click ADD A RULE to specify another rule.
5. This time, for Rule 2 (Figure 3-5), set the Metric Type to CPU. Keep the other values as they were for the previous rule, Rule 1.
Figure 3-5 Add a rule: Rule 2
6. Click SAVE to save your policy
44 IBM Bluemix Architecture Series: Web Application Hosting on Java Liberty

The two scaling rules are shown in Figure 3-6.
Figure 3-6 Save the auto-scaling policy definition
Your application can now automatically scale based on the policies you defined. The next task shows the effects when you start load-testing the application.
3.3 Task 3: Add a Load Impact service and create an account
In the previous task, you incorporated the auto-scaling capabilities into your application. In this task, you test that auto-scaling capability. To test, you must create some load tests to stress the application so that the auto-scaling policies, created in the previous task can be run. The Load Impact service is a third-party service that allows you to define the load and stress tests and simulate significant loads on your application.
In this task, you add a Load Impact service and bind it to your application.
If you have a no-cost or trial account, the limit is four service instances. Up to now in the labs, you have deployed four services (Data Cache, Delivery Pipeline, Monitoring and Analytics, and Auto-Scaling). Therefore, to continue with the tasks in Lab 2 if you have a no-cost or trial account, we suggest that you delete the Delivery Pipeline service from your dashboard.
To do so, select the settings icon in the top right of the Delivery Pipeline service pane (Figure 3-7 on page 46) and click Delete Service. If you are prompted to restage your application, click Restage and wait for your application to be redeployed before proceeding.
Chapter 3. Lab 2: Auto-scale, load-test, and monitor your web application 45
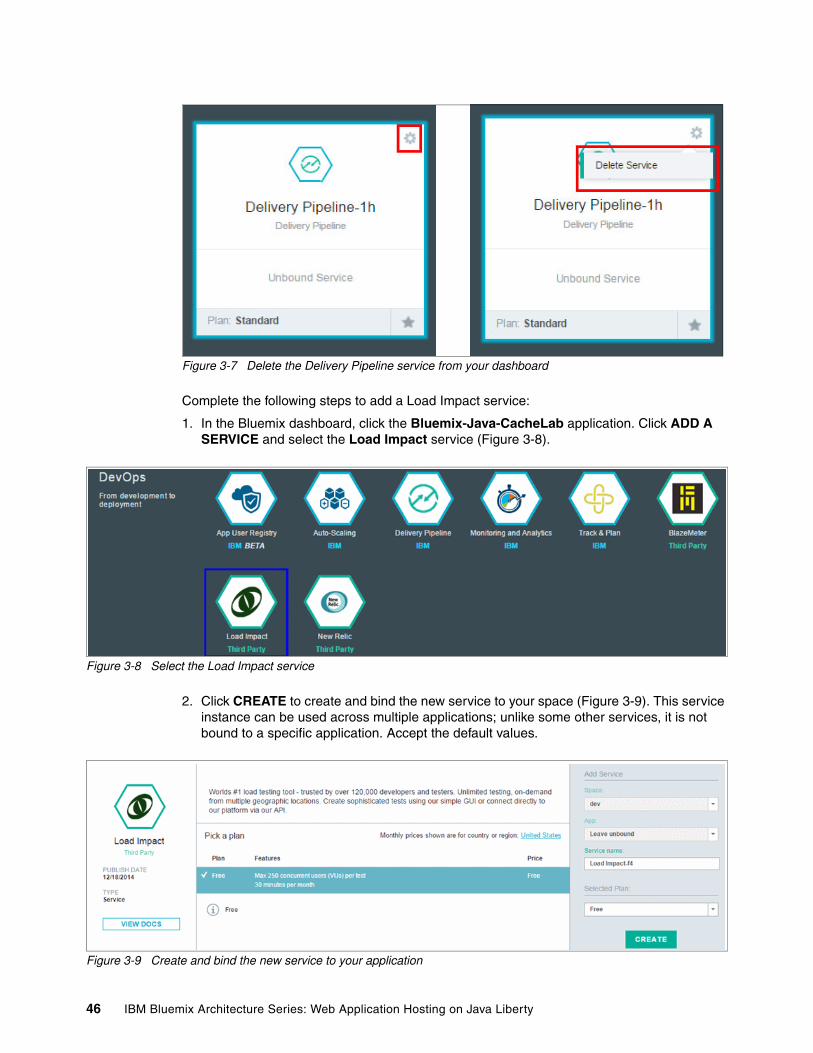
Figure 3-7 Delete the Delivery Pipeline service from your dashboard
Complete the following steps to add a Load Impact service:
1. In the Bluemix dashboard, click the Bluemix-Java-CacheLab application. Click ADD A SERVICE and select the Load Impact service (Figure 3-8).
Figure 3-8 Select the Load Impact service
2. Click CREATE to create and bind the new service to your space (Figure 3-9). This service instance can be used across multiple applications; unlike some other services, it is not bound to a specific application. Accept the default values.
Figure 3-9 Create and bind the new service to your application
46 IBM Bluemix Architecture Series: Web Application Hosting on Java Liberty
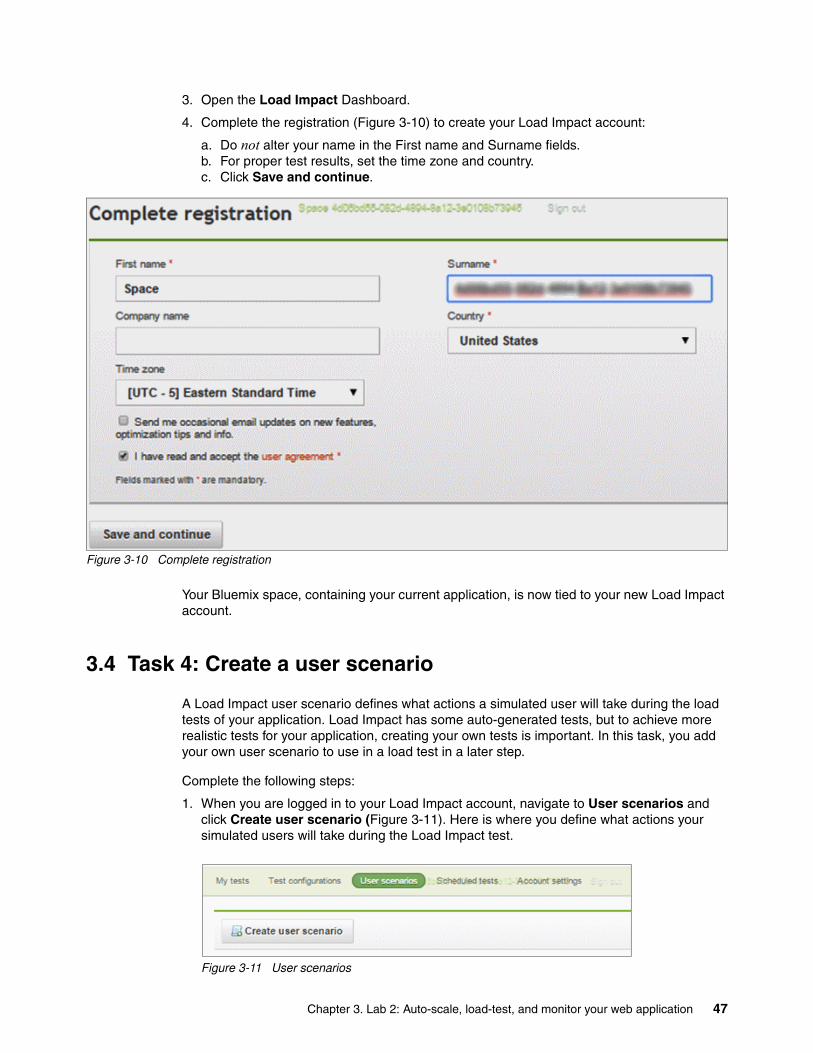
3. Open the Load Impact Dashboard.
4. Complete the registration (Figure 3-10) to create your Load Impact account:
a. Do not alter your name in the First name and Surname fields.b. For proper test results, set the time zone and country.c. Click Save and continue.
Figure 3-10 Complete registration
Your Bluemix space, containing your current application, is now tied to your new Load Impact account.
3.4 Task 4: Create a user scenario
A Load Impact user scenario defines what actions a simulated user will take during the load tests of your application. Load Impact has some auto-generated tests, but to achieve more realistic tests for your application, creating your own tests is important. In this task, you add your own user scenario to use in a load test in a later step.
Complete the following steps:
1. When you are logged in to your Load Impact account, navigate to User scenarios and click Create user scenario (Figure 3-11). Here is where you define what actions your simulated users will take during the Load Impact test.
Figure 3-11 User scenarios
Chapter 3. Lab 2: Auto-scale, load-test, and monitor your web application 47

2. Create the scenario (Figure 3-12):
a. Provide a name for your user scenario.b. Copy the test from Appendix A, “Sample test for the Load Impact scenario” on page 57. c. Paste the test into the script box, as shown in the figure. d. Because your web application uses a URL that differs from the URL in the script, you
must modify the WEBSITE_URL code setting variable to your own application’s Bluemix URL.
Figure 3-12 Copy and paste the test into the script box
3. Click Save to create your scenario.
The User Scenario we provided was created with the culmination of Load Impacts Chrome recorder extension and some custom Lua scripting. For more information about generating your own tests for other applications, see the Load Impact documentation:
� Load Impact Quick Start Guide:
http://support.loadimpact.com/knowledgebase/articles/302067-load-impact-quick-start-guide
� Simulating realistic load using Load Impact:
http://support.loadimpact.com/knowledgebase/articles/265464-simulating-realistic-load-using-load-impact
� Lua Quick Start Guide:
http://support.loadimpact.com/knowledgebase/articles/174637-lua-quick-start-guide
3.5 Task 5: Create and run a test configuration
A test configuration in Load Impact orchestrates how simulated users will act and behave during a Load Impact test. Here you determine testing factors such as how many users will be simulated, how long the test will run, the number of servers used, and which user scenarios will be run throughout the test.
Complete the following steps:
1. Navigate to Test configurations and click Create test configuration (Figure 3-13 on page 49) to start creating our Load Impact test.
URL ending: Be sure your URL does not end with a forward slash (/) character.
48 IBM Bluemix Architecture Series: Web Application Hosting on Java Liberty
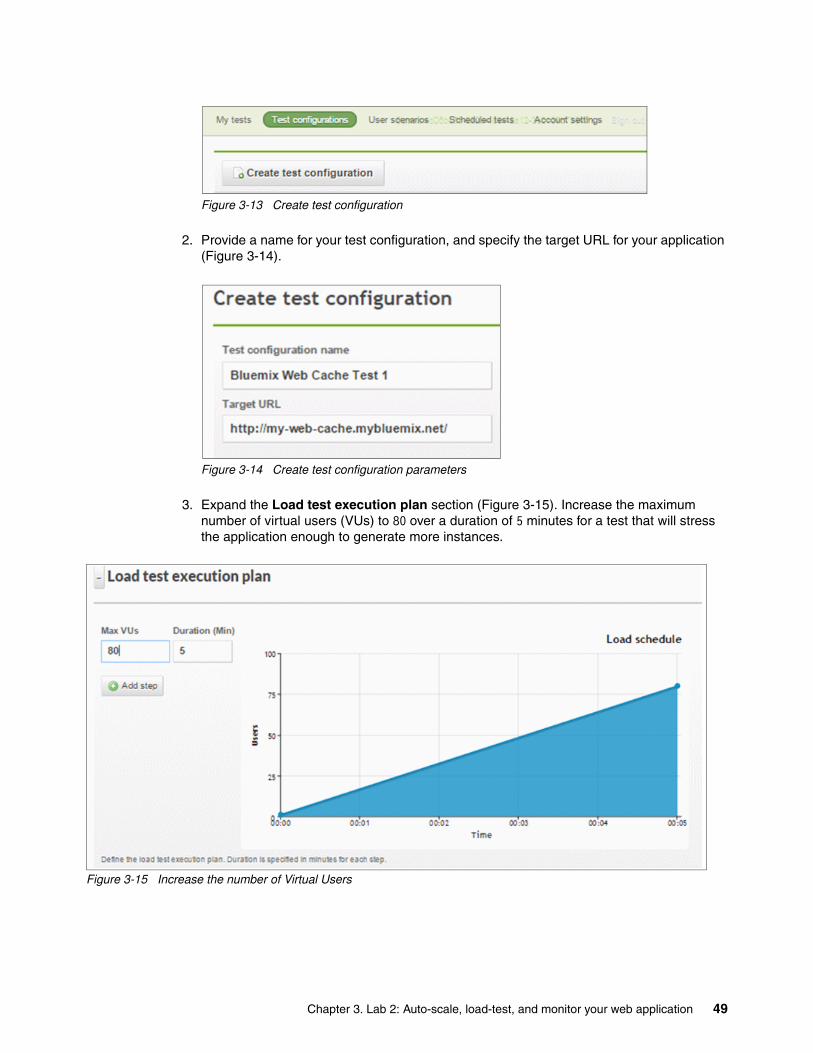
Figure 3-13 Create test configuration
2. Provide a name for your test configuration, and specify the target URL for your application (Figure 3-14).
Figure 3-14 Create test configuration parameters
3. Expand the Load test execution plan section (Figure 3-15). Increase the maximum number of virtual users (VUs) to 80 over a duration of 5 minutes for a test that will stress the application enough to generate more instances.
Figure 3-15 Increase the number of Virtual Users
Chapter 3. Lab 2: Auto-scale, load-test, and monitor your web application 49
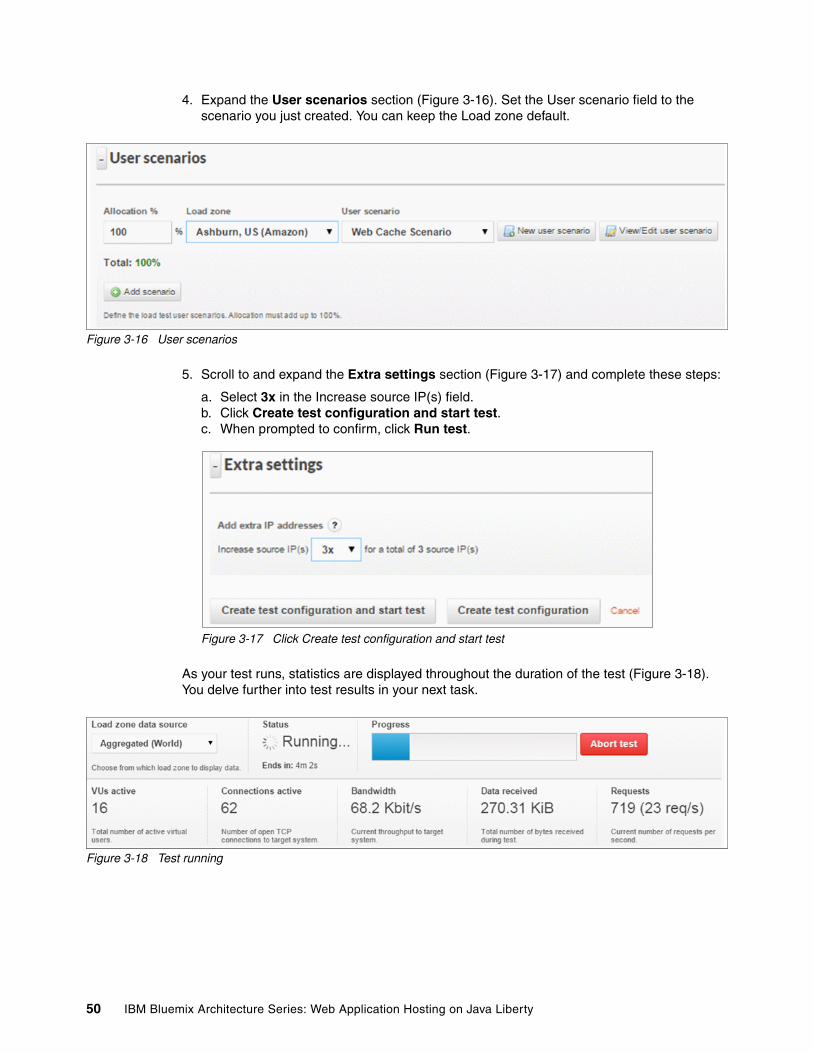
4. Expand the User scenarios section (Figure 3-16). Set the User scenario field to the scenario you just created. You can keep the Load zone default.
Figure 3-16 User scenarios
5. Scroll to and expand the Extra settings section (Figure 3-17) and complete these steps:
a. Select 3x in the Increase source IP(s) field. b. Click Create test configuration and start test. c. When prompted to confirm, click Run test.
Figure 3-17 Click Create test configuration and start test
As your test runs, statistics are displayed throughout the duration of the test (Figure 3-18). You delve further into test results in your next task.
Figure 3-18 Test running
50 IBM Bluemix Architecture Series: Web Application Hosting on Java Liberty
3.6 Task 6: View Load Impact test results and add graphs
As the Load Impact test runs, data that is collected from load testing your application is generated and saved. In this task, you access and view some of this information.
Complete the following steps:
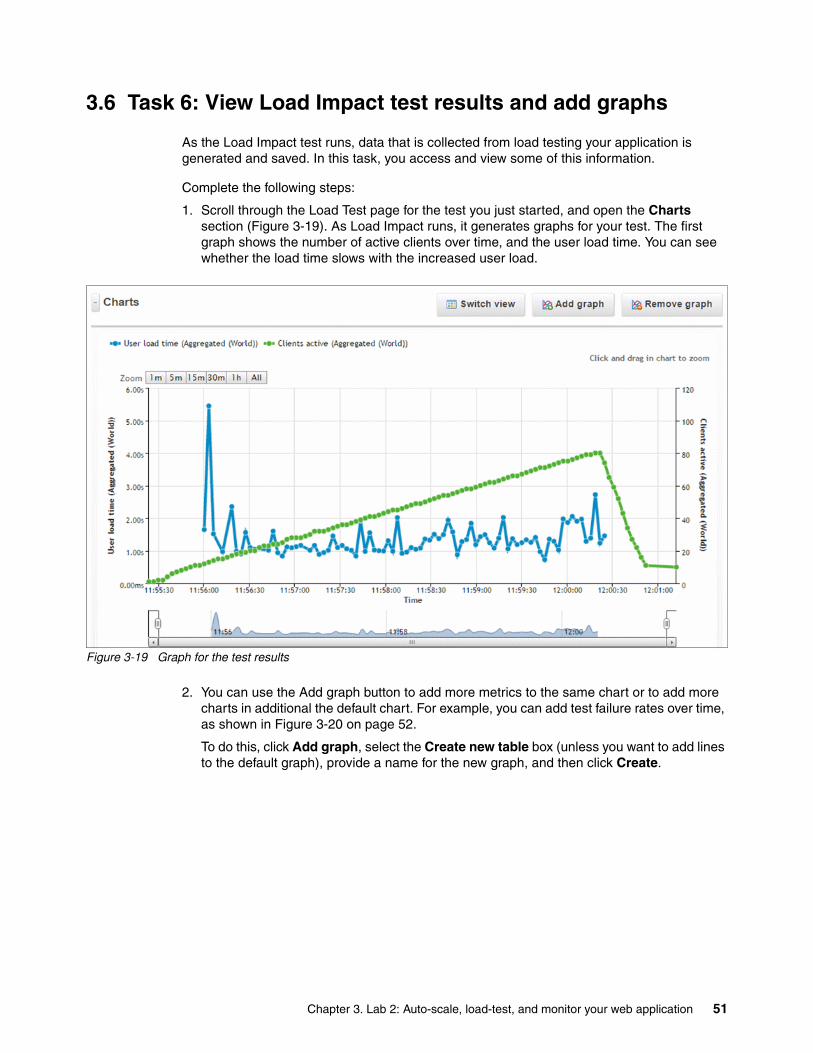
1. Scroll through the Load Test page for the test you just started, and open the Charts section (Figure 3-19). As Load Impact runs, it generates graphs for your test. The first graph shows the number of active clients over time, and the user load time. You can see whether the load time slows with the increased user load.
Figure 3-19 Graph for the test results
2. You can use the Add graph button to add more metrics to the same chart or to add more charts in additional the default chart. For example, you can add test failure rates over time, as shown in Figure 3-20 on page 52.
To do this, click Add graph, select the Create new table box (unless you want to add lines to the default graph), provide a name for the new graph, and then click Create.
Chapter 3. Lab 2: Auto-scale, load-test, and monitor your web application 51
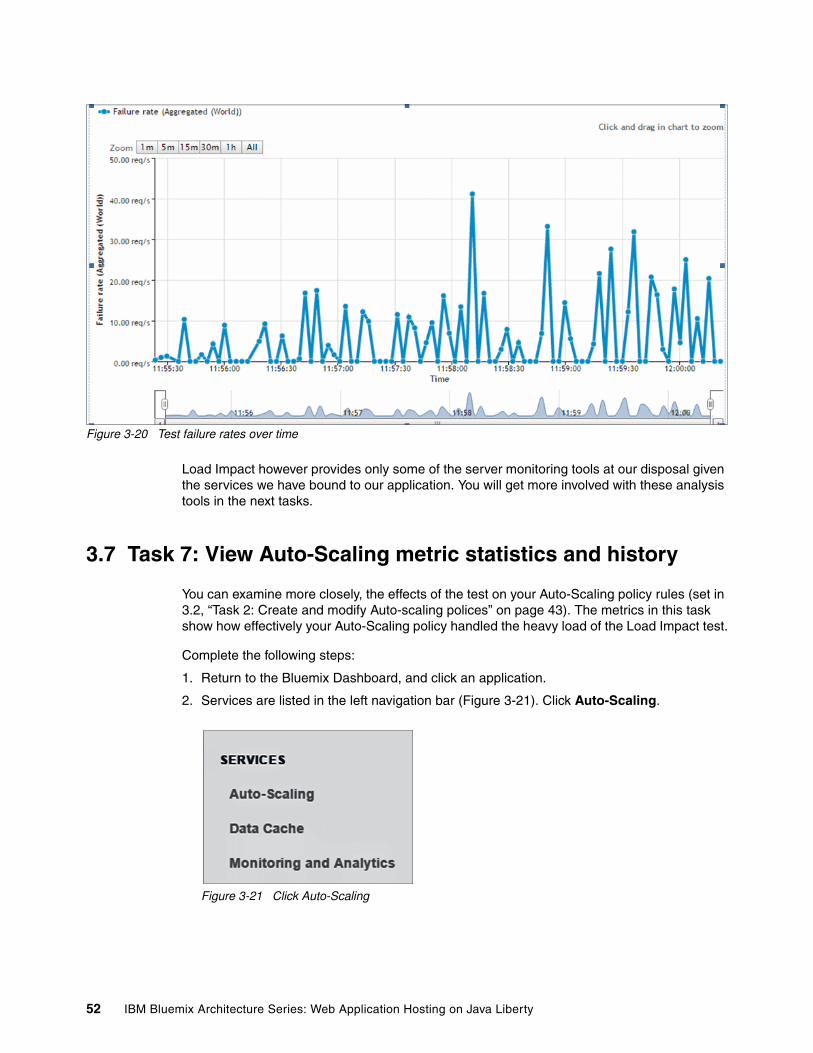
Figure 3-20 Test failure rates over time
Load Impact however provides only some of the server monitoring tools at our disposal given the services we have bound to our application. You will get more involved with these analysis tools in the next tasks.
3.7 Task 7: View Auto-Scaling metric statistics and history
You can examine more closely, the effects of the test on your Auto-Scaling policy rules (set in 3.2, “Task 2: Create and modify Auto-scaling polices” on page 43). The metrics in this task show how effectively your Auto-Scaling policy handled the heavy load of the Load Impact test.
Complete the following steps:
1. Return to the Bluemix Dashboard, and click an application.
2. Services are listed in the left navigation bar (Figure 3-21). Click Auto-Scaling.
Figure 3-21 Click Auto-Scaling
52 IBM Bluemix Architecture Series: Web Application Hosting on Java Liberty

3. Click the Metric Statistics tab to see graphs of usage statistics over time for your Bluemix application. Scroll through to see all the graphs. If you set up any scaling rules for a specific property, upper and lower threshold indicators show when your application will create or remove additional instances.
Figure 3-22 shows the CPU metrics.
Figure 3-22 Graphs of usage statistics
Figure 3-23 shows the memory metrics.
Figure 3-23 Graphs of usage statistics
Chapter 3. Lab 2: Auto-scale, load-test, and monitor your web application 53
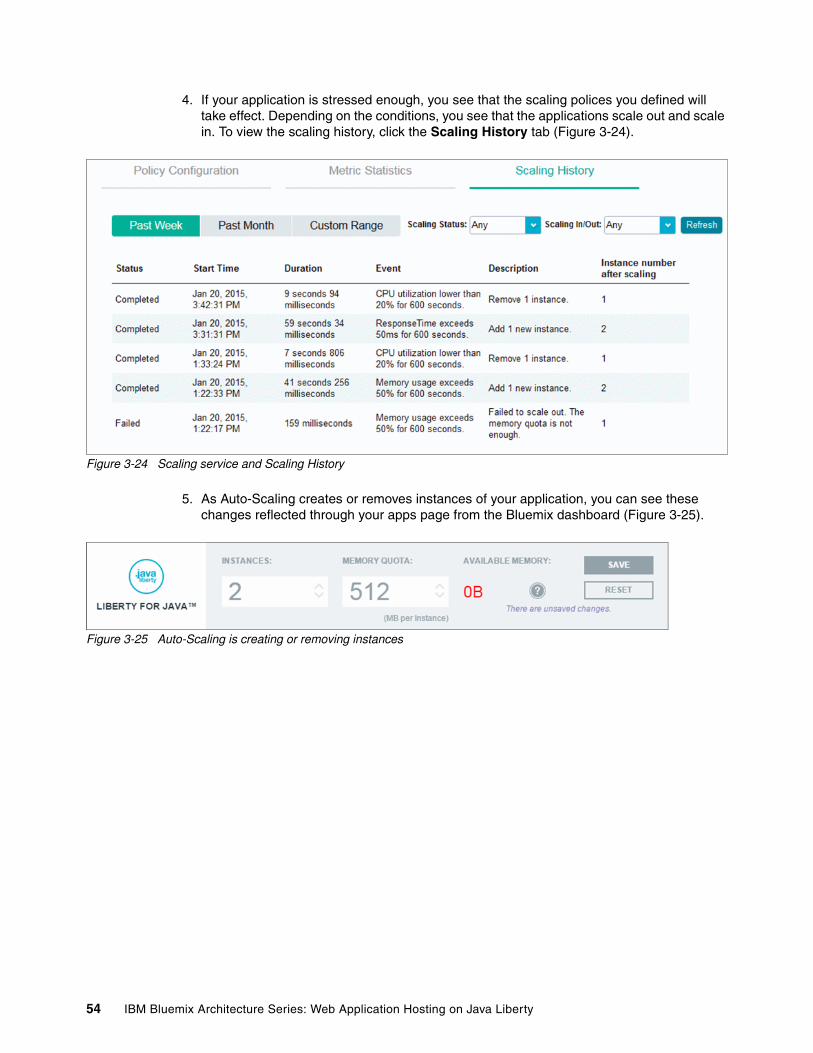
4. If your application is stressed enough, you see that the scaling polices you defined will take effect. Depending on the conditions, you see that the applications scale out and scale in. To view the scaling history, click the Scaling History tab (Figure 3-24).
Figure 3-24 Scaling service and Scaling History
5. As Auto-Scaling creates or removes instances of your application, you can see these changes reflected through your apps page from the Bluemix dashboard (Figure 3-25).
Figure 3-25 Auto-Scaling is creating or removing instances
54 IBM Bluemix Architecture Series: Web Application Hosting on Java Liberty
3.8 Task 8: View Monitoring and Analytics performance
The Monitoring and Analytics service provides Performance Monitoring resource metrics about your Bluemix Java Liberty application. In this part of the service, you can identify potential issues with your application at run time.
Complete the following steps:
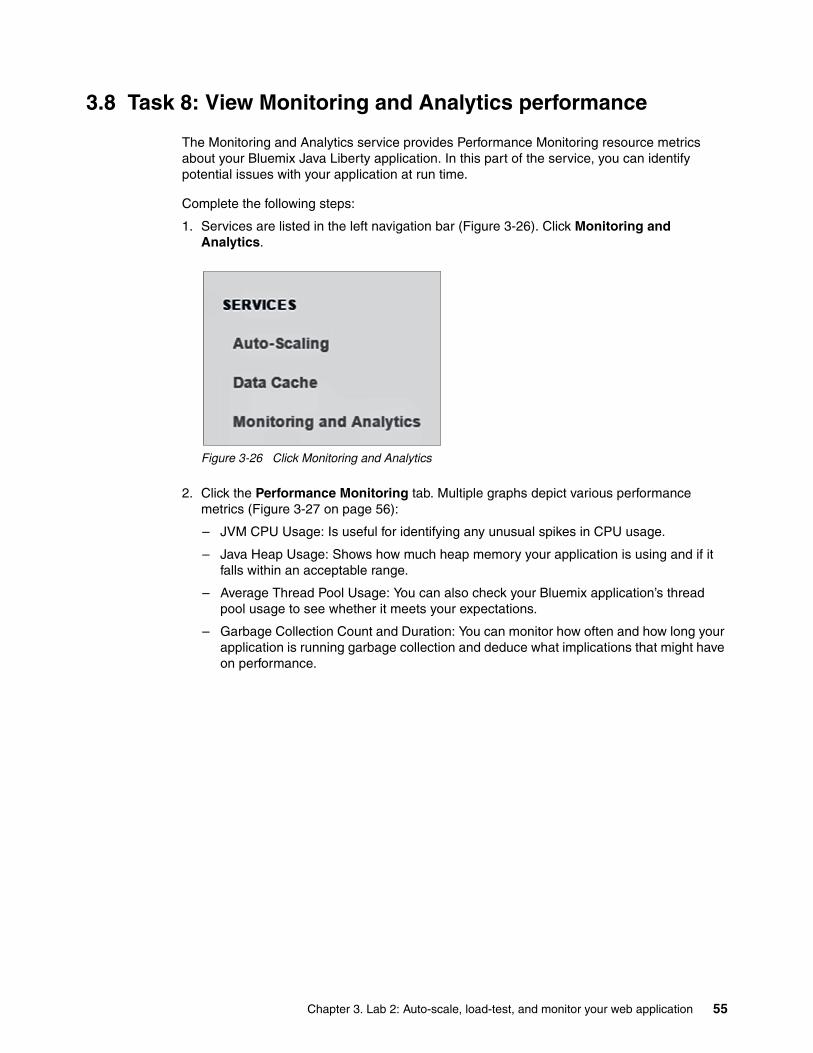
1. Services are listed in the left navigation bar (Figure 3-26). Click Monitoring and Analytics.
Figure 3-26 Click Monitoring and Analytics
2. Click the Performance Monitoring tab. Multiple graphs depict various performance metrics (Figure 3-27 on page 56):
– JVM CPU Usage: Is useful for identifying any unusual spikes in CPU usage.
– Java Heap Usage: Shows how much heap memory your application is using and if it falls within an acceptable range.
– Average Thread Pool Usage: You can also check your Bluemix application’s thread pool usage to see whether it meets your expectations.
– Garbage Collection Count and Duration: You can monitor how often and how long your application is running garbage collection and deduce what implications that might have on performance.
Chapter 3. Lab 2: Auto-scale, load-test, and monitor your web application 55
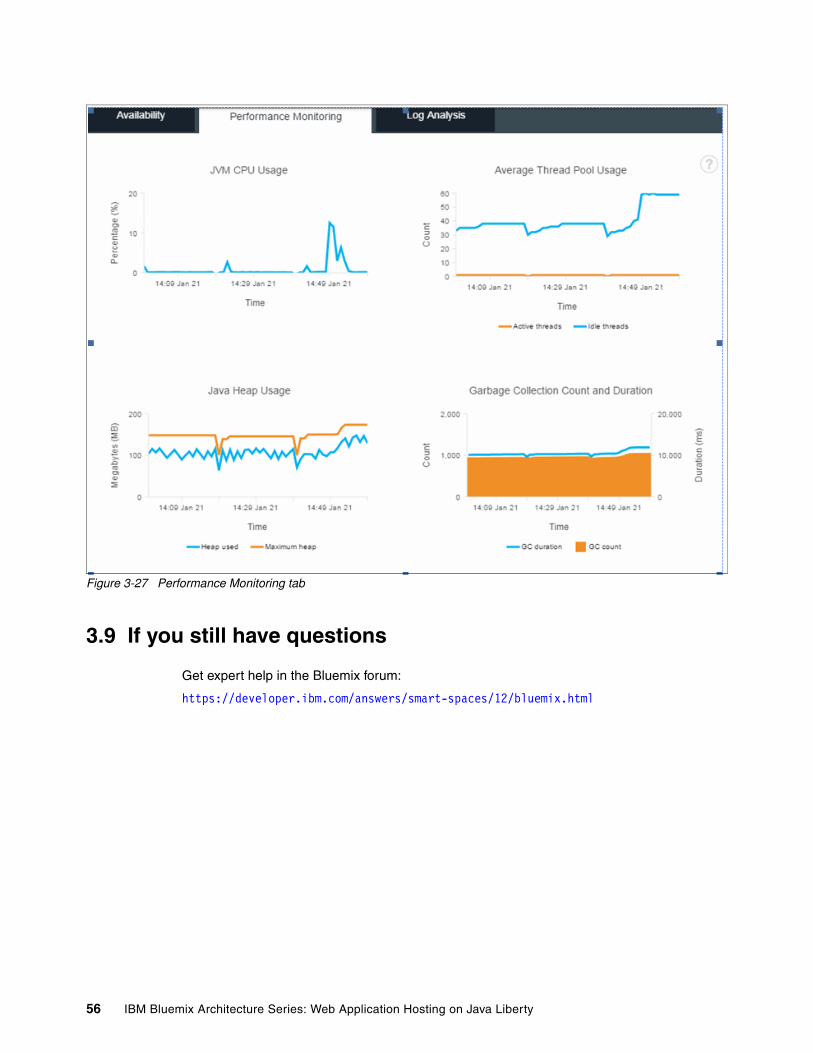
Figure 3-27 Performance Monitoring tab
3.9 If you still have questions
Get expert help in the Bluemix forum:
https://developer.ibm.com/answers/smart-spaces/12/bluemix.html
56 IBM Bluemix Architecture Series: Web Application Hosting on Java Liberty
Appendix A. Sample test for the Load Impact scenario
The code in this Appendix is used in the Load Impact user scenario (in Chapter 2, “Lab 1: Build a web application hosting architecture with Cloud Foundry” on page 9). Although Load Impact has some auto-generated tests, you can achieve more realistic tests for your application by creating your own.
For this purpose, you need to copy and paste the test we provide here into the script box in step 2 on page 48 (of “Task 4: Create a user scenario” on page 47).
A
© Copyright IBM Corp. 2015. All rights reserved. 57
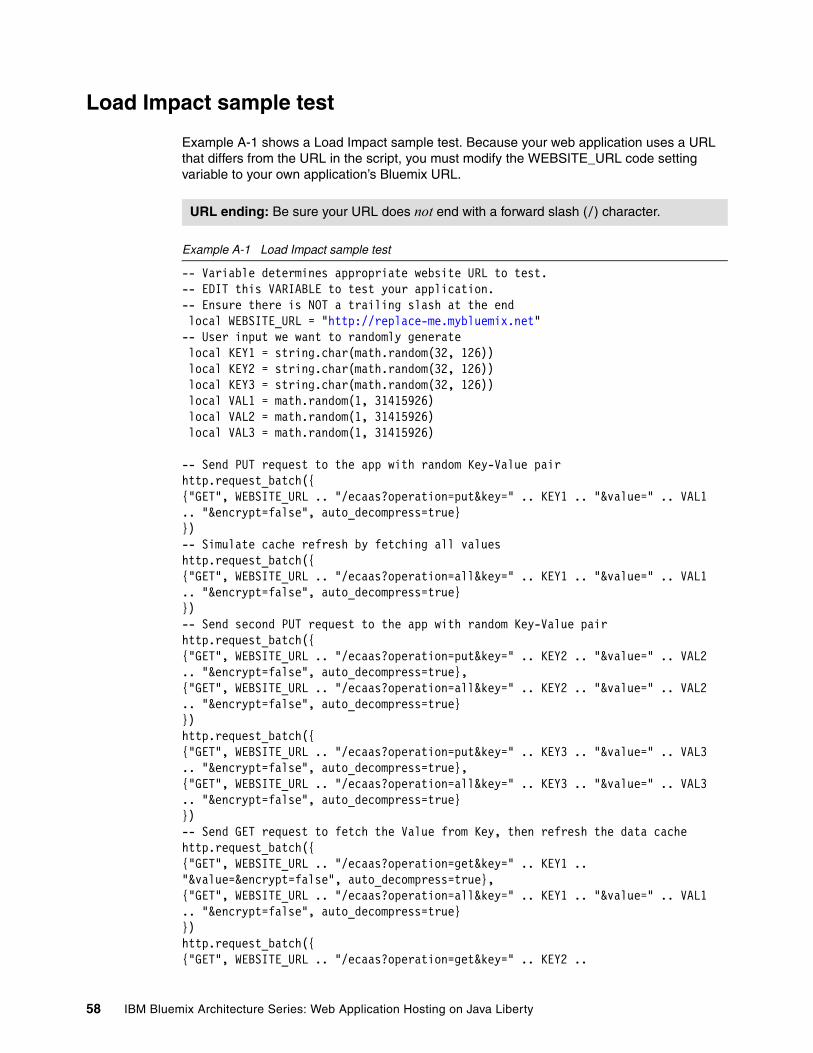
Load Impact sample test
Example A-1 shows a Load Impact sample test. Because your web application uses a URL that differs from the URL in the script, you must modify the WEBSITE_URL code setting variable to your own application’s Bluemix URL.
Example A-1 Load Impact sample test
-- Variable determines appropriate website URL to test.-- EDIT this VARIABLE to test your application.-- Ensure there is NOT a trailing slash at the end local WEBSITE_URL = "http://replace-me.mybluemix.net"-- User input we want to randomly generate local KEY1 = string.char(math.random(32, 126)) local KEY2 = string.char(math.random(32, 126)) local KEY3 = string.char(math.random(32, 126)) local VAL1 = math.random(1, 31415926) local VAL2 = math.random(1, 31415926) local VAL3 = math.random(1, 31415926)
-- Send PUT request to the app with random Key-Value pairhttp.request_batch({{"GET", WEBSITE_URL .. "/ecaas?operation=put&key=" .. KEY1 .. "&value=" .. VAL1.. "&encrypt=false", auto_decompress=true}})-- Simulate cache refresh by fetching all valueshttp.request_batch({{"GET", WEBSITE_URL .. "/ecaas?operation=all&key=" .. KEY1 .. "&value=" .. VAL1.. "&encrypt=false", auto_decompress=true}})-- Send second PUT request to the app with random Key-Value pairhttp.request_batch({{"GET", WEBSITE_URL .. "/ecaas?operation=put&key=" .. KEY2 .. "&value=" .. VAL2.. "&encrypt=false", auto_decompress=true},{"GET", WEBSITE_URL .. "/ecaas?operation=all&key=" .. KEY2 .. "&value=" .. VAL2.. "&encrypt=false", auto_decompress=true}})http.request_batch({{"GET", WEBSITE_URL .. "/ecaas?operation=put&key=" .. KEY3 .. "&value=" .. VAL3.. "&encrypt=false", auto_decompress=true},{"GET", WEBSITE_URL .. "/ecaas?operation=all&key=" .. KEY3 .. "&value=" .. VAL3.. "&encrypt=false", auto_decompress=true}})-- Send GET request to fetch the Value from Key, then refresh the data cachehttp.request_batch({{"GET", WEBSITE_URL .. "/ecaas?operation=get&key=" .. KEY1 .."&value=&encrypt=false", auto_decompress=true},{"GET", WEBSITE_URL .. "/ecaas?operation=all&key=" .. KEY1 .. "&value=" .. VAL1.. "&encrypt=false", auto_decompress=true}})http.request_batch({{"GET", WEBSITE_URL .. "/ecaas?operation=get&key=" .. KEY2 ..
URL ending: Be sure your URL does not end with a forward slash (/) character.
58 IBM Bluemix Architecture Series: Web Application Hosting on Java Liberty
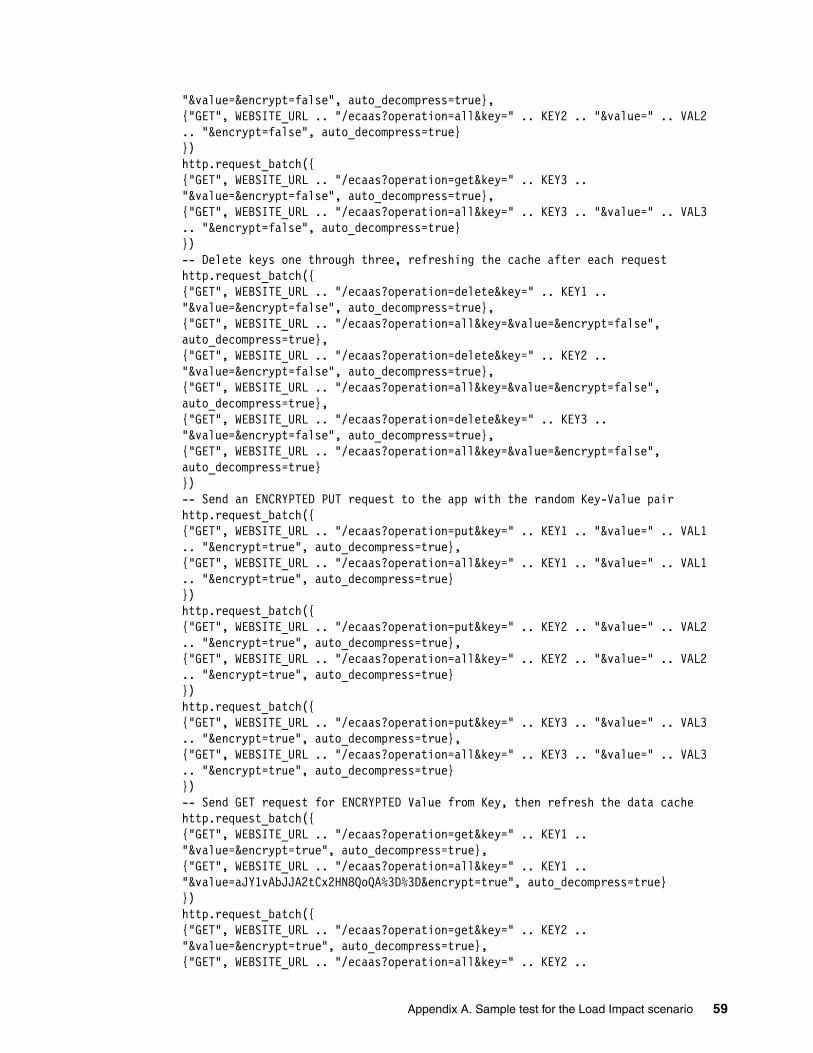
"&value=&encrypt=false", auto_decompress=true},{"GET", WEBSITE_URL .. "/ecaas?operation=all&key=" .. KEY2 .. "&value=" .. VAL2.. "&encrypt=false", auto_decompress=true}})http.request_batch({{"GET", WEBSITE_URL .. "/ecaas?operation=get&key=" .. KEY3 .."&value=&encrypt=false", auto_decompress=true},{"GET", WEBSITE_URL .. "/ecaas?operation=all&key=" .. KEY3 .. "&value=" .. VAL3.. "&encrypt=false", auto_decompress=true}})-- Delete keys one through three, refreshing the cache after each requesthttp.request_batch({{"GET", WEBSITE_URL .. "/ecaas?operation=delete&key=" .. KEY1 .."&value=&encrypt=false", auto_decompress=true},{"GET", WEBSITE_URL .. "/ecaas?operation=all&key=&value=&encrypt=false",auto_decompress=true},{"GET", WEBSITE_URL .. "/ecaas?operation=delete&key=" .. KEY2 .."&value=&encrypt=false", auto_decompress=true},{"GET", WEBSITE_URL .. "/ecaas?operation=all&key=&value=&encrypt=false",auto_decompress=true},{"GET", WEBSITE_URL .. "/ecaas?operation=delete&key=" .. KEY3 .."&value=&encrypt=false", auto_decompress=true},{"GET", WEBSITE_URL .. "/ecaas?operation=all&key=&value=&encrypt=false",auto_decompress=true}})-- Send an ENCRYPTED PUT request to the app with the random Key-Value pairhttp.request_batch({{"GET", WEBSITE_URL .. "/ecaas?operation=put&key=" .. KEY1 .. "&value=" .. VAL1.. "&encrypt=true", auto_decompress=true},{"GET", WEBSITE_URL .. "/ecaas?operation=all&key=" .. KEY1 .. "&value=" .. VAL1.. "&encrypt=true", auto_decompress=true}})http.request_batch({{"GET", WEBSITE_URL .. "/ecaas?operation=put&key=" .. KEY2 .. "&value=" .. VAL2.. "&encrypt=true", auto_decompress=true},{"GET", WEBSITE_URL .. "/ecaas?operation=all&key=" .. KEY2 .. "&value=" .. VAL2.. "&encrypt=true", auto_decompress=true}})http.request_batch({{"GET", WEBSITE_URL .. "/ecaas?operation=put&key=" .. KEY3 .. "&value=" .. VAL3.. "&encrypt=true", auto_decompress=true},{"GET", WEBSITE_URL .. "/ecaas?operation=all&key=" .. KEY3 .. "&value=" .. VAL3.. "&encrypt=true", auto_decompress=true}})-- Send GET request for ENCRYPTED Value from Key, then refresh the data cachehttp.request_batch({{"GET", WEBSITE_URL .. "/ecaas?operation=get&key=" .. KEY1 .."&value=&encrypt=true", auto_decompress=true},{"GET", WEBSITE_URL .. "/ecaas?operation=all&key=" .. KEY1 .."&value=aJY1vAbJJA2tCx2HN8QoQA%3D%3D&encrypt=true", auto_decompress=true}})http.request_batch({{"GET", WEBSITE_URL .. "/ecaas?operation=get&key=" .. KEY2 .."&value=&encrypt=true", auto_decompress=true},{"GET", WEBSITE_URL .. "/ecaas?operation=all&key=" .. KEY2 ..
Appendix A. Sample test for the Load Impact scenario 59

"&value=3o29aRTtQAPQBq1uW7zSkg%3D%3D&encrypt=true", auto_decompress=true}})http.request_batch({{"GET", WEBSITE_URL .. "/ecaas?operation=get&key=" .. KEY3 .."&value=&encrypt=true", auto_decompress=true},{"GET", WEBSITE_URL .. "/ecaas?operation=all&key=" .. KEY3 .."&value=zQ7y%2Frb9pnRKfvxoPk%2B3cA%3D%3D&encrypt=true", auto_decompress=true}})-- Delete Keys one and two, leaving three. Refresh cache after each requesthttp.request_batch({{"GET", WEBSITE_URL .. "/ecaas?operation=delete&key=" .. KEY1 .."&value=&encrypt=true", auto_decompress=true},{"GET", WEBSITE_URL .. "/ecaas?operation=all&key=&value=&encrypt=true",auto_decompress=true},{"GET", WEBSITE_URL .. "/ecaas?operation=delete&key=" .. KEY2 .."&value=&encrypt=true", auto_decompress=true},{"GET", WEBSITE_URL .. "/ecaas?operation=all&key=&value=&encrypt=true",auto_decompress=true}})client.sleep(math.random(20,40))
60 IBM Bluemix Architecture Series: Web Application Hosting on Java Liberty
Related publications
The publications listed in this section are considered particularly suitable for a more detailed discussion of the topics covered in this paper.
IBM Redbooks
The following IBM Redbooks publications provide additional information about the topic in this document. Note that some publications referenced in this list might be available in softcopy only.
� Accelerate Development of New Enterprise Solutions for the Cloud with Codename Bluemix, REDP-5011
� IBM Bluemix Architecture Series: Web Application Hosting on IBM Containers, REDP-5181
You can search for, view, download or order these documents and other Redbooks, Redpapers, Web Docs, draft and additional materials, at the following website:
ibm.com/redbooks
Online resources
These websites are also relevant as further information sources:
� Sign up for Bluemix:
https://bluemix.net/
� Bluemix documentation:
https://www.ng.bluemix.net/docs/#
� Cloud Standards Customer Council Resource Hub:
http://www.cloud-council.org/resource-hub.htm
Help from IBM
IBM Support and downloads
ibm.com/support
IBM Global Services
ibm.com/services
© Copyright IBM Corp. 2015. All rights reserved. 61

62 IBM Bluemix Architecture Series: Web Application Hosting on Java Liberty


ibm.com/redbooks
REDP-5184-00
Printed in U.S.A.
Back cover