i95Dev NAV Connect User Manual - Marketplace · Dynamics NAV ERP systems. The manual is divided...
14
i95Dev NAV Connect User Manual
Transcript of i95Dev NAV Connect User Manual - Marketplace · Dynamics NAV ERP systems. The manual is divided...

www.i95Dev.com | USA | Australia | India Copyright © 2016 i95Dev. All Rights Reserved 1
Table of Contents
i95Dev NAV Connect User Manual

www.i95Dev.com | USA | Australia | India Copyright © 2016 i95Dev. All Rights Reserved 2
Table of Contents
1. Introduction .......................................................................................................................................... 3
1.1. About this guide ............................................................................................................................ 3
1.2. Terminologies................................................................................................................................ 3
2. Configuration and Setup ....................................................................................................................... 4
2.1. Enabling the Connector................................................................................................................. 4
2.2. Setting up the Connector .............................................................................................................. 5
2.3. Setting up Connector notifications ............................................................................................... 5
2.4. General Contact Info ..................................................................................................................... 5
2.5. Enabling Message Queue Report .................................................................................................. 6
2.6. Implementing Locale ..................................................................................................................... 6
3. Data synced between Magento and Dynamics NAV ............................................................................ 7
4. Magento admin dashboard................................................................................................................... 7
4.1. Customer ....................................................................................................................................... 8
4.1.1. Email Address ........................................................................................................................ 8
4.1.2. Primary Address .................................................................................................................... 8
4.1.3. Customer grid and information screen ................................................................................. 8
4.2. Order ............................................................................................................................................. 9
4.2.1. Custom order workflow ........................................................................................................ 9
4.2.2. Pre requisite for invoice sync ................................................................................................ 9
4.2.3. Order grid and information screen ..................................................................................... 10
4.3. Product ........................................................................................................................................ 11
4.3.1. Inventory & Tier Prices ........................................................................................................ 11
4.3.2. Product grid and information screen .................................................................................. 11
5. Message Queue Report in Magento ................................................................................................... 12
5.1. Sync status .................................................................................................................................. 12
5.2. Manual data sync ........................................................................................................................ 12
5.3. Clean up synced data .................................................................................................................. 12
5.4. Viewing sync report and manually syncing data......................................................................... 12

www.i95Dev.com | USA | Australia | India Copyright © 2016 i95Dev. All Rights Reserved 3
1. Introduction
i95Dev NAV Connect is a secure, scalable and an efficient way of integrating your Magento e-
commerce and Microsoft Dynamics NAV system without impacting the client’s existing workflows.
i95Dev NAV Connect is more than just information sync and helps you increase sales, reduce costs,
improve operational efficiency, and provide superior customer experience thus enabling you to take
your business to the next level.
The bidirectional information sync results in consistent data across the systems, which helps reduce
the manual administrative work, improves efficiency, streamlines order fulfilment, inventory, return
& refund, and more.
1.1. About this guide
The objective of the document is to help users understand i95Dev NAV Connect features and its
functionality. The document works on the premise that the reader is familiar with Magento and
Dynamics NAV ERP systems.
The manual is divided into the following parts:
1 Introduction A note about the guide, and terminologies used.
2 Configuration and setup Instructions to enable and configure i95Dev NAV Connect
3 Information exchanged between
Magento and Dynamics NAV List of data synchronized between Magento and Dynamics NAV.
4 Magento admin dashboard
Changes made in Magento admin screens to view Dynamics NAV
information (like NAV IDs, order status, etc.) associated with a record
in Magento.
5 i95Dev message queue report in
Magento About report functionality in Magento to view sync status, and more.
1.2. Terminologies
Customer - Customer details
Address - Order details
Product - Product detail
Order - Order details
Invoice - Invoice details
Shipment - Shipment details
Connector – i95Dev NAV Connect
Magento admin - Magento’s admin panel or web store’s backend

www.i95Dev.com | USA | Australia | India Copyright © 2016 i95Dev. All Rights Reserved 4
2. Configuration and Setup
Once i95Dev NAV Connect is installed on your Magento system two tabs, i95Dev Connect Settings
and i95Dev Message Queue Report, are added to the store configurations screen. Here you can
configure settings related to i95Dev NAV Connect and Message Queue report.
Note - This document is only for your reference. When NAV Connect is installed, the i95Dev team
takes care of installation and configuration of the connector.
i95Dev Connect settings tab is where you can manage all settings related to the connector and has
the following four sections.
i95Dev Extension
i95Dev Connect Settings
i95Dev Connect Notifications
General Contact Info
i95Dev Message Queue Report tab is where you can manage all the settings related to the reporting
functionality made available by NAV Connect. The Message Queue report allows you to view the
status of data syncing from Dynamics NAV to Magento, manually sync the data which did not sync
automatically, and more.
2.1. Enabling the Connector
The connector, when installed, is by default in disabled mode. For connector to start synchronizing
data between Magento and Dynamics NAV, it must first be enabled from the store configurations
screen.
Follow the following steps to enable the Connector from Magento admin.
1. Sign in to your Magento admin dashboard.
2. Click Store in the left admin bar, then click Configurations in the
Settings group.
3. Scroll down and expand i95Dev Connect tab in the left navigation
pane as shown in Figure 1.
4. Click i95Dev Connect Settings and expand i95Dev Extension tab.
Figure 1: i95Dev Connect Settings in store configurations
www.i95Dev.com | USA | Australia | India Copyright © 2016 i95Dev. All Rights Reserved 5
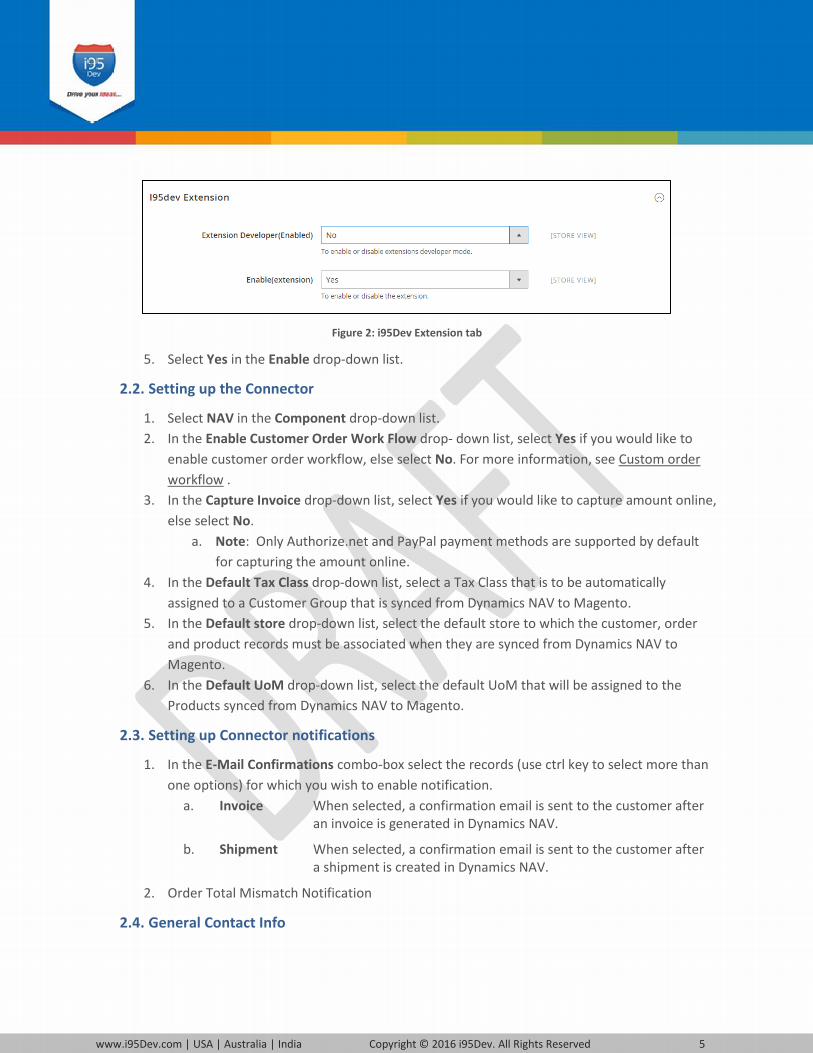
Figure 2: i95Dev Extension tab
5. Select Yes in the Enable drop-down list.
2.2. Setting up the Connector
1. Select NAV in the Component drop-down list.
2. In the Enable Customer Order Work Flow drop- down list, select Yes if you would like to
enable customer order workflow, else select No. For more information, see Custom order
workflow .
3. In the Capture Invoice drop-down list, select Yes if you would like to capture amount online,
else select No.
a. Note: Only Authorize.net and PayPal payment methods are supported by default
for capturing the amount online.
4. In the Default Tax Class drop-down list, select a Tax Class that is to be automatically
assigned to a Customer Group that is synced from Dynamics NAV to Magento.
5. In the Default store drop-down list, select the default store to which the customer, order
and product records must be associated when they are synced from Dynamics NAV to
Magento.
6. In the Default UoM drop-down list, select the default UoM that will be assigned to the
Products synced from Dynamics NAV to Magento.
2.3. Setting up Connector notifications
1. In the E-Mail Confirmations combo-box select the records (use ctrl key to select more than
one options) for which you wish to enable notification.
a. Invoice When selected, a confirmation email is sent to the customer after an invoice is generated in Dynamics NAV.
b. Shipment When selected, a confirmation email is sent to the customer after a shipment is created in Dynamics NAV.
2. Order Total Mismatch Notification
2.4. General Contact Info

www.i95Dev.com | USA | Australia | India Copyright © 2016 i95Dev. All Rights Reserved 6
2.5. Enabling Message Queue Report
Message queue report in Magento admin dashboard enables you to
view data sync status for records synced from Dynamics NAV to
Magento. It also allows you to manually sync the records which did
not sync automatically.
Refer Message Queue Report in Magento for more information.
Follow the following steps to enable message queue report from
Magento configuration.
1. Click Store in the left admin bar, then click Configurations in
the Settings group.
2. Scroll down and expand i95Dev Connect tab in the left
navigation pane.
3. Click i95Dev Message Queue Report, as shown in Figure 3,
to view the Message Queue Report Configurations screen.
4. Select Yes in the Enable(extension) drop-down list.
Figure 4: Message Queue Report Configurations
2.6. Implementing Locale
i95Dev NAV Connect by default is implemented in English language which is configured using a CSV
file. Follow the following steps to view custom fields and labels in your preferred language:
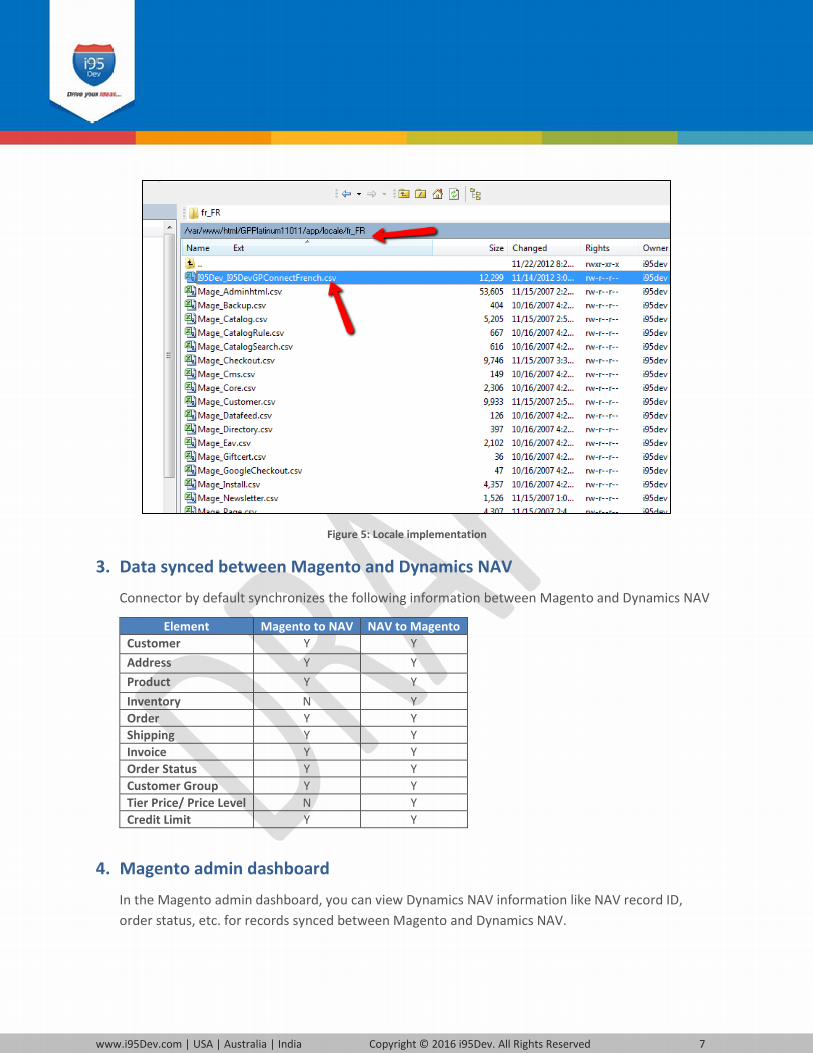
1. To display customer fields in your preferred language, download the English template, add
preferred language, and upload the same to Magento FTP as shown below.
Figure 3: i95Dev Message Queue Report Configuration
www.i95Dev.com | USA | Australia | India Copyright © 2016 i95Dev. All Rights Reserved 7
Figure 5: Locale implementation
3. Data synced between Magento and Dynamics NAV
Connector by default synchronizes the following information between Magento and Dynamics NAV
Element Magento to NAV NAV to Magento
Customer Y Y
Address Y Y
Product Y Y
Inventory N Y
Order Y Y
Shipping Y Y
Invoice Y Y
Order Status Y Y
Customer Group Y Y
Tier Price/ Price Level N Y
Credit Limit Y Y
4. Magento admin dashboard
In the Magento admin dashboard, you can view Dynamics NAV information like NAV record ID,
order status, etc. for records synced between Magento and Dynamics NAV.

www.i95Dev.com | USA | Australia | India Copyright © 2016 i95Dev. All Rights Reserved 8
4.1. Customer
4.1.1. Email Address
Customer email address is mandatory field in Magento, hence customer records created in
Dynamics NAV must have an email address. In cases where an email address in not available, the
Connector automatically generates and assigns a dummy email address. This email address
generated follows the following format:
In the above email address the NAVcustomerid is the Customer ID given at the time of Customer
creation in Dynamics NAV and companyname is the name of the NAV Company. This email id can be
updated later.
4.1.2. Primary Address
As with email, primary address is mandatory in Magento. Hence a customer record created in
Dynamics NAV must have a primary address associated with the customer record for successful
synchronization to Magento.
4.1.3. Customer grid and information screen
Once a Customer record is synced between Magento and Dynamics NAV, you can view the NAV
Customer ID in Magento admin’s Customer information screen.
We add two additional columns to Magento admin’s Customer grid, Origin - to identify the
originator (the source system where the record was created), and NAV Customer ID – to display the
primary identifier of the record in Dynamics NAV to help correlate the records in Magento and NAV.
Figure 6: Customer grid in Magento admin
www.i95Dev.com | USA | Australia | India Copyright © 2016 i95Dev. All Rights Reserved 9
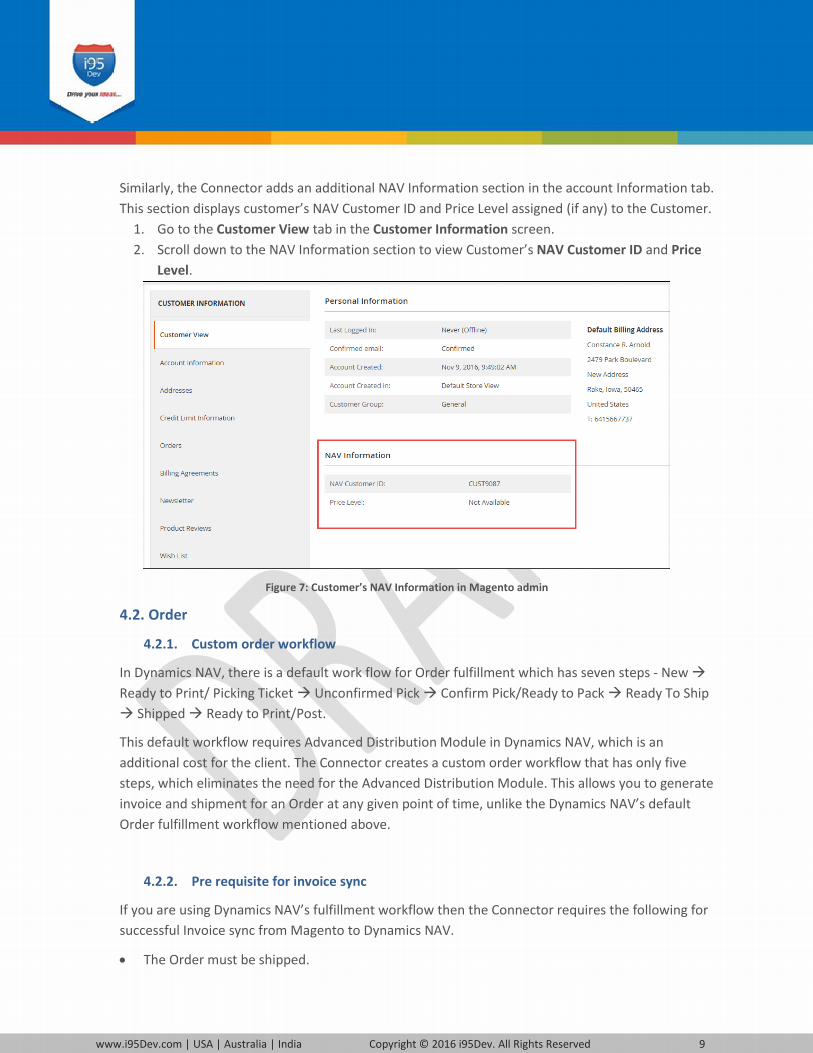
Similarly, the Connector adds an additional NAV Information section in the account Information tab.
This section displays customer’s NAV Customer ID and Price Level assigned (if any) to the Customer.
1. Go to the Customer View tab in the Customer Information screen.
2. Scroll down to the NAV Information section to view Customer’s NAV Customer ID and Price
Level.
Figure 7: Customer’s NAV Information in Magento admin
4.2. Order
4.2.1. Custom order workflow
In Dynamics NAV, there is a default work flow for Order fulfillment which has seven steps - New
Ready to Print/ Picking Ticket Unconfirmed Pick Confirm Pick/Ready to Pack Ready To Ship
Shipped Ready to Print/Post.
This default workflow requires Advanced Distribution Module in Dynamics NAV, which is an
additional cost for the client. The Connector creates a custom order workflow that has only five
steps, which eliminates the need for the Advanced Distribution Module. This allows you to generate
invoice and shipment for an Order at any given point of time, unlike the Dynamics NAV’s default
Order fulfillment workflow mentioned above.
4.2.2. Pre requisite for invoice sync
If you are using Dynamics NAV’s fulfillment workflow then the Connector requires the following for
successful Invoice sync from Magento to Dynamics NAV.
The Order must be shipped.

www.i95Dev.com | USA | Australia | India Copyright © 2016 i95Dev. All Rights Reserved 10
The Order status in Dynamics NAV must be ‘Ready to Print/Post’.
Note: For the custom order workflow provided by the Connector, the above describe pre requisites
are not mandatory.
4.2.3. Order grid and information screen
As with Customer grid, the same two columns are also added to the Order grid – Origin and NAV Order
ID.
Figure 8: Order grid in Magento admin
Similar to Customer information page, an additional section, NAV Information, is also added to the
Order information page. This section displays NAV Order ID, Order Status and NAV Invoice ID.
The Connector adds an additional NAV Information section in the account Information tab. This
section displays customer’s NAV Customer ID and Price Level assigned (if any) to the Customer.
1. Go to Information tab in the Order View screen.
2. Scroll down to the NAV Information section to view Order’s NAV Order ID, NAV Order Status
and NAV Invoice ID.
www.i95Dev.com | USA | Australia | India Copyright © 2016 i95Dev. All Rights Reserved 11
Figure 9: NAV Information of Order in Magento admin
4.3. Product
4.3.1. Inventory & Tier Prices
For inventory and tier prices, the Connector by default assumes the Dynamics NAV system as the
master. Hence, both the inventory and tier pricing information is synchronized only from Dynamics
NAV to Magento.
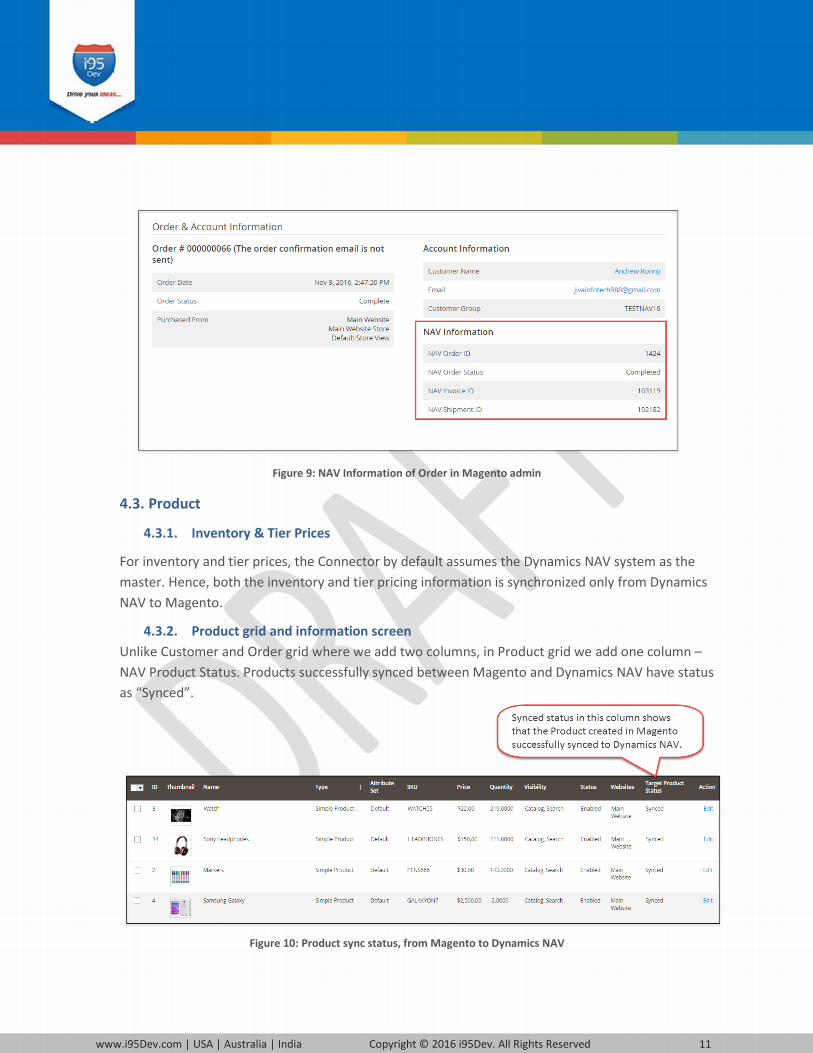
4.3.2. Product grid and information screen
Unlike Customer and Order grid where we add two columns, in Product grid we add one column –
NAV Product Status. Products successfully synced between Magento and Dynamics NAV have status
as “Synced”.
Figure 10: Product sync status, from Magento to Dynamics NAV

www.i95Dev.com | USA | Australia | India Copyright © 2016 i95Dev. All Rights Reserved 12
5. Message Queue Report in Magento
The Message Queue Report gives an overview of the status of data sync transactions happening
from Dynamics NAV to Magento. The sync status can be viewed for the following entities:
Customer Product Order
Address Tier Price Invoice
Customer Group Price Level Shipment
This is a dynamic report; once the record has synced successfully there would be no records in the
report section.
5.1. Sync status
The Connector assigns the following status to each record during various stages of the sync process
Pending Status used for incoming data – once the Connector starts receiving a message (data of an entity) from Dynamics NAV. At this stage, the data is received by Magento but yet to be synced.
Success Status used for records, which have successfully synced to Magento.
Error Status used when the Connector encounters an error during the sync process.
Complete Status used when a record is successfully synced to Magento and the success notification is sent back to the Dynamics NAV system.
5.2. Manual data sync
For every records that fail to sync to Magento (records with sync status “Error”), the connector
attempts to re-sync the record couple of times which is pre-configured. In the process, if the record
successfully syncs then the status is changed to “Success” and then to “Complete” as discussed
above. However, if the record fails to sync even after a pre-configured number of attempts, the
automated retry process is stopped and will be removed from the message queue periodically (pre-
configured).
Magento administrator can manually sync (after resolving the issue that is causing the automated
sync to fail) or delete those records.
5.3. Clean up synced data
To avoid the message queue from getting overwhelming (to understand and in size), the Connector
periodically (pre-defined) removes the data, with sync status “Complete” and “Error”, from the
message queue.
5.4. Viewing sync report and manually syncing data
Please follow the following steps to view sync report and to manually sync records with sync status
Error.
1. Login as administrator in Magento admin panel.

www.i95Dev.com | USA | Australia | India Copyright © 2016 i95Dev. All Rights Reserved 13
2. Click Reports in the Admin sidebar click Message Queue Report in i95Dev Message
Queue group. The system displays the Message Queue Report screen.
Figure 11: Navigation to Message Queue Report
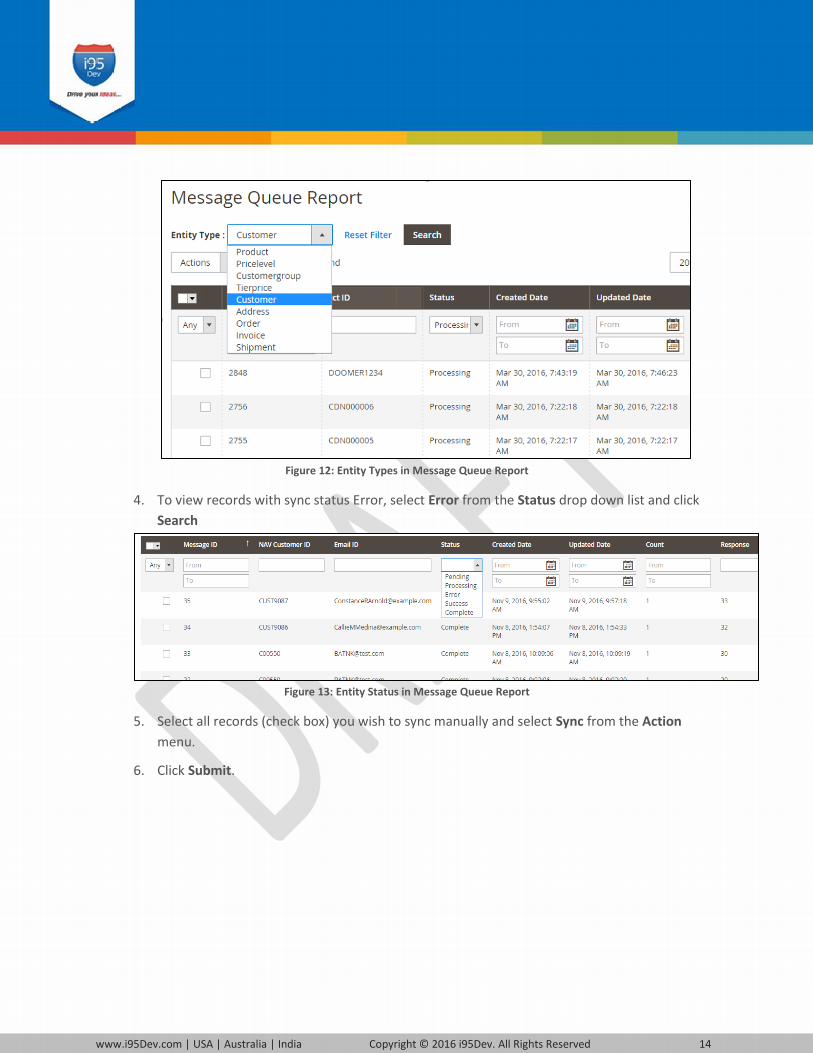
3. Select the entity type in Entity Type drop-down list for which you wish to see the sync
report.
www.i95Dev.com | USA | Australia | India Copyright © 2016 i95Dev. All Rights Reserved 14
Figure 12: Entity Types in Message Queue Report
4. To view records with sync status Error, select Error from the Status drop down list and click
Search
Figure 13: Entity Status in Message Queue Report
5. Select all records (check box) you wish to sync manually and select Sync from the Action
menu.
6. Click Submit.