Human Powered Trebuchet - Make · PDF fileHuman Powered Trebuchet In Medieval times, the...
7
Human Powered Trebuchet In Medieval times, the trebuchet was the largest and most expensive machine on earth. With giant wooden arms and counterweights weighing many tons, the trebuchet was used to hurl heavy boulders and break down castle walls. No heavy weights here, though. Instead, this project is an in- expensive, portable, human-powered machine that can toss water balloons farther than you ever imagined. It’s a modern take on a very old idea. FOR MORE PROJECTS, VISIT: makezine.tv Human Powered Trebuchet page 1 Tools Electric drill ½” drill bit 25/64” drill bit 9/32” drill bit Saw Miter box 4” or larger C-clamps (3-4) Scrap wood Materials Note: All pipes and fittings are schedule 40 ABS or PVC pipe, 1½” in diameter. PVC is usually white. ABS is typically black. We used ABS but either will work. 10’ long pipe (5) End cap fittings (4) Threaded pipe unions (4) Coupling 90° elbow fittings (4) Tee fittings (2) Pieces of garden hose, ½” inside diameter, 1” long (2) ½” diameter, fully threaded bolt or threaded rod, 8” long, nuts and washers ¼” bolt, 2” long, washers and nuts 3/8” diameter bolt, 5” long, washers and nuts (4) Cement appropriate for the type of plastic used Estimated Cost: Under $75. Before you begin: You may find it necessary to modify these instructions, depending on what materials and tools you have at hand, and any improvements you might want to make in the design. Go ahead and customize the project and make it your own!
Transcript of Human Powered Trebuchet - Make · PDF fileHuman Powered Trebuchet In Medieval times, the...

Human Powered Trebuchet
In Medieval times, the trebuchet was the largest and most expensive machine on earth. With giant wooden arms and counterweights weighing many tons, the trebuchet was used to hurl heavy boulders and break down castle walls.
No heavy weights here, though. Instead, this project is an in-expensive, portable, human-powered machine that can toss water balloons farther than you ever imagined. It’s a modern take on a very old idea.
FOR MORE PROJECTS, VISIT: makezine.tv
Human Powered Trebuchetpage 1
ToolsElectric drill½” drill bit25/64” drill bit9/32” drill bitSawMiter box4” or larger C-clamps (3-4)Scrap wood
MaterialsNote: All pipes and fittings are schedule 40 ABS or PVC pipe, 1½” in diameter. PVC is usually white. ABS is typically black. We used ABS but either will work.10’ long pipe (5)End cap fittings (4)Threaded pipe unions (4)Coupling90° elbow fittings (4)Tee fittings (2)Pieces of garden hose, ½” inside diameter, 1” long (2)½” diameter, fully threaded bolt or threaded rod, 8” long, nuts and washers ¼” bolt, 2” long, washers and nuts3/8” diameter bolt, 5” long, washers and nuts (4)Cement appropriate for the type of plastic used
Estimated Cost: Under $75.
Before you begin:You may find it necessary to modify these instructions, depending on what materials and tools you have at hand, and any improvements you might want to make in the design. Go ahead and customize the project and make it your own!
Human Powered Trebuchet
FOR MORE PROJECTS, VISIT: makezine.tv
Human Powered Trebuchetpage 2
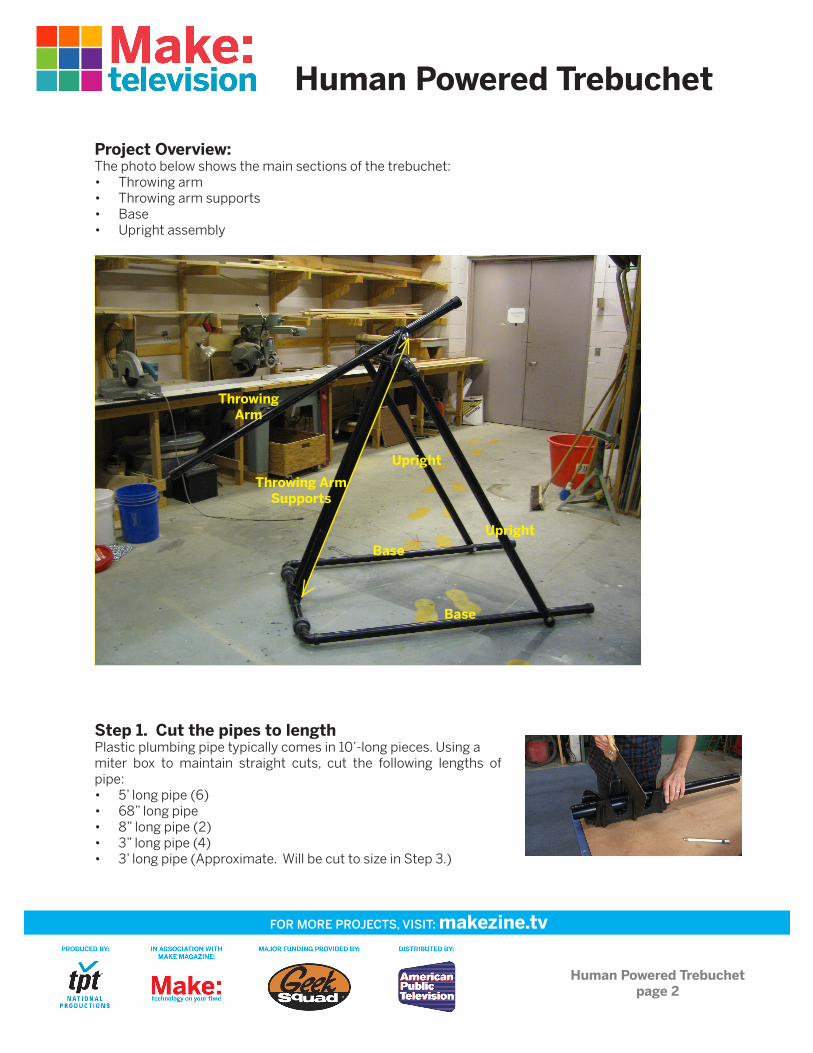
Project Overview: The photo below shows the main sections of the trebuchet:
Throwing arm• Throwing arm supports • Base• Upright assembly•
Step 1. Cut the pipes to lengthPlastic plumbing pipe typically comes in 10’-long pieces. Using a miter box to maintain straight cuts, cut the following lengths of pipe:
5’ long pipe (6)• 68” long pipe • 8” long pipe (2)• 3” long pipe (4)• 3’ long pipe (Approximate. Will be cut to size in Step 3.)•
Throwing Arm
Throwing ArmSupports
Upright
Upright
Base
Base
Human Powered Trebuchet
FOR MORE PROJECTS, VISIT: makezine.tv
Human Powered Trebuchetpage 3
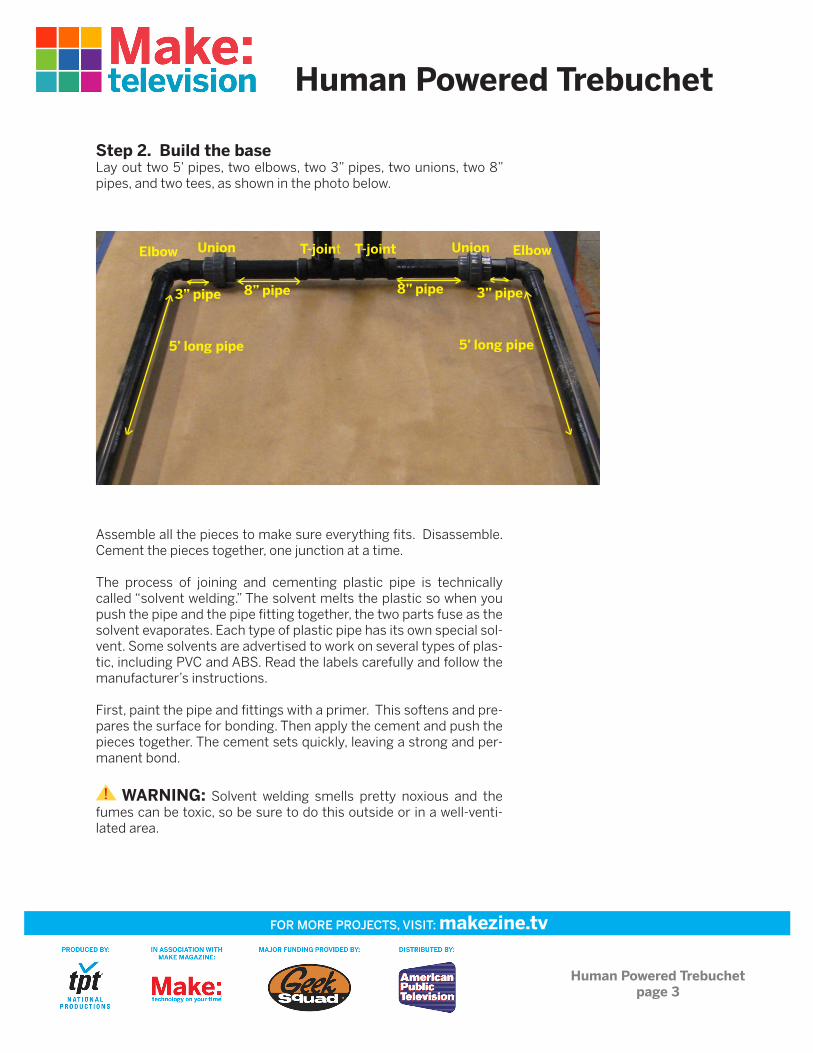
Step 2. Build the baseLay out two 5’ pipes, two elbows, two 3” pipes, two unions, two 8” pipes, and two tees, as shown in the photo below.
Assemble all the pieces to make sure everything fits. Disassemble. Cement the pieces together, one junction at a time. The process of joining and cementing plastic pipe is technically called “solvent welding.” The solvent melts the plastic so when you push the pipe and the pipe fitting together, the two parts fuse as the solvent evaporates. Each type of plastic pipe has its own special sol-vent. Some solvents are advertised to work on several types of plas-tic, including PVC and ABS. Read the labels carefully and follow the manufacturer’s instructions.
First, paint the pipe and fittings with a primer. This softens and pre-pares the surface for bonding. Then apply the cement and push the pieces together. The cement sets quickly, leaving a strong and per-manent bond.
WARNING: Solvent welding smells pretty noxious and the fumes can be toxic, so be sure to do this outside or in a well-venti-lated area.
Union UnionT-joint T-joint
8” pipe 8” pipe
Elbow Elbow
3” pipe 3” pipe
5’ long pipe 5’ long pipe

Step 3. Build the upright assembly Lay out two 5’ pipes, two elbows, two 3” pipes, two unions. Dry fit pieces together, and then lay the uprights next to the sides of the base. Measure the distance between the unions on the upright as-sembly. Cut the pipe to length so that the pipe is well seated be-tween the unions. (Our length was 28”.) Disassemble, then carefully apply cement and fit pieces together to form the upright.
Step 4. Attach the upright assembly to the baseMeasure and mark a point twelve inches from the end of the base. Then, measure and mark a point two inches from the end of the up-right assembly. Clamp the upright assembly to the base using the C-clamps. Drill a 25/64” hole through both sides. Insert a 3/8” bolt, with a washer on each side of the plastic pipe and secure with a nut. Repeat this process for the other side of the trebuchet.
Human Powered Trebuchet
FOR MORE PROJECTS, VISIT: makezine.tv
Human Powered Trebuchetpage 4
Base
Base
Upright
UprightElbow3” pipe
Cut to Length
5’ long p
ipe
12”2”
Base
Upright

Human Powered Trebuchet
FOR MORE PROJECTS, VISIT: makezine.tv
Human Powered Trebuchetpage 5
Step 5. Complete the triangleCement the two remaining 5’ pipes into the tees on the base. These pipes will form the throwing arm supports. Then, raise the upright assembly up to the throwing arm supports so it forms a triangle with the base when seen from the side.
Next, clamp the structure with C-clamps and wood scraps as shown in the picture. The throwing arm supports should extend 12” beyond the crosspiece of the upright assembly. Using a 7/16” drill, drill a hole through the clamped upright assembly and each throwing arm support. Insert a 3/8” bolt, with a washer on each side of the plastic pipe and secure with a nut.
Step 6. Reinforce throwing armThe 68” length of pipe will function as a throwing arm. The throwing arm will also attach to the trebuchet structure with a ½” bolt, but drilling through the pipe will weaken the throwing arm. Reinforce the throwing arm by placing a pipe coupling over the throwing arm at the point where a hole will be drilled. To be able to fit a pipe coupling around the throwing arm, you’ll have to remove the ridge from the interior of a pipe coupling using a rotary grinding tool.
Measure and mark a point 18” from one end of the throwing arm. Slide the coupling down the throwing arm until it is centered on the marked point. Drill a ½” hole through the pipe coupling and throwing arm. (See photo on next page.)
Throwing ArmSupports
Cemented at t-joints

Human Powered Trebuchet
FOR MORE PROJECTS, VISIT: makezine.tv
Human Powered Trebuchetpage 6
Step 7. Attach the throwing armFirst, drill the holes in the throwing arm supports. Measure three inches down from the top of each throwing arm support. Taking care to keep the drill level, drill a 9/16” hole through both supports.
Using the ½” threaded rod or eyebolt, attach the throwing arm to the trebuchet as shown in the picture below. Use small pieces of garden hose as washers to keep the arm centered in the space between the two throwing arm supports.
Step 8. Attach projectile holding pinDrill a ¼” hole in the center of one end cap. Insert the 2”-long, ¼”-diameter bolt through the inside of the cap, and secure with a lock washer and nuts.
Cement the cap with the bolt to the longer end of the throwing arm. Attach the other cap to the shorter end of the arm. Allow all of the joints to fully cure before using (see label direction for curing time).
Your human powered trebuchet is complete!
Step 9. Fire when ready!To use your trebuchet, tie a loop in one end of a short length of twine. Tie the other end to a suitable projectile such as a water balloon or a tennis ball. Experiment with the length of the twine holding the pro-jectile. Different lengths result in very different trajectories.
Place the loop over the projectile holding pin. Grasp the short end of the throwing arm and pull down. The harder you push, the farther the projectile will travel.
WARNING:1. Position your hand such that it does not get pinched against the throwing arm supports when you push down.
2. The trajectory of the projectile can be hard to predict, especially initially. Should the trebuchet “misfire” be aware that your projectile could land anywhere in front of or behind the trebuchet.
3. When in motion, the throwing arm is dangerous. Keep people (and pets) away from the moving arm.
18”
3”
Hose

Human Powered Trebuchet
FOR MORE PROJECTS, VISIT: makezine.tv
Human Powered Trebuchetpage 7
Resources:For general information on trebuchets, see:http://www.trebuchet.com
For a short sketch about the history of hurling machines, see: http://www.uh.edu/engines/epi458.htm
Use of the instructions here and on Make: television is at your own risk. Twin Cities Public Television, Inc., O’Reilly Media, Inc., the show’s sponsors, producers, and distributors disclaim all responsibility for any damage, injury, and expense resulting from these projects. Your safety is your own responsibility and that includes the proper use of equipment and safety gear and determination of whether you have the requisite skills to successfully and safely undertake the project. These projects are not intended for children. It is mandatory that you understand that technology, laws, and limitations imposed by manufacturers and content owners are constantly changing. Thus, all Make: television projects may not work, may be inconsistent with current laws or user agreements, or may damage or adversely affect some equipment.
TELL US HOW YOUR TREBUCHET WORKS!LEAVE A COMMENT UNDER THE VIDEO FOR THIS PROJECT AT http://www.makezine.tv