In business for people. PROSOFT HRMS PAYROLL SELF SERVICE (ePay) Configuration Guide.

H R M S U S E R T R A I N I N G M A N A G E R S E L F S E R V I C E G U I D E
Page 1 of 31

Table of Contents
HRMS User Training Manager Self Service Guide................................................. 1
Introduction .............................................................................................................. 3
Support ............................................................................................................................. 3
Manager Self Service ........................................................................................................ 4
Pending Approvals - How do I Approve an Absence Request? ......................................... 5
To approve an Absence Request ........................................................................ 5
Manage Absence Approval Proxy ..................................................................................... 8
To create a new absence approval proxy ........................................................... 9
Reviewing your list of proxies ............................................................................ 15
Revoking an Absence Approval Proxy .............................................................. 17
Submitting an Absence Request on behalf of an employee ............................................. 19
Viewing Employee Information ........................................................................................ 24
ANU Position Delegations ............................................................................................... 26
Manage Timesheets ........................................................................................................ 28
Page 2 of 31

I N T R O D U C T I O N Welcome to the Human Resources Management System (HRMS), the University’s HR and payroll system. We use the Oracle|PeopleSoft Human Resources, version 9 product to administer all our Payroll and Human Resources functions.
Suppor t Support for you in using HRMS in the workplace is provided:
Training is provided by appointment only: Tuesday and Wednesday mornings 9.30am until 12.30pm. Email or call HR Systems: ext. 59622 [email protected].
Page 3 of 31

Manager Sel f Serv ice
When you have staff reporting to you in HRMS you will automatically gain access to the Manager Self Service menu when you log onto HORUS.
You will have access to the following:
• Pending Approvals
• Requests on Behalf of Employee
• View Employee Information
• ANU Position Delegations
• Manage Timesheets
• Manage Delegation
Page 4 of 31

Pending Approvals - How do I Approve an Absence Request?
As a Manager you able to approve Absence Requests for your staff. You will be notified via email when one of your staff submits an absence request.
To approve an Absence Request 1. Navigation: Main Menu>Manager Self-Service> Manager Self-Service CFAN>Pending
Approvals>Review and Approve Request
2. To view further details, approve or deny the request click the Name of the individual link.
3. The Request Details page displays.
Page 5 of 31

4. You can add comments in the Approver Comments section.
5. You may spell check your comments by clicking the Spell Check icon.
6. Click the Action button you wish to perform.
Will approve the request.
Will deny the request.
Will send the request back to the Employee without approving it. Use this option if you need further clarification of the request or you need the Employee to modify the request prior to approval. It is recommended you always enter a comment when pushing back a request.
Page 6 of 31

7. When you click the Approve button, the Confirmation Page displays.
8. Click the action button you wish to perform.
9. The Success Page displays.
End of Procedure.
*Please note, the HRMS goes into what is called ‘inquiry mode’ every fortnight for the running of the pay, and during this time you will not be able to approve leave. Generally the pay is run on the Monday night before pay day, however this day could change due to public holidays.
There is a message on the Absence Request page on HORUS saying that you won’t be able to approve leave during the pay run and the Yes/No buttons will be ‘greyed out’ if you try and approve the leave.
Page 7 of 31

Manage Absence Approval Proxy
As a Manager you have access to approve your staff’s absence events. This is automatically granted to you as a manager and you can access it through HORUS (please see below):
When delegating transactions, you are allowing a proxy to approve transactions on your behalf. You may choose to delegate your transactions for the following reasons:
• You know that you’ll be away from the office for an extended period of time, and thus won’t be able to manage transactions for you or your employees. You can delegate your transactions to someone else for a specific period of time.
• You prefer to have an assistant process all of your transactions. You can delegate all of your transactions to someone else for an indefinite period of time.
There are three links on Delegation Home Page - one for each way of managing delegation:
• Create Absence Approval Proxy - To create a new delegation request so that your transaction(s) can be taken care of by a proxy.
• Review My Proxies - To view a list of transactions that you have delegated to proxies and to revoke the delegated authority of proxies.
• Review My Approval Proxies - To view a list of transactions that have been delegated to you. You can either accept the request or reject the request.
Page 8 of 31

To create a new absence approval proxy
1. Navigation: Main Menu>HORUS>Manage Delegation
2. Click on the Create an Approval Proxy link.
3. Nominate the Begin and End dates for the delegation, select the Next button.
Note: For ongoing delegation leave the end date blank.
Page 9 of 31

4. Select the transaction you wish to delegate, click the Next button.
5. Select the individual you wish to act as your proxy.
Page 10 of 31

If the person doesn’t appear here follow the steps below, otherwise go to step 10.
6. OR, if the person does not appear here, click the Search for Name link.
7. The Search page displays.
8. Enter the Parameters to search for the person and Click the Search button.
Page 11 of 31

9. The search results are returned.
10. Select the Radio Button corresponding with the individual you wish to act as your proxy. Click the Next button.
11. Click the Submit button.
12. The Delegation Request Successfully Submitted message appears.
Page 12 of 31

13. When submitted, the selected person will receive an email with a link to accept the proxy. The proxy will need to accept the pending delegation request in order for it to become active.
Proxy accepts delegation request:
Page 13 of 31

End of Procedure.
Page 14 of 31

Reviewing your list of proxies
1. Navigation: Main Menu>HORUS>Manage Delegation
2. Click the Review My Proxies link.
3. A list of your delegations will be displayed.
4. Click the Information icon to view details of this delegation.
Page 15 of 31

5. The Delegation Request Details page displays.
6. Click the Return button to return to your list.
End of Procedure.
Page 16 of 31

Revoking an Absence Approval Proxy
1. Navigation: Main Menu>HORUS>Manage Delegation
2. Click the Review My Proxies link.
3. A list of your delegations will be displayed.
Page 17 of 31

4. Select the Checkbox corresponding to the Delegation you wish to Revoke.
5. Click the Revoke button
6. The Revoke Delegation confirmation page appears.
7. Click the Yes- Continue button to continue with the revocation.
End of Procedure.
Page 18 of 31

Submit t ing an Absence Request on behal f of an employee
Navigation: Main Menu > Manager Self Service >Manager Self Service CFAN > Requests on Behalf of Employee > Absence Request.
* Please note, when entering the end date, remember that this now refers to the last day of your leave, not the first day you return to work.
1. Navigation: Main Menu >Manager Self Service >Manager Self Service CFAN > Requests on Behalf of Employee > Absence Request.
2. Enter the date that leave commences then select ‘Refresh Employees’.
3. This will bring up all positions that currently report to you in HRMS, including positions that are empty with no incumbents. You will then need to select the employee that you are submitting the request for.
Page 19 of 31

4. You then continue as per normal submission of an Absence Request.
5. Enter the Start Date for the request.
6. Select the Type of Absence from the Filter by Type drop down menu.
Page 20 of 31

7. Select the Absence Name from the Absence Name drop down menu.
8. The page will refresh and additional fields will appear.
9. Enter the End Date for the request.
10. If you need to enter Partial Days for this request, select the Day the Partial hours apply to.
Page 21 of 31

Select None if no partial days are to be taken
11. The page will refresh based on the selection made in step 8. Additional fields may appear.
Where part days are taken enter either the hours or select the Half Day option.
12. Click the Calculate Duration button.
The Duration field will update with the number of hours that will deducted from your leave balance.
13. Click the Forecast Balance button.
14. The system will determine your eligibility and return a message.
15. Enter further details as appropriate in the Requestor Comments section.
You may spell check your comments by clicking the Spell Check icon.
16. Select the submit button to submit request.
Page 22 of 31

17. The Submit Successful page displays.
End of Procedure.
Page 23 of 31

Viewing Employee In format ion
This function allows you to access the home/mailing addresses, phone numbers and emergency contacts of those employees who report to you.
1. Navigation: Main menu > Manager Self Service > Manager Self Service CFAN > View Employee Information > View Employee Personal Info
2. Select ‘As of Date’ you wish to view this information and then Select the employee you wish to view,
3. You can now see the Job information regarding the employee you selected and also select the links at the bottom of the page to access Home and Mailing Addresses, Phone Numbers and Emergency Contacts.
Page 24 of 31

End of Procedure.
Page 25 of 31

ANU Posi t ion Delegat ions
This function allows you to access the delegations that your subordinates may have.
1 Navigation: Manager Self Service > ANU Position Delegations
2 Select ‘As of’ date you wish to view this information and then select ‘Continue’.
3 Select the employee you wish to view, then select ‘Continue’ button.
4 You can now see the delegations that the employee has.
Page 26 of 31

End of Procedure.
Page 27 of 31

Manage T imesheets
Navigation: Main Menu> Manager Self Service> Manage Timesheets
1.
Log into HORUS/Manager Self Service
2. Navigate to Manage Timesheets>Approve Timesheets
3.
You will see a list of all the outstanding timesheets with entries in them that you need to review and approve.
4.
Select timesheet for employee by selecting link/name
5.
You will now be able to see the whole timesheet for an employee for a particular employment record.
Things to note:
• You will have access to review and approve timesheets
• You are able to override hours and penalty rates
• You can add comments
Page 28 of 31

• You can ‘Push Back’ times entered to an employee for updating and resubmission
6.
Before approving a timesheet you might want to check:-
• The times entered against each date are correct;
• If the employee is a an invigilator, projectionist, simulated patient or a theatre staff employee select the appropriate Attendance Type for their attendance from the list provided;
• if all or some of the times entered by the employee relate to work dine for another area, and that area needs to pay for the work, Override the Timesheet GL Distribution for the timesheet.
7.
As a superviser you can also View GL Distributions for a particular timesheet as well as Override Timesheet GL Distribution.
8.
View GL Distributions: this will show you what GL the timesheet is currently being paid against
Override Timesheet GL Distribution: this will allow you to override what GL is defaulting currently. You must enter Fund, Department and Project (N/A if no project) as well as ensuring that the percentage adds up to 100%.
Page 29 of 31

9. Once you are satisfied that all entries are correct you can select Save for Later or Approve Timesheet buttons:
Save for Later: this button only saves changes you may have made to the timesheet, it will not submit the timesheet for payment.
Approve Timesheet: this will ‘workflow’ the timesheet to the Administrator for review and final payment.
10. Once you select Approve Timesheet option you will see
11.
You will then automatically be taken to window below so that you can check the status of the timesheet.
Page 30 of 31
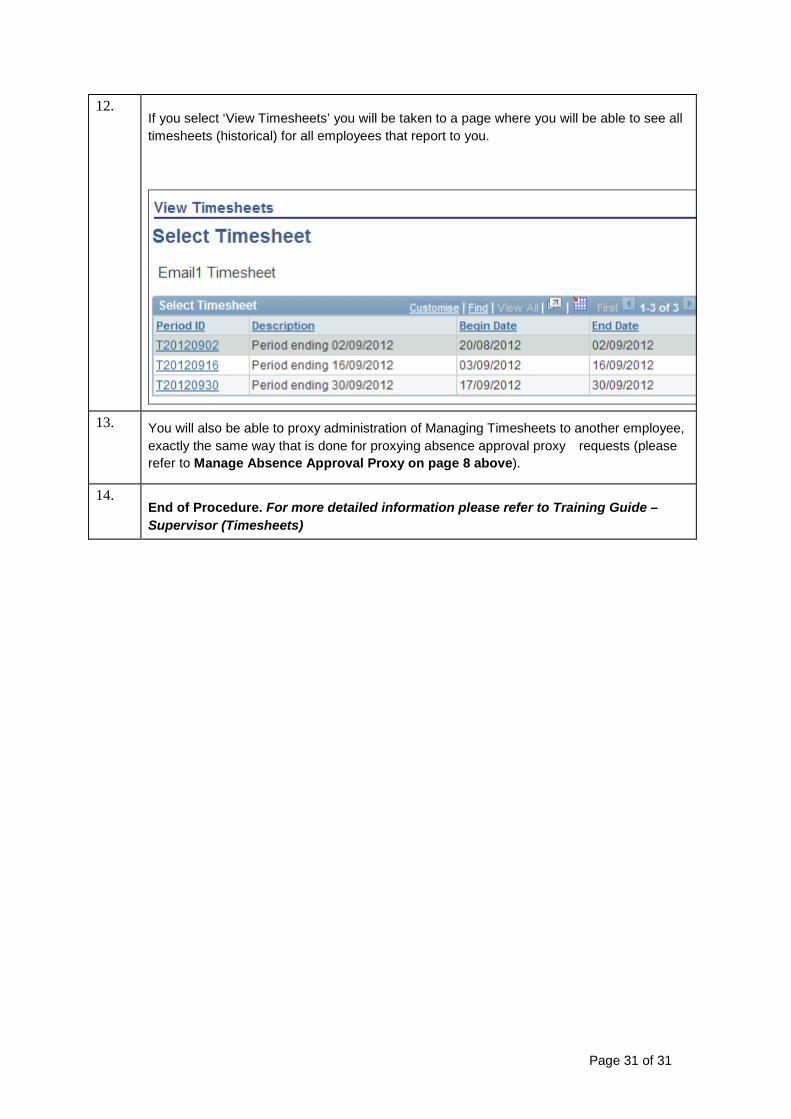
12. If you select ‘View Timesheets’ you will be taken to a page where you will be able to see all timesheets (historical) for all employees that report to you.
13. You will also be able to proxy administration of Managing Timesheets to another employee, exactly the same way that is done for proxying absence approval proxy requests (please refer to Manage Absence Approval Proxy on page 8 above).
14. End of Procedure. For more detailed information please refer to Training Guide – Supervisor (Timesheets)
Page 31 of 31