HP Service Manager Mobile Applications
35
HP Service Manager For the Supported Windows® and UNIX® operating systems Software Version: 1.0 Mobile Applications Document Release Date: July 2011 Software Release Date: July 2011
Transcript of HP Service Manager Mobile Applications
HP Service ManagerFor the Supported Windows® and UNIX® operating systems
Software Version: 1.0
Mobile Applications
Document Release Date: July 2011
Software Release Date: July 2011
Legal NoticesWarranty
The only warranties for HP products and services are set forth in the express warranty statementsaccompanying such products and services. Nothing herein should be construed as constituting anadditional warranty. HP shall not be liable for technical or editorial errors or omissions containedherein.
The information contained herein is subject to change without notice.
Restricted Rights LegendConfidential computer software. Valid license from HP required for possession, use or copying.Consistent with FAR 12.211 and 12.212, Commercial Computer Software, Computer SoftwareDocumentation, and Technical Data for Commercial Items are licensed to the U.S. Governmentunder vendor's standard commercial license.
Copyright Notice© Copyright 1994-2011 Hewlett-Packard Development Company, L.P.
Trademark NoticesAdobe™ is a trademark of Adobe Systems Incorporated.
Java is a registered trademark of Oracle and/or its affiliates.
Microsoft® andWindows® are U.S. registered trademarks of Microsoft Corporation.
Oracle® is a registered US trademark of Oracle Corporation, Redwood City, California.
UNIX® is a registered trademark of TheOpenGroup.
For a complete list of open source and third party acknowledgements, visit the HP SoftwareSupport Online web site and search for the product manual calledHP ServiceManager OpenSource and Third Party License Agreements.
HP ServiceManager (1.0)Page 2 of 35
Mobile Applications

Documentation UpdatesThe title page of this document contains the following identifying information:
l Software Version number, which indicates the software version.
l Document Release Date, which changes each time the document is updated.
l Software Release Date, which indicates the release date of this version of the software.
To check for recent updates or to verify that you are using themost recent edition of a document, goto:
http://h20230.www2.hp.com/selfsolve/manuals
This site requires that you register for an HP Passport and log on. To register for an HP PassportID, go to:
http://h20229.www2.hp.com/passport-registration.html
Or click theNew users - please register link on the HP Passport log on page.
You will also receive updated or new editions if you subscribe to the appropriate product supportservice. Contact your HP sales representative for details.
HP ServiceManager (1.0)Page 3 of 35
Mobile Applications
SupportVisit the HP Software Support Online web site at:
http://www.hp.com/go/hpsoftwaresupport
This web site provides contact information and details about the products, services, and supportthat HP Software offers.
HP Software online support provides customer self-solve capabilities. It provides a fast andefficient way to access interactive technical support tools needed tomanage your business. As avalued support customer, you can benefit by using the support web site to:
l Search for knowledge documents of interest
l Submit and track support cases and enhancement requests
l Download software patches
l Manage support contracts
l Look up HP support contacts
l Review information about available services
l Enter into discussions with other software customers
l Research and register for software training
Most of the support areas require that you register as an HP Passport user and sign in. Many alsorequire a support contract. To register for an HP Passport ID, go to:
http://h20229.www2.hp.com/passport-registration.html
To findmore information about access levels, go to:
http://h20230.www2.hp.com/new_access_levels.jsp
HP ServiceManager (1.0)Page 4 of 35
Mobile Applications
Contents
Mobile Applications 1
Contents 5
Getting Started with HP Service Manager Mobile Applications 7
How can ServiceManager Mobile Applications be used? 7
Preparing to launch ServiceManager Mobile Applications on your smartphone 8
Launch ServiceManager Mobile Applications on your smartphone 8
Views within ServiceManager Mobile Applications 9
Home page 9
List view 9
Detail view 10
View my assignments andmy group's assignments 10
Incident Management mobile application 10
Set the customer-visible flag for an incident's activity 11
ChangeManagement mobile application 11
Customizing personal settings 13
Customize personal settings 13
System administration 15
Datamodel 15
Data flow 15
Introduction to installing and configuring ServiceManager Mobile Applications 16
Install ServiceManager Mobile Applications 16
Installation considerations 17
Uninstall ServiceManager Mobile Applications 18
Configure ServiceManager Mobile Applications 18
Edit ServiceManager Mobile Applications configuration files 19
Configure global settings in the AppConfig.groovy file 20
Configure SOAP settings in the CustomConfig.groovy file 22
ConfigureMobile Applications views in the CustomConfig.groovy file 23
HP ServiceManager (1.0)Page 5 of 35

Configure ServiceManager 26
Set up SSL to protect communications between ServiceManager Mobile Applicationsand the ServiceManager server 26
Part I: Set up SSL betweenMobile Applications and the ServiceManager server 26
A. Set upOpenSSL 26
B. Create SSL certificates 27
C. Add certificates to the truststores 28
D. Configure the sm.ini file 29
E. Configure the sm.cfg file 29
F. Enable SSL in the configuration (AppConfig.groovy) file 30
G. Configure the ServiceManager client 30
Part II: Set up SSL between the browser andMobile Applications 30
A. Generate the keystore file 31
B. Configure the Apache Tomcat server to use the keystore file 31
C. Configure your web application to work with SSL 31
Add SOAP API capability for user access 31
Enablemultiple user sessions 32
Set up email notifications to include URL links 32
Performance tuning 33
HP ServiceManager (1.0)Page 6 of 35
Mobile ApplicationsContents

Chapter 1
Getting Started with HP Service Manager MobileApplications
Welcome to HP ServiceManager Mobile Applications! ServiceManager Mobile Applicationsconnect your company's people and information by providing your team access to the ChangeManagement and Incident Management applications through the use of smartphones.
ServiceManager Mobile Applications enable your ChangeManagement and Incident Managementstaff to have 24 X 7mobile access while out of the office so they can:
l approve and deny change requests
l view newly-assigned tickets
l reassign incidents to the proper support group
l continue working on-site with customers
How can Service Manager Mobile Applications be used?Because field engineers are typically tasked to work with business users at a customer site, theyspendmost of their time away from the office to resolve tickets. When Change Approvers are awayfrom the office, they need a way to quickly approve or deny changes, so that pending work orderscan be assigned. These users can log on to ServiceManager Mobile Applications from asmartphone to receive and view work assignments; and review and approve or deny pendingchange requests. These quick responses improve business metrics, as service level objectives aremet.
When users launch ServiceManager Mobile Applications, they can:
l log on with their ServiceManager user name and password
l check a “RememberMe” option (if enabled)
l tap the log-in button to land on their home page
When logged in, users can:
l view incidents (assigned tome and assigned tomy group) or changes (awaitingmy approval andassigned tomy group)
l view related configuration items
l approve and deny changes
l reassign an incident to another group
l add or update activities
l resolve or close tickets and requests when work is complete
HP ServiceManager (1.0)Page 7 of 35
Mobile ApplicationsChapter 1: Getting Started with HP ServiceManager Mobile Applications
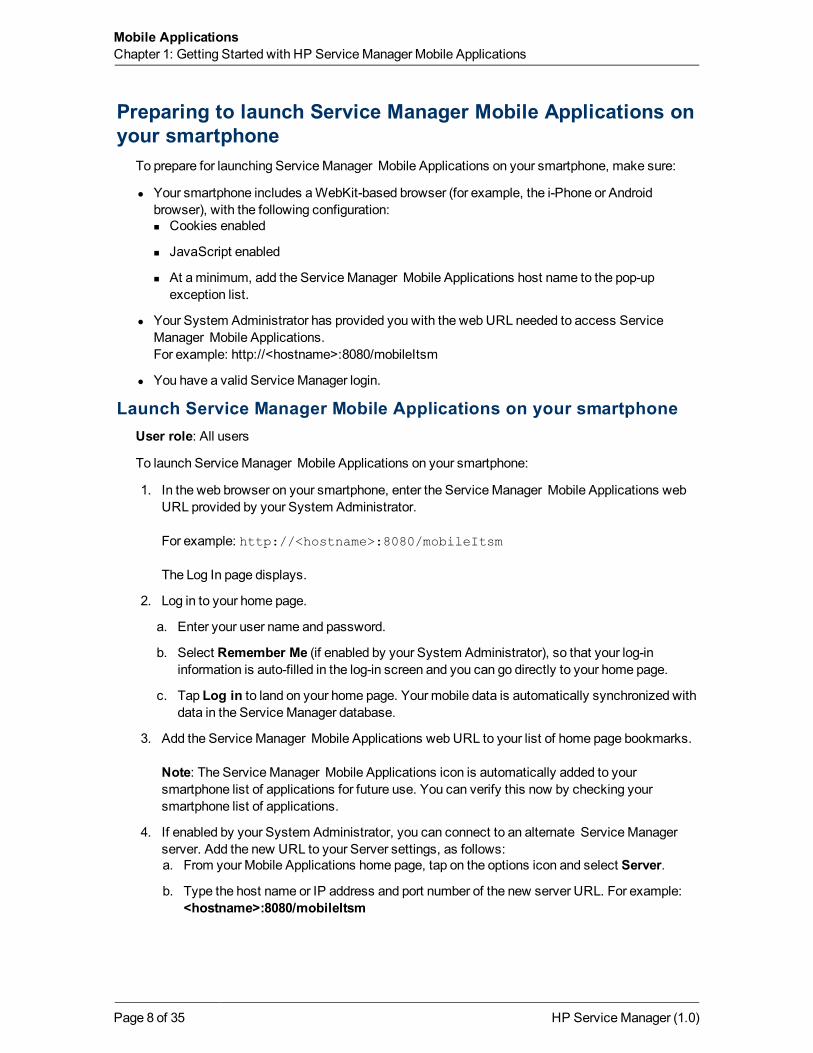
Preparing to launch Service Manager Mobile Applications onyour smartphone
To prepare for launching ServiceManager Mobile Applications on your smartphone, make sure:
l Your smartphone includes aWebKit-based browser (for example, the i-Phone or Androidbrowser), with the following configuration:n Cookies enabled
n JavaScript enabled
n At aminimum, add the ServiceManager Mobile Applications host name to the pop-upexception list.
l Your System Administrator has provided you with the web URL needed to access ServiceManager Mobile Applications.For example: http://<hostname>:8080/mobileItsm
l You have a valid ServiceManager login.
Launch Service Manager Mobile Applications on your smartphoneUser role: All users
To launch ServiceManager Mobile Applications on your smartphone:
1. In the web browser on your smartphone, enter the ServiceManager Mobile Applications webURL provided by your System Administrator.
For example: http://<hostname>:8080/mobileItsm
The Log In page displays.
2. Log in to your home page.
a. Enter your user name and password.
b. Select Remember Me (if enabled by your System Administrator), so that your log-ininformation is auto-filled in the log-in screen and you can go directly to your home page.
c. Tap Log in to land on your home page. Your mobile data is automatically synchronized withdata in the ServiceManager database.
3. Add the ServiceManager Mobile Applications web URL to your list of home page bookmarks.
Note: The ServiceManager Mobile Applications icon is automatically added to yoursmartphone list of applications for future use. You can verify this now by checking yoursmartphone list of applications.
4. If enabled by your System Administrator, you can connect to an alternate ServiceManagerserver. Add the new URL to your Server settings, as follows:a. From your Mobile Applications home page, tap on the options icon and select Server.
b. Type the host name or IP address and port number of the new server URL. For example:<hostname>:8080/mobileItsm
HP ServiceManager (1.0)Page 8 of 35
Mobile ApplicationsChapter 1: Getting Started with HP ServiceManager Mobile Applications
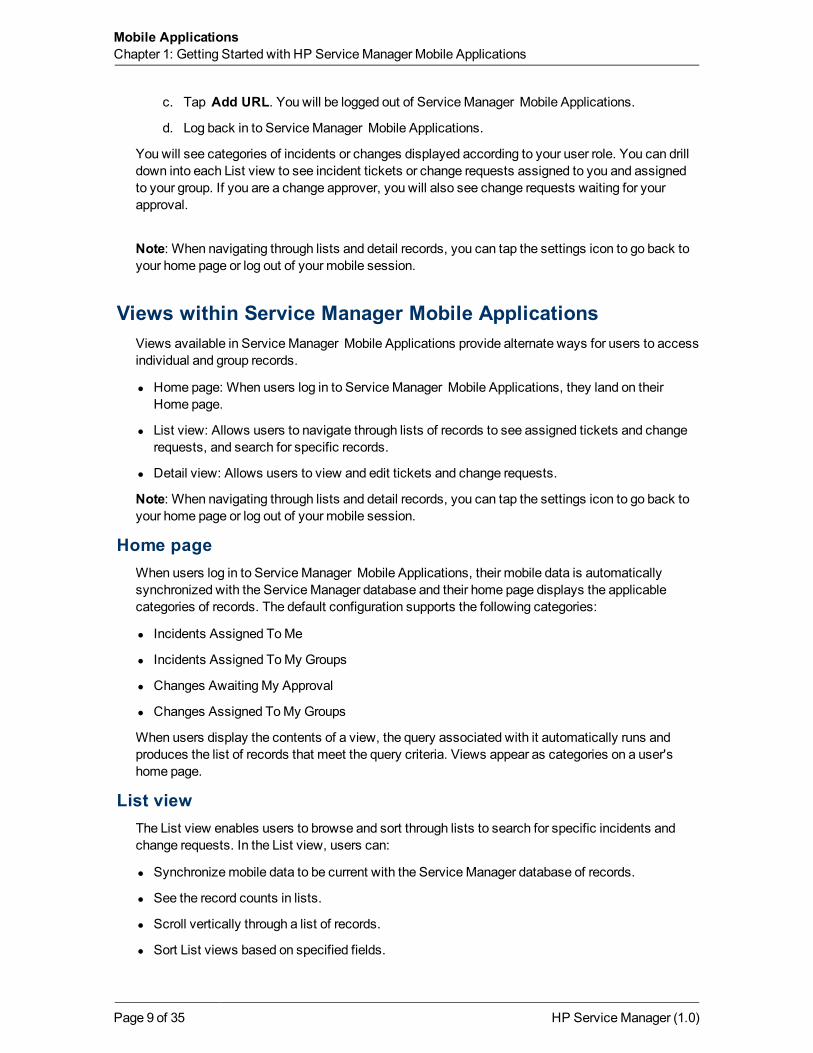
c. Tap Add URL. You will be logged out of ServiceManager Mobile Applications.
d. Log back in to ServiceManager Mobile Applications.
You will see categories of incidents or changes displayed according to your user role. You can drilldown into each List view to see incident tickets or change requests assigned to you and assignedto your group. If you are a change approver, you will also see change requests waiting for yourapproval.
Note: When navigating through lists and detail records, you can tap the settings icon to go back toyour home page or log out of your mobile session.
Views within Service Manager Mobile ApplicationsViews available in ServiceManager Mobile Applications provide alternate ways for users to accessindividual and group records.
l Home page: When users log in to ServiceManager Mobile Applications, they land on theirHome page.
l List view: Allows users to navigate through lists of records to see assigned tickets and changerequests, and search for specific records.
l Detail view: Allows users to view and edit tickets and change requests.
Note: When navigating through lists and detail records, you can tap the settings icon to go back toyour home page or log out of your mobile session.
Home pageWhen users log in to ServiceManager Mobile Applications, their mobile data is automaticallysynchronized with the ServiceManager database and their home page displays the applicablecategories of records. The default configuration supports the following categories:
l Incidents Assigned ToMe
l Incidents Assigned ToMy Groups
l Changes AwaitingMy Approval
l Changes Assigned ToMy Groups
When users display the contents of a view, the query associated with it automatically runs andproduces the list of records that meet the query criteria. Views appear as categories on a user'shome page.
List viewThe List view enables users to browse and sort through lists to search for specific incidents andchange requests. In the List view, users can:
l Synchronizemobile data to be current with the ServiceManager database of records.
l See the record counts in lists.
l Scroll vertically through a list of records.
l Sort List views based on specified fields.
HP ServiceManager (1.0)Page 9 of 35
Mobile ApplicationsChapter 1: Getting Started with HP ServiceManager Mobile Applications
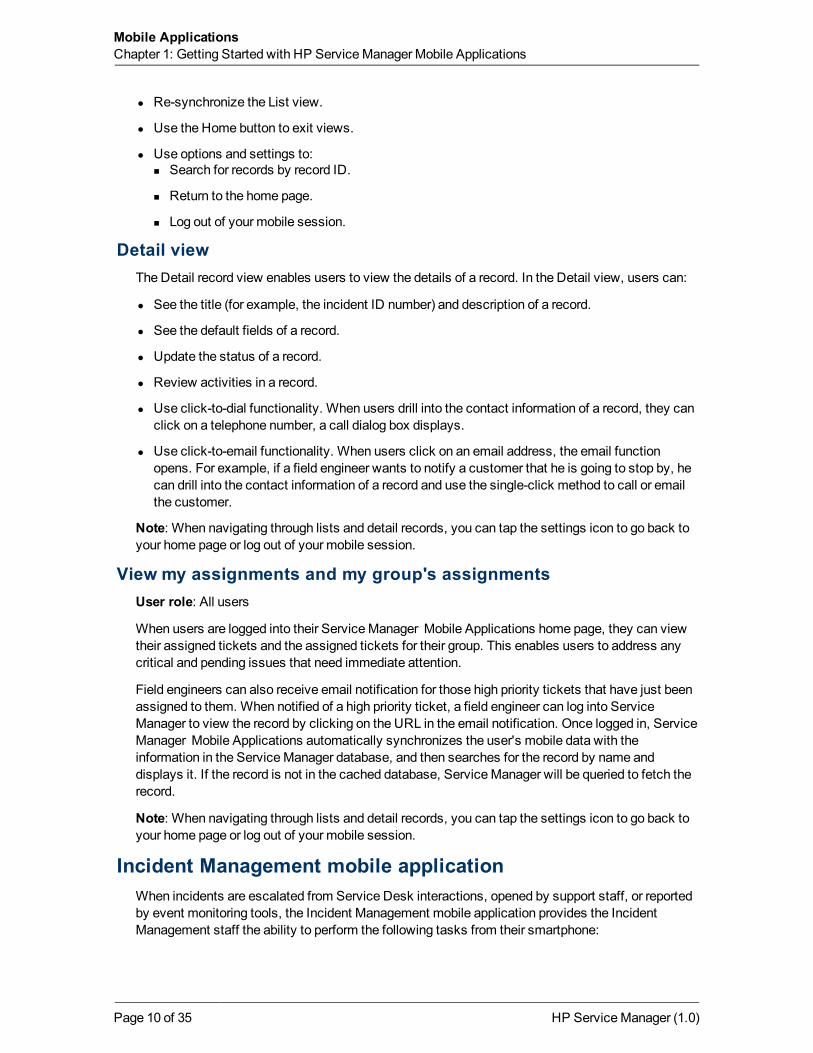
l Re-synchronize the List view.
l Use the Home button to exit views.
l Use options and settings to:n Search for records by record ID.
n Return to the home page.
n Log out of your mobile session.
Detail viewThe Detail record view enables users to view the details of a record. In the Detail view, users can:
l See the title (for example, the incident ID number) and description of a record.
l See the default fields of a record.
l Update the status of a record.
l Review activities in a record.
l Use click-to-dial functionality. When users drill into the contact information of a record, they canclick on a telephone number, a call dialog box displays.
l Use click-to-email functionality. When users click on an email address, the email functionopens. For example, if a field engineer wants to notify a customer that he is going to stop by, hecan drill into the contact information of a record and use the single-click method to call or emailthe customer.
Note: When navigating through lists and detail records, you can tap the settings icon to go back toyour home page or log out of your mobile session.
View my assignments and my group's assignmentsUser role: All users
When users are logged into their ServiceManager Mobile Applications home page, they can viewtheir assigned tickets and the assigned tickets for their group. This enables users to address anycritical and pending issues that need immediate attention.
Field engineers can also receive email notification for those high priority tickets that have just beenassigned to them. When notified of a high priority ticket, a field engineer can log into ServiceManager to view the record by clicking on the URL in the email notification. Once logged in, ServiceManager Mobile Applications automatically synchronizes the user's mobile data with theinformation in the ServiceManager database, and then searches for the record by name anddisplays it. If the record is not in the cached database, ServiceManager will be queried to fetch therecord.
Note: When navigating through lists and detail records, you can tap the settings icon to go back toyour home page or log out of your mobile session.
Incident Management mobile applicationWhen incidents are escalated from Service Desk interactions, opened by support staff, or reportedby event monitoring tools, the Incident Management mobile application provides the IncidentManagement staff the ability to perform the following tasks from their smartphone:
HP ServiceManager (1.0)Page 10 of 35
Mobile ApplicationsChapter 1: Getting Started with HP ServiceManager Mobile Applications
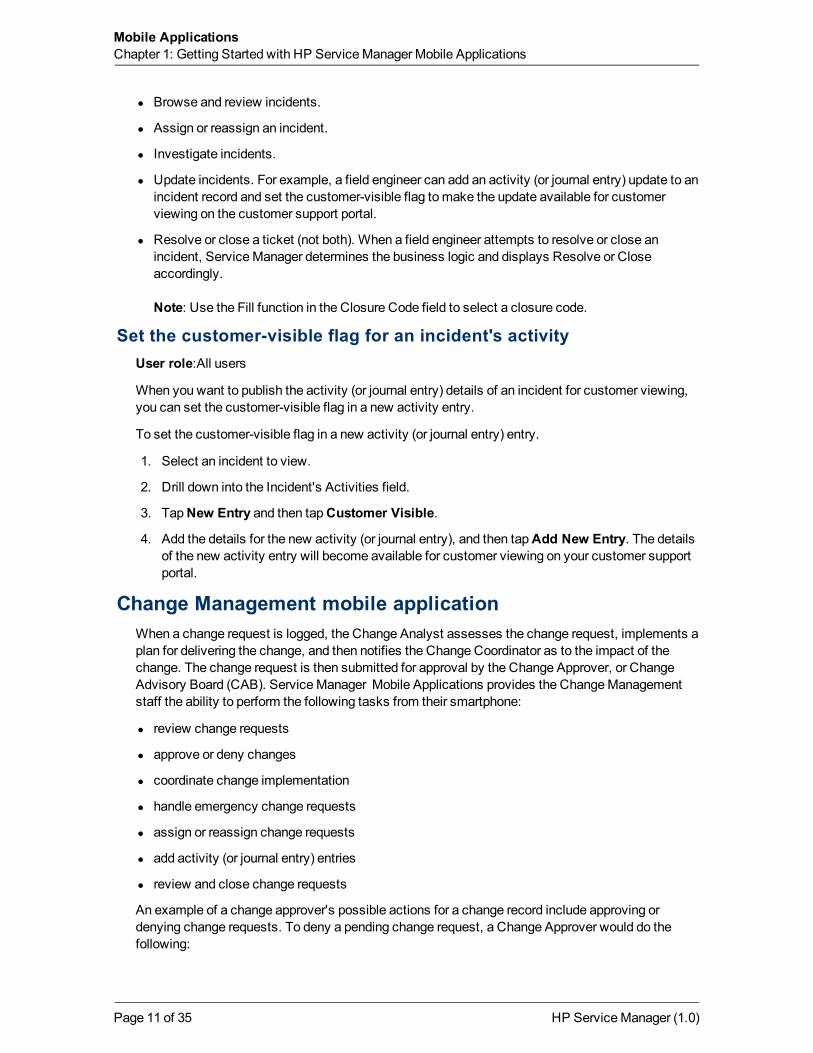
l Browse and review incidents.
l Assign or reassign an incident.
l Investigate incidents.
l Update incidents. For example, a field engineer can add an activity (or journal entry) update to anincident record and set the customer-visible flag tomake the update available for customerviewing on the customer support portal.
l Resolve or close a ticket (not both). When a field engineer attempts to resolve or close anincident, ServiceManager determines the business logic and displays Resolve or Closeaccordingly.
Note: Use the Fill function in the Closure Code field to select a closure code.
Set the customer-visible flag for an incident's activityUser role:All users
When you want to publish the activity (or journal entry) details of an incident for customer viewing,you can set the customer-visible flag in a new activity entry.
To set the customer-visible flag in a new activity (or journal entry) entry.
1. Select an incident to view.
2. Drill down into the Incident's Activities field.
3. TapNew Entry and then tapCustomer Visible.
4. Add the details for the new activity (or journal entry), and then tapAdd New Entry. The detailsof the new activity entry will become available for customer viewing on your customer supportportal.
Change Management mobile applicationWhen a change request is logged, the Change Analyst assesses the change request, implements aplan for delivering the change, and then notifies the Change Coordinator as to the impact of thechange. The change request is then submitted for approval by the Change Approver, or ChangeAdvisory Board (CAB). ServiceManager Mobile Applications provides the ChangeManagementstaff the ability to perform the following tasks from their smartphone:
l review change requests
l approve or deny changes
l coordinate change implementation
l handle emergency change requests
l assign or reassign change requests
l add activity (or journal entry) entries
l review and close change requests
An example of a change approver's possible actions for a change record include approving ordenying change requests. To deny a pending change request, a Change Approver would do thefollowing:
HP ServiceManager (1.0)Page 11 of 35
Mobile ApplicationsChapter 1: Getting Started with HP ServiceManager Mobile Applications
l Drill down into a single record.
l Deny the ticket.
l In the Update field, type detailed notes about the denied request.
Users can also drill down to the details of a field within a record. For example, if the ChangeManagement staff wants to add an activity (or journal entry) update to a change request, they woulddo the following:
l Search for the change record.
l Drill down into the record's activities.
l Add the necessary activity update.
l Make any other necessary changes.
HP ServiceManager (1.0)Page 12 of 35
Chapter 2
Customizing personal settingsAll users like to personalize their work environment for efficiency. For example, they may need toadd an additional server to access their tickets, or set default fields for easy access to the urgenttickets in their queue. You can change these things with the settings on your home page. If yourSystem Administrator has enabled these options for you, your changes will be immediatelyavailable on your home page.
Customize personal settingsUser role: All users
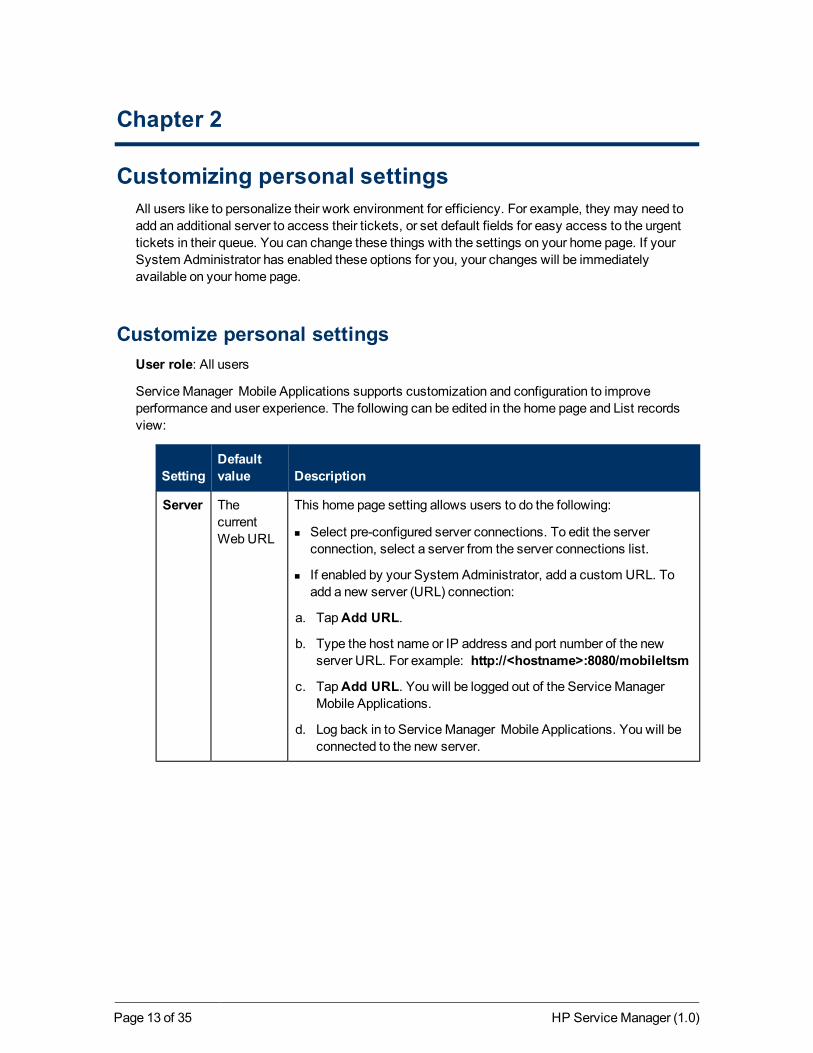
ServiceManager Mobile Applications supports customization and configuration to improveperformance and user experience. The following can be edited in the home page and List recordsview:
SettingDefaultvalue Description
Server ThecurrentWebURL
This home page setting allows users to do the following:
n Select pre-configured server connections. To edit the serverconnection, select a server from the server connections list.
n If enabled by your System Administrator, add a custom URL. Toadd a new server (URL) connection:
a. TapAdd URL.
b. Type the host name or IP address and port number of the newserver URL. For example: http://<hostname>:8080/mobileItsm
c. TapAdd URL. You will be logged out of the ServiceManagerMobile Applications.
d. Log back in to ServiceManager Mobile Applications. You will beconnected to the new server.
HP ServiceManager (1.0)Page 13 of 35

Mobile ApplicationsChapter 2: Customizing personal settings
HP ServiceManager (1.0)Page 14 of 35
Chapter 3
System administrationOut-of-box, ServiceManager includes a bundle of published tables, fields, and display actionscollectively known as the ServiceManagerWeb Services application program interface (API).ServiceManager Mobile Applications is a framework deployed to Apache Tomcat server.It uses the ServiceManager WebServices API to give users mobile access to Service Managerrecords to review, deny, approve, assign, update, and resolve issues.As a System Administrator,you will install, set up, and configure ServiceManager Mobile Applications.
Data modelThe ServiceManager Mobile Applications datamodel is based on the Business TechnologyOptimization (BTO) software DataModel (BDM), which is the standard datamodel for integrationsbetween HP BTO products.
This standard datamodel allows the System Administrator to:
l Set up the ServiceManager Mobile Applications server
l Add tables and fields
l Update field maps
l Enable or disable user settings in ServiceManager Mobile Applications
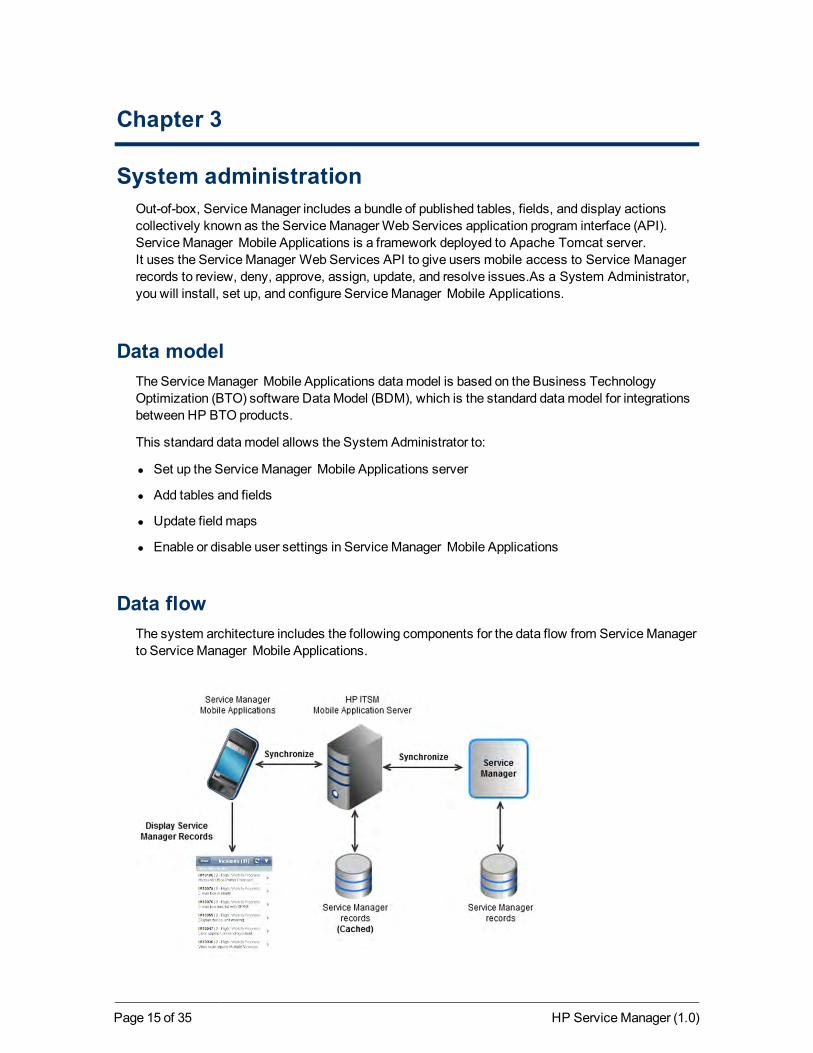
Data flowThe system architecture includes the following components for the data flow from ServiceManagerto ServiceManager Mobile Applications.
HP ServiceManager (1.0)Page 15 of 35
Mobile ApplicationsChapter 3: System administration
This illustration depicts the flow of ServiceManager record data from the ServiceManager server tothe HP Information Technology ServiceManagement (ITSM) ServiceManager Mobile Applicationsserver.
l ServiceManager records are stored in the relational databasemanagement system (RDBMS).
l The ITSM ServiceManager Mobile Applications server synchronizes records from ServiceManager into theMobile Applications cache.
Introduction to installing and configuring Service ManagerMobile Applications
This document provides details on how to install and configure ServiceManager MobileApplications to support your business processes.
As the System Administrator, youmust:
l Have already installed ServiceManager 9.30 on a web accessible location. For installationinformation, see theHP ServiceManager 9.30 Interactive Installation Guide.
l Install the Java Development Kit (JDK).
l Set JAVA_HOME to the location where the JDKwas installed.
l Install a Service Manager Mobile Applications using the self-contained installer on the Service Manager Installation DVD.
l Set up an ITSM ServiceManager Mobile Applications server to connect with the HP Service Manager server.
l Review the browser requirements for smartphones.
l ConfigureMobile Applications.
l Configure ServiceManager.
Install Service Manager Mobile ApplicationsWhen you have finished preparing for your installation (see Introduction to installing and configuringServiceManager Mobile Applications), you can install ServiceManager Mobile Applications.
Important: Before you start installing ServiceManager Mobile Applications, do the following:
l Install a Java Development Kit (JDK).
l Set JAVA_HOME to the location where the JDKwas installed.
HP ServiceManager (1.0)Page 16 of 35
Mobile ApplicationsChapter 3: System administration
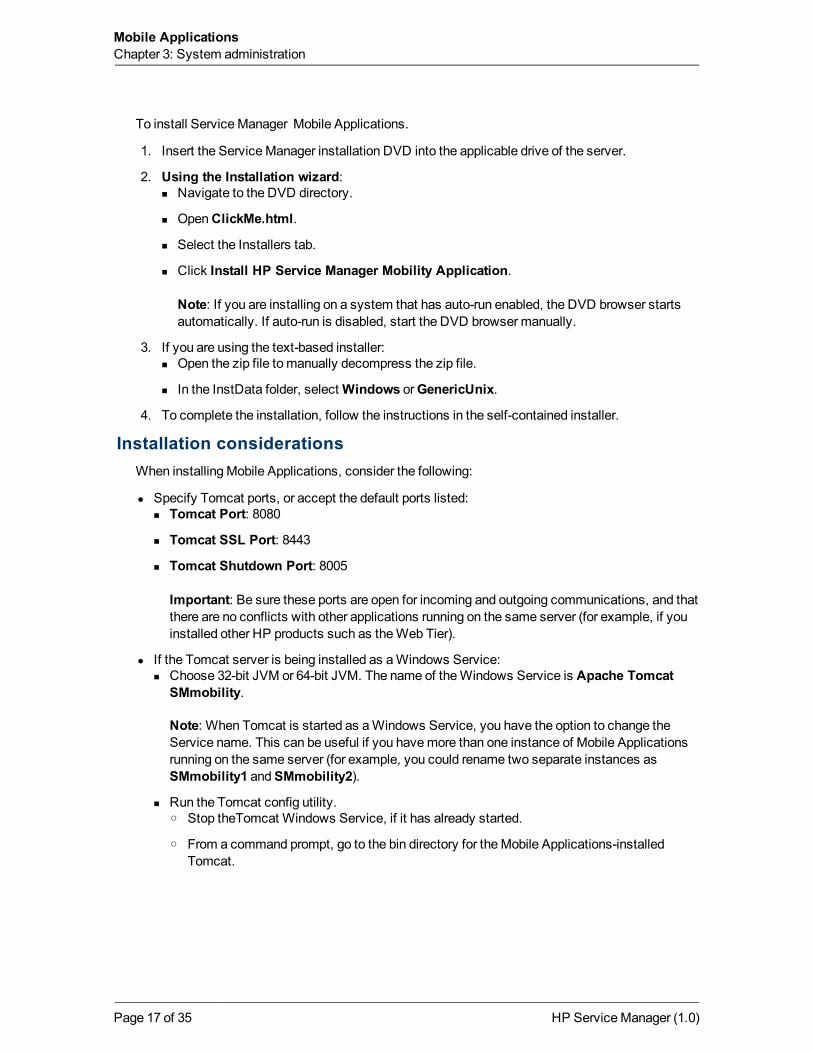
To install ServiceManager Mobile Applications.
1. Insert the ServiceManager installation DVD into the applicable drive of the server.
2. Using the Installation wizard:n Navigate to the DVD directory.
n OpenClickMe.html.
n Select the Installers tab.
n Click Install HP Service Manager Mobility Application.
Note: If you are installing on a system that has auto-run enabled, the DVD browser startsautomatically. If auto-run is disabled, start the DVD browser manually.
3. If you are using the text-based installer:n Open the zip file to manually decompress the zip file.
n In the InstData folder, selectWindows orGenericUnix.
4. To complete the installation, follow the instructions in the self-contained installer.
Installation considerationsWhen installingMobile Applications, consider the following:
l Specify Tomcat ports, or accept the default ports listed:n Tomcat Port: 8080
n Tomcat SSL Port: 8443
n Tomcat Shutdown Port: 8005
Important: Be sure these ports are open for incoming and outgoing communications, and thatthere are no conflicts with other applications running on the same server (for example, if youinstalled other HP products such as theWeb Tier).
l If the Tomcat server is being installed as aWindows Service:n Choose 32-bit JVM or 64-bit JVM. The name of theWindows Service is Apache Tomcat
SMmobility.
Note: When Tomcat is started as aWindows Service, you have the option to change theService name. This can be useful if you havemore than one instance of Mobile Applicationsrunning on the same server (for example, you could rename two separate instances asSMmobility1 andSMmobility2).
n Run the Tomcat config utility.o Stop theTomcat Windows Service, if it has already started.
o From a command prompt, go to the bin directory for theMobile Applications-installedTomcat.
HP ServiceManager (1.0)Page 17 of 35

Mobile ApplicationsChapter 3: System administration
o Enter the following command: tomcat6w //ES//SMmobility.Note:Unix has an equivalent to theWindows Service, which deals with daemons. Insteadof entering the command, you can start the service/daemon.
l When Tomcat is not started as aWindows service, do the following:n At a command prompt, point to the Tomcat bin folder.
n Type the following at the command prompt: catalina runThe Tomcat server starts.
Uninstall Service Manager Mobile ApplicationsYou can uninstall ServiceManager Mobile Applications as follows:
Windows
1. Go to theMobile Applications installation directory. For example, the default directory is:C:\Program Files\HP\ServiceManager 9.30\
2. Click Uninstall SM-Mobility.exe.
3. Choose one of the following:n Complete Uninstall
n Uninstall Specific Features
4. Click Next. The uninstaller begins to remove features. When the uninstall is complete, a list ofthe files that have been removed displays.
Unix
1. Go to the HP root folder (or root folder where you installedMobile Applications).Caution: If you go directly to the ServiceManager 9.30 folder and select UninstallSM-Mobility, not all the files will uninstall properly.
2. At a command prompt, type the following:sh ./HP/SM_Mobility/Uninstall SM_MobilityThe uninstaller is prepared.
3. Choose one of the following:n 1-Completely remove
n 2-Specific features
The uninstaller begins to remove features. When the uninstall is complete, a list of the filesthat have been removed displays.
Configure Service Manager Mobile ApplicationsWhen you have finished installingMobile Applications, you need to configure the following inMobileApplications:
l Configure global settings in the AppConfig.groovy file
l Configure SOAP settings in the CustomConfig.groovy file
l ConfigureMobile Applications views in the CustomConfig.groovy file
HP ServiceManager (1.0)Page 18 of 35
Mobile ApplicationsChapter 3: System administration
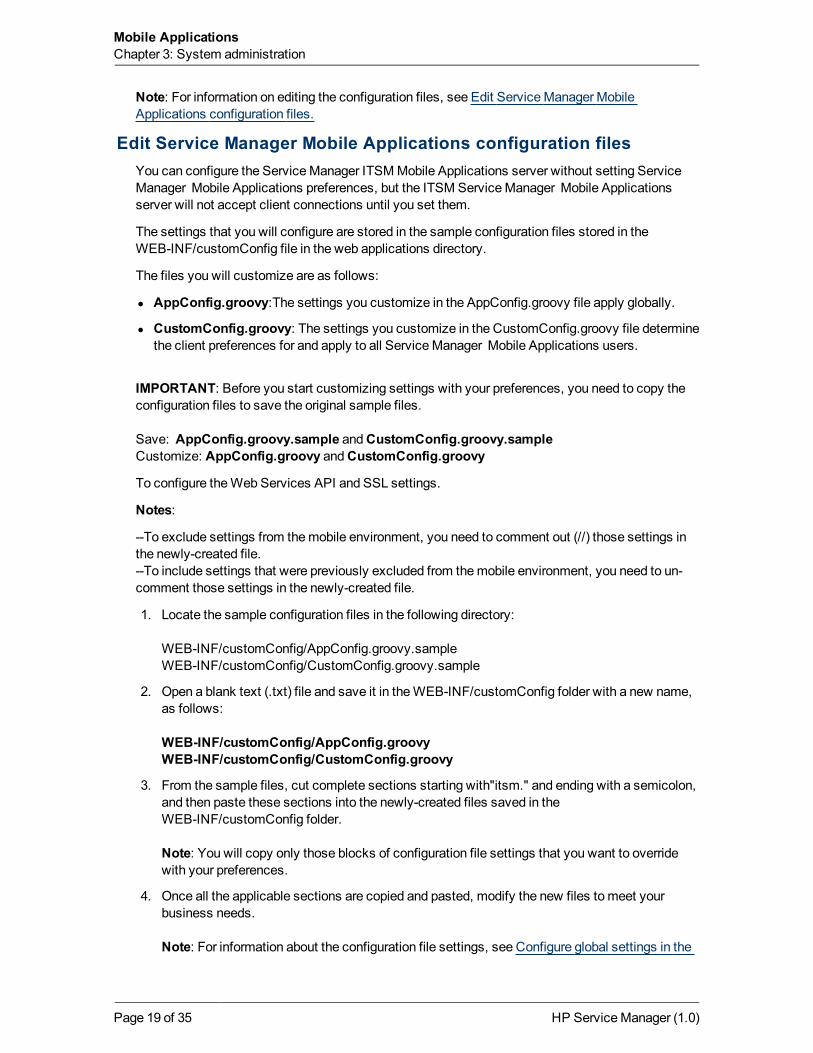
Note: For information on editing the configuration files, see Edit ServiceManager MobileApplications configuration files.
Edit Service Manager Mobile Applications configuration filesYou can configure the ServiceManager ITSMMobile Applications server without setting ServiceManager Mobile Applications preferences, but the ITSM ServiceManager Mobile Applicationsserver will not accept client connections until you set them.
The settings that you will configure are stored in the sample configuration files stored in theWEB-INF/customConfig file in the web applications directory.
The files you will customize are as follows:
l AppConfig.groovy:The settings you customize in the AppConfig.groovy file apply globally.
l CustomConfig.groovy: The settings you customize in the CustomConfig.groovy file determinethe client preferences for and apply to all ServiceManager Mobile Applications users.
IMPORTANT: Before you start customizing settings with your preferences, you need to copy theconfiguration files to save the original sample files.
Save: AppConfig.groovy.sample andCustomConfig.groovy.sampleCustomize: AppConfig.groovy andCustomConfig.groovy
To configure theWeb Services API and SSL settings.
Notes:
--To exclude settings from themobile environment, you need to comment out (//) those settings inthe newly-created file.--To include settings that were previously excluded from themobile environment, you need to un-comment those settings in the newly-created file.
1. Locate the sample configuration files in the following directory:
WEB-INF/customConfig/AppConfig.groovy.sampleWEB-INF/customConfig/CustomConfig.groovy.sample
2. Open a blank text (.txt) file and save it in theWEB-INF/customConfig folder with a new name,as follows:
WEB-INF/customConfig/AppConfig.groovyWEB-INF/customConfig/CustomConfig.groovy
3. From the sample files, cut complete sections starting with"itsm." and ending with a semicolon,and then paste these sections into the newly-created files saved in theWEB-INF/customConfig folder.
Note: You will copy only those blocks of configuration file settings that you want to overridewith your preferences.
4. Once all the applicable sections are copied and pasted, modify the new files tomeet yourbusiness needs.
Note: For information about the configuration file settings, see Configure global settings in the
HP ServiceManager (1.0)Page 19 of 35

Mobile ApplicationsChapter 3: System administration
AppConfig.groovy file, Configure SOAP settings in the CustomConfig.groovy file, andConfigureMobile Applications views in the CustomConfig.groovy file.
An example block of configuration file settings looks like the following:
/** Web service connection information settings visible in Server list in UI(when itsm.soapServerSettingVisible is true)* Add or remove rows below as needed, specifying the server URLs and someappropriate label meaningful to a user.* The tag to the left of the :[ can be any unique string and is used whenspecifying the default server below.*/itsm.soapServers = [
production:[url:'http://localhost:13080',label:'production'],test:[url:'http://localhost:13090',label:'test'],
];
// default SM soap connection, should reference one of the tags specifiedabove.itsm.default.soapServer = itsm.soapServers.production;
//Allow users to see and customize soap settings - set to false to disablethese capabilitiesitsm.soapServerSettingVisible = true;itsm.soapServerAddEnabled = true;
5. When you have finished configuring settings, save the configuration files and restart the webapplication server.
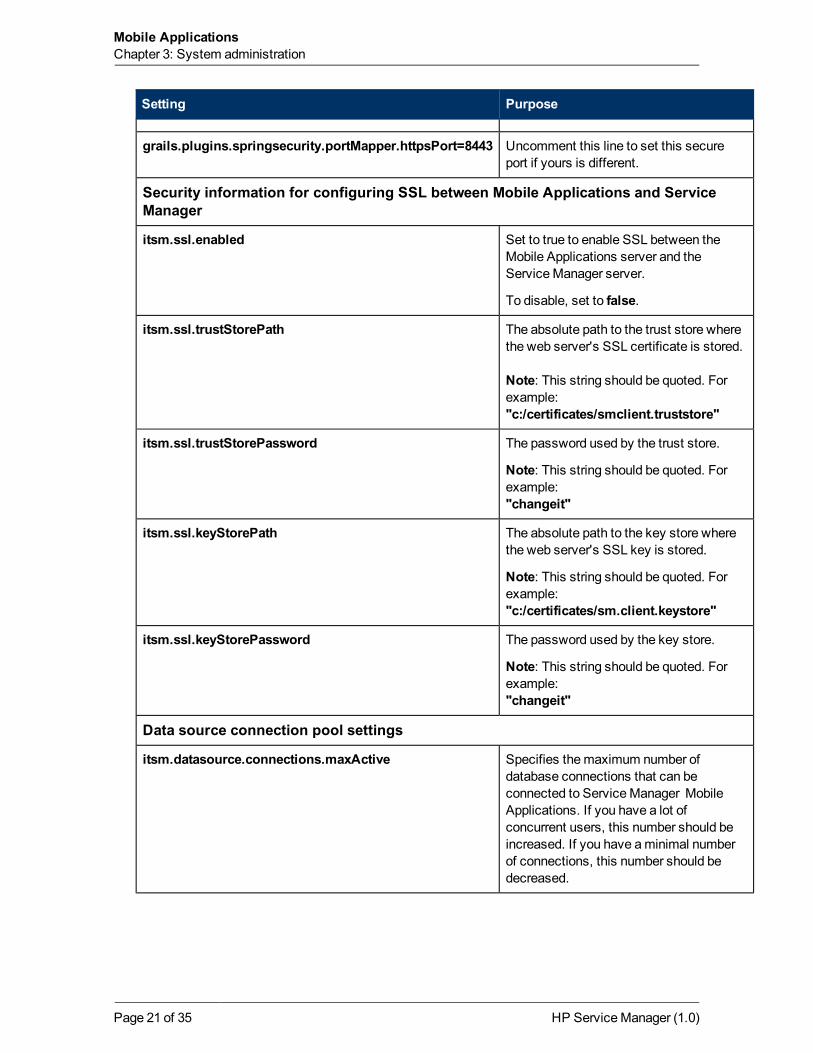
Configure global settings in the AppConfig.groovy fileAs the System Administrator, you need to configure the AppConfig.groovy file to customize theglobal settings, including:
l Security -- SSL settings between Mobile Applications and the browser
l Data source connection pool settings
l SSL betweenMobile Applications and ServiceManager
For information on editing this file, see Edit ServiceManager Mobile Applications configuration files.
Setting Purpose
Set security - SSL settings between Mobile Applications and the browser
grails.plugins.springsecurity.secureChannel.definition =itsm.secureChannel.definition.loginOnly
Uncomment this line to enable SSL forlogin.
grails.plugins.springsecurity.secureChannel.definition =itsm.secureChannel.definition.fullSSL
Uncomment this line to enable SSL for theentire ServiceManager MobileApplications site.
grails.plugins.springsecurity.portMapper.httpPort=8080 Uncomment this line to set this port ifyours is different.
HP ServiceManager (1.0)Page 20 of 35
Mobile ApplicationsChapter 3: System administration
Setting Purpose
grails.plugins.springsecurity.portMapper.httpsPort=8443 Uncomment this line to set this secureport if yours is different.
Security information for configuring SSL between Mobile Applications and ServiceManager
itsm.ssl.enabled Set to true to enable SSL between theMobile Applications server and theServiceManager server.
To disable, set to false.
itsm.ssl.trustStorePath The absolute path to the trust store wherethe web server's SSL certificate is stored.
Note: This string should be quoted. Forexample:"c:/certificates/smclient.truststore"
itsm.ssl.trustStorePassword The password used by the trust store.
Note: This string should be quoted. Forexample:"changeit"
itsm.ssl.keyStorePath The absolute path to the key store wherethe web server's SSL key is stored.
Note: This string should be quoted. Forexample:"c:/certificates/sm.client.keystore"
itsm.ssl.keyStorePassword The password used by the key store.
Note: This string should be quoted. Forexample:"changeit"
Data source connection pool settings
itsm.datasource.connections.maxActive Specifies themaximum number ofdatabase connections that can beconnected to ServiceManager MobileApplications. If you have a lot ofconcurrent users, this number should beincreased. If you have aminimal numberof connections, this number should bedecreased.
HP ServiceManager (1.0)Page 21 of 35

Mobile ApplicationsChapter 3: System administration
Setting Purpose
itsm.datasource.connections.maxIdle Specifies themaximum number ofdatabase connections that can be idlebefore they are disconnected from theserver.
itsm.datasource.connections.minIdle Specifies theminimum number ofdatabase connections that can be idlebefore they are disconnected from theserver.
itsm.datasource.connections.initialSize Specifies the initial number of databaseconnections that you want connected toServiceManager Mobile Applications.
Datasource statistics logging information
itsm.datasource.StatsLoggingPeriodSec Monitors, in the Tomcat log file, how manyrecords, such as, activites (or journalentries), incidents, and change requestsare in your in-memory cache. This is anindication of the size of the cache. Youcan set the period (or frequency) of howoften to write to the log. For example, 3600seconds represents every hour. Settingthe value to 0 disables logging.
Configure SOAP settings in the CustomConfig.groovy fileAs the System Administrator, you will need to configure the SOAP settings in theCustomConfig.groovy file to:
l Set up the list of supported SOAP servers.
l Define the default SOAP server.
The list of SOAP settings in this configuration file are listed below.
For information on editing this file, see Edit ServiceManager Mobile Applications configuration files.
Setting Purpose
itsm.soapServers List of supported SOAP servers:
production:[url:'http://localhost:13080',label:'production']test:[url:'http://localhost:13090',label:'test'] .
Note: You can add other servers to the serverlist, as needed.Important: If you add a new server to this listand expect it to become the default Service
HP ServiceManager (1.0)Page 22 of 35

Mobile ApplicationsChapter 3: System administration
Setting Purpose
Manager server to whichMobile Applicationsshould connect, update the default server valuein the itsm.default.soapServer setting.
itsm.default.soapServer Defines the default ServiceManager server towhichMobile Applications should point. Thedefault server is currently production. However,you can change this setting tomeet your needs.
itsm.soapServerSettingVisible When set to true, the SOAP server setting isvisible in the smartphone.
itsm.soapServerAddEnabled When set to true, the setting to add anotherSOAP server is enabled.
itsm.soapServerMaxRecordCount Specifies themaximum number of records tofetch from the SOAP server in a single request.Caution: If this number is increased, it couldimpact performance.
itsm.soapServerResponseTimeMsec Specifies the SOAP server maximum responsetime, in milliseconds.(Example: 120000milliseconds = 120 seconds)
Configure Mobile Applications views in the CustomConfig.groovyfile
As the System Administrator, you can configure settings in the CustomConfig.groovy file tocustomize themobile environment views for all users. You can:
l Configure what is shown in list and detail views. For both list and detail views, you can specifyfields to display, captions for fields, and the sort order for those fields.
l Modify detail views to specify the individual view of a record and how information is displayed fora person, organization, and functional group.
l Change the sort order of lists.
l Change suffixes or captions.
l Add styling.
Notes:
Detail view
l Allows you to change the order of how fields are displayed.
l If you want to add fields that are not currently displayed, uncomment the lines for those fieldsyou want displayed in the Detail view.
List view
l Contains separators between fields for display purposes.
l Allows you to set the sort order for records listed.
HP ServiceManager (1.0)Page 23 of 35

Mobile ApplicationsChapter 3: System administration
l Allows you to place a field (for example, Description) on a new line by setting newline:true.
For information on editing this file, see Edit ServiceManager Mobile Applications configuration files.
Setting Purpose
itsm.detailView.Task Defines the detail view of task records.
itsm.listView.Task Defines the order of task records, how fieldsare sorted, and the sort order of those fields.
Note: Fields can be sorted in ascending (asc)order or descending (desc) order.
itsm.detailView.Incident Defines the detail view of an incident record.
itsm.listView.Incident Defines the list view of incident records.
itsm.detailView.Party Defines the detail view of the abstract for aperson, an organization, and a functional group.
Important: If the Person andOrganizationsettings are to be different than this setting,then the content of this setting can be copied toeither the Person or Organization setting.
itsm.detailView.Person Defines the detail view of users.
Important: If this setting is supposed to inheritany changes made to the Party setting, thenthe Person line containing clone() must beincluded in the CustomConfig.groovy file.
itsm.detailView.Organization Defines the detail view of an organization.
Important: If this setting is supposed to inheritany changes made to the Party setting, thentheOrganization line containing clone() must beincluded in the CustomConfig.groovy file.
itsm.listView.FunctionalGroup Defines the list view of functional work groups.
itsm.listView.ConfigurationItem Defines the list view of configuration items.
itsm.detailView.JournalEntry Defines the detail view of an activity (or journalentry).
itsm.listView.JournalEntry Defines the list view of journal entries (oractivities).
itsm.detailView.Change Defines the detail view of a change record.
HP ServiceManager (1.0)Page 24 of 35
Mobile ApplicationsChapter 3: System administration
Setting Purpose
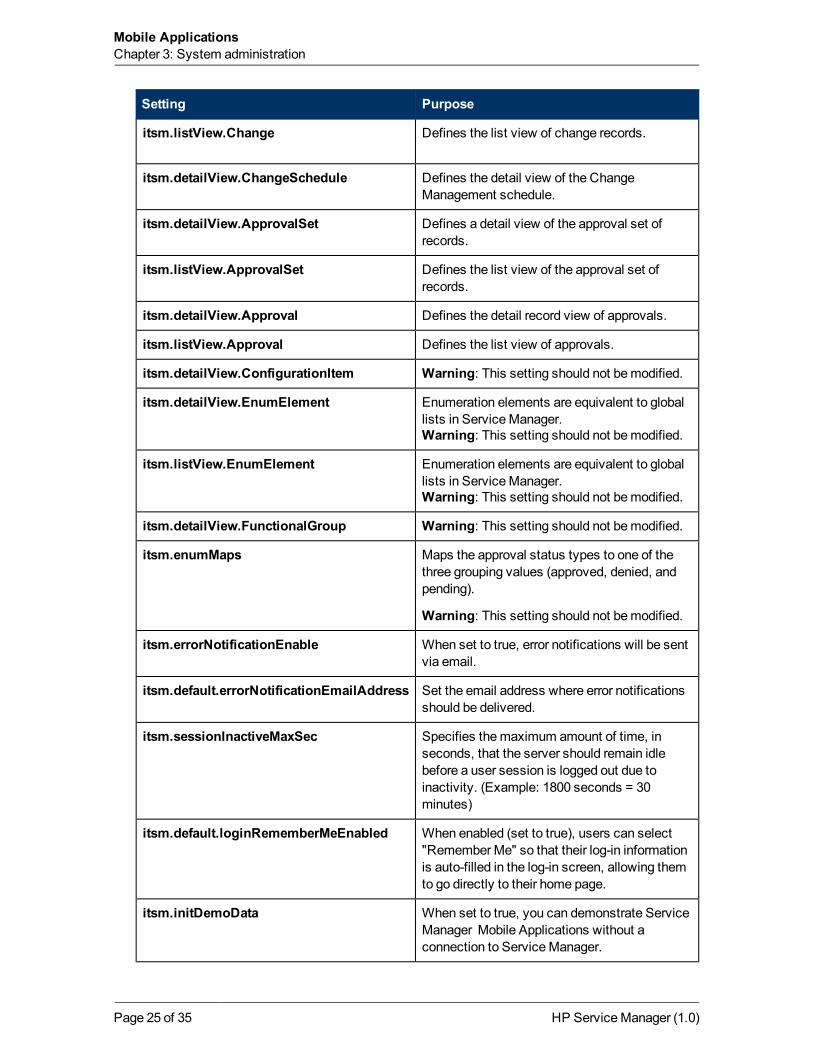
itsm.listView.Change Defines the list view of change records.
itsm.detailView.ChangeSchedule Defines the detail view of the ChangeManagement schedule.
itsm.detailView.ApprovalSet Defines a detail view of the approval set ofrecords.
itsm.listView.ApprovalSet Defines the list view of the approval set ofrecords.
itsm.detailView.Approval Defines the detail record view of approvals.
itsm.listView.Approval Defines the list view of approvals.
itsm.detailView.ConfigurationItem Warning: This setting should not bemodified.
itsm.detailView.EnumElement Enumeration elements are equivalent to globallists in ServiceManager.Warning: This setting should not bemodified.
itsm.listView.EnumElement Enumeration elements are equivalent to globallists in ServiceManager.Warning: This setting should not bemodified.
itsm.detailView.FunctionalGroup Warning: This setting should not bemodified.
itsm.enumMaps Maps the approval status types to one of thethree grouping values (approved, denied, andpending).
Warning: This setting should not bemodified.
itsm.errorNotificationEnable When set to true, error notifications will be sentvia email.
itsm.default.errorNotificationEmailAddress Set the email address where error notificationsshould be delivered.
itsm.sessionInactiveMaxSec Specifies themaximum amount of time, inseconds, that the server should remain idlebefore a user session is logged out due toinactivity. (Example: 1800 seconds = 30minutes)
itsm.default.loginRememberMeEnabled When enabled (set to true), users can select"RememberMe" so that their log-in informationis auto-filled in the log-in screen, allowing themto go directly to their home page.
itsm.initDemoData When set to true, you can demonstrate ServiceManager Mobile Applications without aconnection to ServiceManager.
HP ServiceManager (1.0)Page 25 of 35

Mobile ApplicationsChapter 3: System administration
Configure Service ManagerWhen you have finished installingMobile Applications, you can configure the following in ServiceManager:
l Set up SSL to protect communications between ServiceManager Mobile Applications and theServiceManager server
l Add SOAP API capability for user access
l Enablemultiple user sessions
l Set up email notifications to include URL links
Set up SSL to protect communications between Service ManagerMobile Applications and the Service Manager server
To protect communications between ServiceManager Mobile Applications and the ServiceManager server, you need to set up a Secure Sockets Layer (SSL) between ServiceManagerMobile Applications and the ServiceManager server.
Important: Before you begin to set up SSL, you need to configure the Security - SSL settings in theAppConfig.groovy file. For more information, see Configure global settings in theAppConfig.groovy file.
To set up SSL to protect communications, complete the steps in the following sections:
l Part I: Set up SSL betweenMobile Applications and the ServiceManager server
l Part II: Set up SSL between the browser andMobile Applications
Part I: Set up SSL between Mobile Applications and the Service Managerserver
To set up SSL, do the following:
l A. Set upOpenSSL
l B. Create SSL certificates
l C. Add certificates to the truststores
l D. Configure the sm.ini file
l E. Configure the sm.cfg file
l F. Enable SSL in the configuration (AppConfig.groovy) file
l G.Configure the ServiceManager client
A. Set up OpenSSL
1. Download and install an OpenSSL toolkit to implement SSL and TLS protocols with fullstrength cryptography on your system. To learn about downloading and using the toolkit forWindows, go to the following URL:
HP ServiceManager (1.0)Page 26 of 35
Mobile ApplicationsChapter 3: System administration
http://code.google.com/p/openssl-for-windows/downloads/detail?name=openssl-0.9.8k_WIN32.zip&can=2&q=
2. You can also download and install something like 7-Zip, which is an open sourceWindowsutility for manipulating archives. To learnmore about 7-Zip, go to the following URL:
http://www.google.com/search?hl=en&biw=1042&bih=478&q=7-zip&aq=f&aqi=g5g-s1g4&aql=&oq=
3. Note the directory where the OpenSSL is installed.
4. Go to the root of the OpenSSL directory and open the openssl.cnf file inWordpad.
Note: Notepad does not handle the carriage returns in the file properly.
5. Search for the following lines andmake sure they are not commented out:
x509_extensions = user_certx509_extensions = ve_careq_extensions = v3_req
6. Search for the line [v3_req] and add the following line in this section:
Note: ReplaceYOUR_IP_HERE with the IP address of themachine where the client will berunning.
subjectAltName = IP: YOUR_IP_HEREFor example: subjectAltName = IP:15.178.178.165
B. Create SSL certificates
1. Follow the instructions in the following online Help topic:
Example: Generating a server certificate with OpenSSL at the following Help server link
2. In step 26 of the Help topic instructions, enter the following command at the DOS prompt(instead of the command specified in the Help topic):
Note: Replace [CERTLOCATION]with the directory where the certificates are being created.
openssl x509 -req -days 365 -inc:\[CERTLOCATION]\smserver_certrequest.crs -CAc:\[CERTLOCATION]\mycacert.pem -CAkey c:\[CERTLOCATION]\cakey.pem -CAcreateserial -out c:\[CERTLOCATION]\smserver_cert.pem -extfile../openssl.cnf -extensions v3_req
3. Verify that everything worked by etnering the following command at the DOS prompt:
Note: Replace [CERTLOCATION]with the directory where the certificates are being created.openssl x509 -text -noout -in :\[CERTLOCATION]\smserver _cert.pem
You should see sections marked withX509v3 extensions with a Subject Alternative Name thathas your IP in it. You have created your server certificates.
HP ServiceManager (1.0)Page 27 of 35
http://code.google.com/p/openssl-for-windows/downloads/detail?name=openssl-0.9.8k_WIN32.zip&can=2&q=
http://code.google.com/p/openssl-for-windows/downloads/detail?name=openssl-0.9.8k_WIN32.zip&can=2&q=
http://code.google.com/p/openssl-for-windows/downloads/detail?name=openssl-0.9.8k_WIN32.zip&can=2&q=
http://code.google.com/p/openssl-for-windows/downloads/detail?name=openssl-0.9.8k_WIN32.zip&can=2&q=
Mobile ApplicationsChapter 3: System administration
4. Complete the steps in the online Help topic:Example: Generating a server certificate with OpenSSL at the following Help server link
5. Next, follow the instructions in aseparate example online Help topic for generating a clientcertificate with OpenSSL. The online Help topic is titled:
Example: Generating a client certificate with OpenSSL
6. In step 13 of the Help topic instructions forExample: Generating a client certificate withOpenSSL, enter the following command at the DOS prompt(instead of the command specified in the Help topic):
Note: Replace [CERTLOCATION]with the directory where the certificates are being created.
openssl x509 -req -days 365 -inc:\[CERTLOCATION]\smwebtier_certrequest.crs -CAc:\[CERTLOCATION]\mycacert.pem -CAkeyc:\[CERTLOCATION]\cakey.pem -CAcreateserial -outc:\[CERTLOCATION]\smwebtier_cert.pem -extfile ../openssl.cnf-extensions v3_req
7. Verify that everything worked by entering the following command at the DOS prompt:
Note: Replace [CERTLOCATION]with the directory where the certificates are being created.
openssl x509 -text -noout -in :\[CERTLOCATION]\swebtier _cert.pem
You should see sections marked with X509v3 extensions with a Subject Alternative Name thathas your IP in it. You have created your client certificates.
8. Complete the steps in the online Help topic:Example: Generating a client certificate with OpenSSL
C. Add certificates to the truststores
1. Open a DOS prompt and run the following command:
cd %JAVA_HOME\bin
2. Run the following commands at your DOS prompt:
Notes:--Replace [CERTLOCATION]with the directory where the certificates are being created.--Replace [SERVERALIAS]with the text that was used to specify the server's alias (forexample, smserver).--Replace [CLIENTALIAS]with the text that was used to specify the client's alias (forexample, smclient).
keytool -export -alias [SERVERALIAS] -keystore c:\[CERTLOCATION]\servercert.keystore -file c:\[CERTLOCATION]\ smserver.cert
keytool -import -alias [SERVERALIAS] -file
HP ServiceManager (1.0)Page 28 of 35
Mobile ApplicationsChapter 3: System administration
c:\[CERTLOCATION]\smserver.cert -keystorec:\[CERTLOCATION]\smserver.truststore
keytool -export -alias [CLIENTALIAS] –keystorec:\[CERTLOCATION]\clientcerts.keystore -filec:\[CERTLOCATION]\smclient.cert
keytool -import -alias [CLIENTALIAS] -filec:\[CERTLOCATION]\smclient.cert -keystorec:\[CERTLOCATION]\smclient.truststore
keytool -import -alias [CLIENTALIAS] -file c:\[CERTLOCATION]\smclient.cert -keystore c:\[CERTLOCATION]\smserver.truststore
keytool -import -alias [SERVERALIAS] -filec:\[CERTLOCATION]\smserver.cert -keystore c:\[CERTLOCATION]\smclient.truststore
D. Configure the sm.ini file
1. Add the following lines to the sm.ini file located in the RUN directory where the ServiceManager server was installed:
Notes:-- In <keystore password>, enter the password and leave out the brackets.--In <truststore password>, enter the password and leave out the brackets.
# SSL configurationkeystoreFile:smserver.keystorekeystorePass:<keystore password>truststoreFile:smserver.truststoretruststorePass:<truststore password>
Note: For keystoreFile:smserver.keystore and trustoreFile:smserver.truststore, enter theabsolute path.
For example:C:/Program Files/Java/jdk1.6.0_24/bin/servercert.keystore
2. Comment out the following line: sslConnector:0For example:# sslConnector:0
E. Configure the sm.cfg file
Edit the following line in the sm.cfg file located in the RUN directory where the ServiceManagerserver was installed.
HP ServiceManager (1.0)Page 29 of 35
Mobile ApplicationsChapter 3: System administration
From:sm -httpPort:13080
To:sm -httpPort:13080 -httpsPort:13443
F. Enable SSL in the configuration (AppConfig.groovy) file
Edit the following settings in theAppConfig.groovy file. For information on editing this file, seeEdit ServiceManager Mobile Applications configuration files.
l itsm.ssl.enabled: Set to true (without quotes) to enable SSL between theMobile Applicationsserver and the ServiceManager server.
l itsm.ssl.trustStorePath: Specify the absolute path to the trust store where the web server'sSSL certificate is stored. This string should be quoted.For example: "c:/certificates/smclient.truststore"
l itsm.ssl.trustStorePassword: Specify the password used by the trust store. This string shouldbe quoted. For example: "changeit"
l itsm.ssl.keyStorePath: Specify the absolute path to the key store where the web server's SSLkey is stored. This string should be quoted.For example: "c:/certificates/smclient.keystore"
l itsm.ssl.keyStorePassword: Specify the password used by the key store. This string shouldbe quoted. For example: "changeit"
G. Configure the Service Manager client
1. Log onto ServiceManager as a System Administrator.
2. Go toWindows > Preferences.
3. TypeSecurity in the filter.
4. Point everything to the right CA certs file (which is in the security folder of your Javainstallation).
5. Point to the client keystore and enter the password.
6. Try to connect with SSL enabled.a. Go to File > Connect >Connections....
b. Click on the connection which you are using to connect to your local machine.
c. Go to the advanced tab and click onUse SSL Encryption.
d. Save your changes.
Part II: Set up SSL between the browser and Mobile Applications
The following steps will set up SSL between the browser and ServiceManager MobileApplications:
A. Generate the keystore file
B. Configure the Apache Tomcat server to use the keystore file
C. Configure your web application to work with SSL
HP ServiceManager (1.0)Page 30 of 35

Mobile ApplicationsChapter 3: System administration
A. Generate the keystore file
1. Open a command prompt inWindows and type the following:cd%JAVA_HOME%/binYouwill land in the Java bin directory.
2. Type the followign command:keytool -genkey -alias mobility -keypass admin -keystore mobil.bin -storepass admin
Note: Notice keypass and storepass should be the same.A questionnaire starts.
3. Answer all questions accordingly.
4. Once all the steps are completed successfully, themobile.bin file is created in the Java bindirectory.
5. Copy themobile.bin file to the webapps directory in the Tomcat server.
B. Configure the Apache Tomcat server to use the keystore file
Youwill make some changes to the server.xml file inside the Apahce Tomcat server files, so thatthe Tomcat server knows the path to the keystore to be used.
Note: This was the path set in the configuration file in step G.
1. Inside the Apache Tomcat server files, open the server.xml file.
2. Find the connector element which has port ="8443" and uncomment it (if not already done).
3. Add the following lines:
<Connector port="8443" protocol="HTTP/1.1" SSLEnabled="true"maxThreads="150" scheme="https" secure="true"clientAuth="false" sslProtocol="TLS" keystoreFile="C:\Program Files\Apache SoftwareFoundation\Tomcat 6.0\webapps\mobile.bin" keystorePass="admin"/>
C. Configure your web application to work with SSL
1. Go to the custom config directory of Mobile Applications.
2. Make a copy of the AppConfig.groovy.sample file and rename it toAppConfig.groovy.
3. Uncomment the following line to enable ssl for theMobile Applications:
grails.plugins.springsecurity.secureChannel.definition = itsm.secureChannel.definition;Note: Save your changes.
Add SOAP API capability for user accessCapability words provide a security mechanism to control access to ServiceManager applications.To grant secure user access to ServiceManager Mobile Applications, you can assign the SOAP API capability to user operator records.
To add the SOAP API capability to user operator records:
HP ServiceManager (1.0)Page 31 of 35

Mobile ApplicationsChapter 3: System administration
1. Click System Administration > Ongoing Maintenance > Operators.
2. Search for operator records with user roles that have access to ServiceManager MobileApplications. For example, search for operator records with the changemanager user role. Alist of operator records displays.
3. Click Mass Update and answerYes to proceed with updating all the records in the list.
4. Click Complex Update.
5. In the Instructions for action on EACH RECORD field, type the following:
cap.exec in $file=insert(cap.exec in $file, 0, 1, "SOAP API")
6. Click Execute. All records in the list will be updated with the SOAP API capability.
7. Repeat these steps for each user role that has access to ServiceManager MobileApplications.
Enable multiple user sessionsThe System Administrator can set the number of user sessions for those operators who need toopenmultiple Mobile Applications user sessions.
To set upmultiple user sessions:
1. Click System Administration > Ongoing Maintenance > Operators.
2. Find the operator record to be edited.
3. Select theSecurity tab.
4. In theMax Logins In the User Session Information section, select Unlimited Sessions.
5. Save your changes.
Set up email notifications to include URL linksThe System Administrator can set up email notifications to include themobility URL so that whentickets are assigned, field engineers can receive email notification and click on the URL link to godirectly to the assigned ticket.
The System Administrator updates the System Information record so that:
l Field engineers receive an email notification when a ticket is assigned to them.
l Email messages contain a direct URL to the assigned tickets.
ServiceManager Mobile Applications automatically synchronizes users' mobile data withinformation in the ServiceManager database. When an email notification is sent to a field engineer,ServiceManager Mobile Applications searches for the record by name and then displays it. If therecord is not in the cached database, ServiceManager will be queried to fetch the record.
To set up email notifications:
1. Restart the ITSM ServiceManager Mobile Applications server.
2. Log onto the ServiceManager server as a System Administrator.
HP ServiceManager (1.0)Page 32 of 35

Mobile ApplicationsChapter 3: System administration
3. Click System Administration > Base System Configuration > Miscellaneous > SystemInformation Record.
4. Select theActive Integrations tab.
5. In theMobility URL field, type the fully-qualified URL to your ITSM ServiceManager MobileApplications server. For example:
http://myserver.mydomain.com:myport/mobileItsmWebApp/
Where you replace the following:
myserver = server host name
mydomain.com = domain name of the server running the ITSM ServiceManager MobileApplications
myport = communications port that your ITSM ServiceManager Mobile Applications webserver listens to for HTTP requests
The server stores the value of this field in the $L.mobility.url global variable.
6. Save your changes.
Performance tuningServiceManager Mobile Applications uses an in-memory lazily loaded cache to optimizeperformance. Objects loaded in the cache are shared by all users connected to the samemobileweb application. Therefore, the cache size will grow as users log in, navigate to view incidenttickets and change requests, and enter activities (or journal entries). It is possible performance willdegrade if the cache grows too large, or if insufficient resources are allocated to the web server'sJava Virtual Machine (JVM) instance.
If a noticeable degradation in performance occurs, do the following:
l Restart the web application server hosting ServiceManager Mobile Applications.
l If this becomes a recurring issue, increase JVM resources. For information on increasing JVM resources, you can search the knowledgebase in KnowledgeManagement or visit the HPSoftware Customer Support web site for a variety of best practice documents and publishedwhite papers.
When configured, the logs include statistics indicating the number of records loaded periodically. Atypical log entry looks like:
2011-06-07 11:15:55 INFO: DataSourceStatistics - Record counts: User=152,Authorization=17376, FunctionalGroup=294, Person=153, Organization=0, Incident=1376,Change=1707, JournalEntry=5376, ConfigurationItem=4, ApprovalSet=0, Approval=0,
HP ServiceManager (1.0)Page 33 of 35

Mobile ApplicationsChapter 3: System administration
HP ServiceManager (1.0)Page 34 of 35