How to... Magazine - September 2011-Slicer
35
A PUBLICATION FREE WITH $50 PURCHASE AT A FANTASTIC NOUERA BATHROOM PACKAGE - SEE PAGE 13 September 2011 • $5.90 Prepare your deck Know your powertools Pick your paint personality Let’s talk tomatoes Grow your own salad
-
Upload
thatgaurav -
Category
Documents
-
view
51 -
download
7
description
must read for everyone...........
Transcript of How to... Magazine - September 2011-Slicer

A publicAtion
FREE WIT
H
$50
PURC
HASE
AT
A fAnTASTiC noUERA bATHRoom
PACkAgE- SEE PAgE 13
September 2011 • $5.90
Prepare your deck
Knowyour powertools
Pick your paint personality
Let’s talk tomatoesGrow your own salad

11
Volume 6, Issue 8Mitre 10 Projects How To magazine is published 11 times a year by MMS Publishing [email protected]
Managing Editor: Scott Wilson • Phone 021-725 061Email: [email protected]: Shaun Evans • Mobile 021-1529136 Email: [email protected]
Sales Manager:Chris Yates • Phone: 027 573 2005Email [email protected]
Contributors: Contributors: Shaun Evans, Scott Wilson, Je t’aime Hayr, Sandy Johnson.
Marketing:Juliette Bavister – Muse Marketing [email protected]
Design and Layout:Bernadette Tipene, Twist DesignPhone 021 323 904
Printer: Nicholson Print Solutions
Enquiries: MMS Publishing LtdP O Box 14069Five Cross RoadsHamilton 3252.0800 NZPROJECTS (0800 697 765)
Join us on Facebook (How To Magazine) and Twitter (NZHowTo)
New Zealand Subscriptions:www.emags.co.nz/projects0800 624 7001 year (11 issues) - $49.00 (save 24% off the cover price)
NZ Projects magazine is a monthly publication, produced 11 times a year ISSN 2230-4770 (Print) ISSN 2230-4789 (Online). MMS Publishing reserves the right to accept or reject all editorial or advertising material. No part of NZ Projects How To magazine may be reproduced without express permission of the publisher. All rights rved.All letters to the magazine will be considered for publication unless clearly marked to the contrary. NZ Projects How To magazine accepts no responsibility for the return or condition of unsolicited manuscripts, art or photography material.Limitation of liability: NZ Projects How To magazine has been produced to provide the basic and general information required when undertaking home improvement projects around your home. It is not designed to replace the advice you may require in certain applications around your home. The contents of any article may need to be modified for a particular site and circumstances pertaining to some projects.Local bylaws pertaining to certain construction or home improvements should always be adhered to and we advise contacting a suitably qualified tradesperson when you require expert services or advice.
4
32
54 60
22
4 POWER DIYPower tools you know you want.
14 WARM UP THE WALLSWhat’s in your walls has everything to do with keeping your heat.
20 THE GEAR YOU NEEDSafety gear you need to install insulation in your walls.
22 KNOCK, KNOCKAnswer the door to new door furniture … we show you How To.
32 DYNAMIC DECKSWhat a difference a stain makes … so how do you get started?
36 WINDOW DRESSINGRevitalise your interiors with simple and effective blinds.
40 STYLE PLANWe guide you through developing your own paint style.
44 NO LION, NO WITCHWe look at modern wardrobe design and stylish storage features.
48 SIX WAYSDeciphering the jargon, six gardening terms explained.
50 CHECKLISTSeeds, salads and spring – it’s all here.
52 GET YOUR GREENSYates take us for a walk in their garden for salad greens.
54 RED, JUICY TOMATOESGreat to eat and a pleasure to grow, it’s a tomato How To.
60 WONDERLAND LIGHTINGCreate an amazing look in your late night garden.
contents
A publicAtion
NIS3307 - Navara Mitre10 Trade FP.indd 1 21/01/11 1:20 PM

New colourful coverplate collectionA kaleidoscope of colours inspired the new collection of switches and powerpoints from HPM. Designed to lift and
invigorate a home’s décor, the affordable Linea wall plates help to establish each room’s personality while celebrating
design statements around the home.
The coverplates can be easily interchanged to refl ect changing colour trends. Sleek and functional, the Linea
collection can be used for a host of applications including light switches, extra safe power points, dimmers and internet,
telephone and television outlets. And, the soft suede-like fi nish means they are simply a delight to touch.
Teaching old doors new tricks
Schlage Stella® sliding door locks by Ingersoll Rand give old aluminium sliding doors
new life, style and security.
Stella® is not only secure with its twin activating jaws and stainless steel receiver
plate, it also retro-fi ts existing location holes, including those installed from 1970-
1990, giving you a modern design while covering previous installation holes.
Available in three locking options, Schlage Stella® offers all the advantages you
would expect from this world leading brand; uncompromised security, simplicity,
style and a high quality manufactured fi nish.
Schlage’s 85 years of design and innovation produces stylish, innovative
technologies that meet stringent quality and security standards.
Exciting new lighting rangeOlympus: The Olympus creates a striking visual impact with it’s contemporary design
and smooth anthracite fi nish. With a durable aluminium body and energy saving
LED technology, this is truly a bold statement for any environment.
Arigo: A versatile and durable spotlight constructed out of marine grade stainless steel.
Light up your garden or plants from above or below the water!! With an IP68 rating the
Arigo spotlight can be fully submersed under the water. You can easily replace the lamp
with an LED alternative, great for those who are looking to light their garden while using
as little energy as possible…
Cylon: The natural granite fi nish allows the Cylon to integrate seamlessly into it’s
environment, it provides a upward illumination highlighting a feature or creating ambience
in your garden. You can easily replace the lamp with an LED alternative, great for those who
are looking to light their garden while using as little energy as possible…
Callisto: A traditional wall light with classic features and a rust brown fi nish will integrate
perfectly into a natural environment. While classic in style there are many great features
including a durable aluminium body and the added benefi t of energy saving LED technology…
ee
t
m
uus
mm
hh
tte
tt
eec
eel.
the
mp
sing
mbience
hose who
egrate
ures
chnology…
easyTRAP has added 12 new lines to their range;
Codling Moth and Codling Moth Refi ll Kit, Sticky Tree
Band, “Mini-Stickies” for fl ying insects, sticky traps for
Cockroaches, Pantry Moths, Cloths Moths, Silverfi sh &
Spiders plus live-catch and multi-catch mouse traps!
easyTRAP products offer a Natural Solution to Indoor
and Outdoor Pest Control; Non-Toxic, no poisons or
pesticides and 100% natural.
Other products in the range include Wasp Traps, Slug
& Snail Traps and Sticky Traps to control Aphids, Thrips,
Whitefl y and other fl ying insects that damage gardens
and plants.
Available now at your local retailer.
For more info please contact Tollesbury Enterprises;
e: [email protected] p: 09 421 0190
f: 09 421 0192
easyTRAP new products
Olympus
Arigo
Callisto
w
as
Cylon

DIY 101
5
How To
4
DIY 101 by Scott Wilson
Power toolsEvery well-stocked workshop needs a number of power tools to
get projects completed accurately and professionally; however,
just which tools you need depends on what jobs you are planning
to do. Over the next few pages, we take a look at some of the tools
you may have, want or need in your workshop – and some that
may be completely irrelevant but are still very cool.
The basicsCircular saw
Every workshop needs one of these. Depending on what
type of job you have in mind, or whether you want a useful
all-purpose circular saw, you can choose something high-
powered with a large blade, or go for something more
middle-of-the-road (and budget friendly) with a slightly
smaller blade.
Cordless drill/driver
There is a huge range available and they have come a
long way from their market release in the 1980’s. In
some cases, it may even pay to have two – one set up to
drill and one to drive screws. Grab a spare battery, so you
can charge one while using the other.
Electric drill
A good electric drill will be able to handle more demanding
work for longer periods of time than a battery drill.
There’s no need to wait for the battery to charge as well;
just plug it in and away you go.
Increased power and torque mean corded drills to handle
bigger bits and tackle tasks like drilling concrete.

How To
6
www.blackanddecker.co.nzFreecall 0800 339 258
• Detail + 125mm ROS• 170 Watt Powerful motor • 11000 rpm• Finger Sanding Attachment• Hook and loop paper attachment• Cyclonic Dust Canister• 2 year limited warranty
• Two Battery Packs• Two Speed• 24 Position Clutch• Variable Speed• Handy Kit Box• 4 year limited warranty
• 600 Watt Powerful Motor• Variable Speed• On-Board Blade Storage • Accu-bevel - Tool Free
Bevel adjustment• Orbital Action
• 550 Watt Powerful Motor• 13mm Keyless Chuck• Variable Speed• Side handle with Depth rod• Drilling & Hammer Drilling Modes• 2 year limited warranty
• 1200 Watt Powerful Motor• Rubber grips add to user comfort
and control • Spindle Lock• 3 position side handle• Tool free safety guard
• 2000 Watt Element• Variable Temperature Range
50ºC - 600ºC• Free Stand Ability• Kitbox - Conveniently stores
Heatgun and Accessories
• 1300 Watt Powerful Motor• Aluminium / Steel Blade
Guard• Depth Adjustment• Sawdust Ejection Chute• Bevel Adjustment• 2 year limited warranty
Two Battery Packs
24 Position ClutchVariable SpeedHandy Kit Box4 year limited warranty
Freecall 0800 339 258
2000 Watt Element Variable Temperature Range
Kitbox - Conveniently stores Heatgun and Accessories
Drilling & Hammer Drilling Modes
• • • • •
1300 Watt Powerful Motor
KS900EK-XEJIG SAW
KR55CREK-XE - HAMMER DRILL
EPC182K2-XE18V CORDLESS
DRILL
KG1200-XE125mm ANGLE GRINDER
KS1300-XE - 185mm Circular Saw
KX2000K-XEHeat Gun
170 Watt Powerful motor
KA270-XEMULTI SANDER
Black & Decker’s key play makers
BD_M10_FathersDay_v2.indd 1 5/08/11 2:36 PM
Jigsaw
Such a handy little tool, a jigsaw is ideal for getting into
those places inaccessible with a circular saw. They feature
changeable blades for working on different materials:
perfect for cutting out holes in panels for power points,
plumbing fixtures and cutting curves for some of those
more exotic projects.
Planer
This may seem like a luxury item but you’ll only have to
use it once, in a situation where you need to remove quite
a bit of material from a project, to realise just how useful
an electric planer is.
Sander
Suggesting a sander is one thing, deciding which sort
you need is something else entirely. There are a number
of electric planers – orbital sanders, belt sanders, detail
sanders and random orbital sanders.
Belt sanders are designed to remove a considerable
amount of material and can quickly do a lot of damage
to the surface of a project if used by someone unaware.
In most cases, sanders are a way of finishing a project, so
should be seen as a finishing tool.
With that in mind, an orbital or random orbital sander
will do the job. It can be paired with a detail sander to get
into all the corners, nooks and crannies.
Lights
Not technically classed as a power tool, but an
electrical item that is a must in any good workshop
(or anywhere you’re working where it’s a little dark).
Without good lighting, working with power tools isn’t
going to be safe. You need to see clearly to get the job
done right with minimal danger to yourself or others.

How To
8
R
Pick up your free copy of the LATEST edition ofForeno’s UNPLUGGEDMagazine in store...
With MORE products,DESIGN TIPS & the latest onthe new Water EfficiencyLabelling scheme
New Zealanddesign is in a
league ofit’s own
Check out the rest of the V-Line range
on page 10
Rainjet featuresfacial spa mode for
a little luxuryat home
Waka Swivel Spout Sink Mixer
WK1
Rainjet Slide Shower
FSLR
V-Line Wall mount bath spout
VL05
New Zealanddesign is in a
league ofit’s own
Waka Swivel Spout Sink Mixer
WK1
Nat Davis, Judge
from TV2’s Dreamhome
explains the ins &
outs of choosing
your tapware. Read
on below to find out
why she has chosen
these products as
her top 6.
Nat’s Top 6
A water efficient shower that doesn’t compromise on the quality of your shower. Five different functions including a facial spa mode.
Add some sophistication to your bathroom with the elegant V-line wall mount bath spout.
NZ designed and manufactured.NZ identity in your own home
7
UNPLUGGEDTapware Bu
yers Guide
ISSUE 3
+ All you need to know
about the new Water E
fficiency Labelling Sc
heme
LOVEyour kitchen... get wh
at you really want
Bold BathroomsAdd the WOW factor
to your bathroom
• Low water pressure
solutions
• Autoflo - Electron
ic Taps
• The designer’s eye
with Nat Davis
L w water
•• The• The design
Plus
de
More advanced toolsTable saw
One of the real problems with a tool like a table saw is
that it takes up so much room. These can be a wonderfully
versatile tool, especially if you are in your shed on a
regular basis, for a range of different projects.
Table saws can be used for everything from accurately
cutting panels to size through to ripping timber, as well
as cutting grooves in timber for decorative or functional
purposes.
Drop saw/draw saw
A drop saw or draw saw is a useful addition to your power
tool arsenal but because of its limitations, it certainly
wouldn’t be the first power tool you would choose to buy.
They can be unbeatable for jobs like cutting finishing
trim like architraves, skirting and scotia.
Most drop saws can be adjusted to cut on a mitre up to 45
degrees. Some have the option of tilting the blade as well,
allowing a cut to be made in two angles at the same time
(compound mitre).
POWERING YOUR TOOLS
No matter whether you have gone for the most basic of tools, or the best that money can buy; you’ll still need a number of power cords to supply them.
Heavy-duty cords are the best bet because they stand up better to the rigors of a workshop.
It’s a good idea to get cords longer than you think you need, as you may need to run them around other items in your shed. It’s much easier (and safer) to have one cord than multiple linked together to reach your objective.
To store, coil cords loosely but tidily rather than having them tightly wound (which can cause wear to some of the wires inside the cable).
If a cord does become damaged it can be a safety hazard, so get it checked or replaced.
When using power tools, it’s also good practice to run them through a residual current device (RCD) to reduce the possibility of electric shock. Modern power tools are quite safe due to their construction however there is still some risk.
An RCD provides just another safety barrier to electric shock because you can never be too careful.

How To
10
Bosch Hot Water. Delivering Peace of Mind. Bosch has been delivering hot water to New Zealand households for over 50 years. Pioneering continuous flow water heating in the late 1800’s, Bosch has secured a name synonymous with quality and innovation that continues to drive the company today. As a result, Bosch now offers the largest range of continuous flow gas hot water systems on the market today.
One such product, the Bosch Highflow 25e is compact, space-saving and is easy to install. It has been designed for maximum energy efficiency and environmental protection making it a smart choice for New Zealand homes.
Call Bosch on 0800 54 33 52 or visit www.bosch.co.nz/hotwater for more information.
Drop saws work only in an up and down motion; while
draw saws work with a back-and-forth motion, drawing
the blade through the material being cut. It is possible to
obtain a combination draw and drop saw.
Reciprocating saw
Now here’s a tool that has a huge range of uses. It’s one of
those “use-one, want-one” type of tools that can quickly
have you searching through the power tools section at
Mitre 10.
The first time I used one was during a major renovation
project when I had to cut some bolts holding a section
of wall framing to the floor. A tedious, frustrating job
normally with a hacksaw, was achieved quickly and easily
using a reciprocating saw.
The secret to the saw’s performance is the long thin blade
that moves back and forth and can be squeezed into the
most awkward of spots.
With a range of interchangeable blades available, a
reciprocating saw can be used to cut through a wide
variety of materials.
Router
Often used for decorative work on the edges of timber
or panels. A router can also be used for basic tasks like
creating a uniform finish along the edge of a piece of
timber which makes it much easier to sand a smooth
rounded edge.
With a change of bit a router can also be used to
machine a groove or slot in pieces of timber — ideal for
creating strong joints between two separate sections
of stock.
Angle grinder
Here’s a tool that’s likely to only come out on odd
occasions but, when it’s needed, you’ll find it almost
invaluable.
Angle grinders can be used to carefully grind down
metal to a smooth surface or, with a change of disc,
to cut through masonry or metal. They can even be
used to get into awkward areas to cut off bolts or
nails that can’t be reached with the correct blade on
a circular saw.
How To
12
Bench grinder
Again, a tool that probably isn’t used too much, but can
prove to be quite the addition to your power tool arsenal
once you have realised how handy it can be.
If you work with pieces of metal, a bench grinder is the
perfect tool to remove those annoying burrs or sharp edges.
It can also be used to sharpen your hand tools, such as
chisels, axes or even lawnmower blades, but this does
take some practice and skill to get right – especially when
honing blades, like chisels, that require an accurate blade
angle.
A publicAtion
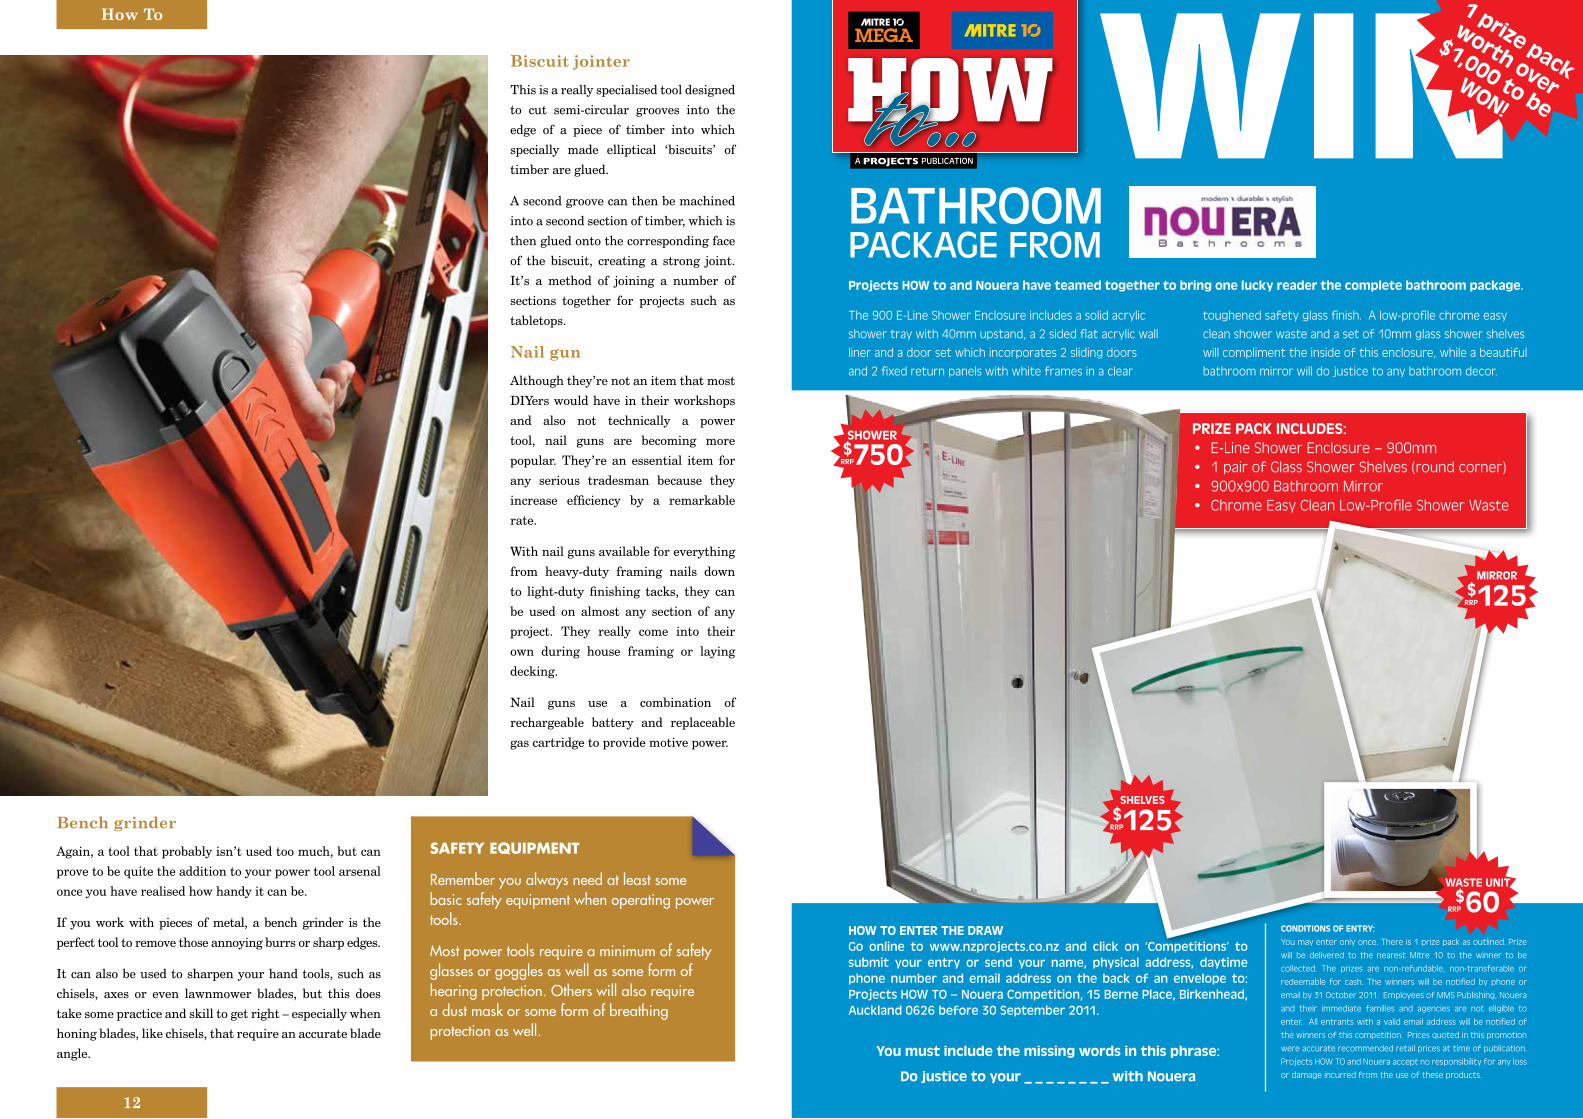
How To EnTEr THE drawGo online to www.nzprojects.co.nz and click on ‘competitions’ to submit your entry or send your name, physical address, daytime phone number and email address on the back of an envelope to: projects HoW to – nouera competition, 15 berne place, birkenhead, Auckland 0626 before 30 September 2011.
You must include the missing words in this phrase:
do justice to your _ _ _ _ _ _ _ _ with nouera
CondITIonS oF EnTrY:
You may enter only once. There is 1 prize pack as outlined. Prize
will be delivered to the nearest Mitre 10 to the winner to be
collected. The prizes are non-refundable, non-transferable or
redeemable for cash. The winners will be notified by phone or
email by 31 October 2011. Employees of MMS Publishing, Nouera
and their immediate families and agencies are not eligible to
enter. All entrants with a valid email address will be notified of
the winners of this competition. Prices quoted in this promotion
were accurate recommended retail prices at time of publication.
Projects HOW TO and Nouera accept no responsibility for any loss
or damage incurred from the use of these products.
PrIzE PaCk InCludES:• E-Line Shower Enclosure – 900mm • 1 pair of Glass Shower Shelves (round corner) • 900x900 Bathroom Mirror• Chrome Easy Clean Low-Profile Shower Waste
Projects How to and nouera have teamed together to bring one lucky reader the complete bathroom package.
The 900 E-Line Shower Enclosure includes a solid acrylic
shower tray with 40mm upstand, a 2 sided flat acrylic wall
liner and a door set which incorporates 2 sliding doors
and 2 fixed return panels with white frames in a clear
toughened safety glass finish. A low-profile chrome easy
clean shower waste and a set of 10mm glass shower shelves
will compliment the inside of this enclosure, while a beautiful
bathroom mirror will do justice to any bathroom decor.
$750rrP
SHowEr
$125rrP
$125rrP
SHElvES
mIrror
$60rrP
waSTE unIT
bAtHRooM pAcKAGE FRoM
1 prize pack
worth over
$1,000 to be won!
SAFETY EqUIPMENT
Remember you always need at least some basic safety equipment when operating power tools.
Most power tools require a minimum of safety glasses or goggles as well as some form of hearing protection. Others will also require a dust mask or some form of breathing protection as well.
Biscuit jointer
This is a really specialised tool designed
to cut semi-circular grooves into the
edge of a piece of timber into which
specially made elliptical ‘biscuits’ of
timber are glued.
A second groove can then be machined
into a second section of timber, which is
then glued onto the corresponding face
of the biscuit, creating a strong joint.
It’s a method of joining a number of
sections together for projects such as
tabletops.
Nail gun
Although they’re not an item that most
DIYers would have in their workshops
and also not technically a power
tool, nail guns are becoming more
popular. They’re an essential item for
any serious tradesman because they
increase efficiency by a remarkable
rate.
With nail guns available for everything
from heavy-duty framing nails down
to light-duty finishing tacks, they can
be used on almost any section of any
project. They really come into their
own during house framing or laying
decking.
Nail guns use a combination of
rechargeable battery and replaceable
gas cartridge to provide motive power.

Insulate Walls
15
How To
14
Wall warmthby Shaun Evans
New Zealand has more than it’s fair share of cold and draughty homes. The reason is a combination of underinvestment, poor design and poor maintenance. Home insulation only became mandatory in 1978, so if your home was constructed before then, it’s likely you are in need of insulation.

How To
16
The monetary price we pay for un-insulated houses is in
the form of wasted energy – from heating homes that are
unable to retain heat. The damp and moisture are also a
drawback, but more worrying still is the toll it can take
on your family’s comfort and health.
Installing insulation in your walls will retain heat and
contribute to a warm and healthy home. Insulation will
stop the cold seeping in, prevent heat escaping and stop
damp rising. Wall insulation can be made from polyester,
wool, fibreglass and polystyrene.
R-values denote the type of fibreglass insulation perfect
for your home:
• A minimum of R1.6 insulation in the North Island
(excluding the Central Plateau)
Cut the R-value sticker off the bale and staple it to the framing for future reference.
• A minimum of R2.6 insulation in the South Island or
Central Plateau.
Combine this with advice from trained professionals at
Mitre 10 and online resources to make choosing your
wall insulation a breeze.
Run through this checklist to assess your wall insulation
status:
• Do you have wall insulation?
• Is your insulation gap free?
• Is your insulation dry?
• Does your insulation cover the whole area?
The easiest part is down to Mitre 10 to order enough for
the job!
InstallationIt’s important to install your insulation correctly, as even
a tiny gap can make it significantly less effective. Wall
insulation can be easy to install depending on the state of
your walls. If you are in the process of a new build then
installing insulation in your walls, prior to attaching the
linings, is relatively simple.
If on the other hand you need to remove your wall linings
then this can create a larger project altogether. In the
grand scheme of things, the cost benefit will outweigh
the hassle.
Pulling your linings off the framing does NOT have to
involve a sledgehammer!
It’s possible to pull out a few nails around the perimeter
of the sheet and carry away the whole piece of Gib intact.
This means you can use it again to save you money or
stack easily for removal.
Fibreglass-based products are designed to friction fit
between 600mm wall studs. Typically they measure
1140mm x 580mm, however if you find you have 400mm
centered wall studs you will need a sharp Stanley knife
to cut each piece to fit.
Go beyond the minimum and saveInstall insulation with higher R-values to future proof your home against rising energy costs. An R-value measures a products resistance to heat fl ow. By installing insulation with a high R-value such as Pink® Batts® Ultra™ into walls, ceilings and under your fl oors, you can create a signifi cantly warmer and more comfortable home that’s free from mould and condensation. Also, you can reduce your home’s heating costs by up to 17%* compared to installing the minimum levels required by the NZ Building Code.
Consider sound as wellUse Pink® Batts® Silencer® acoustic insulation strategically, by building into internal walls wherever you wish to decrease sound transmission between rooms; such as bedroom and bathroom.
Build in your energy savings now...and save up to a further 17% on your heating costs*
Ener
gi 8
3151
Licence No 2504017.Thermal (resistive type) building insulants.
Internal wall use Pink® Batts® Silencer® to reduce noise transmissions
10% through the fl oor Use Pink
®
Batts® Cosyfl oor
®
42% through the roofUse Pink
® Batts
® Ultra
TM
Where doesthe heat go?
24% through the wallUse Pink
® Batts
® Ultra
TM
Building or renovating is the best time to include insulation that will future-proof your home. By using
Pink® Batts® thermal insulation you can reduce the amount of heat loss from your home. This diagram
explains where the heat is lost from a home, and what products to use where.
*Test results illustrate estimated energy savings for particular scenarios. Savings will vary dending on factors such as building design, construction and location. Building Workshop Architectural Consultants 2005.
We’d love to help you further
Our Comfort in Style
brochure is full of
tips and how to’s
for planning, buying
and installing the
correct insulation.
For a FREE copy, email us on
Include your name and
postal address and we’ll
send you a brochure.
www.comfortablehomes.co.nz
83151 Energy Ad.indd 1 21/3/07 11:18:22 AM
Timber should be completely dry before installing insulation.

Insulate Walls
19
How To
18
Reducing the gaps between your insulation and the
wall studs is not enough – they must be eliminated
entirely. Gaps around the edges will reduce the
effective R-value of the insulation by approximately
3% for every 1mm gap.
When you are retro fitting insulation into externally
facing walls, the backside will be exposed to the cladding.
Condensation forms here so you will need to install
underlay to protect your insulation from moisture. Use
building paper such as Bitumac® 850 or Flamestop®
650 if the cladding is not-absorbent (steel or plastic),
otherwise use a synthetic wrap and simply staple it to
the internal perimeter of the stud cavities.
If you are using a polystyrene-based insulation, use
a sharp Stanley knife to make your cuts accurate and
straight – this will help you fit the insulation perfectly.
All the spaces within exterior walls need to be insulated
between the top and bottom plates. Where there are
split-level ceilings or floors, the area above and below the
split needs to be well insulated. Using your off cuts to
insulate around window and door frames will also help.
With fibreglass products, simply friction fit it into place
to ensure there is no movement over time. However,
polystyrene is more rigid and any gaps need to be filled.
Polystyrene insulation also needs a protective sheathing
around wiring to prevent contact.
There are many great installers available if you’re unsure
about your skill level for this project and the Mitre 10
team has a list to help you. One thing that’s for sure is
once your insulation is installed, you and your family will
notice the difference in terms of comfort, warmth and
savings on your power bill.
BUILDING AND RENOVATINGThe perfect time to make your home warm, comfortable and energy efficient is when you are building or renovating. It is your opportunity to go back to the drawing board and really think about how you can incorporate energy efficiency into your home’s design.
Designing better new homesWith the right combination of materials, features and technologies you can create a stylish, warm and comfortable new home that uses relatively little energy to run and is better for the environment.
Good energy efficient design needn’t cost much more, but you’ll enjoy the benefits for many years to come. Start by reading Designing Comfortable Homes on the EECA, Energywise website - a plain English guide for anyone interested in designing comfortable, energy efficient homes.
Find out more about designing an energy efficient home at www.energywise.co.nz
Renovating for warmer, drier homesEveryone would like to live in a house that is warm, comfortable and healthy - and doesn’t cost too much to run.
But compared with houses in other countries with similar climates, New Zealand houses are cold, damp and unhealthy. Most of our houses are draughty, badly ventilated and under-insulated. This makes them difficult and expensive to heat.
Fortunately, there are many things you can do to make your home warmer and more comfortable to live in, and it’s a great opportunity to do it while you are renovating.

How To
20
and safetyInstallation equipment
As with all DIY projects, installing insulation
in your walls requires concentration, a
steady hand and the right equipment. Safety
equipment is paramount, as you are dealing
with a product that can irritate your skin
and eyes. Also, there are many potential
dangers in your walls such as electrical
cables, timber splinters, exposed nails and,
sometimes, plumbing.
Here is a list of How To safety products you should have for installing insulation in your walls:
• Dust mask: Behind your wall linings are a dusty
place and the irritation from dust particles poses a
health risk, so using a disposable cotton pad mask is
the very least you can do to protect your lungs. If you
were going to be installing a lot of insulation, then it
would pay to invest in a more robust respirator.
• Clothing: Loose-fitting clothing will lessen the
chances of skin irritation from the insulation
material.
• Footwear: Good shoes will make the difference in
terms of grip, comfort and the prevention of abrasions
or damage to your feet. The range of Bata products
are ideal and can be found at Mitre 10.
• Lamp and extension cord: An adequately lit work
area is essential; make sure you have an extension
cord about 15m long.
• Installing sticks: These should be about 1.5m long,
50mm wide and 5-10mm thick. They will allow you to
push the insulation into the corner.
• Knife: The sharper the knife, the better, as it will
slice through insulation for a clean edge. This edge
will give you the friction fit ensuring a professional
and effective finish.
• Goggles: Due to the irritation caused by insulation it
is always a great idea to wear eye protection to ensure
your eyes are saved from unnecessary aggravation.
Use fully enclosed goggles for this job.
• Gloves: Protect your hands from nails and splinters
and your skin from the irritation caused by insulation.
A good set of gloves will last you for many years and
they will be useful for many other projects.
There are some important safety precautions that are
worth mentioning, specific to the installation of wall
insulation:
• Always have sufficient lighting. This is the key to
being aware of your surroundings and of threats to
your safety. It also helps you carry out a professional
job.
• Electrical hazards are everywhere and accidentally
interrupting the flow could put your life in danger. Be
aware of where the electrical cables are and mark the
areas where hidden cables lay.
Installing insulation is a great project for winter and
the tools you need are easy to find. Should you need
more information, talk to the team in store at your local
Mitre 10.
A publicAtion
Like you ... we’ve beenrenovating too!
Visit us on the Website (www.nzprojects.co.nz)
Like us on Facebook (www.facebook.com/NZHowTo)
Tweet us on Twitter (www.twitter.com/NZHowTo)
How To is now your digital DIY partner ...
Wherever you are, you can find DIY tips, links, videos and competitions; all just a click away.

Project
23
How To
22
When it comes to home security, the first
barrier to any intruder is your front
door… and the lock that secures it in place.
Ideally, you want something that’s going to
provide some security and strength against
any unwanted visitors, while retaining a
welcoming aesthetic for those you do want
to come in.
Schlage provides a range of high-performance front
door locks and handles designed to keep intruders out,
yet remain stylish enough to grace the entryway to
your home. As well as a range of standard ‘keyed’ locks,
Schlage produces electronic versions, which offer a
unique range of advantages over standard locks. For a
start, you don’t need a key to get in, which means you
won’t need to fumble around in your bag or through
your pockets looking for one when you get home. There’s
also no key to get lost, so you won’t need to worry about
where it is or who’s got hold of it.
Different codes can be programmed into the lock
depending on who you want to have access and when. For
example, if a tradesperson needs access to your home,
you can programme a one-time code that automatically
erases itself from the system once it’s been used, or
you can have different entry codes for different family
members.
If you get to the door after the sun’s gone down (or
shortly before it’s due to come up), the backlit keypad
makes it easy to see what you are doing.
Lock, stock and looking good by Scott Wilson
Basic tools required:
• Electric drill
• 53mm hole saw
• 25mm spade bit
• Phillips screwdriver
• Tape measure or ruler
• Sharp pencil
• Chisel (approx. 25mm)
• Hammer

ProjectHow To
0800 477 869 www.ingersollrand.co.nz
Style.
0800 477 869 www.ingersollrand.co.nz
Security.
The lock is powered by a standard nine-volt battery, which lasts up to three years in normal circumstances and gives plenty of warning when it is running low on power. Even after the initial ‘low power’ warning, there are still a couple of months of normal performance left in the system. If the battery runs flat, a standard key override allows access to the house, which means you can hide the key away in a safe place, just in case the system runs out of power. A light on the keypad flashes with differing colour combinations (ie, red/green or red), indicating the battery requires replacement.
Lock installation isn’t difficult and if you are considering retro-fitting one to an existing door, these locks are compatible with a standard 54mm hole. As a rule of thumb, if you have a handle with a key that inserts into the front of the knob or lever, then you should be able to swap it for a new Schlage lock without any difficulties.
If you have basic DIY skills and the necessary tools, you
will be able to install one in a new door yourself.
Step 1The first step is to establish the correct height on the door for the handle – too high and it will be difficult to reach, too low and it will feel awkward and look out of place. Around 1m up from the bottom of the door is a good starting point.
At that point, mark the door based on the back set of the latch – in the case of this Schlage set, it has the option of 60mm or 70mm. Because it sat nicely in the centre of the door stile, a 70mm back set was chosen in this case. Using a square, a ruler and a sharp pencil, mark this
position on both sides of the door.
Step 1Step 3
Step 2 Step 5Step 4
Step 2Once the position of the handle has been established, drill
54mm through the door to accommodate the hardware.
Using a sharp hole saw fitted to an electric drill, make
a hole through from one side without going all the way
through the door, then drill back through from the
other side. This will prevent the saw breaking out and
damaging the face of the door.
Step 3To fit the cylinder of the latch set, a 25mm (1”) hole needs
to be drilled in the centre of the edge of the door – lining
up to the middle of the 54mm hole you have already
made for the handle. Take care to keep the drill straight
and level as you are drilling or this can cause problems
when you fit the latch.
Step 4 & Step 5The faceplate of the latch cylinder needs to be checked
into the edge of the door so it’s flush with the surface.
Mark around the faceplate and use a sharp chisel to
carefully remove timber until the faceplate sits flush
with the surface. If the plate sits above the surface when
it’s in place, it can cause the door to bind to the frame or
hit the strike plate when it’s closed, so continue to chisel
out any extra material until the plate fits correctly and
then screw it in place.

How To
0800 477 869 www.ingersollrand.co.nz
Style. Security.Real security sets you free
BRIGHT IDEASINJECT A LITTLE PERSONALITY INTO ONE OF YOUR HOME’S OFTEN OVERLOOKED FIXTURES
Whether you’re renovating or simply updating the decor of a room to reflect the current season, you no longer have to settle for plain light
switches. While standard white covers work in neutral-coloured rooms, the Linea Soft Touch range allows you to fuse fun with functionality and get your creative juices flowing.
With 18 colours to choose from, you can mix and match Linea Soft Touch coverplates to your heart’s content, using them to complement or provide contrast to your surrounds. Easy to fit, the snap-on coverplates have a super-slim profile and can be swapped as you update your colour scheme. They have a beautiful, suede-like finish and can be teamed with textured feature walls and even wallpaper to create complete hue harmony at home.
Inspired by pop art, Linea Soft-Touch Brights add punch and a touch of fun to your interiors. Pair with textured wallpapers or match to a unique piece in the room.
Energise & Invigorate
Abracadabra
Sunshine Cheeky Boy Blue
Saucy Red
Orange CrushBubblegum
Extra safe (ES) power points with unique rotating covers keep inquisitive young fingers extra safe.
NEW!
Stocklists: Available by special order through hardware stores and electrical wholesalers. We remind you that 240V electrical accessories need to be installed by a licensed electrician. For more information visit www.lineacolours.co.nz or call HPM Legrand on 0800 476 009
Soothing elements in nature provided the inspiration for the Earth range. These neutral colours work particularly well with timber, stone and marble features in the home.
Natural Sanctuary
Wet Elephant
Ninja Khaki
Runaway Bride
5 O’Clock Olive
Ghost Gum
Midnight Dash
Step 6 & Step 7Slip the handle in to place ensuring the connect wire is
fed through the hole to the other side of the door.
Slip the backing plate into place (this is held in position
using a ‘hands free post’, which is an adjustable screw
used to hold it together while you work), then connect
the battery and plug in the connection wire. If correctly
installed, the handle will beep to let you know it’s
working.
Step 6
Step 7

How To
28CLAUDE 14612
Easi-PlanksMade from 18mm
GoldenEdge MDF in a rangeof convenient lengths and
widths to suit the DIYer.
Can be painted or stained.
because GoldenEdge makes it easy withEasi-Planks, Easi-Panels and Primed HMR Mouldings
Of courseyou can make it
Sizes (mm)
1800x300, 1800x400, 1800x600
2400x300, 2400x400, 2400x600
Easi-PanelsThese come in a range ofthicknesses from 4.75 to18mm, ideal for all sorts
of projects.
Sizes
4.75 and 6mm1200x600, 1200x900, 1200x1200
9, 12 and 18mm1200x600, 1200x900
Bevelled Architrave
Colonial Architrave
Square Dressed
Splayed Architrave
Bullnose Architrave
Bevelled Cornice
Primed HMRMouldings
This range of mouldings aremachine coated with a
premium acrylic undercoat.
In 5.4m lengths.
GoldenEdge Medium Density Fibreboard (MDF) isthe ideal material for a wide range of interior projects.Whether you are making kitchen joinery, bookcases,
storage cabinets, furniture or toys, you’ll make iteasier with GoldenEdge MDF.
from your nearestMitre 10 or Mitre 10 Mega
Step 8When everything’s connected, the battery can be slipped
into position in a holder on the backing plate, the wires
tucked away and the inside handle screwed in. Note that
this is done using a standard screwdriver and not a battery
driver, as these can over tighten screws and cause damage.
Step 9Now that the handle is all fixed in place and working
properly, the strike plate needs to be fixed to the
doorframe.
This is a fairly simple job but can cause some problems if
it’s not done correctly. A striker plate that’s not fitted in
the right place can cause a door to either rattle in the wind
(too loose) or needed to be slammed to latch into place
(too tight). One way of working out the correct position
is to mark the position of the latch on the doorframe,
measure back from the front of the door to the backside
of the bolt and then transfer this measurement to the
door frame.
By chiselling out a small amount of timber first and then
closing the door, it’s easy to establish just where the
strike plate needs to be fitted.
Step 8
Step 9

How To
30
200mm CHANNEL SYSTEM
130mm CHANNEL SYSTEM
uPVC Standard Grate – Grey
SHALLOW CHANNEL SYSTEM
Marley Surface Drainage products remove water quickly and effectively from your property
uPVC Standard Grate – Grey
The 200mm large capacity channel makes it ideal for use in areas where large volumes of water need to be drained quickly, especially in steep areas.
Cast Iron Grate & PP Channel
Galvanised Grate & PP Channel
The shallow channel with an overall depth of 60mm is an ideal solution where there are minimum depth requirements. Suitable for apartments, terraces, patios, decks, garden walkways, swimming pools and building entrances.
Galvanised Grate & uPVC Channel
uPVC Pedestrian Grate
Made from 100% recycled polypropylene, the 130mm Channel and Grate system is ideal for use in home driveways, garage entrances, patios, gardens and outdoor entertainment areas.
For more information: 0800 MARLEY (0800 627 539)
uPVC Reinforced Grate
uPVC Standard Grate – Charcoal
Surface Drainage Solutions
www.marley.co.nz
Once this position has been established, mark around the
striker plate and remove the timber with a chisel until it
sits flush with the surface before screwing it into place.
Step 10The final step to getting your door working is to read
the keypad operation instructions and establish the
key codes. It’s best to do it with door open and the code
sheet nearby, because the last thing you want to do is
lock yourself out – a possibly frustrating end to your lock
installation project!

How To
32
Prep the deckThe furniture you have on the deck may also be in the same box as your deck
and may need a new lease of life using the same techniques.
So, how is your deck looking?Has your deck lost the colour it had originally? Faded in some areas and not
others? How about marks from furniture, pot plants or the barbeque?
Whether you have constructed a new deck or you are looking at revitalizing
the one you have, it’s important to make sure you have the knowledge and
tools to add life to your outdoor living areas.
Getting startedAdopt a planned approach to stain your deck successfully, just as you do when
painting the house. This begins with proper preparation, because if the job is
not done thoroughly from the outset there is little chance of your deck ending
up looking perfect for the summer of entertaining ahead.
Simple preparation steps to a well-stained deck will include:
• Sanding off the old stain to expose the timber.
• Ensuring the surface is free from dirt, grime and oils.
• Using Wattyl Combat to reduce mould growth, warping and cracking.
Weathering of new timberAllow any new dense or resinous timbers, such as jarrah, teak, kwila, cypress
pine and other hardwood timbers, to weather for four to six weeks before
staining. Pine treated with LOSP (Light Organic Solvent Preservative) should
weather for two weeks prior to application.
We all know summer is coming and pretty soon it will be
time to have family and friends out on the deck for the
first summer barbeque. In fact with the New Zealand way
of life orientated towards al fresco dining, the deck has
become the environment of choice.
The best possible start to the job.
• Excellent for Annual Cleaning • Bleach Free • Caustic Alkaline Free
• Removes Moss & Lichen
Start your deck or roof job the way you mean to go on - doing the best job possible. Essential preparation products prior to using Wattyl Forestwood or Wattyl Solagard Roof.
WORK2563
WORK2563 PrepRange HowToMag 1 8/08/11 4:06 PM

How To
34
If the timber has a shiny dressed surface or patches
from the timber production process, sand using 150 grit
sandpaper to allow for stain adhesion and penetration or
allow to weather for six weeks.
Choosing the right product and colourPart of the planning process is to ensure you have the
right product and colour.
A stain often takes on a slightly different hue on different
decking timbers, so carrying out a test on a spare piece of
decking or getting samples from the team at Mitre 10 is
a really good idea.
Major manufacturers like Wattyl help by offering test
pots. Take an off cut and try several stains to be absolutely
sure which will look best on the timber you have chosen.
Here are a few types of stains from the Wattyl range that
you will find at Mitre 10:
Wattyl Forestwood Traditional Oil Stain
This is a rich penetrating oil stain that adds colour and
allows the grain to show through. It’s best used on rough
sawn and smooth weathered timbers. It dries to a low
sheen and is available in a beautiful range of warm,
earthy colours.
Wattyl Forestwood Aquatech
A water-reduced oil stain suited for exterior surfaces,
such as rough sawn and weathered smooth timbers of
weatherboards, beams, pergolas, gates and windows.
You will find an extensive range of standard and tinted
Aquatech colours available.
Wattyl Forestwood Decking Stain
A solvent-based stain that gives a matt oiled finish. It’s
suitable for most decking and garden timbers, including
durable softwoods and close grain hardwoods. Available
in a range of standard timber colours.
Surface preparation
Before you start applying the actual stain, double check
to make sure you’ve removed all mould and stains like
grease, oil or any other contaminants. You can deal to
mould by using a stiff brush and stains can be removed
by using a good solvent like Wattyl Deck & Timber Prep.
Simply follow the instructions and allow your deck to dry
before applying your stain. This preparation product can
also be used to help maintain the appearance of your deck.
Wash your deck with it every year following the label
instructions and it will remove stains and contaminants
– giving life to your stained deck or furniture.
From here the real work of staining your deck begins. By
preparing thoroughly, the job becomes much easier and,
ultimately, the result will be that much better.
Over 30 colours taken from natureA choice of traditional oil-based and new water-
based stains that enhance the look of exterior
timber in ways you will absolutely love. This
superb range of colours allows the exterior of
your home to be as much a fashion statement as
the interior.
®
WORK2571 Forestwood Tree Mag FP.indd 1 11/08/11 2:29 PM

Blinds
37
How To
36
Often a simple change like updating your dated curtains to
modern, streamlined blinds can make a huge difference.
There are a number of blind styles to choose from:
tailored roller blinds, modern lined aluminium venetian
blinds, warm wooden blinds or the universally popular
vertical blinds.
You’ll find there is a blind style to cover your window
and suit the style of your home. They’re the most cost
effect way to update your look and are simpler to find and
install than you imagined.
So, how do you get started?Measure your window as shown.
First decide if you want to have your blinds inside
your window frame (inside fit) or outside your window
frame (outside fit). For a streamlined look select an
inside fit, as the blinds will sit snugly inside your
window frame.
Update yourwindowsIf you have been looking at your tired window coverings and
thinking the hassle to update them may be too much… think again!
It’s easy and cheap to revamp the window coverings in your house.

BlindsHow To
38
For the best light control select outside fit and add at
least 20mm on each side to cover off any light gaps. This
works well for children’s rooms, TV rooms or any room
that you wish to eliminate light seepage around the
window frame.
Visit you Mitre 10 store and select the style of blind that
you are after. Whether you choose aluminium, wooden,
roller or vertical blinds, they are available in pre-packs
as well as a custom made range.
Make sure you take your measurements to the store
as this will help you decide which option is the best fit
for your home. The Mitre 10 staff can help discuss your
options.
If you want your blinds to have an exact fit and your
window measurements don’t match the pre-packaged
measurements, don’t worry, there are some great options
available to you.
Mitre 10 offers a Cut-to-Size option and will cut blinds
down to the exact height and drop you require. This is
available on any pre-packaged aluminium venetian or
wooden blind. Select the blind in the closest size, give
it to Mitre 10 and it will be returned to you in a few
days, the exact size ready to hang. Just ask a Mitre 10 staff member for
pricing and a timeline for these adjustments.
If you have selected to outside fit your blinds then find the closest size and you
might have some more overhang on the outside of your window.
If you are after a more specialised option then By Request Custom Made blinds
are for you. This is an easy choice to get a perfect fit. Ask a Mitre 10 staff
member to view the full range of sample swatches and have your measurements
handy. Once ordered, your blinds will arrive ready to be installed.
It really is that simple to drastically change the look of your home. An updated,
fresh, modern look is a lot cheaper than you’d think.

How To
40
Pick yourYour home is a reflection of your personality and achieving a style that
invites you, your family and your friends into your home is the sign of
style success. You want to put together a look and feel that welcomes you
in at the front door, if not, then the second you pull into the driveway.
style
Use your theme to inspire decorating choices but resist being a slave to the theme when you start choosing appliances – old-fashioned washing machines look good but are not user-friendly.
A well-developed theme using all the painting techniques
at your disposal can certainly help promote your style
onto the canvas of your home. Once you have a solid
theme, the choices you make will be guided by the need
to fit into your “look”. This will apply to everything from
soft furnishings and furniture to the appliances.
When you are looking at improving your home, be bold
and go with your own sense of style. It’s your house and
your home, you will living there, so best be comfortable.
While the homes you see in magazines may be appealing,
take into account your lifestyle and the practicalities of
real life — like children and pets.
Let’s look at some How To rules to home design:Develop a theme
When you pick a theme for your redecoration, stay true
to it, even down to the materials, textures and colours
that you use. Maintaining the theme throughout will
help to achieve a harmonious and balanced environment
for both the interior and exterior of your home.

Style Guide
43
How To
42
There are many themes to choose from and usually the
construction of your home will dictate what is possible.
From traditional villas through to contemporary
apartments, once you have chosen your style, this
unifying theme will help guide your decisions.
Environment
Take a look around your neigbourhood and see how
your house fits into the grand scheme of the area. It is
important to promote your individual style, but having
a brightly painted home in a subdued neighbourhood
may not be appropriate. Try to choose colours that
compliment the site where you house is situated.
Accents
Accents can be used on both the exterior of your home
and the interior. The idea here is to use a complimentary
colour to highlight the main body of colour and draw the
viewer’s eye. Accents can also be a piece of furniture or
soft furnishings like curtains or a duvet on a bed. On the
exterior you can create an accent simply by painting the
front door or window frames. Try a “Cape Cod” look with
a marine theme, blue grey body of the house with a crisp
marine white window frames.
Flow
The key to good living is a good layout. Easy flow from one area to another is
governed by the room’s layout. For example, it’s common to have the lounge,
kitchen and dining room in the same area to allow for ease of use. Likewise
bedrooms will be grouped in the quiet part of the house.
It is important to assign a budget to the materials you will need to complete
tasks during renovations. Fundamentals of any home, like the driveway,
front door, insulation or bench tops should never be skimped on. These
are permanent fixtures that you will have for a very long time, so care and
money should be spent to make sure they stand the test of time.
With regards to painting, both internally and externally, decide ahead of
time on the extent of the project – where it starts and where it finishes!
Break the project up into manageable chunks and set limits to get the job
done methodically and efficiently.
While painting the interior, it’s better to move furniture out of one or two
rooms and then paint them. Once complete, move the furniture and fittings
back into place and move on to the next rooms. This helps in maintaining an
efficient flow of work and will save your nerves.
The team at Mitre 10 have been helping household DIYer’s plan and decorate
their homes for a very long time – this knowledge is at your disposal! In
combination with their supply partners, you will find all the information,
products, advice and help you will need to get the job done.To help you splash some of the latest colours around your place, when you bring this ad into Resene we’ll give you a FREE Resene 55ml testpot to get you started.
Choose from an extensive range of colours, including our The Range fashion fandeck selection.
Offer valid until 15 October 2011 at your local Mitre 10 MEGA (excluding Rangiora), Mitre 10 Wanaka, Cromwell or Resene owned ColorShops. Limit one free testpot per coupon and per customer.
Get inspired with a FREE
testpot
0800 RESENE (737 363)www.resene.co.nz

Wardrobe
45
How To
44
Storagewith styleChoosing and using a wardrobe storage system will also
keep you clothes fresh and free from harmful moulds,
prolonging the life of your wardrobe collection.
With Elfa compatible storage systems available from
Mitre 10, organising your wardrobe is fun and easy, and
even your favourite trousers can have a place in the sun
on the stylish and useful pants rack. Also, it’s just a snap
to assemble any of the Elfa components.
Elfa produces world-renowned modular shelving and
drawer systems that can be customised to your needs and
your space to help you get organised. It can be used in
any room of the home, including a closet, office, garage or
pantry to maximise your vertical space and bring beauty,
ease and order to your home.
With the appropriate wardrobe system, you can
add valuable storage to your home and show
off clothes in style; you went to such trouble
choosing them, it only seems fair!

Wardrobe
47
How To
46
Customised to suit your unique storage needs, and made
of exceptionally strong epoxy-bonded steel components,
you can rely on Elfa to stand the test of time. And that’s
not all. The true benefits come from the flexibility
offered by Elfa, designed to make things easier for you
throughout life.
All of the drawers, pant racks and shoe racks have the
same measurements and match perfectly together, which
makes it a piece of cake to plan, buy and assemble a
wardrobe or storage unit. This component feature allows
you to rearrange your wardrobe with ease when you need
to. Elfa can grow with your needs, which is a good thing
if you have kids, since toys won’t be the most important
thing in their life forever!
Getting startedRedesigning areas to increase much-needed storage space
can be a very simple process. By using custom designed
storage and organisation systems, Elfa wardrobes can
be transformed into multi-purpose areas, yielding up
to 50% more usable space for a fraction of the cost of
custom built-ins.
Begin by noting everything you would like to store in a
particular wardrobe or cupboard. This includes hanging
and folded clothing, shoes, accessories, linens and
miscellaneous items, such as sporting equipment and
luggage.
Donate or sell anything you don’t or can’t wear or use
any more. Use the two-year rule — if you haven’t worn
it in two years, it’s time to say goodbye to it. These items
take up valuable space and probably won’t be missed.
If you have one lone closet rod at the top of your closet
to hang your clothes on — remove it. One rod severely
limits your ability to visualize available space and does
not allow you to double-hang clothing.
Measure your entire closet space from front to back,
side to side and floor to ceiling. Note the height and
width of doors and door frames. Also note the location of
built-in shelves, fuse boxes, cables, ducts and any other
obstructions that may hinder you.
And here’s where it gets fun! Go along to your local Mitre
10, and view the Elfa video in store. This will give you a
feel for what Elfa’s all about and how easy it is to install.
Next choose your system – be it the classic white, sleek
and modern platinum or the rich, subtle tones of walnut
or beech décor finishes.
You can add more bits and pieces whenever you like too,
so if you decide after using your system for a few weeks
ToolS• Power drill and
bits.
• Hammer.
• Tape measure.
• ladder or step stool.
• Pencil.
• Scissors.
• level.
you would like to add another shoe rack you can do it in
a snap!
Remember, what you assemble in minutes with Elfa will
last a lifetime.
InstallationRemove all contents from wardrobe and take the
opportunity to sell or donate items no longer required.
Take out the old shelving and closet rods. You may want
to store clothes you are keeping on a garment rack during
the installation to keep them neat and tidy.
Tape the pages of your custom space design to the
corresponding wall so you can refer to this for the
placement of your Elfa system. Lay all the Elfa pieces out
by type and size and allocate the pieces to the wall they
will be installed on. Installation is easy and using the list
of tools here you want to ensure all the components are
installed level and flat to ensure future additions can be
made with ease.
If you get stuck, always refer to the installation pamphlet
or talk to the experts at Mitre 10. There’s plenty of
information online at www.mitre10.co.nz in our How To
guides and from the Elfa display in store.

How To
48
As well as the scientific names given to each plant, there are often more general terms
written on plant labels. If you understand them, these terms can guide your choice of
plant depending on where you plan to grow it and what its function will be.
Here are some of the key terms you need to know:
1. Annual This is used to describe a plant that will grow, flower,
set seed and die all in one season. It’s most often applied
to flowering bedding plants. The flowering time noted in
the plant’s description is a guide to its life cycle, which
is usually split into winter and summer. It is important
to remember that a summer plant can flower through to
autumn if it is planted late in the season and conditions
are mild.
2. Biennial This is a plant that needs two years to complete its life
cycle. It will be sown in the first year, then flower and
set seed in the second. Biennials are less common than
annuals and perennials. Parsley is an excellent example
of a biennial plant.
3. Perennial This is a plant that lives for more than two years. Many
are propagated from the division of a larger mature
clump. Often a perennial is referred to as “herbaceous”,
which simply means that the plant will die away after
flowering and reappear next spring. Remember to prune
foliage between flowering.
4. EvergreenAs the name suggests, evergreen trees, climbers and
shrubs keep their leaves all year round. They develop new
leaves through all seasons. These are a great addition to
any garden, as they provide life in even the coldest of
winter months.
5. Deciduous This is the name for all trees, climbers and shrubs that
lose their leaves during the winter. Once the leaves are
gone, the plant becomes dormant. Cold temperatures
signal the change, which is why in a mild season you will
see trees holding on to their leaves a little longer.
6. Semi–deciduous Some plants don’t seem to be able to make up their mind!
Semi-deciduous means that a tree or shrub will partially
lose its leaves or, if the season is mild, not at all.
There are three other terms that you need to know in
order to understand what conditions a plant likes to
grow in. These terms can relate to any plant in any of the
above classes.
• Tender plants need to be continually protected from
the elements.
• Half-hardy plants need protection from only the
severest of weather.
• Hardy plants will survive in all weather conditions.
SUBSCRIBEAND WIN!
AND, It’S EASy to SUBSCRIBE:
Phone/Fax: +64 9 575 7870Freephone: 0800 624 700Email: [email protected]
or, post the form to:Complete subscriptions Limited, FREEPOST 167004, PO Box 125115, St Heliers, Auckland 1740
You can subscribe to Projects using Your FLYbuYs Points – simply go to: www.flybuys.co.nz and type ‘Projects’ in the search box to order a 1 year subscription. Just 230 points.
i’d like to take out a n one year subscription $49.00
biLL PaYers name:
Postal address:
Suburb: Town/City: Postcode:
Phone number: Email:
Enclosed is my cheque n made payable to Complete Subscriptions or charge my card n
VISA n Mastercard n AMEX n
Total amount to be charged to credit card:
Card number: Expiry date:
Cardholders name:
Signature:
reciPient name:
Postal address:
Suburb: Town/City: Postcode:
Phone number: Email:
Message: Office use - code: Sept 2011
SAVE 24%
SUBSCRIBERS ENjoy:• Home delivery every month of the latest
issue full of HoW to
• A magazine full of home renovation inspiration and practical know-how
• just $49 for one year (11 issue) subscription
• Save 24% off the retail price
MUltI-tool MAgICWin a handy Bahco Multi-tool worth $40 with Projects HOW to magazine. 3 lucky subscribers will each receive a pocket genius. Eighteen mini hand tools including screwdrivers, saws, wire cutters, pliers, a fish-hook remover and even a bottle opener means that this is the perfect all-in-one device.
All new and renewing subscribers in the month of September will go in the draw to win. So make sure you subscribe today! www.bahco.com
Six gardeningterms by Sandy Johnson
If you take a course in Greek or Latin language, then the information about each plant is actually hidden in its name. A plant’s name will generally refer to its colour, where it was found and who found it. Further information may be contained in the name if the plant is thought to have any healing properties.

Checklist
51
How To
50
Septemberby Sandy Johnson
checklistHome grownAs the weather and ground warms up, it’s time to plant
your vegetable seedlings. You will need to judge the
exact planting time for yourself, as each area can differ
wildly throughout the country; however, September is
traditionally warm enough for most plantings.
The exception here is for your tomatoes; hold off until
October, unless you have a greenhouse.
First off, prepare your vegetable garden by adding a
layer of home-made or pre-packaged compost and sheep
pellets. Make sure you dig this through well to give a
consistent coverage. Hold off adding blood and bone until
you are ready to plant, as it may be washed away with
rain – the same applies with a lot of powdered fertilisers.
If you are using home-made compost, hold off planting
for at least two weeks to give it time to settle.
When you are ready to start planting, use a rake to level
off the soil and break up any remaining lumps. Work the
soil with your trowel to get a fine texture for the new
seedlings and be sure to add a handful of blood and bone
as you plant to give them a good start.
• Salad greens need to be staggered so that you get a
continuous supply.
• Plant your first lot of peas straight into the ground and
a second crop three weeks later.
• Plant celery, beetroot, spinach, cabbages, asparagus,
peppers and cucumbers.
• Prepare your tomato beds.
• Beans and pea seeds can be planted straight into their
permanent position.
• Onions are planted now for the autumn harvest.
• Potatoes can still be planted, but remember to mound
soil up around existing potatoes to prevent them from
going green.
• Fertilise potatoes already in the ground every two to
three weeks with potato food.
At this time of year, frost is a danger to your newly
planted seedlings. If the night is clear and still, place a
cloche or frost cloth over the most vulnerable parts of
your garden.
Fruit trees will be showing blossoms about now, so check
the Codlin moth traps and, if necessary, apply new ones
for the season.
Fertilise your citrus trees and hibiscus trees with the
same fertiliser.
Spring’s the rush hour for gardening – the earlier you get started, the better prepared you’ll be!
Flower garden• Plant summer annuals.
• Feed your camellias and rhododendrons.
Lawn• Top dress existing lawns with lawn fertiliser and water in
well.
• Spray to kill any broadleaf weeds that are in the lawn.
• Spray for Onehunga weed as the plant is now in flower.
• New lawns can be seeded.
How to repair patches in the lawn
Rake over bare patches and remove any weeds or dead grass, so
you’re left with bare soil. Loosen the soil to a depth of 10-15cm
and spread a layer of topsoil or lawn preparation mix over this
bare patch. Rake it though the surrounding grass as well; it will
benefit all grass and help to merge the patch better.
You need to choose the best seed for your environment and
purpose; the Mitre 10 staff are more than happy to help with
this. Scatter the seed over the area lightly and use a rake to
cover before watering the entire area. Keeping the seed wet
while it germinates and establishes itself is very important. If
there is no rain in the forecast, water regularly.

How To
52
Vary the componentsOther suggestions for the salad bowl include rocket and
Yates now has the richly-flavoured Wild Rocket and large,
soft-leafed rocket in the range. Easy-to-grow spring
onions add an onion-like piquancy and there’s also the
sweet-flavoured baby spinach.
Add some herbsHerbs like basil and parsley spice up a salad. They’re
particularly good choices because their lush leaves bring
a different flavour to the blend. For extra colour variety,
look for the purple basil that’s been added to the Yates
seed range.
Other salad veggiesIf you have the room – and a bit more patience – you
might like to try slower-growing salad veggies such as
tomatoes and capsicums. While these will grow in pots,
they generally do better in the ground. Never plant them
in the same place in successive years as tomatoes and
their relatives can be troubled by a number of soil-borne
diseases.
The freshest way to serve salad is straight out of the garden and it’s
easier than you think. Just a few pots will supply enough greens for a
small family. When you visit the nearest Yates seed stand you’ll find a
choice of leafy salad varieties, including the Salad Mix packet and the
slightly more exotic Mesclun Mix.
with Yates
own saladGrow your
Young beetroot leaves make another popular salad ingredient.
You’re never alone in the garden, simply visit www.yates.co.nz for advice, apps and more.
Come join our online community of gardeners with the Yates Vegie Growing Challenge.Simply register at the Yates website, select which vegetables you intend to grow and compete by posting regular blogs, photos and comments about your gardening journey.
Every entrant receives a free packet of Tomato or Lettuce seeds, and you will be in to win a share of $4,000 worth of prizes.
Follow uswww.yates.co.nz
Registrations commence 17 September 2011
Grow Vegies
and friendships
with the Yates
Vegie Growing
Challenge.
Can you rise to the Challenge?
DP
P41
670
Getting startedStart with a few pots filled with quality potting mix. Salad greens need plenty of water, so a potting mix like Yates Professional, with added soil wetters and water-storing crystals, will help keep them hydrated. Yates Tuscan Edge pots, with a self-watering reservoir in the base, are very forgiving if you occasionally forget to water.
Sprinkle a layer of Yates Black Magic Seed Raising Mix on top of the potting mix to provide nutrients to get the seeds going. Then sow seeds according to the instructions on the pack. Don’t bury them too deeply; small seeds are usually sown at, or close to, the surface.
Keep the seeds consistently moist while they’re germinating. The easiest way to do this, with small seeds like lettuce, is to mist spray with a hand atomiser. If you use a hose or watering can, make sure the water flow is gentle – otherwise your seeds will be flooded out of the pot!

How To
54
Terrific
C
M
Y
CM
MY
CY
CMY
K
Spade.pdf 1 26/07/11 12:46 PM
by Sandy Johnson
Preparation is the key to success:• Soil preparation can be done a few weeks beforehand.
• Just prior to planting, work the soil through with generous amounts of
Results Compost and a handful of blood and bone. These extras aren’t
needed if you are using a pre-prepared tomato soil mix.
• Lightly water the plant and gently tip it out of the pot, keeping the root
ball intact.
• If you are going to use stakes, pop them in now so as not to disturb the
roots later on.
• Remember to keep supporting the plant as it grows. McGregor’s plant ties
are excellent, as they will not cut into the stem.
Water is vital to the success of your tomatoes, so water them regularly and
deeply. They require more water and food once they become established.
When the fruit starts to appear, fertilise the plants more regularly with a
liquid fertiliser. These can be easily mixed in a watering can and applied
directly to the soil. Avoid getting too much fertiliser on the plant foliage, as
it can encourage fungal disease. Apply approximately every two weeks.
Laterals are the side growths that grow in the angle of each leaf on the main
stem. Regularly remove side laterals when they are small to get one strong
central leader.
tomatoesTomatoes are a warm-weather crop and the plants are
available to buy from late September. If you don’t have a
greenhouse or some other protection from the cold, wait
until October before you plant.
Tomatoes require consistent conditions to ensure a
healthy harvest, so plant them in light, free-draining
soil in direct sunlight out of the wind. Choose only the
healthiest seedlings to transfer to the garden.

TomatoesHow To
56
C
M
Y
CM
MY
CY
CMY
K
Untitled-1.pdf 1 1/08/11 9:49 AM
Tomatoes do have a few enemies, but a healthy plant
will be better able to fight off bugs and diseases. The
easiest way combat them is to check your plants on a
regular basis and remove caterpillars and bugs by hand.
There are many pesticides that are friendly to food crops
available from Yates:
• Pyrethrum sprays are a natural insecticide derived
from pyrethrum flowers, which can be used on fruit,
vegetables and ornamentals.
• Pyrethrum sprays have a withholding period of 24
hours.
• Pyrethrum spray is toxic to bees – avoid using it when
they are around, as we need them to pollinate our
plants.
• No Caterpillars spray is an organic certified spray that
is an effective stomach poison for caterpillars. It can
be used on fruit, vegetables, vines and flowers.
• Sticky traps work throughout the garden by luring and
capturing bugs.
There are many tomato varieties to choose from:
heirloom, yellow, green, purple and even black. If you just
want to grow a standard tomato, here are a few varieties
that have stood the test of time and are still among the
most popular.
VARIETY FRUIT NOTES
Grosse Lisse Medium to large-sized fruit – crops well Tall, vigorous growth
Russian Red Medium-sized fruit Sturdy growth habit – good for cooler climates
Moneymaker Medium-sized fruit – crops well Tall, vigorous growth
Roma Egg-shaped fruit Medium growth habit
Sweet 100 Masses of tiny bite-sized fruit Grow against a fence for support, as it grows wild

Tomatoes
59
How To
Grafted tomatoesThese bear a much larger crop than normal tomatoes because they are two plant types grafted together. The top part of the plant is chosen for flavour, size and colour of the fruit and then grafted on to rootstock chosen for its vigorous growth, root development and disease resistance.
They have a few special requirements:• The clip that you see around the plant near the bottom
is where the graft has been attached. This needs to be planted above the ground, as it will fall off by itself as the stem grows.
• Grafted tomatoes grow large; when you plant, place them at least 1m apart to prevent overcrowding.
• They will also need a framework to grow up, rather than just one stake, so place 2.5m (or higher) stakes about 30cm apart. This will give you a framework to attach plastic netting to.
• Alternatively, grow them up a wall or trellis with string to support the plant.
• When your tomatoes are about 30cm high, pinch out the growing tip; this will encourage the side shoots to grow and the vigorous rootstock will provide up to ten or more leaders. Let the leaders grow without pinching out the tips, but remember to remove the side shoots or laterals.
TRICKS OF THE TRADE• Tomatoes shouldn’t be planted in the same
place as the previous year. Crop rotation will minimise the spread of bugs and diseases that may be left in the soil.
• Tomatoes like onions, garlic, basil and sage as neighbours.
• Harvesting time is often up to personal choice but it’s best to pick the fruit when they are fully coloured and firm to the touch; this will allow the fruit to stay firmer longer and encourage the plant to produce more fruit.

LightingHow To
60
Well-planned garden lighting will not only make your
outdoor area safer, but accentuate the finest aspects
of your home and garden, while providing after-dark
outdoor ambiance. Thankfully, the days of mixing
and matching different expensive lighting brands and
figuring out tricky wiring are over. Getting your outdoor
ambiance right has never been easier thanks to Mitre
10’s high quality ‘plug and play’ Garden Lights system.
12 Volt - Simple & SafeQuality European designs combined with a simple yet sophisticated system allows you to transform your garden quicker and easier than ever before. All our cables and transformers are pre-wired so anyone can install them..
3 Step Selection
1. Choose your Lights
2. Choose your Transformer - TIP: add up the total wattage of your lights & select a transformer with a greater wattage
3. Choose your Cables
www.12vgardenlights.co.nz
Techmar A5-advert.indd 1 5/08/11 8:34 AM
All lit upby Je t’aime Hayer
With a little consideration, it’s possible to transform
your outdoor area from dark and dull to beautifully lit
and elegant, simply by choosing the right lighting.
Before planning your outdoor lighting design, ask
yourself these questions:
What are your lighting needs?
Do you have areas such as paths, steps and obstacles that
need to be lit for safety? Do you spend time entertaining
guests and need to enhance the atmosphere? Do you have
specific features, like sculptures or trees, which deserve
to be lit up after dark?
What is your home style?
Look at your home in the daylight and decide whether
it has a simple design, villa or modern feel. By matching
the style and design of the lighting fixtures to your
house, you can create stand-out or subtle character.
Outdoor torches, ornate garden lanterns, contemporary
spotlights and fairy lights each lend a different style to
your outdoor area.
What is the position of the viewer?
Consider the effects of your lighting design on the viewer.
Make sure that the lights will not be glaring to the eyes.
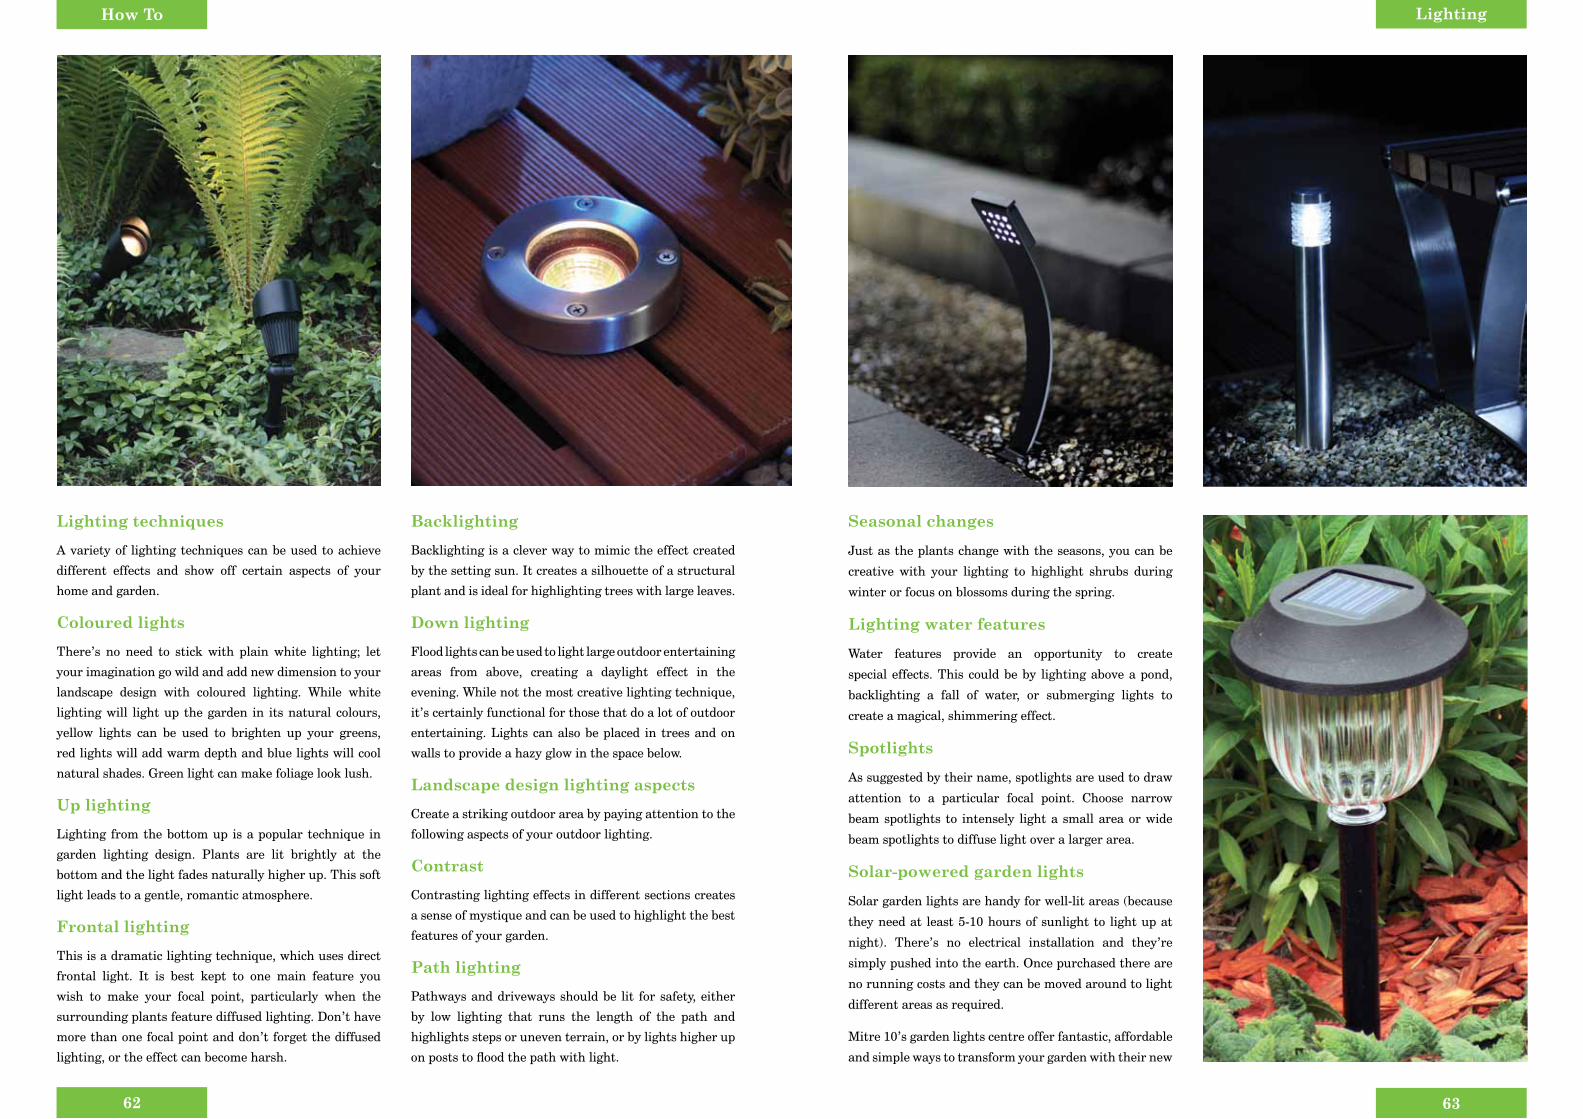
Lighting
63
How To
62
Lighting techniques
A variety of lighting techniques can be used to achieve
different effects and show off certain aspects of your
home and garden.
Coloured lights
There’s no need to stick with plain white lighting; let
your imagination go wild and add new dimension to your
landscape design with coloured lighting. While white
lighting will light up the garden in its natural colours,
yellow lights can be used to brighten up your greens,
red lights will add warm depth and blue lights will cool
natural shades. Green light can make foliage look lush.
Up lighting
Lighting from the bottom up is a popular technique in
garden lighting design. Plants are lit brightly at the
bottom and the light fades naturally higher up. This soft
light leads to a gentle, romantic atmosphere.
Frontal lighting
This is a dramatic lighting technique, which uses direct
frontal light. It is best kept to one main feature you
wish to make your focal point, particularly when the
surrounding plants feature diffused lighting. Don’t have
more than one focal point and don’t forget the diffused
lighting, or the effect can become harsh.
Backlighting
Backlighting is a clever way to mimic the effect created
by the setting sun. It creates a silhouette of a structural
plant and is ideal for highlighting trees with large leaves.
Down lighting
Flood lights can be used to light large outdoor entertaining
areas from above, creating a daylight effect in the
evening. While not the most creative lighting technique,
it’s certainly functional for those that do a lot of outdoor
entertaining. Lights can also be placed in trees and on
walls to provide a hazy glow in the space below.
Landscape design lighting aspects
Create a striking outdoor area by paying attention to the
following aspects of your outdoor lighting.
Contrast
Contrasting lighting effects in different sections creates
a sense of mystique and can be used to highlight the best
features of your garden.
Path lighting
Pathways and driveways should be lit for safety, either
by low lighting that runs the length of the path and
highlights steps or uneven terrain, or by lights higher up
on posts to flood the path with light.
Seasonal changes
Just as the plants change with the seasons, you can be
creative with your lighting to highlight shrubs during
winter or focus on blossoms during the spring.
Lighting water features
Water features provide an opportunity to create
special effects. This could be by lighting above a pond,
backlighting a fall of water, or submerging lights to
create a magical, shimmering effect.
Spotlights
As suggested by their name, spotlights are used to draw
attention to a particular focal point. Choose narrow
beam spotlights to intensely light a small area or wide
beam spotlights to diffuse light over a larger area.
Solar-powered garden lights
Solar garden lights are handy for well-lit areas (because
they need at least 5-10 hours of sunlight to light up at
night). There’s no electrical installation and they’re
simply pushed into the earth. Once purchased there are
no running costs and they can be moved around to light
different areas as required.
Mitre 10’s garden lights centre offer fantastic, affordable
and simple ways to transform your garden with their new

How To
64
www.masterpet.co.nz
pre-wired plug and play 12-volt garden lights system. It’s
a quality European brand with lights priced from $19.98
to $89.98. The set-up process has never been easier.
The garden lights centre at Mitre 10 offers: deck lights,
wall lights, bollards and spotlights, cables, accessories and
replacement globes – everything you need to transform
your outdoor area. There’s a guide for the selection
process and a convenient in-store garden planner, which
allows you to draw up your own garden plan and manage
your cable considerations.
Set up tips• When positioning the transformer, aim to keep the
main cable line as short as possible or select a SPT
3 cable – this will ensure optimum brightness by
reducing voltage drop.
• For best results, space lights evenly.
• Make sure you turn off the power supply when fitting
the lights.
THREE-STEP GARDEN LIGHTS SYSTEM1) Choose the lights that best suit your home
and garden.
2) Add the wattage of the lights together and select a transformer that is greater than the total wattage.
3) Choose your cable.

Purchase 5 litres or more of Forestwood and gointo the draw to win 1 of 35 Mitre 10 Gift Cards!
$20,00020,000worth of Gift Cards to be won
Offer ends 30th September 2011 or while stocks last. 1 of 35 Mitre 10 Gift Cards to be won nationwide: 5 x $1000 Gift Cards and 30 x $500 Gift Cards. Offer not available in conjunction with any other offer. Offer excludes trade accounts.
DR
AFT
FCB
M10
614
2
M10 6142 Wattyl A2 Strutted Card v5.indd 1 3/08/11 3:10 PM