How to Configure a PRI on a Mitel 3300
24
How to configure PRI on a Mitel 3300
-
Upload
chris-mcandrew -
Category
Documents
-
view
336 -
download
43
description
A basic guide for configuring a PRI (NSU or Framer) on a Mitel 3300
Transcript of How to Configure a PRI on a Mitel 3300

How to configure PRI on a Mitel 3300
Page 2
Table of Contents
Primary Rate Euro ISDN Trunks ..................................................................................................3Introduction...............................................................................................................................3Protocols...................................................................................................................................3Physical Connection .................................................................................................................3
Programming PRI/QSig - Introduction..........................................................................................43300 E1 Digital Trunk Programming ............................................................................................4
Controller Module Configuration Form......................................................................................5Network Services Unit Configuration........................................................................................5Dual E1/T1 Framer Configuration.............................................................................................5Digital Trunk Forms ..................................................................................................................5
Digital Link Descriptor ...........................................................................................................6Digital Link Assignment ............................................................................................................7MSDN/DPNSS/DASSII Trunk Circuit Descriptor ......................................................................7Trunk Service Assignment........................................................................................................8Digital Trunk Assignment..........................................................................................................8
Network Synchronisation ......................................................................................................8Class of Service.......................................................................................................................10
NSU Boot Process .....................................................................................................................11E1 Dual Framer Boot Process....................................................................................................11Programming PRI/QSig on the E1/T1 Dual Framer Module ......................................................12
E1 Protocol Assignment .........................................................................................................12Outgoing Call Characteristics .................................................................................................13
Bearer Capabilities..............................................................................................................13High Layer Compatibility .....................................................................................................13Calling Line Restriction .......................................................................................................13DID Ranges for CPN Substitution.......................................................................................14CPN Substitution.................................................................................................................15Outgoing Number Assignment............................................................................................15Advice of Charge................................................................................................................16
Inward Dialling Configuration ..............................................................................................16Programming Euro ISDN PRI/QSig Protocol on the NSU Using IMAT ......................................17
Connecting the IMAT PC........................................................................................................17Installing and Launching IMAT ...............................................................................................17Creating a New IMAT Database.............................................................................................18Configuring the Options..........................................................................................................18
System Configuration - Site Options...................................................................................18System Configuration - Site PRI Link Characteristics .........................................................19Incoming Call Characteristics..............................................................................................20Outgoing CPN Setup...........................................................................................................20Outgoing Call Characteristics..............................................................................................21Enabling the CPN Substitution Index..................................................................................22Numbering Plan/Type of Number........................................................................................23
Saving and Activating the Database.......................................................................................23
Page 3
Primary Rate Euro ISDN Trunks
Introduction
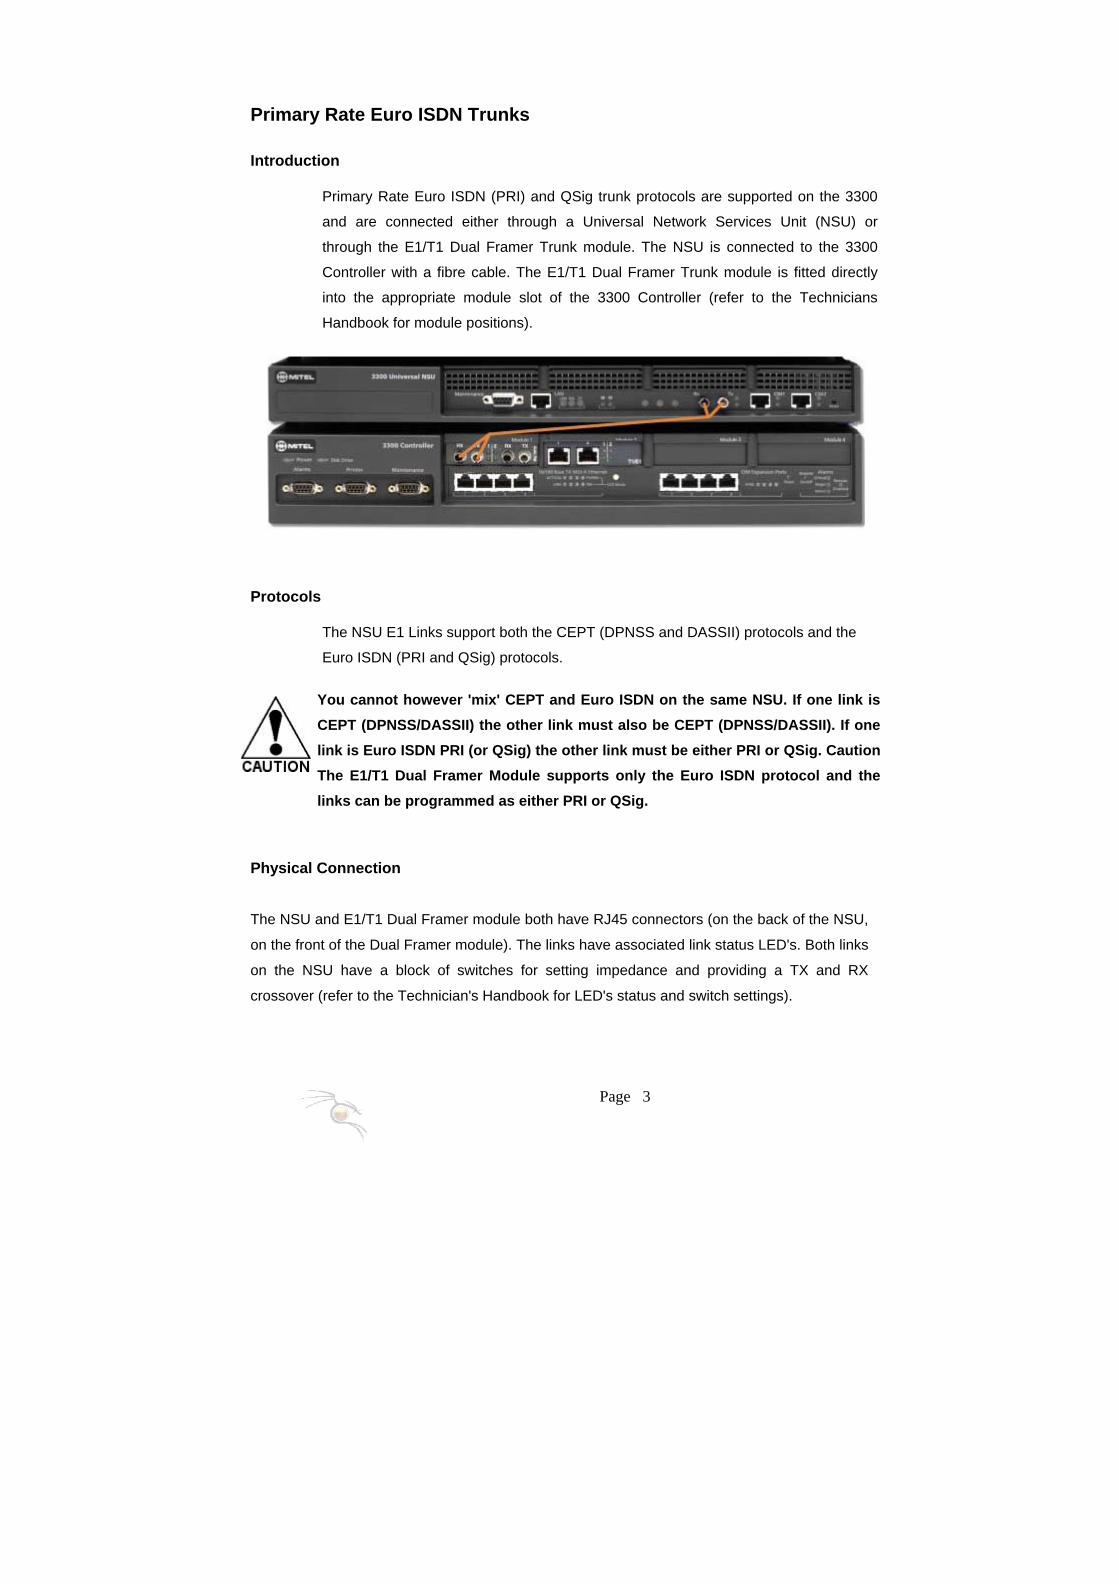
Primary Rate Euro ISDN (PRI) and QSig trunk protocols are supported on the 3300
and are connected either through a Universal Network Services Unit (NSU) or
through the E1/T1 Dual Framer Trunk module. The NSU is connected to the 3300
Controller with a fibre cable. The E1/T1 Dual Framer Trunk module is fitted directly
into the appropriate module slot of the 3300 Controller (refer to the Technicians
Handbook for module positions).
Protocols
The NSU E1 Links support both the CEPT (DPNSS and DASSII) protocols and the
Euro ISDN (PRI and QSig) protocols.
You cannot however 'mix' CEPT and Euro ISDN on the same NSU. If one link is CEPT (DPNSS/DASSII) the other link must also be CEPT (DPNSS/DASSII). If one link is Euro ISDN PRI (or QSig) the other link must be either PRI or QSig. Caution The E1/T1 Dual Framer Module supports only the Euro ISDN protocol and the links can be programmed as either PRI or QSig.
Physical Connection The NSU and E1/T1 Dual Framer module both have RJ45 connectors (on the back of the NSU,
on the front of the Dual Framer module). The links have associated link status LED's. Both links
on the NSU have a block of switches for setting impedance and providing a TX and RX
crossover (refer to the Technician's Handbook for LED's status and switch settings).
Page 4
Programming PRI/QSig - Introduction
Programming an E1 link as PRI/QSig on the 3300 is done by first programming the E1
digital links (and 30 channels each) into the 3300 database. Then you program the
Euro ISDN PRI or QSig protocol onto the link. This PRI/QSig protocol programming is
done slightly differently on the NSU and the E1/T1 Dual Framer module. With the
NSU you program the PRI/QSig protocol directly into the NSU using a PC connected
either through the serial connector on the NSU or via an Ethernet connection
(preferred method). The Mitel supplied application 'ISDN Maintenance and Testing'
(IMAT) is used for this. IMAT is available on the 3300 Software CD (Tools Directory).
With the E1/T1 Dual Framer module you program the PRI/QSig protocol at the same
time as the digital trunks (one operation) into the 3300 database. This handout is
therefore in three parts: "Programming E1 Digital Links" (common to both NSU and
E1/T1 module), "Programming PRI/QSig on the E1/T1 Dual Framer Module" and
"Programming Euro ISDN PRI/QSig Protocol on the NSU".
3300 E1 Digital Trunk Programming
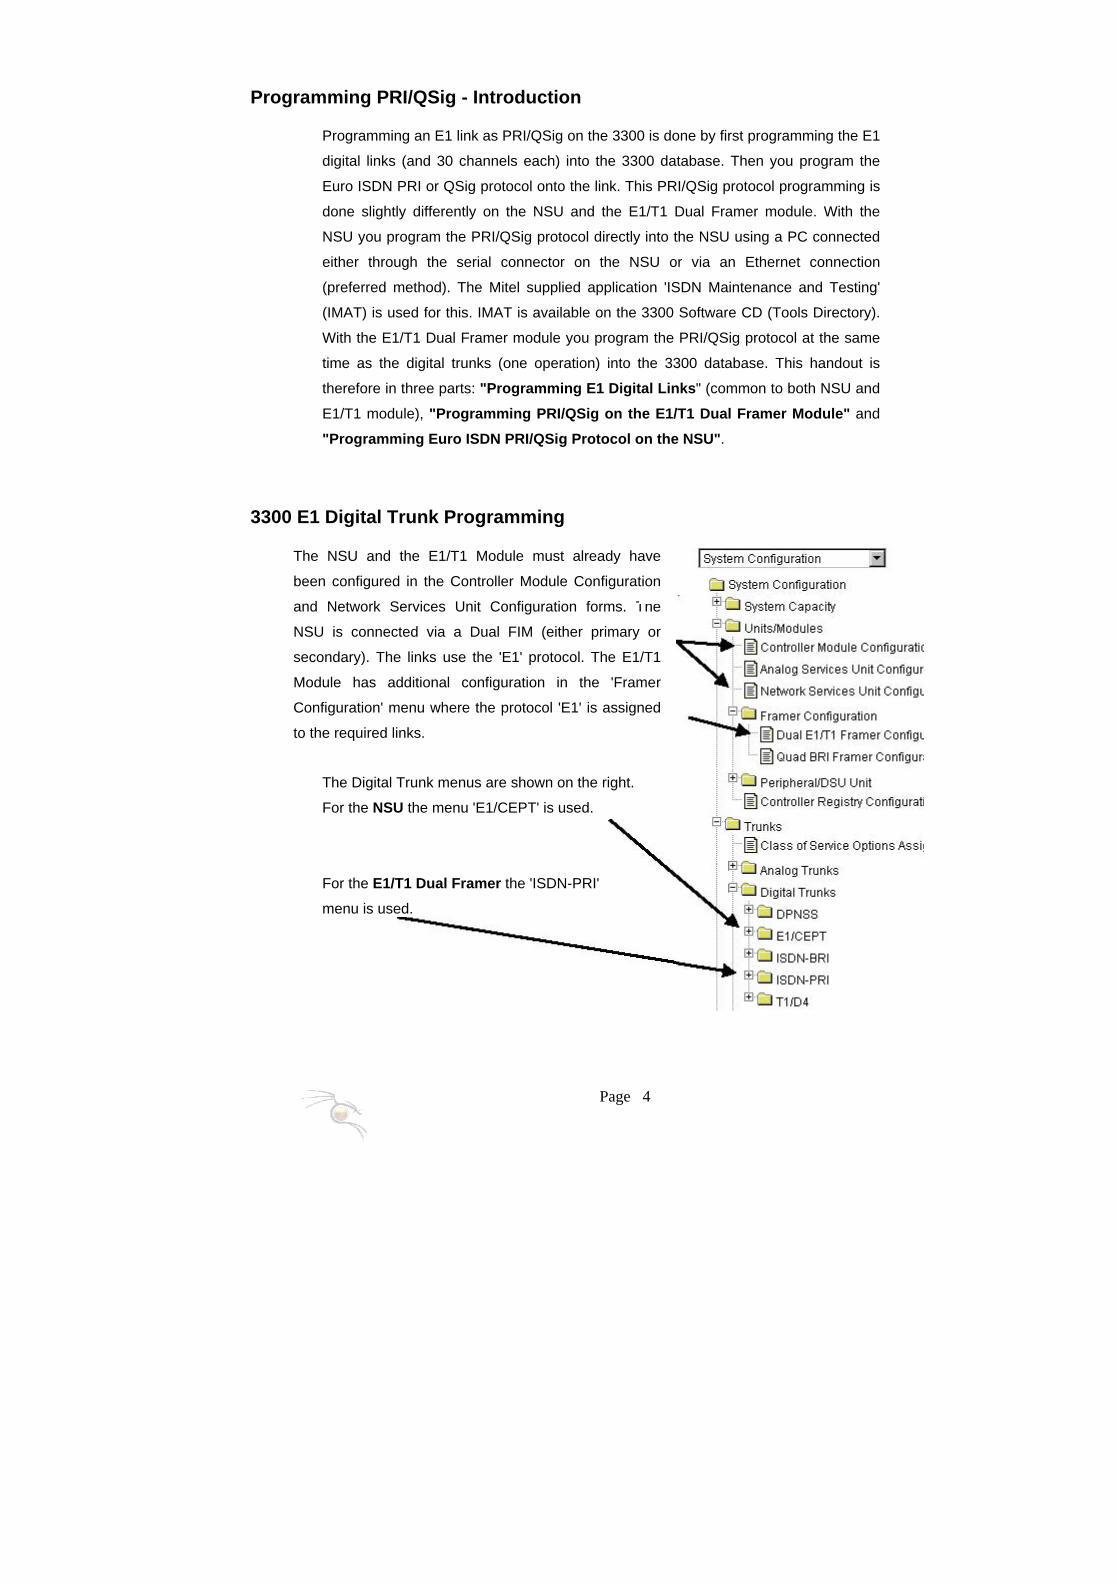
The NSU and the E1/T1 Module must already have
been configured in the Controller Module Configuration
and Network Services Unit Configuration forms. The
NSU is connected via a Dual FIM (either primary or
secondary). The links use the 'E1' protocol. The E1/T1
Module has additional configuration in the 'Framer
Configuration' menu where the protocol 'E1' is assigned
to the required links.
The Digital Trunk menus are shown on the right.
For the NSU the menu 'E1/CEPT' is used.
For the E1/T1 Dual Framer the 'ISDN-PRI'
menu is used.

Page 5
Controller Module Configuration Form
Example: A dual FIM is programmed to Module 1 and the Dual Framer to Module 2.
You must now configure the NSU and E1 Framer module.
Network Services Unit Configuration
Example: The NSU is assigned Unit number 6 and the protocol Universal E1.
Dual E1/T1 Framer Configuration
The E1 Dual Framer module is assigned Unit 7 (please note that if you have several
NSU’s in your system each with a Unit number you have to manually check in the
NSU configuration form which will be the next available Unit number). You must also
set the Interface Type to the links on the E1 Framer module.
Digital Trunk Forms
The following Digital Trunk and other Forms are programmed:
Page 6
Digital Link Descriptor Assignment, Digital Link Assignment, MSDN-DPNSS-DASSII, Trunk Circuit Descriptor, Trunk Service Assignment, Digital Trunk Assignment, Class of Service, Network Synchronisation Finally Automatic Route Selection is programmed to allow outgoing calls to be made
(not part of this module).
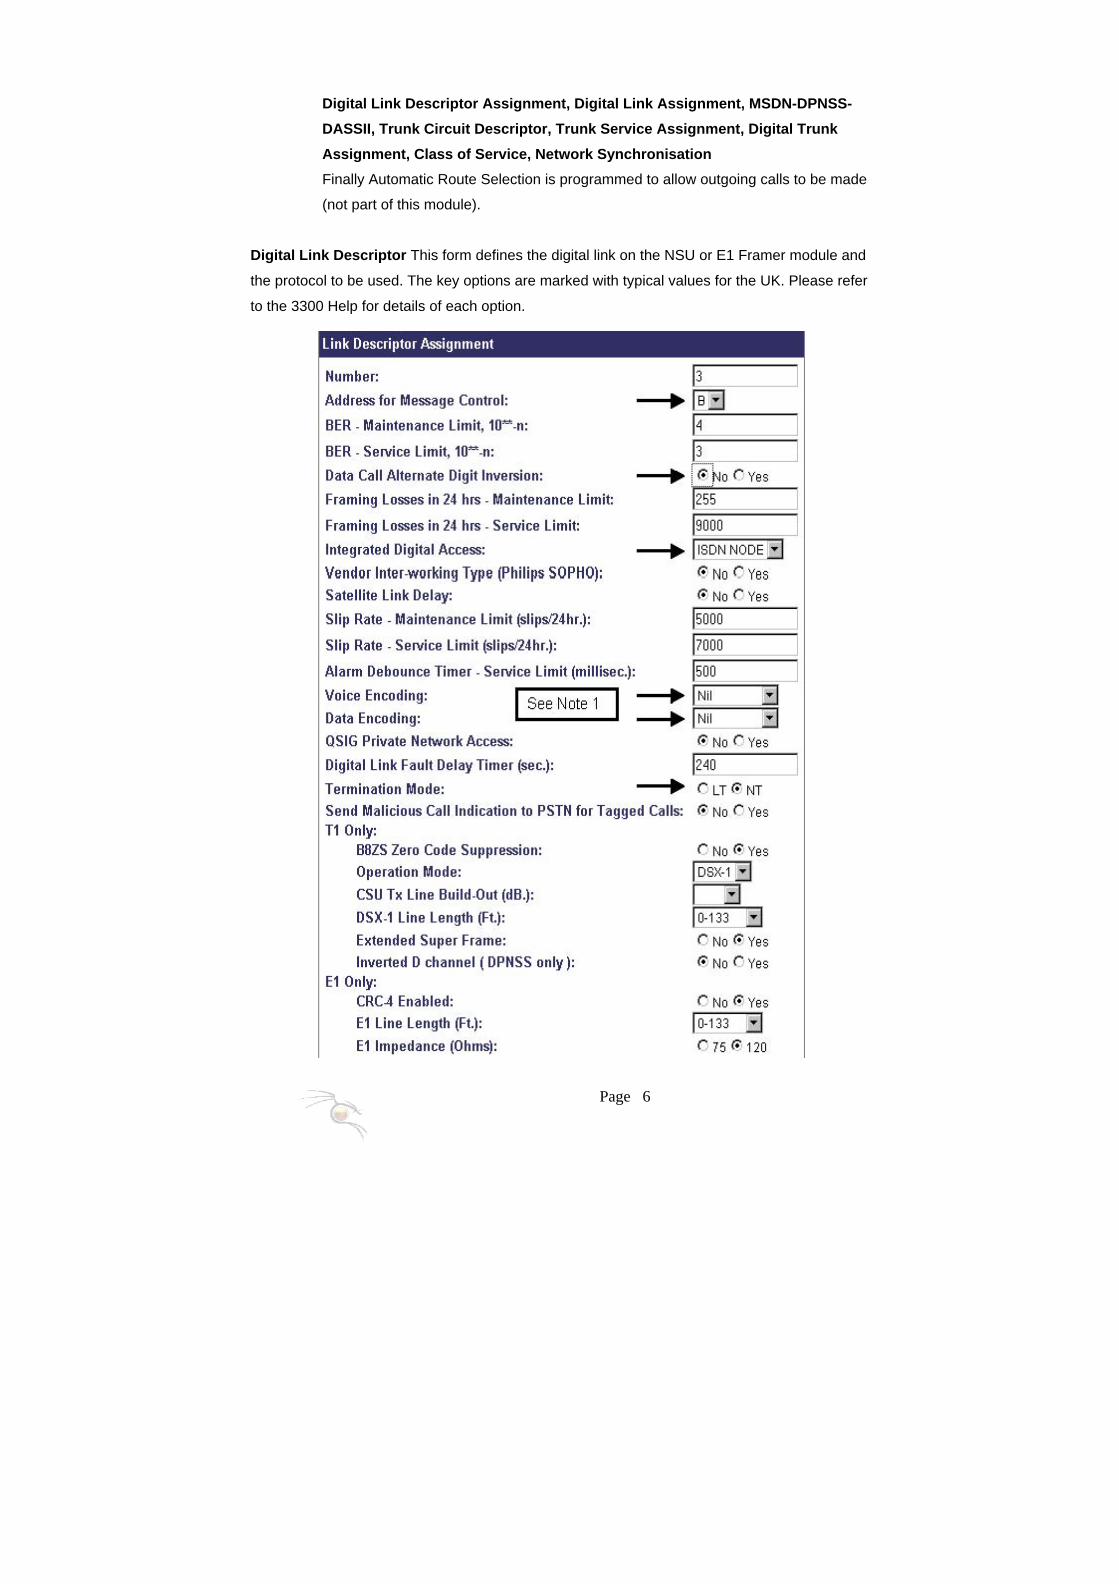
Digital Link Descriptor This form defines the digital link on the NSU or E1 Framer module and
the protocol to be used. The key options are marked with typical values for the UK. Please refer
to the 3300 Help for details of each option.
Page 7
Note 1: The Voice Encoding and Data Encoding values are different depending on
whether you are using an NSU or E1 Framer module and the 3300 software level.
The table below shows the correct values.
E1 Framer Module 3300 5.0 or below 3300 5.1 or above Voice Encoding Nil Nil Data Encoding Nil Nil
NSU 3300 5.0 or below 3300 5.1 or above
Voice Encoding ADI ADI Data Encoding ADI Nil
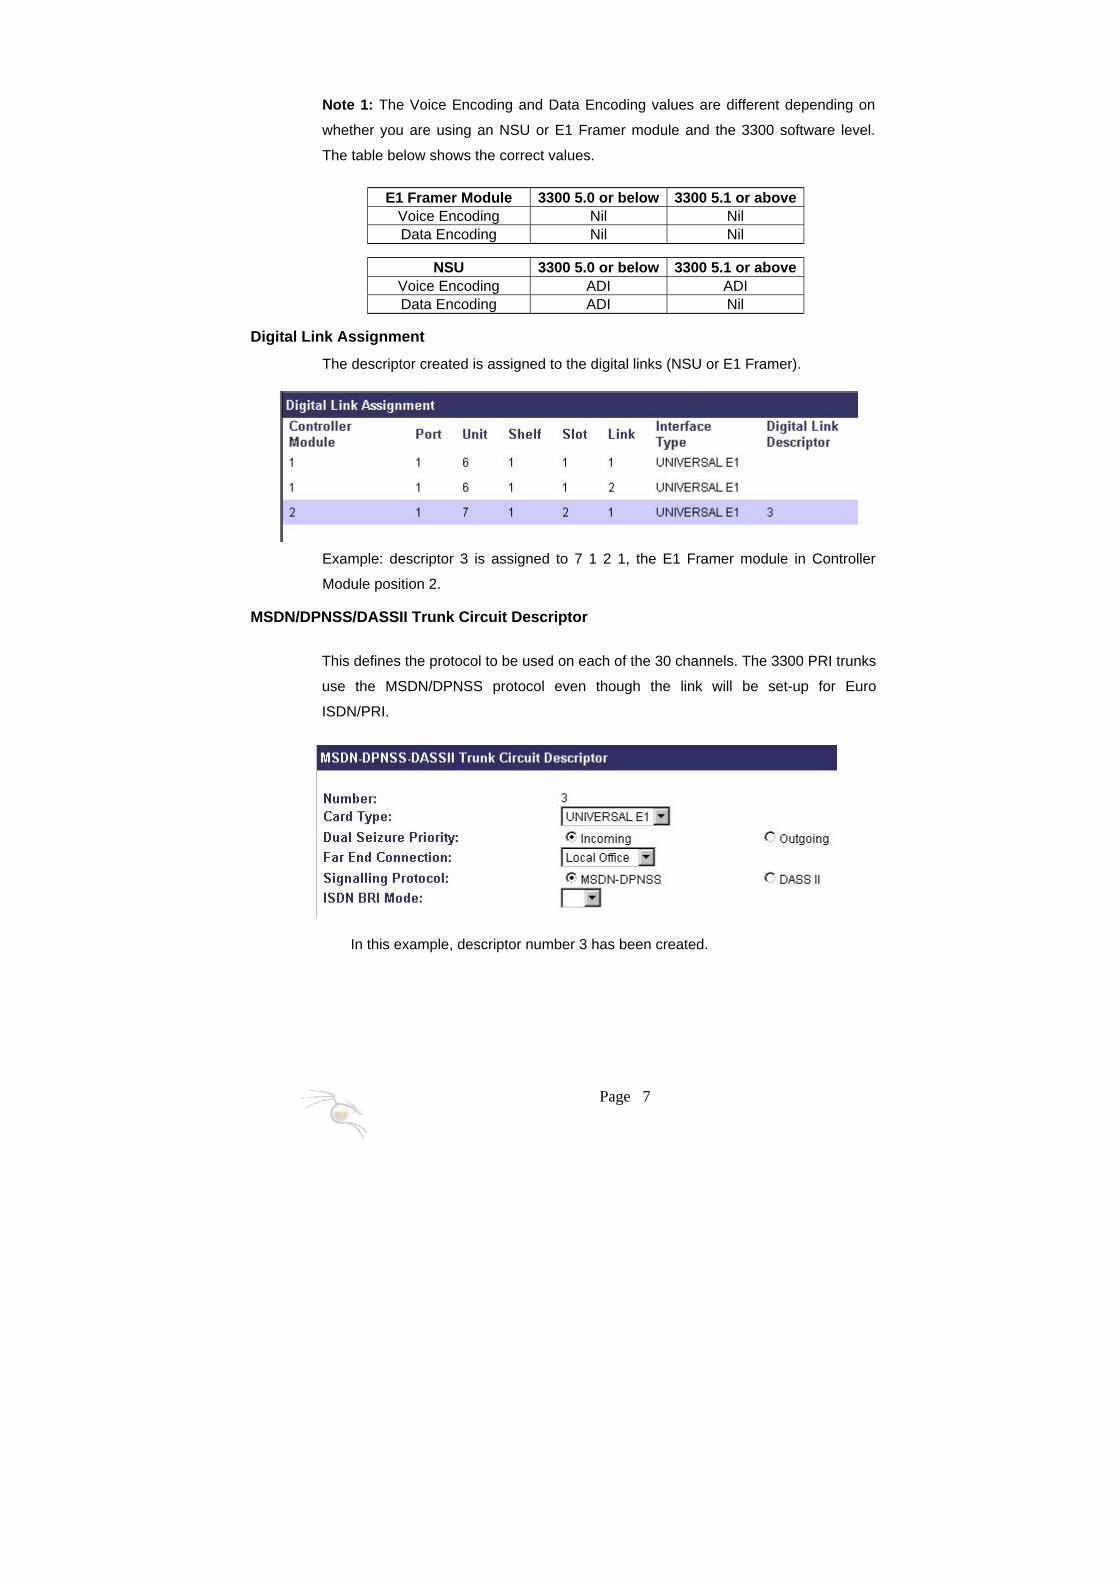
Digital Link Assignment
The descriptor created is assigned to the digital links (NSU or E1 Framer).
Example: descriptor 3 is assigned to 7 1 2 1, the E1 Framer module in Controller
Module position 2.
MSDN/DPNSS/DASSII Trunk Circuit Descriptor
This defines the protocol to be used on each of the 30 channels. The 3300 PRI trunks
use the MSDN/DPNSS protocol even though the link will be set-up for Euro
ISDN/PRI.
In this example, descriptor number 3 has been created.
Page 8
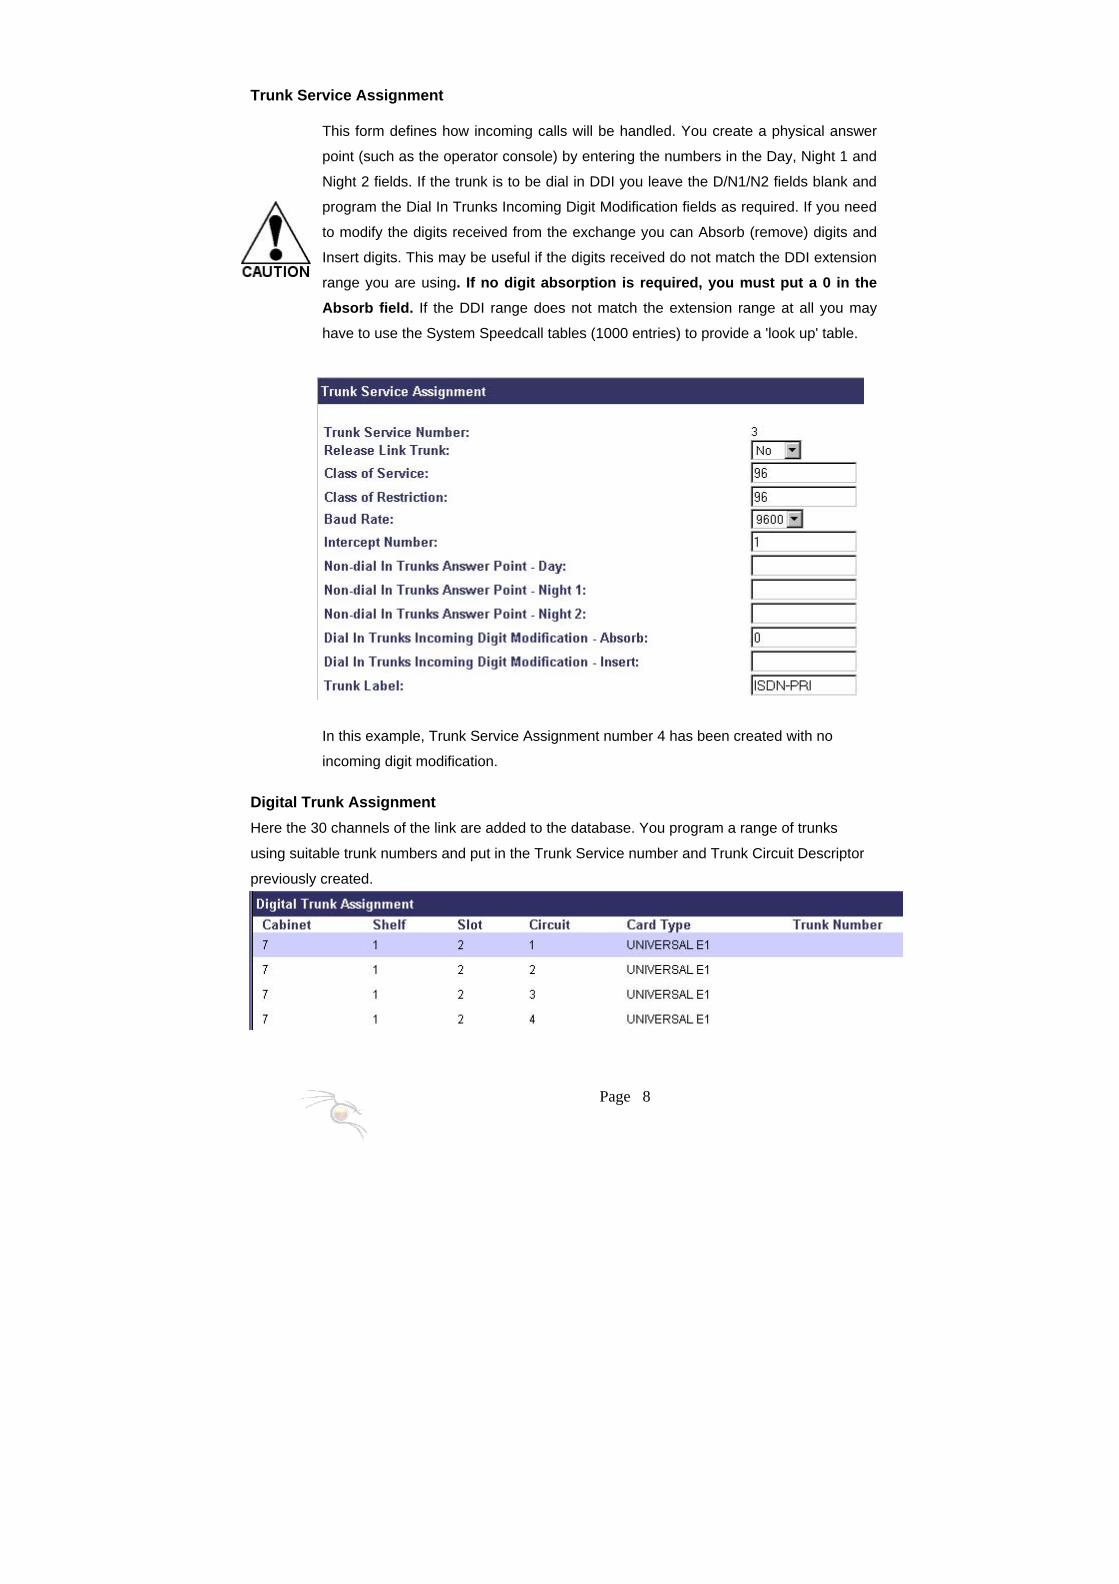
Trunk Service Assignment
This form defines how incoming calls will be handled. You create a physical answer
point (such as the operator console) by entering the numbers in the Day, Night 1 and
Night 2 fields. If the trunk is to be dial in DDI you leave the D/N1/N2 fields blank and
program the Dial In Trunks Incoming Digit Modification fields as required. If you need
to modify the digits received from the exchange you can Absorb (remove) digits and
Insert digits. This may be useful if the digits received do not match the DDI extension
range you are using. If no digit absorption is required, you must put a 0 in the Absorb field. If the DDI range does not match the extension range at all you may
have to use the System Speedcall tables (1000 entries) to provide a 'look up' table.
In this example, Trunk Service Assignment number 4 has been created with no
incoming digit modification.
Digital Trunk Assignment Here the 30 channels of the link are added to the database. You program a range of trunks
using suitable trunk numbers and put in the Trunk Service number and Trunk Circuit Descriptor
previously created.
Page 9
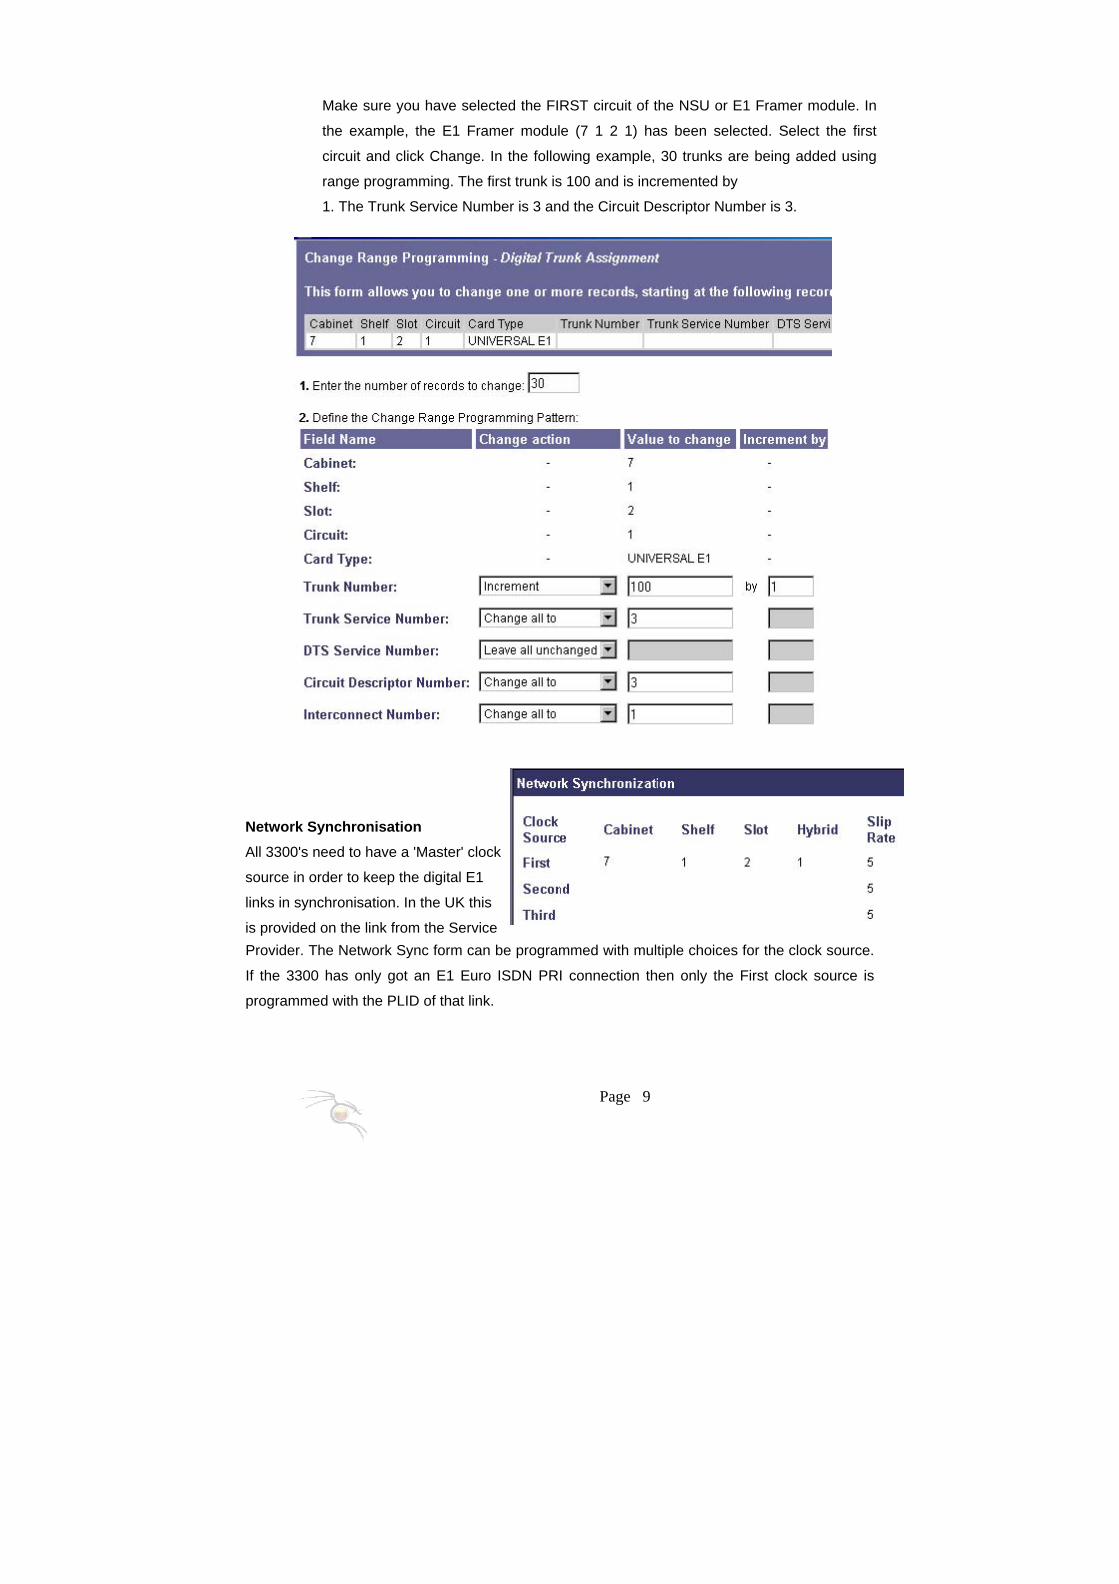
Make sure you have selected the FIRST circuit of the NSU or E1 Framer module. In
the example, the E1 Framer module (7 1 2 1) has been selected. Select the first
circuit and click Change. In the following example, 30 trunks are being added using
range programming. The first trunk is 100 and is incremented by
1. The Trunk Service Number is 3 and the Circuit Descriptor Number is 3.
Network Synchronisation All 3300's need to have a 'Master' clock
source in order to keep the digital E1
links in synchronisation. In the UK this
is provided on the link from the Service Provider. The Network Sync form can be programmed with multiple choices for the clock source.
If the 3300 has only got an E1 Euro ISDN PRI connection then only the First clock source is
programmed with the PLID of that link.
Page 10
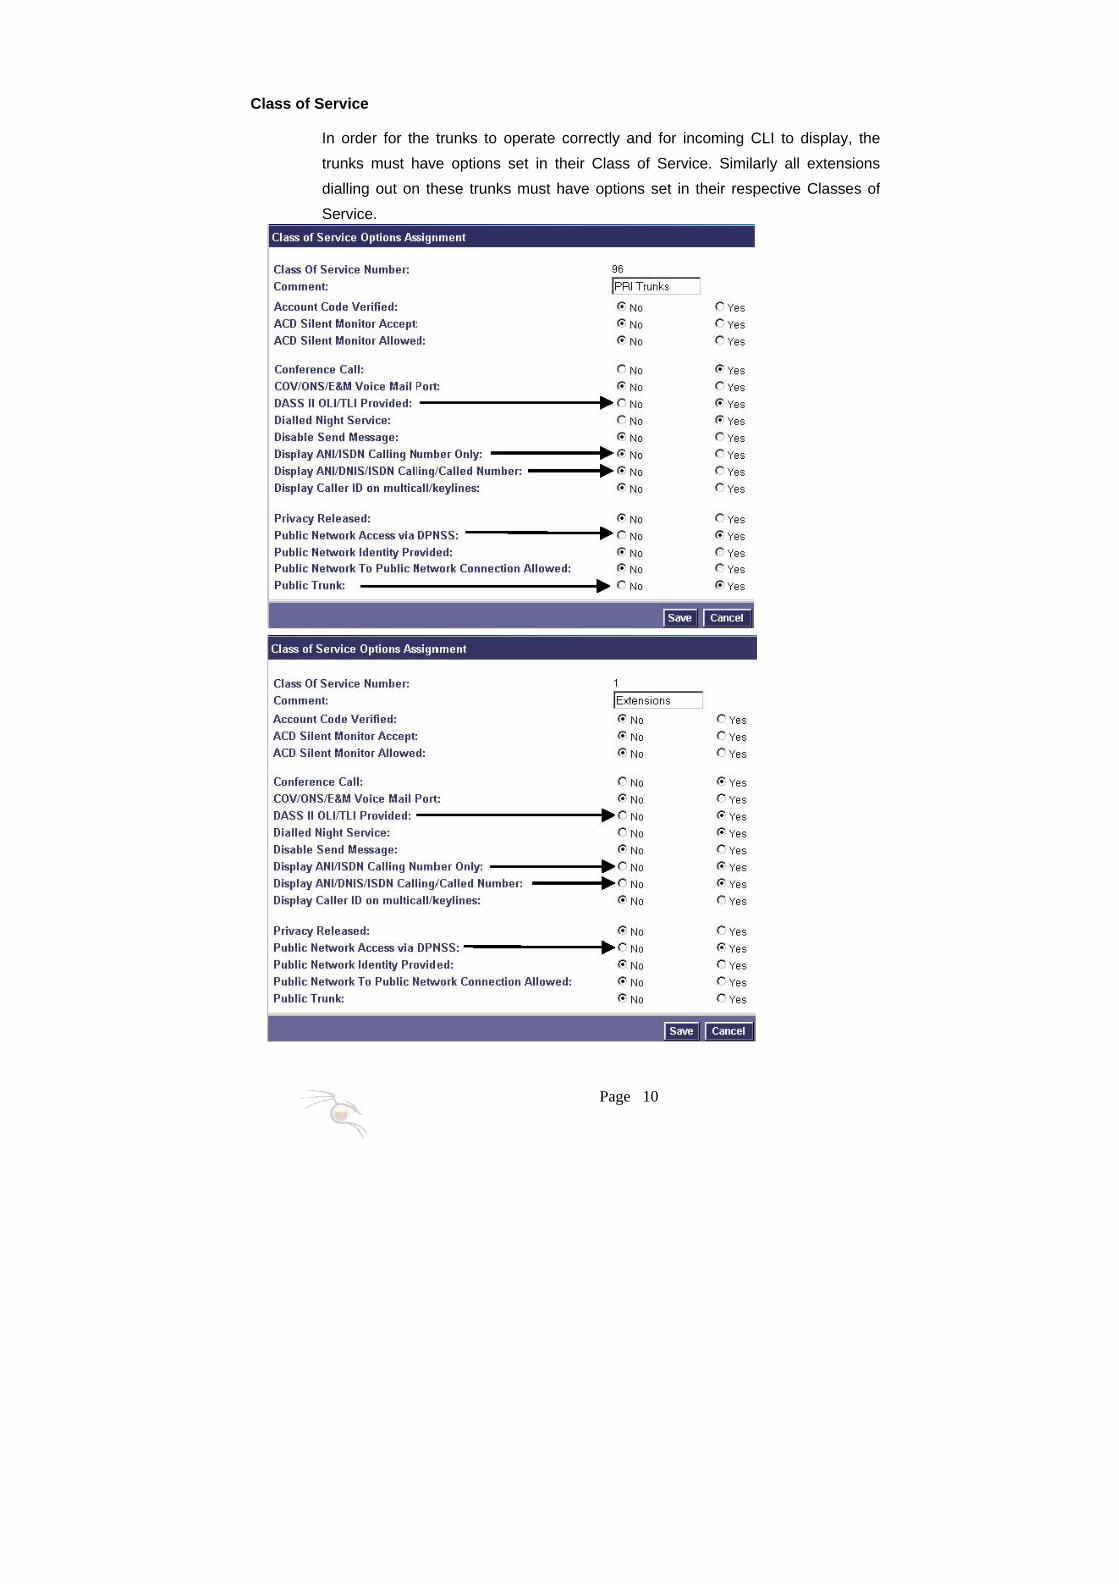
Class of Service
In order for the trunks to operate correctly and for incoming CLI to display, the trunks must have options set in their Class of Service. Similarly all extensions dialling out on these trunks must have options set in their respective Classes of Service.
Page 11
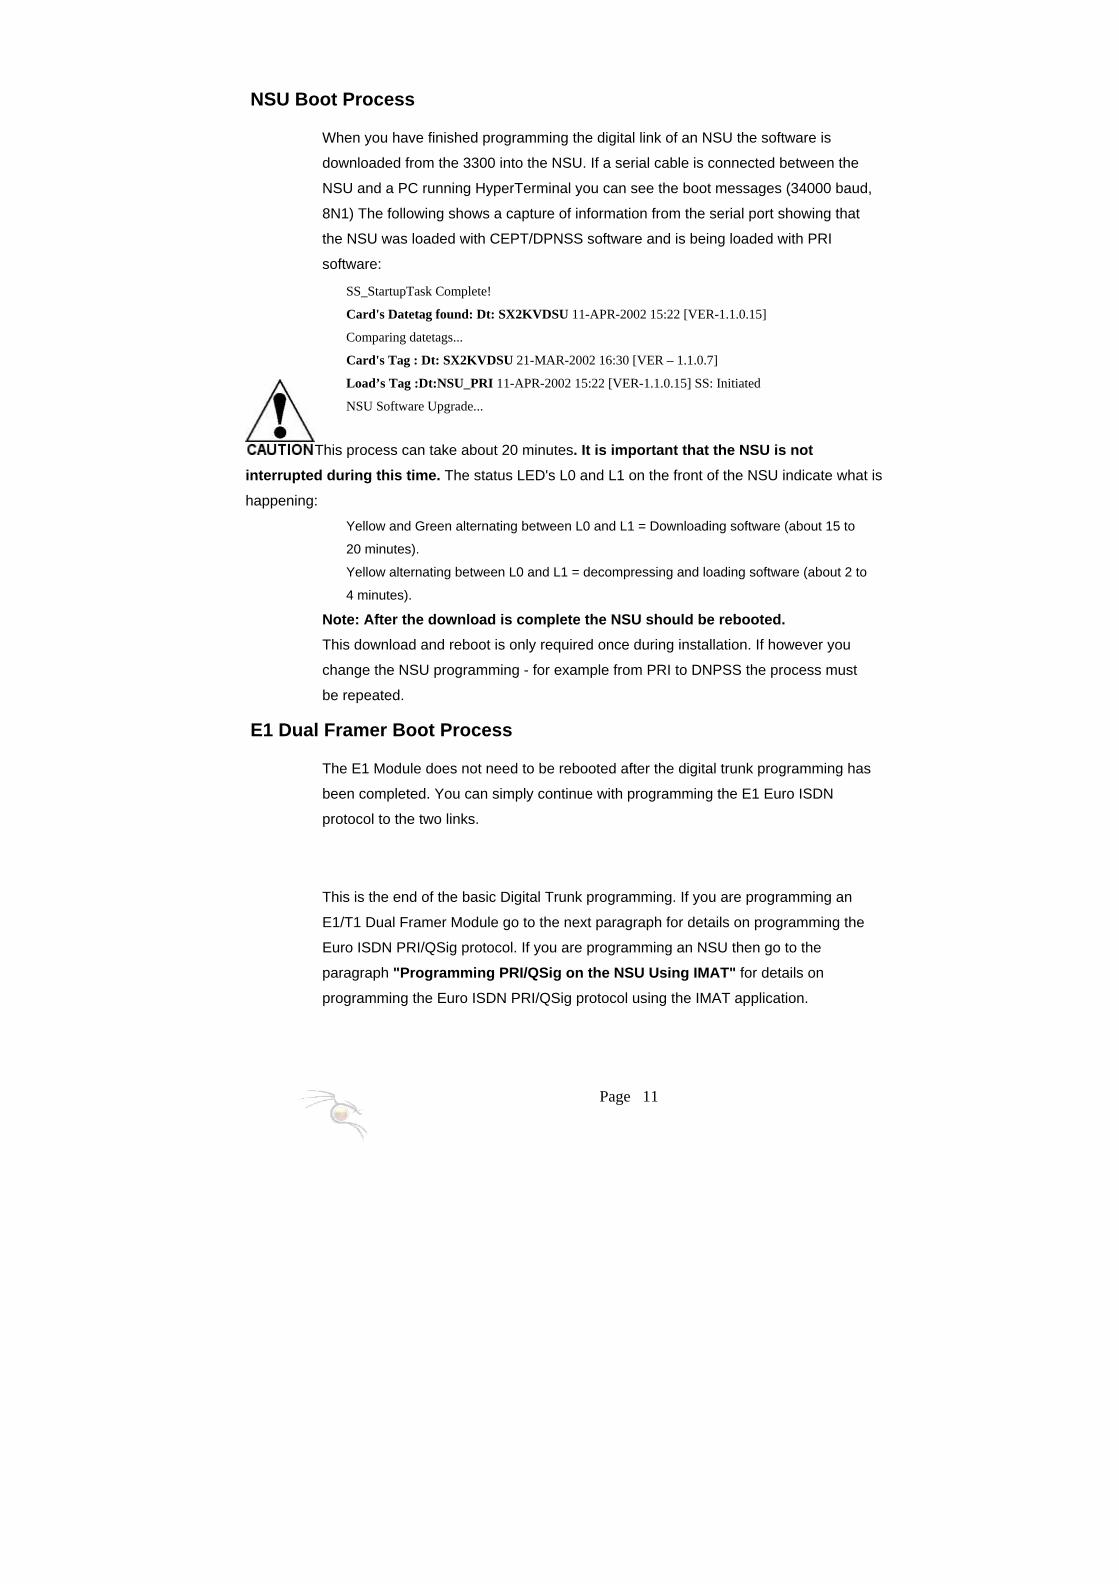
NSU Boot Process
When you have finished programming the digital link of an NSU the software is
downloaded from the 3300 into the NSU. If a serial cable is connected between the
NSU and a PC running HyperTerminal you can see the boot messages (34000 baud,
8N1) The following shows a capture of information from the serial port showing that
the NSU was loaded with CEPT/DPNSS software and is being loaded with PRI
software:
SS_StartupTask Complete!
Card's Datetag found: Dt: SX2KVDSU 11-APR-2002 15:22 [VER-1.1.0.15]
Comparing datetags...
Card's Tag : Dt: SX2KVDSU 21-MAR-2002 16:30 [VER – 1.1.0.7]
Load’s Tag :Dt:NSU_PRI 11-APR-2002 15:22 [VER-1.1.0.15] SS: Initiated
NSU Software Upgrade...
This process can take about 20 minutes. It is important that the NSU is not interrupted during this time. The status LED's L0 and L1 on the front of the NSU indicate what is
happening:
Yellow and Green alternating between L0 and L1 = Downloading software (about 15 to
20 minutes).
Yellow alternating between L0 and L1 = decompressing and loading software (about 2 to
4 minutes).
Note: After the download is complete the NSU should be rebooted. This download and reboot is only required once during installation. If however you
change the NSU programming - for example from PRI to DNPSS the process must
be repeated.
E1 Dual Framer Boot Process
The E1 Module does not need to be rebooted after the digital trunk programming has
been completed. You can simply continue with programming the E1 Euro ISDN
protocol to the two links.
This is the end of the basic Digital Trunk programming. If you are programming an
E1/T1 Dual Framer Module go to the next paragraph for details on programming the
Euro ISDN PRI/QSig protocol. If you are programming an NSU then go to the
paragraph "Programming PRI/QSig on the NSU Using IMAT" for details on
programming the Euro ISDN PRI/QSig protocol using the IMAT application.

Page 12
Programming PRI/QSig on the E1/T1 Dual Framer Module
Once the digital trunk programming forms are completed
continue with the menu E1 and program the Euro ISDN
PRI/QSig protocol onto the link(s). Simply follow each
menu item
E1 Protocol Assignment The E1/T1 Dual Framer Module is in position 2 as assigned in the Controller Module
Configuration form.
Select the E1 Framer module
and click Change.
Select the values as shown on
the right. If you are configuring
the link as QSig then you set
the Protocol accordingly and
configure the other options.
Page 13
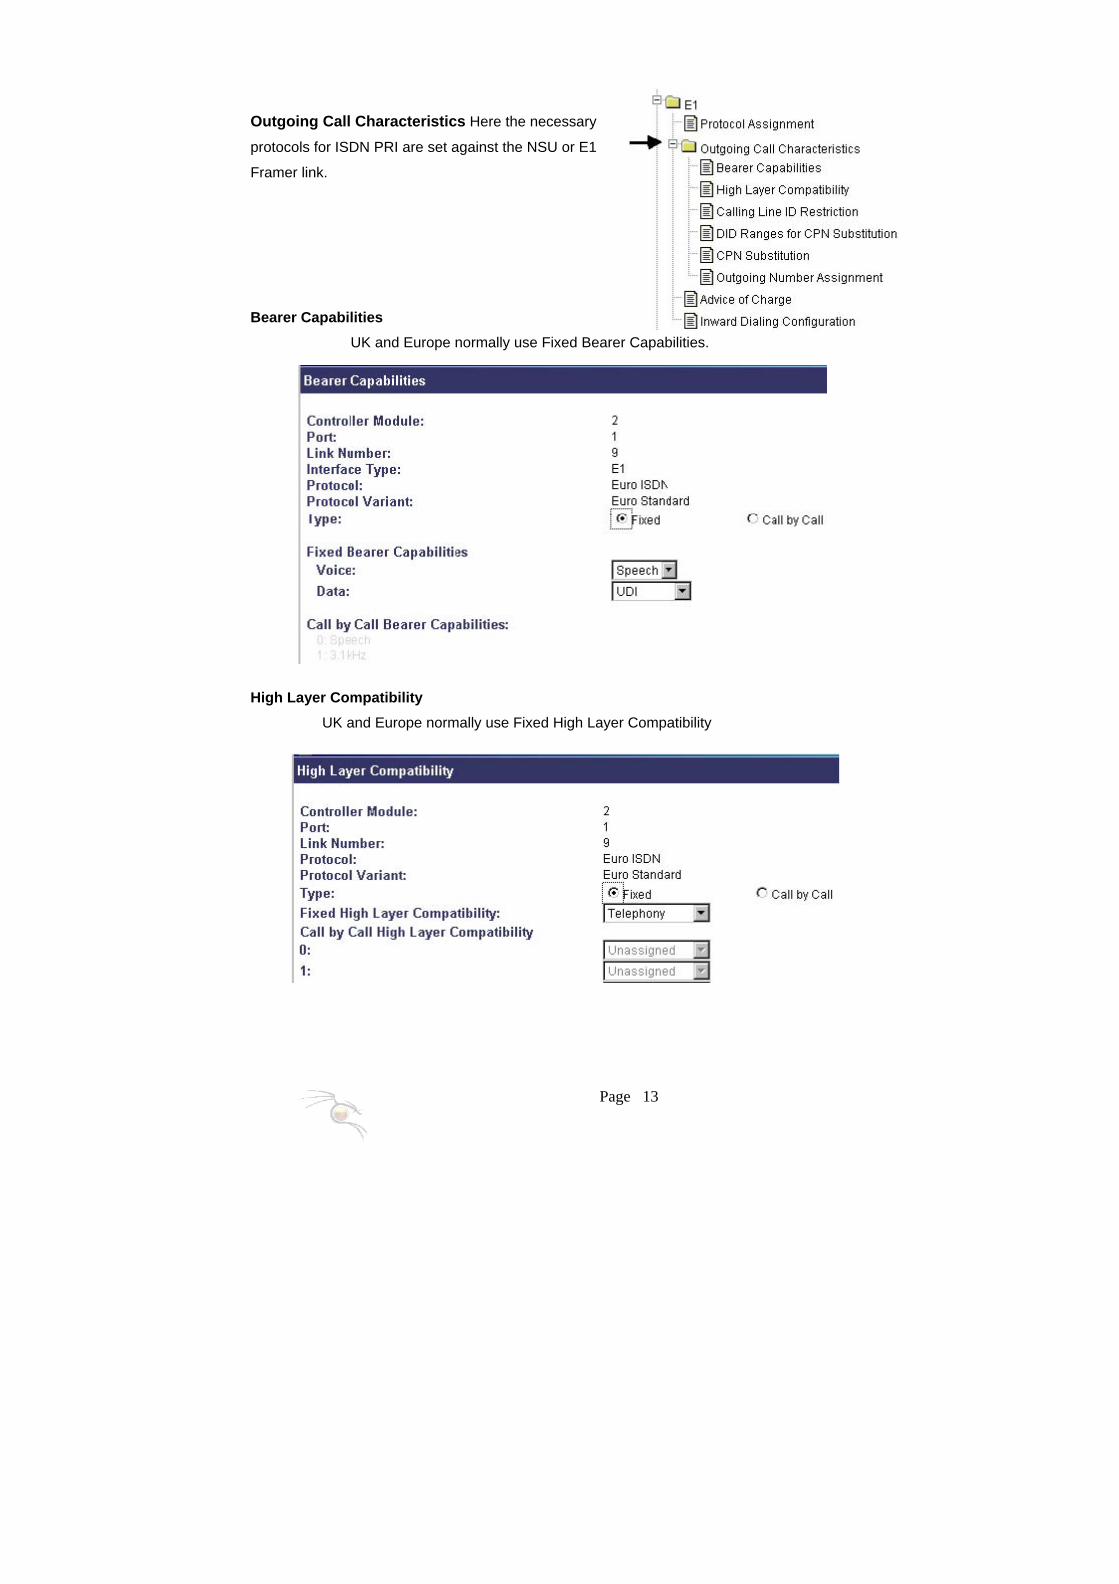
Outgoing Call Characteristics Here the necessary
protocols for ISDN PRI are set against the NSU or E1
Framer link.
Bearer Capabilities UK and Europe normally use Fixed Bearer Capabilities.
High Layer Compatibility UK and Europe normally use Fixed High Layer Compatibility
Page 14
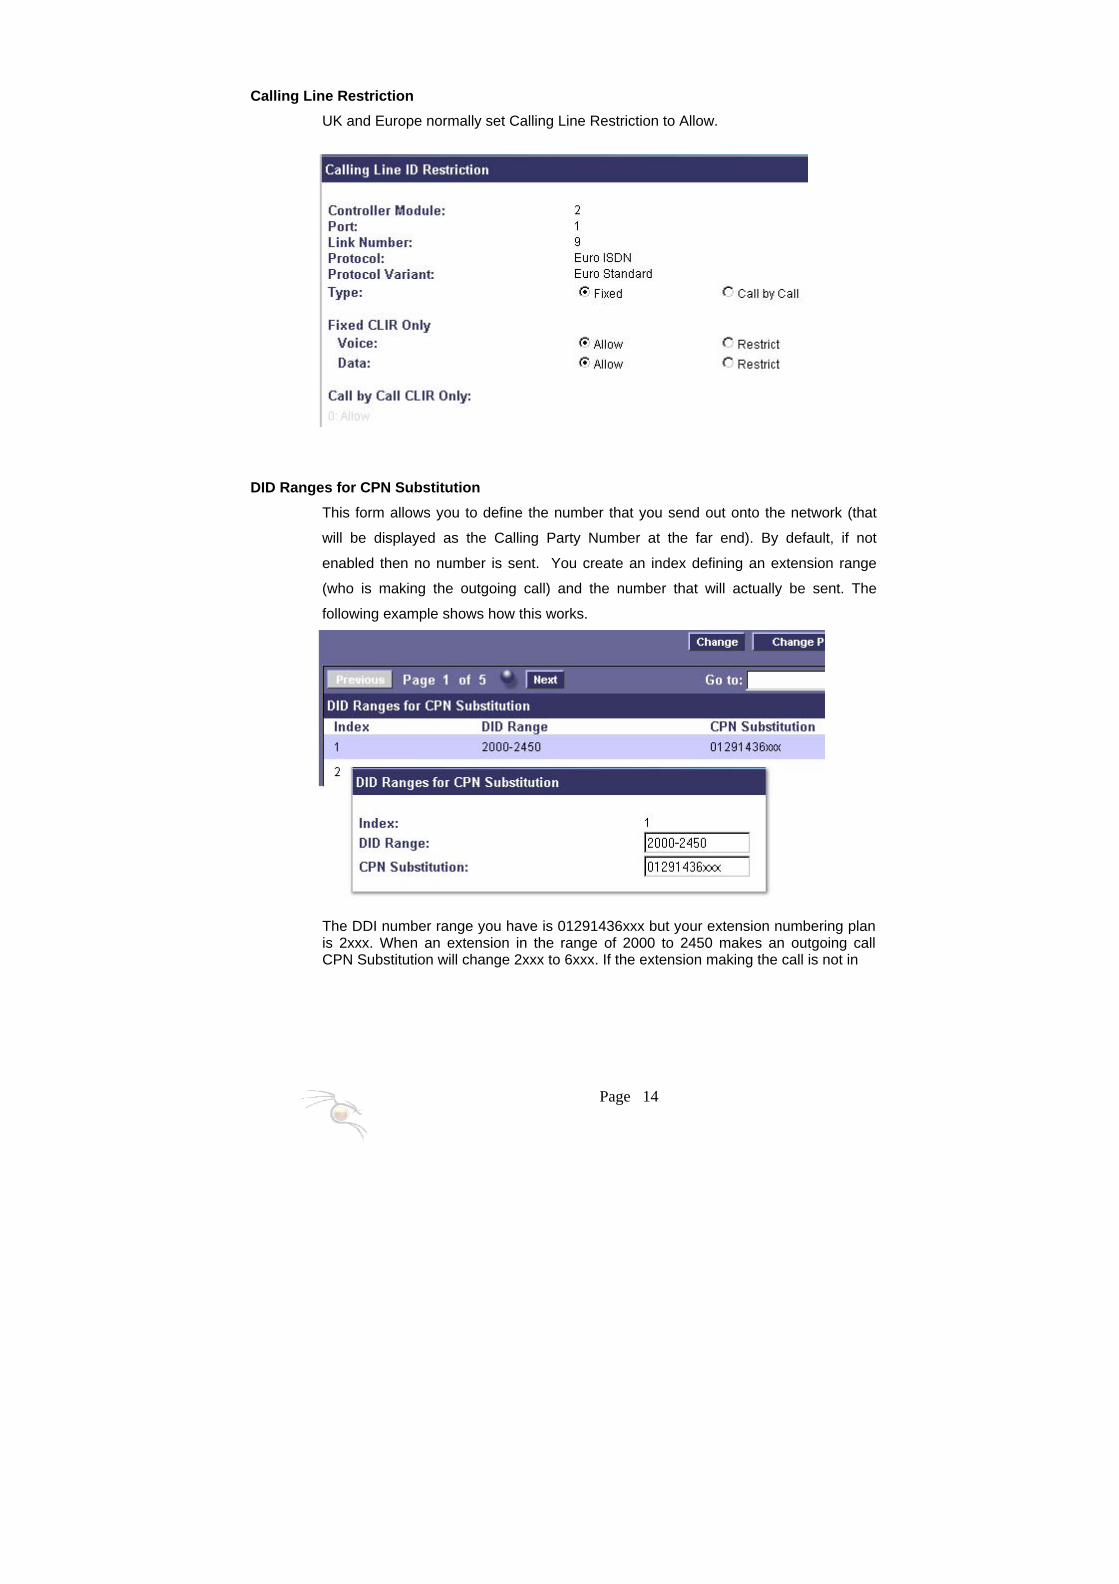
Calling Line Restriction UK and Europe normally set Calling Line Restriction to Allow.
DID Ranges for CPN Substitution This form allows you to define the number that you send out onto the network (that
will be displayed as the Calling Party Number at the far end). By default, if not
enabled then no number is sent. You create an index defining an extension range
(who is making the outgoing call) and the number that will actually be sent. The
following example shows how this works.
The DDI number range you have is 01291436xxx but your extension numbering plan is 2xxx. When an extension in the range of 2000 to 2450 makes an outgoing call CPN Substitution will change 2xxx to 6xxx. If the extension making the call is not in
Page 15
the index range it is ignored. In this case either no number is sent, or if you have programmed a Default Voice CPN then this will be sent (for example 0870321321).
You can create as many indexes as required and use them on the same E1 link.
In the UK and most of Europe the CPN number MUST match the DDI range. If you
use a default CPN then it must be a valid number for your business.
Note: The index numbers are programmed here but are not enabled by default. You must enable them in the next form.
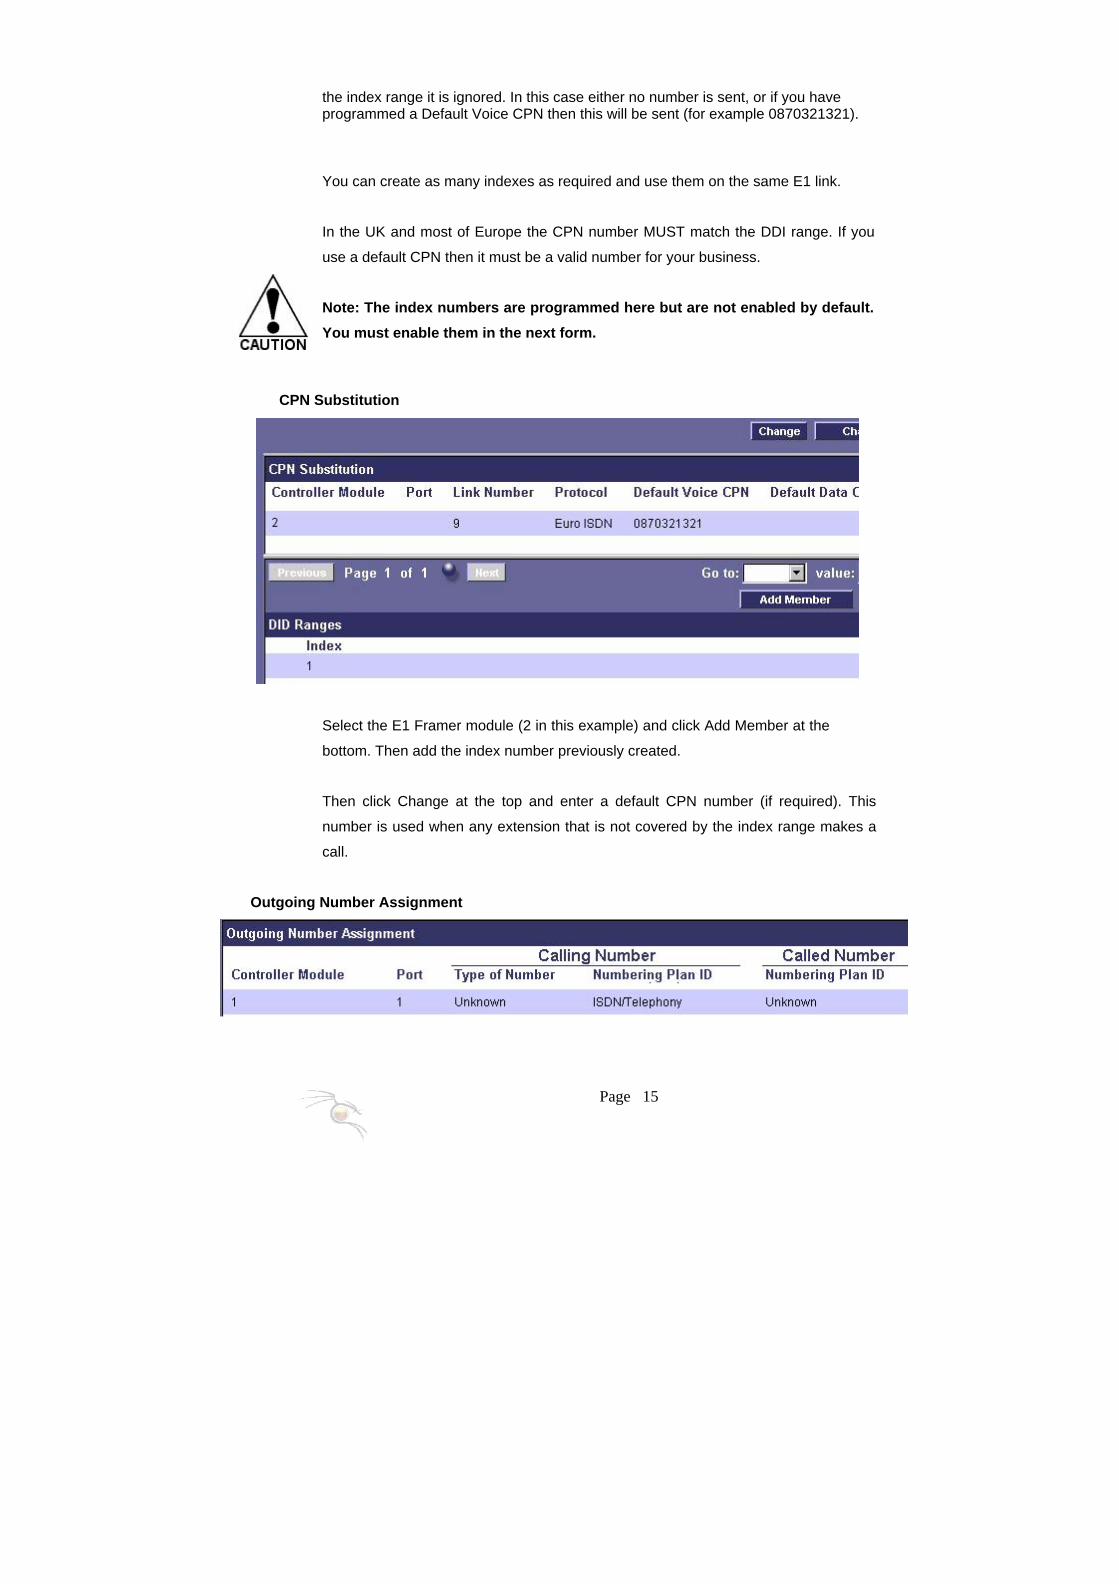
CPN Substitution
Select the E1 Framer module (2 in this example) and click Add Member at the
bottom. Then add the index number previously created.
Then click Change at the top and enter a default CPN number (if required). This
number is used when any extension that is not covered by the index range makes a
call.
Outgoing Number Assignment
Page 16
Some UK Service Providers require the Type of Number and Number Plan ID to be specified.
By default this is set to Unknown. If there is a problem with calls not connecting or dropping on
connection then contact the Service Provider to find out what value they require in these fields.
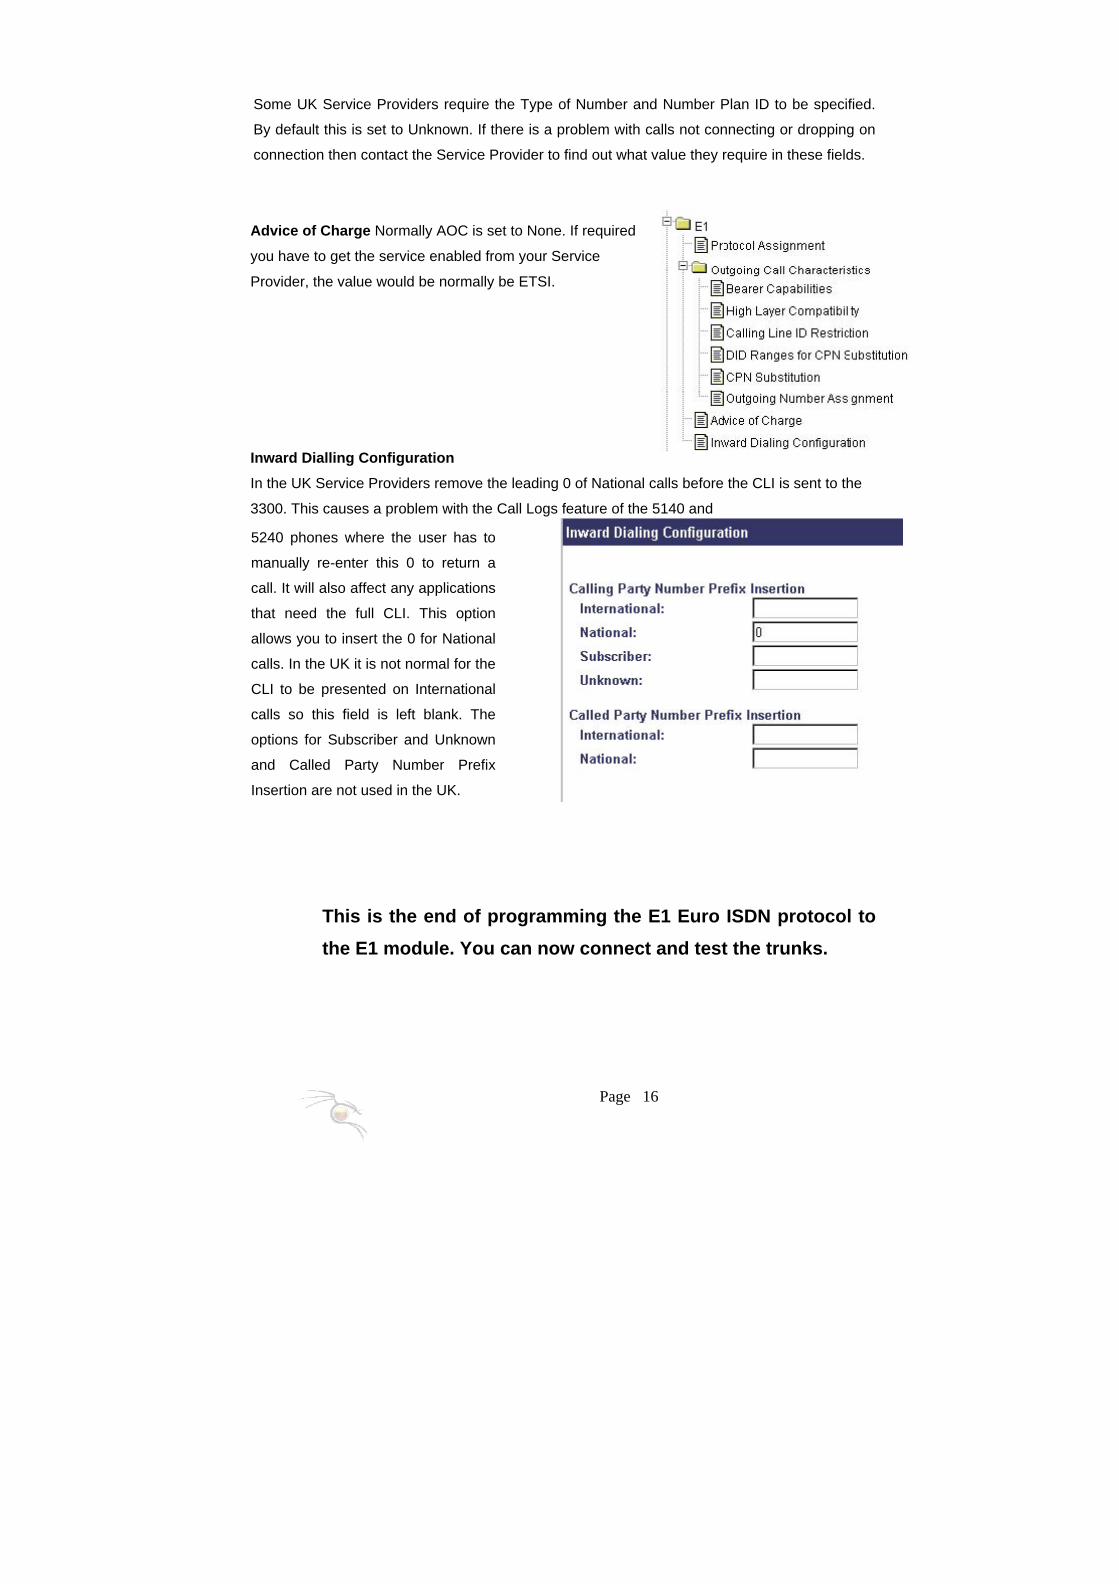
Advice of Charge Normally AOC is set to None. If required
you have to get the service enabled from your Service
Provider, the value would be normally be ETSI.
Inward Dialling Configuration
In the UK Service Providers remove the leading 0 of National calls before the CLI is sent to the
3300. This causes a problem with the Call Logs feature of the 5140 and
5240 phones where the user has to
manually re-enter this 0 to return a
call. It will also affect any applications
that need the full CLI. This option
allows you to insert the 0 for National
calls. In the UK it is not normal for the
CLI to be presented on International
calls so this field is left blank. The
options for Subscriber and Unknown
and Called Party Number Prefix
Insertion are not used in the UK.
This is the end of programming the E1 Euro ISDN protocol to the E1 module. You can now connect and test the trunks.
Page 17
Programming Euro ISDN PRI/QSig Protocol on the NSU Using IMAT
Once the Digital Trunk Programming is done and the NSU has loaded, you now program the
Euro ISDN PRI (or QSig) protocol into the NSU. This is done using the IMAT program from a
PC. A database is created in IMAT and then downloaded into the NSU. Any subsequent
changes to this programming is done by pulling this database from the NSU, modifying it with
IMAT and then downloading it back to the NSU.
Connecting the IMAT PC The PC can be connected to the serial port of the NSU using the Direct Cable Connection
feature in Windows and a Dial Up Networking connection. For details of setting up this type of
connection on the PC refer to the Technician's Handbook.
Note: This option does not work if you have loaded Windows 2000 Service Pack 4 onto
the PC.
The preferred method is to connect the PC directly to the Ethernet port of the NSU using a Cat 5-
crossover cable. The default IP address of the NSU is 192.168.1.1. Refer to the Technician's
Handbook for details. Please note that the Technician's Handbook does tell you to change the IP
address of the NSU to match the customer's LAN. If you don’t plan to connect the NSU to the
customer's LAN then you do not have to, you can just directly connect the PC to the Ethernet
port on the NSU.
Installing and Launching IMAT The IMAT software is on the 3300 Software CD-ROM. You must be using the latest version of
IMAT for the version of 3300 software you are using. Refer to the Release Notes for the current
3300 software release available on Mitel on Line for details. Install the IMAT program using the
default options given. The program will appear in your Program list under the Start button on
your PC.
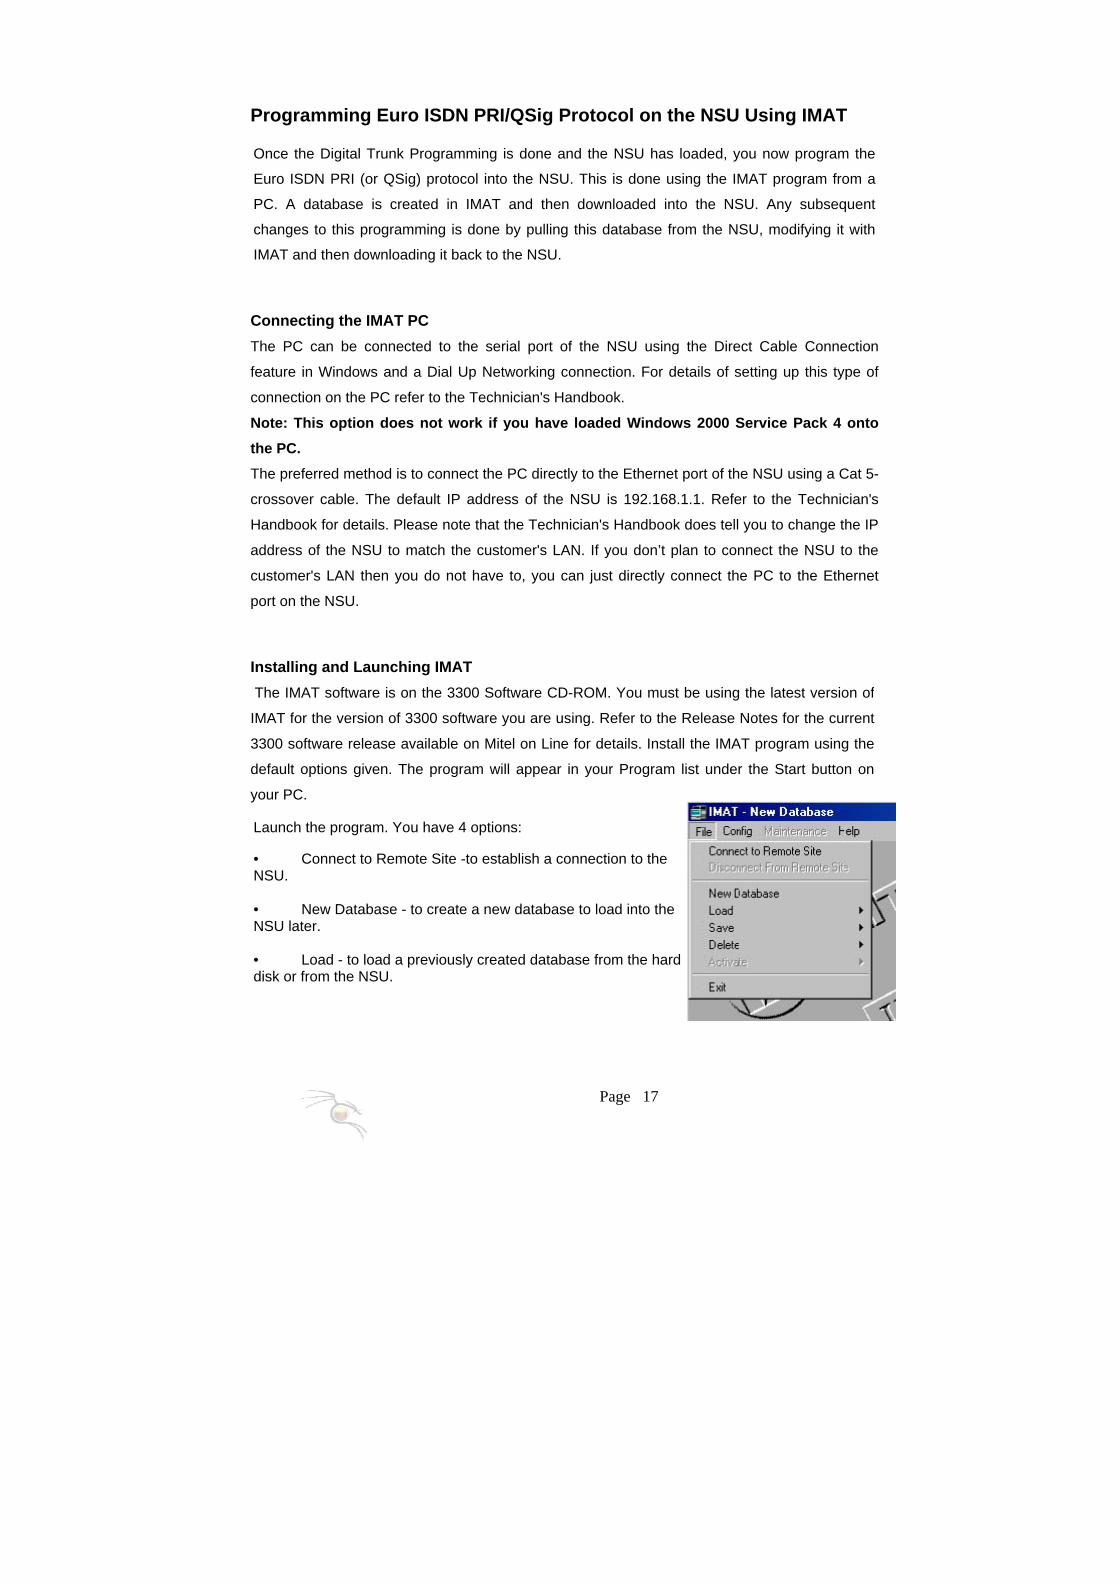
Launch the program. You have 4 options:
• Connect to Remote Site -to establish a connection to the NSU. • New Database - to create a new database to load into the NSU later. • Load - to load a previously created database from the hard disk or from the NSU.
Page 18
• Save - to save a database to either the hard disk or to the NSU.
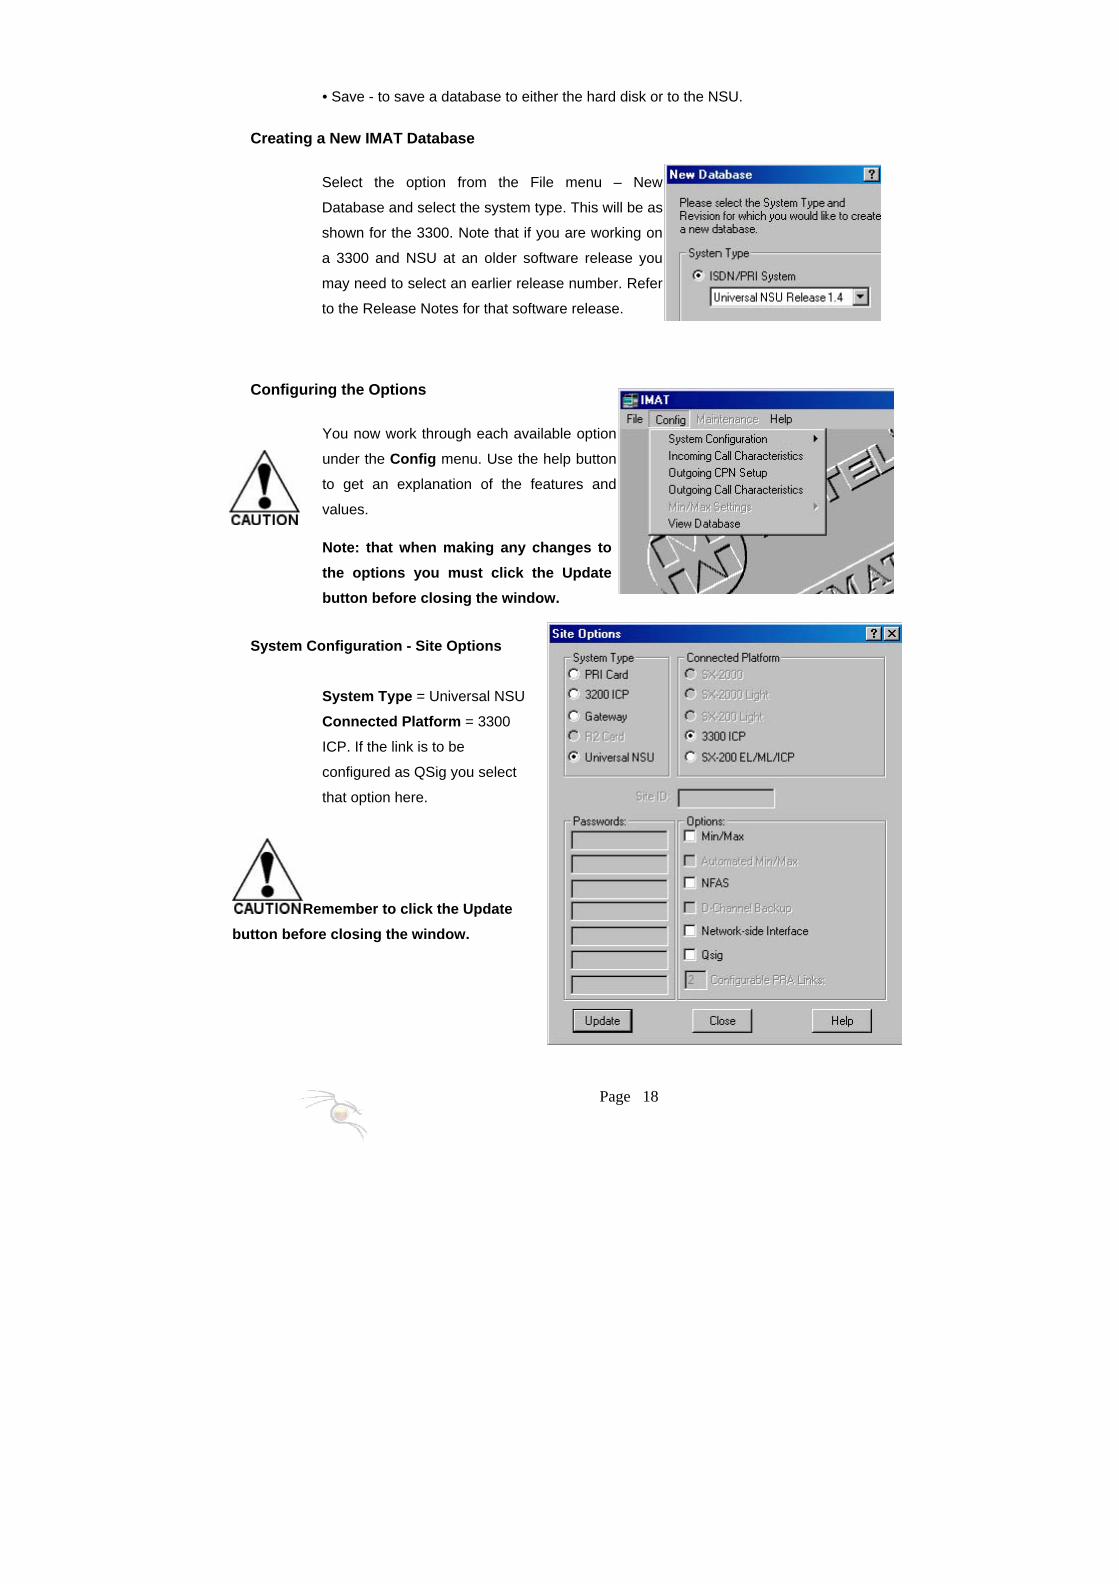
Creating a New IMAT Database
Select the option from the File menu – New
Database and select the system type. This will be as
shown for the 3300. Note that if you are working on
a 3300 and NSU at an older software release you
may need to select an earlier release number. Refer
to the Release Notes for that software release.
Configuring the Options
You now work through each available option
under the Config menu. Use the help button
to get an explanation of the features and
values.
Note: that when making any changes to the options you must click the Update button before closing the window.
System Configuration - Site Options
System Type = Universal NSU
Connected Platform = 3300
ICP. If the link is to be
configured as QSig you select
that option here.
Remember to click the Update button before closing the window.

Page 19
System Configuration - Site PRI Link Characteristics
Each link is programmed separately in this form.
Protocol Type = Euro ISDN
Protocol Variant = Euro Standard
Physical Type = E1/CEPT
Click the Characteristics button and set: CRC4 = Enable ADI = Disable – note, this option has no effect on the 3300 NSU. ADI is set in the Digital Link Descriptor. Remember to Update the window before closing it.
Click the AOC Setup. Normally AOC is set to None.
If required you have to get the service enabled from
your Service Provider, the value would normally be
ETSI.
Remember to Update the window before closing it.
Then click the Update button to return to the main IMAT screen Config menu.
Page 20
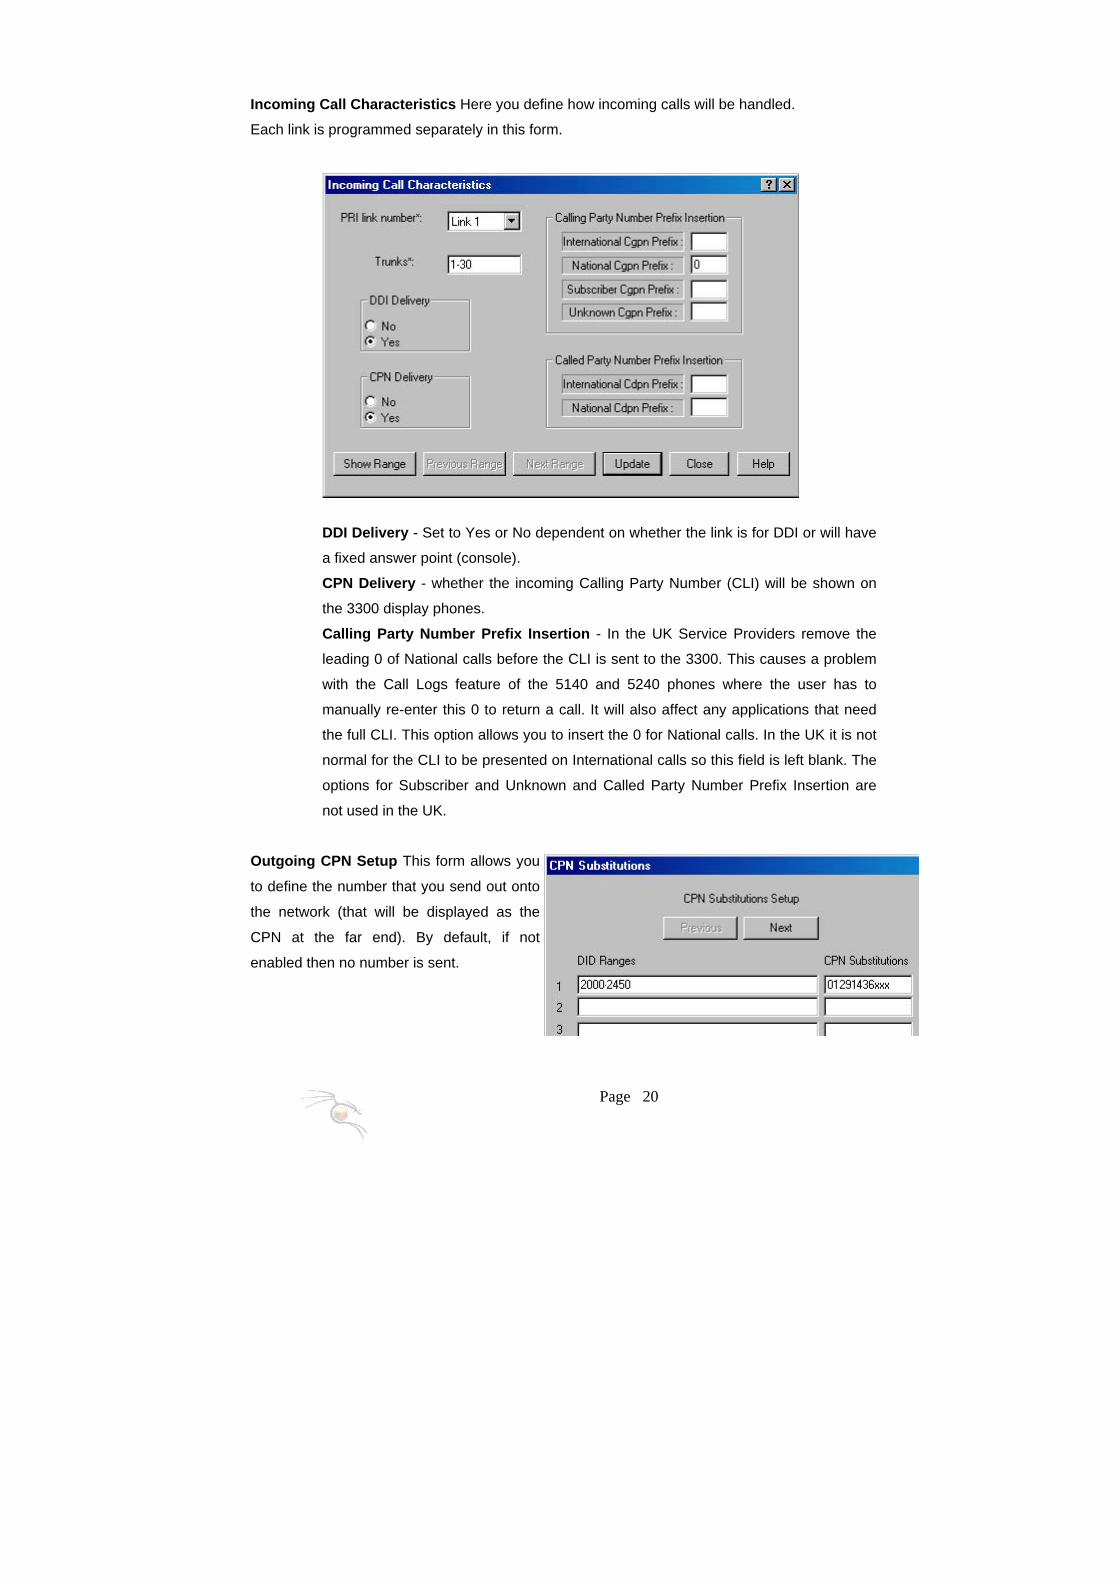
Incoming Call Characteristics Here you define how incoming calls will be handled.
Each link is programmed separately in this form.
DDI Delivery - Set to Yes or No dependent on whether the link is for DDI or will have
a fixed answer point (console).
CPN Delivery - whether the incoming Calling Party Number (CLI) will be shown on
the 3300 display phones.
Calling Party Number Prefix Insertion - In the UK Service Providers remove the
leading 0 of National calls before the CLI is sent to the 3300. This causes a problem
with the Call Logs feature of the 5140 and 5240 phones where the user has to
manually re-enter this 0 to return a call. It will also affect any applications that need
the full CLI. This option allows you to insert the 0 for National calls. In the UK it is not
normal for the CLI to be presented on International calls so this field is left blank. The
options for Subscriber and Unknown and Called Party Number Prefix Insertion are
not used in the UK.
Outgoing CPN Setup This form allows you
to define the number that you send out onto
the network (that will be displayed as the
CPN at the far end). By default, if not
enabled then no number is sent.
Page 21
You create an index defining an extension range (who is making the outgoing call)
and the number that will actually be sent. The following example shows how this
works. The DDI number range you have is 01291436xxx but your extension
numbering plan is 2xxx. When an extension in the range of 2000 to 2450 makes an
outgoing call CPN Substitution will change 2xxx to 6xxx. If the extension making the
call is not in the index range it is ignored. In this case either no number is sent, or if
you have programmed a Default Voice CPN then this will be sent (for example
0870321321).
You can create as many indexes as required and use them on the same E1 link.
In the UK and most of Europe the CPN number MUST match the DDI range. If you
use a default CPN then it must be a valid number for your business.
Note: The index numbers are programmed here but are not enabled by default. You must enable them in the next form.
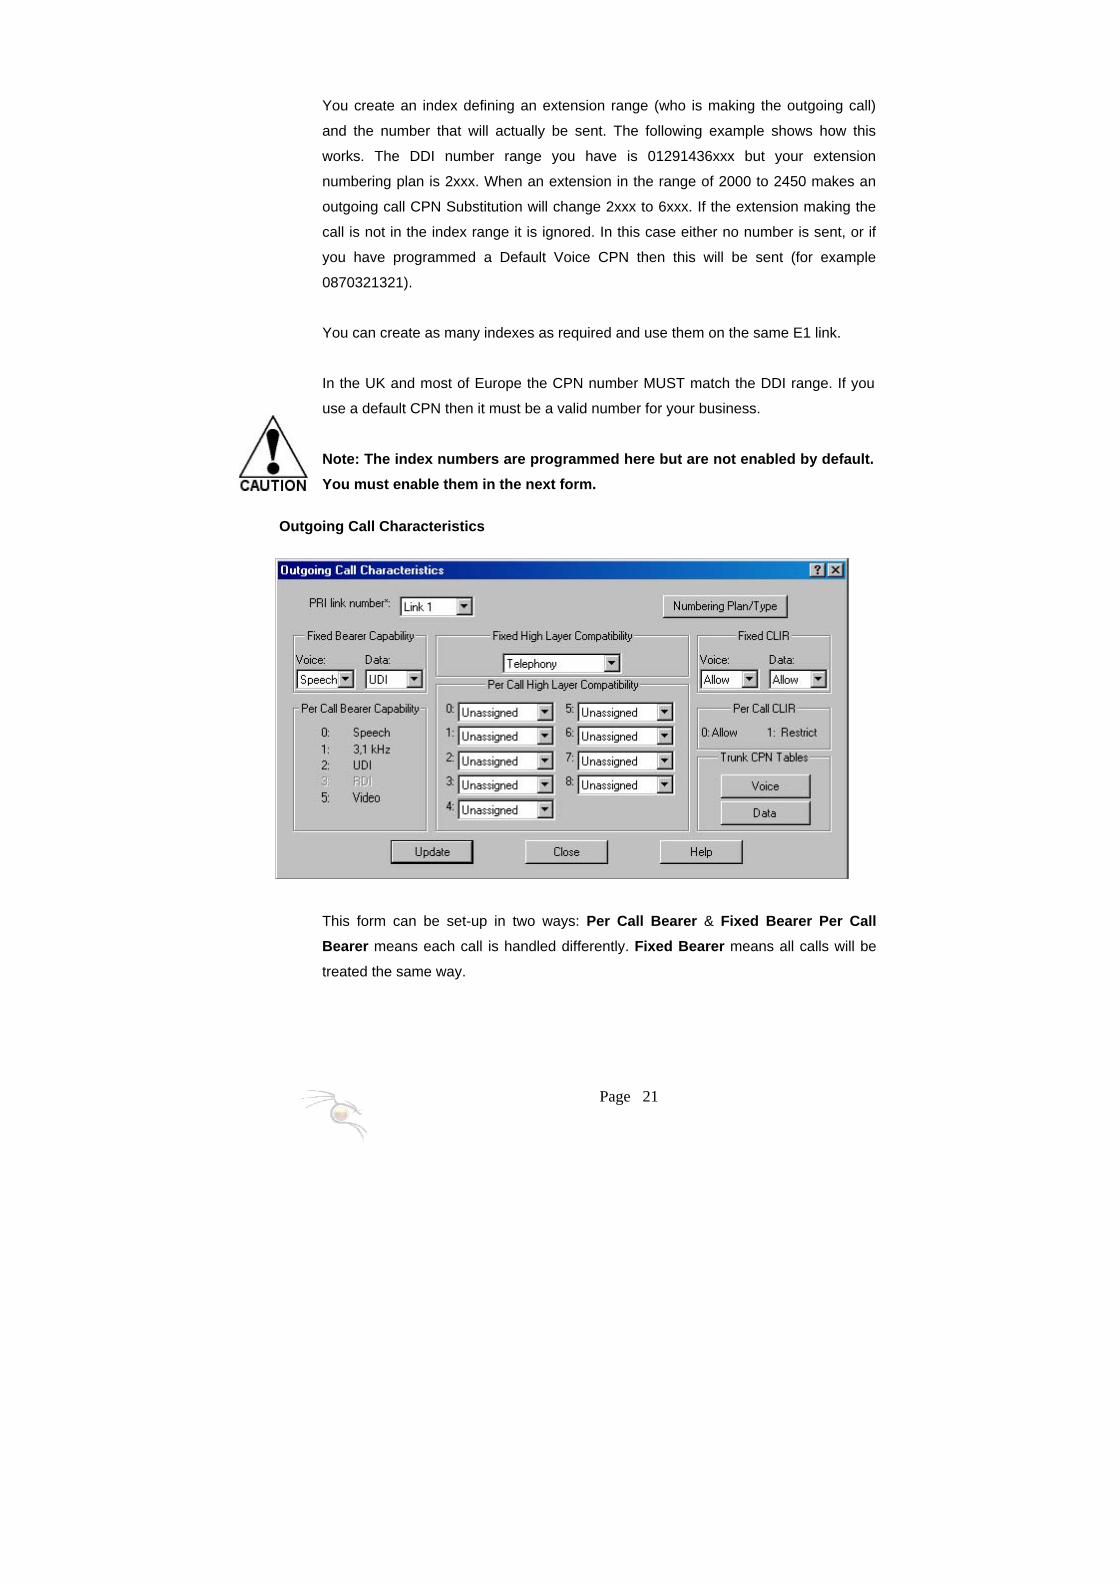
Outgoing Call Characteristics
This form can be set-up in two ways: Per Call Bearer & Fixed Bearer Per Call Bearer means each call is handled differently. Fixed Bearer means all calls will be
treated the same way.
Page 22
Per Call Bearer (not normally used in the UK - example only) Set the options at the top of the form to Voice and Data = Null, Fixed High Layer
Compatibility = Unassigned, Fixed CLIR Voice and Data to Null. The NSU E1 card is
now expecting to see 3 digits before the dialled number. These digits are inserted in
the Digit Modification form of the 3300 ICP Automatic Route Selection Programming.
You set what you want these values to be in the IMAT form and then program them
into the 3300ICP. For example, set 000 in the 3300ICP and make IMAT options: Per Call Bearer Capability = 0 (Speech), Per Call High Layer Compatibility = 0
(Telephony), and Per Call CLIR = 0 (Allow). You can set the digits to various values,
it basically tells the card how to handle the call.
Fixed Bearer (normally used in the UK) The options at the top of the form are set as shown overleaf. This way all calls are
handled the same way.
Fixed Bearer Capability: Voice = Speech and Data = UDI
Fixed High Layer Compatibility = Telephony
Fixed CLIR: Voice = Allow and Data = Allow
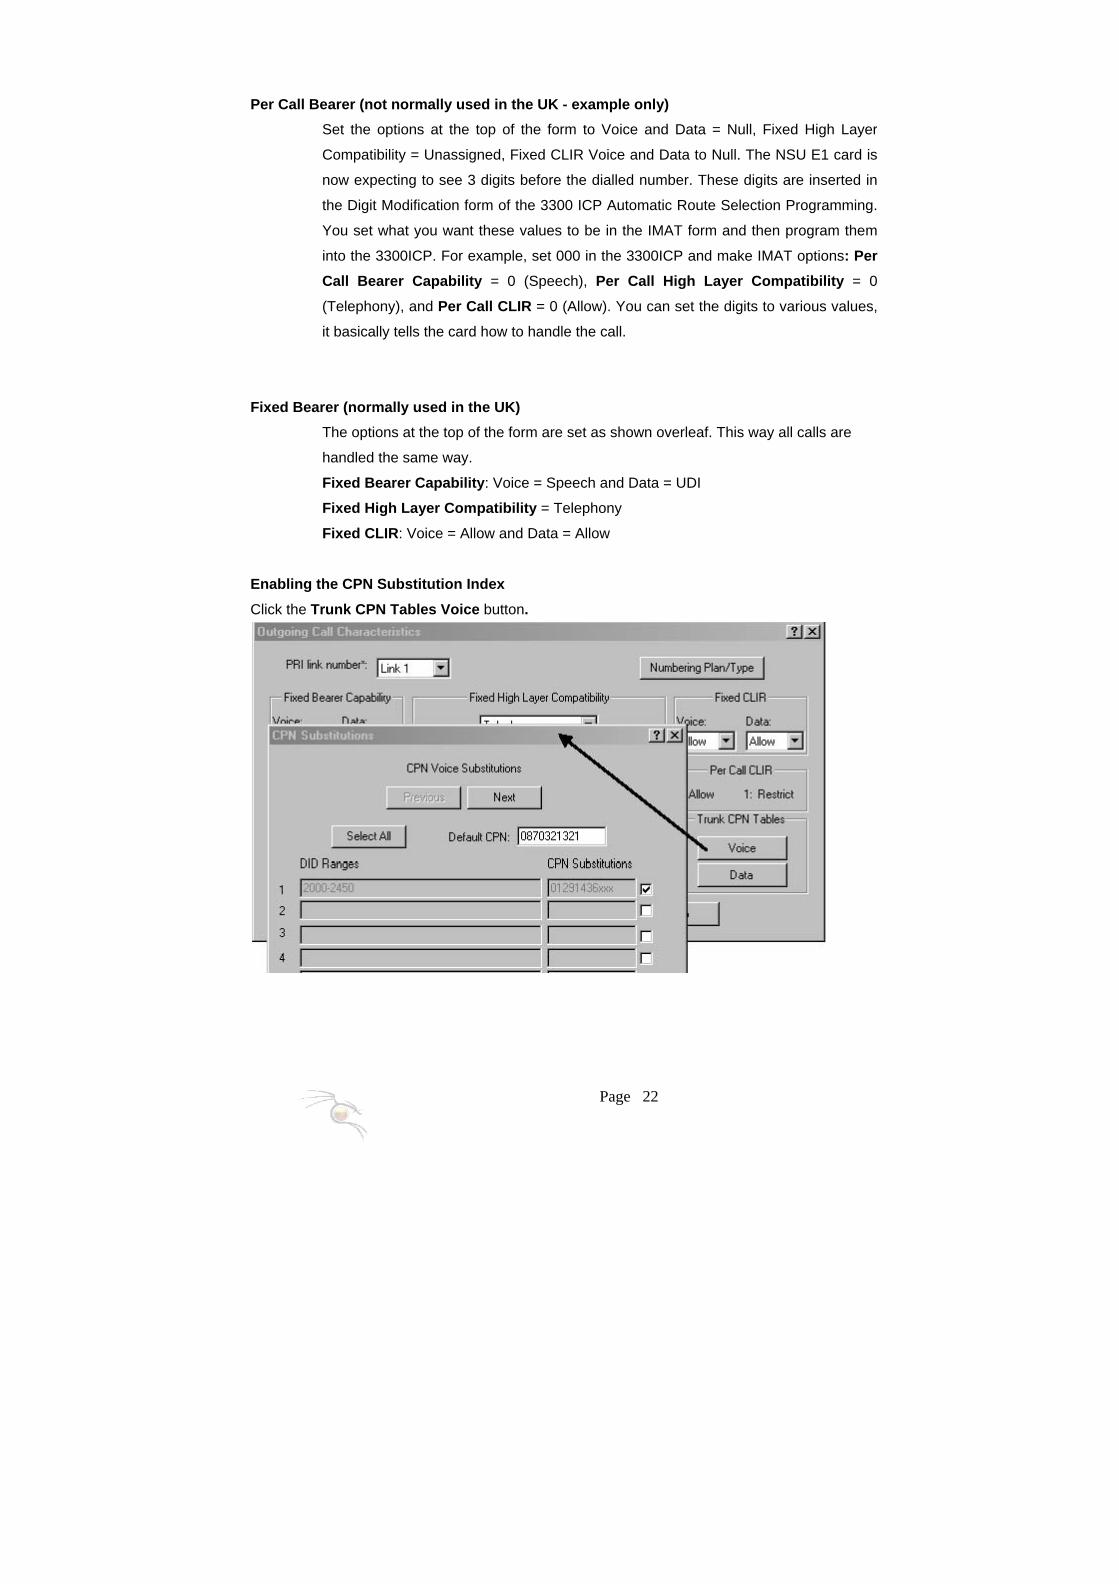
Enabling the CPN Substitution Index
Click the Trunk CPN Tables Voice button.
Page 23
The CPN Index numbers programmed earlier must now be enabled. This is done by ticking the
relevant box next to the Index number. You can also program a Default CPN. This will be used
by any extension making an outgoing call whose number is not caught by one of the
programmed index numbers.
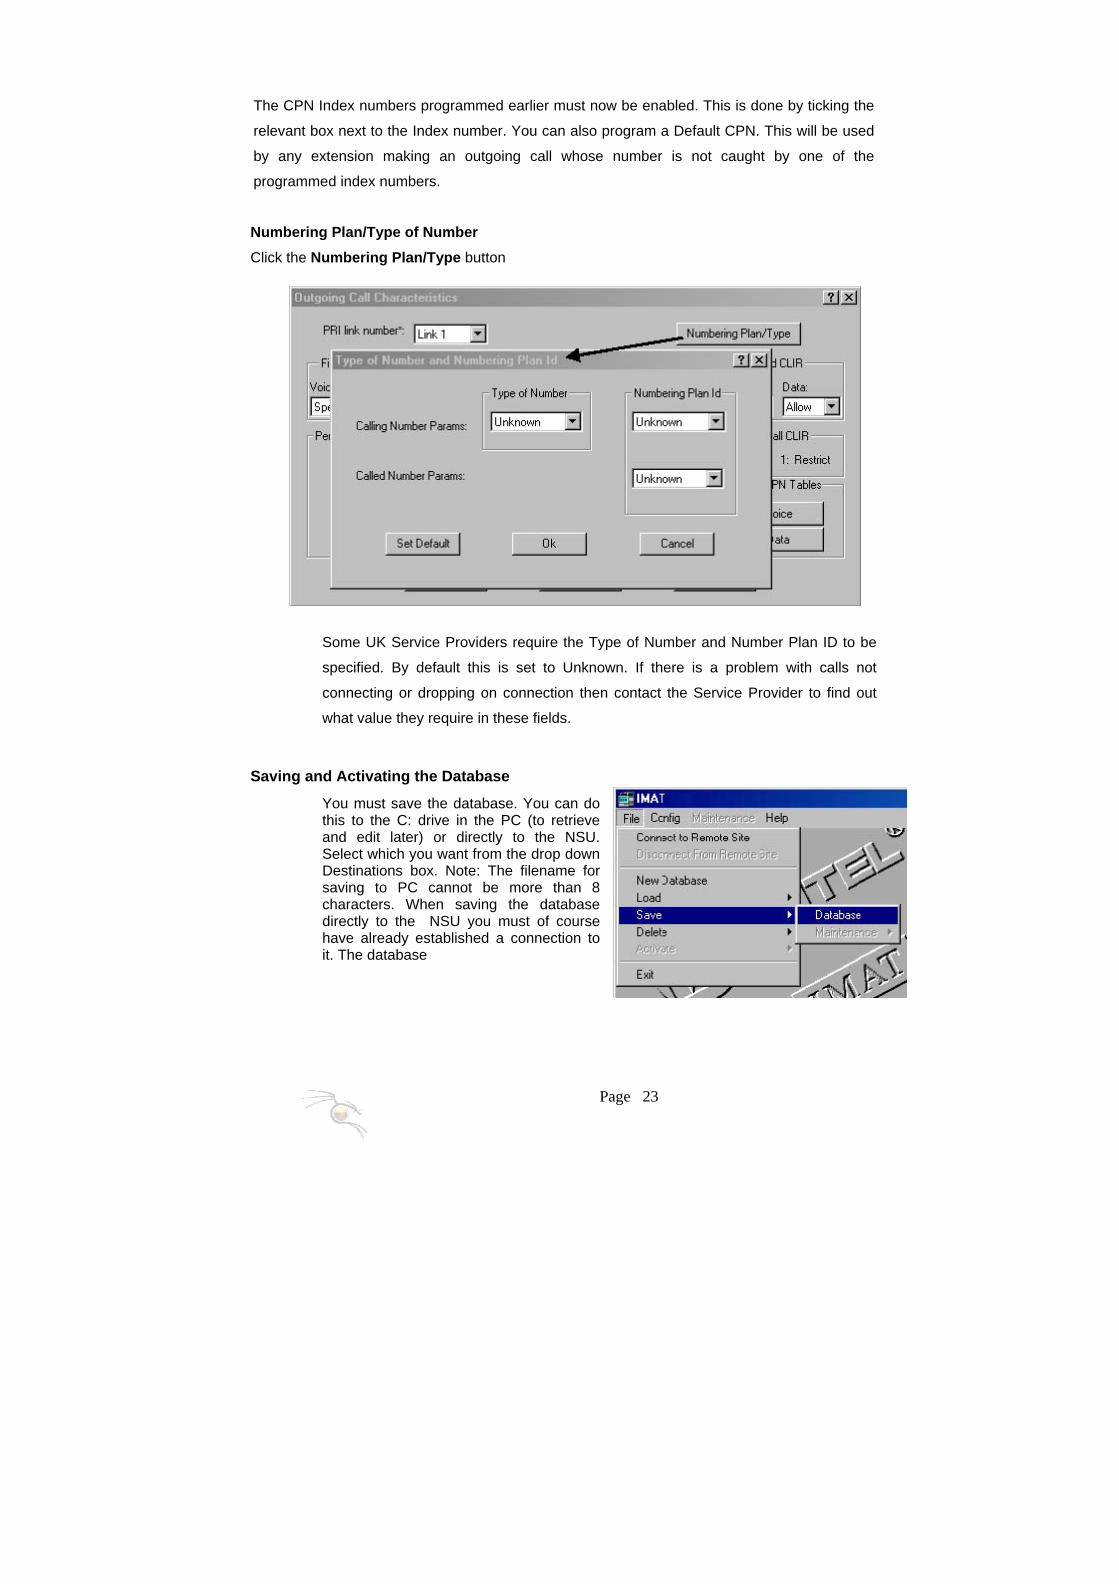
Numbering Plan/Type of Number
Click the Numbering Plan/Type button
Some UK Service Providers require the Type of Number and Number Plan ID to be
specified. By default this is set to Unknown. If there is a problem with calls not
connecting or dropping on connection then contact the Service Provider to find out
what value they require in these fields.
Saving and Activating the Database
You must save the database. You can do this to the C: drive in the PC (to retrieve and edit later) or directly to the NSU. Select which you want from the drop down Destinations box. Note: The filename for saving to PC cannot be more than 8 characters. When saving the database directly to the NSU you must of course have already established a connection to it. The database

Page 24
is first compressed then transferred to the NSU where it is extracted. You must then
reset the NSU using the Remote Site Reset option under the Maintenance Menu.
The NSU will reset and then the link(s) should be established.