Configuring Mitel 3300 for Spitfire SIP Trunks · PDF fileConfiguring Mitel 3300 for Spitfire...
10
Configuring Mitel 3300 for Spitfire SIP Trunks This document is a guideline for configuring Spitfire SIP trunks onto Mitel 3300 and includes the settings required for Inbound DDI routing and Outbound CLI presentation. The settings contained within have been tested and are known to work at the time of testing. SIP trunk details such as account number and password will be provided separately. Provisioning a SIP trunk: Page 2 Inbound Routing – Reference only: Page 8 Outbound Routing – Reference only: Page 9 Outgoing CLI – Reference only: Page 10 As there are several ways to program Inbound/Outbound routing on the Mitel 3300, the Inbound/Outbound routing examples are intended as a reference only. System installers may program differently according to their requirements.
Transcript of Configuring Mitel 3300 for Spitfire SIP Trunks · PDF fileConfiguring Mitel 3300 for Spitfire...
Configuring Mitel 3300 for Spitfire SIP Trunks
This document is a guideline for configuring Spitfire SIP trunks onto Mitel 3300 and includes the settings required for Inbound DDI routing and Outbound CLI presentation. The settings contained within have been tested and are known to work at the time of testing. SIP trunk details such as account number and password will be provided separately.
Provisioning a SIP trunk: Page 2 Inbound Routing – Reference only: Page 8 Outbound Routing – Reference only: Page 9 Outgoing CLI – Reference only: Page 10 As there are several ways to program Inbound/Outbound routing on the Mitel 3300, the Inbound/Outbound routing examples are intended as a reference only. System installers may program differently according to their requirements.
2
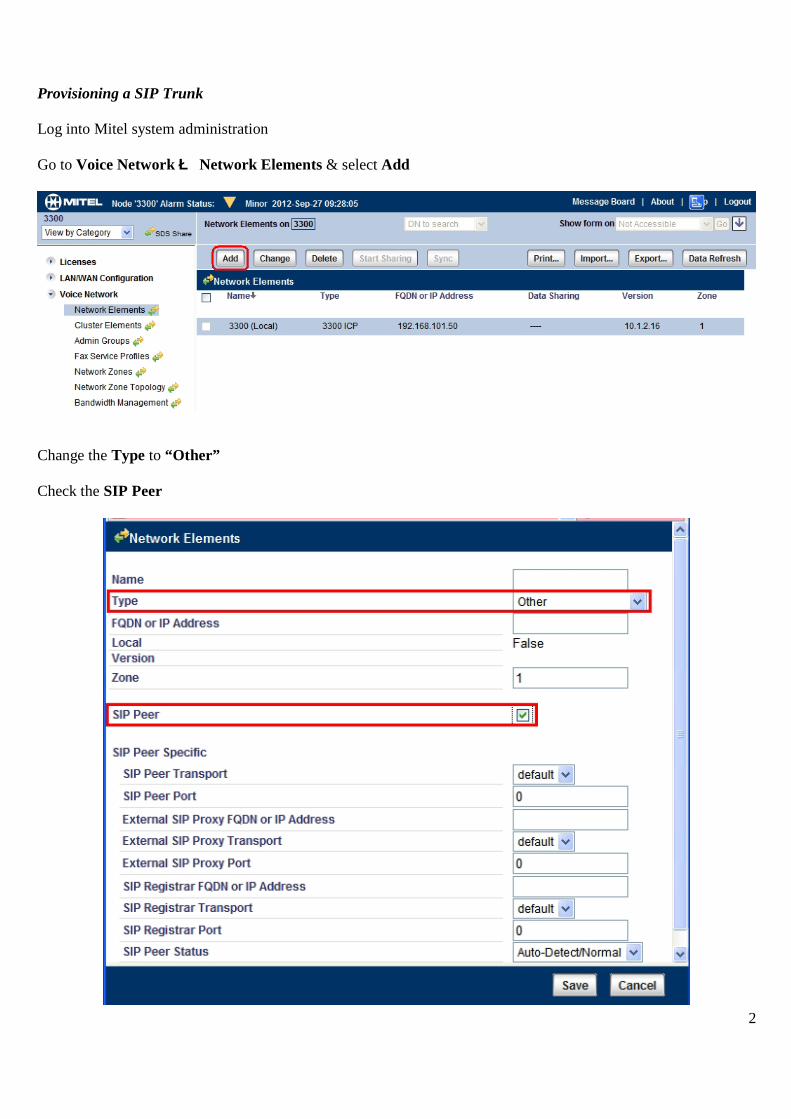
Provisioning a SIP Trunk Log into Mitel system administration Go to Voice Network è Network Elements & select Add
Change the Type to “Other” Check the SIP Peer
3
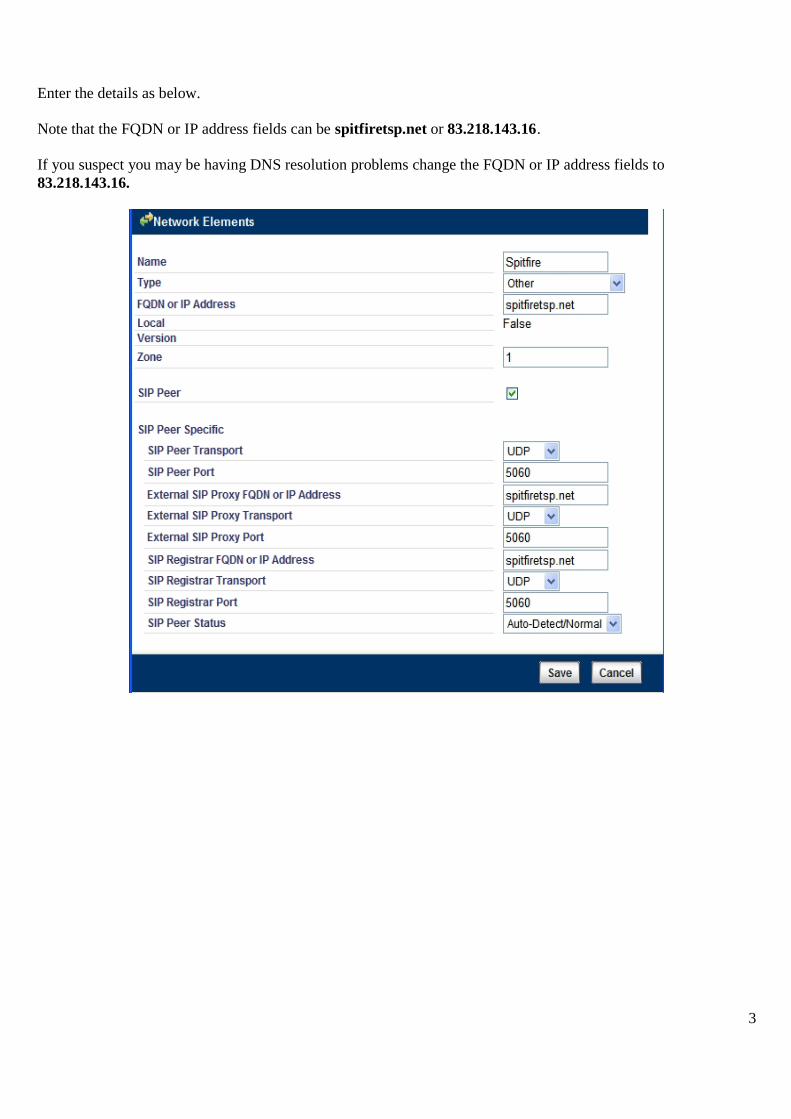
Enter the details as below. Note that the FQDN or IP address fields can be spitfiretsp.net or 83.218.143.16. If you suspect you may be having DNS resolution problems change the FQDN or IP address fields to 83.218.143.16.

4
Go to System Properties è System Feature Settings è Class of Service Options & select a COS to use for your SIP trunk. 1. Change Public Network Access via DPNSS to “Yes”
Go to Trunks è Trunk Attributes and select a “Trunk Attribute Service Number” for use with your SIP trunk.
1. Assign the Class of Service configured previously above 2. Change the Baud Rate to 9600 3. Set the Dial in Trunks Incoming Digit Modification – Absorb to remove the leading digits as
required. The remainder will be routed later in the System Speed Call field.
5
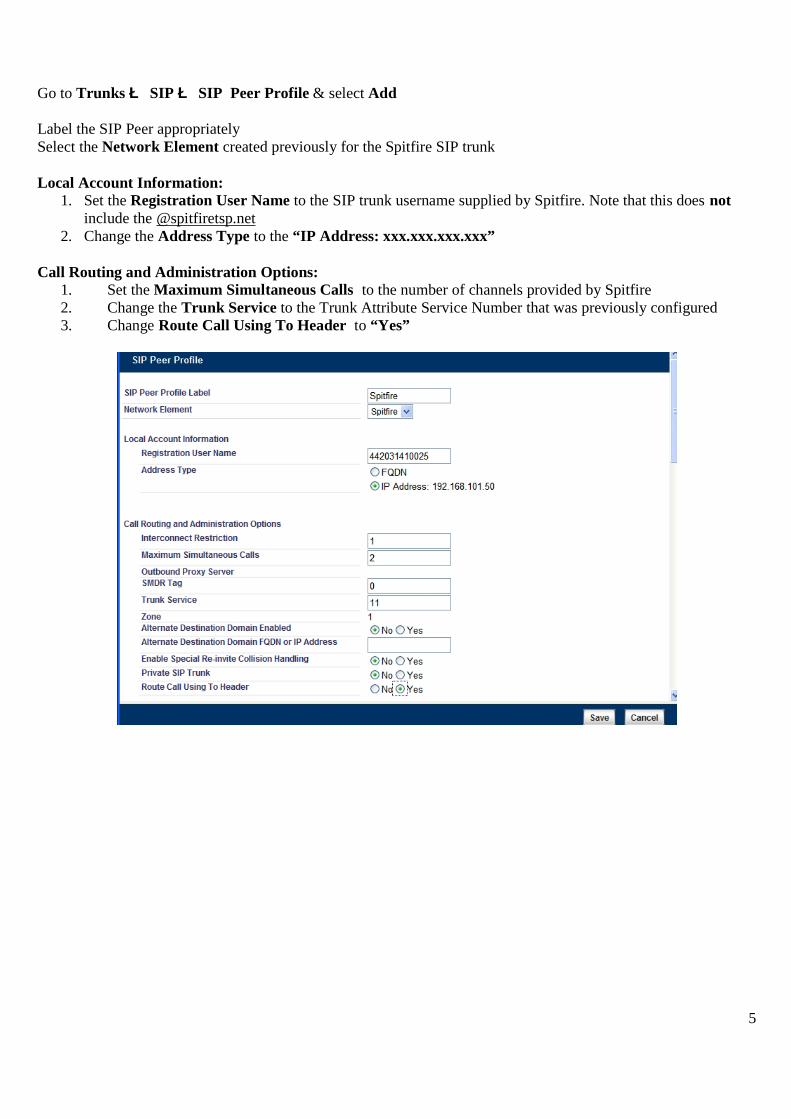
Go to Trunks è SIP è SIP Peer Profile & select Add Label the SIP Peer appropriately Select the Network Element created previously for the Spitfire SIP trunk Local Account Information:
1. Set the Registration User Name to the SIP trunk username supplied by Spitfire. Note that this does not include the @spitfiretsp.net
2. Change the Address Type to the “IP Address: xxx.xxx.xxx.xxx” Call Routing and Administration Options:
1. Set the Maximum Simultaneous Calls to the number of channels provided by Spitfire 2. Change the Trunk Service to the Trunk Attribute Service Number that was previously configured 3. Change Route Call Using To Header to “Yes”
6
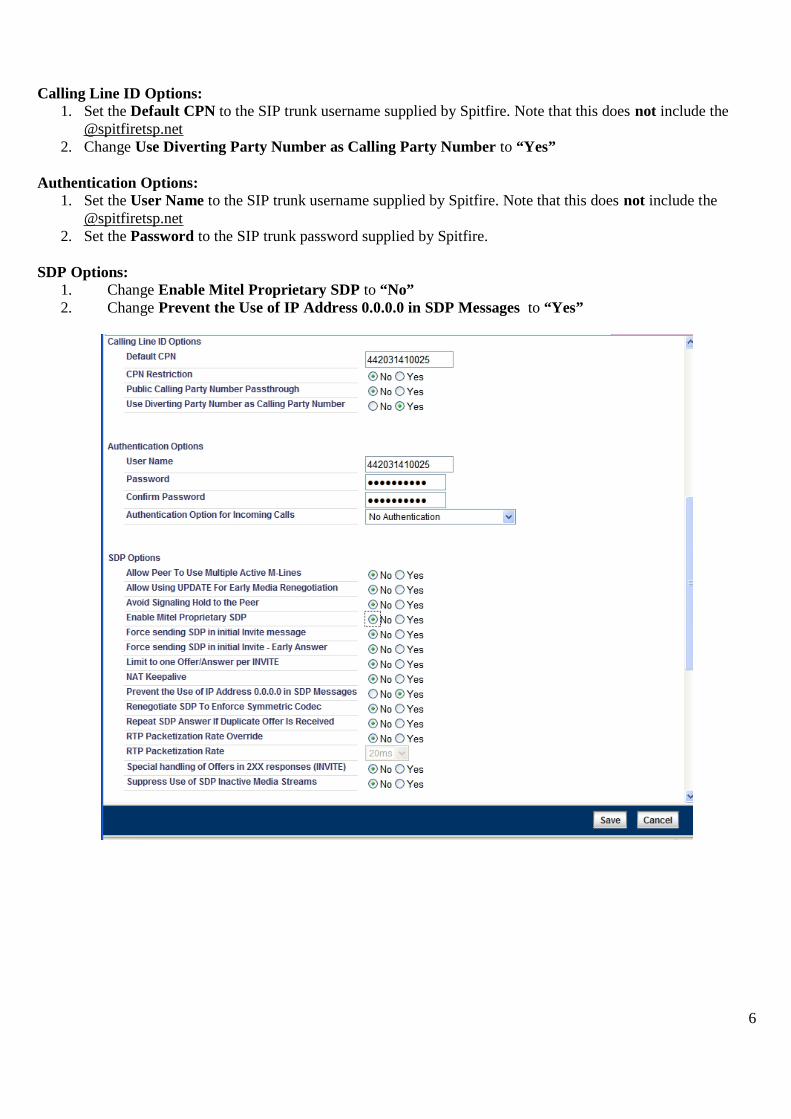
Calling Line ID Options: 1. Set the Default CPN to the SIP trunk username supplied by Spitfire. Note that this does not include the
@spitfiretsp.net 2. Change Use Diverting Party Number as Calling Party Number to “Yes”
Authentication Options:
1. Set the User Name to the SIP trunk username supplied by Spitfire. Note that this does not include the @spitfiretsp.net
2. Set the Password to the SIP trunk password supplied by Spitfire. SDP Options:
1. Change Enable Mitel Proprietary SDP to “No” 2. Change Prevent the Use of IP Address 0.0.0.0 in SDP Messages to “Yes”
7
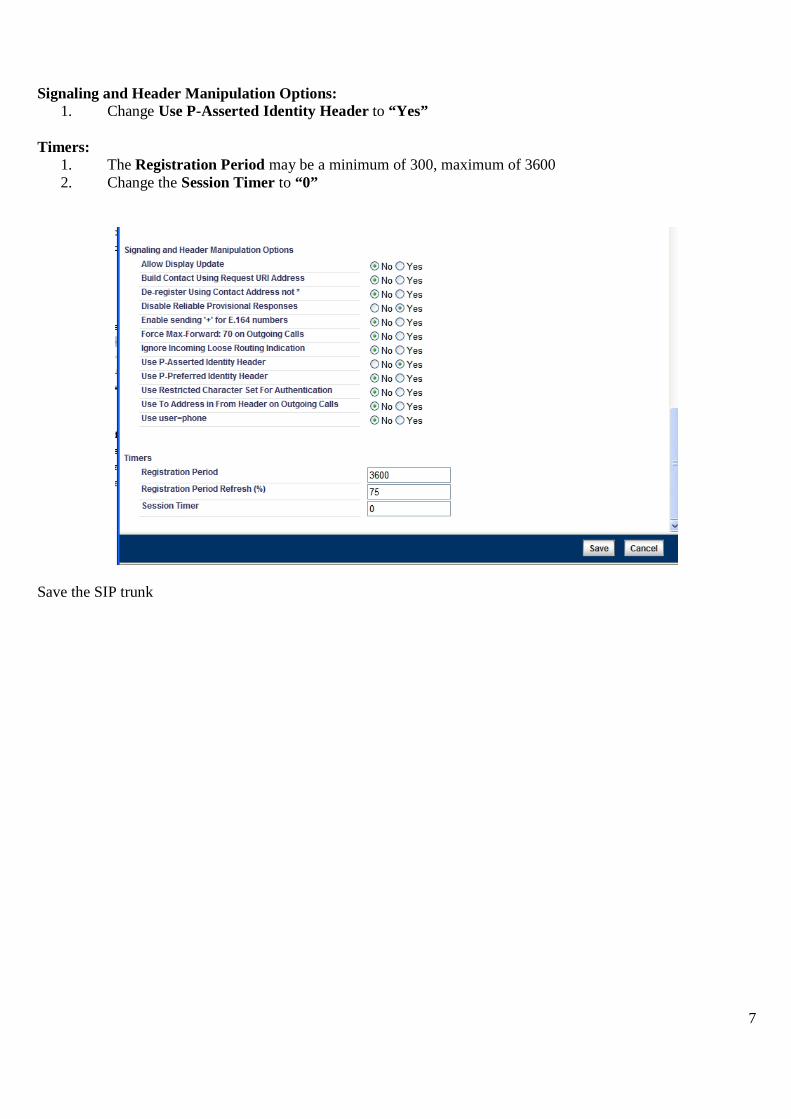
Signaling and Header Manipulation Options: 1. Change Use P-Asserted Identity Header to “Yes”
Timers:
1. The Registration Period may be a minimum of 300, maximum of 3600 2. Change the Session Timer to “0”
Save the SIP trunk
8
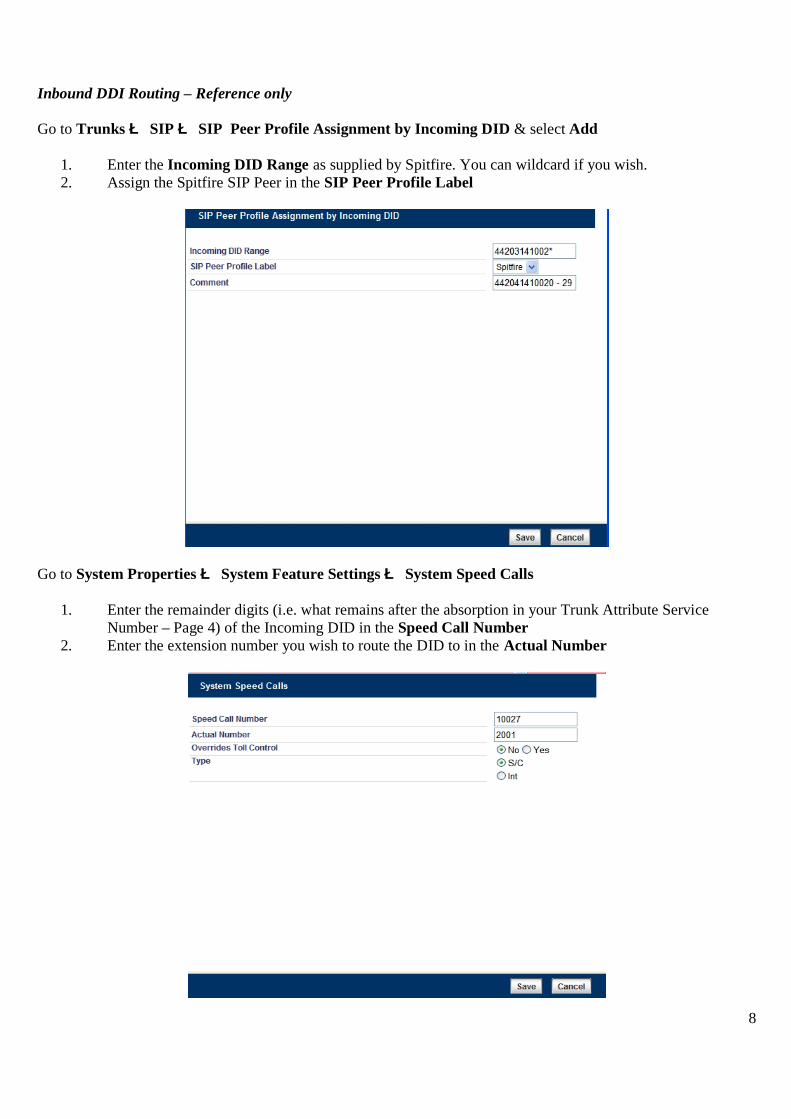
Inbound DDI Routing – Reference only Go to Trunks è SIP è SIP Peer Profile Assignment by Incoming DID & select Add
1. Enter the Incoming DID Range as supplied by Spitfire. You can wildcard if you wish. 2. Assign the Spitfire SIP Peer in the SIP Peer Profile Label
Go to System Properties è System Feature Settings è System Speed Calls
1. Enter the remainder digits (i.e. what remains after the absorption in your Trunk Attribute Service Number – Page 4) of the Incoming DID in the Speed Call Number
2. Enter the extension number you wish to route the DID to in the Actual Number
9
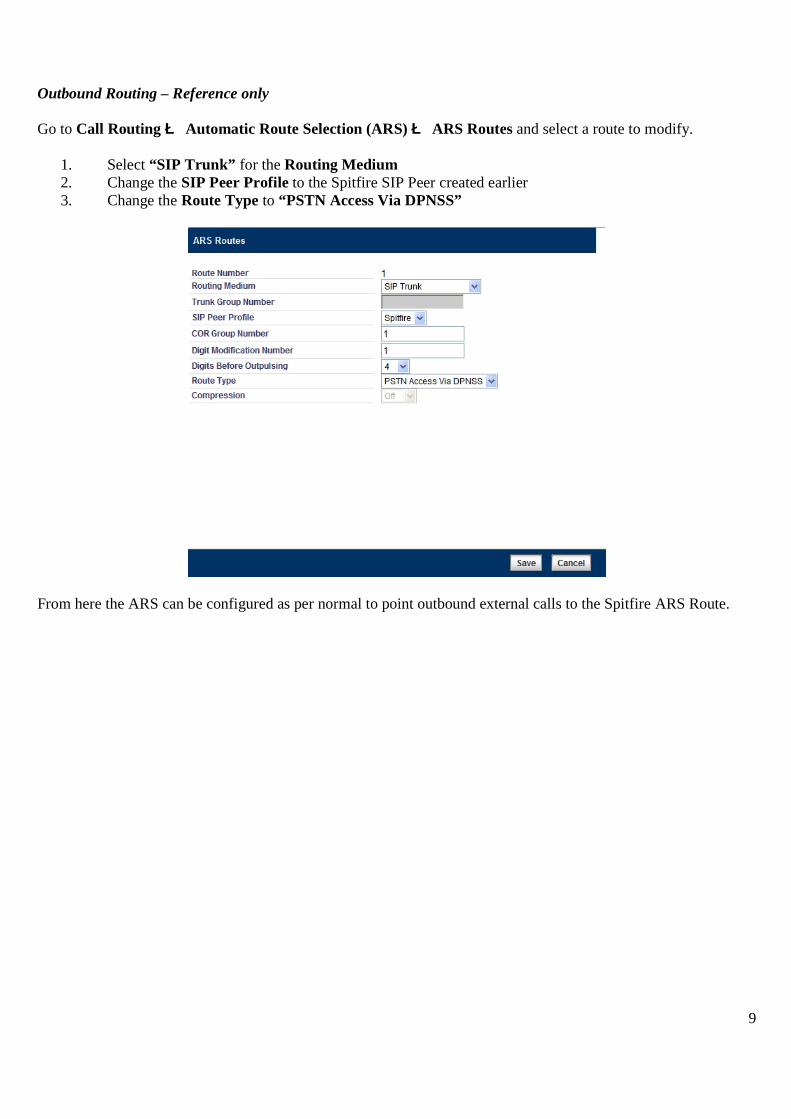
Outbound Routing – Reference only Go to Call Routing è Automatic Route Selection (ARS) è ARS Routes and select a route to modify.
1. Select “SIP Trunk” for the Routing Medium 2. Change the SIP Peer Profile to the Spitfire SIP Peer created earlier 3. Change the Route Type to “PSTN Access Via DPNSS”
From here the ARS can be configured as per normal to point outbound external calls to the Spitfire ARS Route.
10
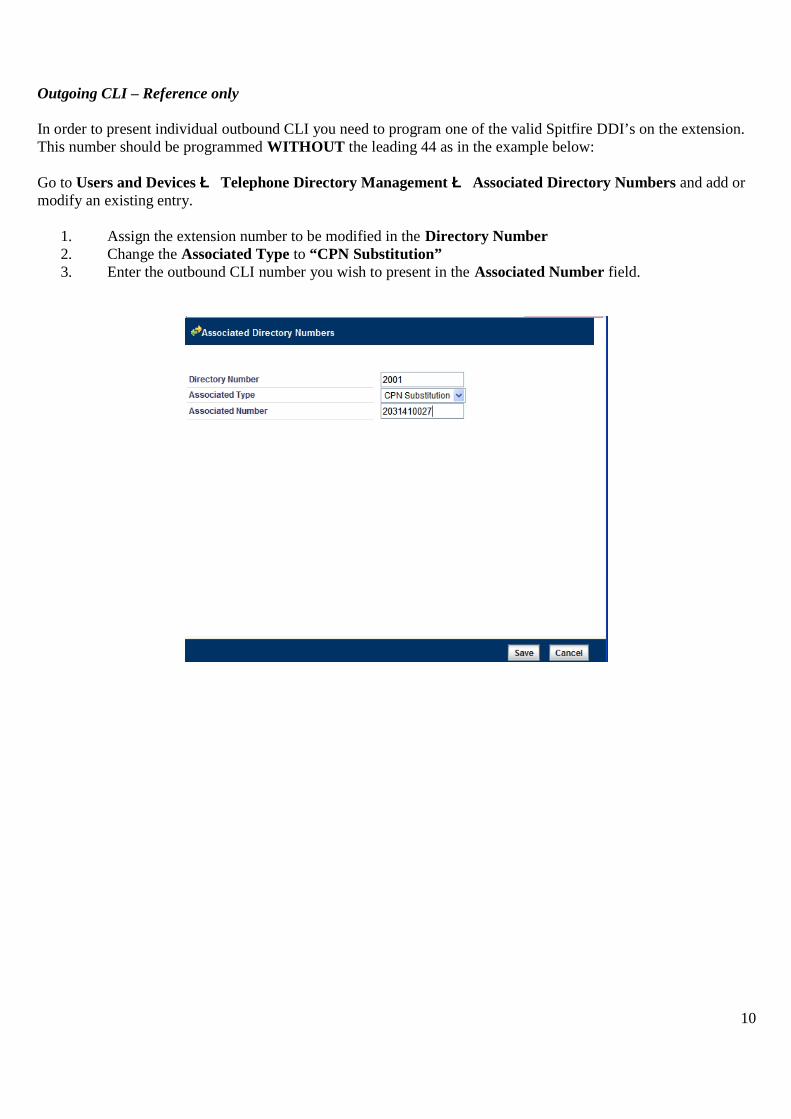
Outgoing CLI – Reference only In order to present individual outbound CLI you need to program one of the valid Spitfire DDI’s on the extension. This number should be programmed WITHOUT the leading 44 as in the example below: Go to Users and Devices è Telephone Directory Management è Associated Directory Numbers and add or modify an existing entry.
1. Assign the extension number to be modified in the Directory Number 2. Change the Associated Type to “CPN Substitution” 3. Enter the outbound CLI number you wish to present in the Associated Number field.