Psalm 103 Holey = Ingratitude Holy = God’s Graciousness Wholly = Remembering

Glass Separator: It is crucial to coat your holey/jewelry mold with a good glass separator so that your glass wont stick to the mold when it is fired. If you don’t apply enough glass separator your glass will get stuck or pull some of the mold out with it including the mold post when it is done firing. You can use primo primer/kiln wash on your molds but we get better results with a spray glass separator. At Creative Paradise, Inc. we recommend using ZYP previously known as Boron Nitride Spray. ZYP comes in a can and can be sprayed easily. Several light coats with a short waiting period between coats is preferable to one heavy coat. You must shake the can well before using it and hold the can upright while using to assure proper distribution of product. It is also advisable to wear a mask over your mouth and nose whilst spraying. It is important to turn the mold to make sure you coat the mold cavity at all angles paying close attention to the mold posts. Click here for a tutorial on applying the ZYP. We recommend strictly using ZYP on the LF58 Holey Peace mold and the LF77 Holey Peace Trio.
If you have a holey/jewelry mold that has primo primer in it you can change to ZYP. All you have to do is coat it with ZYP, no need for scrubbing, however you must re coat it with ZYP before each firing there after. You can not go from ZYP to primo primer as easily because the ZYP will resist water based things such as primer. If you wish to go from ZYP to Primo Primer you have to take the Zyp off with a sanding cloth.
Frit weights and firing: If you want to have a thick pendant that has some weight to it you should add more frit than you would if you wanted a thin and light pendant. Our firing schedule is for a full fuse which means that your mold needs to be filled with a frit weight that would be the same as two standard layers of glass- otherwise the glass will shrivel and not fill the mold cavity. If you do not want a thick pendant do not go to a full fuse. We have made a recommended frit weight table below for pendants firing to a full fuse, but really it is your preferential decision on the weights and the firing schedule especially if you find that your kiln fires hot. Many kilns do not fire the same as ours do, you may have a favorite full fuse schedule that works for you every time that you would rather use and that is great. To test your kiln and to see if it has discrepancies we have made a PDF tutorial that you may find worth your while reading- just click here.Once your frit has been added to your mold it is advisable to sweep away frit from the edges of the mold into the center with a small paint brush. This will prevent burrs from occurring on the edges of your pendant as the glass will melt and roll and create a smooth edge instead. If you do get some burrs, sanding then edges of your piece will help get rid of them. It is important to remember that the glass frit facing up in the kiln will be facing the viewer of the pendant.
Holey and Jewelry Mold Tutorial Revised
Before brushing away frit from the edges ...
... after brushing frit from the edges.
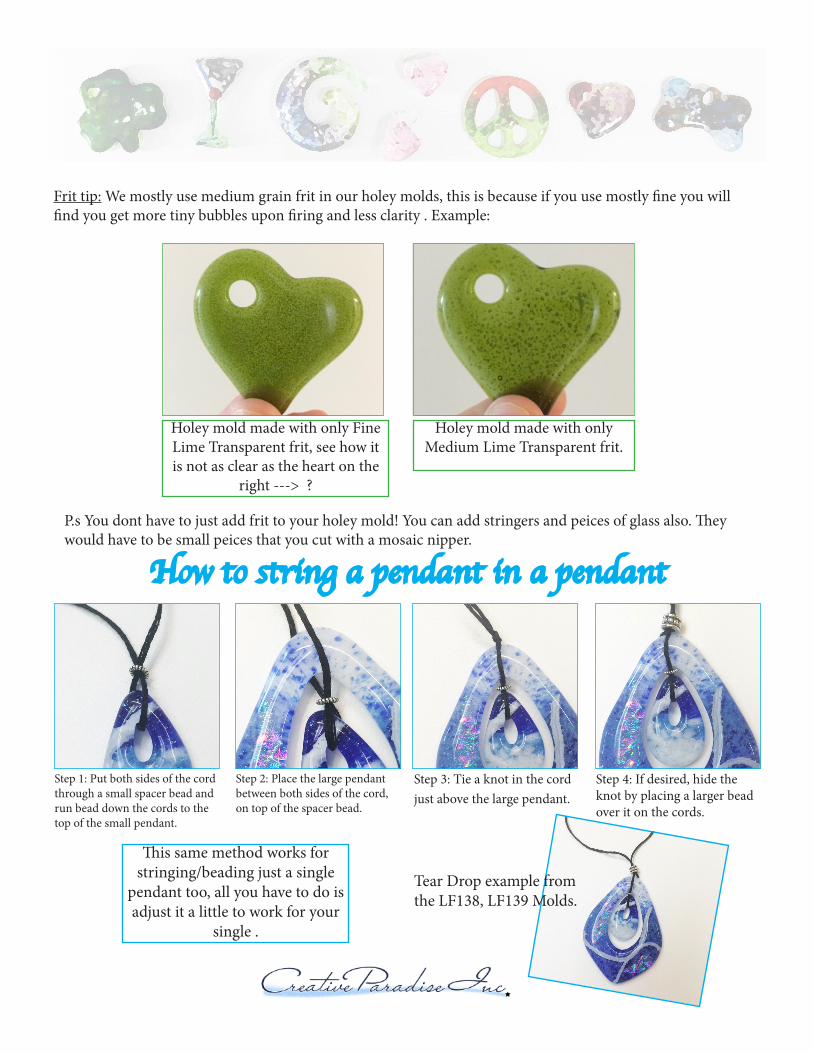
Frit tip: We mostly use medium grain frit in our holey molds, this is because if you use mostly fine you will find you get more tiny bubbles upon firing and less clarity . Example:
P.s You dont have to just add frit to your holey mold! You can add stringers and peices of glass also. They would have to be small peices that you cut with a mosaic nipper.
Holey mold made with only Fine Lime Transparent frit, see how it is not as clear as the heart on the
right ---> ?
Holey mold made with only Medium Lime Transparent frit.
How to string a pendant in a pendant
Step 1: Put both sides of the cord through a small spacer bead and run bead down the cords to the top of the small pendant.
Step 2: Place the large pendant between both sides of the cord, on top of the spacer bead.
Step 3: Tie a knot in the cord just above the large pendant.
Step 4: If desired, hide the knot by placing a larger bead over it on the cords.
Tear Drop example from the LF138, LF139 Molds.
This same method works for stringing/beading just a single
pendant too, all you have to do is adjust it a little to work for your
single .

After reading the above instructions you are now ready to make a pendant! Here is a quick Guide:
Image 1
Image 4
Image 3Image 2
Image 5
First, spray your mold with Zyp.
Place your holey mold on a weighing scale and set it at 0 (image 1). Begin filling your frit the way you desire until it reaches its reccommended frit weight (image 4). The mold pictured is an LF57 and its frit reccomendation is 22grams. The frit used in the example was COE96 F3 Hydrangea and F3 Green. 4 small piec-es of COE96 white rod were cut up using a mosaic nipper and placed on the frit facing upwards to create dots (image 2 and 3).
*If you want to add dichro pieces to your jewlery place them in the mold dichro side up.
Brush the frit away from the edges of the mold to prevent burrs (image 5).
Fire your mold using the reccomended firing schedule in table 1.
Segment Rate Temp Hold1 275 1215 452 275 1465 053 9999 950 60
Table 1

Mold # Description Size Fill Weight in Grams =/1 gram
LF57 Hole Tear 2.25” l 22LF58 Hole Peace 2.25” dia 20LF59 Hole Rhombus 1.5” l 26LF60 Holey Cross 2”l 24LF61 Holey Square 2” 18LF62 Holey Heart 2.5” 20LF63 Holey Circle 2” dia 28LF64 Holey Christmas Tree 3” l 24LF65 Holey Star 3”l 30LF66 Holey Journey 2.5”l 26LF67 Holey Butterfly 2.25”l 32LF68 Hollow Heart Holey 1.75”l 18LF69 Holey Tears (2) 1” x 2” 10 per cavityLF70 Holey Ovals (2) 1” x 2” 10 per cavityLF71 Holey Trilliant 1.75”l 20LF72 Holey Wine Glass 2.25”l 16LF73 Holey Heart Trio 1” – 1.5” LG 10 per cavity SM 6 per
cavityLF74 Holey Oval Trio 7/8” – 2” LG 10 per cavity SM 4 per
cavityLF75 Holey Tear Trio 2”-1.2”l LG 12 per cavity SM 7 per
cavityLF76 Holey Martini Trio 2” – 1.5”l LG 14 per cavity SM 9 per
cavityLF77 Holey Peace Trio 2” – 1” dia LG 26 per cavity SM 6 per
cavityLF78 Petite Holey Cross 1.75” x 1.25” 8LF81 Keys (2) 2” – 2.5” l 6 & 4LF82 Holey Love Tag 2.5”l x 1.5”l 26LF83 Holey Dog Bone 2.5”l 18LF84 Holey Heart Choker 2.75”l 34LF85 Holey Moon Choker 24LF86 Sm Holey Dog Bone 2”l 24LF87 Sm Round Buttons (4) 1” dia 4 per cavityLF88 Lg Rd Buttons (2) 22 per cavityLF89 Square Buttons (2) 1.25”l 18 per cavityLF90 Buckles (2) 1.5”l 10 per cavityLF91 Lg Oval Holey Casting: 2.25” x 26LF92 Cameo One 3.5” x 2”t Casting: 1.75” x 24

If you need more information or have any questions or comments about the Holey molds or if something still doesnt seem to be working for you please
let us know and we will help you the best we can. Email us at [email protected]
LF93 Dragonfly Cameo 2.75” x 2.5”
Casting: 2” x 1.5” 28
LF94 Tree of Life Cameo 2.5” x 2” Casting: 2” x 1.5” 30LF95 Skull Cameo 30LF97 Hands Cameo 30 LF98 Angel Cameo 1.75” t. 44 LF101 Hoop Holey (6) Casting 1.25” dia 12 per cavityLF105 Large Shamrock Mold 2.25” dia 42LF106 Small Journey Hole 3” x 3” 26LF124 2 Castacab Hearts Castings 1.75” x 2” 37 per heartLF125 2 Castacab Circles Castings 2” dia. 39 per circleLF126 2 Castacab Squares Castings 1.5” x 1.5” 34 per squareLF127 2 Castacab Tears Castings 1.25” w. x 3” l 42 per tearLF128 2 Holey Tear Drops Casting size: 1.75” x 2.25” 32 per tearLF129 2 Holey Trilliant Casting size: 1.75” x 1.75” 31 per trilliantLF130 2 Holey Circles Casting size: 2” 43 per circleLF131 Clover Casting: 1.5” x 1.5” 14LF132 Quad Tear Holey Casting: 1.75” x 1.5” 17 per cavityLF133 Quad Heart Holey Casting: 1.5” x 1.75” 20 per cavityLF134 Quad Star Holey Casting: 1.5” x 2.25” 18 per cavityLF135 Organic Hoops (3) Casting: 2.5” to 2.25” 11LF136 Organic Drops (3) Castings: 1” to 1.25” l 6 LF138 Geometric Hoops (3) Casting: 2.5” to 2.25” Large Tear 19 g, Large
Circle 18g, LargeSquare 15g
LF139 Geometric Drops (3) Castings: 1” to 1.25” l Small Tear 4g, Small Circle 7g, Small Square 7g
To see the whole line of Holey Molds click here.