
HD Fire Helmet Cams For America’s Bravest TRAINING · PDF fileHD Fire Helmet Cams For...
8
HD Fire Helmet Cams For America’s Bravest TRAINING MANUAL BullDog 1080
Transcript of HD Fire Helmet Cams For America’s Bravest TRAINING · PDF fileHD Fire Helmet Cams For...
HD Fire Helmet Cams ForAmerica’s Bravest
TRAININGMANUAL
BullDog1080
3
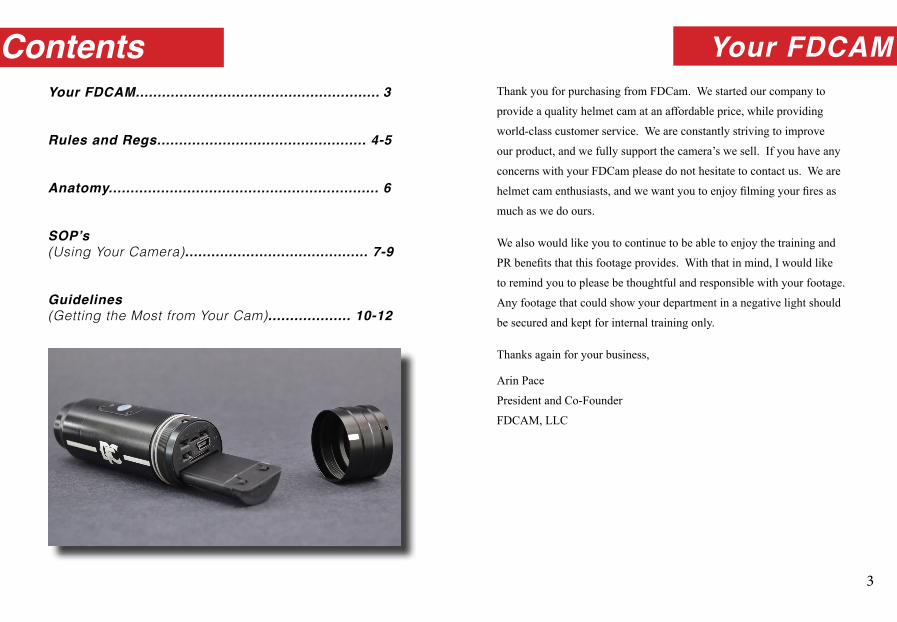
Contents Your FDCAMThank you for purchasing from FDCam. We started our company to
provide a quality helmet cam at an affordable price, while providing
world-class customer service. We are constantly striving to improve
our product, and we fully support the camera’s we sell. If you have any
concerns with your FDCam please do not hesitate to contact us. We are
helmet cam enthusiasts, and we want you to enjoy filming your fires as
much as we do ours.
We also would like you to continue to be able to enjoy the training and
PR benefits that this footage provides. With that in mind, I would like
to remind you to please be thoughtful and responsible with your footage.
Any footage that could show your department in a negative light should
be secured and kept for internal training only.
Thanks again for your business,
Arin Pace
President and Co-Founder
FDCAM, LLC
Your FDCAM........................................................ 3
Rules and Regs................................................ 4-5
Anatomy.............................................................. 6
SOP’s (Using Your Camera).......................................... 7-9
Guidelines (Getting the Most from Your Cam)................... 10-12

4 5
Rules and Regs• Don’t subject your FDCam to sustained high heat environments
like the burn building. The camera can take temps in excess of 900°F, but like anything, it can and will get heat soaked.
• While your FDCam is tough, it is not invincible. Avoid dropping the unit, or otherwise subjecting it to undue shock.
• Do not point the lens at the sun or any extremely bright light as damage to the lens/sensor unit may result.
• Do not submerge your camera without first installing the waterproof tailcap (included). The cap should screw on smoothly, without binding or extruding the o-rings. If it doesn’t, DO NOT submerge it. Contact FDCAM customer support.
• Charge your FDCam weekly and after use. You do not need to let lithium batteries fully discharge before recharging. A normal charge should be good for roughly 90 minutes of filming.
• Do not insert or remove the SD card unless the unit is turned OFF.
• Always properly eject/unmount the device before removing it from the computer.
Rules and Regs• Never disconnect the camera from the computer while
uploading or downloading files as damage to your footage or even the camera may result.
• It is a good practice to download footage you record as soon as possible after taking it. FDCAM, LLC cannot accept responsibility for any data loss you incur.
• Do not attempt to repair the unit yourself. If your FDCam is in need of repair, please contact FDCam Customer Support.
PATIENT PRIVACY
When using your FDCam, strictly follow your department’s policies regarding patient privacy. Penalties for violating patient privacy laws can be severe.
If in doubt, or if your department has no established policy regarding patient privacy, you should follow this rule:
If it involves a person with an injury or medical complaint, DO NOT FILM IT!!!
If, during the course of filming, you encounter a patient, attempt to turn the camera off. If this is not feasible, then upon completion of the incident, turn your SD card over to your departments patient privacy officer or similar individual in charge of patient privacy compliance for your organization.
6 7
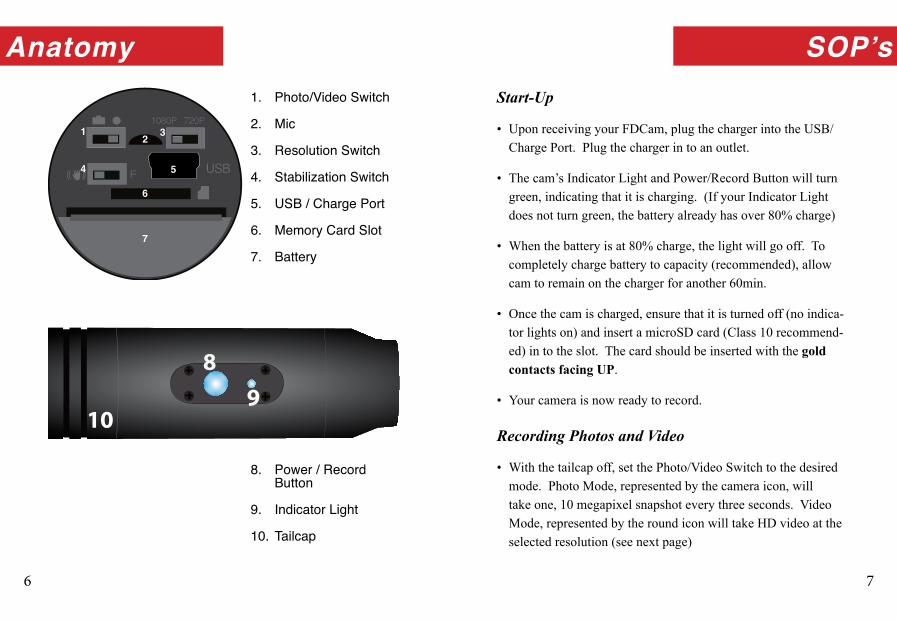
Anatomy SOP’s1. Photo/Video Switch
2. Mic
3. Resolution Switch
4. Stabilization Switch
5. USB / Charge Port
6. Memory Card Slot
7. Battery
8. Power / Record Button
9. Indicator Light
10. Tailcap
89
10
USB
1080P 720P
F
12 3
4 5
6
7
Start-Up
• Upon receiving your FDCam, plug the charger into the USB/Charge Port. Plug the charger in to an outlet.
• The cam’s Indicator Light and Power/Record Button will turn green, indicating that it is charging. (If your Indicator Light does not turn green, the battery already has over 80% charge)
• When the battery is at 80% charge, the light will go off. To completely charge battery to capacity (recommended), allow cam to remain on the charger for another 60min.
• Once the cam is charged, ensure that it is turned off (no indica-tor lights on) and insert a microSD card (Class 10 recommend-ed) in to the slot. The card should be inserted with the gold contacts facing UP.
• Your camera is now ready to record.
Recording Photos and Video
• With the tailcap off, set the Photo/Video Switch to the desired mode. Photo Mode, represented by the camera icon, will take one, 10 megapixel snapshot every three seconds. Video Mode, represented by the round icon will take HD video at the selected resolution (see next page)

8 9
SOP’s SOP’s
• Set the Resolution Switch to the desired frame size. 1080P Mode records at 30fps (frames per second) and 720P Mode records at 60fps and is the recommended setting for firefighting and any other low light activity.
• Ensure that a microSD card has been properly inserted into the Memory Card Slot. Then re-install the desired tailcap. The cap with the round opening in the back is NOT waterproof. But you may use the tape provided to add water resistence.
• Press and hold the Power/Record Button (8) for 3-5 seconds. The unit will vibrate once (long) and the indicator will turn blue. The camera is now on standby and ready to record.
• To begin recording, make one brief press of the Power/Record Button. The Indicator Light and Power/Record Button will begin flashing red and the unit will vibrate once (short). The camera now is recording.
• To stop recording, make one brief press of the Power/Record Button. The Indicator Light and Power/Record button will stop flashing and the unit will vibrate twice (short). The unit is now back in stand-by mode and the file is saved.
• To turn the camera off, press and hold the Power/Record Button while in stand-by mode until you feel it vibrate twice (long) and all indicator lights go out.
Viewing Your Photos/Videos
With microSD Adapter In Computer Card Slot- (preferred)
• Turn off your FDCam (no lights should be on) and remove the tailcap.
• Eject your microSD card by pressing down on it with your fingertip. Insert it into the included SD card adapter.
• Insert the adapter into the SD card slot on your computer.
• The card will mount to the computer as an external disk drive.
• You may view the files directly from the card, or move them to your computer’s desktop or folder of your choice.
Using USB Cord from Camera to Computer -
• Turn off your FDCam and remove the tailcap.
• Connect the camera to your computer via the USB cable using the USB Port on the backplate, then press the Power/Record button. It will turn from green to blue.
• No drivers are necessary for your FDCam. PC’s may try to install some Coach drivers initially, but it is not needed at all. The cam will mount to the computer as an external disk drive
• You may view the files directly from the camera, or move them to your computer’s desktop or folder of your choice.

10 11
The following are some general guidelines to help you make the best use of your FDCam
Charge frequently -
• You would be surprised how often your relief person turns on your camera. To avoid a failure at the worst possible time, charge frequently and check the memory status of your FDCam often. You should ALWAYS test the record function after charging. If the LED indicators do not indicate proper recording, remove any important files from the SD card, turn off the unit, and remove and re-intall the battery. If this does not work, contact FDCAM Customer Support at 904-253-3855 or [email protected].
• Cold weather significantly reduces how long your battery will keep its charge. Charge more frequently in cold weather.
• Practice -
• Make sure you practice turning it on and recording. With your adrenalin pumping, fine motor skills go out the window. You do not want the first time you use the camera to be on the way to a structure fire. You will probably not get the recording sequence right. You need to build the muscle memory for activating the cam. Press-and-hold, then press again. And be sure the red indicator is blinking before you don your helmet.
Get a good light-
• A few good lights mounted to your gear will prevent those boring shots of darkness when the fire is not providing illumination. Not to mention, as a firefighter, you are unprepared for interior attack if you don’t have a properly functioning flashlight on your person. There are many great lighting options available for purchase at fdcam.com. But regardless of where you get a light, get a good one.
Mounting-
• Top of Brim: If you have Bourke-style flip-down eyeshields, you may choose to mount the camera to the top of your brim. This gives easy access to the power/record button. It also precludes you from having to flip the image in your video recording software. On the downside:
• It does not give an eye level POV. It also subjects your camera to more physical, water, and thermal damage since it receives no protection from the brim.
Guidelines Guidelines

12
• With top mounting, the shot is more often obstructed by the helmet or due to debris on the helmet blocking the lens. The outer lens also becomes dirty faster.
• The power/record button is also exposed, leading to more accidental shut-offs.
• Under Brim: There are many advantages to this type of mounting. We find that less shots get ruined due to stuff on the lens and pieces of ceiling falling on the helmet, blocking the view. The power/record button is also pointing down, so falling debris is unlikely to de-activate the camera. Additionally, the mic pics up more of what the wearer says because it is closer to your mouth.
• On the downside, you will have to use video editing software to flip the image back to normal.
We at FDCAM, LLC hope you enjoy your camera. If you have any questions not covered here, please call us or e-mail us at:
You may also post your question in our Forum section on fdcam.com.
Copyright 2012 ©
Guidelines