Handi-Guide - FMCNA · This Liberty Select Handi-Guide is designed to answer many of the questions...
36
1 A Patient’s Reference to the Most Commonly Asked Questions About the Liberty ® Select Cycler This information is not intended to replace the advice or training from your physician or PD nurse. Please refer to the Instructions For Use (IFU) for detailed information on device description, instructions, contraindications, warnings and precautions. Handi-Guide
Transcript of Handi-Guide - FMCNA · This Liberty Select Handi-Guide is designed to answer many of the questions...
1
A Patient’s Reference to the Most Commonly Asked Questions About the Liberty® Select Cycler
This information is not intended to replace the advice or training from your physician or PD nurse. Please refer to the Instructions For Use (IFU) for detailed information on device description, instructions, contraindications, warnings and precautions.
Handi-Guide
480147 Liberty Select Handi-Guide Rev A.indd 1 9/11/2019 3:44:31 PM
Table of Contents
1
Introduction to Liberty Select Cycler 1
Treatment Based and Cycle Based Therapies 2
Inserting the Liberty Cassette 3
Cycler Set-Up Procedure 8
Operation Questions 11
Alarms 15
Warning Messages 16
Different People Drain Differently 17
Drain Complications 18
Flow Alert 19
Drain Options 20
Overfill 21
Power Failure 22
Bypassing 24
Disconnecting 25
Cleaning 26
Liberty Select Cycler Options 27
Liberty Select Cycler Therapy Settings 30
Index 33
480147 Liberty Select Handi-Guide Rev A.indd 1 9/11/2019 3:44:31 PM
Introduction to Liberty Select Cycler
1
This Liberty Select Handi-Guide is designed to answer many of the questions that you may have when you start using your Liberty Select cycler at home.
This Handi-Guide is not intended to replace the advice or training from your doctor, practitioner, or peritoneal dialysis (PD) nurse. Please refer to the Liberty Select User’s Guide for detailed information on device description, instructions, contraindications, warnings and precautions. With this and all other peritoneal dialysis procedures, always use aseptic technique. This information is provided for QUICK REFERENCE only. Please follow the directions as they appear on the Liberty Select cycler screens.
Another important and helpful reference is the Liberty Select Initiating Treatment Procedure Card. If we haven’t addressed your concerns or if you have any other questions, you can always call your doctor, practitioner, or PD nurse at your dialysis unit or a Fresenius Medical Care Technical Support Representative at 800-227-2572.
This document is for software version 2.9.0 (Liberty Select cycler).
480147 Liberty Select Handi-Guide Rev A.indd 1 9/11/2019 3:44:31 PM
Treatment Based and Cycle Based Therapies
2
The Liberty Select cycler may be programmed to deliver either Treatment Based therapy or Cycle Based therapy.
TREATMENT BASED THERAPY means that your total treatment time will be programmed into your cycler. Your cycler will deliver your treatment in the specified amount of time. This method is useful for people who need to finish treatment by a certain time in the morning in order to meet other obligations, such as going to work.
CYCLE BASED THERAPY means the prescribed dwell time will elapse before solution is automatically drained. This ensures that the time prescribed to filter waste and remove excess fluid is not shortened.
NOTE: Depending on your treatment results, your doctor, practitioner, or peritoneal dialysis (PD) nurse may switch you from Treatment Based to Cycle Based or the reverse. Patients may experience fewer drain complication alarms using Treatment Based than Cycle Based therapy. If you are in Cycle Based therapy and experiencing drain complications, you may want to discuss switching therapy types with your doctor, practitioner, or peritoneal dialysis (PD) nurse.
480147 Liberty Select Handi-Guide Rev A.indd 2 9/11/2019 3:44:31 PM
3
Inserting the Liberty Cassette
3
How do I insert the Liberty cassette?1. Make sure that the Liberty Select cycler is positioned near the front of the table or cart so that all
lines can hang freely from the cassette.
2. Check the package label on the Liberty cycler set to ensure it is not past its expiration date, and then remove the cycler set from its packaging. Inspect the cycler set to make sure it is free from kinks or damage. Look for scratches, loose tubing, or small holes in the cassette film.
CAUTION: Use caution when touching the cassette film to prevent damage.
WARNING: A damaged cassette can cause PD solution to leak into the cycler and is a potential risk for contamination. Notify your PD nurse if you find a fluid leak.
WARNING: DO NOT USE the set if it is damaged. Put the damaged set aside and immediately call Customer Service at 800-323-5188 to arrange a pick-up to return the damaged set.
CAUTION: DO NOT insert the cassette until the cycler prompts you with the on-screen instructions. If you attempt to insert it at any other time, the cassette will not snap properly into place and the door will not close.
480147 Liberty Select Handi-Guide Rev A.indd 3 9/11/2019 3:44:33 PM
4
Inserting the Liberty Cassette
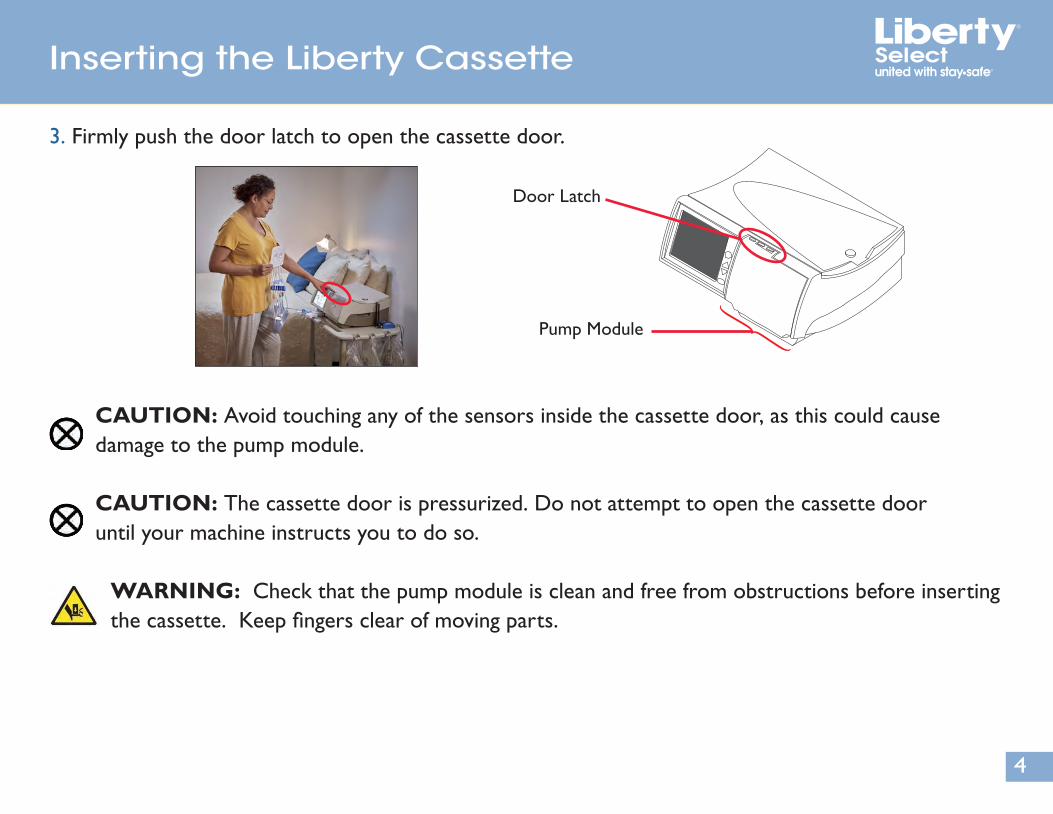
3. Firmly push the door latch to open the cassette door.
CAUTION: Avoid touching any of the sensors inside the cassette door, as this could cause damage to the pump module.
CAUTION: The cassette door is pressurized. Do not attempt to open the cassette door until your machine instructs you to do so.
WARNING: Check that the pump module is clean and free from obstructions before inserting the cassette. Keep fingers clear of moving parts.
Door Latch
Pump Module
480147 Liberty Select Handi-Guide Rev A.indd 4 9/11/2019 3:44:35 PM
Inserting the Liberty Cassette
5
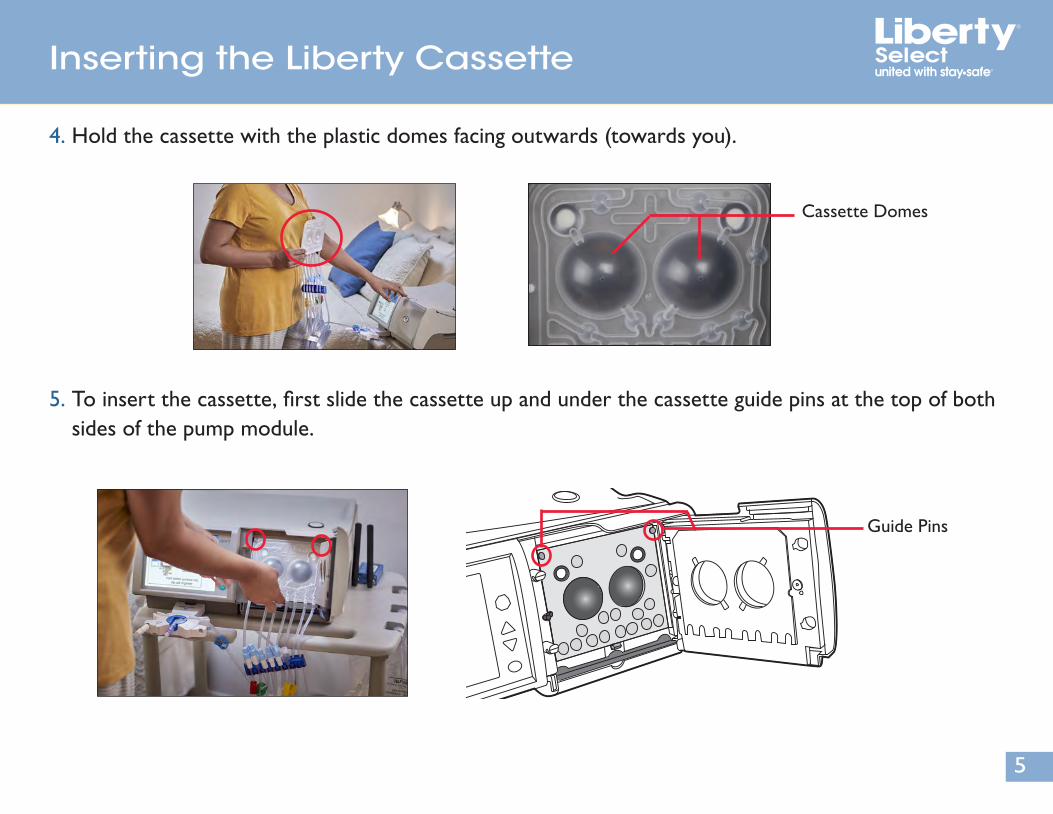
4. Hold the cassette with the plastic domes facing outwards (towards you).
5. To insert the cassette, first slide the cassette up and under the cassette guide pins at the top of both sides of the pump module.
Cassette Domes
Guide Pins
480147 Liberty Select Handi-Guide Rev A.indd 5 9/11/2019 3:44:40 PM
Inserting the Liberty Cassette
6
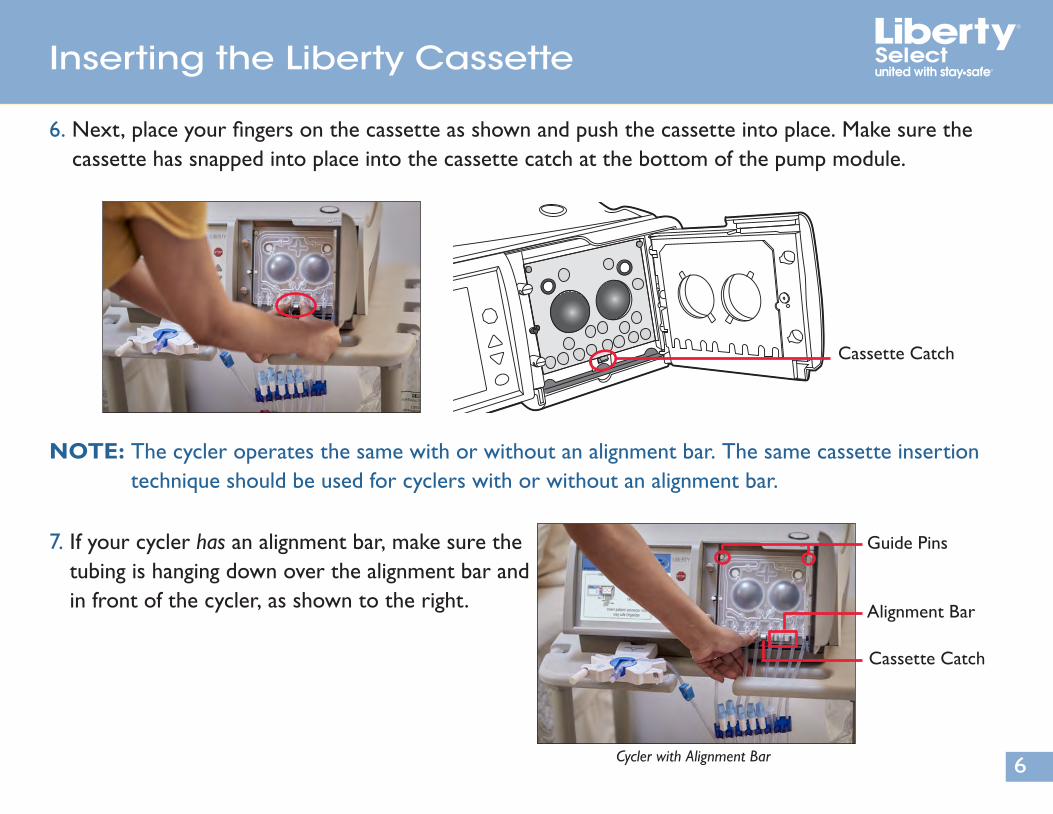
6. Next, place your fingers on the cassette as shown and push the cassette into place. Make sure the cassette has snapped into place into the cassette catch at the bottom of the pump module.
NOTE: The cycler operates the same with or without an alignment bar. The same cassette insertion technique should be used for cyclers with or without an alignment bar.
7. If your cycler has an alignment bar, make sure the tubing is hanging down over the alignment bar and in front of the cycler, as shown to the right.
Guide Pins
Cassette Catch
Alignment Bar
Cycler with Alignment Bar
Cassette Catch
480147 Liberty Select Handi-Guide Rev A.indd 6 9/11/2019 3:44:43 PM
Inserting the Liberty Cassette
7
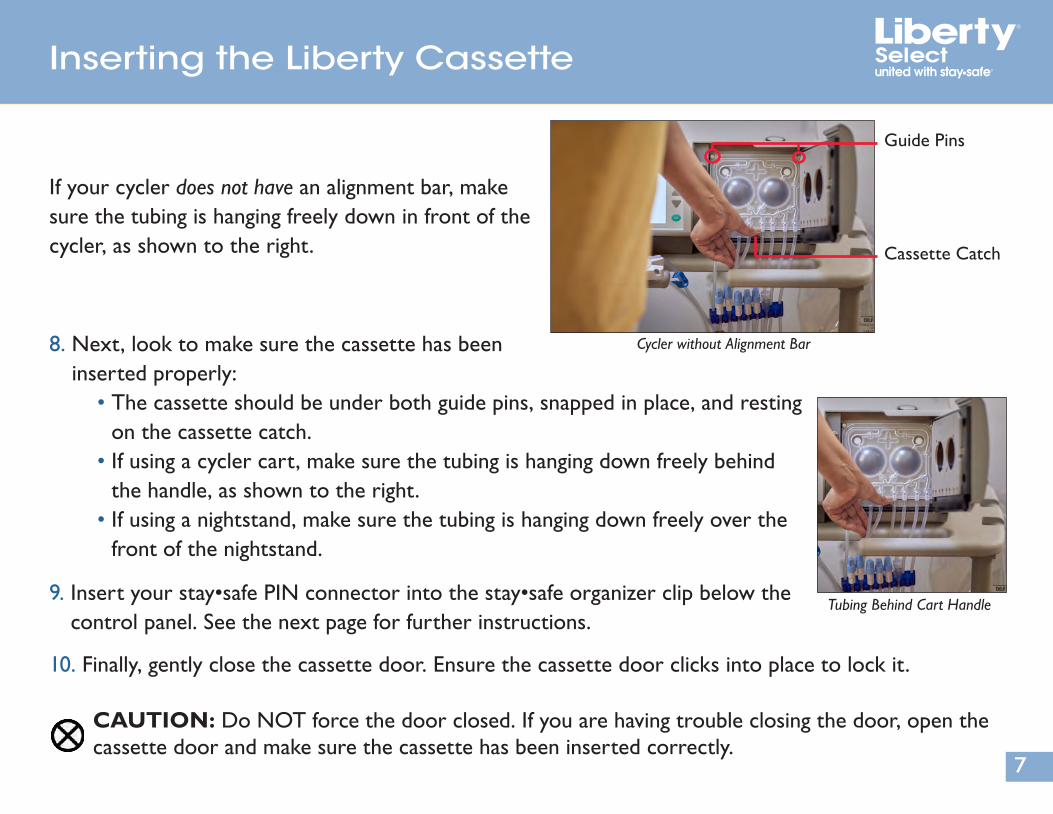
If your cycler does not have an alignment bar, make sure the tubing is hanging freely down in front of the cycler, as shown to the right.
8. Next, look to make sure the cassette has been inserted properly: • The cassette should be under both guide pins, snapped in place, and resting
on the cassette catch. • If using a cycler cart, make sure the tubing is hanging down freely behind
the handle, as shown to the right. • If using a nightstand, make sure the tubing is hanging down freely over the
front of the nightstand.
9. Insert your stay•safe PIN connector into the stay•safe organizer clip below the control panel. See the next page for further instructions.
10. Finally, gently close the cassette door. Ensure the cassette door clicks into place to lock it.
CAUTION: Do NOT force the door closed. If you are having trouble closing the door, open the cassette door and make sure the cassette has been inserted correctly.
Guide Pins
Cassette Catch
Cycler without Alignment Bar
Tubing Behind Cart Handle
480147 Liberty Select Handi-Guide Rev A.indd 7 9/11/2019 3:44:47 PM
Cycler Set-Up Procedure
8
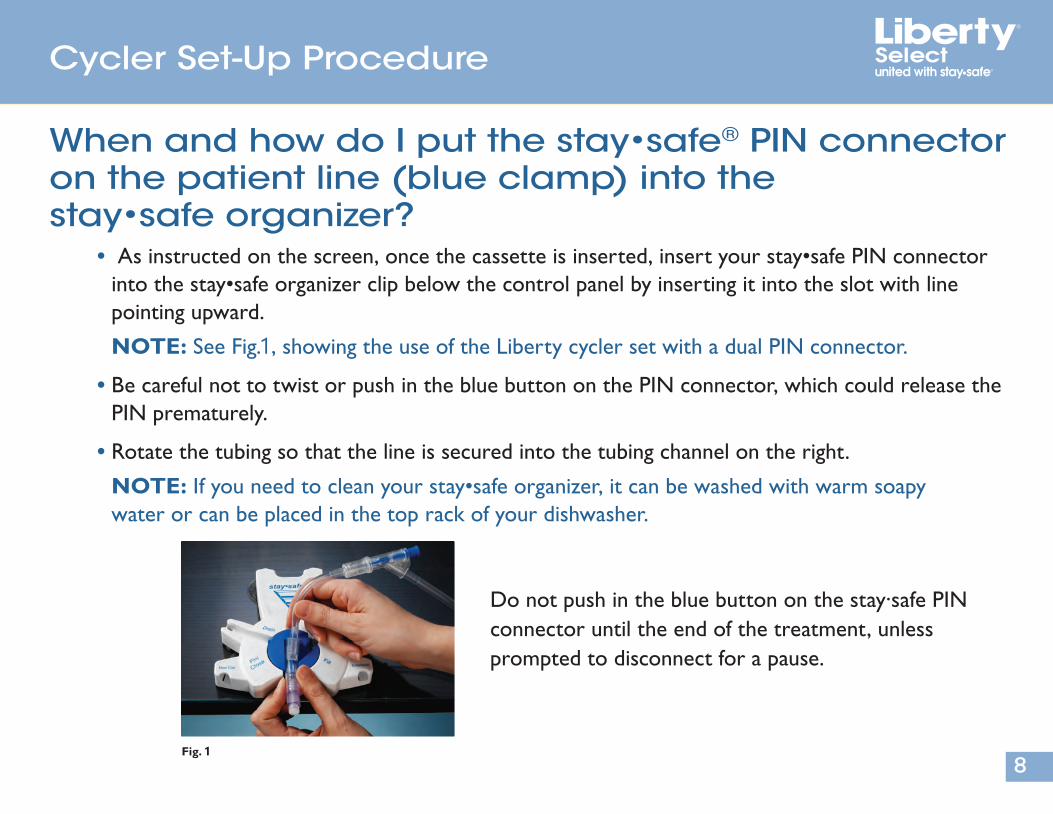
When and how do I put the stay•safe® PIN connector on the patient line (blue clamp) into the stay•safe organizer? • As instructed on the screen, once the cassette is inserted, insert your stay•safe PIN connector
into the stay•safe organizer clip below the control panel by inserting it into the slot with line pointing upward. NOTE: See Fig.1, showing the use of the Liberty cycler set with a dual PIN connector.
• Be careful not to twist or push in the blue button on the PIN connector, which could release the PIN prematurely.
• Rotate the tubing so that the line is secured into the tubing channel on the right. NOTE: If you need to clean your stay•safe organizer, it can be washed with warm soapy water or can be placed in the top rack of your dishwasher.
Fig. 1
Do not push in the blue button on the stay·safe PIN connector until the end of the treatment, unless prompted to disconnect for a pause.
480147 Liberty Select Handi-Guide Rev A.indd 8 9/11/2019 3:44:48 PM

Cycler Set-Up Procedure
9
How do I connect my solution bags to the cycler?To decrease the chance of contamination, solution bags should be on a flat surface with the ports facing you while connecting. Make sure that the heater bag is the only bag on the heater tray before going to the next step. The bag you use for your heater bag must be at least 1000 mL larger than your first fill volume and at least as much as your maximum fill volume.
NOTE: Make sure to choose the correct volume for your heater bag. Not enough volume for the programmed treatment may cause alarms and prevent you from completing a treatment.
NOTE: Place the solution bag with the largest volume on the heater tray.
Connect the heater bag to the line with a RED clamp, additional solution bags to lines with a WHITE clamp, and the last bag to the last bag option line with a GREEN clamp, if required.
The heater bag with the red line clamp must be positioned properly on the heater tray and covering the silver bag sensor.
• Obtain the package insert that is included in each case of solution bags and follow the specific instructions under “Directions for Use” to initiate solution flow.
• Make sure the cone is broken completely. A white retaining guide should be visible.
• You may use the Handi-Tool to assist you in breaking the cones.
480147 Liberty Select Handi-Guide Rev A.indd 9 9/11/2019 3:44:48 PM
Cycler Set-Up Procedure
10
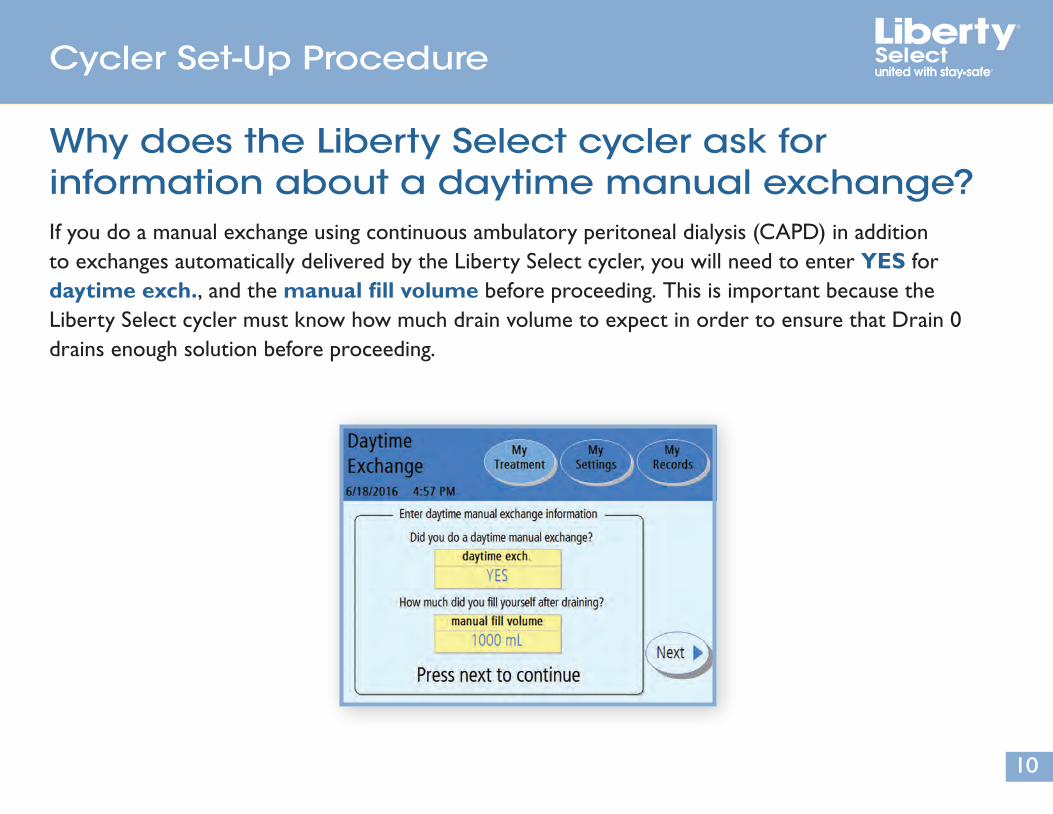
Why does the Liberty Select cycler ask for information about a daytime manual exchange?If you do a manual exchange using continuous ambulatory peritoneal dialysis (CAPD) in addition to exchanges automatically delivered by the Liberty Select cycler, you will need to enter YES for daytime exch., and the manual fill volume before proceeding. This is important because the Liberty Select cycler must know how much drain volume to expect in order to ensure that Drain 0 drains enough solution before proceeding.
480147 Liberty Select Handi-Guide Rev A.indd 10 9/11/2019 3:44:49 PM

Operation Questions
11
What if the dwell time is shorter than expected?In Treatment Based mode, your cycler will adjust the dwell time based on the total time programmed, the number of cycles, as well as the time it takes for each drain and fill. If a drain or fill cycle takes longer than estimated by your cycler, the dwell time will be shortened to make sure you end treatment on time.
In Cycle Based mode, your dwell time will not be shortened.
480147 Liberty Select Handi-Guide Rev A.indd 11 9/11/2019 3:44:50 PM
Operation Questions
12
What if the alarm volume is too soft or too loud?When you receive your Liberty Select cycler, the alarm volume is preset to five (5), with one (1) being the softest volume, and 20 being the loudest.
Set the alarm loudness number while in a quiet room, similar to when you are sleeping. If you sleep without your hearing aids, be sure to remove them before setting the loudness number.
To change the alarm loudness:
• Touch the My Settings button and select the Hardware tab.
• Touch the yellow alarm loudness box. It will turn orange.
• Use the Up/Down arrow keys to change the setting.
• Press OK. The box will now turn yellow, indicating that you have set the alarm loudness.
480147 Liberty Select Handi-Guide Rev A.indd 12 9/11/2019 3:44:50 PM

Operation Questions
13
How do I use the IQdrive for the first time or with a new prescription?Put the rectangular metal end of the IQdrive into the IQdrive slot/USB port in the upper left back panel of the Liberty Select cycler. Turn the Liberty Select cycler on. The drive is designed to fit one way. Be sure it fits snugly.
NOTE: Once you have inserted the IQdrive properly, the screen should display a message asking if you want to program the cycler with the new IQdrive settings. If this message is NOT displayed, call your PD nurse. You may be asked to access the My Settings/Options tab and set USB enabled option to YES.
This is an example of an IQdrive (USB). IQdrive models may change.
480147 Liberty Select Handi-Guide Rev A.indd 13 9/11/2019 3:44:54 PM
Operation Questions
14
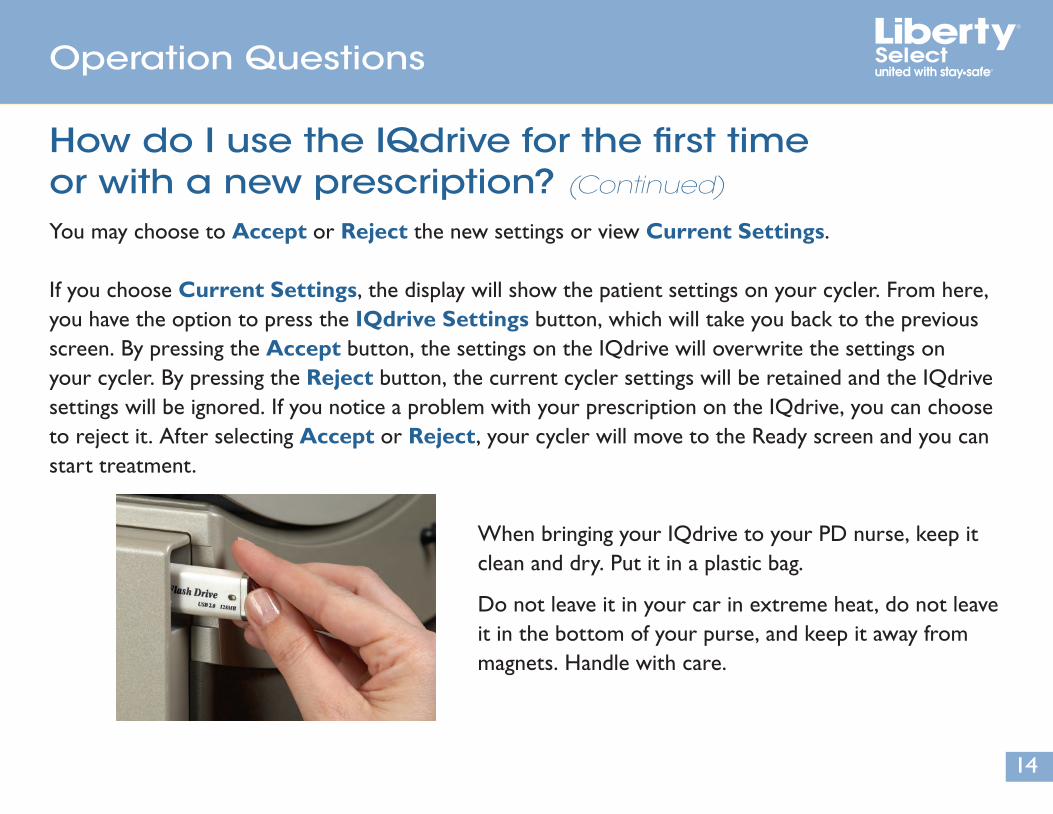
How do I use the IQdrive for the first time or with a new prescription? (Continued)You may choose to Accept or Reject the new settings or view Current Settings.
If you choose Current Settings, the display will show the patient settings on your cycler. From here, you have the option to press the IQdrive Settings button, which will take you back to the previous screen. By pressing the Accept button, the settings on the IQdrive will overwrite the settings on your cycler. By pressing the Reject button, the current cycler settings will be retained and the IQdrive settings will be ignored. If you notice a problem with your prescription on the IQdrive, you can choose to reject it. After selecting Accept or Reject, your cycler will move to the Ready screen and you can start treatment.
When bringing your IQdrive to your PD nurse, keep it clean and dry. Put it in a plastic bag.
Do not leave it in your car in extreme heat, do not leave it in the bottom of your purse, and keep it away from magnets. Handle with care.
480147 Liberty Select Handi-Guide Rev A.indd 14 9/11/2019 3:44:59 PM
Alarms
15
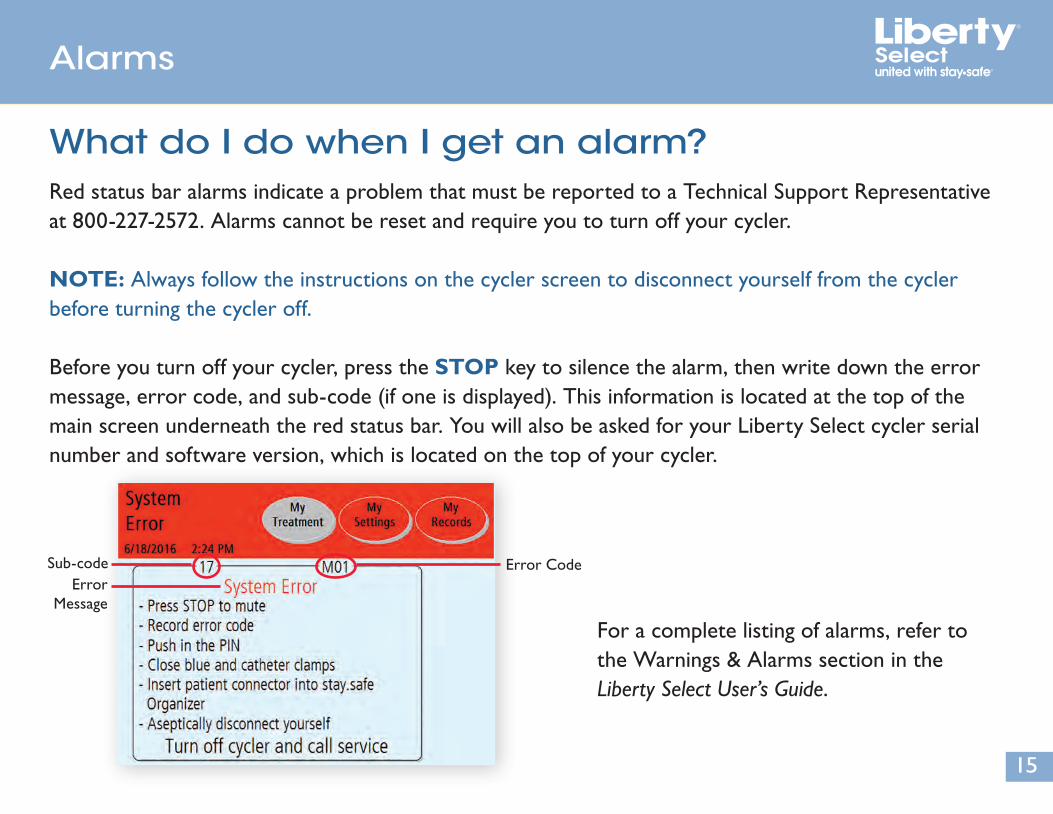
What do I do when I get an alarm?Red status bar alarms indicate a problem that must be reported to a Technical Support Representative at 800-227-2572. Alarms cannot be reset and require you to turn off your cycler.
NOTE: Always follow the instructions on the cycler screen to disconnect yourself from the cycler before turning the cycler off.
Before you turn off your cycler, press the STOP key to silence the alarm, then write down the error message, error code, and sub-code (if one is displayed). This information is located at the top of the main screen underneath the red status bar. You will also be asked for your Liberty Select cycler serial number and software version, which is located on the top of your cycler.
For a complete listing of alarms, refer to the Warnings & Alarms section in the Liberty Select User’s Guide.
Error Message
Sub-code Error Code
480147 Liberty Select Handi-Guide Rev A.indd 15 9/11/2019 3:45:00 PM
Warning Messages
16
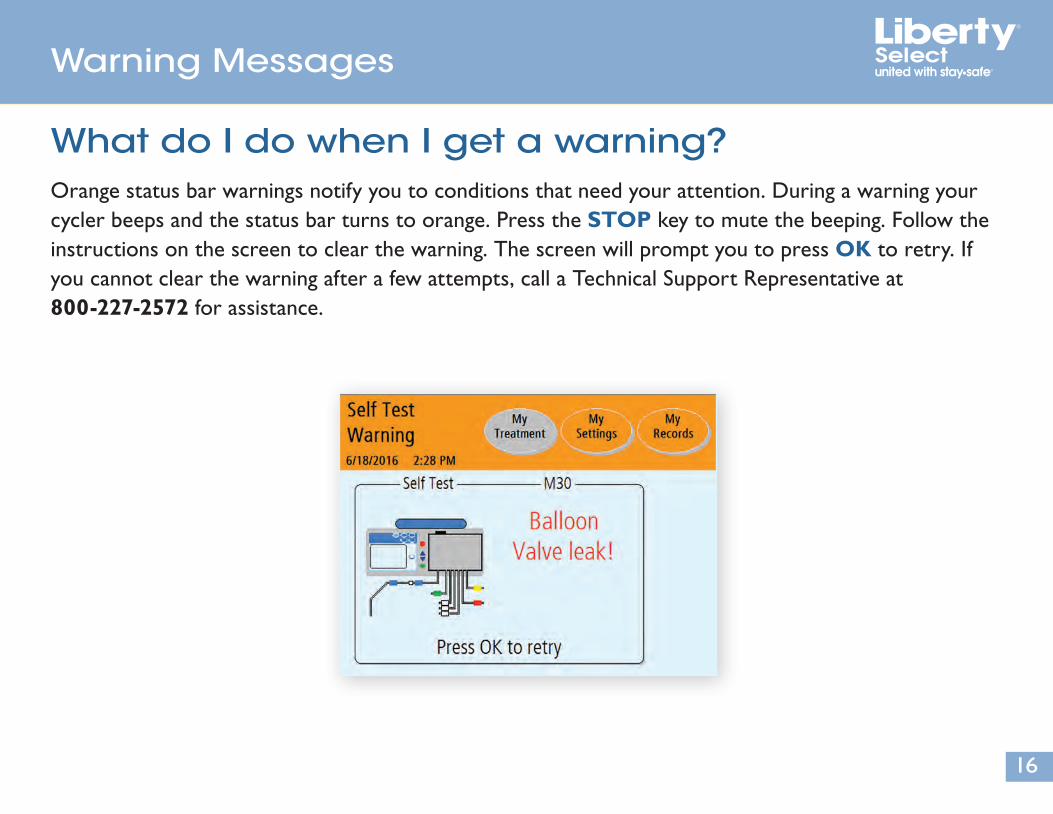
What do I do when I get a warning?Orange status bar warnings notify you to conditions that need your attention. During a warning your cycler beeps and the status bar turns to orange. Press the STOP key to mute the beeping. Follow the instructions on the screen to clear the warning. The screen will prompt you to press OK to retry. If you cannot clear the warning after a few attempts, call a Technical Support Representative at 800-227-2572 for assistance.
480147 Liberty Select Handi-Guide Rev A.indd 16 9/11/2019 3:45:03 PM
Different People Drain Differently
17
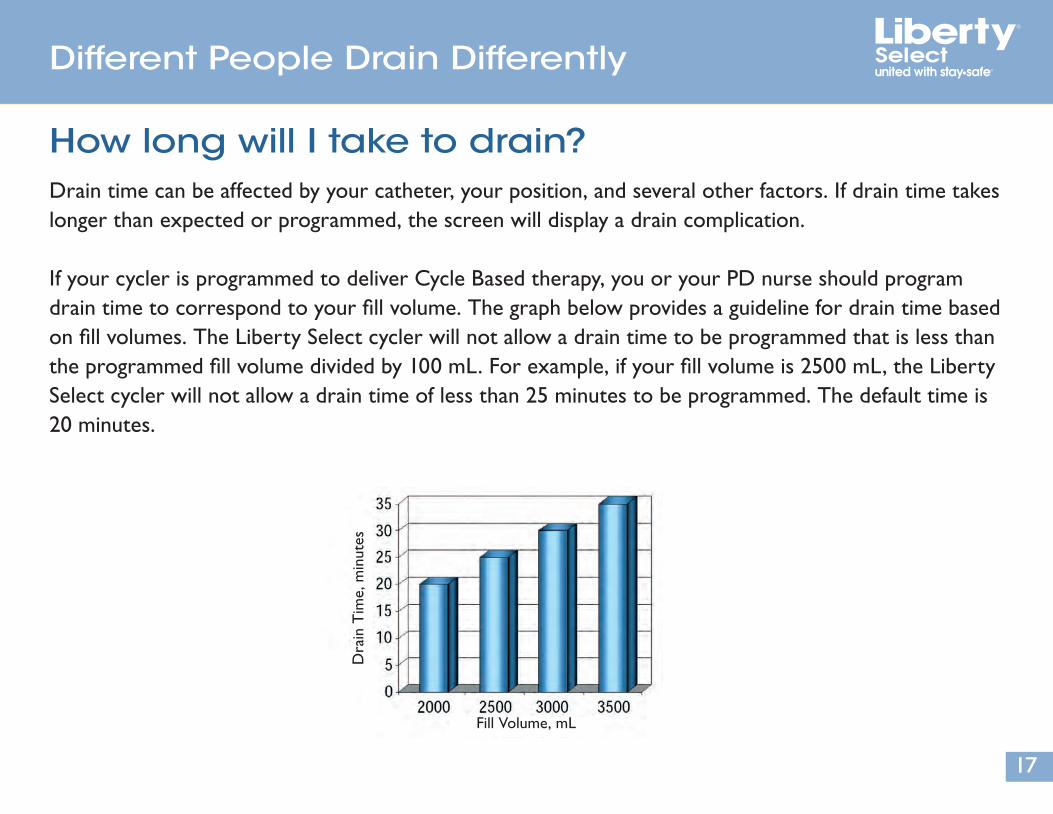
How long will I take to drain?Drain time can be affected by your catheter, your position, and several other factors. If drain time takes longer than expected or programmed, the screen will display a drain complication.
If your cycler is programmed to deliver Cycle Based therapy, you or your PD nurse should program drain time to correspond to your fill volume. The graph below provides a guideline for drain time based on fill volumes. The Liberty Select cycler will not allow a drain time to be programmed that is less than the programmed fill volume divided by 100 mL. For example, if your fill volume is 2500 mL, the Liberty Select cycler will not allow a drain time of less than 25 minutes to be programmed. The default time is 20 minutes.
Dra
in T
ime,
min
utes
Fill Volume, mL
480147 Liberty Select Handi-Guide Rev A.indd 17 9/11/2019 3:45:05 PM
Drain Complications
18
What should I do if I have a drain complication?If the Liberty Select cycler displays a drain complication warning, try the following:
• Check that your catheter is not kinked and the clamp is open.
• Check for fibrin or clots in the drain line. If so, contact your PD nurse for instructions.
• Change positions to move fluid within your abdomen.
• Be sure you have not rolled on the patient line.
• Are you constipated? If so, contact your PD nurse for instructions.
• Check that your catheter/extension set is adequately secured.
• If you are unable to clear the drain complication, contact your PD nurse for instructions.
• A completely or partially pushed in PIN can result in a drain complication alarm.
• Be sure the position of your cycler is no more than 12 inches above or below the surface of your bed.
• If your sleep is interrupted due to drain complications, speak to your doctor, practitioner, or peritoneal dialysis (PD) nurse about trying Treatment Based therapies.
480147 Liberty Select Handi-Guide Rev A.indd 18 9/11/2019 3:45:05 PM
Flow Alert
How am I notified if I am draining or filling slowly?The flow alert is a series of self-resetting notification alerts in the form of four soft beeps and an on-screen notification message. It allows you to correct drain or fill issues caused by a kink in the line, or by your body position, without having to interact with the cycler. Once the flow restarts, the alert will stop.
NOTE: The flow alert’s volume is not adjustable but depends on the “Alarm Loudness” setting. These sounds are a series of gentle beeps with the first alert at 25% of the programmed alarm loudness, the next at 50%, and the last at 75%.
• If both flow alert and flow alert sound are set to YES (default setting): • The flow alert “Notice: Draining slowly” or “Notice: Filling slowly” displays on the cycler screen • The flow alert sound plays once a minute for a total of three times or until the flow resumes • If flow does not resume after the third alert, an alarm will occur
• If flow alert is set to YES and flow alert sound is set to NO: • The flow alert “Notice: Draining slowly” or “Notice: Filling slowly” displays on the cycler screen • The flow alert sound does NOT occur • If flow does not resume after the third alert, an alarm will occur
• If both flow alert and flow alert sound are set to NO: • The flow alert message will NOT display • The flow alert sound does NOT occur • The cycler displays an alarm when you are draining or filling slowly
The alarm that displays depends on whether you are draining or filling. If you continue to drain slowly, a ‘drain complication’ alarm will display. If you continue to fill slowly, a ‘patient line blocked’ alarm will display. 19
480147 Liberty Select Handi-Guide Rev A.indd 19 9/11/2019 3:45:05 PM
Drain Options
20
What if I need an additional drain at the end of treatment?The Liberty Select cycler can perform an additional drain at the end of your treatment if your doctor or PD nurse advises it. After your last drain, if add. drain option is set to YES, the cycler will ask you if you want to do an additional drain.
To set this option to YES, touch the My Settings button at the top of any treatment screen and then touch the blue options button just below it. Next, touch the yellow add. drain button to highlight it. It will turn orange when it is activated. Finally, use the Up and Down arrow keys to change NO (the default setting) to YES and press the OK key to confirm.
If the add. drain alert option is set to YES, your cycler will alert you with an alarm sound to choose whether or not to do an additional drain. Follow the same process to set this option to YES as you did with the add. drain option. If you leave this option set to NO, the cycler screen will still prompt you to decide whether you want an additional drain, but without an alarm sound.
STAT drain at the end of treatment: Even if you have not programmed an additional drain, you can still do a STAT drain at the end of treatment. Consult your PD nurse if you are feeling full. A STAT Drain button is available on the Treatment Complete screen (step 8). If you choose this option, the cycler will perform a STAT drain and then return you to the Treatment Complete screen.
480147 Liberty Select Handi-Guide Rev A.indd 20 9/11/2019 3:45:05 PM
Overfill
21
What is overfill and how do I prevent it?Increased Intraperitoneal Volume (IIPV), commonly known as overfill, is when you have too much fluid in your abdomen. IIPV/overfill may result in serious injury or death from conditions such as: abdominal wall and/or diaphragmatic hernias, hydrothorax, heart problems including chest pain and heart failure, high blood pressure, pulmonary edema, decreased pulmonary function and pericardial effusion.
Patients and caregivers should watch for the potential signs of IIPV. These include:
• Difficulty breathing • Vomiting or spitting up • Feeling full, bloated, or overfilled after treatment • Abdominal pain or discomfort • Expanded or tense abdomen • Chest pain • Increased blood pressure • Change in mental status • Leakage of fluid from the PD catheter exit site
If you experience any of these symptoms, you may perform an immediate STAT drain anytime during fill, pause or dwell, or even at the end of treatment, if you feel uncomfortable or suspect an overfill situation. To perform a STAT drain:
• Press the STOP key. • Press STAT drain button on right side of screen. The next screen displays “Are you sure you
want to do a STAT drain?” • Confirm that you want to initiate an immediate drain by pressing STAT drain. • Always let your doctor, practitioner, or peritoneal dialysis (PD) nurse know that you performed
a STAT drain during your treatment.
480147 Liberty Select Handi-Guide Rev A.indd 21 9/11/2019 3:45:05 PM
Power Failure
22
What happens when there is a power failure? • All lines will automatically close.
• The pump will stop.
• The touchscreen will go blank.
If the power failure occurs after you have started your treatment, the treatment settings will be stored and your treatment will restart where you left off if the power comes back on within eight (8) hours. An “F” will show up in your records indicating a power failure occurred during that treatment.
NOTE: Your Liberty Select cycler must be plugged into a 120V three-prong power outlet.
WARNING! If you are unable to insert the plug into an outlet, contact a Technical Support Representative at 800-227-2572. Do not alter the power cord. Your machine must be plugged directly into the electrical outlet; do not use extension cords or power strips (surge protectors).
480147 Liberty Select Handi-Guide Rev A.indd 22 9/11/2019 3:45:06 PM
Power Failure
23
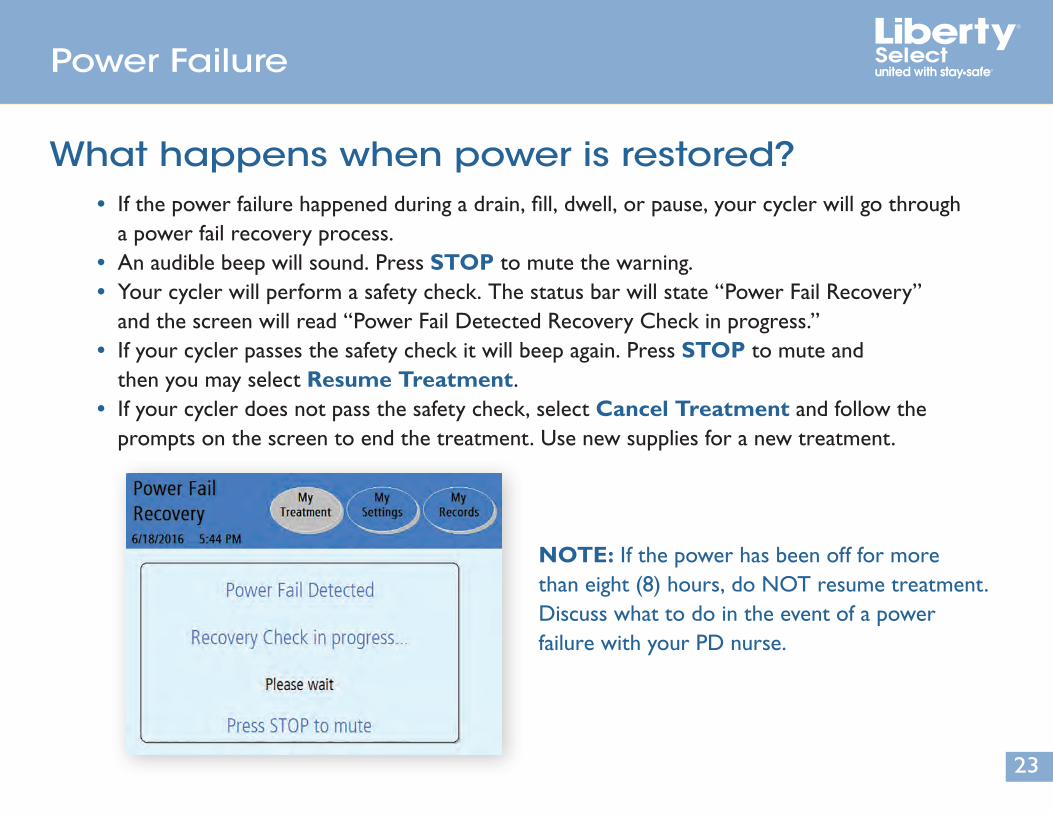
What happens when power is restored? • If the power failure happened during a drain, fill, dwell, or pause, your cycler will go through
a power fail recovery process. • An audible beep will sound. Press STOP to mute the warning. • Your cycler will perform a safety check. The status bar will state “Power Fail Recovery”
and the screen will read “Power Fail Detected Recovery Check in progress.” • If your cycler passes the safety check it will beep again. Press STOP to mute and
then you may select Resume Treatment. • If your cycler does not pass the safety check, select Cancel Treatment and follow the
prompts on the screen to end the treatment. Use new supplies for a new treatment.
NOTE: If the power has been off for more than eight (8) hours, do NOT resume treatment. Discuss what to do in the event of a power failure with your PD nurse.
480147 Liberty Select Handi-Guide Rev A.indd 23 9/11/2019 3:45:07 PM
Bypassing
24
Why can’t I bypass during my treatment? If you attempt to bypass when it is unsafe, your screen will display a message reading “bypass not allowed”. Bypass is not allowed during:
• Drain: if you have not drained enough that overfill can occur after the next fill
• Dwell: if the heater bag has not been refilled with enough solution for next fill
• Pause: if the heater bag has not been refilled with enough solution for next fill
WARNING! You must discuss the risks associated with bypassing, or skipping, any phase of treatment with your doctor, practitioner, or peritoneal dialysis (PD) nurse. Bypassing may decrease the amount of treatment you receive. You should not bypass Drain 0 unless you have a dry day.
NOTE: Fill can be bypassed anytime.
480147 Liberty Select Handi-Guide Rev A.indd 24 9/11/2019 3:45:07 PM
Disconnecting
25
How do I disconnect from my Liberty Select cycler? 1. Mask, then wash or sanitize hands as instructed by your PD nurse.
2. Insert the stay•safe PIN connector connected to your catheter extension set into the stay•safe organizer clip below the control panel.
3. Insert a new stay•safe cap on the left side of the organizer.
4. Turn the blue button on the stay•safe PIN connector 1/4 turn and then push it in to to make sure that the PIN has been inserted into the PIN connector.
5. Close patient line (blue clamp).
6. Close catheter extension set (white clamp).
7. Use aseptic technique to carefully disconnect your catheter extension set from your patient line and cap off with a new sterile stay•safe cap.
8. Check that the new sterile stay•safe cap is securely attached to your catheter extension set before removing it from the stay•safe organizer.
480147 Liberty Select Handi-Guide Rev A.indd 25 9/11/2019 3:45:07 PM
Cleaning
26
How do I clean my Liberty Select cycler?Keep your Liberty Select cycler clean and dry at all times. Clean the exterior surface of your machine as needed using a damp cloth and a diluted (1:100) bleach solution. After wiping your machine with the damp bleach cloth, re-wipe with a water-dampened cloth.
CAUTION: Do not allow any fluid to drip into your cycler or onto the pump module. Your cycler must be OFF when you are cleaning it to prevent fluid from entering the pump module. If any fluid gets inside your cycler, you must contact a Technical Support Representative immediately at 800-227-2572. Clean fluid spills immediately to prevent moisture from possibly damaging your machine. Your machine should be placed on a water-tolerant surface, and spills should be cleaned up immediately.
CAUTION: Do not touch the white pressure sensors in the pump module. Pressing on the pressure sensors may damage them.
CAUTION: Do not use foaming type cleansers or disinfectants. Do not use spray bottles. Periodically check your Liberty Select cycler for:
• Damage to the cabinet • Loose or missing pieces
There is no other preventive maintenance for your cycler. Any service must be performed by a Fresenius Medical Care service technician. If your cycler needs service, call a Technical Support Representative at 800-227-2572.
480147 Liberty Select Handi-Guide Rev A.indd 26 9/11/2019 3:45:08 PM
Liberty Select Cycler Options
27
What are my optional settings on the Liberty Select cycler?The following settings are programmed under the Options tab on the My Settings screen.
• add diurnal UF – Your PD nurse will tell you whether or not to select YES for this option. YES includes the ultrafiltration (UF) from drain 0 to be part of the net UF.
• last bag option – If this option is selected, your cycler will fill you exclusively from the Last Bag option (green clamp) for your last fill. During the last dwell, your cycler will empty the heater bag, fill it from the last bag, warm the fluid and deliver this specific solution for your last fill. If you need more than 24,000 mL total fill volume and do not require a Last Bag option, this last bag line (green clamp) may be used for additional solution.
• drain exit % – This option allows you to set 70% or 85% as the minimum volume requirement for completing a drain. This option defaults to 70%. Follow your prescription and your PD nurse’s instructions.
• language – Choose from English, Spanish or French.
• SI units – You choose YES or NO
If you choose YES: If you choose NO: Weight - Kg Weight - lb Blood Glucose - mmol/L Blood Glucose - mg/dL Temperature - °C Temperature - °F
480147 Liberty Select Handi-Guide Rev A.indd 27 9/11/2019 3:45:08 PM
Liberty Select Cycler Options
28
What are my optional settings on the Liberty Select cycler? (continued) • personal data – If you choose YES your cycler will display–Your personal health data–at the end of
the treatment. Be sure to include your dextrose concentrations.
• USB enabled – If you select YES for this option, your cycler will automatically look for the IQdrive when your cycler is turned on. If the IQdrive is not inserted into your cycler, it will display a message letting you know it is not in place. You can then insert it and your cycler will detect that the IQdrive is active. Your treatment information will be saved on the IQdrive.
• add. drain (additional drain) – If you select YES for this option, you can perform an additional (planned) drain after completing the last drain.
• add. drain alert (additional drain alert) – If you select YES for this option, your cycler will alert you with an alarm sound to choose whether or not to do an additional drain.
• flow alert – If you select YES for this option, your cycler will display an on-screen notification message once a minute for three times alerting you that you are draining or filling slowly. This alert clears automatically when the flow restarts. If you continue to drain or fill slowly after the three alerts, an audible alarm displays.
• flow alert sound – If you select YES for this option, a series of four soft beeps will play once a minute for three times alerting you that you are draining or filling slowly. The volume increases a little bit each time it plays. This alert clears automatically when the flow restarts. If you continue to drain or fill slowly after the three alerts, an audible alarm displays. You MUST have flow alert set to YES to use this option.
480147 Liberty Select Handi-Guide Rev A.indd 28 9/11/2019 3:45:08 PM
Liberty Select Cycler Options
29
What are my optional hardware settings on the Liberty Select cycler?All of the following settings under the Hardware tab of the My Settings page should be entered before you start your first treatment.
• Alarm loudness – Can be set between 1 (soft) and 20 (loud)
• Key loudness – Can be set between 0 (off) and 20 (loud)
• Date format – Can be set as either MM/DD/YYYY or DD/MM/YYYY
• Date – Your cycler arrives with the date already set.
• Time format – Can be set as either 12-hour (AM/PM) or 24-hour time
• Time – Your cycler arrives with the date set for the Pacific Standard time zone. Reset the time to your specific time zone by following the directions in your Liberty Select User’s Guide or on page 31 of this Handi-Guide.
• Screen blanking – This option, when set to YES, causes the touchscreen to go dark after 10 minutes of inactivity. It stays dark until you touch the screen or a key. If there is an alarm, simply touch the screen to bring up the picture. If this option is set to NO, the screen remains lit at the brightness level you selected.
• Screen brightness – Can be set between 1 (very dim) and 10 (brightest)
480147 Liberty Select Handi-Guide Rev A.indd 29 9/11/2019 3:45:08 PM
Liberty Select Cycler Therapy Settings
30
What are the therapy ranges for the Liberty Select cycler? • Total therapy time – Programmable up to 47 hours and 59 minutes
• Fill volume range – 500 mL to 4000 mL (pause and last fill volumes may be 0)
• Dwell time – As much as 9 hours and 59 minutes
• Bag volumes allowed – 2000 mL, 3000 mL, 5000 mL or 6000 mL (the heater bag must hold the first fill volume plus 1000 mL)
• Number of exchanges – One to 99
• Number of pauses – You may or may not be prescribed pauses. Your PD nurse will instruct you on the number of pauses to enter.
• Maximum total volume – Each treatment can deliver up to 30,000 mL.
• Drain time – 20 to 59 minutes
• Patient weight – The dry weight may be set between 44 lbs (20 kgs) up to 880 lbs (400 kgs).
• Daytime manual exchange – 0 to 4000 mL
480147 Liberty Select Handi-Guide Rev A.indd 30 9/11/2019 3:45:09 PM
Liberty Select Cycler Therapy Settings
31
How do I change the time on my Liberty Select cycler?When your machine arrives from the factory, it is pre-set to Pacific standard time. You need to reset this to your specific time zone.
Once you start your treatment, you cannot change the time. Therefore, you must make the change before you begin or wait until you are finished.
To change the time:
• Touch the My Settings button and select the Hardware tab.
• Touch the yellow time format box. It will turn orange.
• Use the Up/Down arrow keys to set it to AM/PM or 24-hour.
• Press OK.
• Now, touch the yellow time box. It will turn orange.
• Use the Up/Down arrow keys to set the hour. Press OK. Press the Up/Down arrow keys again to set the minutes. Press OK. The box will now turn yellow, indicating that you have set the time.
480147 Liberty Select Handi-Guide Rev A.indd 31 9/11/2019 3:45:09 PM
Liberty Select Cycler Therapy Settings
32
What personal health data do I enter into the Liberty Select cycler?The yellow boxes will be blank when the screen first appears. Touch each individual yellow box, as described below, to enter the desired value. When the yellow box is touched, it changes colors and the previous treatment value displays. Use the Up/Down Arrow ( / ) keys to adjust the current value. If you did not enter a value previously, the yellow boxes remain blank. Enter in these values exactly as directed by your PD nurse.
• Your Personal Health Data – When you select YES under your personal data options for this setting you have the option to fill in the following data:
• How much of each type of solution was used during your treatment
• Last bag type (if different)
• Blood glucose (sugar)
• Weight
• Pulse
• Blood pressure
• Temperature
480147 Liberty Select Handi-Guide Rev A.indd 32 9/11/2019 3:45:09 PM

Index
A
Alarms 15Alarm volume 12Alignment bar 6
B
Bypass 24
C
Cassette insertion 3Change the time 31Cleaning the cycler 26Cycle Based Therapy 2, 11, 17
D
Daytime manual exchange 10Disconnecting from the cycler 25Drain complication 18Drain time 17, 20Dwell time 11
F
Flow alert 19, 28
H
Hardware settings (Optional) 29
I
Increased Intraperitoneal Volume (IIPV) 21IQdrive 13, 14, 28
O
Optional settings 27, 28
P
Pause 8, 21, 23, 30Personal health data 28, 32Power Fail recovery 23Power Failure 22, 23
S
STAT drain 20, 21stay•safe organizer 7, 8stay•safe PIN connector 7, 8, 18
T
Therapy ranges 30Treatment Based Therapy 2, 11, 18
W
Warnings 16, 18
33
480147 Liberty Select Handi-Guide Rev A.indd 33 9/11/2019 3:45:09 PM
www.fmcna.com
For safe and proper use of this device, refer to the Instructions for Use. For a complete description of hazards, contraindications, side effects and precautions, see full package labeling at www.fmcna.com.
Indications for Use: The Fresenius Liberty Select cycler is indicated for acute and chronic peritoneal dialysis. The Fresenius stay•safe patient connectors are intended for use with a peritoneal cycler for drainage and infusion of PD solution during a peritoneal dialysis exchanges. The Fresenius stay•safe patient connectors are indicated for use in acute and chronic peritoneal dialysis.
Caution: Federal (US) law restricts these devices to sale by or on the order of a physician.
© 2016-2019, Fresenius Medical Care, All Rights Reserved. Fresenius Medical Care, the triangle logo, Fresenius Renal Technologies, Liberty, Liberty Select, and stay•safe are trademarks of Fresenius Medical Care Holdings, Inc. or its affiliated companies. All other trademarks are the property of their respective owners. P/N 480147 Rev A 09/2019
Fresenius Renal Technologies, a division of Fresenius Medical Care North America • 4040 Nelson Avenue • Concord, CA 94520
For all inquiries or questions, please contact Technical Support at 800-227-2572.For medical or clinical questions, call your home therapy nurse or nurse on call.
480147 Liberty Select Handi-Guide Rev A.indd 34 9/11/2019 3:45:11 PM