handbook presentations microsoft powerpoint 2010 - … · · 2016-03-25acknowledged by groups...
48
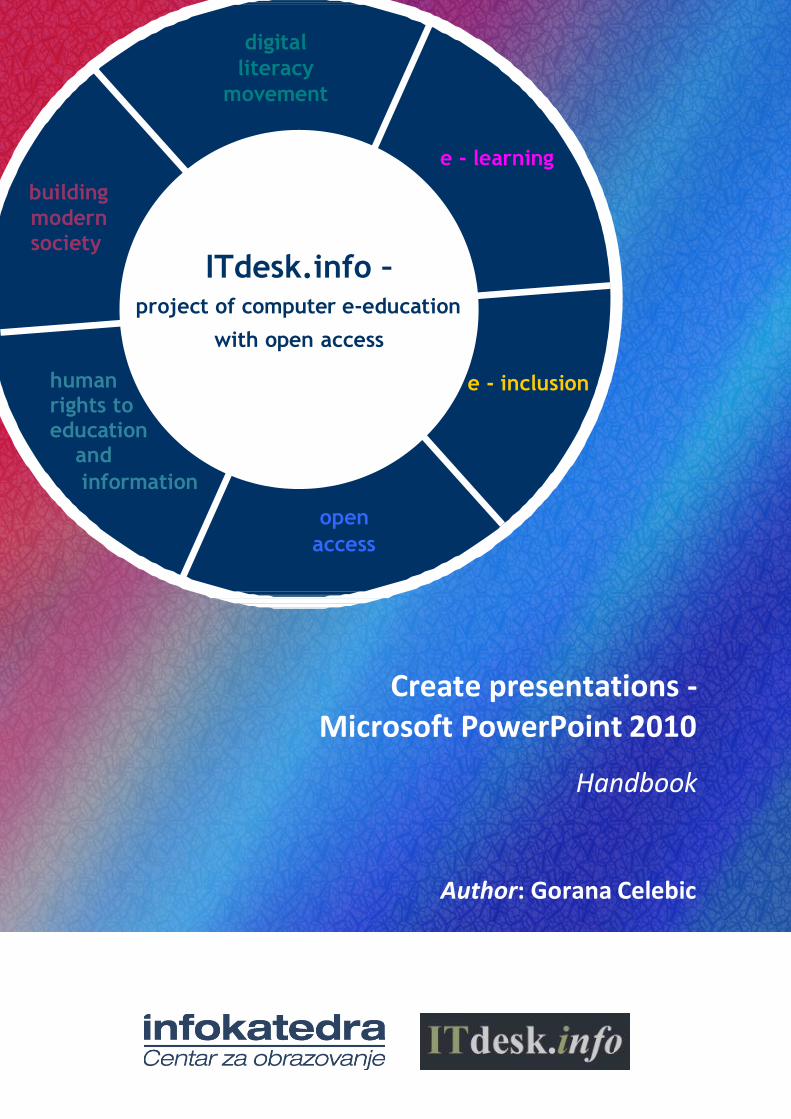
digital literacy movement building modern society ITdesk.info – e - learning human rights to project of computer e-education with open access e - inclusion education and information open access Create presentations - Microsoft PowerPoint 2010 Handbook Author: Gorana Celebic
Transcript of handbook presentations microsoft powerpoint 2010 - … · · 2016-03-25acknowledged by groups...
digital
literacy
movement
building
modern
society
ITdesk.info –
e - learning
human rights to
project of computer e-education
with open access
e - inclusion
education and
information
open
access
Create presentations - Microsoft PowerPoint 2010
Handbook
Author: Gorana Celebic

Author:
Gorana Celebic
Translation:
Dario Ilija Rendulic, Sanja Kolaric
Proofreading:
Ivana Posaric
Expert review:
Alan L Eliason, Professor of Management Information Technology (retired)
Main title:
ITdesk.info – project of computer e-education with an open access
Subtitle:
Create presentations - Microsoft PowerPoint 2010, handbook
Cover:
Silvija Bunic
Publisher:
Open Society for Idea Exchange (ODRAZI), Zagreb
Expert review of Croatian version:
Infokatedra, center for the adult education, Zagreb
ISBN:
978-953-7908-17-1
Place and year of the publication:
Zagreb, 2011
Copyright:
Feel free to copy, print, and further distribute the whole or part of this publication, including for the purpose of organized education, whether in public or private educational organizations, but only for non-commercial purposes (that is, free of charge to end users for use of this publication) and with attribution (source: www.ITdesk.info - project of the computer e-education with an open access). Derivative works without prior approval of the copyright holder (NGO Open Society for Idea Exchange) are not permitted.
For permission of derivative works please contact us at: [email protected]

ITdesk.info – project of computer e-education with an open access
ITdesk.info is licensed under a Creative Commons Attribution-
Noncommercial-No Derivative Works 3.0 Croatia License.
PREFACE
Today’s society has been shaped by the rapid growth and development of
the information technology (IT) infrastructure. The prominence of IT in
society has created a dependence on an individual’s knowledge and
competence in IT areas. Although that dependence is growing, the human
right to education and information has yet to be extended to the IT area.
This has created a growing problem for both individuals without access to
IT education, as well as for society as a whole. Today, computer illiterate
people find themselves unable to fully participate in modern society, and
lose out on opportunities as a result. Those who lack IT education lack
opportunity itself, the main motivation for progress within a society.
In spite of the necessity and benefits of inclusive computer literacy
acknowledged by groups such as the European Commission, UNESCO, and
OECD, there are still many people with limited access to basic computer
education. Often these are persons with disabilities, persons with learning
difficulties, migrant workers, unemployed or persons that live in remote
(rural) areas where IT education is not accessible.
This handbook (combined with other materials published at the web site
www.ITdesk.info) represents our effort and contribution to the realization
and promotion of human rights to IT education and information. We hope
that this education will help in mastering basic computer skills and with
that hope, it is our desire that you learn as much in order to become an
active member of today’s IT society.
Sincerely yours,
ITdesk.info team Expert review of Croatian version:
ITdesk.info – project of computer e-education with an open access
ITdesk.info is licensed under a Creative Commons Attribution-
Noncommercial-No Derivative Works 3.0 Croatia License.
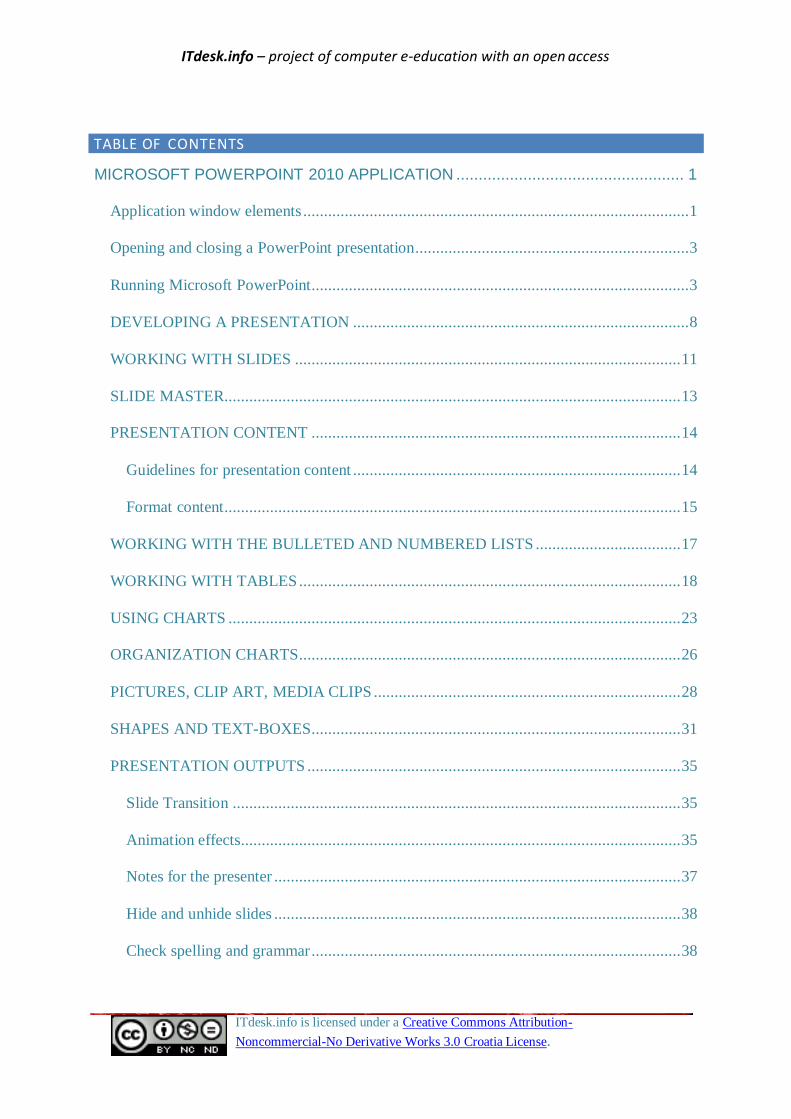
TABLE OF CONTENTS
MICROSOFT POWERPOINT 2010 APPLICATION ................................................... 1
Application window elements ............................................................................................. 1
Opening and closing a PowerPoint presentation .................................................................. 3
Running Microsoft PowerPoint ........................................................................................... 3
DEVELOPING A PRESENTATION ................................................................................. 8
WORKING WITH SLIDES ............................................................................................. 11
SLIDE MASTER.............................................................................................................. 13
PRESENTATION CONTENT ......................................................................................... 14
Guidelines for presentation content ............................................................................... 14
Format content .............................................................................................................. 15
WORKING WITH THE BULLETED AND NUMBERED LISTS ................................... 17
WORKING WITH TABLES ............................................................................................ 18
USING CHARTS ............................................................................................................. 23
ORGANIZATION CHARTS ............................................................................................ 26
PICTURES, CLIP ART, MEDIA CLIPS .......................................................................... 28
SHAPES AND TEXT-BOXES ......................................................................................... 31
PRESENTATION OUTPUTS .......................................................................................... 35
Slide Transition ............................................................................................................ 35
Animation effects.......................................................................................................... 35
Notes for the presenter .................................................................................................. 37
Hide and unhide slides .................................................................................................. 38
Check spelling and grammar ......................................................................................... 38
ITdesk.info – project of computer e-education with an open access
ITdesk.info is licensed under a Creative Commons Attribution-
Noncommercial-No Derivative Works 3.0 Croatia License.
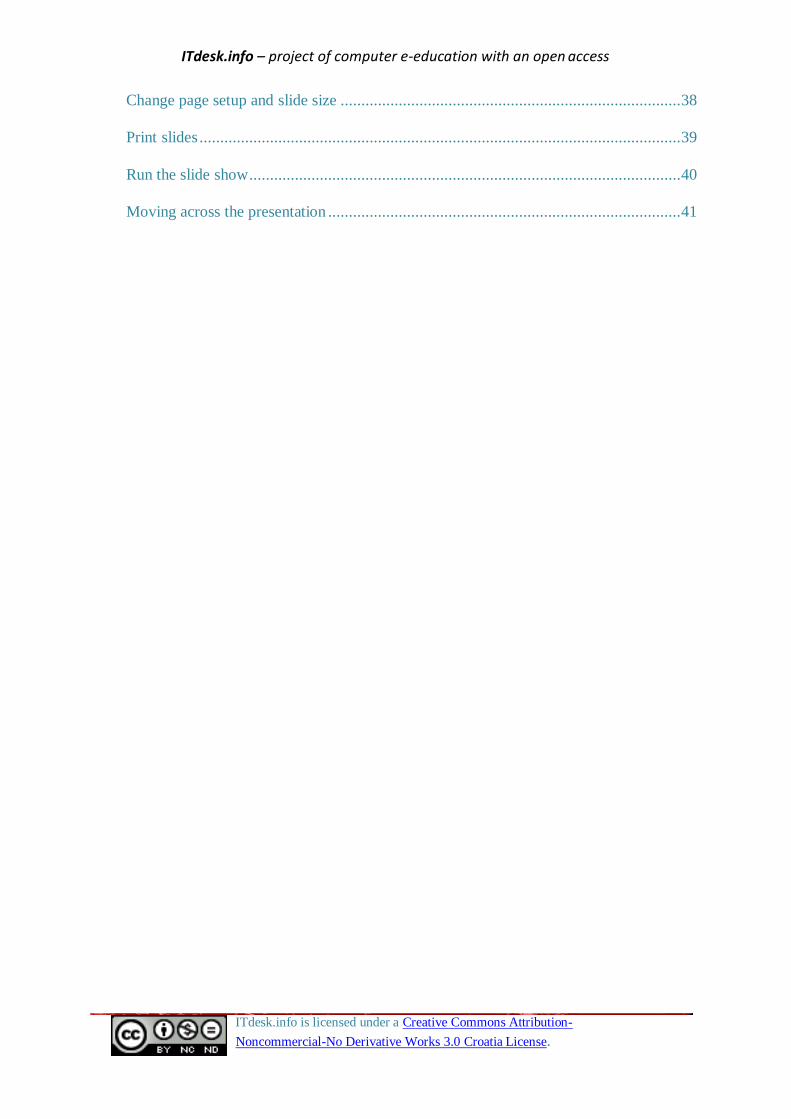
Change page setup and slide size .................................................................................. 38
Print slides .................................................................................................................... 39
Run the slide show ........................................................................................................ 40
Moving across the presentation ..................................................................................... 41
ITdesk.info – project of computer e-education with an open access
ITdesk.info is licensed under a Creative Commons Attribution-
Noncommercial-No Derivative Works 3.0 Croatia License. 1/43
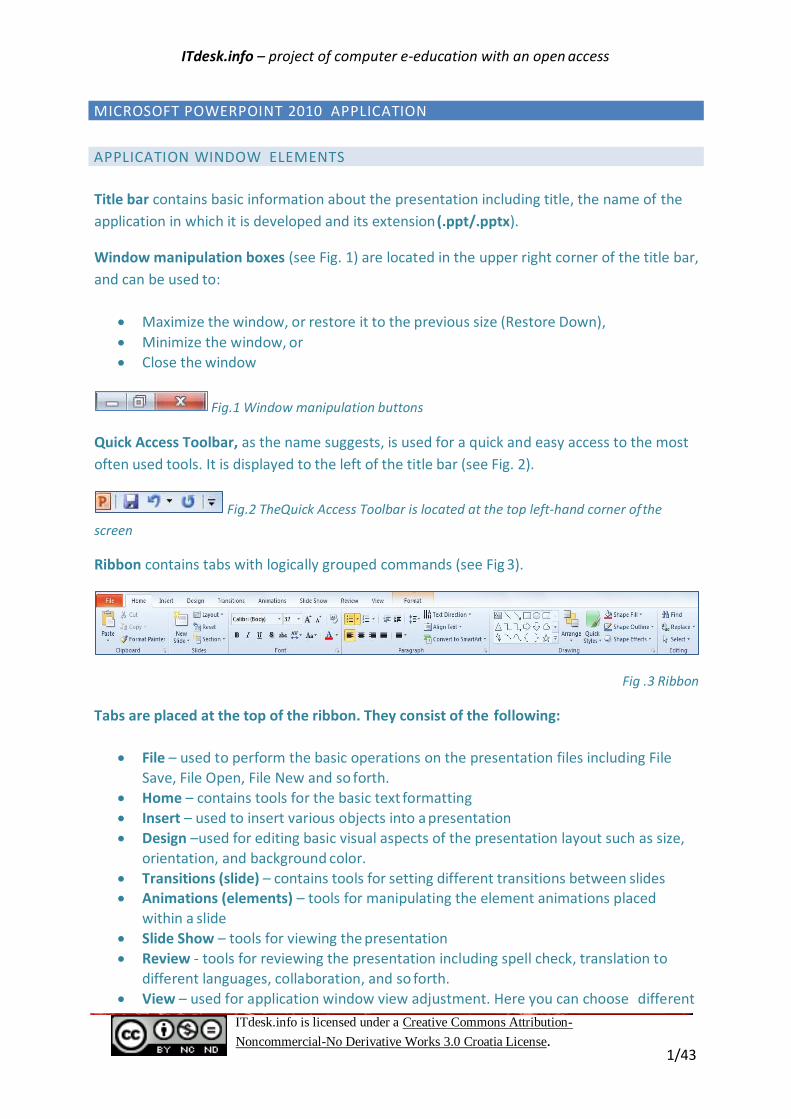
MICROSOFT POWERPOINT 2010 APPLICATION
APPLICATION WINDOW ELEMENTS
Title bar contains basic information about the presentation including title, the name of the
application in which it is developed and its extension (.ppt/.pptx).
Window manipulation boxes (see Fig. 1) are located in the upper right corner of the title bar,
and can be used to:
Maximize the window, or restore it to the previous size (Restore Down),
Minimize the window, or
Close the window
Fig.1 Window manipulation buttons
Quick Access Toolbar, as the name suggests, is used for a quick and easy access to the most
often used tools. It is displayed to the left of the title bar (see Fig. 2).
Fig.2 TheQuick Access Toolbar is located at the top left-hand corner of the
screen
Ribbon contains tabs with logically grouped commands (see Fig 3).
Fig .3 Ribbon
Tabs are placed at the top of the ribbon. They consist of the following:
File – used to perform the basic operations on the presentation files including File
Save, File Open, File New and so forth.
Home – contains tools for the basic text formatting
Insert – used to insert various objects into a presentation
Design –used for editing basic visual aspects of the presentation layout such as size,
orientation, and background color.
Transitions (slide) – contains tools for setting different transitions between slides Animations (elements) – tools for manipulating the element animations placed
within a slide
Slide Show – tools for viewing the presentation
Review - tools for reviewing the presentation including spell check, translation to
different languages, collaboration, and so forth.
View – used for application window view adjustment. Here you can choose different

ITdesk.info – project of computer e-education with an open access
ITdesk.info is licensed under a Creative Commons Attribution-
Noncommercial-No Derivative Works 3.0 Croatia License. 2/43
view types, as well as zoom and arrange slides in different ways
Storyboarding-a primary tool used for adding a new slide to your presentation, working with slide layout, adding pictures and links, and working with text
The Presentation Window
Each slide or storyboard is created in the presentation window. When you select New Slide,
an empty slide is positioned for you to work on.
The slide/outline pane (left side of the presentation window) provides an overview of all
slides in the presentation.
Slides pane - displays presentation slides in a thumbnail form
Outline pane - shows the text placed on each slide
Notes pane - contains notes which are of help to the presenter
Insertion point - shows where we are positioned within the slide and where information will
be entered (for example, text,where the cursor is flashing)
Bars for the horizontal and vertical navigation (scroll bars) - used for navigation across the
presentation
Status bar - displays information about the current slide
ITdesk.info – project of computer e-education with an open access
ITdesk.info is licensed under a Creative Commons Attribution-
Noncommercial-No Derivative Works 3.0 Croatia License. 3/43
OPENING AND CLOSING A POWERPOINT PRESENTATION
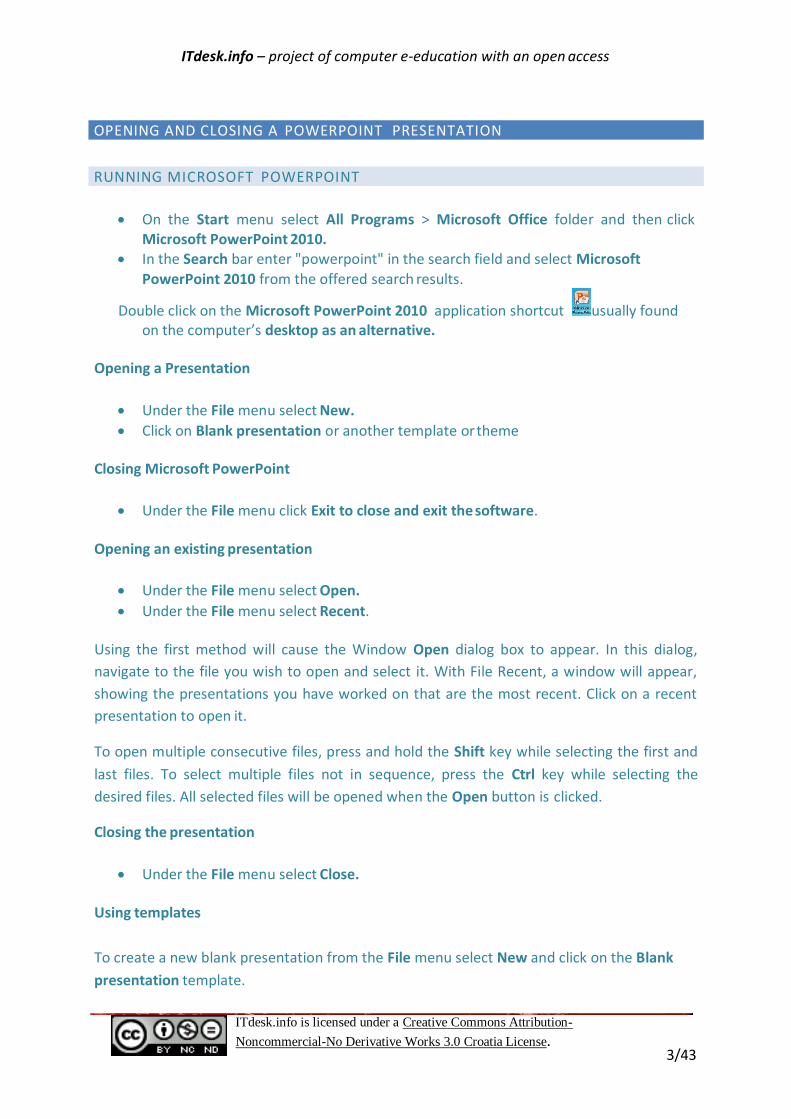
RUNNING MICROSOFT POWERPOINT
On the Start menu select All Programs > Microsoft Office folder and then click Microsoft PowerPoint 2010.
In the Search bar enter "powerpoint" in the search field and select Microsoft
PowerPoint 2010 from the offered search results.
Double click on the Microsoft PowerPoint 2010 application shortcut usually found on the computer’s desktop as an alternative.
Opening a Presentation
Under the File menu select New.
Click on Blank presentation or another template or theme
Closing Microsoft PowerPoint
Under the File menu click Exit to close and exit the software.
Opening an existing presentation
Under the File menu select Open.
Under the File menu select Recent.
Using the first method will cause the Window Open dialog box to appear. In this dialog,
navigate to the file you wish to open and select it. With File Recent, a window will appear,
showing the presentations you have worked on that are the most recent. Click on a recent
presentation to open it.
To open multiple consecutive files, press and hold the Shift key while selecting the first and
last files. To select multiple files not in sequence, press the Ctrl key while selecting the
desired files. All selected files will be opened when the Open button is clicked.
Closing the presentation
Under the File menu select Close.
Using templates
To create a new blank presentation from the File menu select New and click on the Blank
presentation template.

ITdesk.info – project of computer e-education with an open access
ITdesk.info is licensed under a Creative Commons Attribution-
Noncommercial-No Derivative Works 3.0 Croatia License. 4/43
To open a new template, select the desired template from the Sample Templates folder.
Existing templates can be used to create a wide range of presentations, for example a
calendar. Additional templates are available for download at Office.com.
Saving the presentation
Under the File menu select Save.
Under the File menu select Save As
Click the icon, shown on the Quick Access Toolbar.
The first time a presentation is saved, selecting Save or Save As will cause a dialog box to
appear. In the File Name field, enter a name for the presentation. Click on the folder to
specify where the presentation is to be saved. Click the Save button.
Saving the presentation under a different name
To save a presentation under a different name, select Save As from the File menu. When the
dialog box appears, enter a new filename in the File Name field and click on Save. You will
notice a change of the presentation name on window’s title bar. After a file name is
changed, use File Save or keyboard shortcut Ctrl + S for subsequent saves.
Saving the presentation as another file type
To save a presentation as a different file type, use File Save As. In the Save As dialog box,
click on the Save As Type drop-down menu and select the desired file type. To save as a
template, select PowerPoint Template (*.potx). To save a presentation in a format
compatible with older versions of Microsoft PowerPoint, select PowerPoint 97-2003
Template (*.pot). To save a presentation as Rich Text Format (.rtf), choose Outline/RTF
(*.rtf).
Switching between open presentations
Move to the PowerPoint ribbon and click on the Switch Windows icon. Choose
the presentation you want to switch to.
Position the cursor on the PowerPoint icon in the taskbar at the bottom of the screen
to preview open presentations (see Fig 4). Click on a presentation to select it.
Fig.4 Preview of
open presentations
ITdesk.info – project of computer e-education with an open access
ITdesk.info is licensed under a Creative Commons Attribution-
Noncommercial-No Derivative Works 3.0 Croatia License. 5/43
Use the keyboard shortcut Alt + Tab to switch between windows (i.e. opened presentations, folders, applications).
The PowerPoint Options dialogue box
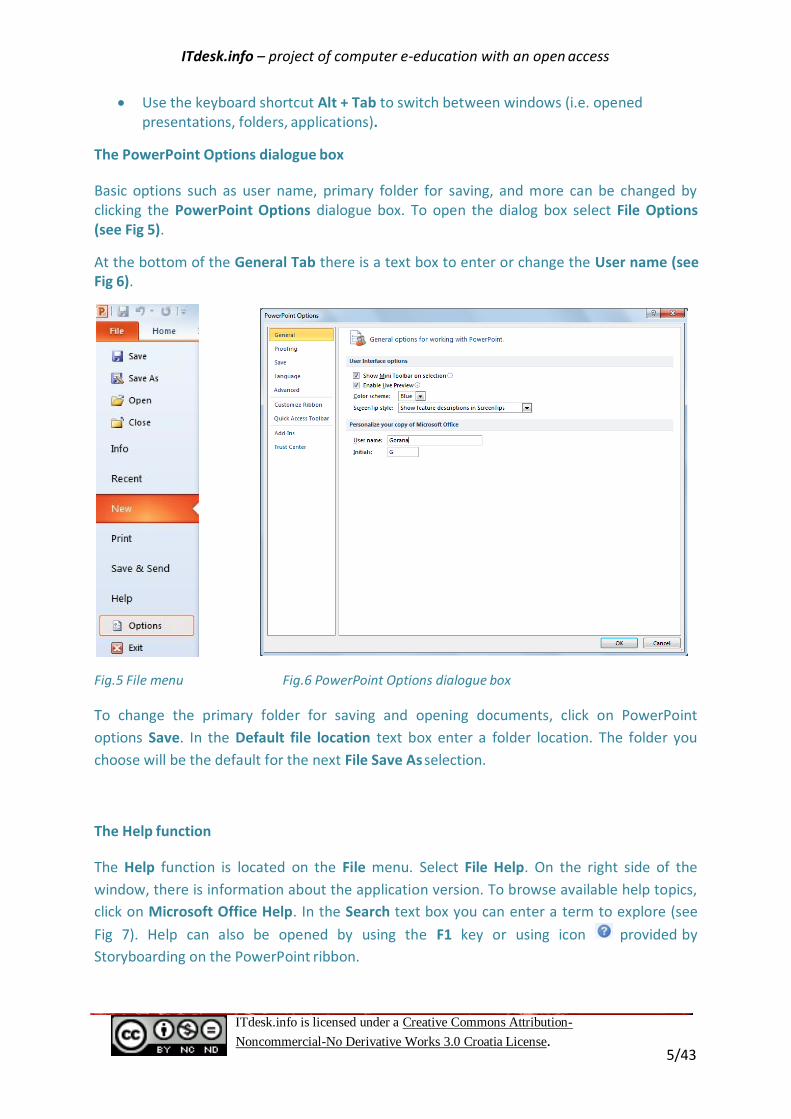
Basic options such as user name, primary folder for saving, and more can be changed by clicking the PowerPoint Options dialogue box. To open the dialog box select File Options (see Fig 5).
At the bottom of the General Tab there is a text box to enter or change the User name (see Fig 6).
Fig.5 File menu Fig.6 PowerPoint Options dialogue box
To change the primary folder for saving and opening documents, click on PowerPoint
options Save. In the Default file location text box enter a folder location. The folder you
choose will be the default for the next File Save As selection.
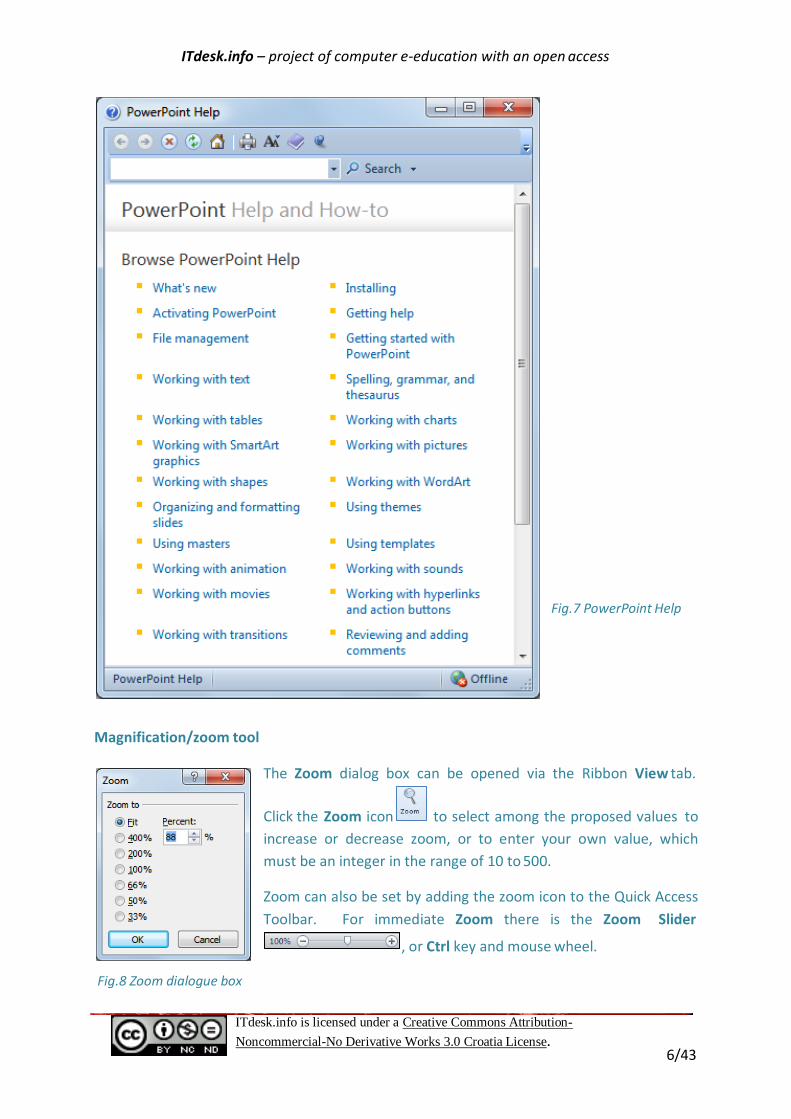
The Help function
The Help function is located on the File menu. Select File Help. On the right side of the
window, there is information about the application version. To browse available help topics,
click on Microsoft Office Help. In the Search text box you can enter a term to explore (see
Fig 7). Help can also be opened by using the F1 key or using icon provided by
Storyboarding on the PowerPoint ribbon.
ITdesk.info – project of computer e-education with an open access
ITdesk.info is licensed under a Creative Commons Attribution-
Noncommercial-No Derivative Works 3.0 Croatia License. 6/43
Magnification/zoom tool
Fig.7 PowerPoint Help
Fig.8 Zoom dialogue box
The Zoom dialog box can be opened via the Ribbon View tab.
Click the Zoom icon to select among the proposed values to
increase or decrease zoom, or to enter your own value, which
must be an integer in the range of 10 to 500.
Zoom can also be set by adding the zoom icon to the Quick Access
Toolbar. For immediate Zoom there is the Zoom Slider
, or Ctrl key and mouse wheel.
ITdesk.info – project of computer e-education with an open access
Noncommercial-No Derivative Works 3.0 Croatia License. 7/43
Fig.10 Menu that opens by right-clicking over the Ribbon
ITdesk.info is licensed under a Creative Commons Attribution-
Customizing the Ribbon
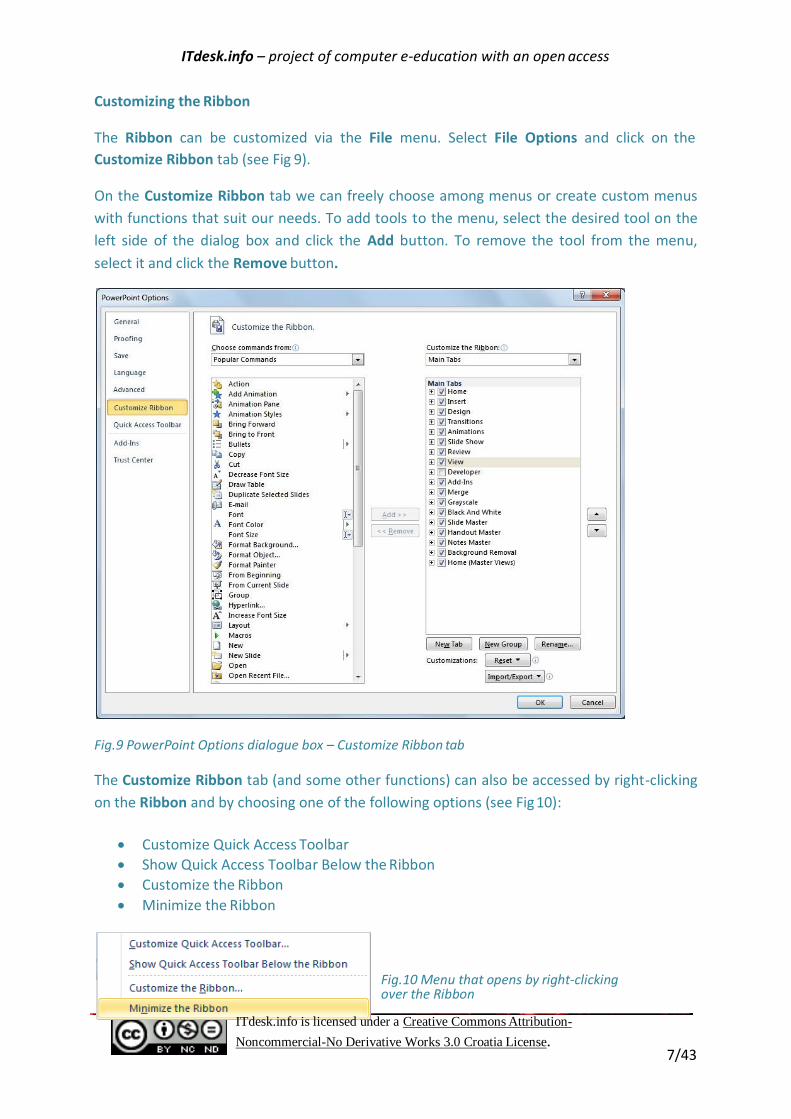
The Ribbon can be customized via the File menu. Select File Options and click on the
Customize Ribbon tab (see Fig 9).
On the Customize Ribbon tab we can freely choose among menus or create custom menus
with functions that suit our needs. To add tools to the menu, select the desired tool on the
left side of the dialog box and click the Add button. To remove the tool from the menu,
select it and click the Remove button.
Fig.9 PowerPoint Options dialogue box – Customize Ribbon tab
The Customize Ribbon tab (and some other functions) can also be accessed by right-clicking
on the Ribbon and by choosing one of the following options (see Fig 10):
Customize Quick Access Toolbar
Show Quick Access Toolbar Below the Ribbon
Customize the Ribbon
Minimize the Ribbon

ITdesk.info – project of computer e-education with an open access
ITdesk.info is licensed under a Creative Commons Attributio
DEVELOPING A PRESENTATION
Presentation views
The Presentation Views group on the View tab offers four different ways of viewing a presentation (see Fig 11). The different views are outlined below
In Normal View the slide is shown in the middle of the presentation window (see Fig 12).
Below the slide is a box in which the author can enter notes and comments. The left side of
the window shows either slide thumbnails (if you choose Slides) or
text-only slides (if you choose Outline).
Fig.11 Presentation Views
Fig.12 Normal View
Slide Sorter View shows multiple slides in the window, making it the most convenient view
for tasks such as rearranging slide order or adding transition effects (see Fig 13).
Fig.13 Slide Sorter Notes Page View
n-
Noncommercial-No Derivative Works 3.0 Croatia License.
8/43

ITdesk.info – project of computer e-education with an open access
ITdesk.info is licensed under a Creative Commons Attribution-
Noncommercial-No Derivative Works 3.0 Croatia License. 10/43
The Notes Page View provides a full page notes area below the slide (see Fig 14). In this
area the presenter can enter notes to use during the presentation.
Fig.14 Notes Page
View
The Reading View displays the presentation full-screen (see Fig 15). Press the Escape Key
(Esc) on the keyboard to return to the normal view or click on the Normal icon shown on the
lower right-hand corner of the screen.
Fig. 15 Reading View

ITdesk.info – project of computer e-education with an open access
ITdesk.info is licensed under a Creative Commons Attribution-
Noncommercial-No Derivative Works 3.0 Croatia License. 11/43
WORKING WITH SLIDES
Insert slide
There are multiple ways to insert a new slide into the presentation.
To insert a slide using the Ribbon, click the New
Slide icon in the Slides group, located in the Home tab. This
option will allow you to choose from different slide layouts
including Blank, Title Slide, or Title and Content.
Alternatively, a new slide can be inserted using the Slides tab
in two ways:
Right-click the slide after which you want to insert a new slide and select New Slide (see Fig 16), or
Select the slide after which to insert a new slide, and
press the Enter key
Fig.16 Insert new slide
Copy or move slides
To copy or move a slide, either into the current or another presentation, select the slide in
the Slide Sorter View. In Normal View select the slide Thumbnail on the left side of the
window.
After you have selected the slide, right click the mouse and select Cut or Copy. Next, select
the desired place in the presentation to move or copy the slide. Finally, right-click the mouse
and choose the Paste command.
Keyboard Cut, Copy, Paste commands
Ctrl + X - Cut
Ctrl + C - Copy
Ctrl + V - Paste
“Drag and drop” copying method
An alternative way to copy and move a slide is to drag and drop the slide.
1. Select the slide in the Slides tab area that you want to copy
2. Left click and hold, at the same time press and hold the Ctrl button. A small icon will
appear moving to the next step.

ITdesk.info – project of computer e-education with an open access
ITdesk.info is licensed under a Creative Commons Attribution-
Noncommercial-No Derivative Works 3.0 Croatia License. 12/43
3. Move or Drag the mouse cursor to the desired location for the slide.
4. Release the left mouse button and then the Ctrl button. A copy of the slide is pasted.
To move the slide and not make a copy, use the “Drag and drop” method but do not hold
down the Ctrl key.
Delete Slides
Select one or more slides to be deleted and then use one of the following methods:
Right click on the mouse and click Delete slide.
Click Delete on the Home tab.
Press the Delete key on the keyboard
Slide Themes and Designs
A variety of themes are available to change the look and feel of slides. To add a theme,
navigate to the Themes group located within the Design tab and select the desired theme
(see Fig 17).
Fig.17. Themes
Click the down arrow to the right to display built-in themes and office.com themes (see Fig
18). Also, you can click Browse for Themes to browse for themes saved anywhere on the
computer.
Fig.18 Select the theme

ITdesk.info – project of computer e-education with an open access
ITdesk.info is licensed under a Creative Commons Attribution-
Noncommercial-No Derivative Works 3.0 Croatia License. 13/43
The Design tab also contains options for customizing the background of one or all of the
slides. First, select the slide or slides you wish to
customize. Next, in the Background group in the Design
tab select Background Styles or right click on the
selected slide and select Format Background. You can
shape the background by using Format Background(see
Fig 19).
Fig. 19. Format Background
SLIDE MASTER
The Slide Master controls the format of the title and main text objects for each slide.
Changes made in master slide format will reflect to all slides. The Slide Master can be called
via the Master Views group located within the View tab, by clicking the Slide Master icon
.
Once activated, the Slide Master is ready for editing:
• Use the Insert tab to insert objects like drawings, pictures, and forms (see Fig 20).
Fig.20. Tools to insert objects – Images and
Illustrations groups
To Delete an object, select the object while in the Slide Master view and press the Delete key.
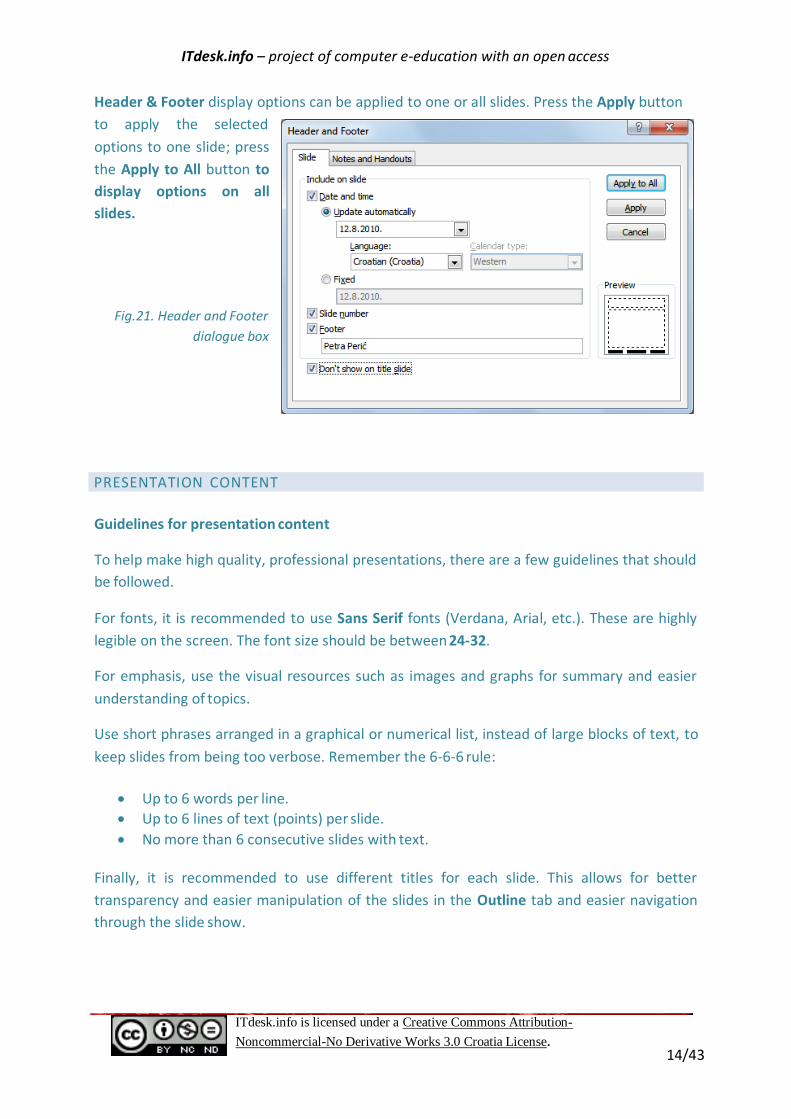
Use Insert tab to add a header or footer. Click on the Header & Footer icon
located in the Text group. To add text to the footer open the open Header and Footer dialog box, , select Footer, and add the text for the footer in the text box..
o The Header and Footer dialog box also allows control of the following (see Fig 21):Date and Time – includes the Update automatically option and Fixed option.
o Slide number – automatically adds the slide number to the footer. o Don't show on title slide – If this option is checked, the selected elements (date,
slide number, etc.) will not be displayed on the first slide of the presentation.
ITdesk.info – project of computer e-education with an open access
ITdesk.info is licensed under a Creative Commons Attribution-
Noncommercial-No Derivative Works 3.0 Croatia License. 14/43
Header & Footer display options can be applied to one or all slides. Press the Apply button
to apply the selected
options to one slide; press
the Apply to All button to
display options on all
slides.
Fig.21. Header and Footer
dialogue box
PRESENTATION CONTENT
Guidelines for presentation content
To help make high quality, professional presentations, there are a few guidelines that should
be followed.
For fonts, it is recommended to use Sans Serif fonts (Verdana, Arial, etc.). These are highly
legible on the screen. The font size should be between 24-32.
For emphasis, use the visual resources such as images and graphs for summary and easier
understanding of topics.
Use short phrases arranged in a graphical or numerical list, instead of large blocks of text, to
keep slides from being too verbose. Remember the 6-6-6 rule:
Up to 6 words per line.
Up to 6 lines of text (points) per slide.
No more than 6 consecutive slides with text.
Finally, it is recommended to use different titles for each slide. This allows for better
transparency and easier manipulation of the slides in the Outline tab and easier navigation
through the slide show.
ITdesk.info – project of computer e-education with an open access
ITdesk.info is licensed under a Creative Commons Attribution-
Noncommercial-No Derivative Works 3.0 Croatia License. 15/43
Adding content to a slide
To begin, select the slide that you wish to add content to. The slide can be selected in the
slide/outline pane. Once the slide has been selected you may begin entering text. Many
slides will already contain text boxes for entering text. For example, title slides contain a text
box that says Click to add title.
It is likely that presentation development objects, such as text, pictures, or shapes, will need
to be manipulated. For example, you may want to copy or move an object to a different slide
or presentation. Please note that any object you would like to manipulate must be selected
first.
To perform the Cut/Copy/Paste operation on an object, select the desired object and right
click with the mouse. From the Quick menu choose Cut command (if you want to cut) or
Copy (if you want to copy). Finally, position the cursor in the position you want to paste the
object, right click the mouse and select Paste from the Quick menu. Recall that these
commands can be accessed using the following keyboard shortcuts:
Ctrl + X - Cut
Ctrl + C - Copy Ctrl + V – Paste
To delete the object, select it and press the keyboard keys Delete or Backspace. When deleting text, the Delete key deletes the character to the right of the cursor; the Backspace key deletes character to the left of the cursor.
Undo and Redo
The Undo and Redo functions are used whenever you wish to undo or redo the last
action. For example, if some text is accidentally deleted, or you make a change that you do
not like, using the Undo tool will return the document to its previous state. It is also useful
when we want to explore PowerPoint functions, as we can fearlessly try any function and
return the document to its previous state. It is a practical and frequently used function.
Undo is located in Quick Access Toolbar or can be accessed via the keyboard shortcut Ctrl +
Z.
The Redo function annuls the result of the Undo function. We can use it as many times as
we use Undo. Redo is also located in the Quick Access Toolbar or can be accessed via the
keyboard shortcut Ctrl + Y.
Format content
Text can be manipulated using commands found in Font group, located in the Home tab.
Remember, before applying any function or command, select the text you want to edit.
ITdesk.info – project of computer e-education with an open access
ITdesk.info is licensed under a Creative Commons Attribution-
Noncommercial-No Derivative Works 3.0 Croatia License. 16/43
To change the font type click on the arrow in the Font box , and select from drop-
down menu one of the offered fonts. The same rule applies to the manipulation of the font
size---in the Font Size box click on the arrow and choose the number of the font size
you want to use.
Text can be displayed in: bold, italics or underline. These formatting tools are placed in the
Font group. They are activated by clicking on the following buttons:
- selected text is displayed in bold
- selected text is displayed in italic
- selected text is displayed underlined
- selected to apply shadow effect to the text
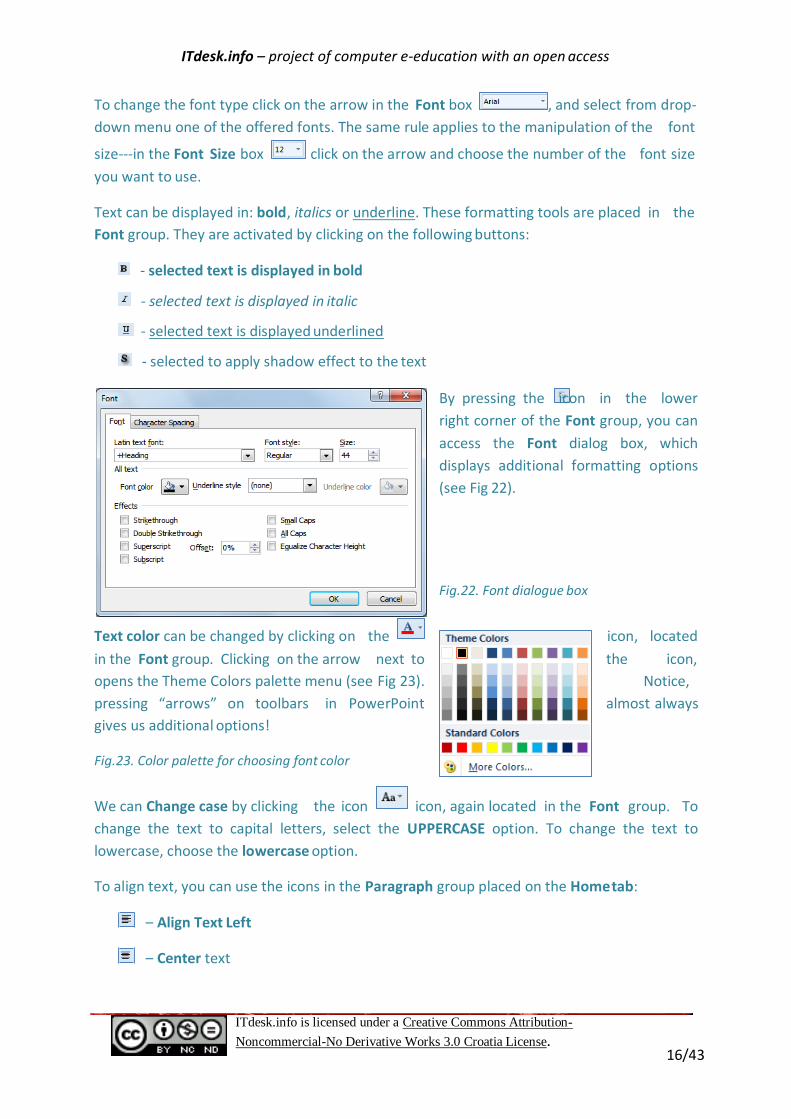
By pressing the icon in the lower
right corner of the Font group, you can
access the Font dialog box, which
displays additional formatting options
(see Fig 22).
Fig.22. Font dialogue box
icon, located
in the Font group. Clicking on the arrow next to the icon,
opens the Theme Colors palette menu (see Fig 23). Notice,
pressing “arrows” on toolbars in PowerPoint almost always
gives us additional options!
Fig.23. Color palette for choosing font color
We can Change case by clicking the icon icon, again located in the Font group. To
change the text to capital letters, select the UPPERCASE option. To change the text to
lowercase, choose the lowercase option.
To align text, you can use the icons in the Paragraph group placed on the Home tab:
– Align Text Left
– Center text
Text color can be changed by clicking on the

ITdesk.info – project of computer e-education with an open access
ITdesk.info is licensed under a Creative Commons Attribution-
Noncommercial-No Derivative Works 3.0 Croatia License. 17/43
– Align Text Right
– Justify text
Format Painter
The Format Painter tool, located in the Clipboard group on the Home tab, can be used to
copy text format from one set of text to another. The Format Painter is a great shortcut tool
as it will apply the selected texts color, size, case and any other formatting options to
another set of text without the need to set each option individually.
To use Format Painter, first highlight the text to be formatted. Next, click the Format Painter
tool and highlight the text the formatting should be applied to.
WORKING WITH THE BULLETED AND NUMBERED LISTS
We might use lists for various list creation and enumeration needs throughout the presentation. Lists can be set to display numbers, letters, bullets or images as delineators. Icons for these various list options are located in the Paragraph group on the Home tab.
To select a bullet shape to be used for a list, press the arrow
next to the icon and select one of the offered bullet
shapes (see Fig 24).
Fig.24. Menu with different shaped bullets
To display the list items numerically, press the arrow next to
the icon and select from the offered formats (see Fig 25).
Replace bullet with a picture
Press the arrow next to the icon and select the
Bullets and Numbering option. Click on Picture and select
from the stored pictures. You can import pictures by
clicking the Import button and adding to the existing
picture list in the dialogue box. Once a picture is imported,
you can apply it to a list.
Fig. 25 Menu with different numerical formats

ITdesk.info – project of computer e-education with an open access
ITdesk.info is licensed under a Creative Commons Attribution-
Noncommercial-No Derivative Works 3.0 Croatia License. 18/43
Replace graphical mark with symbol
Press the arrow next to the icon and select the Bullets and Numbering option. Click on
the Customize button and to open the Symbol dialogue box. Select the suitable symbol.
Resize graphical or numerical marks
Press the arrow next to the icon and select the Bullets and Numbering option. In the
Size field enter a percentage or, adjust it by clicking the up or down arrows.
Change the level of the listed items
Text entered in PowerPoint can be formatted as lists. Often, it is necessary to change the
level of a list or portion of a list. We can increase or decrease the level of one list item or the
entire list.
To do this, first select the list item or the entire
list. Then choose either the Increase List Level
tool or Decrease List Level tool
Pressing the button in the Paragraph group
within the Home tab, opens the Paragraph
dialogue box with additional options. For
example, on the Spacing tab, you can enter
values to set spacing Before and After
paragraphs (see Fig 26).
Fig.26. Paragraph dialogue box
WORKING WITH TABLES
Enter a table
To insert a table into the document select the icon on the Insert tab.
In the opened Insert Table window, drag your cursor to highlight the desired number of
rows and columns for the table.
ITdesk.info – project of computer e-education with an open access
ITdesk.info is licensed under a Creative Commons Attribution-
Noncommercial-No Derivative Works 3.0 Croatia License. 19/43
Fig. 27 Insert Table
To determine the dimensions of the table before insertion, select Insert Table examine the
dialog box that appears. A 4x2 Table for example contains four
columns and two rows (see Fig 27).
To create a complex table, after selecting the icon select
Draw Table tool, and with the help of the mouse determine the
lines for the table.
Enter and edit data in a table
To enter the contents of the table simply place the insertion point in a table cell and enter text. Moving the insertion point around the table can be done in three ways:
By pressing the left mouse button
By using the TAB key on your keyboard
By using the arrow keys on the keyboard
Select a cell/column/row
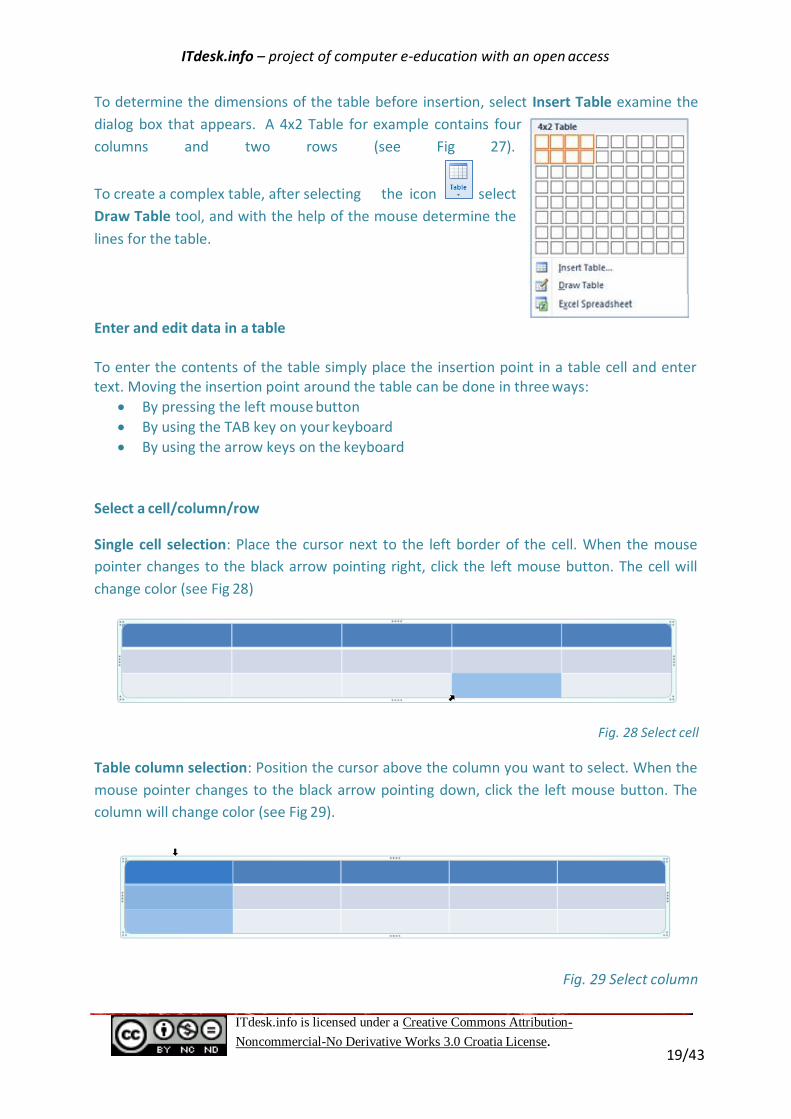
Single cell selection: Place the cursor next to the left border of the cell. When the mouse
pointer changes to the black arrow pointing right, click the left mouse button. The cell will
change color (see Fig 28)
Fig. 28 Select cell
Table column selection: Position the cursor above the column you want to select. When the
mouse pointer changes to the black arrow pointing down, click the left mouse button. The
column will change color (see Fig 29).
Fig. 29 Select column

ITdesk.info – project of computer e-education with an open access
ITdesk.info is licensed under a Creative Commons Attribution-
Noncommercial-No Derivative Works 3.0 Croatia License. 20/43
Table row selection: Position the cursor to the left of the row you want to select. When the
mouse pointer changes to the black arrow pointing right, click the left mouse button. The
selected row will change color (see Fig 30)
Fig. 30. Select row
To select an entire table, click on its border. When the mouse pointer changes to , drag
the table to a new place using the drag and drop method (see Fig 31).
Fig. 31. Select entire table
Format a table
Tools for inserting rows and columns are located in Rows & Columns group of the Table
Tools section within the Layout tab (see Fig 32).
Fig. 32 Rows & Columns group – tools for inserting rows and columns
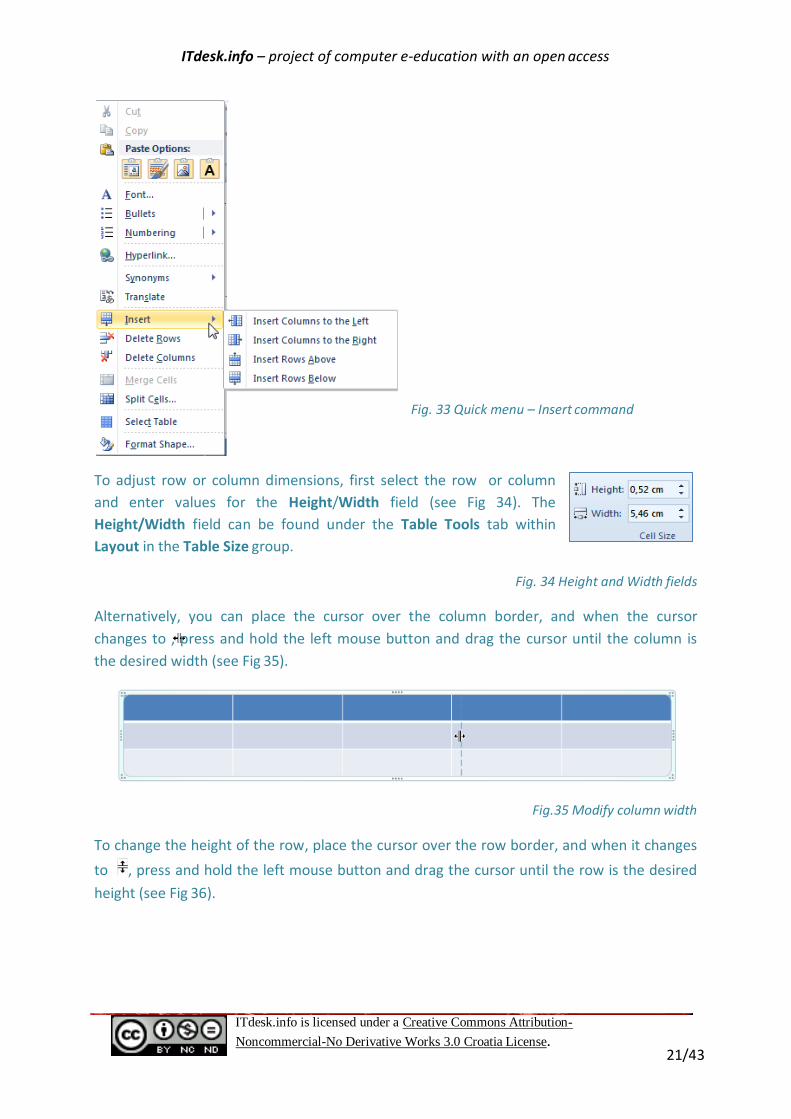
Another way to insert rows and columns is through use of the quick menu. Right click the
mouse over the cell you want to insert row or column next to, and click the appropriate
Insert command (see Fig 33).
ITdesk.info – project of computer e-education with an open access
ITdesk.info is licensed under a Creative Commons Attribution-
Noncommercial-No Derivative Works 3.0 Croatia License. 21/43
Fig. 33 Quick menu – Insert command
To adjust row or column dimensions, first select the row or column
and enter values for the Height/Width field (see Fig 34). The
Height/Width field can be found under the Table Tools tab within
Layout in the Table Size group.
Fig. 34 Height and Width fields
Alternatively, you can place the cursor over the column border, and when the cursor
changes to , press and hold the left mouse button and drag the cursor until the column is
the desired width (see Fig 35).
Fig.35 Modify column width
To change the height of the row, place the cursor over the row border, and when it changes
to , press and hold the left mouse button and drag the cursor until the row is the desired
height (see Fig 36).

ITdesk.info – project of computer e-education with an open access
ITdesk.info is licensed under a Creative Commons Attribution-
Noncommercial-No Derivative Works 3.0 Croatia License. 22/43
Fig.36 Modify row height
Borders and shading
Click on the Shading icon in the Table Tools under Design in the Table Styles group to
change the cell background. Click on the arrow next to the icon to display a palette of
available background colors. If Enable Live Preview is turned on, a preview of the formatting
will appear in the table when moving through the offered colors.
Clicking on the Borders icon, places a bottom border on the
designated table (see Fig 37). To view more skirting options, click
the arrow next to the Borders icon.
Delete a table
Rows or columns of a table can be deleted by pressing the Delete icon located in the
Table Tools section, under Layout in the Rows & Columns group.

ITdesk.info – project of computer e-education with an open access
ITdesk.info is licensed under a Creative Commons Attribution-
Noncommercial-No Derivative Works 3.0 Croatia License. 23/43
USING CHARTS
1. Insert a chart:
If a slide layout includes
content, for example
Title and Content in the
above slide, icons for
inserting objects such as
charts, tables, or images
will be visible. To insert
a chart click the Insert
Chart icon (see Fig 38).
Fig.38 Add chart by clicking
on Insert Chart
Charts can also be inserted from the Insert tab by choosing the Chart tool in the
Illustrations group.
2. Choose a chart type
After Chart is clicked, the Insert Chart
dialogue box opens offering various
chart types for insertion (see Fig 39).
Fig.39 Insert Chart dialogue box
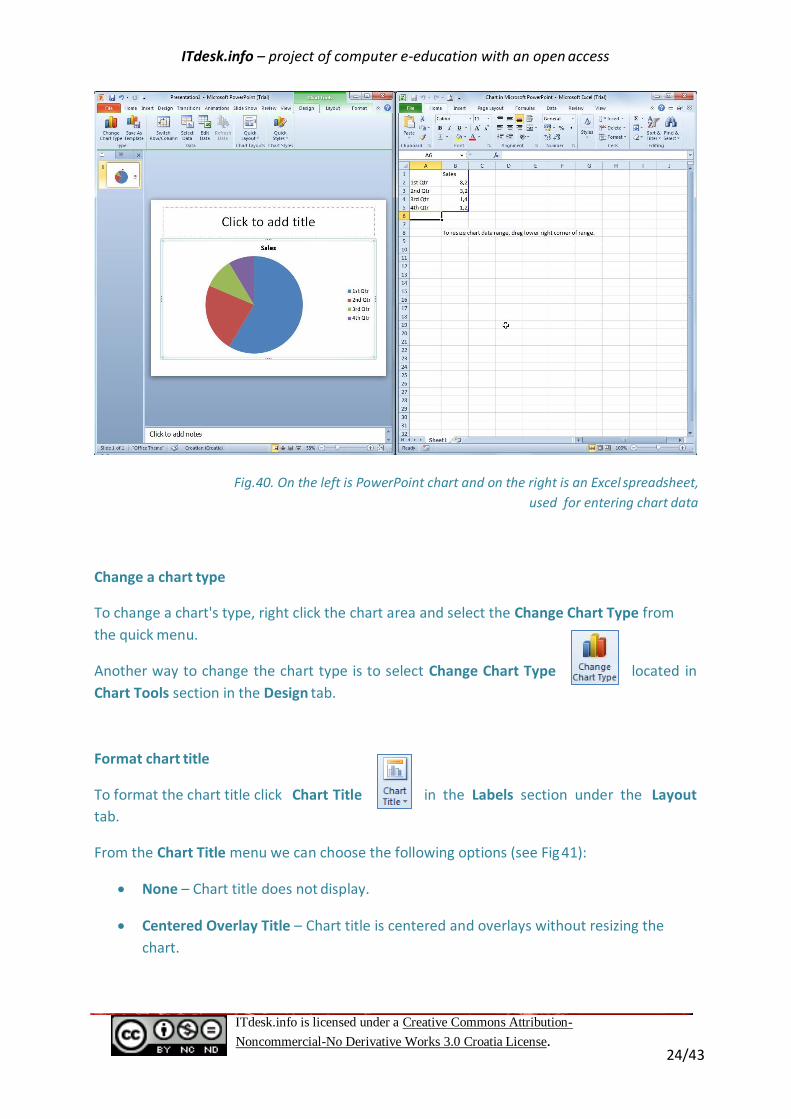
After selecting a chart type, MS Excel will be opened next to PowerPoint on the screen (see
Fig 40). In the Excel workbook, enter the data to be displayed in the chart and close the
workbook. The PowerPoint chart layout is changed to replicate the data in the Excel
workbook.
ITdesk.info – project of computer e-education with an open access
ITdesk.info is licensed under a Creative Commons Attribution-
Noncommercial-No Derivative Works 3.0 Croatia License. 24/43
Fig.40. On the left is PowerPoint chart and on the right is an Excel spreadsheet,
used for entering chart data
Change a chart type
To change a chart's type, right click the chart area and select the Change Chart Type from
the quick menu.
Another way to change the chart type is to select Change Chart Type located in
Chart Tools section in the Design tab.
Format chart title
To format the chart title click Chart Title in the Labels section under the Layout
tab.
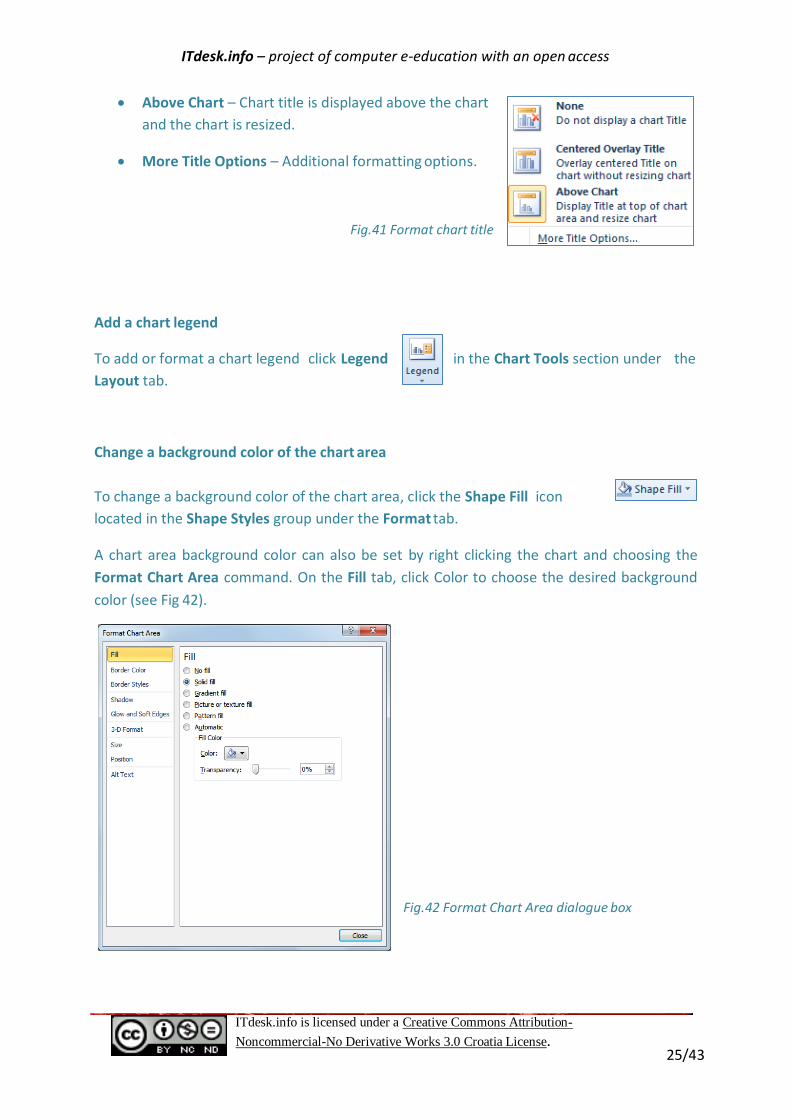
From the Chart Title menu we can choose the following options (see Fig 41):
None – Chart title does not display.
Centered Overlay Title – Chart title is centered and overlays without resizing the
chart.
ITdesk.info – project of computer e-education with an open access
ITdesk.info is licensed under a Creative Commons Attribution-
Noncommercial-No Derivative Works 3.0 Croatia License. 25/43
Above Chart – Chart title is displayed above the chart
and the chart is resized.
More Title Options – Additional formatting options.
Fig.41 Format chart title
Add a chart legend
To add or format a chart legend click Legend in the Chart Tools section under the
Layout tab.
Change a background color of the chart area
To change a background color of the chart area, click the Shape Fill icon
located in the Shape Styles group under the Format tab.
A chart area background color can also be set by right clicking the chart and choosing the
Format Chart Area command. On the Fill tab, click Color to choose the desired background
color (see Fig 42).
Fig.42 Format Chart Area dialogue box
ITdesk.info – project of computer e-education with an open access
ITdesk.info is licensed under a Creative Commons Attribution-
Noncommercial-No Derivative Works 3.0 Croatia License. 26/43
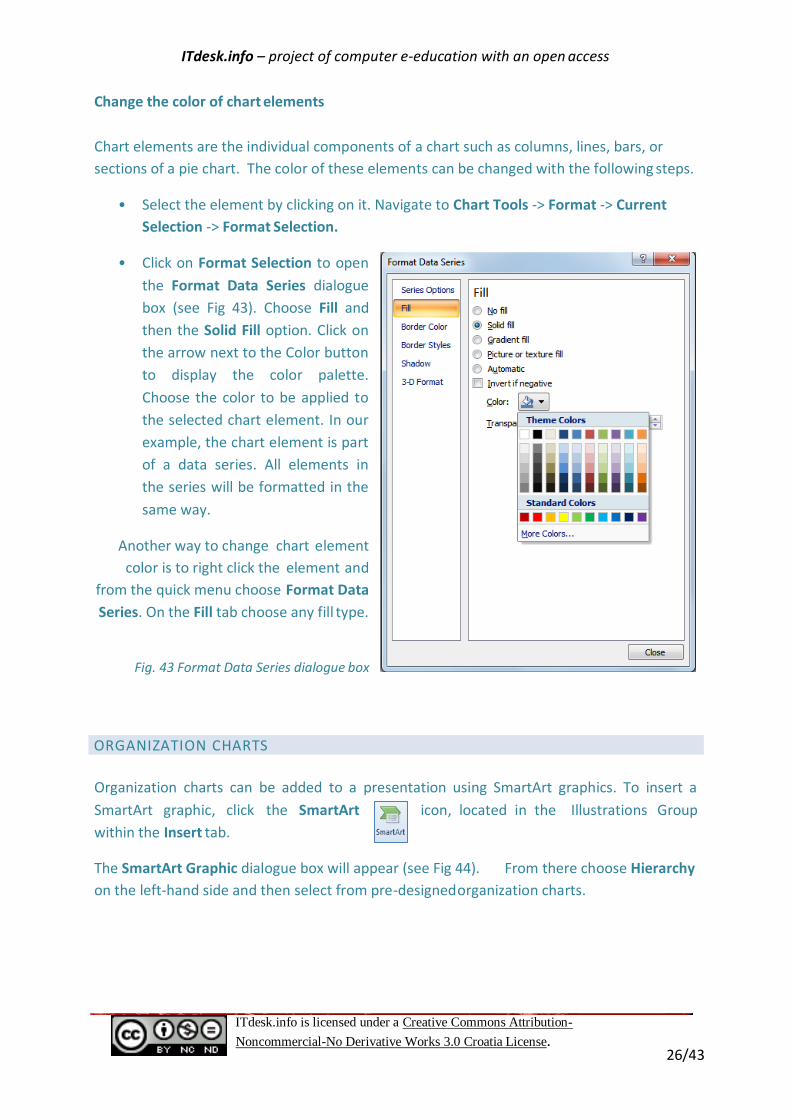
Change the color of chart elements
Chart elements are the individual components of a chart such as columns, lines, bars, or
sections of a pie chart. The color of these elements can be changed with the following steps.
• Select the element by clicking on it. Navigate to Chart Tools -> Format -> Current
Selection -> Format Selection.
• Click on Format Selection to open
the Format Data Series dialogue
box (see Fig 43). Choose Fill and
then the Solid Fill option. Click on
the arrow next to the Color button
to display the color palette.
Choose the color to be applied to
the selected chart element. In our
example, the chart element is part
of a data series. All elements in
the series will be formatted in the
same way.
Another way to change chart element
color is to right click the element and
from the quick menu choose Format Data
Series. On the Fill tab choose any fill type.
Fig. 43 Format Data Series dialogue box
ORGANIZATION CHARTS
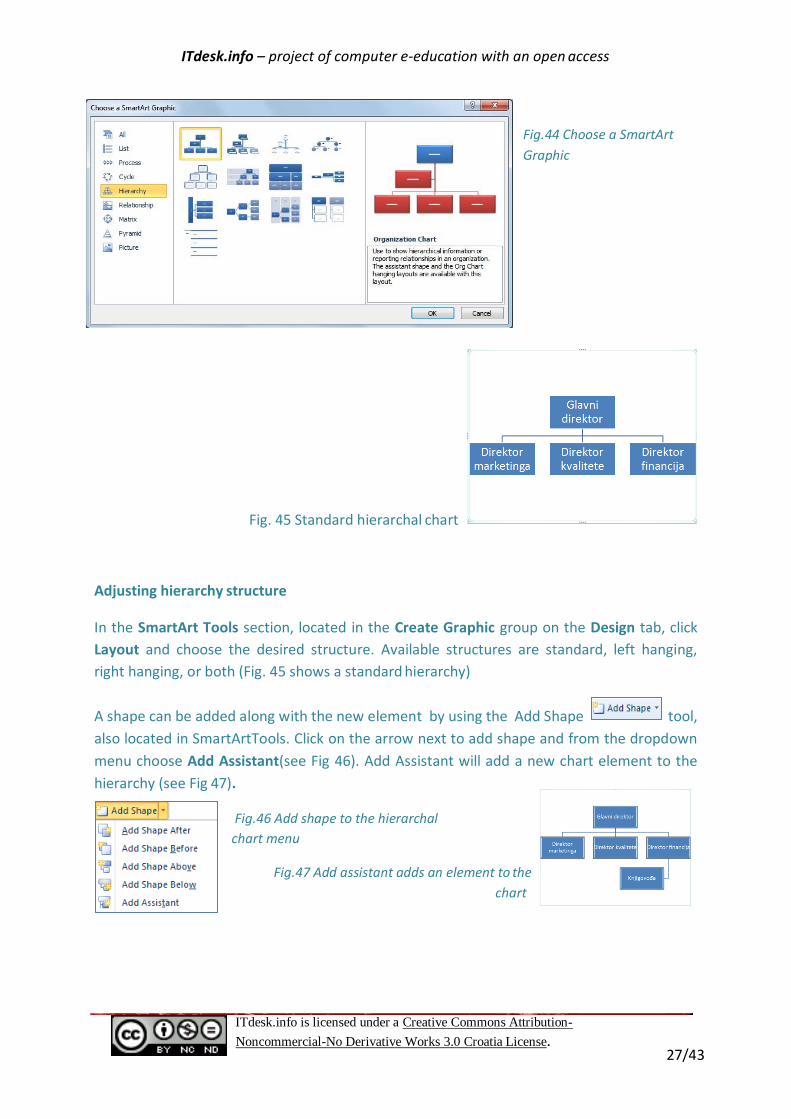
Organization charts can be added to a presentation using SmartArt graphics. To insert a
SmartArt graphic, click the SmartArt icon, located in the Illustrations Group
within the Insert tab.
The SmartArt Graphic dialogue box will appear (see Fig 44). From there choose Hierarchy
on the left-hand side and then select from pre-designed organization charts.
ITdesk.info – project of computer e-education with an open access
ITdesk.info is licensed under a Creative Commons Attribution-
Noncommercial-No Derivative Works 3.0 Croatia License. 27/43
Fig. 45 Standard hierarchal chart
Adjusting hierarchy structure
Fig.44 Choose a SmartArt
Graphic
In the SmartArt Tools section, located in the Create Graphic group on the Design tab, click
Layout and choose the desired structure. Available structures are standard, left hanging,
right hanging, or both (Fig. 45 shows a standard hierarchy)
A shape can be added along with the new element by using the Add Shape tool,
also located in SmartArtTools. Click on the arrow next to add shape and from the dropdown
menu choose Add Assistant(see Fig 46). Add Assistant will add a new chart element to the
hierarchy (see Fig 47).
Fig.46 Add shape to the hierarchal
chart menu
Fig.47 Add assistant adds an element to the
chart

ITdesk.info – project of computer e-education with an open access
ITdesk.info is licensed under a Creative Commons Attribution-
Noncommercial-No Derivative Works 3.0 Croatia License. 28/43
PICTURES, CLIP ART, MEDIA CLIPS
Insert graphic objects in a slide
If a content box on a slide is selected, icons for various types of
object insertion will be visible. By clicking on an icon you can insert a
Table, Chart, SmartArt Graphic, Picture, Clip Art, or Media Clip (see
Fig 48).
Fig.48 Insert Picture icon
Objects can also be inserted using the Insert tab followed by clicking on the appropriate icon
(see Fig 49).
Fig.49 Insert tab
Clicking on an object will select it. To delete an object, first select it and then press the
Delete key.
Copy or move within the presentation and between open presentations
To move an object using the drag and drop method press and hold down the left mouse
button over the object, drag the cursor to the desired location, and release the button.
To move an object to a new slide in the same or a different presentation, select the object
and right click it to open the quick menu. In the quick menu, select the Cut command.
Position the insertion point in the slide the object will be moved to, and right click. From the
quick menu select the Paste command.
Alternatively, the object can be selected from Slides and pulled to another slide, including an
empty slide.
To copy an object to a slide in the same or a different presentation, select the object and
right click to open the quick menu. In the quick menu, choose the Copy command. Position
the insertion point on the slide the object will be moved to, right click and select the Paste
command.

ITdesk.info – project of computer e-education with an open access
ITdesk.info is licensed under a Creative Commons Attribution-
Noncommercial-No Derivative Works 3.0 Croatia License. 29/43
Resize and delete objects
To resize an object, position the cursor over the object until the pointer changes to a two-
way arrow. Then press and hold down the left mouse button and drag until the object is the
desired size (see Fig 50).
Fig.50 Resize shape
Resizing an object can also be done by right clicking the object, and choosing Format Shape
from the quick menu. In the Format Shape dialog box, choose the Size tab, and enter the
desired values to the Height and Width fields.
Objects can be deleted by selecting the object and pressing the Delete key.
Rotation of the objects
After selecting an object, press and hold the left mouse button over the rotation regulator,
which is recognizable by the green ball (see Fig 51). Then drag the pointer in the desired
direction and release the mouse button.
Fig. 51 Rotate an object
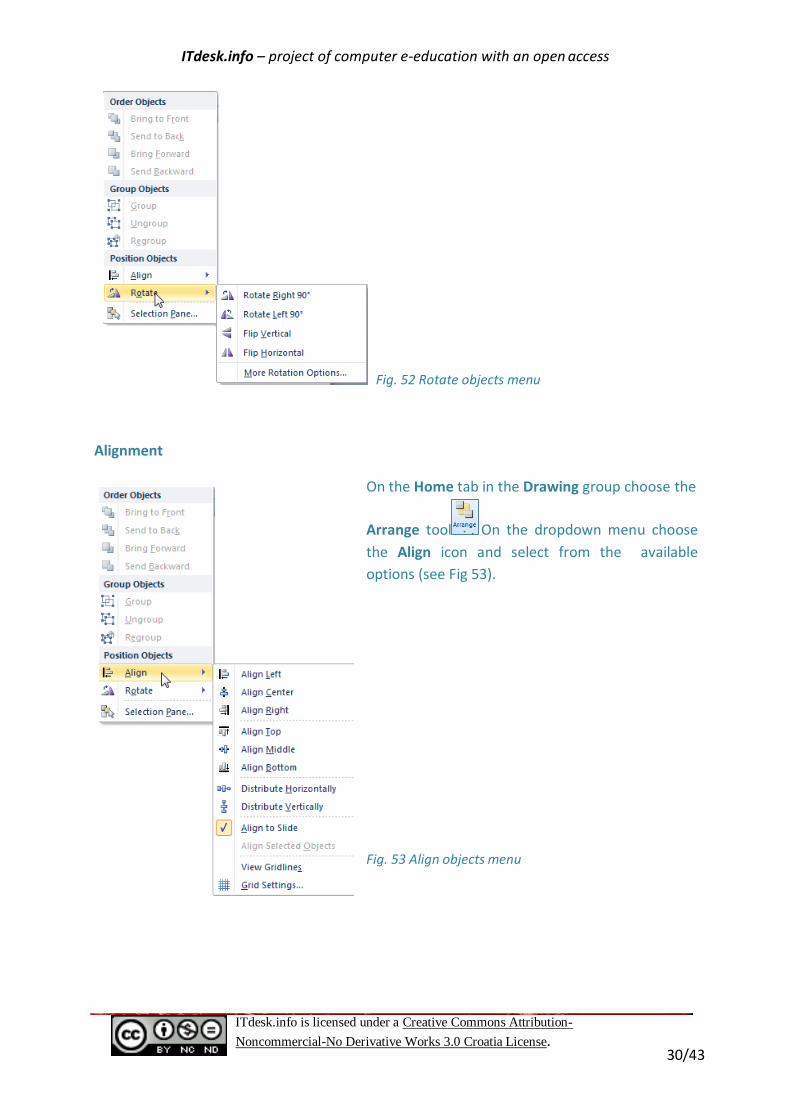
Objects can also be rotated using the Home tab. In the Drawing group choose Arrange .
On the dropdown menu, choose Rotate and select one of the displayed options (see Fig 52).
ITdesk.info – project of computer e-education with an open access
ITdesk.info is licensed under a Creative Commons Attribution-
Noncommercial-No Derivative Works 3.0 Croatia License. 30/43
Fig. 52 Rotate objects menu
Alignment
On the Home tab in the Drawing group choose the
Arrange tool . On the dropdown menu choose
the Align icon and select from the available
options (see Fig 53).
Fig. 53 Align objects menu
ITdesk.info – project of computer e-education with an open access
ITdesk.info is licensed under a Creative Commons Attribution-
Noncommercial-No Derivative Works 3.0 Croatia License. 31/43
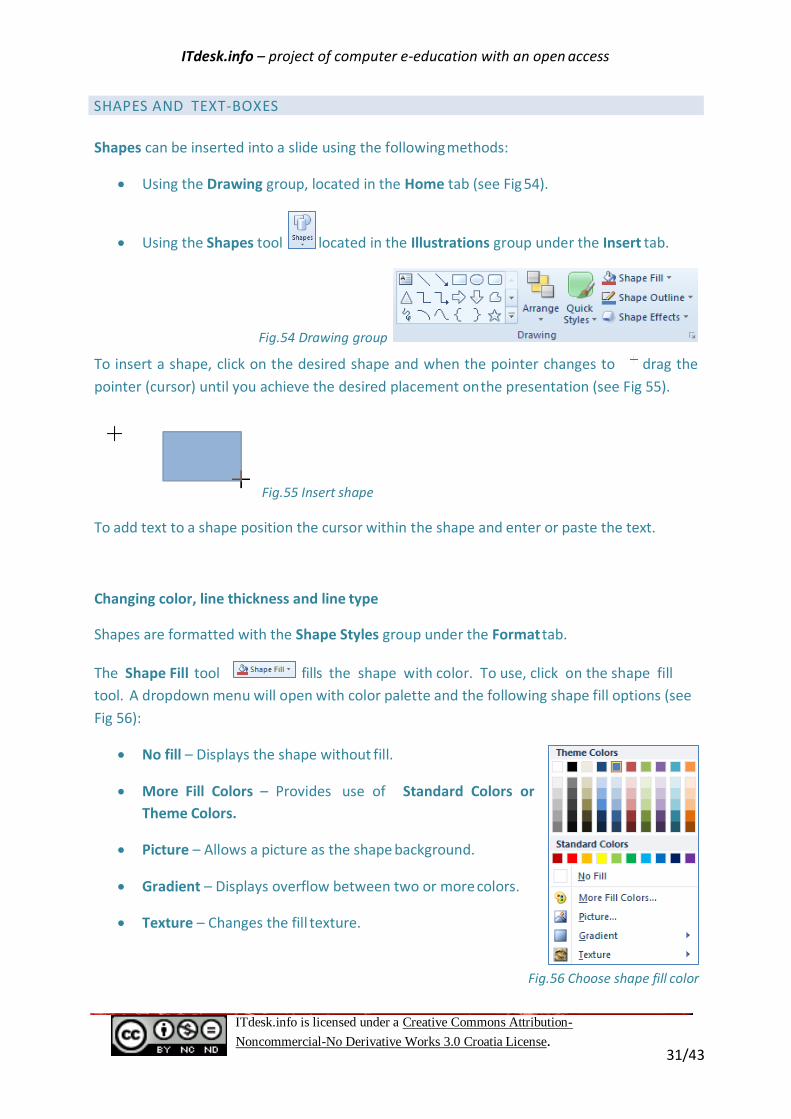
SHAPES AND TEXT-BOXES
Shapes can be inserted into a slide using the following methods:
Using the Drawing group, located in the Home tab (see Fig 54).
Using the Shapes tool located in the Illustrations group under the Insert tab.
Fig.54 Drawing group
To insert a shape, click on the desired shape and when the pointer changes to drag the
pointer (cursor) until you achieve the desired placement on the presentation (see Fig 55).
Fig.55 Insert shape
To add text to a shape position the cursor within the shape and enter or paste the text.
Changing color, line thickness and line type
Shapes are formatted with the Shape Styles group under the Format tab.
The Shape Fill tool fills the shape with color. To use, click on the shape fill
tool. A dropdown menu will open with color palette and the following shape fill options (see
Fig 56):
No fill – Displays the shape without fill.
More Fill Colors – Provides use of Standard Colors or
Theme Colors.
Picture – Allows a picture as the shape background.
Gradient – Displays overflow between two or more colors.
Texture – Changes the fill texture.
Fig.56 Choose shape fill color
ITdesk.info – project of computer e-education with an open access
ITdesk.info is licensed under a Creative Commons Attribution-
Noncommercial-No Derivative Works 3.0 Croatia License. 32/43
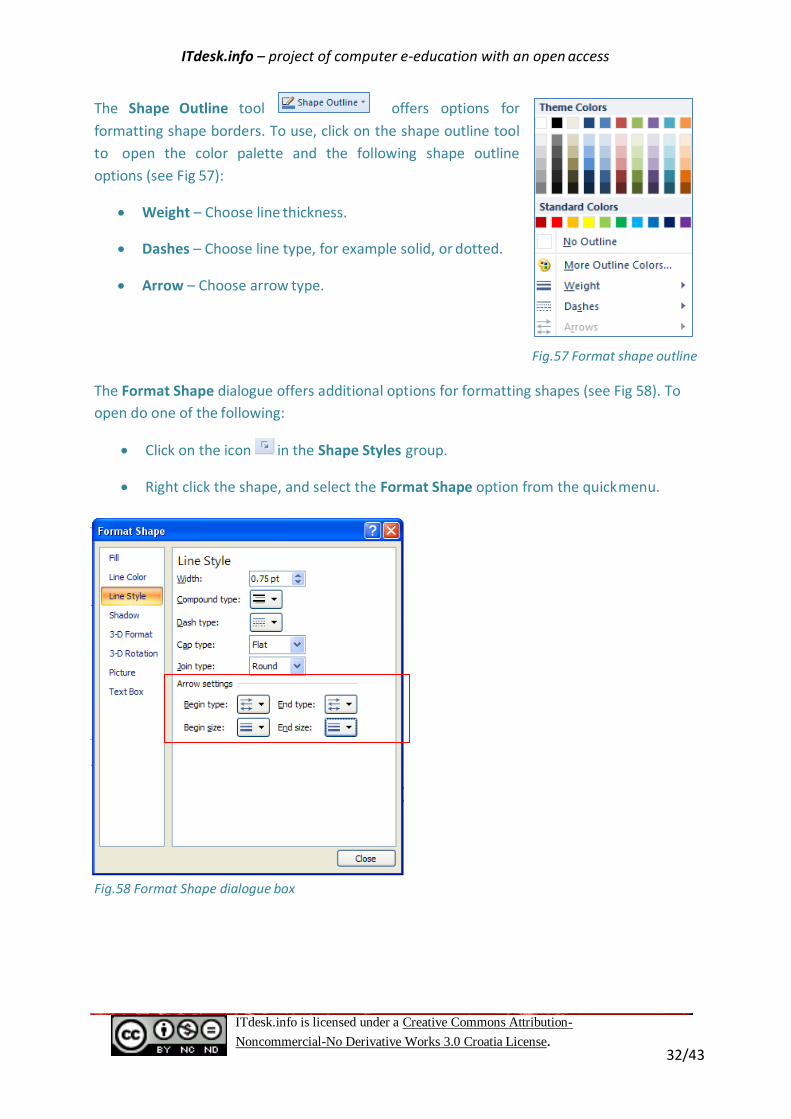
The Shape Outline tool offers options for
formatting shape borders. To use, click on the shape outline tool
to open the color palette and the following shape outline
options (see Fig 57):
Weight – Choose line thickness.
Dashes – Choose line type, for example solid, or dotted.
Arrow – Choose arrow type.
Fig.57 Format shape outline
The Format Shape dialogue offers additional options for formatting shapes (see Fig 58). To
open do one of the following:
Click on the icon in the Shape Styles group.
Right click the shape, and select the Format Shape option from the quick menu.
Fig.58 Format Shape dialogue box
ITdesk.info – project of computer e-education with an open access
ITdesk.info is licensed under a Creative Commons Attribution-
Noncommercial-No Derivative Works 3.0 Croatia License. 33/43
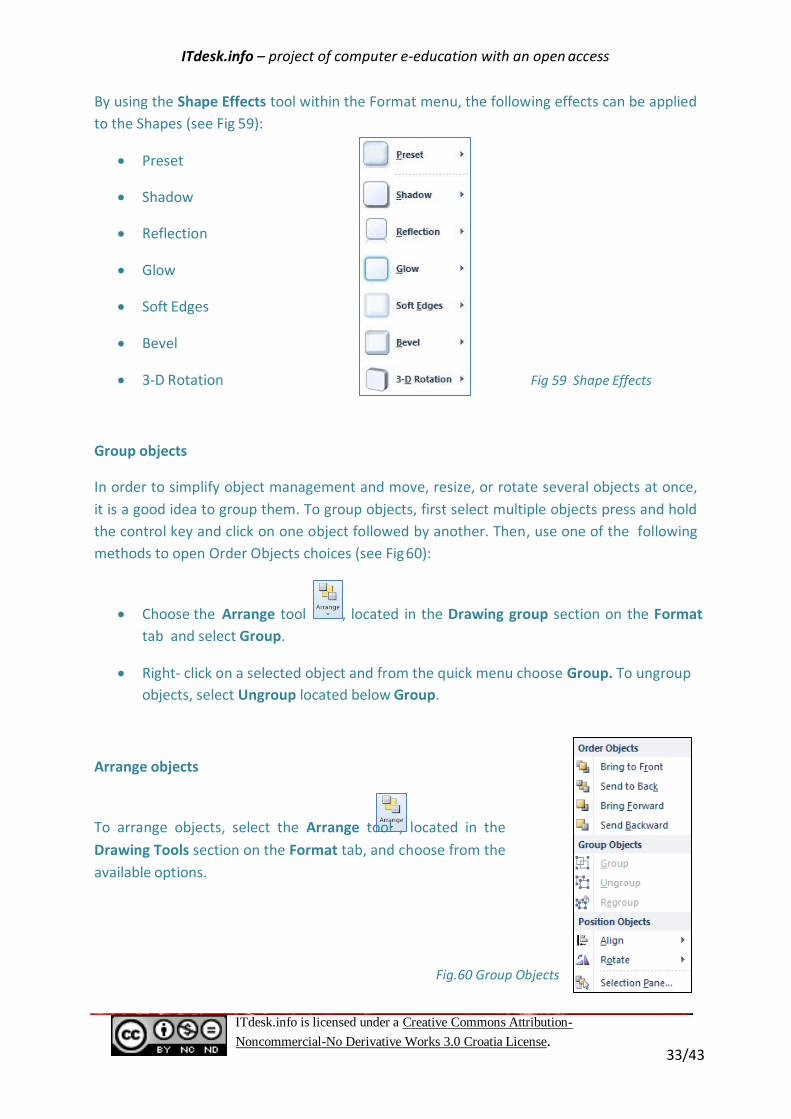
By using the Shape Effects tool within the Format menu, the following effects can be applied
to the Shapes (see Fig 59):
Preset
Shadow
Reflection
Glow
Soft Edges
Bevel
3-D Rotation Fig 59 Shape Effects
Group objects
In order to simplify object management and move, resize, or rotate several objects at once,
it is a good idea to group them. To group objects, first select multiple objects press and hold
the control key and click on one object followed by another. Then, use one of the following
methods to open Order Objects choices (see Fig 60):
Choose the Arrange tool , located in the Drawing group section on the Format
tab and select Group.
Right- click on a selected object and from the quick menu choose Group. To ungroup
objects, select Ungroup located below Group.
Arrange objects
To arrange objects, select the Arrange tool , located in the
Drawing Tools section on the Format tab, and choose from the
available options.
Fig.60 Group Objects

ITdesk.info – project of computer e-education with an open access
ITdesk.info is licensed under a Creative Commons Attribution-
Noncommercial-No Derivative Works 3.0 Croatia License. 34/43
The green shape is moved forward by one level.
The green shape moves in front of all other objects.
The green shape moves back one level.
The green shape moves behind all other objects.
Send Backward
Send to Back
Bring To Front
ITdesk.info – project of computer e-education with an open access
ITdesk.info is licensed under a Creative Commons Attribution-
Noncommercial-No Derivative Works 3.0 Croatia License. 35/43
PRESENTATION OUTPUTS
Slide Transition
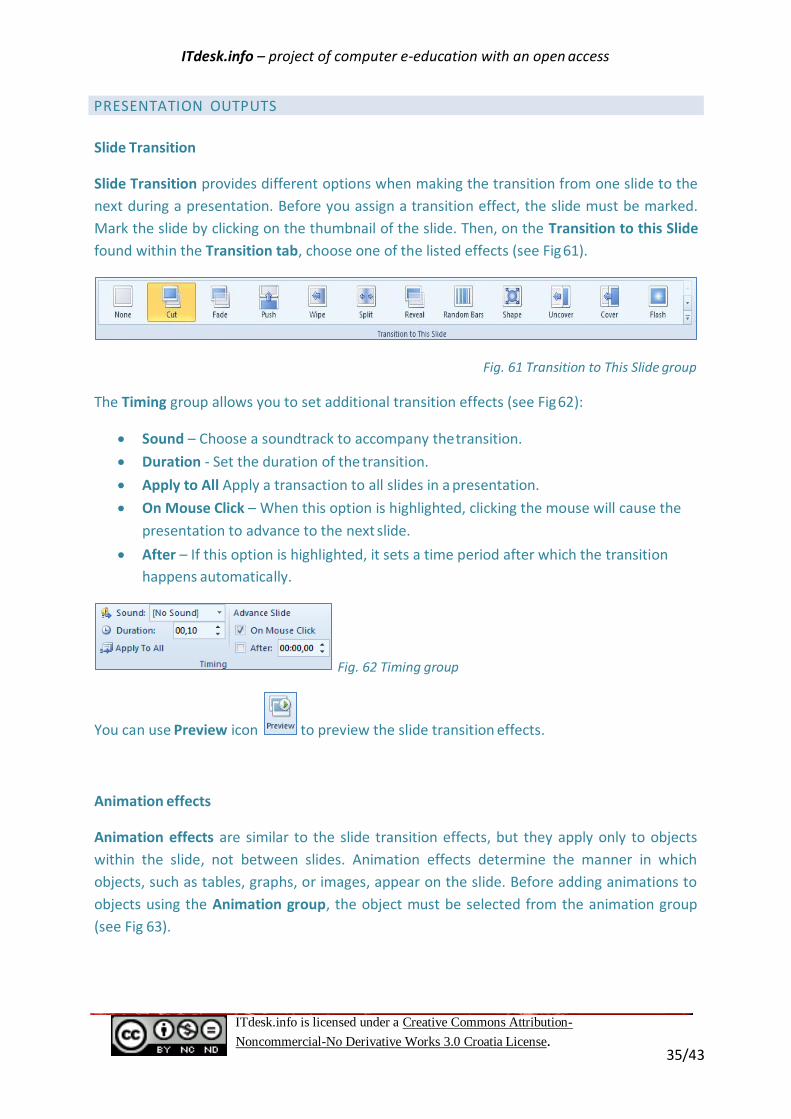
Slide Transition provides different options when making the transition from one slide to the
next during a presentation. Before you assign a transition effect, the slide must be marked.
Mark the slide by clicking on the thumbnail of the slide. Then, on the Transition to this Slide
found within the Transition tab, choose one of the listed effects (see Fig 61).
Fig. 61 Transition to This Slide group
The Timing group allows you to set additional transition effects (see Fig 62):
Sound – Choose a soundtrack to accompany the transition.
Duration - Set the duration of the transition.
Apply to All Apply a transaction to all slides in a presentation.
On Mouse Click – When this option is highlighted, clicking the mouse will cause the
presentation to advance to the next slide.
After – If this option is highlighted, it sets a time period after which the transition
happens automatically.
Fig. 62 Timing group
You can use Preview icon to preview the slide transition effects.
Animation effects
Animation effects are similar to the slide transition effects, but they apply only to objects
within the slide, not between slides. Animation effects determine the manner in which
objects, such as tables, graphs, or images, appear on the slide. Before adding animations to
objects using the Animation group, the object must be selected from the animation group
(see Fig 63).

ITdesk.info – project of computer e-education with an open access
ITdesk.info is licensed under a Creative Commons Attribution-
Noncommercial-No Derivative Works 3.0 Croatia License. 36/43
Fig.63 Animation group
Fig. 64 The order of presentation of animation
Select an object such as a picture and move from one icon to another on the amination
group panel (see Fig 64). This allows you to examine the different types of animation
effects. To add an animation, click on Add Animation. Click on the type of animation to be
displayed during the presentation.
Clicking on the icon will open the Animation Pane dialog box. As shown by
Fig 65, this pane provides an overview of all animated slide objects, such as picture 10.
Clicking an object within the Animation pane in the drop-down menu allows for the setting
of various options:
Start On Click – Animation is activated when the mouse is clicked.
Start With Previous – Object animation runs at the same time as the previous object
animation.
Start After Previous – Object animation runs after the previous object animation.
Effect Options – Additional customization effects options.
Timing – Additional animation timing options.

ITdesk.info – project of computer e-education with an open access
ITdesk.info is licensed under a Creative Commons Attribution-
Noncommercial-No Derivative Works 3.0 Croatia License. 37/43
Hide Advanced Timeline – Hides the advanced display
timing animation in the task pane.
Remove – Removes the animation.
Fig.65 Animation pane
Press the Play button to preview animations.
When an animation effect has been set, the Timing
of the effect can be set from the Timing group. The
settings are (see Fig 66):
Fig.66 Timing group
Start – Set when the animation starts.
Duration – How long the animation should continue.
Delay – How long to delay the animation after the start.
Reorder Animation – Change the order the animations will run.
Click Preview to the far left on the animation pane to preview all slide animations.
Notes for the presenter
In the bottom of the presentation window, there is area to enter notes for
speaker/presenter (see Fig 67).
Fig.67 Notes Pane

ITdesk.info – project of computer e-education with an open access
ITdesk.info is licensed under a Creative Commons Attribution-
Noncommercial-No Derivative Works 3.0 Croatia License. 38/43
Output format for the presentation
Selecting the appropriate output format for the presentation is done using the Page Setup
group found under Design. Click on the Page Setup icon . In the Page Setup dialog box select the appropriate show format from the Slides sized for option.
Hide and unhide slides
PowerPoint includes the option to hide or unhide slides within the presentation. This can be
useful when the presenter is unsure about displaying a slide. Rather than deleting the slide,
it can be hidden and will not be displayed. In this way, the slide can easily be unhidden at a
later time.
To hide a slide, right click on the slide within the slide pane and choose Hide slide. To unhide
a slide, do the same procedure, but this time choose Unhide slide.
* Hidden slides are marked by a crossed out number.
Check spelling and grammar
Use the Spelling tool in the Proofing group of the Review tab
to perform a spell check of the presentation (see Fig 68).
Fig.68 Proofing group
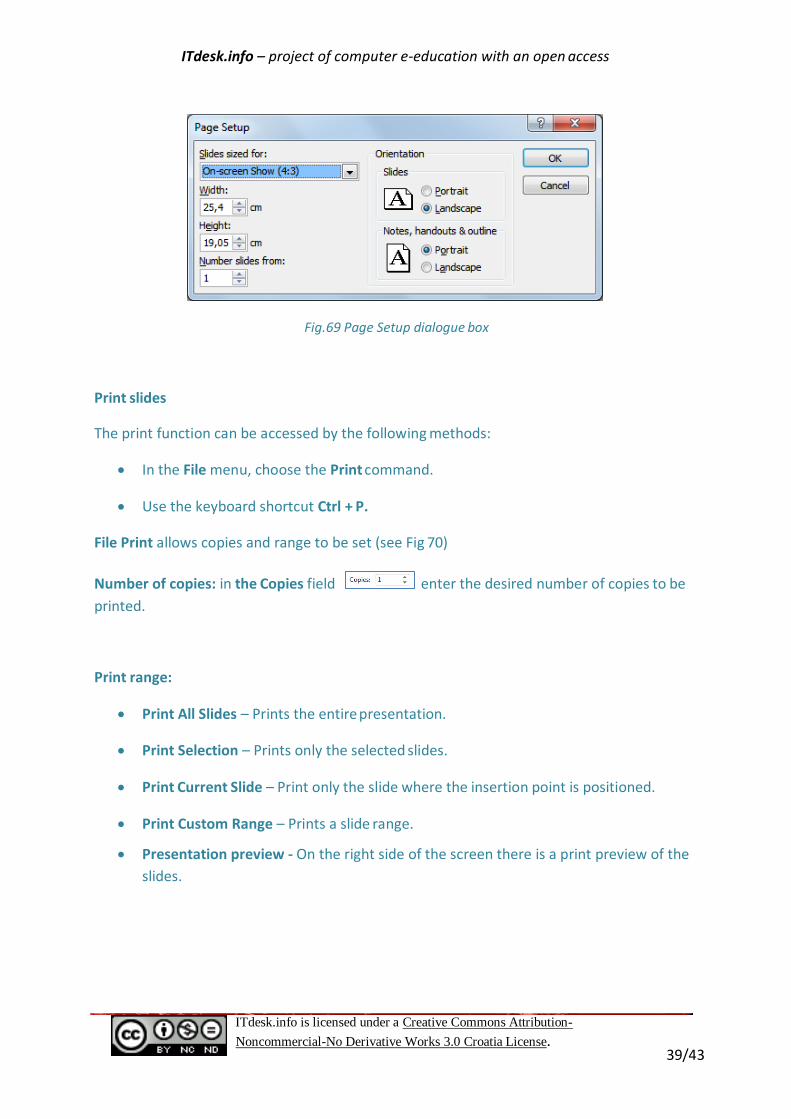
Change page setup and slide size
Slide orientation is changed from the Design tab, located within the Page Setup group. Click
on the Slide Orientation icon .
Slide size can be changed via the Design tab, within the Page Setup group, using Page Setup
. In the Page Setup dialog box, options for slide size are Width, Height, orientation of
Slides, and orientation of Notes, handouts & outline (see Fig 69).
ITdesk.info – project of computer e-education with an open access
ITdesk.info is licensed under a Creative Commons Attribution-
Noncommercial-No Derivative Works 3.0 Croatia License. 39/43
Fig.69 Page Setup dialogue box
Print slides
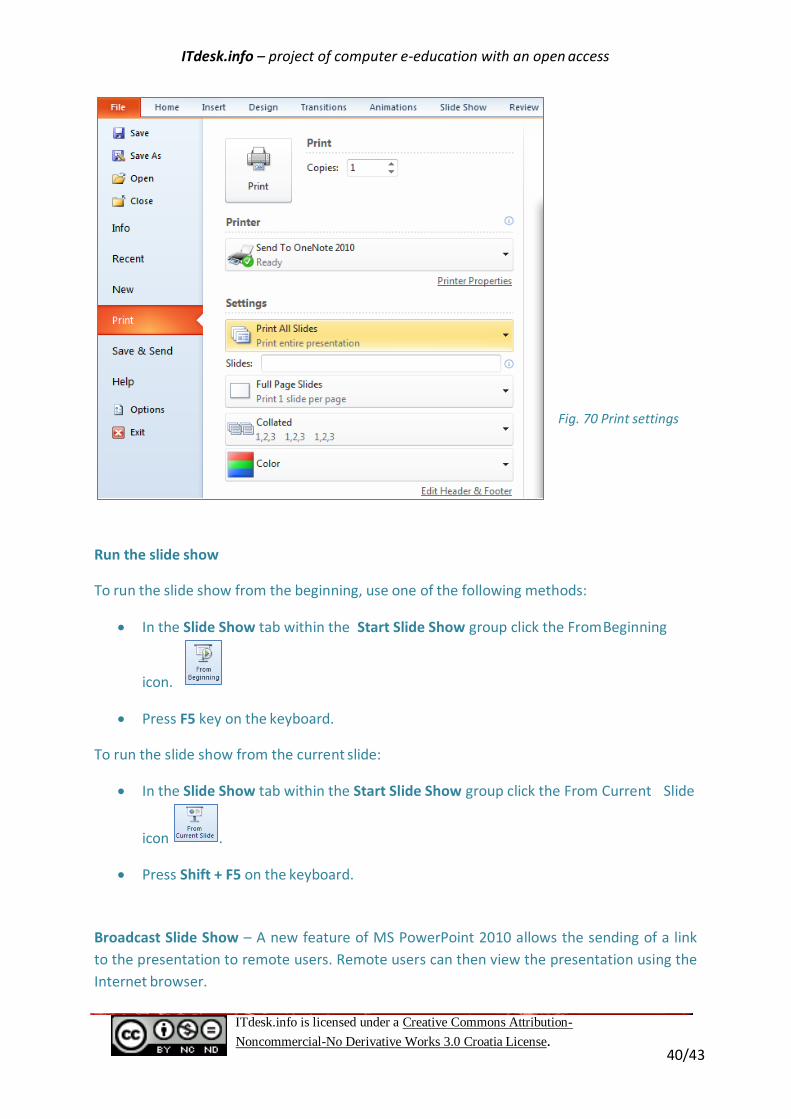
The print function can be accessed by the following methods:
In the File menu, choose the Print command.
Use the keyboard shortcut Ctrl + P.
File Print allows copies and range to be set (see Fig 70)
Number of copies: in the Copies field enter the desired number of copies to be
printed.
Print range:
Print All Slides – Prints the entire presentation.
Print Selection – Prints only the selected slides.
Print Current Slide – Print only the slide where the insertion point is positioned.
Print Custom Range – Prints a slide range.
Presentation preview - On the right side of the screen there is a print preview of the
slides.
ITdesk.info – project of computer e-education with an open access
ITdesk.info is licensed under a Creative Commons Attribution-
Noncommercial-No Derivative Works 3.0 Croatia License. 40/43
Fig. 70 Print settings
Run the slide show
To run the slide show from the beginning, use one of the following methods:
In the Slide Show tab within the Start Slide Show group click the From Beginning
icon.
Press F5 key on the keyboard.
To run the slide show from the current slide:
In the Slide Show tab within the Start Slide Show group click the From Current Slide
icon .
Press Shift + F5 on the keyboard.
Broadcast Slide Show – A new feature of MS PowerPoint 2010 allows the sending of a link
to the presentation to remote users. Remote users can then view the presentation using the
Internet browser.
ITdesk.info – project of computer e-education with an open access
ITdesk.info is licensed under a Creative Commons Attribution-
Noncommercial-No Derivative Works 3.0 Croatia License. 41/43
Custom Slide Show – A frame in which we can determine a new slide sequence.
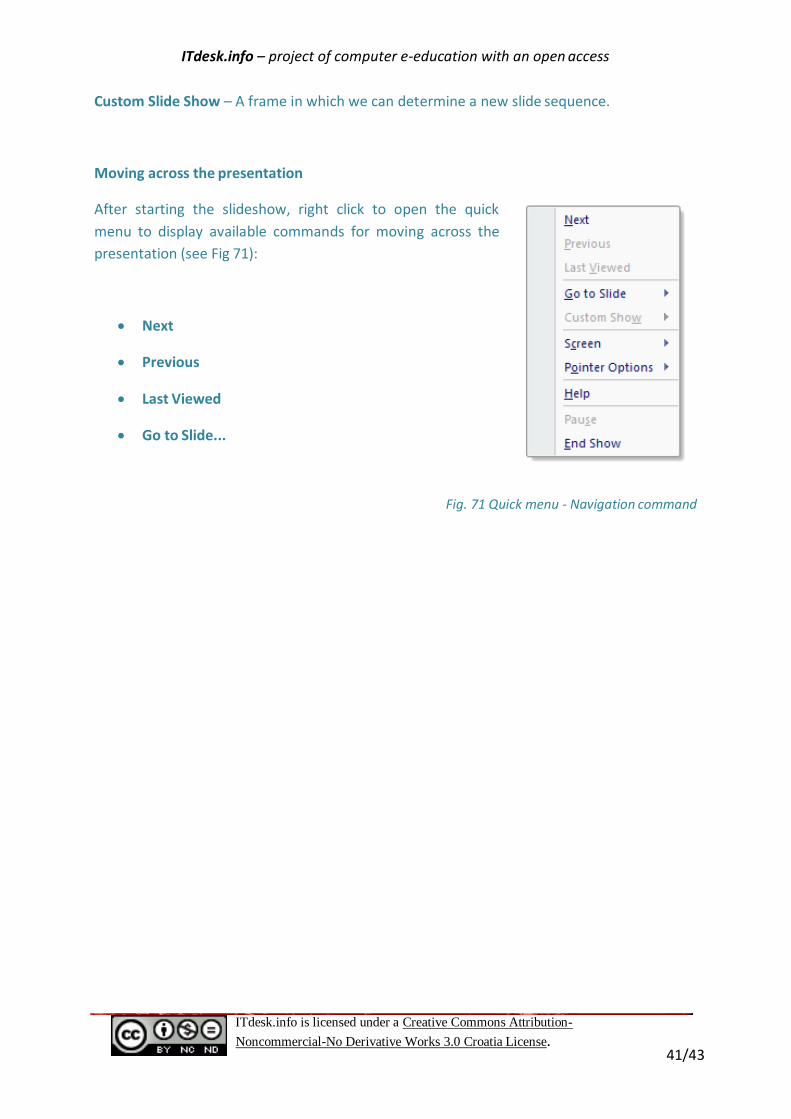
Moving across the presentation
After starting the slideshow, right click to open the quick
menu to display available commands for moving across the
presentation (see Fig 71):
Next
Previous
Last Viewed
Go to Slide...
Fig. 71 Quick menu - Navigation command
ITdesk.info – project of computer e-education with an open access
ITdesk.info is licensed under a Creative Commons Attribution-
Noncommercial-No Derivative Works 3.0 Croatia License. 42/43
This handbook is intended for learning along with materials published at the following links:
*Notes:
http://www.itdesk.info/Microsoft PowerPoint 2010 notes.pdf
*Video presentations for the basic use of Microsoft PowerPoint 2010:
http://www.itdesk.info/en/microsoft-powerpoint-2010-creating-presentation-1/
http://www.itdesk.info/en/microsoft-powerpoint-2010-creating-presentation-2/
http://www.itdesk.info/en/microsoft-powerpoint-2010-creating-presentation-3/
*Sample exam:
http://www.itdesk.info/sample exam/sample exam module 6.pdf
*Exam solution for this sample exam:
http://www.itdesk.info/en/exam-solution-module-6/
*Quiz for self-evaluation:
http://www.itdesk.info/en/developing-presentations-quiz/
http://www.itdesk.info/en/developing-presentations-quiz-2/
(to open the link within the .pdf document, press the left mouse button on one of the above
links)

ITdesk.info – project of computer e-education with an open access
ITdesk.info is licensed under a Creative Commons Attribution-
Noncommercial-No Derivative Works 3.0 Croatia License. 43/43
Terms of use:
All freeware programs and services listed on the ITdesk Home Web site at ITdesk.info are the sole property of their respective authors. Microsoft, Windows, and Windowsxx are registered trademarks of Microsoft Corporation. Other registered trademarks used on the ITdesk Home Web site are the sole property of their respective owners. If you have questions about using or redistributing any program, please refer to the program license agreement (if any) or contact: [email protected]
These sites contain links to other web sites or resources. ITdesk.info team is not responsible for the text and / or advertising content or products that are on these sites / resources provided, as is not responsible for any content that is available through them, nor the possibility of the use or the accuracy of the content. Use links at your own risk. Also, ITdesk.info team does not guarantee:
- that the content on this web site is free from error or suitable for any purpose - that these web sites or web services will function without error or interruption - would be appropriate for your needs - that implementing such content will not violate patents, copyrights, trademark or
other rights of any third party
If you disagree with the general terms of use or if you are not satisfied with the sites we provide, stop using this web site and web services. ITdesk.info team is not responsible to you or any third party for any resulting damages, whether direct, indirect, incidental or consequential, associated with or resulting from your use, misuse of this web site or web services. Although your claim may be based on warranty, contract violation or any other legal footing, regardless whether we are informed about the possibility of such damages, shall be released from all liability. Accepting the limitations of our responsibilities is a necessary prerequisite of using these web pages and web services.
Please note that all mentioned software, in this or other documents published on ITdesk.info, is stated only for educational or exemplary purposes and that we, in any case or manner, do not prefer these software over the other, similar software mentioned or not mentioned in the materials. Any statement that would suggest that we prefer some software over the other, mentioned or not mentioned in materials, will be considered as false statement. Our direct and unconditional support have only open source software that allows users to become digitally literate, use computer and participate in the modern information society without barriers.
The website www.ITdesk.info was launched by Non-governmental Organization “Open Society for the Idea Exchange ODRAZI” in order to actively promote human rights to free access to information and human rights to education.
Feel free to copy and distribute this document, provided that you do not change anything in it!

ITdesk.info is licensed under a Creative Commons Attribution-
Noncommercial-No Derivative Works 3.0 Croatia License. 44/43
ITdesk.info – project of computer e-education with an open access
project of computer e-education with open access
Publisher:
Open Society for Idea Exchange (ODRAZI), Zagreb
ISBN: 978-953-7908-17-1