Half-Pint Homestead 12 tray Hydroponic Fodder System Plans...
32
www.half-pinthomestead.com Half-Pint Homestead 12 tray Hydroponic Fodder System Plans and Growing Instructions Copywrited material—All Rights Reserved. For personal use by the Purchaser only. Not to be copied for resale nor used to build units for resale.
Transcript of Half-Pint Homestead 12 tray Hydroponic Fodder System Plans...

www.half-pinthomestead.com
Half-Pint Homestead
12 tray
Hydroponic Fodder System
Plans and Growing Instructions
Copywrited material—All Rights Reserved. For personal use by the
Purchaser only. Not to be copied for resale nor used to build units
for resale.

1
www.half-pinthomestead.com
Improve Your Feed Program
With Fodder
Good feed doesn’t have to cost a fortune. Fodder is over 80% digestible and is filled with vitamins and living enzymes that result in shiny coats, faster weight gain, and greater fertility. Fodder is grown in a climate controlled environment and is not affected by outside weather conditions. The entire mat, roots and all, is fed so there is no waste at all. Looking for a better way to feed your livestock? Are you tired of wondering what is in those “mystery pel-lets”? Grow your own wheat Fodder and control your feed from start to finish. Purchase your wheat locally and cut out the big corporations all together. The pro-cess of growing Fodder makes the protein and energy in wheat more available to your animals and increases the vitamin content by over 200%.
The Half-Pint Homestead 6 tray Fodder system de-scribed in this E-book is designed with the small or ur-ban homesteader in mind. It is easy to build and use. The system takes care of rinsing and watering for you. Simply fill your trays with grain and watch them grow into lush green Fodder mats. Depending on the price of your grain, each tray can cost as little as 40 cents!

2
www.half-pinthomestead.com
Why Grow Fodder?
Efficiency Fodder is 80% digestible as opposed to about 30% digestibility for dry grain. Save Money Fodder is very cost effective. You are basically creating pasture out of water and thin air. One pound of grain translates into about 6 pounds of Fodder. Reduced Waste The entire mat is eagerly consumed, roots and all. No more wasted feed. Provides Superior Nutrition Fodder provides a much higher protein and vitamin content than dry grain. Since the mat is living, it also provides enzymes and micro-nutrients that are not available in dry feed. Year Round Green Feed Enjoy the rich milk and eggs one usually gets only during the Spring year round. Saves Water It takes much less water to grow Fodder than to water pasture. Water can be re-circulated through the system and then used as a nutrient rich water for other crops. Peace of Mind Grow fodder regardless of local weather conditions. A year's worth of grain can be purchased while prices are low and easily stored to be used as needed. Saves Space Growing Fodder takes much less land than growing pasture for much more return. In just 4 square feet, the 6 tray Fodder Kit will feed one of the following: 1 horse, 1 dry cow, 8-10 goats, 40 chickens, or 30 rabbits

3
www.half-pinthomestead.com
Fodder FAQs
What kinds of animals will eat Fodder? Anything that can eat hay or grain will do well on fodder. This includes: rabbits, poultry, pigs, goats, sheep, cows, llamas, alpacas, and equines. How much Fodder should I feed? The recommended feeding rate of Fodder is 1 lb to 100lb body-weight. This should be increased to 2-3 lb for 100 lb bodyweight for rapidly growing, pregnant, or heavily lactating animals. Will Fodder replace hay? While Fodder is highly nutritious and digestible, it does not con-tain a sufficient amount of long fibers for ruminants such as sheep, goats, llamas, and cattle. Therefore some sort of hay must be provided. However; the hay can be very poor quality and they will eat considerably less of it. Hay is less vital for poul-try, pigs, horses, and rabbits but should be offered. Can Fodder replace grain? Most modern farm animals have been bred for maximum pro-duction requiring concentrated feeds such as grain. Fodder has more available nutrients than grain and should be a good re-placement. However; every animal is different so it is up to the you to be responsive to the animal's needs. There is mold on my Fodder! Fodder contains lots of nutrients and mold likes them just as much as animals do. Mold is always an potential issue but can be controlled with proper management. What Grains work for Fodder? Wheat and Barley are the only grains that sprout and grow quickly enough for good Fodder.

4
www.half-pinthomestead.com
Is It Worth It?
There are many reasons to feed Fodder. Having a clean, reliable source of feed that is also affordable is a great comfort to me. Yet there is no denying that growing Fodder is a lot more work and worry that simply opening a bag of feed and shoveling a few scoops out. Especially now, when Spring has truly sprung and the world is greening around me, it is easy to wonder if it is all worth it. My opinion is a resounding YES. While economics are important to me, and I am not overly blessed with an abundance of time, I am raising livestock for a very specific reason – a source of healthy and humanely raised food. It is only by feeding my ani-mals the best feed I can possibly give them that I can accom-plish that goal. So what does growing Fodder really take? I spend about 10 minutes a day harvesting, cleaning, and refilling trays. I spend about 10 minutes every other day emptying and refilling the wa-ter tank. These chores fit well with my other animal care tasks. Since my system isn’t completely climate controlled, sometimes my results aren’t quite as good as other. I’ve learned not to worry about it. Even ugly Fodder, as long as it isn’t really moldy, offers much better nutrition than dry grain and there is no Fodder Police to come tell me mine just isn’t up to snuff. The other issue with Fodder is the cost. This year, feed costs were terribly high due to the weather. Next year that may not be the case. Still, at 40 cents per day to feed all my chickens, rab-bits, and goats, I can hardly justify going to regular bagged feed, even if I wasn’t suspicious of “mystery pellets”. I enjoy the peace of mind knowing I am feeding clean, unadulterated grain (it wouldn’t sprout if it had been tampered with) and nothing else. I also like to know I am getting the most for my money by unlocking almost all the nutrients in the wheat I buy. Each person must decide what is best for their livestock. For me, Fodder just makes a lot of sense. Happy Growing!! .

5
www.half-pinthomestead.com
Fodder and Weight?
I thought this would be a good time to discuss the weight of your Fodder. I get many anxious questions about why a batch of Fodder doesn't gain the expected 1:6 ratio. There is really only one reason for that... it didn't absorb as much water. You see, the weight of your finished Fodder really doesn't matter at all. What matters is the weight of the seed you use in the first place. To understand why this is true, you must know the process that makes Fodder such a great nutritious feed. Let's start with a dry wheat kernel. Being a seed, it is simply a storage container and life support system for the tiny wheat embryo that lives in its heart. It's sole purpose is to grow into a wheat plant and make more wheat kernels. When this kernel is eaten in it's dormant form, only about 30% of it is digestible. The rest of those nutrients are locked away, waiting to feed the growing embryo. Something amazing happens when you add water and warmth to that little kernel. The embryo awakens and all those locked away nutrients become available to feed and nurture it. After 6 days or so, about 80% of those nutrients are now available. Basically, by growing your dry grain into Fodder, you make maximum use of what you already have. So why doesn't the finished weight of Fodder matter? Because you are not adding anything to the seed you put in there. Everything you are feeding in your Fodder was already in that grain, you just made it available. The weight gain is basically water. The 1 pound of grain to 6 pounds of Fodder is not written in stone, but it is a handy rule of thumb to figure out how much you should be feeding each animal. For example, if you use 2 1/2 pounds of grain, you can figure 15 pounds of Fodder when you decide how much that tray should feed. We all know feeding animals isn't an exact science, no matter how much we'd like it to be. One animal will gain weight on a ration that another might maintain or even lose weight on. Observation is the key to keeping your critters happy. Start with a rule of thumb, such as the 1:6 ratio and adjust accordingly. If your animals are healthy.... you're doing it right.
6
www.half-pinthomestead.com
Adding Sunflower Seeds to Fodder
If you're anything like me, and I assume most people who enjoy growing Fodder also like experimenting, you've tried one or two things besides grain in your Fodder. I've tried field peas, corn, mung beans, alfalfa seeds, and sunflower seeds. By far my favorite are sunflower seeds. They give the Fodder a great protein and essential fats boost, are easy to get, and are inexpensive. What's not to love? Well, one thing not to love is that sunflower hulls con-tain a chemical that retards both sprouting and root de-velopment. Too many sunflower seeds and you'll find your Fodder suffering for them. The other irritation is that sunflower seeds float and are a pain during the pre-soak and pre-sprout. They tend to float to the top and end up in clumps in your Fodder rather than being spread evenly. There's an easy solution to both of these problems. In-stead of adding your seeds to the pre-soak, simply sprinkle a thin layer of dry sunflower seeds on top after you put your prepared grain in the tray. This keeps the amount low and allows you spread them easily since they are dry. They still sprout just fine and you'll have nice shoots when your Fodder is ready.

7
www.half-pinthomestead.com
Is Bigger Better?
When the ground is covered with snow and my little heaters can't quite keep up, it gets cooler in my house than my usual 73 degrees. Temperature is the key to lush, green Fodder and even 3 degrees can make a couple of inches of growth’s difference as well as a looser root mat, I'm seeing a difference in my Fodder trays. The bottom line is, my Fodder just isn't as pretty as I'm used to right now. There is a temptation to leave it for a couple of extra day, just to get more 'green'. But this invites mold and, if the process that makes Fodder more nutritious than dry wheat is understood, doesn't necessarily offer any benefit. While we associate the green with healthy nutritious feed, it is not actually the green part that contains the most nutrients. It is the act of sprouting the grain itself that turns the indigestible components which make up 70% of dry grain into usable nutrients. 6 day old Fod-der is 80% digestible. This means that feeding a $1 worth of dry grain will give you 30 cents worth of feed, while feeding that same amount of grain grown as Fod-der will give you 80 cents worth of feed. The height of the grass has nothing to do with this, it is the actual sprouting process that matters. In fact, as it gets taller, the green blades begin to build lignin, an in-digestible compound plants use to stiffen themselves, so you are actually losing nutrients. In the case of Fod-der, bigger just isn't better and pretty doesn't matter.

8
www.half-pinthomestead.com
How Much Will a 12 Tray Kit Feed?
Every animal is different, so it's hard to give concrete numbers, but here's an idea of how many animals the 6 Tray kit can feed: 80 chickens or 60 rabbits or 8 full sized goats in milk or 14 mini goats in milk or 2 horses Hay must still be provided for the goats, horses, and cow, however; it can be very poor hay as they need it for roughage, not nutrition. Caged rabbits should also be offered grass hay or other dry feed to counteract the moisture in Fodder.

9
Growing Fodder with the Half-pint Homestead’s Fodder
Kits
Grains to use:
Wheat and Barley are the best grains to grow Fodder. Barley has slightly more nutrition, but if it’s
unavailable or expensive where you live, the others substitute perfectly well. Personally I use wheat. I
had terrible luck with Oats and Barley isn’t readily available here. Other seeds such as sunflower, alfalfa,
bean, pea, and amaranth can be added in small amounts but are not really necessary. Small seeds may
wash though the drainage holes in the trays until the root mat develops at the end of day two. You may
want to soak small seeds separately and sprinkle them on the grain at this time.
Of course for grain to sprout it cannot be heat treated or crushed in any way. It should also be fresh as
viability declines as the grain ages. I highly recommend buying a small amount and testing it before
buying any grain for sprouting in bulk.
Pre-sprout:
I like to pre-sprout my grains in an ice cream bucket for 24 hours before adding to the tray. I add 4-5
cups of grain to the bucket (1 cup of clean, hulled grain is about ½ pound) and fill the bucket to the top
with warm water. I then pour off any floating chaff and refill the bucket. I allow the grain to soak for
thirty minutes and then pour most of the water out. The grain will absorb quite a bit of water and swell,
so it isn’t necessary to completely drain the water. I put the lid on the bucket and place it on top of my
refrigerator to sprout. I rinse it once in the evening drain it lightly and put it back on top of the
refrigerator until morning. I rinse it well again before putting it in the tray, spreading evenly. The pre-
sprouted wheat should have the beginning of a sprout on nearly every grain. I spray the ice cream
bucket and lid with a little bleach water and rinse it out before adding the next day’s grain. I wash the
tray after harvest and before filling with some dish soap and hot water only, but you can spray with a
bleach solution as well.

10
Watering:
One of the keys to growing quality Fodder is consistent watering. The Fodder Kit takes care of that for
you. Water is distributed to the top trays by the pump and trickles into the lower trays via the drainage
holes, finally dripping back into the sump below to be used again. I use an outdoor grade mechanical
timer by Brinks with at least 48 settings (one per half hour in the day). I find 15 minutes every two hours
works well during summer and the period can be lengthened when it get cooler. Barley needs less
water so you should start out with 15 minutes every 6 hours. I set my timer to not run the water during
the time period I generally harvest Fodder and add grain to a new tray. The temperature and humidity
of the room where the Fodder Kit sits will determine the best watering schedule for your situation. As
long as the water doesn’t smell bad (a yeasty smell with some foaming is fine), I’d leave it alone as those
are nutrients that recirculate back to the Fodder as it grows. It is not necessary to add any additional
nutrients to the water. I generally get a couple days before changing water but it does depend on how
clean your grain is and the temperature of your room. The larger systems need the water changed more
often.
Light:
Because the cycle for growing Fodder is only six days, it is not necessary to provide supplemental light.
The Fodder will do fine in any room with a window facing any direction. The grain seed has enough
energy to meet the needs of the Fodder for the short growing period required.
Mold:
I have not had any mold issues with the Fodder Kit. Precise and regular watering help prevent mold as
well as the superior air circulation the design provides. Keep in mind that sprouts look slightly fuzzy as
they are starting to form the root mat and this is not mold. If you are having serious mold issues, a small
amount of bleach or hydrogen peroxide can be added to the first presoak water and the grain rinsed
thoroughly before finishing the pre-sprout routine. A small fan blowing across the trays can help air
circulation and keep mold in check as well.
11
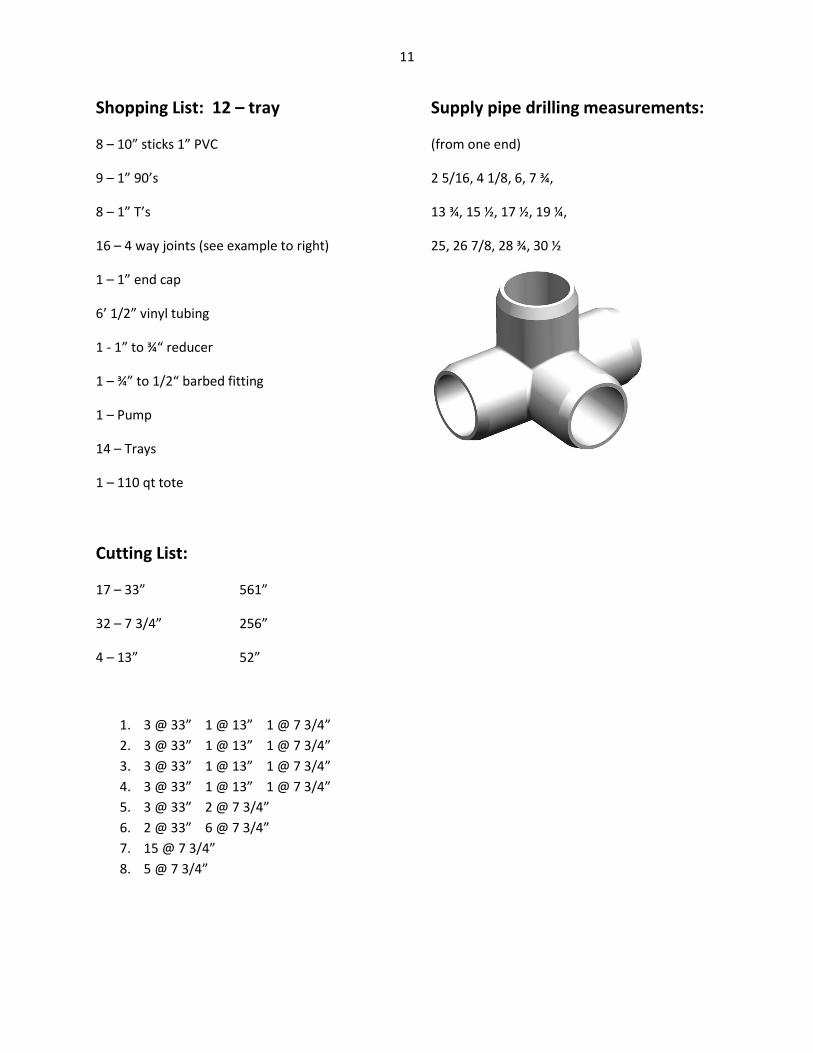
Shopping List: 12 – tray
8 – 10” sticks 1” PVC
9 – 1” 90’s
8 – 1” T’s
16 – 4 way joints (see example to right)
1 – 1” end cap
6’ 1/2” vinyl tubing
1 - 1” to ¾“ reducer
1 – ¾” to 1/2“ barbed fitting
1 – Pump
14 – Trays
1 – 110 qt tote
Cutting List:
17 – 33” 561”
32 – 7 3/4” 256”
4 – 13” 52”
1. 3 @ 33” 1 @ 13” 1 @ 7 3/4”
2. 3 @ 33” 1 @ 13” 1 @ 7 3/4”
3. 3 @ 33” 1 @ 13” 1 @ 7 3/4”
4. 3 @ 33” 1 @ 13” 1 @ 7 3/4”
5. 3 @ 33” 2 @ 7 3/4”
6. 2 @ 33” 6 @ 7 3/4”
7. 15 @ 7 3/4”
8. 5 @ 7 3/4”
Supply pipe drilling measurements:
(from one end)
2 5/16, 4 1/8, 6, 7 ¾,
13 ¾, 15 ½, 17 ½, 19 ¼,
25, 26 7/8, 28 ¾, 30 ½

www.half-pinthomestead.com
Front and Rear Assembly Instructions
Assemble top and bottom rails by putting 2 90’s on 3
33” pieces. Tap with mallet to seat firmly Make sure
the pre-assembled Supply is a top rail with barbed fit-
ting facing out. 33”
33”
Insert 7/34” pieces into the 90’s. Tap with mallet to
seat firmly.
Press 4 way joints onto 7 3/4” pieces. Tap with mal-
let to seat firmly.
33”
7 3/4”
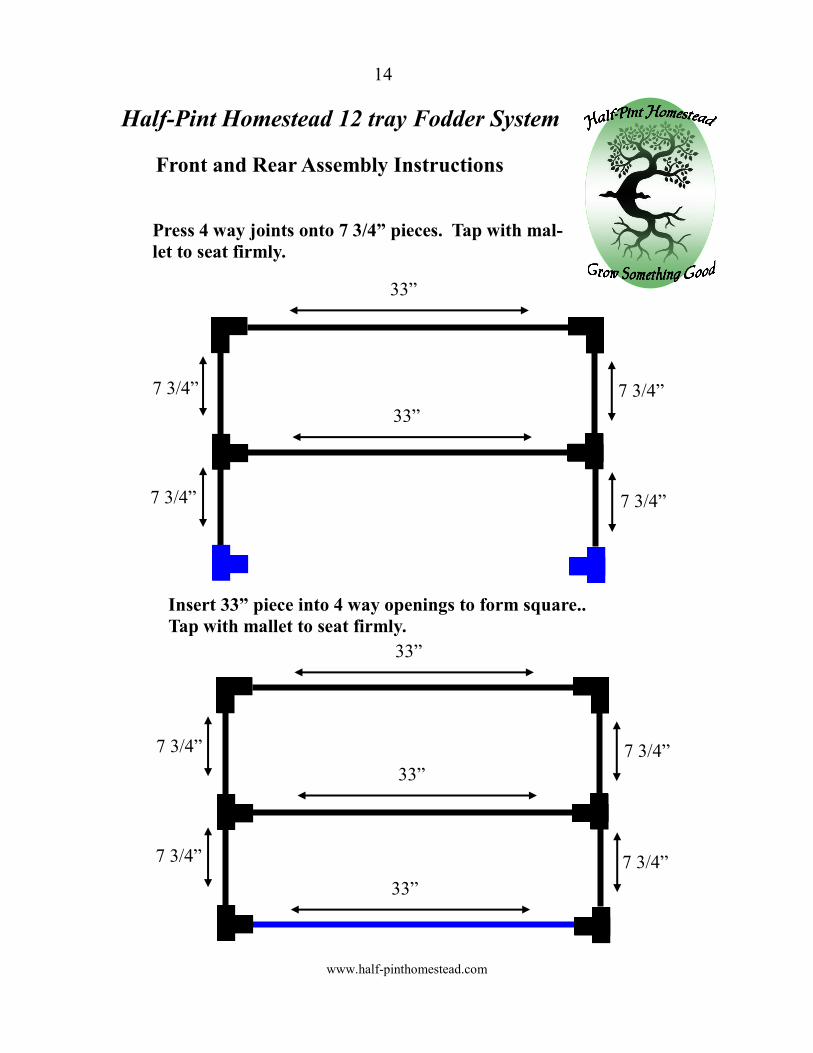
Half-Pint Homestead 12 tray Fodder System
12
7 3/4” 7 3/4”
7 3/4”

www.half-pinthomestead.com
Half-Pint Homestead 12 tray Fodder System
Front and Rear Assembly Instructions
Insert 33” piece into 4 way openings to form square..
Tap with mallet to seat firmly.
33”
33”
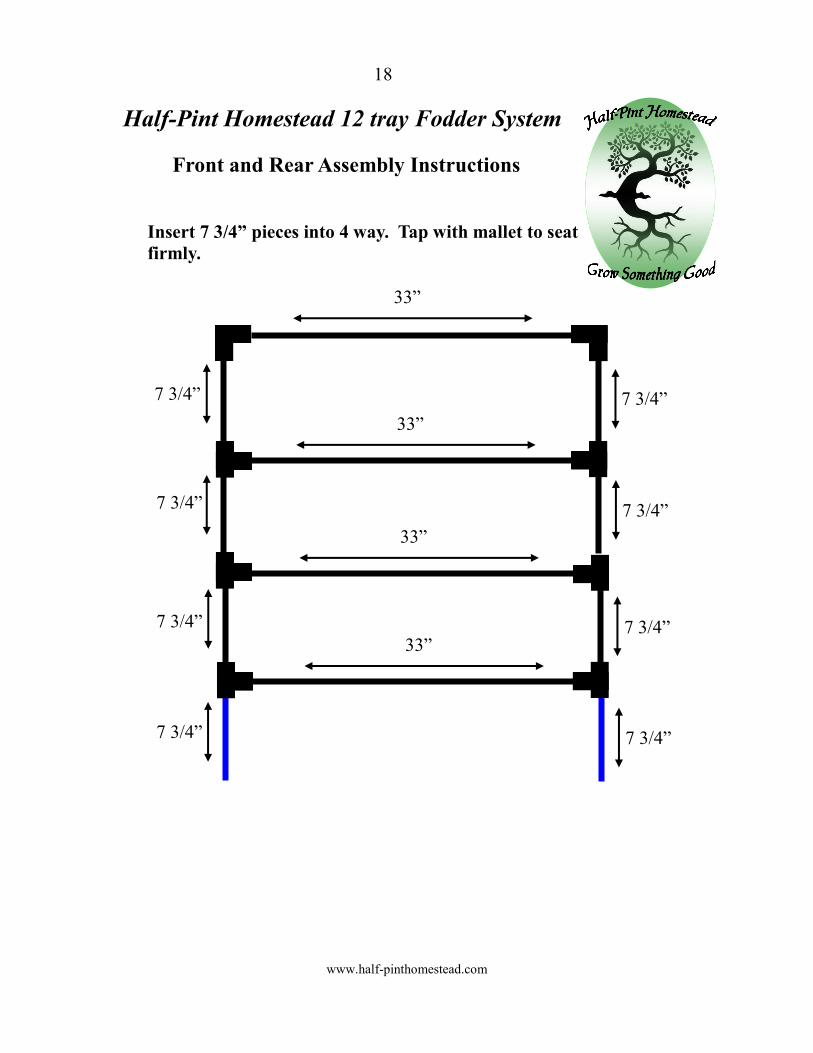
Insert 7 3/4” pieces into 4 way. Tap with mallet to seat
firmly.
33”
33”
13
7 3/4” 7 3/4”
7 3/4” 7 3/4”
7 3/4” 7 3/4”
www.half-pinthomestead.com
Front and Rear Assembly Instructions
Press 4 way joints onto 7 3/4” pieces. Tap with mal-
let to seat firmly.
33”
33”
7 3/4”
33”
33”
Insert 33” piece into 4 way openings to form square..
Tap with mallet to seat firmly.
33”
Half-Pint Homestead 12 tray Fodder System
14
7 3/4”
7 3/4”
7 3/4”
7 3/4” 7 3/4”
7 3/4” 7 3/4”

www.half-pinthomestead.com
Front and Rear Assembly Instructions
Insert 7 3/4” pieces into 4 ways. Tap with mallet to
seat firmly.
33”
33”
7 3/4”
33”
Half-Pint Homestead 12 tray Fodder System
15
7 3/4”
7 3/4”
7 3/4”
7 3/4”
7 3/4”

www.half-pinthomestead.com
Front and Rear Assembly Instructions
Press 4 way joints onto 7 3/4” pieces. Tap with mal-
let to seat firmly.
33”
33”
33”
Half-Pint Homestead 12 tray Fodder System
16
7 3/4”
7 3/4”
7 3/4”
7 3/4”
7 3/4”
7 3/4”
www.half-pinthomestead.com
Front and Rear Assembly Instructions
Insert 33” piece into 4 way openings to form square..
Tap with mallet to seat firmly.
33”
33”
33”
33”
Half-Pint Homestead 12 tray Fodder System
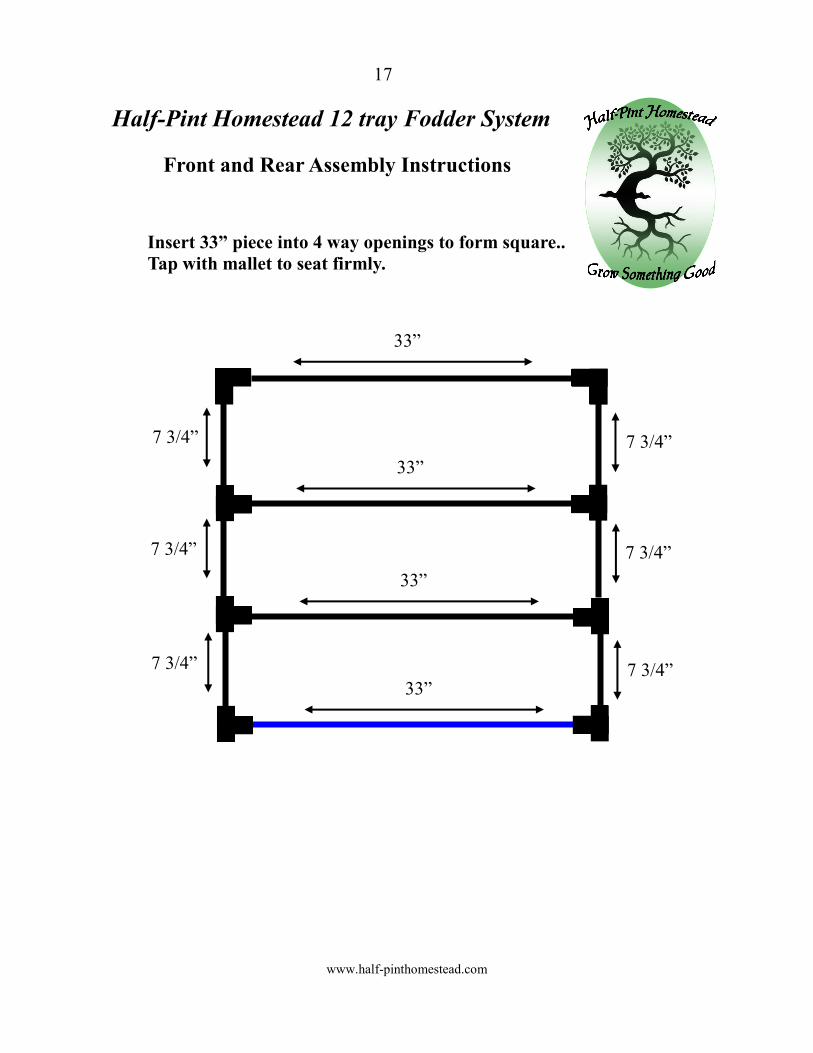
17
7 3/4” 7 3/4”
7 3/4” 7 3/4”
7 3/4” 7 3/4”
www.half-pinthomestead.com
Front and Rear Assembly Instructions
Insert 7 3/4” pieces into 4 way. Tap with mallet to seat
firmly.
33”
33”
33”
33”
Half-Pint Homestead 12 tray Fodder System
18
7 3/4”
7 3/4”
7 3/4” 7 3/4”
7 3/4”
7 3/4”
7 3/4” 7 3/4”
www.half-pinthomestead.com
Front and Rear Assembly Instructions
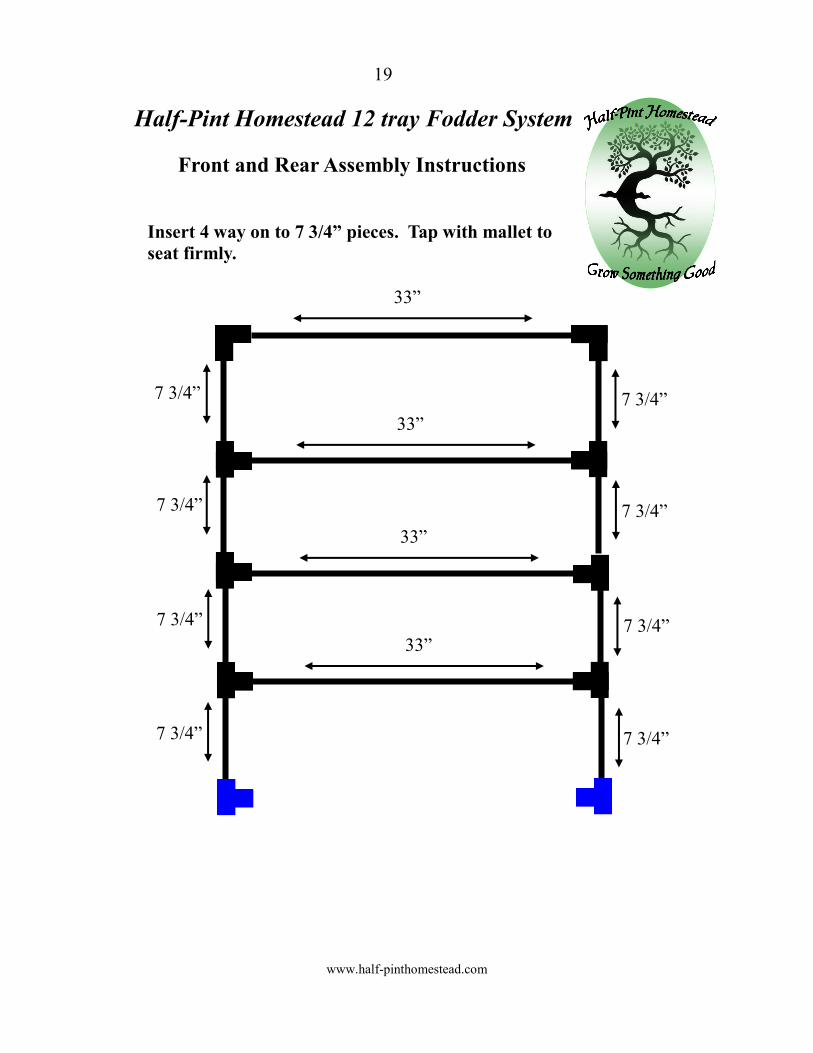
Insert 4 way on to 7 3/4” pieces. Tap with mallet to
seat firmly.
33”
33”
33”
33”
Half-Pint Homestead 12 tray Fodder System
19
7 3/4” 7 3/4”
7 3/4” 7 3/4”
7 3/4” 7 3/4”
7 3/4” 7 3/4”

www.half-pinthomestead.com
Front and Rear Assembly Instructions
Insert 33” piece into 4 way. Tap with mallet to seat
firmly.
33”
33”
33”
33”
33”
Half-Pint Homestead 12 tray Fodder System
20
7 3/4”
7 3/4”
7 3/4”
7 3/4”
7 3/4”
7 3/4”
7 3/4”
7 3/4”

www.half-pinthomestead.com
Front and Rear Assembly Instructions
Insert 13” piece into 4 way. Tap with mallet to seat
firmly.
33”
33”
33”
33”
33”
13” 13”
Half-Pint Homestead 12 tray Fodder System
21
7 3/4”
7 3/4”
7 3/4”
7 3/4”
7 3/4” 7 3/4”
7 3/4” 7 3/4”

www.half-pinthomestead.com
Front and Rear Assembly Instructions
Insert bottom Railing onto 13” piece. Tap with mallet
to seat firmly.
33”
33”
33”
33”
33”
13” 13”
33”
Half-Pint Homestead 12 tray Fodder System
22
7 3/4”
7 3/4”
7 3/4”
7 3/4”
7 3/4”
7 3/4”
7 3/4”
7 3/4”
www.half-pinthomestead.com
Shelf Assembly Instructions
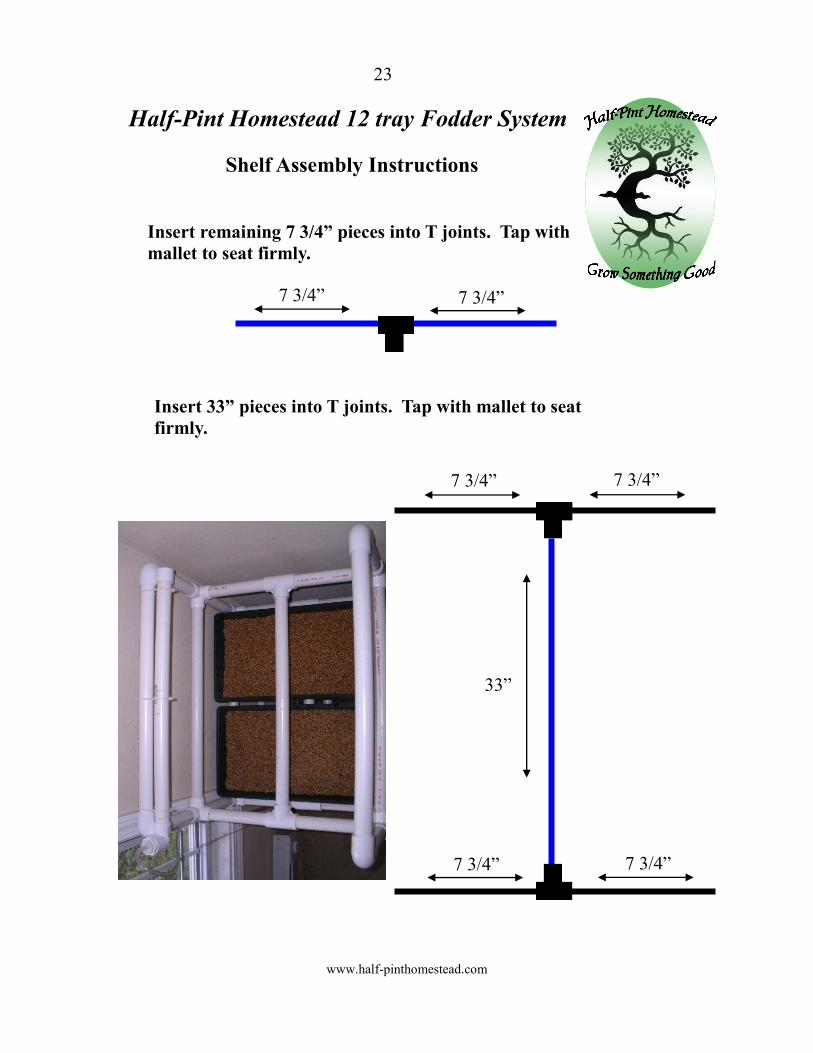
Insert remaining 7 3/4” pieces into T joints. Tap with
mallet to seat firmly.
Insert 33” pieces into T joints. Tap with mallet to seat
firmly.
33”
Half-Pint Homestead 12 tray Fodder System
23
7 3/4” 7 3/4”
7 3/4” 7 3/4”
7 3/4” 7 3/4”

Half-Pint Homestead 12 Tray Fodder System
Frame Assembly Instructions
Insert assembled pieces into 4 way openings of front
to form shelves.. Tap with mallet to seat firmly.
Insert assembled pieces into 4 way openings of front
to form shelves.. Tap with mallet to seat firmly.
Stand frame with 13” pieces down.
24

www.half-pinthomestead.com Copyrighted Material—All rights reserved.
25
Assembly Instructions
33”
33”
7 3/4” 7 3/4”
7 3/4 7 3/4”
Place trays on shelves and fill Sump 3/4 full of water.
Plug timer into outlet and plug pump into timer. The
pump is water lubricated and must never run out of
water.
Half-Pint Homestead 12 tray Fodder System
To pump
Attach 1/2” tubing to pump and place in sump con-
tainer under frame. Attach 1/2” tubing to barbed fit-
ting at the end of the water distribution pipe. Zip tie
water distribution pipe to top rail.

www.half-pinthomestead.com
Water Supply Assembly Instructions
Glue Endcap to 33” piece. Glue 90 elbow to other end
of 33” piece. Glue 1” to 3/4” reducer to other end of
90 elbow. Glue 3/4” to 1/2” barbed male fitting into
reducer
Attach 1/2” tubing to 1/2” male barbed fitting and to
pump.
33”
33”
Drill 12 - 1/16” holes in the pipe with the 90 elbow
pointing down.
Half-Pint Homestead 12 tray Fodder System
26

www.half-pinthomestead.com
Half-Pint Homestead 12 tray Fodder System
Pump Recommendation - PonicsPumps PP291 : 291 GPH, Underwa-
ter, Hydroponics, Aquarium, Aquaponics Pump - 16W, 5' Cord
FLOW RATES: 291 Gallons Per Hour (GPH) @ 0' Lift; 271 GPH @ 1' Lift; 251 GPH @ 2' Lift;
218 GPH @ 3' Lift; 172 GPH @ 4' Lift; 120 GPH @ 5' Lift; 26 GPH @ 6' Lift; Max Lift - 6' 3".
5 FOOT QUALITY CORD: Many pump manufacturers use an inferior quality cord, our Electric
Cord is the highest quality... waterproof, 18# gauge wire, molded three pin plug and wire is 100%
copper. Heavy duty SJTW flexible vinyl jacketed cord with ground, resists oil, grease, moisture,
abrasion resistant, very good flexibility at all temperatures.
UL APPROVED: The file number is E329601.
EASY CLEAN: No tools required to disassemble and clean filter/impeller.
EPOXY RESIN ENCASEMENT of key internal motor components prevents unwanted conductivi-
ty and corrosion of metal parts.
SALT OR FRESH WATER READY: All components are designed to not corrode in either salt or
fresh water.
NEODYMIUM IRON BORON (NdFeB) MAGNETS are used in all our electric motors because
they are the most powerful permanent magnetic materials commercially available and increase
energy efficiency.
WATER-LUBRICATED HYDROGENATED NITRILE (HNBR) BEARINGS are used because
they possess a very low coefficient of friction, have inherent vibration-dampening qualities and are
non-polluting. Because of its durability, HNBR is used by the US Navy for propulsion shaft appli-
cations.
POLISHED ALUMINUM OXIDE CERAMIC IMPELLER SHAFT insures long pump life. This
non-corrodible ceramic shaft is 3 times as hard as stainless steel.
NO SEAL TO FAIL between the pump impeller and the motor because ingeniously, the motor is
water lubricated and cooled. Therefore, it is not possible for water from seal leakage to damage the
pump motor
3 OUTLET ADAPTORS : For 1/2", 5/8" and 3/4"
tubing.
16 WATTS - 120VAC - 60Hz
SALT OR FRESH WATER READY!
ADJUSTABLE INPUT FLOW RATE
OIL FREE, NO EXPOSED COPPER Safe for
fish!
27

www.half-pinthomestead.com
Half-Pint Homestead 12 tray Fodder System
Tray Drainage
The Fodder system is designed to use the 1020
greenhouse trays with no holes.
Put drainage holes 8 holes in the troughs (no hole in
the outside trough to reduce splashing) 6 inches from
each long end. Holes should be no more than 1/8”
wide and 1/4” long. I melt the holes with a thin sol-
dering iron tip, fearing a drill might crack the tray.
28

www.half-pinthomestead.com
Half-Pint Homestead 12 tray Fodder System
Timing Suggestions and Filling Trays
I recommend a mechanical timer with 96 settings. I
have mine set to run for 15 minutes every 2 hours.
This rinses the grain well but allows time for thorough
drainage.
You can use wheat, barley, or oats in your system. I
cannot get barley here and the oats I tried made the
water dirty very quickly and didn’t sprout well at all.
The wheat did wonderfully and at $9.70 for 50 lbs
which should give me about 300 lbs of Fodder at $.03
a lb or $60 a ton
For each tray, I put 4-5 cups of dry wheat into an ice
cream bucket , fill the bucket with water and soak it
for 30 min. I drain the wheat and close up the bucket.
I rinse the grain before bed and then rinse again be-
fore I put it in the tray the next day. Spray the ice
cream bucket and lid with a little bleach water and let
it sit 10 min before rinsing and adding the next day’s
wheat.
29

30
www.half-pinthomestead.com
Visit Us Online!
Watch Informative Videos
Read Our Blog
Sign Up For Our Newsletter
“Fodder for Thought”
Come see us at www.halfpinthomestead.com

www.half-pinthomestead.com
Grow Something Good!