Guitar Concepts...a New Aproach (With Audio)
28
Musician’s Class Series Guitar Concepts…A New Approach By Scott Ouellette Copyright 2008 1
-
Upload
souellette -
Category
Documents
-
view
230 -
download
0
Transcript of Guitar Concepts...a New Aproach (With Audio)
8/8/2019 Guitar Concepts...a New Aproach (With Audio)
http://slidepdf.com/reader/full/guitar-conceptsa-new-aproach-with-audio 1/28
Musician’s Class Series
Guitar Concepts…A New Approach
By Scott Ouellette
Copyright 2008
1
8/8/2019 Guitar Concepts...a New Aproach (With Audio)
http://slidepdf.com/reader/full/guitar-conceptsa-new-aproach-with-audio 2/28
INTRODUCTION
Welcome to Guitar Concepts…A New Approach . This course was designed to teachguitar from beginner to the intermediate level. What makes this course different fromthe rest is that it takes in consideration, every possible situation a student of the guitar
will encounter, and expands on it. Complete with pictures, and audio examples,learning the guitar will take less time to master, which gives you more time to enjoyplaying.
The course begins with discussions on body size, types of strings to use, and playingacoustic/electric guitars. These are subjects not always taken seriously by thebeginner student. Many times a student will be learning on a guitar that is too big, osmall, and it slows down their progress without them even thinking that it’s the guitar.They often think it’s them, and sometimes even quit! Also, I’ve seen students playguitars where the strings are so high off the neck; it’s close to impossible to play. I’d
like to make sure this doesn’t happen to you. Tuning is another very important aspectof guitar playing. A poorly tuned guitar will make anyone discouraged. I’ve containeda tuning tutorial that demonstrates the sound of each string.
These are very important topics that I feel need to be addressed in the very beginningIf you heed the advice given in the first few chapters and practice often, you will nodoubt learn guitar at an incredibly fast rate.
The course continues with the study of chords, which are one of the most important
subjects we’ll be focusing on. You’ll learn a handful of chords, and then learn the basicstrumming patterns in order to start playing songs. Scales will follow, as every guitaristshould know a few in order to play single note melodies.
Technique will be covered in depth because even though you may know lots of chordssongs and solos, if you can’t produce a clear and solid sounding note, your listenerswill notice! We’ll cover what’s necessary in order to sound good on your instrument.
If it’s your determination to master the guitar, then you’ll need to practice every day.By putting in lots of time in the beginning, you’ll find that playing the guitar will get
easier as you go. If you have any questions at all, feel free to email me [email protected]
2
8/8/2019 Guitar Concepts...a New Aproach (With Audio)
http://slidepdf.com/reader/full/guitar-conceptsa-new-aproach-with-audio 3/28
The Right Guitar For You
One thing that people often ignore, is the body size of the guitar. There are three sizesto choose from. The first is the ½ scale (or simply called half scale). This is a smal
size guitar that is great for young children with a smaller body type. Typically, childrenunder the age of ten fit into a ½ scale comfortably. It uses standard size guitar strings(nylon strings will be easier to play) and can be tuned to concert pitch (standard tuningfor most instruments). This size guitar is not very common, but if you look hardenough, you will find one.
The next size up is called the ¼ scale (quarter scale). This size is much bigger than a½ scale, but smaller than a full size. The ¼ scale is great for young adults. It fits snugand is very comfortable. Some adults even find the ¼ scale guitar easy to play.
Last, we have the full size guitar. This is the standard used by many, and is verypopular throughout the industry. Not all full size guitars are the same. There are somany guitars out there to choose from. Some may seem bigger or smaller, dependingon the manufacturer. A full size guitar will be louder, and you will find that there aremany more to choose from than the previous two mentioned.
Ultimately, you should try out all the different sizes to see what feels most comfortableYou should never just try one size. We all have different size frames and hands, so it’sworth taking the time to see what fits you just right. Even just holding the guitar in you
lap should tell you if it feels right or not. If a guitar is too big, you might find that youright arm, while resting on the guitar body, feels a bit tense and raised up. That’s agood sign that you do not have the proper size instrument. Or, if the guitar is too smallyou might feel that your left hand fingers are cramped when playing chords, therebycausing the strings to buzz when you strum. These are things that must be taken intoconsideration if you want to progress easily and quickly.
3
8/8/2019 Guitar Concepts...a New Aproach (With Audio)
http://slidepdf.com/reader/full/guitar-conceptsa-new-aproach-with-audio 4/28
Acoustic or Electric
Choosing an acoustic or an electric guitar is of personal preference. If you like a morenatural sound, go for the acoustic, if you like a more modern sound…well, of course gofor the electric guitar. First, let’s talk about the acoustic guitar. The acoustic guitar is
much louder than the electric because it is hollow and has a sound hole. A benefit toplaying an acoustic guitar is that it doesn’t require an amplifier. You can bring itanywhere to play, and people will be able to hear you. Also, you can purchaseacoustic guitars with a built in pick-up system. This means that you can plug it into anamp and play. Most guitar companies offer a wide selection of guitars with or withoutthe pick-up. So, if you think you may be playing with other musicians in the future, youmight want to think about purchasing one with a built in pick-up. Of course they cost alittle more, but worth it if you are asked to play amplified. It doesn’t hurt to beprepared!
Now, about the electric guitar, most people associate it with rock music. Sure it’s usedfor rock music, but also for jazz, country, and pop. The electric guitar is simply a guitarmade for amplification. You can play it in most any situation. Again, it’s all a personapreference. You can use an electric to begin you guitar studies, but I’d like to mentionone thing. From my experience, plan to spend a little more on an electric guitarInexpensive electric guitars are low in quality. When you spend around $100.00 on anelectric guitar, you might encounter problems. The workmanship’s just not there. Butif you spend $200.00 or more, you get a better quality instrument. The same goes withan acoustic guitar. Spending the money on a good quality guitar will help you progress
because the string height will probably be low, the solder joints will most likely bestronger, and there will be less noise coming out of your amplifier. If you don’t have anamplifier, that’s ok, because you can still complete this course without one. As long asit’s quiet in the room, you will be able to hear yourself play. When it comes to choosingan electric guitar, try not to become overwhelmed. Just take the time to try out asmany as you can. Even if you don’t play much at this point, you can still hold it, pluckthe strings, and just get to know it. You’ll be able to figure out if one feels good to youor not. If you have a guitar now, or are thinking of upgrading, please contact me, and will assist you in your search for the right guitar.
4
8/8/2019 Guitar Concepts...a New Aproach (With Audio)
http://slidepdf.com/reader/full/guitar-conceptsa-new-aproach-with-audio 5/28
Steel or Nylon Strings
Steel
The steel string guitar is one of the most popular types of guitars to play. Mostfamilies, if they have a guitar lying around, probably have an acoustic steel string. Onegreat benefit of playing a steel string guitar is that it projects with great volume. It hasa bright sound, as well as a deep low end. Steel string guitars are also very easy tostring up. They also stay in tune real well.
There’s only one thing about playing on steel strings that might discourage you, andthat’s the fact that they are very hard on the fingers. Your fingers may take someabuse when learning on a steel string guitar…you are not alone! I don’t know oneperson who found it easy to learn on steel strings when they first started playing guitarDon’t fret (no pun intended) it’s temporary. I went through it too, but I also realized thatin the middle of my studies, it became much easier to play on them. It’s inevitable thatit will become easier to play. I think everyone should spend some time playing on steestrings.
Nylon
Now let’s talk about nylon strings. Nylon strings are my personal favorite. They areeasier to play than steel, which makes learning less of a chore. That’s the biggest
advantage about nylon. You will find that nylon strings are standard on classicaguitars. Now, I started off playing a steel string, but eventually moved on to nylonNylon strings aren’t just associated with classical guitar playing. There are manydifferent types of nylon string guitars available in which you can play jazz, classical,Latin…almost anything you want! If you’re curious about who plays on a nylon stringguitar, look up artists like Andres Segovia, Earl Klugh, and Chet Atkins (as well asmyself!). Remember, you are not limited to playing classical guitar music if you chooseto play on a nylon string guitar.
As far as stringing up nylon strings, they do take longer to “settle” more than steel.After you string up a nylon string guitar, you must constantly play on them, regularplaying and tuning of the strings will keep them in tune. After about three days, yourguitar should stay in tune regularly. In the long run, nylon strings are a real joy to playon!
5

8/8/2019 Guitar Concepts...a New Aproach (With Audio)
http://slidepdf.com/reader/full/guitar-conceptsa-new-aproach-with-audio 6/28
Guitar Picks
About picks…..you should use them when playing singe note playing. Try not to usethem when learning how to strum. I know this seems a bit odd, but when you strumchords, you’ll want to really feel the strings. Plus, when first learning how to strum,
the pick might feel a bit foreign to you, and make it uncomfortable to strum. Ofcourse after you become good at playing, you can choose to use a pick if you’d like.
What kind of pick? Well, you’ll probably become overwhelmed when you see howmany different brands there are to choose from. As far as brand names, it’s up to youto try them out. I can’t say, because they are all different. What I can suggest is touse medium or hard picks. They take less time to flex back into place after plucking anote. You’ll want this feature when you become faster at playing single notes. Thethin picks tend to break easily, and take more time to flex back into place.
That’s pretty much it about picks. There’s not much else to talk about. Just try themall out. They are not very expensive. Eventually, you’ll find the one for you.
6
8/8/2019 Guitar Concepts...a New Aproach (With Audio)
http://slidepdf.com/reader/full/guitar-conceptsa-new-aproach-with-audio 7/28
Tuning
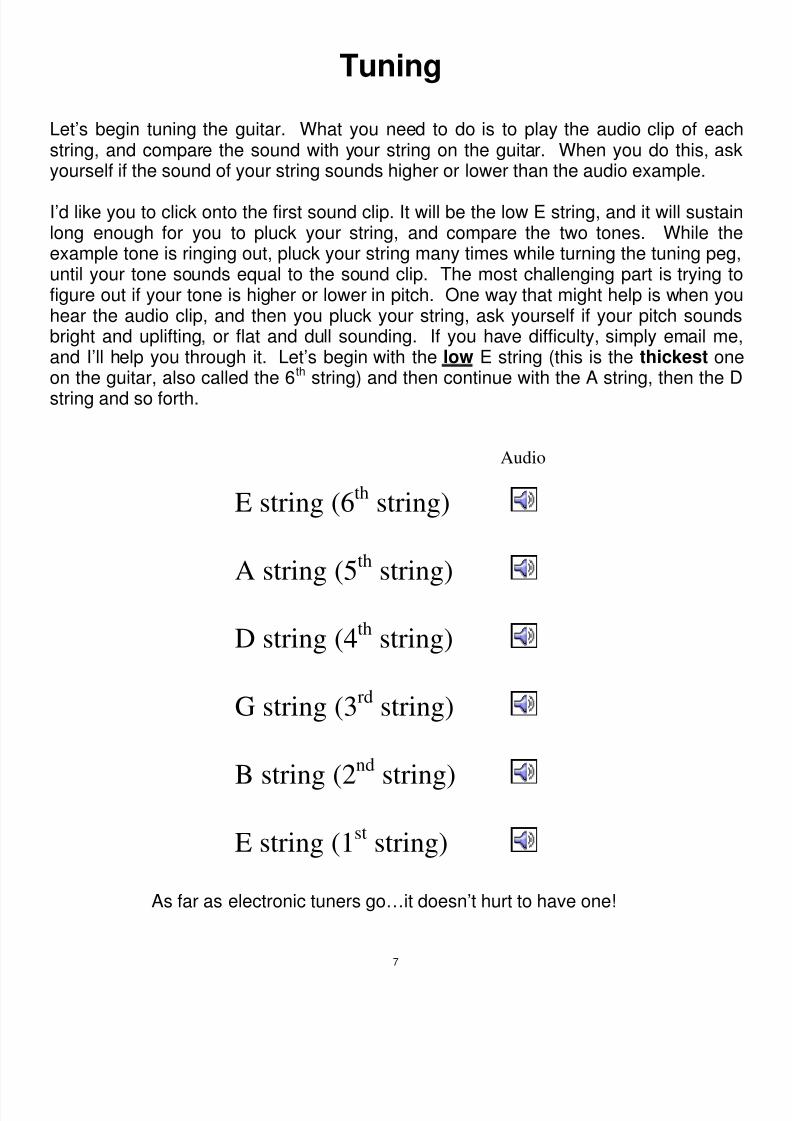
Let’s begin tuning the guitar. What you need to do is to play the audio clip of eachstring, and compare the sound with your string on the guitar. When you do this, askyourself if the sound of your string sounds higher or lower than the audio example.
I’d like you to click onto the first sound clip. It will be the low E string, and it will sustainlong enough for you to pluck your string, and compare the two tones. While theexample tone is ringing out, pluck your string many times while turning the tuning peg,until your tone sounds equal to the sound clip. The most challenging part is trying tofigure out if your tone is higher or lower in pitch. One way that might help is when youhear the audio clip, and then you pluck your string, ask yourself if your pitch soundsbright and uplifting, or flat and dull sounding. If you have difficulty, simply email meand I’ll help you through it. Let’s begin with the low E string (this is the thickest oneon the guitar, also called the 6th string) and then continue with the A string, then the D
string and so forth.
Audio
E string (6th
string)
A string (5th
string)
D string (4th
string)
G string (3rd
string)
B string (2
nd
string)
E string (1st
string)
As far as electronic tuners go…it doesn’t hurt to have one!
7
8/8/2019 Guitar Concepts...a New Aproach (With Audio)
http://slidepdf.com/reader/full/guitar-conceptsa-new-aproach-with-audio 8/28
Chords
Chords and Rhythm Playing
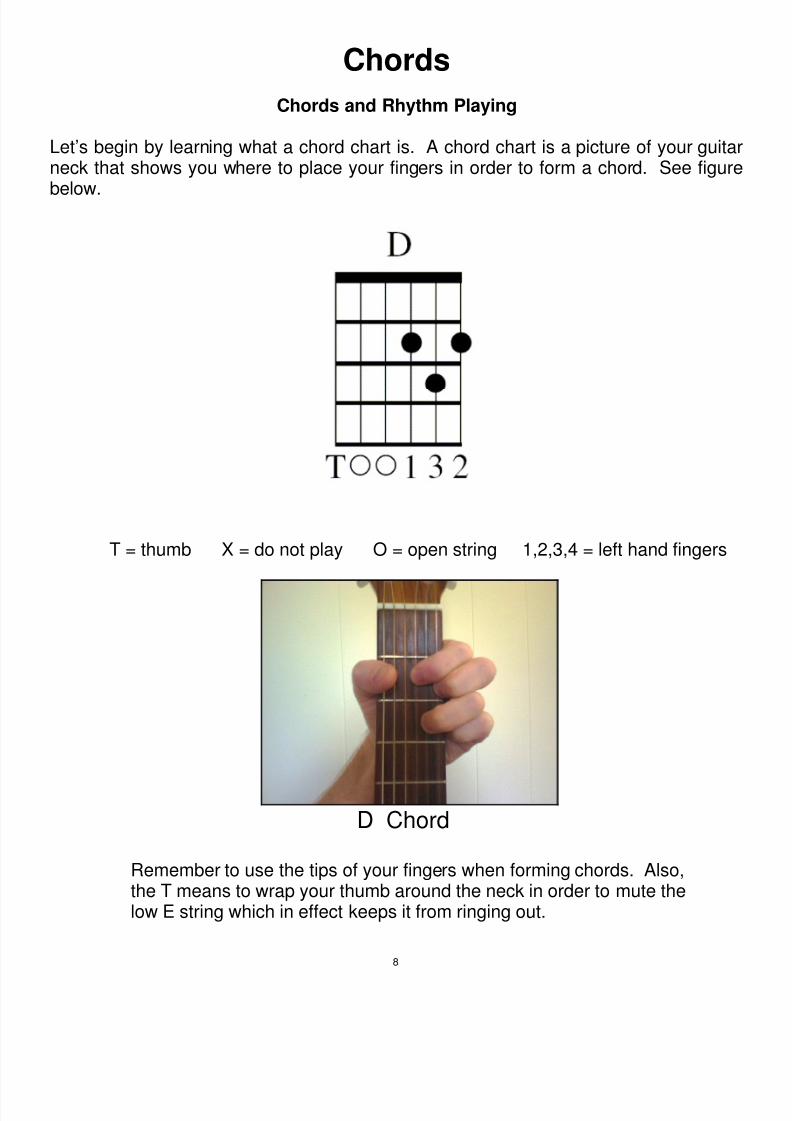
Let’s begin by learning what a chord chart is. A chord chart is a picture of your guitarneck that shows you where to place your fingers in order to form a chord. See figure
below.
T = thumb X = do not play O = open string 1,2,3,4 = left hand fingers
D Chord
Remember to use the tips of your fingers when forming chords. Also,the T means to wrap your thumb around the neck in order to mute the
low E string which in effect keeps it from ringing out.
8

8/8/2019 Guitar Concepts...a New Aproach (With Audio)
http://slidepdf.com/reader/full/guitar-conceptsa-new-aproach-with-audio 9/28
For chords that don’t require muting the low E string, you can keep your thumbflat on the back of the neck and pointing towards the ceiling. Try to leave spacebetween your palm and the neck…don’t “hug” the neck. You can hug the neckwhen you need to mute the low E string.
Let’s learn three more chords…
First start out by forming the E Minor chord and strumming it once. Now switch to theG chord without lifting your second finger off the neck. Now do the same whenswitching from G to C. But this time, it’s your third finger that you want to keep on theneck while switching.
Notice that your second finger plays the same note for both the E Minor and G majorchord. Also notice that when switching from G Major to C Major, your third fingerplays the same note. This makes it much easier for you to improve how you soundwhile switching from one chord to another. Also, try not to lift your fingers up too highwhen switching notes. You should try to lift them no higher than an inch.
9

8/8/2019 Guitar Concepts...a New Aproach (With Audio)
http://slidepdf.com/reader/full/guitar-conceptsa-new-aproach-with-audio 10/28
Let’s now try strumming chords. First I need to ask that you tap your foot when youstrum chords. When you tap your foot down, say “one”. When you raise your foot upsay “and”. Continue this pattern until you reach the number four.
One and Two and Three and Four and.
1 + 2 + 3 + 4 +
We’ll be using what’s called “rhythm slashes” to show when to strum up and down. Inthe following example, you will tap four times within one measure. So, that meansyou will strum a chord for every time you tap your foot and say a number. These arecalled quarter notes. Think of it like four actual quarters (coins), and the measure is adollar bill in which the four quarters are lying down on.
Measure (dollar bill)
Quarter note (25 cents)
The next example will show quarter notes and quarter rests…simplydon’t play on the rests.
Strum down Rest the side of your hand on the strings
1 2 3 4
Note: When strumming down, it might be easier to use the front of your finger(the side with the nail), and when strumming up, use the oppositeside (the padded side). This way, you can feel the strings, and developa much closer relationship with the guitar. Plus, by using a pick, youmight find yourself worrying about dropping it. You want to put 100%concentration in what you do, and not have to worry about anything else!
10
8/8/2019 Guitar Concepts...a New Aproach (With Audio)
http://slidepdf.com/reader/full/guitar-conceptsa-new-aproach-with-audio 11/28
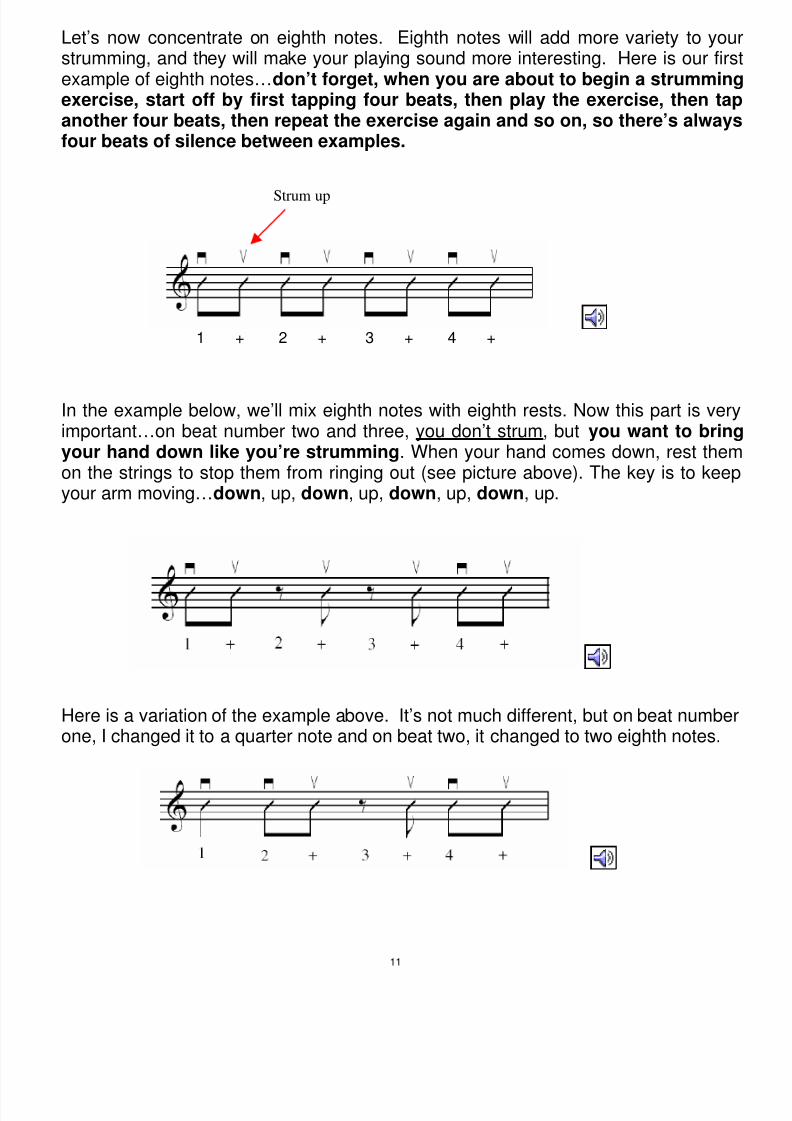
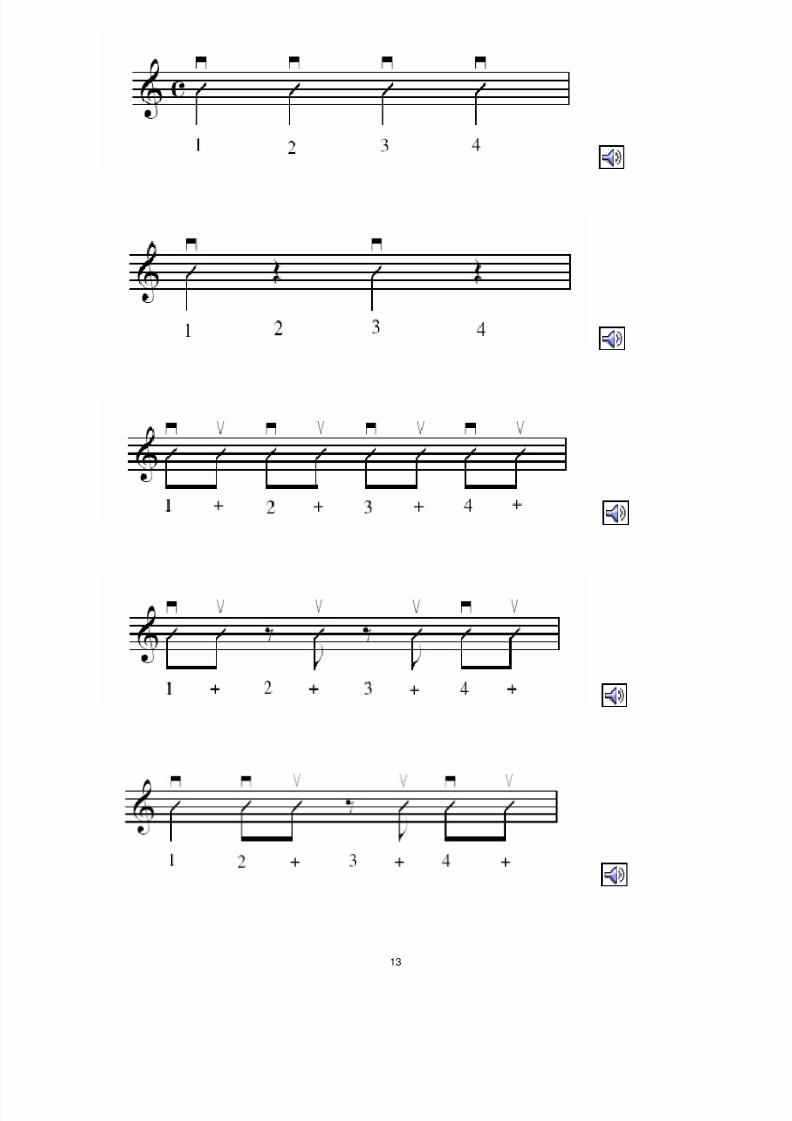
Let’s now concentrate on eighth notes. Eighth notes will add more variety to yourstrumming, and they will make your playing sound more interesting. Here is our firsexample of eighth notes…don’t forget, when you are about to begin a strummingexercise, start off by first tapping four beats, then play the exercise, then tapanother four beats, then repeat the exercise again and so on, so there’s alwaysfour beats of silence between examples.
Strum up
1 + 2 + 3 + 4 +
In the example below, we’ll mix eighth notes with eighth rests. Now this part is veryimportant…on beat number two and three, you don’t strum, but you want to bringyour hand down like you’re strumming. When your hand comes down, rest themon the strings to stop them from ringing out (see picture above). The key is to keepyour arm moving…down, up, down, up, down, up, down, up.
Here is a variation of the example above. It’s not much different, but on beat numberone, I changed it to a quarter note and on beat two, it changed to two eighth notes.
11

8/8/2019 Guitar Concepts...a New Aproach (With Audio)
http://slidepdf.com/reader/full/guitar-conceptsa-new-aproach-with-audio 12/28
Next, we’ll cover sixteenth notes. Now, sixteenth notes will allow you to strum theguitar on songs with a different pulse or “feel”. Listen to the audio example to get afeel for sixteenth note strumming.
Let’s begin by displaying what sixteenth notes look like on a music staff. Keep in mindthat you’re now strumming four times per beat. You don’t have to play faster, but youmight want to slow your tempo down a bit, in order to play the sixteenth notes accurate
Let’s start by tapping your foot down on “one” and at the same time, strumming down,then up (keeping your hand in the up position). Next, you’ll raise your foot up and say“and” and at the same time, strum down and then up again. The illustration below willclarify this in more depth. Try playing the example below using the E Minor chord.
The bold lines represent your foot tapping the downbeat, and then lifting it up on what’scalled the “upbeat” (or plus sign). Basically, you’re strumming twice when your foot’sdown, and twice when your foot is up.
The following strumming examples are some of the most widely used in rhythm guitarplaying….they should all be memorized!! In fact, all rhythm exercises should be
memorized. It’s like learning a language. We all know the word “the”, we can pick itout in a sentence, or recognize it when someone says it. The same goes with theserhythm studies. If you learn them, and memorize them, you’ll be able to pick them outwith little or no effort when it comes time to learn songs off a CD.
Each example will have an audio sample for you to listen to so that you can be surehow it’s supposed to sound.
12
8/8/2019 Guitar Concepts...a New Aproach (With Audio)
http://slidepdf.com/reader/full/guitar-conceptsa-new-aproach-with-audio 13/28
13
8/8/2019 Guitar Concepts...a New Aproach (With Audio)
http://slidepdf.com/reader/full/guitar-conceptsa-new-aproach-with-audio 14/28
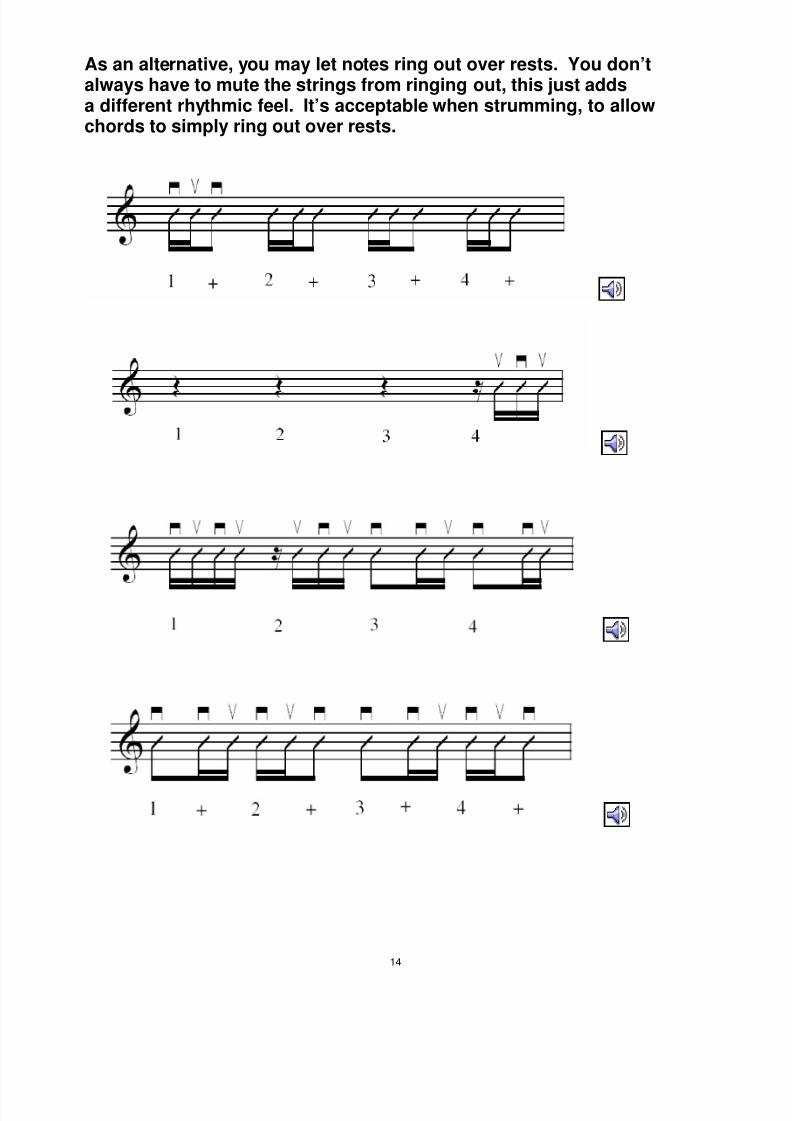
As an alternative, you may let notes ring out over rests. You don’talways have to mute the strings from ringing out, this just addsa different rhythmic feel. It’s acceptable when strumming, to allowchords to simply ring out over rests.
14
8/8/2019 Guitar Concepts...a New Aproach (With Audio)
http://slidepdf.com/reader/full/guitar-conceptsa-new-aproach-with-audio 15/28
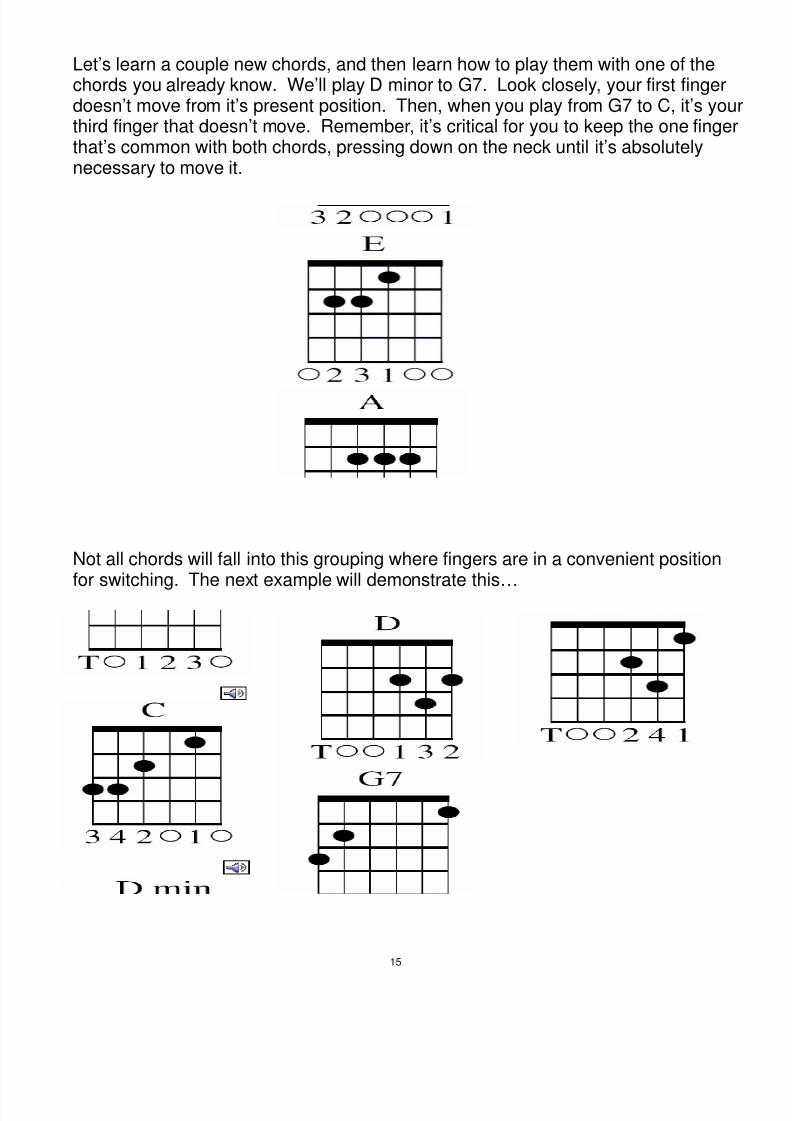
Let’s learn a couple new chords, and then learn how to play them with one of thechords you already know. We’ll play D minor to G7. Look closely, your first fingerdoesn’t move from it’s present position. Then, when you play from G7 to C, it’s yourthird finger that doesn’t move. Remember, it’s critical for you to keep the one fingerthat’s common with both chords, pressing down on the neck until it’s absolutelynecessary to move it.
Not all chords will fall into this grouping where fingers are in a convenient position
for switching. The next example will demonstrate this…
15

8/8/2019 Guitar Concepts...a New Aproach (With Audio)
http://slidepdf.com/reader/full/guitar-conceptsa-new-aproach-with-audio 16/28
Here are six more chords to learn. Although there are many more chords, it’s best tolearn a little at a time. And through learning songs, you will pick up on additional chordsas you go. Don’t become overwhelmed with all the chords to learn in this course, justtake one or two at a time, and apply them to the rhythm studies presented in thiscourse.
16
8/8/2019 Guitar Concepts...a New Aproach (With Audio)
http://slidepdf.com/reader/full/guitar-conceptsa-new-aproach-with-audio 17/28
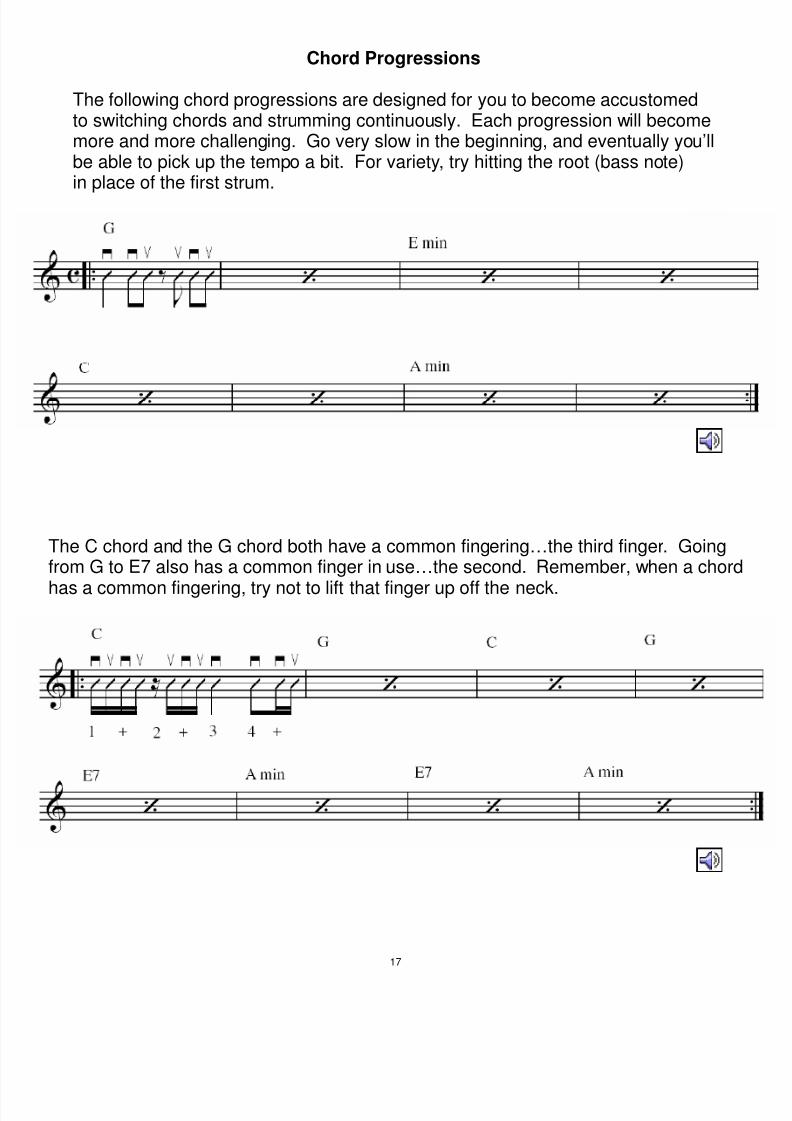
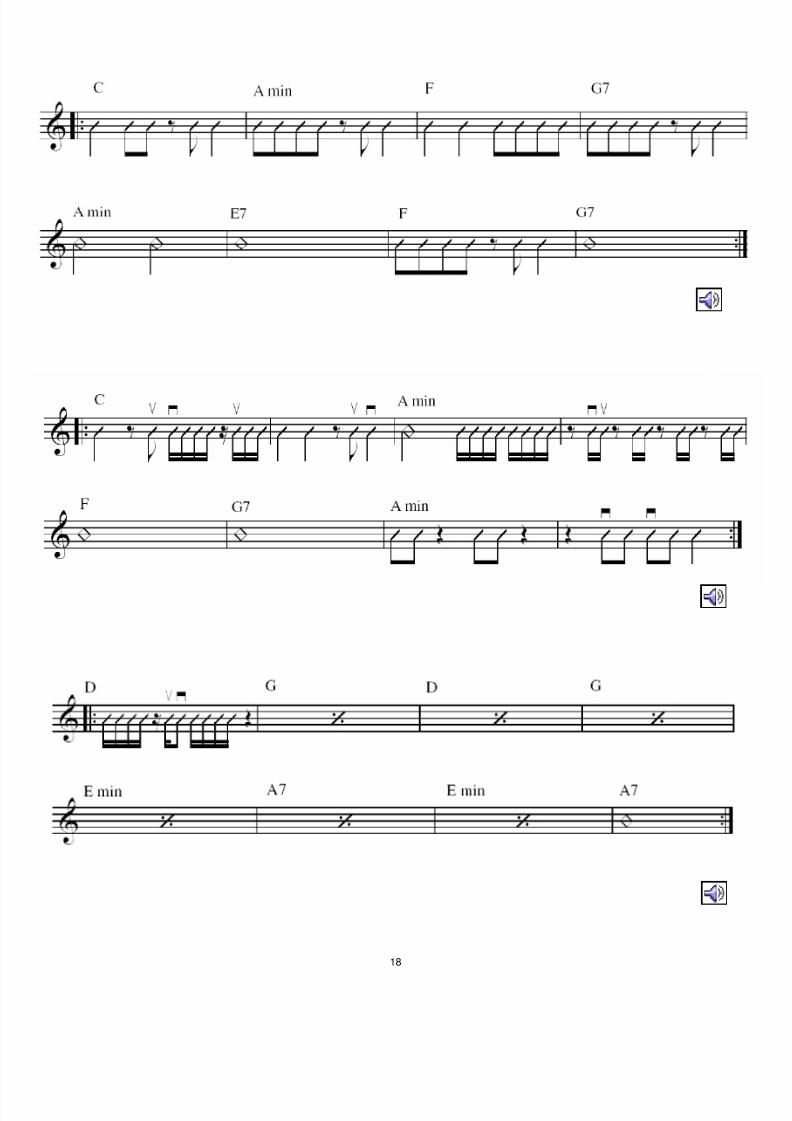
Chord Progressions
The following chord progressions are designed for you to become accustomedto switching chords and strumming continuously. Each progression will becomemore and more challenging. Go very slow in the beginning, and eventually you’llbe able to pick up the tempo a bit. For variety, try hitting the root (bass note)in place of the first strum.
The C chord and the G chord both have a common fingering…the third finger. Goingfrom G to E7 also has a common finger in use…the second. Remember, when a chord
has a common fingering, try not to lift that finger up off the neck.
17
8/8/2019 Guitar Concepts...a New Aproach (With Audio)
http://slidepdf.com/reader/full/guitar-conceptsa-new-aproach-with-audio 18/28
18
8/8/2019 Guitar Concepts...a New Aproach (With Audio)
http://slidepdf.com/reader/full/guitar-conceptsa-new-aproach-with-audio 19/28
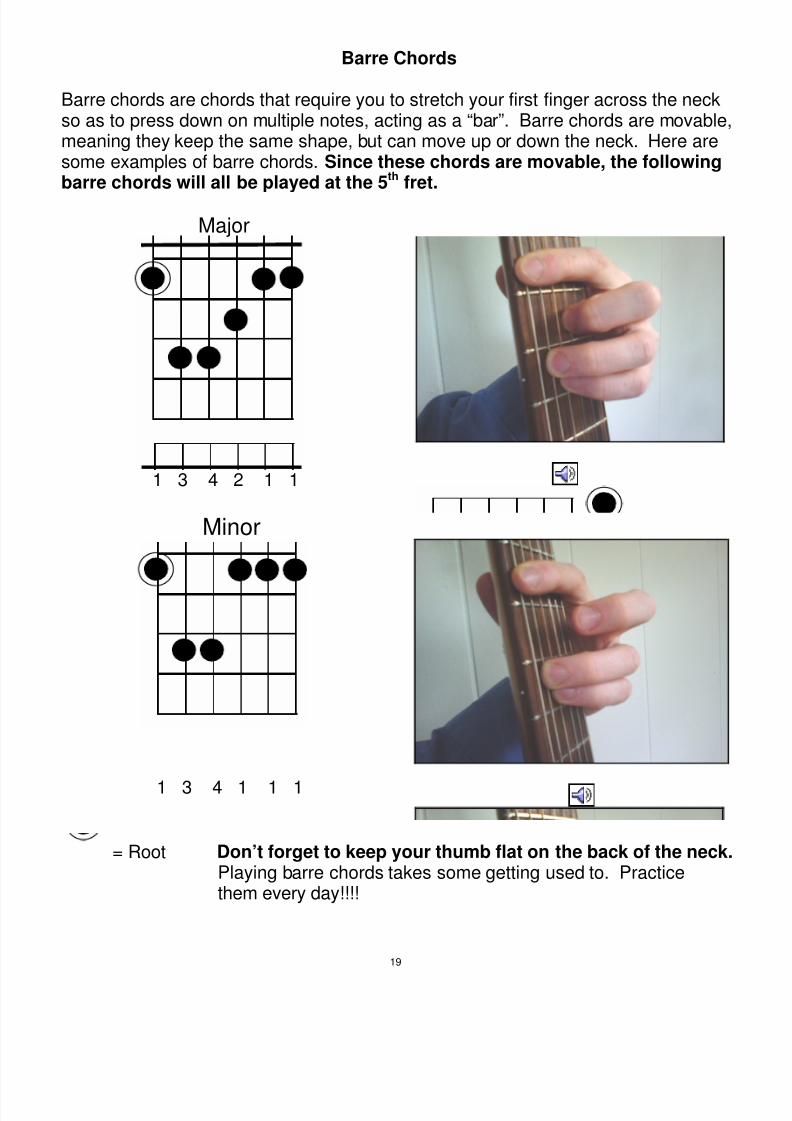
Barre Chords
Barre chords are chords that require you to stretch your first finger across the neckso as to press down on multiple notes, acting as a “bar”. Barre chords are movable,meaning they keep the same shape, but can move up or down the neck. Here aresome examples of barre chords. Since these chords are movable, the followingbarre chords will all be played at the 5th fret.
Major
1 3 4 2 1 1
Minor
1 3 4 1 1 1
= Root Don’t forget to keep your thumb flat on the back of the neck. Playing barre chords takes some getting used to. Practicethem every day!!!!
19
8/8/2019 Guitar Concepts...a New Aproach (With Audio)
http://slidepdf.com/reader/full/guitar-conceptsa-new-aproach-with-audio 20/28
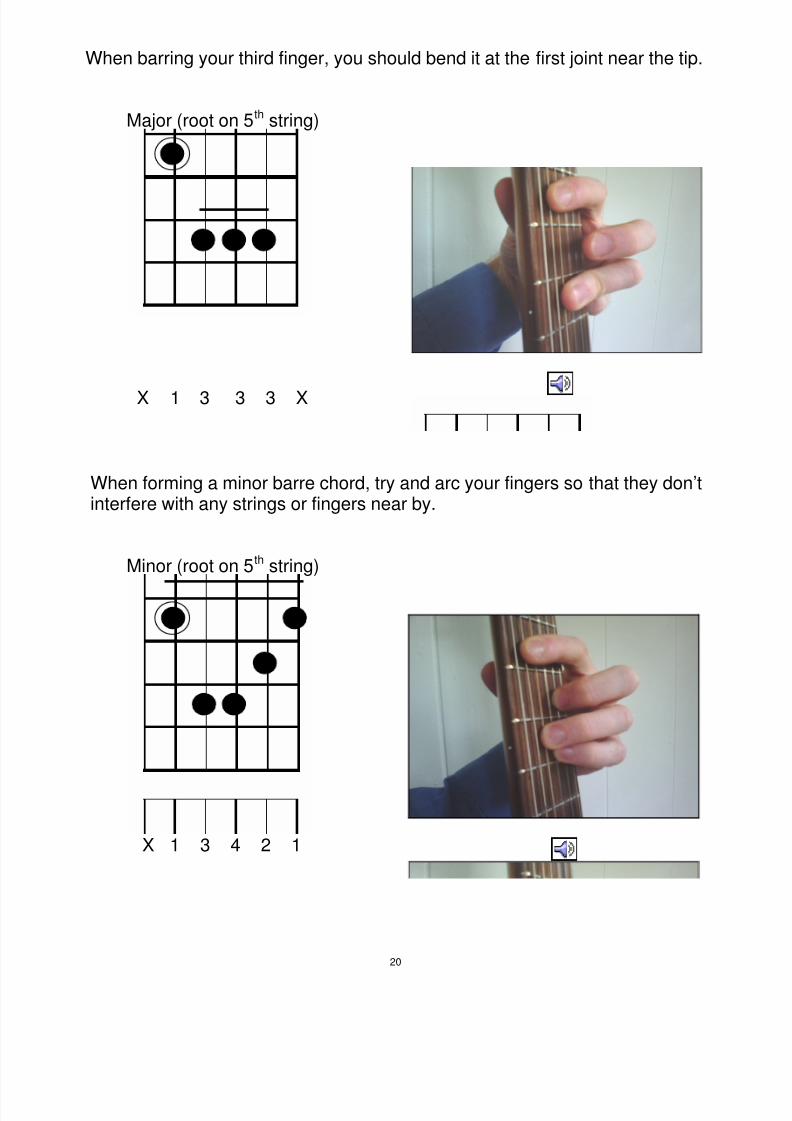
When barring your third finger, you should bend it at the first joint near the tip.
Major (root on 5th string)
X 1 3 3 3 X
When forming a minor barre chord, try and arc your fingers so that they don’tinterfere with any strings or fingers near by.
Minor (root on 5th string)
X 1 3 4 2 1
20
8/8/2019 Guitar Concepts...a New Aproach (With Audio)
http://slidepdf.com/reader/full/guitar-conceptsa-new-aproach-with-audio 21/28
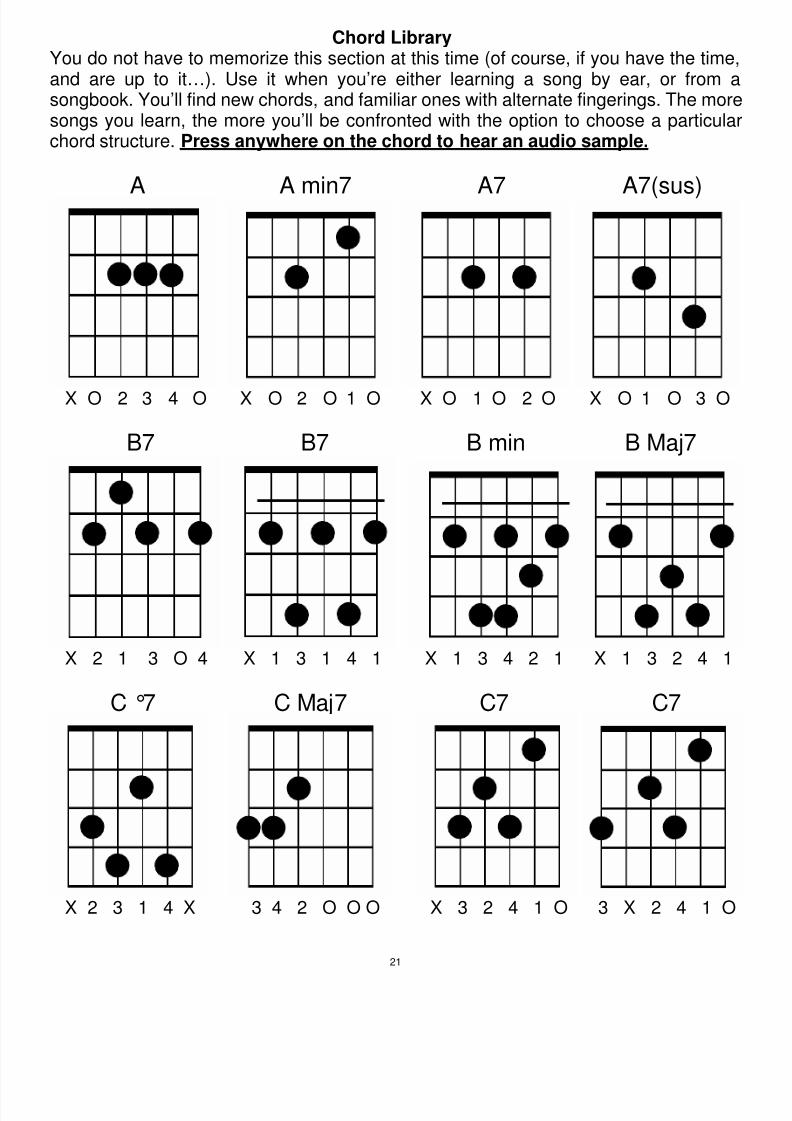
Chord Library
You do not have to memorize this section at this time (of course, if you have the time,and are up to it…). Use it when you’re either learning a song by ear, or from asongbook. You’ll find new chords, and familiar ones with alternate fingerings. The moresongs you learn, the more you’ll be confronted with the option to choose a particularchord structure. Press anywhere on the chord to hear an audio sample.
A A min7 A7 A7(sus)
X O 2 3 4 O X O 2 O 1 O X O 1 O 2 O X O 1 O 3 O
B7 B7 B min B Maj7
X 2 1 3 O 4 X 1 3 1 4 1 X 1 3 4 2 1 X 1 3 2 4 1
C °7 C Maj7 C7 C7
X 2 3 1 4 X 3 4 2 O O O X 3 2 4 1 O 3 X 2 4 1 O
21
8/8/2019 Guitar Concepts...a New Aproach (With Audio)
http://slidepdf.com/reader/full/guitar-conceptsa-new-aproach-with-audio 22/28
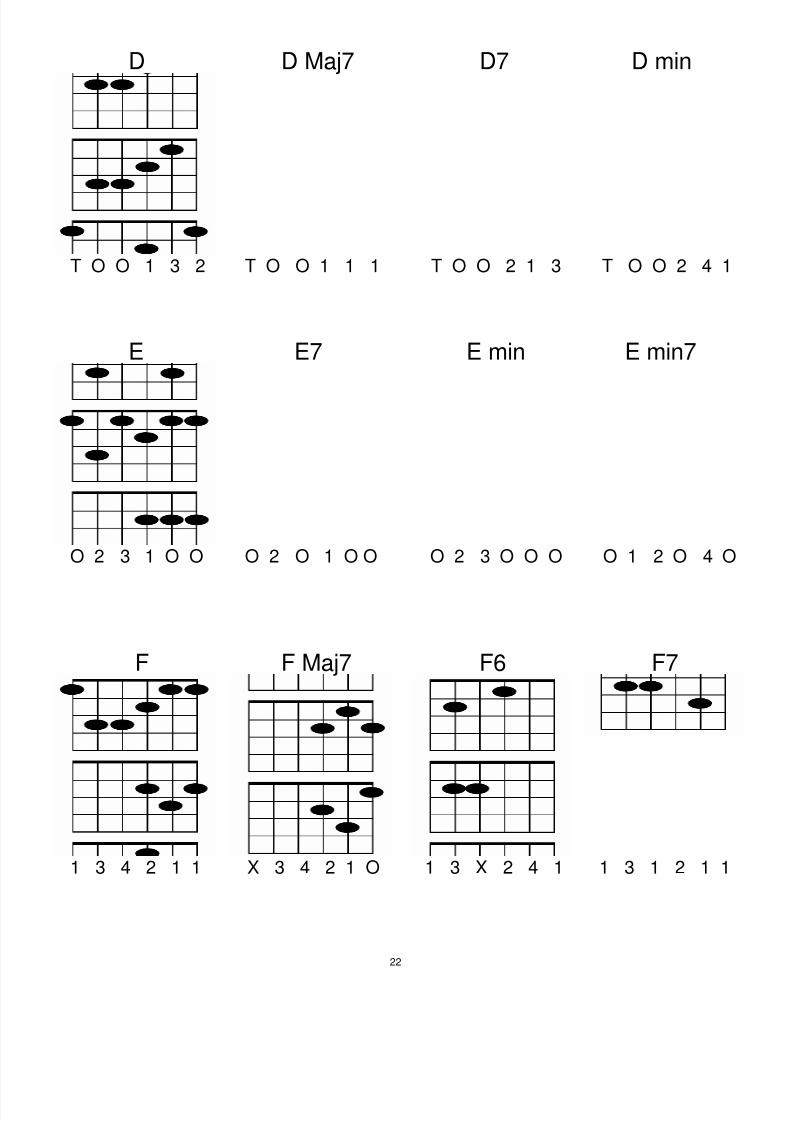
D D Maj7 D7 D min
T O O 1 3 2 T O O 1 1 1 T O O 2 1 3 T O O 2 4 1
E E7 E min E min7
O 2 3 1 O O O 2 O 1 O O O 2 3 O O O O 1 2 O 4 O
F F Maj7 F6 F7
1 3 4 2 1 1 X 3 4 2 1 O 1 3 X 2 4 1 1 3 1 2 1 1
22
8/8/2019 Guitar Concepts...a New Aproach (With Audio)
http://slidepdf.com/reader/full/guitar-conceptsa-new-aproach-with-audio 23/28
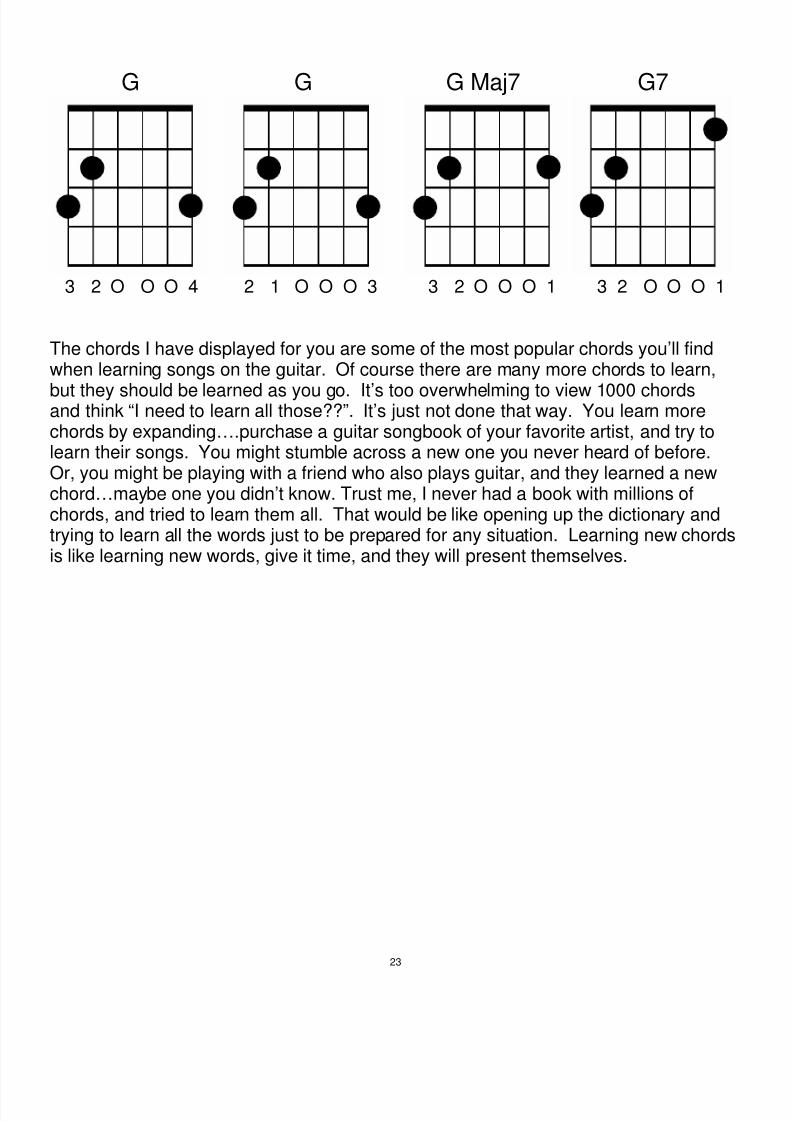
G G G Maj7 G7
3 2 O O O 4 2 1 O O O 3 3 2 O O O 1 3 2 O O O 1
The chords I have displayed for you are some of the most popular chords you’ll findwhen learning songs on the guitar. Of course there are many more chords to learn,
but they should be learned as you go. It’s too overwhelming to view 1000 chordsand think “I need to learn all those??”. It’s just not done that way. You learn morechords by expanding….purchase a guitar songbook of your favorite artist, and try tolearn their songs. You might stumble across a new one you never heard of before.Or, you might be playing with a friend who also plays guitar, and they learned a newchord…maybe one you didn’t know. Trust me, I never had a book with millions ofchords, and tried to learn them all. That would be like opening up the dictionary andtrying to learn all the words just to be prepared for any situation. Learning new chordsis like learning new words, give it time, and they will present themselves.
23
8/8/2019 Guitar Concepts...a New Aproach (With Audio)
http://slidepdf.com/reader/full/guitar-conceptsa-new-aproach-with-audio 24/28
Single Note Playing
Major Scale
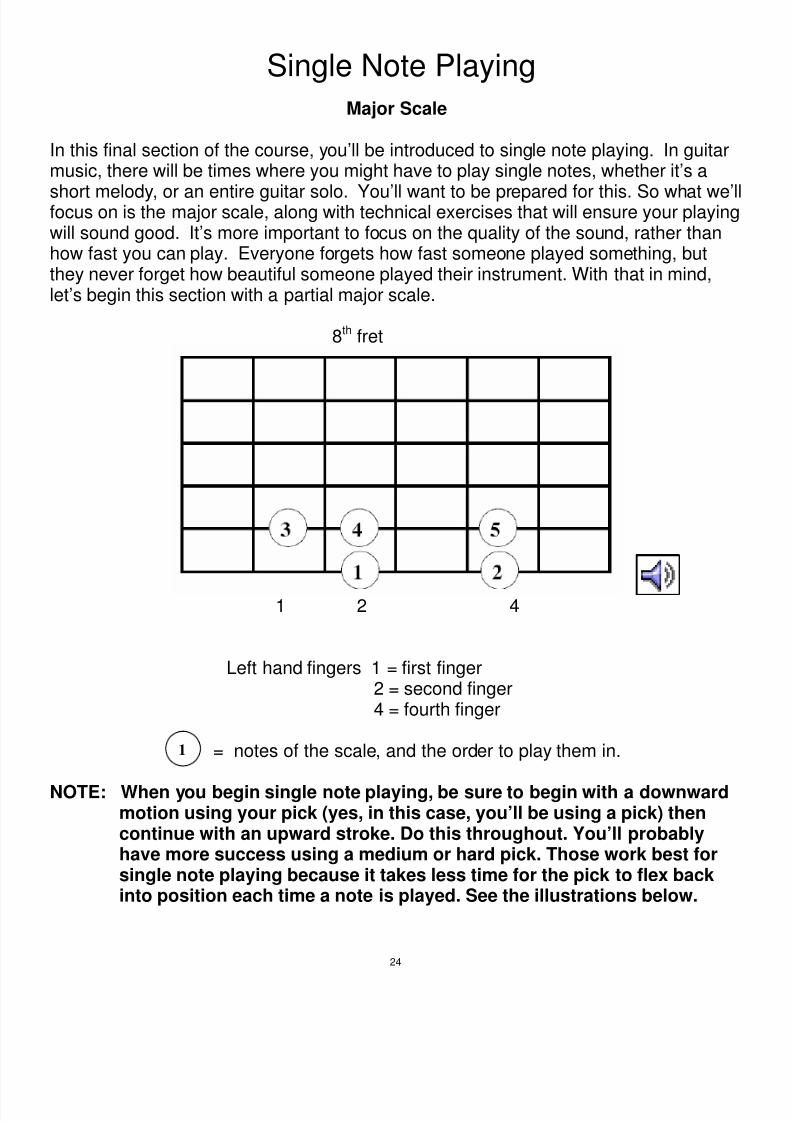
In this final section of the course, you’ll be introduced to single note playing. In guitarmusic, there will be times where you might have to play single notes, whether it’s a
short melody, or an entire guitar solo. You’ll want to be prepared for this. So what we’lfocus on is the major scale, along with technical exercises that will ensure your playingwill sound good. It’s more important to focus on the quality of the sound, rather thanhow fast you can play. Everyone forgets how fast someone played something, butthey never forget how beautiful someone played their instrument. With that in mind,let’s begin this section with a partial major scale.
8th fret
1 2 4
Left hand fingers 1 = first finger2 = second finger4 = fourth finger
= notes of the scale, and the order to play them in.
NOTE: When you begin single note playing, be sure to begin with a downwardmotion using your pick (yes, in this case, you’ll be using a pick) thencontinue with an upward stroke. Do this throughout. You’ll probablyhave more success using a medium or hard pick. Those work best forsingle note playing because it takes less time for the pick to flex backinto position each time a note is played. See the illustrations below.
1
24
8/8/2019 Guitar Concepts...a New Aproach (With Audio)
http://slidepdf.com/reader/full/guitar-conceptsa-new-aproach-with-audio 25/28
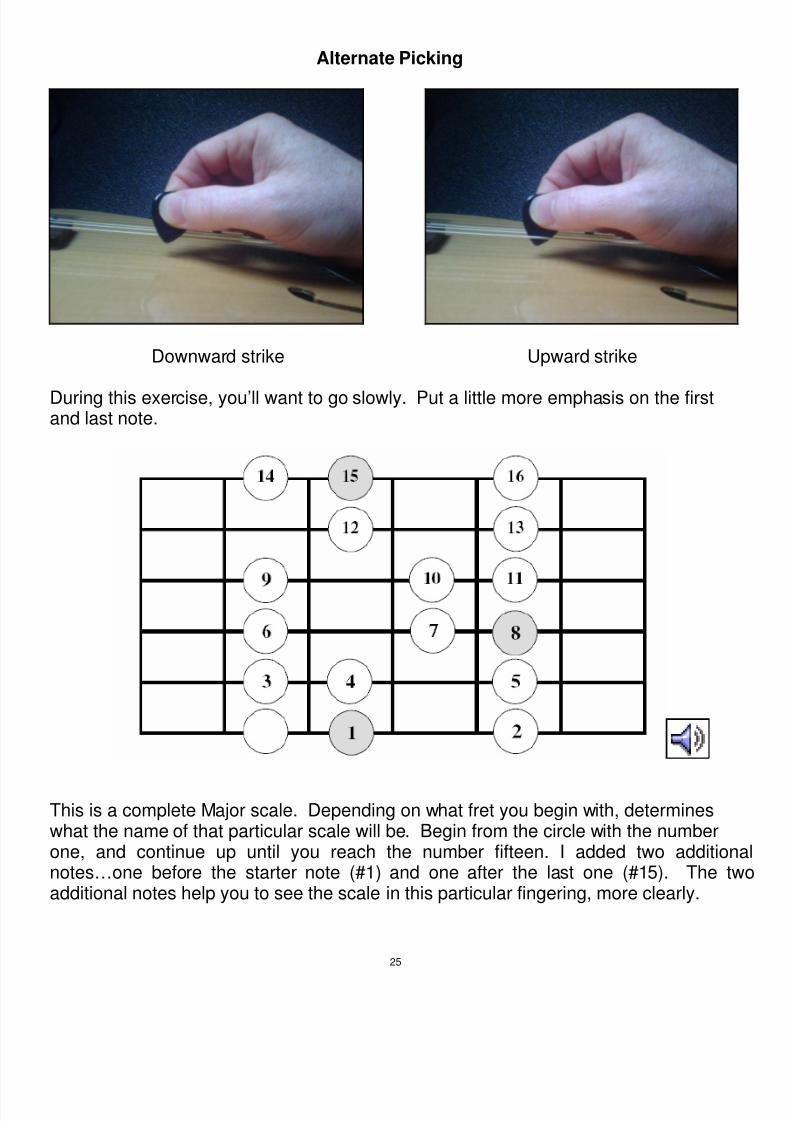
Alternate Picking
Downward strike Upward strike
During this exercise, you’ll want to go slowly. Put a little more emphasis on the firstand last note.
This is a complete Major scale. Depending on what fret you begin with, determineswhat the name of that particular scale will be. Begin from the circle with the numberone, and continue up until you reach the number fifteen. I added two additionnotes…one before the starter note (#1) and one after the last one (#15). The twadditional notes help you to see the scale in this particular fingering, more clearly.
25
8/8/2019 Guitar Concepts...a New Aproach (With Audio)
http://slidepdf.com/reader/full/guitar-conceptsa-new-aproach-with-audio 26/28
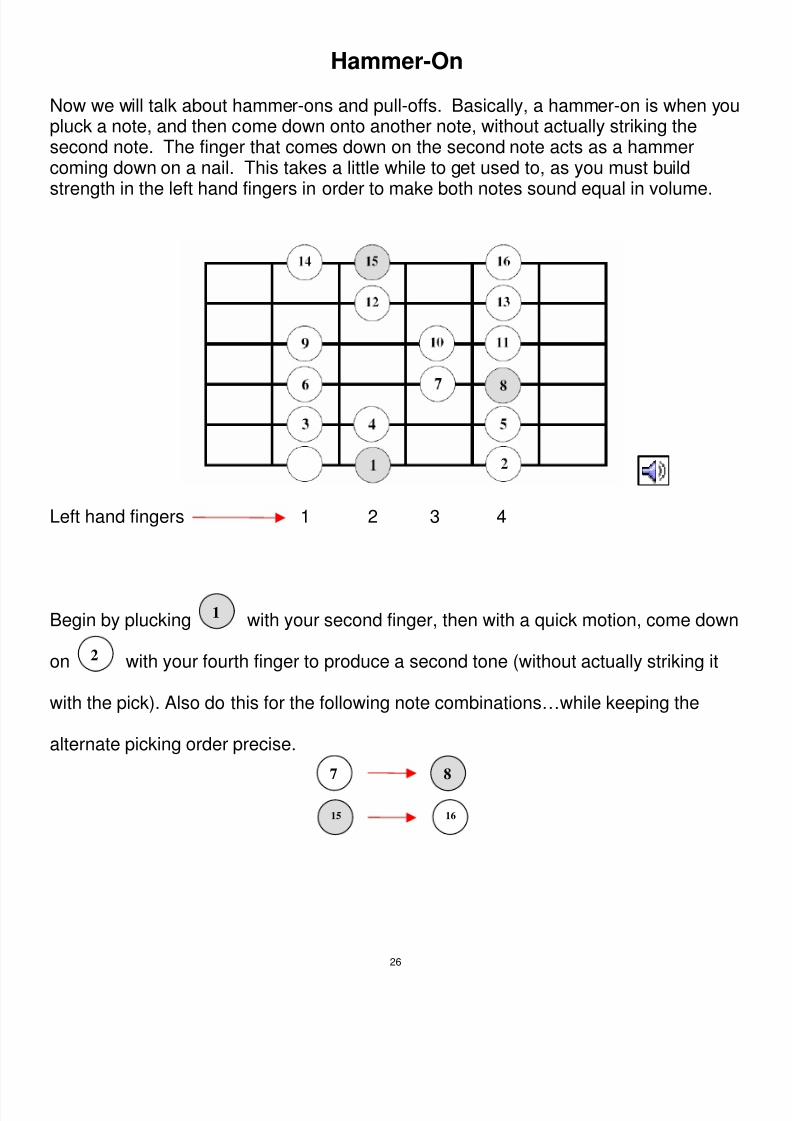
Hammer-On
Now we will talk about hammer-ons and pull-offs. Basically, a hammer-on is when youpluck a note, and then come down onto another note, without actually striking thesecond note. The finger that comes down on the second note acts as a hammercoming down on a nail. This takes a little while to get used to, as you must build
strength in the left hand fingers in order to make both notes sound equal in volume.
Left hand fingers 1 2 3 4
Begin by plucking with your second finger, then with a quick motion, come down
on with your fourth finger to produce a second tone (without actually striking it
with the pick). Also do this for the following note combinations…while keeping the
alternate picking order precise.
1
2
7 8
15 16
26
8/8/2019 Guitar Concepts...a New Aproach (With Audio)
http://slidepdf.com/reader/full/guitar-conceptsa-new-aproach-with-audio 27/28
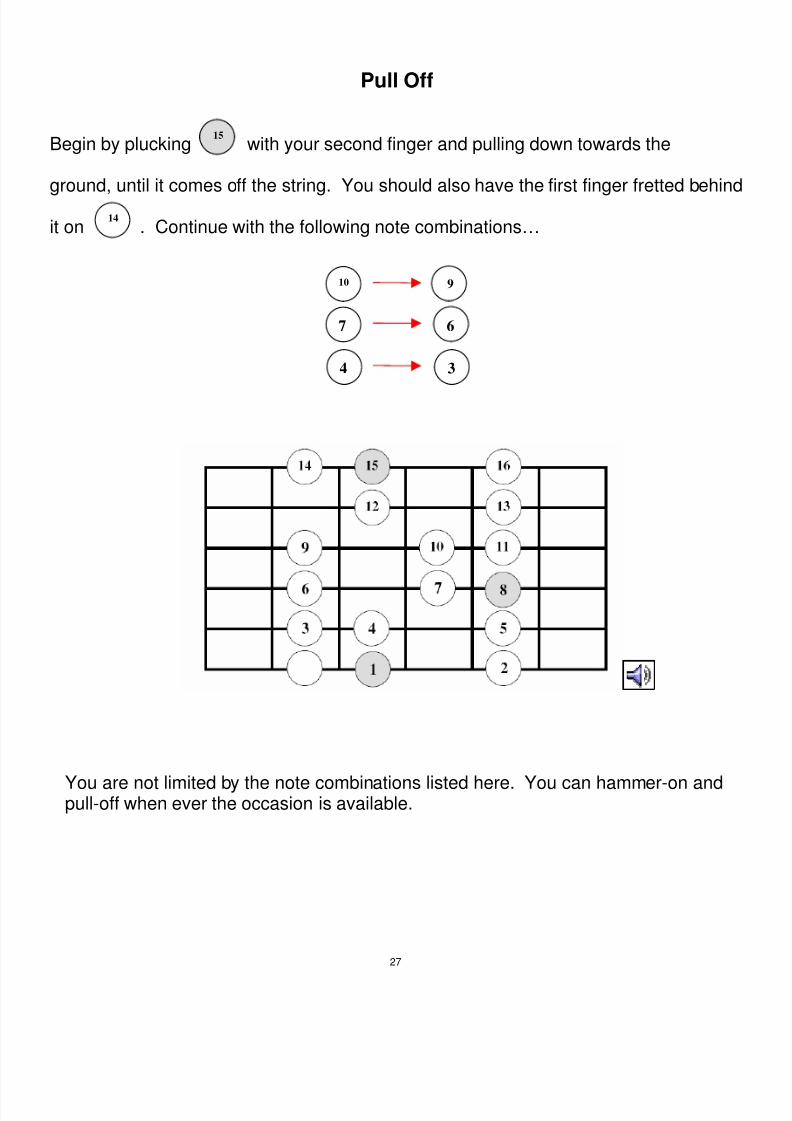
Pull Off
Begin by plucking with your second finger and pulling down towards the
ground, until it comes off the string. You should also have the first finger fretted behind
it on . Continue with the following note combinations…
You are not limited by the note combinations listed here. You can hammer-on andpull-off when ever the occasion is available.
15
14
10 9
7 6
4 3
27
8/8/2019 Guitar Concepts...a New Aproach (With Audio)
http://slidepdf.com/reader/full/guitar-conceptsa-new-aproach-with-audio 28/28
Final notes from the author…
I would like to take this opportunity to bring out a few important points. When playingany note or chord on the guitar, it’s very important to play within the frets, and to pressdown hard enough to produce a tone. If you don’t do this, you’ll get what’s called
“string buzz”. This is a sign that you must make some adjustments with your fingers, inorder to get the best sound possible. Quality is what we’re talking about. Make eachnote or chord sound pleasing to the ear. Have you ever heard a violinist play one longand drawn out note? Do you remember how beautiful it sounded? That’s what you cando on the guitar if you pay attention to your own sound, and be patient, and listen tothe examples as your guide to how the notes should sound.
In closing, I’d like to say congratulations on your dedication to the study of guitar. Iknow that if you stay with it, and not let those frustrating moments stumble you, you wileventually reach your goals.
Most beginner guitar students quit in the beginning because of poor instruction, or nothaving the right instrument. This course was designed to prevent that from happening.
The best way for you get the most out of this course, is for you to get right into it. Find handful of songs, and attempt to learn them. Start off with learning the chords, and thefocus on strumming. This is the best foundation you can have to prepare you for anyother type of study for guitar. Good luck, and let me know how you’re progressing!
Scott Ouellette