GP Corrugated BVP Manual 2017 - gppackaging.com · 1. Assigning Pick Lists and Dock Doors to Orders...
159
GP Corrugated BVP Manual 2017
Transcript of GP Corrugated BVP Manual 2017 - gppackaging.com · 1. Assigning Pick Lists and Dock Doors to Orders...
1
GP Corrugated BVP Manual
2017
2
Table of Contents 1. Assigning Pick Lists and Dock Doors to Orders 3 2. BVP Deleting Ship Plans 4 3. BVP Menus 7 4. BVP Support Basics 13 5. Roll Stock w/o an ASN – Creating In Transits 16 6. Create Delivery Slip for Previously Shipped Unscanned Units 24 7. Create Pick List 31 8. Delete and Cancel RGO Process 36 9. Delivery Slip Maintenance Screen Seal Number 40 10. Delivery Slip Maintenance and Deletion 42 11. Delivery Slips Weekend and Month-End Procedures 43 12. Delivery Freight Terms and Rules for Title Transfer 44 13. Downtime Working Documents 46 14. Enter a Manual Shipment 50 15. Have Ready Orders Storage 55 16. How to Open a Closed Ship Plan 55 17. In House Product Stock Storage 56 18. Inventory on Trailers – PLLOC 57 19. Material Receiving – MATRECMULT 68 20. Modify Trailer on a Delivery Slip 73 21. No Product Returned RGO Process 75 22. Order Cutback Shipment Planning Process 86 23. Partial Orders in RF 92 24. Product Returned RGO Process 94 25. Returning Lot Tracked Inventory to Unit Tracked Warehouse 111 26. Reworked Finished Goods 112 27. RF Bander Single Shot 113 28. RF Inventory Storage on Trailers 115 29. RF Messaging Basics 119 30. RF Reset Document 130 31. RF Reset Pick Lists 131 32. RF Shipping Basics 133 33. RF Short-Cuts Hand Out 134 34. RF Unit Check Procedures 140 35. Scheduled Downtime Procedures 141 36. Ship Plan and Pick List Sequencing 144 37. Shipment Planning 147 38. Unit Loading Procedures 148 39. Unscheduled Downtime Procedures 156 40. Subscribe to BVP Aged Report 159
3
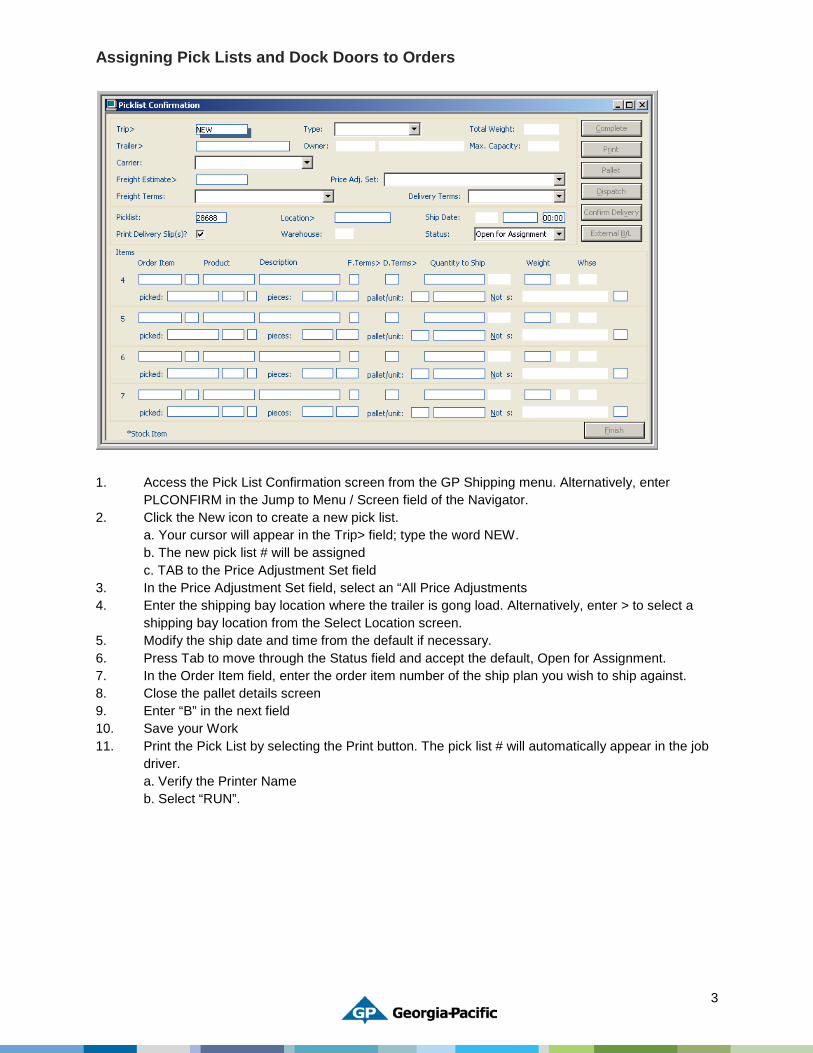
Assigning Pick Lists and Dock Doors to Orders
1. Access the Pick List Confirmation screen from the GP Shipping menu. Alternatively, enter
PLCONFIRM in the Jump to Menu / Screen field of the Navigator. 2. Click the New icon to create a new pick list.
a. Your cursor will appear in the Trip> field; type the word NEW. b. The new pick list # will be assigned c. TAB to the Price Adjustment Set field
3. In the Price Adjustment Set field, select an “All Price Adjustments 4. Enter the shipping bay location where the trailer is gong load. Alternatively, enter > to select a
shipping bay location from the Select Location screen. 5. Modify the ship date and time from the default if necessary. 6. Press Tab to move through the Status field and accept the default, Open for Assignment. 7. In the Order Item field, enter the order item number of the ship plan you wish to ship against. 8. Close the pallet details screen 9. Enter “B” in the next field 10. Save your Work 11. Print the Pick List by selecting the Print button. The pick list # will automatically appear in the job
driver. a. Verify the Printer Name b. Select “RUN”.
4
BVP Deleting Ship Plans
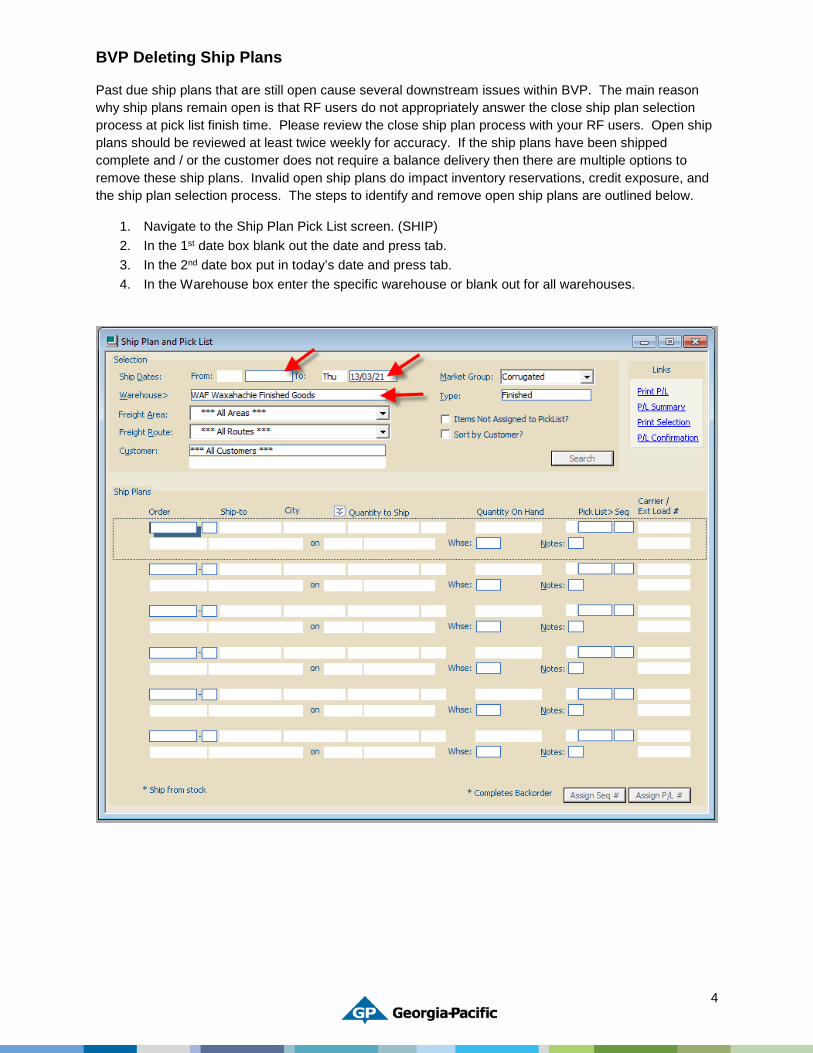
Past due ship plans that are still open cause several downstream issues within BVP. The main reason why ship plans remain open is that RF users do not appropriately answer the close ship plan selection process at pick list finish time. Please review the close ship plan process with your RF users. Open ship plans should be reviewed at least twice weekly for accuracy. If the ship plans have been shipped complete and / or the customer does not require a balance delivery then there are multiple options to remove these ship plans. Invalid open ship plans do impact inventory reservations, credit exposure, and the ship plan selection process. The steps to identify and remove open ship plans are outlined below.
1. Navigate to the Ship Plan Pick List screen. (SHIP) 2. In the 1st date box blank out the date and press tab. 3. In the 2nd date box put in today’s date and press tab. 4. In the Warehouse box enter the specific warehouse or blank out for all warehouses.
5
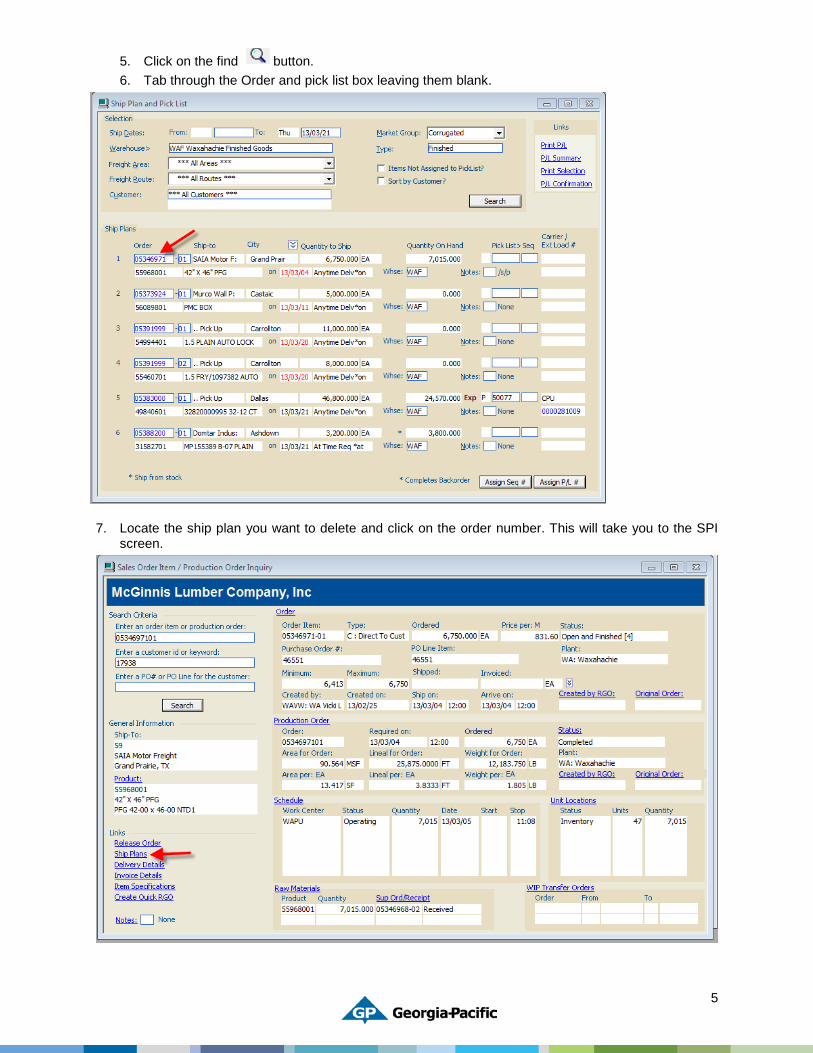
5. Click on the find button. 6. Tab through the Order and pick list box leaving them blank.
7. Locate the ship plan you want to delete and click on the order number. This will take you to the SPI screen.
6
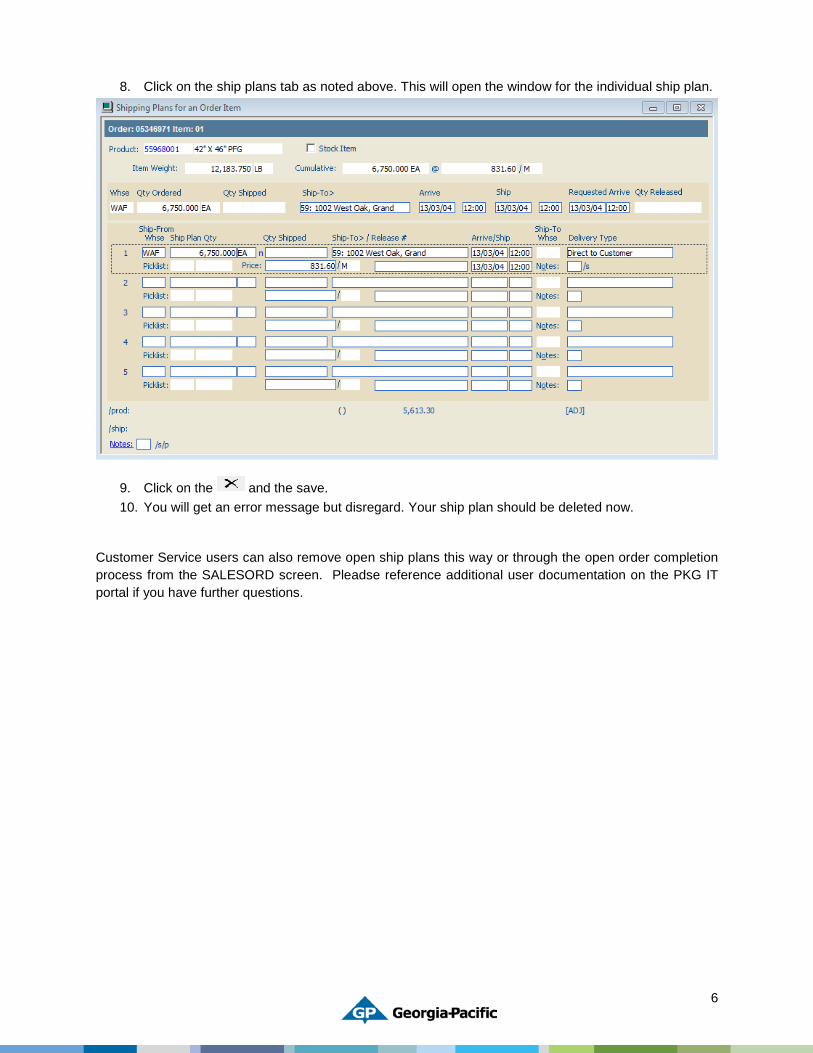
8. Click on the ship plans tab as noted above. This will open the window for the individual ship plan.
9. Click on the and the save. 10. You will get an error message but disregard. Your ship plan should be deleted now.
Customer Service users can also remove open ship plans this way or through the open order completion process from the SALESORD screen. Pleadse reference additional user documentation on the PKG IT portal if you have further questions.
7
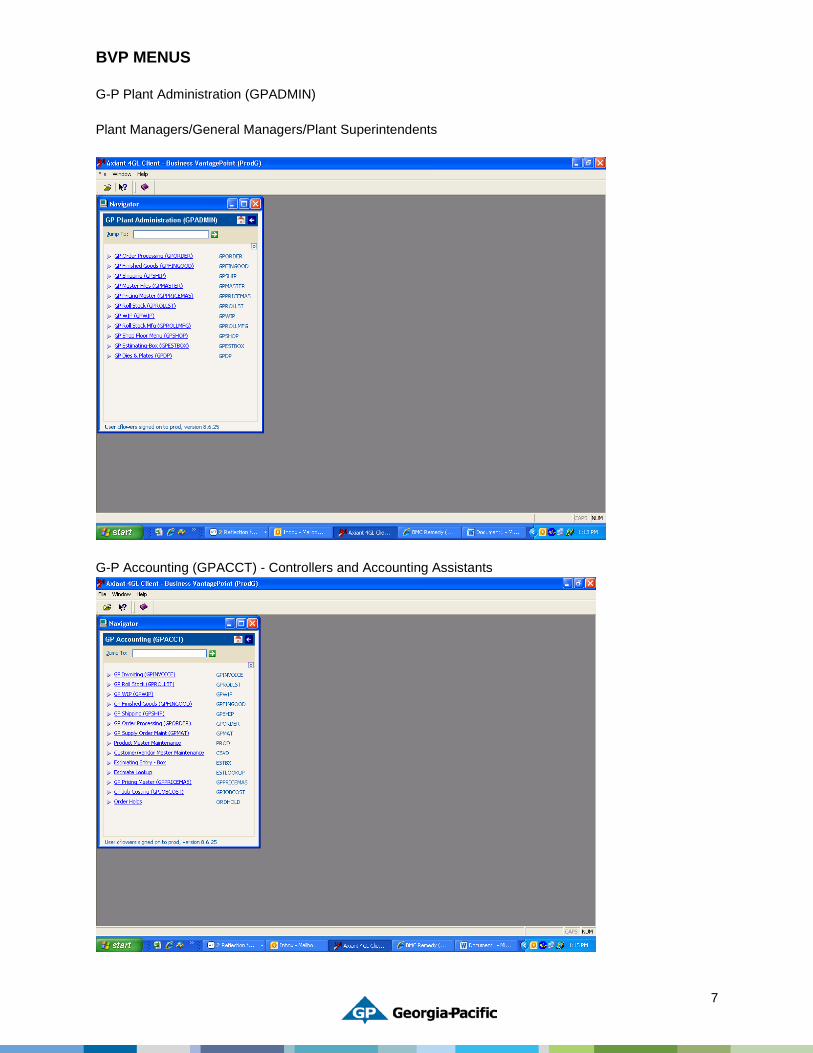
BVP MENUS G-P Plant Administration (GPADMIN) Plant Managers/General Managers/Plant Superintendents
G-P Accounting (GPACCT) - Controllers and Accounting Assistants
8
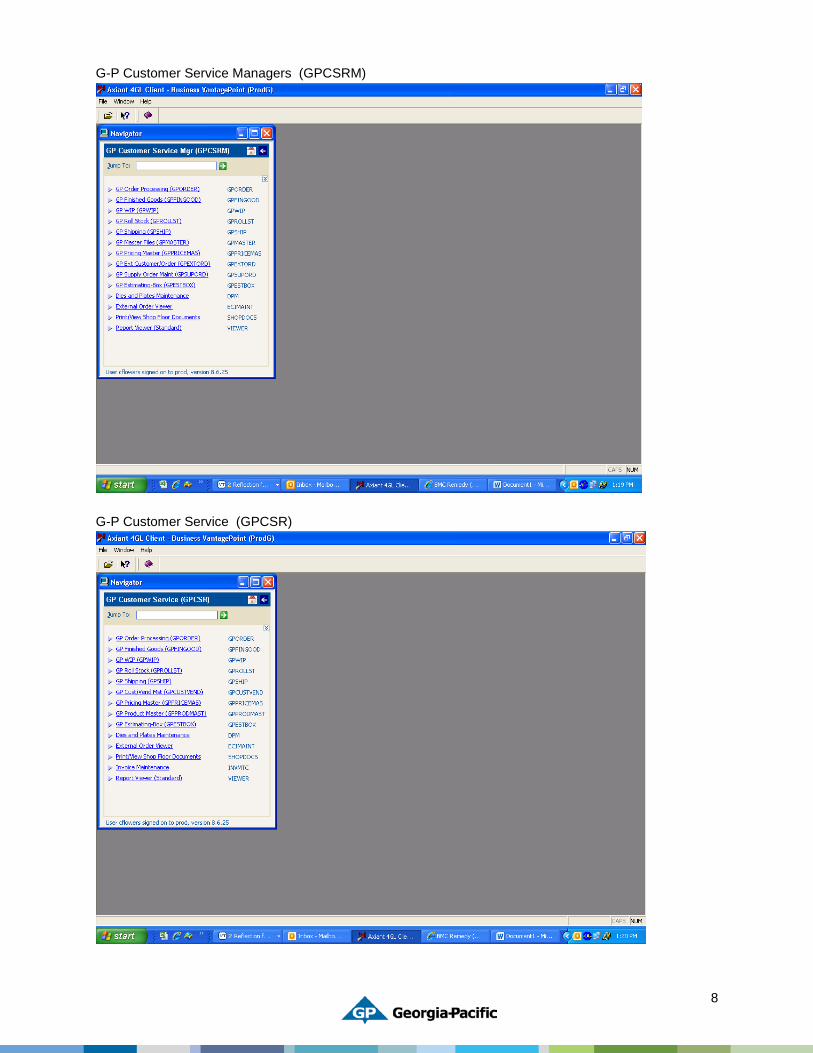
G-P Customer Service Managers (GPCSRM)
G-P Customer Service (GPCSR)
9
G-P Shipping (GPSHIP)
G-P Schedulers (GPROLLAD)
10
G-P Quality (GPQUALITY)
G-P Corrugator Supervisors (GPCORSUP)
11
G-P Production Floor (GPSHOP)
G-P Shipping RF Menu (GPRFSHIP)
12
G-P RF Roll Stock Menu (GPRFROLL)
G-P Sales (GPSALES) Sales Representatives/Account Reps
13
BVP Support Basics The following are the basic steps that will help you get the BVP support you need.
• Please contact the Service Desk on all support needs o We utilize the Service Desk for first point of contact for all BVP support needs except
customer master/shipto requests. You can contact them at 1 (877) 352-4357 and they will create a Remedy case on your behalf. Please make sure you provide them details so that they or the BVP team can handle your case without having to contact you for more details.
• Please make sure that you call the Service Desk on any email case to verify it has the right priority and is routed to PKG BVP Support queue.
o Remember, if you enter a case through email, the Service Desk has up to 24 hours to get the case created. Putting CRITICAL/URGENT/HIGH in the Subject of the email does not change that fact. You must call the Service Desk and ask them to change the priority to High/Critical. All emails are created as LOW cases and can take up to a week to resolve. For any High/Critical cases, your best option is to contact the Service Desk directly at 1 (877) 352-4357.
• Please do not respond to any automatically generated emails from the Service Desk o These are not processed and will not be captured in any way. If you have additional
details, please call the Service Desk directly. • Please do not ask the Service Desk to open up a closed case because you have another
issue like the one you had before. o This adds confusion and waste to the process as the case details and support provider
have most likely changed. • Please do not cc the BVP Support Team members on any emails going to the Service
Desk. o We have had instances where multiple people were working the same case causing
confusion and wasted effort or cases were not handled because someone thought someone else was handling it. To keep focus and get your cases handled properly, the BVP Support Team only handles cases and does not respond to any emails unless they are directly related to an existing case.
• Please provide as much information in your case as possible: order #, pick list #, delivery slip #, trip #, etc.
o Missing information is a consistent challenge. The Service Desk has been told to get as many details as possible and they will challenge you to get them. If they do not, then please challenge them to capture all necessary details. This is for your benefit and will help us solve your case faster.
• Please provide a fax of the manifest(s) if you have rolls that you can not receive in BVP. o We need this information to properly research what is wrong and get the load details
resent. • Please fill out your BVP Forms’ requests completely and correctly.
o Form 13322 Any add or change to a Customer, Vendor, or Ship-to requires a form that is
complete and properly signed by plant or regional controller. Please use the Additional Information section to provide any additional details if you are making a change. For requests during 7 AM EDT - 6 PM EDT that you need within one hour, please add HIGH/URGENT to the SUBJECT line of the email. For requests during 6 PM EDT - 9 PM EDT that can not wait until the next
14
business day, please enter a case with the Service Desk and request that it be URGENT priority.
Please do not send a form without a controller's signature as we can DO NOTHING with these forms and you will need to fill out another one. If your customer needs a name change, please send name change request to the Credit Department who will then approve it and forward to a BVP Support Team member.
o Form 13391 Any add or change to an employee requires a form that is complete and
properly signed by plant controller, general manager, or regional manager. If the request is for access to all plants, then the Packaging Controller will have to approve.
If the request is for a new employee, please give us a person at your facility to model the id after.
Please verify that the requested menu and access is consistent with the employee's role and responsibilities.
Please make sure that the REQUESTOR and APPROVER is not the same person. We can not process those forms due to compliance and audit requirements.
o Form 13459 Any add or change report request requires a form that has as much detail as
possible and is routed for approval. o Form 14111
Any board combination request will be handled through this form. Remember that we need this filled out completely and correctly.
It is also important that you discuss new requests with your local experts such as customer service manager, seasoned customer service professional, scheduler, etc., as there may be existing combination(s) that meet the need.
Please make sure that a board combination meets the respective ECT or Mullen value.
Please make sure that you get a blank form from Forms!Now website each time. We have been hearing of instances where users have had problems with versions saved on their desktop and do not want you experiencing delays due to incorrectly routed or completed forms.
• Please do not switch out an existing BVP printer with a new printer before putting a Remedy case in and discussing with PKG IT technical resources.
o There are certain printers that have specific functions in BVP and switching them will only cause more challenges.
o Please do not buy a printer from the local electronic or office supply store to use with BVP. There are only certain types of printers that work with BVP and they are not usually sold at the local store.
o If you need replacement or additional printers, please put a Remedy case in with the type of printer you need such as loadtag, rollstock label, delivery slip, etc., along with charge code and we can coordinate getting you the right model.
• Please do not switch out any Systec or Speclink PC before putting a Remedy case in and discussing with PKG IT technical resources.
o These PC's have specific software and functions to perform. You cannot use a plant floor PC to do their job so please do not try.
• Please make sure that your night crews have computer room key and know the procedures for rebooting and maintaining your Speclink, Systec, and RF equipment.
15
o We cannot unlock computer room doors nor can we reset a Marquip GPC communications card remotely. Your maintenance and supervisory staff need to have the knowledge and access to do so with or without our direction at 2 AM in the morning.
• Please use myAudimator when resetting your BVP password. o We have integrated BVP password resets in myAudimator tool. You can access
myAudimator off of the GP home page by selecting myWork->myWorkTools->myAudimator->GP Packaging. You can then select BVP from the list and follow the on-screen prompts. Note: Your BVP Password cannot contain spaces or special characters; Audimator may allow it but BVP will not. If you have problems, you can contact the Service Desk and they can walk you through the process.
If you have followed the steps above and are having issues with getting your case(s) handled properly, please contact me directly by phone at (404) 652-4434 or through email [email protected]. Greg Bambic Senior Manager, Packaging IT
16
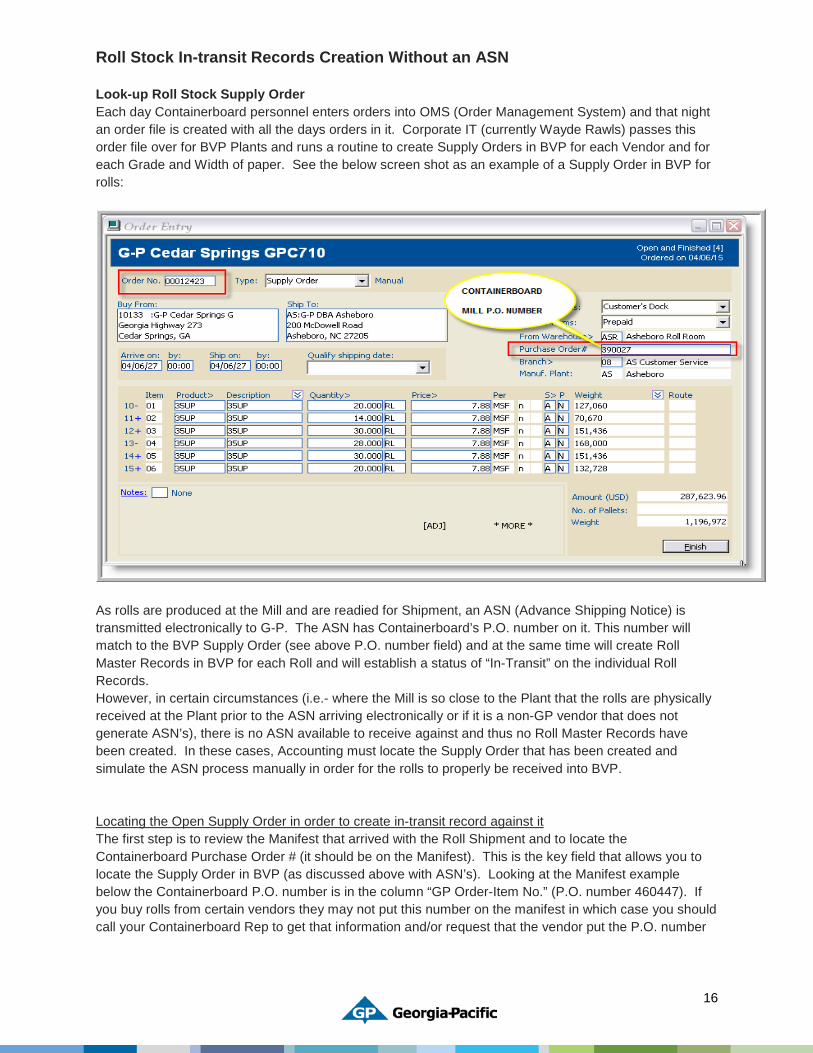
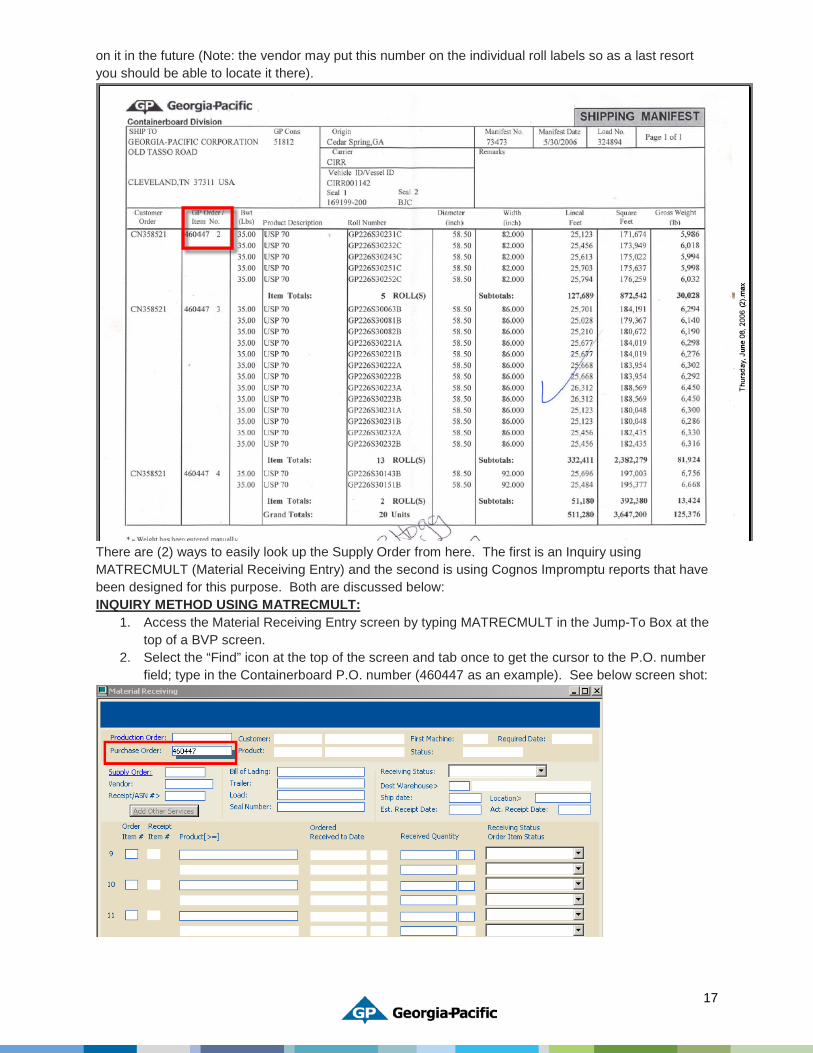
Roll Stock In-transit Records Creation Without an ASN Look-up Roll Stock Supply Order Each day Containerboard personnel enters orders into OMS (Order Management System) and that night an order file is created with all the days orders in it. Corporate IT (currently Wayde Rawls) passes this order file over for BVP Plants and runs a routine to create Supply Orders in BVP for each Vendor and for each Grade and Width of paper. See the below screen shot as an example of a Supply Order in BVP for rolls:
As rolls are produced at the Mill and are readied for Shipment, an ASN (Advance Shipping Notice) is transmitted electronically to G-P. The ASN has Containerboard’s P.O. number on it. This number will match to the BVP Supply Order (see above P.O. number field) and at the same time will create Roll Master Records in BVP for each Roll and will establish a status of “In-Transit” on the individual Roll Records. However, in certain circumstances (i.e.- where the Mill is so close to the Plant that the rolls are physically received at the Plant prior to the ASN arriving electronically or if it is a non-GP vendor that does not generate ASN’s), there is no ASN available to receive against and thus no Roll Master Records have been created. In these cases, Accounting must locate the Supply Order that has been created and simulate the ASN process manually in order for the rolls to properly be received into BVP. Locating the Open Supply Order in order to create in-transit record against it The first step is to review the Manifest that arrived with the Roll Shipment and to locate the Containerboard Purchase Order # (it should be on the Manifest). This is the key field that allows you to locate the Supply Order in BVP (as discussed above with ASN’s). Looking at the Manifest example below the Containerboard P.O. number is in the column “GP Order-Item No.” (P.O. number 460447). If you buy rolls from certain vendors they may not put this number on the manifest in which case you should call your Containerboard Rep to get that information and/or request that the vendor put the P.O. number
17
on it in the future (Note: the vendor may put this number on the individual roll labels so as a last resort you should be able to locate it there).
There are (2) ways to easily look up the Supply Order from here. The first is an Inquiry using MATRECMULT (Material Receiving Entry) and the second is using Cognos Impromptu reports that have been designed for this purpose. Both are discussed below: INQUIRY METHOD USING MATRECMULT:
1. Access the Material Receiving Entry screen by typing MATRECMULT in the Jump-To Box at the top of a BVP screen.
2. Select the “Find” icon at the top of the screen and tab once to get the cursor to the P.O. number field; type in the Containerboard P.O. number (460447 as an example). See below screen shot:
18
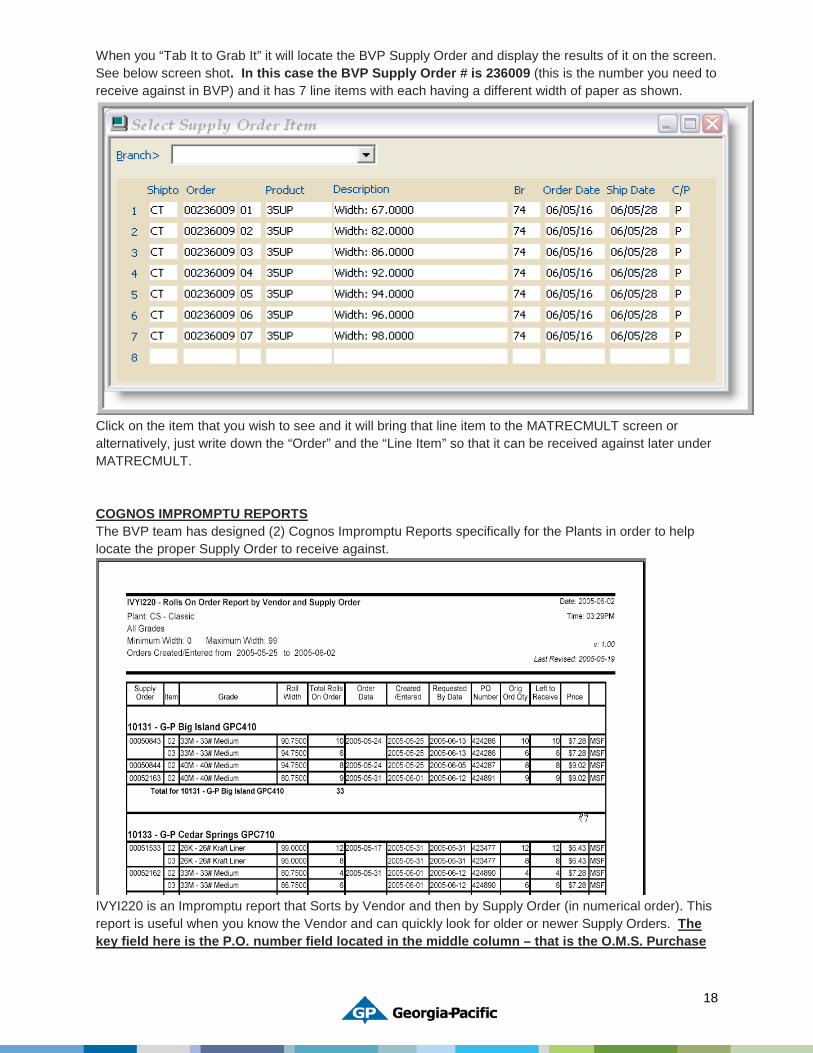
When you “Tab It to Grab It” it will locate the BVP Supply Order and display the results of it on the screen. See below screen shot. In this case the BVP Supply Order # is 236009 (this is the number you need to receive against in BVP) and it has 7 line items with each having a different width of paper as shown.
Click on the item that you wish to see and it will bring that line item to the MATRECMULT screen or alternatively, just write down the “Order” and the “Line Item” so that it can be received against later under MATRECMULT. COGNOS IMPROMPTU REPORTS The BVP team has designed (2) Cognos Impromptu Reports specifically for the Plants in order to help locate the proper Supply Order to receive against.
IVYI220 is an Impromptu report that Sorts by Vendor and then by Supply Order (in numerical order). This report is useful when you know the Vendor and can quickly look for older or newer Supply Orders. The key field here is the P.O. number field located in the middle column – that is the O.M.S. Purchase

19
Order number that should be on the Mill Manifest. Once you know this, then you can look across to the left column and determine the BVP Supply Order number and that will be what you will use in the section below to receive the rolls against. Note: In addition, this report shows the value that the rolls will be received at – these should be checked carefully especially for any deals or narrow roll discounts and adjusted if necessary prior to receiving the rolls. In addition to IVYI220, we also have IVYI213 that Sorts by Grade & then by Width. This report is used by Plants when they don’t know the Vendor the roll-stock has been sourced from but knows the Grades & Widths ordered. See below for example of this report.
Regardless of the method used, once the P.O. number has been located then you can proceed with the next step in receiving rollstock (See below). Using the Material Receiving Screen 1. Enter MATRECMULT in the Jump to Menu / Screen field of the Navigator. 2. Click the “New” icon to create a new receiving record. This will immediately take the cursor to the Supply Order # field for entry. 3. Supply Order #: enter the Supply order number (that you located previously from the OMS P.O. order #) and Line item # that you are receiving against(Note: If the Supply Order cannot be located in BVP, then you must create a Roll Stock supply order before you begin.) 4. Bill of Lading: enter the Bill of Lading number for the shipment (found on the Manifest). Trailer: enter the Trailer number of the shipment (found on the Manifest) Load: enter the Load number of the shipment (found on the Manifest) Seal Number: enter the seal number (found on the Manifest) 5. Receiving Status: - Set this to "In Transit" for rollstock items.
a. “Received” - (select this only if you want accounting to actually receive the rolls into inventory and assign a location to each roll - Not Recommended practice).
b. “In Transit” - (select this if you want the clamp truck driver to scan the rolls into inventory after Accounting has set them up as “In Transit”). Note: This is the recommended procedure since by scanning the rolls with the RF equipment it will validate that the rolls were set up correctly by Accounting
6. Dest Warehouse: (VERY IMPORTANT) press Tab to accept the "Receive to" warehouse that was entered originally on the Supply Order. If this was not entered correctly, then enter the appropriate
20
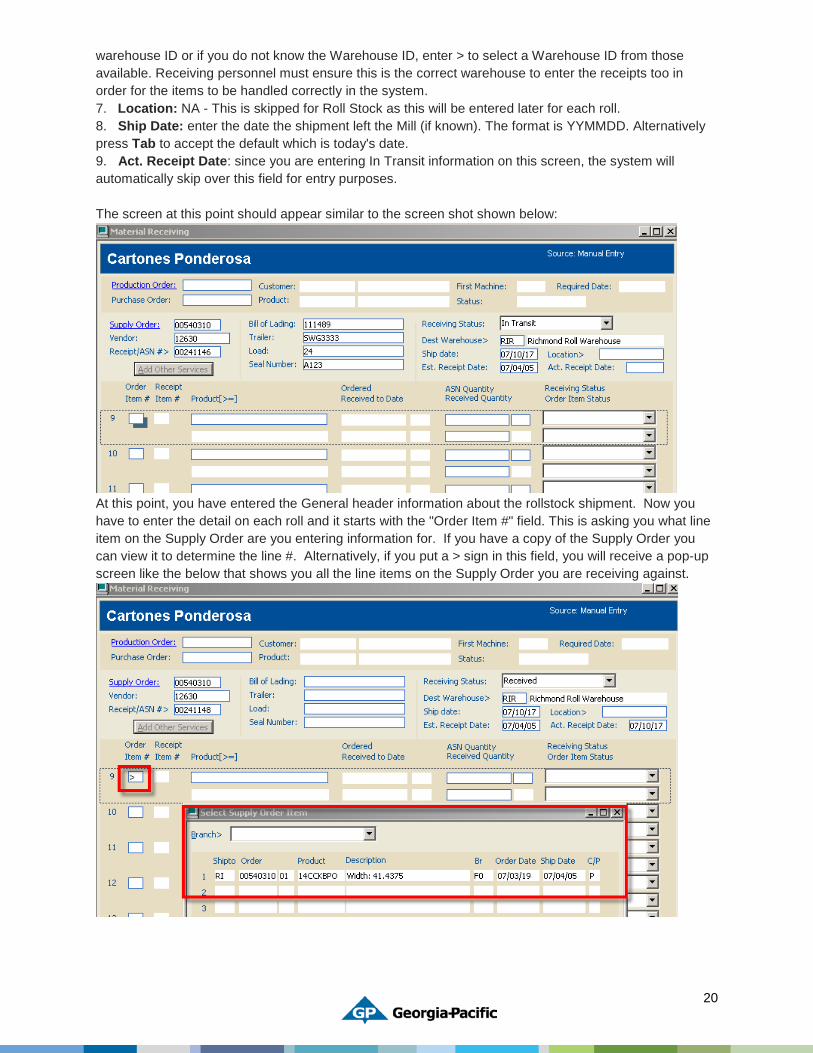
warehouse ID or if you do not know the Warehouse ID, enter > to select a Warehouse ID from those available. Receiving personnel must ensure this is the correct warehouse to enter the receipts too in order for the items to be handled correctly in the system. 7. Location: NA - This is skipped for Roll Stock as this will be entered later for each roll. 8. Ship Date: enter the date the shipment left the Mill (if known). The format is YYMMDD. Alternatively press Tab to accept the default which is today's date. 9. Act. Receipt Date: since you are entering In Transit information on this screen, the system will automatically skip over this field for entry purposes. The screen at this point should appear similar to the screen shot shown below:
At this point, you have entered the General header information about the rollstock shipment. Now you have to enter the detail on each roll and it starts with the "Order Item #" field. This is asking you what line item on the Supply Order are you entering information for. If you have a copy of the Supply Order you can view it to determine the line #. Alternatively, if you put a > sign in this field, you will receive a pop-up screen like the below that shows you all the line items on the Supply Order you are receiving against.
21
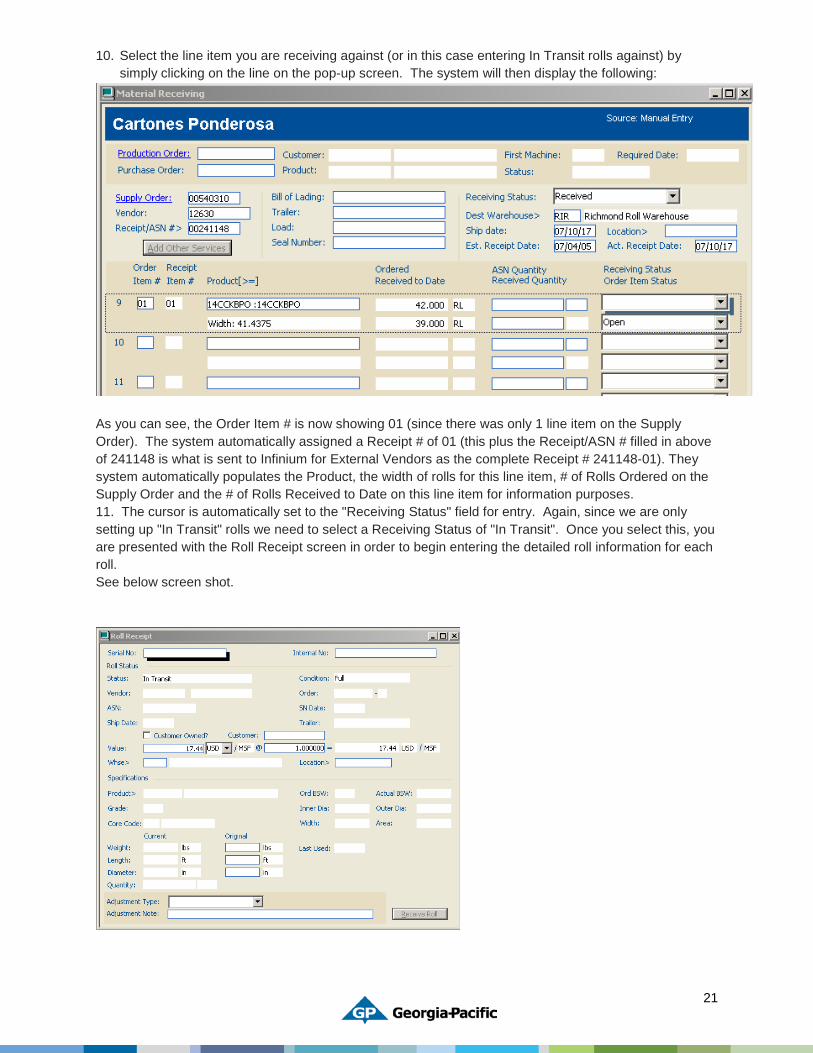
10. Select the line item you are receiving against (or in this case entering In Transit rolls against) by simply clicking on the line on the pop-up screen. The system will then display the following:
As you can see, the Order Item # is now showing 01 (since there was only 1 line item on the Supply Order). The system automatically assigned a Receipt # of 01 (this plus the Receipt/ASN # filled in above of 241148 is what is sent to Infinium for External Vendors as the complete Receipt # 241148-01). They system automatically populates the Product, the width of rolls for this line item, # of Rolls Ordered on the Supply Order and the # of Rolls Received to Date on this line item for information purposes. 11. The cursor is automatically set to the "Receiving Status" field for entry. Again, since we are only setting up "In Transit" rolls we need to select a Receiving Status of "In Transit". Once you select this, you are presented with the Roll Receipt screen in order to begin entering the detailed roll information for each roll. See below screen shot.
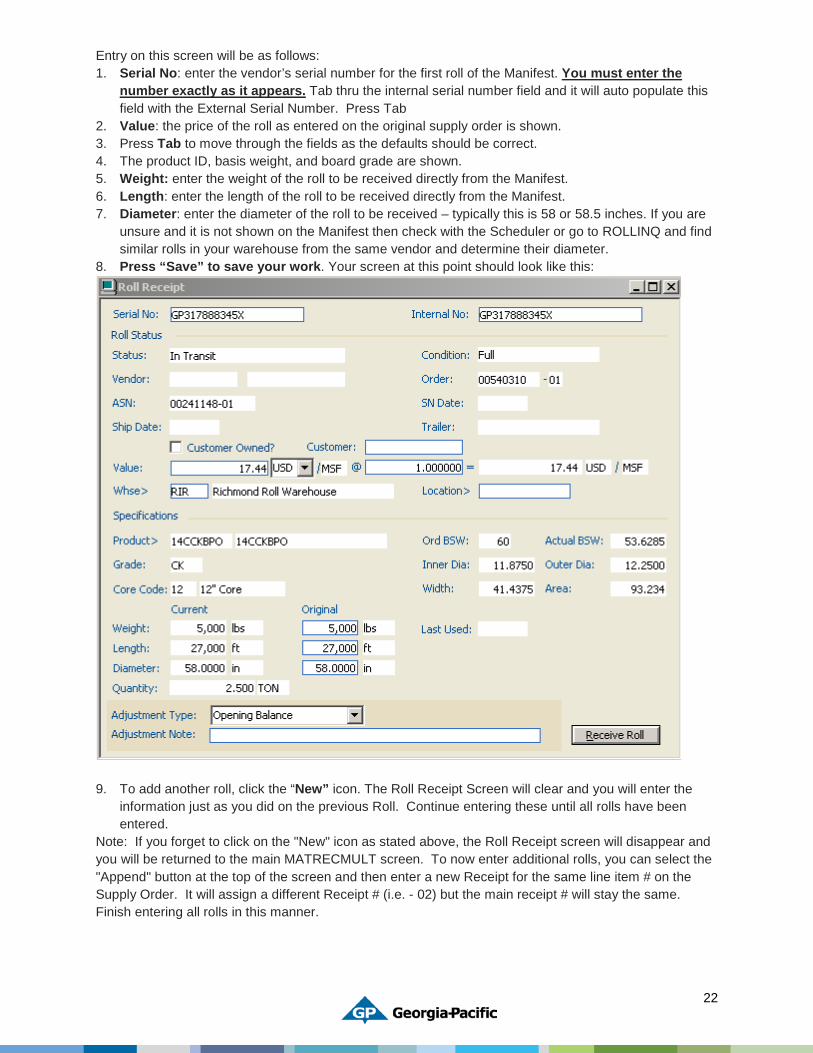
22
Entry on this screen will be as follows: 1. Serial No: enter the vendor’s serial number for the first roll of the Manifest. You must enter the
number exactly as it appears. Tab thru the internal serial number field and it will auto populate this field with the External Serial Number. Press Tab
2. Value: the price of the roll as entered on the original supply order is shown. 3. Press Tab to move through the fields as the defaults should be correct. 4. The product ID, basis weight, and board grade are shown. 5. Weight: enter the weight of the roll to be received directly from the Manifest. 6. Length: enter the length of the roll to be received directly from the Manifest. 7. Diameter: enter the diameter of the roll to be received – typically this is 58 or 58.5 inches. If you are
unsure and it is not shown on the Manifest then check with the Scheduler or go to ROLLINQ and find similar rolls in your warehouse from the same vendor and determine their diameter.
8. Press “Save” to save your work. Your screen at this point should look like this:
9. To add another roll, click the “New” icon. The Roll Receipt Screen will clear and you will enter the
information just as you did on the previous Roll. Continue entering these until all rolls have been entered.
Note: If you forget to click on the "New" icon as stated above, the Roll Receipt screen will disappear and you will be returned to the main MATRECMULT screen. To now enter additional rolls, you can select the "Append" button at the top of the screen and then enter a new Receipt for the same line item # on the Supply Order. It will assign a different Receipt # (i.e. - 02) but the main receipt # will stay the same. Finish entering all rolls in this manner.
23
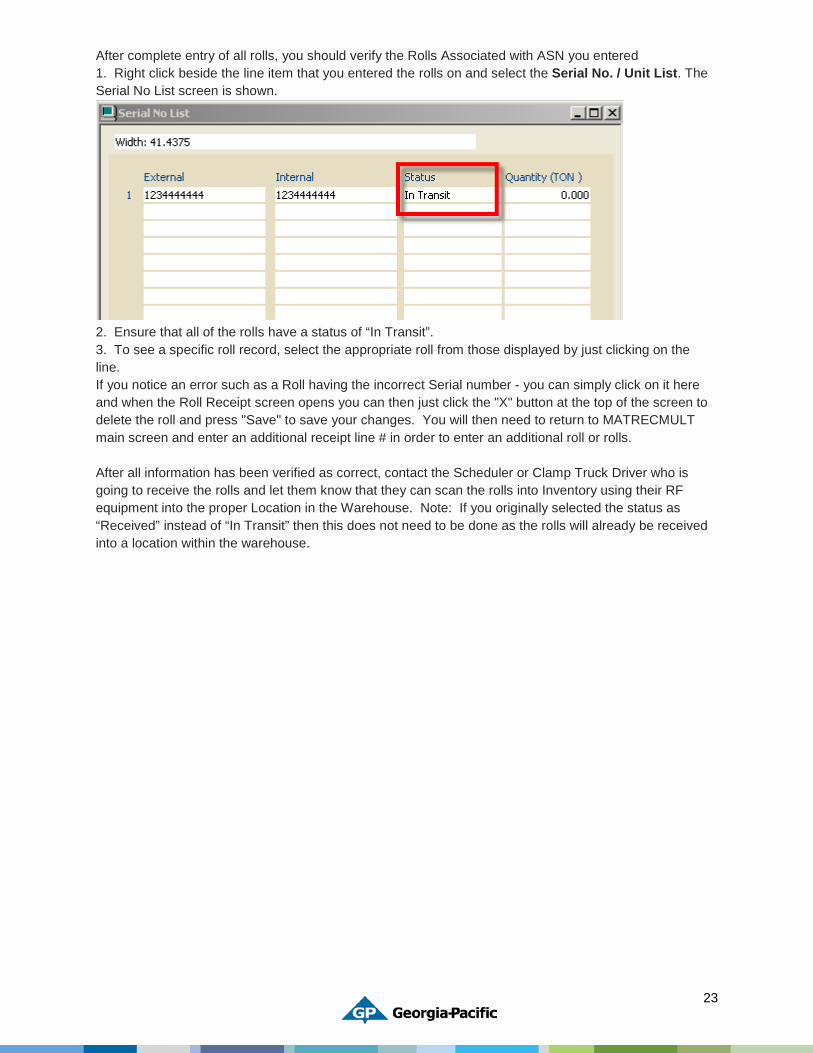
After complete entry of all rolls, you should verify the Rolls Associated with ASN you entered 1. Right click beside the line item that you entered the rolls on and select the Serial No. / Unit List. The Serial No List screen is shown.
2. Ensure that all of the rolls have a status of “In Transit”. 3. To see a specific roll record, select the appropriate roll from those displayed by just clicking on the line. If you notice an error such as a Roll having the incorrect Serial number - you can simply click on it here and when the Roll Receipt screen opens you can then just click the "X" button at the top of the screen to delete the roll and press "Save" to save your changes. You will then need to return to MATRECMULT main screen and enter an additional receipt line # in order to enter an additional roll or rolls. After all information has been verified as correct, contact the Scheduler or Clamp Truck Driver who is going to receive the rolls and let them know that they can scan the rolls into Inventory using their RF equipment into the proper Location in the Warehouse. Note: If you originally selected the status as “Received” instead of “In Transit” then this does not need to be done as the rolls will already be received into a location within the warehouse.
24
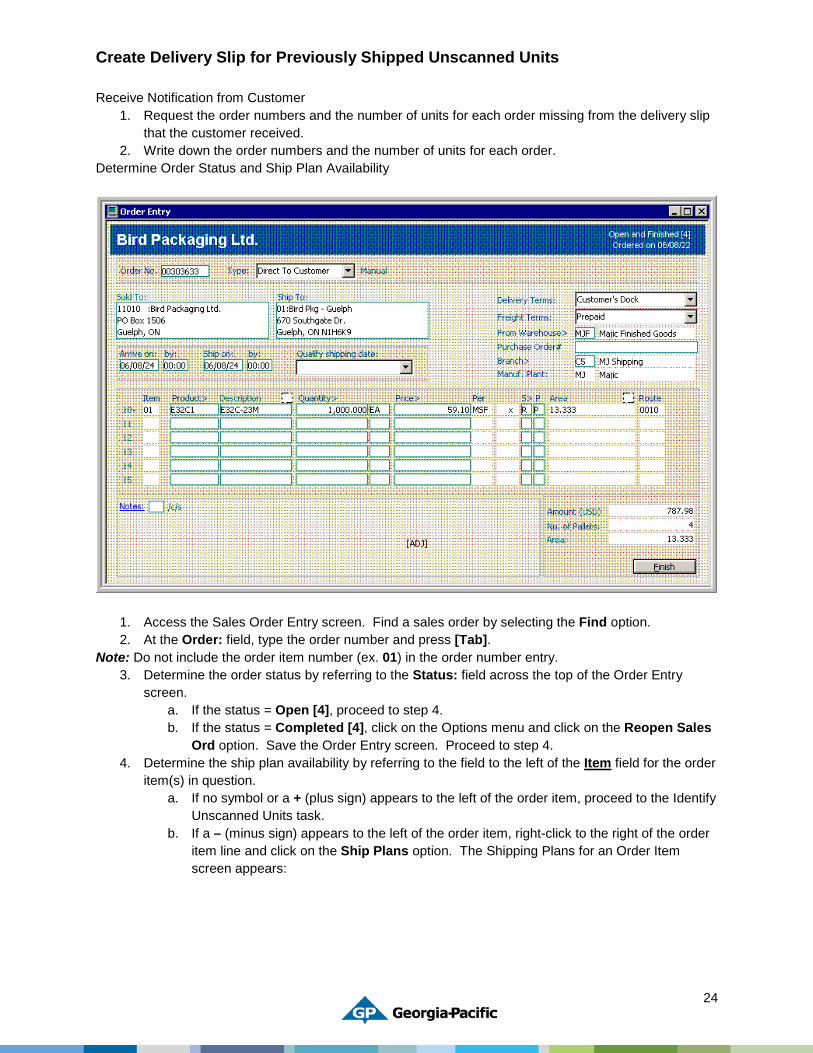
Create Delivery Slip for Previously Shipped Unscanned Units Receive Notification from Customer
1. Request the order numbers and the number of units for each order missing from the delivery slip that the customer received.
2. Write down the order numbers and the number of units for each order. Determine Order Status and Ship Plan Availability
1. Access the Sales Order Entry screen. Find a sales order by selecting the Find option. 2. At the Order: field, type the order number and press [Tab].
Note: Do not include the order item number (ex. 01) in the order number entry. 3. Determine the order status by referring to the Status: field across the top of the Order Entry
screen. a. If the status = Open [4], proceed to step 4. b. If the status = Completed [4], click on the Options menu and click on the Reopen Sales
Ord option. Save the Order Entry screen. Proceed to step 4. 4. Determine the ship plan availability by referring to the field to the left of the Item field for the order
item(s) in question. a. If no symbol or a + (plus sign) appears to the left of the order item, proceed to the Identify
Unscanned Units task. b. If a – (minus sign) appears to the left of the order item, right-click to the right of the order
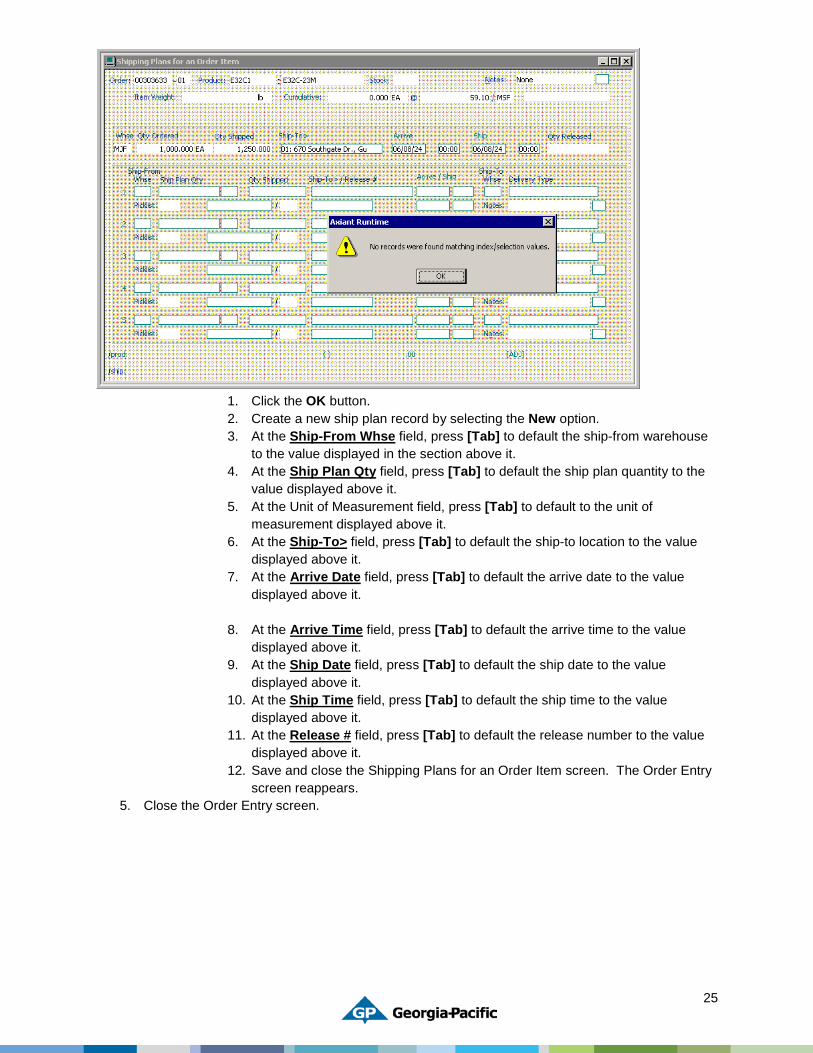
item line and click on the Ship Plans option. The Shipping Plans for an Order Item screen appears:
25
1. Click the OK button. 2. Create a new ship plan record by selecting the New option. 3. At the Ship-From Whse field, press [Tab] to default the ship-from warehouse
to the value displayed in the section above it. 4. At the Ship Plan Qty field, press [Tab] to default the ship plan quantity to the
value displayed above it. 5. At the Unit of Measurement field, press [Tab] to default to the unit of
measurement displayed above it. 6. At the Ship-To> field, press [Tab] to default the ship-to location to the value
displayed above it. 7. At the Arrive Date field, press [Tab] to default the arrive date to the value
displayed above it.
8. At the Arrive Time field, press [Tab] to default the arrive time to the value displayed above it.
9. At the Ship Date field, press [Tab] to default the ship date to the value displayed above it.
10. At the Ship Time field, press [Tab] to default the ship time to the value displayed above it.
11. At the Release # field, press [Tab] to default the release number to the value displayed above it.
12. Save and close the Shipping Plans for an Order Item screen. The Order Entry screen reappears.
5. Close the Order Entry screen.
26
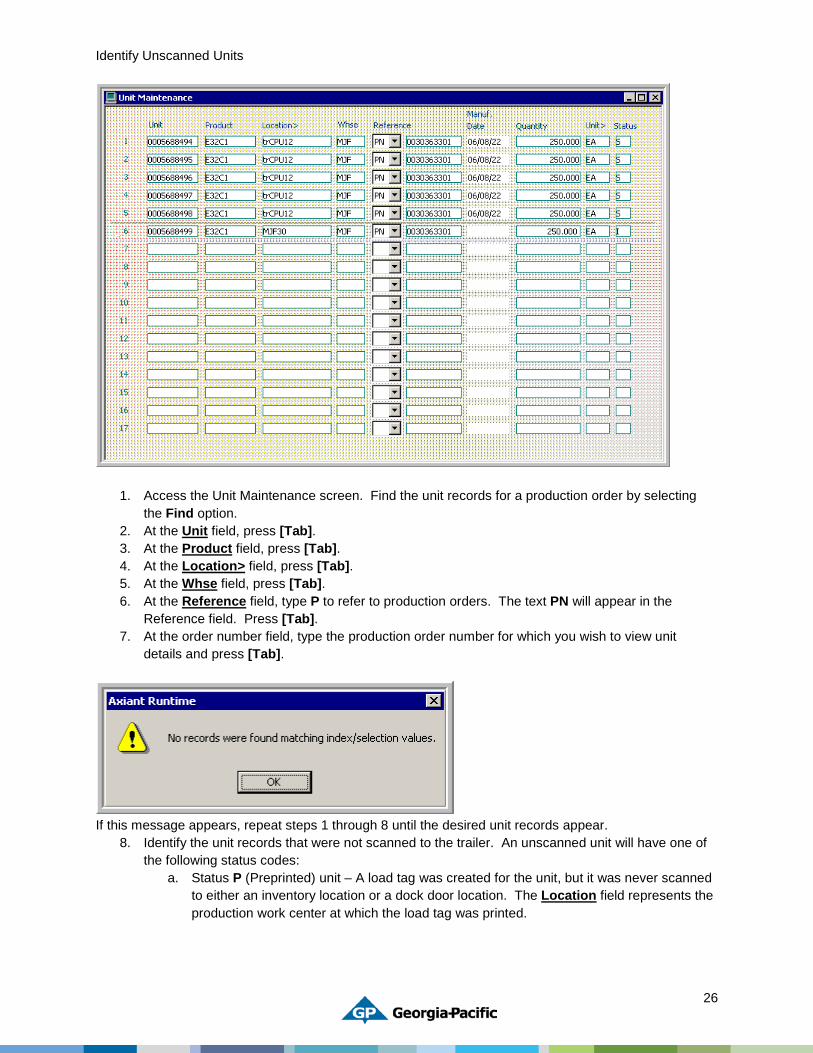
Identify Unscanned Units
1. Access the Unit Maintenance screen. Find the unit records for a production order by selecting the Find option.
2. At the Unit field, press [Tab]. 3. At the Product field, press [Tab]. 4. At the Location> field, press [Tab]. 5. At the Whse field, press [Tab]. 6. At the Reference field, type P to refer to production orders. The text PN will appear in the
Reference field. Press [Tab]. 7. At the order number field, type the production order number for which you wish to view unit
details and press [Tab].
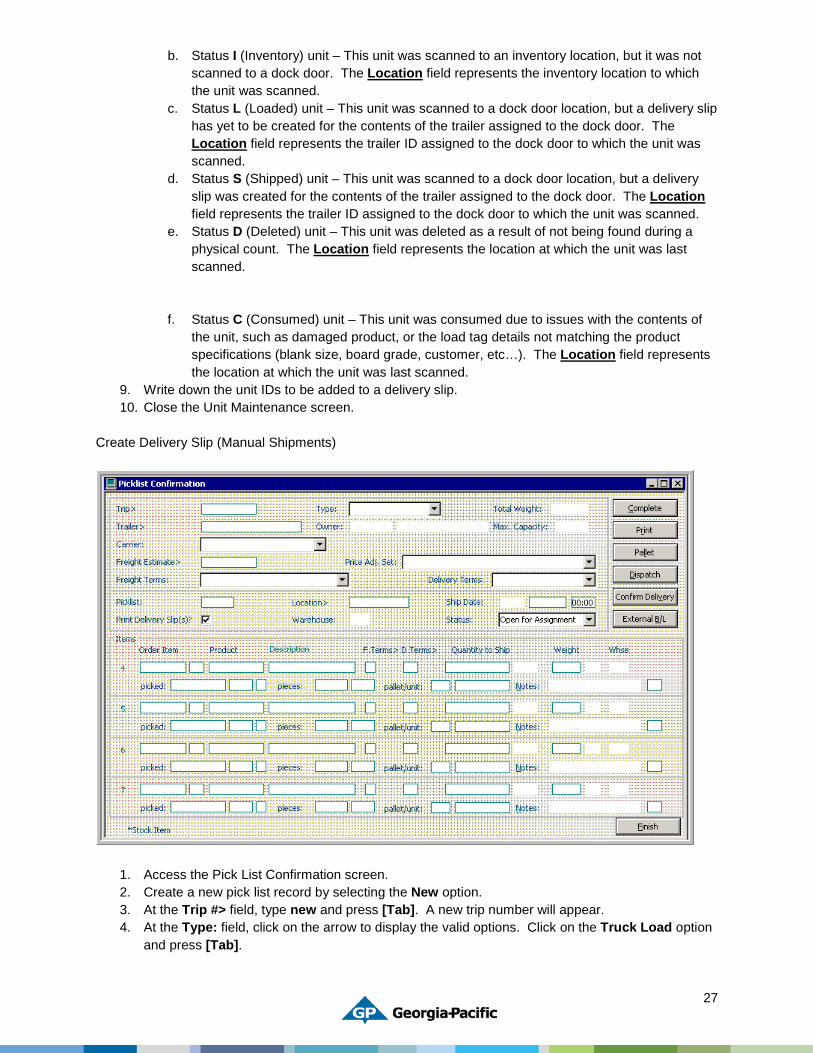
If this message appears, repeat steps 1 through 8 until the desired unit records appear.
8. Identify the unit records that were not scanned to the trailer. An unscanned unit will have one of the following status codes:
a. Status P (Preprinted) unit – A load tag was created for the unit, but it was never scanned to either an inventory location or a dock door location. The Location field represents the production work center at which the load tag was printed.
27
b. Status I (Inventory) unit – This unit was scanned to an inventory location, but it was not scanned to a dock door. The Location field represents the inventory location to which the unit was scanned.
c. Status L (Loaded) unit – This unit was scanned to a dock door location, but a delivery slip has yet to be created for the contents of the trailer assigned to the dock door. The Location field represents the trailer ID assigned to the dock door to which the unit was scanned.
d. Status S (Shipped) unit – This unit was scanned to a dock door location, but a delivery slip was created for the contents of the trailer assigned to the dock door. The Location field represents the trailer ID assigned to the dock door to which the unit was scanned.
e. Status D (Deleted) unit – This unit was deleted as a result of not being found during a physical count. The Location field represents the location at which the unit was last scanned.
f. Status C (Consumed) unit – This unit was consumed due to issues with the contents of the unit, such as damaged product, or the load tag details not matching the product specifications (blank size, board grade, customer, etc…). The Location field represents the location at which the unit was last scanned.
9. Write down the unit IDs to be added to a delivery slip. 10. Close the Unit Maintenance screen.
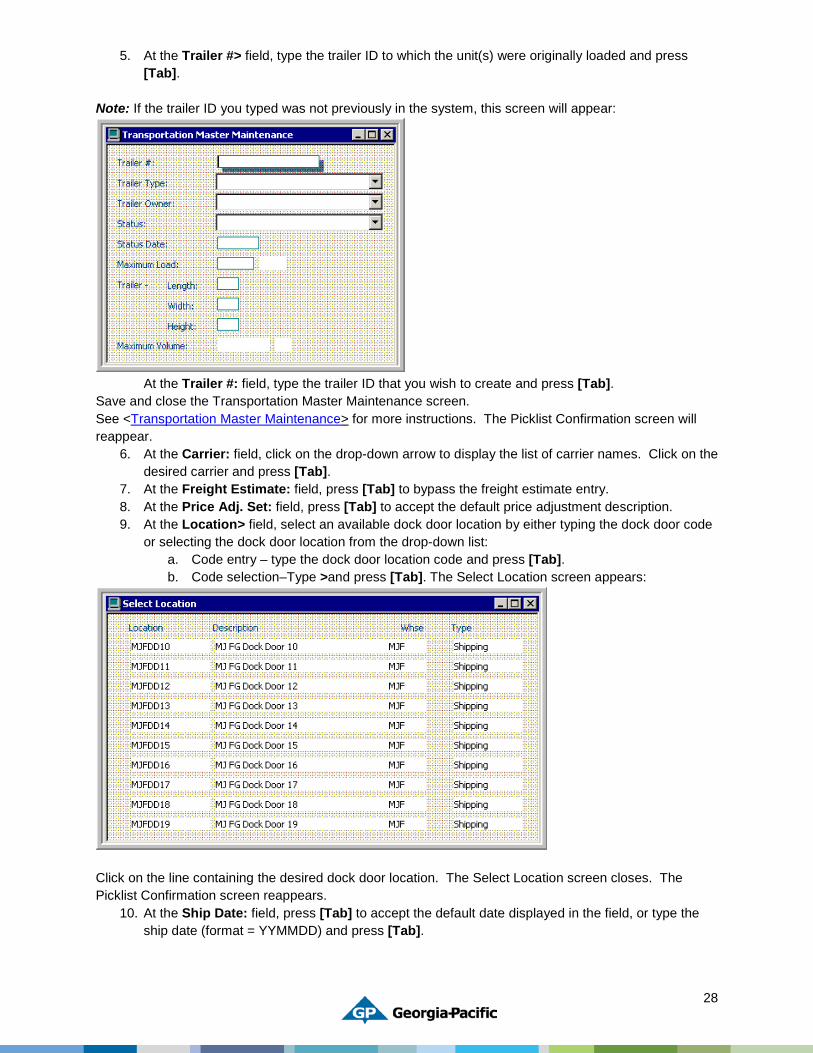
Create Delivery Slip (Manual Shipments)
1. Access the Pick List Confirmation screen. 2. Create a new pick list record by selecting the New option. 3. At the Trip #> field, type new and press [Tab]. A new trip number will appear. 4. At the Type: field, click on the arrow to display the valid options. Click on the Truck Load option
and press [Tab].
28
5. At the Trailer #> field, type the trailer ID to which the unit(s) were originally loaded and press [Tab].
Note: If the trailer ID you typed was not previously in the system, this screen will appear:
At the Trailer #: field, type the trailer ID that you wish to create and press [Tab]. Save and close the Transportation Master Maintenance screen. See <Transportation Master Maintenance> for more instructions. The Picklist Confirmation screen will reappear.
6. At the Carrier: field, click on the drop-down arrow to display the list of carrier names. Click on the desired carrier and press [Tab].
7. At the Freight Estimate: field, press [Tab] to bypass the freight estimate entry. 8. At the Price Adj. Set: field, press [Tab] to accept the default price adjustment description. 9. At the Location> field, select an available dock door location by either typing the dock door code
or selecting the dock door location from the drop-down list: a. Code entry – type the dock door location code and press [Tab]. b. Code selection–Type >and press [Tab]. The Select Location screen appears:
Click on the line containing the desired dock door location. The Select Location screen closes. The Picklist Confirmation screen reappears.
10. At the Ship Date: field, press [Tab] to accept the default date displayed in the field, or type the ship date (format = YYMMDD) and press [Tab].
29
11. At the Ship Time field, press [Tab] to accept the default time displayed in the field, or type the ship time (format = HHMM) and press [Tab].
12. At the Status: field, press [Tab] to accept the default entry. 13. At the Order Item field, type the order number and press [Tab].
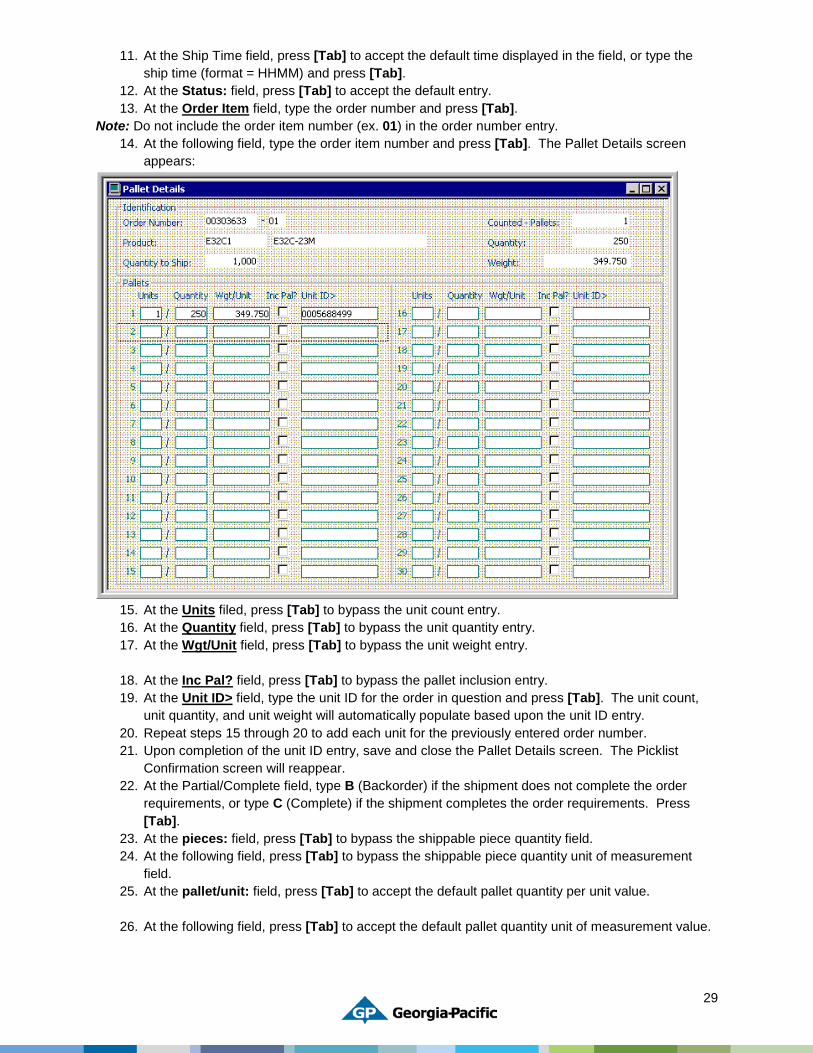
Note: Do not include the order item number (ex. 01) in the order number entry. 14. At the following field, type the order item number and press [Tab]. The Pallet Details screen
appears:
15. At the Units filed, press [Tab] to bypass the unit count entry. 16. At the Quantity field, press [Tab] to bypass the unit quantity entry. 17. At the Wgt/Unit field, press [Tab] to bypass the unit weight entry.
18. At the Inc Pal? field, press [Tab] to bypass the pallet inclusion entry. 19. At the Unit ID> field, type the unit ID for the order in question and press [Tab]. The unit count,
unit quantity, and unit weight will automatically populate based upon the unit ID entry. 20. Repeat steps 15 through 20 to add each unit for the previously entered order number. 21. Upon completion of the unit ID entry, save and close the Pallet Details screen. The Picklist
Confirmation screen will reappear. 22. At the Partial/Complete field, type B (Backorder) if the shipment does not complete the order
requirements, or type C (Complete) if the shipment completes the order requirements. Press [Tab].
23. At the pieces: field, press [Tab] to bypass the shippable piece quantity field. 24. At the following field, press [Tab] to bypass the shippable piece quantity unit of measurement
field. 25. At the pallet/unit: field, press [Tab] to accept the default pallet quantity per unit value.
26. At the following field, press [Tab] to accept the default pallet quantity unit of measurement value.
30
27. Repeat steps 13 through 26 above for each additional order to include on the previously defined trailer.
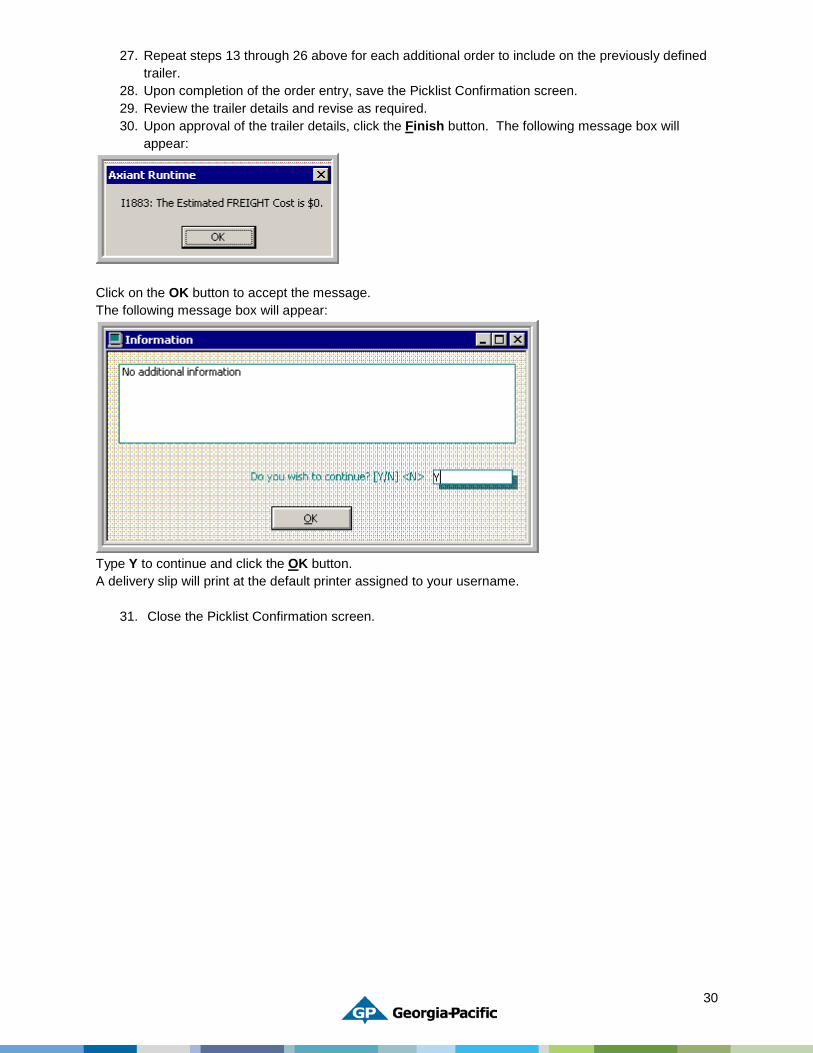
28. Upon completion of the order entry, save the Picklist Confirmation screen. 29. Review the trailer details and revise as required. 30. Upon approval of the trailer details, click the Finish button. The following message box will
appear:
Click on the OK button to accept the message. The following message box will appear:
Type Y to continue and click the OK button. A delivery slip will print at the default printer assigned to your username.
31. Close the Picklist Confirmation screen.
31
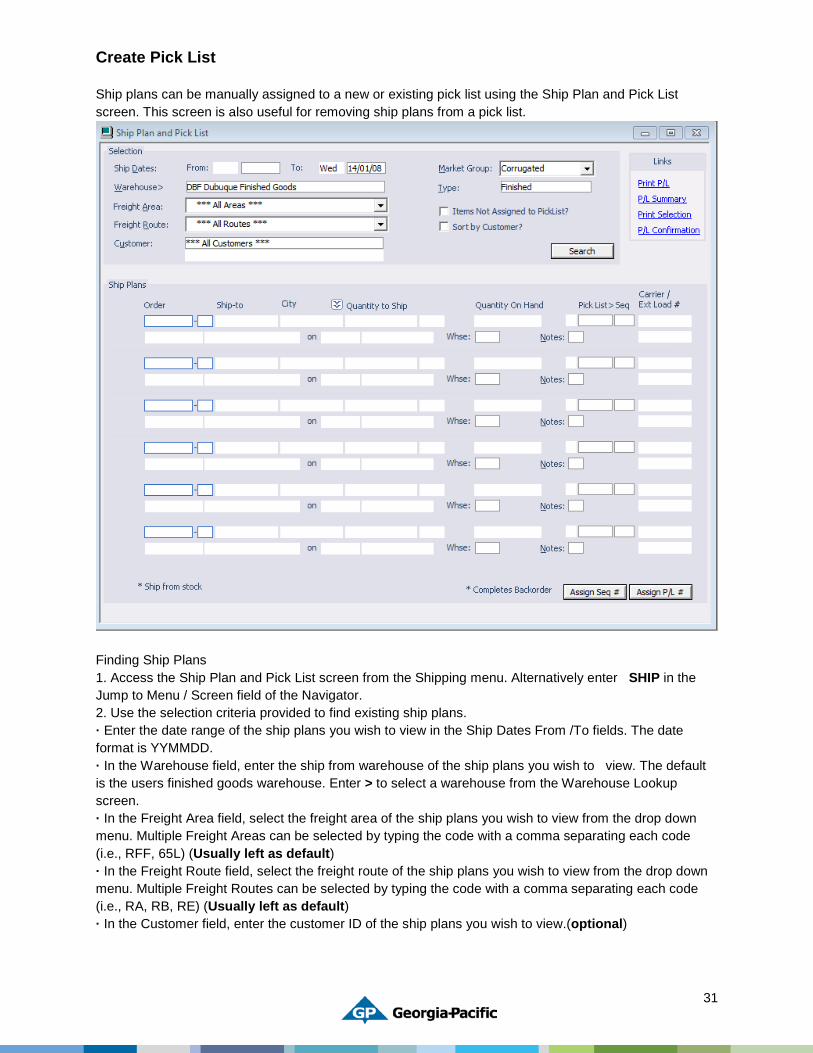
Create Pick List Ship plans can be manually assigned to a new or existing pick list using the Ship Plan and Pick List screen. This screen is also useful for removing ship plans from a pick list.
Finding Ship Plans 1. Access the Ship Plan and Pick List screen from the Shipping menu. Alternatively enter SHIP in the Jump to Menu / Screen field of the Navigator. 2. Use the selection criteria provided to find existing ship plans. · Enter the date range of the ship plans you wish to view in the Ship Dates From /To fields. The date format is YYMMDD. · In the Warehouse field, enter the ship from warehouse of the ship plans you wish to view. The default is the users finished goods warehouse. Enter > to select a warehouse from the Warehouse Lookup screen. · In the Freight Area field, select the freight area of the ship plans you wish to view from the drop down menu. Multiple Freight Areas can be selected by typing the code with a comma separating each code (i.e., RFF, 65L) (Usually left as default) · In the Freight Route field, select the freight route of the ship plans you wish to view from the drop down menu. Multiple Freight Routes can be selected by typing the code with a comma separating each code (i.e., RA, RB, RE) (Usually left as default) · In the Customer field, enter the customer ID of the ship plans you wish to view.(optional)
32
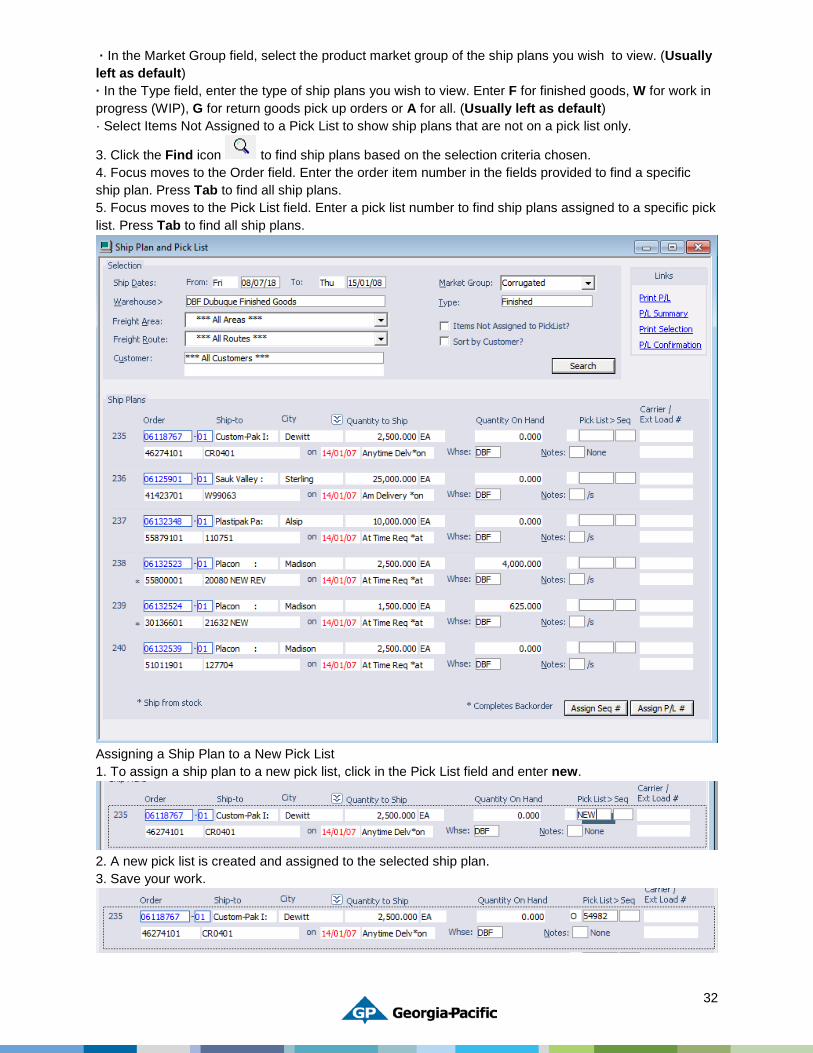
· In the Market Group field, select the product market group of the ship plans you wish to view. (Usually left as default) · In the Type field, enter the type of ship plans you wish to view. Enter F for finished goods, W for work in progress (WIP), G for return goods pick up orders or A for all. (Usually left as default) · Select Items Not Assigned to a Pick List to show ship plans that are not on a pick list only.
3. Click the Find icon to find ship plans based on the selection criteria chosen. 4. Focus moves to the Order field. Enter the order item number in the fields provided to find a specific ship plan. Press Tab to find all ship plans. 5. Focus moves to the Pick List field. Enter a pick list number to find ship plans assigned to a specific pick list. Press Tab to find all ship plans.
Assigning a Ship Plan to a New Pick List 1. To assign a ship plan to a new pick list, click in the Pick List field and enter new.
2. A new pick list is created and assigned to the selected ship plan. 3. Save your work.
33
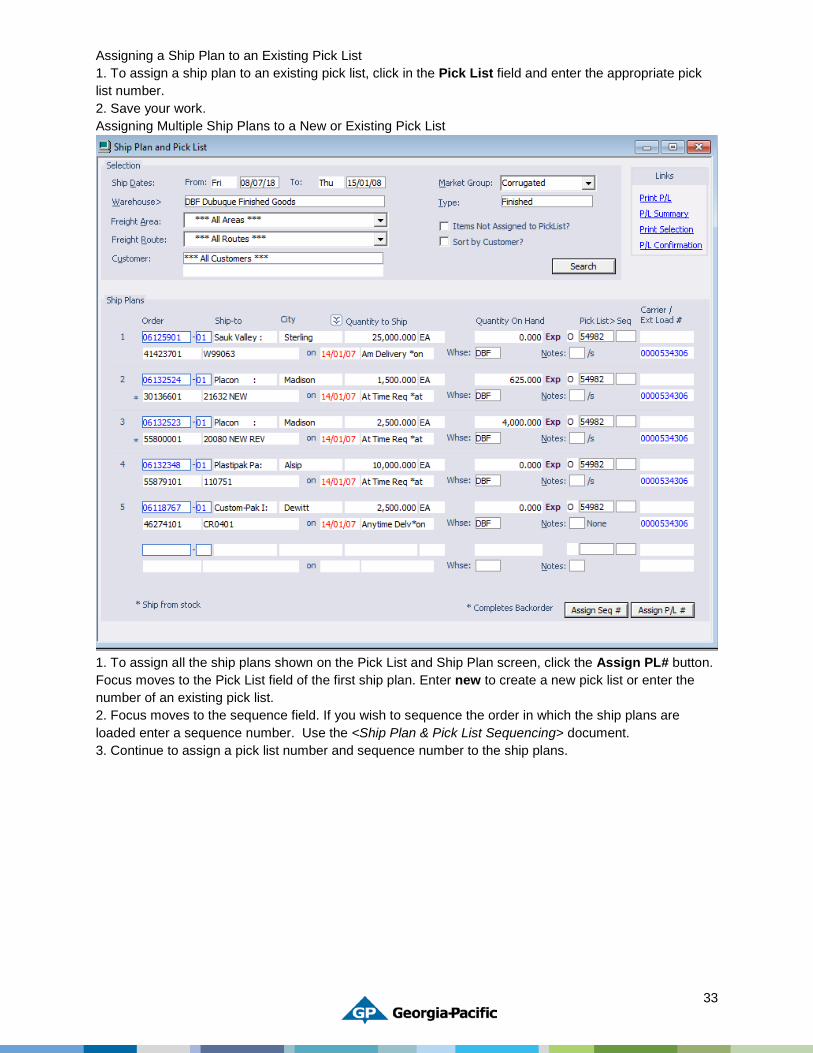
Assigning a Ship Plan to an Existing Pick List 1. To assign a ship plan to an existing pick list, click in the Pick List field and enter the appropriate pick list number. 2. Save your work. Assigning Multiple Ship Plans to a New or Existing Pick List
1. To assign all the ship plans shown on the Pick List and Ship Plan screen, click the Assign PL# button. Focus moves to the Pick List field of the first ship plan. Enter new to create a new pick list or enter the number of an existing pick list. 2. Focus moves to the sequence field. If you wish to sequence the order in which the ship plans are loaded enter a sequence number. Use the <Ship Plan & Pick List Sequencing> document. 3. Continue to assign a pick list number and sequence number to the ship plans.

34
4. When data entry for the ship plans shown is complete, save your work. Press the Page Down key to assign additional ship plans selected. Note: In the above example sequence 1 represents the nose of a trailer and 4 the tail.
35
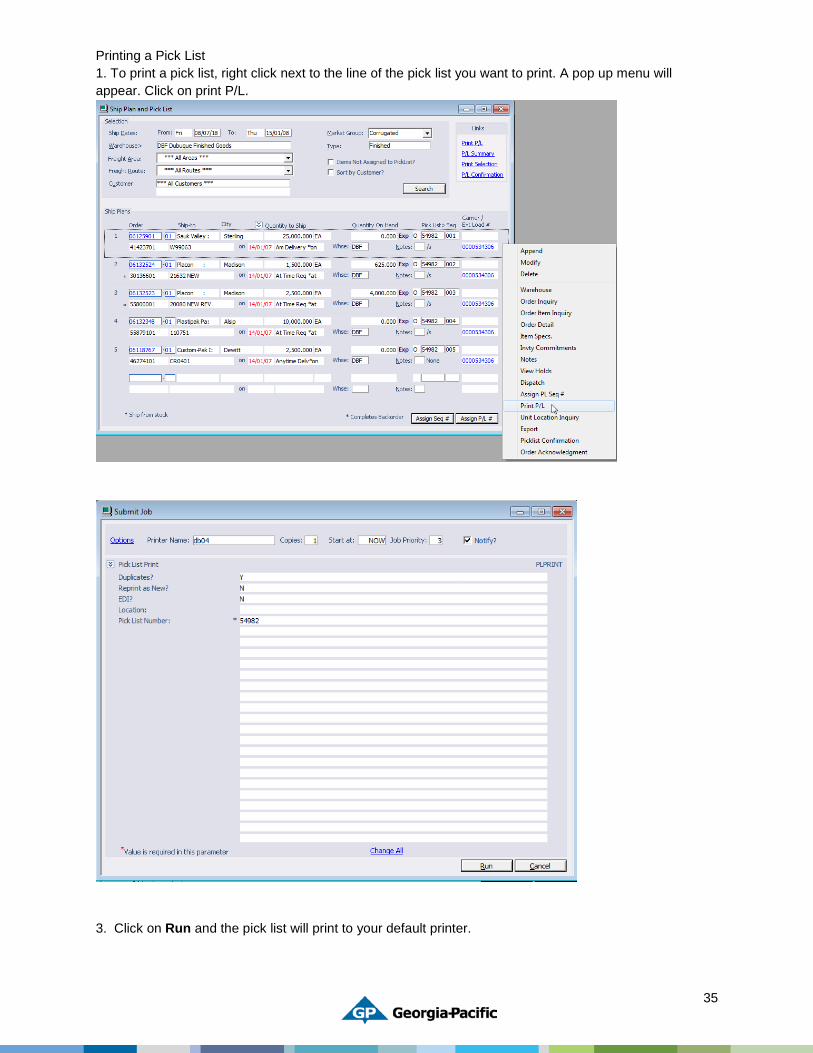
Printing a Pick List 1. To print a pick list, right click next to the line of the pick list you want to print. A pop up menu will appear. Click on print P/L.
3. Click on Run and the pick list will print to your default printer.
36
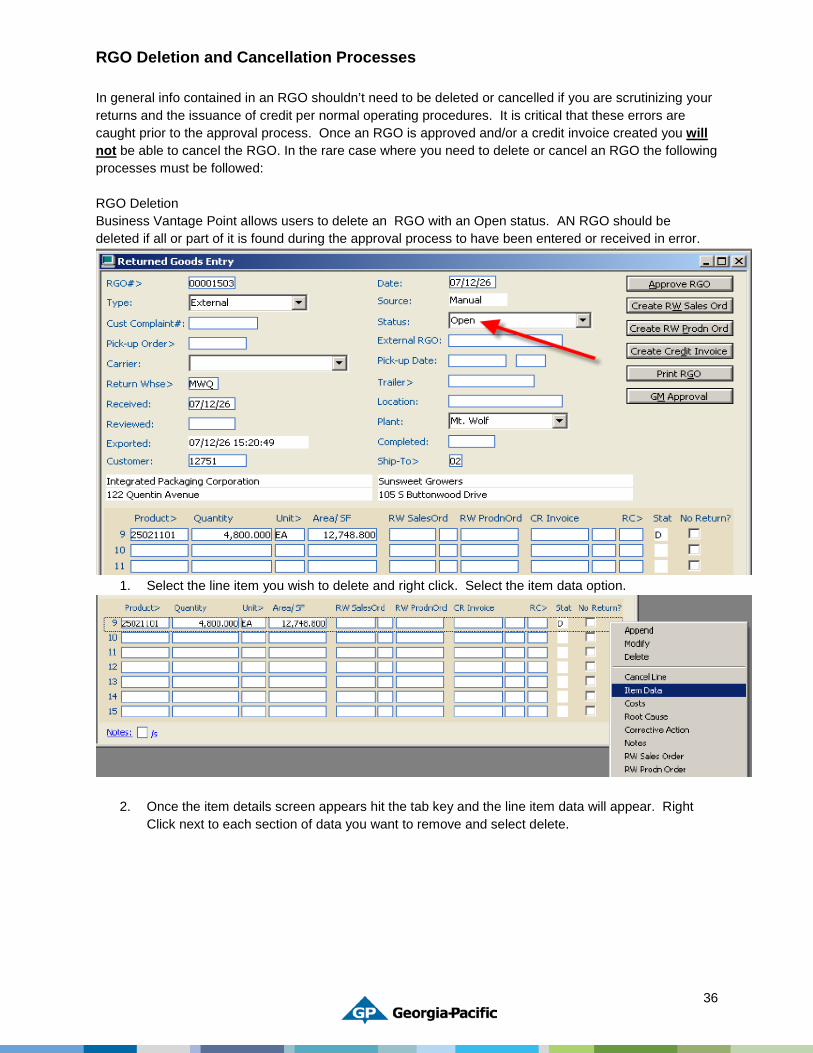
RGO Deletion and Cancellation Processes In general info contained in an RGO shouldn’t need to be deleted or cancelled if you are scrutinizing your returns and the issuance of credit per normal operating procedures. It is critical that these errors are caught prior to the approval process. Once an RGO is approved and/or a credit invoice created you will not be able to cancel the RGO. In the rare case where you need to delete or cancel an RGO the following processes must be followed: RGO Deletion Business Vantage Point allows users to delete an RGO with an Open status. AN RGO should be deleted if all or part of it is found during the approval process to have been entered or received in error.
1. Select the line item you wish to delete and right click. Select the item data option.
2. Once the item details screen appears hit the tab key and the line item data will appear. Right Click next to each section of data you want to remove and select delete.
37
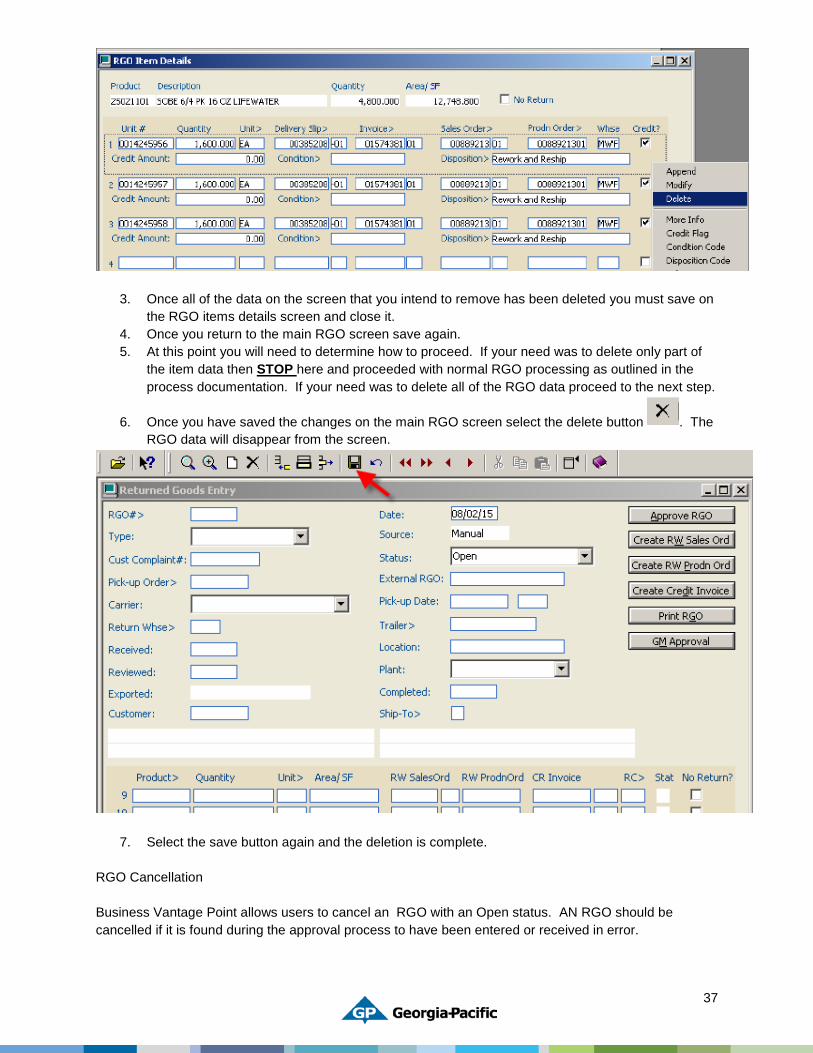
3. Once all of the data on the screen that you intend to remove has been deleted you must save on the RGO items details screen and close it.
4. Once you return to the main RGO screen save again. 5. At this point you will need to determine how to proceed. If your need was to delete only part of
the item data then STOP here and proceeded with normal RGO processing as outlined in the process documentation. If your need was to delete all of the RGO data proceed to the next step.
6. Once you have saved the changes on the main RGO screen select the delete button . The RGO data will disappear from the screen.
7. Select the save button again and the deletion is complete. RGO Cancellation Business Vantage Point allows users to cancel an RGO with an Open status. AN RGO should be cancelled if it is found during the approval process to have been entered or received in error.
38
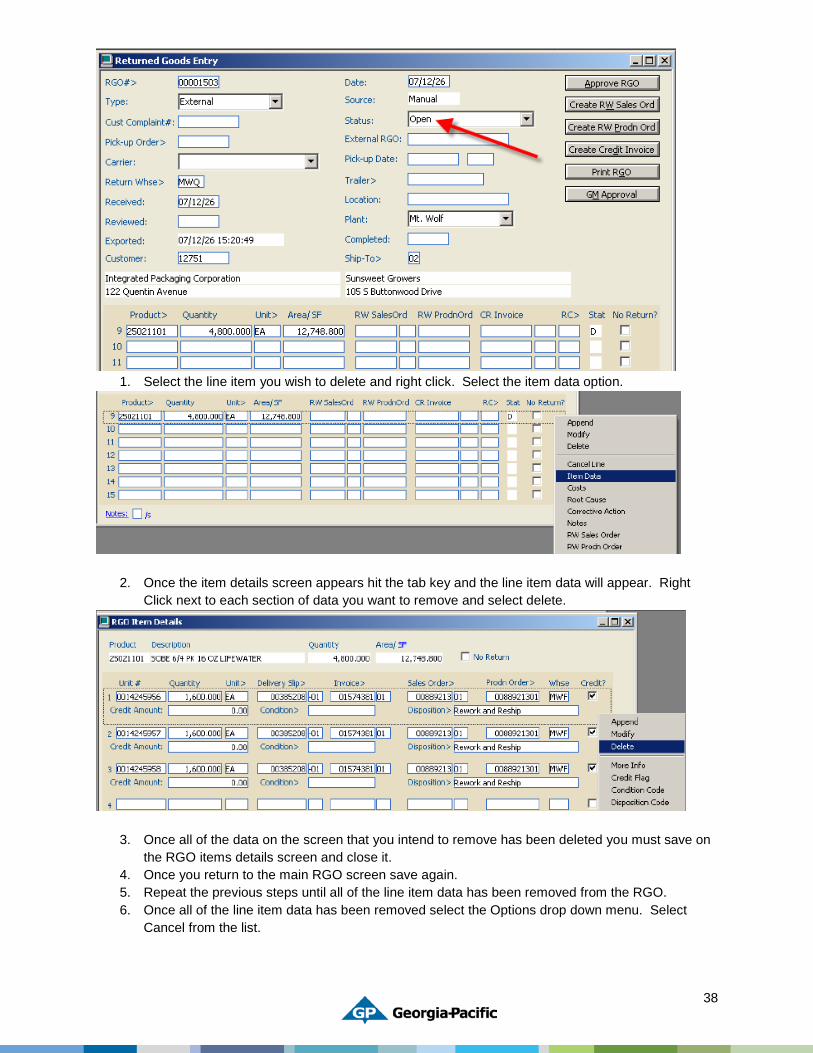
1. Select the line item you wish to delete and right click. Select the item data option.
2. Once the item details screen appears hit the tab key and the line item data will appear. Right Click next to each section of data you want to remove and select delete.
3. Once all of the data on the screen that you intend to remove has been deleted you must save on the RGO items details screen and close it.
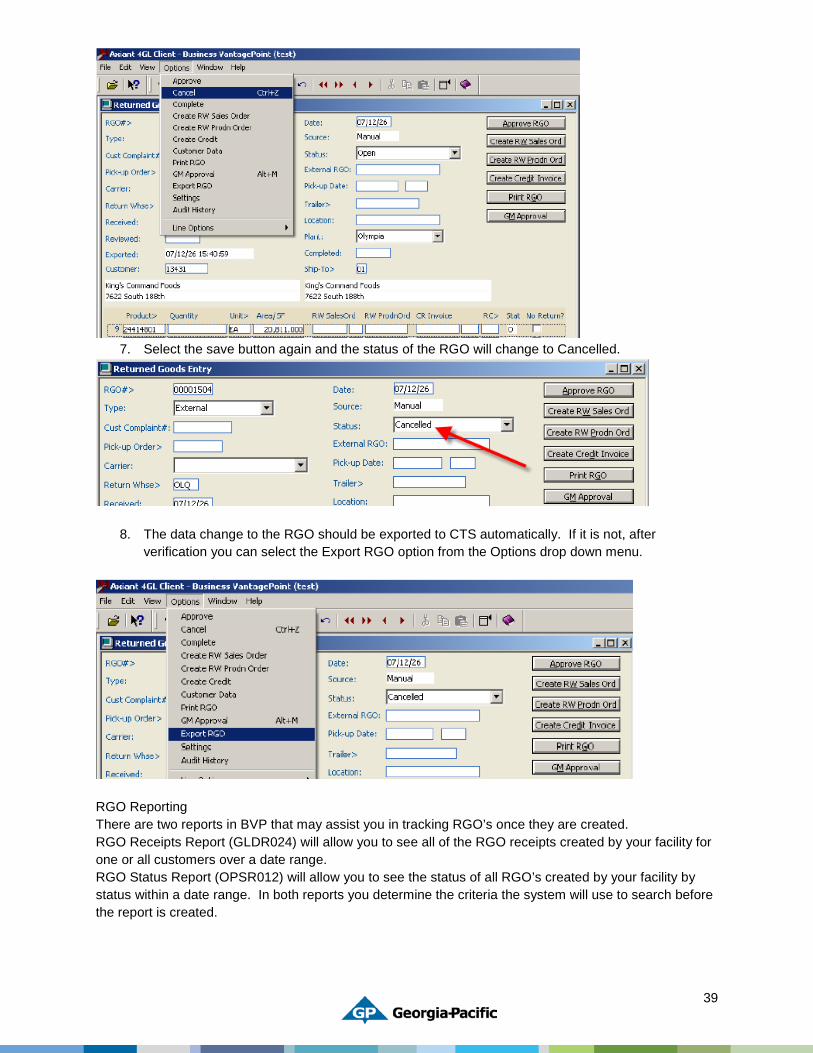
4. Once you return to the main RGO screen save again. 5. Repeat the previous steps until all of the line item data has been removed from the RGO. 6. Once all of the line item data has been removed select the Options drop down menu. Select
Cancel from the list.
39
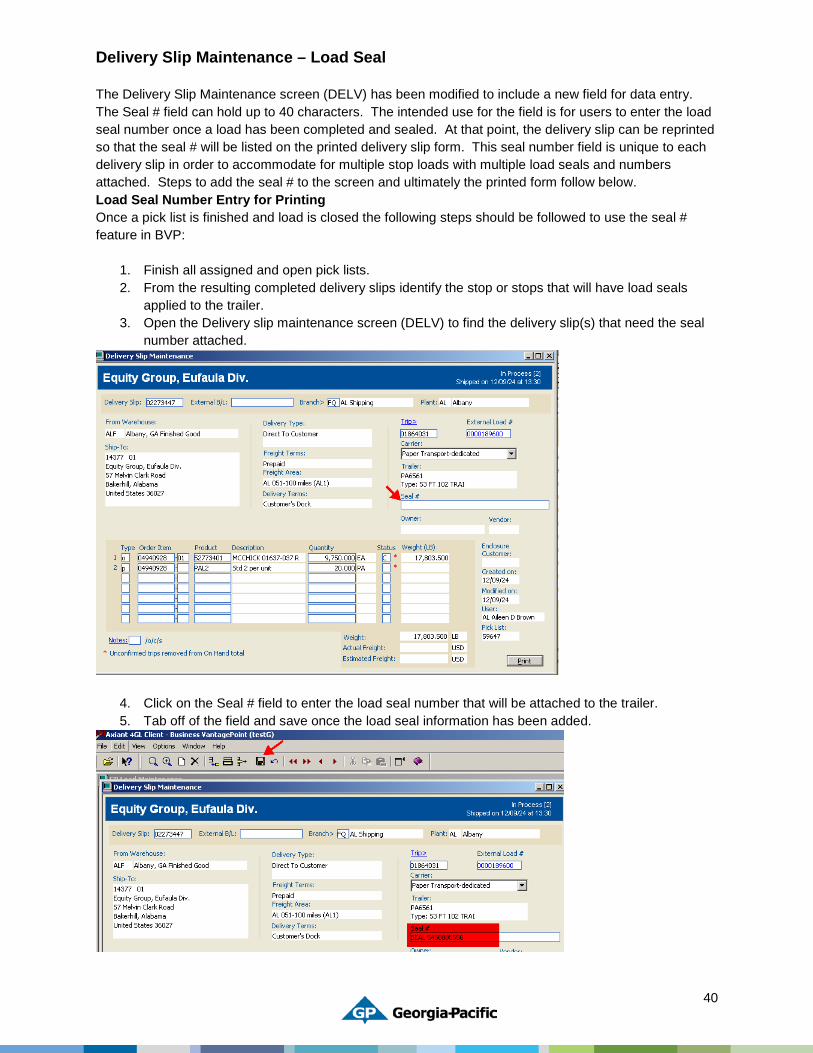
7. Select the save button again and the status of the RGO will change to Cancelled.
8. The data change to the RGO should be exported to CTS automatically. If it is not, after verification you can select the Export RGO option from the Options drop down menu.
RGO Reporting There are two reports in BVP that may assist you in tracking RGO’s once they are created. RGO Receipts Report (GLDR024) will allow you to see all of the RGO receipts created by your facility for one or all customers over a date range. RGO Status Report (OPSR012) will allow you to see the status of all RGO’s created by your facility by status within a date range. In both reports you determine the criteria the system will use to search before the report is created.
40
Delivery Slip Maintenance – Load Seal The Delivery Slip Maintenance screen (DELV) has been modified to include a new field for data entry. The Seal # field can hold up to 40 characters. The intended use for the field is for users to enter the load seal number once a load has been completed and sealed. At that point, the delivery slip can be reprinted so that the seal # will be listed on the printed delivery slip form. This seal number field is unique to each delivery slip in order to accommodate for multiple stop loads with multiple load seals and numbers attached. Steps to add the seal # to the screen and ultimately the printed form follow below. Load Seal Number Entry for Printing Once a pick list is finished and load is closed the following steps should be followed to use the seal # feature in BVP:
1. Finish all assigned and open pick lists. 2. From the resulting completed delivery slips identify the stop or stops that will have load seals
applied to the trailer. 3. Open the Delivery slip maintenance screen (DELV) to find the delivery slip(s) that need the seal
number attached.
4. Click on the Seal # field to enter the load seal number that will be attached to the trailer. 5. Tab off of the field and save once the load seal information has been added.

41
6. The delivery slip should now be reprinted. 7. Click on the Print button in the bottom right-hand corner of the DELV screen.
8. The printer check box and printer should be populated already. Additionally, you can select the EDI, Fax, or Email check boxes for those loads going to customer. This feature requires that the customer already be set-up to receive delivery slips via one of these additional communication methods.
9. Once all of the appropriate check boxes have been selected, press the Print/Send button.
10. The resulting delivery slip print out will now show the load seal number entered on the delivery slip maintenance screen.
11. Complete the same process for each delivery slip on a load that requires the load seal number to be printed on the delivery slip documents.
42
Delivery Slip Maintenance / Deletion On a daily basis shipping needs to identify adjustments that need to be made to created delivery slips. If an adjustment needs to be made to delivery slip after the invoice has been fully processed, a credit memo must be issued. Process:
• Forklift drivers verify the Delivery Slip and notify supervisor of any necessary changes. o Shipping clerk checks to see if the invoice has been finished.
Note: If invoice has been finished, only accounting has security to make adjustments.
o Modify item quantity or delete units as necessary Reprint adjusted Delivery Slip and provide updated copies with originals attached
to appropriate individuals or delete the entire delivery slip and notify the appropriate personnel.
o Delete the entire delivery slip Remove all units for each line item Save and close each pallet detail screen Change ship plan status from C to B, if needed, Save your work Save after the last line item has had all units removed. Select the Delete icon and Save
• Forklift drivers verify the Delivery Slip and notify supervisor of any necessary changes. o Shipping clerk checks to see if the invoice has been finished.
Note: If invoice has been finished, only accounting has security to make adjustments.
o Modify item quantity or delete units as necessary o Reprint adjusted Delivery Slip and provide updated copies with originals attached to
appropriate individuals or delete the entire delivery slip and notify the appropriate personnel.
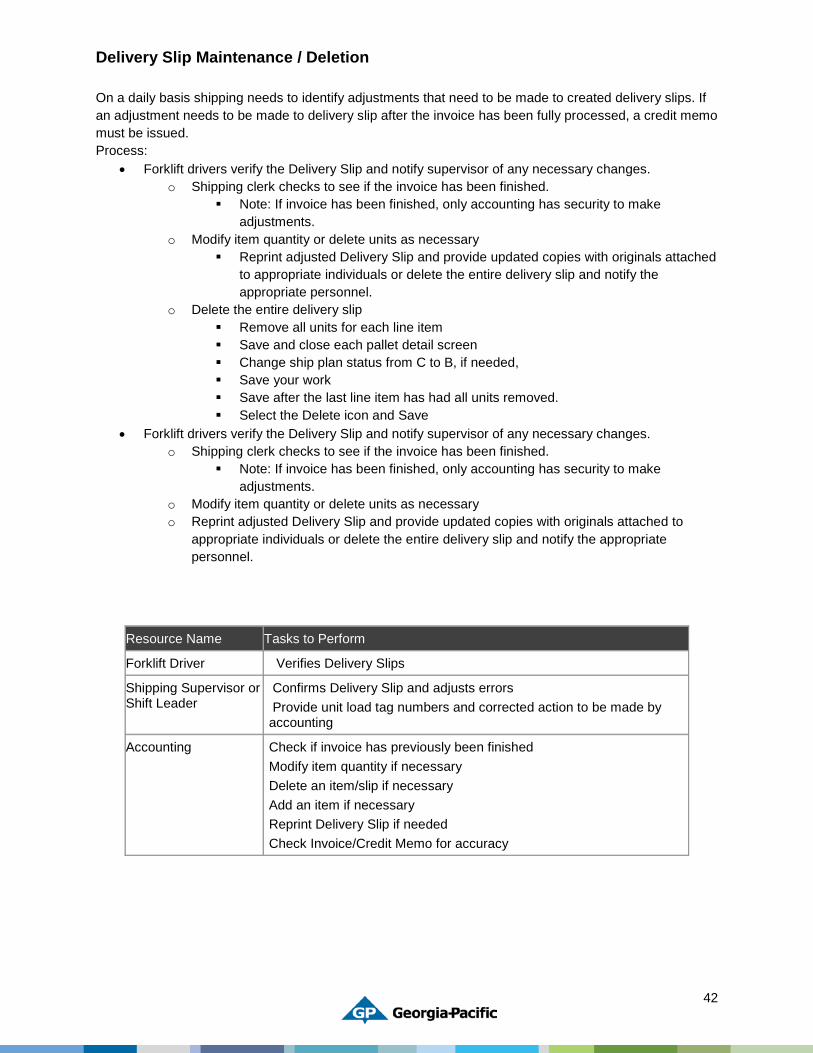
Resource Name Tasks to Perform
Forklift Driver Verifies Delivery Slips
Shipping Supervisor or Shift Leader
Confirms Delivery Slip and adjusts errors Provide unit load tag numbers and corrected action to be made by accounting
Accounting
Check if invoice has previously been finished Modify item quantity if necessary Delete an item/slip if necessary Add an item if necessary Reprint Delivery Slip if needed Check Invoice/Credit Memo for accuracy
43
Delivery Slips Weekend and Month-End Procedures
For trailers that will leave out over a normal business weekend
Place three delivery slips for each load in the back of the corresponding trailer. One of the delivery slips will need to be signed (no initials), dated and placed in the shipping entrance by the truck driver.
The lead person for 1st shift Monday will need to retrieve the delivery slips and confirm all trips based on the departure date provided by the truck driver.
o Use the Delivery Confirmation screen
Click Find
Enter the trip number
Enter the Actual Date and a Default time the trailer left
Follow the prompts
Save your screen
Click Finish and answer the prompt question accordingly
Provide to the appropriate person
For trailers that will deliver over a closing weekend
You should only generate Delivery Slips for loads being delivered on Saturday.
For loads that will be delivered on Sunday or Monday do not generate delivery slips. The Controller will notify you when you can begin this process.
Place three delivery slips for each load in the back of the corresponding trailer. One of the delivery slips will need to be signed (no initials), dated and placed in the shipping entrance door by the truck driver.
The lead person for first shift Monday will need to come in, retrieve the delivery slips and confirm all trips (not previously confirmed) based on the departure date provided by the truck driver.
o Use the Delivery Confirmation screen
Click Find
Enter the trip number
Enter the Actual Date and a Default time the trailer left
Follow the prompts
Save your screen
Click Finish and answer the prompt question accordingly
Provide to the appropriate person
44
Delivery and Freight Terms Rules for Title Transfer
For any truck shipments outside of the US there are only certain Delivery Terms codes we should use on any international shipment -- DAF, DDU, DDP, or EXW. There are two reasons for this. One is that the corporate data warehouse refers to these fields for reporting on different classifications of international shipments because they fall under different tax rules (you may have heard the terms DISC, or 863B, in such discussions). There are tax benefits to be gained by claiming all eligible sales, and the more accurate we are the more successful we will be in reporting the correct amounts to be considered. The other is that the four abbreviations DAF, DDU, DDP, and EXW follow the international INCOTERMS shipping standards.
The plant controller is the approver to sign a customer ship-to request form for addition of new entries; for an address that is outside the United States, in reviewing the information prior to approval, they should verify with sales and customer service what shipping terms we have agreed to with the customer. If it’s not in alignment with these rules the customer setup group will question this and return it for correction.
These are the three Delivery Terms codes added that apply to Prepaid shipments (not customer pickups) that deliver to a foreign address:
DAF Delivered at Frontier = The seller (GP) pays for the carrier to deliver and to clear the shipment for export at a customs broker, but even if the product will stay on the truck we arranged, “Delivery” occurs at the broker before it crosses the border. We pass title at this point and are no longer the insurer of the goods. The buyer is responsible from the time it leaves the customs broker, when taking it across the border and ensuring it’s cleared for import, including paying any foreign import duty/fees/taxes.
DDU Delivered Duty Unpaid = The seller is responsible for delivering the product to the customer’s dock including getting it across the border and insuring the goods until they arrive at the customer’s dock. But the buyer is responsible for payment of the foreign import duty/fees/taxes, not the seller.
DDP Delivered Duty Paid = This is the same as Delivered Duty Unpaid, only the seller does pay the foreign duty/fees/taxes. The seller needs to have some sort of licensing or registration to be able to collect the foreign fees and reimburse the government. For Canada, G-P Corrugated 3 LLC (the old CeCorr) is licensed to do this but GP Corrugated 2 LLC (brown-box) and Color-Box are not.
DAF is the most common Prepaid arrangement for Packaging. Title transfers within the US, at the border.
DDU is less common but done by certain plants, for certain customers upon their request. Title transfers outside of the US.
DDP should only be done if a plant is certain that the legal compliance criteria are met, so if a plant does this they should have solicited the input of the Compliance group and have been authorized by them. As stated above, only certain plants can legally do this. Title transfers outside of the US.
EXW Ex Works (Our Dock) = This designates that GP has no financial responsibility for delivery of the product. The customer will ultimately pay shipping costs. This is used for all Customer Pickups, domestic and foreign. Title transfers within the US, at our own dock or point of shipment.
There are two other values available in the Delivery Terms field that should never be used for a foreign shipment: ‘Customer’s Dock’, and ‘Warehouse Transfer’.
One other value, CIF (Cost, Insurance and Freight) applies to shipments via ocean freighter only – never use this for a truck, rail, or air shipment.
45
Freight and Delivery Terms Combined - both Foreign and Domestic
IMPORTANT: Freight Terms and Delivery Terms should only be used in certain combinations:
• ‘Customer Pick Up’ and ‘Collect’ can combine with ‘Our Dock EXW’, but not any of the three ‘Delivered’ Delivery Terms codes.
• ‘Prepaid’ and ‘Prepaid and Charge’ can combine with ‘DAF’, ‘DDU’, and ‘DDP’; but it’s not logical to state the product is ‘Delivered’ at ‘Our Dock EXW’.
• ‘Consignment’, ‘Third Party’, and ‘Vendor Frt Chg Extra’ should never be used on a foreign shipment.
• For domestic shipments, we should never use the combination of Prepaid and Our Dock. If Delivery Terms are ‘Our Dock’, it’s implied that we are not paying the freight.
• Unless we have a specific agreement with a particular customer would not use Collect along with Customer’s Dock, and even then only on domestic shipments. If we’re not paying for the freight it would be difficult to hold the carrier liable if we kept title to the product and there was damage or loss during the shipment.
46
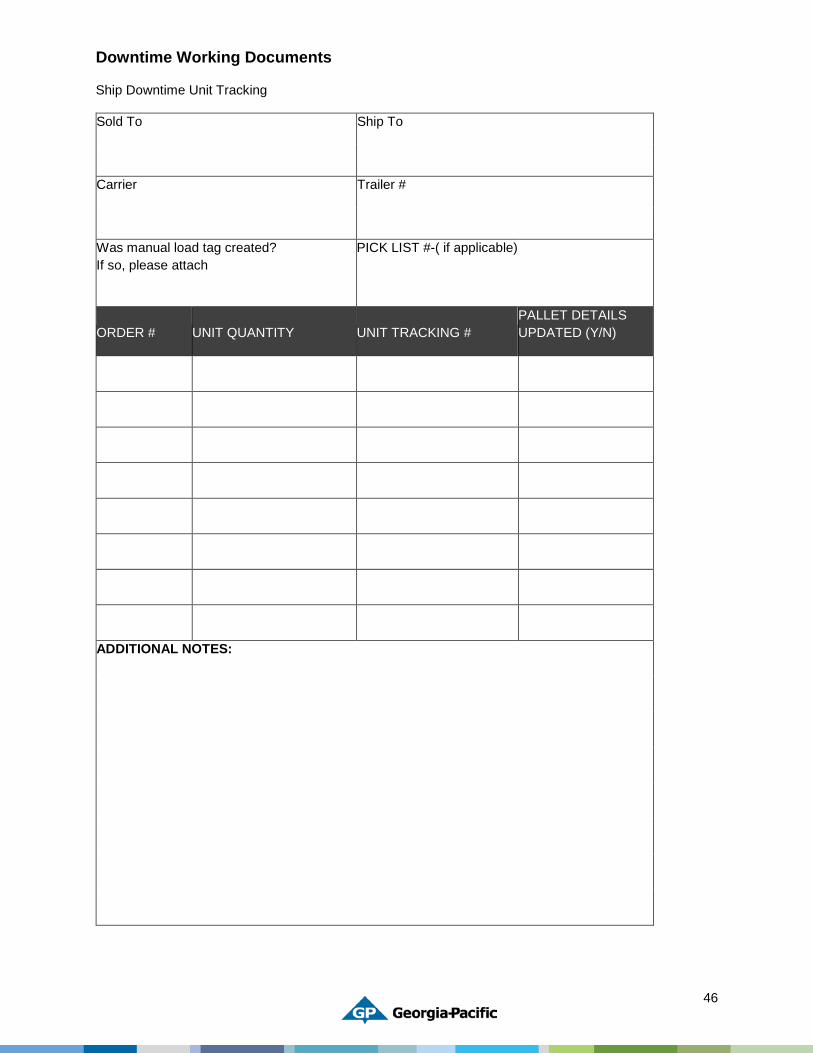
Downtime Working Documents
Ship Downtime Unit Tracking
Sold To Ship To
Carrier Trailer #
Was manual load tag created? If so, please attach
PICK LIST #-( if applicable)
ORDER # UNIT QUANTITY UNIT TRACKING # PALLET DETAILS UPDATED (Y/N)
ADDITIONAL NOTES:
47
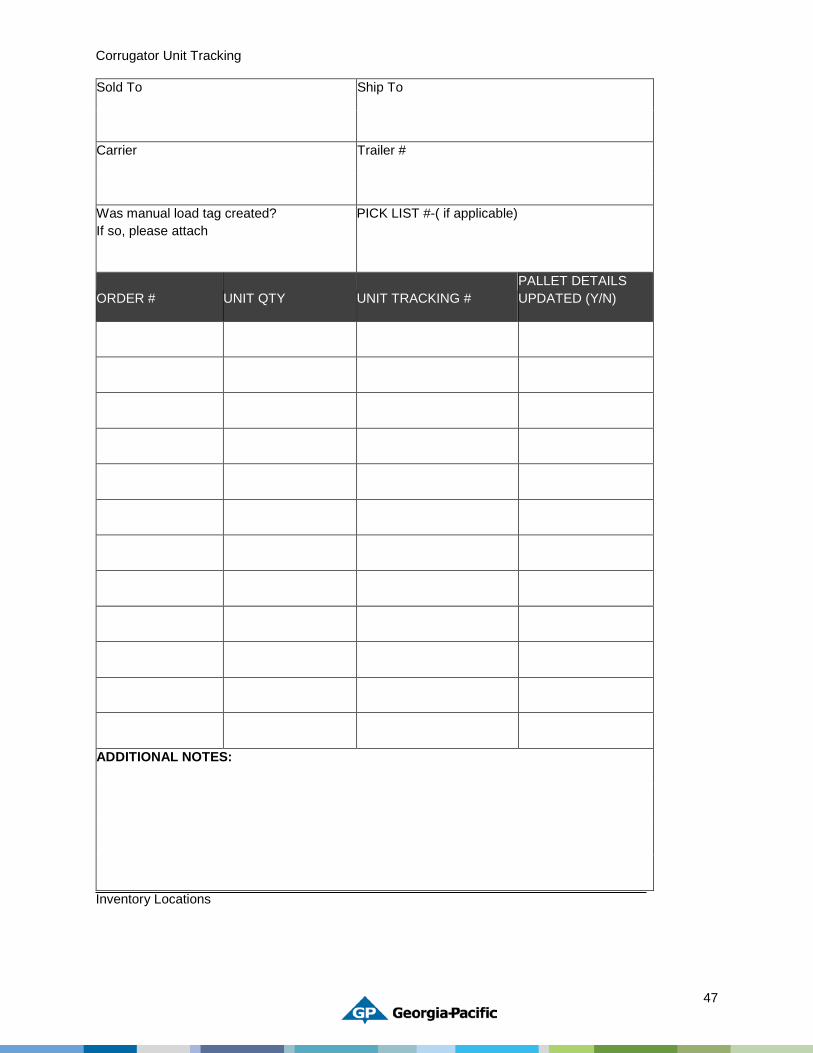
Corrugator Unit Tracking
Sold To Ship To
Carrier Trailer #
Was manual load tag created? If so, please attach
PICK LIST #-( if applicable)
ORDER # UNIT QTY UNIT TRACKING # PALLET DETAILS UPDATED (Y/N)
ADDITIONAL NOTES:
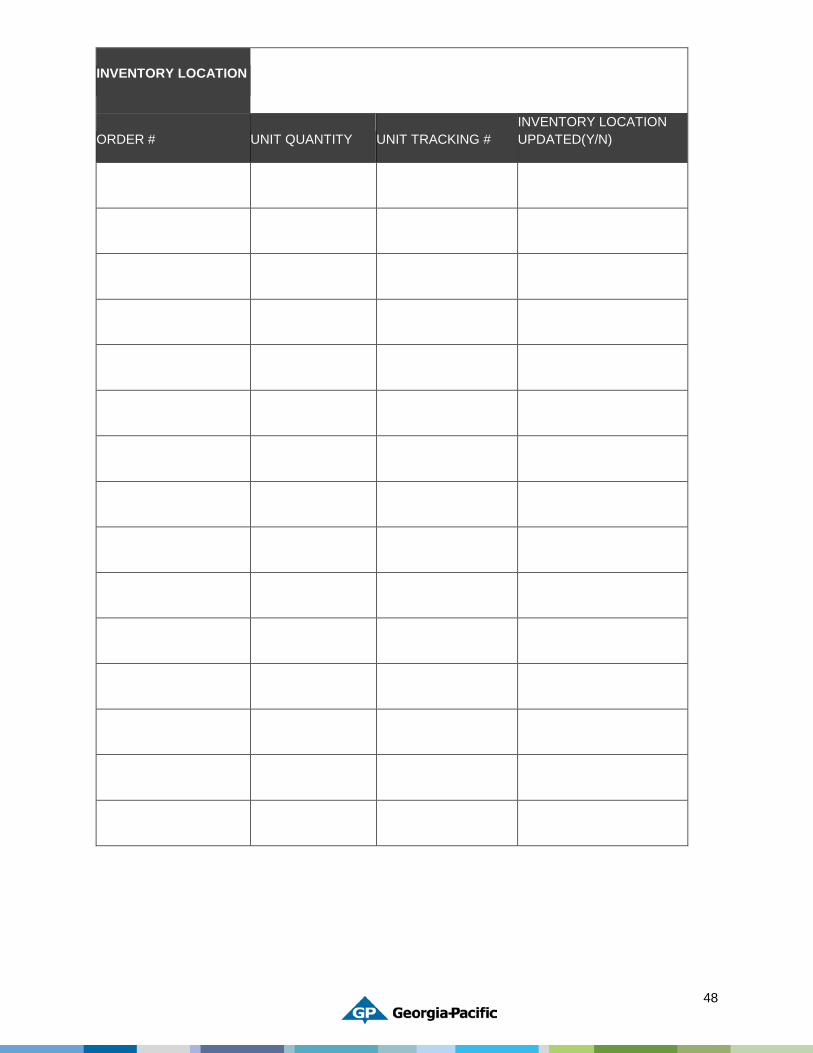
Inventory Locations
48
INVENTORY LOCATION
ORDER # UNIT QUANTITY UNIT TRACKING # INVENTORY LOCATION UPDATED(Y/N)
49
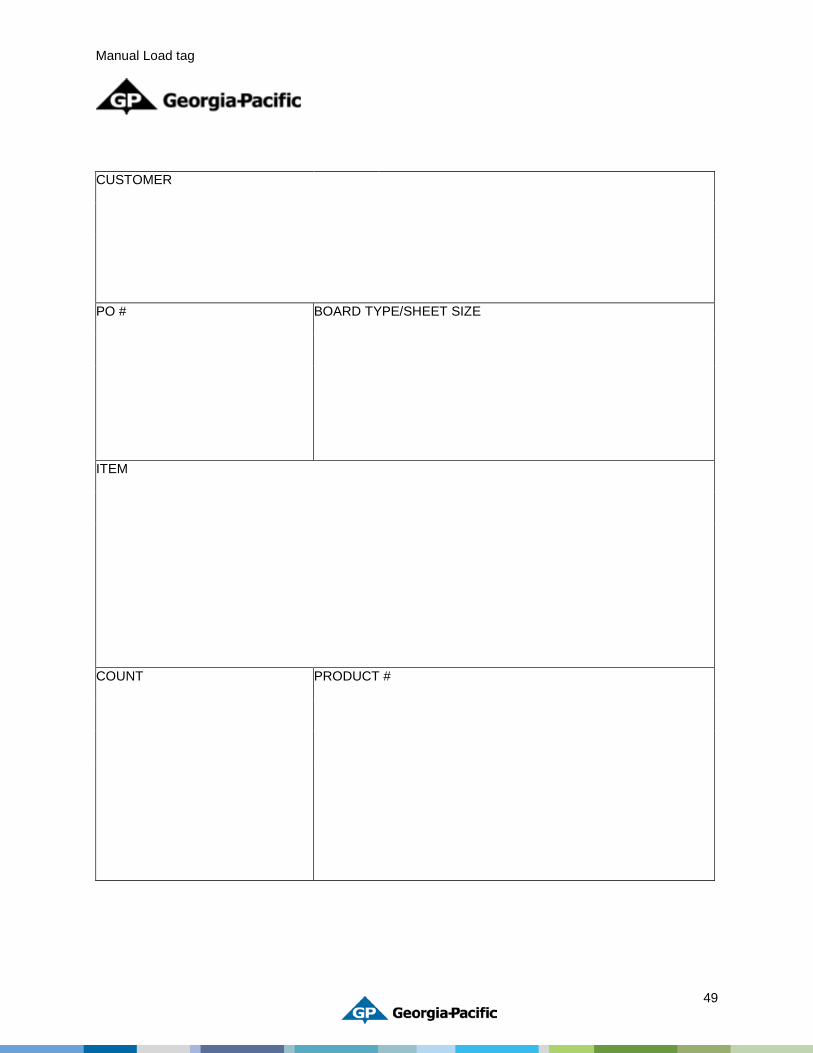
Manual Load tag
CUSTOMER
PO # BOARD TYPE/SHEET SIZE
ITEM
COUNT PRODUCT #
50
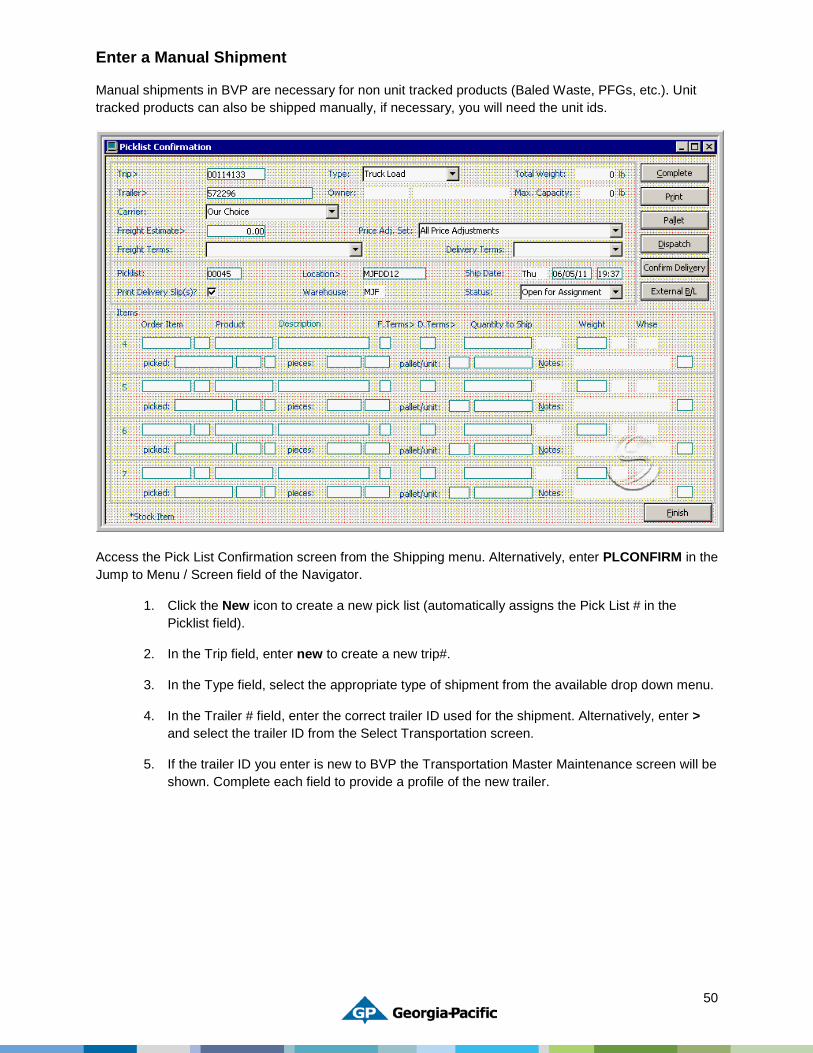
Enter a Manual Shipment
Manual shipments in BVP are necessary for non unit tracked products (Baled Waste, PFGs, etc.). Unit tracked products can also be shipped manually, if necessary, you will need the unit ids.
Access the Pick List Confirmation screen from the Shipping menu. Alternatively, enter PLCONFIRM in the Jump to Menu / Screen field of the Navigator.
1. Click the New icon to create a new pick list (automatically assigns the Pick List # in the Picklist field).
2. In the Trip field, enter new to create a new trip#.
3. In the Type field, select the appropriate type of shipment from the available drop down menu.
4. In the Trailer # field, enter the correct trailer ID used for the shipment. Alternatively, enter > and select the trailer ID from the Select Transportation screen.
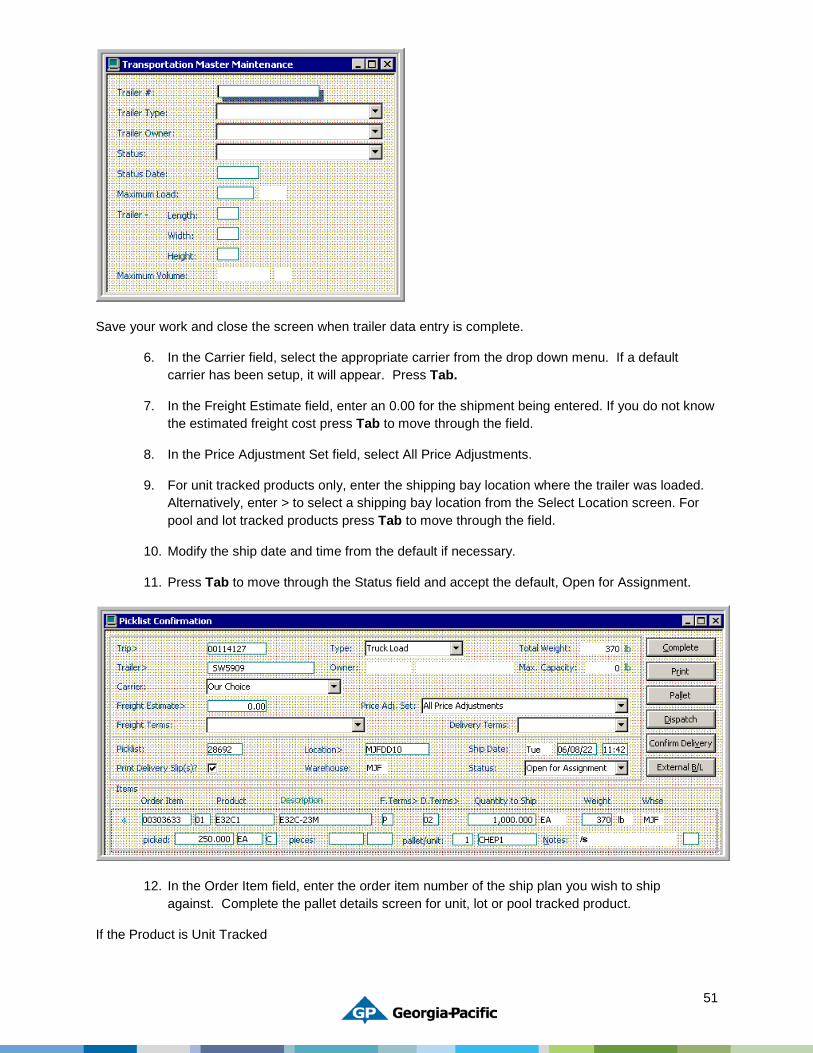
5. If the trailer ID you enter is new to BVP the Transportation Master Maintenance screen will be shown. Complete each field to provide a profile of the new trailer.
51
Save your work and close the screen when trailer data entry is complete.
6. In the Carrier field, select the appropriate carrier from the drop down menu. If a default carrier has been setup, it will appear. Press Tab.
7. In the Freight Estimate field, enter an 0.00 for the shipment being entered. If you do not know the estimated freight cost press Tab to move through the field.
8. In the Price Adjustment Set field, select All Price Adjustments.
9. For unit tracked products only, enter the shipping bay location where the trailer was loaded. Alternatively, enter > to select a shipping bay location from the Select Location screen. For pool and lot tracked products press Tab to move through the field.
10. Modify the ship date and time from the default if necessary.
11. Press Tab to move through the Status field and accept the default, Open for Assignment.
12. In the Order Item field, enter the order item number of the ship plan you wish to ship against. Complete the pallet details screen for unit, lot or pool tracked product.
If the Product is Unit Tracked
52
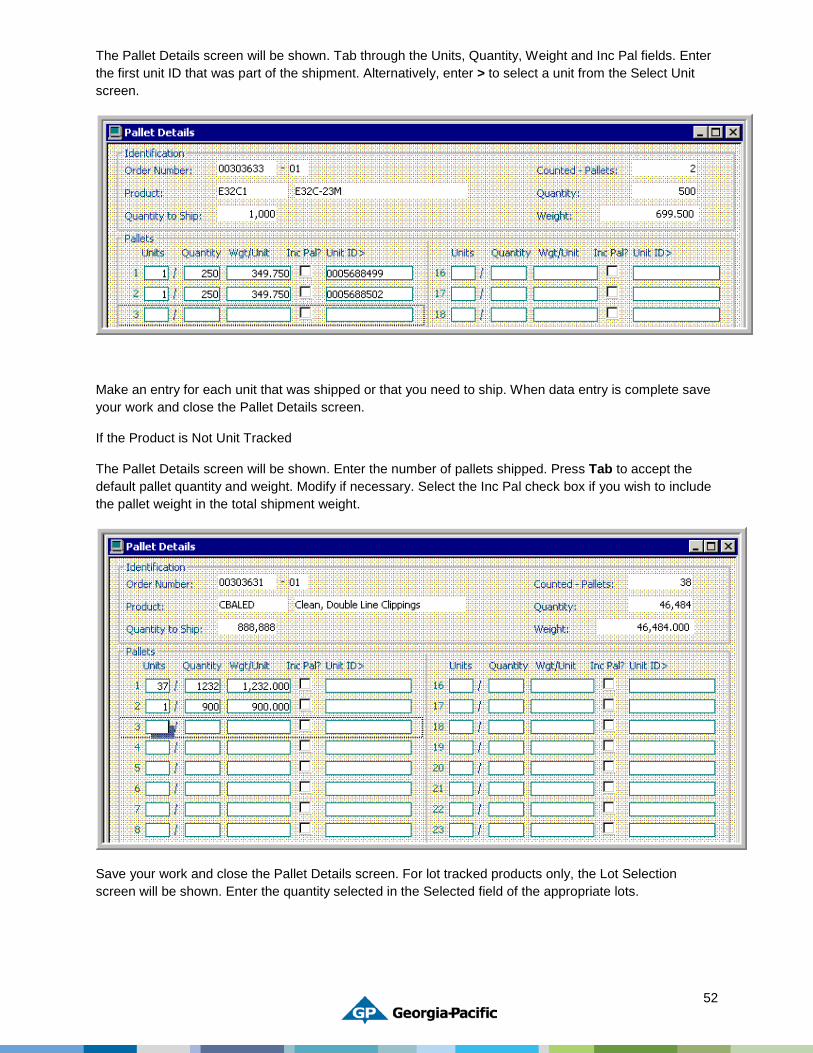
The Pallet Details screen will be shown. Tab through the Units, Quantity, Weight and Inc Pal fields. Enter the first unit ID that was part of the shipment. Alternatively, enter > to select a unit from the Select Unit screen.
Make an entry for each unit that was shipped or that you need to ship. When data entry is complete save your work and close the Pallet Details screen.
If the Product is Not Unit Tracked
The Pallet Details screen will be shown. Enter the number of pallets shipped. Press Tab to accept the default pallet quantity and weight. Modify if necessary. Select the Inc Pal check box if you wish to include the pallet weight in the total shipment weight.
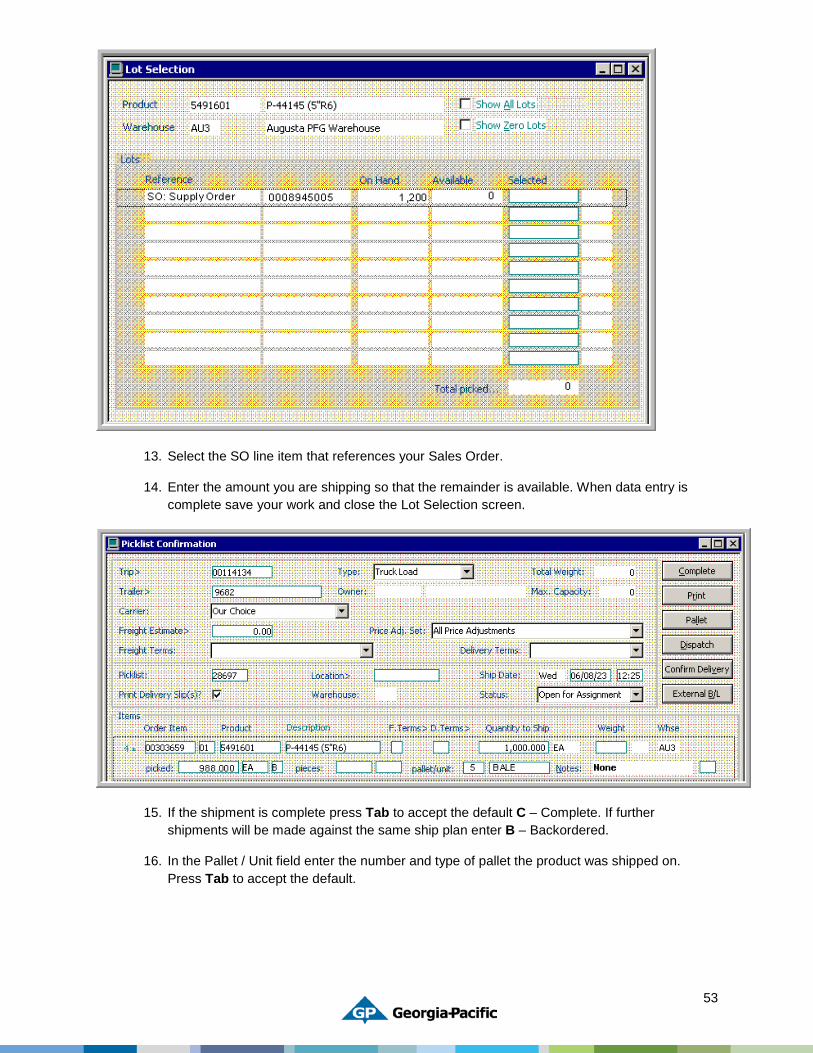
Save your work and close the Pallet Details screen. For lot tracked products only, the Lot Selection screen will be shown. Enter the quantity selected in the Selected field of the appropriate lots.
53
13. Select the SO line item that references your Sales Order.
14. Enter the amount you are shipping so that the remainder is available. When data entry is complete save your work and close the Lot Selection screen.
15. If the shipment is complete press Tab to accept the default C – Complete. If further shipments will be made against the same ship plan enter B – Backordered.
16. In the Pallet / Unit field enter the number and type of pallet the product was shipped on. Press Tab to accept the default.
54
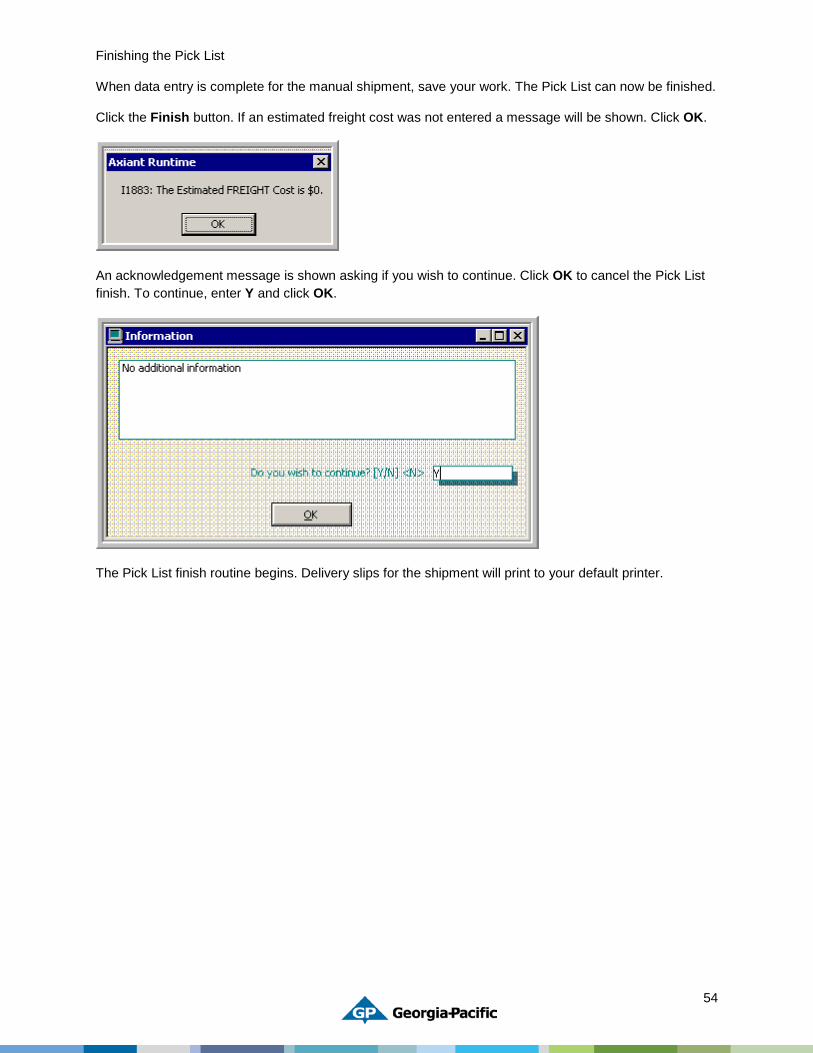
Finishing the Pick List
When data entry is complete for the manual shipment, save your work. The Pick List can now be finished.
Click the Finish button. If an estimated freight cost was not entered a message will be shown. Click OK.
An acknowledgement message is shown asking if you wish to continue. Click OK to cancel the Pick List finish. To continue, enter Y and click OK.
The Pick List finish routine begins. Delivery slips for the shipment will print to your default printer.

55
Have-Ready Orders Storage
Create Sale Order with Production– Change the ship plan to ship on a future date Create the Pick List for the Ship plan Load the trailer as normal- Do not Complete the SHIP PLAN. Move the trailer to a YARD location to wait for correct ship to Customer Service notifies shipping of the correct ship to Shipping moves the trailer back to an open dock door Shipping finds the Pick list (Ship Plan and Pick List screen)
Right click on the pick list line item Select the Order Details Options
o Change the Ship to information in the TO: field o SAVE o Complete the Pick List through the RF screen or the PLCONFIRM screen
Delivery Slip will print with the new ship to information. How to Open a Closed Ship Plan
When the ship plan is called Complete and needs to be re-opened, follow the steps below. If you know the delivery slip # then select “Delivery Slip Maintenance”, find your delivery slip and start at step 7. Other wise follow the below steps.
1) Click “Sales Order Item / Prodn Order Inquiry” (SPI).
2) Click the Find button.
3) Type in the order # of the product that needs the ship plan re-opened.
4) In the lower left hand portion of the window under “Links” select “Delivery Details”.
5) The Delivery Details window will appear showing all of the Delivery slips for the order. Select the line with a “C” in the Status field.
6) Right click in the mystery space on the right hand side and select “Delv Slip Maint.”
7) The Delivery Slip Maintenance window appears. Find the order that you want to open the ship plan to and click in the quantity field of that order.
8) Close the “Alter Ship Units” window.
9) Change the “C” to a “B”. (remember B for Back Order not P for Partial).
56
In-House Product & Stock Storage
Shipping Procedure for In-house product
This procedure describes the steps involved for the Shipping Office to handle internal production orders. Customer Service, Controller or PCS team will enter a direct to customer sales order for an internal order. The shipping department will be provided with a copy of the sales order so they are aware of the shipment.
• In order to accurately handle you must transfer the order from the on-site finished goods warehouse to the production warehouse or assigned area.
• Production will remove the unit load tags once the unit is pulled for use and turn them in to accounting.
• Accounting will handle removing the unit load tags from the system and/or the internal invoicing. •
Order Balances and Stock Storage
This procedure describes the steps involved for the Shipping Office to handle internal production order and outside supply order overruns. The shipping department will be charged with tracking order balances until a final disposition is realized.
• The shipping office verifies that the quantity loaded against a specific order has met the customer requirement thru an RF inquiry and manual check of PCS feedback.
• If there are additional units remaining in inventory they must be accounted for. • Verify the location of the units and counts are correct. • Place the order balance in the stock storage screen in Kiwi (PCS). • This will flag the production scheduler the next time an order comes thru the system for that
specific item • The scheduler will cut the new order back and notify shipping of this fact. • When shipping plans the new order for delivery they can also plan the balance from the previous
order. • Place both orders on the pick list and assign following normal loading procedures. • Once the units from the previous (old) order are loaded they are removed from inventory and
billed appropriately.
57
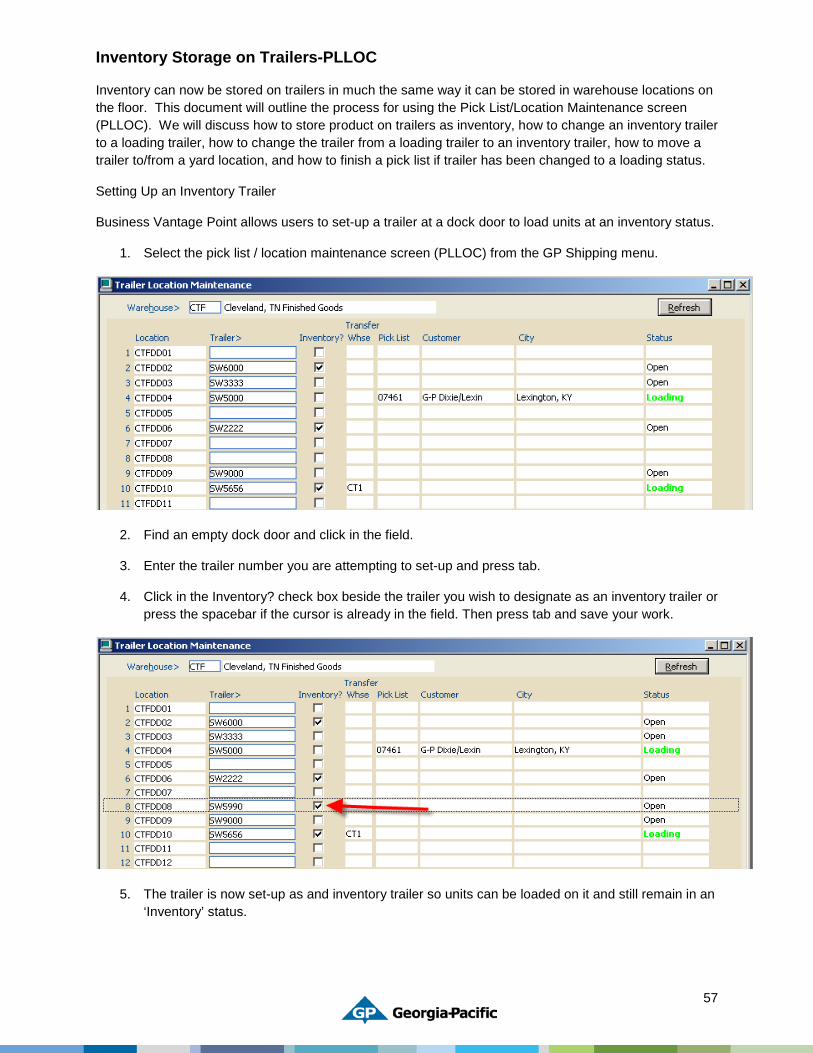
Inventory Storage on Trailers-PLLOC
Inventory can now be stored on trailers in much the same way it can be stored in warehouse locations on the floor. This document will outline the process for using the Pick List/Location Maintenance screen (PLLOC). We will discuss how to store product on trailers as inventory, how to change an inventory trailer to a loading trailer, how to change the trailer from a loading trailer to an inventory trailer, how to move a trailer to/from a yard location, and how to finish a pick list if trailer has been changed to a loading status.
Setting Up an Inventory Trailer
Business Vantage Point allows users to set-up a trailer at a dock door to load units at an inventory status.
1. Select the pick list / location maintenance screen (PLLOC) from the GP Shipping menu.
2. Find an empty dock door and click in the field.
3. Enter the trailer number you are attempting to set-up and press tab.
4. Click in the Inventory? check box beside the trailer you wish to designate as an inventory trailer or press the spacebar if the cursor is already in the field. Then press tab and save your work.
5. The trailer is now set-up as and inventory trailer so units can be loaded on it and still remain in an ‘Inventory’ status.
58
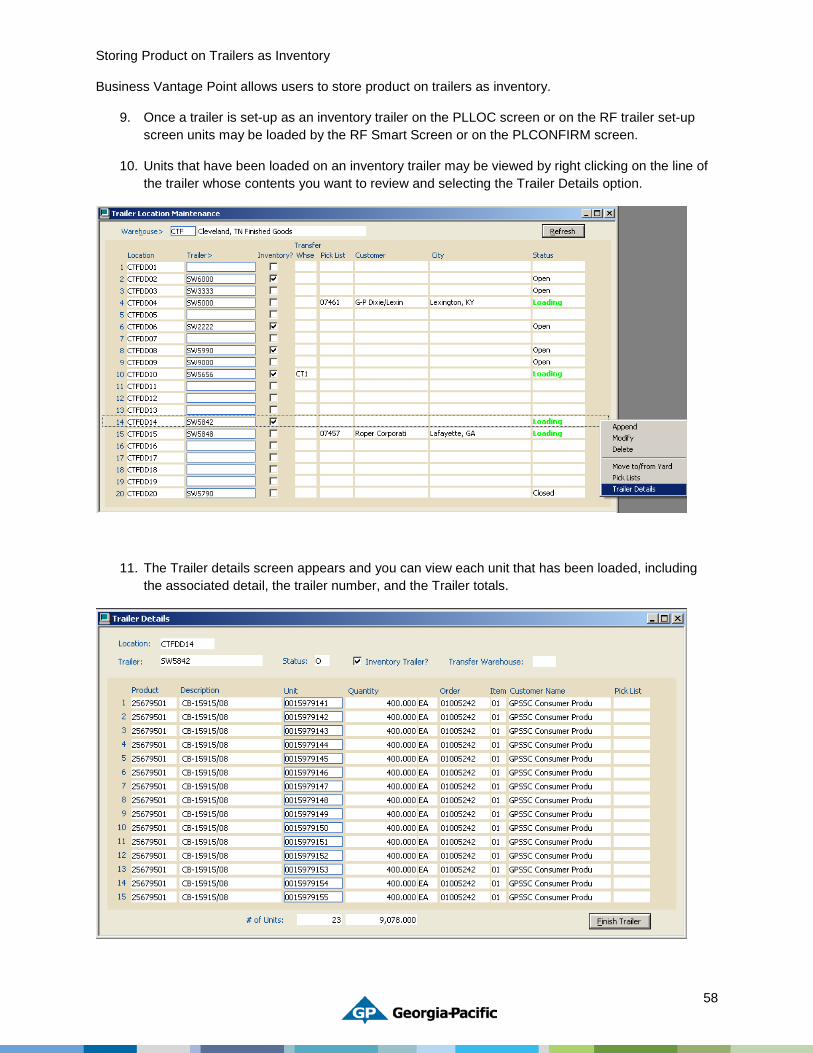
Storing Product on Trailers as Inventory
Business Vantage Point allows users to store product on trailers as inventory.
9. Once a trailer is set-up as an inventory trailer on the PLLOC screen or on the RF trailer set-up screen units may be loaded by the RF Smart Screen or on the PLCONFIRM screen.
10. Units that have been loaded on an inventory trailer may be viewed by right clicking on the line of the trailer whose contents you want to review and selecting the Trailer Details option.
11. The Trailer details screen appears and you can view each unit that has been loaded, including the associated detail, the trailer number, and the Trailer totals.
59
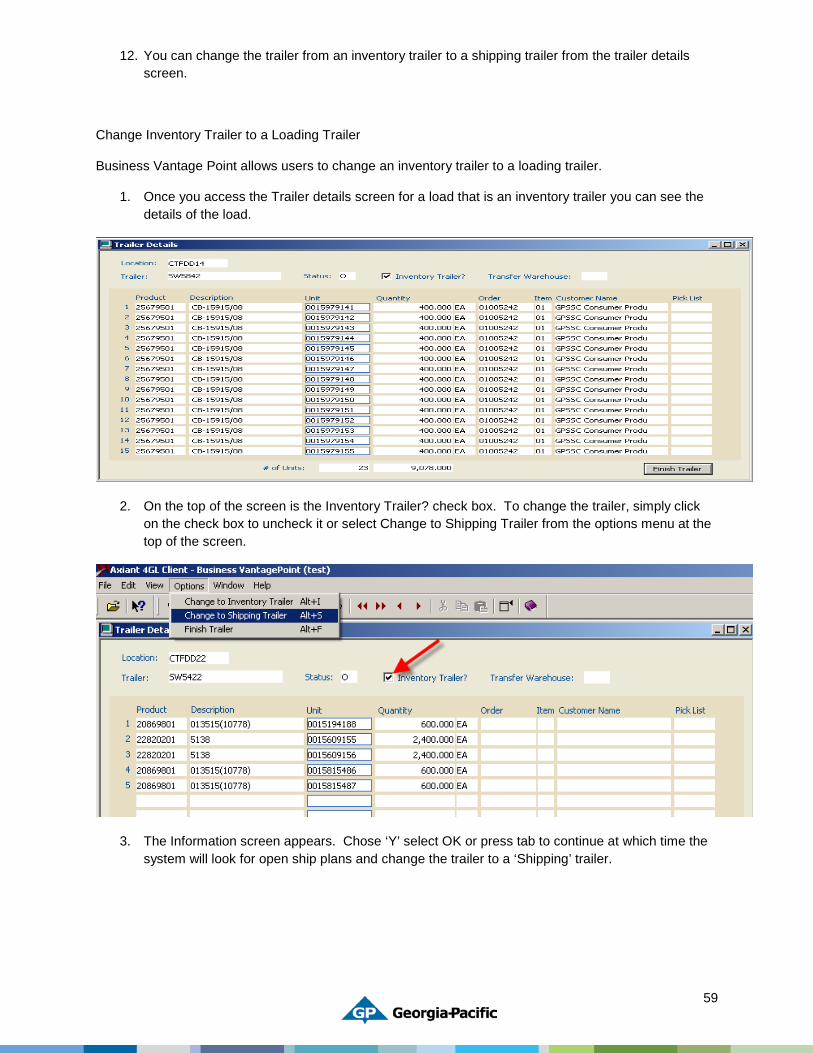
12. You can change the trailer from an inventory trailer to a shipping trailer from the trailer details screen.
Change Inventory Trailer to a Loading Trailer
Business Vantage Point allows users to change an inventory trailer to a loading trailer.
1. Once you access the Trailer details screen for a load that is an inventory trailer you can see the details of the load.
2. On the top of the screen is the Inventory Trailer? check box. To change the trailer, simply click on the check box to uncheck it or select Change to Shipping Trailer from the options menu at the top of the screen.
3. The Information screen appears. Chose ‘Y’ select OK or press tab to continue at which time the system will look for open ship plans and change the trailer to a ‘Shipping’ trailer.
60
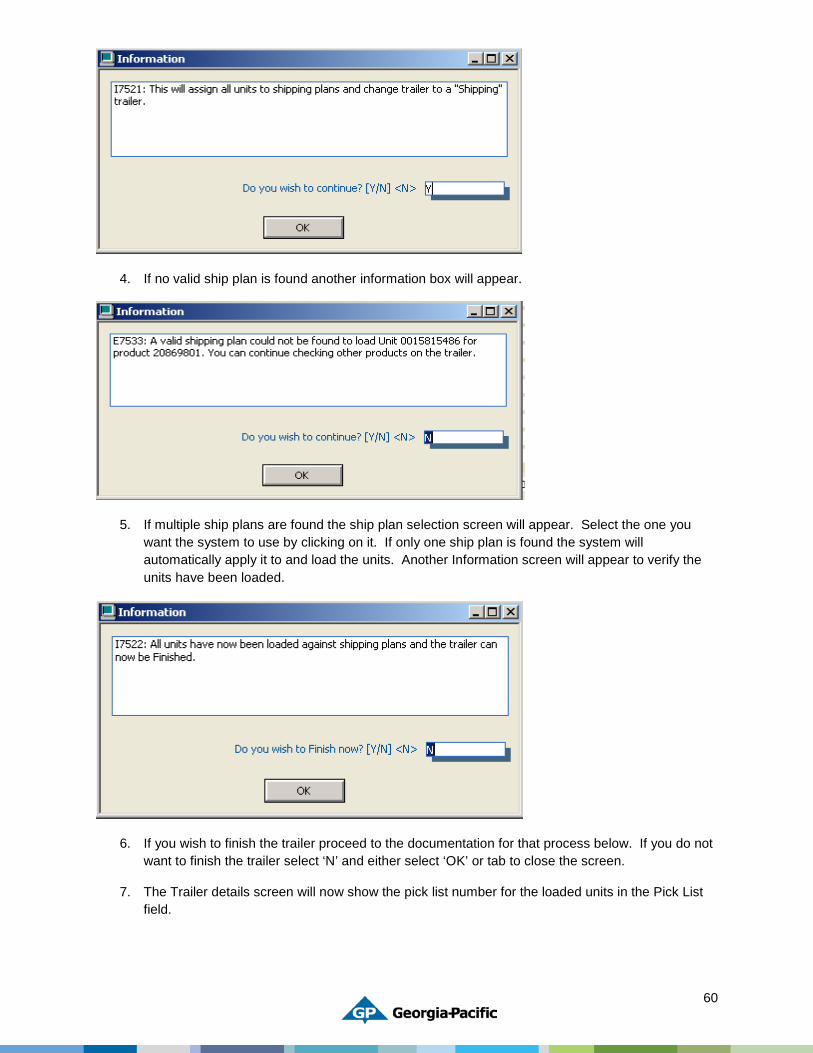
4. If no valid ship plan is found another information box will appear.
5. If multiple ship plans are found the ship plan selection screen will appear. Select the one you want the system to use by clicking on it. If only one ship plan is found the system will automatically apply it to and load the units. Another Information screen will appear to verify the units have been loaded.
6. If you wish to finish the trailer proceed to the documentation for that process below. If you do not want to finish the trailer select ‘N’ and either select ‘OK’ or tab to close the screen.
7. The Trailer details screen will now show the pick list number for the loaded units in the Pick List field.
61
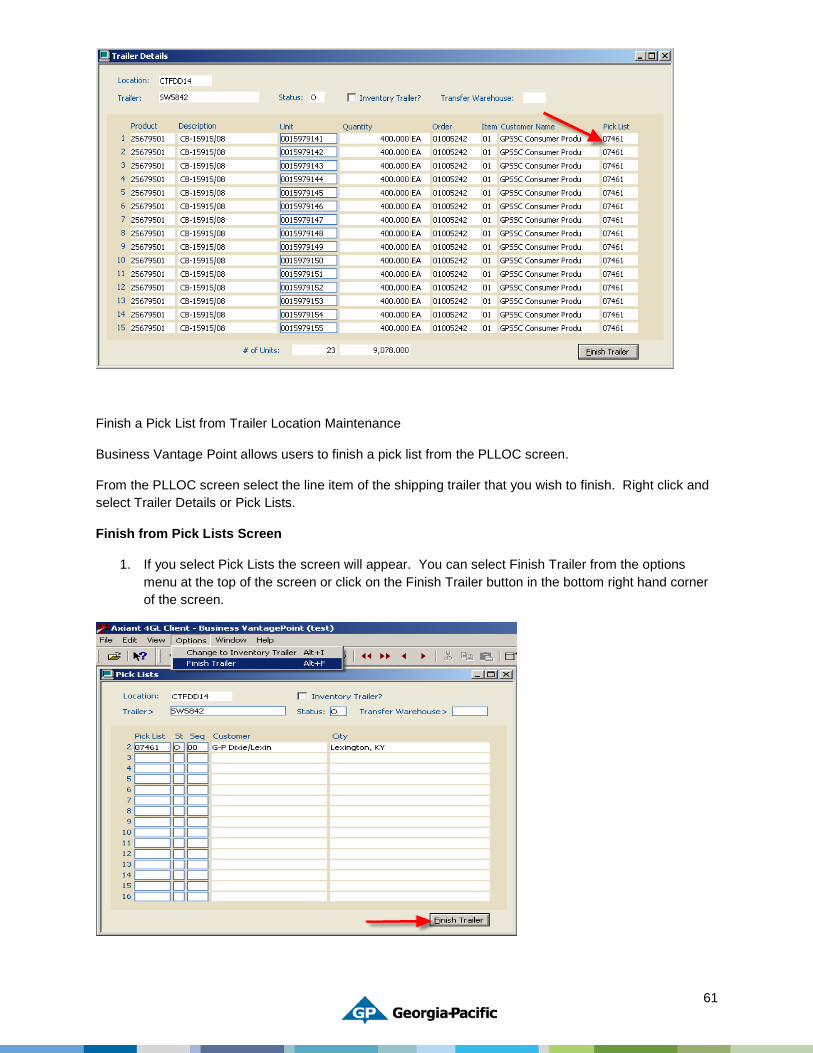
Finish a Pick List from Trailer Location Maintenance
Business Vantage Point allows users to finish a pick list from the PLLOC screen.
From the PLLOC screen select the line item of the shipping trailer that you wish to finish. Right click and select Trailer Details or Pick Lists.
Finish from Pick Lists Screen
1. If you select Pick Lists the screen will appear. You can select Finish Trailer from the options menu at the top of the screen or click on the Finish Trailer button in the bottom right hand corner of the screen.
62
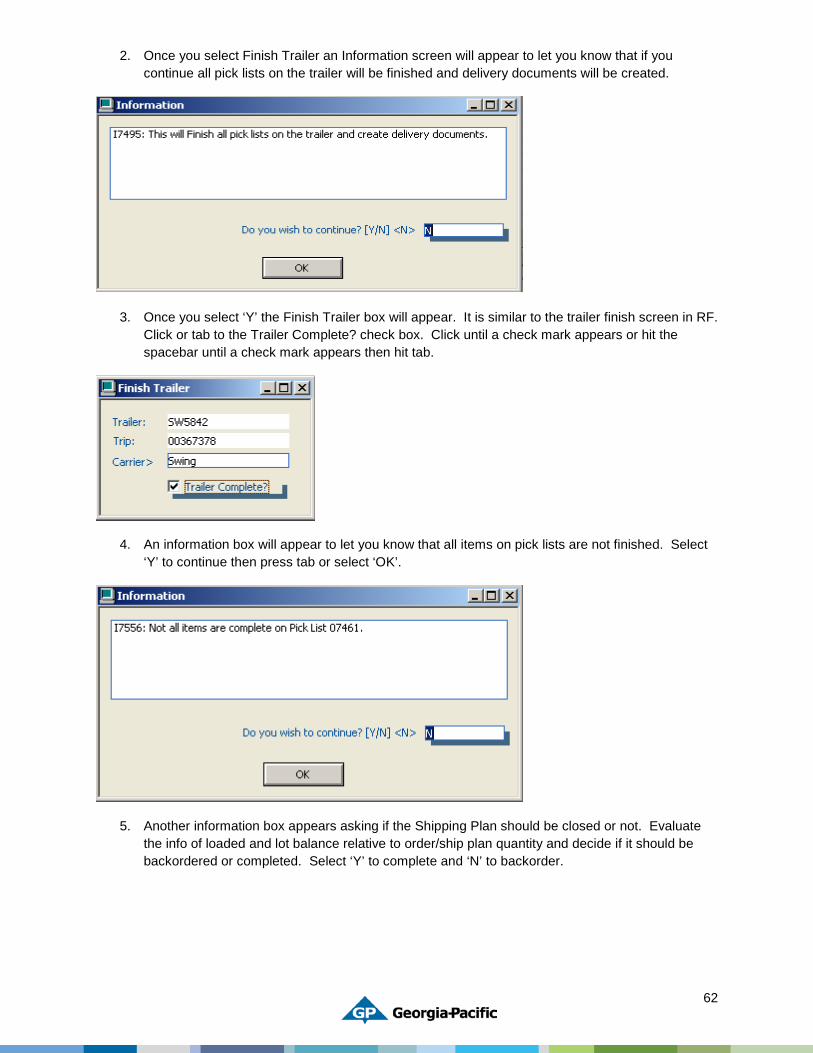
2. Once you select Finish Trailer an Information screen will appear to let you know that if you continue all pick lists on the trailer will be finished and delivery documents will be created.
3. Once you select ‘Y’ the Finish Trailer box will appear. It is similar to the trailer finish screen in RF. Click or tab to the Trailer Complete? check box. Click until a check mark appears or hit the spacebar until a check mark appears then hit tab.
4. An information box will appear to let you know that all items on pick lists are not finished. Select ‘Y’ to continue then press tab or select ‘OK’.
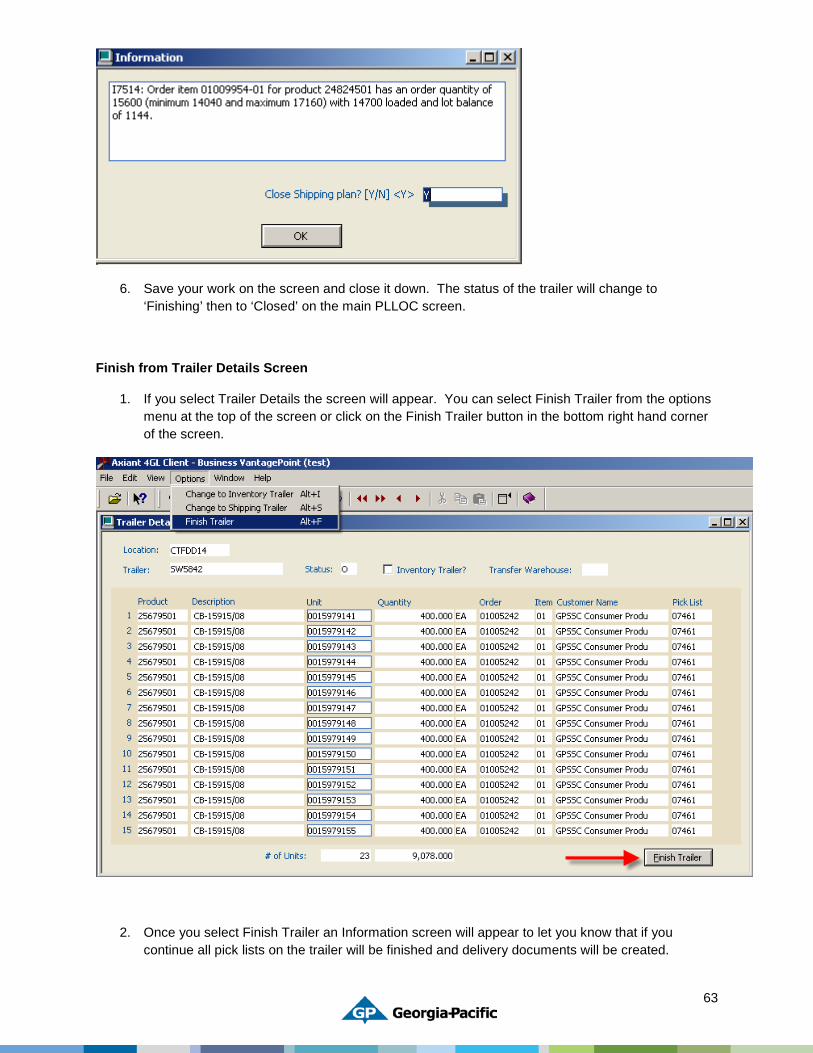
5. Another information box appears asking if the Shipping Plan should be closed or not. Evaluate the info of loaded and lot balance relative to order/ship plan quantity and decide if it should be backordered or completed. Select ‘Y’ to complete and ‘N’ to backorder.
63
6. Save your work on the screen and close it down. The status of the trailer will change to ‘Finishing’ then to ‘Closed’ on the main PLLOC screen.
Finish from Trailer Details Screen
1. If you select Trailer Details the screen will appear. You can select Finish Trailer from the options menu at the top of the screen or click on the Finish Trailer button in the bottom right hand corner of the screen.
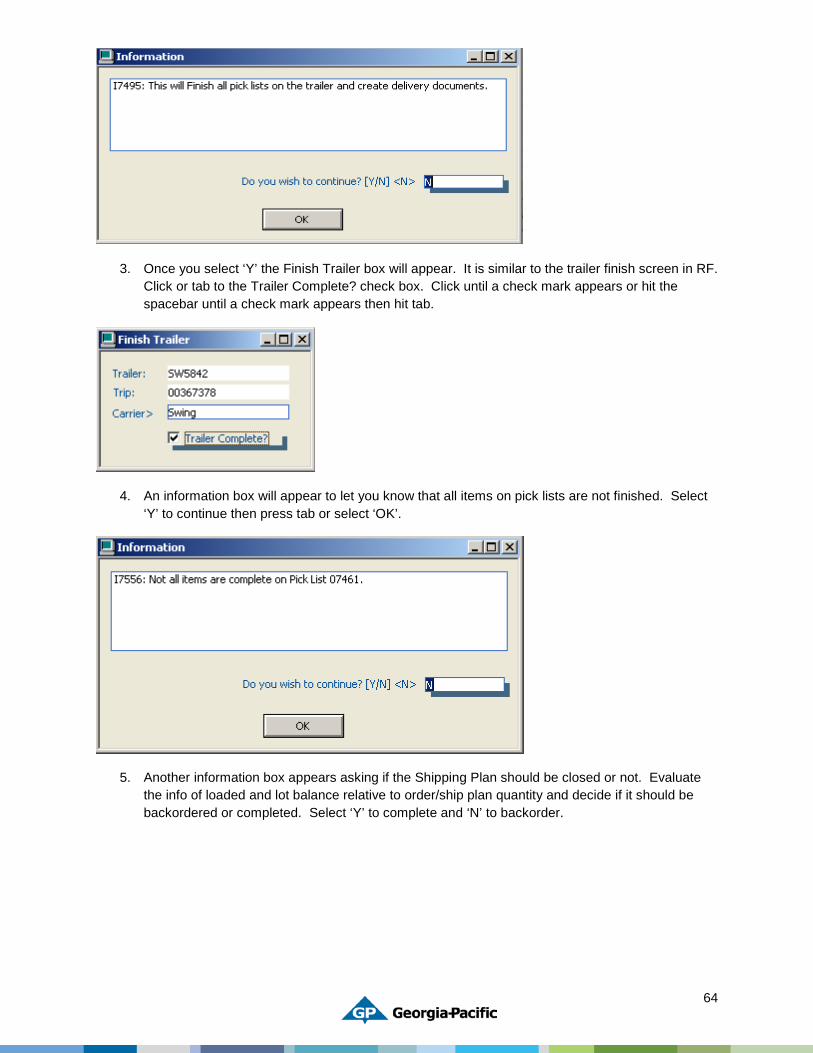
2. Once you select Finish Trailer an Information screen will appear to let you know that if you continue all pick lists on the trailer will be finished and delivery documents will be created.
64
3. Once you select ‘Y’ the Finish Trailer box will appear. It is similar to the trailer finish screen in RF. Click or tab to the Trailer Complete? check box. Click until a check mark appears or hit the spacebar until a check mark appears then hit tab.
4. An information box will appear to let you know that all items on pick lists are not finished. Select ‘Y’ to continue then press tab or select ‘OK’.
5. Another information box appears asking if the Shipping Plan should be closed or not. Evaluate the info of loaded and lot balance relative to order/ship plan quantity and decide if it should be backordered or completed. Select ‘Y’ to complete and ‘N’ to backorder.
65
6. Save your work on the screen and close it down. The status of the trailer will change to ‘Finishing’ then to ‘Closed’ on the main PLLOC screen.
Change Loading Trailer to an Inventory Trailer
Business Vantage Point allows users to change a loading trailer to an inventory trailer.
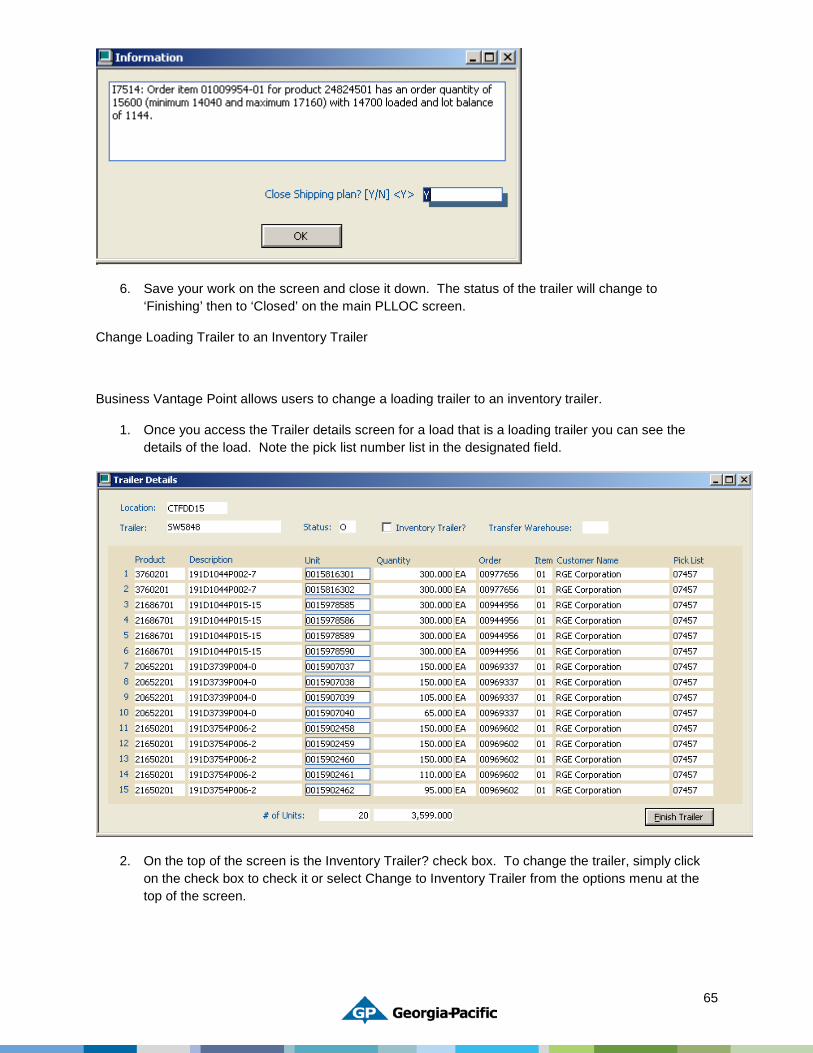
1. Once you access the Trailer details screen for a load that is a loading trailer you can see the details of the load. Note the pick list number list in the designated field.
2. On the top of the screen is the Inventory Trailer? check box. To change the trailer, simply click on the check box to check it or select Change to Inventory Trailer from the options menu at the top of the screen.
66
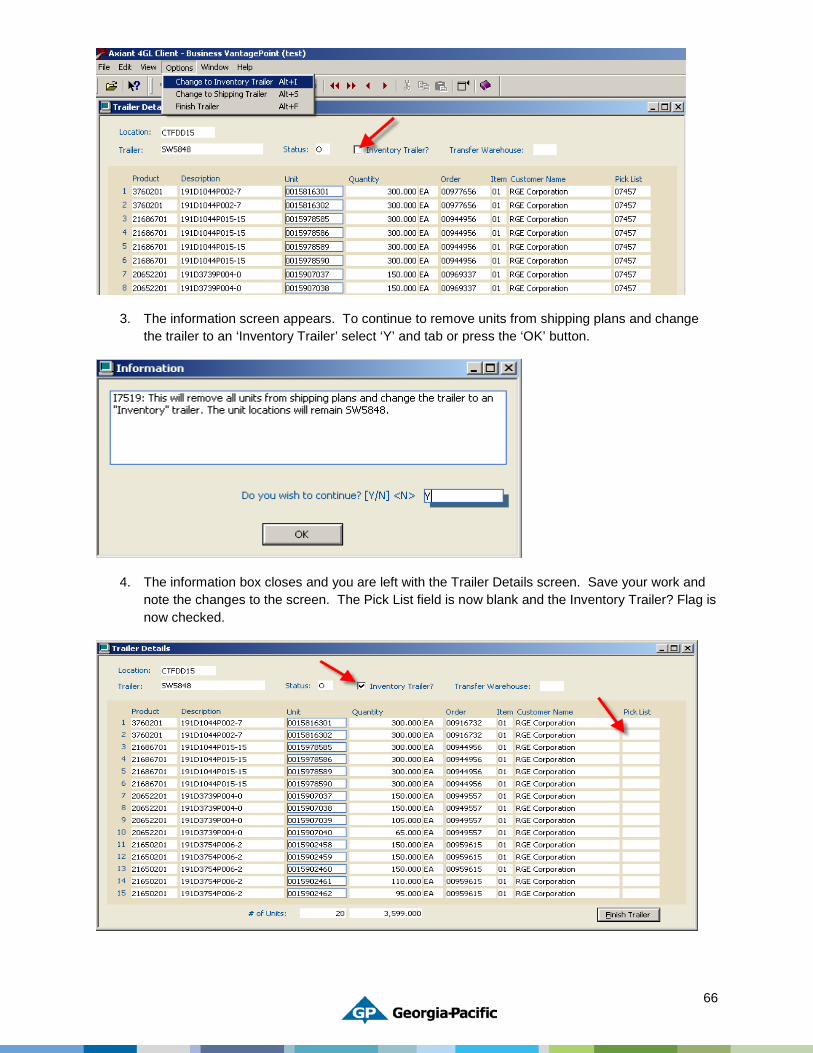
3. The information screen appears. To continue to remove units from shipping plans and change the trailer to an ‘Inventory Trailer’ select ‘Y’ and tab or press the ‘OK’ button.
4. The information box closes and you are left with the Trailer Details screen. Save your work and note the changes to the screen. The Pick List field is now blank and the Inventory Trailer? Flag is now checked.
67
Move Trailer To/From Yard Location
Business Vantage Point allows users to move trailers to and from yard locations.
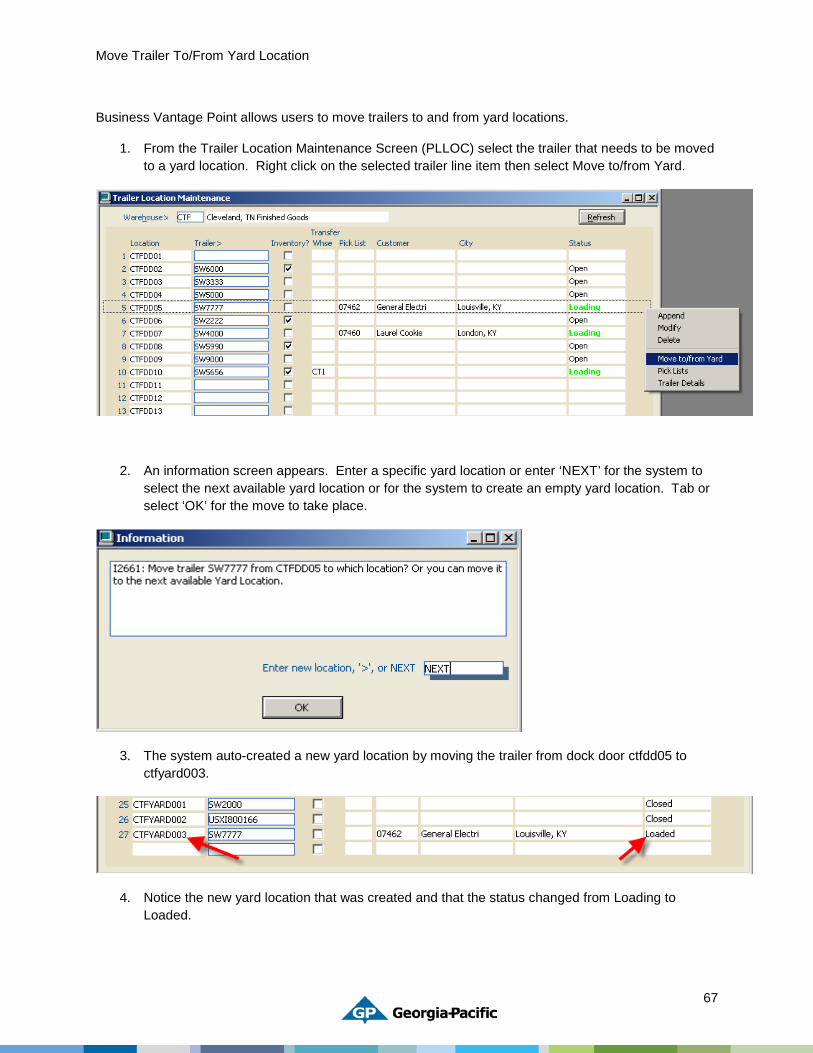
1. From the Trailer Location Maintenance Screen (PLLOC) select the trailer that needs to be moved to a yard location. Right click on the selected trailer line item then select Move to/from Yard.
2. An information screen appears. Enter a specific yard location or enter ‘NEXT’ for the system to select the next available yard location or for the system to create an empty yard location. Tab or select ‘OK’ for the move to take place.
3. The system auto-created a new yard location by moving the trailer from dock door ctfdd05 to ctfyard003.
4. Notice the new yard location that was created and that the status changed from Loading to Loaded.

68
Material receiving in the MATRECMULT screen
When to Use MATRECMULT
MATRECMULT is used to bring unit-tracked or lot-tracked inventory into BVP. For unit-tracked items such as finished goods, master cartons, printed sheets or purchased sheets MATRECMULT will also print load tags. With MATRECMULT you have the ability to receive multiple line items on the same supply order. These items can include roll stock, WIP, finished goods, and additional charge line items such as set-up or delivery charges.
Receiving in MATRECMULT
1. From the Navigator screen type MATRECMULT and press <tab> or select MATRECMULT from the GPSHIP menu.
2. You need the supply order number from customer service and the bill of lading or manifest from the vendor before you proceed. Otherwise use SEARCH or another lookup screen to determine the correct supply order number.
3. To create a new receipt, press the “create new record” button on the navigation bar.
4. Enter the supply order number and press <tab>
69
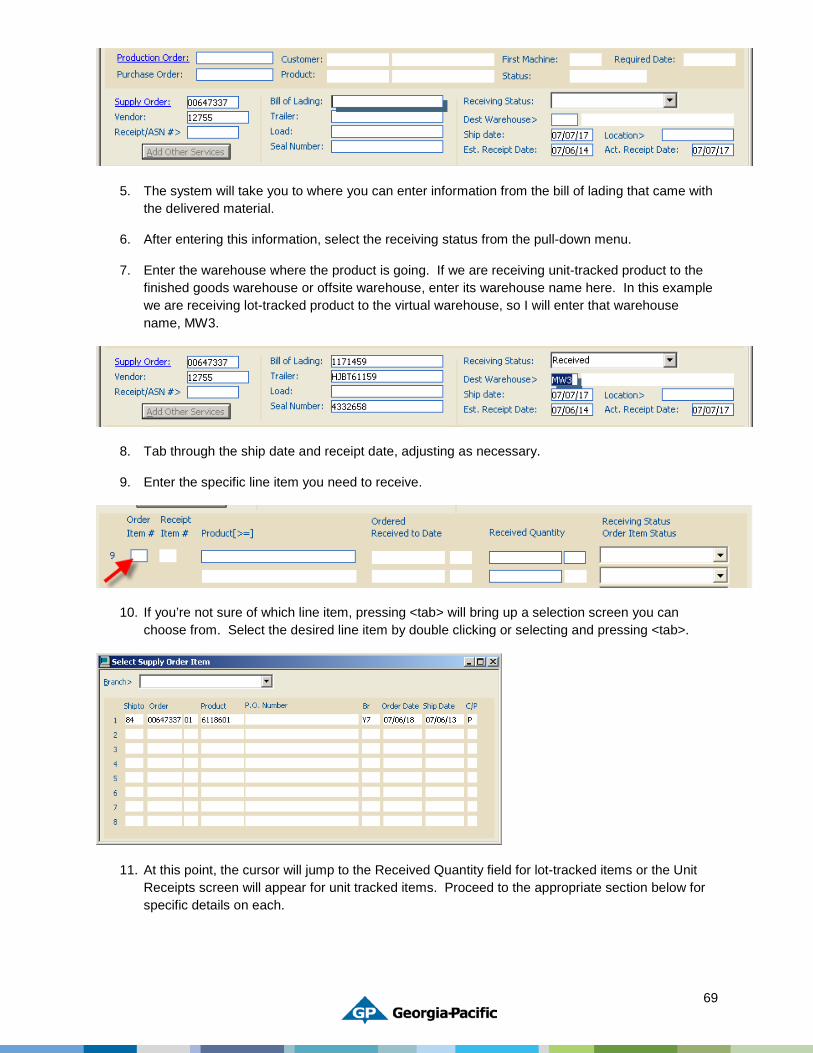
5. The system will take you to where you can enter information from the bill of lading that came with the delivered material.
6. After entering this information, select the receiving status from the pull-down menu.
7. Enter the warehouse where the product is going. If we are receiving unit-tracked product to the finished goods warehouse or offsite warehouse, enter its warehouse name here. In this example we are receiving lot-tracked product to the virtual warehouse, so I will enter that warehouse name, MW3.
8. Tab through the ship date and receipt date, adjusting as necessary.
9. Enter the specific line item you need to receive.
10. If you’re not sure of which line item, pressing <tab> will bring up a selection screen you can choose from. Select the desired line item by double clicking or selecting and pressing <tab>.
11. At this point, the cursor will jump to the Received Quantity field for lot-tracked items or the Unit Receipts screen will appear for unit tracked items. Proceed to the appropriate section below for specific details on each.
70
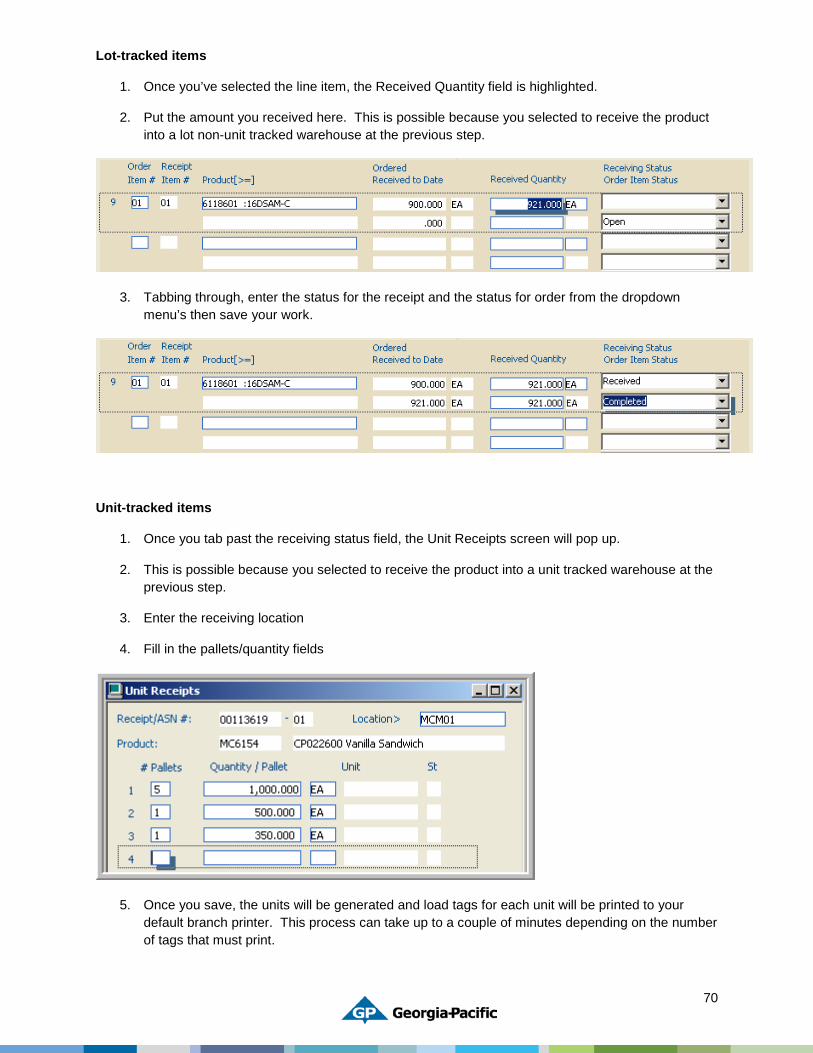
Lot-tracked items
1. Once you’ve selected the line item, the Received Quantity field is highlighted.
2. Put the amount you received here. This is possible because you selected to receive the product into a lot non-unit tracked warehouse at the previous step.
3. Tabbing through, enter the status for the receipt and the status for order from the dropdown menu’s then save your work.
Unit-tracked items
1. Once you tab past the receiving status field, the Unit Receipts screen will pop up.
2. This is possible because you selected to receive the product into a unit tracked warehouse at the previous step.
3. Enter the receiving location
4. Fill in the pallets/quantity fields
5. Once you save, the units will be generated and load tags for each unit will be printed to your default branch printer. This process can take up to a couple of minutes depending on the number of tags that must print.
71
6. Close the unit receipts screen and save once again.
7. Continue through the remaining supply order line items as applicable.
8. Be sure to note the receipt/ASN# on your bill of lading to make it easier to find information later.
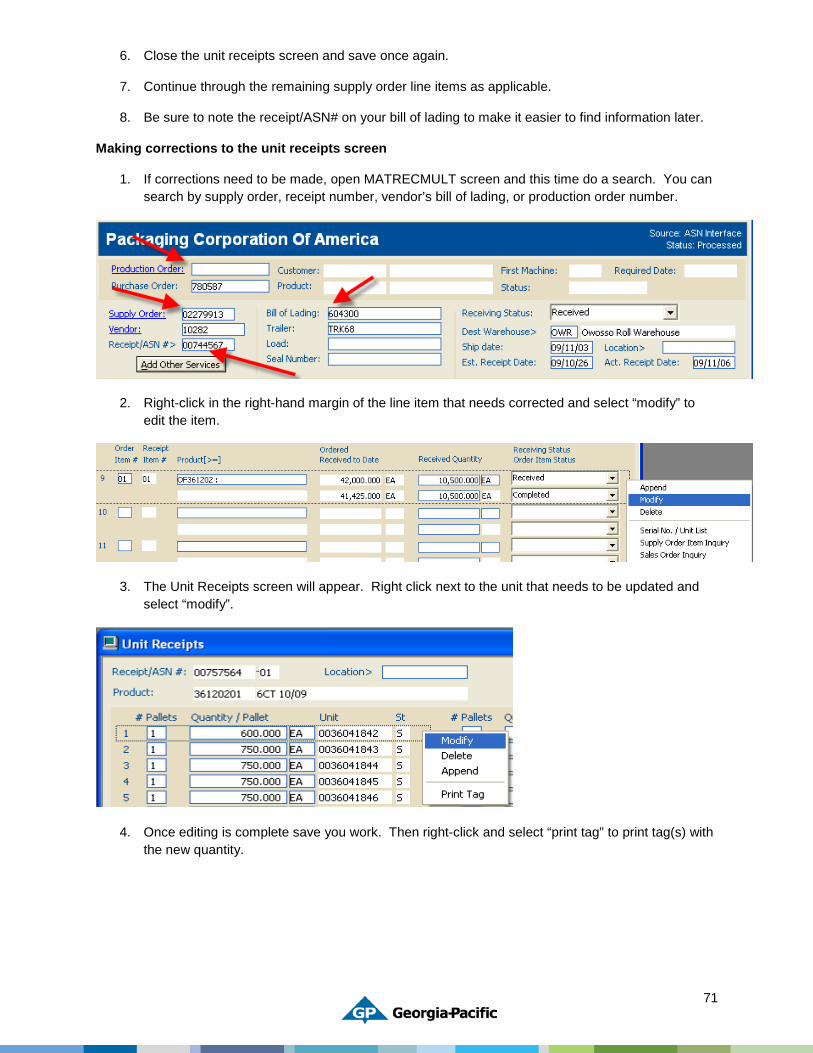
Making corrections to the unit receipts screen
1. If corrections need to be made, open MATRECMULT screen and this time do a search. You can search by supply order, receipt number, vendor’s bill of lading, or production order number.
2. Right-click in the right-hand margin of the line item that needs corrected and select “modify” to edit the item.
3. The Unit Receipts screen will appear. Right click next to the unit that needs to be updated and select “modify”.
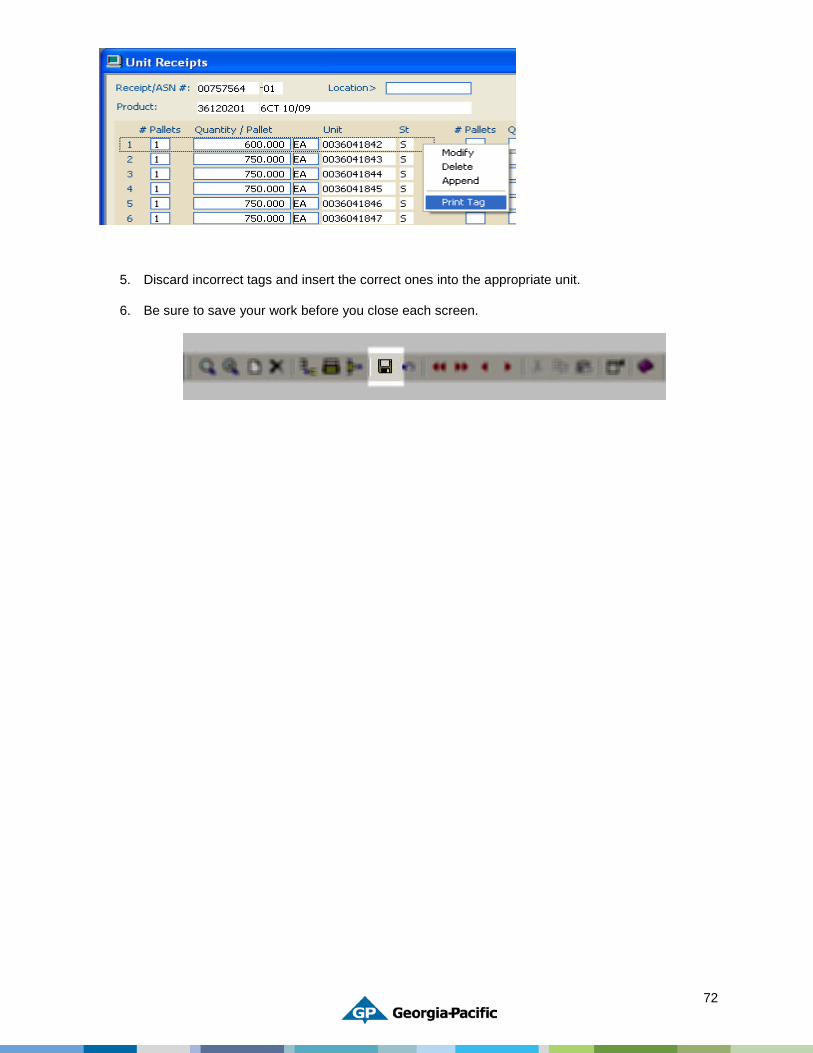
4. Once editing is complete save you work. Then right-click and select “print tag” to print tag(s) with the new quantity.
72
5. Discard incorrect tags and insert the correct ones into the appropriate unit.
6. Be sure to save your work before you close each screen.
73
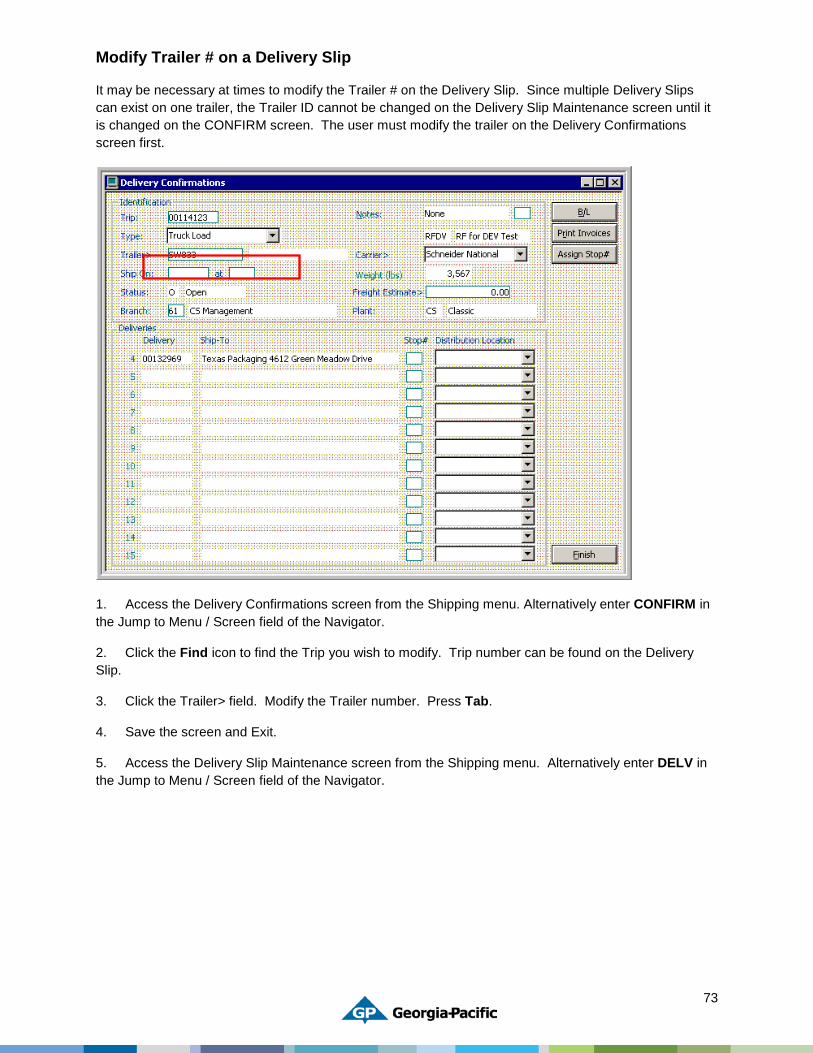
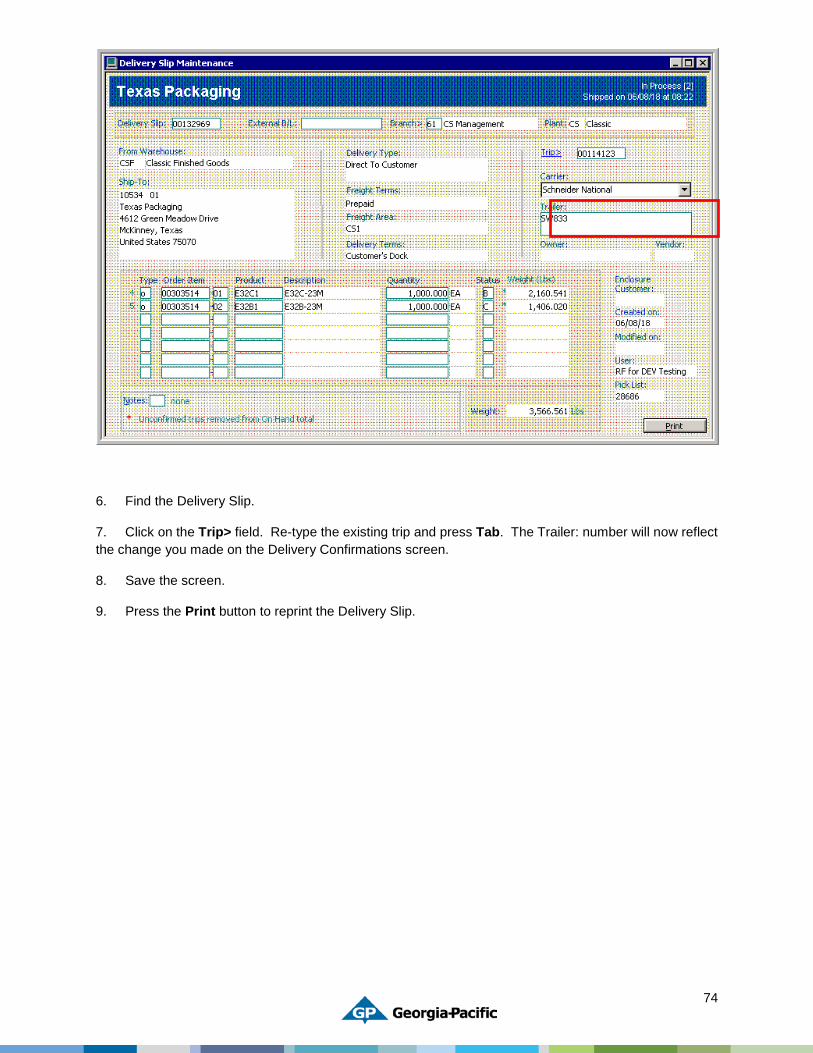
Modify Trailer # on a Delivery Slip
It may be necessary at times to modify the Trailer # on the Delivery Slip. Since multiple Delivery Slips can exist on one trailer, the Trailer ID cannot be changed on the Delivery Slip Maintenance screen until it is changed on the CONFIRM screen. The user must modify the trailer on the Delivery Confirmations screen first.
1. Access the Delivery Confirmations screen from the Shipping menu. Alternatively enter CONFIRM in the Jump to Menu / Screen field of the Navigator.
2. Click the Find icon to find the Trip you wish to modify. Trip number can be found on the Delivery Slip.
3. Click the Trailer> field. Modify the Trailer number. Press Tab.
4. Save the screen and Exit.
5. Access the Delivery Slip Maintenance screen from the Shipping menu. Alternatively enter DELV in the Jump to Menu / Screen field of the Navigator.
74
6. Find the Delivery Slip.
7. Click on the Trip> field. Re-type the existing trip and press Tab. The Trailer: number will now reflect the change you made on the Delivery Confirmations screen.
8. Save the screen.
9. Press the Print button to reprint the Delivery Slip.
75
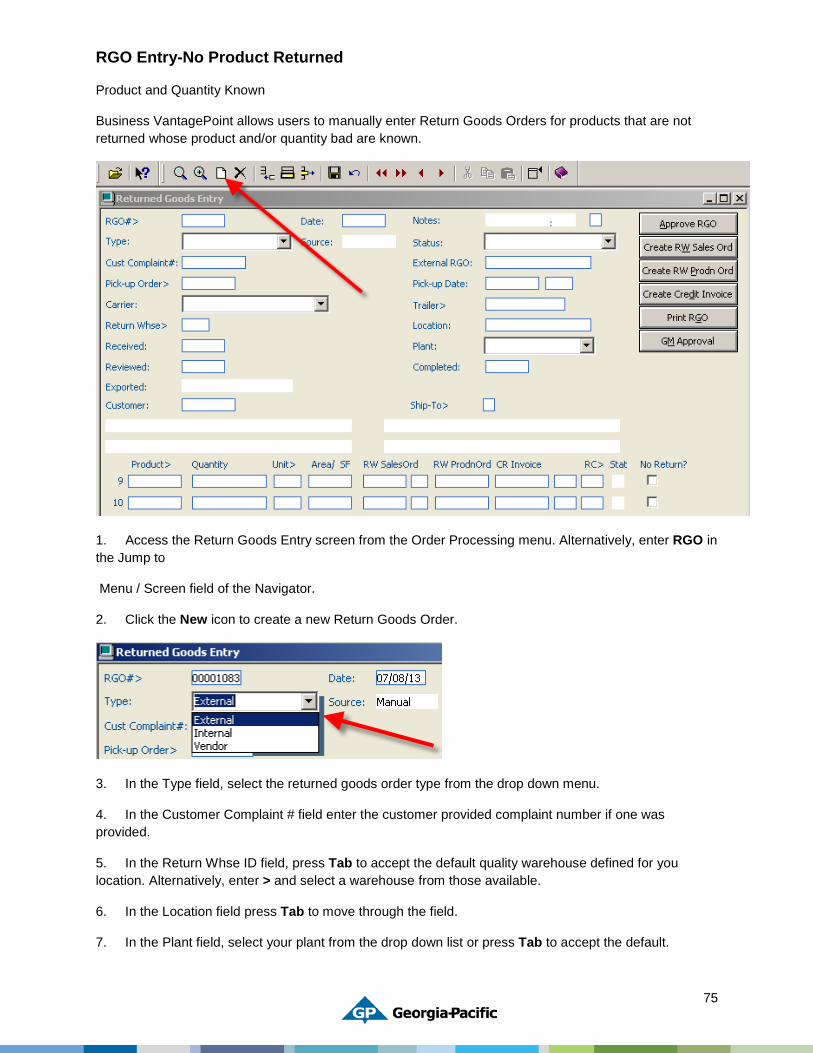
RGO Entry-No Product Returned
Product and Quantity Known
Business VantagePoint allows users to manually enter Return Goods Orders for products that are not returned whose product and/or quantity bad are known.
1. Access the Return Goods Entry screen from the Order Processing menu. Alternatively, enter RGO in the Jump to
Menu / Screen field of the Navigator.
2. Click the New icon to create a new Return Goods Order.
3. In the Type field, select the returned goods order type from the drop down menu.
4. In the Customer Complaint # field enter the customer provided complaint number if one was provided.
5. In the Return Whse ID field, press Tab to accept the default quality warehouse defined for you location. Alternatively, enter > and select a warehouse from those available.
6. In the Location field press Tab to move through the field.
7. In the Plant field, select your plant from the drop down list or press Tab to accept the default.
76
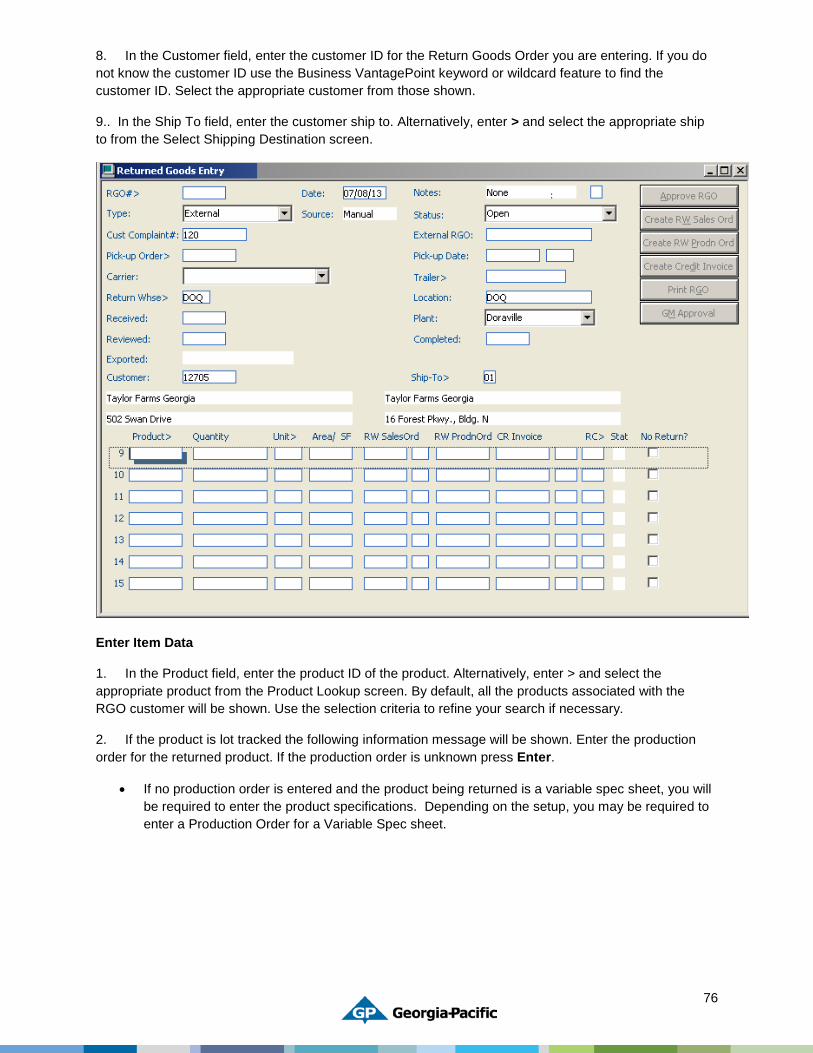
8. In the Customer field, enter the customer ID for the Return Goods Order you are entering. If you do not know the customer ID use the Business VantagePoint keyword or wildcard feature to find the customer ID. Select the appropriate customer from those shown.
9.. In the Ship To field, enter the customer ship to. Alternatively, enter > and select the appropriate ship to from the Select Shipping Destination screen.
Enter Item Data
1. In the Product field, enter the product ID of the product. Alternatively, enter > and select the appropriate product from the Product Lookup screen. By default, all the products associated with the RGO customer will be shown. Use the selection criteria to refine your search if necessary.
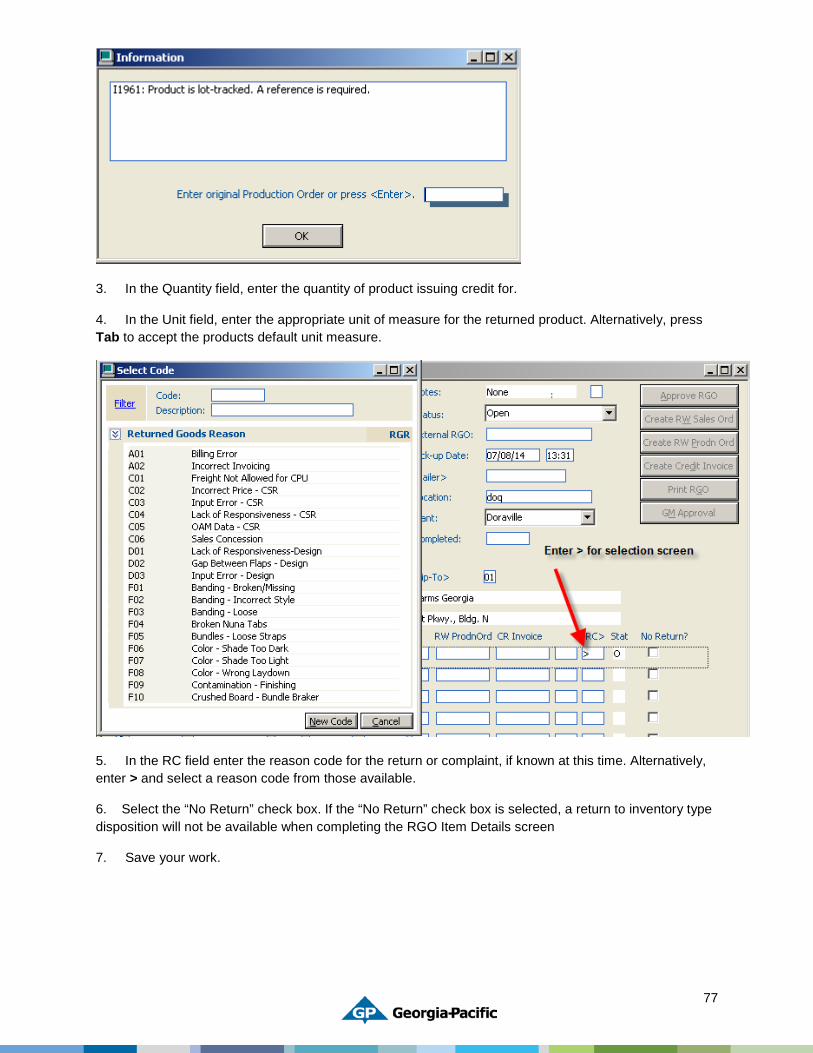
2. If the product is lot tracked the following information message will be shown. Enter the production order for the returned product. If the production order is unknown press Enter.
• If no production order is entered and the product being returned is a variable spec sheet, you will be required to enter the product specifications. Depending on the setup, you may be required to enter a Production Order for a Variable Spec sheet.
77
3. In the Quantity field, enter the quantity of product issuing credit for.
4. In the Unit field, enter the appropriate unit of measure for the returned product. Alternatively, press Tab to accept the products default unit measure.
5. In the RC field enter the reason code for the return or complaint, if known at this time. Alternatively, enter > and select a reason code from those available.
6. Select the “No Return” check box. If the “No Return” check box is selected, a return to inventory type disposition will not be available when completing the RGO Item Details screen
7. Save your work.

78
Approve Returned Goods Order
1. Access the Return Goods Entry screen from the Order Processing menu. Alternatively, enter RGO in the Jump to Menu / Screen field of the Navigator. DO NOT proceed with the approval process unless you are certain that the RGO is complete and accurate. Once you approve the RGO NO changes will be allowed.
2. Click the Find icon to find the appropriate return goods order you wish to approve.
3. From Line Options menu of item you wish to approve select Item Data.
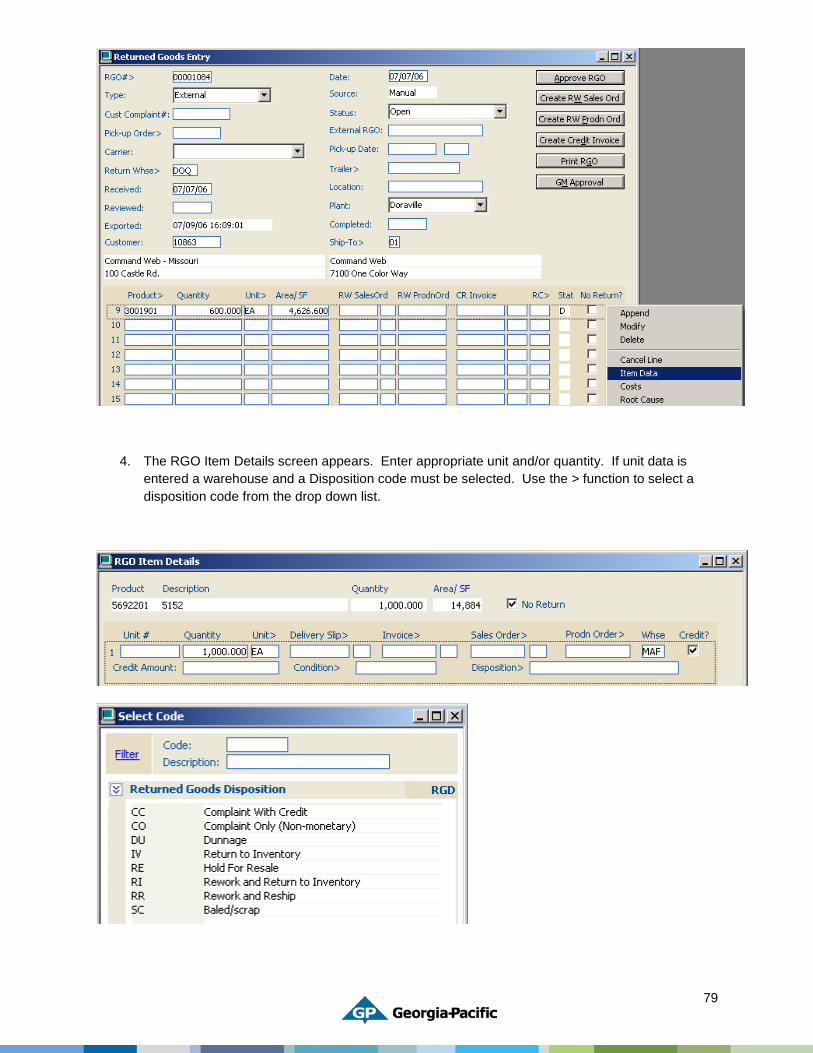
79
4. The RGO Item Details screen appears. Enter appropriate unit and/or quantity. If unit data is entered a warehouse and a Disposition code must be selected. Use the > function to select a disposition code from the drop down list.

80
5. Once a disposition code and warehouse have been selected, make certain the credit flag is checked, save your work and close the screen.
6. To add notes to the RGO Right Click to access the Line Options menu of the item you wish to approve, select Notes.
7. The cursor drops to the note/s box in the bottom left hand corner of the main RGO screen. Press the tab key and the Notes screen will appear.

81
8. Press ‘OK’ then click on the first line, hit tab to select the auto-sequence number, enter the required notes for the RGO, and tab thru the remaining check boxes. Enter additional lines as needed. Save your work before closing. This info will transmit to CTS.
9. From Line Options menu of the item you wish to approve select Costs.
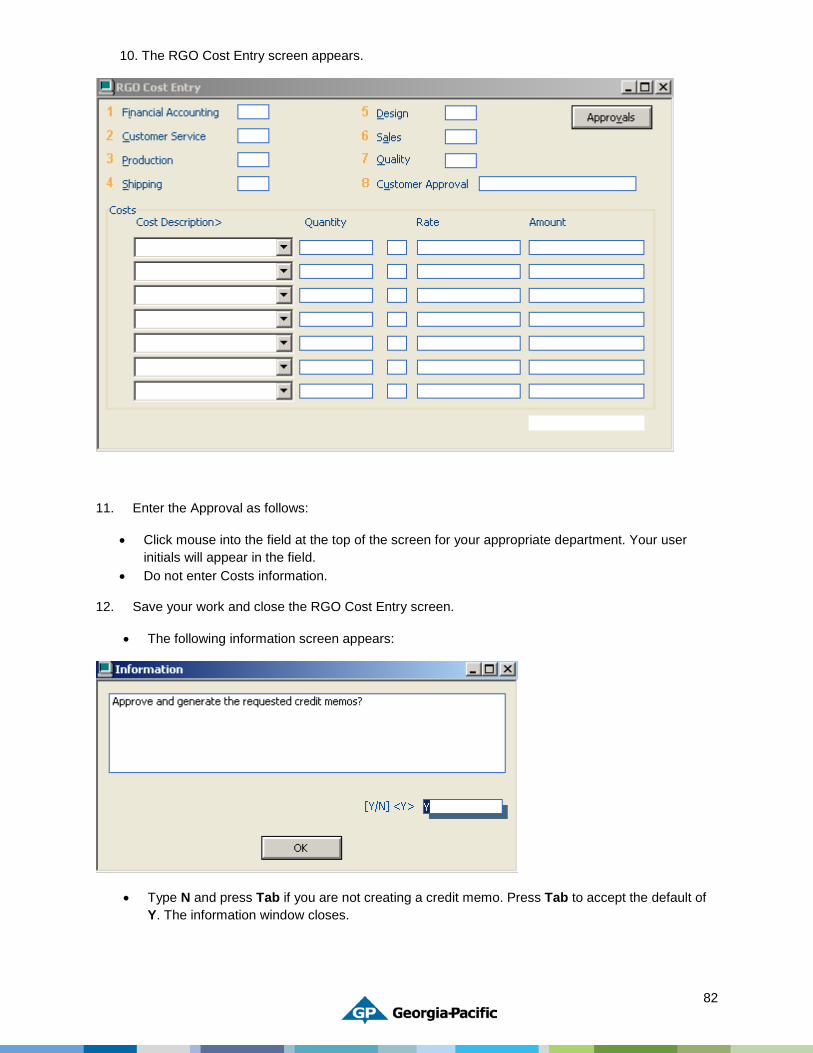
82
10. The RGO Cost Entry screen appears.
11. Enter the Approval as follows:
• Click mouse into the field at the top of the screen for your appropriate department. Your user initials will appear in the field.
• Do not enter Costs information.
12. Save your work and close the RGO Cost Entry screen.
• The following information screen appears:
• Type N and press Tab if you are not creating a credit memo. Press Tab to accept the default of Y. The information window closes.

83
• If all required information has been entered, the RGO status will change to ‘Credit Pending’. The following message will display at the bottom of your screen:
• If all approvals have not been entered on the Costs screen, the following message appears:
Repeat approval steps until all approvals have been entered. Then, repeat steps to save.
• If all required information has not yet been entered on the RGO screen or Item Data screen. A message will appear indicating what items still need input. Enter any missing information. Create the credit note by clicking the Create Credit Invoice.
• After you re-find the RGO the CR Invoice # will appear.
• Finish Credit invoice thru normal BVP process.
Exporting RGO Information to CTS
Typically any change to items or dispositions of returned items causes the RGO to be exported. This happens automatically when users save the changed information. However, there may be times when there is no change to be made to the RGO, but it must be exported. The Returned Goods Entry screen has a new option to force the export of an RGO.
To export an RGO to CTS, do the following:
1. In the Navigator, enter RGO.
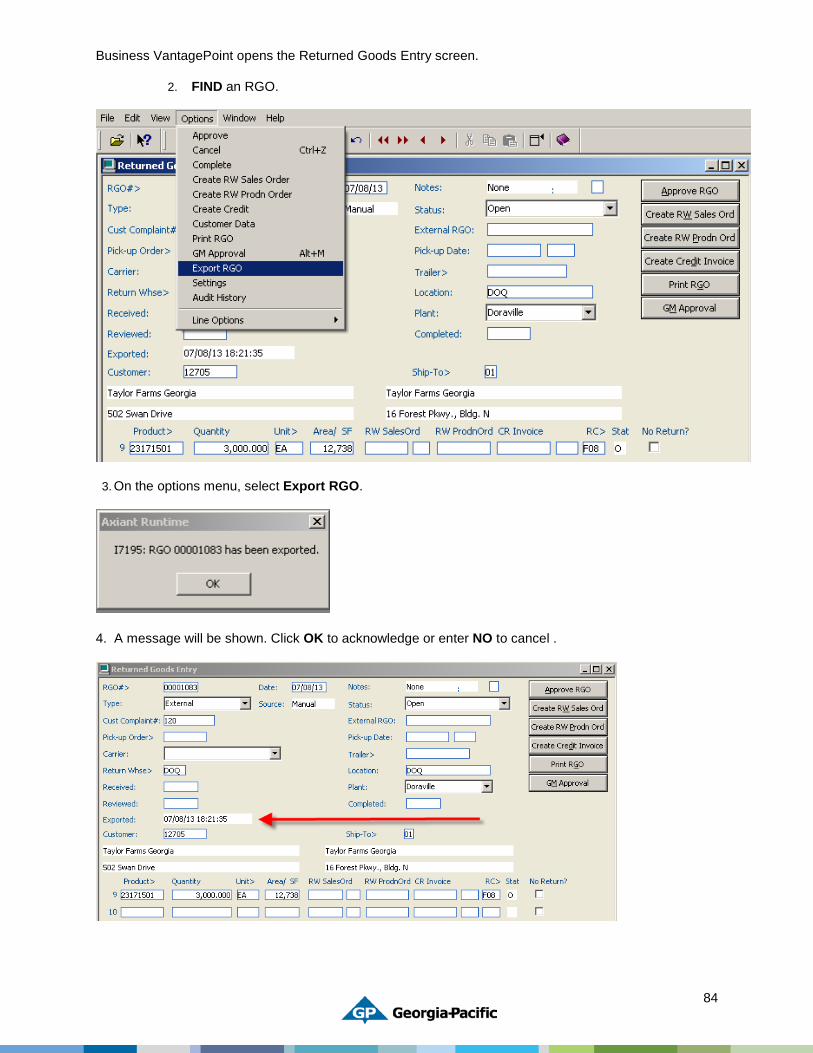
84
Business VantagePoint opens the Returned Goods Entry screen.
2. FIND an RGO.
3. On the options menu, select Export RGO.
4. A message will be shown. Click OK to acknowledge or enter NO to cancel .
85
5. After clicking ok, BVP exports the RGO to CTS. As the system reads the RGO data, it stamps the Returned Goods Entry screen with the current date and time.
RGO Reporting
There are two reports in BVP that may assist you in tracking RGO’s once they are created.
RGO Receipts Report (GLDR024) will allow you to see all of the RGO receipts created by your facility for one or all customers over a date range.
RGO Status Report (OPSR012) will allow you to see the status of all RGO’s created by your facility by status within a date range. In both reports you determine the criteria the system will use to search before the report is created.
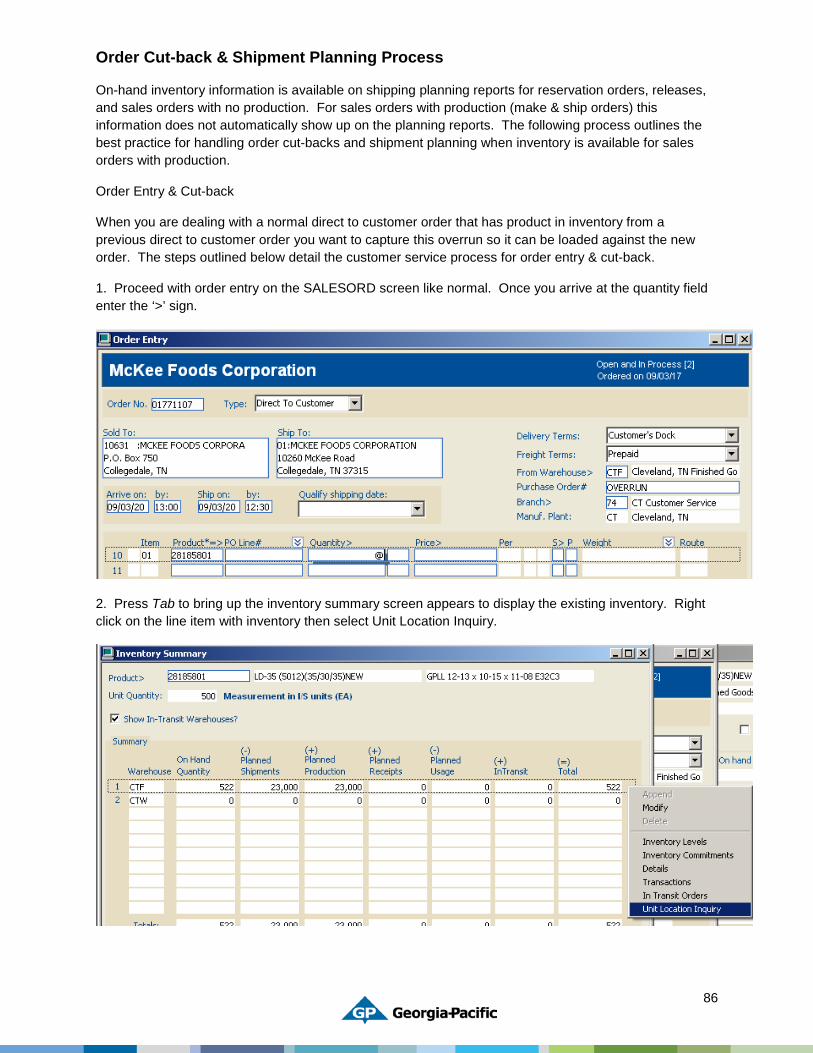
86
Order Cut-back & Shipment Planning Process
On-hand inventory information is available on shipping planning reports for reservation orders, releases, and sales orders with no production. For sales orders with production (make & ship orders) this information does not automatically show up on the planning reports. The following process outlines the best practice for handling order cut-backs and shipment planning when inventory is available for sales orders with production.
Order Entry & Cut-back
When you are dealing with a normal direct to customer order that has product in inventory from a previous direct to customer order you want to capture this overrun so it can be loaded against the new order. The steps outlined below detail the customer service process for order entry & cut-back.
1. Proceed with order entry on the SALESORD screen like normal. Once you arrive at the quantity field enter the ‘>’ sign.
2. Press Tab to bring up the inventory summary screen appears to display the existing inventory. Right click on the line item with inventory then select Unit Location Inquiry.
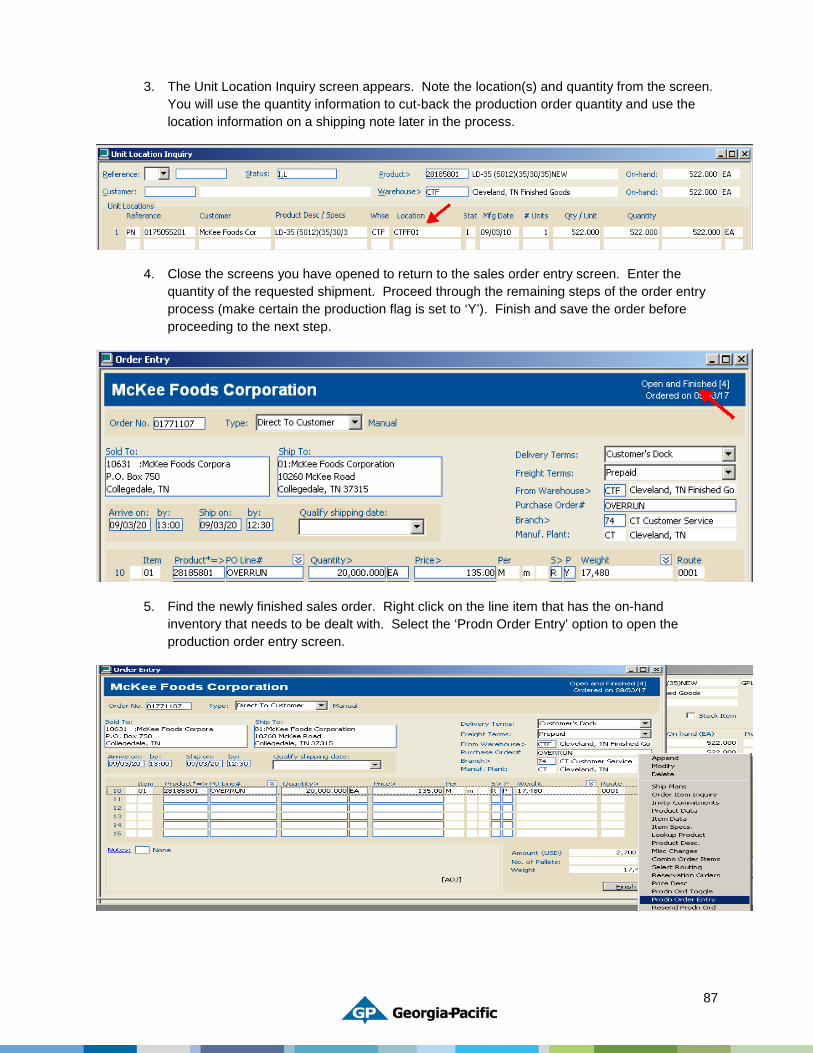
87
3. The Unit Location Inquiry screen appears. Note the location(s) and quantity from the screen. You will use the quantity information to cut-back the production order quantity and use the location information on a shipping note later in the process.
4. Close the screens you have opened to return to the sales order entry screen. Enter the quantity of the requested shipment. Proceed through the remaining steps of the order entry process (make certain the production flag is set to ‘Y’). Finish and save the order before proceeding to the next step.
5. Find the newly finished sales order. Right click on the line item that has the on-hand inventory that needs to be dealt with. Select the ‘Prodn Order Entry’ option to open the production order entry screen.
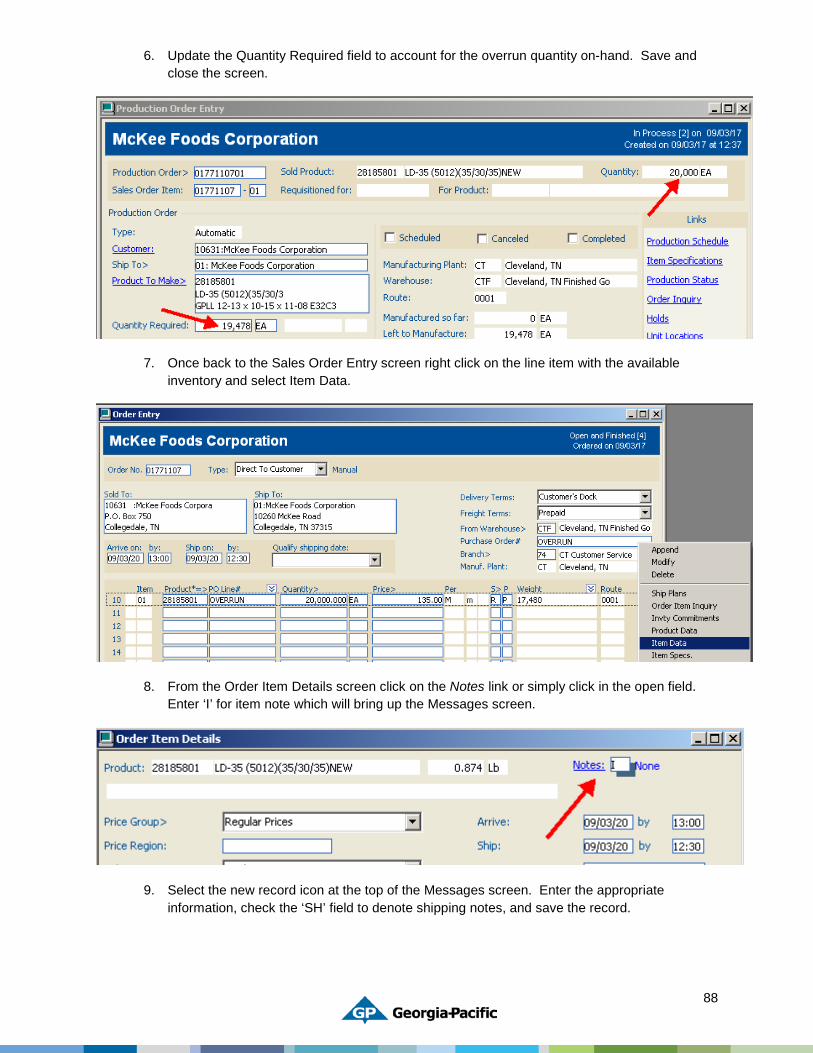
88
6. Update the Quantity Required field to account for the overrun quantity on-hand. Save and close the screen.
7. Once back to the Sales Order Entry screen right click on the line item with the available inventory and select Item Data.
8. From the Order Item Details screen click on the Notes link or simply click in the open field. Enter ‘I’ for item note which will bring up the Messages screen.
9. Select the new record icon at the top of the Messages screen. Enter the appropriate information, check the ‘SH’ field to denote shipping notes, and save the record.

89
10. Close the messages screen and close the order item details screen. Save on the Sales Order Entry screen.
The shipping note will print out on the shipping plan report and on the pick list for the order in question once it is assigned.
Planning Overrun Balances
When there is inventory available from a previously shipped direct to customer order it does not automatically show up under the inventory section on the shipping plan or pick list reports. The steps outlined below detail where this information can be made available at as well as the process to use RF Item Inquiry to determine on-hand. The goal of following this process is to ship overrun inventory when the next available order for that product is entered to ship.
• Follow the normal process for generating the Shipping Plan Report (SHPR002).
• The results will show a shipping note detailing that there is inventory from a previous order for this product on the floor that needs to be loaded. The load planner can note this during the planning process then mark or highlight the pick list once it is printed.

90
• Once the order is planned, assign and print the pick list following the normal pick list print procedure.
• The pick list will list the note added previously by customer service. The planner should highlight this note for the loaders to see.
• The RF user on the floor should now load the product that has been identified to ship against this order. This needs to happen before loading the product that is produced to complete the order and to insure that FIFO (first in, first out) guidelines for inventory management are followed.
RF Verification
One final check that the RF users on the floor should include anytime they are loading direct to customer with production (make & ship) orders is to confirm that all existing inventory on the floor for a product has been loaded.
1. Once the RF user identifies the product that is being loaded they should complete an RF Item Inquiry to validate that all existing product from the floor is loaded before the new product. From the GP RF Ship menu the users should select 04 RF Inquiry.
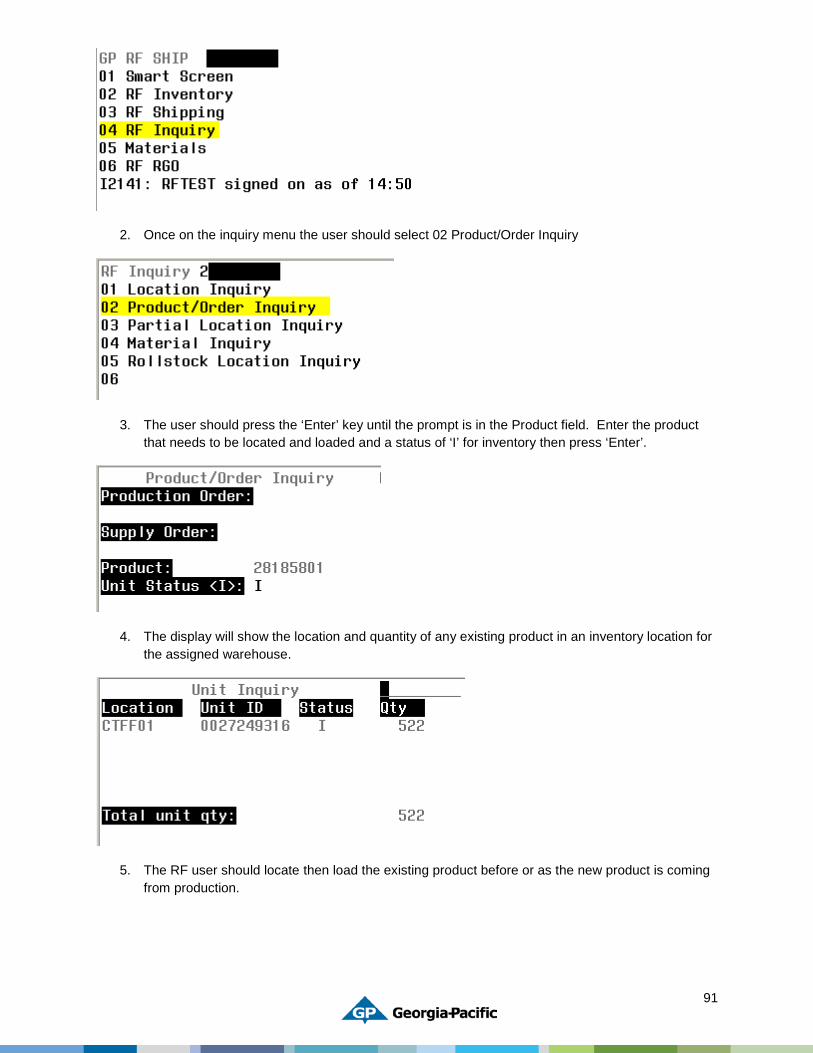
91
2. Once on the inquiry menu the user should select 02 Product/Order Inquiry
3. The user should press the ‘Enter’ key until the prompt is in the Product field. Enter the product that needs to be located and loaded and a status of ‘I’ for inventory then press ‘Enter’.
4. The display will show the location and quantity of any existing product in an inventory location for the assigned warehouse.
5. The RF user should locate then load the existing product before or as the new product is coming from production.
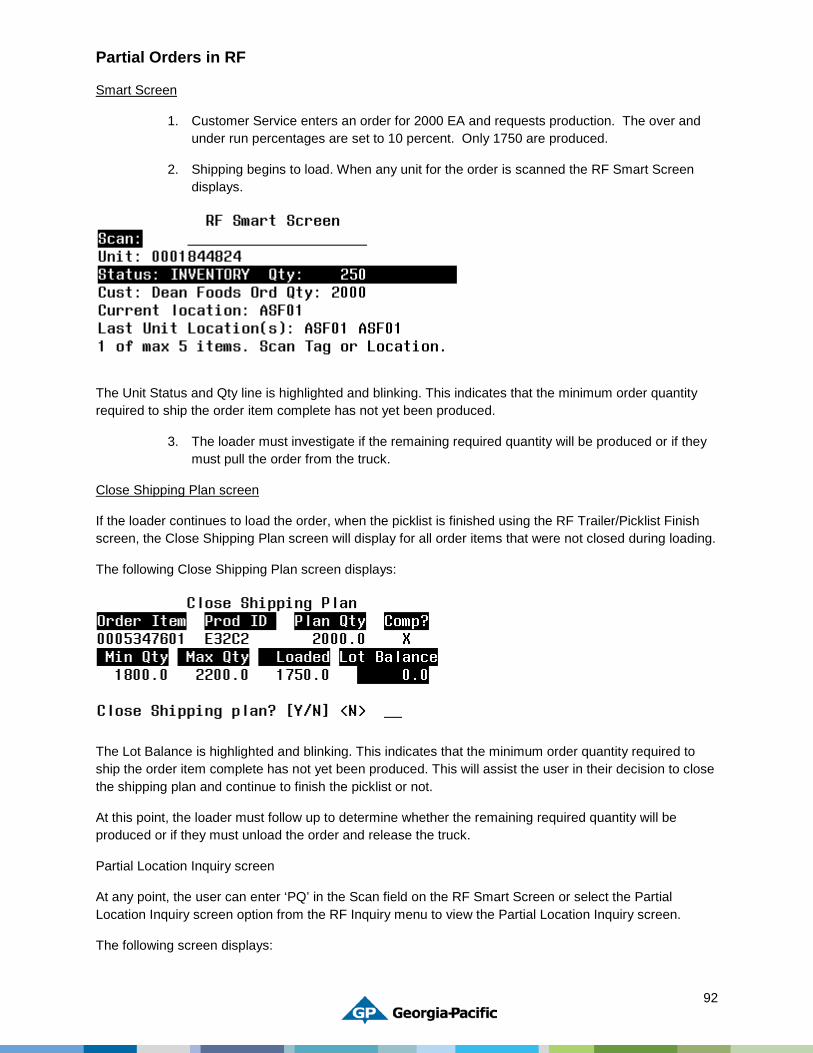
92
Partial Orders in RF
Smart Screen
1. Customer Service enters an order for 2000 EA and requests production. The over and under run percentages are set to 10 percent. Only 1750 are produced.
2. Shipping begins to load. When any unit for the order is scanned the RF Smart Screen displays.
The Unit Status and Qty line is highlighted and blinking. This indicates that the minimum order quantity required to ship the order item complete has not yet been produced.
3. The loader must investigate if the remaining required quantity will be produced or if they must pull the order from the truck.
Close Shipping Plan screen
If the loader continues to load the order, when the picklist is finished using the RF Trailer/Picklist Finish screen, the Close Shipping Plan screen will display for all order items that were not closed during loading.
The following Close Shipping Plan screen displays:
The Lot Balance is highlighted and blinking. This indicates that the minimum order quantity required to ship the order item complete has not yet been produced. This will assist the user in their decision to close the shipping plan and continue to finish the picklist or not.
At this point, the loader must follow up to determine whether the remaining required quantity will be produced or if they must unload the order and release the truck.
Partial Location Inquiry screen
At any point, the user can enter ‘PQ’ in the Scan field on the RF Smart Screen or select the Partial Location Inquiry screen option from the RF Inquiry menu to view the Partial Location Inquiry screen.
The following screen displays:
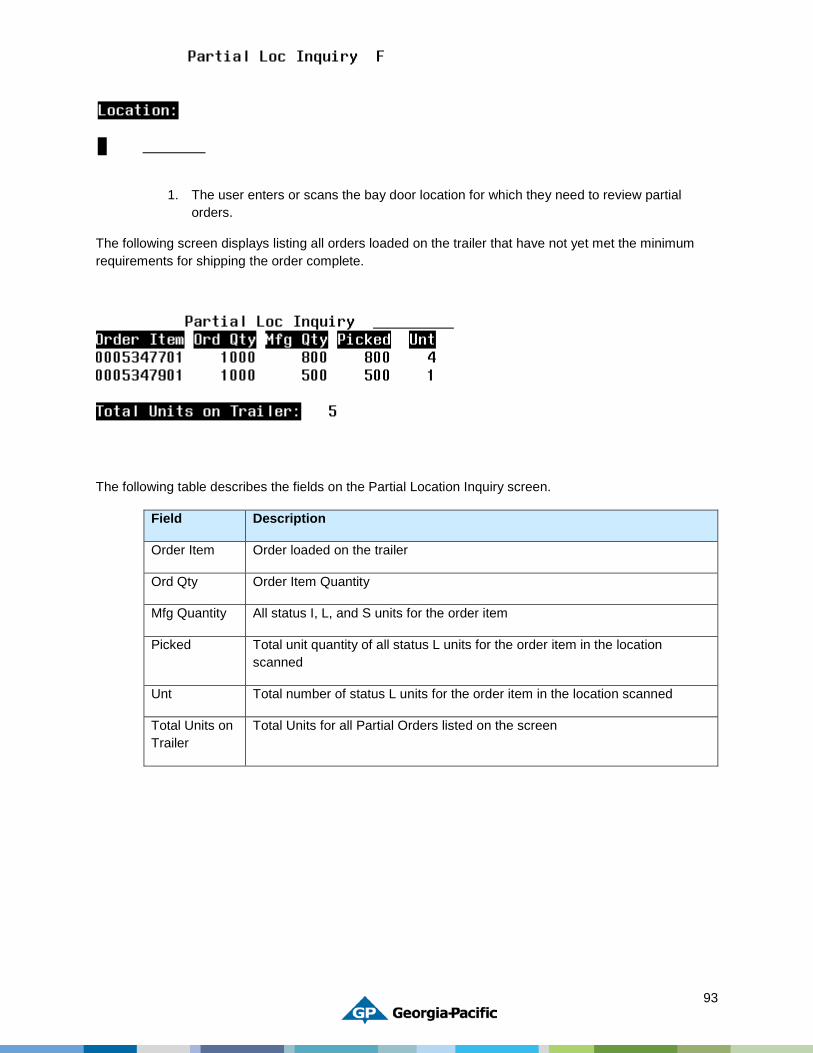
93
1. The user enters or scans the bay door location for which they need to review partial orders.
The following screen displays listing all orders loaded on the trailer that have not yet met the minimum requirements for shipping the order complete.
The following table describes the fields on the Partial Location Inquiry screen.
Field Description
Order Item Order loaded on the trailer
Ord Qty Order Item Quantity
Mfg Quantity All status I, L, and S units for the order item
Picked Total unit quantity of all status L units for the order item in the location scanned
Unt Total number of status L units for the order item in the location scanned
Total Units on Trailer
Total Units for all Partial Orders listed on the screen
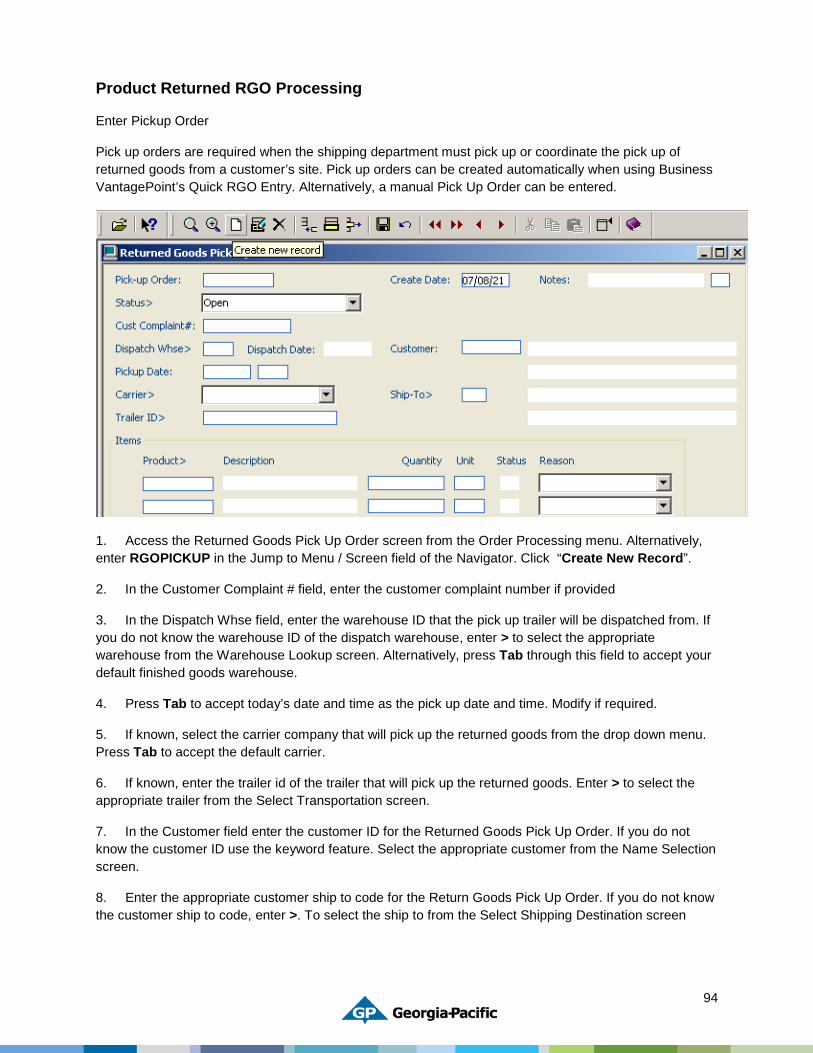
94
Product Returned RGO Processing
Enter Pickup Order
Pick up orders are required when the shipping department must pick up or coordinate the pick up of returned goods from a customer’s site. Pick up orders can be created automatically when using Business VantagePoint’s Quick RGO Entry. Alternatively, a manual Pick Up Order can be entered.
1. Access the Returned Goods Pick Up Order screen from the Order Processing menu. Alternatively, enter RGOPICKUP in the Jump to Menu / Screen field of the Navigator. Click “Create New Record”.
2. In the Customer Complaint # field, enter the customer complaint number if provided
3. In the Dispatch Whse field, enter the warehouse ID that the pick up trailer will be dispatched from. If you do not know the warehouse ID of the dispatch warehouse, enter > to select the appropriate warehouse from the Warehouse Lookup screen. Alternatively, press Tab through this field to accept your default finished goods warehouse.
4. Press Tab to accept today’s date and time as the pick up date and time. Modify if required.
5. If known, select the carrier company that will pick up the returned goods from the drop down menu. Press Tab to accept the default carrier.
6. If known, enter the trailer id of the trailer that will pick up the returned goods. Enter > to select the appropriate trailer from the Select Transportation screen.
7. In the Customer field enter the customer ID for the Returned Goods Pick Up Order. If you do not know the customer ID use the keyword feature. Select the appropriate customer from the Name Selection screen.
8. Enter the appropriate customer ship to code for the Return Goods Pick Up Order. If you do not know the customer ship to code, enter >. To select the ship to from the Select Shipping Destination screen
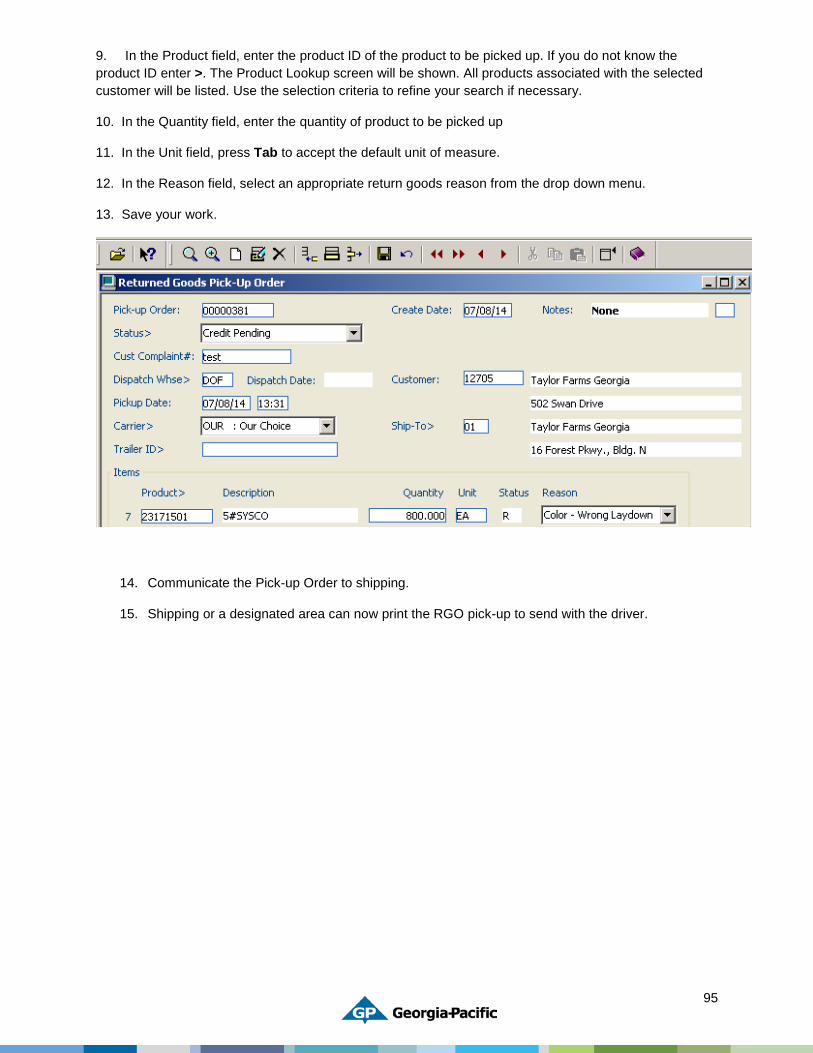
95
9. In the Product field, enter the product ID of the product to be picked up. If you do not know the product ID enter >. The Product Lookup screen will be shown. All products associated with the selected customer will be listed. Use the selection criteria to refine your search if necessary.
10. In the Quantity field, enter the quantity of product to be picked up
11. In the Unit field, press Tab to accept the default unit of measure.
12. In the Reason field, select an appropriate return goods reason from the drop down menu.
13. Save your work.
14. Communicate the Pick-up Order to shipping.
15. Shipping or a designated area can now print the RGO pick-up to send with the driver.
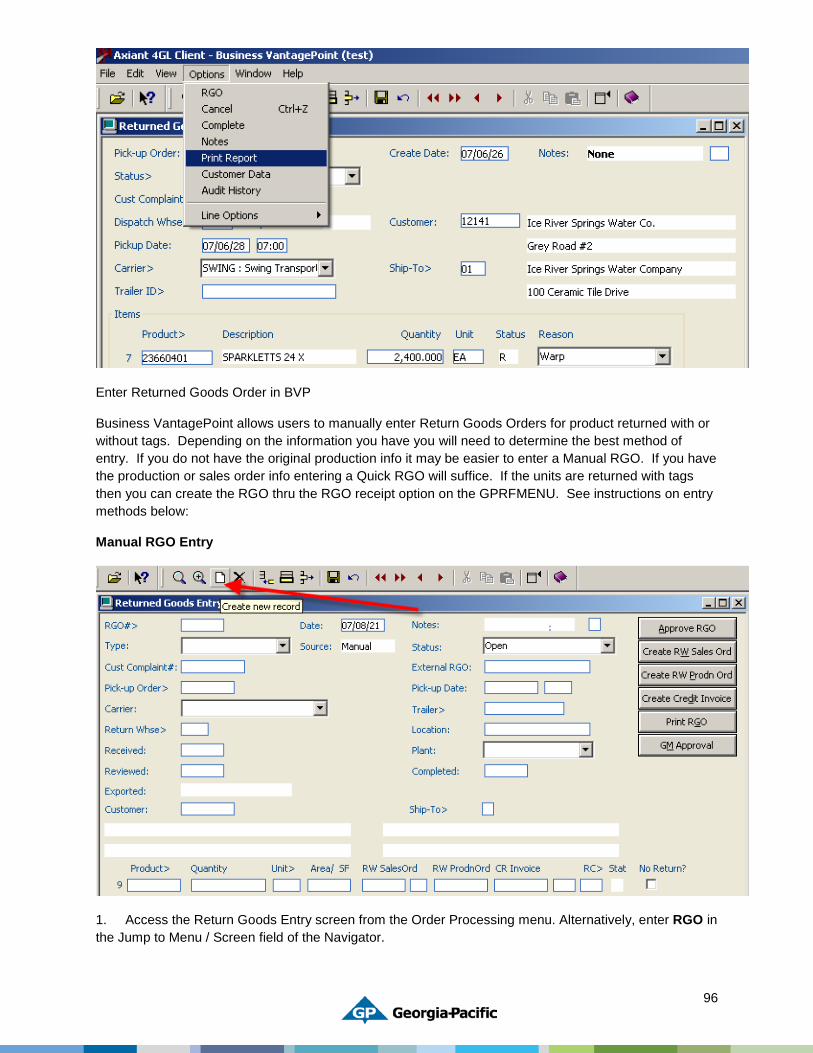
96
Enter Returned Goods Order in BVP
Business VantagePoint allows users to manually enter Return Goods Orders for product returned with or without tags. Depending on the information you have you will need to determine the best method of entry. If you do not have the original production info it may be easier to enter a Manual RGO. If you have the production or sales order info entering a Quick RGO will suffice. If the units are returned with tags then you can create the RGO thru the RGO receipt option on the GPRFMENU. See instructions on entry methods below:
Manual RGO Entry
1. Access the Return Goods Entry screen from the Order Processing menu. Alternatively, enter RGO in the Jump to Menu / Screen field of the Navigator.
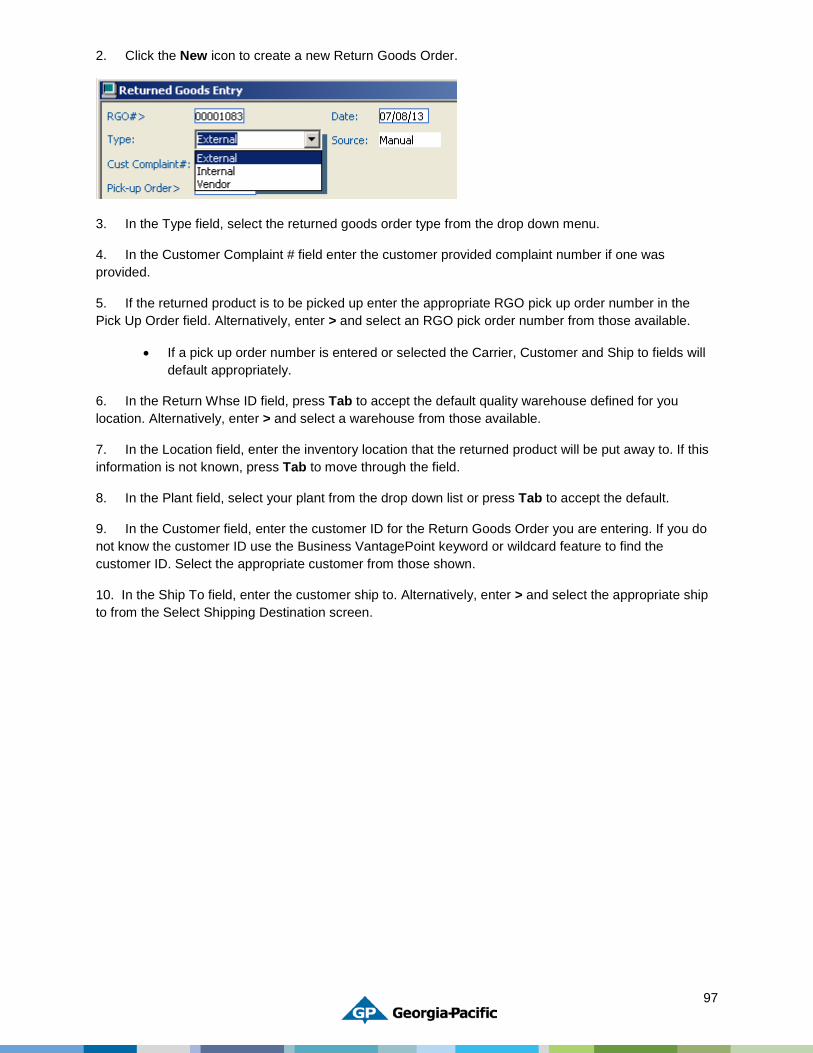
97
2. Click the New icon to create a new Return Goods Order.
3. In the Type field, select the returned goods order type from the drop down menu.
4. In the Customer Complaint # field enter the customer provided complaint number if one was provided.
5. If the returned product is to be picked up enter the appropriate RGO pick up order number in the Pick Up Order field. Alternatively, enter > and select an RGO pick order number from those available.
• If a pick up order number is entered or selected the Carrier, Customer and Ship to fields will default appropriately.
6. In the Return Whse ID field, press Tab to accept the default quality warehouse defined for you location. Alternatively, enter > and select a warehouse from those available.
7. In the Location field, enter the inventory location that the returned product will be put away to. If this information is not known, press Tab to move through the field.
8. In the Plant field, select your plant from the drop down list or press Tab to accept the default.
9. In the Customer field, enter the customer ID for the Return Goods Order you are entering. If you do not know the customer ID use the Business VantagePoint keyword or wildcard feature to find the customer ID. Select the appropriate customer from those shown.
10. In the Ship To field, enter the customer ship to. Alternatively, enter > and select the appropriate ship to from the Select Shipping Destination screen.
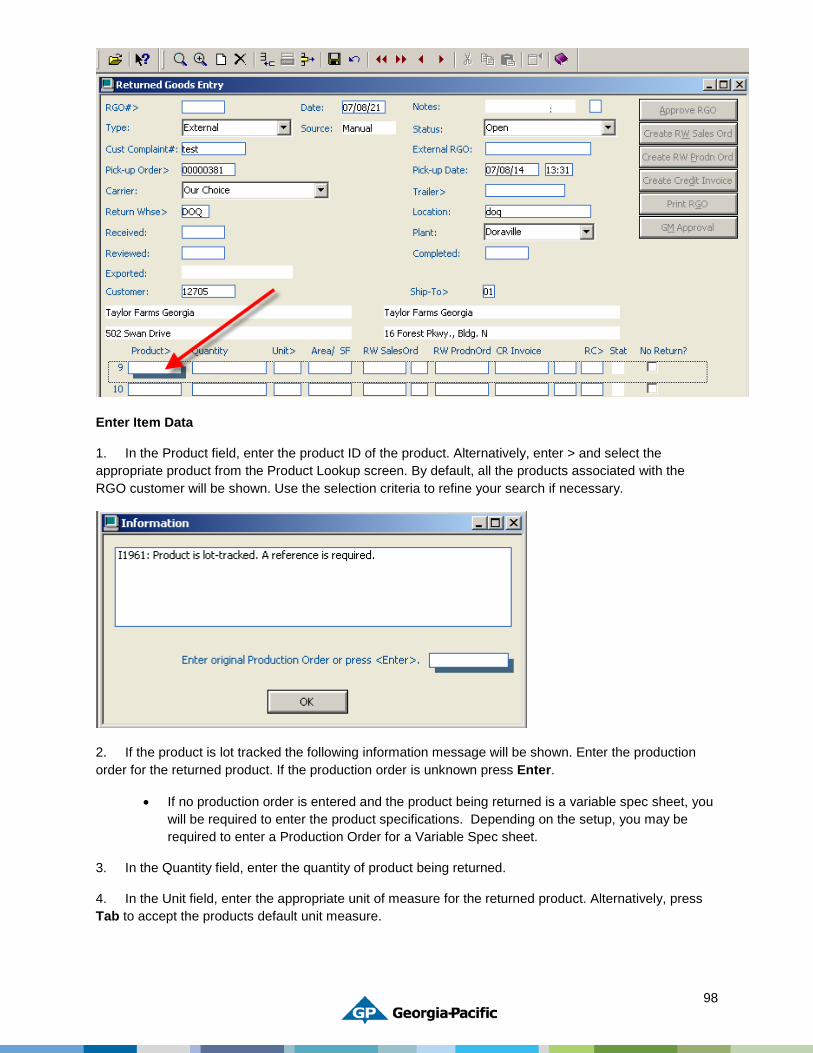
98
Enter Item Data
1. In the Product field, enter the product ID of the product. Alternatively, enter > and select the appropriate product from the Product Lookup screen. By default, all the products associated with the RGO customer will be shown. Use the selection criteria to refine your search if necessary.
2. If the product is lot tracked the following information message will be shown. Enter the production order for the returned product. If the production order is unknown press Enter.
• If no production order is entered and the product being returned is a variable spec sheet, you will be required to enter the product specifications. Depending on the setup, you may be required to enter a Production Order for a Variable Spec sheet.
3. In the Quantity field, enter the quantity of product being returned.
4. In the Unit field, enter the appropriate unit of measure for the returned product. Alternatively, press Tab to accept the products default unit measure.

99
5. In the RC field enter the reason code for the return or complaint, if known at this time. Alternatively, enter > and select a reason code from those available.
6. If the RGO being entered is for quality or credit purposes only and it is not expected that product will be returned, select the “No Return” check box. If the “No Return” check box is selected, a return to inventory type disposition will not be available when completing the RGO Item Details screen
7. Save your work.
Quick RGO
The user will research the units that are returned and placed in the GEQ (quarantine) area. These units, if tagged, should not be scanned because they will be associated to the RGO that is created.
The user will utilize the Quick RGO feature to create the RGO; this allows them to enter quantities for returns. You can still click on the Item data within the RGO to append any specific units.

100
1. Access the Sales Order Inquiry screen from the Order Processing menu. Alternatively, enter ORDINQ in the Jump to Menu / Screen field of the Navigator.
2 Click the Find icon to find the appropriate sales order you wish to create a Returned Goods Order for. Use the available selection criteria to refine your search.
3 From the Line Options menu of the appropriate sales order item select Return Goods Ord. A message will be shown. Click OK to acknowledge or enter No to cancel.
4. The RGO Quick Entry screen will appear:
5. The Return Warehouse and No Return Flag will default; change if necessary.
6. In the Quantity field enter the quantity of goods being returned or that are subject to complaint with no return. Accept the product’s default unit of measure or enter > to select an alternative unit of measure from the Select Product Units screen.
7. If the returned product is to be picked up check the Pickup? Check box. A pickup order will be created when your work is saved.
8. Enter an appropriate pick up date and time if the returned product is to be picked up.
9. In the Reason field, select a reason code from the drop down menu for the return or complaint if known at this time.
10. In the Cust Complaint# field enter the customer’s complaint tracking number if one is provided.
11. If known, enter the trailer ID of the trailer that will pick up the returned goods in the Trailer ID field.
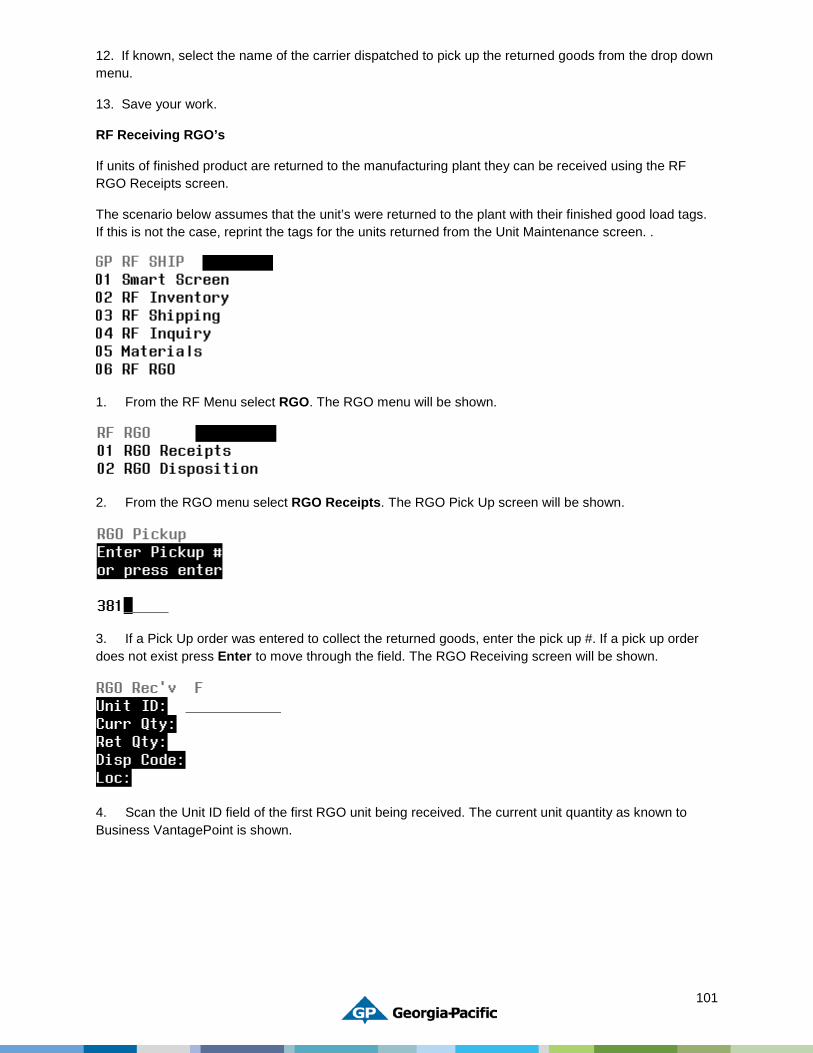
101
12. If known, select the name of the carrier dispatched to pick up the returned goods from the drop down menu.
13. Save your work.
RF Receiving RGO’s
If units of finished product are returned to the manufacturing plant they can be received using the RF RGO Receipts screen.
The scenario below assumes that the unit’s were returned to the plant with their finished good load tags. If this is not the case, reprint the tags for the units returned from the Unit Maintenance screen. .
1. From the RF Menu select RGO. The RGO menu will be shown.
2. From the RGO menu select RGO Receipts. The RGO Pick Up screen will be shown.
3. If a Pick Up order was entered to collect the returned goods, enter the pick up #. If a pick up order does not exist press Enter to move through the field. The RGO Receiving screen will be shown.
4. Scan the Unit ID field of the first RGO unit being received. The current unit quantity as known to Business VantagePoint is shown.
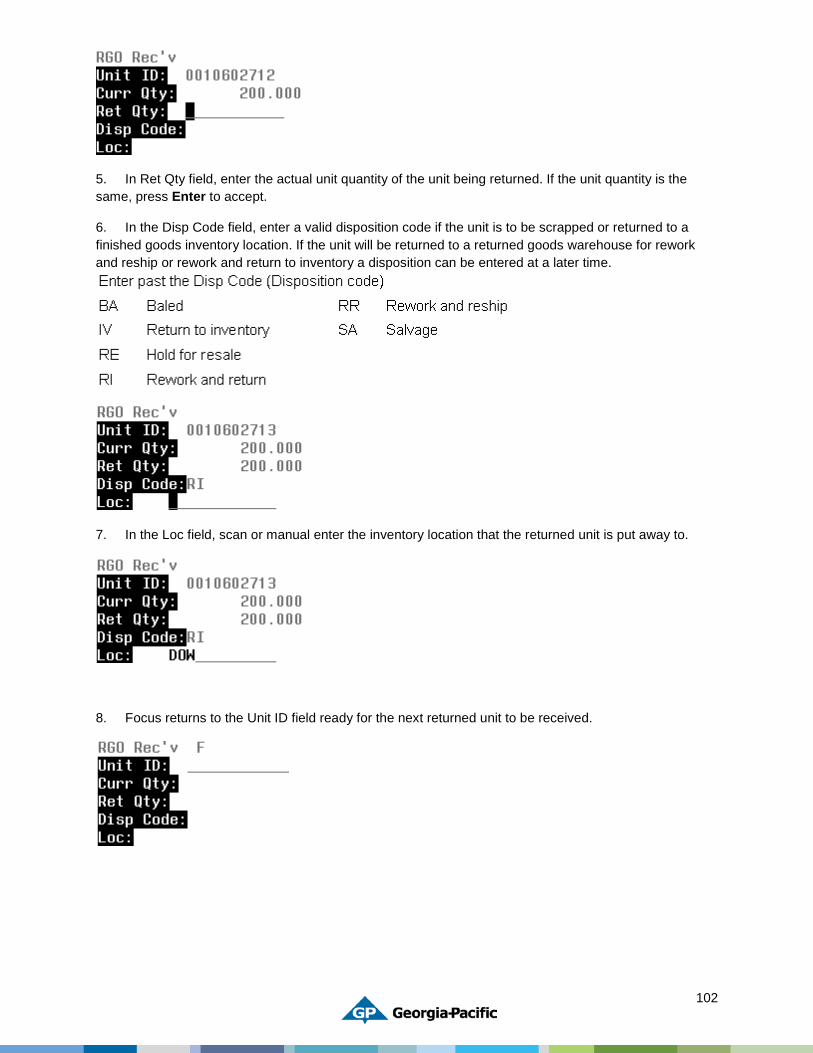
102
5. In Ret Qty field, enter the actual unit quantity of the unit being returned. If the unit quantity is the same, press Enter to accept.
6. In the Disp Code field, enter a valid disposition code if the unit is to be scrapped or returned to a finished goods inventory location. If the unit will be returned to a returned goods warehouse for rework and reship or rework and return to inventory a disposition can be entered at a later time.
7. In the Loc field, scan or manual enter the inventory location that the returned unit is put away to.
8. Focus returns to the Unit ID field ready for the next returned unit to be received.
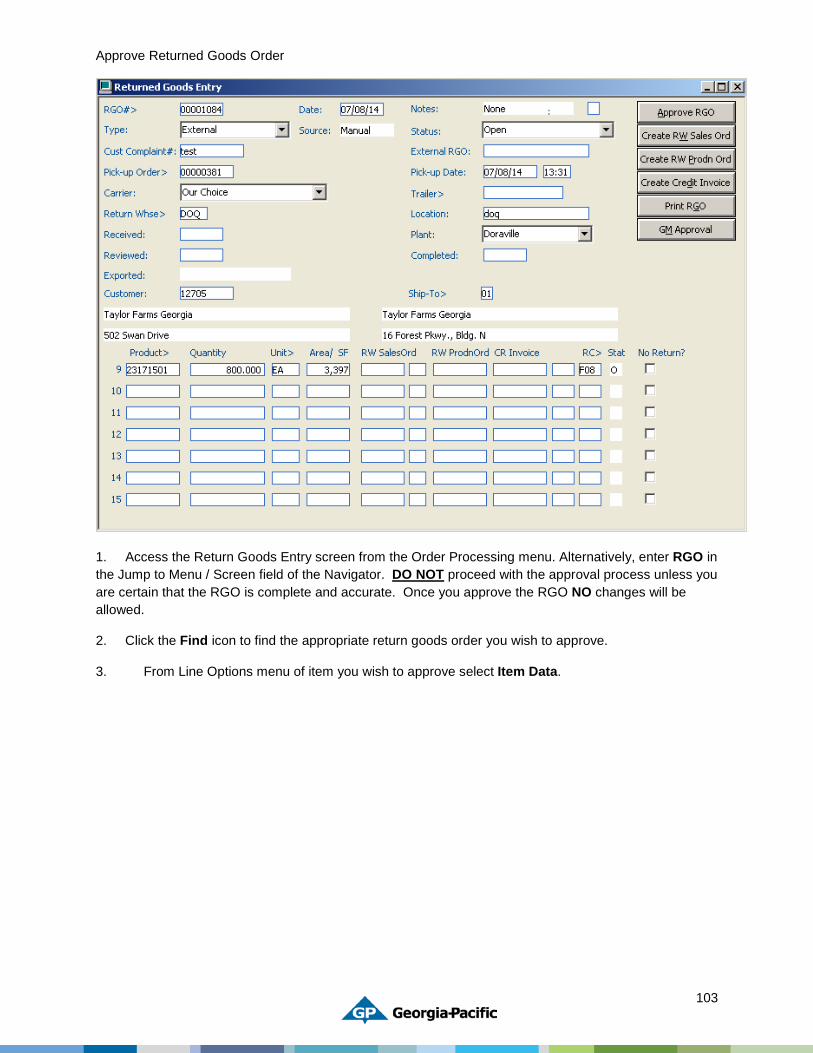
103
Approve Returned Goods Order
1. Access the Return Goods Entry screen from the Order Processing menu. Alternatively, enter RGO in the Jump to Menu / Screen field of the Navigator. DO NOT proceed with the approval process unless you are certain that the RGO is complete and accurate. Once you approve the RGO NO changes will be allowed.
2. Click the Find icon to find the appropriate return goods order you wish to approve.
3. From Line Options menu of item you wish to approve select Item Data.
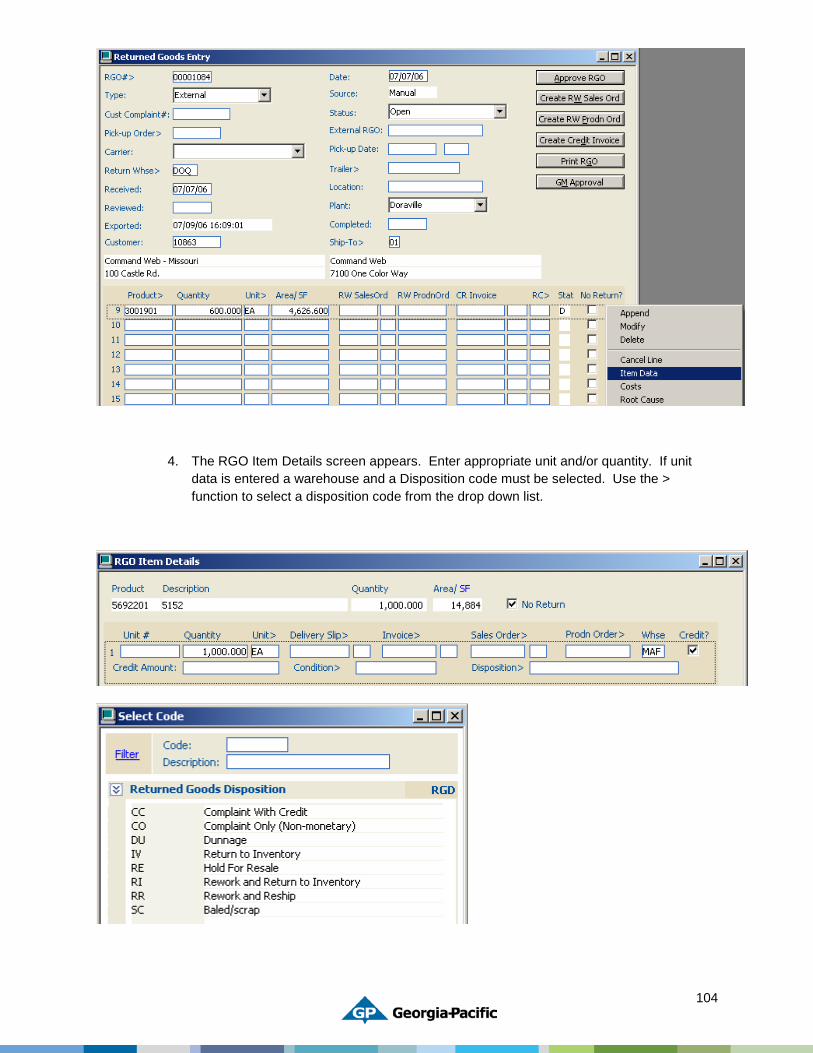
104
4. The RGO Item Details screen appears. Enter appropriate unit and/or quantity. If unit data is entered a warehouse and a Disposition code must be selected. Use the > function to select a disposition code from the drop down list.
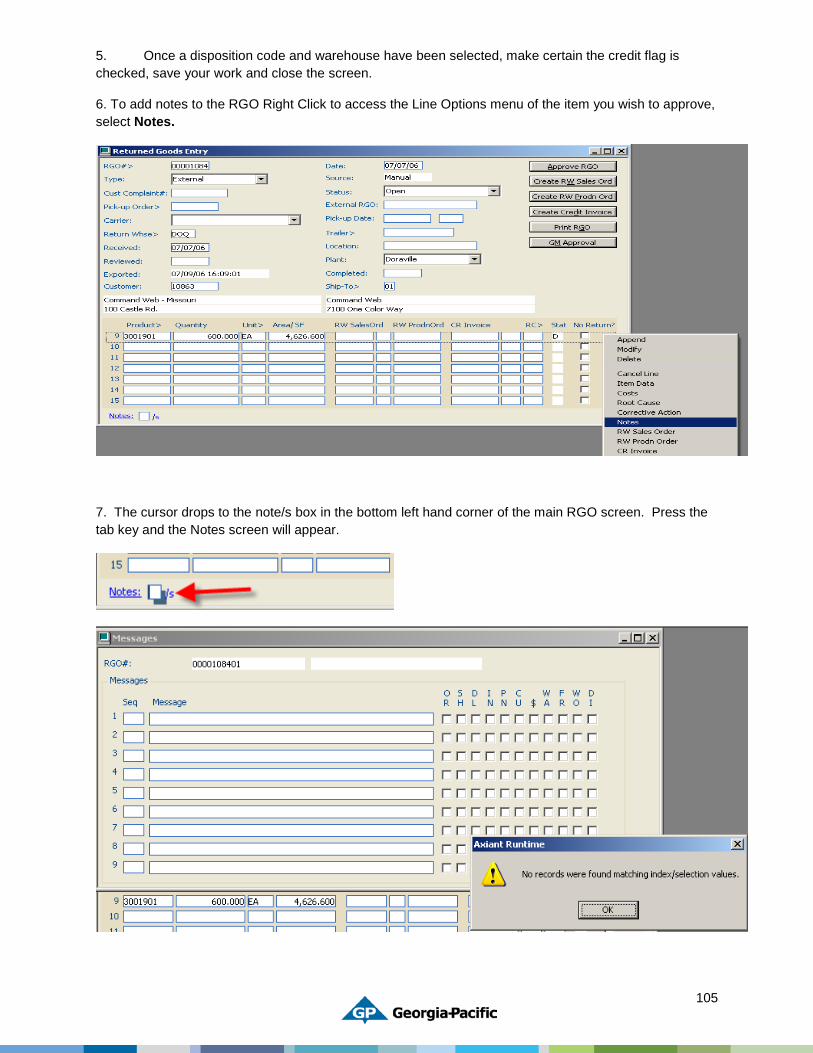
105
5. Once a disposition code and warehouse have been selected, make certain the credit flag is checked, save your work and close the screen.
6. To add notes to the RGO Right Click to access the Line Options menu of the item you wish to approve, select Notes.
7. The cursor drops to the note/s box in the bottom left hand corner of the main RGO screen. Press the tab key and the Notes screen will appear.

106
8. Press ‘OK’ then click on the first line, hit tab to select the auto-sequence number, enter the required notes for the RGO, and tab thru the remaining check boxes. Enter additional lines as needed. Save your work before closing. This info will transmit to CTS.
9. From Line Options menu of the item you wish to approve select Costs.
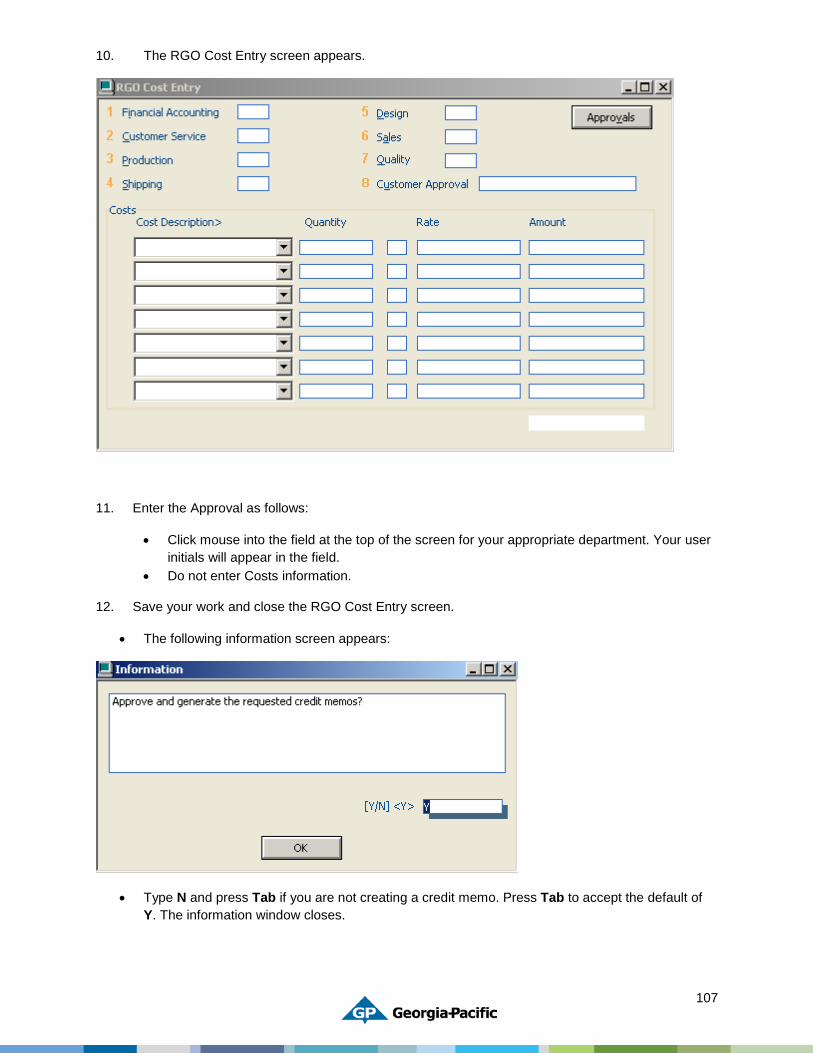
107
10. The RGO Cost Entry screen appears.
11. Enter the Approval as follows:
• Click mouse into the field at the top of the screen for your appropriate department. Your user initials will appear in the field.
• Do not enter Costs information.
12. Save your work and close the RGO Cost Entry screen.
• The following information screen appears:
• Type N and press Tab if you are not creating a credit memo. Press Tab to accept the default of Y. The information window closes.
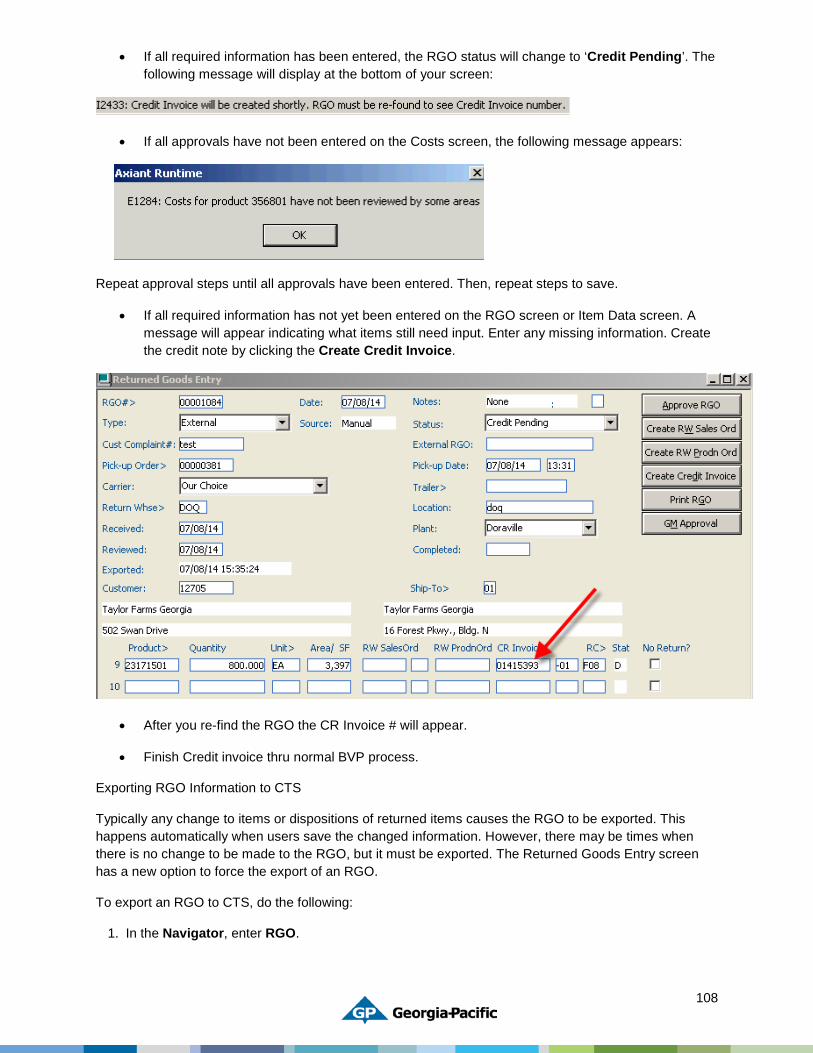
108
• If all required information has been entered, the RGO status will change to ‘Credit Pending’. The following message will display at the bottom of your screen:
• If all approvals have not been entered on the Costs screen, the following message appears:
Repeat approval steps until all approvals have been entered. Then, repeat steps to save.
• If all required information has not yet been entered on the RGO screen or Item Data screen. A message will appear indicating what items still need input. Enter any missing information. Create the credit note by clicking the Create Credit Invoice.
• After you re-find the RGO the CR Invoice # will appear.
• Finish Credit invoice thru normal BVP process.
Exporting RGO Information to CTS
Typically any change to items or dispositions of returned items causes the RGO to be exported. This happens automatically when users save the changed information. However, there may be times when there is no change to be made to the RGO, but it must be exported. The Returned Goods Entry screen has a new option to force the export of an RGO.
To export an RGO to CTS, do the following:
1. In the Navigator, enter RGO.
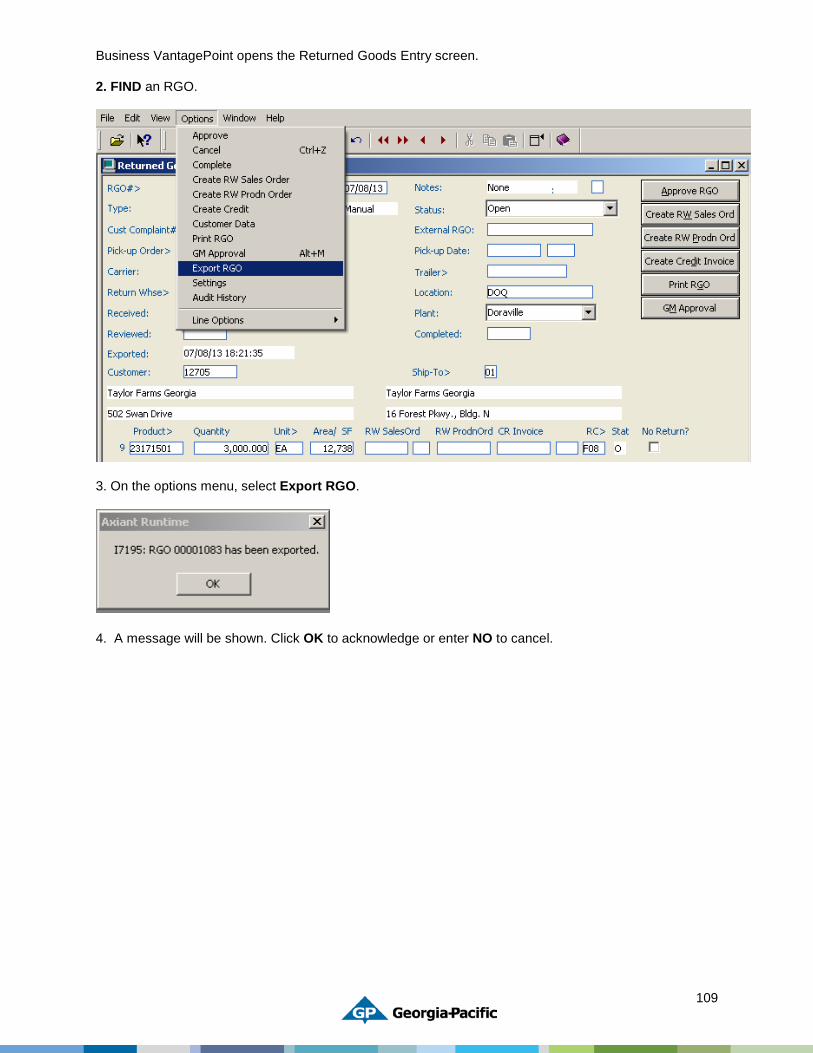
109
Business VantagePoint opens the Returned Goods Entry screen.
2. FIND an RGO.
3. On the options menu, select Export RGO.
4. A message will be shown. Click OK to acknowledge or enter NO to cancel.
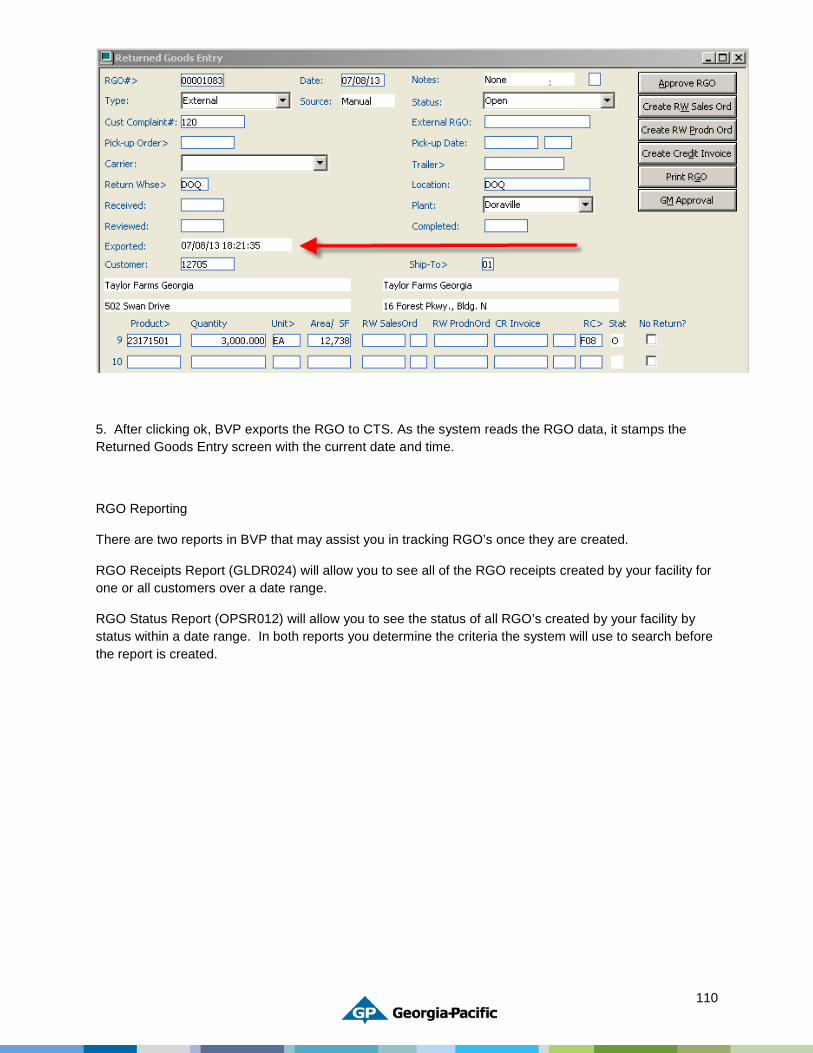
110
5. After clicking ok, BVP exports the RGO to CTS. As the system reads the RGO data, it stamps the Returned Goods Entry screen with the current date and time.
RGO Reporting
There are two reports in BVP that may assist you in tracking RGO’s once they are created.
RGO Receipts Report (GLDR024) will allow you to see all of the RGO receipts created by your facility for one or all customers over a date range.
RGO Status Report (OPSR012) will allow you to see the status of all RGO’s created by your facility by status within a date range. In both reports you determine the criteria the system will use to search before the report is created.
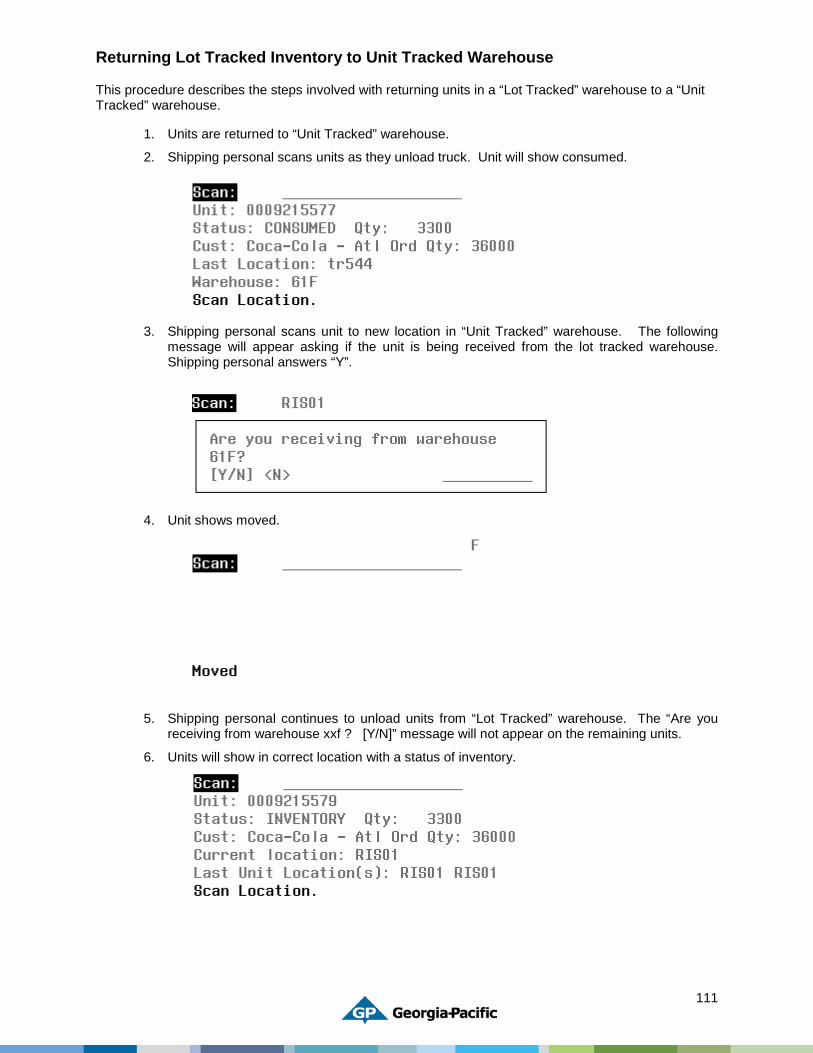
111
Returning Lot Tracked Inventory to Unit Tracked Warehouse
This procedure describes the steps involved with returning units in a “Lot Tracked” warehouse to a “Unit Tracked” warehouse.
1. Units are returned to “Unit Tracked” warehouse.
2. Shipping personal scans units as they unload truck. Unit will show consumed.
3. Shipping personal scans unit to new location in “Unit Tracked” warehouse. The following message will appear asking if the unit is being received from the lot tracked warehouse. Shipping personal answers “Y”.
4. Unit shows moved.
5. Shipping personal continues to unload units from “Lot Tracked” warehouse. The “Are you receiving from warehouse xxf ? [Y/N]” message will not appear on the remaining units.
6. Units will show in correct location with a status of inventory.
112
Reworked Finished Goods
Rework for nonconforming product is to be performed in the designated rework area. The production shift supervisor should check IQS to note when the last check was made to determine how many items will need to be sent to rework.
Any rework items that are tagged and received at the end of production line need to be scanned into the assigned rework area (i.e.-SPW).
Production will need to notify the shipping supervisor or shift leader for that shift of any items that need to be moved and scanned into rework. Once the items are scanned into rework the production team will need to make any necessary adjustments and follow their standard rework process.
If new load tags are printed with adjusted quantities the Production shift supervisor should remove the existing tags and provide them to the controller with an explanation of why the tags need to be deleted or made obsolete.
The units should then be tagged with the new load tags based on the proper load tag placement. Once the units are retagged the shipping department should be notified so they can scan the units into inventory or onto a trailer for shipping.
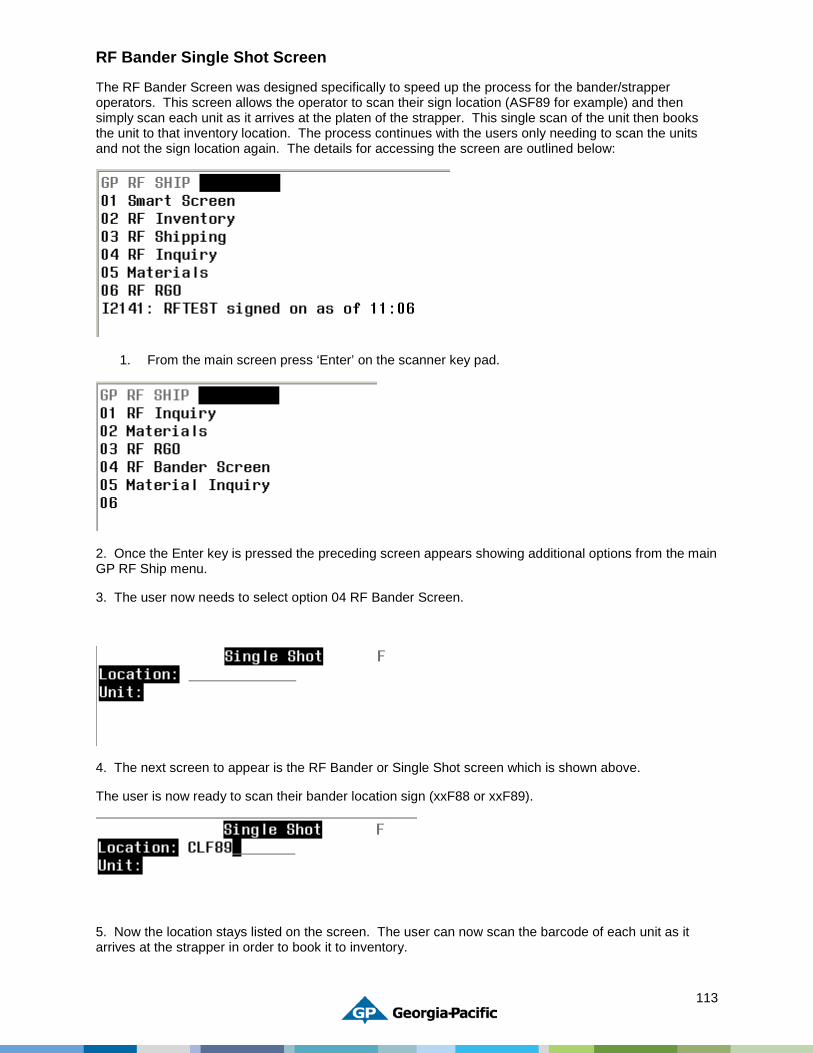
113
RF Bander Single Shot Screen
The RF Bander Screen was designed specifically to speed up the process for the bander/strapper operators. This screen allows the operator to scan their sign location (ASF89 for example) and then simply scan each unit as it arrives at the platen of the strapper. This single scan of the unit then books the unit to that inventory location. The process continues with the users only needing to scan the units and not the sign location again. The details for accessing the screen are outlined below:
1. From the main screen press ‘Enter’ on the scanner key pad.
2. Once the Enter key is pressed the preceding screen appears showing additional options from the main GP RF Ship menu.
3. The user now needs to select option 04 RF Bander Screen.
4. The next screen to appear is the RF Bander or Single Shot screen which is shown above.
The user is now ready to scan their bander location sign (xxF88 or xxF89).
5. Now the location stays listed on the screen. The user can now scan the barcode of each unit as it arrives at the strapper in order to book it to inventory.
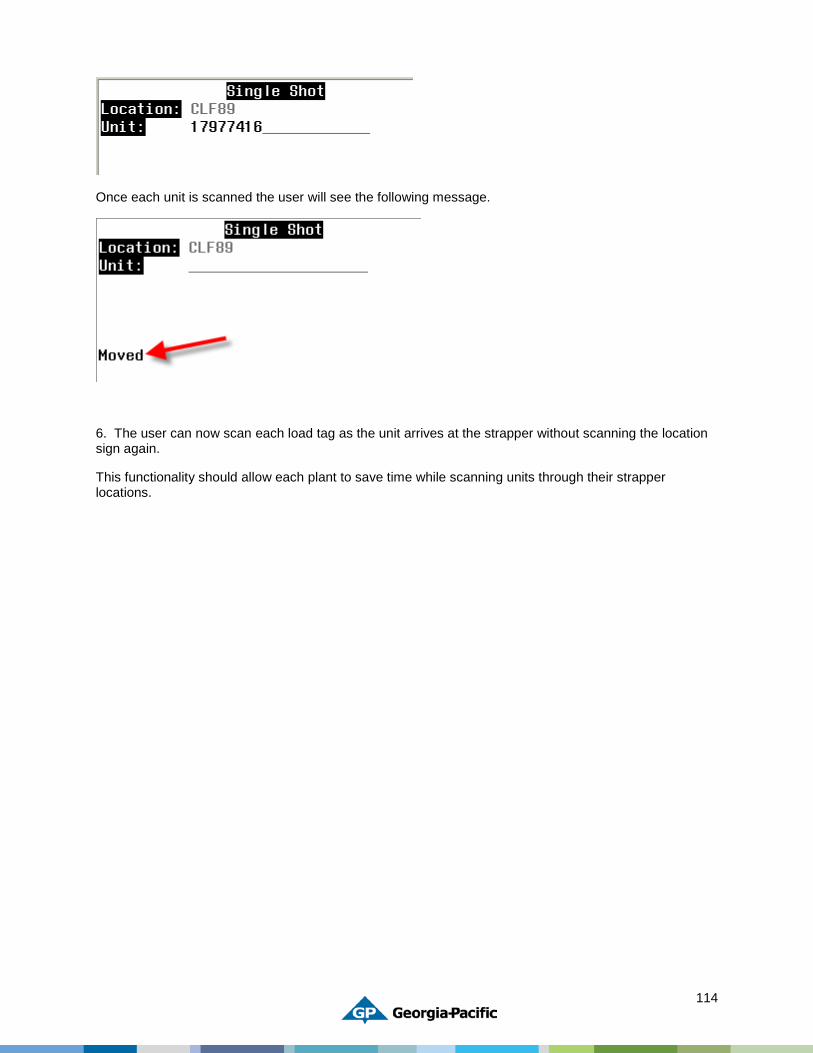
114
Once each unit is scanned the user will see the following message.
6. The user can now scan each load tag as the unit arrives at the strapper without scanning the location sign again.
This functionality should allow each plant to save time while scanning units through their strapper locations.
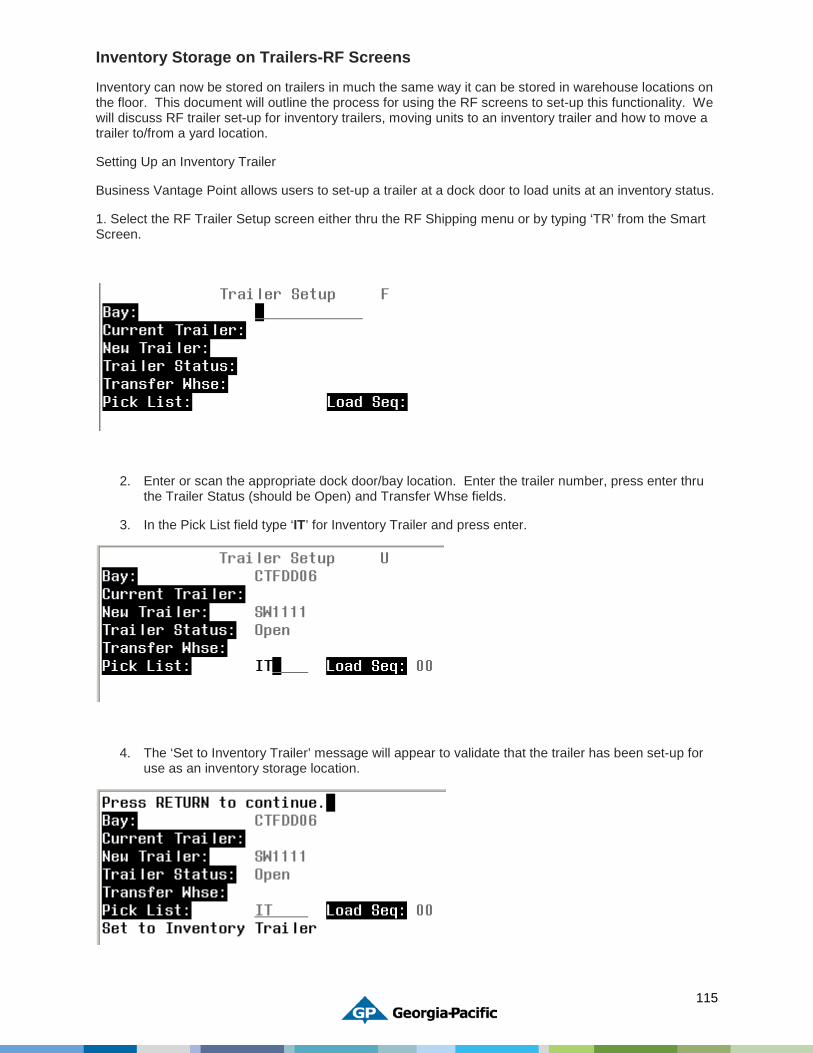
115
Inventory Storage on Trailers-RF Screens
Inventory can now be stored on trailers in much the same way it can be stored in warehouse locations on the floor. This document will outline the process for using the RF screens to set-up this functionality. We will discuss RF trailer set-up for inventory trailers, moving units to an inventory trailer and how to move a trailer to/from a yard location.
Setting Up an Inventory Trailer
Business Vantage Point allows users to set-up a trailer at a dock door to load units at an inventory status.
1. Select the RF Trailer Setup screen either thru the RF Shipping menu or by typing ‘TR’ from the Smart Screen.
2. Enter or scan the appropriate dock door/bay location. Enter the trailer number, press enter thru the Trailer Status (should be Open) and Transfer Whse fields.
3. In the Pick List field type ‘IT’ for Inventory Trailer and press enter.
4. The ‘Set to Inventory Trailer’ message will appear to validate that the trailer has been set-up for use as an inventory storage location.
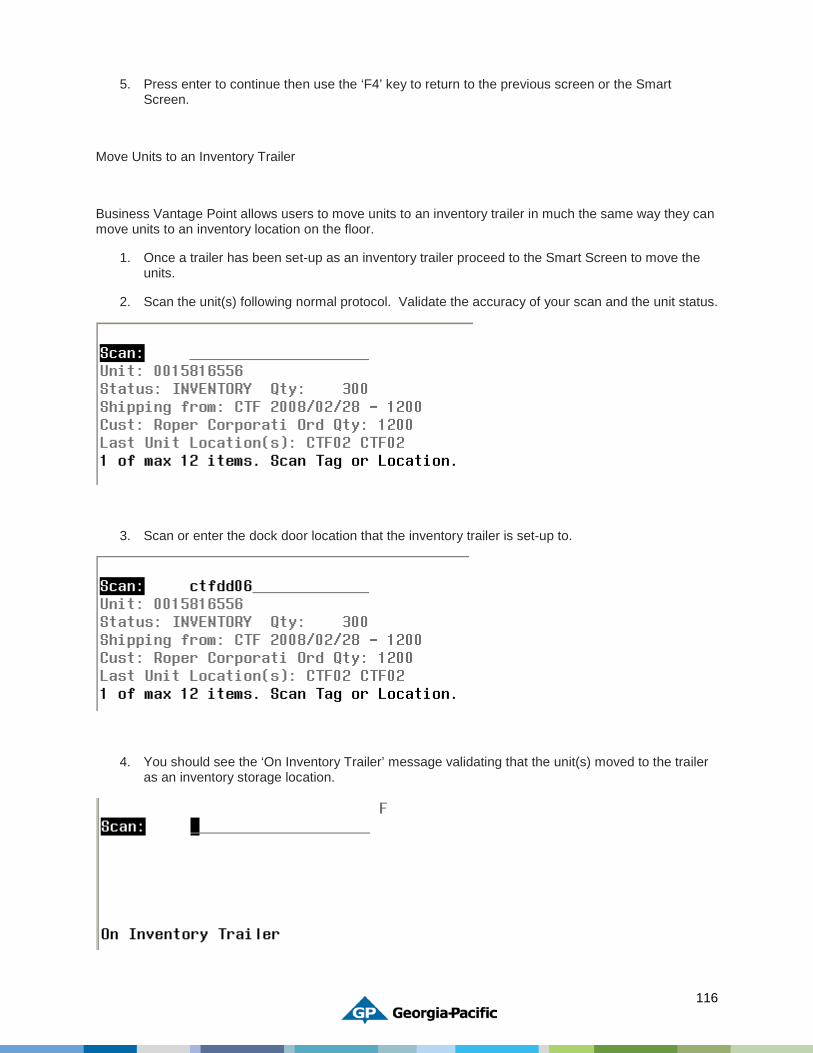
116
5. Press enter to continue then use the ‘F4’ key to return to the previous screen or the Smart Screen.
Move Units to an Inventory Trailer
Business Vantage Point allows users to move units to an inventory trailer in much the same way they can move units to an inventory location on the floor.
1. Once a trailer has been set-up as an inventory trailer proceed to the Smart Screen to move the units.
2. Scan the unit(s) following normal protocol. Validate the accuracy of your scan and the unit status.
3. Scan or enter the dock door location that the inventory trailer is set-up to.
4. You should see the ‘On Inventory Trailer’ message validating that the unit(s) moved to the trailer as an inventory storage location.
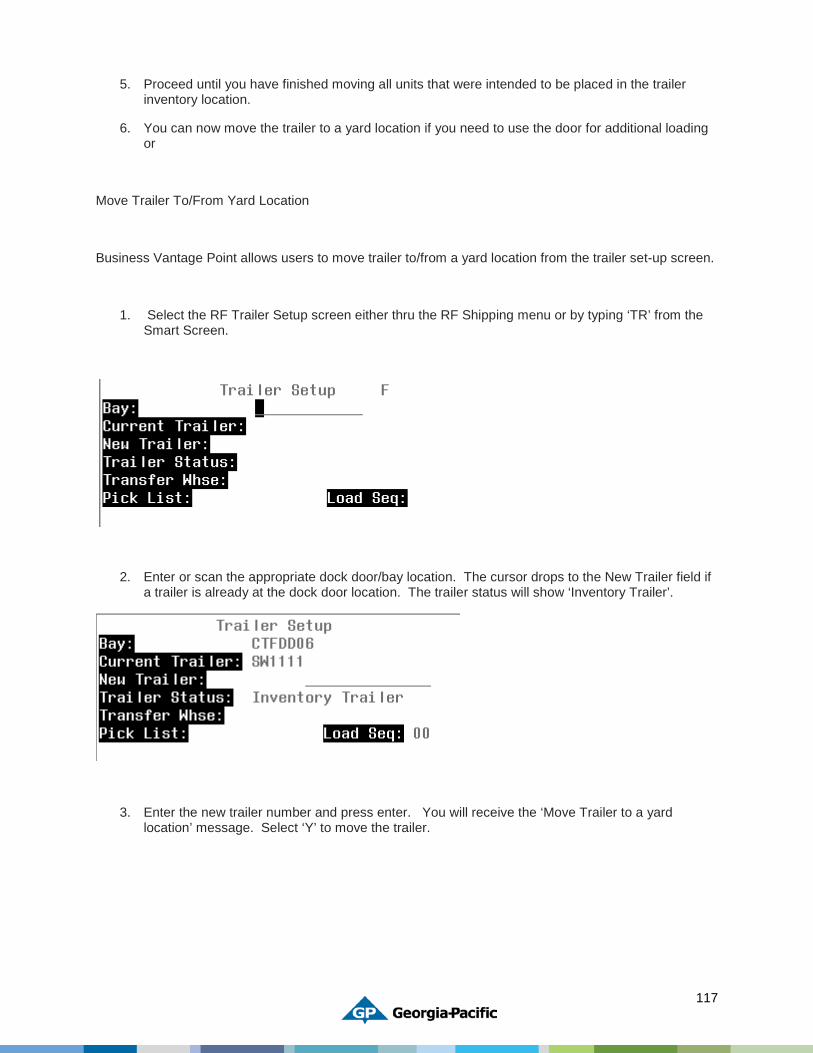
117
5. Proceed until you have finished moving all units that were intended to be placed in the trailer inventory location.
6. You can now move the trailer to a yard location if you need to use the door for additional loading or
Move Trailer To/From Yard Location
Business Vantage Point allows users to move trailer to/from a yard location from the trailer set-up screen.
1. Select the RF Trailer Setup screen either thru the RF Shipping menu or by typing ‘TR’ from the Smart Screen.
2. Enter or scan the appropriate dock door/bay location. The cursor drops to the New Trailer field if a trailer is already at the dock door location. The trailer status will show ‘Inventory Trailer’.
3. Enter the new trailer number and press enter. You will receive the ‘Move Trailer to a yard location’ message. Select ‘Y’ to move the trailer.
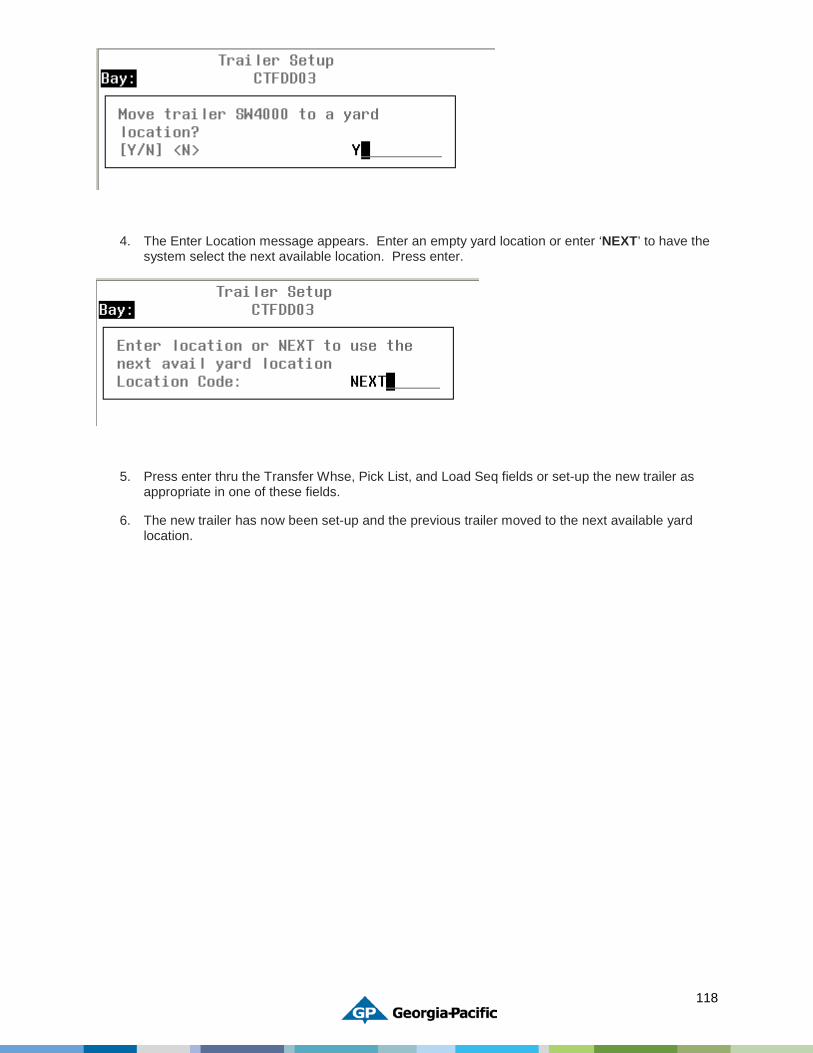
118
4. The Enter Location message appears. Enter an empty yard location or enter ‘NEXT’ to have the system select the next available location. Press enter.
5. Press enter thru the Transfer Whse, Pick List, and Load Seq fields or set-up the new trailer as appropriate in one of these fields.
6. The new trailer has now been set-up and the previous trailer moved to the next available yard location.
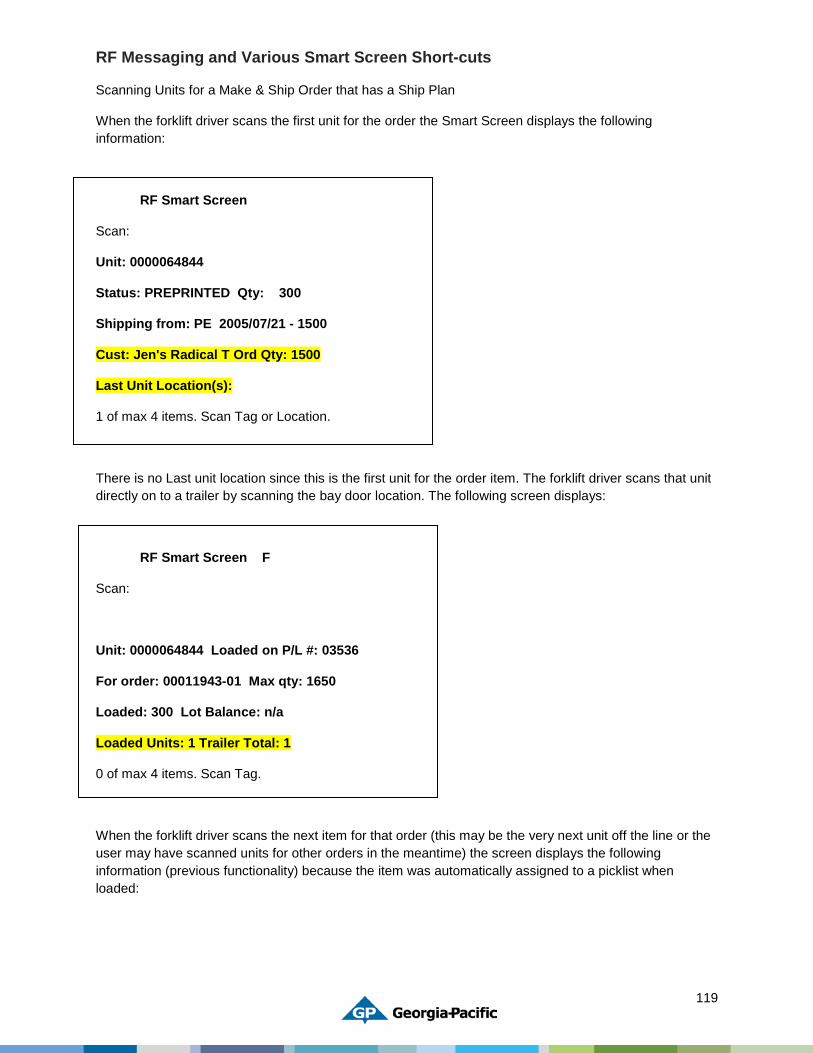
119
RF Messaging and Various Smart Screen Short-cuts
Scanning Units for a Make & Ship Order that has a Ship Plan
When the forklift driver scans the first unit for the order the Smart Screen displays the following information:
RF Smart Screen
Scan:
Unit: 0000064844
Status: PREPRINTED Qty: 300
Shipping from: PE 2005/07/21 - 1500
Cust: Jen's Radical T Ord Qty: 1500
Last Unit Location(s):
1 of max 4 items. Scan Tag or Location.
There is no Last unit location since this is the first unit for the order item. The forklift driver scans that unit directly on to a trailer by scanning the bay door location. The following screen displays:
RF Smart Screen F
Scan:
Unit: 0000064844 Loaded on P/L #: 03536
For order: 00011943-01 Max qty: 1650
Loaded: 300 Lot Balance: n/a
Loaded Units: 1 Trailer Total: 1
0 of max 4 items. Scan Tag.
When the forklift driver scans the next item for that order (this may be the very next unit off the line or the user may have scanned units for other orders in the meantime) the screen displays the following information (previous functionality) because the item was automatically assigned to a picklist when loaded:
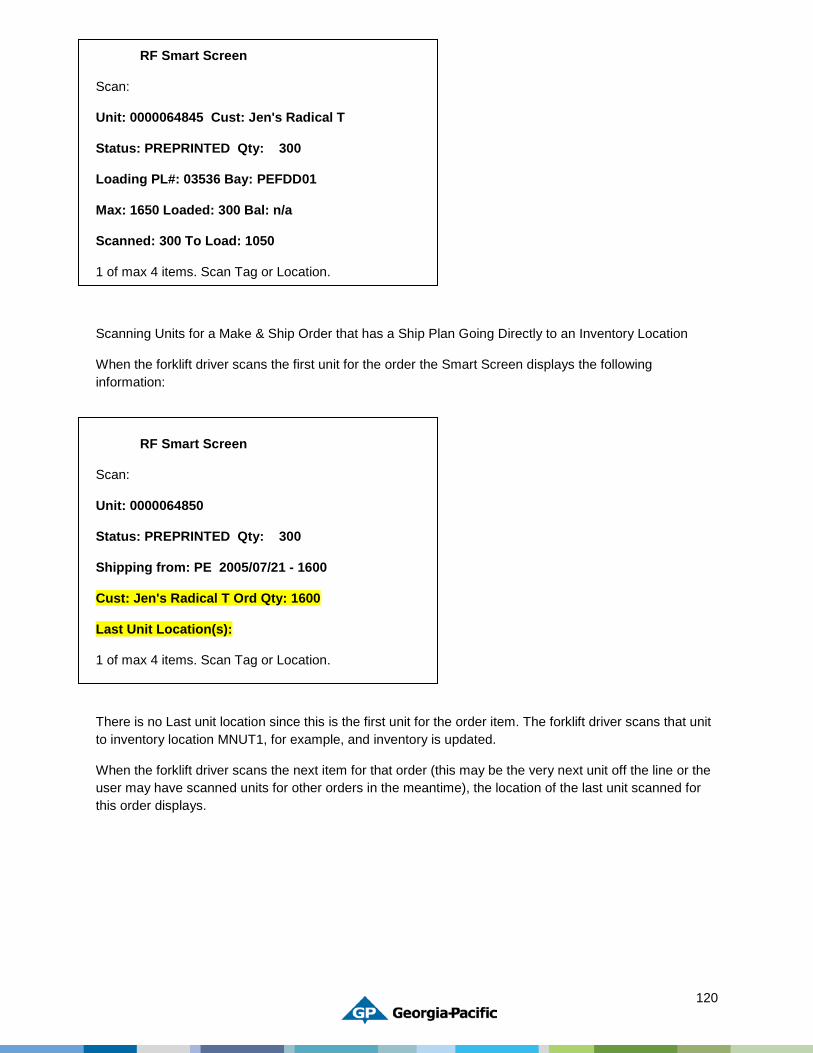
120
RF Smart Screen
Scan:
Unit: 0000064845 Cust: Jen's Radical T
Status: PREPRINTED Qty: 300
Loading PL#: 03536 Bay: PEFDD01
Max: 1650 Loaded: 300 Bal: n/a
Scanned: 300 To Load: 1050
1 of max 4 items. Scan Tag or Location.
Scanning Units for a Make & Ship Order that has a Ship Plan Going Directly to an Inventory Location
When the forklift driver scans the first unit for the order the Smart Screen displays the following information:
RF Smart Screen
Scan:
Unit: 0000064850
Status: PREPRINTED Qty: 300
Shipping from: PE 2005/07/21 - 1600
Cust: Jen's Radical T Ord Qty: 1600
Last Unit Location(s):
1 of max 4 items. Scan Tag or Location.
There is no Last unit location since this is the first unit for the order item. The forklift driver scans that unit to inventory location MNUT1, for example, and inventory is updated.
When the forklift driver scans the next item for that order (this may be the very next unit off the line or the user may have scanned units for other orders in the meantime), the location of the last unit scanned for this order displays.
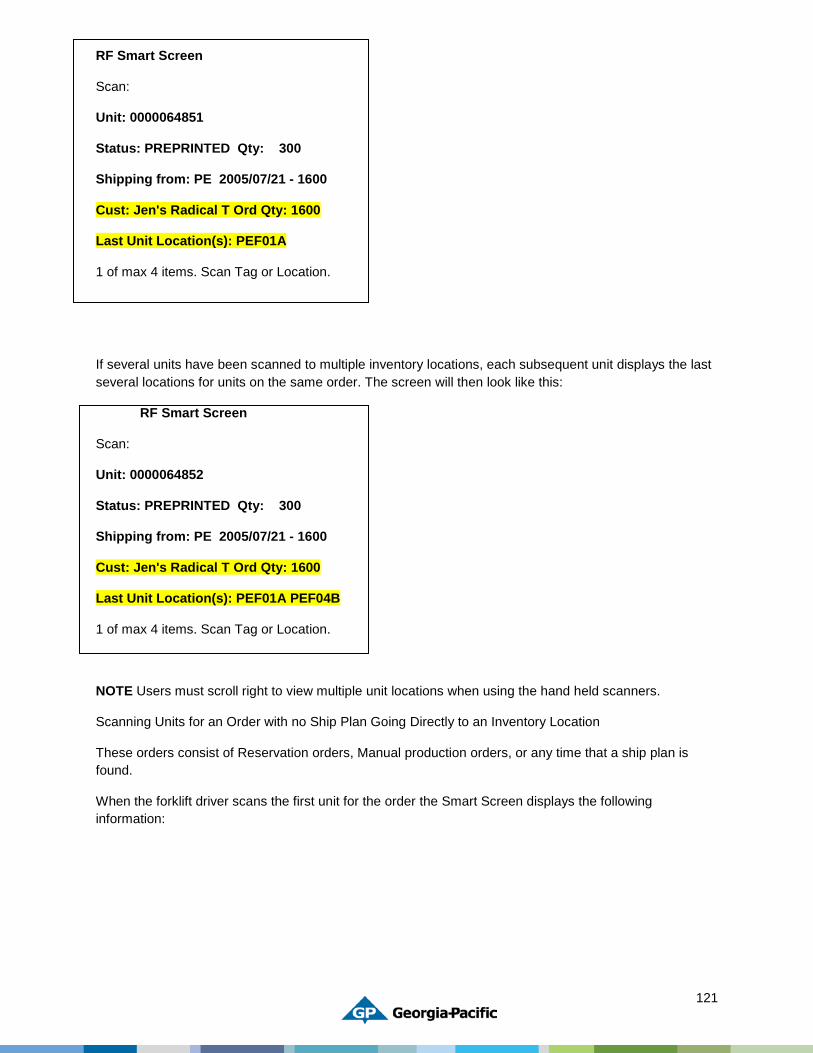
121
RF Smart Screen
Scan:
Unit: 0000064851
Status: PREPRINTED Qty: 300
Shipping from: PE 2005/07/21 - 1600
Cust: Jen's Radical T Ord Qty: 1600
Last Unit Location(s): PEF01A
1 of max 4 items. Scan Tag or Location.
If several units have been scanned to multiple inventory locations, each subsequent unit displays the last several locations for units on the same order. The screen will then look like this:
RF Smart Screen
Scan:
Unit: 0000064852
Status: PREPRINTED Qty: 300
Shipping from: PE 2005/07/21 - 1600
Cust: Jen's Radical T Ord Qty: 1600
Last Unit Location(s): PEF01A PEF04B
1 of max 4 items. Scan Tag or Location.
NOTE Users must scroll right to view multiple unit locations when using the hand held scanners.
Scanning Units for an Order with no Ship Plan Going Directly to an Inventory Location
These orders consist of Reservation orders, Manual production orders, or any time that a ship plan is found.
When the forklift driver scans the first unit for the order the Smart Screen displays the following information:
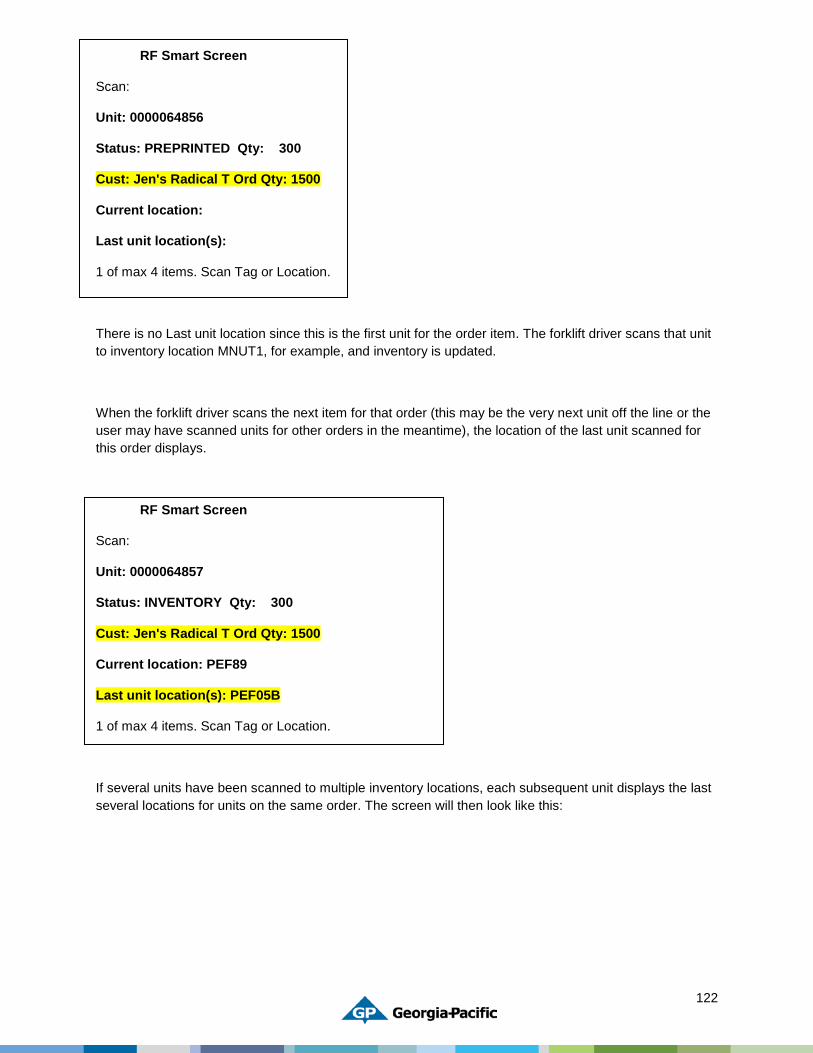
122
RF Smart Screen
Scan:
Unit: 0000064856
Status: PREPRINTED Qty: 300
Cust: Jen's Radical T Ord Qty: 1500
Current location:
Last unit location(s):
1 of max 4 items. Scan Tag or Location.
There is no Last unit location since this is the first unit for the order item. The forklift driver scans that unit to inventory location MNUT1, for example, and inventory is updated.
When the forklift driver scans the next item for that order (this may be the very next unit off the line or the user may have scanned units for other orders in the meantime), the location of the last unit scanned for this order displays.
RF Smart Screen
Scan:
Unit: 0000064857
Status: INVENTORY Qty: 300
Cust: Jen's Radical T Ord Qty: 1500
Current location: PEF89
Last unit location(s): PEF05B
1 of max 4 items. Scan Tag or Location.
If several units have been scanned to multiple inventory locations, each subsequent unit displays the last several locations for units on the same order. The screen will then look like this:
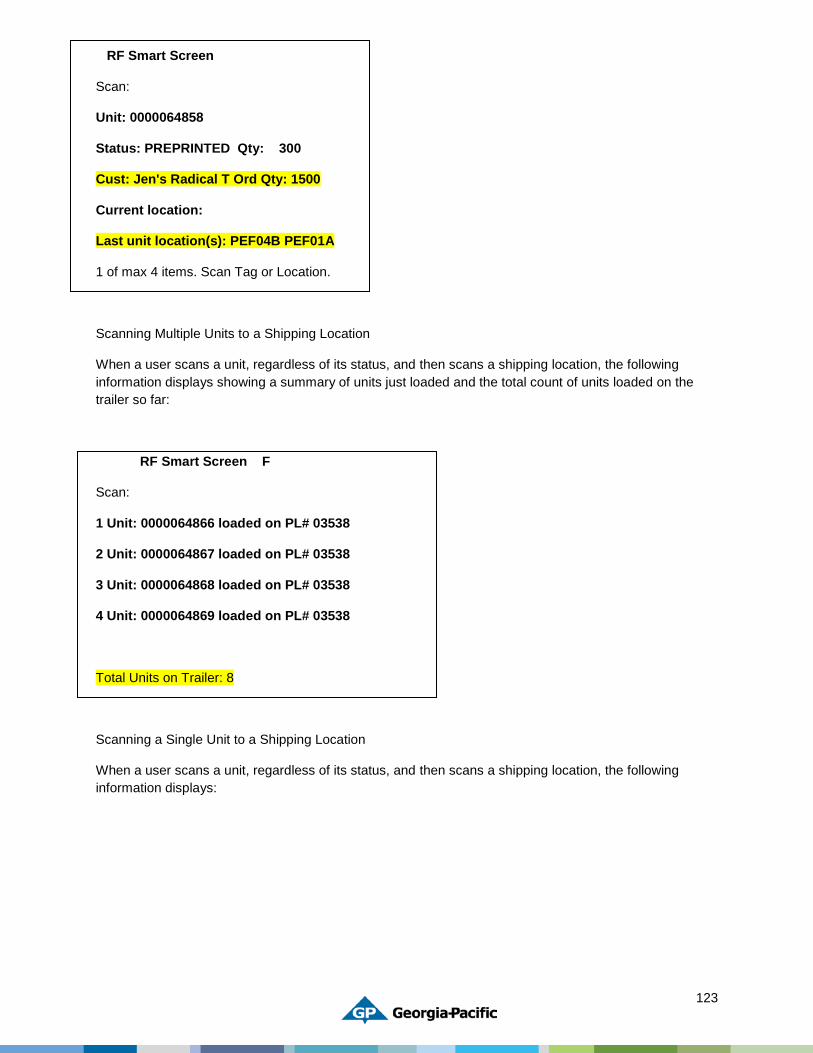
123
RF Smart Screen
Scan:
Unit: 0000064858
Status: PREPRINTED Qty: 300
Cust: Jen's Radical T Ord Qty: 1500
Current location:
Last unit location(s): PEF04B PEF01A
1 of max 4 items. Scan Tag or Location.
Scanning Multiple Units to a Shipping Location
When a user scans a unit, regardless of its status, and then scans a shipping location, the following information displays showing a summary of units just loaded and the total count of units loaded on the trailer so far:
RF Smart Screen F
Scan:
1 Unit: 0000064866 loaded on PL# 03538
2 Unit: 0000064867 loaded on PL# 03538
3 Unit: 0000064868 loaded on PL# 03538
4 Unit: 0000064869 loaded on PL# 03538
Total Units on Trailer: 8
Scanning a Single Unit to a Shipping Location
When a user scans a unit, regardless of its status, and then scans a shipping location, the following information displays:
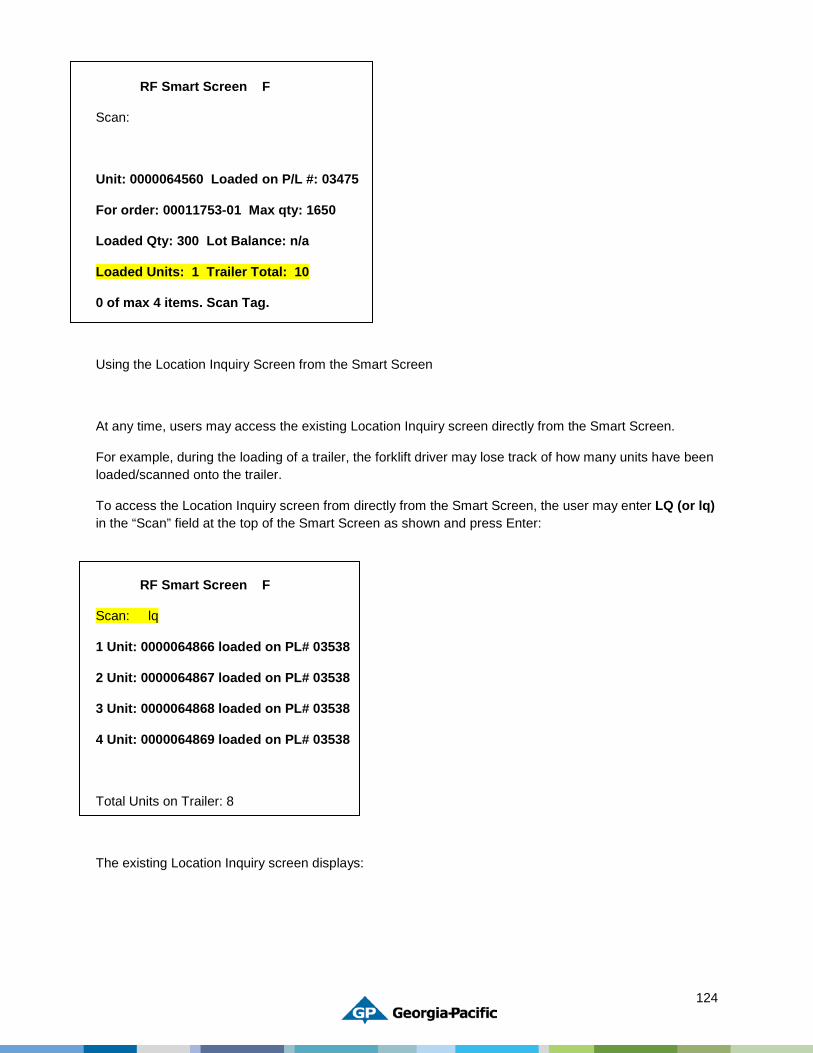
124
RF Smart Screen F
Scan:
Unit: 0000064560 Loaded on P/L #: 03475
For order: 00011753-01 Max qty: 1650
Loaded Qty: 300 Lot Balance: n/a
Loaded Units: 1 Trailer Total: 10
0 of max 4 items. Scan Tag.
Using the Location Inquiry Screen from the Smart Screen
At any time, users may access the existing Location Inquiry screen directly from the Smart Screen.
For example, during the loading of a trailer, the forklift driver may lose track of how many units have been loaded/scanned onto the trailer.
To access the Location Inquiry screen from directly from the Smart Screen, the user may enter LQ (or lq) in the “Scan” field at the top of the Smart Screen as shown and press Enter:
RF Smart Screen F
Scan: lq
1 Unit: 0000064866 loaded on PL# 03538
2 Unit: 0000064867 loaded on PL# 03538
3 Unit: 0000064868 loaded on PL# 03538
4 Unit: 0000064869 loaded on PL# 03538
Total Units on Trailer: 8
The existing Location Inquiry screen displays:
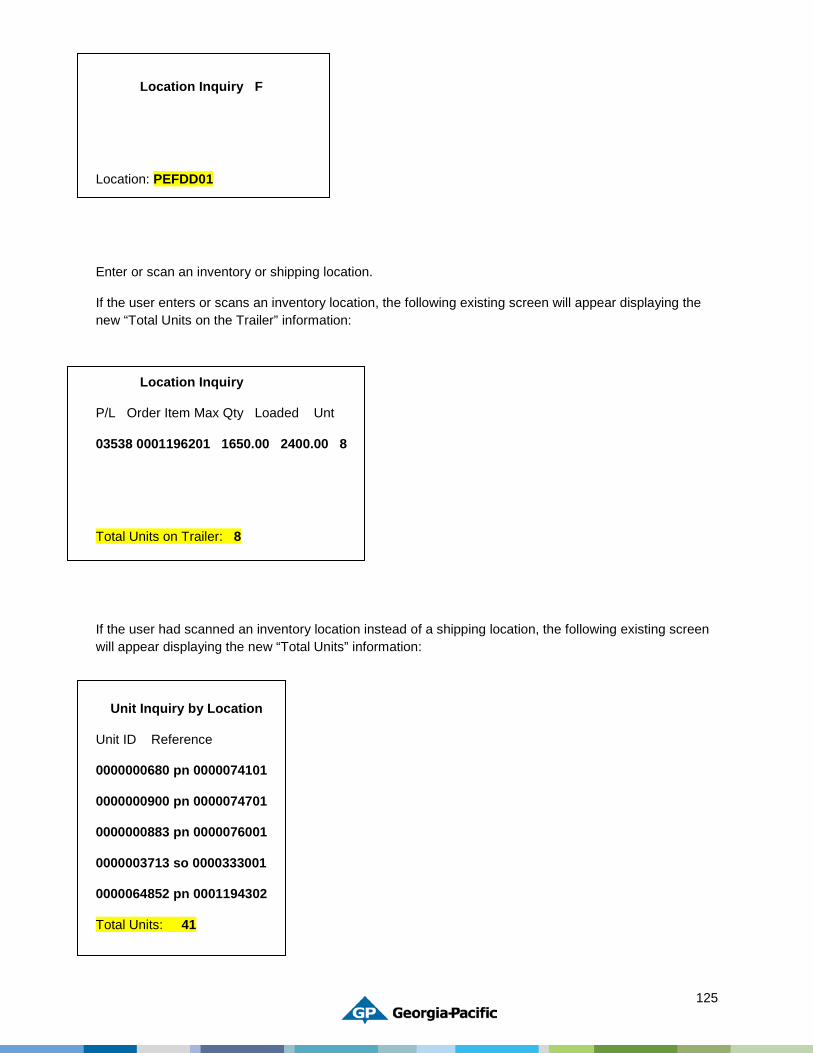
125
Location Inquiry F
Location: PEFDD01
Enter or scan an inventory or shipping location.
If the user enters or scans an inventory location, the following existing screen will appear displaying the new “Total Units on the Trailer” information:
Location Inquiry
P/L Order Item Max Qty Loaded Unt
03538 0001196201 1650.00 2400.00 8
Total Units on Trailer: 8
If the user had scanned an inventory location instead of a shipping location, the following existing screen will appear displaying the new “Total Units” information:
Unit Inquiry by Location
Unit ID Reference
0000000680 pn 0000074101
0000000900 pn 0000074701
0000000883 pn 0000076001
0000003713 so 0000333001
0000064852 pn 0001194302
Total Units: 41
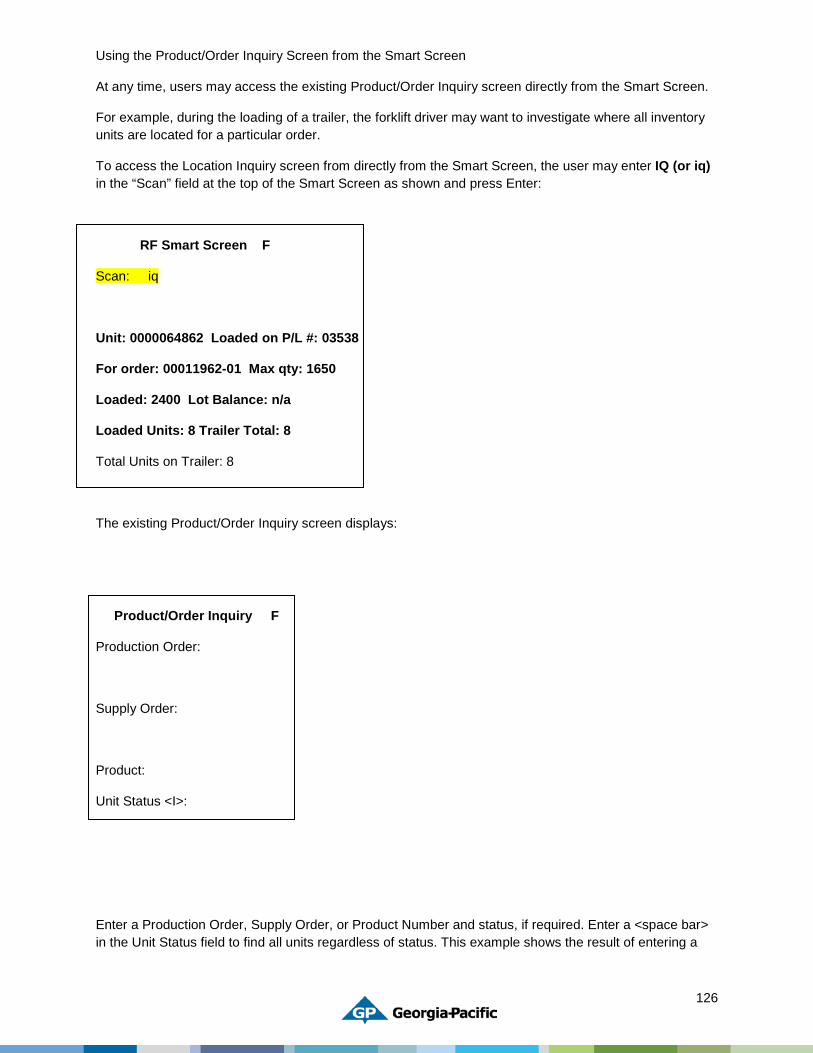
126
Using the Product/Order Inquiry Screen from the Smart Screen
At any time, users may access the existing Product/Order Inquiry screen directly from the Smart Screen.
For example, during the loading of a trailer, the forklift driver may want to investigate where all inventory units are located for a particular order.
To access the Location Inquiry screen from directly from the Smart Screen, the user may enter IQ (or iq) in the “Scan” field at the top of the Smart Screen as shown and press Enter:
RF Smart Screen F
Scan: iq
Unit: 0000064862 Loaded on P/L #: 03538
For order: 00011962-01 Max qty: 1650
Loaded: 2400 Lot Balance: n/a
Loaded Units: 8 Trailer Total: 8
Total Units on Trailer: 8
The existing Product/Order Inquiry screen displays:
Product/Order Inquiry F
Production Order:
Supply Order:
Product:
Unit Status <I>:
Enter a Production Order, Supply Order, or Product Number and status, if required. Enter a <space bar> in the Unit Status field to find all units regardless of status. This example shows the result of entering a
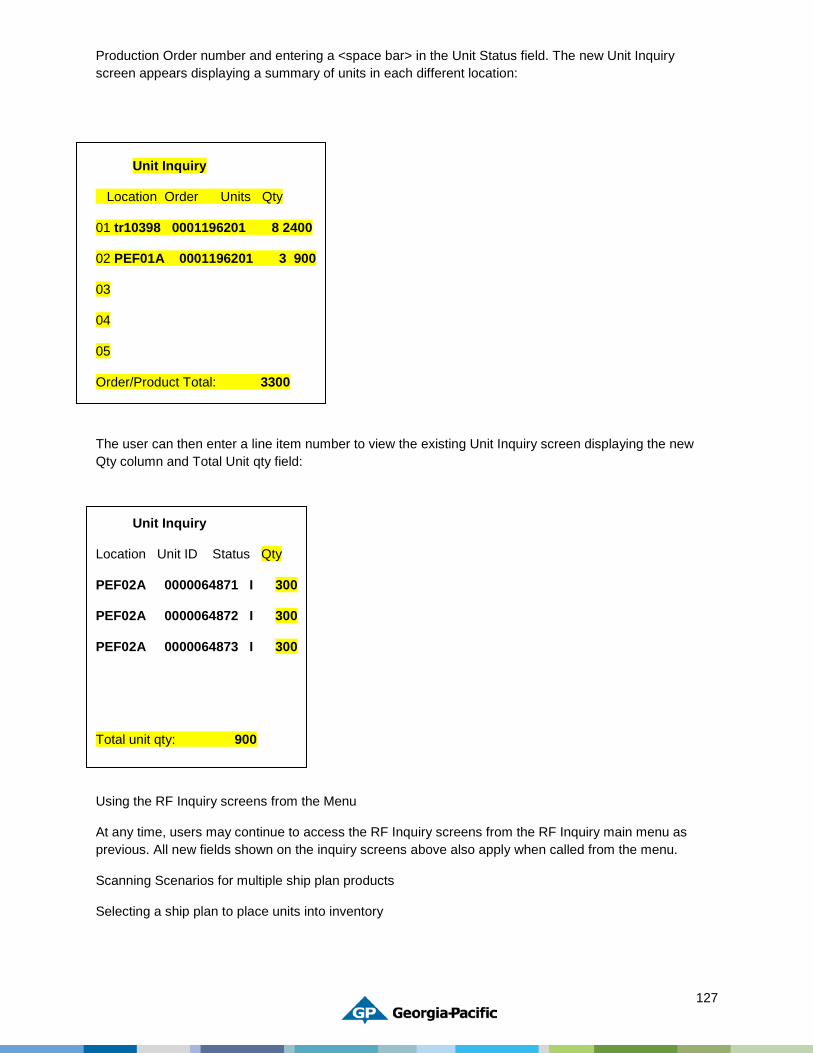
127
Production Order number and entering a <space bar> in the Unit Status field. The new Unit Inquiry screen appears displaying a summary of units in each different location:
Unit Inquiry
Location Order Units Qty
01 tr10398 0001196201 8 2400
02 PEF01A 0001196201 3 900
03
04
05
Order/Product Total: 3300
The user can then enter a line item number to view the existing Unit Inquiry screen displaying the new Qty column and Total Unit qty field:
Unit Inquiry
Location Unit ID Status Qty
PEF02A 0000064871 I 300
PEF02A 0000064872 I 300
PEF02A 0000064873 I 300
Total unit qty: 900
Using the RF Inquiry screens from the Menu
At any time, users may continue to access the RF Inquiry screens from the RF Inquiry main menu as previous. All new fields shown on the inquiry screens above also apply when called from the menu.
Scanning Scenarios for multiple ship plan products
Selecting a ship plan to place units into inventory
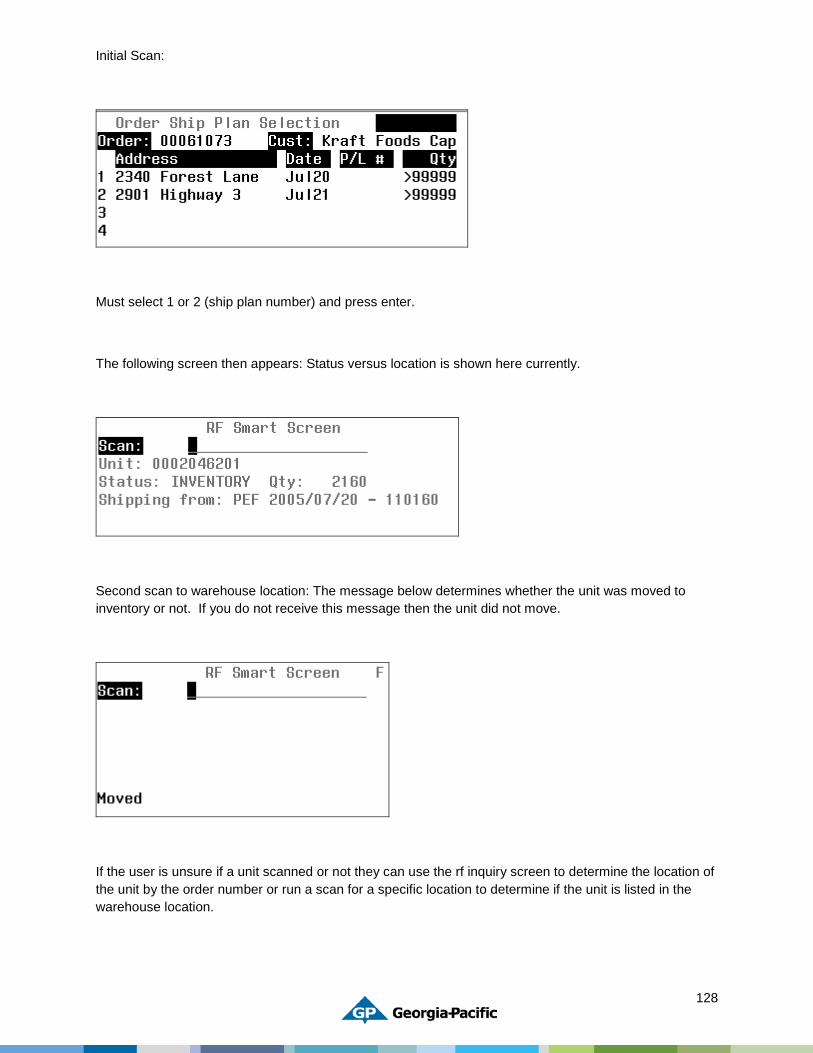
128
Initial Scan:
Must select 1 or 2 (ship plan number) and press enter.
The following screen then appears: Status versus location is shown here currently.
Second scan to warehouse location: The message below determines whether the unit was moved to inventory or not. If you do not receive this message then the unit did not move.
If the user is unsure if a unit scanned or not they can use the rf inquiry screen to determine the location of the unit by the order number or run a scan for a specific location to determine if the unit is listed in the warehouse location.

129
Selecting the correct ship plan when multiple ship plans exist
Initial Scan
Must select 1 or 2 depending on the correct ship to address and/or associated pick list number. Once this is complete the units for that product will be loaded against the selected ship plan
Continue the loading process until complete.
Complete an rf inquiry once the trailer is loaded to insure the correct pick list has been used.
Finish the pick list following normal rf trailer pick list finish procedures.
130
RF Reset Document
1. Suspend-Hold down on Power button until the screen says release for ‘suspend’.
2. Warm Boot- Hold down on Power button until the screen says release for ‘warm boot’.
3. Cold Boot- Hold down on Power button until the screen says release for ‘cold boot’.
4. Unplug & Reset
• Unplug the power cable, leave out for 30 seconds.
• Plug power in.
• Hold Blue ‘MENU’ and ‘R’ on the keyboard down.
• Hit the power button
• After about 10-15 seconds, release the ‘Menu’ and ‘R’ buttons
• Calibrate the screen as requested.
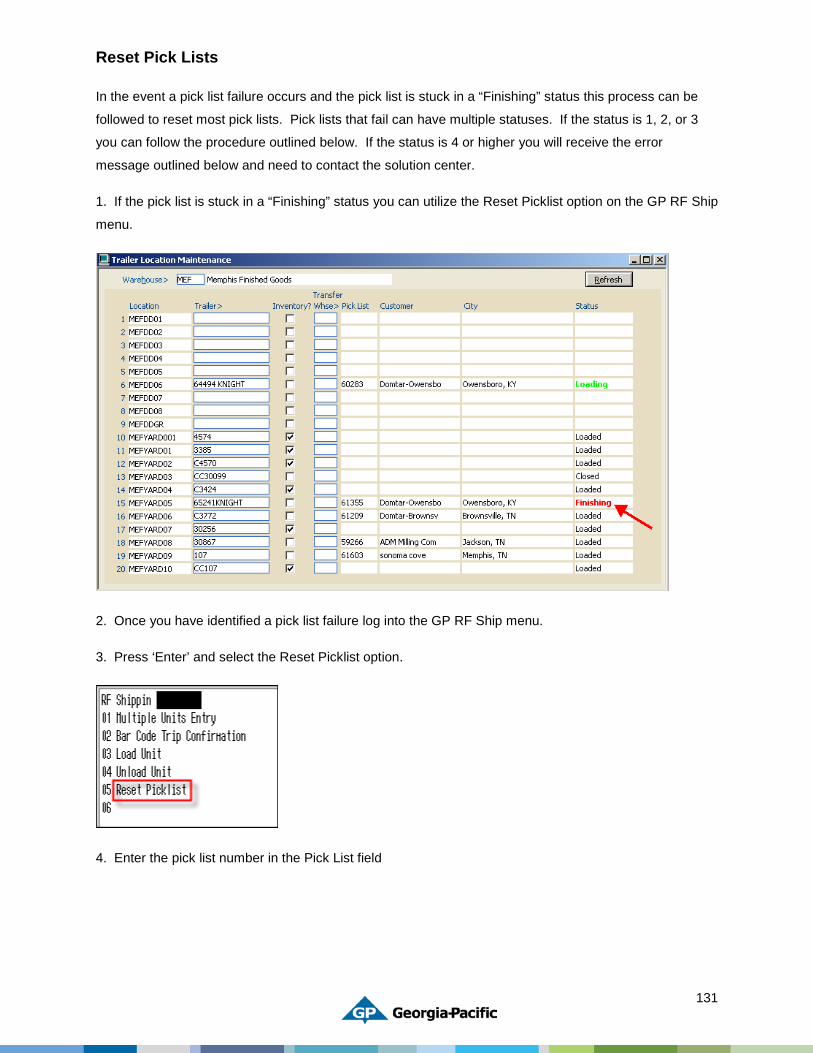
131
Reset Pick Lists
In the event a pick list failure occurs and the pick list is stuck in a “Finishing” status this process can be
followed to reset most pick lists. Pick lists that fail can have multiple statuses. If the status is 1, 2, or 3
you can follow the procedure outlined below. If the status is 4 or higher you will receive the error
message outlined below and need to contact the solution center.
1. If the pick list is stuck in a “Finishing” status you can utilize the Reset Picklist option on the GP RF Ship
menu.
2. Once you have identified a pick list failure log into the GP RF Ship menu.
3. Press ‘Enter’ and select the Reset Picklist option.
4. Enter the pick list number in the Pick List field
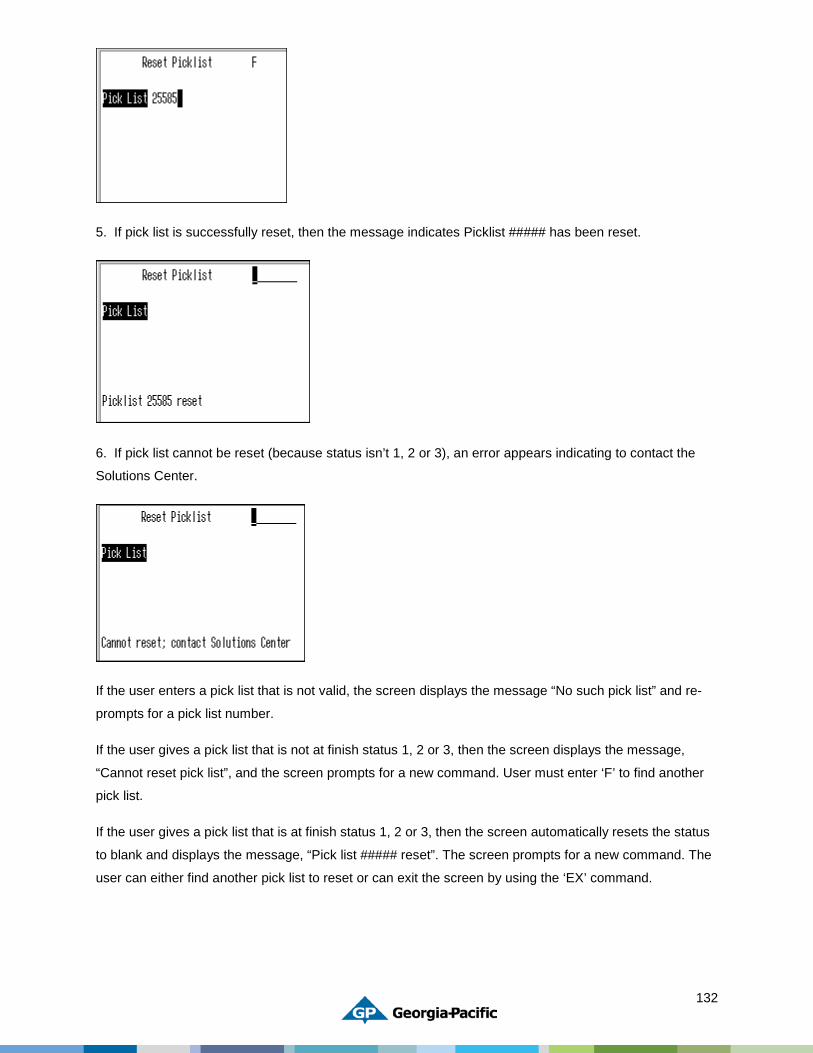
132
5. If pick list is successfully reset, then the message indicates Picklist ##### has been reset.
6. If pick list cannot be reset (because status isn’t 1, 2 or 3), an error appears indicating to contact the
Solutions Center.
If the user enters a pick list that is not valid, the screen displays the message “No such pick list” and re-
prompts for a pick list number.
If the user gives a pick list that is not at finish status 1, 2 or 3, then the screen displays the message,
“Cannot reset pick list”, and the screen prompts for a new command. User must enter ‘F’ to find another
pick list.
If the user gives a pick list that is at finish status 1, 2 or 3, then the screen automatically resets the status
to blank and displays the message, “Pick list ##### reset”. The screen prompts for a new command. The
user can either find another pick list to reset or can exit the screen by using the ‘EX’ command.
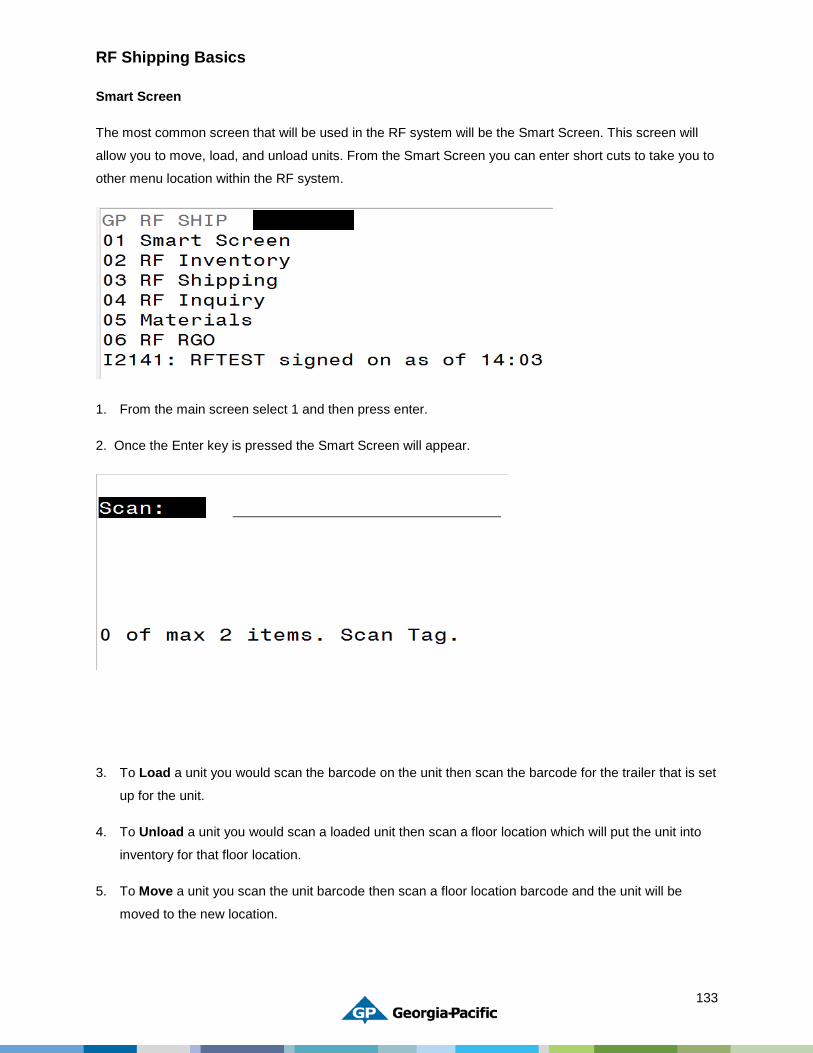
133
RF Shipping Basics
Smart Screen
The most common screen that will be used in the RF system will be the Smart Screen. This screen will
allow you to move, load, and unload units. From the Smart Screen you can enter short cuts to take you to
other menu location within the RF system.
1. From the main screen select 1 and then press enter.
2. Once the Enter key is pressed the Smart Screen will appear.
3. To Load a unit you would scan the barcode on the unit then scan the barcode for the trailer that is set
up for the unit.
4. To Unload a unit you would scan a loaded unit then scan a floor location which will put the unit into
inventory for that floor location.
5. To Move a unit you scan the unit barcode then scan a floor location barcode and the unit will be
moved to the new location.
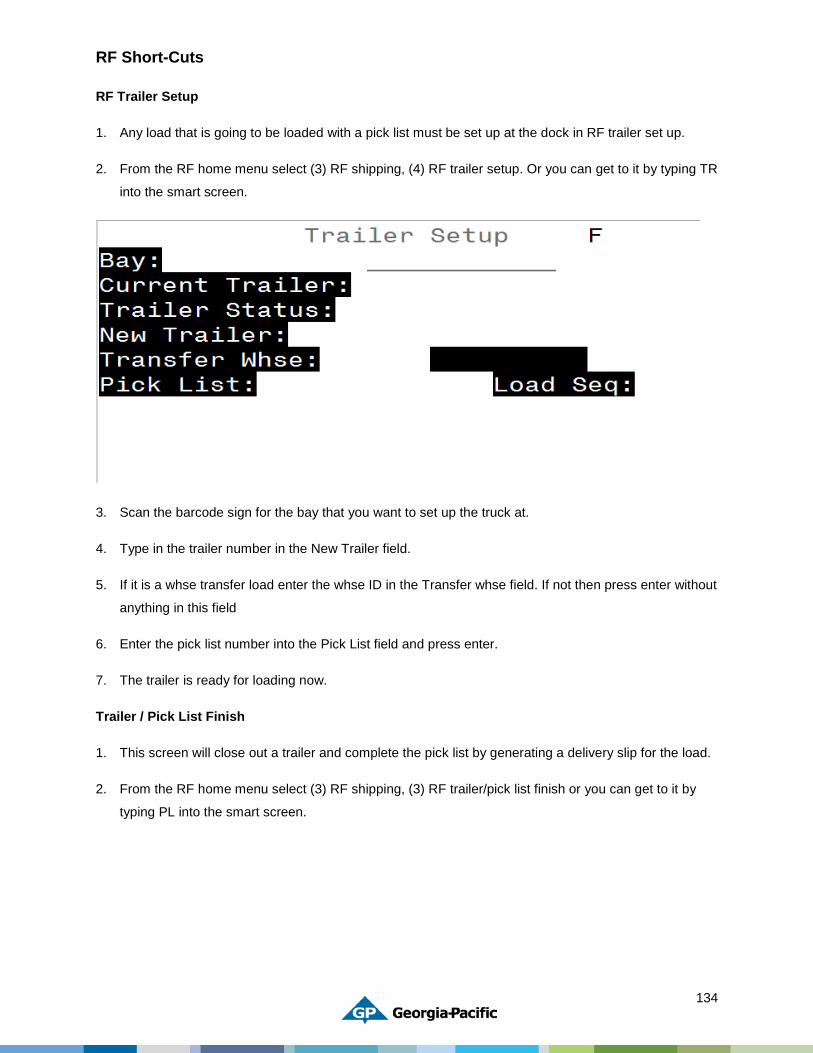
134
RF Short-Cuts
RF Trailer Setup
1. Any load that is going to be loaded with a pick list must be set up at the dock in RF trailer set up.
2. From the RF home menu select (3) RF shipping, (4) RF trailer setup. Or you can get to it by typing TR
into the smart screen.
3. Scan the barcode sign for the bay that you want to set up the truck at.
4. Type in the trailer number in the New Trailer field.
5. If it is a whse transfer load enter the whse ID in the Transfer whse field. If not then press enter without
anything in this field
6. Enter the pick list number into the Pick List field and press enter.
7. The trailer is ready for loading now.
Trailer / Pick List Finish
1. This screen will close out a trailer and complete the pick list by generating a delivery slip for the load.
2. From the RF home menu select (3) RF shipping, (3) RF trailer/pick list finish or you can get to it by
typing PL into the smart screen.

135
3. Enter the pick list number to be closed in the P/L field.
4. It will drop down to Trlr Comp. If the trailer is complete and you want to generate a delivery slip you
answer Y and press enter.
5. If all items are not complete on the pick list it will give you the following question. If you answer yes it
will finish the truck. If you answer No the truck will not be finished and you can proceed with loading
the truck.
Location Inquiry
1. It may be necessary for a loader to check what they already have loaded on a truck. This can be
done in the load inquiry screen.
2. From the RF home menu select (4) RF inquiry, (1) RF Location Inquiry or you can get to it by typing
LQ into the smart screen.
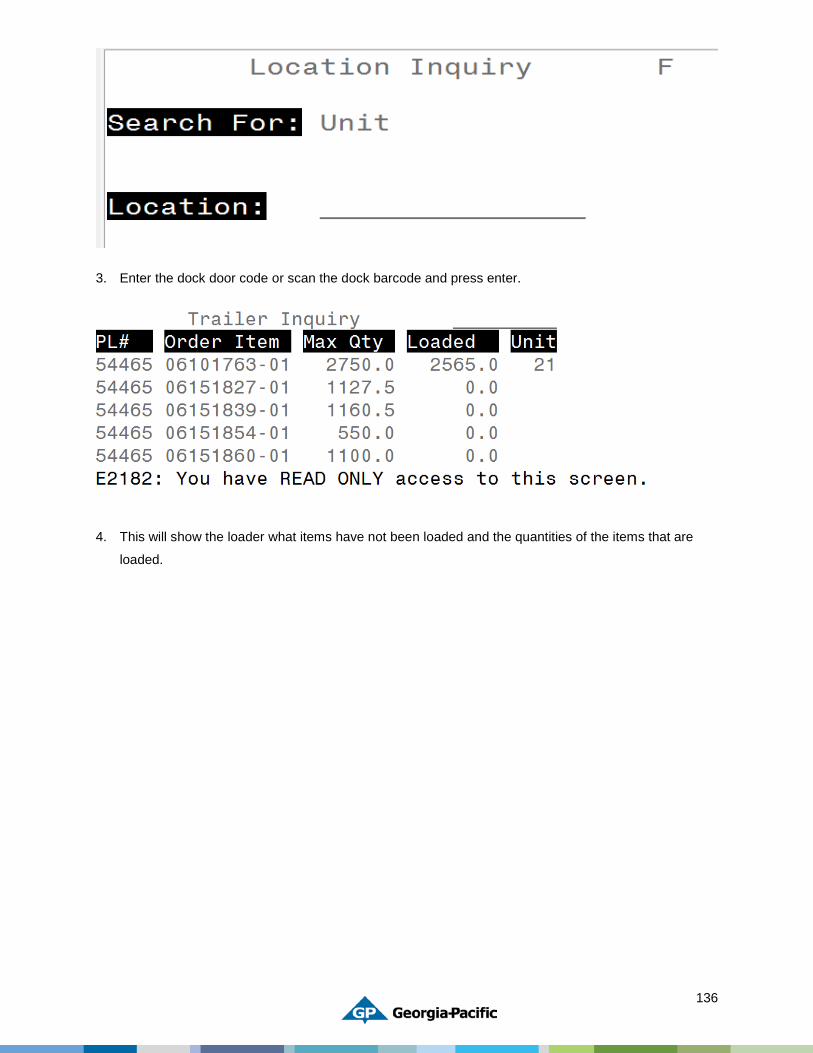
136
3. Enter the dock door code or scan the dock barcode and press enter.
4. This will show the loader what items have not been loaded and the quantities of the items that are
loaded.
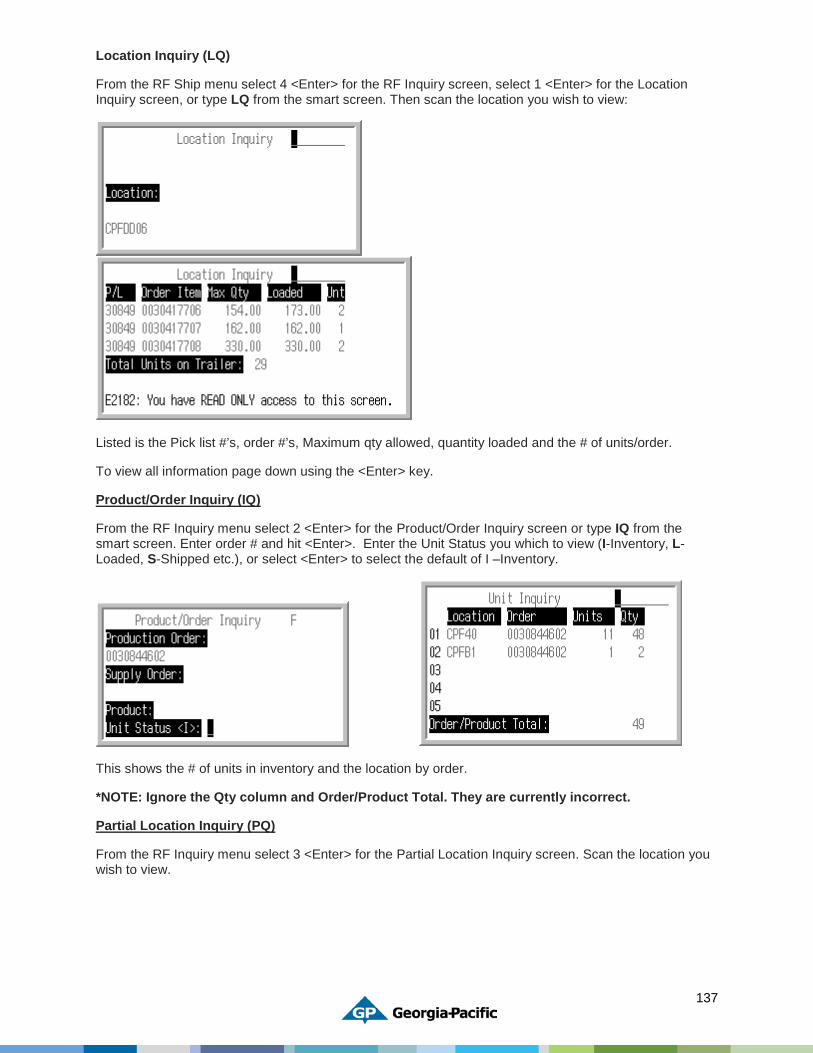
137
Location Inquiry (LQ)
From the RF Ship menu select 4 <Enter> for the RF Inquiry screen, select 1 <Enter> for the Location Inquiry screen, or type LQ from the smart screen. Then scan the location you wish to view:
Listed is the Pick list #’s, order #’s, Maximum qty allowed, quantity loaded and the # of units/order.
To view all information page down using the <Enter> key.
Product/Order Inquiry (IQ)
From the RF Inquiry menu select 2 <Enter> for the Product/Order Inquiry screen or type IQ from the smart screen. Enter order # and hit <Enter>. Enter the Unit Status you which to view (I-Inventory, L-Loaded, S-Shipped etc.), or select <Enter> to select the default of I –Inventory.
This shows the # of units in inventory and the location by order.
*NOTE: Ignore the Qty column and Order/Product Total. They are currently incorrect.
Partial Location Inquiry (PQ)
From the RF Inquiry menu select 3 <Enter> for the Partial Location Inquiry screen. Scan the location you wish to view.
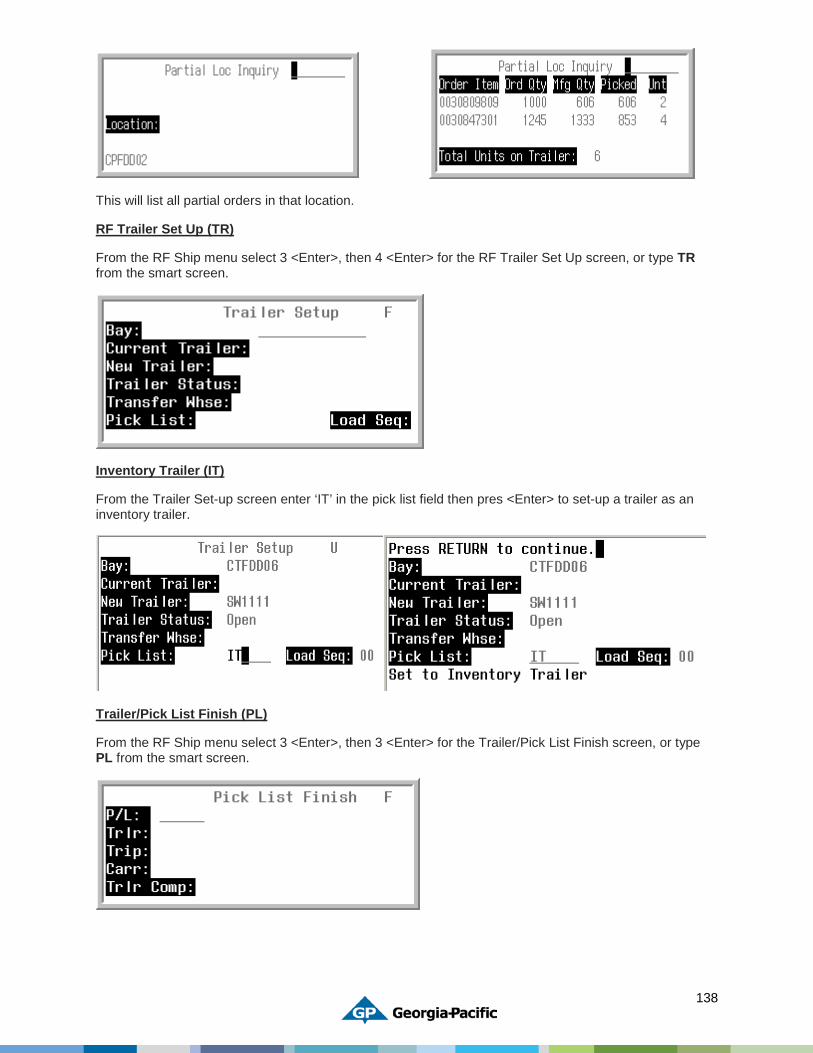
138
This will list all partial orders in that location.
RF Trailer Set Up (TR)
From the RF Ship menu select 3 <Enter>, then 4 <Enter> for the RF Trailer Set Up screen, or type TR from the smart screen.
Inventory Trailer (IT)
From the Trailer Set-up screen enter ‘IT’ in the pick list field then pres <Enter> to set-up a trailer as an inventory trailer.
Trailer/Pick List Finish (PL)
From the RF Ship menu select 3 <Enter>, then 3 <Enter> for the Trailer/Pick List Finish screen, or type PL from the smart screen.
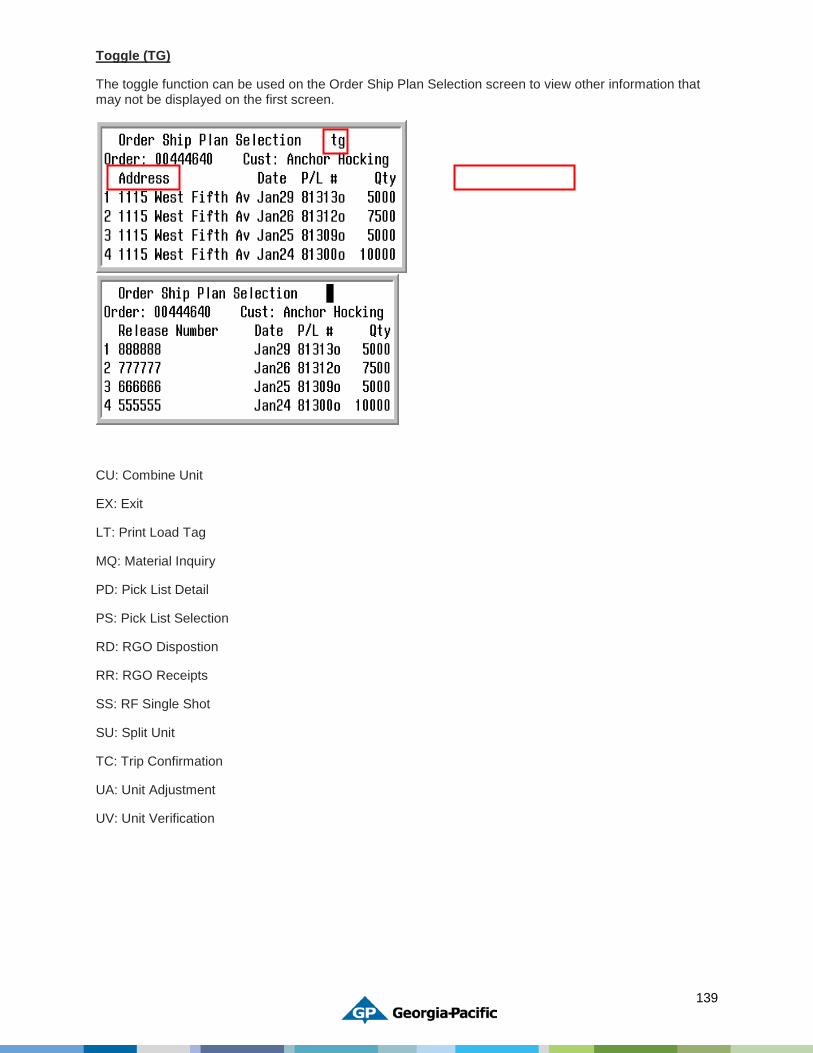
139
Toggle (TG)
The toggle function can be used on the Order Ship Plan Selection screen to view other information that may not be displayed on the first screen.
CU: Combine Unit
EX: Exit
LT: Print Load Tag
MQ: Material Inquiry
PD: Pick List Detail
PS: Pick List Selection
RD: RGO Dispostion
RR: RGO Receipts
SS: RF Single Shot
SU: Split Unit
TC: Trip Confirmation
UA: Unit Adjustment
UV: Unit Verification
140
RF Unit Check Procedures
RF Unit Check Procedures for Units not scanned off take-off line
Checker / Loaders
On the RF Unit – RF Ship menu screen
Select 04 – RF Inquiry
Select 01 – Location Inquiry
At the location Prompt – Enter or Scan the Location you are verifying. I.e. SPF01
Any units that have been scanned at the strapper line and not scanned by the shipping department from the take off will appear on the RF Unit screen. Write the numbers down and find out why these units are showing up on the take-off line. The best time to do this procedure is when there are no units on the take-off line.
NOTE: This will only work if units have been scanned at the strapper prior to this RF Location Inquiry being done.
RF Unit Check Procedures for Units missed from a loaded trailer
Checker / Loaders
On the RF Unit RF ship menu screen
Select 04 – RF Inquiry
Select 02 – Product/Order Inquiry
Select the order number in question and press enter.
This will take you to the unit status. Press enter.
This will display the location status of every unit number that has been scanned into inventory and its location.
NOTE: This will only work if the units have been scanned into inventory.
141
Scheduled Downtime Procedures
Scheduled Downtime Processes
For any and all scheduled downtime the plant IT administrator should notify all appropriate individuals.
• Provide individuals with the determined and approximate period of the downtime.
o If you will not be in the plant determine a back up that can be notified once the system is up and running.
o Print load tags for PCS production orders planned during the scheduled downtime.
Onsite Warehouse Process
• Units that are actively coming down the production line will need to be moved to a designated area (Inventory Location spreadsheet) so they can be properly scanned into an inventory location when the system is available.
• Units that are shipped during the downtime will need to be recorded.
Pull one tag from each unit that is loaded onto the trailer
Attached all load tags and the manual BOL to the back of the Downtime Unit Tracking spreadsheet. Please note any additional information on the spreadsheet
Provide all information to the accounting department
When the system is available you can either use the online procedure for <Enter A Manual Shipment> or use the RF units to ship the product through BVP.
• For loads that were started but not finished prior to the downtime.
Pull one tag from each unit that is loaded onto the trailer
Attached all load tags and the manual BOL to the back of the Downtime Unit Tracking spreadsheet. Please note the pick list that was already created, how many units were already loaded.
Provide all information to the accounting department
When the system is available you can either use the online procedure for use the RF units to ship the product through BVP or update the Pick List confirm screen.
o Go to the Pick List Confirmation screen (PLCONFIRM)
o Find the Pick list
o Select the order item that needs to have units added manually
o Enter the Unit, Quantity and Unit ID.
o Save before exiting the Pallet Details screen
o Tab through the line items fields
o Save the PLCONFIRM screen and finish the Pick list.
NOTE: These steps are outlined within the Enter a Manual Shipment procedure- beginning with Step # 13 to the end.
142
Offsite Warehouse Process
• Units that are shipped during the downtime will need to be recorded.
Pull one tag from each unit that is loaded onto the trailer
Attached all load tags and the manual BOL to the back of the Downtime Unit Tracking spreadsheet. Please note any additional information on the spreadsheet
Provide all information to the accounting department
When the system is available you can either use the online procedure for <Enter A Manual Shipment> or use the RF units to ship the product through BVP.
• For loads that were started but not finished prior to the downtime.
Pull one tag from each unit that is loaded onto the trailer
Attached all load tags and the manual BOL to the back of the Downtime Unit Tracking spreadsheet. Please note the pick list that was already created, how many units were already loaded.
Provide all information to Carol Yow or Ricky Norwood.
When the system is available you can either use the online procedure for use the RF units to ship the product through BVP or update the Pick List confirm screen.
o Go to the Pick List Confirmation screen (PLCONFIRM)
o Find the Pick list
o Select the order item that needs to have units added manually
o Enter the Unit, Quantity and Unit ID.
o Save before exiting the Pallet Details screen
o Tab through the line items fields
o Save the PLCONFIRM screen and finish the Pick list.
NOTE: These steps are outlined within the <Enter a Manual Shipment> procedure- beginning with Step # 13 to the end.
Load tags
If you are unable to produce load tags from any system us the load tag format to record all unit information.
When the system is available again load tags will need to be generated from the GO LIVE screen within BVP. Please contact your BVP administrator.
Documents referenced within this document are located on the shared drive. The spreadsheets are located on one document under each tab.
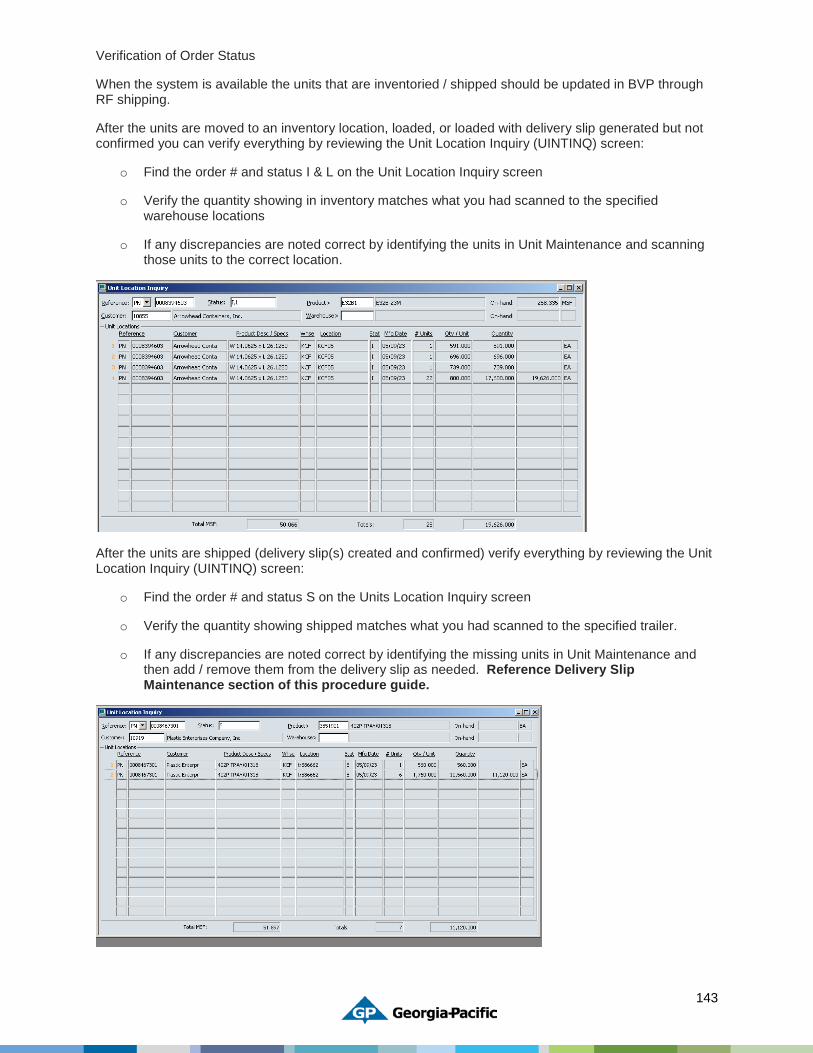
143
Verification of Order Status
When the system is available the units that are inventoried / shipped should be updated in BVP through RF shipping.
After the units are moved to an inventory location, loaded, or loaded with delivery slip generated but not confirmed you can verify everything by reviewing the Unit Location Inquiry (UINTINQ) screen:
o Find the order # and status I & L on the Unit Location Inquiry screen
o Verify the quantity showing in inventory matches what you had scanned to the specified warehouse locations
o If any discrepancies are noted correct by identifying the units in Unit Maintenance and scanning those units to the correct location.
After the units are shipped (delivery slip(s) created and confirmed) verify everything by reviewing the Unit Location Inquiry (UINTINQ) screen:
o Find the order # and status S on the Units Location Inquiry screen
o Verify the quantity showing shipped matches what you had scanned to the specified trailer.
o If any discrepancies are noted correct by identifying the missing units in Unit Maintenance and then add / remove them from the delivery slip as needed. Reference Delivery Slip Maintenance section of this procedure guide.
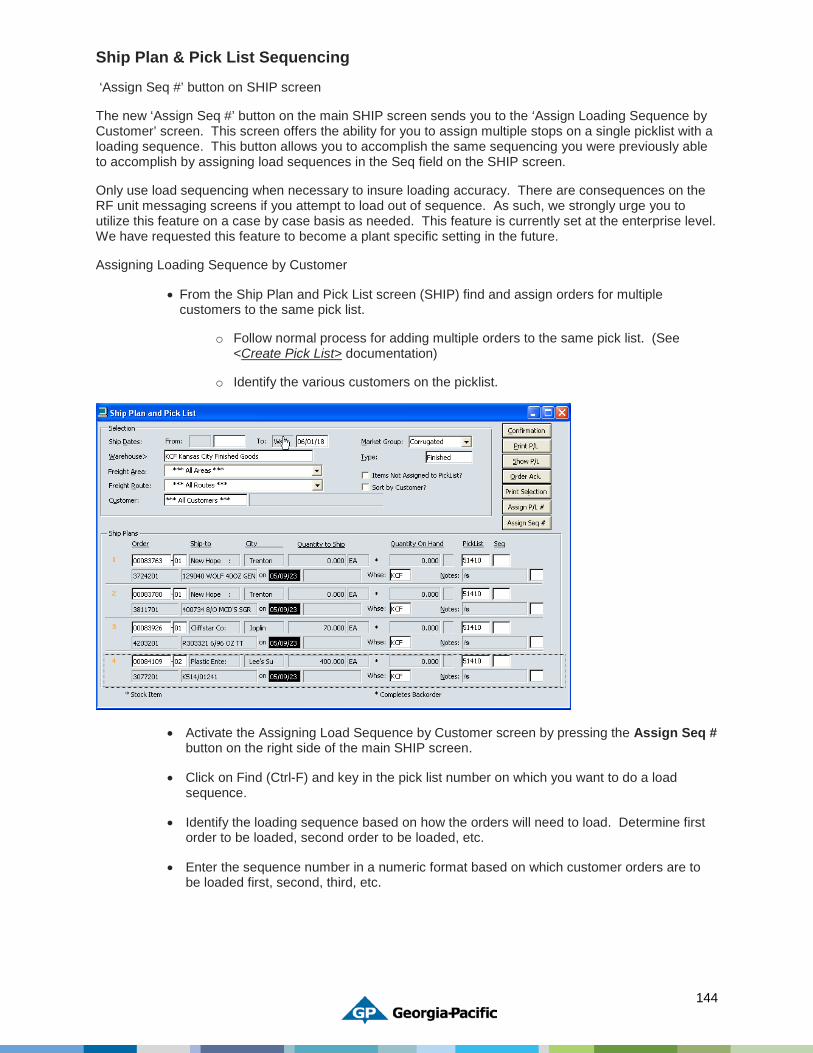
144
Ship Plan & Pick List Sequencing
‘Assign Seq #’ button on SHIP screen
The new ‘Assign Seq #’ button on the main SHIP screen sends you to the ‘Assign Loading Sequence by Customer’ screen. This screen offers the ability for you to assign multiple stops on a single picklist with a loading sequence. This button allows you to accomplish the same sequencing you were previously able to accomplish by assigning load sequences in the Seq field on the SHIP screen.
Only use load sequencing when necessary to insure loading accuracy. There are consequences on the RF unit messaging screens if you attempt to load out of sequence. As such, we strongly urge you to utilize this feature on a case by case basis as needed. This feature is currently set at the enterprise level. We have requested this feature to become a plant specific setting in the future.
Assigning Loading Sequence by Customer
• From the Ship Plan and Pick List screen (SHIP) find and assign orders for multiple customers to the same pick list.
o Follow normal process for adding multiple orders to the same pick list. (See <Create Pick List> documentation)
o Identify the various customers on the picklist.
• Activate the Assigning Load Sequence by Customer screen by pressing the Assign Seq # button on the right side of the main SHIP screen.
• Click on Find (Ctrl-F) and key in the pick list number on which you want to do a load sequence.
• Identify the loading sequence based on how the orders will need to load. Determine first order to be loaded, second order to be loaded, etc.
• Enter the sequence number in a numeric format based on which customer orders are to be loaded first, second, third, etc.
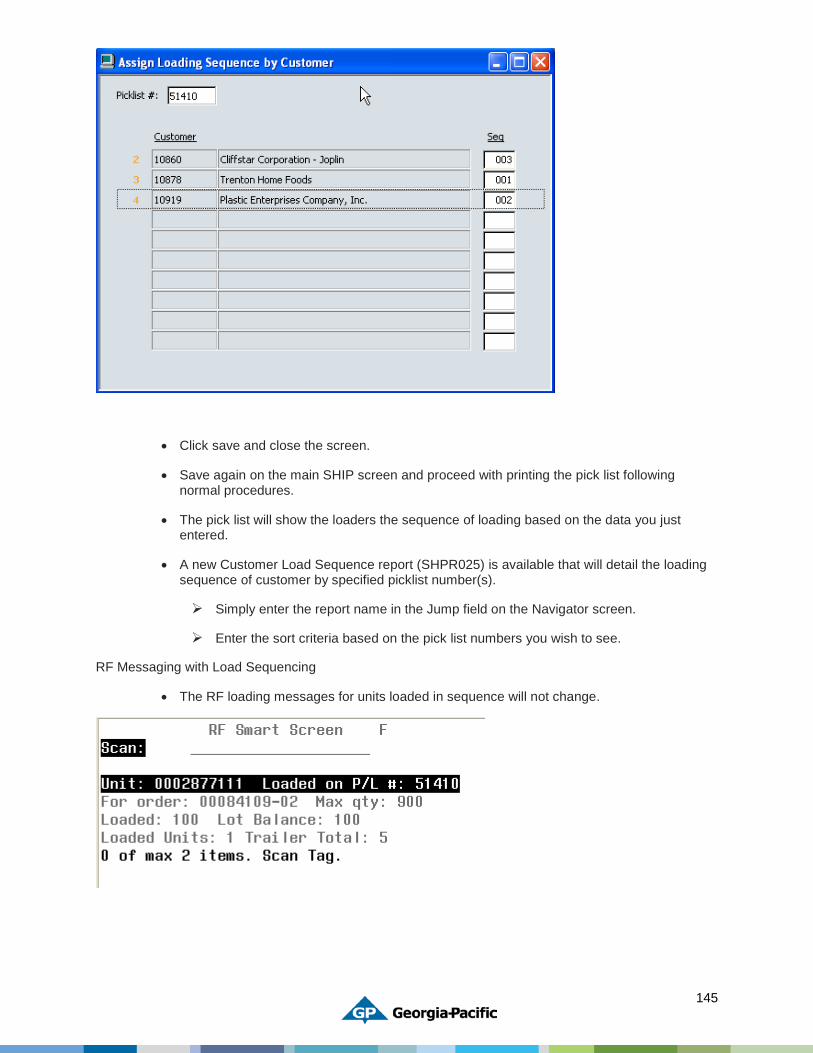
145
• Click save and close the screen.
• Save again on the main SHIP screen and proceed with printing the pick list following normal procedures.
• The pick list will show the loaders the sequence of loading based on the data you just entered.
• A new Customer Load Sequence report (SHPR025) is available that will detail the loading sequence of customer by specified picklist number(s).
Simply enter the report name in the Jump field on the Navigator screen.
Enter the sort criteria based on the pick list numbers you wish to see.
RF Messaging with Load Sequencing
• The RF loading messages for units loaded in sequence will not change.

146
• If a unit assigned to a pick list with an assigned sequence is scanned to a trailer the following message appears on the Load Unit screen.
• In order to load the unit out of sequence you will have to choose ‘Y’ and depress the Enter key for as many units as you are loading past out of sequence.
• For each unit loaded out of sequence you will have to follow the same process.
Resource Name Tasks to Perform
Shipping Supervisor
Or Shipping Shift Leader
Create a pick list with multiple customer/stops
Assign a loading sequence using the Assigning Load Sequence by Customer screen
Print and issue pick list for loading following normal operating procedures
Fork list operator Load units based on assigned sequence.
If you have to load a unit out of sequence follow the enclosed documentation to insure loading accuracy.
147
Shipment Planning
This business procedure involves creating the plan for shipping finished goods to customers or warehouses. After developing the plan, the pick list must be created and distributed.
Load Planning
• Print a current copy of the Shipping Plan (SHPR002) located on the GPSHIPREP menu within BVP.
− Use the selection criteria to widen or narrow the search field for open ship plans.
− The inventory amount and location for each item is listed with the order
− Verify the runs in PCS for orders listed on the Ship plan that do not show an inventory amount
• Plan the trailers based on trailer maximization guidelines, customer requests and any other specifications
• Create the shipping plan for the next three shifts (more if desired) so all possible planning is completed before the second and third shifts arrive.
• Communicate the shipping plan to the contract carrier thru your normal process.
Creating a Pick List
Use the <Create Pick List> procedure. You may have to ship some items on the fly but use this function with caution.
• To print the pick list(s) go to the GP SHIP menu within BVP and choose the SHIP option
• Once an order is on a pick list limited changes (PO numbers can be changed by Customer Service reps) can be made to the order(s), therefore we recommend that you do not assign pick lists to orders that are not shipping within the next 18 to 24 hours. You may need to adjust the timing for your pick list assignments based on customer’s requirements or production runs.
Resource Name Tasks to Perform
Shipping Supervisor
Or Shipping Shift Leader
Run Shipping Plan
Create pick list
Print pick list
Determine who will be:
Working the line(s)
Loading the trailers
Working at the On & Offsite Warehouse(s)
Forklift Drivers Verify your role for your shift:
Working the line(s)
Loading trailers
Working at the On or Offsite Warehouse
148
Unit Loading Procedure
This procedure describes the steps involved for the forklift drivers to load the trailers using RF scanning equipment.
Loading Units on a Trailer Process:
− Retrieve a pick list from the shipping office as assigned.
o Note: A pick list should be created before units can be loaded onto a truck. You may have warehouse transfers and customer restrictions that create “shipping on the fly” situations.
− Verify that the dock door is open by using the RF Inquiry options on the Smart screen.
− Assign a Trailer and Pick List to the dock door.
− Scan units from the line or inventory location to the correct dock door.
− RF Inquiry the dock door before closing the trailer or finishing the pick list (depending on the loading situation) to verify the units loaded. Upon finishing the Pick List the Delivery Slip will print. (See the learning center for procedures)
− Provide a signed and dated copy of the Pick list to the shipping supervisor or shift leader.
− The shipping supervisor or shift leader will verify the delivery slip quantities against the amount ordered and the amount produced.
o Use the Delivery Slip screen (DELV) to access the pallet details information
o Use the KIWI (PCS) system to verify the quantity ordered and produced
− Notify the shipping supervisor or shift leader of any changes that need to be made to the delivery slip
− If you receive an access error when finishing a pick list, press enter and try to enter again. If it processes, record the TRIP #. If you receive an access error message again notify the shift supervisor or shift leader who can log a case with the Solution Center!
If a Delivery Slip does not print:
• Go to Delivery Slip Maintenance- DELV
• Click Find
• Tab until the cursor is in the TRIP field (3 times)
• Enter the Trip #
• Press Enter
• The delivery slip will be displayed-Verify the customer information
• Print the Delivery slip
You can also find the delivery slip by the Trailer ID but the system will provide records from the first time the trailer was used. This will require that you page down until you find the delivery slip that matches the correct customer, date and time.
149
Resource Name Tasks to Perform
Shipping Supervisor or Shipping Shift Leader
Create pick list
Print pick list
Forklift Driver Assign the pick lists and trailer to a shipping bay/dock door
RF Inquiry the shipping bay/dock door before closing the trailer/pick list
Verify Delivery Slip- report any issues with the delivery slip to the shipping supervisor
Loading units from the same order on multiple trailers- “On the fly”:
− Retrieve a pick list from the shipping office as assigned.
o Note: A pick list should be created before units can be loaded onto a truck. You may have warehouse transfers and customer restrictions that create “shipping on the fly” situations.
− Verify that the dock door is open by using the RF Inquiry options on the Smart screen.
− Assign a trailer and the original pick list to the first dock door.
− Scan unit(s) from the line or inventory location to the first dock door.
− Assign a trailer to the next dock door to be used.
− Scan unit(s) from the line or inventory location to the next dock door to be used.
− The RF system will automatically assign a new pick list number to the units loading on the second trailer. You must approve this by pressing the Enter key when prompted.
− After each unit(s) is loaded the screen will ask you to verify that the units were loaded to the appropriate pick list / trailer. Press Enter to confirm this and continue each time.
− In the event one order must be loaded on more than two trailers you would continue this same process.
− RF Inquiry the dock door before closing the trailer or finishing the pick list (depending on the loading situation) to verify the units loaded. Upon finishing the Pick List(s) the Delivery Slip(s) will print. (See page 7 for procedures)
− Provide a signed and dated copy of the Pick list to the shipping supervisor or shift leader.
− Notify the shipping supervisor or shift leader of any changes that need to be made to the delivery slip.
− The shipping supervisor or shift leader will verify the delivery slip(s) quantities against the amount ordered and the amount produced. The total amount will not be visible on the RF Inquiry screen. Only the amount loaded on each specified trailer will be visible.
o Use the Delivery Slip screen (DELV) to access the pallet details information if adjustments are needed.
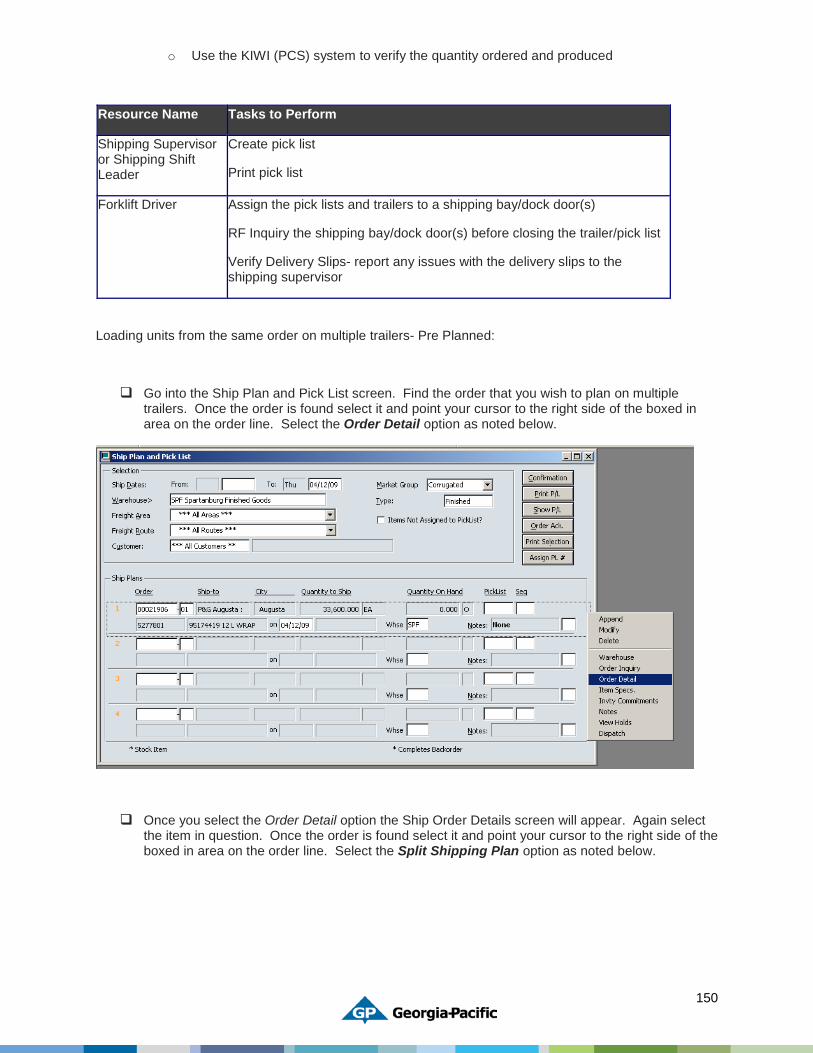
150
o Use the KIWI (PCS) system to verify the quantity ordered and produced
Resource Name Tasks to Perform
Shipping Supervisor or Shipping Shift Leader
Create pick list
Print pick list
Forklift Driver Assign the pick lists and trailers to a shipping bay/dock door(s)
RF Inquiry the shipping bay/dock door(s) before closing the trailer/pick list
Verify Delivery Slips- report any issues with the delivery slips to the shipping supervisor
Loading units from the same order on multiple trailers- Pre Planned:
Go into the Ship Plan and Pick List screen. Find the order that you wish to plan on multiple trailers. Once the order is found select it and point your cursor to the right side of the boxed in area on the order line. Select the Order Detail option as noted below.
Once you select the Order Detail option the Ship Order Details screen will appear. Again select the item in question. Once the order is found select it and point your cursor to the right side of the boxed in area on the order line. Select the Split Shipping Plan option as noted below.

151
This will bring up an Information box on the screen. The box will tell you that you have selected to create new shipping plans and prompt you answer the question of how many ship plans do you want to create? Choose the number of times you wish to split the order up based on your loading criteria and requirements for that particular customer. In the example here we will create two shipping plans for this one order.
At this point the system will automatically calculate the quantity for each ship plan using the total order quantity and number of ship plans you chose to create. The new Information box on the screen will state the specifics for each ship plan. For our example we split an order for 33,600 into two ship plans. Each ship plan now has 16,800 planned against it. Change the Do you wish to continue prompt to Y and press OK.
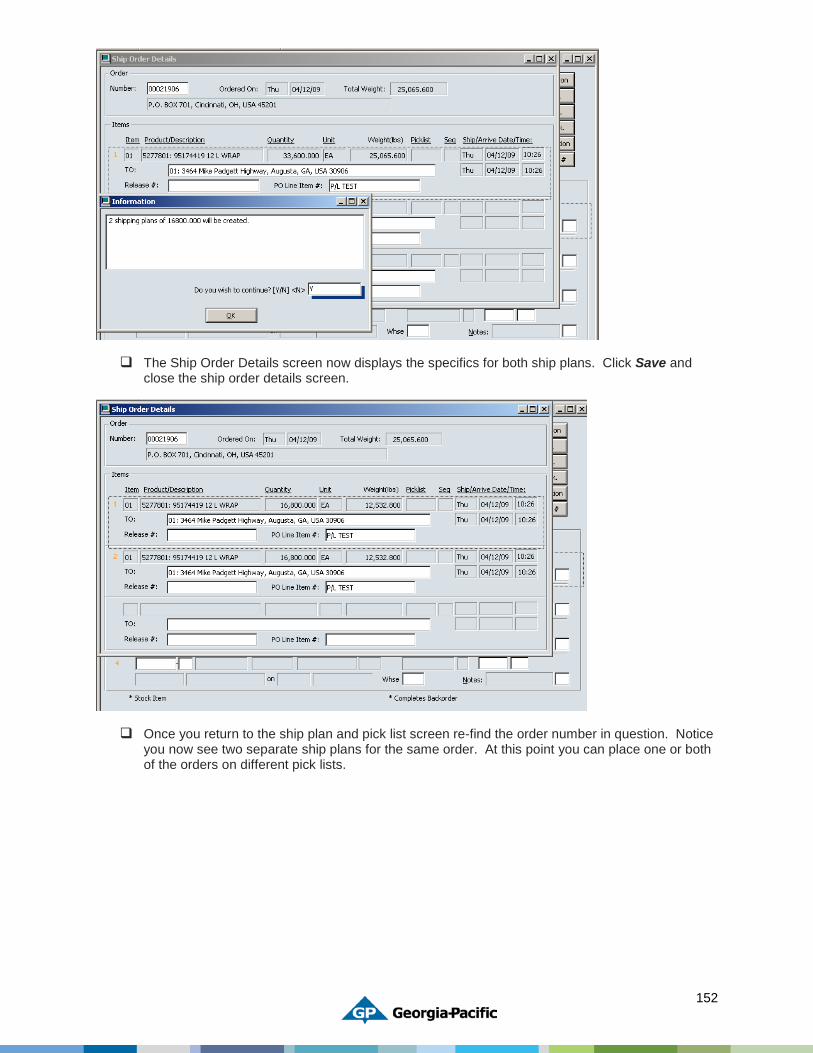
152
The Ship Order Details screen now displays the specifics for both ship plans. Click Save and close the ship order details screen.
Once you return to the ship plan and pick list screen re-find the order number in question. Notice you now see two separate ship plans for the same order. At this point you can place one or both of the orders on different pick lists.
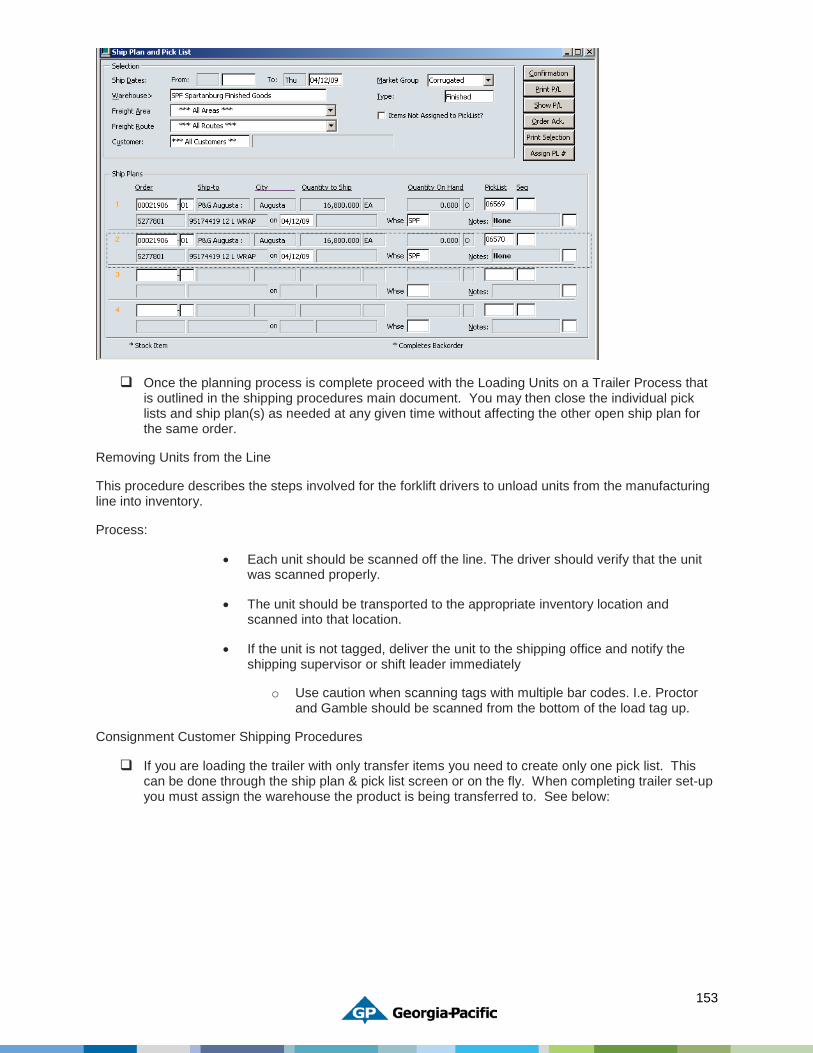
153
Once the planning process is complete proceed with the Loading Units on a Trailer Process that is outlined in the shipping procedures main document. You may then close the individual pick lists and ship plan(s) as needed at any given time without affecting the other open ship plan for the same order.
Removing Units from the Line
This procedure describes the steps involved for the forklift drivers to unload units from the manufacturing line into inventory.
Process:
• Each unit should be scanned off the line. The driver should verify that the unit was scanned properly.
• The unit should be transported to the appropriate inventory location and scanned into that location.
• If the unit is not tagged, deliver the unit to the shipping office and notify the shipping supervisor or shift leader immediately
o Use caution when scanning tags with multiple bar codes. I.e. Proctor and Gamble should be scanned from the bottom of the load tag up.
Consignment Customer Shipping Procedures
If you are loading the trailer with only transfer items you need to create only one pick list. This can be done through the ship plan & pick list screen or on the fly. When completing trailer set-up you must assign the warehouse the product is being transferred to. See below:
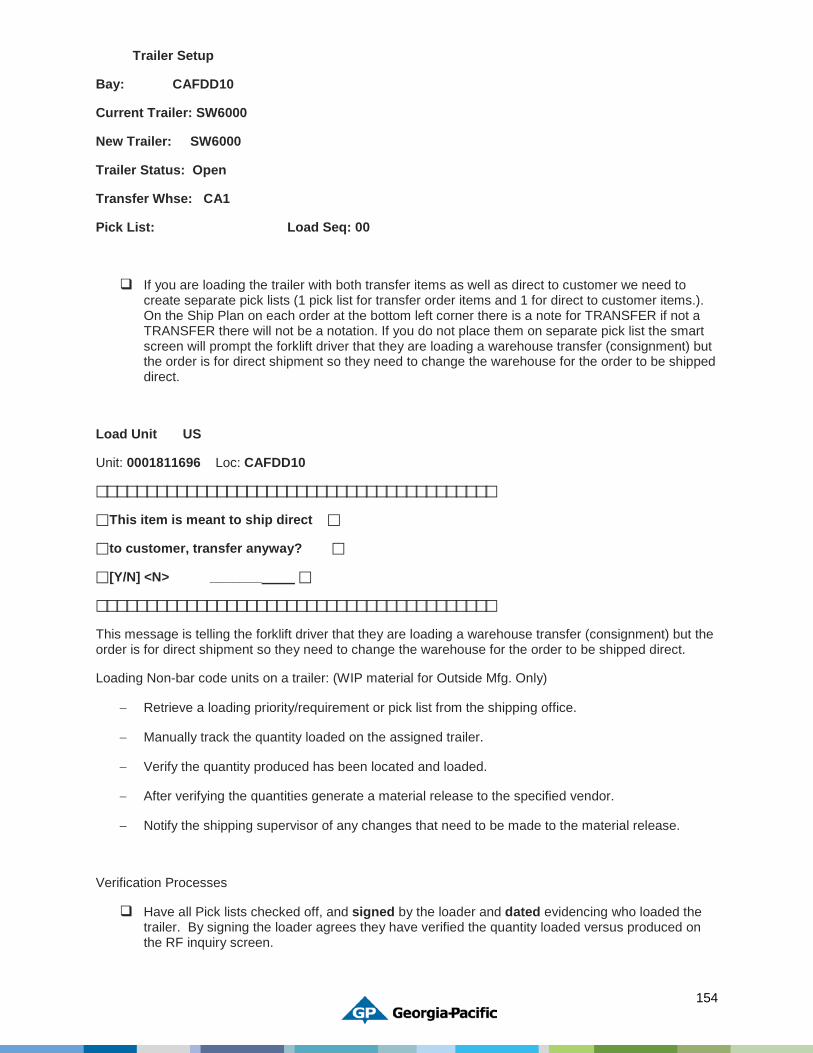
154
Trailer Setup
Bay: CAFDD10
Current Trailer: SW6000
New Trailer: SW6000
Trailer Status: Open
Transfer Whse: CA1
Pick List: Load Seq: 00
If you are loading the trailer with both transfer items as well as direct to customer we need to create separate pick lists (1 pick list for transfer order items and 1 for direct to customer items.). On the Ship Plan on each order at the bottom left corner there is a note for TRANSFER if not a TRANSFER there will not be a notation. If you do not place them on separate pick list the smart screen will prompt the forklift driver that they are loading a warehouse transfer (consignment) but the order is for direct shipment so they need to change the warehouse for the order to be shipped direct.
Load Unit US
Unit: 0001811696 Loc: CAFDD10
This item is meant to ship direct
to customer, transfer anyway?
[Y/N] <N> _______
This message is telling the forklift driver that they are loading a warehouse transfer (consignment) but the order is for direct shipment so they need to change the warehouse for the order to be shipped direct.
Loading Non-bar code units on a trailer: (WIP material for Outside Mfg. Only)
− Retrieve a loading priority/requirement or pick list from the shipping office.
− Manually track the quantity loaded on the assigned trailer.
− Verify the quantity produced has been located and loaded.
− After verifying the quantities generate a material release to the specified vendor.
− Notify the shipping supervisor of any changes that need to be made to the material release.
Verification Processes
Have all Pick lists checked off, and signed by the loader and dated evidencing who loaded the trailer. By signing the loader agrees they have verified the quantity loaded versus produced on the RF inquiry screen.
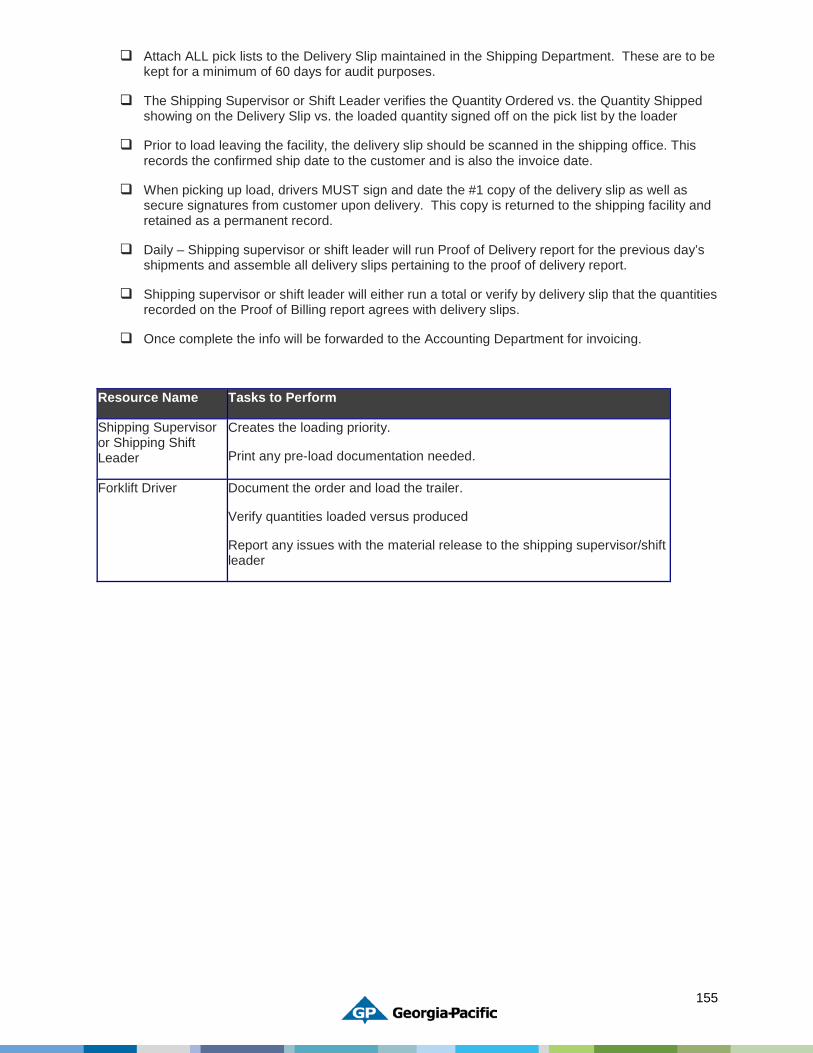
155
Attach ALL pick lists to the Delivery Slip maintained in the Shipping Department. These are to be kept for a minimum of 60 days for audit purposes.
The Shipping Supervisor or Shift Leader verifies the Quantity Ordered vs. the Quantity Shipped showing on the Delivery Slip vs. the loaded quantity signed off on the pick list by the loader
Prior to load leaving the facility, the delivery slip should be scanned in the shipping office. This records the confirmed ship date to the customer and is also the invoice date.
When picking up load, drivers MUST sign and date the #1 copy of the delivery slip as well as secure signatures from customer upon delivery. This copy is returned to the shipping facility and retained as a permanent record.
Daily – Shipping supervisor or shift leader will run Proof of Delivery report for the previous day’s shipments and assemble all delivery slips pertaining to the proof of delivery report.
Shipping supervisor or shift leader will either run a total or verify by delivery slip that the quantities recorded on the Proof of Billing report agrees with delivery slips.
Once complete the info will be forwarded to the Accounting Department for invoicing.
Resource Name Tasks to Perform
Shipping Supervisor or Shipping Shift Leader
Creates the loading priority.
Print any pre-load documentation needed.
Forklift Driver Document the order and load the trailer.
Verify quantities loaded versus produced
Report any issues with the material release to the shipping supervisor/shift leader
156
Unscheduled Downtime Procedures
For any and all unscheduled downtime the plant should notify all appropriate individuals.
− Provide IT with details on the type of system outage/issue you are having.
o Notify every department when the system is up and running.
Onsite Warehouse Process
Units that are actively coming down the production line will need to be moved to a designated area (Inventory Location spreadsheet) so they can be properly scanned into an inventory location when the system is available.
Units that are shipped during the downtime will need to be recorded.
o Pull one tag from each unit that is loaded onto the trailer
o Attached all load tags and the manual BOL to the back of the Downtime Unit Tracking spreadsheet. Please note any additional information on the spreadsheet
o Provide all information to the accounting department
o When the system is available you can either use the online procedure for <Enter a Manual Shipment> or use the RF units to ship the product through BVP.
For loads that were started but not finished prior to the downtime.
o Pull one tag from each unit that is loaded onto the trailer
o Attached all load tags and the manual BOL to the back of the Downtime Unit Tracking spreadsheet. Please note the pick list that was already created, how many units were already loaded.
o Provide all information to the accounting department
o When the system is available you can either use the online procedure or use the RF units to ship the product through BVP or update the Pick List confirm screen.
Go to the Pick List Confirmation screen (PLCONFIRM)
Find the Pick list
Select the order item that needs to have units added manually
Enter the Unit, Quantity and Unit ID.
Save before exiting the Pallet Details screen
Tab through the line items fields
o Save the PLCONFIRM screen and finish the Pick list.
NOTE: These steps are outlined within the Enter a Manual Shipment procedure- beginning with Step # 13 to the end.

157
Offsite Warehouse Process
• Units that are received during the downtime need to be moved to a designated area (Inventory Location spreadsheet) so they can be properly scanned into an inventory location when the system is available.
• Units that are shipped during the downtime will need to be recorded.
Pull one tag from each unit that is loaded onto the trailer
Attached all load tags and the manual BOL to the back of the Downtime Unit Tracking spreadsheet. Please note any additional information on the spreadsheet
Provide all information to accounting department
When the system is available you can either use the online procedure for <Enter A Manual Shipment> or use the RF units to ship the product through BVP.
• For loads that were started but not finished prior to the downtime.
Pull one tag from each unit that is loaded onto the trailer
Attached all load tags and the manual BOL to the back of the Downtime Unit Tracking spreadsheet. Please note the pick list that was already created, how many units were already loaded.
Provide all information to the accounting department
When the system is available you can either use the online procedure for use the RF units to ship the product through BVP or update the Pick List confirm screen.
o Go to the Pick List Confirmation screen (PLCONFIRM)
o Find the Pick list
o Select the order item that needs to have units added manually
o Enter the Unit, Quantity and Unit ID.
o Save before exiting the Pallet Details screen
o Tab through the line items fields
o Save the PLCONFIRM screen and finish the Pick list.
NOTE: These steps are outlined within the Enter a Manual Shipment procedure- beginning with Step # 13 to the end.
Load tags
If BVP is down it is acceptable to use PCS finished goods load tags in conjunction with the load tag form. However, every unit still has to be recreated in BVP once the system returns to normal. If you are unable to produce load tags from any system use the load tag form to record all unit information. When the system is available, load tags will need to be generated from the PRTTAG screen within BVP.
Documents referenced within this documention are located on your shared drive. The spreadsheets are located in one document under each tab.
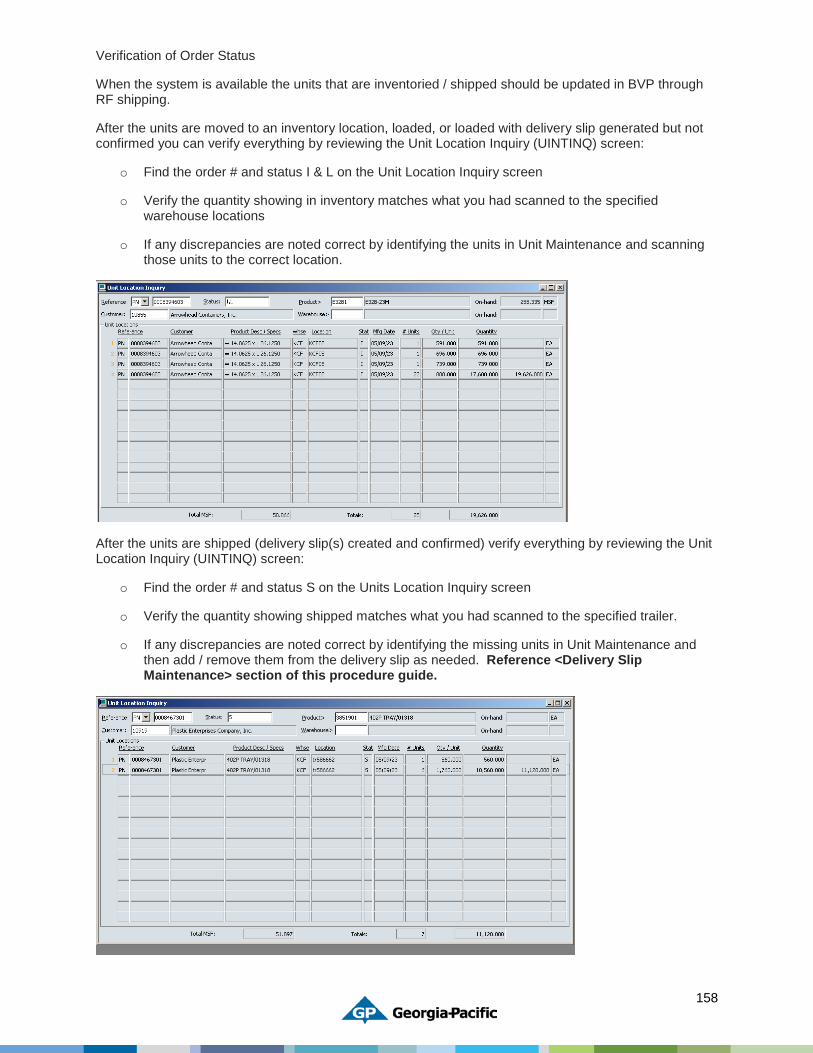
158
Verification of Order Status
When the system is available the units that are inventoried / shipped should be updated in BVP through RF shipping.
After the units are moved to an inventory location, loaded, or loaded with delivery slip generated but not confirmed you can verify everything by reviewing the Unit Location Inquiry (UINTINQ) screen:
o Find the order # and status I & L on the Unit Location Inquiry screen
o Verify the quantity showing in inventory matches what you had scanned to the specified warehouse locations
o If any discrepancies are noted correct by identifying the units in Unit Maintenance and scanning those units to the correct location.
After the units are shipped (delivery slip(s) created and confirmed) verify everything by reviewing the Unit Location Inquiry (UINTINQ) screen:
o Find the order # and status S on the Units Location Inquiry screen
o Verify the quantity showing shipped matches what you had scanned to the specified trailer.
o If any discrepancies are noted correct by identifying the missing units in Unit Maintenance and then add / remove them from the delivery slip as needed. Reference <Delivery Slip Maintenance> section of this procedure guide.

159
Subscribe to BVP Aged Report
Offsite warehouses can ask the GP Plant controller to subscribe them to the Aging Report. The plant needs to follow these instructions:
In SQL reporting there is a drop down out to the right of the report. They will select subscribe then it will let them enter all the information to include on the report and how often to send it.