Glass Installation Guide 0710 - Stiles Custom Metal Installation Guide 0710.pdf · Table of...
8
Table of Contents Glass Installation Overview 1 Measuring for Glass 2 Opening Preparation 3 Glazing Tape Application 4 Glass Installation 5 Reveal Caulking & Stop Installation 6 Fasteners & Face Caulking 7 Our technical manuals are prepared as tools designed to inform our customers of technical data as it relates to our products and services. It is our goal to help you make informed decisions when designing, specifying, ordering, installing, or maintaining Stiles products. Stiles makes no guarantee as to the accuracy of information obtained from outside sources. Whenever possible, links will be provided for additional information, and sources cited. ©2010 Stiles Custom Metal, Inc. 0710 Glass Installation Guide For Hollow Metal Doors & Frames Stiles Steel Door + Window Systems ® 1885 Kinser Road Ceres CA USA 95307 T 209 / 538-3667 F 209 / 538-2776 www.stilesdoor.com i
Transcript of Glass Installation Guide 0710 - Stiles Custom Metal Installation Guide 0710.pdf · Table of...
Table of Contents
Glass Installation Overview 1
Measuring for Glass 2
Opening Preparation 3
Glazing Tape Application 4
Glass Installation 5
Reveal Caulking & Stop Installation 6
Fasteners & Face Caulking 7
Our technical manuals are prepared as tools designed to inform our customers of technical data as it relates to our products and services. It is our goal to help you make informed decisions when designing, specifying, ordering, installing, or maintaining Stiles products.
Stiles makes no guarantee as to the accuracy of information obtained from outside sources. Whenever possible, links will be provided for additional information, and sources cited.
©2010 Stiles Custom Metal, Inc. 0710
Glass Installation Guide For Hollow Metal Doors & Frames Stiles
Steel Door + Window Systems
®
1885 Kinser Road Ceres CA USA 95307
T 209 / 538-3667 F 209 / 538-2776 www.stilesdoor.com
i
Glass Installation Overview
These standard glazing procedures have been developed to insure that glass is ordered and installed in accordance with standard glass industry recommendations. The step-by-step instructions contained herein are a guide based upon the installation of common single-glazed glass. Specialty glass, such as insulated or coated glass products may require procedures not contained in this guide. Consult Stiles for specific glazing instructions for specialty glass products.
■ Types of Single-Glazed Glass Included in this Guide
1. Tempered glass 2. Wire glass 3. Laminated glass (not including bullet-resistant or polycarbonate) 4. Architectural textured glass (pattern glass)
■ Recommended Tools and Supplies Required for Glass Installation
1. Tape Measure 2. Rubber Coated Gloves 3. Phillips Screwdriver 4. Straight-edged Razor Blades 5. Utility Knife 6. Caulking Gun 7. Closed Cell Double-Sided Adhesive Glazing Tape 8. Clear Silicone Sealant 9. Denatured Alcohol 10. Glass Cleaner and Cotton Towels
A continuously welded assembly alone will not ensure a watertight condition. Whenever possible, it is strongly recommended that glazing material be installed on the exterior rabbet of the frame assembly, which will help act as a deterrent to water penetration. Stiles does not control the installation of our products or application of perimeter caulking, joint sealants, or glazing materials. This work should be specified in the Installation / Glass / Glazing / Caulking section of the specifications. These are recommended guidelines for the installation of single-glazed glass into exterior hollow metal. A primary source of glass failure is the interface of the glass edge and the hollow metal frame. The glazier must ensure proper glass reveal and sealant procedures are followed as specified in the contract documents. It is important to note that silicone can not be painted; however, colors to compliment finishes are available. The sealant tested was Dow-Corning 795 silicone. It is the responsibility of the general contractor to ensure that this or an equivalent sealant is used. Silicone sealant cannot be painted; however, colors to compliment finishes are available.
1 ©2010 Stiles Custom Metal, Inc. 0710
OPENING WIDTH
OPENING HEIGHT
GLAZING POCKET WIDTH
GLASS STOP HEIGHT
GLAZING REVEAL
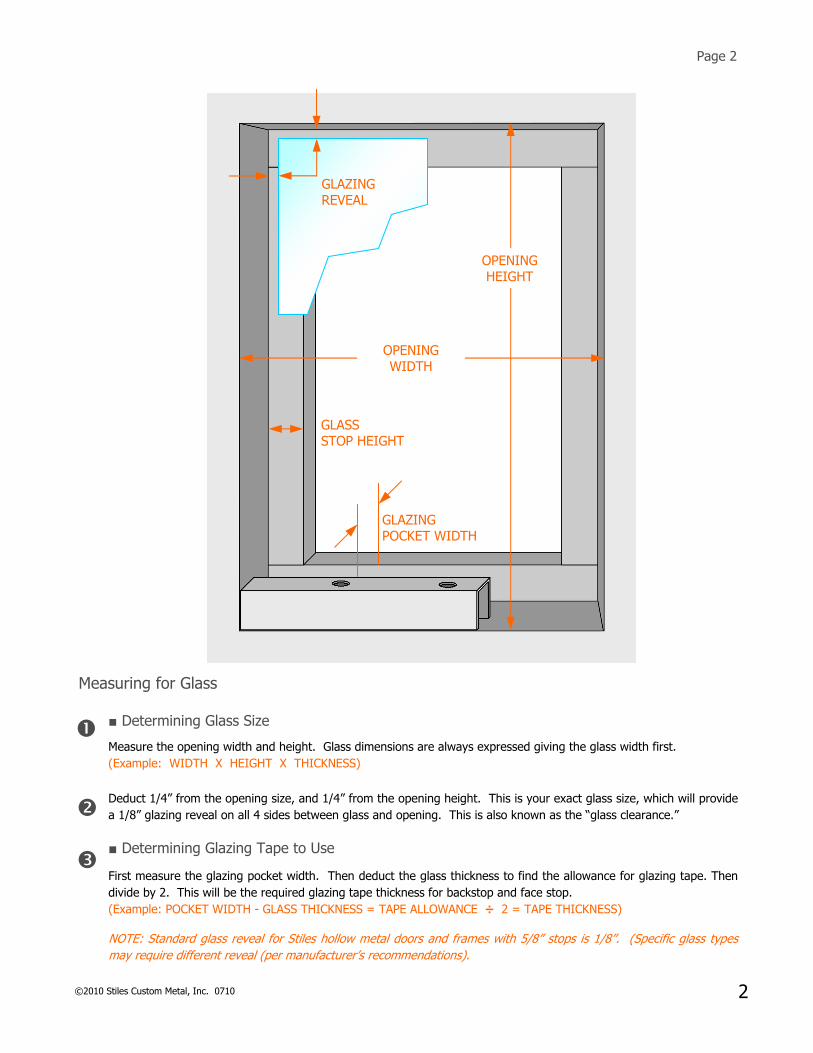
Measuring for Glass
■ Determining Glass Size
Measure the opening width and height. Glass dimensions are always expressed giving the glass width first. (Example: WIDTH X HEIGHT X THICKNESS) Deduct 1/4” from the opening size, and 1/4” from the opening height. This is your exact glass size, which will provide a 1/8” glazing reveal on all 4 sides between glass and opening. This is also known as the “glass clearance.”
■ Determining Glazing Tape to Use
First measure the glazing pocket width. Then deduct the glass thickness to find the allowance for glazing tape. Then divide by 2. This will be the required glazing tape thickness for backstop and face stop. (Example: POCKET WIDTH - GLASS THICKNESS = TAPE ALLOWANCE ÷ 2 = TAPE THICKNESS)
NOTE: Standard glass reveal for Stiles hollow metal doors and frames with 5/8” stops is 1/8”. (Specific glass types may require different reveal (per manufacturer’s recommendations).
Page 2
2 ©2010 Stiles Custom Metal, Inc. 0710
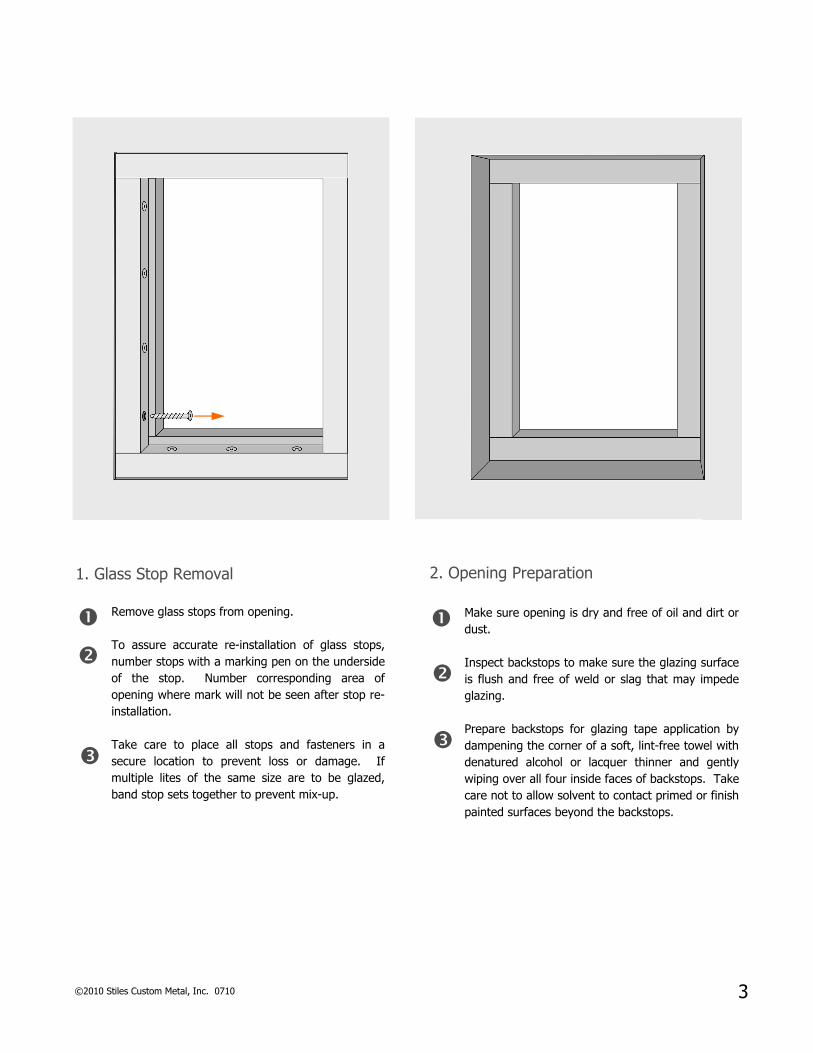
1. Glass Stop Removal
Remove glass stops from opening. To assure accurate re-installation of glass stops, number stops with a marking pen on the underside of the stop. Number corresponding area of opening where mark will not be seen after stop re-installation. Take care to place all stops and fasteners in a secure location to prevent loss or damage. If multiple lites of the same size are to be glazed, band stop sets together to prevent mix-up.
2. Opening Preparation
Make sure opening is dry and free of oil and dirt or dust. Inspect backstops to make sure the glazing surface is flush and free of weld or slag that may impede glazing. Prepare backstops for glazing tape application by dampening the corner of a soft, lint-free towel with denatured alcohol or lacquer thinner and gently wiping over all four inside faces of backstops. Take care not to allow solvent to contact primed or finish painted surfaces beyond the backstops.
3 ©2010 Stiles Custom Metal, Inc. 0710
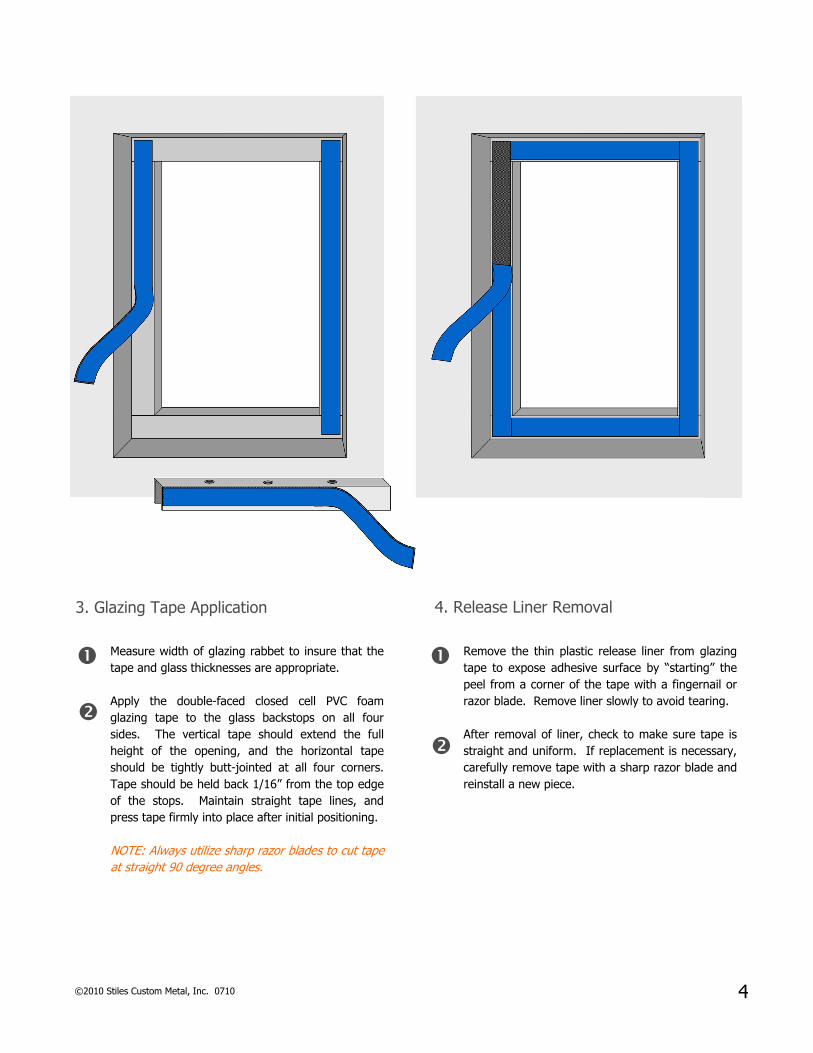
3. Glazing Tape Application
Measure width of glazing rabbet to insure that the tape and glass thicknesses are appropriate. Apply the double-faced closed cell PVC foam glazing tape to the glass backstops on all four sides. The vertical tape should extend the full height of the opening, and the horizontal tape should be tightly butt-jointed at all four corners. Tape should be held back 1/16” from the top edge of the stops. Maintain straight tape lines, and press tape firmly into place after initial positioning. NOTE: Always utilize sharp razor blades to cut tape at straight 90 degree angles.
4. Release Liner Removal
Remove the thin plastic release liner from glazing tape to expose adhesive surface by “starting” the peel from a corner of the tape with a fingernail or razor blade. Remove liner slowly to avoid tearing. After removal of liner, check to make sure tape is straight and uniform. If replacement is necessary, carefully remove tape with a sharp razor blade and reinstall a new piece.
4 ©2010 Stiles Custom Metal, Inc. 0710
5. Setting Block Installation 6. Glass Installation
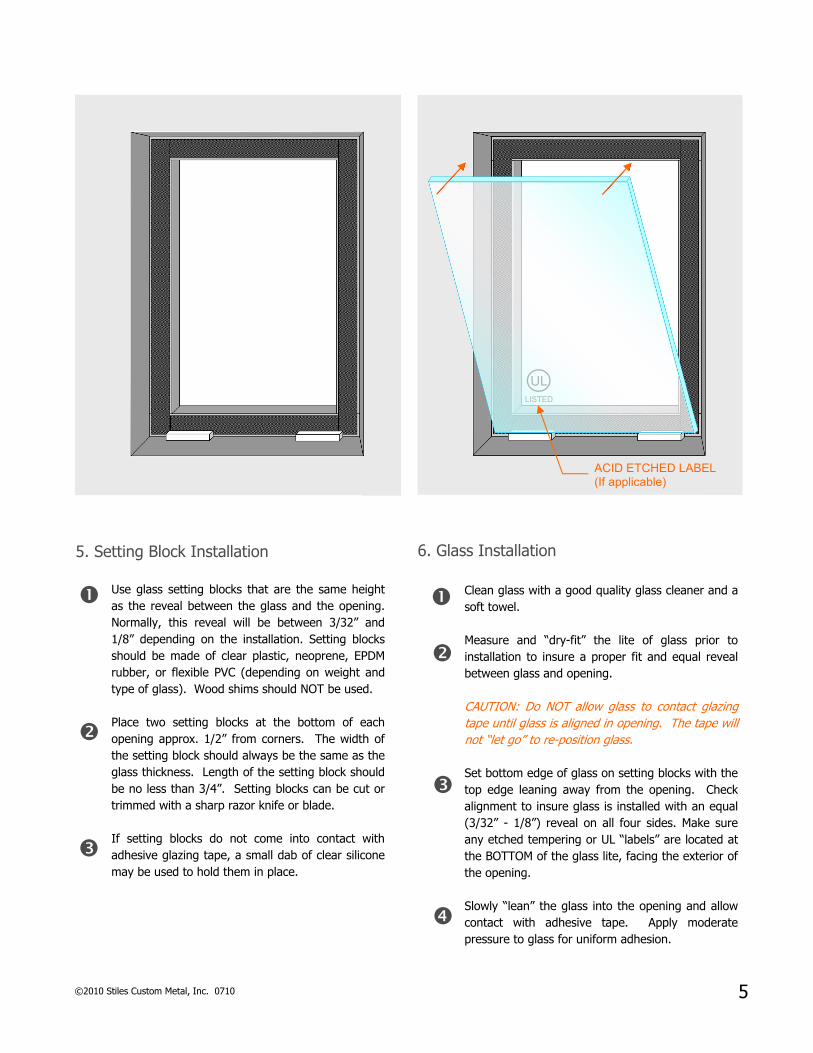
Use glass setting blocks that are the same height as the reveal between the glass and the opening. Normally, this reveal will be between 3/32” and 1/8” depending on the installation. Setting blocks should be made of clear plastic, neoprene, EPDM rubber, or flexible PVC (depending on weight and type of glass). Wood shims should NOT be used. Place two setting blocks at the bottom of each opening approx. 1/2” from corners. The width of the setting block should always be the same as the glass thickness. Length of the setting block should be no less than 3/4”. Setting blocks can be cut or trimmed with a sharp razor knife or blade. If setting blocks do not come into contact with adhesive glazing tape, a small dab of clear silicone may be used to hold them in place.
Clean glass with a good quality glass cleaner and a soft towel. Measure and “dry-fit” the lite of glass prior to installation to insure a proper fit and equal reveal between glass and opening. CAUTION: Do NOT allow glass to contact glazing tape until glass is aligned in opening. The tape will not “let go” to re-position glass. Set bottom edge of glass on setting blocks with the top edge leaning away from the opening. Check alignment to insure glass is installed with an equal (3/32” - 1/8”) reveal on all four sides. Make sure any etched tempering or UL “labels” are located at the BOTTOM of the glass lite, facing the exterior of the opening. Slowly “lean” the glass into the opening and allow contact with adhesive tape. Apply moderate pressure to glass for uniform adhesion.
UL
LISTED
ACID ETCHED LABEL (If applicable)
5 ©2010 Stiles Custom Metal, Inc. 0710
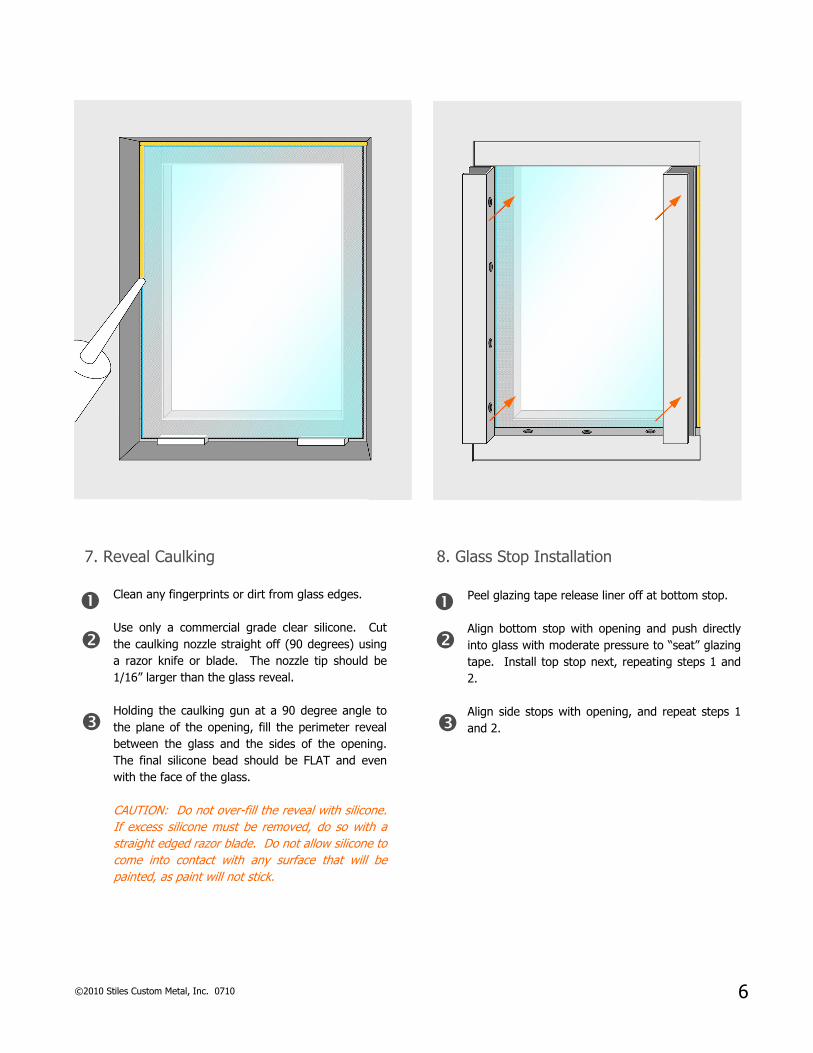
7. Reveal Caulking
Clean any fingerprints or dirt from glass edges. Use only a commercial grade clear silicone. Cut the caulking nozzle straight off (90 degrees) using a razor knife or blade. The nozzle tip should be 1/16” larger than the glass reveal. Holding the caulking gun at a 90 degree angle to the plane of the opening, fill the perimeter reveal between the glass and the sides of the opening. The final silicone bead should be FLAT and even with the face of the glass. CAUTION: Do not over-fill the reveal with silicone. If excess silicone must be removed, do so with a straight edged razor blade. Do not allow silicone to come into contact with any surface that will be painted, as paint will not stick.
8. Glass Stop Installation
Peel glazing tape release liner off at bottom stop. Align bottom stop with opening and push directly into glass with moderate pressure to “seat” glazing tape. Install top stop next, repeating steps 1 and 2. Align side stops with opening, and repeat steps 1 and 2.
6 ©2010 Stiles Custom Metal, Inc. 0710
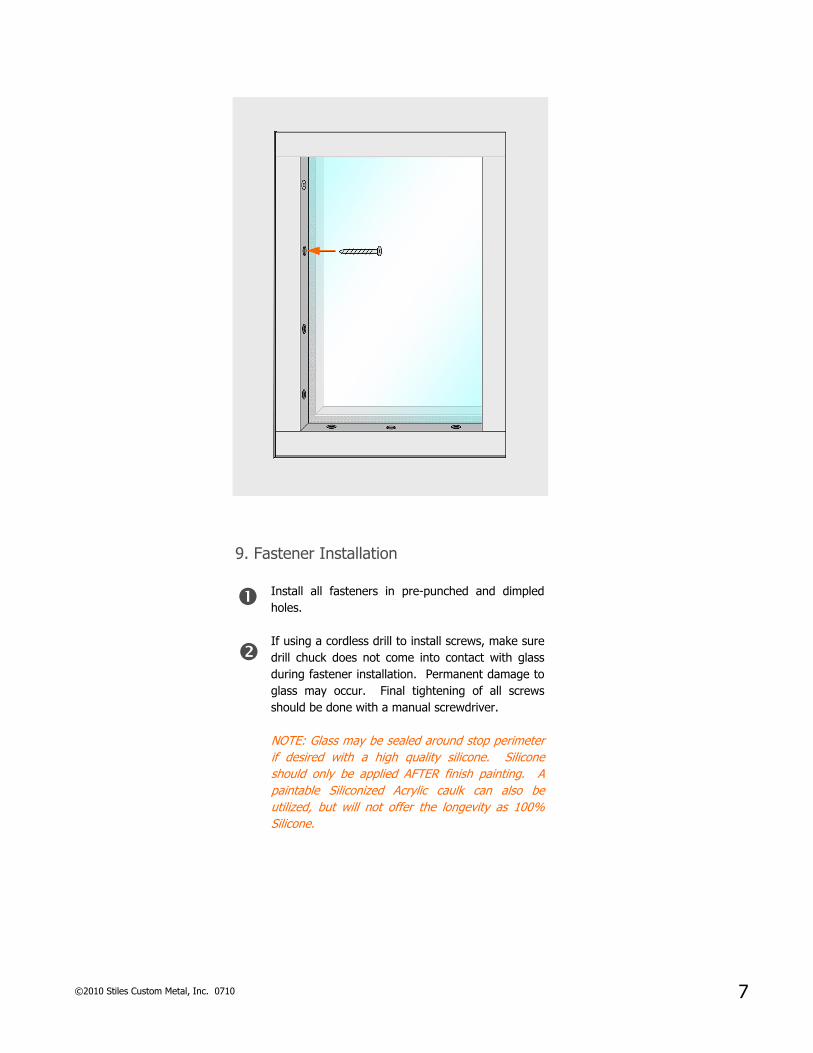
9. Fastener Installation
Install all fasteners in pre-punched and dimpled holes. If using a cordless drill to install screws, make sure drill chuck does not come into contact with glass during fastener installation. Permanent damage to glass may occur. Final tightening of all screws should be done with a manual screwdriver. NOTE: Glass may be sealed around stop perimeter if desired with a high quality silicone. Silicone should only be applied AFTER finish painting. A paintable Siliconized Acrylic caulk can also be utilized, but will not offer the longevity as 100% Silicone.
7 ©2010 Stiles Custom Metal, Inc. 0710