GFI Network Server Monitor 6 Manual - Web, Email and ... Network Server Monitor 6 Manual By GFI...
154
GFI Network Server Monitor Contents • i GFI Network Server Monitor 6 Manual By GFI Software Ltd.
-
Upload
nguyenkiet -
Category
Documents
-
view
227 -
download
4
Transcript of GFI Network Server Monitor 6 Manual - Web, Email and ... Network Server Monitor 6 Manual By GFI...

GFI Network Server Monitor Contents • i
GFI Network Server Monitor 6
Manual
By GFI Software Ltd.
Contents • ii Monitor Network Server Monitor
http://www.gfi.com
Email: [email protected]
Information in this document is subject to change without notice. Companies, names, and data used in examples herein are fictitious unless otherwise noted. No part of this document may be reproduced or transmitted in any form or by any means, electronic or mechanical, for any purpose, without the express written permission of GFI SOFTWARE Ltd. GFI Network Server Monitor is copyright of GFI SOFTWARE Ltd. 2000-2005 GFI SOFTWARE Ltd. All rights reserved. Version 6.0 last updated: June 21, 2005

GFI Network Server Monitor Contents • iii
Contents
Introduction 1 Introduction to GFI Network Server Monitor (NSM).......................................................1 Key features ...................................................................................................................1 GFI Network Server Monitor components .....................................................................6
Network Monitor Engine....................................................................................6 Network Server Monitor configuration ..............................................................6 Network Server Monitor Attendant....................................................................7
License Scheme.............................................................................................................7
Installing GFI Network Server Monitor 8 System Requirements....................................................................................................8 Installation Procedure ....................................................................................................8 Entering your License key after installation .................................................................12 Changing NSM Engine Service Logon Credentials after Installation ..........................13
Configuring GFI Network Server Monitor 14 Getting started with GFI Network Server Monitor ........................................................14 Quick Start Wizard .......................................................................................................14 Creating monitor checks ..............................................................................................17 Configure monitor check properties .............................................................................21
Configure General parameters .......................................................................22 Configure Check (functional) Parameters.......................................................23 Define Logon credentials ................................................................................24 Configure Notifications Parameters ................................................................27 Run an external file after an alert is triggered.................................................29 Restart Computers / Services after an alert is triggered.................................31 Set up Dependencies......................................................................................32 Define Maintenance schedules.......................................................................33
Inheriting check properties...........................................................................................34 How to inherit properties from a folder............................................................35
Enable, disable or immediately run a check ................................................................36 Delete monitor checks..................................................................................................36 Move checks between existing folders ........................................................................36 Copy checks from/to existing folders ...........................................................................37
Configuring Monitor Functions 39 Introduction ..................................................................................................................39 Network/Internet Monitor functions ..............................................................................39
HTTP/HTTPs function.....................................................................................39 FTP .................................................................................................................41 IMAP Mail Server availability ..........................................................................41 NNTP News Server availability .......................................................................42 POP3 Mail Server availability..........................................................................43 SMTP Mail Server availability .........................................................................44 NTP Time Server availability...........................................................................45 DNS Server .....................................................................................................46 ICMP/Ping .......................................................................................................47 Generic TCP/IP check ....................................................................................48
SNMP Monitoring Checks............................................................................................49 Generic SNMP function ..................................................................................49
Windows OS Generic Checks......................................................................................51 Generic VB Script ...........................................................................................51 OS Object Performance Counter ....................................................................52

Contents • iv Monitor Network Server Monitor
Command Line executable output ..................................................................53 Process Properties (Memory/CPU/Handles etc..) ..........................................54
Windows Operating System Checks............................................................................55 Event Log ........................................................................................................55 File Existence..................................................................................................57 Disk Space......................................................................................................58 Services ..........................................................................................................58 CPU Usage .....................................................................................................60 Directory / Folder Size ....................................................................................60 File Size ..........................................................................................................61 LDAP query.....................................................................................................62 Physical disk conditions check........................................................................63 Printer availability ............................................................................................64 Process Running.............................................................................................65 Users and Group membership........................................................................66
Windows Applications Checks .....................................................................................67 Generic ISA Server Check..............................................................................67 Generic Exchange Server Check....................................................................68 Generic MS SQL / ADO Check.......................................................................69
Windows OS Databases Checks .................................................................................70 Generic – ODBC .............................................................................................70 Oracle..............................................................................................................72 Terminal Services Port Check ........................................................................73 Terminal Services Physical Logon Check ......................................................74
Linux / Unix OS Generic Checks .................................................................................75 Generic Secure Shell (SSH) Check................................................................75
Linux / Unix Operating System Checks .......................................................................77 File existence Check.......................................................................................77 CPU usage Check ..........................................................................................78 Directory size Check .......................................................................................78 File size Check................................................................................................79 Printer availability Check.................................................................................80 Process Running Check .................................................................................81 Users and groups membership Check ...........................................................82 Disk Partition Checks......................................................................................83 Disk Space Check...........................................................................................84
Monitoring Check Folders 87 Introduction ..................................................................................................................87 Creating new folders ....................................................................................................87 Configure properties of existing folders .......................................................................89 Delete existing folders..................................................................................................89
Monitoring Checks Status 91 Viewing the state of checks .........................................................................................91 Check state indicators..................................................................................................92 Remote viewing checks status.....................................................................................92
Global Alerting Options 95 Introduction ..................................................................................................................95 Mail Server Settings.....................................................................................................95
Adding a Mail server .......................................................................................96 Edit existing mail server details.......................................................................97 Formatting the Email Message .......................................................................97
Network Alerts Global Settings ....................................................................................98 Format Network Message...............................................................................99
SMS/Pager Alerts Global Settings ...............................................................................99 Setup for TAP/UCP compliant SMS Service Center.....................................100 Add new SMSC providers.............................................................................102

GFI Network Server Monitor Contents • v
Changing SMSC providers details ................................................................103 Setup for direct mobile phone connection to server .....................................103 Additional Notes............................................................................................105 Format SMS/Pager message........................................................................105
Message Templates...................................................................................................105
General Options 107 Introduction ................................................................................................................107 Uncertain Results Settings.........................................................................................107 Web Server Settings ..................................................................................................108
Configuring IIS as the web server.................................................................109 Securing the Remote Monitor .......................................................................112
Proxy Server Settings ................................................................................................114 Log File Settings ........................................................................................................115
Users and Groups 117 Introduction ................................................................................................................117 Users..........................................................................................................................117
Add a new user .............................................................................................117 Configure user’s general parameters ...........................................................118 Define working hours ....................................................................................119 Define notifications to be used......................................................................120 Add user to a group ......................................................................................120 Delete users ..................................................................................................121
Groups .......................................................................................................................121 Add a New Group .........................................................................................121 Add members to an existing group ...............................................................122 Remove Members from a group ...................................................................122 Delete a group...............................................................................................122
Reporting 123 Introduction ................................................................................................................123 Availability - Detail Report..........................................................................................123 Availability - Summary Report....................................................................................126
Network Tools 128 Enumerate Computers...............................................................................................128 Enumerate Processes................................................................................................129 DNS Lookup...............................................................................................................131 Whois .........................................................................................................................132 Traceroute..................................................................................................................133 SNMP Audit................................................................................................................134 SNMP Walk................................................................................................................135
Other features 137 Export Configurations ................................................................................................137 Import Configurations.................................................................................................137 Version Information....................................................................................................138 Licensing ....................................................................................................................139
Writing your own monitoring functions 141 Introduction ................................................................................................................141 Writing a script/function..............................................................................................141 Adding a monitor function written in VBscript ............................................................142 WMI (Windows Management Instrumentation)..........................................................144 ADSI (Active Directory Service Interfaces) ................................................................144

Contents • vi Monitor Network Server Monitor
Troubleshooting 145 Introduction ................................................................................................................145 Knowledgebase..........................................................................................................145 Request support via e-mail ........................................................................................145 Request support via web chat....................................................................................146 Request support via phone ........................................................................................146 Web Forum ................................................................................................................146 Build notifications .......................................................................................................146
Index 147

GFI Network Server Monitor Introduction • 1
Introduction
Introduction to GFI Network Server Monitor (NSM) GFI Network Server Monitor is a network & server monitoring tool that allows administrators to monitor the network for failures or irregularities automatically. With GFI Network Server Monitor, you can identify problems and fix unexpected conditions before your users (or managers) report them to you! GFI Network Server Monitor maximizes network availability by monitoring all aspects of your servers (including UNIX/LINUX servers), workstations and devices (routers, etc.). When it detects a failure, GFI Network Server Monitor can alert you by email, pager or SMS, as well as take corrective action by, for example, rebooting the machine, restarting a service or running a script or external file. GFI Network Server Monitor can also choose the type of alert to be used, depending on the time that an important event (e.g. check failure) occurs, and also in relation to the working hours you specify during the setup of the intended recipients. In GFI Network Server Monitor, monitoring checks are created using wizards. A wizard called the Quick Start Wizard, that can create a batch of checks, has also been included. This wizard enables you to quickly create a number of checks at one go - depending on computer OS, role, etc - making it possible for GFI Network Server Monitor to be up and running in the least time possible. In GFI Network Server Monitor all monitoring checks are organised in folders. You can configure each monitoring check individually or you can choose to configure all the checks in a folder simultaneously through inheritance. Inheritance enables you to setup the required parameters from the folder properties and pass them on to the contained checks. Inheritance conveniently avoids having to setup checks, one by one.
Key features Enterprise class architecture GFI Network Server Monitor consists mainly of the monitoring service called the GFI Network Server Monitor 6.0 Engine, the configuration and management UI program called GFI Network Server Monitor Configuration and an alerts/notifications service control called GFI Network Server Monitor Attendant. No agent software needs to be installed on the computers that you wish to monitor. The Network Monitor Engine is multi-threading and can run 24 checks at a time. This software architecture allows for high reliability and scalability to monitor both large and small networks.

2 • Introduction GFI Network Server Monitor
Setup monitor checks using wizards. Check setup wizards help the user to quickly setup an efficient monitoring system using the built-in checks available in just few steps. It is also possible to create a batch of checks simultaneously using the Quick Start Wizard. Property Inheritance Since GFI Network Server Monitor organizes all checks in folders, it is possible to change the properties of a folder and pass these settings on to the checks contained in that folder. This feature, referred to as property inheritance, conveniently avoids having to repeat the same parameter configuration for every check contained in a folder. Alert notification via Email, Pager or SMS When it detects a failure, GFI Network Server Monitor can send alerts via SMS/pager, email or a network message. SMS messages are sent through either an SMS service provider (SMSC), or directly through a connected GSM phone/modem. GFI Network Server Monitor can also choose the type of notification (alert) to be sent depending on the time that an important event (e.g. check failure) occurs and in relation to the working hours specified for the intended recipients. In built Exchange 2000/2003 monitoring Out of the box, GFI Network Server Monitor checks the status of your Exchange Server by monitoring critical Exchange services and performance counters (Information Store, mailboxes, SMTP service, etc.). Monitor your database servers (SQL/ORACLE/ODBC) GFI Network Server Monitor can check for the availability of all leading database applications. Out of the box, it can monitor Microsoft SQL server via ADO and Oracle via SQL*Net. Oracle servers can be monitored by a TNS ping check and by a logon/logoff. Other databases such as Access, FoxPro, Paradox, SyBase, Informix, IBM DB2 and many more, can be monitored via ODBC. Monitor remote Event Logs GFI Network Server Monitor can scan Windows Event logs on local- or remote computers and look for specific Event Sources, Categories, and Event ID's as well as for patterns in the Description of the Event. In addition it can look for multiple events occurring in a specific time interval, for example antivirus alerts posted in the last 30 minutes. Built-in checks for Windows OS / Windows OS based computers • Generic VB Script – Enables you to customise/build monitoring
checks using your own VBscript functions. • OS Object performance counter – Determines the performance of
applications by checking the properties of OS objects on target machines.
• Command Line executable output – Determines the status of target computers by checking the text output of a command line tool.
• Process Properties function – Checks the properties of processes running on target computers (e.g. Memory/CPU/Handles).

GFI Network Server Monitor Introduction • 3
• Event Log function – Verifies if the specified (Windows) events, occurred on target machine(s).
• File existence function – Checks for the existence of a particular file; e.g. results of scheduled batch jobs.
• Disk space function – Checks for available disk space. • Services function – Checks if the specified Services are running on
local or remote machine. • CPU usage function – Monitors and restricts for processor usage. • Directory size function – Monitors and restricts the size of a
specified directory. • File size function – Monitors and restricts the size of specified files. • LDAP Query – Checks the status of LDAP services on target
computers. • Physical Disk Condition function –Checks the physical health of
disk drives on windows based target computers. • Disk drive function - Monitors the physical status of specified disk
drives. • Printer availability function – Checks for the status of printers
connected to target computers. • Process Running function – Checks that processes are running on
specified target computers. • Users and Groups Membership function – Monitors user groups
against the presence of unauthorized users. Built-in checks for Windows Applications • Generic ISA Server check – Monitors the status of ISA Server
services. • Generic Exchange Server check – Monitors the status of
Exchange services and important performance counters. • Generic MS SQL/ADO check – Monitors the status of MS SQL
databases using ADO. Built-in checks for Databases • ODBC function – Checks the availability of a database using
ODBC. • Oracle function – Checks the availability of Oracle servers (NOTE:
requires SQL*NET). Built-in checks for Network/Internet protocols and services • HTTP function – Checks the availability of HTTP and Https sites. • FTP function – Checks the availability of an FTP server/site. • IMAP function – Checks the availability of IMAP mail servers by
remotely connecting to the IMAP port. • NNTP news server function - Checks the availability of NNTP
news services. • POP3 server function - Checks POP3 servers by establishing a
connection and doing a handshake.

4 • Introduction GFI Network Server Monitor
• SMTP server function - Monitors mail servers by establishing a connection and doing a handshake in order to check if the SMTP protocol is working correctly.
• Terminal services: Port check - Checks if the terminal port is open/available on local and remote servers.
• NTP timeserver function – Monitors the status of timeservers. • DNS server function - Checks DNS servers by reading an 'A'
record and verifying the result. • ICMP ping function - Checks a remote host for availability. • Generic TCP/IP port function – Checks if a port availability and
response. Built-in checks for SNMP (Simple Network Management Protocol) • SNMP function – Monitors specified variables on remote
computers or devices via the SNMP GET message. Built-in checks for Linux/Unix OS • Generic Secure Shell (SSH) check – Allows you to create custom
monitor functions which can be remotely executed on Unix/Linux based computers through the Secure Shell (SSH) service running on that computer.
• Physical Disk Condition function – Checks the physical health of disk drives on Linux/Unix based target computers.
• File existence function – Checks for the existence of a particular file on Linux/Unix based computers; e.g. results of scheduled batch jobs.
• CPU usage function – Checks and restricts processor usage on Linux/Unix based target computers.
• Directory size function – Checks and restricts the size of a specified directory on Linux/Unix based target computers.
• File size function – Checks and restricts the size of a specified file on Linux/Unix based target computers.
• Printer availability function – Checks the status of network printers connected to Linux/Unix based target computers.
• Process Running function – Checks if a specified process is running on Linux/Unix based target computers.
• Users and Groups Membership function – Monitors user groups on Linux/Unix based target computers against unauthorized users.
• Disk Partition Check – Checks the state of mounted drives on Linux/Unix based target computers.
• Disk space function – Checks and restricts the available hard disk space on Linux/Unix based target computers.
Take corrective action automatically When an important event (e.g. check failure) occurs, GFI Network Server Monitor can attempt to correct a problem by restarting a failed service, reboot a target computer/server or launch an executable, batch or VBScript file. Monitor processes, services & CPU usage

GFI Network Server Monitor Introduction • 5
GFI Network Server Monitor enables you to check for critical processes and services running on local and remote computers. You can also monitor the CPU usage of a machine to ensure that applications are running properly. Build custom network monitor checks using scripts Although GFI Network Server Monitor includes an extensive set of default monitoring functions, you can build your own custom checks using a scripting language such as VBscript or shell scripts for Unix environments. SSH (Secure Shell) is used for remote connections to Unix based computers. In VBscript, you can make use of WMI and ADSI. WMI is an interface to a broad range of hardware/software/OS-related properties of a computer, allowing you to perform almost any check. Using ADSI you can interface to Active Directory. GFI Network Server Monitor includes a library of sample scripts, and others are continuously being added to the GFI website. Monitor users, groups & other Active Directory information Use GFI Network Server Monitor to monitor directory information. For example, monitor group membership of the domain admins group. You can also check user accounts (locked out, disabled, etc.), computer accounts, groups, group membership, organizational units, and so on. A subset of NTDS (NT4-based SAM account database) can be queried too. Additional Network Support Tools Additional Network support tools have been included in GFI Network Server Monitor to help you troubleshoot your network. These tools include:- • Enumerate Computers function – Searches your network for a
list of domains, workgroups and constituent computers. • Enumerate Processes function – Searches for processes running
on local or remote computers. • DNS Lookup function – Resolves Domain Names to their
corresponding IP address. • Whois function – Looks for information related to a specified
domain, or IP address. • Traceroute function – Shows the network path that GFI Network
Server Monitor used to reach a target computer. • SNMP Audit – Performs an SNMP Audit in order to define weak
strings. • SNMP Walk – Allows you to receive SNMP information from an
SNMP Server. Reporting GFI Network Server Monitor allows you to create reports that detail the availability of your network resources. Such reports can be created in HTML as well as in XML/CSV if they need to be imported by other favorite applications. Other features • Allows you to specify maintenance periods to avoid alerts being
sent during scheduled maintenance. • Allows you to store check logs to text file / event log.

6 • Introduction GFI Network Server Monitor
• Allows you to setup dependencies to avoid receiving multiple alerts when the servers or services on which other computers depend, are down or unavailable.
• Allows you to setup a read-only mode for users who are not authorised to make changes to the configuration.
GFI Network Server Monitor components GFI Network Server Monitor is a client/server application, based on a central monitoring service able to run on Windows NT or higher. This application monitors servers and workstations in your LAN, WAN or even outside your enterprise without the need of any other additional software. This software architecture allows for high reliability and scalability to monitor both large and small networks. GFI Network Server Monitor consists of 3 main modules which are:- • NSMUI.exe – Network Monitor configuration and user interface. • NSMENGINE.exe – Network Monitor engine/service (multi-
threading engine able to run 24 checks at a time). • NSMATTENDANT.exe – Service which controls Alerts,
Notifications, Web server access, etc..
Network Monitor Engine The GFI Network Server Monitor Engine is a windows service that polls the servers in your LAN/WAN for availability at specific time intervals. This is a multithreading service, allowing 24 simultaneous checks to take place at the same time. NOTE: GFI Network Server Monitor only makes use of the protocols and application layers available in the Operating System for running its checks, thus no agent software installation is required on the servers to be monitored.
Network Server Monitor configuration The GFI Network Server Monitor configuration program is the user interface to the GFI Network Server Monitor engine. Use this module to configure all settings required for GFI Network Server Monitor. To launch this module go on Start > GFI Network Server Monitor program group > GFI Network Server Monitor configuration.

GFI Network Server Monitor Introduction • 7
Screenshot 1 - The Network Monitor Manager
The main GFI Network Server Monitor configuration display is divided into two windows. • Tools Explorer view (left view) – Contains nodes, check folders
and tools required for the configuration and running of GFI Network Server Monitor.
• Server / Miscellaneous view (right view) – multipurpose window in which the contents and options related to the nodes selected in the Tools explorer (left) window are displayed (e.g. Clicking on Monitoring Check Status node in the Tools Explorer, displays the status of monitoring checks in this window).
The GFI Network Server Monitor configuration module can be installed on any local or remote workstation/server running Windows 2000 or higher. GFI Network Server Monitor configuration connects to the GFI Network Server Monitor engine for retrieval of monitoring data.
Network Server Monitor Attendant The GFI Network Server Monitor attendant module is the service responsible for triggering alerts/notifications, status logging, and web server status monitoring.
License Scheme The GFI Network Server Monitor software has the following licensing scheme: 10 Server License - This license allows you to monitor up to 10 servers/workstations on your network. 25 Server License - This license allows you to monitor up to 25 servers/workstations on your network. Unlimited server license - This license allows you to monitor an unlimited number of servers/workstations on your network.

8 • Installing GFI Network Server Monitor GFI Network Server Monitor
Installing GFI Network Server Monitor
System Requirements Machines running GFI Network Server Monitor require: • Windows 2000 (SP4 or higher), 2003 or XP Pro operating systems. • Windows scripting host 5.5 or higher (Included in Internet Explorer
6 and in Service pack 2 of Internet Explorer 5.5). You can download it separately from www.microsoft.com/scripting.
• .NET Framework 1.1 Any computer that you wish to monitor: • WMI - When using checks having WMI scripts, make sure to install
WMI on every Windows NT 4 target machine being monitored. This can be downloaded for free from - www.microsoft.com/scripting.
• Windows Scripting Host 5.5 or higher – When using functions written in VB Script, make sure that target machines, have Windows Scripting Host 5.5 or higher installed. This can be downloaded for free from www.microsoft.com/scripting.
Installation Procedure The installation wizard will install the actual monitor service, the configuration module and all the required application files automatically. To start an installation: 1. Exit all Windows Programs and log on as Administrator. 2. Launch the GFI Network Server Monitor installation wizard by double-clicking on ‘NetworkServerMonitor6.exe’ and click on the ‘Next’ button to start the installation.

GFI Network Server Monitor Installing GFI Network Server Monitor • 9
Screenshot 2 - Previous Version Detected
3. The Installation Wizard will start by checking if you have previous versions of GFI Network Server Monitor installed on your computer. Specify if you want to keep any previous installation detected or instruct the wizard to uninstall it for you.
Screenshot 3 - Check for latest build
4. Choose whether you want the installation wizard to look for a newer version of GFI Network Server Monitor on the GFI website or click on the ‘Next’ button to continue with the current installation. In the license dialog, read the licensing agreement carefully. Mark ‘I Accept the Licensing agreement’ and click on the ‘Next’ button to continue.

10 • Installing GFI Network Server Monitor GFI Network Server Monitor
Screenshot 4 – Previous Installation detected.
NOTE: The following stage is required only if GFI Network Server Monitor 6 has already been installed on your computer. 5. Choose whether you want to import configuration settings from an existing installation or else continue with a new (clean) installation. Click on the ‘Next’ button to continue.
Screenshot 5 - User and License key details
NOTE: The following stage is only required during a new (clean) installation. 6. Specify the full user name, the company name and the license key. Click on the ‘Next’ button to continue.

GFI Network Server Monitor Installing GFI Network Server Monitor • 11
NOTE: By default GFI Network Server Monitor has a 30 days evaluation period. When an evaluation version is downloaded from the GFI website, a 60 days evaluation key will be automatically emailed to you following the download of the product. NOTE: After you have purchased the product, there is no need to uninstall and reconfigure GFI Network Server Monitor because you can enter the new license key directly from the GFI Network Server Monitor configuration program. For more information on the license key, please refer to ‘Entering your License key after installation’ section in this chapter.
Screenshot 6- Service Account details
7. Specify a service Account for GFI Network Server Monitor. NOTE: The GFI Network Server Monitor service must run with administrator credentials. It is recommended to provide a Domain Admin or Enterprise Admin account, because most probably, GFI Network Server Monitor will need administrative rights to access the servers on the domain. However, it is not mandatory to provide a Domain/Enterprise Admin account for every monitoring check, since separate credentials can be provided or inherited.

12 • Installing GFI Network Server Monitor GFI Network Server Monitor
Screenshot 7 - Mail Server details
NOTE: The following stage is only required during a new (clean) installation. 8. Specify the SMTP/mail server details (Hostname/IP and Port) as well as the e-mail address were generic notifications will be sent. Click on the ‘Next’ button. NOTE: You can define seperate Email notification addresses for each check from the check properties during configuration. NOTE: You can verify your settings by sending a test message. Do this by clicking on the ‘Verify Mail Settings’ button. 9. Click on the ‘Browse’ button to specify a new installation path or click on the ‘Next’ button to use the program’s default installation path (i.e. c:\Program Files\GFI\Network Server Monitor 6.0\). NOTE: The installation does not require more than 27 MB of free disk space. 10. Click on the ‘Next’ button to start the installation. After this completes, click on the ‘Finish’ button to launch GFI Network Server Monitor.
Entering your License key after installation If you have purchased GFI Network Server Monitor, launch GFI Network Server Configuration, right clicking on ‘Licensing’ in the General node and select ‘Enter License key…’ Enter the license key in the dialogue on display and click on the ‘OK’ button. NOTE: You must have a GFI Network Server Monitor license for every server that you wish to monitor. NOTE: Entering the License key should not be confused with the process of registering your company details on our website. This is important, since it allows us to give you support and notify you of

GFI Network Server Monitor Installing GFI Network Server Monitor • 13
important product news. Register on: http://www.gfi.com/pages/regfrm.htm
Changing NSM Engine Service Logon Credentials after Installation The GFI Network Server Monitor engine service account details are set up during the installation phase. There is no way to change the service credentials from the GFI Network Server Monitor 6 configuration application. The only way to change such details is as follows:- 1. Start >Settings >Control Panel > Administrative Tools >Services. 2. Double click on ‘GFI Network Server Monitor 6.0 engine’. 3. Click on the ‘Log On’ tab and make the required changes. 4. Click on the ‘OK’ button to exit.

14 • Configuring GFI Network Server Monitor GFI Network Server Monitor
Configuring GFI Network Server Monitor
Getting started with GFI Network Server Monitor NOTE: All configuration settings for GFI Network Server Monitor are carried out from GFI Network Server Monitor configuration. Launch this configuration program from Start > GFI Network Server Monitor program group > GFI Network Server Monitor configuration.
Introduction to monitor checks Monitoring checks are tests which verify the condition of specified computers and services on your network. These tests check: • Hardware status: i.e. verify that target computers and related
hardware components are available and running (e.g. Printer availability and Physical disks availability check.)
• Applications and Services: i.e. verify that specific services and applications are running on target computers (e.g. Generic Exchange Server Check and DNS Server checks).
In GFI Network Server Monitor, you can create single checks as well as batches of checks using the available wizards.
Quick Start Wizard The Quick Start Wizard helps you quickly create and setup a batch of monitoring checks suitable for your network. This wizard is automatically launched the first time that GFI Network Server Monitor is started, in order to help you get your network monitoring system up and running in the least possible time.
Screenshot 8 – Launch Quick Start Wizard from Tools Explorer window
Once ready, you can still make use of this wizard by launching it from File > New > Quick Start Wizard or Right Click on the ‘Monitoring

GFI Network Server Monitor Configuring GFI Network Server Monitor • 15
Checks Configuration’ node in the Tools Explorer window and go to New > ‘Quick Start Wizard’.
Running the Quick Start Wizard 1. Launch the ‘Quick Start Wizard’ (The first time GFI Network Server Monitor is started, the Quick Start Wizard is launched automatically).
Screenshot 9 – OS Selection stage
2. Select the operating system installed on the target computer, in order to generate a compatible set of monitoring checks.

16 • Configuring GFI Network Server Monitor GFI Network Server Monitor
Screenshot 10 - Server Role Selection stage
3. Select any additional roles that the target computer has within your network (e.g. Mark ‘IIS Web Server’ to include monitoring checks that test for Internet services availability on a web server).
Screenshot 11 – Additional Applications selection stage
4. Select which applications (installed on the target computer) require monitoring. GFI Network Server Monitor will include default monitoring checks to ensure that the selected applications are up and running on

GFI Network Server Monitor Configuring GFI Network Server Monitor • 17
the respective target computer (e.g. enable GFI LANguard Network Security Scanner (N.S.S.) 6.0 to check if the GFI Network Security Scanner is running on a target computer).
Screenshot 12 - Select target computers
5. Define the target computer(s) which will be monitored using this batch of checks: Specify the computer name (e.g. TMJASON) and click on the ‘Add’ button to add a computer to the list. Repeat the same procedure until all target computers have been listed. TIP: You can also define your target computers by clicking on the ‘Select’ button and marking them on the displayed list of available computers on your network. TIP: You can click on the ‘Import’ button to get the list of target computer names from a text file. Make sure that this file is in plain text and contains one computer name per line. 6. Click on the ‘Finish’ button to start generating the batch of monitoring checks. NOTE: GFI Network Server Monitor keeps checks organized, by storing them in folders, The Quick Start Wizard will store all generated checks in the folders automatically created (unless already available) for every target machine specified (e.g. folder TMJASON should contain all checks that have TMJASON as their target computer).
Creating monitor checks 1. Right Click on the ‘Monitoring Checks Configuration’ node (in the Tools Explorer (left) window) and go on New > Monitoring Check… NOTE: To create a check in an existing folder, right click on the target folder and go on New > Monitoring Check…

18 • Configuring GFI Network Server Monitor GFI Network Server Monitor
Screenshot 13- Select Type of Monitoring Check required
2. Select the type of monitoring check required (e.g. if you want to check the availability of a target computer, select ‘ICMP Ping’) and click on the ‘Next’ button. 3. Configure the functional parameters required by the selected check. Functional parameters are the test settings which define the role of a monitoring check. NOTE: Diverse types of monitoring checks require different functional parameters. For further information on the configuration of functional parameters, please refer to the ‘Configuring Monitor Functions’ chapter in this manual.

GFI Network Server Monitor Configuring GFI Network Server Monitor • 19
Example: Configure ICMP Ping functional parameters.
Screenshot 14 - ICMP/Ping monitor function properties
The ICMP/Ping function requires the following parameters: • Make sure you…..ping the target computer – Select ‘Can’ to
specify that the check is successful if the server replies to the ping. Select ‘Cannot’ to specify that the check fails if the server replies to the ping.
• Hostname or IP address – Specify the DNS name or IP address of the computer you want to ping (can even be a WINS name, but only if the name can be resolved by some WINS server in the network).
• Timeout (m.sec) for each reply – Specify the maximum number of milliseconds delay before an error report is triggered.
NOTE: On a congested network, echo response packets may take longer than 3 seconds to be delivered. Adjust the timeout value according to the traffic present on your network, in order to avoid false alarms. • Number of Echo requests to send – Specify the number of
consecutive pings to be sent on execution of this check. 4. Click on the ‘Next’ button and specify a string which describes the function of this monitoring check (e.g. Check if the ‘FILESERVER’ is up and running).

20 • Configuring GFI Network Server Monitor GFI Network Server Monitor
Screenshot 15 - Specify target computer(s)
NOTE: The following stage applies only for checks that are computer based (e.g. ICMP Ping). 5. Specify the target computer(s) which will be monitored using this monitoring check. Enter the target computer name (e.g. TMJASON) and click on the ‘Add’ button to include the computer in the list. When all target computers have been specified, click on the ‘Next’ button. TIP: You can also define your target computers by clicking on the ‘Select’ button and marking them on the displayed list of available computers on your network. TIP: Click on the ‘Import’ button to get the list of target computers from a text file. Make sure that this file is in plain text and that it contains one computer name per line.

GFI Network Server Monitor Configuring GFI Network Server Monitor • 21
Screenshot 16– Select Target folder
NOTE: The following stage applies only to monitoring checks that are not computer based (e.g. HTTP/HTTPs). 6. Specify the name of the target folder in which the monitoring check will be stored and click on the ‘Next’ button. NOTE: If the specified folder does not exist, it will be automatically created by the check wizard. 7. Click on the ‘Finish’ button to generate the new monitoring check.
Configure monitor check properties
About monitor check properties Monitoring checks require parameters which define their performance. (E.g. the ‘Scan Frequency’ defines the time interval between consecutive runs of a monitoring check). These parameters also pre-define the actions that GFI Network Server Monitor must trigger when a check succeeds or fails (e.g. Notification parameters designate the type of notification to be sent, including its recipient(s)). Parameters can be directly configured from the check properties or inherited from the properties of the folder where the checks are stored. For further information on how to inherit properties, please refer to the ‘Inherit properties from folders’ section in this chapter.

22 • Configuring GFI Network Server Monitor GFI Network Server Monitor
Configure General parameters
Screenshot 17 - General check properties
Specify the general parameters of a monitor check (e.g. Check Name and Target Computer) as follows: 1. Double click on the folder containing the check to be configured, right click on the check and select Properties. 2. Specify the following parameters: • Check details – The monitoring check name (e.g. ‘Fileserver
Availability Check’) and relative function description (e.g. Ping the Fileserver to check if it is available).
• Target – The name or IP address of the target computer on which this check will run (e.g. FILESERVER or 192.168.1.10).
• Scan Frequency – The time interval between consecutive executions of this monitoring check (e.g. Specify a scan frequency of 10 minutes, if you want to run this check every 10 minutes).
• Error Threshold – The number of consecutive times that this check must fail before an action is triggered (e.g. Specify an Error Threshold of 3, to allow a check to fail 3 consecutive times, before the check is classified as failed and notifications, etc. are triggered).
NOTE: Check failures occurring within the specified error threshold limit are known as errors. GFI Network Server Monitor, only defines a check as failed when the number of errors exceeds the error threshold. The error threshold is necessary to avoid continuous false alarms, triggered by check timeouts, associated with slow network connections

GFI Network Server Monitor Configuring GFI Network Server Monitor • 23
or delays in connection in extremely busy targets (e.g. File servers and Mail servers) during peak hours.
Configure Check (functional) Parameters The check functional parameters are the test settings that define the role of a monitoring check (i.e. each type of monitoring check requires its own configuration settings and parameters). For further information on functional parameters set ups, please refer to the Configuring Monitor Functions chapter in this manual. Example: Configure functional parameters for a File Existence check. GFI Network Server Monitor can check for the existence of a file. In this example, the monitoring check will be setup to look for a file called ‘status.txt’.
Screenshot 18 - File existence check parameters
1. Double click on the folder containing the check to be configured, right click on the required check and select Properties. 2. Click on the ‘Check Parameters’ Tab and specify the following parameters: • File (UNC Path) – The path to the file in UNC format (e.g.
\\FILESERVER\status.txt) that needs to be checked. • Exists - Enable the ‘Exist’ option to specify that this check must
find the specified file to be successful. • File must contain…. – Enable this option and specify the string that
must be present in the file in order for the check to be successful (e.g. ‘transfer was successful’).

24 • Configuring GFI Network Server Monitor GFI Network Server Monitor
3. Click on the ‘Apply’ button to accept the current configuration.
Define Logon credentials The Logon Credentials are the (logon) authentication details which a monitoring check requires to connect to a target computer. NOTE: Computers running on Linux and Unix may require reference to a certificate authentication (private key) file instead of the logon password. The certificate authentication file is often required by the SSH module for authentication by Linux/Unix computers. NOTE: By default, GFI Network Server Monitor uses the same security context account used by the GFI Network Server Monitor engine.
Screenshot 19 - Logon Credentials Setup Window
To setup alternative or certificate authentication credentials: 1. Double click on the folder containing the check to be configured, right click on the check and select Properties. 2. Click on the Logon Credentials Tab. 3. If the ‘Inherit authentication and access credentials from Parent folder’ option is enabled, disable it and enable ‘Alternative Credentials’ or ‘Certificate Authentication’. 4. Specify the user name (e.g. JasonM), the password or the full path to the certificate file (e.g. /etc/passwd/cert_file) in the case of certificate authentication details. 5. Click on the ‘Apply’ button to accept the current configuration.

GFI Network Server Monitor Configuring GFI Network Server Monitor • 25
Actions and Notifications
Screenshot 20 - Actions Setup window
Actions refer to the activities which follow the occurrence of an important event i.e. what happens when a monitoring check meets a specified condition. GFI Network Server Monitor supports the following actions: • Notifications – Send messages to inform the recipient(s) of the
event(s). • Run an external file – Launch an executable, batch or VBScript
file when a particular check fails. • Rebooting a computer – Attempt to automatically correct a
problem by rebooting the target machine which has failed. • Restarting services – Attempt to automatically correct a problem
by restarting the service(s) which have failed during a check.
Notifications GFI Network Server Monitor supports Email notifications; Network notifications and SMS/Pager Notifications.

26 • Configuring GFI Network Server Monitor GFI Network Server Monitor
Screenshot 21- Notifications Setup Window
These notifications can be sent in two situations: • When a monitoring check fails – after a configurable number of
errors, the monitor check is considered as failed. • When a monitoring check has recovered from the ‘Failed’ state –
since GFI Network Server Monitor can recover a server/device, it can be useful to send an alert to the operator to inform him/her that the previous error is no longer present.
About Email Notifications To use SMTP e-mail notifications, the GFI Network Server Monitor service must have access to an SMTP compliant mail server. GFI Network Server Monitor also supports SMTP servers that require SMTP authentication, such as Microsoft Exchange. SMTP AUTH is a protocol that is used to verify that you are a user on the SMTP server. GFI Network Server Monitor is RFC 821 and RFC 822 SMTP AUTH compliant. NOTE: GFI Network Server Monitor does not require IIS to support e-mail; it communicates directly to the SMTP server using the SMTP protocol.
About Network Notifications GFI Network Server Monitor makes use of ‘Net Send’ (or ‘Net Popup’) to send messages over the network. NOTE: Only computers that support NetBIOS can send and receive network messages. NetBIOS messages can be sent to users and/or computers.
About SMS/Pager Notifications GFI Network Server Monitor can send SMS messages in two ways:

GFI Network Server Monitor Configuring GFI Network Server Monitor • 27
• Through an SMSC (Short Message Service Center). This requires a normal Hayes compatible modem, connected to the server where the GFI Network Monitor Engine is running. When there’s a notification to be sent, GFI Network Server Monitor uses the modem to dial-in to the SMSC provider and deliver the actual SMS message(s); most countries have one or more SMSC service providers.
• Through a GSM phone or GSM modem connected to the server by serial cable, Infrared or Bluetooth. The GSM phone must be capable of processing AT+C commands (most modern GSM phones can do this).
Configure Notifications Parameters
Screenshot 22 - Actions window with Inherit options enabled
1. Double click on the folder containing the check to be configured, right click on the check and select Properties. 2. Click on the ‘Actions’ tab. 3. If the ‘Inherit notifications parameters from the Parent folder’ option is enabled (see above screenshot), disable it and click on the ‘Settings’ button in the notifications area.
28 • Configuring GFI Network Server Monitor GFI Network Server Monitor
Screenshot 23 - Notifications setup
4. Select the event during which notifications will be sent: • Enable ‘When the check fails:’ option to send notifications
whenever this check fails. • Enable ‘When the check recovers from a failed state’ option to
send notifications when the monitoring check recovers from a failed state.
5. Select the type of notification to be sent (e.g. click on the ‘Send an email to:’ option to send Email notifications whenever this check fails).
Screenshot 24 - Users and Groups Selection Window
6. Double click on the users and/or groups that need to be added to the list of notification recipients. Click on the ‘OK’ button when all the intended recipients have been selected. NOTE: Notifications will be sent using the delivery details (email address, etc.) specified in the properties of the selected users. For

GFI Network Server Monitor Configuring GFI Network Server Monitor • 29
more information on user properties, please refer to the ‘Configure user properties’ section in the ‘Users and Groups’ chapter. NOTE: Enable the ‘Once every …… minutes as long as the check continues failing’ option, ONLY if this notification is to be sent more than once during the time that this check is in a failed state. In this case specify the time interval (in minutes) required between each notification sent. (e.g. To send a notification every 10 minutes, enable this option and enter ‘10’ in the time interval to make it read ‘‘Once every 10 minutes as long as the check continues failing’). 7. Click on the ‘Apply’ button to accept the current configuration.
Run an external file after an alert is triggered
Screenshot 25 - Run External File setup window
GFI Network Server Monitor can be set up to launch executables, batch and/or VBScript files whenever an important event occurs. This action is configured as follows: 1. Double click on the folder containing the check to be configured, right click on the check and select Properties. 2. Click on the Actions Tab. 3. If the ‘Inherit run external file parameters from parent folder’ option is enabled, disable it and click on the ‘Settings’ button in the run external file area. 4. Select the event condition during which the external file will be run: • Enable ‘When the check fails execute…..’ option to launch files
whenever the check fails. • Enable ‘When the check recovers …’ option if you want to launch
files when the monitoring check recovers from a failed state.

30 • Configuring GFI Network Server Monitor GFI Network Server Monitor
Screenshot 26 - File parameters settings
5. Click on the respective ‘Add’ button and specify the complete path to the file to be executed (e.g. c:\Error_folder\Capture_Error.exe). If the file requires any parameters you can still pass them on the command line. You can also pass such parameters through GFI Network Server Monitor, by specifying them in the ‘Parameters to pass to the file’ field. You can pass parameters in plain text as well as through variables like <%Date%> and <%CHECK_RESULT%>. These variables are then substituted to values when the program or script is launched. For further information on variables, please refer to the ‘Message Templates’ section in the ‘GFI Network Server Monitor General Alerting Options’ chapter. 6. Click on the ‘OK’ button to add this entry to the list of files to be launched. NOTE: Enable the ‘Once every ….. minutes as long as the check continues failing’ option, ONLY if this file is to be launched more than once during the time that this check is in a failed state. In this case specify the time interval (in minutes) required between the consecutive execution of the files (e.g. To run a file every 5 minutes, enable this option and enter ‘5’ in the time interval to make it read ‘‘Once every 5 minutes as long as the check continues failing’). 7. Click on the ‘Apply’ button to accept the current configuration.

GFI Network Server Monitor Configuring GFI Network Server Monitor • 31
Restart Computers / Services after an alert is triggered
Screenshot 27 - Services / Machine restart setup window
GFI Network Server Monitor can be set to remotely reboot a computer or restart specific services whenever a monitoring check fails (e.g. if you can’t reach an IIS web server in your LAN, you can restart the W3SVC service). Setup this action as follows: 1. Double click on the folder containing the check to be configured, right click on the check and select Properties. 2. Click on the Actions Tab. 3. If the ‘Inherit reboot computer/services parameters from Parent folder’ option is enabled, disable it and click on the ‘Settings’ button in the run external file area. 4. To reboot the computer being checked, enable the ‘Reboot the machine being checked’ option. 5. To reboot a specific computer:
I. Enable ‘Reboot the following computer’ option. II. Specify the name or IP address of the computer which will be
rebooted (e.g. MAILSERVER). 6. To restart the service(s) on a computer:
I. Enable ‘Restart the service(s) on the following computer’ option.
II. Specify the name or IP address of the target computer on which the service(s) will be restarted.
III. Specify the display name (e.g. DNS Client) of the service to be restarted and click on the ‘Add’ button. Repeat this step for every service which needs to be restarted.
7. Click on the ‘Apply’ button to accept the current configuration.
32 • Configuring GFI Network Server Monitor GFI Network Server Monitor
Set up Dependencies Dependencies are checks that define the availability of Servers (e.g. ISA Server or Proxy Server) and Services (e.g. DNS Server or DNS Client) required by a target computer (i.e. on which a target computer is dependent). The specified dependency check(s) must be successfully executed before the other monitoring checks can be run. E.g. If you access internet through a Proxy Server, an ICMP Ping dependency check can be set to check the availability of the Proxy server, before executing HTTP/HTTPS monitoring checks. If the dependency check fails, the HTTP/HTTPS check will not be run but will be classified as a ‘Failure by Dependee’. For further information on check status classification, please refer to the ‘Check State Indicators’ section in the ‘Monitoring check status’ chapter. TIP: Use dependencies to avoid receiving a flood of alerts, when servers on which other computers depend, are down.
Screenshot 28 - Dependencies Setup Window
To setup Dependencies: 1. Double click on the folder containing the check to be configured, right click on the check and select Properties. 2. Click on the ‘Dependencies’ Tab. 3. If the ‘Inherit dependency checks from Parent folder’ option is enabled, disable it and select the dependency condition required: • Enable the ‘Ensure all of the following checks succeed…..’ option.
to denote that ALL checks in the dependency list must be successful before this check is allowed to execute.

GFI Network Server Monitor Configuring GFI Network Server Monitor • 33
• Enable the ‘Ensure one of the following checks succeeds…..’ option, to denote that at least one of the checks specified in the dependency list must be successful before this check is allowed to execute.
4. Click on the ‘Add’ button to specify the checks to be included in the dependencies list.
Screenshot 29 – List of available checks
5. Select the required dependency checks and click on the ‘Select’ button to accept the selection and add it to the list of dependencies. TIP: Multiple check selections are possible using the ‘CTRL’ or ‘SHIFT’ keyboard buttons. 6. Click on the ‘Apply’ button to accept the current configuration.
Define Maintenance schedules Maintenance parameters define the times during which monitoring check(s) are not executed i.e. during Maintenance schedules. These schedules are setup to avoid receiving a flood of alerts when target computers, codependent servers and/or respective services are undergoing maintenance (e.g. during Hardware / Software upgrades and Data Backups).

34 • Configuring GFI Network Server Monitor GFI Network Server Monitor
Screenshot 30 - Maintenance schedule Window
To set up maintenance schedules: 1. Double click on the folder containing the check to be configured, right click on the check and select Properties. 2. Click on the ‘Maintenance’ Tab. 3. If the ‘Inherit maintenance times parameters from Parent folder’ option is enabled, disable it and specify the operational and maintenance periods for the target computer being monitored. e.g. The screenshot above shows the maintenance schedule setup for a target computer which is down between 21:00 and 23:00 hrs all week for data backups and between 8:00 and 12:00 hrs every Saturday for Hardware and Software maintenance. NOTE: Marked ( ) time intervals indicate operational times, during which the monitoring check can be run. 4. Click on the ‘Apply’ button to accept the current configuration. TIP: To mark/unmark a whole day, click on the name of the day (e.g. Monday) at the left of the hours grid on display. TIP: To mark the same hour for a whole week, click on at the top of the column representing the required hour.
Inheriting check properties
About property inheritance In GFI Network Server Monitor, a parent folder is a folder which contains monitoring checks. Parent folders have properties identical to

GFI Network Server Monitor Configuring GFI Network Server Monitor • 35
those configured in monitoring checks. In fact, such folder properties can be configured and then passed on to any/all checks contained in the folder i.e. Inherited. All properties except for the ‘Check details’ and ‘Check (functional) Parameters’ can be inherited from a parent folder. These include Scan Frequency, Logon credentials, Notifications, and Maintenance parameters amongst others. For further information on parent folders, please refer to the ‘Monitor Check Folders’ chapter in this manual.
How to inherit properties from a folder To inherit properties from parent folders, enable the ‘Inherit ……. from parent folder’ option, present in the checks properties that can be inherited. e.g.: To inherit the notification settings from a parent folder: 1. Configure the notification parameters on the folder (please refer to the ‘Monitor Check Folders’ chapter in this manual). 2. Select the monitoring check(s) that will inherit the notification parameters, right click on the selection and choose Properties. TIP: You can select and setup multiple checks simultaneously by holding down the ‘CTRL’ or ‘SHIFT’ button on the keyboard and selecting the required checks.
Screenshot 31 - Monitoring check properties - Actions tab setup
3. Click on the ‘Actions’ tab, enable the ‘Inherit notifications parameters from the parent folder’ option and click on the ‘Apply’ button to accept this configuration.
36 • Configuring GFI Network Server Monitor GFI Network Server Monitor
4. Click on the ‘OK’ button to close the monitoring check properties window. NOTE: It is not possible to inherit the parameters of a single notification method (i.e. you cannot just inherit email notification parameters).
Enable, disable or immediately run a check
Screenshot 32 – Check Status display and relative options.
GFI Network Server Monitor allows you to disable existing monitoring checks, without the need of deleting them. You can verify if checks are enabled or disabled by double clicking on the folder containing the check(s) and watching their status in the right window. The icon on the left of the check details will define its state:
- Indicates that the monitoring check is active (enabled).
- Indicates that the monitoring check is not active (disabled). Disable monitoring checks Double click on the folder containing the check(s) to be disabled, right click on the check(s) and select ‘Disable’. Enable monitoring checks Double click on the folder containing the check(s) to be enabled, right click on the check(s) and select ‘Enable’. Immediately run monitoring checks To run monitoring checks immediately: Double click on the folder containing the check(s) to be run, right click on the check(s) and select ‘Monitor Now’.
Delete monitor checks Double click on the folder containing the check(s) to be deleted, select the required checks and press the ‘Delete’ button on the keyboard. NOTE: Deleted checks cannot be recovered.
Move checks between existing folders Double click on the folder from where the check(s) will be moved, select the required checks and drag them to the destination folder.

GFI Network Server Monitor Configuring GFI Network Server Monitor • 37
Copy checks from/to existing folders 1. Double click on the folder from where the check(s) will be copied. 2. Select the required checks from the events (right) window, right click on the selection and choose Copy. 3. Go on the destination folder, right click and select ‘Paste’.


GFI Network Server Monitor Configuring Monitor Functions • 39
Configuring Monitor Functions
Introduction As soon as the new check wizard is triggered, you must select the required monitor function from the extensive list of built-in functions included in GFI Network Server Monitor. This chapter explains how to configure each built-in function as well as how to create custom monitor functions using VB Scripts. GFI Network Server Monitor groups monitor functions according to their respective role.
Network/Internet Monitor functions This group contains functions that are used to monitor Network/Internet protocols and services.
HTTP/HTTPs function GFI Network Server Monitor can check for the availability of HTTP and HTTPs sites, through specified ports. GFI Network Server Monitor can be configured to go through a proxy server and to pass access credentials when authentication is required. These credentials can be specified as part of the GFI Network Server Monitor Proxy Server parameters, which are configured from the General Options node. For more information on proxy server parameters, please refer to the ‘Proxy Server settings’ section in the ‘General Options’ chapter.

40 • Configuring Monitor Functions GFI Network Server Monitor
Screenshot 33 - HTTP/HTTPS function setup
Should the HTTP/HTTPS site require authentication, GFI Network Server Monitor will pass the username and password specified in the Logon Credentials of the monitoring check. For more information on authentication details, please refer to the Logon Credentials section in the ‘Configuring GFI Network Server Monitor’ chapter. An HTTP/HTTPs function requires the following parameters: • URL:http(s):// – Specify the location of the HTTP/HTTPS site in
URL format (i.e. http://server[:port]/path/... format). • Use server verification (https) for this site – Enable, this flag when
logon credentials are required to access the target site. • Check for availability only – Enable this option to check ONLY for
the availability of a target site. • Check availability – Enable this flag to check the availability of a
target site as well as to search its contents for a specific string. • Contains the following text – Enable this flag and specify the string
to be searched for, in the contents of the target site. If no match is found, the check will be classified as failed.
• Does not contain the following string – Enable this flag and specify the string to be searched for, in the contents of the target site. If no match is found, then the check is classified as successful.
• Use http web site authentication – Enable this flag if the HTTP target site requires authentication. This option will use the authentication details specified in the logon credentials of the check properties.

GFI Network Server Monitor Configuring Monitor Functions • 41
• Use proxy server – Enable this flag if the target web site is to be accessed through the Proxy server.
FTP GFI Network Server Monitor can check the availability of FTP sites through specified ports.
Screenshot 34 - FTP function setup
GFI Network Server Monitor can be configured to go through a proxy server as well as to pass access credentials to the specified FTP site should authentication be required. An FTP monitor function requires the following parameters: • URL:ftp(s):// – Specify the location of the ftp site in URL format (i.e.
ftp://server[:port]/path/... format). • Use FTP site authentication – Enable this flag when logon
credentials are required to access the specified FTP site. • Use Proxy server – Enable this flag if the specified FTP site is to
be accessed through a Proxy server.
IMAP Mail Server availability GFI Network Server Monitor can check IMAP mail servers by starting a handshake connection to the remote IMAP port (generally port 143). By handshaking, GFI Network Server Monitor can verify that the remote server's IMAP protocol is working well.

42 • Configuring Monitor Functions GFI Network Server Monitor
Screenshot 35- IMAP server function setup
An IMAP Mail Server check requires the following parameters: • Connection Port – Specify the TCP port to be used when
connecting to the IMAP mail server (IMAP Default port is 143). • Send command when connected – Enable this flag to send the
specified command as soon as the connection is established. • Response must include the following string – Enable this flag and
enter a string in order to check if the response message contains the specified string.
NOTE: Normally a response from IMAP servers includes: ‘IMAP’ in its string. • Timeout – Specify the connection timeout in milliseconds. The
check will fail if a connection is not established before the specified timeout elapses.
NOTE: Usually, a connection to the server is established within 1 second; however slow/busy servers often need a longer timeout.
NNTP News Server availability GFI Network Server Monitor can check NNTP news servers by starting a handshake connection on the remote TCP port (normally port 119). By handshaking, GFI Network Server Monitor can verify that the remote server's NNTP protocol is online and functional.

GFI Network Server Monitor Configuring Monitor Functions • 43
Screenshot 36 - NNTP Server function setup
An NNTP News Server availability function requires the following parameters: • Port – Specify the TCP port number to be used when connecting to
NNTP news server. (NNTP Default port is 119). • Send command when connected – Enable this flag to send a
specified command as soon as the connection is established. • Response must include the following string – Enable this flag in
order to check if the response message contains a specified string. NOTE: Normally a response from NNTP servers includes: ‘200’ in its string. • Timeout – Specify the number of milliseconds before the function
will timeout. Usually, a connection to the server will be established within 1 second. However, some slow/busy servers need more time. Default value is set to 7000 milliseconds.
POP3 Mail Server availability GFI Network Server Monitor can check POP3 mail servers availability by establishing a handshake connection on the remote TCP port (normally port 110).

44 • Configuring Monitor Functions GFI Network Server Monitor
Screenshot 37 - POP3 server function setup
Through handshaking, GFI Network Server Monitor can verify that the remote server's POP3 protocol is working well. A POP3 Mail Server monitor function requires the following parameters: • Port – Specify the TCP port to be used when connecting to the
POP3 server. (POP3 Default port is 110). • Send command when connected – Enable this flag to send a
specified command as soon as the connection is established. • Response must include the following string – Enable this flag in
order to check if the response message contains a specified string. NOTE: Normally the default response from POP3 servers includes: ‘+OK POP3’ in its string. • Timeout – Specify the number of milliseconds before the function
will timeout. Usually, a connection to the server will be established within 1 second. However, some slow/busy servers need more time. Recommended value is 7000 milliseconds.
SMTP Mail Server availability GFI Network Server Monitor can check SMTP mail server’s availability by establishing a handshake connection on the remote TCP port (normally port 25). Through handshaking, GFI Network Server Monitor can verify that the remote server's SMTP protocol is working well.

GFI Network Server Monitor Configuring Monitor Functions • 45
Screenshot 38 - SMTP server function setup
An SMTP Mail Server check requires the following parameters: • Port – Specify the TCP port number to be used when connecting to
SMTP servers. (SMTP Default port is 25). • Send command when connected – Enable this flag to send a
specified command as soon as the connection is established. • Response must include the following string – Enable this flag in
order to check if the response message contains a specified string. NOTE: Normally the default response from SMTP servers includes: ‘200’ in its string • Timeout – Number of milliseconds before the function will timeout.
Usually, a connection to the server will be established within 1 second. However, some slow/busy servers need more time. Recommended value is 7000 milliseconds.
NTP Time Server availability Most of organizations use a time server to ensure accurate time settings. The NTP protocol is the protocol used to synchronize times between workstations/servers, and external time sources. GFI Network Server Monitor uses NTP to check the availability of internal and external time sources.

46 • Configuring Monitor Functions GFI Network Server Monitor
Screenshot 39- NTP Time server function setup
The NTP function requires NO parameters.
DNS Server GFI Network Server Monitor can read a specified ‘record’ type on a DNS server such as an ‘A record’ (address record) and verify if this ‘A record’ includes the associated IP address.

GFI Network Server Monitor Configuring Monitor Functions • 47
Screenshot 40 - DNS server function setup
A DNS Server function requires the following parameters: • Type of record – Specify the record type to be defined by the DNS
Server. This can be an A record or any other record type present in the drop down list.
• Host/Domain Name to query – Specify the IP address or hostname of the DNS server that you want to check.
• Query should return – Specify the expected result string i.e. the string which should match the resolved result (e.g. If an A record type was selected, the check is successful if the resolved result matches the specified IP address in the ‘Query should return’ parameter).
NOTE: A DNS query can return more than one IP address.
ICMP/Ping The ICMP Ping function checks the availability of a remote host by sending ICMP Echo commands and waiting for the response from the host. NOTE: Although local hosts should normally respond to ping requests within milliseconds, an ICMP timeout failure doesn't necessarily mean that the remote host is actually functioning beyond its ability to echo packets.

48 • Configuring Monitor Functions GFI Network Server Monitor
Screenshot 41 - ICMP/Ping function setup
The ICMP/Ping function requires the following parameters: • Make sure you…..ping the target computer – Select ‘Can’ to
specify that the check is successful if the server replies to the ping. Select ‘Cannot’ to specify that the check fails if the server replies to the ping.
• Hostname or IP address – Specify the DNS name or IP address of the computer you want to ping (can even be a WINS name, but only if the name can be resolved by some WINS server on the network).
• Timeout (m.sec) for each reply – Specify the maximum number of milliseconds delayed before an error response is triggered.
NOTE: On a congested network, echo response packets may take longer than 3 seconds to arrive. Adjust the timeout value according to the traffic present on your network, in order to avoid false alarms. • Number of Echo requests to send – Specify the number of
consecutive pings to be sent on execution of this check.
Generic TCP/IP check GFI Network Server Monitor can check local or remote server connections by challenging a specific port. The challenge will involve connecting to the target machine, sending it a sequence of bytes and analyzing the information received.

GFI Network Server Monitor Configuring Monitor Functions • 49
Screenshot 42 - TCP/IP monitor function setup
A TCP/IP check requires the following parameters: • Port – Specify the TCP port number of the protocol to be checked,
by default port 80. • Send command when connected – Enable this flag to send the
specified command as soon as the connection is established. • Response must include the following string – Enable this flag in
order to check if the response message contains the specified string.
• Timeout – Number of milliseconds before the function will timeout. Usually, a connection to the server will be established within 1 second. However, some slow/busy servers need more time. Recommended value is 7000 milliseconds.
SNMP Monitoring Checks
Generic SNMP function GFI Network Server Monitor can check local or remote server connections by challenging a specific port. GFI Network Server Monitor carries out this function by connecting to the target machine, send it a sequence of bytes and analyze the response received.

50 • Configuring Monitor Functions GFI Network Server Monitor
Screenshot 43 - SNMP function setup
The SNMP (Simple Network Management Protocol) GET message allows the Network Monitor Engine to request information about a specific variable on a remote computer or device. Upon receiving a GET message, the agent will issue GFI Network Server Monitor Engine a GET-RESPONSE message containing either the information requested or an error indicating why the request cannot be processed. An SNMP function requires the following parameters: • Community String – Specify the SNMP community string to be
used, by default: ‘public’. • OID (Object ID) – Specify the Object ID. This is a unique
identification tag, which could be either an alphanumeric name or the physical name (long numeric tag), used to distinguish each variable in SNMP messages.
• OID Data type – Select the data type to be used from the available dropdown list. The following are valid/supported data types: Bit Stream, Counter, Integer, IP address, Object Identifier, Opaque String, String, Time Marks and Unsigned Integer.
• OID Data must be – Specify an OID data value and select the operand to be used to compare the actual SNMP value against the ‘IOD Data Value’ specified. Supported operands include Equal To, Not Equal To, Less Than, Less or Equal To, Greater Than, Greater or Equal To.

GFI Network Server Monitor Configuring Monitor Functions • 51
Windows OS Generic Checks
Generic VB Script The VBscript function allows you to create custom checks using VBscripts. For more information about writing scripts, please refer to the ‘Writing your own monitoring functions’ chapter.
Screenshot 44 - VBscript function setup
A VBScript function requires the following parameters: • Script location – Specify the path to the required VBScript file. The
script should contain the function specified in the Function name field and should return True (-1) in case of success, or False (0) in case of an error.
• Function name – Specify the function that GFI Network Server Monitor service will be calling from the specified script file.
• VB Function Parameters – Double click on the line where the additional parameter values required by this function will be specified.
NOTE: Parameters will be passed to the function according to their position in the list, starting from 1.

52 • Configuring Monitor Functions GFI Network Server Monitor
Screenshot 45 - Add Parameters window
• Specify the parameter value and description. Parameter values can be extracted from variables (e.g. %USERNAME%) upon execution of the function or directly specified as a string (e.g. “JasonM”). Click on the ‘OK’ button to accept the specified parameter.
NOTE: Enclose string parameter values within quotes (e.g. “CPU0”). NOTE: You can make changes to the selected script by clicking on the ‘Edit script …’ button.
OS Object Performance Counter The OS Object Performance Counter establishes the performance of an operating system object available on the target computer by checking its properties.
Screenshot 46 - OS Object Performance Counter function setup
The parameters required for this function are:

GFI Network Server Monitor Configuring Monitor Functions • 53
• Performance Object – Click on the button to display the list of available objects.
Screenshot 47 - Performance Counter - Object Selection Window
1. Specify the target machine containing the object/performance counters that need to be shown. • Select ‘this computer’ to use the performance counters available
on the target computer. • Select ‘another computer’ and specify the computer name to use
performance counters available on another computer. 2. Select from the available dropdown list, the Object to be checked. (e.g. Select ‘Memory’ to check the memory performance of the specified computer). 3. Select the Performance Counter to be used. (e.g. Available bytes – should determine the amount of physical memory in bytes available for system use / process allocation). • Value must be – Select the operand that will be used for
comparing the Performance Counter value to the comparison value specified.
• Comparison Value – Specify the value with which the performance counter value will be compared.
Command Line executable output This function checks the text output of a command line tool / application in order to determine if it is functioning correctly.

54 • Configuring Monitor Functions GFI Network Server Monitor
Screenshot 48 - Command Line Output function setup
The parameters required for this function are: • Run the file at location – Specify the complete path to the
command line tool file which must be executed (e.g.C:\WINDOWS\PING.exe).
• With the following parameters – Specify additional parameters required by the specified tool. (e.g. the IP address / name of host to which the ping will be sent).
• Contains the following text – Enable this flag and specify the string to be searched in the command line output. If a matching string is found, the check will be classified as successful.
• Does not contain the following string – Enable this flag and specify the string to be searched for, in the command line output. In this case, if no matching string is found the check is classified as successful.
Process Properties (Memory/CPU/Handles etc..) This function checks for properties related to a process running on specified target computers. Such checks include % processor usage, % user time consumed, % privileged time consumed, number of handles, number of threads, physical memory and virtual memory in use by application.

GFI Network Server Monitor Configuring Monitor Functions • 55
Screenshot 49 - Process Properties function setup
The parameters required for this function include: • Check that the…. – Select the system resource that will be
checked from the dropdown list. • Used by the process – Specify the name of the process to be
checked. • Operand – Select the operand and specify the value to be
compared with the result.
Windows Operating System Checks
Event Log NOTE: This monitor function requires WMI to be installed on the computer running GFI Network Server Monitor as well as on the computer being monitored. The monitor function will create a VBscript, which uses WMI, with the parameters you specify in the monitor function setup screen. WMI is only available on Windows 2000 and higher computers, so this monitor function can only be used if both the GFI Network Server Monitor machine and the machine to be monitored are running Windows 2000 or higher. GFI Network Server Monitor can read Windows Event logs on local or remote computers and can search their contents for specific Event Sources, Categories, Event ID's, etc..

56 • Configuring Monitor Functions GFI Network Server Monitor
Screenshot 50 - Event log monitor function setup
It can also look for specific patterns in the description of an event as well as notify the system administrator if one of the events occurred within a specific period of time (e.g. You can check if a message from your antivirus software has been posted in the Application Event Log during the last 30 minutes. An Event Log function requires the following parameters: • Query the following event Log – Select the log File to be checked,
from the dropdown list. Available logs include ‘Application’, ‘Security’, ‘System’, or server-related log (like DNS, Exchange, etc).
• This check will fail when … – Specify whether this check will fail when an event having the specified properties is found or vice versa.
• Event ID – Specify an event ID. GFI Network Server Monitor will filter events that match the specified ID (i.e. filter events by ID).
• Event Type – Enable the event types that will be filtered and checked from the event logs (i.e. filter events by type e.g. enable ‘Warning’ to check and filter warning logs only).
• Event Source – Specify event sources that must be filtered from the logs (i.e. filter events by source).
• Event Category – Specify event categories that must be filtered from the log (i.e. filter events by category).
• User – Specify the name of the user whose events are to be filtered (i.e. filter events by user).

GFI Network Server Monitor Configuring Monitor Functions • 57
• Description contains string – Specify the string to search for, in the file contents (i.e. filter event by content string).
• Check only events which happened in the last x minutes – Specify this value to filter events occurring during the specified period of time (i.e. filter events by time of occurrence).
NOTE: Use (*) wildcard to indicate all/any criteria.
File Existence GFI Network Server Monitor can check for the existence of a particular file on a target computer as well as search its contents for particular strings. This is particularly convenient when checking for results of scheduled batch jobs and other logging information.
Screenshot 51 - File existence function setup
A File Existence function requires the following parameters: • File (UNC Path) – Specify the path to the file which is to be
checked in UNC format (e.g. \\server\share\today_job_results.txt). • Does not exist – Enable this option to check if the file exists. In this
case, the check fails if the specified file is found. • Exists - Enable this option to check if the file exists. In this case,
the check succeeds if the specified file is found. • File must contain …string – Enable this flag and specify the string
to be searched for in the existing file contents. In this case the check will succeed only if the file exists and the specified string is present in the file contents.

58 • Configuring Monitor Functions GFI Network Server Monitor
Disk Space GFI Network Server Monitor can check for free disk space on local and remote computers. Notifications can be sent whenever hard disk space falls below a specified value in order for you to take proactive actions before running out of disk space.
Screenshot 52 - Disk space function setup
A Disk Space function requires the following parameters: • Check that the Drive… – Select the disk drive to be checked. • Does not use more than the following hard disk space – Enable
this option and specify the maximum disk space that can be used. The monitoring check will fail if the specified disk limit is exceeded.
• Has at least the following free hard disk space – Enable this option and specify the minimum amount of free disk space required on the target machine. The monitoring check will fail when disk space is below the specified (minimum) value.
Services GFI Network Server Monitor can monitor services on local and remote computers by checking if their status equals to "Running".

GFI Network Server Monitor Configuring Monitor Functions • 59
Screenshot 53 - Services function setup
A Service monitor function requires the following parameters: • With internal name – Enable this option to check for services
having an internal identification / name identical to the string specified in the NAME field. The Internal identification is the ‘Service Name’ displayed in the General window of the service properties.
• With display name – Enable this option to check for services having a display name identical to the string specified in the NAME field. The display name can be seen in the General window of the service properties.
NOTE: To view the internal and display name of a service: 1. Go on Start > Programs > Administrative Tools > Services. 2. Double click on the service to open properties window. The Service and Display names are shown in the general window.
Screenshot 54 – DNS Server Service and display name

60 • Configuring Monitor Functions GFI Network Server Monitor
CPU Usage NOTE: This monitor function requires WMI to be installed on the computer running GFI Network Server Monitor as well as on the computer being monitored. The monitor function will create a VBscript which uses WMI with the parameters you specify in the monitor function setup screen. WMI is only available on Windows 2000 and higher computers, therefore this monitor function can only be used if both the GFI Network Server Monitor machine and the machine to be monitored are running Windows 2000 or higher. GFI Network Server Monitor can check the processor usage status on Windows based target computers. You can setup notifications and trigger other actions (e.g. run an external file) whenever the load of a specific processor exceeds the maximum usage allowed.
Screenshot 55 - CPU usage function setup
A CPU Usage function requires the following parameters: • Maximum global CPU usage allowed – Specify the (maximum) %
CPU usage allowed on the target machine. • Processor – Specify which CPU will be checked. CPU0 is the
default value for computers having one processor.
Directory / Folder Size GFI Network Server Monitor can check the disk space used by a directory / folder on target computers. You can use this function to implement a disk control / quota system, which notifies you when a specific folder exceeds the maximum size specified.
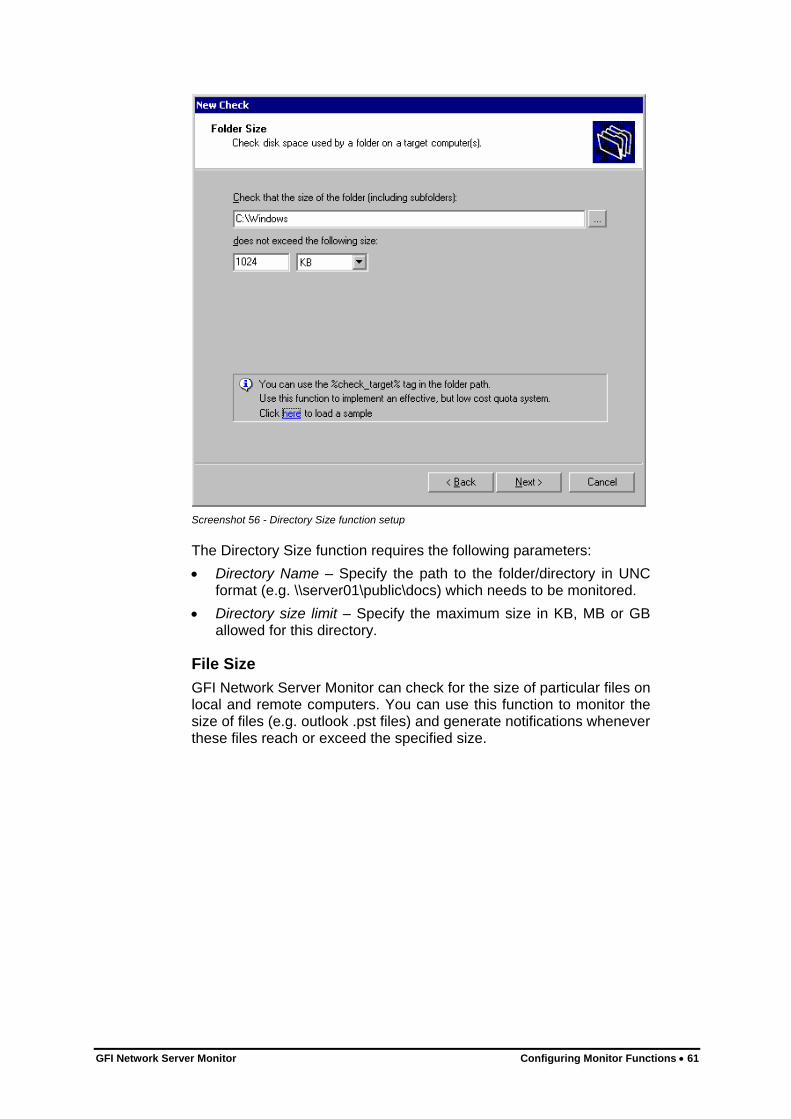
GFI Network Server Monitor Configuring Monitor Functions • 61
Screenshot 56 - Directory Size function setup
The Directory Size function requires the following parameters: • Directory Name – Specify the path to the folder/directory in UNC
format (e.g. \\server01\public\docs) which needs to be monitored. • Directory size limit – Specify the maximum size in KB, MB or GB
allowed for this directory.
File Size GFI Network Server Monitor can check for the size of particular files on local and remote computers. You can use this function to monitor the size of files (e.g. outlook .pst files) and generate notifications whenever these files reach or exceed the specified size.

62 • Configuring Monitor Functions GFI Network Server Monitor
Screenshot 57 - File size function setup
The file size function requires the following parameters: • File name – Specify the path to the file in UNC format (e.g.
\\server01\public\docs.txt) which needs to be monitored. • File size limit – Specify the maximum size in KB, MB or GB
allowed for this file.
LDAP query NOTE: This function requires WMI to be installed on the computer running GFI Network Server Monitor as well as on the computer being monitored. GFI Network server monitor can verify if LDAP Services are available on target computers by querying the rootDSE for the relative information.

GFI Network Server Monitor Configuring Monitor Functions • 63
Screenshot 58 - LDAP Query function setup
No Setup parameters are required for this check.
Physical disk conditions check NOTE: This monitor function requires WMI to be installed on the computer running GFI Network Server Monitor as well as on the computer being monitored. GFI Network server monitor can check the physical condition of the disk drives mounted on computers running windows operating systems.

64 • Configuring Monitor Functions GFI Network Server Monitor
Screenshot 59 - Physical Disk function setup
No parameters are required for this function.
Printer availability NOTE: This function requires WMI to be installed on the computer running GFI Network Server Monitor as well as on the computer being monitored. GFI Network Server Monitor monitors the availability of network printers by checking their status definition. Supported status definitions include 'Running', 'In Test', 'Power Off', 'Offline', and 'Power Save'. If the Printer Status is not equal to ‘Running’ or ‘Power Save’, then GFI Network Server Monitor will consider this printer as being down. You can configure this function to send notifications to the recipients concerned, whenever a printer is down. NOTE: To run this check, you must configure the printers to be monitored as network printers on the target machine.

GFI Network Server Monitor Configuring Monitor Functions • 65
Screenshot 60 - Printer availability function setup
The Printer Availability rule requires the following parameter: • Printer name – Specify the name of the network printer to be
monitored. NOTE: Specify the same printer name used on the network (e.g. HP4P_onJMPC).
Process Running NOTE: This monitor function requires WMI to be installed on the computer running GFI Network Server Monitor as well as on the computer being monitored. The monitor function will create a VBscript which uses WMI with the parameters you specify in the monitor function setup screen. WMI is only available on Windows 2000 and higher computers, therefore this monitor function can only be used if both the GFI Network Server Monitor machine and the machine to be monitored are running Windows 2000 or higher. GFI Network Server Monitor can check for processes running on local and/or remote computers. If a process is active, then the target computer is considered to be available.

66 • Configuring Monitor Functions GFI Network Server Monitor
Screenshot 61 - Check Process function setup
A Process monitor rule requires the following parameter: • Process – Specify the module name of the process which needs to
be monitored. For instance: alerter.exe, or explorer.exe.
Users and Group membership NOTE: This monitor function requires WMI to be installed on the computer running GFI Network Server Monitor as well as on the computer being monitored. The monitor function will create a VBscript which uses WMI with the parameters you specify in the monitor function setup screen. WMI is only available on Windows 2000 and higher computers, therefore this monitor function can only be used if both the GFI Network Server Monitor machine and the machine to be monitored are running Windows 2000 or higher. GFI Network Server Monitor checks groups and group memberships for unexpected/unauthorised members which could make your system vulnerable to attacks (e.g. intruders in the Domain Admins group).

GFI Network Server Monitor Configuring Monitor Functions • 67
Screenshot 62 - User/Group membership function setup
The User and Groups membership function requires the following parameters: • Domain – Specify the name of the domain in which the group is
present. (e.g. GFIMALTA). • Group – Specify the name of the group to be checked (e.g.
Domain Admins group) • Allowed members – Specify the name of the members that are
allowed in this group. Separate each member by commas (e.g. JasonM, NickG, AndreM)
Windows Applications Checks
Generic ISA Server Check NOTE: This monitor function requires WMI to be installed on the computer running GFI Network Server Monitor as well as on the computer being monitored. The monitor function will create a VBscript which uses WMI with the parameters you specify in the monitor function setup screen. WMI is only available on Windows 2000 and higher computers, therefore this monitor function can only be used if both the GFI Network Server Monitor machine and the machine to be monitored are running Windows 2000 or higher. GFI Network Server Monitor can monitor the status of ISA Services on target computers.

68 • Configuring Monitor Functions GFI Network Server Monitor
Screenshot 63 - ISA Server function setup
The parameters required are: 1. Specify the ISA Server version installed on the target computer. • 2000 – Enable this option, if your target computer has ISA server
2000 installed. • 2004 – Enable this option, if your target computer has ISA server
2004 installed. 2. Enable ‘Integrated / Firewall’ or ‘Cache’ option to specify the operation mode of the ISA Server installed on the target computer. NOTE: If the ISA Server operation mode is set to Cache, the Firewall services will not be monitored during this check.
Generic Exchange Server Check NOTE: This monitor function requires WMI to be installed on the computer running GFI Network Server Monitor as well as on the computer being monitored. The monitor function will create a VBscript which uses WMI with the parameters you specify in the monitor function setup screen. GFI Network Server Monitor can monitor the status of Exchange services and performance counters running on a target computer. Supported performance counters include: Information Store performance counters, Mailboxes performance counters, Public folders performance counters, and SMTP service performance counters. Notifications and actions can be triggered whenever the performance of Exchange services runs low.

GFI Network Server Monitor Configuring Monitor Functions • 69
Screenshot 64 - Exchange server function setup
The Exchange server check requires the following parameters: 1. Specify the MS Exchange Server version installed on the target computer(s): • Exchange 2000 – Enable this option if the target computer is
running Exchange server 2000. • Exchange 2003 – Enable this option if the target computer is
running Exchange server 2003.
Generic MS SQL / ADO Check GFI Network Server Monitor uses ADO (ActiveX Data Object) to check for the availability of Microsoft SQL databases. It provides a DSN-less connection to a variety of databases, like MS SQL and MS Access.

70 • Configuring Monitor Functions GFI Network Server Monitor
Screenshot 65 - MS SQL/ADO function setup
An MS SQL / ADO function requires the following parameters: • ADO Connection String – Specify the ADO connection string which
will be used to connect to the SQL Server/Data source. • Query – Specify the SQL Query which will be triggered when
connection is established. NOTE: For more information on SQL/ADO connections strings, please visit http://www.connectionstrings.com
Windows OS Databases Checks
Generic – ODBC GFI Network Server Monitor makes use of ODBC to check for the availability of a variety of databases. Major database systems that support ODBC include: Microsoft SQL Server, Microsoft Access, Microsoft Excel, Oracle, FoxPro, Paradox, SyBase, Informix, OpenIngres, InterBase, Progress, IBM LANDP, DB2 and AS/400. NOTE: To monitor a database via ODBC, you must first setup a System DSN entry to the database you wish to monitor on the server running GFI Network Server Monitor.

GFI Network Server Monitor Configuring Monitor Functions • 71
Screenshot 66 - ODBC administrator with sample database configured
A system DSN entry is setup as follows 1. Go to Administrative tools > Data Sources (ODBC) to launch the ODBC administrator. 2. Click on the ‘System DSN’ tab and click on the ‘Add’ button. NOTE: It is important that you select ‘System DSN’ and not ‘User DSN’ otherwise the service will not have access to the data source/database.
Screenshot 67 - ODBC setup with sample database

72 • Configuring Monitor Functions GFI Network Server Monitor
3. Select a database driver suitable for the database you wish to monitor (e.g. for an MS Access database choose Microsoft Access Driver (*.mdb)). 4. In the ODBC setup dialog, specify a data source name (e.g. MY_Dbase) and select the database you wish to monitor. In this example we have used the ‘Northwind’ database. Click on the ‘OK’ button to add the data source.
Screenshot 68 - Generic ODBC properties
The ODBC check requires the following parameter: • ODBC DSN name - Specify the ODBC data source name (e.g.
Northwind).
Oracle NOTE: This check requires the installation of SQL*Net (included with Oracle) on the GFI Network Server Monitor machine. GFI Network Server Monitor uses SQL*Net to monitor Oracle servers for availability. The role of SQL*Net is to establish and maintain a connection between the client application and the server and exchange messages between them. SQL*Net is a software layer that is required to communicate between Oracle clients and servers. It provides both client-server and server-server communications across any network. It also enables client tools to access, modify, share, and store data on Oracle servers over a Network.

GFI Network Server Monitor Configuring Monitor Functions • 73
Screenshot 69 - Oracle server function setup
The communication between client applications and servers takes place across one or more networks, and is referred to as client/server communication. GFI Network Server Monitor has two SQL*Net based checks for Oracle. Specify the one required: • TNSPing check. • Logon to a database – This function will use the authentication
details (username and password) specified in the Logon Credentials the monitoring check to logon to a database.
Terminal Services Port Check GFI Network Server Monitor can check if Local or Remote servers have their terminal services port enabled. This is done by establishing a handshake connection on the remote TCP port (by default port 3389) of the target computer

74 • Configuring Monitor Functions GFI Network Server Monitor
Screenshot 70 – Terminal Services: Port Check function setup
A Terminal Services rule requires the following parameters: • Port – Specify the TCP port number which will be used for
communicating with a target computer. The default TCP port is 3389.
• Send command when connected – Enable this option to send the specified command as soon as connection is established.
• Response must include the following string – Enable this option and specify the string which must be present in the response. The default response for SMTP servers generally includes: ‘200’.
• Timeout – Specify the number of milliseconds before the function times out. Usually, a connection to the server is established within 1 second. However, some slow/busy servers need more time. Recommended value is 7000 milliseconds.
Terminal Services Physical Logon Check GFI Network Server Monitor can check for the availability of Terminal Services by simulating a remote user session on the terminal server of the target computer.

GFI Network Server Monitor Configuring Monitor Functions • 75
Screenshot 71 – Terminal Services: Physical Logon function setup
The parameters required by this function are: • RDP File – Specify path were the Remote Desktop Protocol (RDP)
file is located (e.g.: C:\Documents and Settings\<relative user folder>\Recent\default.rdp).
NOTE: This file is generated by the Remote Desktop connection client whenever a remote session is established (e.g.: Default.rdp). This RDP file contains properties and parameters relative to the remote connection session made including authentication details and display settings which are used during each remote session. • Timeout – Specify the number of milliseconds before the function
times out. Usually, a connection to the server is established within 1 second. However, some slow/busy servers need more time. Recommended value is 7000 milliseconds
Linux / Unix OS Generic Checks
Generic Secure Shell (SSH) Check The SSH Check function allows you to create custom monitor functions which can be remotely executed on Unix/Linux based computers through the Secure Shell (SSH) service running on that computer. Secure Shell, sometimes known as Secure Socket Shell, is a Unix-based command interface and protocol for securely getting access to a remote computer.

76 • Configuring Monitor Functions GFI Network Server Monitor
Screenshot 72 - SSH function setup
A SSH function requires the following parameters: • Script file – Specify the path to the SSH script file which will be
used. • Private key file – Specify the path to the private key file which the
SSH module requires for authentication. NOTE: If left empty, GFI Network Server Monitor will make use of the logon credentials specified for the relative monitoring rule. For more information on logon details, please refer to the ‘logon credentials’ section in the ‘Configuring GFI Network Server Monitor’ chapter. • Arguments – Specify additional parameters required by this
function. Double click on the line where the additional parameter values are to be specified.
Screenshot 73 - Add Parameters window
Specify the required parameter value and description. Parameter values can be extracted from system variables (e.g. %USERNAME%)

GFI Network Server Monitor Configuring Monitor Functions • 77
upon execution of the function or directly specified as a string (e.g. JasonM or “Mail Server”). NOTE: The quotes"" are required when the string contains spaces (e.g. “Mail Server”). NOTE: You can make changes to the selected script by clicking on the ‘Edit script …’ button.
Linux / Unix Operating System Checks
File existence Check GFI Network Server Monitor can search for specific files in a target computer running on Linux or Unix (e.g. you can use this check to look for scheduled batch job results. If the file exists, you will receive a confirmation stating that the scheduled batch jobs have been executed). You can also search the contents of an existing file for a specified string (e.g. searching for “fail” or “failed” strings in the results file of scheduled batch jobs can help you define if all jobs were successful).
Screenshot 74 - File Existence function setup
A File Existence function requires the following parameters: • File (UNC Path) – Specify the complete path to the file (e.g.
/etc/password). • Does not exist – Enable this option to check for file existence only.
In this case, the check fails if the specified file is found.

78 • Configuring Monitor Functions GFI Network Server Monitor
• Exists - Enable this option to check for file existence only. In this case, the check succeeds if the specified file is found.
• File must contain …string – Enable this flag and specify the string to be searched for in the existing file contents. In this case the check will succeed only if the file exists and the specified string is present in the file contents.
CPU usage Check GFI Network Server Monitor can monitor the CPU usage of a target computer running on Linux / Unix. This function uses a Linux shell script to determine, via SSH, the global CPU usage and can send notifications or trigger actions when the processor usage exceeds the specified CPU usage limit.
Screenshot 75 - CPU usage setup window
A CPU Usage function takes the following parameter: • Maximum global CPU usage allowed – Specify the maximum %
CPU usage allowed on the target machine being monitored.
Directory size Check GFI Network Server Monitor can check the size of directories located on target computers running on Linux/Unix. You can use this function as a disk quota manager which can send notifications when a directory exceeds the specified size.

GFI Network Server Monitor Configuring Monitor Functions • 79
Screenshot 76 – Directory/folder Size setup window
A Directory Size function requires the following parameters: • Directory Name – Specify the path to the directory to be monitored
(e.g. /user/personal). • Directory size – Specify the maximum size (in KB, MB or GB)
allowed for this directory.
File size Check GFI Network Server Monitor can check the size of files on target computers running on Linux/Unix. This function can be used as a disk quota manager which can send notifications when a specific file exceeds the specified size (e.g. you can receive notifications when the system status log file exceeds the specified size, enabling you to free used disk space).

80 • Configuring Monitor Functions GFI Network Server Monitor
Screenshot 77 - File size function setup
The File Size function requires the following parameters: • File name – Specify the complete path to the file which needs to be
monitored (e.g. /data/sys_log). • File size limit – Specify the maximum size (in KB, MB or GB)
allowed for this file.
Printer availability Check GFI Network Server Monitor can check for the availability of network printers connected to target computers running on Linux / Unix. When a printer problem occurs, notifications can be sent to the support personnel in order for them to take immediate action and get the printer back online or transfer print jobs to a different printer.

GFI Network Server Monitor Configuring Monitor Functions • 81
Screenshot 78 - Printer monitor function setup
GFI Network Server Monitor uses a Linux shell script, via SSH, to determine printer availability. A Printer Availability check requires the following parameters: • Printer name – Specify the name of the printer to be monitored.
Process Running Check GFI Network Server Monitor enables you to check processes on local and remote target computers running on Linux/Unix. If a process is active, then the target computer is considered to be available.

82 • Configuring Monitor Functions GFI Network Server Monitor
Screenshot 79 – Process Running function Setup
A process check requires the following parameter: • Process – Specify the name of the process to be monitored (e.g.
init).
Users and groups membership Check GFI Network Server Monitor inspects groups and group membership against intruders which could pose a vulnerability threat to your network system (e.g. Intruders in Domain Administrators group can give themselves administrative rights).

GFI Network Server Monitor Configuring Monitor Functions • 83
Screenshot 80 - User/Group membership function setup
The User/Group membership function requires the following parameters: • Group – Specify the name of the group to be checked against
intruders. • Allowed members – Specify the list of authorized members in the
specified group. Separate each member by a comma (e.g. JasonM, NickG, AndreM).
Disk Partition Checks GFI Network Server Monitor uses a Linux Shell script to check the state of mounted disk drives on a target computer running on Linux/Unix.

84 • Configuring Monitor Functions GFI Network Server Monitor
Screenshot 81 - Disk Partition check function setup
The parameters required by this function are:- • Partition label – Specify the identification name of the disk partition
to be checked.
Disk Space Check GFI Network Server Monitor can check for available free or used disk space information on local and remote target computers running on Linux/Unix. Notifications can be sent when the used or free space exceeds a specified limit.

GFI Network Server Monitor Configuring Monitor Functions • 85
Screenshot 82 - Disk Space function setup.
A Disk Space function requires the following parameters: • Check that the Drive – Specify the drive to be checked. • Does not use more than the following hard disk space – Enable
this option and specify the maximum disk space (in KB, MB or GB) allowed for use on this particular drive, i.e. the check will fail if the used disk space exceeds the specified value.
• Has at least the following free hard disk space – Enable this option and specify the minimum free space value allowed on this particular drive, i.e. the check will fail if free disk space is less than the specified amount.


GFI Network Server Monitor Monitoring Check Folders • 87
Monitoring Check Folders
Introduction All checks are organised into folders. Folders have properties such as notifications, dependencies and maintenance parameters that are inherited by the checks contained in those folders. This way, it is easy to change a notification or dependency for a whole group of checks. By default a check inherits the folder properties; however you can override this setting for individual checks if necessary. You can create these folders yourself or you can let the checks wizards (New Check or Quick Start Wizard) create them automatically for you when new checks are being generated. Folders that are created by check wizards are given the names of the target computers that will be monitored, but you can still rename the folders as well as copy or move checks to other existing folders.
Creating new folders 1. Right Click on the ‘Monitoring Checks Configuration’ node in the Tools Explorer window, go on ‘New’ and select 'Folder’.

88 • Monitoring Check Folders GFI Network Server Monitor
Screenshot 83 - Folder properties window
2. Specify the folder details; i.e. folder name (e.g. TMJASON) and folder description (e.g. this folder contains checks for monitoring test machine: - ‘TMJASON’). TIP: To keep GFI Network Server Monitor organized and to simplify its maintenance, name the folders according to the target computer being monitored by the contained checks, so that their contents are easily identified through the name (e.g. The folder called ‘FileServer’ should only contain the checks that monitor the target computer called FILESERVER). 3. Configure the rest of the folder properties in the same way as is done for the monitoring checks. For the configuration instructions, please refer to the ‘Configure monitor check properties’ section in the ‘Configuring GFI Network Server Monitor’ chapter. 4. Click on the ‘OK’ button to accept settings and close the property window.
Example: Configuring the Target computer parameter. 1. Right click on the folder to be configured and select properties. 2. In the ‘General’ (default) page, specify the target computer Hostname or IP address (e.g. TMJASON or 192.168.1.100) in the ‘Target’ section on this page. 3. Click on the ‘OK’ button to accept settings and close the folder properties window.

GFI Network Server Monitor Monitoring Check Folders • 89
Configure properties of existing folders To configure properties of an existing folder, right click on the folder and select properties. For the rest of the configuration instructions, please refer to the ‘Configure monitor check properties’ section in the ‘Configuring GFI Network Server Monitor’ chapter.
Delete existing folders Right click on the folder to be deleted and select ‘Delete’.


GFI Network Server Monitor Monitoring Checks Status • 91
Monitoring Checks Status
Viewing the state of checks
Screenshot 84 – Monitoring Checks status (opening page)
You can view the current status of monitoring checks either from GFI Network Server Monitor configuration, by clicking on ‘Monitoring Check Status’ or by going on Start > Programs > GFI Network Server Monitor 6.0 > GFI Network Server Monitor 6.0 Status Monitor. The opening (Home) page displays information on all ‘Failed’ checks as well as the last actions that GFI Network Serever Monitor has performed. The information includes the current status of the GFI Network Server Monitor engine service (i.e. started or stopped), the date and time of the failure, as well as the reason why a check has failed (e.g. If a required file is not found during a ‘file existence check’ the reason displayed would be ‘File does not exist’). The status of each check can also be defined from the icons (check state indicators) on display at the start of each monitor check being displayed. Click on the ‘All checks’ option displayed at the top of the current (home) page, to display the status of all checks. TIP: Although the view is automatically refreshed at timed intervals, you can refresh the displayed information by right clicking on the page and selecting ‘Refresh’.

92 • Monitoring Checks Status GFI Network Server Monitor
Check state indicators Check state indicators allow the user to identify the status of the monitoring checks being performed by GFI Network Server Monitor. A monitoring check can be any one of the following states:
Uncertain – Indicates that the result of a monitoring check cannot be clearly determined, i.e. cannot be directly classified as Success or Failed. For example, the engine tries to run a disk space monitoring check against a target remote computer which is switched off; GFI Network Server Monitor would not be able to determine the disk space available due to a situation outside of the context of that check. Other situations which can cause an uncertain result are timeouts over a slow network or firewall blocking the communication between GFI Network Server Monitor and the target computer. When such situations occur, monitoring checks are placed in an uncertain state. No actions are taken against events which are classified as uncertain. NOTE: You can configure GFI Network Server Monitor to transform uncertain state events to a SUCCESS or FAILED state (depending on your monitoring needs). You can configure this setting from Configuration > General Options > Uncertain Results. GFI recommends the classification of uncertain monitoring checks as failed.
Disabled – Indicates that the relative monitoring check has been disabled. (For more details on how to enable/disable checks, please refer to ‘Enable, Disable or immediately run checks’ section in this manual).
Not Monitored – When a check cannot be processed by the engine, the state is set to Not Monitored. This happens if the Network Server Monitor service is stopped. Alternatively if a check requires e.g. the SNMP service, but this service is not installed on the target computer, then the check will be shown as ‘Not Monitored’.
Server in Maintenance – Indicates the result of a check made during maintenance hours. In this case, no notifications will be sent and no actions will be triggered.
Failure – A failure is the occurrence of a number of errors which exceeds the specified Error Threshold parameter of the check. For more information on errors and error threshold parameters, please refer to the ‘Configure monitor check properties’ chapter.
Failure by Dependee – Indicates that dependencies associated with this check have failed and therefore this check has not been executed.
Success – Indicates that the check was successfully executed.
Queued – Indicates that the relative check is waiting to be processed as soon as possible.
Remote viewing checks status The remote web monitor allows you to view the status of your network using a web browser. Two views are available:

GFI Network Server Monitor Monitoring Checks Status • 93
Screenshot 85- Remote Monitor - Normal View
• ‘Normal view’ - displays information for ‘normal sized’ screens (e.g. computer monitors). The URL to access the normal web monitoring page is:
http://<IP address or machine name>:11695/list.html
Screenshot 86 - Optimized view for Handhelds
• ‘Optimized view’ – shows information in a size suitable for viewing on small displays (e.g. mobile phones, blackberry). The URL to access the Optimised monitoring page is:

94 • Monitoring Checks Status GFI Network Server Monitor
http://<IP address or machine name>:port/mobile.html To view these reports, you can connect your web browser to the machine running GFI Network Server Monitor, default port 11694. By default, GFI Network Server Monitor includes a small footprint web server, to avoid having to install and configure IIS to display your network status on screen. This option is ideal for intranet access. NOTE: For security reasons, we do recommend the use of Microsoft IIS web server for accessing and viewing monitoring checks status. For further information on IIS web server setup, please refer to ‘Configuring IIS as the web server’ section in the ‘General Options’ chapter.

GFI Network Server Monitor Global Alerting Options • 95
Global Alerting Options
Introduction
Screenshot 87 - Alerting Options
The Alerting Options node contains the general alerting parameters required by GFI Network Server Monitor when sending Email, Network and SMS/Pager notifications. From this node you can: • Specify the mail server settings and format the email message to
be used when sending email Notifications. • Specify SMS/Pager settings and format the message to be used
when sending SMS/Pager notifications. • Format the message template used for email, network and
sms/pager notifications.
Mail Server Settings GFI Network Serves Monitor requires at least one mail server to be configured for sending email notifications. You can specify alternative mail servers, in the required order of preference; top having the most priority. NOTE: You can use the ‘Move up’ and ‘Move Down’ buttons to change the priority of the mail servers specified in the list.

96 • Global Alerting Options GFI Network Server Monitor
Screenshot 88 – Email Alerts setup window
Adding a Mail server 1. Right Click on the Alerting Options node and select ‘Properties’. The alerting properties page will open by default in the email properties page. 2. Click on the ‘Add’ button.
Screenshot 89 - Mail server Properties

GFI Network Server Monitor Global Alerting Options • 97
3. Specify the following parameters: • Hostname/IP - Specify the Hostname (e.g. MailServer) or IP
address (e.g. 192.168.1.200) of the Mail server to be used. • Port - Specify the communication port (default port set 25) to be
used. • This SMTP server requires authentication – Enable this flag to
indicate that authentication will be required when sending messages via the specified mail server.
• Username / Password – Specify the name (e.g. JasonM) and password (if any) to be used when connecting to the mail server.
• Sender (email) - Specify the sender email address (<username>@<yourdomain>) which will be used when sending emails from the specified server (e.g. [email protected]).
NOTE: All notifications generated by GFI Network Server Monitor will be sent via the specified email account. • Sender (Display Name) – Specify the display name for the
specified email account. NOTE: You can test the specified settings by clicking on the ‘Send a test message button’. 4. Click on the ‘OK’ button to close the mail server properties window.
Edit existing mail server details 1. Right Click on the Alerting Options node and select ‘Properties’. The alerting properties page will open up, by default, in the email properties page. 2. Click on the ‘Edit’ button and make the required configuration changes. For more details on mail server settings, please refer to ‘Adding a mail server’ section in this chapter.
Formatting the Email Message The email message is built up using text strings and variables which provide data related to an event or condition encountered.
Screenshot 90 - Format Email Message
98 • Global Alerting Options GFI Network Server Monitor
NOTE: For more information on variables and message template formatting, please refer to the ‘Message Template’ section in this chapter. NOTE: This message content can be plain text (e.g. Alert by NSM), strings from system variables (e.g. %CHECK_RESULT%), or a combination of both (e.g. Alert Message from %CHECK_NAME% check). 1. Right Click on the Alerting Options node and select ‘Properties’. The alerting properties page will open up (by default) in the email properties page. 2. Click on the ‘Format Email Message’ button and define the following parameters: • Subject – Specify the string which will be used for the message
subject. By default the subject string is set to display the name of the monitoring check which failed.
• Message – Specify the contents of the message body, which should contain details relative to the event encountered (e.g. ‘TARGET MACHINE: %CHECK_TARGET%’).
• Plain text – Enable this flag to indicate that the message must be in plain text format.
• Rich text – Enable this option to indicate that the message must be in HTML format.
Network Alerts Global Settings NOTE: GFI Network Server Monitor makes use of ‘net send’ to send network alerts. Make sure that you enable the ‘Messenger’ service (svchost.exe –k netsvcs) on the computers which will send and receive network messages. NOTE: Network alerts are configured from the user properties. For more information on the configuration of network messaging, please refer to the ‘Configure user properties’ section in the ‘Users and Groups’ chapter.

GFI Network Server Monitor Global Alerting Options • 99
Screenshot 91 - Network Alerts Properties
Format Network Message 1. Right Click on the Alerting Options node and select Properties. 2. Click on the ‘Network’ tab and then click on the ‘Format Network Message’ button. 3. Make the necessary changes to the message and click on the ‘OK’ button to accept changes. For more information on variables and message templates, please refer to the ‘Message Template’ in this chapter.
SMS/Pager Alerts Global Settings NOTE: This section is only applicable for advanced users. We cannot guarantee that GFI Network Server Monitor will work with any SMS provider. First ensure that you obtain the correct information from your SMS service provider before attempting such configuration. GFI Network Server Monitor can send SMS messages in two ways: • Through an SMSC (Short Message Service Center). This requires
a normal Hayes compatible modem, connected to the server on which the Network Monitor Engine is running. When there is a failure, GFI Network Server Monitor uses the modem to dial-in to the SMSC provider and deliver the actual SMS message(s); most countries have one or more SMSC service providers.
• Through a GSM phone or GSM modem, connected to the server by serial cable, Infrared or Bluetooth. The GSM phone must be

100 • Global Alerting Options GFI Network Server Monitor
capable of processing AT+C commands (most modern GSM phone can do this).
NOTE: The Sender ID is the number of the sending entity. Leave it empty if you want your ID to be withheld when sending a message.
Screenshot 92 - SMS/Pager Alert Settings
Setup for TAP/UCP compliant SMS Service Center 1. Right Click on the Alerting Options node and select ‘Properties’. 2. Click on the SMS/Pager tab, enable ‘Send SMS through TAP/UCP compliant sums service center’ and click on the ‘Configure…’ button.

GFI Network Server Monitor Global Alerting Options • 101
Screenshot 93 - TAP/UCP service centers properties setup
3. Click on the ‘Select’ button.
Screenshot 94 - Providers List
4. Choose an SMSC service provider from the available list of providers, and click on the ‘Select’ button. NOTE: You can add new providers to the available list of providers. For further information on how to do this, please refer to the ‘Adding new SMSC providers’ section in this chapter. 5. Configure the dial properties: • Tone – Enable this flag to indicate that tone dialing is to be used. • Pulse – Enable this flag to indicate that pulse dialing is to be used.

102 • Global Alerting Options GFI Network Server Monitor
• Dial prefix – Specify any additional numbers that need to be dialed before the Dial-String.
• Redial Attempts – Specify the number of times that the number is to be redialed, before the connection is timed out.
NOTE: The Dial-string is the number of the selected provider and can only be modified by editing the SMSC provider’s details. For further information on how this is done, please refer to the ‘Changing SMSC providers details’ section in this chapter. 6. Configure the modem properties: • Com Port - Specify the com port where the modem is connected. • Flow Control - Leave as default.
Add new SMSC providers GFI Network Server Monitor includes an extensive list of SMS service providers. However, it maybe necessary to add new providers from time to time. To add a new provider: 1. Right Click on the Alerting Options node and select ‘Properties’. 2. Click on the SMS/Pager tab and enable ‘Send SMS through TAP/UCP compliant sums service center‘ and click on the ‘Configure…’ button. 3. Click on the ‘Select’ button to open the SMSC setup screen and click on the ‘Add’ button.
Screenshot 95 - SMSC Provider Setup Screen
4. Specify the following settings: • Country - Specify the country of the provider. • Provider - Specify the provider name. • Dial-in number - Specify the number that the modem must dial. • Data format - Specify the data format to be used. Obtain this
information from your service provider.

GFI Network Server Monitor Global Alerting Options • 103
• Speed - Specify the speed at which the data must be sent. Obtain this number from your SMS service provider.
• Protocol - Choose between TAP (Telecator Alphanumeric Protocol) and UCP (Universal Computer Protocol). Although TAP is the most commonly used protocol, you should ask your SMS service provider for this information.
• Password - You can specify a password to use for authentication before connection to the provider is made.
• Comments – Add any comment related to the provider (e.g. For support call provider on 22211164)
5. Click on the ‘OK’ button to add the service provider to the list.
Changing SMSC providers details
Screenshot 96 - SMSC providers list
Note: This section is only applicable for advanced users. We cannot guarantee that GFI Network Server Monitor will work with any SMS provider. Ensure that you obtain the correct information from your SMS service provider first. To change the provider’s details: 1. Right Click on the Alerting Options node and select ‘Properties’. 2. Click on the ‘SMS/Pager’ tab, enable ‘Send SMS through TAP/UCP compliant sums service center’ and click on the ‘Configure…’ button. 3. Click on the ‘Select’ button, choose an SMSC service provider from the list and click on the ‘Edit’ button. 4. Make the required changes to the provider’s details and click on the ‘OK’ button to accept the changes.
Setup for direct mobile phone connection to server NOTE: This setup requires a GSM mobile phone with modem facilities.

104 • Global Alerting Options GFI Network Server Monitor
Screenshot 97 - Send SMS alert through Mobile phone.
1. Right Click on the Alerting Options node and select ‘Properties’. 2. Click on the ‘SMS/Pager’ tab, enable ‘Send SMS through direct mobile phone connected to Server’ and click on the ‘Configure…’ button.
Screenshot 98 – GSM Modem Settings
3. Specify the following modem settings: Com Port - Select the com port to which your GSM phone or modem is connected. NOTE: Leave other settings as default, unless you are sure that they need to be changed.

GFI Network Server Monitor Global Alerting Options • 105
4. Click on the ‘OK’ button to accept changes.
Additional Notes NOTE: You can turn on modem logging in the GFI Network Server Monitor Engine. To do so, you must enter a valid file name in the following registry entry: HKLM\Software\GFI\Network Monitor\ModemLogFile NOTE: SMSC providers require the connection speed. Therefore configure this in the provider details. NOTE: The number format of a recipient depends on the provider (when using SMSC) or on GSM (when using local GSM phone). This requires an amount of trial and error in finding the right format. For example, if you live in the UK (+44), you should try: 12345678 4412345678 004412345678
Format SMS/Pager message 1. Right Click on the Alerting Options node and select ‘Properties’. 2. Click on the ‘SMS/Pager’ tab and then click on the ‘FORMAT SMS/Pager MESSAGE’ button.
Screenshot 99- SMS/Pager Message Format Window
3. Make the necessary changes to the SMS/Pager message and click on the ‘OK’ button to accept changes. For more information on variables and message templates formatting, please refer to the ‘Message Template’ section at the end of this chapter.
Message Templates Notification messages templates can be customized by clicking on the ‘Format Message’ button present in the Email, Network, and

106 • Global Alerting Options GFI Network Server Monitor
SMS/Pager pages of the NSM Global Alerting options. Message templates can be built up using text and variables. Variables are substituted each time a message is sent out and must be enclosed within “%” (e.g. %DATE%) when specified in message templates. The following are variables that can be included in message templates: • %DATE% - date in mm/dd/yyyy format. • %TIME% - time in hh:mm:ss format. • %CHECK_NAME% - the display name of the check as seen in the
configuration. • %CHECK_FOLDER% - the name of the folder in which the
specific check is located. • %CHECK_TARGET% - the check's target computer name/IP; can
be either the one set in the check or the one inherited from the parent folder.
• %CHECK_RESULT% - the result of the monitoring of the check represented as a string.
• %CHECK_EXPLANATION% - the explanation returned with the last known status of the check.
• %PRODUCTNAME% - the name of the product, in this case GFI N. S. M. 6.0.
Example of a message template: Message from GFI Network Server Monitor, <% DATE %> <%TIME %>: Item: <% CHECK_TARGET %> Result: <% CHECK_RESULT %> Explanation: <% CHECK_EXPLANATION %> Message from GFI Network Server Monitor, <% DATE %> <%TIME %> NOTE: Using new lines in SMS/Pager Message Templates is NOT recommended. Most GSM phones don’t know how to handle new lines and will display bad characters.

GFI Network Server Monitor General Options • 107
General Options
Introduction
Screenshot 100 – General options node
From the General options node you can: • Specify how GFI Network Server Monitor will handle uncertain
results. • Configure GFI Network Server Monitor built in Web server. • Specify which proxy server will be used for Internet Protocol based
checks. • Enable the event logging activity.
Uncertain Results Settings An uncertain result occurs when the result of a check cannot be determined as successful or failed by the GFI Network Server Monitor engine because of the condition encountered (e.g. If the target computer on which a monitor function checks Disk Space can no longer be accessed, then the check status is set to uncertain, because GFI Network Server Monitor engine can no longer determine the disk space).

108 • General Options GFI Network Server Monitor
Screenshot 101 - Uncertain Results setup
GFI Network Server Monitor can be configured to convert uncertain results to a definite state i.e. Success or Error. To specify how GFI Network Server Monitor will handle uncertain results: 1. Right Click on the General Options node and select ‘Properties’. By default the properties window will open in the Uncertain Results options. 2. Determine uncertain results by: • Enabling ‘If result cannot be determined, consider result as
‘Uncertain’ (default)’ to leave uncertain results unhandled. • Enabling ‘If result cannot be determined, consider result as ‘Error’’
to handle uncertain results as failed. • Enabling ‘If result cannot be determined, consider result as
‘Success’ to handle uncertain results succeeded. In this case, the same conditions specified on the successful execution of a check will apply.
Web Server Settings You can use the GFI Network Server Monitor built in web server to remotely view the status of your network.

GFI Network Server Monitor General Options • 109
Screenshot 102 - built in Web Server settings
To configure the built in web server: 1. Right Click on the General Options node, select ‘Properties’ and click on the ‘Web Server’ tab. 2. Configure the following parameters: • ‘Enable in-built web server on port….’ – Enable this flag and
specify the port which the built in web server will listen on (by default set to 11695).
• ‘Allow anonymous access to the web server’ – Enable this flag to indicate that no authentication is required on the web server.
• ‘Allow only the following users to log on to the web server’ – Enable this flag to grant web server access only to the specified users.
• To specify users that have access to the web server, click on the ‘Add’ button, specify the user’s authentication details (User name and Password) and click on the ‘OK’ button.
Configuring IIS as the web server Using IIS as the web server gives you more advanced authentication features and the possibility to secure the connection via SSL. The integration with IIS is very straightforward. GFI Network Server Monitor updates an XML file, from which the 2 views are rendered. These files are stored in the GFI Network Server Monitor\Server\web folder. You need to create a virtual directory in IIS, which points to the GFI Network Server Monitor\Server\Web folder. To do this:

110 • General Options GFI Network Server Monitor
1. Start up Internet Services Manager, right click on the Web Site node, and from the popup menu select ‘New – Virtual Directory’.
Screenshot 103 - Specifying an alias for the virtual directory
2. This will start the Virtual Directory Creation Wizard. Click on the ‘Next’ button to continue. Now you need to enter an alias for the virtual directory. In this case it is nsmremotemonitor, but you can enter whatever name you like, as long as it follows the folder naming conventions used in Microsoft Windows.
Screenshot 104- Pointing to the GFI NSM web folder

GFI Network Server Monitor General Options • 111
3. Now enter the path where the content is located. Select ‘Browse’, and select the ‘server\web’ folder in the GFI Network Server Monitor installation path.
Screenshot 105 - Setting permissions
4. Next we need to set the access permissions. Mark ‘Read’ only. Do not mark any of the other check boxes. Click on the ‘Next’ button to finish the Virtual Directory Creation Wizard. 5. Right-click on the newly created virtual directory, located under the web root of your web site server and select ‘Properties’.
Screenshot 106 - Setting Virtual Directory properties
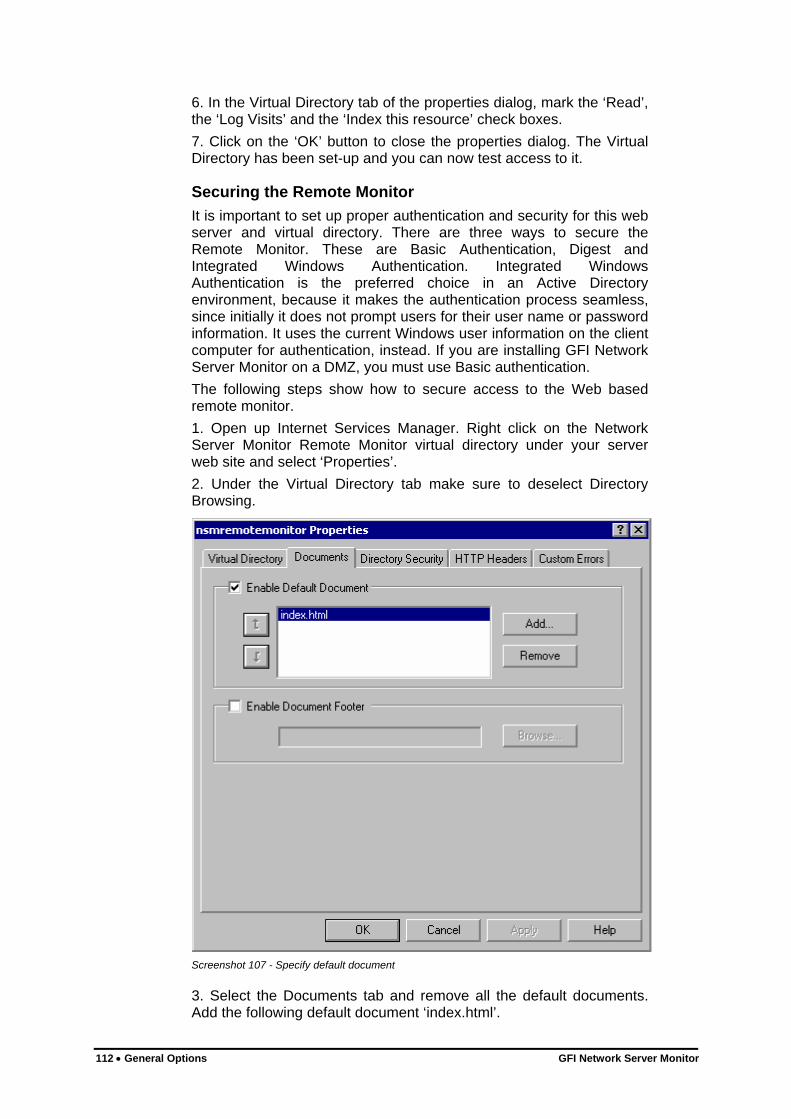
112 • General Options GFI Network Server Monitor
6. In the Virtual Directory tab of the properties dialog, mark the ‘Read’, the ‘Log Visits’ and the ‘Index this resource’ check boxes. 7. Click on the ‘OK’ button to close the properties dialog. The Virtual Directory has been set-up and you can now test access to it.
Securing the Remote Monitor It is important to set up proper authentication and security for this web server and virtual directory. There are three ways to secure the Remote Monitor. These are Basic Authentication, Digest and Integrated Windows Authentication. Integrated Windows Authentication is the preferred choice in an Active Directory environment, because it makes the authentication process seamless, since initially it does not prompt users for their user name or password information. It uses the current Windows user information on the client computer for authentication, instead. If you are installing GFI Network Server Monitor on a DMZ, you must use Basic authentication. The following steps show how to secure access to the Web based remote monitor. 1. Open up Internet Services Manager. Right click on the Network Server Monitor Remote Monitor virtual directory under your server web site and select ‘Properties’. 2. Under the Virtual Directory tab make sure to deselect Directory Browsing.
Screenshot 107 - Specify default document
3. Select the Documents tab and remove all the default documents. Add the following default document ‘index.html’.

GFI Network Server Monitor General Options • 113
4. Select the Directory Security tab and click on the ‘Edit’ button for the Anonymous access and authentication control group. 5. Select Integrated Windows authentication (recommended if installed on the internal network) OR Basic Authentication check box (if installed in the DMZ). Ensure Anonymous access is deselected.
Screenshot 108 - Select authentication method
If Integrated Windows authentication is used, then authentication will occur against Active Directory. This means you do not need to configure additional users. If you use Basic Authentication, authentication will occur against the local user database on the machine. In this case you must create user names and passwords on that local machine. For more information on securing IIS, please review the IIS documentation. Be sure not to allow anonymous access! 6. Restrict the access to the pages by using NTFS permissions. Open up Explorer and navigate to the web folder in the GFI Network Server Monitor installation path. Right click on the ‘web’ sub folder, select ‘Properties’ and then the ‘Security' tab.

114 • General Options GFI Network Server Monitor
Screenshot 109 - Setting permissions
7. Add / remove the users / groups you want to grant access to the Remote Monitor. To grant access only to users forming part of the administrators group, you would set the security tab. Click on the ‘OK’ button to finally secure the remote monitor.
Proxy Server Settings The proxy server settings define which server will be used for Internet protocol checks.

GFI Network Server Monitor General Options • 115
Screenshot 110 - Proxy Server Setup Window
To configure proxy server parameters: 1. Right Click on the General Options node and select Properties. 2. Click on the Proxy Server Tab and define the following parameters: • Hostname/IP Address – Specify the proxy server name (e.g.
ISASERVER) or IP address. • Port – Specify the port on which the proxy server will listen (default
= 8080). • Proxy requires authentication – Enable this flag to indicate that the
specified proxy server requires authentication details. • User name / Password – Specify the logon detail to be passed to
the specified proxy server for authentication.
Log File Settings GFI Network Server Monitor can log monitoring checks activity into a text file for future reference. Since the log file is in plain text, you can import its contents to other applications for further processing.

116 • General Options GFI Network Server Monitor
Screenshot 111 - Log file setup Window
To configure the logging parameters: 1. Right Click on the ‘General Options’ node and select ‘Properties’. 2. Click on the ‘Logging’ tab and define the following parameters: • ‘Enable Logging of monitoring checks activity’ – Enable this flag to
start logging all check activity to a specified text file. • Log file – Specify the full path to the log file. • Field separator – Specify the character that will be used to
separate the fields in the log file (e.g. using the comma (,) would enable you to import the file to excel as CSV).
• Maximum log size – Specify the maximum log file size (in KB) required (e.g. if a 1 MB log file limit is required, specify 1000KB).
• ‘Backup the existing log file and clear it’ – Enable this option to automatically make a copy of the log file and clear the contents of the original log file whenever the specified file size limit is reached.
NOTE: In such cases, the backup file name to be used would be ‘LOG####.TXT’ where #### is the next available number, depending on the number backup files that already exist (e.g. if LOG0002.TXT exist, the next backup file number will be LOG0003.TXT). • ‘Do not log events until event log is cleared manually’ – Enable this
option to stop logging check activity whenever the maximum specified log file size is reached.

GFI Network Server Monitor Users and Groups • 117
Users and Groups
Introduction GFI Network Server Monitor checks refer to the user's properties to gain notification details (e.g. email address), rather than directly to an email or a number. This is in order to avoid having to change all the checks if a particular email or number of a user changes. You can configure user name, email address, mobile number, pager number and the computer name(s) from where network messages should be sent, from the user properties. You can also define the working hours of a user and decide what notification (if any) is to be sent depending on the time that the important event occurred i.e. during or outside of working hours. You can create a group of users to notify more than 1 person and avoid having to specify multiple users for each check you create. This makes it much easier to change the users to notify afterwards since you just need to change the group membership.
Screenshot 112- Users and Groups folders
Users
Add a new user 1. Right click on the Users folder under the Users and Groups node and go on New > User.

118 • Users and Groups GFI Network Server Monitor
2. Specify the parameters required in the user properties as described below.
Configure user properties User parameters are defined in the user properties window, which opens automatically whenever a new user is being added, or can be opened when necessary by right clicking on an existing user and selecting ‘Properties’.
Screenshot 113 - User Properties Window
Configure user’s general parameters These parameters define the general details of the user, including the notification details (e.g. email address, SMS/Pager number, etc...), the person’s working hours and the groups in which this user is a member. To configure these parameters: 1. Click on the General tab (which is the default opening view of the user properties window) 2. Specify the following properties: • Full name – Specify the full name of the user. • Description – Specify a string which describes the user’s role in
the company (e.g. Mail server administrator). • Email – Specify (if required) the address were email notifications
will be sent.

GFI Network Server Monitor Users and Groups • 119
• Mobile Number – Specify (if required) the mobile number were SMS notifications will be sent.
• SMS/Pager number – Specify (if required) the Pager number were SMS messages will be sent.
• Network Messages – Define (if required) all the computers this user has access to, in order to define were network messages should be sent. Specify the computer name and click on the ‘Add’ button. Repeat the same operation until all computers have been specified.
Define working hours GFI Network Server Monitor, allows you to specify the working hours of a user (recipient of notifications). These parameters will be referenced by the GFI Network Server Monitor engine in order to decide what notifications (if any) need to be sent to this user, depending on the time (during or outside of working hours) that an important event occurs (e.g. a check fails).
Screenshot 114 - Working Hours Setup window
NOTE: Marked ( ) hours indicate working time. To setup working hours, click on the ‘Working hours’ tab and then click on the working hours that you need to mark / unmark. TIP: To mark / unmark a whole day click on the day (e.g. MONDAY) displayed on the left of the hours setup grid.

120 • Users and Groups GFI Network Server Monitor
TIP: To mark the same hour for a whole week, click on at the top of the relative hour column.
Define notifications to be used You can specify what notifications (if any) are to be sent, on the occurrence of important events during and/or outside of working hours. This is based on the working hours specified for this user (e.g. you can configure GFI Network Server Monitor to send SMS/Pager notifications to this user ONLY when an event occurs outside normal working hours). For further information on how to setup the working hours for a user, please refer to the ‘Working Hours’ section in this chapter.
Screenshot 115- Alerts Setup Window
Enable the notifications that will be used when alerts occur during and/or outside of working hours (e.g. The screenshot above shows the settings for a user that will receive email notifications at any time an important event occurs as well as a Network notification if the event occurs during working hours and an SMS/Pager notification if the event occurs outside of working hours).
Add user to a group A user can be added to predefined groups. You can create a group of users to notify more than 1 person and avoid having to specify multiple users for each check you create. NOTE: Users can be members of more than 1 group.

GFI Network Server Monitor Users and Groups • 121
Screenshot 116- Members of tab
To specify the group(s) to which this user will be added: 1. Click on the ‘Add’ button, select the required group(s) and click on the ‘OK’ button. TIP: You can make multiple selections of groups so as to add all required groups at one go.
Delete users To delete users: 1. Click on the Users folder under the Users and Groups node and select user(s) to be deleted. 2. Right click on the selected user(s) and select ‘Delete’.
Groups A Group contains a collection of users. You can create a group of users to notify more then 1 person and avoid having to specify multiple users for each check you create. This makes it much easier to add new notification recipients to that particular check since you just need to associate the new users to the recipients group.
Add a New Group 1. Click on the Group folder under the Users and Groups node and go on NEW > GROUP.

122 • Users and Groups GFI Network Server Monitor
Screenshot 117 - Group Properties window
2. Specify the group name (e.g. NetworkAdministrators) and the string which describes the group/groups members (e.g. File Server Administrator). 3. To specify the members for this group, click on the ‘Add’ button, select the users and click on the ‘OK’ button to accept the selection.
Add members to an existing group To add users to an existing group: 1. Double click on the Group folder under the Users and Groups node, right click on the group were the new member will be added and select ‘Properties’. 2. Click on the ‘Add’ button, select the new members and click on the ‘OK’ button to accept the selection.
Remove Members from a group 1. Double click on the Group folder under the Users and Groups node, right click on the group were the new member will be added and select ‘Properties’. 2. Select members to be deleted from displayed list and click on the ‘Remove’ button.
Delete a group Double click on the Group folder under the Users and Groups node, right click on the group to be deleted and select ‘Delete’.

GFI Network Server Monitor Reporting • 123
Reporting
Introduction GFI Network Server Monitor allows you to create reports that detail the availability of your network resources. You can create reports directly in HTML, or generate XML/CSV reports, which you can export to your favorite application. GFI Network Server Monitor stores check activity logs in an Access database. You can use both report templates included (i.e. Availability-Detail Report and Availability-Summary Report) in GFI Network Server Monitor, to extract this information and generate detailed or summary reports related to a specified period of time.
Availability - Detail Report The Availability-Detail Report includes an overview of all changes in check state that occurred across a specified period of time. Other information included in this report specify the length of time a server or service was in a particular state, making it easy to define the relative up/down time. To generate an Availability-Detail Report. 1. Go on: Start > GFI Network Server Monitor 6.0 program group > GFI N.S.M 6.0 Reporter and click on the ‘Next’ button when report wizard starts.

124 • Reporting GFI Network Server Monitor
Screenshot 118 - Specify report interval
2. Enable ‘Availability–Detail Report’ and click on the ‘Next’ button.
Screenshot 119 - Select the period to be covered by report
3. Specify the monitoring period (‘From:’ and ‘To:’ date) to be included in the report.

GFI Network Server Monitor Reporting • 125
Screenshot 120 - Specify which checks to include in the report
4. Specify which checks to include in your report. Enable the ‘All Checks’ option to include all existing checks or Enable ‘The following checks:’ option to specify a selection of checks to include in the report.
Screenshot 121 – Choose the report format required
5. Specify the report format required. Enable ‘CSV’ or ‘XML’ formats if you want to further process the report and perform more advanced calculations using another (external) program (e.g. Excel).

126 • Reporting GFI Network Server Monitor
Screenshot 122 - The availability detailed report
Availability - Summary Report The Availability-Summary Report contains information showing the state of target computers over a specified period of time.
Screenshot 123 - First Stage of the report wizard - Select Report Type
The process for generating a new Availability-Summary Report is identical to that of the Availability-Detail Report with the exception that a user must select Availability–Summary Report as report type in the prompt displayed in the first stage of the report wizard (see screenshot above).

GFI Network Server Monitor Reporting • 127
Screenshot 124 - The availability summary report

128 • Network Tools GFI Network Server Monitor
Network Tools
Enumerate Computers This tool will search for Domains and/or Workgroups on your network. Once the domains are defined, you can scan their contents to catalog the constituent computers and their relative details (e.g. OS, other information from NETBIOS). Computers can be enumerated from: • The Active Directory – Fast method which will also enumerate
computers that are currently switched off. • The Windows Explorer interface – This method is slower and will
not enumerate computers that are switched off.
NOTE: When performing scans, you must use access accounts that have rights over the Active Directory.
Screenshot 125 - Enumerate computers - General Tab options
To setup the required parameters: 1. Click on the general tab. 2. Specify the domain where a search is to be made (e.g. GFIMALTA). 3. Specify the computers which need to be listed: • Select ‘Enumerate All computers’ to display all computers in the
domain. • Select ‘Only these’ to specify which computers to look for. Define
selection criteria parameters to be used from the Operating System, Machine services and Machine type options available.

GFI Network Server Monitor Network Tools • 129
Screenshot 126 - Enumerate Computers - Advanced tab options
4. Click on the ‘Advanced Tab’ and choose the search method by marking ‘Enumerate from Active directory’ or ‘Enumerate using Windows Explore Interface’ 5. Define additional information to be displayed by marking ‘Determine Computer role on the network’ and/or ‘Determine whether computer is turned on’. NB: - Should it be required, enter authentication details in the fields located at the bottom. The list of constituent computers in the specified domain will be displayed. Status details of the operation carried out is displayed in the bottom window E.g. To look for ALL computers which run on Windows 2003 OS in a domain called JASONTEST : 1. Select / enter domain name. 2. Click on the ‘General’ tab, enable ‘Only these’ option. 3. Set to ‘True’ the value near Windows 2003 in the Operating System selection area. 4. Click on the ‘Advanced’ Tab 5. Enable ‘Enumerate from Active Directory’ as well as ‘Determine
computer role in network’ and ‘Determine whether computer is on’. 6. Click on the ‘Retrieve’ button to start enumerating computers.
Enumerate Processes This tool is used to catalog processes running on a remote computer. Amongst other tasks, this tool searches and displays information on the CPU and Memory resources consumed by each process found running on the specified target computer. You can also highlight / a particular process or indicate processes which are consuming more than a defined percentage (%) of CPU usage. The set up window layout is similar to the enumerate computer’s tool, were the resulting list of processes is displayed in the top-middle window, whilst the

130 • Network Tools GFI Network Server Monitor
status/details of the operation carried out are displayed in the bottom-middle window. Icons on the left of each process indicate the state of the process in relation to the specified CPU usage value.
Indicates that the process is using more than the specified CPU usage limit.
Indicates that the process is using less CPU resources than the specified limit.
Screenshot 127 - Enumerate Processes setup window - General Tab
This tool requires the following parameters in the ‘General’ tab view: • Hostname/IP – The name of the remote machine whose
processes will be enumerated. • Retrieve CPU usage per process – Indicate that the process list
should include the percentage (%) CPU usage value. • CPU % usage – Specify the maximum percentage (%) CPU usage
allowed. This option will then highlight processes using more than the specified limit.
• Refresh list frequency – Specify the time interval in seconds, at which the list of processes will be refreshed.
• Logon Credentials – Specify logon credentials (if any), required to connect to host computers.
The following parameters are required in the ‘Advanced’ tab view: • Highlight processes – Specify the list of processes which you need
to highlight in the derived list of processes. This is convenient to find any known unwanted process, such as viruses, which are running on a remote machine, or vice versa to confirm if a particular process, such as a virus, shield is running.
• Hide Processes – Specify the list of processes that you do not want to display in the derived list of processes.
To retrieve the list of running processes:

GFI Network Server Monitor Network Tools • 131
1. Specify the name/IP of the machine from where to retreive the processes. 2. Specify if you want to display the percentage (%) CPU usage and indicate if processes using more than a specified CPU usage value are to be highlighted. Specify the percentage (%) CPU usage value to be used as reference. 3. Set the refresh rate at which the list will be updated. 4. Specify logon authentication details (if any). 5. To highlight particular processes, click on the ‘Advanced’ tab and specify the process names, one for each line. The specified processes will be highlighted in yellow and displayed in the list. 6. To hide any known processes from being displayed click on the ‘Advanced’ tab and specify the process names in the ‘Hide processes ‘list, one process per line. 7. Click on the ‘Start’ button to start enumerating processes.
Screenshot 128 – List of Highlighted Processes
DNS Lookup This tool helps resolving Domain Names to their corresponding IP address as well as displaying any additional information such as Aliases, MX and NS Records.

132 • Network Tools GFI Network Server Monitor
Screenshot 129- DNS Lookup - setup Window
To obtain information about a domain name: 1. Go to the Tools > DNS lookup node. 2. Specify the hostname to resolve. 3. Specify the information to be retrieved. • Basic Information – i.e. host name and what IP this resolves. • Host Information - known technically as the HINFO, usually
includes information such as hardware and what OS runs on the specified domain (most DNS entries do not contain this information for security reasons).
• Aliases - return information on any A Records the Domain might have.
• MX Records - known also as Mail exchangers records, show which mail server(s) in order, are responsible for this domain.
• NS Records - indicate which name servers are responsible for this domain.
In addition it is possible to specify alternative DNS servers.
Whois This tool looks up information on a domain or IP address. You can select a specific Whois Server from the options area, or you can use the 'Default' option which will select a server for you.

GFI Network Server Monitor Network Tools • 133
Screenshot 130 - WhoIs Setup Window
1. Specify the parameters required for this function: • Domain Name/IP Address – The hostname/IP to resolve and
retrieve details for. • Whois Server – The server which will process the query and
supply the information related to the defined host. 2. Click on the ‘Retrieve’ button to start the search.
Traceroute This tool shows the network path that GFI LANguard N.S.S. followed to reach the target machine. When you perform a trace route, each hop has an icon next to it which indicates:
A successful hop taken within normal parameters.
A successful hop, but time required was quite long.
A successful hop, but the time required was too long.
The hop failed / timed out. (i.e. it took longer then 1000ms).

134 • Network Tools GFI Network Server Monitor
Screenshot 131 - Traceroute Setup window
1. Specify the following parameters: • Domain/IP/Name – Specify the targeted destination. • Do Not resolve IPs – Enable this flag to indicate that only the IP
Address is required to be displayed. • Repetition Frequency - Define if the function is to be run more than
once and specify the interval between each run. 2. Click on the ‘Traceroute’ button to start the trace.
SNMP Audit The SNMP Audit tool, allows you to perform an SNMP audit on a device and audit for weak community strings. Some network devices will have alternative or non-default community strings. The dictionary file contains a list of popular community strings to check for. The default file it uses for the dictionary attack is called snmp-pass.txt. You can either add new community names to this file, or direct the SNMP audit to use another file altogether.

GFI Network Server Monitor Network Tools • 135
Screenshot 132 - SNMP Audit Setup Window
1. Specify the following parameters: • IP Address – The IP address of the machine running SNMP • String List –The list of strings/parameters to be checked (can be
left as default). This property is by default set to the dictionary file included in GFI Network Server Monitor. This dictionary file called snmp-pass.txt contains the list of strings which forms the query data fields to be displayed in the result window, being the window on the right of the SNMP Audit setup window. Should more/less information be required, user can either edit the mentioned default file or create a new one using a text editor.
• Resolve computer names – Enable this option to resolve IP addresses and display the computer name.
• Scan Query Timeout – Timeout value in ms which defines the time that a query is allowed to run before being stopped
2. Click on the ‘Retrieve’ button to start SNMP audit.
SNMP Walk SNMP walk allows you to gather SNMP information. The right pane contains a list of names symbolizing specific Object ID’s on the device. To find out more about the information provided by the SNMP walk, you will have to check with the vendor. Some vendors provide great details on what each piece of information means, others, though their devices support SNMP, provide no documentation on it at all. Note: SNMP will help malicious users learn a lot about your system, making password guessing and similar attacks much easier. Unless this service is required it is highly recommended that SNMP is turned off.

136 • Network Tools GFI Network Server Monitor
Screenshot 133 - SNMP Walk Setup window
Note: In most cases SNMP should be blocked at the router/firewall so that Internet users cannot SNMP scan your network. It is possible to provide alternative community strings. 1. Specify the following parameters: • IP address – Enter the IP address of a machine or device which
you wish to scan/’walk’. • Community String – (can be left as default) Define if the default
Community string (public) or an alternative community string is to be used. Should it be required, key other alternative community strings.
2. Click on the ‘Retrieve’ button to start SNMP scan.

GFI Network Server Monitor Other features • 137
Other features
Export Configurations You can export a copy of your GFI Network Server Monitor configuration settings, including checks, folders notification settings, users/groups and general parameters to a specified XML file. This function can be used to backup your current configuration settings or to use the same configuration settings on another computer running GFI Network Server Monitor (e.g. to avoid reconfiguration when changing the computer on which GFI Network Server Monitor is running). NOTE: The Export Configuration function will export all configuration settings present in the GFI Network Server Monitor setup EXCEPT THE LICENSE KEY. To export your configuration settings: 1. Go on File > Export Configurations.
Screenshot 134 - Export Configuration settings
2. Specify the location were the exported XML file will be placed (e.g. C:\Program Files\GFI\configBackup.xml) or click on the ‘Browse’ button to search for the location. 3. Click on the ‘OK’ button to save the file.
Import Configurations You can import all configuration settings (except the license key) of another GFI Network Server Monitor setup (e.g. from another server) by using the Import configuration function. This function conveniently

138 • Other features GFI Network Server Monitor
avoids having to re-configure the settings of GFI Network Server Monitor when you need to change the computer on which your current version of GFI Network Server Monitor is running. NOTE: Since importing a configuration will overwrite all your current configuration settings, we strongly recommend that you export a copy of your current configuration settings and keep it as a backup. 1. Go on File > Import Configurations.
Screenshot 135 - Import configuration settings
2. Specify the complete path to the XML file containing the configuration settings (e.g. \\NSM_Server2\Program Files\GFI\config_Backup.xml) or click on the ‘Browse’ button to search for the file. 3. Click on the ‘OK’ button to import the specified configuration file.
Version Information

GFI Network Server Monitor Other features • 139
Screenshot 136 - Version Information
Check the version of GFI Network Server Monitor from General node > ‘Version Information’.
Screenshot 137 – Check for Newer Builds
You can also check for newer builds right clicking on ‘Version Information’ in the General Node and selecting ‘Check for Newer Build…’
Licensing
Screenshot 138 - Licensing details

140 • Other features GFI Network Server Monitor
Check your licensing details from General node > ‘Licensing’.

GFI Network Server Monitor Writing your own monitoring functions • 141
Writing your own monitoring functions
Introduction NOTE: GFI Support cannot assist you in the writing and debugging of custom scripts. You must be familiar with VBscript to write your own functions and you must debug them yourself. GFI Network Server Monitor is designed to let operators write their own monitor functions and use them in the product. GFI uses VBScript because it is the most popular scripting language in Windows environments. GFI Network Server Monitor uses VBscript itself to perform a number of checks. In fact, during installation, five VBScript files are installed: • ads.vbs – includes monitor functions based on ADSI (Active
Directory Service Interfaces); • exchange.vbs – includes monitor functions that can check
Exchange 2000/2003 servers; • hardware.vbs – includes hardware related monitor functions; • os.vbs – includes Operating System related monitor functions; • sample.vbs – includes some sample functions.
Writing a script/function GFI Network Server Monitor functions should always return: • -1 (True); Return -1 in case the Monitor Function is successful. For
instance, if your function checks the existence of a certain directory, and it does exist, then return -1;
• 0 (False); Return 0 in case the Monitor Function is not successful. For instance, if your function checks the existence of a certain directory, and it does not exist, then return 0;
• 1 (Unknown); Return 1 in case the Monitor Function cannot determine True or False. For instance, if your function checks the existence of a certain directory on a server, but it cannot find the server at all (for instance because the computer is down), return 1;
It’s very easy to write your own monitor functions in VBScript. Use the following guidelines when writing a new function: • The routine must be a Function, not a Sub; • The Function must return True (-1), False (0) or Unknown (1);

142 • Writing your own monitoring functions GFI Network Server Monitor
• Optionally, use the EXPLANATION system variable to add your own explanation to the result of the function; this EXPLANATION is shown in the client program each time the check is made;
• All variables must be 'dimmed', except EXPLANATION. EXPLANATION is a GFI Network Server Monitor system variable automatically dimmed by the GFI Network Server Monitor service.
The function must be written according to the following template: Const retvalUnknown = 1
Function Function_i( var1, var2, ..., varn )
If ( Not Pre-condition ) Then
EXPLANATION = "Unable to determine..."
Function_i = retvalUnknown
Else
If( condition ) Then
EXPLANATION = "Yes it is true because ..."
Function_i = True
Else
EXPLANATION = "No it’s not true because ..."
Function_i = False
End If
End If
End Function
where Function_i is an arbitrary name for the function. You can save this function in either one of the standard VBS files (i.e. ads.vbs, exchange.vbs, hardware.vbs, os.vbs or sample.vbs), or in a new VBScript file. In case of a new file ensure that your VBS file is accessible via the GFI Network Server Monitor Share.
Adding a monitor function written in VBscript After you have written a monitor function in VBscript, you must add it in the Network Server Monitor Manager as a check. To do this: 1. Right Click on ‘Monitoring Checks Configuration’ and go on New > Monitoring Check.

GFI Network Server Monitor Writing your own monitoring functions • 143
Screenshot 139 - VBscript function setup
2. Select ‘Generic VB Script’ and specify the following parameters: • Script location – Specify the path to the VBScript file which will be
used. The script should contain the function specified in the Function name field and should return True (-1) in case of success, or False (0) in case of an error;
• Function name – Specify the function that GFI Network Server Monitor service will be calling from the specified script file.
• VB Function Parameters – Double click on the line where the additional parameter values required by this function are to be specified.
NOTE: Parameters will be passed to the function according to their position in the list, starting from 1.
Screenshot 140 - Add Parameters window
• Specify the parameter value and description. Parameter values can be extracted from system variables (e.g. %USERNAME%)

144 • Writing your own monitoring functions GFI Network Server Monitor
upon execution of the function or directly specified as a string (e.g. “JasonM”)
NOTE: Enclose string parameter values within quotes (e.g. “CPU0”). NOTE: You can make changes to the selected script by clicking on the ‘Edit script …’ button.
WMI (Windows Management Instrumentation) If you plan to write monitor functions based on WMI (Windows Management Instrumentation), be sure you have WMI installed on the GFI Network Server Monitor server and on the target machine/server that you want to monitor. WMI is by default included as part of the Windows 2000/2003 operating system only. For NT4 systems download the file (for free) from the Microsoft website; GFI has collected more than a hundred WMI samples. You can use these samples as a base for new monitor functions that you write yourself. You can find them on the GFI website.
ADSI (Active Directory Service Interfaces) GFI Network Server Monitor can check several Directory Services including Active Directory, and NTDS (NT4 SAM database) directory services. You can program GFI Network Server Monitor to check user accounts (locked out, disabled, etc.), computer accounts, groups, group membership, organizational units, and so on. If you plan to write monitor functions based on ADSI (Active Directory Service Interfaces), be sure you have ADSI installed on the GFI Network Server Monitor server and on the server that you want to monitor. ADSI allows you to access Windows 2000/2003 Active Directory, but also NT4 User information from the SAM database, and other User Databases. ADSI is part of the Windows 2000 operating system; and it’s not part of NT4. For NT4, please download the file from the Microsoft website; ADSI is available for free. GFI includes a sample script that uses ADSI, called ads.vbs. In addition, GFI provides some sample ADSI scripts on the website. You can use these samples as a base for new monitor functions that use ADSI.

GFI Network Server Monitor Troubleshooting • 145
Troubleshooting
Introduction The troubleshooting chapter explains how you should go about resolving issues you have. The main sources of information available to users are: 1. The manual – most issues can be solved by reading the manual. 2. The GFI knowledgebase – accessible from the GFI website. 3. The GFI support site. 4. Contacting the GFI support department by email at [email protected] 5. Contacting the GFI support department using our live support service at http://support.gfi.com/livesupport.asp 6. Contacting our support department by telephone.
Knowledgebase GFI maintains a knowledgebase, which includes answers to most common problems. If you have a problem, please consult the knowledgebase first. The knowledgebase always has the most up-to-date listing of support questions and patches. The knowledgebase can be found on http://kbase.gfi.com
Request support via e-mail If after using the knowledgebase and this manual, you have any problems that you cannot solve, you can contact the GFI support department. We recommend doing this via e-mail. The Troubleshooter, included in the program group, generates automatically a series of files needed for GFI to give you technical support. The files would include the configuration settings etc. To generate these files, start the troubleshooter and follow the instructions in the application. In addition to collecting all the information, it also asks you a number of questions. Please take your time to answer these questions accurately. Without the proper information it will not be possible to diagnose your problem. Then go to the support directory, located under the main program directory, ZIP the files, and send the generated files to [email protected]. We will answer your query within 24 hours or less, depending on your time zone.

146 • Troubleshooting GFI Network Server Monitor
Ensure that you have registered your product on our website first, at http://www.gfi.com/pages/regfrm.htm!
Request support via web chat You may also request support via live support (web chat). You can contact the GFI support department using our live support service at http://support.gfi.com/livesupport.asp Ensure that you have registered your product on our website first, at http://www.gfi.com/pages/regfrm.htm!
Request support via phone You can also contact GFI by phone for technical support. Please check our support website for the correct numbers to call, depending on where you are located, and for our opening times. Support website: http://support.gfi.com Ensure that you have registered your product on our website first, at http://www.gfi.com/pages/regfrm.htm!
Web Forum User to user support is available via the web forum. The forum can be found at: http://forums.gfi.com
Build notifications We strongly suggest that you subscribe to our build notifications list. This way, you will be immediately notified about new product builds. To subscribe to our build notifications, go to: http://support.gfi.com

GFI Network Server Monitor Index• 147
Index
A
ADSI 5, 141, 144 alerts 1, 2, 5, 6, 12, 32, 36
C
configuration 6, 13, 24, 29, 30, 31, 33, 34, 145
CPU usage 3, 4, 5
D
database 2 Dependencies 32 Directory size 3, 4 Disk drive 3 Disk space 3, 4 DNS server 4, 46, 47
E
email 1, 2, 36, 95, 97, 145 EMAIL 117 e-mail notifications 25, 26 Event ID 2, 55, 56 Event Log 56 Event Log function 3 Exchange 2
F
File existence 3, 4, 57 File size function 3, 4 FTP 3, 41
G
GSM 2, 27, 99, 103, 104, 105, 106
H
HTTP function 3
I ICMP ping 4 inheritance 2 installation 8, 11, 12, 13, 111,
113, 141
L
License 7 Logon Credentials 13, 24,
40, 41, 130
M
Maintenance 33, 34 Message Templates 105,
106
N
network message. 2 Network Monitor Engine 1, 6,
27, 50, 99 Network Monitor Manager 7 Network Notifications 26 Network Support Tools 5 NNTP 3, 42, 43 Notifications 25, 26 NTP 4, 45, 46
O
ODBC 2 ORACLE 2
P
pager 1, 2 Pager 25, 106 Physical Disk Condition
function 3, 4 POP3 3, 43, 44 Printer availability function 3,
4 Process Running function 3,
4 Properties 23, 54, 55, 59,
88, 89, 96, 97, 98, 99, 100, 102, 103, 104, 105, 108, 109, 115, 116
protocols 3
R
Reporting 5
S
Services function 3 SMS 1, 2, 25, 26, 27, 99,
100, 102, 103, 104, 105, 106
SMSC 2, 27, 99, 101, 102, 103, 105
SMTP server 4, 26, 45 SNMP 4, 49, 50, 92 SQL 2 System requirements 8
T
TCP 4, 42, 43, 44, 45, 48, 49

148 •Index GFI Network Server Monitor Network
U
UNIX 1 Users and Groups
Memebership function 3, 4
V
VBScript 4, 51, 141, 142
W
WMI 5, 55, 144
X
XML 5, 123