GearBox 3.5 Installer Guide · GearBox 3.5 Installation Guide: Preparing to Install 1•2 Windows...
24
VERSION 3.5 INSTALLER GUIDE Mac ® OS X, Windows ® XP ® & Windows ® Vista ®
Transcript of GearBox 3.5 Installer Guide · GearBox 3.5 Installation Guide: Preparing to Install 1•2 Windows...
Version 3.5
installer GuideMac® OS X, Windows® XP® & Windows® Vista®

GearBox 3.5 Installation Guide
table of Contents
Preparing to Install ..................................................................................1•1
Connecting Your Line 6 Device ..................................................................................... 1•1Where’s the Installer? ..................................................................................................... 1•1System Requirements ..................................................................................................... 1•2
Installation on Mac® OS X ......................................................................2•1
Welcome ......................................................................................................................... 2•2Read Me .......................................................................................................................... 2•2License Agreement ......................................................................................................... 2•3Select Destination .......................................................................................................... 2•3Easy Install vs. Custom Install ........................................................................................ 2•4Install .............................................................................................................................. 2•5Finish .............................................................................................................................. 2•5Uninstalling GearBox 3.5 and Driver Software ............................................................. 2•6
Installation on Windows® .................................................................................. 3•1
Windows XP and Windows Vista .................................................................................. 3•1Welcome ......................................................................................................................... 3•1Release Notes .................................................................................................................. 3•2License Agreement ......................................................................................................... 3•2Disconnect Your Device ................................................................................................. 3•3Choose Components to Install ....................................................................................... 3•3Choose Install Location .................................................................................................. 3•4Allow Installation to Complete ..................................................................................... 3•6Connect your Device ...................................................................................................... 3•6Desktop Shortcut and File Associations ........................................................................ 3•9Uninstalling GearBox 3.5 and Driver Software ........................................................... 3•10
Line 6 Monkey & Additional Resources .................................................4•1
Login Account ................................................................................................................ 4•1The Line 6 Monkey Dialog ........................................................................................... 4•1Register Your Hardware .................................................................................................. 4•2Additional Online Resources ......................................................................................... 4•3

GearBox 3.5 Installation Guide
Line 6, POD, TonePort DI/UX1/UX2/UX8/KB37, PODxt, PODxt Pro,Bass PODxt, TonePort, GearBox, ToneDirect Monitoring, GuitarPort, the Line 6 logo and the GearBox logo are trademarks of Line 6, Inc. © 2007 Line 6, Inc. All rights reserved.
Apple, Mac and Mac OS X are trademarks of Apple Computer, Inc.; Windows, Windows XP and Windows Vista are trademarks of Microsoft Corporation;
Intel and Pentium are trademarks of Intel Corporation;
All other product names, trademarks, and artists’ names are the property of their respective owners, which are in no way associated or affiliated with Line 6.
© 2007 Line 6, Inc. All rights reserved
GearBox 3.5 Installation Guide: Preparing to Install
1•1
PreParinG to installThis document will walk you through the installation process for the Line 6 GearBox software, hardware device drivers, and the Line 6 Monkey utility. Let’s get started...
Quit All Other Applications
It is strongly recommended that you exit all other programs before running the GearBox installation program.
Restart Before Re-Installing
If you need to re-install GearBox, you should restart your machine just before you run the GearBox installer program to re-install. This ensures that your computer has not retained a running version of the Line 6 driver in memory, which can cause conflicts when re-installing.
Connecting Your Line 6 Device
Before installing the GearBox software, make sure that you follow the instructions for plugging in your Line 6 TonePort/PODxt/GuitarPort device:
Mac OS X - connect the USB cable between your Line 6 device and Mac computer BEFORE starting the GearBox installation.
Windows - Do NOT connect the Line 6 device yet. You will be prompted to connect the USB cable to your Windows computer at a specific point during the GearBox installation.
Where’s the Installer?
Your Line 6 USB device (TonePort, PODxt, Bass PODxt) includes a software CD in the original box - this CD includes the installer for the GearBox software for both Windows and Mac computers. Just insert the GearBox CD into your CD-ROM drive. On Mac, the disk image will appear in Finder and on your Desktop. On Windows, the GearBox Installer will usually start automatically. If it doesn’t, then browse the CD and double click on the Setup.exe program to get you going.
If you cannot find the Line 6 CD, no worries! We always have the GearBox installer available online:
If you already have the Line 6 Monkey software utility installed on your computer... You can connect your Line 6 USB device and launch Line 6 Monkey. This will scan your system and point you to the latest version of GearBox available for you (as well as any other recommended updates).
For more details on Line 6 Monkey, check out the Line 6 Monkey & Additional Resources chapter!
If you do not yet have Line 6 Monkey on your computer... You can download the Gearbox installer by going to www.line6.com/software/. Be sure to choose your specific Line 6 USB device from the Product selector, “GearBox” from the Software selector, and the specific Mac or
•
•
•
•

GearBox 3.5 Installation Guide: Preparing to Install
1•2
Windows version your computer uses from the OS selector.
The GearBox installer will also install the latest Line 6 Monkey version, as well as device drivers for your Line 6 hardware - it is not necessary for you to download these items separately.
System Requirements
We highly recommend that you read the separate, GearBox 3.5 Release Notes document for the full, detailed System Requirements, as well as up to date info on compatibility with other hardware and software. This document can be found here:
GearBox Online Help
GearBox 3.5 requires the following computer operating systems:
Windows XP Home or Professional, with Service Pack 2
Windows Vista Home, Business or Ultimate Editions
Mac OS X 10.4.x (Mac OS X ver. 10.5.x Leopard is not yet officially supported)
What if I Already Have an Earlier GearBox Version Installed?
If you already have a previous GearBox version installed on your Mac Or Windows computer, it’s no problem at all. Simply run the GearBox 3.5 installer following the steps in this document and your GearBox version will automatically be updated, and your customized Tone Presets from the previous GearBox version will remain intact.
What if I Have the GuitarPort 2.5 Software Already Installed?
GearBox 3.5 includes full GuitarPort Online (GPO) functionality (a subscription is required to access the Membership content - you can check out the free trial within GearBox 3.5 once you finish the installation!) It is NOT necessary to uninstall your GuitarPort 2.5 software - you can go ahead and install GearBox 3.5 following the steps in this document. If you are already a GPO Member, you will automatically be able to log in using GearBox 3.5 and access the Member pages directly. You probably will not need to use the older GuitarPort 2.5 software at all once you have GearBox 3.5, but you still can use it if you like.
•
•
•

GearBox 3.5 Installation Guide: Installation on Mac OS X
2•1
installation on MaC® os XTo follow are the steps for installing GearBox 3.5 on a Mac OS X computer. To be able to install GearBox version 3.5,
Launch Screen
The first screen you will see after opening the “GearBox 3.5.dmg” file is as follows. Click the on GearBox.mpkg as instructed to launch the installer:

GearBox 3.5 Installation Guide: Installation on Mac OS X
2•2
Welcome
When the installer starts, you will see a Welcome dialog:
Notice that the installer prompts you to plug in your hardware into the USB port. Go ahead and connect your Line 6 USB device and click Continue when done.
Read Me
A dialog with the GearBox 3.5 “Read Me” text is presented next. It’s called “Read Me” for a good reason! Please read the information carefully, and click Continue when ready to proceed.

GearBox 3.5 Installation Guide: Installation on Mac OS X
2•3
License Agreement
The installer presents you with the License Agreement. After carefully reading the Agreement, select Agree if you consent to the terms of this license. Then click Continue and the Installer will allow you to proceed. If you do not agree with the license, you cannot install GearBox.
Select Destination
Your computer will ask you to pick a destination volume where it will install GearBox, as shown below. You’ll want to choose your internal hard drive. Click Continue when ready to proceed.:

GearBox 3.5 Installation Guide: Installation on Mac OS X
2•4
Easy Install vs. Custom Install
For most users, Easy Install is the way to go - for the Easy Install, simply select the Continue button. The installer will install GearBox, all necessary Line 6 drivers, and Line 6 Monkey, which performs important compatibility checks and will provide you with a headache-free path to future upgrades and optional add-on features.
For you advanced users and other smart-alecky types, clicking Customize will allow you to pick the specific items you want installed. For details, select an item in the top pane and its description appears in the lower pane. Once you’ve selected the items you want, click Continue to proceed:

GearBox 3.5 Installation Guide: Installation on Mac OS X
2•5
Install
You may be prompted to enter your Mac Name and Password, enter them in and click OK to proceed:
Finish
And…tada! You’re done. After the installer performs its magic, you’ll be prompted to restart your computer for the changes to take effect.

GearBox 3.5 Installation Guide: Installation on Mac OS X
2•6
Run Line 6 Monkey
It is recommended that you next run Line 6 Monkey to allow it to check your system and see if there any other available Updates for your system. Please go on ahead to the Line 6 Monkey & Additional Resources chapter for more information.
Uninstalling GearBox 3.5 and Driver Software
To remove the GearBox application or Line 6 Device Drivers from your computer, follow these steps:
• To uninstall the GearBox application, simply move GearBox.app from the /Applications/Line6 folder into the Trash. This will not remove your saved GearBox preset Tones or GPO Tracks since they are saved by default within the Documents/Line6 directory (unless of course you manually saved them in a different location).
• To uninstall the drivers for Line 6 TonePort, PODxt and GuitarPort devices, run the Line 6 Driver Uninstaller.app, which is found in the Applications/Line6/Drivers folder.

GearBox 3.5 Installation Guide: Installation on Windows
3•1
installation on WindoWs®
To follow are the steps for installing GearBox on Windows® XP® or Windows® Vista®.
Windows XP and Windows Vista
The installation process is very much the same whether you are installing GearBox 3.5 on Windows XP versus Vista. Please follow these same steps for either Windows version and we’ll point out when there are differences.
Welcome
When the installer starts, you will see a Welcome dialog similar to the following:
Click Next to continue.

GearBox 3.5 Installation Guide: Installation on Windows
3•2
Release Notes
A dialog with detailed Release Notes is presented. Read it carefully and click Next when ready to proceed.
License Agreement
The installer presents you with a License Agreement that you will need to agree to in order to install and use GearBox. After carefully reading the license, select the I Agree option if you consent to the terms of this license, then click Next and the Installer will proceed. If you do not agree with the license, you cannot install GearBox.
GearBox 3.5 Installation Guide: Installation on Windows
3•3
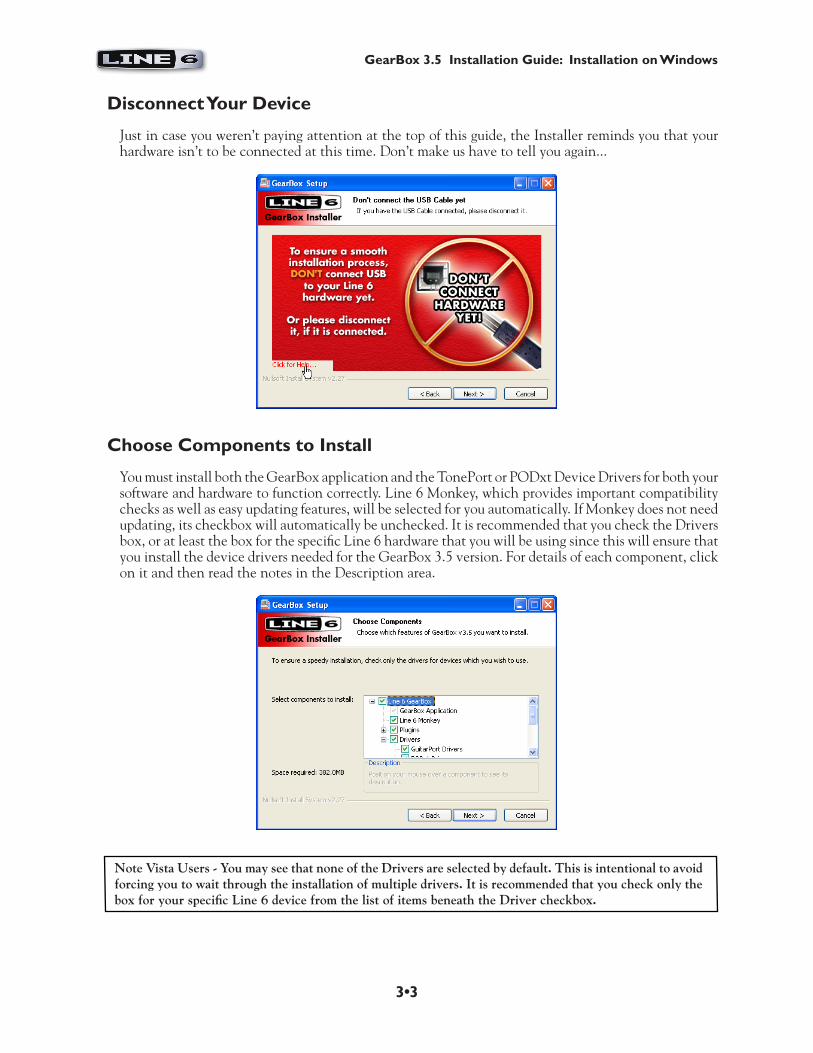
Disconnect Your Device
Just in case you weren’t paying attention at the top of this guide, the Installer reminds you that your hardware isn’t to be connected at this time. Don’t make us have to tell you again...
Choose Components to Install
You must install both the GearBox application and the TonePort or PODxt Device Drivers for both your software and hardware to function correctly. Line 6 Monkey, which provides important compatibility checks as well as easy updating features, will be selected for you automatically. If Monkey does not need updating, its checkbox will automatically be unchecked. It is recommended that you check the Drivers box, or at least the box for the specific Line 6 hardware that you will be using since this will ensure that you install the device drivers needed for the GearBox 3.5 version. For details of each component, click on it and then read the notes in the Description area.
Note Vista Users - You may see that none of the Drivers are selected by default. This is intentional to avoid forcing you to wait through the installation of multiple drivers. It is recommended that you check only the box for your specific Line 6 device from the list of items beneath the Driver checkbox.

GearBox 3.5 Installation Guide: Installation on Windows
3•4
Choose Install Location
If you’d like to install in the standard default location, just click the Install button. If you’d like to choose another location, click Browse:
The installer will also ask you where you would like the GearBox Plug-in installed. Choose the default location shown, or browse for a different one…
Note - You will be prompted to choose the location for the GearBox Plug-in installation even if you have not purchased this optional Add-On (if your Line 6 hardware does not come bundled with the Plug-in). This allows you to purchase the GearBox Plug-in at a later time without having to run this entire GearBox installation again!
Just to make sure you are happy with where you want the GearBox application and Plug-in installed, you will be shown the settings you chose to confirm their locations before the Installer goes to work. Isn’t that thoughtful? Click the Back button to make changes, otherwise click Next to keep these settings and proceed.

GearBox 3.5 Installation Guide: Installation on Windows
3•5
Note For Windows Vista Users
If this is your first time installing Line 6 software using Windows Vista, you’ll be periodically asked for permission to continue the installation. Simply click the Install button each time to continue with the rest of the GearBox installation instructions. Or, you can check the “Always trust software from Line 6” option and Vista will allow the rest of the GearBox installation to proceed without interruption.

GearBox 3.5 Installation Guide: Installation on Windows
3•6
Allow Installation to Complete
Allow the GearBox installation process to run – it will inform you once the Setup is completed successfully. Click Next to continue.
Connect your Device
You will next be prompted to connect the USB cable from your Line 6 device to your computer. Plug the USB cable in and wait for the Windows hardware installation process to start automatically – you do not need to click Next in the installer dialog yet...
Windows Vista Windows XP
Windows Vista Hardware Installation
Once you’ve connected your Line 6 USB hardware to the computer, click Next to proceed and Vista will install the hardware automatically. A status indicator will appear in the bottom right corner of the Windows Vista screen. Vista users can skip to the Desktop Shortcuts and File Associations step.
GearBox 3.5 Installation Guide: Installation on Windows
3•7
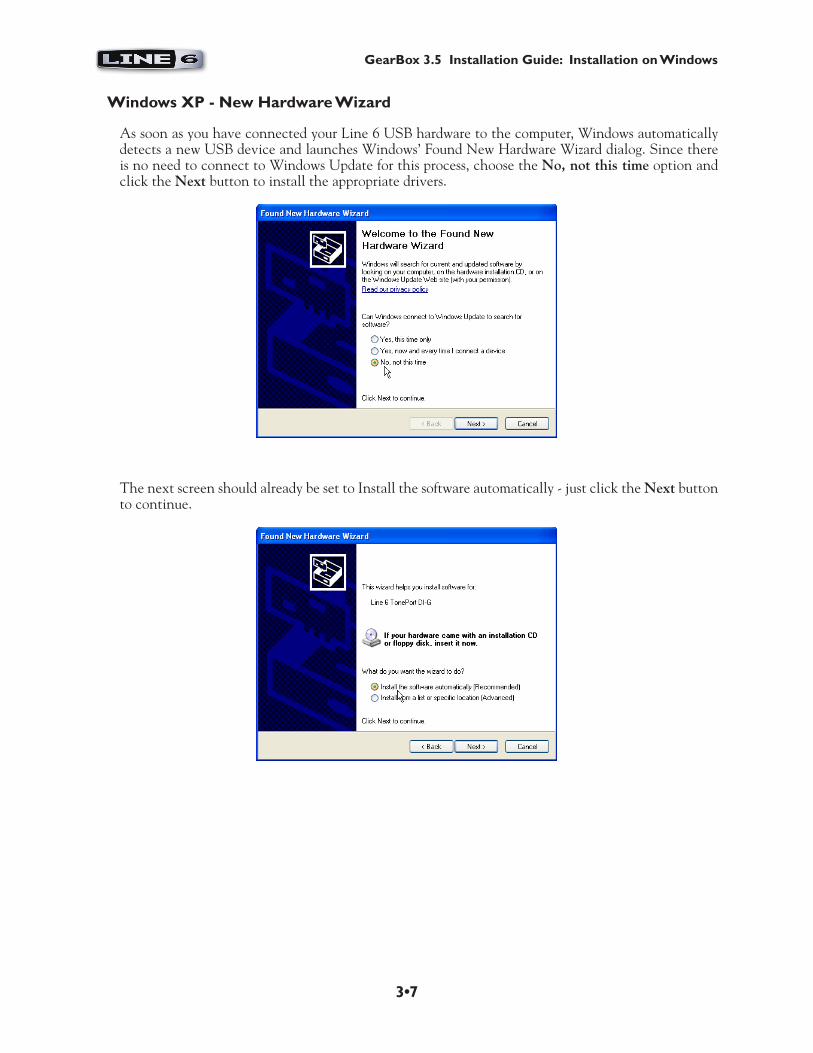
Windows XP - New Hardware Wizard
As soon as you have connected your Line 6 USB hardware to the computer, Windows automatically detects a new USB device and launches Windows’ Found New Hardware Wizard dialog. Since there is no need to connect to Windows Update for this process, choose the No, not this time option and click the Next button to install the appropriate drivers.
The next screen should already be set to Install the software automatically - just click the Next button to continue.

GearBox 3.5 Installation Guide: Installation on Windows
3•8
When presented with the next Alert dialog, simply click the Continue Anyway button to ignore this message and continue the installation
Allow the driver installation process to complete. You will be prompted once the Hardware Wizard is done – click the Finish button
You will now be back at the Plug in Your Device screen – in the installer window, click Next to proceed

GearBox 3.5 Installation Guide: Installation on Windows
3•9
Desktop Shortcut and File Associations
Next you are prompted if you would like a Shortcut icon for the GearBox software added to your Windows desktop. You can also check all the file types that you would like to be “associated” with the GearBox software (meaning, if you double click one of these types of files within Windows, it knows to launch the GearBox software automatically, which is a nice convenience). Choose your options and then click Next.
Done!
All the components you selected have been installed. Click the Finish button to exit the installer.
Run Line 6 Monkey
It is recommended that you next run Line 6 Monkey to allow it to check your system and see if there any other available Updates for your system. Please go on ahead to the next chapter to read about Line 6 Monkey.
GearBox 3.5 Installation Guide: Installation on Windows
3•10
Uninstalling GearBox 3.5 and Driver Software
Should you need to uninstall GearBox or the Line 6 Device Drivers, follow these steps:
• To uninstall the GearBox application, use the Line 6 GearBox uninstaller in the Add/Remove Programs utility within the Windows® Control Panel. Or, use the Remove GearBox command in the GearBox directory which, by default, is installed at Program Files\Line 6\GearBox. The GearBox uninstall process does not remove your saved GearBox preset Tones or GPO Tracks since they are stored by default in the My Documents\Line 6 folder (unless of course you saved them in a different location).
• To uninstall the TonePort, GuitarPort and PODxt Device Drivers, run the Line 6 Driver uninstaller in Add/Remove Programs utility within the Windows Control Panel.
Note - The new Line 6 Audio-MIDI Control Panel replaces the functionality of previous device-specific Control Panels. It is not uninstalled by GearBox or Driver Uninstallers.

GearBox 3.5 Installation Guide: Line 6 Monkey & Additional Resources
4•1
line 6 Monkey & additional resourCes
Line 6 Monkey is an automatic update software utility installed as part of the GearBox installation. You should have been asked to run Line 6 Monkey at the end of your GearBox installation, but if you didn’t do so, we highly recommend you do this now. It’s a good idea to do this every so often as well to keep all your Line 6 hardware and software up to date.
Login Account
When you launch Line 6 Monkey you’ll need to Login so that Monkey can communicate with the Line 6 online server and provide you with exactly what you need. It’s just a few clicks, and it’s free!
If you previously created a Line 6 account, then type in your User Name and Password at the top of the Monkey dialog.
If you have not yet created an account, click the New User button and you’ll be walked right through the steps.
The Line 6 Monkey Dialog
•
•

GearBox 3.5 Installation Guide: Line 6 Monkey & Additional Resources
4•2
You can also take a look at the Monkey Optional Add-Ons page to check out some other cool stuff you might like, such as Model Packs, the GearBox Plug-in, or GuitarPort Online!
Register Your Hardware
If you have not already done so, you’ll be prompted to Register your connected Line 6 hardware. It’s a painless process really, so click that Register button when you are prompted and fill in the blanks on the web page. Registering your Line 6 hardware is important because it ensures that you’re dialed in for warranty service and makes it possible for us to contact you if new software versions or other cool enhancements are offered - cutting edge technology and such!

GearBox 3.5 Installation Guide: Line 6 Monkey & Additional Resources
4•3
Additional Online Resources
Hungry for more info? We’ve got plenty of helpful resources just a click away...
-Several more Help documents covering computer recording, MIDI Control, product Release Notes and more are available here:
GearBox Online Help
-For technical support, choose from the many options listed on the Line 6 Support page:
Line 6 Support
-Official Line 6 hardware Product Manuals can be downloaded here:
Lie 6 Product Manuals


![Gearbox Reliability Collaborative Phase 1 and 2: Testing and … · gearbox carrier bearings, the gearbox housing, the gearbox trunnions, and into the bedplate [1]. However, these](https://static.fdocuments.in/doc/165x107/5fd9a76fb073562a841edd69/gearbox-reliability-collaborative-phase-1-and-2-testing-and-gearbox-carrier-bearings.jpg)