Frei verwendbar in | Permittend in: EU/CH Z18 CR & Z18 CRT ... fileFrei verwendbar in | Permittend...
48
ES - Instrucciones GB - Instruction Z18 CR & Z18 CRT 2,4 GHz Ref. | Ord. No. 05 3280 Z18 CR Buggy 05 3285 Z18 CR Buggy LiPo 05 3281 Z18 CRT Truggy 05 3286 Z18 CRT Truggy LiPo Frei verwendbar in | Permittend in: EU/CH ES GB
Transcript of Frei verwendbar in | Permittend in: EU/CH Z18 CR & Z18 CRT ... fileFrei verwendbar in | Permittend...

ES - Instrucciones GB - Instruction
Z18 CR & Z18 CRT 2,4 GHzRef. | Ord. No. 05 3280 Z18 CR Buggy 05 3285 Z18 CR Buggy LiPo
05 3281 Z18 CRT Truggy 05 3286 Z18 CRT Truggy LiPo
Frei verwendbar in | Permittend in:EU/CH
ES GB

2
ES - ÍndiceSeguridad 2Información general 4Declaración de conformidad 4Emisiones de radio frecuencia 4Notas sobre el reciclado 4Datos técnicos | Contenido del kit | Highlights 4Accesorios necesarios y recomendados 6Primero Pasos (Vers. 053280 & 053281) 7 Primero Pasos (Vers. 053285 & 053286) 8/9
Configuración del Regulador (Vers. 053285 & 053286) 9Controles de la emisora 10Emparejamiento – “Binding“ 11El uso del modelo en condiciones de agua / humedad 11Notas sobre el funcionamiento de las baterías NiMh 12Notas sobre el funcionamiento de las baterías Litio 14Montaje 16 - 40Lista de repuestos | Aluminio Tuning 41 - 45
Seguridad - IMPORTANTE - Por favor, mantenga.
¡Este modelo no es ningún juguete!¡No apropiado para menores de 14 años!
Atención: No es recomendable para los niños menores de 36 meses. Asfixia. Contiene piezas pequeñas..
TENGA EN CUENTA!• Lea atentamente las instrucciones antes de poner el modelo en funcionamiento! Mantenga el embalaje y el manual de instrucciones.
Instrucciones de seguridad para la operación• Este dispositivo no debe ser utilizado por personas (incluidos niños) con discapacidad física,habilidades sensoriales o mentales o la falta de experiencia y / o conocimientos, porque son responsables de su propia seguridad persona de supervisión o instrucción sobre cómo se utiliza el dispositivo. O la persona que son supervisados o instruidos en cómo usar.• Mantenga el modelo lejos de los niños, por lo que el modelo no es adecuado (ver nota en edad).• Antes de iniciar el montaje, deben leer y entender todas las instrucciones• Tómense sucientes medidas de seguridad antes de operar este modelo! ¡Usted es responsable del armado y de una operación segura de este modelo!• En el montaje de este kit tienes que utilizar herramientas y cuchillos. Para evitar lesiones, se recomienda precaución• Si vas utilizar colores y/o adhesivo (no incluido en el kit), siga las instrucciones.• Conserve siempre este manual de instrucciones guardado y a la mano para una referencia rápida, incluso después de haber terminado de armarlo.• Mantenga las manos, cabello, la ropa lejos de los artículos de la rotación. Mantenga las piezas desmontadas.• No coloque objetos en las piezas giratorias.• Utilice el modelo solo cuando las condiciones atmosféricas sean Buenas. No debería utilizar el modelo si llueve, hay tormentas o se prevén malas condiciones atmosféricas.• Busque un espacio abierto, que cumpla con la normativa vigente, y libre de obstáculos• No haga funcionar su modelo en las proximidades de las es taciones de radio,líneas eléctricas, cajas de transformadores, o como! Esto signifi ca que puede la interferencia de radio principal causa la pérda de control sobre el modelo!• Asegúrese de que nadie usa la misma frequencia, ya que pueden suceder accidentes.• Se prohíbe cualquier modificación de la estructura del modelo ya que anulará la garantía inmediatamente.• No deje nunca el modelo, el motor o las baterías expuestos a los rayos solares de manera directa, colóquelos a la sombra.
Seguridad General• ¡Arme este kit, en un lugar que esté fuera del alcance de los niños! El kit de montaje incluye piezas pequeñas que podrían ser tragadas (no debería dejarlas al alcance de los más pequeños).• Evitar de conducir el modelo en sitios lleno de gente y proximidades de niños. Nunca conducir en la vìa pública.• Nunca haga funcionar este modelo en superficies mojadas, los componentes electrónicos podrían dañarse. Si el modelo, el motor o la batería se mojan, tienes que limpiar y secar todo.• Si el modelo es el primer coche radio controlado que monta y quiere poner en marcha, le recomendamos que solicite la ayuda de un piloto experimentado. Seguramente, cerca de Usted, existe algún club de modelismo donde habrá personas dispuestas a ayudarle.• Antes, y después de cada marcha , inspeccione su modelo en busca de desperfectos. Recuerde que solo debe usar modelos en perfectas condiciones. El único responsable de los posibles daños causados por el vuelo de su aeromodelo es Usted• Tenga en cuenta: El modelo está fabricado con plásticos y goma, siendo por lo tanto altamente inflamable. Manténgalo lejos de cualquier llama o altas temperaturas.• Durante los preparativos al viaje deberá encender primero la emisora y después el receptor.• Mueva la palanca de gas siempre en la posición neutral.
Información importante el uso de pilas:• Recuerda los detalles de cómo colocar y quitar las baterías en el cargador.• Nunca recargue baterías no recargables.• Antes de volver a cargar las baterías, extráigalas del modelo.• Las baterías solo deben recargarse bajo la supervisión de un adulto.• Nunca mezcle baterías recargables con las que no lo son, no mezcle pilas descargadas con otras cargadas.• Respete la polaridad a la hora de colocar las pilas.• Las pilas gastadas deben sacarse inmesiatamente del modelo.• No cortocircuite los cables o terminales de las baterías.• La batería incluida no se carga!Carga por completo antes de usar!• No cargue la batería inmediatamente después de su uso! Si él se calienta con el uso, deje enfríe!• Evitar cortocircuitos! Esto podría en el peor causa de los incendios, pero en todo caso reducir la duración de la batería.• Recarga con el cargador de batería incluida, con una capacidad superior o inferior a la especificada.• Mantenga las baterías lejos de niños pequeños!
Nota para cargar la batería• Conecte la batería con el cable del cargador!• Conecte el cargador a la toma!• Si el tiempo de carga es de hasta, desenchufe el cargador del tomacorriente de pared y desconecte la batería del cargador! La batería ya está listo para usar!

3
GB - ContentSafety Information 3General Information 5Certificate of Conformity 5Communications Regulations 5Disposal information 5Technical data | Box contents | Highlights 5Recommended Tool 6Getting Started (Vers. 053280 & 053281) 7 Getting Started (Vers. 053285 & 053286) 8/9
Configuring your controller (Vers. 053285 & 053286) 9Controls of the transmitter 10Binding | Using the model in wet conditions 11Instructions for the use of NiMh Batteries 13Instructions for the use of Lithium Batteries 15Assembly 16 - 40Spare parts and tuning parts 41 - 45
Safety Information
This radio control model is not a toy!Suitable for persons over 14 years!
Note: Not suitable for children under 36 months. Risk of suffocation. Contains small parts which can be swallowed.
WARNING!• Read the instructions carefully before using the model. Keep the instructions and packing after reading it.
Operating Safety Instructions• This device is not intended for use by individuals (Including children) with reduced physical sensory, mental abilities, lack of experience and / or knowledge, unless they are supervised in how the device is to be used.• Keep the model away from Children in case it is not appropriate to be used by a Child (see note of age).• Read carefully and fully understand the instructions before commencing assembly.• Take enough safety precautions prior to operating this model. You are responsible for this model’s assembly and safe operation!• When assembling this kit, tools including knives are used. Extra care should be taken to aviod personal injury.• Read and follow the instructions supplied with paints and/or Qcement, if used (not included).• Always keep this instruction manual ready at hand for quick reference, even after completing the assembly.• Keep hands, hair and loose clothing away from rotating and heated parts.• Never allow anything to come into contact with rotating parts.• The model can only be flown in good weather. Do not fly in wind, rain or thunder storms.• Find a place to fly which complies with any laws, and is free from obstacles.• Do not operate your model near radio stations, power lines, transformer boxes or similar facilities! This can result in radio interference, causing loss of control over the model.• Make sure that no one else is using the same frequency in your running area. Using the same frequency at the same time can cause seriou accidents, whether it’s driving.• The model should not be changed in any way, doing so will invalidate the guarantee.• Do not expose the model or batteries to direct sunlight, always keep them in the shade.
General Safety Instructions• Assemble this kit only in places out of children’s reach! The kit contains small parts which may cause choking if swallowed, keep away from small children.• NEVER fly your model over people and never operate the model in way which may endanger people, small children or animals.• Never operate the model on rain or over damp surfaces, this may damage the electronics. If R/C unit, motor, or battery get wet, clean and dry thoroughly in a dry shaded area.
• If this model is the first radio controlled model which you are attempting to build or run, you should secure the assistance of an experienced model pilot. Your local dealer will be able to assist you in locating your local model model sport club or experienced pilots in your area.• Inspect the model before and after every drive for damage and loosing screws and plug connections. The operator is responsible for any damage caused by the operation of flying models.• Remember that your model is made from such materials as plastic and rubber and as such is inflammable. Keep it away from any open flame, or high temperatures.• When operating the model, switch on the transmitter first and then the model, switch off in the reverse order.• Always ensure that the throttle stick is in the low position before you switch on.
Important Information for use of batteries and battery packs• Adhere to the specification of how the batteries should be taken out or placed into the product.• Do not recharge disposable batteries!• Rechargeable batteries should be taken out of the model before charging (if applicable)!• Only charge rechargeable batteries under adult supervision!• Different types of batteries or new and used batteries should not be used together!• Adhere to correct polarity!• Remove spent batteries from the device!• Do not short circuit connection terminals!• The included battery is not charged! Charge before use!• Do not charge the battery pack immediately after use! If the battery pack becomes warm during use, leave it to cool down before charging!• Avoid short circuits! This could in the worst case cause fires and in any case it will reduce the battery life.• Only recharge battery packs with same capacity and specifications as the supplied battery pack if you intend to use the supplied charger.• Keep batteries away from small children!
Information on how to charge the battery pack• Connect the battery to the charger.• Plug the charger into the socket.• Once fully charged, unplug the charger from the wall socket and disconnect the battery from the charger! The battery is now ready to use!

Notas sobre el recicladoRespete la normativa vigente sobre la eliminación deresiduos, especialmente sobre baterías y pilas. Llevea reciclar las baterías solo si están descargadas (Cu-ando vea que su modelo ya no se mueve, querrá de-cir que las pilas o baterías están descargadas)
Por favor, respete la normativa sobre reciclado demateriales eléctricos/electrónicos cuando se deshagade dispositivos de este tipo (Emisoras, cargadores,modelos, etc.) Por favor, cuando se deshaga de ellosllévelos a un centro de reciclado.
Datos técnicosMedidas ~ 265 x 190 x 100 mmPeso ~ 576 g Servos 300 VentiBaterías NiMh LiPo
7,2 V 1300 mAh7,4 V 1800 mAh
Salvo error u omisión. La empresa se reserva el derecho a realizar cambios técnicos las fotos y dibujos no contrac-tuales. Nos reservamos el erecho a cambios técnicos y equivocaciones..
Contenido del kit• Modelo 4WD• Emisora 2,4 GHz• Batería NiMh• Cargador 230 V• Motor electrico montado• Regulador electrico montado• 1 servo montado• Carrocería pintada• Decoraciones• Instrucciones con piezas Tuning
Highlights:• Electrónica completa protegida de agua• Engranaje cubierto protegido de suciedad• Barras de acero ajustable con roscas parte izquierda & parte derecha (Convergencia)• Suspensión, totalmente ajustable• Servo de dirección en horizontal
• Amortiguador con aceite ajustable• Neumático SuperSoft High-Grip Performance• Motor Brush de alta rotación 300• Chasis de plástico robusto • Sistema C-Hub delantero• Dual rate dirección/gas/freno (Principiante y modo Profesional)
4
ES - Información generalYa que no es posible controlar la instalación, ni el manejo, ni elmantenimiento o la observación de las normas de funcionamien-to del modelo por su parte, la empresa JAMARA e.K. no seráresponsablede los daños, pérdidas o costes derivados de la utilización del modelo.
La JAMARA e.K. no acepta las reclamaciones derivadas delmal uso o mal manejo de sus artículos.
¡Advertencia!Accensione: accendete prima il trasmettitore e poi il modellino.Spegnimento: spegnere prima il modellino e poi il trasmettitore.
Declaración de conformidadPor medio de la presente, la empresa Jamara e. K. declara quelos modelos „Z18 CR. No. 053280, No. 053285, Z18 CRT, No. 053281, No. 053286“ cumple con las normativas CE correspon-dientes (en particular con las indicadas más abajo) y su produc-ción seguirá dichas directrices.
Si tiene alguna pregunta sobre esta declaración, por favor, con-sulte connuestro Servicio Técnico:Jamara e.K. | Erich NattererAm Lauerbühl 5 | D-88317 AichstettenTel. +49 (0) 7565/9412-0 | Fax +49 (0) 7565/9412-23www.jamara.com | [email protected]
Encontrará más información en:www.neuershop.jamara.com/Conformidad
Directrices CE correspondientes:- (R&TTE) Equipos radioeléctricos y terminales de telecomunicaciones 1995/5/CE
- (WEEE) Residuos de aparatos eléctricos y electrónicos 2002/96/CE
- (RoHS) Restricciones a la utilización de determinadas sustancias peligrosas en aparatos eléctricos y electrónicos 2011/65/EU, 2002/95/CE

GB - Certificate of Conformity JAMARA e.K. hereby declares that the models‚ „Z18 CR. No. 053280, No. 053285, Z18 CRT, No. 053281, No. 053286“ follows the appropriate and relevant EEC Directives, in particular those listed below and that the model has been constructed accordin-gly.
Please direct any queries that you may have regarding conformi-ty to our service department at:Jamara e.K. | Erich NattererAm Lauerbühl 5 | D-88317 AichstettenTel. +49 (0) 7565/9412-0 | Fax +49 (0) 7565/9412-23www.jamara.com | [email protected]
Further information can also be found at:www.neuershop.jamara.com/Conformity
Relevant EC Directives:- (R&TTE) Radio & Telecom Terminal Equipment 1999/5/EC
- (WEEE) Waste Electrical and Electronic Equipment 2002/96/EC
- (RoHS) Restriction of Hazardous Substances 2011/65/EU, 2002/95/EC
Highlights• Electronics completely splashproof• Fully capsuled dust-proof gear• Adjustable steel wishbone with left & right thread• Adjustable Suspension• Horizontal stearing servo• Adjustable oil pressure shocks
• SuperSoft High-Grip Performance tyre• High rotating 300 Brushmotor• Robust plastic chassis• Front C-Hub System
GB - General InformationAs the company JAMARA e. K. has no influence over the use, maintenance or conditions under which our products will opera-te, we accept no responsibility for any damage caused be it of a physical, financial or theoretical nature. JAMARA e. K. will accept no claim against it which results directly or indirectly from the operation or use of ist products.Your Statutory Rights apply, any claim made against us will be based solely on the retail price of the product, and limited to the model only. This will not apply if we are proved to be legally res-ponsible or when gross negligence can be proved.
Attention!Switch the transmitter on first then the model. When youare finisished first switch off the model then the transmitter.
Technical dataDimensions ~ 265 x 190 x 100 mmWeight ~ 576 g Motor 300 VentiBattery NiMh LiPo
7,2 V 1300 mAh7,4 V 1800 mAh
No responsibility is taken for the cor-rectness of this information. Subject to change without prior notice. Errors and omissions excepted.
Box contents 05 7581• 4WD model• Transmitter 2,4 GHz• Battery pack• Charger 230 V• Electric motor installed• Electric controller installed• 1 servo installed• Painted body• Decals• Instructions
Disposal informationPlease care for a environmental correct and legal way of disposing the batteries and/or accus. Please, only throw away empty accus into the collect-boxes in your local shops or commune. (Normally discharge the ac-cus, when the model stops running)
All parts of this model should be disposed of correctly, in particular electronic components may be subject to local restrictions. Your dealer will advise you.
5

6
ES - Accesorios necesarios GB - Recommended Tool
No. 23 0409 20 g „Wheel blood“Cola de neumaticoRim Glue
No. 28 1904 Aceite de silicona p. amortiguadorShock-Oil Louise
No. 23 2423 Adhesivo para fijacion detornillosNut lock medium strength
No. 23 0461 400 mlEspuma para limpiar especialSpecial cleaning foam
No. 15 3055X-Peak 80 BAL CargadorCharger
No. 15 2058X-Peak 50 BAL PultCargadorCharger
No. 15 2060 X-Peak 50 BALCargadorCharger
No. 19 3130 Soporte de montaje deluxeCar Stand rotatable
No. 19 3065 1,5/2,0/2,5/3,0mmLlave allen juegoHexagonal head wrench set
No. 28 1730Tijeras especial para lexanLexan scissors
No. 19 0065 Convergencia medidasCamber adjusting Tool
No. 19 0060 Calibradores p.alturaHeight lange
No. 23 2060 Cinta adhesiva 2 carasDoublesided power tape
No. 05 9273 1:10Clip de carroceriaBody clips

ESA Interruptor de Emparejamiento “Binding“B Tornillos de la tapa del regulador / receptorC Tapa del regulador / receptorD Toma de corriente del reguladorE Interruptor de “On/Off“ – Encendido / ApagadoF Conexión del motor
Cargue la batería del modelo con el cargador suministrado. El tiempo medio de carga de una batería descargada suele ser deaproximadamente 5 - 6 horas.
Inserte 4 pilas / baterías llenas del formato AA/Mignon 1,5V. en la emisora. Asegúrese de que todos los controles de ajuste fino de la emisora se encuentren en posición central y que todos los controles del “Dual Rate“ se encuentren en posición máxima.
Compruebe el estado correcto de todos los conectores y tornillosantes y después de cada uso del modelo. Asegúrese también del estado correcto de todos los componentes eléctricos del mo-delo. (Rotura de cables o similar).
Inserte la batería en el modelo. Conecte la batería con la toma de corriente del regulador. Conecte siempre primero la emiso-ra y después el modelo.
Compruebe que el acelerador/freno y la dirección funcionen de forma acorde y proporcional con los controles de la emisora. Si esto no fuera el caso, puede resultar necesario el uso del inter-ruptor de “Reverse“ de la emisora, para invertir la dirección del acelerador/freno y/o dirección. Si el modelo no se desplaza en linea recta hacia delante, Ud. puede resolver esto con los cont-roles de ajuste fino de la dirección en la emisora o calibrando las transmisiones de la dirección del modelo. Si el modelo se mueve ligeramente hacia delante o hacia atrás, aún sin una orden se-mejante de la emisora, Ud. puede resolver esto con los controles de ajuste fino del acelerador/freno en la emisora o puede de-sconectar el modelo y volver a conectarlo de nuevo. La electró-nica del modelo se calibra de nuevo automáticamente cada vez que este se conecta, siempre que los controles de ajuste fino del acelerador/freno en la emisora se encuentren en posición central durante el proceso.
GBA Binding buttonB Screws of controller and receiver coverC Controller and receiver coverD Controller power connectionE On/ Off switchF Motor connectionG Battery connection
Charge the battery with the included charger. The average char-ging time is approximately 5 - 6 hours.
Equip the transmitter with four fully charged AA batteries or re-chargeable batteries. Make sure all trim controls are set in the middle and the dual rate are set to max.
Before each drive, check all screws and plug-in connections that they are fitted tight. Make sure all electric components of the mo-del are good working condition (cable break or similar).
Put the battery pack in the model and connect to the power con-nection of the controller. Switch on the transmitter and then the model.
Make sure throttle/ break and steering is adhering to your control input. If this is not the case, you are able to reverse the throttle/ break and steering with the reverse button. In case the vehicle does not drive straight, please use the trim button for steering or adjust the steering link of the vehicle.The vehicle might move forward and backward without giving any controls. Adjust by throttle/ break trim or switch the car off and back on.
7
ES - Primeros Pasos GB - Getting Started
A
B
C
E
D
F
G
Versión | Version 053280 & 053281

8
Normas de seguridad• Asegúrese de que el contacto de carga con la humedad y la exposición a la luz solar directa.• Cuando deje de utilizar, desenchufe la fuente de alimentación y las baterías.• No coloque el cargador o las pilas en las zonas inflamables y los procedimientos de seguimiento, no deje desatendida.• Evite cualquier corto circuito y comprobe la polaridad de las dos potencias, la de entrada y la batería conectada.• No cargar el cargador defectuosas o dañadas.• No cargar las baterías defectuosas o dañadas.• Respetar a la indicación del fabricante de la batería.
Safety Information• Never expose the charger to moisture or direct sun light.• Never leave the charger unattended when in use, and always operate it on a fire proof surface.• Avoid short circuits at all costs. Always observe the correct polarity.• Batteries should always be allowed to cool down before you charge or discharge them.• Never try to charge/discharge damaged charger.• Never try to charge/discharge damaged packs or cells.• Follow the directions given by the battery manufacturer.
ESA Interruptor de Emparejamiento “Binding“B Tornillos de la tapa del regulador / receptorC Tapa del regulador / receptorD Toma de corriente del reguladorE Interruptor de “On/Off“ – Encendido / ApagadoF Conexión del motorG Toma de corriente del bateríaH Conexión de la bateríaI Cable cargador
GBA Binding buttonB Screws of controller and receiver coverC Controller and receiver coverD Controller power connectionE On/ Off switchF Motor connectionG Battery power connectionH Battery connectionI Charging lead
ES - Primeros Pasos GB - Getting Started
Versión | Version 053285 & 053286
A
B
C
E
D
F
G
H
I

9
Configuración del ReguladorEl regulador se calibra automáticamente con la señal de la emi-sora. Para esto el trim (ajuste fino) del acelerador de la emisora tiene que estar en posición neutral. Encienda primero la emiso-ra y después el regulador. El regulador confirma la calibración automática con una melodía corta y después se encuentra listo para funcionar. Si el regulador no reconoce una señal clara o si el trim del acelerador no esta en posición neutral, el regulador no se iniciará.El regulador dispone de una función de corte en caso de baja tensión. Procede al corte en el caso de aprox. 2,8 V con una batería Lipo de 2 células o respectivamente con aprox. 1 V en el caso de una batería NiMh de 6 células. Cuando se acerca al umbral de baja tensión, primero se nota que el regulador baja la potencia de forma significativa para después apagarse del todo. Nada mas notar la bajada de potencia, Ud. debería dejar de usar el modelo, especialmente en el caso de usar una batería LiPo, sacar la batería y volver a cargarla. En caso contrario daños debido a una descarga excesiva pueden ser la consecuencia para sus baterías.
Configuring your controllerThe speed controller automatically calibrates itself to the trans-mitter signal. For this, the trim button of the gas channel at the transmitter must be set to neutral. Turn on the transmitter and then the speed controller. The speed controller signals the cali-bration with a short melody and is ready for use. In case the speed controller has no clear signal or the trim control is not set to neutral, the speed controller will not initialize.The speed controller has an under voltage cut off function. The cut-off occurs around 2, 8V p. Lipo cell (2S) and 1V p. NiMhZelle (6N). If the cut-off value is reached the speed controller reduces the controller’s performance and then switch off completely. Al-ready On the point of noticeable reduction of power, particular by using Lipo batterys you should remove the battery and recharge. Deep discharge and damage to your battery might otherwise be the result.
ES - Manual de instrucciones1. Conecte el cable (de salida) de la fuente de alimentación de a la toma de entrade del bloque de carga (portapilas). Los LEDs rojo y verde se encenderán, indicando que está listo para cargar. El LED rojo indica que la alimentación funciona, el LED verde muestra que hay voltaje de salida.2. Conecte la batería LiPo con su cable de equilibrado (3 hilos) a a salida del bloque de charga. El brillo del LED verde cambriará dependiendo del nivel de carga actual. Cuando brille al máximo (muy claro) la batería estará cargada. Una carga completa tarda unos 2 a 3 horas dependiendo de la capacidad de la batería. Si al conectar la batería el LED no se oscurece, la batería estará totalmente cargade.
Tiempo de cargaEl tiempo de carga depende la la capacidad de la batería.Ejemplo:Corriente de carga = 0,8A/hCapacidad de la batería = 800 mAhTiempo de carga = 1 hora (h)
GB - Operating Instructions1. Connect the charger to the AC Network and plug it into a grounding receptacle. The LED on the charger will indicate it is ready for charging.2. Connect the charger to the battery pack. The LED will change the color to show it is charging. If the battery pack is completely empty, a full charge process will take approx. 3 ~ 4 hours, depending on the batteries capacity. Once the LED changin the color again, charge has been completed.
Charging TimeThe charging time varies depending on the capacity of the battery.Example:Charge current = 0.8 A/hBattery Capacity = 800 mAhCharging time = 1 hour (h)
Atención: Cargar sólo baterías adecuadas con este cargador. Baterías adecuadas son de litio polímero con máx. 2 células, máx. 7,4 V de tensión y máx. 5000mAh. La batería debe tener un conector de balanceador tipo JST-XH. La carga de las baterías no ade-cuadas pueden causar daños en el cargador y en la batería. Riesgo de incendio! El conector del balanceador de cargador nose puede soldar o cambiar algo.
Caution: Only charge suitable battery‘s with this charger. Suitable battery‘s are lithium polymer battery‘s with max. 2 cells, max. 7.4 V nomi-nal voltage and max. 5000mAh. The battery must have a balan-cer plug type JST-XH. The charging of unsuitable battery‘s can cause damage to the charger and the battery‘s. Fire Hazard! The balancer plug of the charger is not allowed to get altered or sol-dered to a different balancer plug type!
LED
Versión | Version 053285 & 053286
10
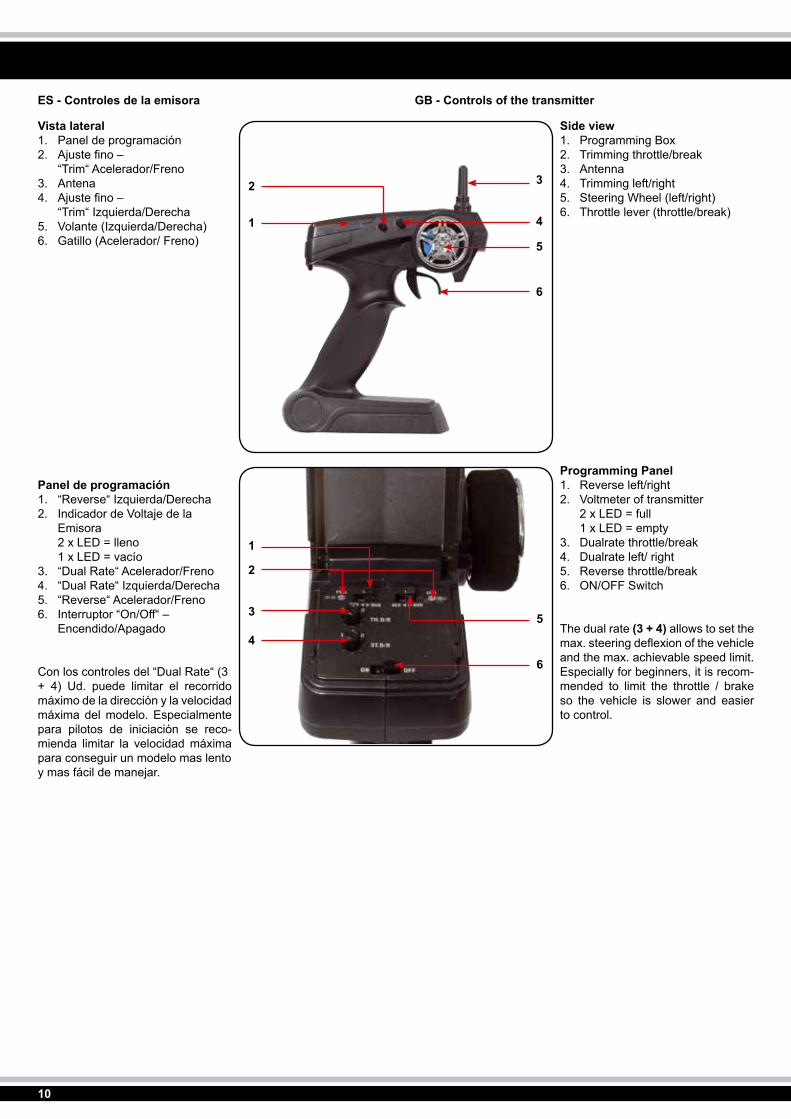
Vista lateral1. Panel de programación2. Ajuste fino – “Trim“ Acelerador/Freno3. Antena4. Ajuste fino – “Trim“ Izquierda/Derecha5. Volante (Izquierda/Derecha)6. Gatillo (Acelerador/ Freno)
Panel de programación1. “Reverse“ Izquierda/Derecha2. Indicador de Voltaje de la Emisora 2 x LED = lleno 1 x LED = vacío3. “Dual Rate“ Acelerador/Freno4. “Dual Rate“ Izquierda/Derecha5. “Reverse“ Acelerador/Freno6. Interruptor “On/Off“ – Encendido/Apagado
Con los controles del “Dual Rate“ (3+ 4) Ud. puede limitar el recorrido máximo de la dirección y la velocidadmáxima del modelo. Especialmente para pilotos de iniciación se reco-mienda limitar la velocidad máxima para conseguir un modelo mas lentoy mas fácil de manejar.
Side view1. Programming Box2. Trimming throttle/break3. Antenna4. Trimming left/right5. Steering Wheel (left/right)6. Throttle lever (throttle/break)
Programming Panel1. Reverse left/right2. Voltmeter of transmitter 2 x LED = full 1 x LED = empty3. Dualrate throttle/break4. Dualrate left/ right5. Reverse throttle/break6. ON/OFF Switch
The dual rate (3 + 4) allows to set the max. steering deflexion of the vehicle and the max. achievable speed limit. Especially for beginners, it is recom-mended to limit the throttle / brake so the vehicle is slower and easier to control.
ES - Controles de la emisora GB - Controls of the transmitter
1
3
4
5
6
2
1
3
4
5
6
2

11
Como norma general se recibe el modelo con la emisora ya em-parejada. Si resultará que el modelo no reacciona a las ordenésde la emisora, puede resultar necesario emparejar ambos de nuevo. En dicho caso haga lo siguiente:
• Asegúrese de tener pilas nuevas / baterías cargadas en la emisora y la batería del modelo cargada al máximo.• Todos los controles de ajuste fino de la emisora tienen que estar en posición central y todos los controles del “Dual Rate“ tienen que estar en posición máxima.• Primero conecte el modelo.• Presione brevemente el interruptor de emparejamiento del modelo hasta que el LED comienza a parpadear rápidamente. Ahora conecte la emisora.• El modelo vuelve a estar emparejado con su emisora y listo para su uso.
Usually the car and transmitter are already bound once you re-ceive the set. In case the car does not react to the control in-puts given through the transmitter, it might be neccessary to bind once again.
• Make sure that the batteries in transmitter and vehicle are full. • All trimming buttons have to be positioned in the middle and the dual rate at max. • Switch on the model. • Press the binding button on the model until the LED flashes. Now switch on the transmitter. • The transmitter and model are now bound.
Su modelo esta a prueba de salpicaduras. ¡No es impermeable !Esto significa, que gracias a la caja cerrada del receptor, es posi-ble usar el modelo en condiciones de lluvia ligera y/o humedad.De todos modos debe evitar cruzar charcos profundos o similar,ya que a partir de cierta profundidad de agua, el agua puede entrar directamente a la caja del receptor.Agua dentro de la caja se haría notar con falta de potencia y problemas de recepción. En este caso, desconecte la batería del modelo y abra la tapa del receptor sacando previamente sustornillos.Ahora puede retirar la electrónica de forma cuidadosa hacia ar-riba y eliminar cualquier huella de agua o humedad con un trapoo similar. Una vez que todo vuelve a estar seco, vuelva a colocarla electrónica de forma correcta en su sitio y vuelva a colocar latapa y sus tornillos cuidadosamente. Al colocar la electrónica, tenga especial cuidado de no dañar o apretar el cable del servode dirección. Después el modelo debería volver a funcionar de forma correcta.
Your model is splash-proof but not waterproof. The closed receiver box enables you to drive in rain or when wet but not through deep puddles as high water density will enable water to penetrate inside the receiver box, which will result in power or control loss. In this event the battery pack needs to be detached from the mo-del and the receiver box cover needs to be removed. Remove the electronics carefully and dry with a cloth. Once dried, insert the electronics and secure the receiver box cover. Make sure not to squash or damaged the steering servo cable.
ES - Emparejamiento – “Binding“ GB - Binding
El uso del modelo en condiciones de agua / humedad Using the model in wet conditions.
12
Versiòn 053280 & 053281
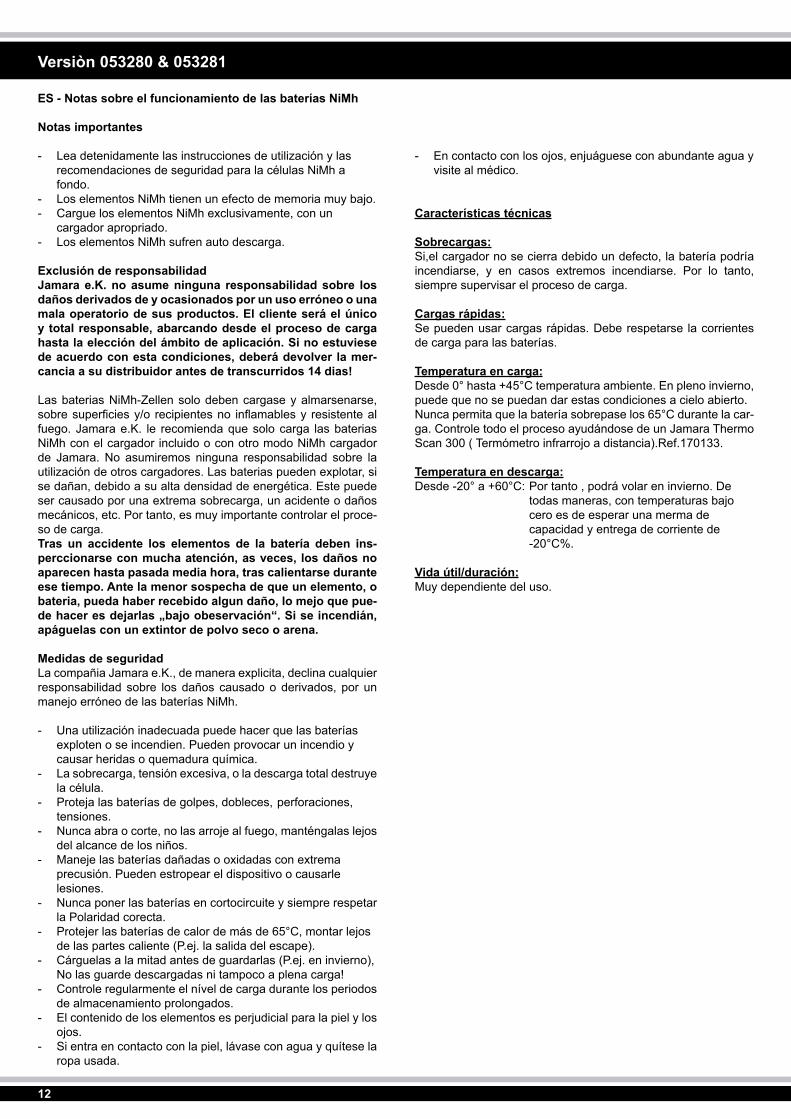
ES - Notas sobre el funcionamiento de las baterías NiMh
Notas importantes
- Lea detenidamente las instrucciones de utilización y las recomendaciones de seguridad para la células NiMh a fondo. - Los elementos NiMh tienen un efecto de memoria muy bajo.- Cargue los elementos NiMh exclusivamente, con un cargador apropriado.- Los elementos NiMh sufren auto descarga.
Exclusión de responsabilidadJamara e.K. no asume ninguna responsabilidad sobre los daños derivados de y ocasionados por un uso erróneo o una mala operatorio de sus productos. El cliente será el único y total responsable, abarcando desde el proceso de carga hasta la elección del ámbito de aplicación. Si no estuviese de acuerdo con esta condiciones, deberá devolver la mer-cancia a su distribuidor antes de transcurridos 14 dias!
Las baterias NiMh-Zellen solo deben cargase y almarsenarse, sobre superficies y/o recipientes no inflamables y resistente al fuego. Jamara e.K. le recomienda que solo carga las baterias NiMh con el cargador incluido o con otro modo NiMh cargador de Jamara. No asumiremos ninguna responsabilidad sobre la utilización de otros cargadores. Las baterias pueden explotar, si se dañan, debido a su alta densidad de energética. Este puede ser causado por una extrema sobrecarga, un acidente o daños mecánicos, etc. Por tanto, es muy importante controlar el proce-so de carga.Tras un accidente los elementos de la batería deben ins-perccionarse con mucha atención, as veces, los daños no aparecen hasta pasada media hora, tras calientarse durante ese tiempo. Ante la menor sospecha de que un elemento, o bateria, pueda haber recebido algun daño, lo mejo que pue-de hacer es dejarlas „bajo obeservación“. Si se incendián, apáguelas con un extintor de polvo seco o arena.
Medidas de seguridad La compañia Jamara e.K., de manera explicita, declina cualquier responsabilidad sobre los daños causado o derivados, por un manejo erróneo de las baterías NiMh.
- Una utilización inadecuada puede hacer que las baterías exploten o se incendien. Pueden provocar un incendio y causar heridas o quemadura química.- La sobrecarga, tensión excesiva, o la descarga total destruye la célula.- Proteja las baterías de golpes, dobleces, perforaciones, tensiones.- Nunca abra o corte, no las arroje al fuego, manténgalas lejos del alcance de los niños.- Maneje las baterías dañadas o oxidadas con extrema precusión. Pueden estropear el dispositivo o causarle lesiones.- Nunca poner las baterías en cortocircuite y siempre respetar la Polaridad corecta.- Protejer las baterías de calor de más de 65°C, montar lejos de las partes caliente (P.ej. la salida del escape).- Cárguelas a la mitad antes de guardarlas (P.ej. en invierno), No las guarde descargadas ni tampoco a plena carga!- Controle regularmente el nível de carga durante los periodos de almacenamiento prolongados.- El contenido de los elementos es perjudicial para la piel y los ojos.- Si entra en contacto con la piel, lávase con agua y quítese la ropa usada.
- En contacto con los ojos, enjuáguese con abundante agua y visite al médico.
Características técnicas
Sobrecargas: Si,el cargador no se cierra debido un defecto, la batería podría incendiarse, y en casos extremos incendiarse. Por lo tanto, siempre supervisar el proceso de carga.
Cargas rápidas:Se pueden usar cargas rápidas. Debe respetarse la corrientes de carga para las baterías.
Temperatura en carga: Desde 0° hasta +45°C temperatura ambiente. En pleno invierno,puede que no se puedan dar estas condiciones a cielo abierto.Nunca permita que la batería sobrepase los 65°C durante la car-ga. Controle todo el proceso ayudándose de un Jamara Thermo Scan 300 ( Termómetro infrarrojo a distancia).Ref.170133.
Temperatura en descarga:Desde -20° a +60°C: Por tanto , podrá volar en invierno. De todas maneras, con temperaturas bajo cero es de esperar una merma de capacidad y entrega de corriente de -20°C%.
Vida útil/duración: Muy dependiente del uso.

13
Version 053280 & 053281
GB - Instructions for the use of NiMh Batteries
Important Information
Read these instructions and safety notes for your NiMH Packs thoroughly before use
- NiMH Packs have a nominal memory effect - NiMH Packs can only be charged with a NiMH charger - NiMH Packs self discharge
Indemnity Statement JAMARA e.K. accept no responsibility for any damage caused by its products which arises through misuse. The customer alone bares the responsibility for the use andope-ration of this product and this includes, for example, the me-thod of changing and application for which the packs are used. If you are not in agreement with the above conditions you may return this product unused to your dealer within 14 days.
NiHM cells should only be charged or stored on an inflammab-le surface. JAMARA e.K. strongly recommend the use of either the charger included with the model or one of its range set to the NiMH program. Using chargers from other manufactures or incorrectly invalidates the guarantee and JAMARA e.K. will ac-ceptno responsibility from any damage arising. Due to their high capacities damaged or incorrectly treated packs can ignite and to this end any charging or discharging of packs must be monitored. After a crash the packs must be thoroughly inspected for da-mage and you should never attempt to charge or discharge a damaged pack. If a cell is damaged, it is possible that it may short-circuit and ignite for up to 30 minutes after the impact and for this reason packs must be placed on a fire proof surface and observed for half an hour after any impact. Burning cells or packs must be extinguished with sand or powder.
Safety PolicyJAMARA accepts no responsibility for any damage caused by or to its products which is caused by failing to follows these ins-tructions.
- The incorrect use of these cells can lead to an explosion and or ire! Risk of injury!- Over-charging, the use of too high currents, or deep dischar- ging may damage the cells- Protect from mechanical damage (crushing, dents, bending or piercing)- Never attempt to open the cells, never expose them to fire and keep them away from children- Always treat damaged or leaking cells with the utmost caution as they may cause injury- Never short-circuit cells and observe the correct polarity - Protect cells from temperatures of over 65°C, do not mount them near to heat sources, i.e. Exhausts- Store packs (over winter) half full. Do not store them empty or full- Periodically check the state of charge of packs stored for long periods- The contents of the cells is will cause injury to skin and eyes- In the event of skin contact, wash the area thoroughly with plenty of water and remove any clothing- In the event of eye contact, wash thoroughly with plenty of water and consult a doctor
Technical Details
Over-Charging:If the charger fails to switch off due to a technical defect the cells may overheat and ignite, for this reason, charging must always be monitored
Fast Charging:Fast charging is possible. The maximal rated current must be adhered to.
Charging Temperatures: 0°C to +45°C. Charging pack outside in winter is not always pos-sible. The cell temperature must not exceed 65°C. To monitor this we recommend using our JAMARA Thermo Scan 300 (con-tact less infer red thermometer) Part No. 17 0133.
Discharging Temperatures:-20°C to +60°C. This make flying in winter possible, however, minus temperatures can lead to a 20% reduction in capacity and reduced current draw.
Life Span:Heavily dependant on use.
14
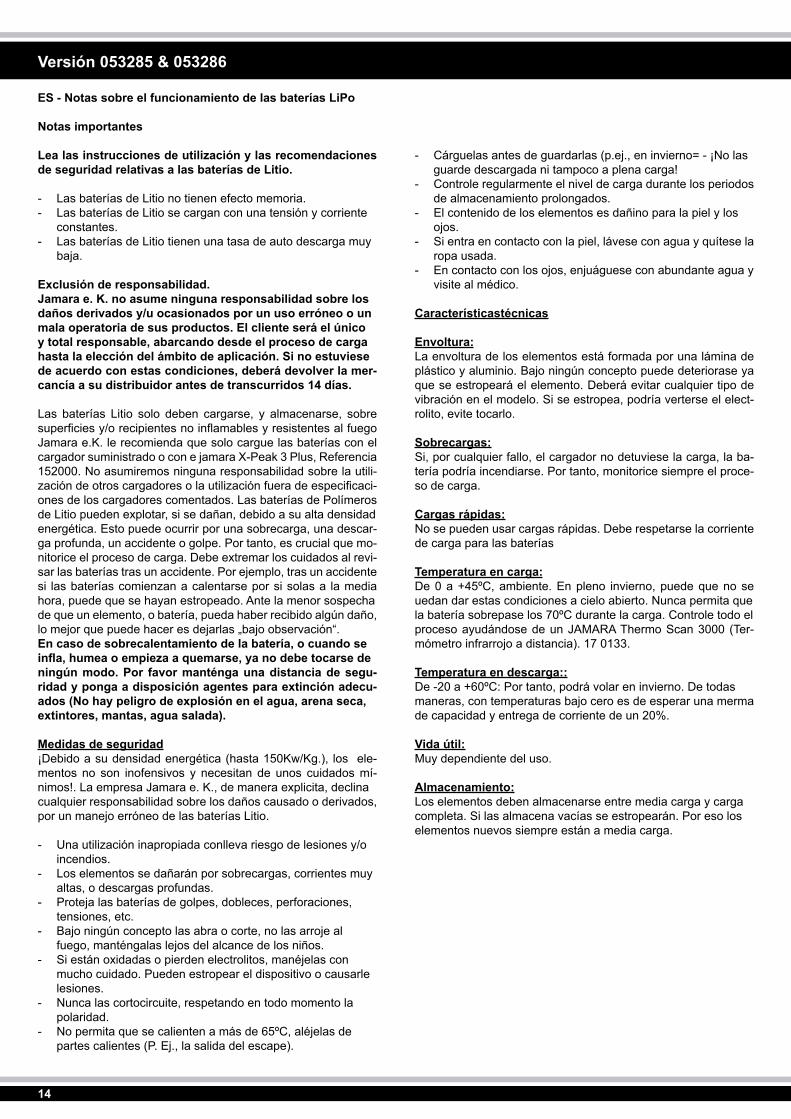
ES - Notas sobre el funcionamiento de las baterías LiPo
Notas importantes
Lea las instrucciones de utilización y las recomendaciones de seguridad relativas a las baterías de Litio.
- Las baterías de Litio no tienen efecto memoria.- Las baterías de Litio se cargan con una tensión y corriente constantes.- Las baterías de Litio tienen una tasa de auto descarga muy baja.
Exclusión de responsabilidad.Jamara e. K. no asume ninguna responsabilidad sobre losdaños derivados y/u ocasionados por un uso erróneo o unmala operatoria de sus productos. El cliente será el únicoy total responsable, abarcando desde el proceso de cargahasta la elección del ámbito de aplicación. Si no estuviesede acuerdo con estas condiciones, deberá devolver la mer-cancía a su distribuidor antes de transcurridos 14 días.
Las baterías Litio solo deben cargarse, y almacenarse, sobre superficies y/o recipientes no inflamables y resistentes al fuego Jamara e.K. le recomienda que solo cargue las baterías con el cargador suministrado o con e jamara X-Peak 3 Plus, Referencia152000. No asumiremos ninguna responsabilidad sobre la utili-zación de otros cargadores o la utilización fuera de especificaci-ones de los cargadores comentados. Las baterías de Polímerosde Litio pueden explotar, si se dañan, debido a su alta densidadenergética. Esto puede ocurrir por una sobrecarga, una descar-ga profunda, un accidente o golpe. Por tanto, es crucial que mo-nitorice el proceso de carga. Debe extremar los cuidados al revi-sar las baterías tras un accidente. Por ejemplo, tras un accidentesi las baterías comienzan a calentarse por si solas a la media hora, puede que se hayan estropeado. Ante la menor sospechade que un elemento, o batería, pueda haber recibido algún daño,lo mejor que puede hacer es dejarlas „bajo observación“.En caso de sobrecalentamiento de la batería, o cuando seinfla, humea o empieza a quemarse, ya no debe tocarse deningún modo. Por favor manténga una distancia de segu-ridad y ponga a disposición agentes para extinción adecu-ados (No hay peligro de explosión en el agua, arena seca,extintores, mantas, agua salada).
Medidas de seguridad¡Debido a su densidad energética (hasta 150Kw/Kg.), los ele-mentos no son inofensivos y necesitan de unos cuidados mí-nimos!. La empresa Jamara e. K., de manera explicita, declinacualquier responsabilidad sobre los daños causado o derivados,por un manejo erróneo de las baterías Litio.
- Una utilización inapropiada conlleva riesgo de lesiones y/o incendios.- Los elementos se dañarán por sobrecargas, corrientes muy altas, o descargas profundas.- Proteja las baterías de golpes, dobleces, perforaciones, tensiones, etc.- Bajo ningún concepto las abra o corte, no las arroje al fuego, manténgalas lejos del alcance de los niños.- Si están oxidadas o pierden electrolitos, manéjelas con mucho cuidado. Pueden estropear el dispositivo o causarle lesiones.- Nunca las cortocircuite, respetando en todo momento la polaridad.- No permita que se calienten a más de 65ºC, aléjelas de partes calientes (P. Ej., la salida del escape).
- Cárguelas antes de guardarlas (p.ej., en invierno= - ¡No las guarde descargada ni tampoco a plena carga!- Controle regularmente el nivel de carga durante los periodos de almacenamiento prolongados.- El contenido de los elementos es dañino para la piel y los ojos.- Si entra en contacto con la piel, lávese con agua y quítese la ropa usada.- En contacto con los ojos, enjuáguese con abundante agua y visite al médico.
Característicastécnicas
Envoltura: La envoltura de los elementos está formada por una lámina de plástico y aluminio. Bajo ningún concepto puede deteriorase ya que se estropeará el elemento. Deberá evitar cualquier tipo de vibración en el modelo. Si se estropea, podría verterse el elect-rolito, evite tocarlo.
Sobrecargas:Si, por cualquier fallo, el cargador no detuviese la carga, la ba-tería podría incendiarse. Por tanto, monitorice siempre el proce-so de carga.
Cargas rápidas: No se pueden usar cargas rápidas. Debe respetarse la corrientede carga para las baterías
Temperatura en carga: De 0 a +45ºC, ambiente. En pleno invierno, puede que no se uedan dar estas condiciones a cielo abierto. Nunca permita quela batería sobrepase los 70ºC durante la carga. Controle todo elproceso ayudándose de un JAMARA Thermo Scan 3000 (Ter-mómetro infrarrojo a distancia). 17 0133.
Temperatura en descarga:: De -20 a +60ºC: Por tanto, podrá volar en invierno. De todasmaneras, con temperaturas bajo cero es de esperar una mermade capacidad y entrega de corriente de un 20%.
Vida útil: Muy dependiente del uso.
Almacenamiento: Los elementos deben almacenarse entre media carga y cargacompleta. Si las almacena vacías se estropearán. Por eso loselementos nuevos siempre están a media carga.
Versión 053285 & 053286
15
GB - Instructions for the use of LiPo Batteries
Important Notice
Read the manual and the safety precautions for theLithium-Polymer-Cells properly.
- Litium-Polymer-Cells have no memory-effect- Lithium-Polymer-Cells are recharged with a constant voltage and a constant power- Lithium-Polymer-Cells have a small self-discharging Voltage
Liability exclusionJamara e.K. assumes no liability in case of wrong usage or operation of the product, respectively of all injuries. The customer alone is in charge of the cell, this includes from the recharging process up to the choice of place of use. If the customer is not satisfied with the terms of usage, he may use his right to return the unused product to the dealer.
Lithium-Polymer-Cells may only be stored and recharged, on fireproof non-flamable grounds. Jamara e.K. recommends to re-charge the cells only with the transmitter. When using an other charger or when using the permitted charger incorrect, no liabili-ty can be taken. Because of their enormous power-compactivity Lithium-Polymer-Cells are flameable when damaged. This can happen through extrem overcharging, a crash or a mechanical damage etc. Therefore, it is extremly important to supervise the recharging process. After a crash the cell/pack should be che-cked carefully. For example the cell/pack could have been da-maged, but does not heat up before 30 minutes. So, in case of a damage at one pack or a cell always strictly supervise.If the cell overheats, swells, burns or smoke is coming from it, do not touch it under any circumstances. Keep away in a safe distance and prepare adequate extinguishing agents such (No water explosion, well dry sand, fire extinguishers, fire blanket, salt water).
Safety precausionsBecause of the high power compactivity (up to 150 Wh/kg) the cells are quite dangerous and need special care! The company Jamara excludes explicitly, all types of liability for damages, that can occure when using the Lithium-Polymer-Cells indequate.
- When using the battery incorrect there is a risk of getting fire- or acid-injuries.- Overcharging, too high power, or discharging at low level destroys the cell.- Protect from mechanical stress (squeezing, pushing, bending, drilling).- Never open or cut open, do not throw into fire, keep away from children.- Handle damaged or leaking battery with care. Injuries or damages to the product can occure.- Under no circumstance short-circuit the device and always watch out for correct polarity.- Protect batteries from heat above 65 °C , mount away from hot objects (for example exhaust pipe).- Before storing batteries (for example in the winter) charge the battery. Do not store in fully charged or in non charged state!- If stored over a longer period of time, observe the power l evel occasionally.- The contents of the cell is harmfull for skin and eye.- If the content comes into contact with skin, clean with plenty of water and take off moisted clothes.- If the content comes into contact with the eyes, clean with plenty of water and consult a doctor.
Technical data
Case: The case of the cells consists of an aluminium-plasticfoil. This foil should not be damaged under any circumstance, because this will lead to a damaged cell. Take care of sufficient protection (i.e. vibrations) in the model. If damaged, they might leak, avoid contact under all circumstances.
Overcharging:If charging does not stop because of any damage to the charger the battery may catch fire. Therefore supervise the charging pro-cess frequently.
Speed charging:Speed charging is not possible. The charging voltage for these cells must be followed.
Charging temperature: 0 to +45 degrees outside temperature. During charge, the bat-tery should not get warmer than 70 °C. Supervise the charging process with help of the JAMARA Thermo Scan 300 ( Non-touch infrared thermometer) Order No. 17 0133.
Discharging temperature:-20 to +60 degrees: Flying in winter is therefore possible. At tem-peratures beneath 0 degrees, it is likely that the capacity may be reduced by approx. 20% and the discharge level may be smaller as well.
Lifetime: Very user-dependent.
Storage:The cells need to be between half full and full charged. The sto-ring empty cells will lead to their destruction. New cells are there-fore half full.
Version 053285 & 053286
16
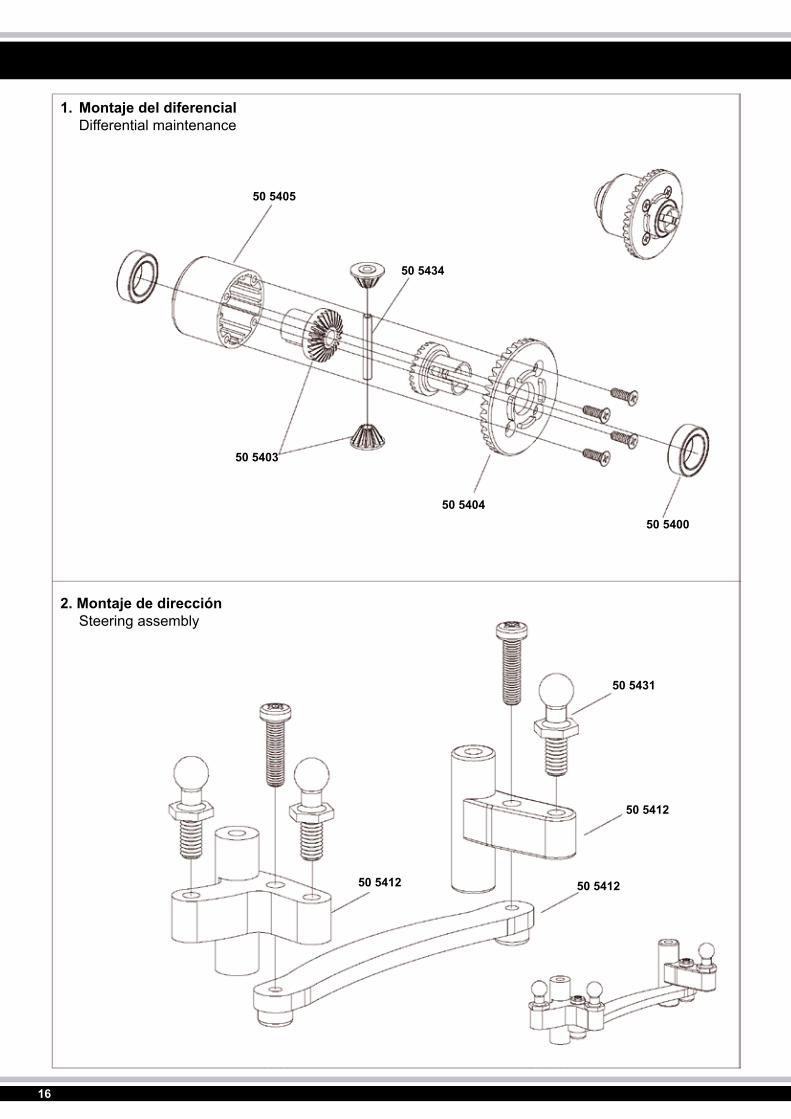
1. Montaje del diferencial Differential maintenance
2. Montaje de dirección Steering assembly
50 5405
50 5434
50 5403
50 5412
50 5431
50 5412
50 5412
50 540450 5400
17
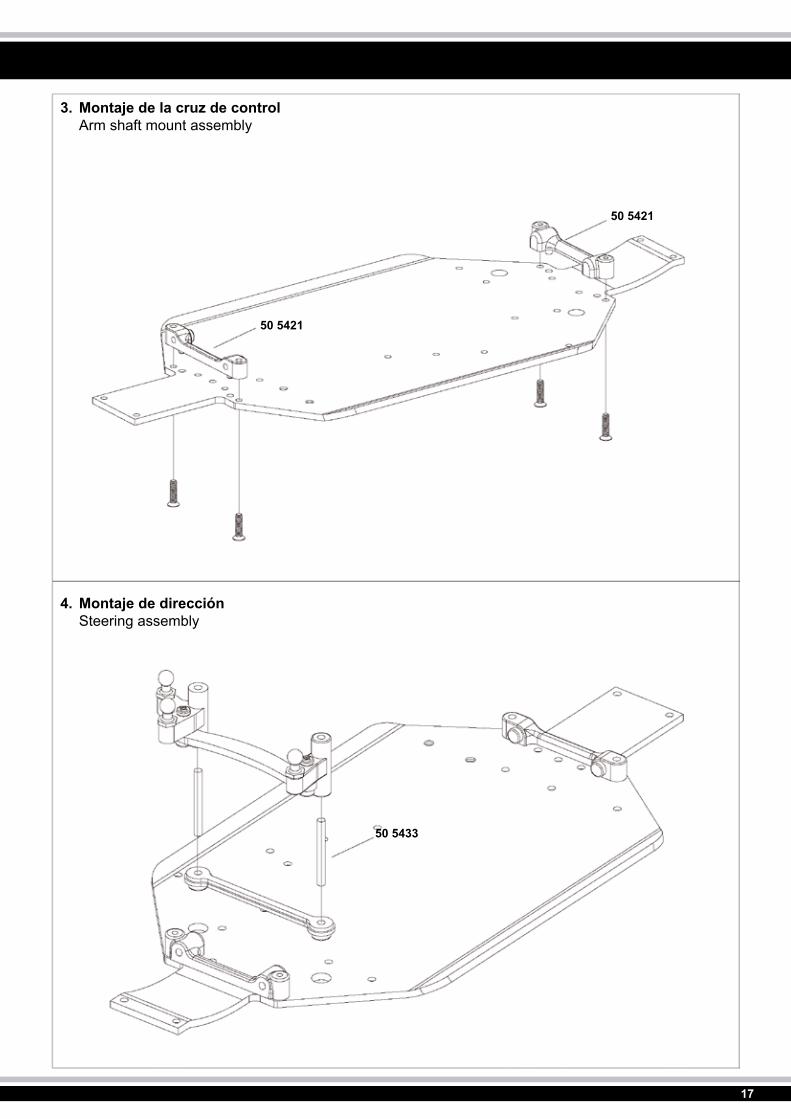
3. Montaje de la cruz de control Arm shaft mount assembly
4. Montaje de dirección Steering assembly
50 5421
50 5421
50 5433

18
5. Montaje de la Caja pinoneria Gear box assembly
6. Montaje de la caja del diferencial Mid. diff. case assembly
50 5407
50 5422
50 5422

19
8. Montaje de la corona principa Main gear assembly
7. Montaje del diferencial Differential assembly
50 5404
50 540250 5406
50 5400
50 5409
50 5400
50 5404
20
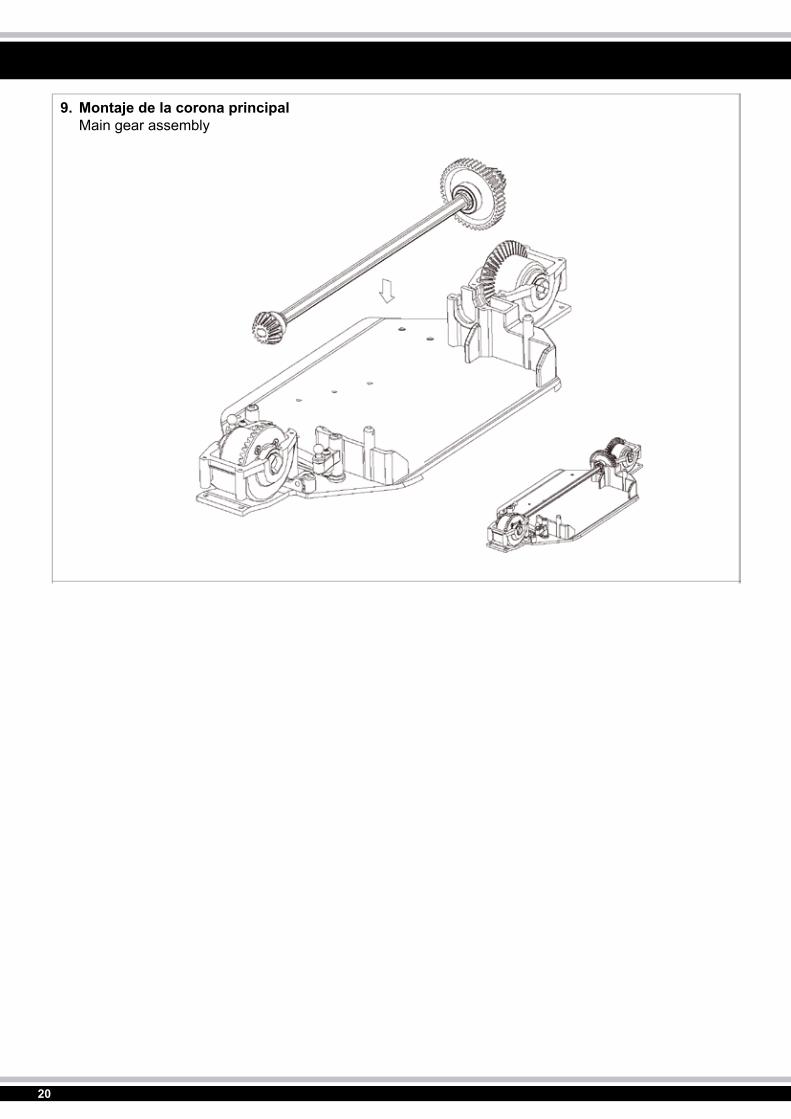
9. Montaje de la corona principal Main gear assembly

21
10. Montaje del puente de suspensión delantero Front shock plate assembly
50 5435
50 5431
50 5441
50 5407
22
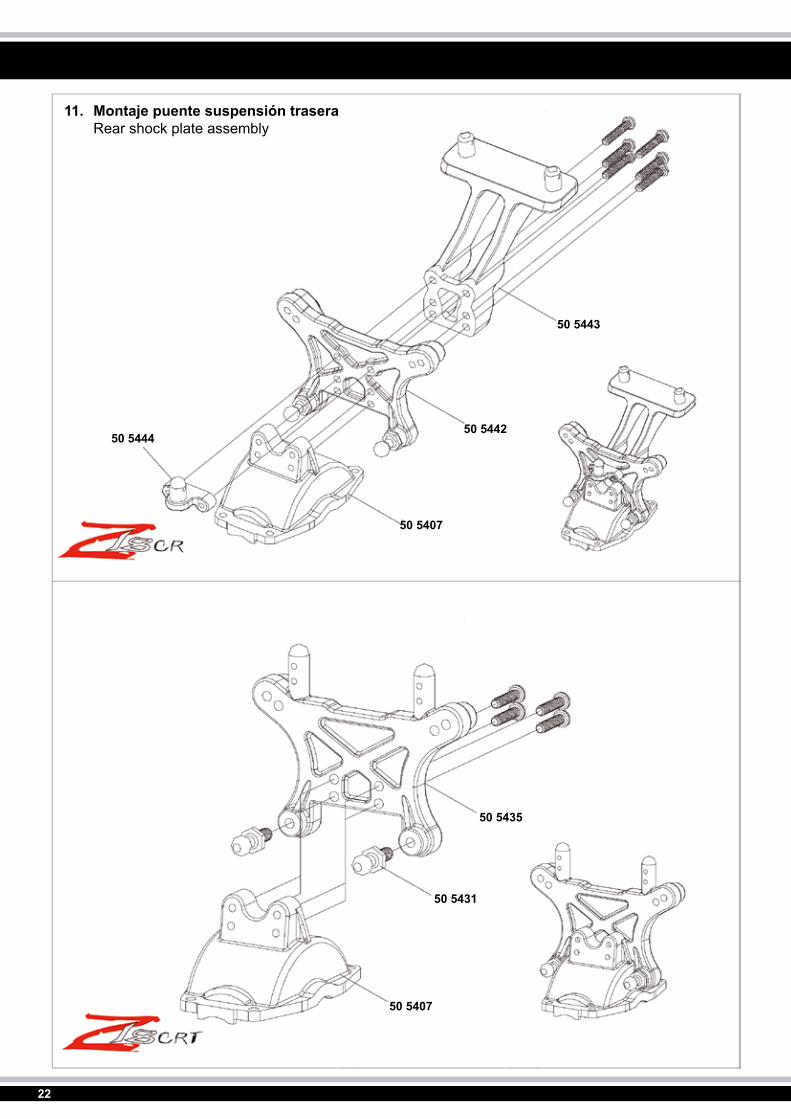
11. Montaje puente suspensión trasera Rear shock plate assembly
50 5435
50 5443
50 544250 5444
50 5407
50 5431
50 5407

23
12. Montaje puente suspensión Shock plate assembly

24
13. Montaje del soporte del motor Motor assembly
50 5427
50 5427
50 5428
50 5428
50 5445
50 5439
25
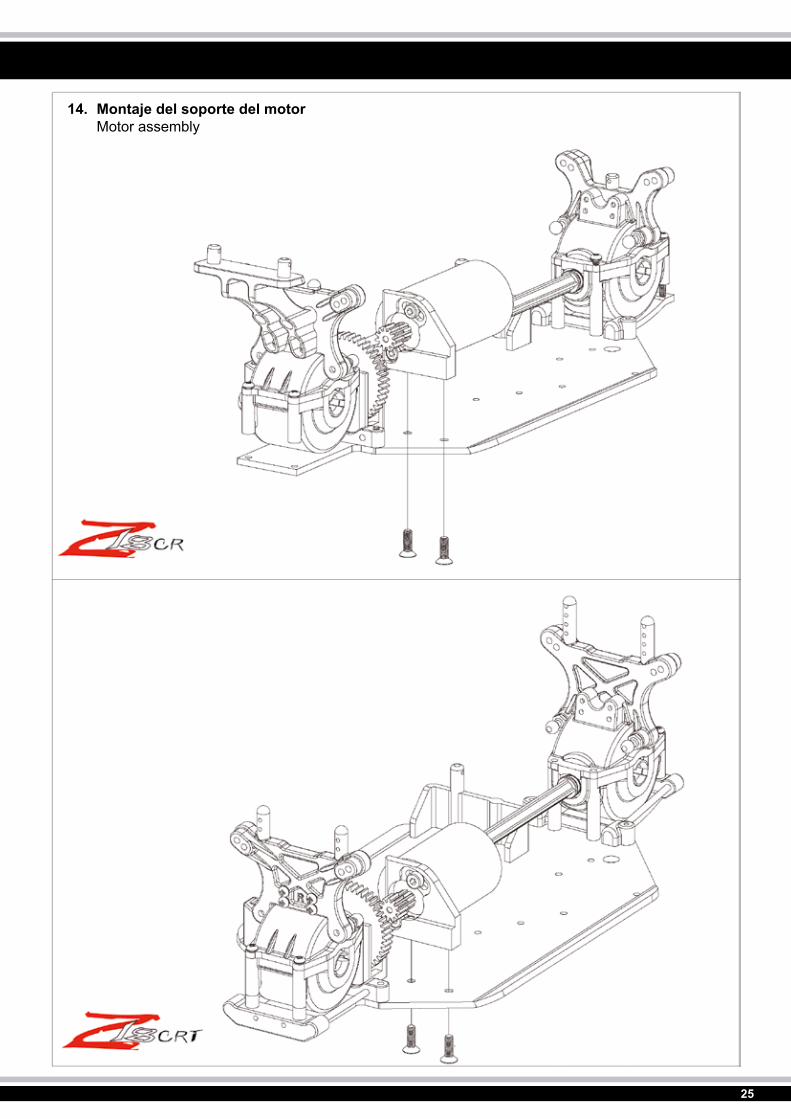
14. Montaje del soporte del motor Motor assembly

26
15. Montaje de la cubierta del motor Motor cap assembly
50 5424
50 5420

27
17. Montaje manguetas C hub assembly
16. Montaje del salva servos Servo saver assembly
50 5414
50 5431
50 5413
50 5413
50 5413
50 5413
50 5400
50 543150 5410 50 5431
50 541550 5416

28
18. Montaje del trapecio delanteras Front suspension assembly
50 5421
50 5444
50 5433
50 5432
50 5408
50 5419
50 5411
50 5408
50 541150 5421
50 5432
50 541950 5433

29
19. Montaje suspensión trasera Rear hub assembly
50 5410
50 5400
50 5417
50 5431
50 5400
30
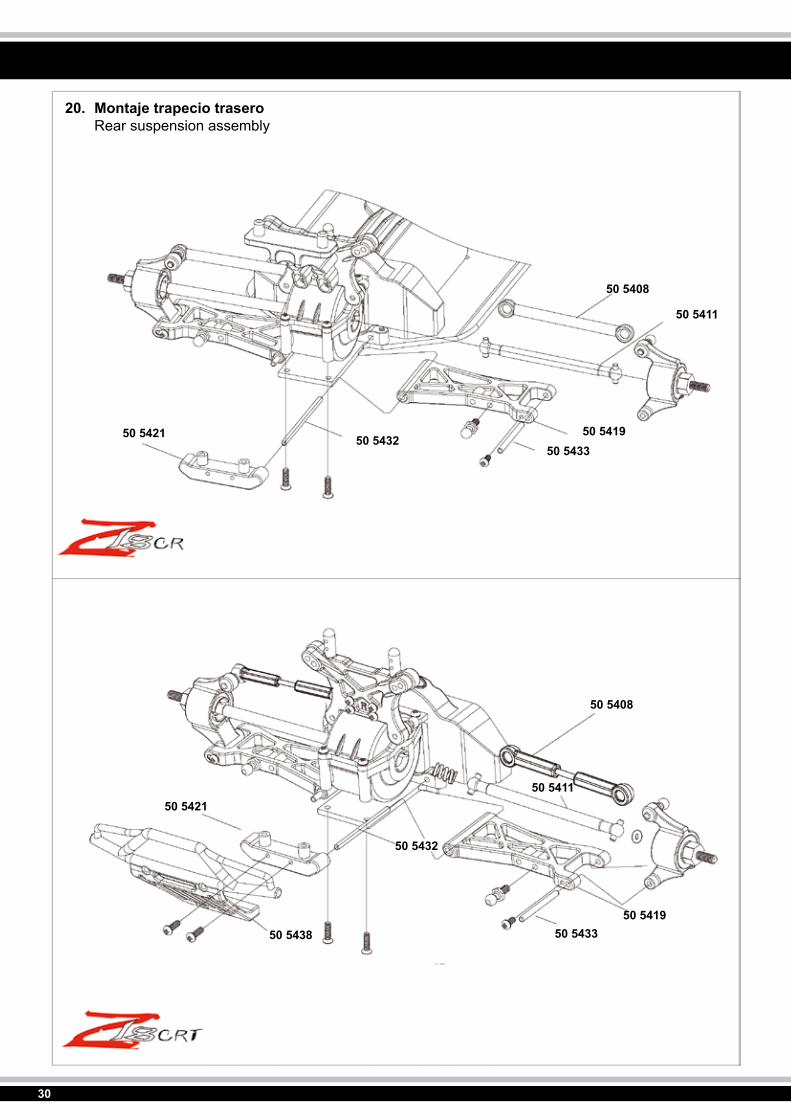
20. Montaje trapecio trasero Rear suspension assembly
50 5421
50 5438
50 5421
50 5432
50 5432
50 5433
50 5433
50 5419
50 5419
50 5408
50 5408
50 5411
50 5411
31
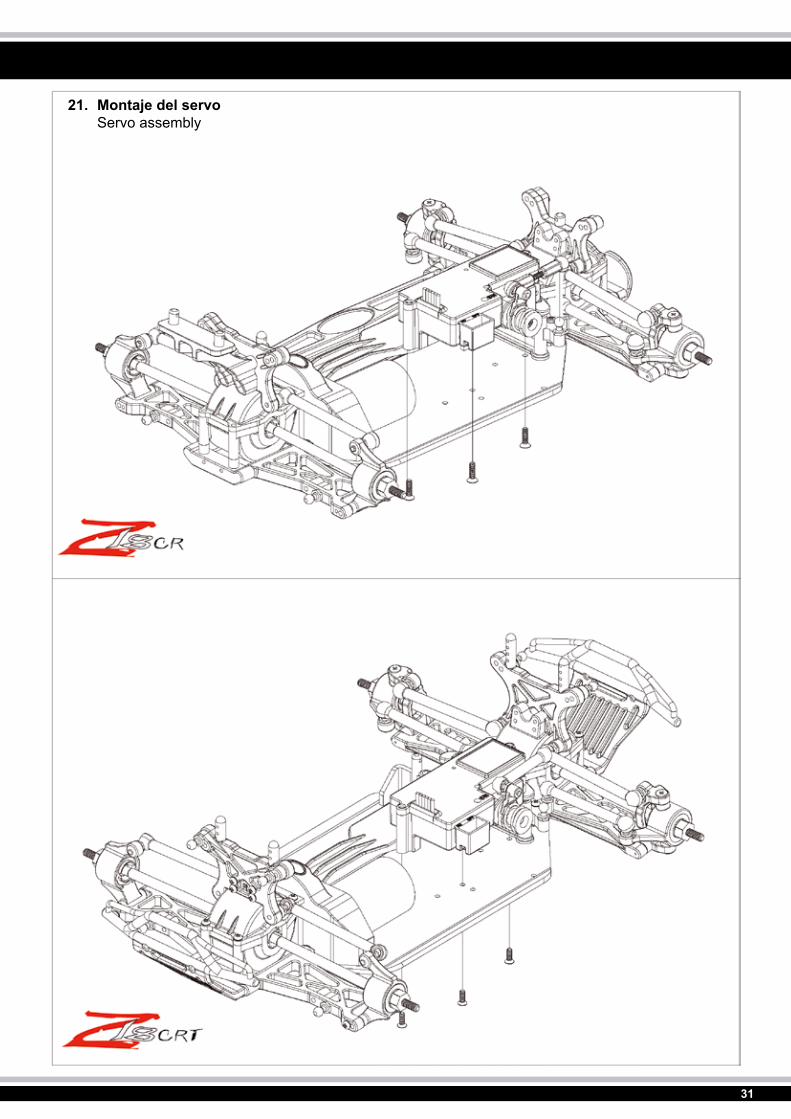
21. Montaje del servo Servo assembly

32
22. Motaje de las varillas Steering rod assembly
50 5408
50 5408

33
23. Montaje del amortiguadores Shock assembly
50 5446front
50 5418rear

34
23. Montaje del amortiguadores Shock assembly
50 5418vorne & hintenfront& rear
35
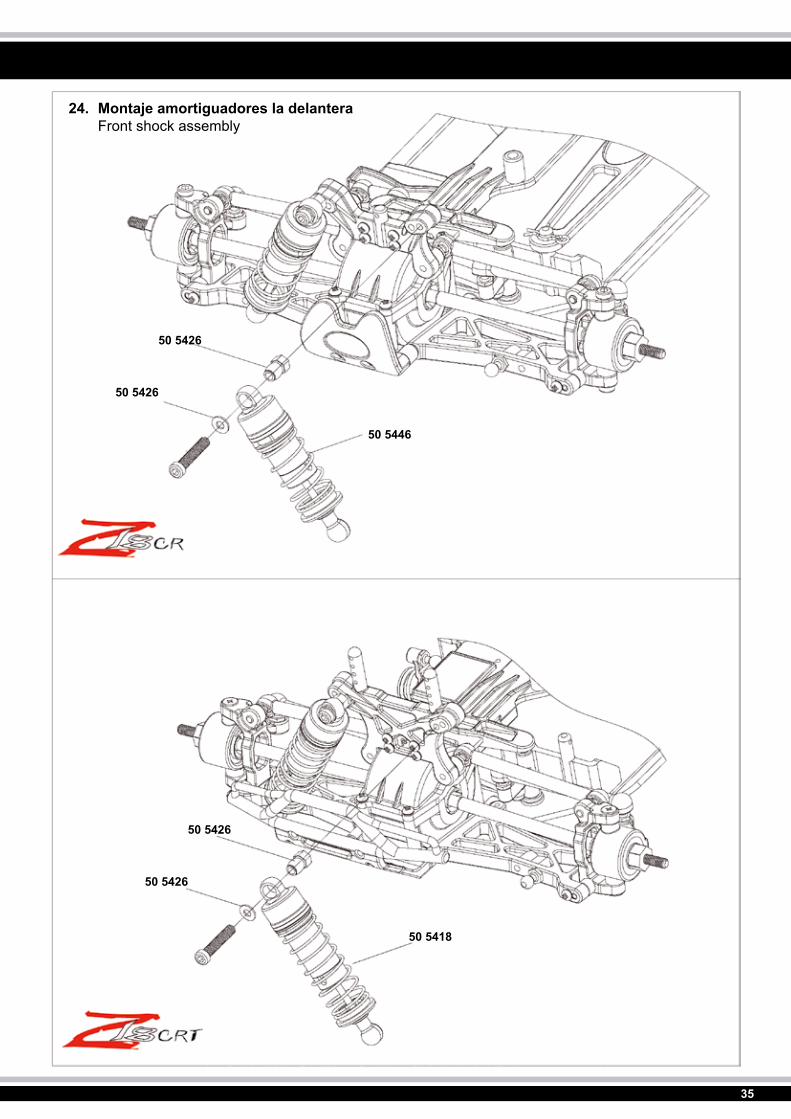
24. Montaje amortiguadores la delantera Front shock assembly
50 5426
50 5426
50 5426
50 5426
50 5446
50 5418

36
25. Montaje amortiguadores la detrás Rear shock assembly
50 5426
50 5426
50 5426
50 5426
50 5418
50 5418

37
26. Montaje de los neumáticos Tire assembly
50 5437
50 5447
17 7443
17 7443
38
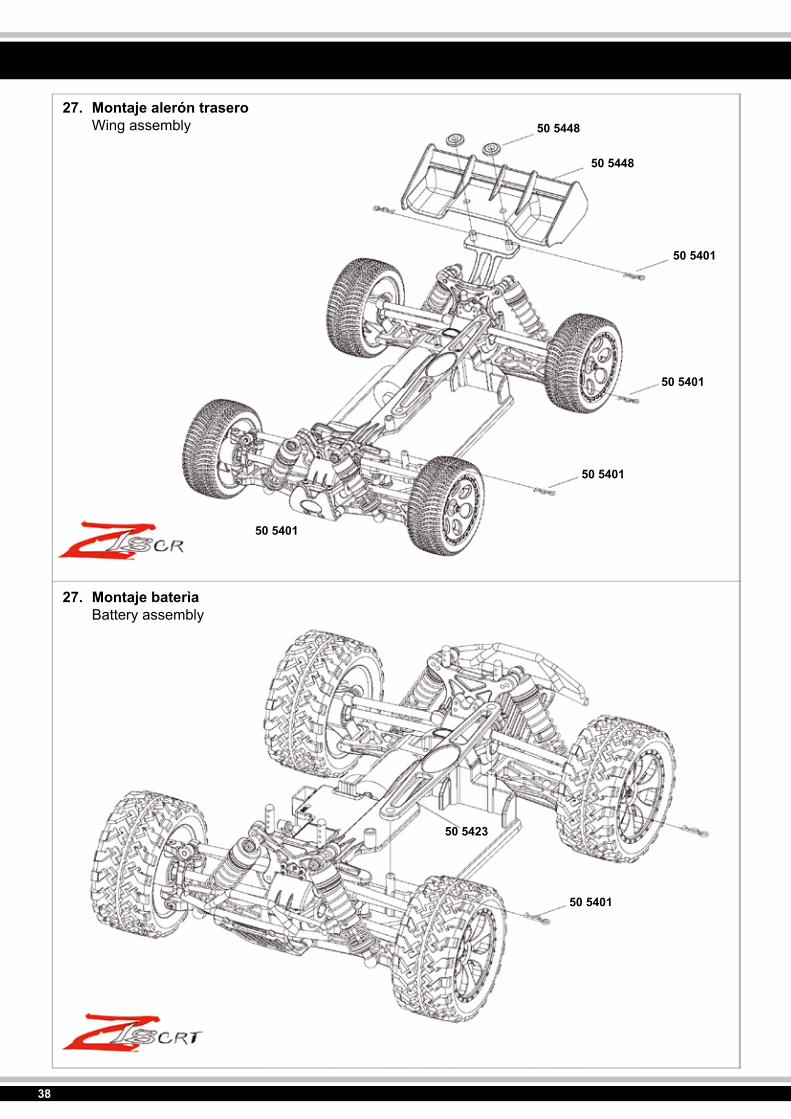
27. Montaje alerón trasero Wing assembly
27. Montaje baterìa Battery assembly
50 5448
50 5448
50 5401
50 5401
50 5401
50 5401
50 5401
50 5423

39
28. Montaje de la carrocería Body assembly
50 5401
50 5401
50 5449

40
28. Montaje de la carrocería Body assembly
50 5401
50 5436

41
No. 50 5423Soporte bateria sup.Battery plate
No. 50 5424Cobertura d. engranajeMotor case
No. 50 5426RotulaShock ball head set
No. 50 5403Pinion diferencialDifferential gear set
No. 50 5407Caja pinoneriaGear box set
No. 50 5404Corona satelitar inc. engr.conicoDiff pinion incl. ring gear
No. 50 5412Set palancaSteering set
No. 50 5415C-HubC hub
No. 50 5416Palier delante Steering hub set
No. 50 5405Caja diferencialDifferential case
No. 50 5409Arbol motor centralMiddle shaft
No. 50 5413Servo SaverServo saver
No. 50 5417Palier atrasRear hub carrier
No. 50 5420Placa radioUpper plate
No.50 5421Sop. brazo inf. elante+atrasSuspension mount set
No. 50 5406Corona principalSpur gear
No. 50 5410Eje de ruedaAxle set
No. 50 5414Receptor / Regulador elect.R/C unit set
No. 50 5418Amortiguador delante/atrasShock
No. 50 5422Soporte bateriaBattery mount set
ES - Lista de repuestos GB - Spare parts

42
No. 50 5427Motor eléctricoMotor
No. 50 5431Tornillos d.cabeza esfericaBall head
No. 17 7443 M3Tuerca autoblocanteLock nut
No. 50 5428Soporte motorMotor mount
No. 50 5432 2 x 36,5Perno brazo interiorPin
No. 50 5400 8 x 12 x 3,5Rodamiento de bolas Bearing
No. 50 5429ServoMini servo
No. 50 5433 2 x 22Perno brazo exteriorPin
No. 50 5402 6 x 10 x 3Rodamiento de bolasBearing
No. 50 5430Batería 7,2V 1300mAh Battery 7,2V 1300mAh
No. 50 5434 2 x 16,5Diferencial bulon Pin
No. 50 5401 1:18Clips carroceriaClip
ES - Lista de repuestos GB - Spare parts
No. 50 5408Brazo sup. delante+atrasPulling rod set
No.50 5411Arbol motor delante+atrasSwing shaft
No. 50 5419Brazo inf. delante/atrasLower suspension set
No. 50 5425ChasisChassis
No. 50 5451CargadorCharger

43
No. 50 5449CarroceriaBody
No. 50 5450AdhesivoDecal
No. 50 5445Pinon motorMotor gear
No. 50 5446Amortiguador delanteFront shock
No. 50 5447 1:8Neumatico + llantaTires + Rims
No. 50 5441Sop. amortiguador delanteFront shock plate
No. 50 5442Sop. amotiguador traseroRear shock plate
No. 50 5443Soporte spoilerWing mount
No. 50 5444Parachoque delanteBumper Set
No. 50 5448AleronWing
ES - Lista de repuestos GB - Spare parts
No. 50 5435Sop. amortiguador delante/traseroShock plate
No. 50 5436CarroceriaBody
No. 50 5437 1:18Neumatico + llanta Tires + Rims
No. 50 5438Parachoque delante/trasero Bumper
No. 50 5440AdhesivoDecal
No. 50 5439Pinon motorMotor gear
44
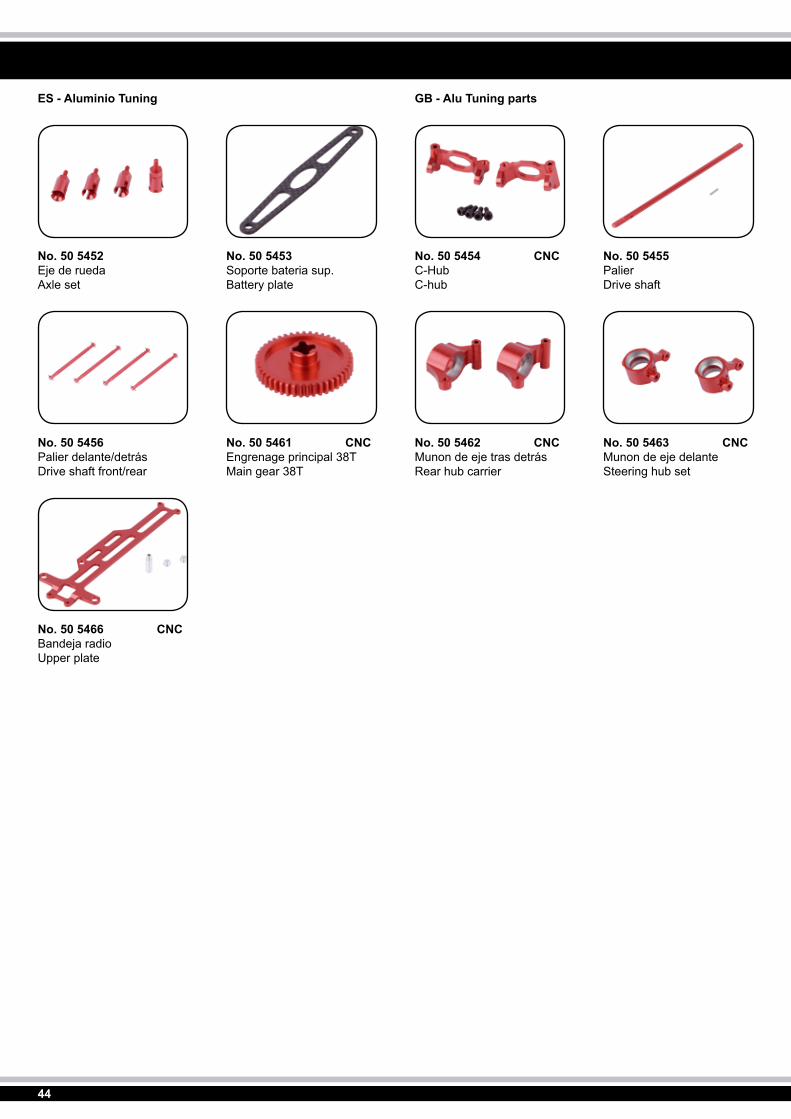
No. 50 5452Eje de ruedaAxle set
No. 50 5456Palier delante/detrásDrive shaft front/rear
No. 50 5466 CNCBandeja radioUpper plate
No. 50 5453 Soporte bateria sup.Battery plate
No. 50 5461 CNCEngrenage principal 38TMain gear 38T
No. 50 5454 CNCC-Hub C-hub
No. 50 5462 CNCMunon de eje tras detrásRear hub carrier
No. 50 5455PalierDrive shaft
No. 50 5463 CNCMunon de eje delanteSteering hub set
ES - Aluminio Tuning GB - Alu Tuning parts

45
No. 50 5465 CNCSop. amortiguador detrásRear shock plate
No. 50 5457Amortiguador delanteFront shock
No. No. 50 5458Amortiguador delante/detrásShock front/rear
No. 50 5458Amortiguador detrásRear shock
No. No. 50 5459 CNCSop. amortiguador delanteFront shock plate
No. 50 5460 CNCSop. amortiguador delanteFront shock plate
No. No. 50 5464 CNCSop. amortiguador detrásRear shock plate
ES - Aluminio Tuning GB - Alu Tuning parts

46

47

All rights reserved.Copyright JAMARA e.K. 2012
Copying or reproduction in whole or part,only with the expressed permission of JAMARA e.K.
JAMARA e.K.Inh. Erich NattererAm Lauerbühl 5 - DE-88317 AichstettenTel. +49 (0) 75 65/94 12-0 - Fax +49 (0) 75 65/94 12-23
[email protected] www.jamara.com
Salvo error o modificación técnicaCopyright JAMARA e. K. 2013Prohibida su reproducción o distribución, porcualquier medio, salvo consentimiento expreso de JAMARA e. K.
Solicite hoy mismo nuestro catálogo principal con to-dos los productos de nuesta gama.
Nombre _______________________________
Apellidos _______________________________
Dirección _______________________________
Población _______________________________
Teléfono _______________________________
E-mail _______________________________
Por favor, envíen mi catálogo al siguiente distribuidor:
Distribuidor
_______________________________________________
_______________________________________________
_______________________________________________
_______________________________________________
Cuando se sirva el próximo pedido de su distribuidor seincluirá el catálogo a su nombre.
Order the current catalogue with our complete assortment of modelling goods today.
Name _______________________________
First name _______________________________
Street _______________________________
City _______________________________
Phone _______________________________
E-mail _______________________________
Please send the catalogue to the following specialist dealer:
Your dealer
_______________________________________________
_______________________________________________
_______________________________________________
_______________________________________________
We will include a catalogue for your attention with the next order placed by your dealer.
Vale Coupon