FREELANCE USER MANUAL
19
Last updated 02-Nov-2020 - 1 - FREELANCE USER MANUAL (UPDATED 11/23/21) ExpertSource Pro is a human capital management system. Lumina created it to mitigate the traditional risks of outsourcing to known and unknown candidates. The software is not freely searchable by anyone other than Lumina or its clients. The easy-to-use online system includes: profiles that highlight your skill set, education, and fields of expertise. historic project ratings that highlight your past performance. a Job Board to help you find projects that fit with your skills, interests, and schedule. invoicing with prompt payment via direct deposit. predictive testing via Writing Sample (optional) that is used to establish key personality scores (e.g., flexibility, cautiousness). This manual includes the following sections: Introduction .................................................................................................................. 2 ExpertSource Pro: Personal Demographic Data ........................................................... 3 ExpertSource Pro Orientation ....................................................................................... 4 Accessing Your Profile ................................................................................................... 5 Freelancer Availability................................................................................................... 7 Understanding the Dashboard...................................................................................... 8 Certification................................................................................................................... 9 Understanding the Rating System .............................................................................. 10
Transcript of FREELANCE USER MANUAL
Last updated 02-Nov-2020
- 1 -
FREELANCE USER MANUAL (UPDATED 11/23/21)
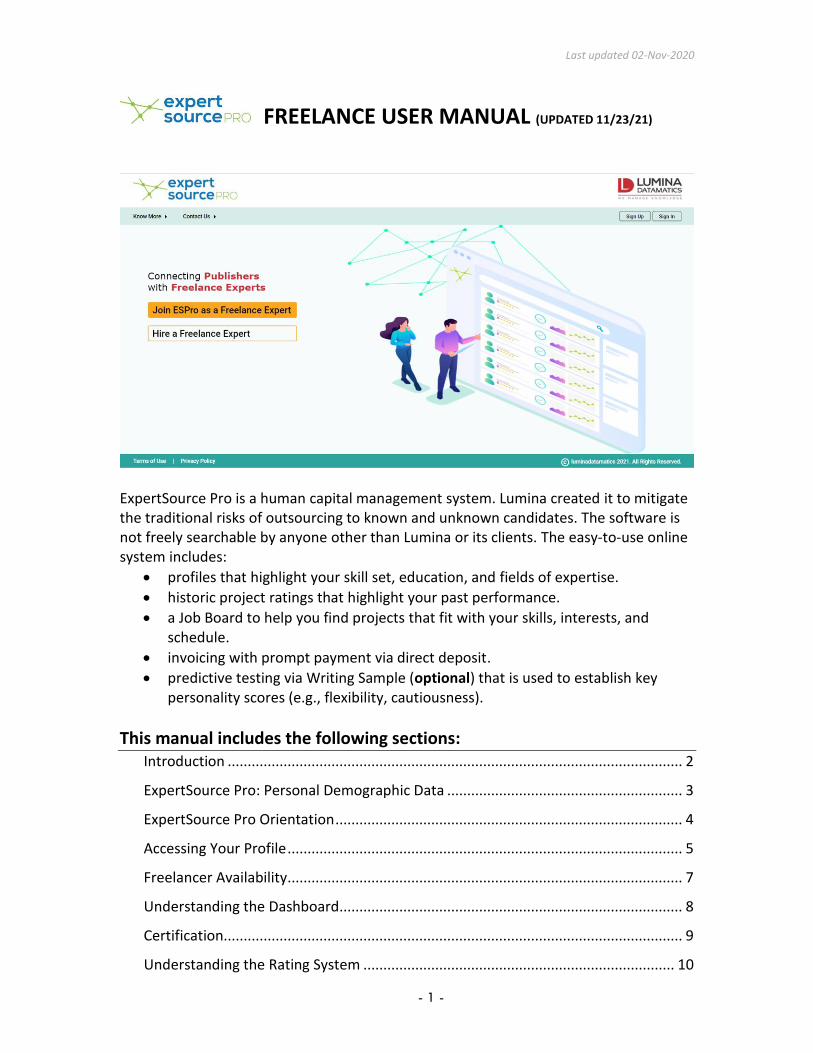
ExpertSource Pro is a human capital management system. Lumina created it to mitigate the traditional risks of outsourcing to known and unknown candidates. The software is not freely searchable by anyone other than Lumina or its clients. The easy-to-use online system includes:
profiles that highlight your skill set, education, and fields of expertise.
historic project ratings that highlight your past performance.
a Job Board to help you find projects that fit with your skills, interests, and schedule.
invoicing with prompt payment via direct deposit.
predictive testing via Writing Sample (optional) that is used to establish key personality scores (e.g., flexibility, cautiousness).
This manual includes the following sections: Introduction .................................................................................................................. 2
ExpertSource Pro: Personal Demographic Data ........................................................... 3
ExpertSource Pro Orientation ....................................................................................... 4
Accessing Your Profile ................................................................................................... 5
Freelancer Availability ................................................................................................... 7
Understanding the Dashboard...................................................................................... 8
Certification................................................................................................................... 9
Understanding the Rating System .............................................................................. 10
Last updated 02-Nov-2020
- 2 -
Assignments & Contracts ............................................................................................ 10
Job Board .................................................................................................................... 11
Invoicing & Payments ................................................................................................. 12
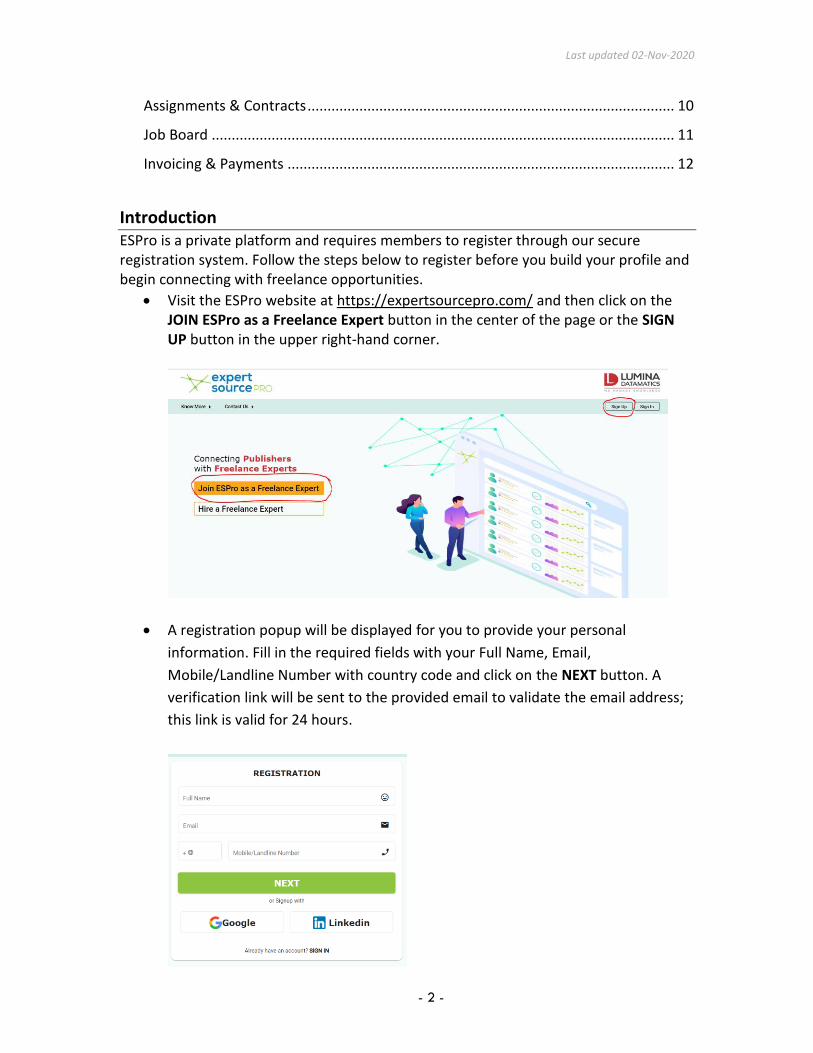
Introduction ESPro is a private platform and requires members to register through our secure registration system. Follow the steps below to register before you build your profile and begin connecting with freelance opportunities.
Visit the ESPro website at https://expertsourcepro.com/ and then click on the JOIN ESPro as a Freelance Expert button in the center of the page or the SIGN UP button in the upper right-hand corner.
A registration popup will be displayed for you to provide your personal
information. Fill in the required fields with your Full Name, Email,
Mobile/Landline Number with country code and click on the NEXT button. A
verification link will be sent to the provided email to validate the email address;
this link is valid for 24 hours.
Last updated 02-Nov-2020
- 3 -
If you prefer to use Open Authentication, you can also register using either
Google OR LinkedIn (email verification is not required).
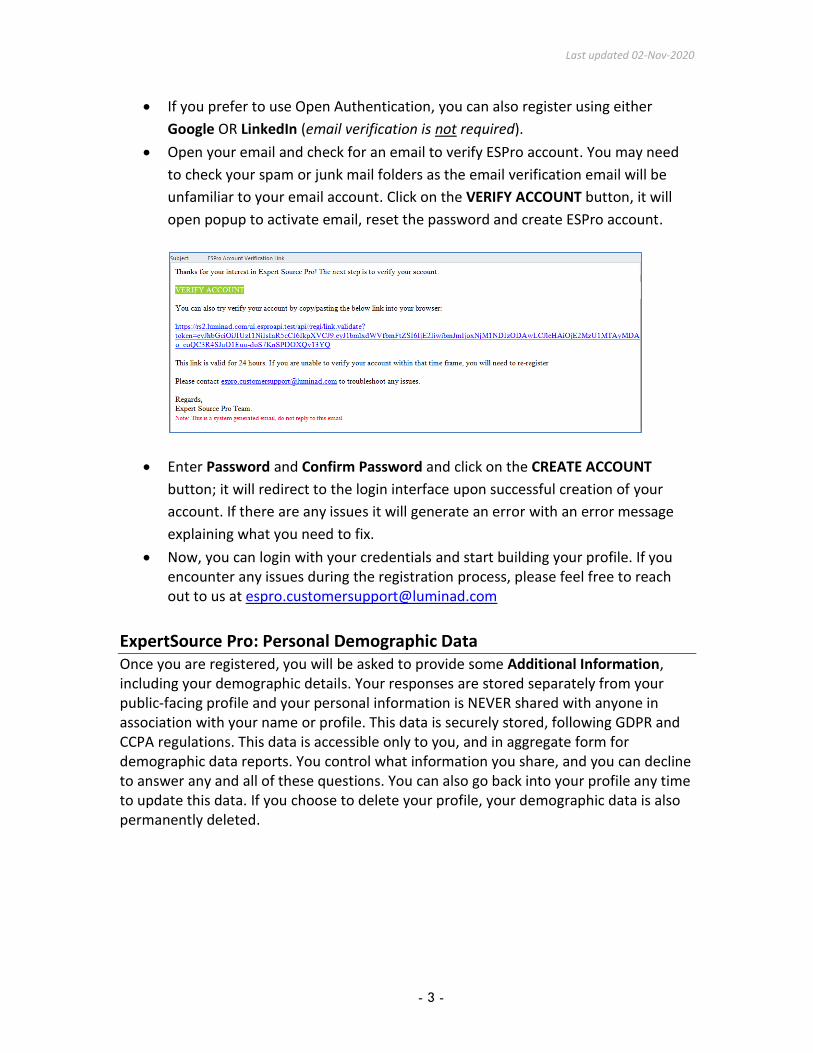
Open your email and check for an email to verify ESPro account. You may need
to check your spam or junk mail folders as the email verification email will be
unfamiliar to your email account. Click on the VERIFY ACCOUNT button, it will
open popup to activate email, reset the password and create ESPro account.
Enter Password and Confirm Password and click on the CREATE ACCOUNT
button; it will redirect to the login interface upon successful creation of your
account. If there are any issues it will generate an error with an error message
explaining what you need to fix.
Now, you can login with your credentials and start building your profile. If you encounter any issues during the registration process, please feel free to reach out to us at [email protected]
ExpertSource Pro: Personal Demographic Data Once you are registered, you will be asked to provide some Additional Information, including your demographic details. Your responses are stored separately from your public-facing profile and your personal information is NEVER shared with anyone in association with your name or profile. This data is securely stored, following GDPR and CCPA regulations. This data is accessible only to you, and in aggregate form for demographic data reports. You control what information you share, and you can decline to answer any and all of these questions. You can also go back into your profile any time to update this data. If you choose to delete your profile, your demographic data is also permanently deleted.

Last updated 02-Nov-2020
- 4 -
Lumina Datamatics collects this data to ensure inclusive and diverse recruiting best practices are followed. From time to time, we may also share aggregate data with clients or other stakeholders regarding the demographic makeup of our freelancer talent pool. Your name or other personal identifying information will NEVER be included with any reports containing demographic data. If you have questions about the Additional Information collected as part of your registration, please contact [email protected] for assistance.
ExpertSource Pro Orientation Let’s get familiar with the platform! The Icons in the left-hand menu indicate the different features found within ExpertSource Pro. The table below indicates what you can do once you click into each of the navigation icons. More information on each of these functions is provided throughout this user guide.
Dashboard: Your personalized list of projects that you have completed. You can take actions such as raising an invoice when a job is complete.
Financials/Invoicing: Details from projects for which you have received payment can be found here, including invoice amount, currency information, and date the invoice was submitted.
Job Board: Open/available freelance jobs are posted here for you to review. You can request more information or notify the hiring manager if you would like to be considered for the project.
Certification: Select skills provide the option to take a certification test. Badges earned indicate you have demonstrated expertise in accordance with Lumina Datamatics standards.
Profile: Your personal page highlighting your skills and areas of expertise. Profiles that get noticed include resumes, sample work, links to social media pages, and thoughtful headlines & personal descriptions.
Rating History: Each project managed in ESPro receives a rating submitted by the project manager. This tab shows the ratings and comments you receive on your completed work. The simple 1-3 rating system is often used

Last updated 02-Nov-2020
- 5 -
by hiring managers when deciding who to contact for a project.
Reports: The drop-down menu shows you reports you can pull about the work you’ve completed through ESPro.
Bank Info: Viewable ONLY to you and the Lumina finance admin, this tab captures your personal bank information, enabling direct deposit payments within 30 days of invoices being submitted and approved. Your information is safe and secure, providing you with reliable compensation for work.
Training & Material: Resources to help you as a freelancer will be provided on this tab when they are released.
Accessing Your Profile Your profile highlights your skills and areas of expertise, along with other key information hiring managers need when they are looking for talent. It is how you get noticed for freelance opportunities. A more complete profile that includes your resume, writing samples, and a brief description of your professional background helps you stand out from other freelancers. Provide as much information as possible when setting up your profile. You can access or revise your profile any time by simply clicking the Profile
icon in the left navigation bar and provide profile OTP, it will be sent on your registered email id.
Resend OTP option is available in case of OTP expired or not received in first time.

Last updated 02-Nov-2020
- 6 -
You can delete your profile at any time by clicking the DELETE PROFILE button.
Within your profile, key details of interest to hiring managers will appear at the top, next to your (optional) photo or avatar. You can edit any of these fields in the sections below. Required fields are clearly marked. While many fields are not required, the more complete your profile is, the more likely you will appear in searches—and receive suitable project offers! Q: Is my address visible to others?
A: No. While we require your mailing address for tax purposes, it is not visible to any users outside of accounts payable.
Q: Is my personal demographic data visible to others? A: No. Your information is secure and never visible to others. We collect this data to ensure inclusive recruiting practices and to understand demographic trends in our freelancer membership. Aggregate data may be provided to clients or stakeholders
TIP
FAQ
Last updated 02-Nov-2020
- 7 -
to understand trends, but no individual’s personal identifying information will ever accompany demographic data reports or analysis.
Q: I’m a freelancer but have an exclusivity contract with an agency. How do I mark that? A: Within your profile, go to Manage Agency. Select the agency you have an agreement with from the dropdown list provided. If the appropriate agency doesn’t exist, please contact [email protected] for assistance.
Q: How do I change my password? A: Click the Settings tab to access a screen that allows you to change your password and authentication settings as desired.
Q: How do I delete my profile? A: Click the DELETE PROFILE button at the bottom of your Profile if you no longer want to participate in ExpertSource Pro. Your data will be deleted and no longer accessible to anyone.
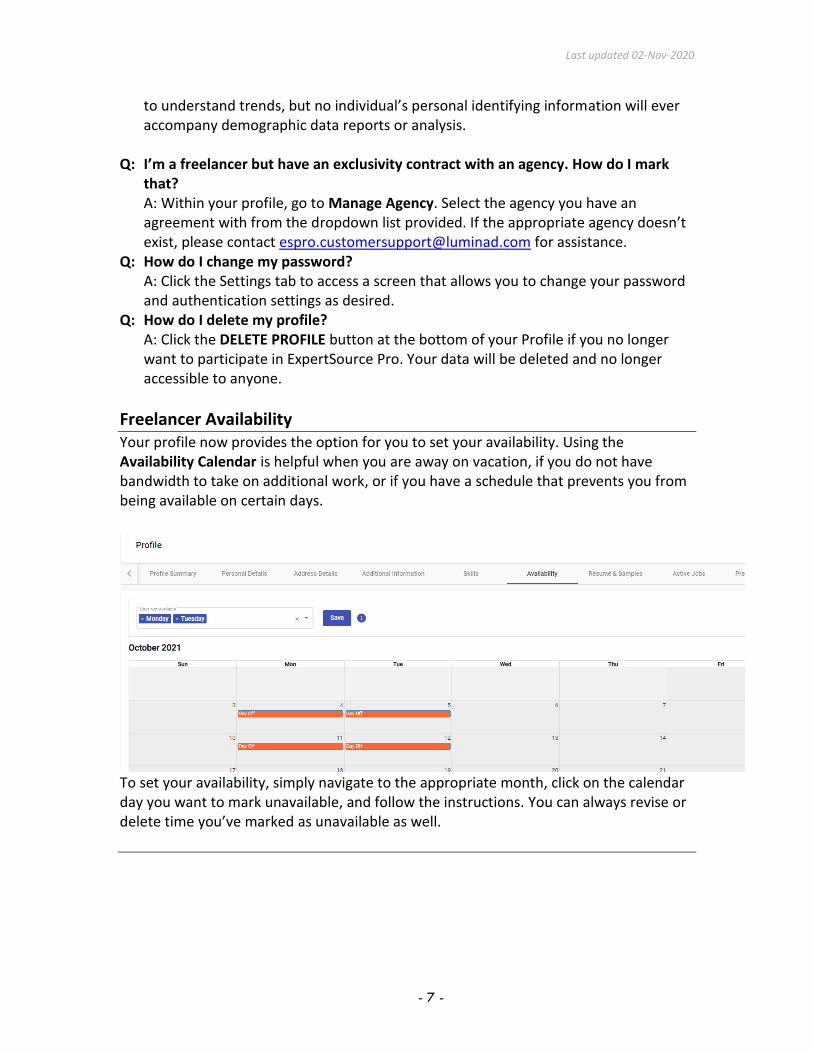
Freelancer Availability Your profile now provides the option for you to set your availability. Using the Availability Calendar is helpful when you are away on vacation, if you do not have bandwidth to take on additional work, or if you have a schedule that prevents you from being available on certain days.
To set your availability, simply navigate to the appropriate month, click on the calendar day you want to mark unavailable, and follow the instructions. You can always revise or delete time you’ve marked as unavailable as well.

Last updated 02-Nov-2020
- 8 -
Using the Availability Calendar gives you control over when you are—and aren’t—open to new projects.
Understanding the Dashboard When you sign in, you’ll see your dashboard—a list of all open projects assigned to you. You can also access this at any time by clicking the dashboard icon in the left navigation bar.
You can customize the columns you see by clicking the DISPLAY COLUMNS button on the top right of the table. Before signing your contract (if applicable) or beginning any live work, be sure to review the project assignment details, including the contracted rate/unit and the contracted currency. If you see any errors, alert your client or project manager so that they can fix it. Doing this early will help avoid any delays in your ability to invoice! Q: What if my project is not on my dashboard?
A: If the project you need to invoice is not showing up on your dashboard, there are two likely culprits:
TIP
FAQ
TIP

Last updated 02-Nov-2020
- 9 -
1) The project has not yet been officially assigned to you. If this is the case, contact the person who hired you, and ask them to make the formal assignment. Once that is done, the project will appear on your dashboard.
2) You’ve previously submitted a final invoice for this project, which removed it from your dashboard. If this is the case, please contact [email protected] for assistance.
Certification When you sign in, you’ll be prompted to complete various tests. These tests are optional, but we strongly encourage you to take them, as having done so will likely improve your chances of being hired (hiring managers may simply consider those profiles with test results to be a “safer bet”). Predictive Testing Predictive testing is done by analyzing a writing sample you submit in your profile. This sample is used to establish key personality scores (e.g., flexibility, cautiousness) that may help us decide which projects are best suited for you. Samples must be at least 3,000 words long (closer to 8,000 preferred). You can insert any professional work you’ve completed (thesis, reports, even email); that is, no need to write something new! The writing samples are not sent to clients as samples of your work, though the graphical analysis will be visible.
Skill- or Task-Based Testing Other optional tests are those on specific skills (e.g., copyediting, assessment writing, etc.). Though not required, we encourage you to complete those relevant to the types
TIP

Last updated 02-Nov-2020
- 10 -
of work for which you’d like to be considered. New tests will be released as they are developed. The Copyediting (beta) test uses Americanized English/spelling.
Understanding the Rating System As you complete each project on behalf of a client, the person for whom you completed the work will have the ability to rate your work on three categories:
Adherence to Schedule
Overall Quality of Work
Communication Within each category, you will be given a ranking of:
1: Poor 2: As Expected/Requested 3: Exceptional/Above Average (scores of 3 will be rare)
Those ratings are combined into an average rating for the project. The rating in your profile is the composite for all rated work to date. Q: How do I access my ratings?
You can access your project ratings at any time by clicking the relevant link in the top right of your profile. The same ratings are included in all three alternate views. To see the guidelines/rubric used, click any of the three RATINGS links, then GUIDELINES.
Q: Are there any additional details on how the ratings are chosen? All client and Lumina users are provided with a rubric to provide the most consistent approach possible. To see the rubric, click any of the three RATINGS links, then GUIDELINES.
Q: Are the ratings only numerical in nature? The PM or other person you completed the work for while also be inserting comments with their numerical rating, but you will not be able to see those comments. They are primarily used for responding to feedback requests.
Q: What if I disagree with a particular project rating? Can I contest it? Yes! You can submit a one-time request for clarification on any project. The request will go to either Lumina or the client who hired you, and they will provide feedback via email. To request feedback, click the REQUEST DETAILS button from any of the ratings views.
Assignments & Contracts When you are assigned a project by an external client of Lumina’s, you will receive email confirmation that the project has been successfully assigned to you within the system.
TIP
FAQ

Last updated 02-Nov-2020
- 11 -
(This should not be the first time you hear of a project—projects should not be assigned to you without the stakeholder having first contacted you outside the system to offer you the project.) If the hiring client has an automated contract set up, you will receive an email prompting you to sign into the system to review and sign your contract. In these cases, you must do so before you can submit your first invoice. To review the contract, sign in, and find the relevant project in your dashboard. Click the DOWNLOAD icon at the right of the row. Use the associated icons to either accept or reject the contract. Upon acceptance the INVOICE button will be enabled.
Q: What happens when I reject a contract?
A pop up will appear. Please provide your reasons for rejection; these will be sent to the client or Lumina user who created the contract, so that they can revise it accordingly.
Q: Should I have a digital contract for every project? No. Some clients require contracts to be created/signed directly within the system. Those contracts are automatically generated at the time of project assignment. If a digital contract is not automatically created, you will likely receive one via email for your project.
Job Board Lumina project managers and recruiters have the option of posting open positions to the Job Board. Here you will find a list of open opportunities, filter, and favorite postings, and reach out directly to the hiring manager via personalized messaging to express interest or ask for more information. This feature puts you in control and is a great way for you to connect with projects that fit your skills and availability.
FAQ
Last updated 02-Nov-2020
- 12 -
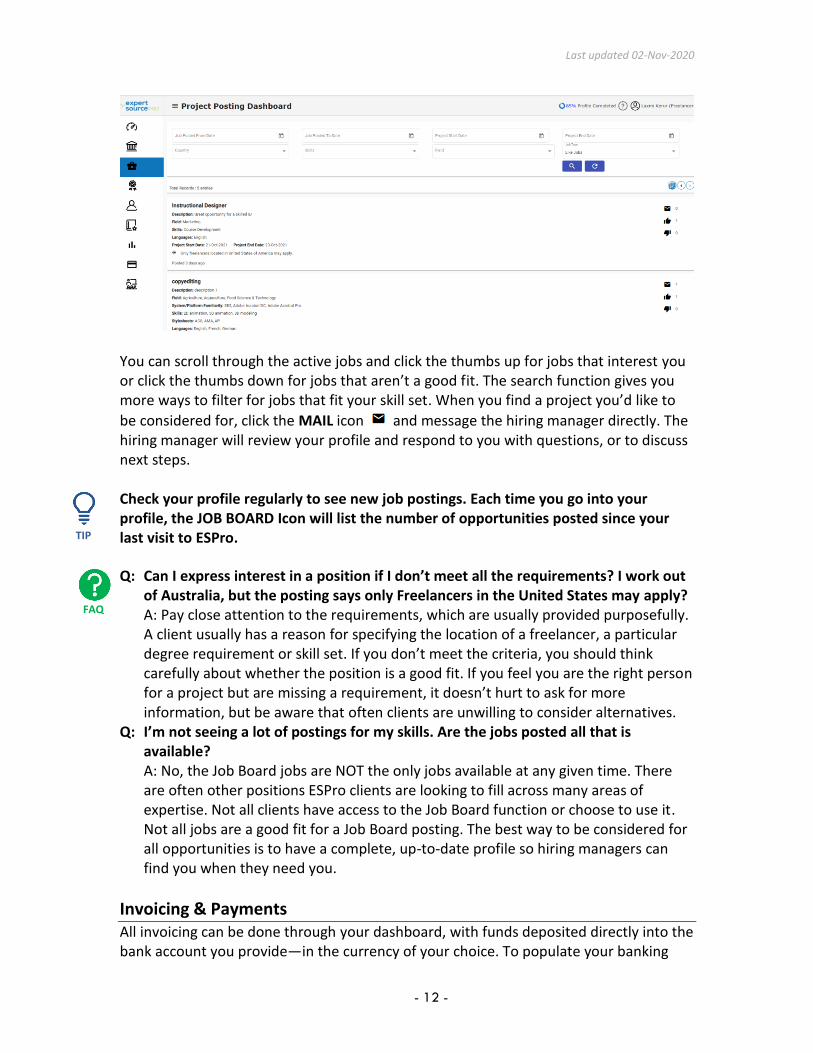
You can scroll through the active jobs and click the thumbs up for jobs that interest you or click the thumbs down for jobs that aren’t a good fit. The search function gives you more ways to filter for jobs that fit your skill set. When you find a project you’d like to
be considered for, click the MAIL icon and message the hiring manager directly. The hiring manager will review your profile and respond to you with questions, or to discuss next steps. Check your profile regularly to see new job postings. Each time you go into your profile, the JOB BOARD Icon will list the number of opportunities posted since your last visit to ESPro. Q: Can I express interest in a position if I don’t meet all the requirements? I work out
of Australia, but the posting says only Freelancers in the United States may apply? A: Pay close attention to the requirements, which are usually provided purposefully. A client usually has a reason for specifying the location of a freelancer, a particular degree requirement or skill set. If you don’t meet the criteria, you should think carefully about whether the position is a good fit. If you feel you are the right person for a project but are missing a requirement, it doesn’t hurt to ask for more information, but be aware that often clients are unwilling to consider alternatives.
Q: I’m not seeing a lot of postings for my skills. Are the jobs posted all that is available? A: No, the Job Board jobs are NOT the only jobs available at any given time. There are often other positions ESPro clients are looking to fill across many areas of expertise. Not all clients have access to the Job Board function or choose to use it. Not all jobs are a good fit for a Job Board posting. The best way to be considered for all opportunities is to have a complete, up-to-date profile so hiring managers can find you when they need you.
Invoicing & Payments All invoicing can be done through your dashboard, with funds deposited directly into the bank account you provide—in the currency of your choice. To populate your banking
TIP
FAQ

Last updated 02-Nov-2020
- 13 -
information, click the BANK INFO icon in the left navigation bar, then fill in all required fields. You can submit partial or final invoices via the dashboard. Simply click the + button to open the project, then check/click the ACTION box that appears at the right of the open record. Next, populate the number of units you are invoicing for, and click the (now enabled) INVOICE button, making sure to select whether the invoice is a partial or final. Remember, you can customize the columns you see by clicking the DISPLAY COLUMNS button on the top right of the table. Please ensure your bank account information and address details are current.
Step-by-Step Invoicing Instructions
Expand (+) Icon for a particular job
Select checkbox under the action column to enable INVOICE button
Now click on INVOICE button, it will open a popup to provide additional
information
Last updated 02-Nov-2020
- 14 -
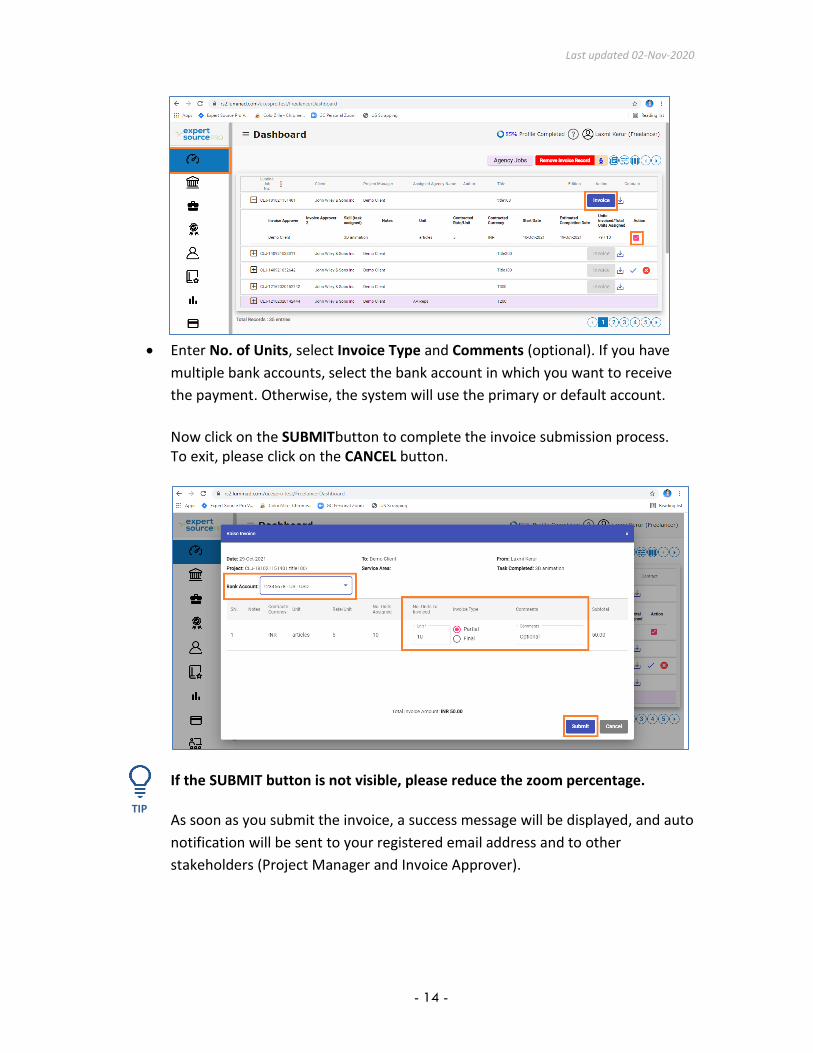
Enter No. of Units, select Invoice Type and Comments (optional). If you have
multiple bank accounts, select the bank account in which you want to receive
the payment. Otherwise, the system will use the primary or default account.
Now click on the SUBMITbutton to complete the invoice submission process. To exit, please click on the CANCEL button.
If the SUBMIT button is not visible, please reduce the zoom percentage.
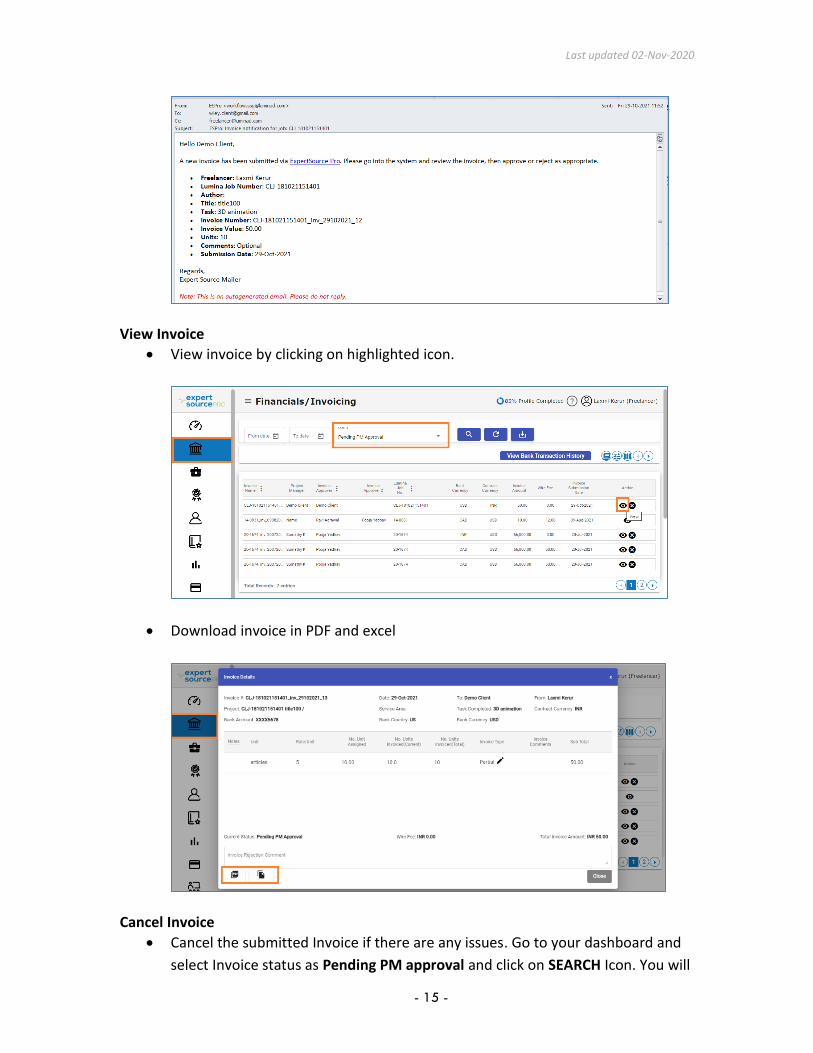
As soon as you submit the invoice, a success message will be displayed, and auto
notification will be sent to your registered email address and to other
stakeholders (Project Manager and Invoice Approver).
TIP
Last updated 02-Nov-2020
- 15 -
View Invoice
View invoice by clicking on highlighted icon.
Download invoice in PDF and excel
Cancel Invoice
Cancel the submitted Invoice if there are any issues. Go to your dashboard and
select Invoice status as Pending PM approval and click on SEARCH Icon. You will

Last updated 02-Nov-2020
- 16 -
see all the submitted invoices. Select the invoice you want to cancel by clicking
on the highlighted icon.
Provide the reason you want to cancel this invoice and hit the CANCEL button.
The invoice will be canceled, and a notification email will be sent to the
respective stakeholders.
Last updated 02-Nov-2020
- 17 -
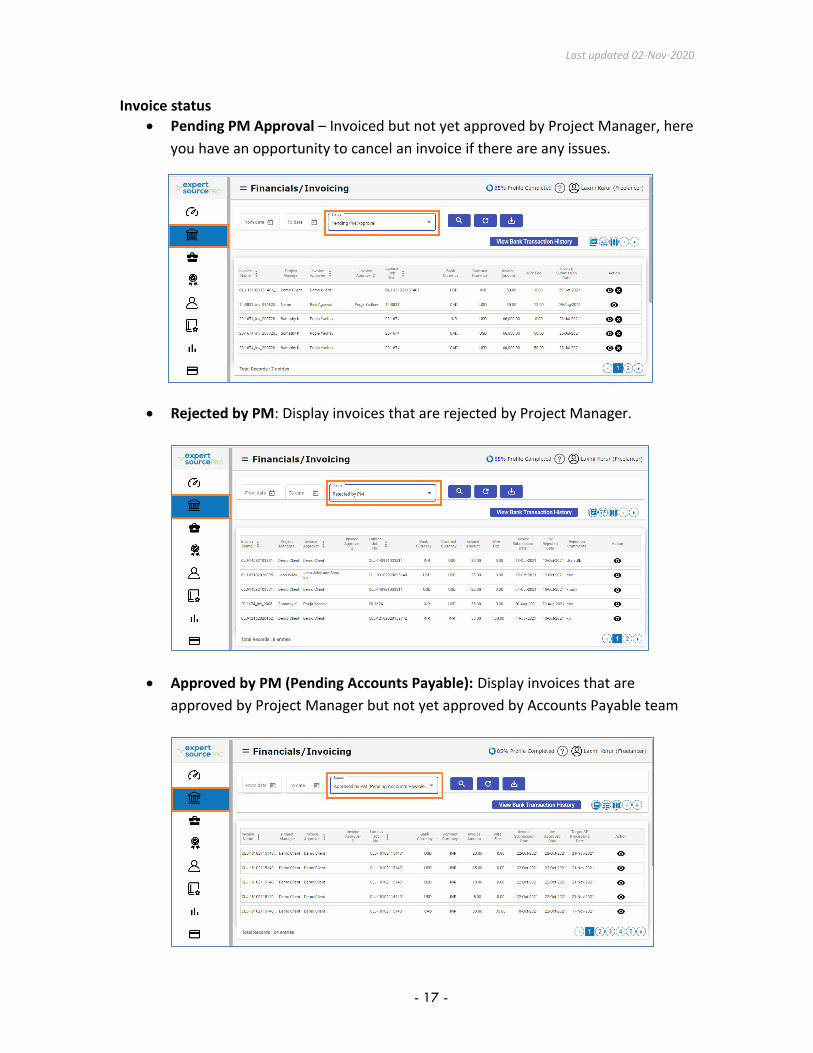
Invoice status
Pending PM Approval – Invoiced but not yet approved by Project Manager, here
you have an opportunity to cancel an invoice if there are any issues.
Rejected by PM: Display invoices that are rejected by Project Manager.
Approved by PM (Pending Accounts Payable): Display invoices that are
approved by Project Manager but not yet approved by Accounts Payable team

Last updated 02-Nov-2020
- 18 -
Approved by Accounts Payable: All invoices that are approved by Account
payable team
Rejected by Accounts Payable: View invoices rejected by the Accounts Payable
team
Bank Account Information – To access this OTP is required.
Provide bank account details for direct deposit to your bank account

Last updated 02-Nov-2020
- 19 -
You can add multiple bank accounts by clicking on the ADD NEW ACCOUNT
button. If you want to delete or update an existing account, please click on the
respective icon.
Carefully review the invoice before submitting it for approval. If the rate per unit or currency is incorrect, your invoice will be rejected. Should you find an error of this sort, please alert your client contact or project manager and ask them to review and make the necessary revision so that you can accurately invoice. Q: How long does it take for payment to arrive?
A: That depends on your contract terms (typically within 30 days) after the invoice is approved.
Q: What should I do if my payment is late? Or some other issue occurs? A: Contact Lumina’s accounts payable team ([email protected]). Please be sure to provide details (project name or job number, title, task/skill, etc.) in your message.
Q: What if I don’t want to be paid via direct deposit? A: Unfortunately, all work must be paid electronically via direct deposit.
Q: What do I do if I accidentally chose the wrong invoice type? A: When you submit an invoice type and click FINAL; the invoice record is removed from your dashboard. If you submit as final in error, you can change your invoice to be a partial by accessing the Invoice Details and clicking the Edit (pencil) icon under Invoice Type.
If your invoice is rejected, you will receive an email with comments explaining why the invoice was rejected. Please resubmit your invoice, accordingly, being sure to reach out to your PM directly as needed.
FAQ
TIP