Free Pattern Instructions Fabric Strips ... - Nancy's Notions · FORM871DL ©2018 Nancy's...
3
Free Pattern Instructions Fabric Strips Oval Basket FORM871DL ©2018 Nancy's Notions®; nancysnotions.com Create a textured basket that mimics rope pottery. Begin with 2½" wide strips of fabric and cotton batting; add thread and stitch. The finished basket is perfect for containing crafts, fruit, or gifts. We’re certain you’ll want to make more than one! Approximate Finished Size: 8" D x 14" W x 4" H Supplies Needed: • One precut fabric strip pack Or, • Ten 2½" wide crosswise strips from a variety of cotton fabrics • One roll 2½" Cotton Batting On-a-Roll • Coordinating all-purpose thread • Optional: Decorative button or pin • Optional: Decorative threads or yarn Helpful Notions: • Wonder Clips • Denim or Jeans Needles, size 100/16 • Walking Foot • Thermal Thimbles • Optional: Spray Starch or starch alternative, such as Best Press™ Starch Alternative • Optional: Rotary cutter, ruler, and mat • Optional: Jumbo Wonder Clips Instructions: Read all instructions before beginning project. 1. Prepare fabric strips: • Option 1: - Select 10 precut fabric strips. Cut one of the strips in half, for two 2½" x 21" pieces. Set one half aside to use in another project. - Press fabric strips flat. Optional: Use spray starch to help relax stubborn or difficult folds. • Option 2: - Press fabrics flat. Optional: Use spray starch to help relax stubborn or difficult wrinkles and folds. Note: Strips should be cut crosswise. Fold fabric in half meeting selvage edges; then fold again, meeting fold to selvage. - Cut a total of ten 2½" wide strips from a variety of cotton fabrics. Cut one of the strips in half, for two 2½" x 21" pieces. Set one half aside to use in another project. • Join short ends of strips, right sides together, using diago- nal seams to reduce bulk. Use a 2.0—2.5 stitch length. • Trim seams to ¼"; press open. 2. Create fabric “rope”: • Place the half-strip end of long pieced fabric strip, wrong side up, on a pressing surface. • Position batting end ¼" in from fabric end and long edges aligned. • Fold in approximately ½" of batting/fabric layers along both long edges and press. Use thermal thimbles to protect your fingers as you press a section at a time. Meet selvage edges Wrong side Wrong side Batting Position end 1/4" from fabric edge Fold in 1/2" Fold in 1/2" Right side Fold again Fold
Transcript of Free Pattern Instructions Fabric Strips ... - Nancy's Notions · FORM871DL ©2018 Nancy's...
Free Pattern Instructions
Fabric Strips Oval Basket
FORM871DL ©2018 Nancy's Notions®; nancysnotions.com
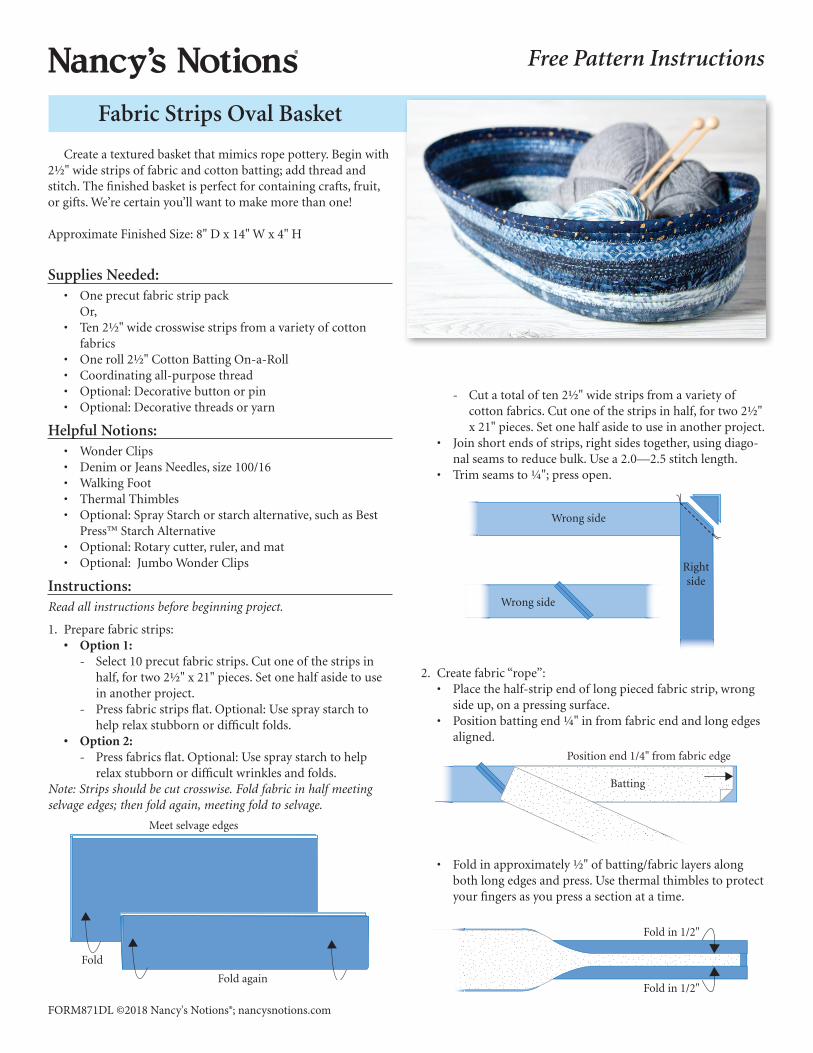
Create a textured basket that mimics rope pottery. Begin with 2½" wide strips of fabric and cotton batting; add thread and stitch. The finished basket is perfect for containing crafts, fruit, or gifts. We’re certain you’ll want to make more than one!
Approximate Finished Size: 8" D x 14" W x 4" H
Supplies Needed:• One precut fabric strip pack Or,• Ten 2½" wide crosswise strips from a variety of cotton
fabrics• One roll 2½" Cotton Batting On-a-Roll• Coordinating all-purpose thread• Optional: Decorative button or pin• Optional: Decorative threads or yarn
Helpful Notions:• Wonder Clips• Denim or Jeans Needles, size 100/16• Walking Foot• Thermal Thimbles• Optional: Spray Starch or starch alternative, such as Best
Press™ Starch Alternative• Optional: Rotary cutter, ruler, and mat• Optional: Jumbo Wonder Clips
Instructions:Read all instructions before beginning project.
1. Prepare fabric strips:• Option 1:
- Select 10 precut fabric strips. Cut one of the strips in half, for two 2½" x 21" pieces. Set one half aside to use in another project.
- Press fabric strips flat. Optional: Use spray starch to help relax stubborn or difficult folds.
• Option 2: - Press fabrics flat. Optional: Use spray starch to help
relax stubborn or difficult wrinkles and folds.Note: Strips should be cut crosswise. Fold fabric in half meeting selvage edges; then fold again, meeting fold to selvage.
- Cut a total of ten 2½" wide strips from a variety of cotton fabrics. Cut one of the strips in half, for two 2½" x 21" pieces. Set one half aside to use in another project.
• Join short ends of strips, right sides together, using diago-nal seams to reduce bulk. Use a 2.0—2.5 stitch length.
• Trim seams to ¼"; press open.
2. Create fabric “rope”:• Place the half-strip end of long pieced fabric strip, wrong
side up, on a pressing surface.• Position batting end ¼" in from fabric end and long edges
aligned.
• Fold in approximately ½" of batting/fabric layers along both long edges and press. Use thermal thimbles to protect your fingers as you press a section at a time.
Meet selvage edges
Wrong side
Wrong side
Batting
Position end 1/4" from fabric edge
Fold in 1/2"
Fold in 1/2"
Right side
Fold again
Fold

FORM871DL ©2018 Nancy's Notions®; nancysnotions.com
• Fold the pressed layers together, meeting the long folded edges. Clip together with Wonder Clips.
• Set up sewing machine:- Replace presser foot with Walking Foot.- Insert a new Denim or Jeans needle.- Wind at least two bobbins with selected thread.- Select a straight stitch with a 3.0 or 3.5 length.Or,- Select a zigzag stitch with a 0.5—1.0 width and 3.0—3.5
length.• Stitch folded layers into fabric “rope”:
- Stitch at the approximate center of the folded layers.- Optional: Stitch approximately ¼" away from the dou-
ble folds or, edgestitch next to the double folds. Both of these options will give a slightly different look to the finished basket, making each project unique.
- Remove clips as you sew.- Cut any thread tails close to fabric.
• Cut batting approximately ¼"–½" shorter than fabric strip before you stitch to the end of rope.
3. Stitch oval basket:• Set zigzag stitch to a 3.0—4.0 length and
5.0—6.5 width.• At the half-strip end, hold the rope with
double fold on the left-hand side.• Fold under 8½" end to the left of the fab-
ric rope in your hand. Optional: Jumbo Wonder Clip fold to hold rope end aligned with working rope. The double fold will nest slightly with the single fold next to it.
Note: The 8½" length will be the “center or start-ing rib” of the base. The remaining length is the “working rope”.
• Zigzag stitch into part of the overlap at the end fold. Keeping single and double fold aligned, zigzag to within 1" of the center rib of the bas-ket base. Center the stitching over the aligned edges.
• Ease working “rope” around the end of the cen-ter rib. The inner double fold edge should have small ripples or gathers, while the outer single fold should lay smooth and flat on the sewing machine bed.
• Tuck the rib end into the rippled double fold. Zigzag a few stitches, then pivot to keep edges centered under walking foot as you stitch, cre-ating a curved end.
• Zigzag along the straight edge of the rib and working rope. This will be the only section where two double fold edges are stitched together.
• Ease/gather the working rope around the second curved end, then keep edges even and aligned for straight edges.
• If thread changes are needed, simply zigzag back and for-ward for a few stitches.
• Begin forming basket walls or sides after 5 rows are stitched on both sides of center rib:- Optional: Place a Wonder Clip at the point where you
wish to begin the wall.
- At both curved ends gently pull the working rope while stitching to prevent the basket base from growing. Tilting the base will help.
- Stitch straight sides by keeping rope even with the adjacent rope edge.
Fold
8-1/
2"
Stitch at center
Stitch 1/4" from edge Edgestitch
2

3FORM871DL ©2018 Nancy's Notions®; nancysnotions.com
- Continue to pull or stretch the working rope when you are stitching around the curved ends. The amount you pull determines how flared or straight the basket walls will be. You are the creator!
• Stitch until about 2"–3" of working rope remain.• Bring rope tail gradually into basket interior, stitching it in
place. Zigzag over cut end to secure.
• Optional: Flip basket (it’s completely reversible!) so stitched end is on the outside. Embellish with a button and decorative threads or yarns.