FRANKE MINERVA 3-IN-1 HOT WATER TAP
12
FRANKE MINERVA 3-IN-1 HOT WATER TAP HEATING TANK INSTALLATION GUIDE
Transcript of FRANKE MINERVA 3-IN-1 HOT WATER TAP
FRANKE MINERVA 3-IN-1 HOT WATER TAPHEATING TANK INSTALLATION GUIDE

2 3
Introduction
Thank you for purchasing this Franke product, which has been designed and manufactured to the highest quality standards. This product must be installed and commissioned by a qualified professional.
Read this installation guide carefully and plan the layout of the installation carefully before proceeding as failure to install and maintain this unit in strict accordance with these instructions will render your product warranty invalid. The manufacturer will not accept liability for damage or accidents resulting from incorrect installation or operation.
Package Contents
1 Franke Heating Tank Unit2 15mm Copper Pipe (optional)3 T-coupling4 Pressure Relief Valve and Tundish5 Data Plate (fixed to Heating Tank)6 Plastic Discharge T piece7 Flexible Plastic Hose8 Sealing Ring9 x2 Compression Reducing Rings 15-10mm10 Water Filter Assembly (supplied in separate box)
101
4
7
2
5
8 9
3
6
07.9
4.12
.389
07.94.12.293
DATA PLATE

2 3
Application
This product is a boiling water device intended for domestic use only. Important note: The heating tank is suitable for water at a supply pressure between Minimum 1.5 BAR (23psi) and Maximum 4 BAR (58psi).
A suitable pressure reducing valve can be purchased from any plumbers merchant.
Safety
This product must be installed by a qualified installer in strict accordance with the instructions and comply with local Water Supply Regulations and safety standards.
Children, or users with a physical or mental disability, should not use this tap unless they have received sufficient instructions about its operation from a person responsible for their safety. Children must never be allowed to play with the appliance.
The Minerva is a built-in domestic electrical appliance. The boiler is fitted with an electrical lead terminating with a 3 pin fused plug for plugging into the 13amp domestic electricity supply. It is important to use a conveniently located socket with a built-in switch that can be easily accessed to switch off and isolate the boiler at any time.
The heater must only be connected to the 230V mains electricity supply through either an earthed independent wall socket in the ring main or via a fused spur.
The maximum consumptive power of the unit is 1500 watts.
Always shut off the mains water stopcock before installation.
Never lift the heater tank by the flexible connector hoses.
The power must only be connected POST installation and once the tank has been completely filled with water and vented.
Always disconnect the power to your heater before you close the mains stopcock. Restore power to the heater after the mains stopcock has been opened.
Filter maintenance
The water filter supplied with this unit is designed to keep the heater tank free of limescale, to protect the tank from aggressive soft water and to prevent taste problems associated with chlorine.
Important note: The filter cartridge must be changed every 6 months to maintain its efficiency. Neglecting to change the cartridge at regular intervals may invalidate your warranty. Please refer to the separate filter maintenance guide for information relating to the filter unit and instructions for replacing the filter cartridge.
Important information relating to the plastic housing
Plastic is susceptible to UV light degradation and may become brittle over time. As a precaution the filter housing should be replaced every 10 years.
Do not under any circumstances allow the housing to come into contact with solvents, household cleaners and sprays or a naked flame.
Sensible precautions
If you are planning to leave the premises for an extended period (eg. on holiday) it is a sensible precaution to turn off both the electricity supply to the boiler and the water supply to the filter.
Installation sequence
Before you begin installation.
Important note: Check the mains water pressure. It must not be below 1.5 BAR (measured during a high demand period), or above 4 BAR (measured during a low demand period). If the pressure exceeds 4 BAR a pressure reducing device must be fitted.
Take into account the space required for the Inlet Pressure Relief Valve and Tundish, Waste T-piece and the Filter Set, making sure there is convenient access for routine filter cartridge changes and servicing the tank.
The unit must be installed in a frost free environment.
Ensure there is sufficient ventilation for the tank to avoid overheating. If you feel that the ventilation is inadequate, drill some holes in a suitable position at the top and bottom of the cupboard panels. Normally lack of ventilation is less of an issue when the tank is installed behind the plinth (kick-space).
Identify and mark the hot and cold water pipes.
Mark this on the tap inlet and on the water pipe.
Shut off the mains water supply.
Switch off the mains electrical supply.
BOILING WATER TANK
Article number 119.0395.298
Voltage 230 V
Power 1500 W
Content 4.7 I
Load 7 A
Working pressure [max.] 400 kPa
Working pressure [min.] 150 kPa
Dimensions [ L x W x H ] 522 x 200 x 145 mm
Heating-up time (∆T-100k) 23 minutes
Energy consumption when non-operational 25 W
Storage temperature 108oC OC

4 5
4 Connect the Waste T-piece (6) to the Inlet Pressure Relief Valve and Tundish (4) using the Flexible Plastic Hose (7). The Tundish has a water trap in order to prevent odours from escaping from the waste pipe.
3 Turn the stop valve (the small knob) on the Inlet Pressure Relief Valve to ‘OFF’ to turn on the mains water supply and check the assembly for leaks, and rectify as necessary. Once this check has been carried out, turn off the mains water supply again. The expansion discharge of the Inlet Pressure Relief Valve and the Tundish must always point downwards and remain unobstructed.
1 Install the 15mm stop valve included in the Water Filter Assembly (10). Determine the position to fit the 15mm Compression Tee (3) in the mains water pipework. Determine where the Waste T-piece (6) will be connected to the sink plastic waste pipe. Important note: There must be a minimum drop of 500mm between the bottom of the Tundish and the inlet of the waste connector. If a waste disposal unit is installed, the waste water from the Tundish must be piped to discharge directly into the soil stack, rather than the sink waste.
Install the 15mm Compression Tee (3) and the Waste Saddle Connection (6).
2 Install the Filter Housing (10) to the 15mm Compression Tee (3) Connect the Inlet Pressure Relief Valve (4) to the outlet of the filter. (Note there is an arrow in the top of the filter head indicating the direction of flow). Secure the filter unit securely using the bracket and screws provided. Important note: If the bracket is not employed the weight of the filter unit when full of water will put undue strain on the pipework. The distance between the Pressure Relief Valve inlet and the boiling water heater must never exceed 1.5 metres.
4
3
6
Cold mains water
feed to supply tap and
filter
Filtered water to heater tank only
4
10
4 5
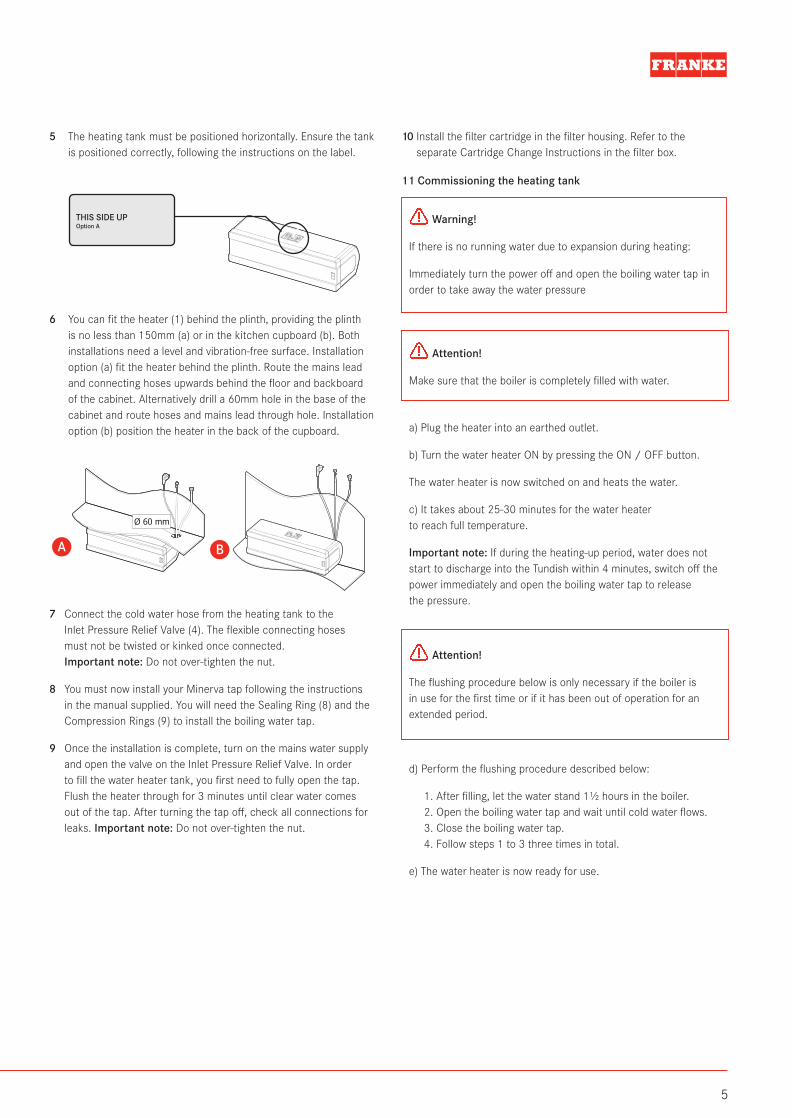
5 The heating tank must be positioned horizontally. Ensure the tank is positioned correctly, following the instructions on the label.
7 Connect the cold water hose from the heating tank to the Inlet Pressure Relief Valve (4). The flexible connecting hoses must not be twisted or kinked once connected. Important note: Do not over-tighten the nut.
8 You must now install your Minerva tap following the instructions in the manual supplied. You will need the Sealing Ring (8) and the Compression Rings (9) to install the boiling water tap.
9 Once the installation is complete, turn on the mains water supply and open the valve on the Inlet Pressure Relief Valve. In order to fill the water heater tank, you first need to fully open the tap. Flush the heater through for 3 minutes until clear water comes out of the tap. After turning the tap off, check all connections for leaks. Important note: Do not over-tighten the nut.
10 Install the filter cartridge in the filter housing. Refer to the separate Cartridge Change Instructions in the filter box.
6 You can fit the heater (1) behind the plinth, providing the plinth is no less than 150mm (a) or in the kitchen cupboard (b). Both installations need a level and vibration-free surface. Installation option (a) fit the heater behind the plinth. Route the mains lead and connecting hoses upwards behind the floor and backboard of the cabinet. Alternatively drill a 60mm hole in the base of the cabinet and route hoses and mains lead through hole. Installation option (b) position the heater in the back of the cupboard.
Ø 60 mm
A B
THIS SIDE UPOption A
11 Commissioning the heating tank
Warning!
If there is no running water due to expansion during heating:
Immediately turn the power off and open the boiling water tap in order to take away the water pressure
Attention!
Make sure that the boiler is completely filled with water.
a) Plug the heater into an earthed outlet.
b) Turn the water heater ON by pressing the ON / OFF button.
The water heater is now switched on and heats the water.
c) It takes about 25-30 minutes for the water heater to reach full temperature.
Important note: If during the heating-up period, water does not start to discharge into the Tundish within 4 minutes, switch off the power immediately and open the boiling water tap to release the pressure.
Attention!
The flushing procedure below is only necessary if the boiler is in use for the first time or if it has been out of operation for an extended period.
d) Perform the flushing procedure described below:
1. After filling, let the water stand 1½ hours in the boiler.2. Open the boiling water tap and wait until cold water flows.3. Close the boiling water tap.4. Follow steps 1 to 3 three times in total.
e) The water heater is now ready for use.

6 7
Shutting down
If you plan not to make use of the boiler for a long time, for example, due to holidays, you can disable it temporarily.
a) Turn the water heater off using the ON / OFF button.
b) Remove the plug from the socket to avoid accidental activation.
DrainDisconnect the electricity supply to the tank. Operate the boiling water function until only cold water flows from the spout. Shut off the water supply to the tank at the main stopcock or use the stop valve on the Pressure Relief Valve. Operate the boiling water function again to release the pressure in the heating tank. Turn it off once the water stops flowing. Disconnect the pipes from the heating tank. Remove the tank carefully and pour out the water it contains.
ON/OFF
12 Affix the supplied data plate close to the unit or on this manual. This will provide easy access to ascertain the model and serial number of the unit even if you decide to place the unit behind the plinth of the cupboard.
13 You have successfully completed the installation of your Franke Heating Tank.
14 Finally, please demonstrate to the homeowner the procedure for replacing the water filter cartridge.
Resetting the thermal cut-outThe tank is fitted with a safety device that will shut-off the boiling water if the tank is switched on without water, or there is a power surge. The hot water can be restored by operating a reset button on the front of the tank.
Disconnect the tank’s electrical power supply. Operate the boiling water handle on the tap to check that the tank is full of water. Switch on the power supply, press the on/off button and allow 25 minutes for the tank to reheat before use. Attention!
Do not lift the water heater by the flexible hose or power cord.

6 7
Order of installationInstall in order from 1 to 5.
Cold water supply
Warm water supply
Drain pipe
Socket
Plumbing kit
Boiling water tap
Inlet combination
Drain connection
Water filler
Heating tank
DE
C
AB
54
23
1
DE
CAB
5 4
2
3
1
8 9
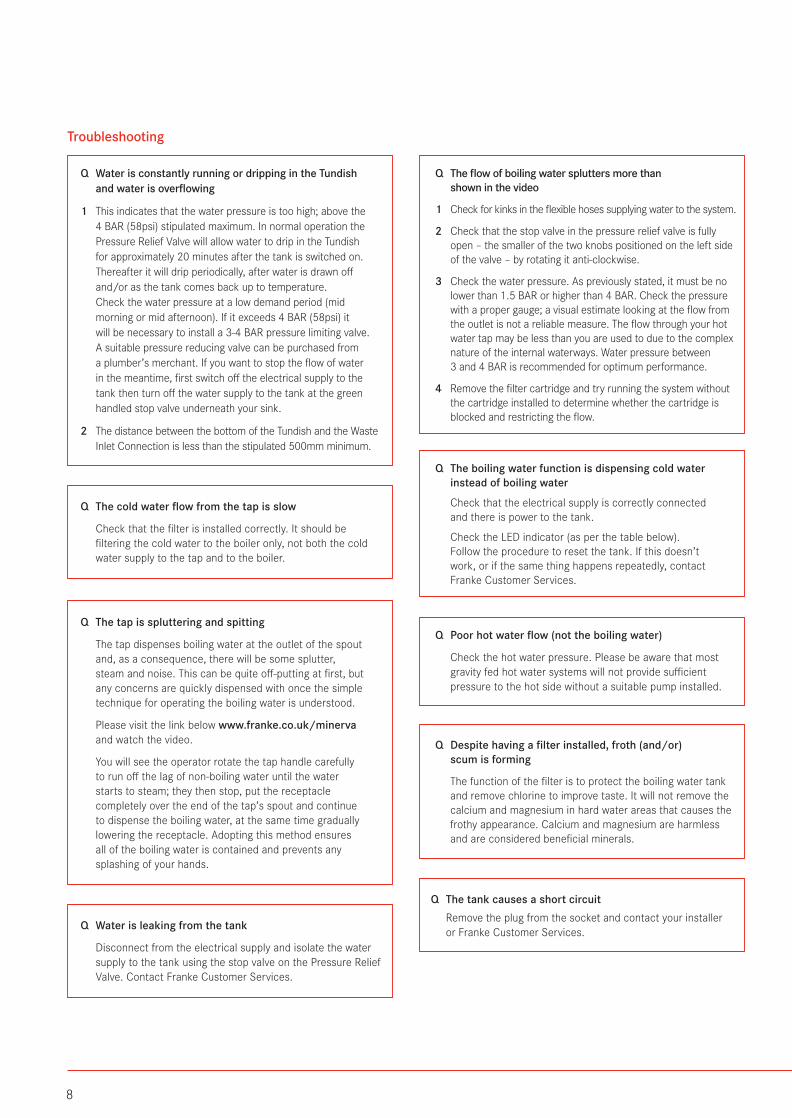
Troubleshooting
Q Water is constantly running or dripping in the Tundish and water is overflowing
1 This indicates that the water pressure is too high; above the 4 BAR (58psi) stipulated maximum. In normal operation the Pressure Relief Valve will allow water to drip in the Tundish for approximately 20 minutes after the tank is switched on. Thereafter it will drip periodically, after water is drawn off and/or as the tank comes back up to temperature. Check the water pressure at a low demand period (mid morning or mid afternoon). If it exceeds 4 BAR (58psi) it will be necessary to install a 3-4 BAR pressure limiting valve. A suitable pressure reducing valve can be purchased from a plumber’s merchant. If you want to stop the flow of water in the meantime, first switch off the electrical supply to the tank then turn off the water supply to the tank at the green handled stop valve underneath your sink.
2 The distance between the bottom of the Tundish and the Waste Inlet Connection is less than the stipulated 500mm minimum.
Q The flow of boiling water splutters more than shown in the video
1 Check for kinks in the flexible hoses supplying water to the system.
2 Check that the stop valve in the pressure relief valve is fully open – the smaller of the two knobs positioned on the left side of the valve – by rotating it anti-clockwise.
3 Check the water pressure. As previously stated, it must be no lower than 1.5 BAR or higher than 4 BAR. Check the pressure with a proper gauge; a visual estimate looking at the flow from the outlet is not a reliable measure. The flow through your hot water tap may be less than you are used to due to the complex nature of the internal waterways. Water pressure between 3 and 4 BAR is recommended for optimum performance.
4 Remove the filter cartridge and try running the system without the cartridge installed to determine whether the cartridge is blocked and restricting the flow.
Q The cold water flow from the tap is slow
Check that the filter is installed correctly. It should be filtering the cold water to the boiler only, not both the cold water supply to the tap and to the boiler.
Q Water is leaking from the tank
Disconnect from the electrical supply and isolate the water supply to the tank using the stop valve on the Pressure Relief Valve. Contact Franke Customer Services.
Q The tank causes a short circuit Remove the plug from the socket and contact your installer
or Franke Customer Services.
Q The boiling water function is dispensing cold water instead of boiling water
Check that the electrical supply is correctly connected and there is power to the tank.
Check the LED indicator (as per the table below). Follow the procedure to reset the tank. If this doesn’t work, or if the same thing happens repeatedly, contact Franke Customer Services.
Q Poor hot water flow (not the boiling water)
Check the hot water pressure. Please be aware that most gravity fed hot water systems will not provide sufficient pressure to the hot side without a suitable pump installed.
Q Despite having a filter installed, froth (and/or) scum is forming
The function of the filter is to protect the boiling water tank and remove chlorine to improve taste. It will not remove the calcium and magnesium in hard water areas that causes the frothy appearance. Calcium and magnesium are harmless and are considered beneficial minerals.
Q The tap is spluttering and spitting
The tap dispenses boiling water at the outlet of the spout and, as a consequence, there will be some splutter, steam and noise. This can be quite off-putting at first, but any concerns are quickly dispensed with once the simple technique for operating the boiling water is understood.
Please visit the link below www.franke.co.uk/minerva and watch the video.
You will see the operator rotate the tap handle carefully to run off the lag of non-boiling water until the water starts to steam; they then stop, put the receptacle completely over the end of the tap’s spout and continue to dispense the boiling water, at the same time gradually lowering the receptacle. Adopting this method ensures all of the boiling water is contained and prevents any splashing of your hands.

8 9
Boiler LED indicator guide
If a fault occurs in the system, check the LED lighting on the ON / OFF button. In the table below you will find the meaning of these LED indications.
LED color LED Description Action Action
Red 1 second on / 1 second off Hardware error
Red / White 1 second red / 1 second white Hardware failure - sensor is defective
Red / Yellow 1 second red / 1 second yellow Dry operation - There is no water in boiler
Red / Orange 1 second red / 1 second orange Circuit breaker tripped - Boiler is hot (*)
* Turn off the power to the tank and contact your installer or Franke Customer Services.
Re-setting the message on the boiler
If the heater shows a fault, you can reset.
a) Hold the ON/OFF button for 5 seconds. The message will reset and switches the boiler OFF.
b) Now switch ON the boiler again.
If the boiler gives the same error message again after a reset, turn it off and contact your installer or Franke Customer Services.
Troubleshooting
If you are unable to remedy a failure or malfunction, please contact your installer or Franke Customer Services. Switch off the boiling water unit by unplugging it from the wall socket and shut off the water supply.

10 11
Eco-Mode
When the heater is turned on, the water is automatically maintained at 100°C, so that at any time of the day boiling water is available.
However, there will also be times when you are not using boiling water, such as during the night.
In order to prevent the water heating unnecessarily at certain times you can use the energy-saving ECO mode.
ECO mode occurs every day at the same time when in operation. The duration of the ECO mode is 6 hours and the LED indicator during this time is green.
Enabling ECO mode
You can only turn the ECO mode on when the device is ON. The ECO mode is enabled by pressing the ON / OFF button for 4 seconds. Once the LED is green, you have a 6 hour period and the start time (*) remains the same as long as ECO mode is enabled.
*You will need to reset the start time when the clocks go forward or back.
ECO mode off
You can turn off the ECO mode by pressing the ON / OFF button for 4 seconds until the LED lights up blue, orange or red.
This operation deletes the specified start time. Then you can re-enable ECO mode at any time.
During a power outage, ECO mode will be turned off and must be reset.
Heating Tank Operation
Pressing the ON / OFF button turns the heating tank on to heat the water.
Press the ON / OFF button to turn off the heating tank.
The LED light provides the status of the heating tank according to the table below:
LED indicator
Heating Tank Status Description LED Colour (Normal) LED Colour (Eco-mode)
Boiler OFF Hold White White
Boiler ON The boiler is turned ON See below See below
Cold Water Water temperature < 45°C Blue Light Blue
Warm Water 45°C < Water temperature < 103°C Orange Purple
Boiling Water Water temperature > 103°C Red Pink
Eco Water is not heated unless < water temperature 50°C Green Green

10 11
Guarantee
This Franke product carries a 2 year warranty against material and manufacturing defects. The warranty will be valid from the date of purchase as shown on the sales invoice. Please keep the invoice for your records. This is a domestic appliance only. The warranty will only be validated when it is used in a domestic environment.
Warranty
What is covered by the Franke guarantee?
- The repair or replacement of your system if your system is found to be defective due to faulty materials or within 2 years of purchase at Franke’s discretion.
- If any part is no longer available or out of manufacture, Franke will replace it with a functional alternative.
Terms and conditions of the Franke 2 year guarantee
- The guarantee is valid for the UK and Republic of Ireland.
- The guarantee becomes effective at the date of purchase (or the date of delivery if this is later).
- Proof of purchase is required under the terms of the guarantee.
- The guarantee provides benefits which are additional to, and do not affect your statutory rights as a consumer.
What is not covered by the guarantee?
- The Franke Minerva Heating Tap. See separate installation guide for the tap warranty details.
EC Declaration of ConformityFranke UK LimitedWest Park, MIOCStyal RoadManchesterUnited KingdomM22 5WB
Declares that the product :Franke Minerva Heating Tank
Complies with the requirements stated in the directives :• Low Voltage Directive 2006/95/EG• Electromagnetic Compatibility Directive 2004/108/EG
Complies with the harmonised European standard :• EN 60335-1:2012 | EN 60335-2-15:2002
EN 60335-2-15:2002/A1:2005 | EN 60335-2-15:2002/A11:2012 EN 60335-2-15:2002/A2:2008 EN 60335-2-15:2006
• EN 55014-1:2006 | EN 55014-1:2006/A1:2009 EN 55014-2:1997 | EN 55014-2:1997/A1:2001 EN 55014-2:1997/A2:2008
• EN 61000-3-2:2006 | EN 61000-3-2:2006/A1:2009 EN 61000-3-2:2006/A2:2009 | EN 61000-3-3:2008
• EN 60529:1992
Franke does not guarantee the repair or replacement of a product as a result of:
- Normal wear and tear.
- Accidental damage, faults caused by negligent use or care, misuse, neglect, careless operation or handling of the system which is not in accordance with the Minerva operating guidelines.
- Use of the filter system for anything other than normal domestic household purposes.
- Use of parts not assembled or installed in accordance with the instructions of your Minerva.
- Faulty installation, repairs or alterations (not in accordance with the installation guide).
How do I make a claim under my Franke 2 year guarantee?
- If you are in any doubt as to what is covered by your guarantee or wish to discuss a claim please call Franke Customer Services. If you are calling for the first time please have your receipt to hand so we can record your date of purchase.
- The company reserves the right to alter, change or modify product specifications without prior notice.

Franke UK Limited West Park, MIOC Styal Road Manchester M22 5WB Tel: +44 (0)161 436 6280 Fax: +44 (0)161 436 2180 Email [email protected]
For spare parts, servicing or any other queries, visit www.franke.co.uk
01-00897-001