
Fossil Beaver (Dipoides) Tooth, Always Welcome Inn, Baker City, Oregon
25
Deploying Intellicus Portal on IBM WebSphere Intellicus Web-based Reporting Suite Version 4.5 ©Intellicus Technologies [email protected] www.intellicus.com Enterprise Professional Smart Developer Smart Viewer
Transcript of Fossil Beaver (Dipoides) Tooth, Always Welcome Inn, Baker City, Oregon
Deploying Intellicus Portal on IBM WebSphere
Intellicus Web-based Reporting Suite Version 4.5
©Intellicus Technologies [email protected] www.intellicus.comEnterprise
Professional
Smart Developer
Smart Viewer

Deploying Intellicus Portal on IBM WebSphere i
Copyright © 2009 Intellicus Technologies This document and its content is copyrighted material of Intellicus Technologies. The content may not be copied or derived from, through any means, in parts or in whole, without a prior written permission from Intellicus Technologies. All other product names are believed to be registered trademarks of the respective companies. Dated: - May 2009.
AAcckknnoowwlleeddggeemmeennttss Intellicus acknowledges using of third-party libraries to extend support to the functionalities that they provide. For details, visit: http://www.intellicus.com/acknowledgements.htm .

Deploying Intellicus Portal on IBM WebSphere ii
Contents
Deploying Intellicus web application in IBM WebSphere ........3 Deploying Intellicus web application using WAR file ........................................ 3
Download Intellicus web application ................................................... 3 Installing Intellicus (using WAR file) ................................................... 4
Deploying Intellicus using EAR file .............................................................. 12 Installing Intellicus.........................................................................13 Unzip Client.zip folder .....................................................................18 Setting path of ReportClient.properties ..............................................19

Deploying Intellicus Portal on IBM WebSphere 3
Deploying Intellicus web application in IBM WebSphere The chapter provides instructions to deploy Intellicus in IBM WebSphere using: • Intellicus WAR file
• Intellicus EAR file
Target Audience It is technical in nature and is written for users who have knowledge in following: • IBM WebSphere Application Server administration.
Important: Intellicus web application can be deployed inside WebSphere Server, whereas Intellicus Report Server always needs to be run separately.
Deploying Intellicus web application using WAR file Steps to deploy Intellicus application in WebSphere The steps are as follows: • Download and place intellicuswebapplication.tar.gz.
• Decompress the file intellicuswebapplication.tar.gz
Download Intellicus web application For Solaris / Linux / AIX Intellicus provides separate download of Intellicuswebapplication.tar.gz (name shall be followed by version). Contact Intellicus support to receive a link for that download. Unzip the gz after downloading it.
gunzip intellicuswebapplication.tar.gz This will create intellicuswebapplication.tar. For Windows For Windows installation, Intellicus.war is included in setup.exe (Intellicus setup file). This is stored in /intelllicus/API filder.
Deploying Intellicus Portal on IBM WebSphere 4
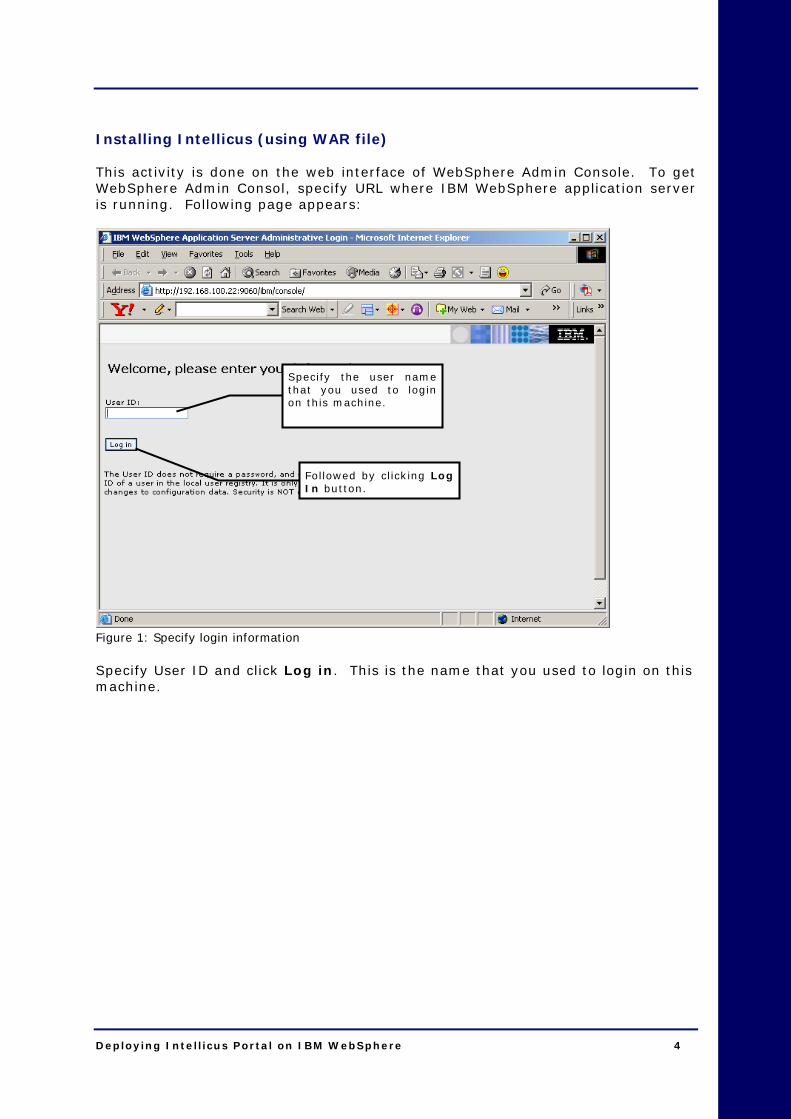
Installing Intellicus (using WAR file) This activity is done on the web interface of WebSphere Admin Console. To get WebSphere Admin Consol, specify URL where IBM WebSphere application server is running. Following page appears:
Figure 1: Specify login information Specify User ID and click Log in. This is the name that you used to login on this machine.
Specify the user namethat you used to loginon this machine.
Followed by clicking LogIn button.

Deploying Intellicus Portal on IBM WebSphere 5
Figure 2: Installing new application Select Applications menu from the menu on the Welcome Page. It expands and displays two options. Select Install New Application option.
Figure 3: Specifying path and name of war file On the page that appears on the right pane, specify the path where war file sent by Intellicus is located.
Click Applications menu, toview the options under it.Click Install NewApplication option.
Specify path and filename of .war file thatwill be installed.

Deploying Intellicus Portal on IBM WebSphere 6
For Context root, specify /Intellicus. Click Next.
Figure 4: Default binding and mappings Under Override, make sure Do not override existing bindings is selected. Under Virtual Host, select option Do not use default virtual host name for Web modules. Click Next to proceed.
Make sure this option isselected.

Deploying Intellicus Portal on IBM WebSphere 7
Figure 5: Application Security Warnings Click Continue to proceed.

Deploying Intellicus Portal on IBM WebSphere 8
Figure 6: Selecting installation options Make sure only the option Distribute application is selected. Click Next to proceed.
Figure 7: Mapping modifiers to servers Click Next to proceed. If another options appear on the same page, you may ignore them.
We need to have onlythis option selected.
Specify Intellicus here.

Deploying Intellicus Portal on IBM WebSphere 9
Figure 8: Mapping virtual hosts for Web modules Select intellicus.war and click Next to proceed.
Figure 9: View summary and click Finish to go ahead Click Finish to proceed.
Check the checkboxrepresenting Intellicusweb module.

Deploying Intellicus Portal on IBM WebSphere 10
Figure 10: Messages appearing Above page will appear.
Figure 11: Click Save to Master Configuration link Click the link Save to Master Configuration.
Figure 12: Click Save Click Save to complete the work. From Enterprise Applications page of WebSphere Administration Console, start Intellicus application.
Click on the link to save theconfiguration.
Deploying Intellicus Portal on IBM WebSphere 11
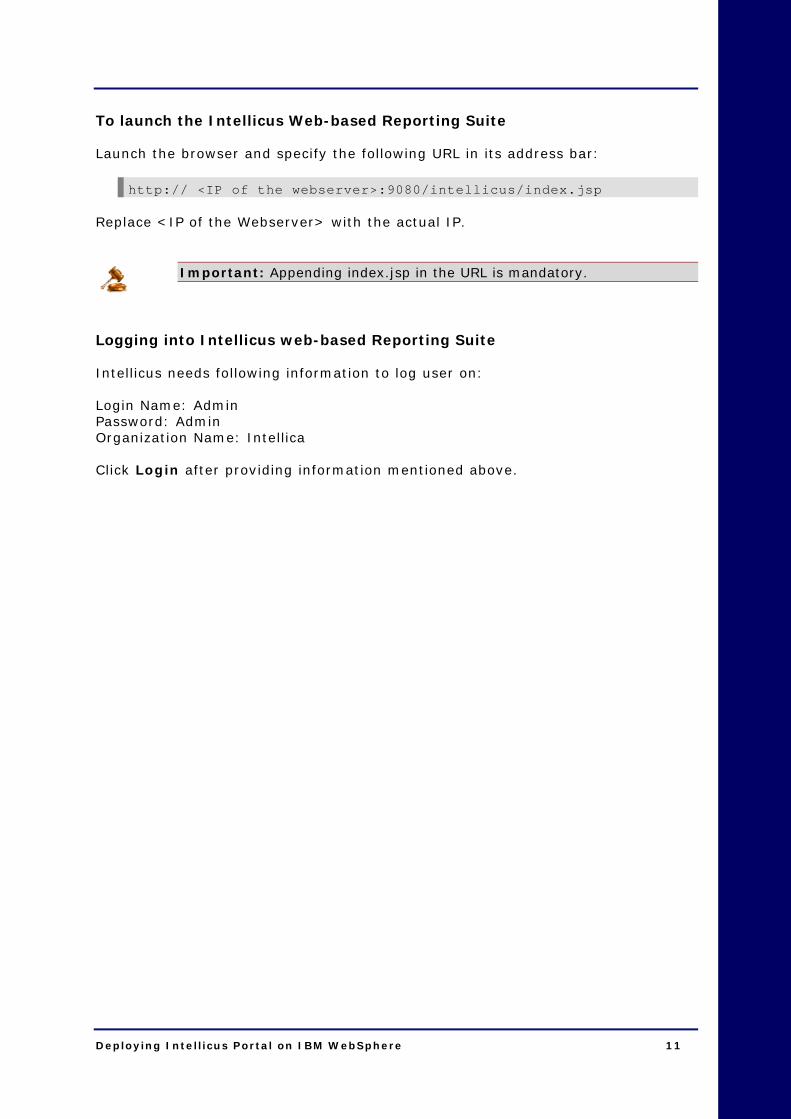
To launch the Intellicus Web-based Reporting Suite Launch the browser and specify the following URL in its address bar:
http:// <IP of the webserver>:9080/intellicus/index.jsp Replace <IP of the Webserver> with the actual IP.
Important: Appending index.jsp in the URL is mandatory. Logging into Intellicus web-based Reporting Suite Intellicus needs following information to log user on: Login Name: Admin Password: Admin Organization Name: Intellica Click Login after providing information mentioned above.
Deploying Intellicus Portal on IBM WebSphere 12
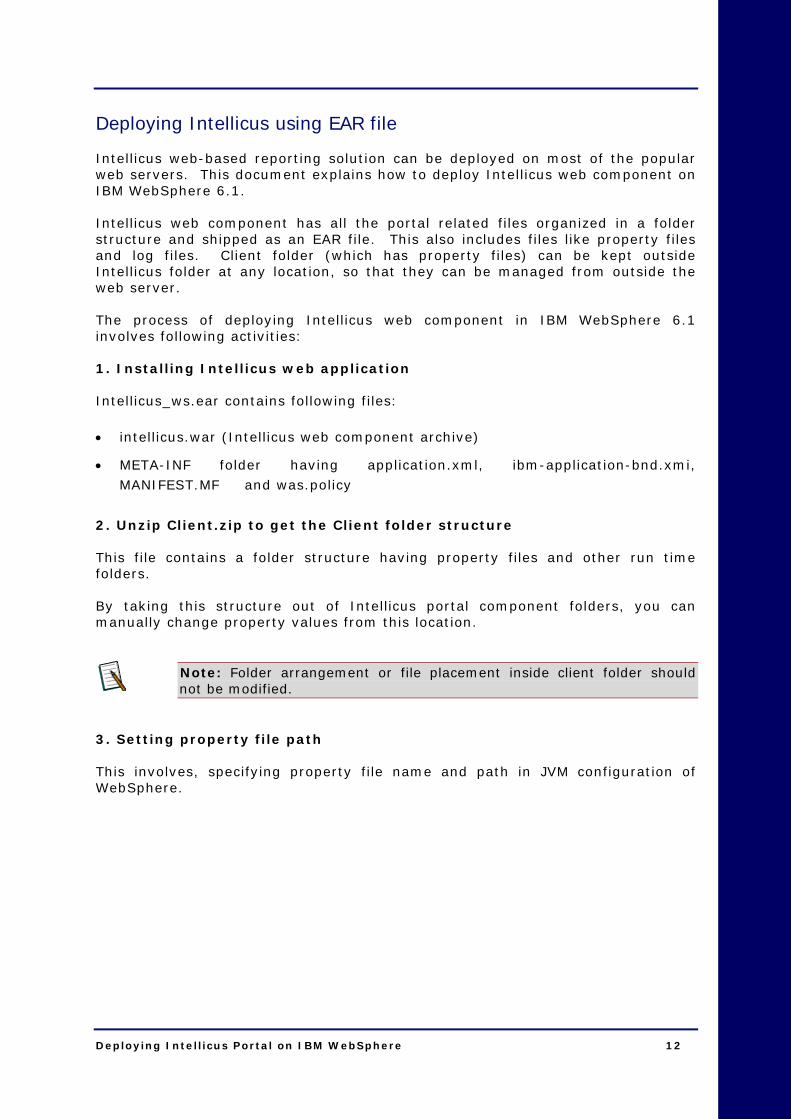
Deploying Intellicus using EAR file Intellicus web-based reporting solution can be deployed on most of the popular web servers. This document explains how to deploy Intellicus web component on IBM WebSphere 6.1. Intellicus web component has all the portal related files organized in a folder structure and shipped as an EAR file. This also includes files like property files and log files. Client folder (which has property files) can be kept outside Intellicus folder at any location, so that they can be managed from outside the web server. The process of deploying Intellicus web component in IBM WebSphere 6.1 involves following activities: 1. Installing Intellicus web application Intellicus_ws.ear contains following files: • intellicus.war (Intellicus web component archive)
• META-INF folder having application.xml, ibm-application-bnd.xmi, MANIFEST.MF and was.policy
2. Unzip Client.zip to get the Client folder structure This file contains a folder structure having property files and other run time folders. By taking this structure out of Intellicus portal component folders, you can manually change property values from this location.
Note: Folder arrangement or file placement inside client folder should not be modified.
3. Setting property file path This involves, specifying property file name and path in JVM configuration of WebSphere.
Deploying Intellicus Portal on IBM WebSphere 13
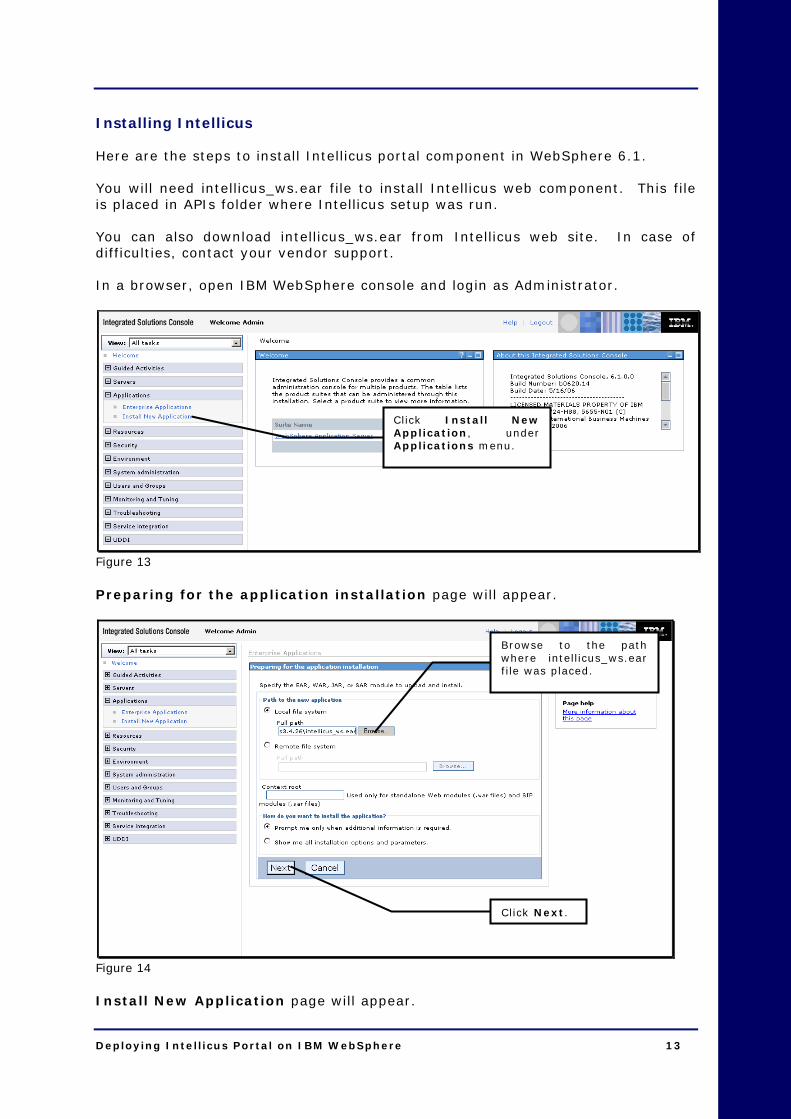
Installing Intellicus Here are the steps to install Intellicus portal component in WebSphere 6.1. You will need intellicus_ws.ear file to install Intellicus web component. This file is placed in APIs folder where Intellicus setup was run. You can also download intellicus_ws.ear from Intellicus web site. In case of difficulties, contact your vendor support. In a browser, open IBM WebSphere console and login as Administrator.
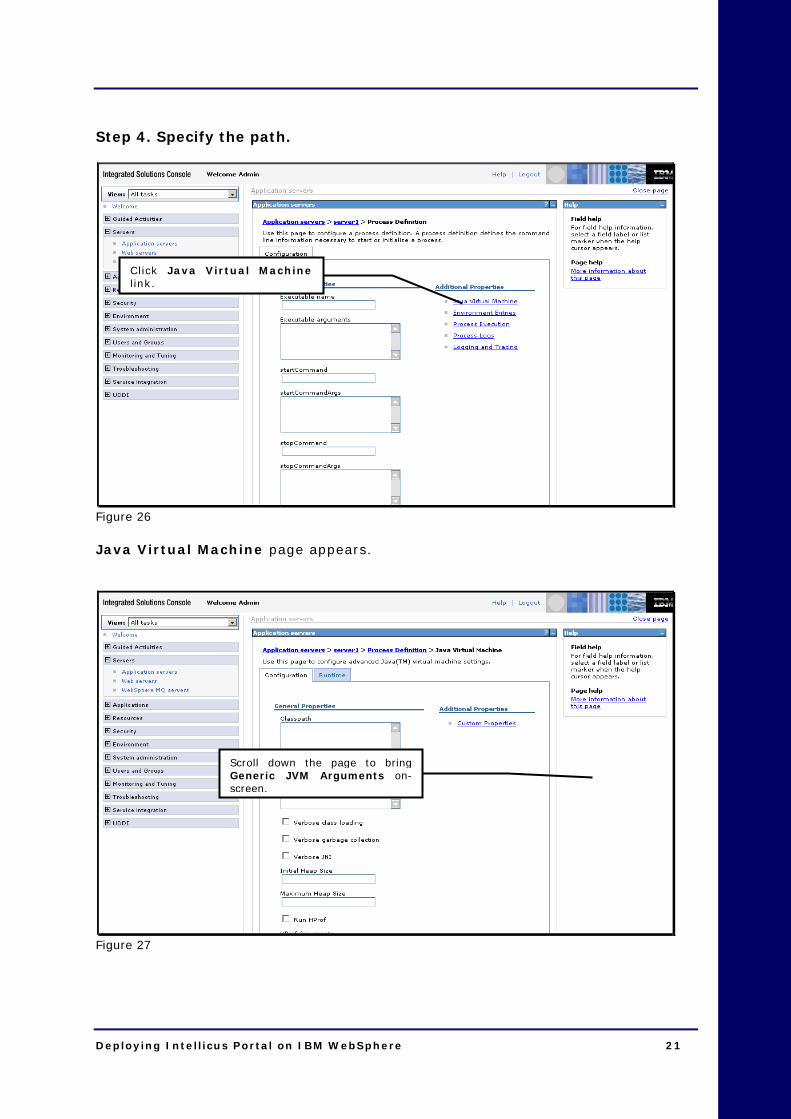
Figure 13 Preparing for the application installation page will appear.
Figure 14 Install New Application page will appear.
Browse to the pathwhere intellicus_ws.earfile was placed.
Click Next.
Click Install NewApplication, underApplications menu.

Deploying Intellicus Portal on IBM WebSphere 14
Figure 15
Figure 16 Install New Application’s Step 2 appears.
Install New Applicationpage appears. Scrolldown to bottom of thepage.
Click Next.

Deploying Intellicus Portal on IBM WebSphere 15
Figure 17 Install New Application’s Step 3 appears.
Figure 18 Install New Application’s Step 4 appears.
Click Next.
Click Next.

Deploying Intellicus Portal on IBM WebSphere 16
Figure 19
Figure 20
On Step 4, scroll down tothe bottom of the page.
Click Finish.

Deploying Intellicus Portal on IBM WebSphere 17
Figure 21 Intellicus portal component is now installed in IBM WebSphere 6.1.
Click Save.

Deploying Intellicus Portal on IBM WebSphere 18
Unzip Client.zip folder Being a report generation and publishing tool, Intellicus generates different types of files at folder location that is accessible by Web server. Here is the description of those folders: • client/config: Holds all property files that control behavior of Intellicus
applications and modules.
• client/logs: Creates Intellicus Web client log files in rotation mode.
• client/reports: Creates temporary HTML pages of report output when user is navigating back and forth on report pages. For Intellicus to comply with report security, this folder should be secured well.
• client/temp: Creates temporary files related to list cache etc.
• client/lang: Ships with language library files. You can add or enhance these files according your language needs on Intellicus pages.
Client.zip is available on Report server at path: <installation path>/Intellicus/APIs. Copy this file to the location where you want Intellicus Client folder to reside and Unzip it. This will create following folder structure and the files within: client folder config folder ReportClient.properties adhoc.properties HtmlToolBar.properties Portal.properties temp folder logs folder reports folder lang folder en_US.xls After you have unzipped the file, you can make changes related to Report Server IP and Port in ReportClient.properties file. If changes in ReportClient.properties are made manually, you may need to re-start Web server for bringing the new values to effect. If changes are made using Intellicus Administration UI, then you may not need re-starting of the web server.

Deploying Intellicus Portal on IBM WebSphere 19
Setting path of ReportClient.properties Here are the instructions to set path of ReportClient.properties file as JVM argument. Step 1. Login in the IBM WebSphere 6.1 console.
Figure 22 Step 2. Go to Application Servers.
Figure 23
Click server1.
Click ApplicationServers.

Deploying Intellicus Portal on IBM WebSphere 20
Step 3. Go to Server Infrastructure > Process definition.
Figure 24
Figure 25 Process Definition page appears.
Click Process Definitionunder Java and ProcessManagement.
Scroll down the page to bringServer Infrastructure on-screen.
Deploying Intellicus Portal on IBM WebSphere 21
Step 4. Specify the path.
Figure 26 Java Virtual Machine page appears.
Figure 27
Scroll down the page to bringGeneric JVM Arguments on-screen.
Click Java Virtual Machinelink.

Deploying Intellicus Portal on IBM WebSphere 22
Figure 28 In Generic JVM arguments, specify -DIntellicus.propertyfilepath=followed by the path including file name where ReportClient.properties file is located. ReportClient.properties file should be placed in <path>/client/config folder.
Important: This path should not contain blank space. For example, “C:\Program Files\client\config\ReportClient.properties” is invalid.
Caution: If ReportClient.properties file is not found at the specified path, you will receive HTTP Status 500 error at the time of launching Intellicus in browser.
Step 5. Save the changes.
Figure 29 Restart the WebSphere server. From Enterprise Applications page of WebSphere Administration Console, start Intellicus application.
In Generic JVM arguments, specify -DIntellicus.propertyfilepath=followed by the path including file name where ReportClient.properties file is located.
Scroll the page up, and click Save link to save the changes.
Click Apply.
Deploying Intellicus Portal on IBM WebSphere 23
To launch the Intellicus Web-based Reporting Suite Launch the browser and specify the following URL in its address bar:
http:// <IP of the webserver>:9080/intellicus/index.jsp
Important: Appending index.jsp in the URL is mandatory. Replace <IP of the Webserver> with the actual IP. Logging into Intellicus web-based Reporting Suite Intellicus needs following information to log user on: Login Name: Admin Password: Admin Organization Name: Intellica Click Login after providing information mentioned above.


![B. Beaver-Introduction to Probability and Statistics - Mendenhall, Beaver and Beaver [STUDENT's SOLUTION MANUAL]-Duxbury (2006)](https://static.fdocuments.in/doc/165x107/577c7f5e1a28abe054a444a7/b-beaver-introduction-to-probability-and-statistics-mendenhall-beaver-and.jpg)


