for Everyone
127
Community Preparedness: Simple Activities for Everyone
Transcript of for Everyone

Community Preparedness: Simple Activities for Everyone

Community Preparedness: Simple Activities for Everyone
September 2011 Page i
FACILITATOR GUIDE
CONTENTS Purpose ........................................................................................................................................... 1
The Preparedness Topics............................................................................................................... 2
How To Use the Materials .............................................................................................................. 3
Preparing Your Presentation .......................................................................................................... 4 Preparedness Activities Preparedness on a Shoestring ....................................................................................................... 6
Where Is Everybody? ................................................................................................................... 13
Who Can You Count on? Who Counts on You? ......................................................................... 19
Easy Out: Getting to Safety ......................................................................................................... 25
Storm Safe: Sheltering in Place................................................................................................... 30
Disaster Plan Dress Rehearsal .................................................................................................... 36
Hunting Home Hazards ................................................................................................................ 41
An Ounce of Fire Prevention ........................................................................................................ 51
Putting Out Fires ........................................................................................................................... 64
Home Safe Home ......................................................................................................................... 73
Safeguarding Your Valuables ....................................................................................................... 82
Pet/Service Animal Preparedness ................................................................................................ 87
Rx for Readiness .......................................................................................................................... 93
Going Off Grid: Utility Outages ................................................................................................. 102
Coming Home After a Disaster ................................................................................................... 112
Preparedness: The Whole Community ..................................................................................... 119
Note: The Handout Masters document contains the materials you need to copy for each presentation.

Community Preparedness: Simple Activities for Everyone
September 2011 Page 1
FACILITATOR GUIDE
PURPOSE Preparedness is the shared responsibility of all levels of government, the private and nonprofit sectors, and individual citizens.
Individuals and households are at the core of our Nation’s preparedness. A community’s ability to respond to or recover from a disaster depends on the level of preparedness of every member. However, a 2009 Citizen Corps National Survey found that 29 percent of Americans have not prepared because they think that emergency responders will help them and that over 60 percent expect to rely on emergency responders in the first 72 hours following a disaster. The reality is that in a complex disaster, first responders and emergency workers may not be able to reach everyone right away. In addition, providers may not be able to restore critical services, such as power, immediately. The purpose of this initiative is to promote personal and community preparedness through engaging activities for individuals, neighbors, or households. These activities are a set of building blocks. You can mix and match the activities based on the needs of your target audience or time available. Most activities can be completed during a 15-minute to 60-minute session. You should adapt the materials to include critical local information, such as information on local hazards, local alerts and warnings, and local community response resources and protocols. Remember, preparedness does not have to be complex or overly time consuming. Rather, it should motivate, empower, and engage the whole community.

Community Preparedness: Simple Activities for Everyone
September 2011 Page 2
FACILITATOR GUIDE
THE PREPAREDNESS TOPICS Below is a list of the preparedness activities:
Core Preparedness Topics Title Information and Activities on . . . Approx. Length Preparedness on a Shoestring
Creating a no-cost or low-cost disaster kit 30 – 60 minutes
Where Is Everybody? Developing a communications plan 20 minutes Who Can You Count on? Who Counts on You?
Establishing a personal support network 20 minutes
Easy Out: Getting to Safety Planning for and practicing an evacuation 30 minutes Storm Safe: Sheltering in Place
Staying safe when evacuation is not an option 20 – 40 minutes
Disaster Plan Dress Rehearsal
Practicing your disaster plan 30 – 60 minutes
Hazard-Reduction Topics Title Information and Activities on . . . Approx. Length Hunting Home Hazards Identifying and reducing home hazards 30 – 60 minutes An Ounce of Fire Prevention Identifying and reducing fire risks 30 minutes Putting Out Fires Using a fire extinguisher 30 – 60 minutes Home Safe Home Implementing simple risk-reduction (mitigation)
measures 30 – 60 minutes
Safeguarding Your Valuables Protecting important items and documents 30 minutes
Specialized Preparedness Topics Title Information and Activities on . . . Approx. Length Pet/Service Animal Preparedness
Taking care of pets and service animals during a disaster
30 minutes
Rx for Readiness Starting a “stay healthy” kit and plan 30 minutes Going Off Grid: Utility Outages
Preparing for utility outages 20 – 40 minutes
Coming Home After a Disaster
Planning for recovery from disaster 20 minutes
Preparedness: The Whole Community
Understanding emergency management and response roles and getting involved
30 – 90 minutes
Remember . . . You can mix and match the topics based on the needs of your audience. In addition, you may adjust the times by modifying the activities demonstrated during the session.

Community Preparedness: Simple Activities for Everyone
September 2011 Page 3
FACILITATOR GUIDE
HOW TO USE THE MATERIALS Each topic includes a facilitator guide and participant materials.
The program design has limited the number of pages and the need for presentation equipment such as computers and projectors.
The first pages of each topic provide the facilitator with:
• Overall purpose of the session.
• Suggested preparation steps and materials.
Facilitator Guide
Following the facilitator guide are handouts for the participants to use during the session or as “take away” materials.
Handouts

Community Preparedness: Simple Activities for Everyone
September 2011 Page 4
FACILITATOR GUIDE
PREPARING YOUR PRESENTATION The facilitator’s preparation and conduct of the session are keys to the effectiveness of this program. Presenters should do the following:
• Read the materials thoroughly.
• Complete all activities and be prepared to answer the questions that the participants will likely ask while completing the activities.
• Draft your own notes in the margins of the materials.
• Add personal experiences to help explain the important points.
• Tailor the material by adding information on local hazards, local alerts and warnings, and local community response resources and protocols. Also, you may want to emphasize different information (e.g., apartment evacuation vs. single homes) to meet your audience’s needs.
• Rehearse with a small group and ask for suggestions for enhancing the delivery.
• Remember to use the following effective facilitation techniques:
Facilitation Techniques
Make yourself part of the group. Do not separate yourself physically from the group by standing behind a podium or a table. Feel free to move around the room while you are speaking.
Do not read or lecture to the group. Think back to the last class that you attended. If the instructor lectured incessantly, chances are that you tuned out and did not learn much. This package is a guide, not your script. Flexibility is the key to success. You may modify discussion questions to meet the needs of the group. If you do not like or do not understand a question, change it.
Don’t answer questions if you are not sure of the answers. If a participant asks you a question to which you do not know the answer:
• Tell the participant that you do not know the answer. • Explain that you will find the answer and get back to the participant.
Check for understanding. Sticking to the agenda is important, but do not move to the next activity before ensuring that the group understands what has already been discussed. You can check understanding by asking for volunteers to summarize concepts and fill in gaps during your transitions.
Watch for both verbal and nonverbal responses and clues. Use your observations to keep the session running smoothly.
Additional presentation do’s and don’ts are listed on the next page.

Community Preparedness: Simple Activities for Everyone
September 2011 Page 5
FACILITATOR GUIDE
PREPARING YOUR PRESENTATION (CONTINUED)
Do’s . . . Don’ts . . .
Eye Contact Eye Contact • Look at people’s eyes. • Continually scan the group with your eyes. • Look at the whole group.
• Avoid eye contact. • Scan the group too rapidly or infrequently.
Body Movement Body Movement • Position your body so you face the majority
of the people. • Vary your position in the room. • Stand with good posture. • Walk toward people when they speak.
• Talk to your notes, easel, or board. • Turn your back to part of the group. • Stand in fixed positions. • Slouch. • Distance yourself from people.
Gestures Gestures • Use natural and spontaneous gestures. • Smile and be animated.
• Engage in distracting behavior such as looking at your watch, or jingling change.
Voice/Speech Voice/Speech • Speak loud enough to be heard. • Vary the pace of your presentation. • Slow down for important points. • Use the pause.
• Mumble. • Use “fillers” such as “like” or “um.” • Speak with a monotone voice. • Be afraid of pauses.
Ask Questions Ask Questions • Ask clear, concise questions. • Focus each question on a single issue. • Make sure the participants can answer your
questions.
• Ask questions that require two distinct answers. • Answer your own question! Rephrase your
question if you don’t get an answer.
Listening Listening • Keep an open mind. • Maintain eye contact and show interest. • Consider the speaker’s nonverbal
behaviors and tone of voice. • Ask for clarification. • Paraphrase the meaning and feelings being
expressed.
• Be judgmental. • Interrupt the speaker. • Begin formulating a rebuttal. • Distort the message based on your own beliefs
or thoughts.

September 2011 Page 6
Activity Title: Preparedness on a Shoestring Description: Creating a no-cost or low-cost disaster kit Approximate Time: 30 – 60 minutes

PREPAREDNESS ON A SHOESTRING
September 2011 Page 7
FACILITATOR GUIDE
ACTIVITY: DISASTER KIT SCAVENGER HUNT Purpose: The purpose of this activity is to educate families on how to create a no-cost or low-cost disaster kit. Objectives: • List the critical items to include in a disaster kit.
• Identify how to create a disaster kit from items available in the home. Preparation and Needed Materials: Prior to conducting this activity, you may want to: • Assemble a model kit from the items listed on the participant handout.
• Work with local merchants or voluntary organizations to get donation of essential items to include in the kits.
• Encourage voluntary organizations to create disaster kits for a family or neighbor in need. Presentation Tips: • Welcome participants to the session.
• Explain that by the end of the session, they will be able to assemble a disaster kit from items found in their homes.
• Ask the participants the following discussion question: If a major disaster happened, how long should they plan to be able to take care of themselves or their families until help can arrive?
• Acknowledge the answers and then present the following key points:
• You may need to survive on your own after an emergency. This means having your own food, water, and other supplies to last for at least 3 days.
• Local officials and responders will be on the scene after a disaster, but they cannot reach everyone immediately.
• Creating a family disaster preparedness kit does not have to be costly—many of the items for your family’s kit may be found around your home.

PREPAREDNESS ON A SHOESTRING
September 2011 Page 8
FACILITATOR GUIDE
ACTIVITY: DISASTER KIT SCAVENGER HUNT Presentation Tips: (Continued) • Distribute the Family Disaster Kit handout. Tell the participants that they will have an
opportunity to create a family disaster kit using a scavenger hunt activity.
• Briefly review the items listed on the scavenger hunt handout. Explain why each item is important to include in the disaster kit.
• Optional Activity: If there is time, conduct the scavenger hunt in your facility.
• Divide the groups in teams. Tell the participants where they can look for items to complete the scavenger hunt within your facility.
• Give the teams 20 minutes to assemble their kits.
• Reassemble the participants and review what items the teams found.
• Ask the participants what else they would like to include in their kits.
• Optional Demonstrations:
• If feasible, demonstrate how to secure water from a water heater.
• If feasible, demonstrate the use of National Oceanic and Atmospheric Administration (NOAA) Weather Radios.
• Conclude the session by reviewing the last two pages of the Family Disaster Kit handout on what to do if disaster strikes. Emphasize the importance of following evacuation orders and the safety measures outlined on the pages. Ask the participants if they have any questions about what they should expect during a disaster or in the immediate aftermath.
• Thank the participants for attending the session. Explain that more information about preparing to meet the needs of all community members is available in other sessions.

PREPAREDNESS ON A SHOESTRING
September 2011 Page 9
FAMILY DISASTER KIT: HANDOUT
ACTIVITY: DISASTER KIT SCAVENGER HUNT You may need to survive on your own after an emergency for at least 3 days. Local officials and responders will be on the scene after a disaster, but they cannot reach everyone immediately. Creating a family disaster preparedness kit does not have to be costly—many of the items for your family’s kit may be found around your home. You can make a game of getting prepared by organizing a family scavenger hunt. Begin by finding a container to store the items (e.g., large bucket, pillowcase, backpack, plastic container, etc.). Water—at least 1 gallon per person per day for at least 3 days, for drinking and
sanitation Cautions: Unopened (sealed) water bottles should be good for at least 1 year. After a bottle is opened, the water will begin to grow bacteria in less than a month. Alternative Water Source: If you are unable to purchase water, a typical home water heater can provide 30 or more gallons of clean drinking water. To use the water in your tank, first turn off the electricity or gas to the water heater. Then, close the supply valve to preserve the cleanliness of the water in the tank. Next, get the air out of the tank by opening any hot water tap such as the kitchen sink. (Caution: The water coming out of the tank may be very hot.) You can use a short water hose (e.g., the supply hose to a washing machine) to drain the water from the tank. Use a screwdriver or coin to operate the drainage valve. If you do not have a hose to transfer the water to jugs or pots, use a shallow pan to collect the water. Allow the tank to fill before restoring power to the water heater.
Food—at least a 3-day supply of nonperishable food What To Include: Include ready-to-eat canned or dried meats/tuna, fruits, juices, and vegetables. High-energy foods such as peanut butter, cereals, breakfast bars, etc., are the best. Add a can opener, scissors, or knife for cutting open foil and plastic pouches, and disposable plates, cups, and utensils. Tips: Make sure to include food for infants or those on special diets (e.g., medical restrictions, food allergies). Pack all these items in plastic bags to keep them dry and as airtight as possible. Keep a list of dates when food items need to be inspected and possibly replaced. Remember to include food for pets and service animals.

PREPAREDNESS ON A SHOESTRING
September 2011 Page 10
FAMILY DISASTER KIT: HANDOUT
First aid supplies
What To Include: Look for items such as bandages, cotton washcloths, cleaning agent/soap, hydrogen peroxide/isopropyl alcohol, antiseptic cream, and aspirin or an aspirin substitute. Include a list of medical conditions and prescription medicines. Tip: Keep your prescriptions in a plastic bag or travel kit in an easy-to-find location.
Copies of important information What To Include: Include important information such as phone numbers, family records, insurance and financial documents, and copies of passports, identification documents, Social Security cards, immunization records for people and pets, etc.
Radio, flashlight, and batteries What To Include: Include a battery-powered or hand-crank flashlight and radio and extra batteries. Tips: Avoid using candles, which can easily cause fires. It is advisable to have a Weather Radio with tone alert. If you are unable to get a Weather Radio, you may be able to listen to alerts on local radio or access them on the Internet at: http://www.nws.noaa.gov/nwr/streamaudio.htm
Other supplies and items: You may want to include things such as a whistle to signal for help, wrench or pliers to turn off utilities, sanitary products, diapers, and any other items you’ll need during an emergency.
Check the expiration dates of items in your kit at least every 6 months.

PREPAREDNESS ON A SHOESTRING
September 2011 Page 11
FAMILY DISASTER KIT: HANDOUT
REMINDERS: WHEN DISASTER STRIKES Disaster can strike quickly and without warning. It can force you to evacuate your neighborhood or confine you to your home. Below are some steps you should take if a disaster strikes. Keep Informed Listen to local radio or television for news and instructions.
Bring things indoors such as lawn furniture, trash cans, children’s toys, garden equipment, clotheslines, hanging plants, and any other objects that may be blown around. Confine or secure your pets in a location in your home or in a carrier for evacuation. Move to a safe area of your home unless you are instructed to evacuate. Follow Evacuation Orders Evacuate immediately if told to do so. Ignoring an evacuation order puts you and your
family in danger. Wear protective clothing and sturdy shoes. Lock your home. Use the travel routes specified by local authorities; other routes may be impassable or dangerous. If you have only moments before leaving, grab the following items and go:
• Prescription medications and other essentials
• Driver’s license, personal identification, insurance information, and other critical documents
• Disaster kit Notify your family contact. Relatives and friends will be concerned about your safety.
Letting someone know your travel plans will help relieve the fear and anxiety of those who care.
• WATCH means it is possible that severe weather conditions will develop.
• WARNING means the weather is already occurring or is likely to occur and that people should take proper protective measures.
PLACE THIS LIST IN YOUR DISASTER KIT!

PREPAREDNESS ON A SHOESTRING
September 2011 Page 12
FAMILY DISASTER KIT: HANDOUT
When It Is Safe—Assess the Damage Check for injuries. Determine if anyone is injured. If so, call for help and provide simple
first aid measures.
Wear protective clothing and sturdy shoes. Disaster areas and debris contain many hazards. The most common injury following a disaster is cut feet.
Help your neighbors who may require assistance in an emergency situation—infants, elderly people, and people with disabilities—and the people who care for them.
Look for hazards.
• Gas: If you smell gas or suspect a leak, open a window and get everyone outside quickly. Turn off the gas at the outside main valve.
• Electrical system: If you see sparks or broken or frayed wires, or if you smell burning insulation, turn off the electricity at the main fuse box or circuit breaker. Getting damaged utilities turned off will prevent further injury or damage. Stay away from downed power lines.
• Water: If the water pipes are broken, turn the water off at the main valve. Tip: For all the utilities―gas, electric, and water―find out where shutoff valves/switches are before a disaster strikes.
• Structural problems: Watch for objects that could fall. Evacuate structures that are not stable.
• Spills: Stay away from areas that contain spilled chemicals or other hazardous materials.

September 2011 Page 13
Activity Title: Where Is Everybody? Description: Developing a communications plan Approximate Time: 20 minutes

WHERE IS EVERYBODY?
September 2011 Page 14
FACILITATOR GUIDE
ACTIVITY: DEVELOPING A COMMUNICATIONS PLAN Purpose: In this activity, participants will learn how to create a communications plan. Objectives: • Describe situations in which emergency communications are needed.
• Identify emergency contacts for individuals and families.
• Explain how to develop a communications plan that can be used in emergency situations. Preparation and Needed Materials: Prior to conducting this activity, you may want to: • Find an example in the local area or region where emergency communications were
needed.
• Prepare handouts of the Family Communications Plan and wallet card in FEMA’s Are You Ready? booklet. You can access communications plan and wallet card templates at the following Web site: http://www.ready.gov/america/makeaplan/index.html
• Develop a sample communications plan and wallet card to use as examples. The card should be laminated to protect it from wear; the communications plan could also be laminated if desired.
• Have several copies of local telephone books for participants to use as they develop their communications plans and wallet cards.
Presentation Tips: • Welcome participants to the session.
• Explain that by the end of the session, they will be able to develop a communications plan and wallet card for use in emergencies.
• Give an example in the area or region where emergency communications were needed. Ask participants to think about what they would do in that situation. Ask: “Would you be able to reach family members, friends, or caregivers to check on them or let them know where you are?”

WHERE IS EVERYBODY?
September 2011 Page 15
FACILITATOR GUIDE
ACTIVITY: DEVELOPING A COMMUNICATIONS PLAN Presentation Tips: (Continued) • Acknowledge the answers and then present the following key points:
• Emergency situations may occur at home, at work, at other locations, or while traveling.
• Communications systems normally relied on may be disrupted or completely out of service.
• Individuals and families can create a communications plan to reach family, friends, or caregivers in these emergency situations.
• Distribute the Plan To Stay in Touch handout. Note that some examples of plans or cards include Social Security numbers. For privacy purposes, you may not want to include these numbers. Show the examples that you created.
• Optional Activity: If feasible, have the participants develop communications plans and wallet cards in your meeting place, using the second page of the Plan To Stay in Touch handout as a plan template.
• Divide participants into family groups or groups of individuals.
• Tell participants that local telephone books are available for their use.
• Give participants 20 minutes to create communications plans and wallet cards.
• Reassemble the participants and review their plans and wallet cards.
• Advise participants to review their plans and cards with other family members, friends, and/or caregivers before finalizing and laminating them. (You may wish to partner with a community organization to help people with lamination after the session.)
• Thank the participants for attending the session.

WHERE IS EVERYBODY?
September 2011 Page 16
PLAN TO STAY IN TOUCH: HANDOUT
ACTIVITY: DEVELOPING A COMMUNICATIONS PLAN In emergency situations you may need to contact family members, friends, or caregivers to check on their safety or advise them of your status. Follow the steps below to develop a communications plan. Identify contacts.
List the names, addresses, phone numbers, and other essential information for family members, friends, caregivers, and other frequently used contacts. Here are some tips:
• Immediate family members include those still living in your home, those who are away temporarily (at college, deployed, etc.), and those living elsewhere in your community or in other places.
• Extended family members, such as parents and other relatives, may live close by or in other places. They, too, may need to be contacted if they are affected by an emergency, or they may need to know your status if the emergency occurred in your area.
• Some family members may be entrusted to caregivers in group homes, nursing homes, or other facilities or programs. Some may live alone but depend on health care or personal care providers for support. Again, you or they may be affected by an emergency and need to be contacted.
• Don’t forget your pets. They may be left at home or in kennels while you are away during the day or on extended periods of travel. In emergencies, you may need to know if they are safe or if someone can check on them.
• Be sure to include an out-of town contact. It may be easier to make a long-distance phone call than to call across town, so an out-of-town contact may be in a better position to communicate among separated family members.
Organize your contact information into a communications plan.
You may also want to prepare wallet cards with contact information, to laminate and store in your wallet for ready access. (See the next page.)
Review your communications plan. After you have assembled your plan and cards, review them with family members and other contacts to ensure the information is complete and accurate. Add alternate phone numbers or contacts as needed.
PUT YOUR COMMUNICATIONS PLAN IN YOUR DISASTER KIT!

WHERE IS EVERYBODY?
September 2011 Page 17
PLAN TO STAY IN TOUCH: HANDOUT
Share your plan.
• Be sure every family member knows the phone number of the emergency contact and
has a cell phone, coins to use a pay phone, or a prepaid phone card. • Teach family members or friends to use text messaging. Text messages can often get
through network disruptions when phone calls can’t.
• If you have a cell phone, program your primary contact as “ICE” (In Case of Emergency). In an accident, emergency personnel will often check ICE listings. Tell your contact that you’ve listed him or her as your emergency contact person.
• Include your communications plan in your family disaster kit. Post a copy on the refrigerator or near a telephone. Distribute copies of your plan to everyone who needs to have one.
• Update your plan and wallet card as needed.
Stay informed. Subscribe to alert services. Many communities now have systems that will send instant text alerts or emails about bad weather, road closings, or local emergencies. Sign up by visiting your local office of emergency management Web site.

WHERE IS EVERYBODY?
September 2011 Page 18
PLAN TO STAY IN TOUCH: HANDOUT
Additional copies of this sheet can be found at http://www.ready.gov.

ON YOU?
September 2011 Page 19
Activity Title: Who Can You Count on? Who Counts on You? Description: Establishing a personal support network Approximate Time: 20 minutes

WHO CAN YOU COUNT ON? WHO COUNTS ON YOU?
September 2011 Page 20
FACILITATOR GUIDE
ACTIVITY: WHO CAN YOU COUNT ON? WHO COUNTS ON YOU? Purpose: The purpose of the activity is to encourage the development of personal support networks whose members can help one another if a disaster occurs. Objectives: • Identify the resources you need to help cope during a disaster.
• Establish a personal support network so that you can help one another during an emergency.
Preparation and Needed Materials: Prior to conducting this activity, you may want to: • Ask advocates and individuals with functional needs to attend the session and speak about
how people can contribute to and benefit from personal support networks.
• Arrange for demonstrations of how to operate and move common medical and assistive devices, such as a wheelchair, insulin pump, computer speech device, etc.
Presentation Tips: • Welcome participants to the session.
• Explain that by the end of the session, they will be able to establish a personal support network in their neighborhood, school, workplace, or other location where they spend a lot of time. During a disaster most of us are willing to help out those in need. However, we often are limited by our lack of understanding of how best to help one another.
• Explain that the process begins by asking yourself: In a crisis, who could you count on to help you out? Identify at least three people in each major location where you regularly spend time. Try not to depend on only one person.
• Distribute the Establishing a Support Network handout. Suggest that the participants invite members of their networks to a planning get-together (making it a social event by adding coffee, tea, and cookies works well). During this session:
• Discuss each other’s needs and how you can help one another. Explain how you may need different help in the event of an evacuation, power outage, darkness, or other conditions.

WHO CAN YOU COUNT ON? WHO COUNTS ON YOU?
September 2011 Page 21
FACILITATOR GUIDE
ACTIVITY: WHO CAN YOU COUNT ON? WHO COUNTS ON YOU? Presentation Tips: (Continued)
• Provide written emergency contact information with key phone numbers of relatives and medical professionals. Include relevant medical information, such as the types of medications, doses, and locations where items can be found. Also, note any vital things to check in the event of a fall or other injury.
• Show the members how to operate and move any assistive devices or specialized medical equipment. Attach laminated labels to equipment with operating instructions.
• If you have service animals, make sure that they are familiar with people who will help.
• Give copies of keys to get into your home or office in case of an emergency.
• Work out a system for contacting one another during a crisis. Signals can be whistles, shouting, knocking, or visual signs. Do not count on telephones as the only means of communication.
• Develop a system for letting each other know when you will be traveling.
• Select a way to communicate to let the members of the network know that you are safe.
• Finally, make a commitment to get together periodically to review the plan.
• Optional Demonstrations and Activity: Demonstrate how to operate and move common assistive/medical devices. Next, demonstrate how to help individuals with mobility limitations evacuate a building. After the demonstrations, develop teams to help different individuals evacuate from the building.
• Thank the participants for attending the session.

WHO CAN YOU COUNT ON? WHO COUNTS ON YOU?
September 2011 Page 22
ESTABLISHING A SUPPORT NETWORK: HANDOUT
ACTIVITY: WHO CAN YOU COUNT ON? WHO COUNTS ON YOU? Often, during the initial period of a crisis our safety depends on helping each other. Most of us are very willing to help those who may need assistance. Our actions may be limited by not understanding how best to offer help. Building a personal support network is an old-fashioned concept of neighbors helping neighbors. By establishing a personal support network, we know who we can count on and who counts on us. And we will be ready to help. • Assess Your Capabilities: It is important to evaluate your capabilities, limitations and
needs, and surroundings to determine what type of help you will need in an emergency.
Question Yes No Will you be able to shut off the necessary utilities (gas, water, electricity)?
Can you operate a fire extinguisher? Will you be able to carry your emergency supply kit or critical assistive/medical devices?
Will you be able to move or objects that might block your evacuation path? Note: You should move or secure objects that could block an evacuation route.
Are there potential barriers to being able to evacuate? Do you have an alternate exit path?
Are you able to hear or see warnings or announcements?
• Identify Members of Your Support Network: A personal support network can consist of friends, roommates, family members, relatives, personal attendants, coworkers, and neighbors who will check in with you in an emergency to ensure you are OK and provide assistance if needed. Do not depend on any one person. Identify a minimum of three people at each location where you regularly spend your time: job, home, school, volunteer site, etc.
• Meet With Your Network Members: Invite members of your network to a planning get-together (making it a social event by adding coffee, tea, and cookies works well). During this session:
• Discuss each other’s needs and how you can help one another. Explain how you may need different help in the event of an evacuation, power outage, darkness, or other conditions.
• Provide written emergency contact information with key phone numbers of relatives and medical professionals. Include relevant medical information, such as the types of medications, doses, and locations where items can be found. Also, note any vital things to check in the event of a fall or other injury.

WHO CAN YOU COUNT ON? WHO COUNTS ON YOU?
September 2011 Page 23
ESTABLISHING A SUPPORT NETWORK: HANDOUT
• Show the members how to operate and move any assistive devices or specialized
medical equipment. Attach laminated labels to equipment with operating instructions.
• If you have service animals, make sure that they are familiar with members.
• Give copies of keys to get into your home or office in case of an emergency.
• Work out a system for contacting one another during a crisis. Signals can be whistles, shouting, knocking, or visual signs. Do not count on telephones as the only means of communication.
• Develop a system for letting other know when you will be traveling.
• Select a way to communicate to let the members of the network know that you are safe.
• Finally, make a commitment to get together periodically to review the plan. "Carry-With-You" Supplies to Keep With You at All Times • Emergency health information card
• Instructions on personal assistance needs and how best to provide them
• Copy of emergency documents
• Essential medications/copies of prescriptions (at least a week's supply)
• Flashlight on key ring
• Signaling device (whistle, beeper, bell)
• Small battery-operated radio and extra batteries
• Packing/Container suggestions: a fanny pack, backpack, or drawstring bag that can be hung from a wheelchair, scooter, or other assistive device
WHO CAN YOU COUNT ON? WHO COUNTS ON YOU?
September 2011 Page 24
ESTABLISHING A SUPPORT NETWORK: HANDOUT
Specialized Supplies to Add to Emergency Kits Check with your medical provider to determine a sufficient quantity of specialized supplies to last for up to 2 weeks (medication syringes, colostomy supplies, respiratory aids, catheters, padding, distilled water, etc.). If you have chemical sensitivities or a respiratory or cardiac condition, store towels, masks, industrial respirators, or other supplies you can use to filter your air supply. Emergency shelters or first aid stations might not be able to meet your supply needs. In an emergency, supplies will be limited. Store supplies in areas you anticipate will be easy to reach after a disaster. If you are unable to afford extras, consider contacting disability-specific organizations such as the Multiple Sclerosis Society, Arthritis Foundation, United Cerebral Palsy Association, etc. They may be able to assist you in gathering low-cost or no-cost emergency supplies and medications. Additional items to consider: • Extra eyeglasses, hearing aids if you have them or have coverage for them
• Battery chargers and extra batteries for hearing aids, motorized wheelchairs, or other battery-operated medical or assistive technology devices
• Copies of medical prescriptions, doctor’s orders, and the style and serial numbers of the support devices you use
• Medical alert tags or bracelets or written descriptions of your disability and support needs, in case you are unable to describe the situation in an emergency
• Supplies for your service animal
• Medical insurance cards, Medicare/Medicaid cards, physician contact information, list of your allergies and health history
• A list of the local nonprofit or community-based organizations that know you or assist people with access and functional needs similar to yours
• A list of personal contacts, family, and friends that you may need to contact in an emergency
• A laminated personal communication board, if you might need assistance with being understood
• If possible, extra medicine, oxygen, insulin, catheters, or other medical supplies you use regularly
• If you use a motorized wheelchair, have a lightweight manual chair available for emergencies. Know the size and weight of your wheelchair, in addition to whether or not it is collapsible, in case it has to be transported.
• Even if you do not use a computer yourself, consider putting important information onto a thumb drive for easy transport in an evacuation.

September 2011 Page 25
Activity Title: Easy Out: Getting to Safety Description: Planning for and practicing an evacuation Approximate Time: 30 minutes

EASY OUT: GETTING TO SAFETY
September 2011 Page 26
FACILITATOR GUIDE
ACTIVITY: PLANNING FOR AND PRACTICING EVACUATION Purpose: The purpose of this activity is to educate individuals and families about how to prepare for an evacuation. Objectives: • Explore planning issues to consider in safely evacuating.
• Complete an evacuation planning checklist. Preparation and Needed Materials: Prior to conducting this activity, you may want to: • Gather copies of local road maps for participants and know the evacuation routes,
highlighting them on the maps. You can use online mapping Web sites.
• Gather copies for participants of local bus, train, and subway routes as applicable.
• Gather information about local shelters if possible or have a phone number or Web address to provide to participants for more information.
• Try the suggested Road Trip Weekend activity so you can share lessons learned with participants.
Presentation Tips: • Welcome participants to the session.
• Explain that by the end of the session, they will have planned how they will evacuate their homes and know what they will need to do to prepare for that evacuation.
• Ask the participants the following discussion questions: Where would you get information about orders to evacuate? Where would you go? How far should you go? What will you do if you or a member of your household needs assistance to safely evacuate?
• Acknowledge the answers and then present the following key points:
• You can follow developing storms, watches, and warnings on local media or a NOAA weather radio. Other options are battery-operated radios, computers, cell phones, pagers, and television to get notice of evacuation. You can also contact your local emergency management office for local information on evacuation.

EASY OUT: GETTING TO SAFETY
September 2011 Page 27
FACILITATOR GUIDE
ACTIVITY: PLANNING FOR AND PRACTICING EVACUATION Presentation Tips: (Continued)
• Evacuate to the home of family or friends in an unaffected part of the county, if possible. If that isn’t possible, try a motel or hotel. Use shelters as a last resort. They are not designed for comfort and do not generally accept pets.
• Depending upon the type of emergency, try to stay within your local area when you evacuate. It reduces the chance of being caught in traffic and makes it easier to return home after the emergency is over.
• If you or someone in your household needs assistance, register with the local emergency management office. (Write that number where participants can see it.) If you’re in a multifamily, multistory building, you may want to register with the building staff as well. You can also ask your neighbors for help.
• Distribute the Evacuation Checklist handout and maps. Briefly review the items and direct participants to come up with an evacuation plan.
• Optional Activity: Suggest that families may want to plan a “Road Trip Weekend” to rehearse the evacuation plan. Tell them to follow their checklist and plan to do something fun at their destination. They should use the mode of transportation decided on and the route chosen, and bring disaster kits. Besides revealing things they have not considered or flaws in the planning, escaping the normal routine can be fun for the family as well. If you have done the activity beforehand, share the lessons you learned with the group.
• Conclude the session by asking if participants have questions about evacuating. Explain that more information about disaster preparedness, such as stocking a disaster kit and creating a personal support network, are available in other sessions. Thank the participants for attending the session.

EASY OUT: GETTING TO SAFETY
September 2011 Page 28
EVACUATION CHECKLIST: HANDOUT
Plan Where will you go? (Choose both a closer location (within the county), and one outside the
county, in case the type of emergency demands that you go farther away.) Within the county/area ______________________________________________________
Outside the county/area _____________________________________________________
How will you get there? Car Bus Boat Subway Train
What route will you take? (Attach road map with evacuation route highlighted or transit maps.)
Will your transportation mode change if you have to evacuate from work? How will you meet your family? (Make any notes below.)
_________________________________________________________________________
_________________________________________________________________________
_________________________________________________________________________
Will you or a household member need assistance to evacuate safely? If so, what kind of assistance? From whom? Have you talked with them about helping?
_________________________________________________________________________
If so, register with the local emergency management office. Phone number: ____________
If you live in a building, make sure your name is on a current log of those needing assistance to exit the building.
What will you do with pets or livestock? (Contact your veterinarian or the local humane society to find out how to prepare pets/livestock for an emergency.) Note your plans below.
_________________________________________________________________________
What friends or family members should be notified about your evacuation plans? Name ________________________________ Number ___________________________
Name ________________________________ Number ___________________________
Name ________________________________ Number ___________________________

EASY OUT: GETTING TO SAFETY
September 2011 Page 29
EVACUATION CHECKLIST: HANDOUT
Prepare Have extra sets of car keys and house keys made.
Make sure maps or transit routes are attached.
Make sure the car is running well or that you know how to get to the transit station.
Fill the car up with gas or ensure that you have transit fare in advance.
Have cash on hand for expenses.
If you need assistance to evacuate, make sure you have any needed equipment on hand (example: evacuation chair).
Practice telling people quickly and concisely how to assist you if you need help. If you like, write it down here. ________________________________________________________________________________
________________________________________________________________________________
Go Give yourself plenty of time to prepare to leave.
Start out with a destination in mind. Make arrangements with friends or family or make a hotel reservation. If you need assistance, ask the hotel about accessibility options.
Use the plans you developed to take care of your pets/animals.
Tell friends and family what you are doing.
Call the local emergency management office if you or someone in your household needs assistance to evacuate.
Secure your home. Depending on the type of emergency, you may be boarding up windows or moving and securing loose objects in your yard.
Bring disaster kit.

September 2011 Page 30
Activity Title: Storm Safe: Sheltering in Place Description: Staying safe when evacuation is not an option Approximate Time: 20 – 40 minutes

STORM SAFE: SHELTERING IN PLACE
September 2011 Page 31
FACILITATOR GUIDE
ACTIVITY: FINDING SAFE SPOTS TO SHELTER IN PLACE Purpose: The purpose of the activity is to educate individuals and families on finding safe locations to shelter in place during severe weather emergencies. Objective: Identify the safest locations to shelter in place during severe weather emergencies. Presentation Tips: • Welcome participants to the session.
• Tell the participants that the focus of this activity is sheltering in place—whether at home, at work, or in some other location—during severe weather, including hurricanes, tornadoes, winter storms, or heat waves. Safe locations vary depending upon the weather emergency. This activity concentrates on those weather hazards for which sheltering in place may be the best option.
• Distribute the Safe Havens handout. Briefly review the information on the handout.
• Optional Activity: If feasible, have the group do a quick exercise to assess the room you’re meeting in for safety in different weather emergencies. Explain that they won’t always be at home when a weather emergency happens. They have to be able to assess the shelter-in-place potential of other locations as well. Divide the participants into smaller groups. Assign each group a different weather emergency from among the following: hurricane, heat wave, thunderstorm and lightning, tornado, and winter storm. Use weather emergencies that happen in your community. Ask each group the following two questions:
• Is our meeting room a good location for sheltering in place?
• If not, where else could we try in this building?
• Distribute the Mark the Safe Spots handout. Tell participants to identify the safe locations for the weather emergencies listed, using the simple floor plan provided.
• Optional Activity: If feasible, and if participants are made up of families, divide them into family groups. Give a family member a type of weather emergency and tell them to go “hide” in the safe shelter-in-place spot for that hazard. Ask other family members to find him or her. If it’s not feasible to have participants go out into the meeting place, then distribute the Shelter Together: Activities handout and suggest they do one of the activities at home.

STORM SAFE: SHELTERING IN PLACE
September 2011 Page 32
FACILITATOR GUIDE
ACTIVITY: FINDING SAFE SPOTS TO SHELTER IN PLACE Presentation Tips: (Continued) • Conclude the session by reminding the participants that they should observe these
additional precautions during emergencies:
• In some weather emergencies, for certain structures such as mobile homes, it may be safer to evacuate rather than try to find a safe place inside.
• Listen to the radio or television or follow other communications systems for news of developing conditions, warnings, and instructions on what to do.
• Evacuate if ordered to do so by local authorities.
• Thank the participants for attending the session.

STORM SAFE: SHELTERING IN PLACE
September 2011 Page 33
SAFE HAVENS: HANDOUT
Taking shelter is critical in times of disaster. You need to identify safe locations during severe weather, whether at home, work, or some other location. Listed below are the best places to shelter in place for selected weather emergencies. Heat Wave • Stay indoors as much as possible and limit exposure to the sun. • Stay on the lowest floor out of the sunshine if air conditioning is not available. Thunderstorm and Lightning • Stand or sit away from doors and windows that lead outside. • Stand away from concrete walls, and avoid lying on concrete floors. • Close doors and windows to the outside to prevent wind damage and injuries inside the
home. Hurricane • Listen to local watches and warnings about evacuating. • If you live in a high-rise building, hurricane winds are stronger at higher elevations or floors. • If you are unable to evacuate, go to your wind-safe room. • If you don’t have a wind-safe room, take refuge in a small interior room, closet, or hallway on
the lowest level. • Lie on the floor under a table or another sturdy object. Tornado • Go to a pre-designated shelter area such as a safe room, basement, storm cellar, or the
lowest building level. • If there is no basement, go to the center of an interior room on the lowest level (closet,
interior hallway) away from corners, windows, doors, and outside walls. • Put as many walls as possible between you and the outside. Get under a sturdy table and
use pillows, blankets, or other “cushions” to protect your head and neck. As a last resort, use your arms to protect your head and neck.
Winter Storm • Select a location where heat can best be conserved, such as the side of the house that
receives the most sunlight and is away from cold winds. • Interior rooms are probably the best option. • A basement may be a good location. • If necessary, seal off rooms that are not being used by shutting doors, closing window
coverings, etc.
EVACUATE instead of sheltering in place if you are ordered to do so by local authorities.

STORM SAFE: SHELTERING IN PLACE
September 2011 Page 34
MARK THE SAFE SPOTS: HANDOUT
ACTIVITY: FINDING SAFE SPOTS TO SHELTER IN PLACE Purpose: The purpose of this activity is to practice locating safe places in the home during severe weather. Directions: Using one of the sample floor plans below—either for an apartment or for a detached one-story home, locate a safe place for each type of severe weather listed. Indicate your safe location with the suggested abbreviation as follows: • H = Heat Wave
• HR = Hurricane (home is not in a coastal or other flood hazard area)
• TH = Thunderstorm and Lightning
• T = Tornado
• W = Winter Storm

STORM SAFE: SHELTERING IN PLACE
September 2011 Page 35
SHELTER TOGETHER: ACTIVITIES
PRACTICING SHELTERING IN PLACE Purpose: The purpose of these activities is to practice sheltering in place so you can determine what additional resources you might need. Directions: Below are two shelter-in-place activities that you can do at home together with members of your household. Activity #1: Hide and Shelter Seek Using the Mark the Safe Spots handout, give a family member a type of weather emergency and tell him or her to go “hide” in the safe shelter-in-place spot for that hazard. Ask other family members to find him or her. When you find the hiding family member, decide together whether the shelter location is adequate for the threat. Activity #2: Camp In Using the Mark the Safe Spots handout, pick a weather emergency. Gather the family together in that safe spot to hang out. Feel free to bring sleeping bags and snacks. You may even want to assume the power is out and carry flashlights and board games as well. Plan to spend an hour or more at the location. At the end of the activity, ask the family members the following questions: • What was it like to have to stay in this area and not go to other parts of our home?
• What additional items would you have liked in the shelter area?
• What would have made it more comfortable?
• What might you need if you had to stay in this area for 3 hours? What about for 6 hours or more time?
• How would someone find you in this shelter area?

September 2011 Page 36
Activity Title: Disaster Plan Dress Rehearsal Description: Practicing your disaster plan Approximate Time: 30 – 60 minutes

DISASTER PLAN DRESS REHEARSAL
September 2011 Page 37
FACILITATOR GUIDE
ACTIVITY: PRACTICING THE PLAN Purpose: The purpose of this activity is to show individuals and families how to discuss and practice their disaster plans, revising them as necessary, so that the plans are kept current and disaster kits are complete. Objective: In this activity, participants are shown how to discuss and practice their disaster plans in a game. Preparation and Needed Materials: Prior to conducting this activity, you may want to: • Review the Dealing With the Disaster Deck handout and prepare a set for display and
demonstration purposes.
• Have on hand a supply of scissors, adhesive tape, small index cards, and marking pens for the participants to use in constructing their own decks of flash cards.
Presentation Tips: • Welcome participants to the session.
• Explain that by the end of the session, they will be able to assemble a set of flash cards to be used to discuss and practice their family disaster plan.
• Ask the participants the following discussion question: Why is it important to revisit your plan and practice it?
• Acknowledge the answers and then present the following key points:
• Practice helps the steps become second nature, like developing muscle memory in a sport.
• When you revisit the plan and practice it, you know that the equipment works and that your supplies are safe to use.
• Distribute the Dealing With the Disaster Deck handout. Explain that the game lets families discuss important parts of their plans and make sure that those plans are current. The flash cards have key questions about their plan, safety drills that could be done, equipment testing, and disaster supplies. Emphasize that the sample questions on the cards are just a few of the many questions that families could use. Encourage participants to add their own questions to cards, too.

DISASTER PLAN DRESS REHEARSAL
September 2011 Page 38
FACILITATOR GUIDE
ACTIVITY: PRACTICING THE PLAN Presentation Tips: (Continued) • Optional Demonstrations:
• Demonstrate how to separate the flash cards and attach them to small index cards.
• Show the participants the deck of flash cards you prepared beforehand.
• Ask for a volunteer to assist you in demonstrating how to use the cards to question each other about a disaster plan in a simulated household discussion.
• Invite the participants to develop their own deck of flash cards, following the instructions on the handout.
• Thank participants for attending the session. Explain that more information about preparing for disasters will be covered in additional presentations.

DISASTER PLAN DRESS REHEARSAL
September 2011 Page 39
DEALING WITH THE DISASTER DECK: HANDOUT
PLACE THESE CARDS WITH YOUR FAMILY DISASTER PLAN.
ACTIVITY: PRACTICING THE PLAN Review your disaster plan with other family members by playing a game. Use the questions on the flash cards to quiz each other about the plan. Feel free to add other questions based on your family’s needs. Directions: 1. Cut out the cards and attach them to index cards with tape or glue. Write the answer to the
question on the back of the index card. Add your own questions on separate index cards or use the blanks on the next page.
2. Gather the family, distribute the cards evenly, and take turns quizzing each other with the cards.
What are the main hazards we have planned for?
Where can I find a copy of our family disaster plan?
Where can I find our family disaster supply kit?
If I am at school when an emergency happens, how will I reach my parents?
If members of our family are separated during an emergency or disaster, who will they contact?
If I am at home and hear a tornado or other warning siren or alert on the radio or TV, what should I do?
Where can I find our pet disaster supply kit?
If we have an emergency or disaster, what should I immediately do about our pet?
Where can I find a copy of our communications plan?
How often should our family disaster supply kit be checked and updated, and who is responsible for doing it? When was it last checked?
Which family member is responsible for checking our smoke detectors, and how often will they do it? When was it last checked?
Which family member is responsible for checking our fire extinguishers, and how often will they do it? When was it last checked?
If our family is told to evacuate the neighborhood and we are not together, where is our meeting place?
Who is our out-of-state family contact in case of an emergency or disaster?
Where are the main switches for water, gas, and electricity in our house, and how do you turn them on and off?
What should we do if we have a house fire in the middle of the night?
If we have to evacuate our home, what things should we take with us?
What precautions should we take when returning to our home if it has been damaged in a disaster?

DISASTER PLAN DRESS REHEARSAL
September 2011 Page 40
DEALING WITH THE DISASTER DECK: HANDOUT
Use these blank flash cards to create additional questions and cards of your own.

September 2011 Page 41
Activity Title: Hunting Home Hazards Description: Identifying and reducing home hazards Approximate Time: 30 – 60 minutes

HUNTING HOME HAZARDS
September 2011 Page 42
FACILITATOR GUIDE
ACTIVITY: IDENTIFYING HOME HAZARDS Purpose: The purpose of this activity is to educate about hazards in the home. Participants will learn how to identify hazards at home and fix them through a hazard hunt game. Objectives: • Identify types of hazards that commonly exist in homes.
• Assess homes for the presence of these hazards.
• Recognize how to mitigate many common household hazards. Preparation and Needed Materials: Prior to conducting this activity, you may want to: • Place a few potential hazards, such as a poisonous houseplant, in the meeting place for the
activity, or be prepared to point out potential hazards in the meeting place by saying (for example): “What could happen to this overhead light in an earthquake?” or “What would happen to this fluorescent bulb in a fire?” Tailor potential hazards to your local area.
• Conduct a home hazard hunt, so that you can share lessons learned with participants. Presentation Tips: • Welcome participants to the session.
• Explain that by the end of the session, they will be able to identify common household hazards. Participants will also have a checklist to use for a home hazard hunt, along with tips for dealing with chemical emergencies.
• Tell participants that we all want our homes to be safe. However, approximately 6.8 million accidents happen in homes every year. Many more injuries occur when unsafe household conditions are combined with emergency situations such as floods, fires, and earthquakes.
• Ask participants to list common types of hazards in the home. Acknowledge the answers and then present the following types of hazards:
• Chemical hazards
• Electrical hazards
• Fire hazards
• Flood hazards

HUNTING HOME HAZARDS
September 2011 Page 43
FACILITATOR GUIDE
ACTIVITY: IDENTIFYING HOME HAZARDS Presentation Tips: (Continued)
• Structural hazards
• Organic hazards, such as poisonous plants or insects
Add any other types of hazards as necessary.
• Divide the meeting place into grids or areas. Separate participants into groups and assign them each an area. Encourage them to assess the area for potential hazards. Give them 5 minutes to complete the activity.
• Ask each group to report its findings. Supplement what they report as necessary. Some potential hazards in the meeting place might include extension cords and outlets, unsecured heavy furniture and fixtures, fluorescent light bulbs, poisonous house plants, industrial cleaners with chemicals, or structural cracks.
• Next, review the steps that participants could take to mitigate or eliminate each of the hazards found.
• Distribute the handouts on the home hazard hunt and chemical hazards. Encourage the participants to do a home hazard hunt with their household members. If you did one before this session, share any lessons learned.
• Select a common chemical product. Pass out the item and point to the warning label on the package. Note the importance of reading the labels on all products.
• Thank participants for attending the session and tell them additional preparedness information will be covered in future sessions.

HUNTING HOME HAZARDS
September 2011 Page 44
HOME HAZARD HUNT: HANDOUT
ACTIVITY: HAVING A HOME HAZARD HUNT Take the checklist below and divide it into sections that are applicable for your household. Each household member takes one or more sections and goes room by room through the home. Don’t forget to include garages and yards. Check off each item and circle or highlight the things that need to be fixed. Make sure to work together to address the hazards, going through one section at a time. Chemical Hazards (See the separate handout that lists common household chemical hazards.) Are flammable liquids—such as gasoline, cleaning products, acetone, and paint/lacquer
thinner—stored away from the home? Are they in secure containers? Is the area well ventilated?
Do the storage containers have labels stating that they are approved by Underwriters Laboratory (UL) or Factory Mutual (FM)?
Are the containers stored away from heat sources and children?
Do all chemical storage containers have Mr. Yuk labels on them to warn children? Electrical Hazards Are extension and appliance cords in good condition, or are they frayed or cracked?
If extension cords are used, are they “strong enough” or rated for the electrical load they are carrying? Can someone trip over them?
Are extension cords going under rugs or over nails, heaters, or pipes?
Are prongs and plugs tight fitting? Is there one plug per one outlet (as opposed to a cube tap, where multiple plugs go into one outlet)?
Is the wiring in outlets covered by a plate and not exposed?
Do all appliances operate safely and not overheat, short out, smoke, or spark? Fire Hazards Are gasoline, turpentine, paint thinner, kerosene, and charcoal lighter fluid stored away from
heat sources and children?
Are old rags, papers, mattresses, broken furniture, clothes, curtains, or other combustible materials found near electrical equipment, gas appliances, or flammable materials?
Are there dried grass clippings, tree trimmings, or pulled weeds on the property?

HUNTING HOME HAZARDS
September 2011 Page 45
HOME HAZARD HUNT: HANDOUT
Fire Hazards (Continued) Are heaters, candles, or matches in high-traffic areas or accessible to children?
Are heaters standing upright, without extension cords? (If feasible, they should have automatic shutoffs.)
Are there enough fire extinguishers (one for each floor)? Have they been recharged as directed? Do you know how to use them?
Are there enough smoke alarms and carbon monoxide detectors (one for each floor)? Have the batteries been tested and changed as needed? (Change batteries at least once a year; some recommend doing it when you’re setting clocks at the start and end of Daylight Savings Time. If possible, replace the batteries with those lasting10 years. Many fire departments distribute smoke detectors and batteries for those who are unable to purchase them.) Does everyone know what to do when the alarm sounds? If there are people in the house who cannot hear an alarm, install ones that flash and sound.
Organic Hazards Are any of the houseplants poisonous or toxic? (Poisonous types include aloe, peace lily,
and philodendron.) If so, are they out of reach of pets and children?
Have you seen poisonous animals such as spiders or scorpions in the home? Consider pesticides, and always be cautious when reaching into boxes and corners, or putting on shoes.
Is there any visible mold? Treat mold with a solution of bleach and water (no more than 1 cup of bleach in 1 gallon of water) or seek professional help.
Flood Hazards Check gutters and downspouts to be sure they are in good working order and not clogged
with debris. Use pipes to direct drain water away from the foundation.
If storm drains are located near your property, check to ensure they are not clogged with debris or ask your local authorities to do so.
Check for adequate sloping of soil or fill away from your foundation. If needed, add soil or fill around the foundation to obtain more adequate drainage away from the building.
Look for areas where there may be erosion due to fast moving water. If needed, add rocks to slow the movement of water.

HUNTING HOME HAZARDS
September 2011 Page 46
HOME HAZARD HUNT: HANDOUT
Flood Hazards (Continued) Check into the feasibility of having a supply of sandbags or temporary closures for parts of
your building where floodwaters could enter. If you choose this remedy, ensure that household members are prepared to fill the sandbags or place the temporary closure when needed.
If you might experience flood problems, check on the availability and advisability of having flood insurance by contacting local insurance providers.
Structural Hazards Have water heaters, large appliances, bookcases, other tall and heavy furniture, shelves,
mirrors, pictures, and overhead light fixtures been anchored to wall studs?
Have pictures or mirrors been moved away from where people sleep or sit?
Have large or heavy objects been moved to lower shelves or stored somewhere else?
Does the water heater or other gas appliances have flexible gas supply lines?
Are cabinet doors latched or locked so that items cannot fall out?
Are hallways and stairways well lit?
Are hallways and stairways free of clutter?
Have any deep cracks in ceilings or the foundation been repaired? Hazards for Small Children Are safety gates at the bottom and top of stairways?
Are guards around fireplaces, radiators, hot pipes, or wood-burning stoves?
Are sharp edges cushioned with corner guards or other material?
Are curtain cords and shade pulls out of reach?
Is the hot water heater set at a safe temperature (120 degrees or less)?
Are prescription drugs and over-the-counter medicines kept in childproof containers and out of reach?
Are shampoos and cosmetics kept out of reach?

HUNTING HOME HAZARDS
September 2011 Page 47
HOME HAZARD HUNT: HANDOUT
Hazards for Small Children (Continued) Are all sharp objects in the bathroom, kitchen, and other areas kept out of reach?
Are toilet seats and lids down when not in use?
Are outlets covered?
Are beds or cribs away from radiators or other hot surfaces?
Do mattresses fit the sides of cribs snugly? Are crib slats no more than 2-3/8 inches apart?
Do toy boxes have secure lids and safe-closing hinges?

HUNTING HOME HAZARDS
September 2011 Page 48
CHEMICAL EMERGENCIES: HANDOUT
Identifying Chemical Hazards The average household contains many dangerous chemicals found in common products. They can be toxic, or corrosive, meaning that they can wear away containers or harm skin. They may also catch on fire or explode. Below is a list of common household products with potentially dangerous chemicals. Cleaning Products Oven cleaners Drain cleaners Wood and metal cleaners and polishes Toilet cleaners Tub, tile, and shower cleaners Laundry bleach Pool chemicals
Indoor Pesticides Ant sprays and baits Cockroach sprays and baits Flea repellents and shampoo Bug sprays Houseplant insecticides Moth repellents Mouse and rat poisons and baits
Automotive Products Motor oil Fuel additives Carburetor and fuel cleaners Air conditioning refrigerants Starter fluids Automotive batteries Transmission and brake fluid Antifreeze
Workshop/Painting Supplies Adhesives and glues Furniture strippers Oil- or enamel-based paint Stains and finishes Paint thinners and turpentine Paint strippers and removers Photographic chemicals Fixatives and other solvents
Lawn and Garden Products Herbicides Insecticides Fungicides/wood preservatives
Other Flammable Products Propane tanks and other compressed gas cylinders Kerosene Home heating oil Diesel fuel Gas/oil mix Lighter fluid
Miscellaneous Batteries Mercury thermostats or thermometers Fluorescent light bulbs Driveway sealer

HUNTING HOME HAZARDS
September 2011 Page 49
CHEMICAL EMERGENCIES: HANDOUT
Tips for Safe Use of Hazardous Chemicals • Buy only as much of a chemical as you think you will use. Check to see if you can share
leftovers with neighbors or a local business, charity, or government agency.
• Keep products containing hazardous materials in their original containers and never remove the labels unless the container is corroding. Corroding containers should be repackaged and clearly labeled.
• Never store hazardous products in food containers.
• Never mix household hazardous chemicals or waste with other products. Some of them—such as chlorine bleach and ammonia—may react, ignite, or explode.
• Never use gasoline, benzene, or other flammable liquids for starting fires or cleaning indoors.
• Follow the manufacturer’s instructors for the proper use of the household chemical.
• Never smoke while using household chemicals.
• Never use hair spray, cleaning solutions, paint products, or pesticides near an open flame (e.g., pilot light, lighted candle, fireplace, wood-burning stove, etc.). Although you may not be able to see or smell them, vapor particles in the air could catch fire or explode.
• Clean up any chemical spill immediately. Use rags to clean up the spill. Wear gloves and eye protection. Allow the fumes in the rags to evaporate outdoors, then dispose of the rags by wrapping them in newspaper and placing them in a sealed plastic bag in your trash can.
• Dispose of hazardous materials correctly. Take household hazardous waste to a local collection program. Check with your county or State environmental or solid waste agency to learn if there is a household hazardous waste collection program in your area.

HUNTING HOME HAZARDS
September 2011 Page 50
CHEMICAL EMERGENCIES: HANDOUT
Dealing With Chemical Emergencies Post the number of local emergency medical services and the National Poison Control Center by all telephones. Symptoms of poisoning: • Difficulty breathing
• Irritation of the eyes, skin, throat, or respiratory tract
• Changes in skin color
• Headache or blurred vision
• Dizziness
• Clumsiness or lack of coordination
• Cramps or diarrhea If someone is experiencing toxic poisoning symptoms or has been exposed to a household chemical: • Find any containers of the substance that are readily available in order to provide requested
information. Call 911 and then the National Poison Control Center at 1-800-222-1222.
• Follow the emergency operator or dispatcher’s first aid instructions carefully. The first aid advice found on containers may be out of date or inappropriate. Do not give anything by mouth unless advised to do so by a medical professional.
• Discard clothes that may have been contaminated. Some chemicals may not wash out completely and can cross-contaminate other clothing or continue to cause problems.
If there is a danger of fire or explosion: • Get out of the residence immediately. Do not spend time collecting items or calling the fire
department when you are in danger. Call the fire department from outside (using a cellular phone or a neighbor’s phone) after you are safely away from danger.
• Stay upwind and away from the residence to avoid breathing toxic fumes. The way to know you are upwind is to look at flags, trees, or other items moving. Upwind is the opposite direction of the way the wind is blowing.
POST POISON CONTROL NUMBER BY PHONES!
1-800-222-1222

September 2011 Page 51
Activity Title: An Ounce of Fire Prevention Description: Identifying and reducing fire risks Approximate Time: 30 minutes

AN OUNCE OF FIRE PREVENTION
September 2011 Page 52
FACILITATOR GUIDE
ACTIVITIES: GETTING FIRED UP FOR PREVENTION Purpose: The purpose of these activities is to encourage participants to take measures to prevent fires in their homes. Objectives: • Identify the elements necessary for a fire.
• Demonstrate how to use a fire extinguisher. Preparation and Needed Materials: Prior to conducting these activities, you may want to: • Contact the fire department about participating in this session.
• Collect materials and items to demonstrate effective fire prevention measures. Presentation Tips: Refer the participants to the Fire Prevention Guidelines handout. • Welcome the participants. Explain that more than 3,500 Americans die each year in fires
and approximately 18,000 are injured. An overwhelming number of fires occur in the home. This presentation reviews time-tested ways to prevent and survive a fire.
• Ask participants to review the items on the handout. After giving them time to review the handout, point out the following guidelines:
• Keep Working Smoke Detectors: The single most important thing is to have a working smoke detector. Working smoke alarms can double your chances of survival. Install a smoke alarm on every level of your home. Test it monthly, keep it free of dust, and replace the battery at least once a year. Smoke alarms themselves should be replaced after 10 years of service, or as recommended by the manufacturer. Note: Consider installing a carbon monoxide detector if your dwelling has:
• Liquid-fueled space heaters (kerosene or propane).
• An attached garage.
• Gas appliances (furnace, stove, fireplace, clothes dryer, or hot water heater).
• Oil heat.
• A wood stove.
If you live in an all-electric single family residence without any combustion-type appliances or an attached garage, you may not need a residential carbon monoxide detector.

AN OUNCE OF FIRE PREVENTION
September 2011 Page 53
FACILITATOR GUIDE
ACTIVITIES: GETTING FIRED UP FOR PREVENTION Presentation Tips: (Continued)
• Reduce Your Fire Risk: Take steps to reduce flammable materials in your home. Reduce flammable chemicals and materials in your home and store them away from an ignition source.
• Reduce the amount of hazardous materials in the home. Store flammable materials, liquids and solvents in metal containers outside the home, at least 30 feet away from structures and wooden fences.
• Prevent electrical fires. Never overload circuits or extension cords. Do not place cords and wires under rugs, over nails, or in high-traffic areas. Immediately shut off and unplug appliances that sputter, spark, or emit an unusual smell. Have them professionally repaired or replaced.
• Avoid cooking fires. Most home fires occur in the kitchen, and cooking fires are the leading cause of injuries from fire. Stay in the kitchen when you are frying, grilling, or broiling food. If you leave the kitchen for even a short period of time, turn off the stove.
• STOP, DROP, and ROLL: Clothes can catch on fire if they get close to heat sources such as open fires or stoves, or when playing with matches or lighters. If clothing catches on fire, a natural reaction may be to run. The moment clothes start to burn, stop where you are, drop to the ground, cover your face with your hands and roll repeatedly to smother the flames. Note: You may want to demonstrate “STOP, DROP, and ROLL.”
• Educate Children: Children under 5 are naturally curious about fire. Many play with matches and lighters. Fifty-two percent of all children who die in fires are under age 5. Take the mystery out of fire play by teaching your children that fire is a tool, not a toy.
• Practice an Escape Plan: Practice an escape plan from every room in the house. Caution everyone to stay low to the floor when escaping from fire (“GET LOW and GO”) and never to open doors that are hot. Select a location where everyone can meet after escaping the house. Get out then call for help.

AN OUNCE OF FIRE PREVENTION
September 2011 Page 54
FACILITATOR GUIDE
ACTIVITIES: GETTING FIRED UP FOR PREVENTION Demonstrate the Activities: Distribute the Getting Fired Up for Prevention handout. Explain that the participants can complete these two activities with members of their households. Note that you will demonstrate the activities. Activity #1: Reduce Fire Risks 1. Refer the participants to the drawings of the rooms. Ask the participants to identify the
hazards in each room. If not mentioned, add the hazards listed below:
Overloaded electrical outlet Candle too close to upholstered materials and left unattended Television left on and unattended Mesh screen missing from in front of the fireplace Newspapers left too close to the fireplace where a spark could ignite them Smoke alarm battery missing
Towel too close to the stove top Child cooking alone Pot handle turned in the wrong direction – it should be turned to the center of the stove to prevent burns Smoke alarm battery missing in hallway
Clothing draped over lamp where it could start to burn An object (duck) placed on a space heater where it could start to burn Space heater left on when no one is in the room Clothing left too close to the space heater where it could catch fire Smoke alarm battery missing
2. Next, divide the participants into teams and have them complete a room-by-room search for possible fire hazards. At the end of the search, have the teams complete the checklists and report their findings. You may want to “plant” mockup of hazards in the rooms that are not dangerous.

AN OUNCE OF FIRE PREVENTION
September 2011 Page 55
FACILITATOR GUIDE
ACTIVITIES: GETTING FIRED UP FOR PREVENTION Demonstrate the Activities (Continued) Activity #2: Have a Plan 1. Refer the participants to the handout on developing a fire escape plan. Ask the participants
to work in their teams to develop an escape plan for the room or floor where you are meeting.
2. After the plans are developed, ask each team to present the plan.
3. Next, ask the participants to identify how they develop and practice fire escape plans for their homes.

AN OUNCE OF FIRE PREVENTION
September 2011 Page 56
FIRE PREVENTION GUIDELINES: HANDOUT
More than 3,500 Americans die each year in fires and approximately 18,300 are injured. An overwhelming number of fires occur in the home. Review the time-tested ways to prevent and survive a fire. Install Smoke Alarms • Install smoke alarms on every level of your home, including the basement. Many fatal fires
begin late at night or early in the morning, so the U.S. Fire Administration recommends installing smoke alarms both inside and outside of sleeping areas. Some fire departments will install battery-operated smoke alarms in your home at no cost. Contact your local fire department’s non-emergency phone number for more information.
• Test each alarm monthly and ask those living in the home if they heard it (or saw it, if you have a flashing-light type for the hearing impaired).
• Replace the batteries at least once per year, or with long-lasting batteries. If replacing annually, pick a holiday to partner this activity with, so that it becomes a regular function of that holiday. Replace the entire smoke alarm unit after 10 years of service, or as recommended by the manufacturer.
• Never disable a smoke alarm while cooking. A smoke alarm is just doing its job when it sounds while you are cooking or taking a shower with lots of steam.
Develop and Practice a Fire Escape Plan • Ensure that all household members know two ways to escape from every room of your
home.
• Mark the entrance to your property with signs that are clearly visible.
• Make sure everyone knows where to meet outside in case of fire.
• Practice escaping from your home at least twice a year and at different times of the day. Practice waking up to smoke alarms, low crawling, and meeting outside. Make sure everyone knows how to call 911.
• Teach household members to STOP, DROP, and ROLL if their clothes should catch on fire.

AN OUNCE OF FIRE PREVENTION
September 2011 Page 57
FIRE PREVENTION GUIDELINES: HANDOUT
Make Your Home Fire Resistant • Use fire-resistant materials like stone, brick, and metal to protect your home. Avoid using
wood materials that offer the least fire protection.
• Reduce flammable chemicals and materials in your home and store them away from an ignition source.
• Buy only as much of a chemical as you think you will use. Leftover material can be shared with neighbors or donated to a business, charity, or government agency. For example, excess pesticide could be offered to a greenhouse or garden center, and theater groups often need surplus paint.
• Keep products containing hazardous or flammable materials in their original containers and never remove the labels unless the container is corroding. Corroding containers should be repackaged and clearly labeled.
• Store flammable materials, liquids, and solvents in metal containers outside the home, at least 30 feet away from structures and wooden fences.
• Cover all exterior vents, attics, and eaves with metal mesh screens no larger than 6 millimeters.
• Use fire-resistant draperies for added window protection.
• Make sure water sources, such as hydrants and ponds, are accessible to the fire department.
• Avoid using lighted candles. If you do use candles, ensure they are in sturdy metal, glass, or ceramic holders and placed where they cannot be easily knocked down.
• Set a good example by using matches, lighters, and fire carefully. Children should never be allowed to play with matches, lighters, or candles.

AN OUNCE OF FIRE PREVENTION
September 2011 Page 58
FIRE PREVENTION GUIDELINES: HANDOUT
Be Prepared for a High-Rise Fire Emergency • Never lock fire exits or doorways, halls, or stairways. Fire doors provide a way out during
the fire and slow the spread of fire and smoke. Never prop stairway or other fire doors open.
• Learn your building evacuation plan. Make sure everyone knows what to do if the fire alarm sounds. Plan and practice your escape plan together.
• Be sure your building manager posts evacuation plans in high-traffic areas, such as lobbies.
• Learn the sound of your building's fire alarm and post emergency numbers near all telephones.
• Know who is responsible for maintaining the fire safety systems. Make sure nothing blocks these devices and promptly report any sign of damage or malfunction to the building management.
• Do not assume anyone else has already called the fire department.
• Immediately call your local emergency number. Early notification of the fire department is important. The dispatcher will ask questions regarding the emergency. Stay calm and give the dispatcher the information requested.
Maintain Chimneys (if relevant) • Have your chimney inspected and cleaned annually by a certified specialist.
• Insulate chimneys and place spark arresters on top.
• Extend the chimney at least 3 feet above the roof.
• Remove branches hanging above and around the chimney. Let Your Landscape Defend Your Property • Trim grass on a regular basis up to 100 feet surrounding your home.
• Create defensible space by thinning trees and brush within 30 feet around your home.
• Beyond 30 feet, remove dead wood, debris, and low tree branches.
• Landscape your property with fire-resistant plants and vegetation to prevent fire from spreading quickly.
• Stack firewood at least 30 feet away from your home and other structures.

AN OUNCE OF FIRE PREVENTION
September 2011 Page 59
FIRE PREVENTION GUIDELINES: HANDOUT
Follow Local Burning Laws • Do not burn trash or other debris without proper knowledge of local burning laws,
techniques, and the safest times of day and year to burn. Contact your local fire department for a permit and information on conditions.
• Before burning debris in a wooded area, make sure you notify local authorities and obtain a burning permit.
• Use an approved incinerator with a safety lid or covering with holes no larger than 3/4-inch.
• Create at least a 10-foot clearing around the incinerator before burning debris. Avoid Electrical Fires • Routinely check your electrical appliances and wiring.
• Frayed wires can cause fires. Replace all worn, old, or damaged appliance cords immediately.
• Replace any electrical tool if it causes even small electrical shocks, overheats, shorts out, or gives off smoke or sparks.
• Keep electrical appliances away from wet floors and counters; pay special attention to electrical appliances in the bathroom and kitchen.
• Buy electrical products evaluated by a nationally recognized laboratory, such as Underwriters Laboratories (UL).
• Keep clothes, curtains, and other potentially combustible items at least 3 feet from all heaters.
• If an appliance has a three-prong plug, use it only in a three-slot outlet. Never force it to fit into a two-slot outlet or extension cord.
• Do not allow children to play with or around electrical appliances like space heaters, irons, and hair dryers.
• Use safety closures to "child-proof" electrical outlets.
• Use electrical extension cords wisely; never overload extension cords or wall sockets.
• Immediately shut off, then professionally replace, light switches that are hot to the touch and lights that flicker.

AN OUNCE OF FIRE PREVENTION
September 2011 Page 60
FIRE PREVENTION GUIDELINES: HANDOUT
Avoid Cooking Fires • Plug microwave ovens and other cooking appliances directly into an outlet. Never use an
extension cord for a cooking appliance, as it can overload the circuit and cause a fire.
• Stay in the kitchen when you are frying, grilling, or broiling food. If you leave the kitchen for even a short period of time, turn off the stove.
• If you are simmering, baking, roasting, or boiling food, check it regularly, remain in the home while food is cooking, and use a timer to remind you that you are cooking.
• Keep anything that can catch fire – potholders, oven mitts, wooden utensils, paper or plastic bags, food packaging, towels, or curtains – away from your stovetop.
• Wear short, close-fitting or tightly rolled sleeves when cooking. Loose clothing can dangle onto stove burners and catch fire if it comes into contact with a gas flame or electric burner.
• When young children are present, use the stove's back burners whenever possible. Never hold a child while cooking, drinking, or carrying hot foods or liquids.
• When children are old enough, teach them to cook safely. Supervise them closely. Know How and When to Fight Cooking Fires • When in doubt, just get out. When you leave, close the door behind you to help contain the
fire. Call 911 or the local emergency number after you leave.
• Always keep an oven mitt and a lid nearby when you are cooking. If a small grease fire starts in a pan, smother the flames by carefully sliding the lid over the pan (make sure you are wearing the oven mitt).
• Turn off the burner. Do not move the pan. To keep the fire from restarting, leave the lid on until the pan is completely cool.
• In case of an oven fire, turn off the heat and keep the door closed to prevent flames from burning you or your clothing.
• If you have a fire in your microwave oven, turn it off immediately and keep the door closed. Never open the door until the fire is completely out. Unplug the appliance if you can safely reach the outlet.

AN OUNCE OF FIRE PREVENTION
September 2011 Page 61
ACTIVITIES: GETTING FIRED UP FOR PREVENTION
ACTIVITY #1: REDUCE FIRE RISKS Review the Fire Prevention Guidelines handout. Next, identify or circle the fire hazards in each room below.
Living Room
Kitchen
Bedroom
Source: http://www.firesafety.gov/kids

AN OUNCE OF FIRE PREVENTION
September 2011 Page 62
ACTIVITIES: GETTING FIRED UP FOR PREVENTION
ACTIVITY #1: REDUCE FIRE RISKS Next, have all household members help you conduct a room-by-room search for possible fire hazards. At the end of the search, check off the following items that apply: All smoke alarms work when tested monthly.
All escape routes are clear of clutter and easily accessible.
Curtains and other fabrics that can burn are away from the stovetop or other heat sources.
Electrical cords are in good condition (not damaged).
Appliances and lights are plugged into separate electrical outlets. Note: Try to unplug all appliances when you are done using them.
All extension cords in use are safe (not under carpets or across walking areas). Note: Extension cords are not permanent solutions for power needs.
The clothes dryer has a clean vent and filter (no lint build-up). Note: Be sure to clean the lint tray in your dryer before each use and check around the drum for any accumulated lint. Do not let your dryer continue running when you leave your home.
If you allow smoking, cigarettes are not left unattended and large, deep ashtrays are used.
Flammable materials, liquids, and solvents are stored safely away from heat sources.
Firewood, gasoline, newspapers, and other flammable materials are not stored close to the home and other structures.
Water sources, such as hydrants and ponds, are accessible to the fire department.
Matches, lighters, and candles are not within reach of children.
The furnace/air conditioning system has been inspected in the past year.
The chimney has been inspected and cleaned in the past year.
Outdoor grills are kept at least 3 feet away from your home.
Grass up to 100 feet surrounding the home is kept trimmed. Note: You should try to create defensible space by thinning trees and brush within 30 feet around your home.
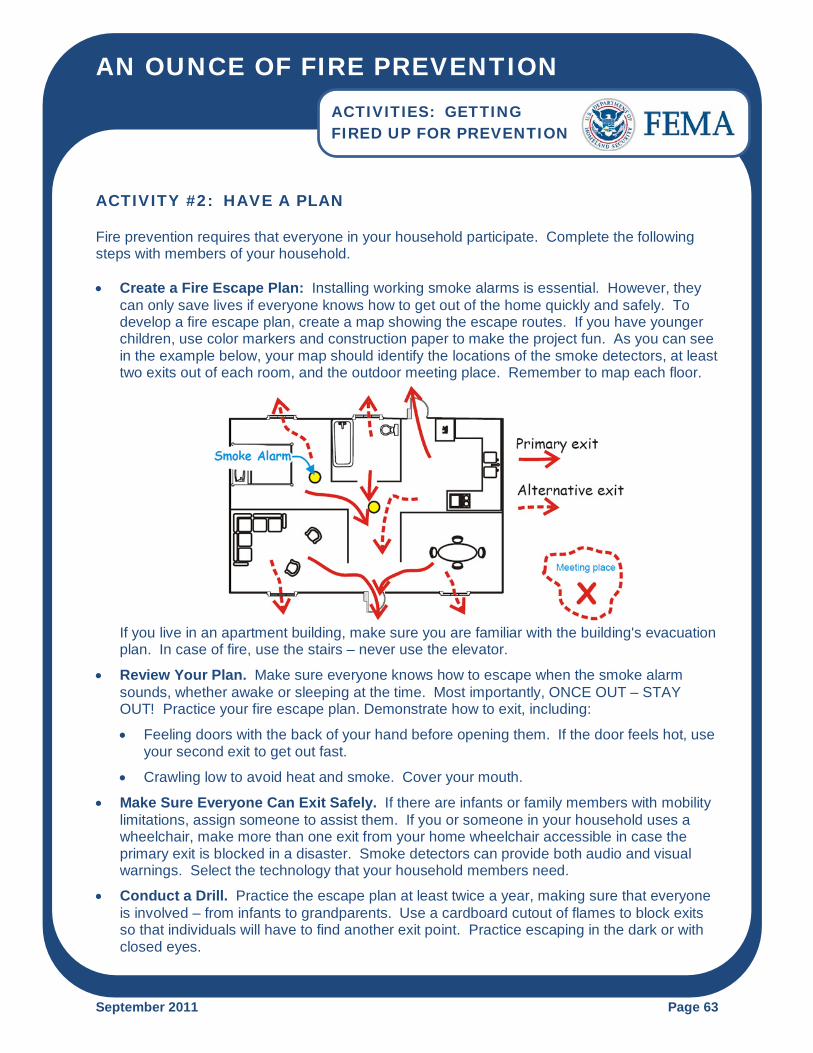
AN OUNCE OF FIRE PREVENTION
September 2011 Page 63
ACTIVITIES: GETTING FIRED UP FOR PREVENTION
ACTIVITY #2: HAVE A PLAN Fire prevention requires that everyone in your household participate. Complete the following steps with members of your household. • Create a Fire Escape Plan: Installing working smoke alarms is essential. However, they
can only save lives if everyone knows how to get out of the home quickly and safely. To develop a fire escape plan, create a map showing the escape routes. If you have younger children, use color markers and construction paper to make the project fun. As you can see in the example below, your map should identify the locations of the smoke detectors, at least two exits out of each room, and the outdoor meeting place. Remember to map each floor.
If you live in an apartment building, make sure you are familiar with the building's evacuation plan. In case of fire, use the stairs – never use the elevator.
• Review Your Plan. Make sure everyone knows how to escape when the smoke alarm sounds, whether awake or sleeping at the time. Most importantly, ONCE OUT – STAY OUT! Practice your fire escape plan. Demonstrate how to exit, including:
• Feeling doors with the back of your hand before opening them. If the door feels hot, use your second exit to get out fast.
• Crawling low to avoid heat and smoke. Cover your mouth.
• Make Sure Everyone Can Exit Safely. If there are infants or family members with mobility limitations, assign someone to assist them. If you or someone in your household uses a wheelchair, make more than one exit from your home wheelchair accessible in case the primary exit is blocked in a disaster. Smoke detectors can provide both audio and visual warnings. Select the technology that your household members need.
• Conduct a Drill. Practice the escape plan at least twice a year, making sure that everyone is involved – from infants to grandparents. Use a cardboard cutout of flames to block exits so that individuals will have to find another exit point. Practice escaping in the dark or with closed eyes.

September 2011 Page 64
Activity Title: Putting Out Fires Description: Using a fire extinguisher Approximate Time: 30 – 60 minutes

PUTTING OUT FIRES
September 2011 Page 65
FACILITATOR GUIDE
ACTIVITY: PUTTING OUT FIRES Purpose: The purpose of this activity is to educate participants about how to extinguish a fire. Objectives: • Identify the elements necessary for a fire.
• Demonstrate how to use a fire extinguisher. Preparation and Needed Materials: Prior to conducting this activity: • Ask the local fire department to participate by setting a controlled fire and demonstrate how
to use a fire extinguisher. You should not do this activity without the support of the local fire department.
• Determine if local merchants or organizations will donate fire extinguishers to those who cannot afford them.
Presentation Tips: Refer the participants to the Fire Basics handout. • Explain that fire requires the following three elements to exist:
• Heat: Heat is required to elevate the temperature of a material to its ignition point. Sources of heat include matches, stoves, sparks, etc.
• Fuel: The fuel for a fire may be a solid (e.g., coal, wood, paper, cloth, hay, etc.), liquid (e.g., gasoline, kerosene, alcohol, paint, cooking oil, etc.), or gas (e.g., propane, natural gas, butane, etc.). The type and quantity of the fuel will determine which method should be used to extinguish the fire.
• Oxygen: Most fires will burn vigorously in any atmosphere of at least 20 percent oxygen. Without oxygen, most fuels could be heated until entirely vaporized, yet would not burn.
• Note that these three elements, called the “fire triangle,” create a chemical exothermic reaction, which is fire. Ask participants to find sources of heat and fuel in the meeting room or building.

PUTTING OUT FIRES
September 2011 Page 66
FACILITATOR GUIDE
ACTIVITY: PUTTING OUT FIRES Presentation Tips: (Continued) • Next, explain each class of fire. Emphasize the following key points:
• It is very important to identify the type of fuel feeding the fire to select the correct method and agent for extinguishing the fire.
• Never use water on a fire unless you know what is burning. Water conducts electricity which could spread the problem and cause more shorting in the equipment. Water will also carry burning oil, gas, and other petroleum products into new areas to ignite.
• Distribute the Fire Extinguishers handout. Using a fire extinguisher, explain the features and
capabilities of fire extinguishers. Make sure to point out the symbols and information concerning the fire classes and capacity of the fire extinguisher(s). Ask the participants to find the list of questions to answer when determining whether to use a fire extinguisher. Give the participants time to review the questions. Emphasize that if you answer “NO” to any of these questions or if you are unable to put out the fire in 5 seconds using the extinguisher, you should not use a fire extinguisher. Tell the participants in that case, they should: • Leave the building immediately.
• Shut all doors as you leave to slow the spread of the fire.
• As soon as you get out of the building, call 911. If you answer “YES” to all of the questions but still feel unable to extinguish the fire, you should leave immediately. You should always remember the 5-second rule.
• Activity: Present some “what-if” situations and have the participants determine whether to
use the fire extinguisher. Provide feedback on the participants’ decisions.

PUTTING OUT FIRES
September 2011 Page 67
FACILITATOR GUIDE
ACTIVITY: PUTTING OUT FIRES Presentation Tips: (Continued) • Next, refer the participants to the “PASS” steps illustrated on the handout. Explain each of
the following steps:
• STEP 1: PULL. Pull the pin. This will also break the tamper seal.
• STEP 2: AIM. Aim low, pointing the extinguisher nozzle (or its horn or hose) at the base of the fire. Note: Do not touch the plastic discharge horn on CO2 extinguishers; it could get very cold and may damage skin.
• STEP 3: SQUEEZE. Squeeze the handle to release the extinguishing agent.
• STEP 4: SWEEP. Sweep from side to side at the base of the fire until it appears to be out. Watch the area. If the fire re-ignites, repeat steps 2 through 4.
• Demonstration: Work with your fire department as they set a small, contained fire. Demonstrate how to put out the fire using the extinguisher. If you have the time and resources, have each participant practice using a fire extinguisher. Do not do this activity unless the local fire department is there with you!
• Distribute the Fire Safety Rules handout. Review the safety guidelines. Emphasize that only those trained in the proper use and maintenance of fire extinguishers should consider using them when appropriate.
• Ask the participants if they have any questions. Respond to any questions and tell the participants about other related sessions and community resources.
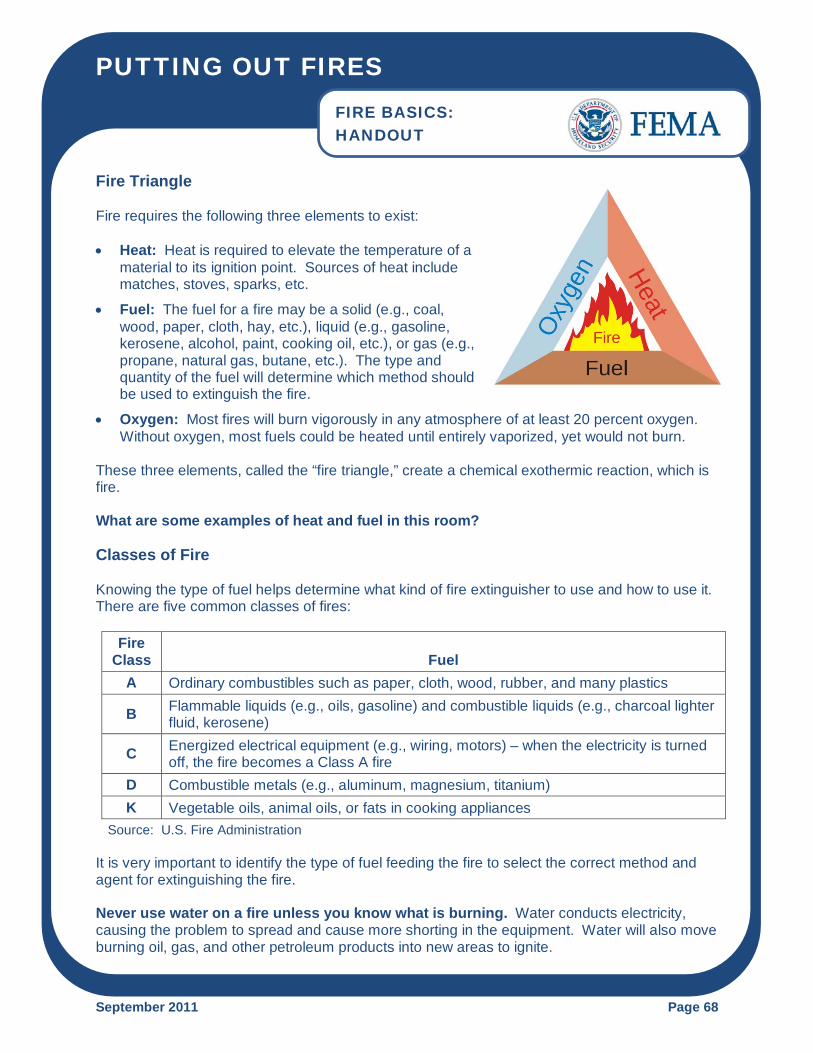
PUTTING OUT FIRES
September 2011 Page 68
FIRE BASICS: HANDOUT
Fire Triangle Fire requires the following three elements to exist: • Heat: Heat is required to elevate the temperature of a
material to its ignition point. Sources of heat include matches, stoves, sparks, etc.
• Fuel: The fuel for a fire may be a solid (e.g., coal, wood, paper, cloth, hay, etc.), liquid (e.g., gasoline, kerosene, alcohol, paint, cooking oil, etc.), or gas (e.g., propane, natural gas, butane, etc.). The type and quantity of the fuel will determine which method should be used to extinguish the fire.
• Oxygen: Most fires will burn vigorously in any atmosphere of at least 20 percent oxygen. Without oxygen, most fuels could be heated until entirely vaporized, yet would not burn.
These three elements, called the “fire triangle,” create a chemical exothermic reaction, which is fire. What are some examples of heat and fuel in this room? Classes of Fire Knowing the type of fuel helps determine what kind of fire extinguisher to use and how to use it. There are five common classes of fires:
Fire Class
Fuel
A Ordinary combustibles such as paper, cloth, wood, rubber, and many plastics
B Flammable liquids (e.g., oils, gasoline) and combustible liquids (e.g., charcoal lighter fluid, kerosene)
C Energized electrical equipment (e.g., wiring, motors) – when the electricity is turned off, the fire becomes a Class A fire
D Combustible metals (e.g., aluminum, magnesium, titanium) K Vegetable oils, animal oils, or fats in cooking appliances
Source: U.S. Fire Administration It is very important to identify the type of fuel feeding the fire to select the correct method and agent for extinguishing the fire. Never use water on a fire unless you know what is burning. Water conducts electricity, causing the problem to spread and cause more shorting in the equipment. Water will also move burning oil, gas, and other petroleum products into new areas to ignite.

PUTTING OUT FIRES
September 2011 Page 69
FIRE EXTINGUISHERS: HANDOUT
Fire Extinguishers: Overview Understanding Fire Extinguishers • Portable fire extinguishers are invaluable for putting
out small fires. A well prepared home or workplace will have at least two portable fire extinguishers of the appropriate type for the location.
• The type of fuel that is burning will determine which resources to select to fight a fire. Most household fires are:
Class A (ordinary combustible)
Class B (flammable liquids)
Class C (energized electrical equipment)
Class D (flammable metals – commercial use)
Class K (cooking oils, animal fats)
• A dry chemical extinguisher can be used on any type of fire. Common characteristics of dry
chemical extinguishers include:
• Capacity. Approximately 10 to 20 seconds discharge time.
• Range. Standard range is 8 to 12 feet.
• Pressure. Standard pressure is 175 to 250 pounds per square inch.
Deciding to Use a Fire Extinguisher: Before attempting to put out a fire with a portable fire extinguisher, you must quickly answer the following questions: • Has someone called the fire department?
• Are there two ways to exit the area quickly and safely if I attempt to extinguish the fire? (The first priority for you is safety.)
• Do I have the right type of extinguisher for the type of fire?
• Is the extinguisher large enough for the fire?
• Is the fire small and contained (like in a wastepaper basket)?
• Is the area free from other dangers, such as hazardous materials or any debris?

PUTTING OUT FIRES
September 2011 Page 70
FIRE EXTINGUISHERS: HANDOUT
Fire Extinguishers: Overview (Continued) If you answer “NO” to any of these questions or if you will be unable to put out the fire in 5 seconds using the extinguisher, you should not use a fire extinguisher. Rather, you should:
• Leave the building immediately.
• Shut all doors as you leave to slow the spread of the fire.
• As soon as you get out of the building, call 911. If you answer “YES” to all of the questions but still feel unable to extinguish the fire, you should leave immediately. You should always remember the 5-second rule. If the fire is extinguished in 5 seconds and the area is safe, you should stay and carefully check the fire scene for hidden fire or sparks in an effort to prevent the fire from rekindling. Separate any burned or charred material to allow it to cool completely. Fire Extinguisher: Steps To use a fire extinguisher, remember “PASS”:
P PULL. Pull the pin. This will also break the tamper seal.
A AIM. Aim low, pointing the extinguisher nozzle (or its horn or hose) at the base of the fire. Stand approximately 8 feet away. Note: Do not touch the plastic discharge horn; it may get very cold and may damage skin.
S SQUEEZE. Squeeze the handle to release the extinguishing agent.
S SWEEP. Sweep from side to side at the base of the fire until it appears to be out. Watch the area. If the fire re-ignites, repeat steps 2 through 4.

PUTTING OUT FIRES
September 2011 Page 71
FIRE EXTINGUISHERS: HANDOUT
Fire Extinguisher: Steps (Continued) When using a fire extinguisher: • Always stand with an exit at your back.
• Stand several feet away from the fire, moving closer once the fire starts to diminish.
• Use a slow, sweeping motion and aim the fire extinguisher nozzle at the base of the fire.
• If possible, use a "buddy system" to have someone back you up or to call for help if something goes wrong.
• After putting out the fire, call 911. Be sure to watch the area for a while to ensure the fire does not re-ignite.
Installing and Maintaining Fire Extinguishers • Extinguishers should be installed in plain view, above the reach of children, near an escape
route, and away from stoves and heating appliances.
• Extinguishers require routine care. Read your operator's manual to learn how to inspect your extinguisher. Follow the manufacturer's instructions on maintenance.
• You must service rechargeable models after every use. Disposable fire extinguishers can be used only once and must be replaced after use.
If you have the slightest doubt about your ability to stop the fire . . . EVACUATE IMMEDIATELY!

PUTTING OUT FIRES
September 2011 Page 72
FIRE SAFETY RULES: HANDOUT
• Always have two ways to exit the fire area. Fires spread much faster than you might
think. Always have a backup escape plan in case your main escape route becomes blocked.
• Look at the door. If air is being sucked under the door or smoke is coming out the top of the door, do not touch the door.
• Feel closed doors with the back of the hand, working from the bottom of the door up. Do not touch the door handle before feeling the door. If the door is hot, there is fire behind it. Do not enter! Opening the door will feed additional oxygen to the fire.
• Confine the fire, whenever possible, by closing doors and keeping them closed.
• Stay low to the ground. Smoke will naturally rise. Keeping low to the ground will provide you with fresher air to breathe.
• Don’t get too close. Stay near the outer range of your extinguisher. If you feel the heat, you are too close.
• Never turn your back on a fire when backing out.
• When you have extinguished the fire, carefully check to be sure that it is out, and stays out. Sometimes, what you don’t do when suppressing fires is as important as what you should do.
• Don’t forget that your personal safety is your first priority. Don’t put it at risk.
• Don’t try to suppress a large fire. If you can’t put out the fire in 5 seconds or less, the fire it too large. Get out.
• Don’t enter smoke-filled areas. Suppressing fires in smoke-filled areas requires equipment other than a portable fire extinguisher.
Remember . . . Only those trained in the proper use and maintenance of fire extinguishers should consider using them when appropriate.

September 2011 Page 73
Activity Title: Home Safe Home Description: Implementing simple risk-reduction (mitigation) measures Approximate Time: 30 – 60 minutes

HOME SAFE HOME
September 2011 Page 74
FACILITATOR GUIDE
ACTIVITY: SIMPLE RISK REDUCTION MEASURES Purpose: The purpose of the activity is to encourage individuals to implement simple measures to reduce common home hazards. Objective: Implement actions to reduce the risk of loss of life and property from common hazards. Preparation and Needed Materials: Prior to conducting this activity, you should: • Review the Emergency Management Institute (EMI) independent study course titled
“Protecting Your Home or Small Business From Disaster” for more information about nonstructural hazard mitigation. The course can be accessed at: http://training.fema.gov/EMIWeb/IS/IS394Alst.asp.
• Develop examples of safety measures discussed in the accompanying handout. Presentation Tips: • Welcome participants to the session. Explain that by the end of the session, they will be
able to take actions to reduce the risk of loss of life and property from common hazards.
• Stress that there are simple, low-cost steps that households can take to help make their homes safer.
• Distribute the Simple Safety Measures handout. Briefly review the items. Tell the participants to check off the items that apply to their situation.
• Optional Demonstration: If you are able to do so, demonstrate some of the measures discussed in the handout.
• Optional Activity: Divide the participants into teams. Assign different areas of the room or building where you are meeting. Have the teams:
• Identify existing measures for improving safety.
• Recommend additional measures for improving safety.
• Conclude the session by asking participants if they have any questions. Thank participants for attending the session. Explain that more information about disaster preparedness is available in other sessions.

HOME SAFE HOME
September 2011 Page 75
SIMPLE SAFETY MEASURES: HANDOUT
Securing Heavy Furniture/Other Items Bookcases or other items can tip causing their contents, and sometimes the shelves themselves, to fall to the floor. Tipping can occur in an earthquake or other event that causes homes and buildings to vibrate or move. In addition, children or pets climbing on bookcases or other furniture can cause them to tip. Move or secure items that could fall
over or block an exit, such as bookcases, china cabinets, and storage racks.
Move heavy items, such as pictures, mirrors, or tall dressers, away from beds and sitting areas.
Anchor all large kitchen and laundry equipment to the floor, wall, or countertop, including:
• Stoves and ovens.
• Built-in and countertop microwave ovens.
• Garbage compactors.
• Dishwashers.
• Refrigerators and freezers.
• Clothes washers and dryers. Tips for Securing Items • Screws must penetrate the studs behind the wall. Gypsum board, drywall, and plaster won’t
hold heavy furniture during an earthquake.
• For wood studs (typically spaced 16 or 24 inches apart on center), use minimum 1/4" diameter by 3" lag screws.
• For metal studs, use #12 sheet-metal screws long enough to penetrate the flange material. For concrete or masonry walls, use concrete anchor bolts.
• If wall studs do not line up with the furniture, attach a wood 2x4 or steel horizontal mounting strip to the studs near the top of the items to be anchored. Anchor furniture to that strip.
• If possible, bolt file cabinets together (and to the wall studs) to form a more stable shape.
• Anchor eyebolts to wall studs for hanging heavy items such as pictures, mirrors, and shelving. Securely attach picture wires to picture frames.

HOME SAFE HOME
September 2011 Page 76
SIMPLE SAFETY MEASURES: HANDOUT
Tips for Securing Items (Continued) • Make sure overhead light fixtures and hanging plants are anchored to the structural support
above the ceiling. Ask a carpenter or an electrician to determine whether light fixtures and modular ceiling systems are securely fastened.
Note: Water heaters can tip over and spill dangerously hot water into a building. If the heater uses flammable gas and the gas line breaks, the situation becomes far more serious. For additional information on how to secure water heaters and other items, you should take the following independent study course: IS-394.a, Protecting Your Home or Small Business From Disaster (http://training.fema.gov/EMIWeb/IS/IS394Alst.asp). Securing Loose Items and Equipment: Items in Drawers or Cabinets Use barrel bolts, safety hasps, and childproof locks.
Most permanent latches will not interfere with opening and closing drawers and doors.
Use a slide lock as shown on doors that are not opened often.
Store breakable items such as bottled foods, glass, and china in low, closed cabinets with latches.
Store weed killers, pesticides, and flammable products on bottom shelves in sturdy, closed, latched cabinets that are fastened to the wall or floor. Move incompatible chemicals to prevent mixing if the containers break.
Securing Loose Items and Equipment: Items on Shelves Add lips or edge restraints.
Use elastic cords or wire guardrails to keep items from falling off open shelves.
Fasten heavy or precious items to shelves or tables.
Use tack putty to secure fragile objects on shelves.
Keep breakable items in original packing boxes if possible.

HOME SAFE HOME
September 2011 Page 77
SIMPLE SAFETY MEASURES: HANDOUT
Securing Loose Items and Equipment: Electronic Equipment Secure items to desks, tables,
shelves, or countertops with hook-and-loop material, such as Velcro.
Use chains, cables, or elastic cord (e.g., “bungees”) for heavier items.
Preventing Falls Reduce fall risks by making sure
carpets are securely fastened to floors via tacks, Velcro, or anti-skid linings.
Reduce clutter in living areas and make sure pathways around furniture are clear, especially if the individual relies on a cane or walker.
Keep the stairs clear of clutter.
Make sure you can turn on lights before entering a dark room.
Add grab bars in the tub and shower.
Wipe-up spills when they happen.
Place nightlights along pathways throughout your home. Preventing Water Damage: Simple No-Cost/Low-Cost Measures Check storm drain lines to make sure they are clear of debris, roots, etc.
Grade the property around your home to drain water away from it.
Install gutters and make sure downspouts are extended away from the foundation in order to carry water away from the basement walls.
Use shelving or store items several inches above the potential water level in order to prevent loss.
Fix leaks in faucets, toilets, or pipes immediately. Continued small leaks can result in mold, dry rot, and pest infestation as well.
Check the water hoses on your washing machine, refrigerator icemaker, and dishwasher for signs of wear. Check your water heater for leaks. Partially drain the heater every 6 months to stop sediment from building up on the bottom.

HOME SAFE HOME
September 2011 Page 78
SIMPLE SAFETY MEASURES: HANDOUT
Preventing Water Damage: Simple No-Cost/Low-Cost Measures (Continued) Check for cracked or missing grout across the base of your toilet, bathtub, and/or shower,
and bathroom cabinets.
In cold climates, protect against frozen pipes by:
• Making sure you have adequate insulation in places where pipes run along outside walls, under floors above basements, and above ceilings in unprotected attics.
• Disconnecting outside garden hoses before cold weather.
• Wrapping exposed pipes with insulating sleeves.
• Taping and sealing foundation cracks in crawlspaces that could let cold air, snow, or ice in to freeze pipes.
• Opening the cabinet doors under your sinks to allow warm air to get to piping during a deep freeze.
• Running a small trickle of water through vulnerable cold and hot water faucets when there is a cold snap.
Protecting HVAC Equipment In flood-prone buildings, HVAC equipment can be moved from the basement or lower level to an upper floor, or even to the attic. Relocation can involve plumbing and electrical changes. If you decide to raise your HVAC equipment, consider upgrading to a more energy-efficient unit at the same time. Upgrading not only can save you money on your heating and cooling bills, but also may make you eligible for a rebate from your utility company.

HOME SAFE HOME
September 2011 Page 79
SIMPLE SAFETY MEASURES: HANDOUT
Protecting Electrical Systems Electrical system components, including service panels (fuse and circuit breaker boxes), meters, switches, and outlets, are easily damaged by floodwater. If the electrical system components are inundated, they probably will have to be replaced. Short circuits from flooded systems also cause fires. Raising electrical system components helps you avoid damage. All components of the electrical system, including the wiring, should be raised at least 1 foot above the base flood level for your location. Protecting Washers and Dryers Elevate them on masonry or pressure-treated lumber at least 1 foot above the projected flood level. Preventing Wind Damage: Simple No-Cost/Low-Cost Measures Strong winds from severe weather such as thunderstorms, tornadoes, and tropical storms can turn patio furniture, grills, and tree branches into destructive missiles. To protect against wind damage, take the following steps: Identify and remove trees and branches that could fall on power lines, walls, or roofs. Wind
can topple trees onto your home and can pick up smaller objects and drive them through windows and glass doors.
Secure all storage sheds and other outbuildings, either to a permanent foundation or with straps and ground anchors. You may use straps and ground anchors for manufactured homes to anchor systems for outbuildings.
Secure other objects. You can secure outdoor furniture and barbecue grills by bolting them to decks or patios or by attaching them to ground anchors with cables or chains. Even trash cans can be secured with cables or chains attached to ground anchors or to wood posts firmly embedded in the ground.

HOME SAFE HOME
September 2011 Page 80
SIMPLE SAFETY MEASURES: HANDOUT
Preventing Wind Damage: Simple No-Cost/Low-Cost Measures (Continued) Prior to a storm with predicted strong winds: Move breakable items away from doors and windows.
Bring in flowerpots, outdoor furniture, and other items that could become airborne.
Board up doors and windows (if possible).
Turn off propane tanks. Also, secure items if your home will be vacant during a trip. Preventing Wind Damage: Securing Double-Entry Doors If you have double doors, then you should secure at least one of the doors at both the top of the doorframe and the floor with sturdy sliding bolts. Most bolts that come with double doors, however, are not strong enough to withstand high winds. Your local hardware store can help you select the proper bolts. Some door manufacturers provide reinforcing bolt kits made specifically for their doors. Creating a Safe Outdoors • Make sure that the street number is clear and legible from the street. This will ensure that
emergency vehicles do not have trouble locating your home in an emergency.
• Maintain the yard. Unkempt brush and dry lawns can catch fire; so can sheds and woodpiles. Overhanging tree limbs, and entire diseased trees, can fall through a roof.
• Position trees at least 10 feet apart and at least 100 feet away from the house.
• Remove any dead trees or trees that pose a threat of falling on your home.
• Clean pine needles, leaves, and other debris from roofs and gutters often.
• Enclose the undersides of aboveground decks with non-combustible materials, such as wire mesh, in order to prevent the buildup of leaves and other debris.

HOME SAFE HOME
September 2011 Page 81
SIMPLE SAFETY MEASURES: HANDOUT
Creating a Safe Outdoors (Continued) • Plant native, fire-resistant vegetation, and avoid vines or climbing plants that may serve as a
link between grass and treetops or roofs during a fire.
• Ensure all cords used outside, such as for electric lawn mowers and other lawn tools, are rated for outdoor use and have the correct amp rating (15-20 amps is usually okay, 20 amp rating for larger motors like lawn mowers).
• Do not use power tools or lawn equipment when it is raining, or use an electric lawnmower on wet grass. Check all cords for damage before and after use.
• Store all yard and gardening equipment safely, making sure to keep all chemicals out of reach.
Source: Bureau of Land Management, U.S. Department of Interior

September 2011 Page 82
Activity Title: Safeguarding Your Valuables Description: Protecting important items and documents Approximate Time: 30 minutes

SAFEGUARDING YOUR VALUABLES
September 2011 Page 83
FACILITATOR GUIDE
ACTIVITY: PROTECTING VALUABLES Purpose: The purpose of the activity is to provide steps to take to protect valuables from damage due to fires, floods, or other disasters. Objectives: • Identify valuables (including information) you need to protect if a disaster occurs.
• Identify low-cost or no-cost measures to protect valuables from damage due to fires, floods, or other disasters.
Preparation and Needed Materials: Prior to conducting this activity, you may want to: • Gather information from local banks about safe deposit boxes and have that information on
display.
• Work with local merchants to get donations of items such as computer storage devices, waterproof containers, etc.
• Prepare display items such as a family safe box, computer storage devices (USB drive, CD/DVD), and waterproof storage containers.
Presentation Tips: • Welcome participants to the session.
• Explain that by the end of the session, they will be able to identify valuables that should be protected from flood damage and describe low-cost or no-cost protective measures.
• Ask participants to look in their wallets, pursues, pockets, etc. Ask them to identify the items that would be difficult or impossible to replace. Next, ask participants to think about the items that could be lost if their homes were damaged by fire, floods, or other disasters.
• Acknowledge the answers and then present the following key points:
• Valuables include costly or irreplaceable items such as photos of family members, family keepsakes, or other treasured things.
• Valuables also include items that are difficult to replace, such as vital records and financial documents.
• Simple measures can be taken to protect these valuables.

SAFEGUARDING YOUR VALUABLES
September 2011 Page 84
FACILITATOR GUIDE
ACTIVITY: PROTECTING VALUABLES Presentation Tips: (Continued) • Distribute the Protecting Valuables checklist and give participants a few minutes to review it.
• Distribute the Protecting Valuables tips.
• Ask participants if they have any questions about the information covered in the handouts.
• Thank the participants for attending the session.

SAFEGUARDING YOUR VALUABLES
September 2011 Page 85
PROTECTING VALUABLES: CHECKLIST HANDOUT
You may have little or no time to protect your valuables in a flood, earthquake, or other disaster. By taking simple steps now, you can safeguard your treasured belongings and information from damage or loss. The first step is to identify what you have. Go through your home to find your treasures. Use the list below to check off your valuables. Vital records (birth, marriage, divorce, adoption, child custody, death certificates)
Passport, driver’s license, or other identification documents
Social Security cards
Property leases, deeds, mortgages, and records
Financial documents including copies of pay stubs, bank accounts, etc.
Legal titles (auto, home)
Insurance policies
Wills, living wills, and powers of attorney
Recent tax returns
Medical records including lists of prescription medicines, medical conditions, medical provider contact information, copies of health insurance/Medicare/Medicaid cards, etc.
Debit/credit card numbers
Home/bank safe deposit information/keys
Records of passwords and personal identification numbers (PINs)
Family photos, keepsakes, jewelry, or other mementos
Photographic or data inventory of valuables (photos, videos, CD/flash drive)
Other __________________________________________________________ The Protecting Valuables: Tips handout suggests ways to protect these valuables.

SAFEGUARDING YOUR VALUABLES
September 2011 Page 86
PROTECTING VALUABLES: TIPS HANDOUT
You can take simple no-cost or low-cost steps to protect your valuables. Create a photographic record or inventory of your valuables and store it in a safe deposit
box or other off-site location. Consider keeping a copy on a CD or flash drive in your disaster kit, so that you can provide it to your insurance company following a loss; this will allow you to start the insurance/recovery process more quickly.
Scan important records such as vital records, medical records, and financial documents, and save the files on disk or flash drives. You may also want to password-protect the data you have stored in case of loss or theft. Store the backup records in a safe deposit box or other off-site location.
If you have too many records or no way to scan/copy them, store them in a flood/fireproof home safe or a safe deposit box. Also consider giving backup copies of important documentation to family members to store for you.
If you have valuable items stored in a basement, move them to a higher location to avoid water damage.
Include any readily accessible records, such as medical records, medical contact information, etc., in your disaster kit.
In some cases, you may be able to protect valuables such as keepsakes in waterproof containers available in sporting goods or hardware stores. For smaller items, a flood/fireproof home safe may provide temporary protection.
Take precautions to protect yourself from identity theft when you create backup systems to store critical information.
For more ideas on protecting valuables or cleaning them after a flood, consult the following information from FEMA: http://www.fema.gov/news/newsrelease.fema?id=8495
September 2011 Page 87
Activity Title: Pet/Service Animal Preparedness Description: Taking care of pets and service animals during a disaster Approximate Time: 30 minutes

PET/SERVICE ANIMAL PREPAREDNESS
September 2011 Page 88
FACILITATOR GUIDE
ACTIVITY: PROTECTING PETS AND SERVICE ANIMALS Purpose: The purpose of this activity is to help individuals plan for the safety of their pets and service animals if a disaster occurs. Objectives: • Identify the unique needs of pets and service animals during a disaster.
• Establish a plan for evacuating and caring for pets and service animals during a disaster. Preparation and Needed Materials: Prior to conducting this activity, you may want to: • Ask local animal advocacy organizations and shelters to participate in the presentation or
provide literature about their services.
• Assemble a model pet/service animal disaster kit and plan. Presentation Tips: • Welcome participants to the session.
• Ask the participants to introduce themselves and think of one word that best describes how they feel about their pets/service animals. During a disaster, we want to make sure our pets and service animals will be safe.
• Next, ask participants: What would your pets or service animals need if you had to evacuate your home? Acknowledge the responses. If possible, record the list of needs on chart paper or a white board.

PET/SERVICE ANIMAL PREPAREDNESS
September 2011 Page 89
FACILITATOR GUIDE
ACTIVITY: PROTECTING PETS AND SERVICE ANIMALS Presentation Tips: (Continued) • Distribute the Protecting Pets and Service Animals handout. Show your model disaster
kit and model techniques as you explain the following preparedness key points:
• Identifying Potential Shelters. Contact your local emergency management office, animal shelter, or animal control office to get advice on where pets/service animals can go during a disaster. Make a list of hotels or kennels that would allow you to bring your types of pets. Make sure to research hotels in areas outside your immediate neighborhood. Check with friends and relatives to see if they would be willing to provide shelter to your pets/animals.
• Developing a Pet/Animal Disaster Kit. Include emergency food, water, travel bowls, safety harnesses/leashes, carriers/cages, first aid items, medicines, sanitary supplies (cat litter, trash bags, etc.), toys/blankets/bedding, etc. Add a copy of veterinary records including immunization cards.
• Ensuring Proper Identification. Make sure that each pet/service animal has a current identification tag. Have a current photo of your pet/service animal in your personal emergency kit. Photos will help reunite you in case you become separated.
• Practicing Your Evacuation Plan. Look for pets during severe weather to see where they may hide. Knowing their hiding places inside and outside the home will speed up your evacuation process. Get a flashing collar to help locate your pet in case of darkness. Use a trip to the veterinarian or other event to practice securing your pets/service animals. Time how long it takes. Figure it will take longer during a crisis.
• Sheltering in Place. If you are unable to evacuate, make sure to get your pets/service animals to the safest point in the home. Some pets do better if they are in their crates, away from windows, or with covers on cages. Think through what would be most comforting. Place pet rescue decals on windows and doors to alert rescue teams.
• Reducing Hazards After a Disaster. Understand that following a disaster, pets/animals may become defensive or fearful. Keep pets/service animals in control or confined until you know they will be safe. Be aware of hazards such as debris, chemicals, and other substances that could harm them.
• Thank the participants for attending the session.

PET/SERVICE ANIMAL PREPAREDNESS
September 2011 Page 90
PROTECTING PETS AND SERVICE ANIMALS: HANDOUT
ACTIVITY: PROTECTING PETS AND SERVICE ANIMALS Most of us consider our pets and service animals as extended members of our family. We depend on them for companionship and service. In turn, they depend on us to be prepared to protect their safety and well being during a disaster. Complete these simple steps to help protect your pets and service animals: Identify Potential Shelters.
• Contact your local emergency management office, animal shelter, or animal control office to get advice on where pets/service animals can go during a disaster.
• Make a list of hotels or kennels that would allow you to bring your types of pets. Make sure to research hotels in areas outside your immediate neighborhood. Note: Most hotels allow service animals.
• Check with friends and relatives to see if they would be willing to provide shelter to your pets/animals.
Develop a Pet/Service Animal Disaster Kit.
• Include emergency food, water, travel bowls, safety harnesses/leashes, carriers/cages, first aid items, medicines, sanitary supplies (cat litter, trash bags, etc.), toys/blankets/bedding, etc.
• Add a copy of veterinary records including immunization cards. Ensure Proper Identification.
• Make sure that each pet/service animal has a current identification tag.
• Have a current photo of your pet/service animal in your personal emergency kit. Photos will help reunite you in case you become separated.
• Have your pet tattooed or implanted with a microchip to enable identification if lost. Practice Your Evacuation Plan.
• Look for pets during severe weather to see where they may hide. Knowing their hiding places inside and outside the home will speed up your evacuation process.
• Get a flashing collar to help locate your pet in case of darkness.
• Use a trip to the veterinarian or other event to practice securing your pets/service animals. Time how long it takes. Figure it will take longer to evacuate your pets/service animals during a crisis.

PET/SERVICE ANIMAL PREPAREDNESS
September 2011 Page 91
PROTECTING PETS AND SERVICE ANIMALS: HANDOUT
Plan to Shelter in Place.
• If you are unable to evacuate, make sure to get your pets/service animals to the safest point in the home. Some pets do better if they are in their crates, away from windows, or with covers on cages. Think through what would be most comforting.
• Place pet rescue decals on windows and doors to alert rescue teams. Plan for After the Disaster.
• Understand that following disasters, pets/animals may become defensive or fearful. Keep pets/service animals in control or confined until you know they will be safe.
• Be aware of hazards such as debris, chemicals, and other substances that could harm them.
EVACUATING OTHER TYPES OF ANIMALS
Small Animals • Use a secure, covered carrier or cage to transport most small mammals (ferrets, hamsters, gerbils, rats, mice, guinea pigs, etc.).
• Make sure to include necessary dietary supplements, exercise equipment, and extra bedding materials.
Large Animals • If you have large animals such as horses, cattle, sheep, goats, or pigs on your property, be sure to prepare before a disaster. Use the following guidelines:
• Ensure all animals have some form of identification.
• Evacuate animals whenever possible. Map out primary and secondary routes in advance.
• Make available vehicles and trailers needed for transporting and supporting each type of animal. Also make available experienced handlers and drivers. (Note: It is best to allow animals a chance to become accustomed to vehicular travel so they are less frightened and easier to move.)
• Ensure destinations have food, water, veterinary care, and handling equipment.
• Note: If evacuation is not possible, animal owners must decide whether to move large animals to shelter or turn them outside.

PET/SERVICE ANIMAL PREPAREDNESS
September 2011 Page 92
PROTECTING PETS AND SERVICE ANIMALS: HANDOUT
EVACUATING OTHER TYPES OF ANIMALS
Birds • Use small, secure, covered carriers to avoid injury when transporting. Note: If traveling in cold weather, always warm the interior of your vehicle before moving your bird(s) from the house to the vehicle.
• Transfer your bird(s) to a standard cage upon arrival at the evacuation site; covering the cage may reduce stress; this transfer should occur in a small, enclosed room to reduce the risk of escape. Note: Birds should be kept in quiet areas and not allowed out of the cage in unfamiliar surroundings. Fresh food and water should be provided daily, and a hot water bottle for warming birds in cold weather.
Reptiles • Use a pillowcase, cloth sack, or small transport carrier. Note: Because most reptiles do not eat daily, feeding during evacuation circumstances may increase stress.
• Transfer your pet to a secure cage at the evacuation site as soon as possible and if appropriate. The enclosure should, if possible, be placed in a controlled environment, away from areas of heavy traffic, loud noises, and vibrations. Make sure that the container housing the reptile is escape proof.
Amphibians • Use watertight plastic bags, such as the ones used for pet fish transport, or plastic containers, such as plastic shoeboxes or plastic food containers with snap-on lids to transport amphibians.
• Take care to monitor water and air temperature, humidity, lighting, and nutrition during the time that the animal will be in the evacuation facility.
• For terrestrial or semiaquatic amphibians use a tiny amount of water, or moistened paper towels, clean foam rubber, or moss as a suitable substrate.
• For aquatic species, fill the plastic bag one-third full of water, then inflate the bag with fresh air and close with a knot or rubber band. It is best to use clean water from the animal’s enclosure to minimize physiologic stress.
• Take an extra container of water, clean moist paper towels, or clean moss as appropriate in case any of your pet’s containers break or leak.

September 2011 Page 93
Activity Title: Rx for Readiness Description: Starting a “stay healthy” kit and plan Approximate Time: 30 minutes

Rx FOR READINESS
September 2011 Page 94
FACILITATOR GUIDE
ACTIVITY: STARTING A “STAY HEALTHY” KIT Purpose: The purpose of the activity is to educate individuals and families on how to stay healthy. Objectives: • Explain how to keep medicines, first aid supplies, prescriptions, and medical records ready
and accessible.
• Describe ways to avoid contracting or spreading diseases.
• Identify where to get first aid and CPR training. Preparation and Needed Materials: Prior to conducting this activity, you may want to: • Assemble a model kit of medicines, first aid supplies, and records as described in the
participant handout.
• Work with local merchants to get donations of items such as hand sanitizer, simple first aid supplies, or pill-a-day containers to include in the kits.
• Have information available on first aid and CPR training in the local area. Presentation Tips: • Welcome participants to the session. Explain that by the end of the session, they will be
able to assemble a family medical kit from items found in their homes and understand how to avoid contracting or spreading diseases.
• Ask the participants the following discussion question: When a disaster happens, how do you plan to stay healthy if medical help is unavailable?
• Acknowledge the answers and then present the following key points:
• In an emergency or natural disaster, first responders and health care providers may be overwhelmed just trying to respond to the event. Or, if transportation is cut off, neither they nor you may be able to reach hospitals and clinics.
• That’s why it’s important to keep medical supplies, records, and prescriptions on hand and to know how to do simple first aid and CPR.

Rx FOR READINESS
September 2011 Page 95
FACILITATOR GUIDE
ACTIVITY: STARTING A “STAY HEALTHY” KIT Presentation Tips: (Continued)
• Also, in a natural disaster or severe weather, contagious diseases can spread, particularly if basic services like water are out. So be ready and take simple preventive measures to avoid getting or spreading diseases.
• Distribute the “Stay Healthy” Kit handout. Briefly review the items listed. Ask the participants if there are additional items that they would include in their family kits or information sheets. Show examples using the kit you assembled. Briefly review the preventive measures listed on the handout.
• Optional Germ Busters Activities:
• Explain that there are simple steps that individuals and households can take to prevent the spread of germs such as the flu and common cold.
• Distribute the Germ Busters Activities handout.
• Demonstrate the activities described on the handout.
• Conclude the session by explaining how people can receive training in simple first aid and CPR. Direct participants to more information.
• Thank the participants for attending the session.

Rx FOR READINESS
September 2011 Page 96
“STAY HEALTHY” KIT: HANDOUT
ACTIVITY: STARTING A “STAY HEALTHY” KIT In an emergency or natural disaster, first responders and health care providers may be overwhelmed just trying to respond to the event. Transportation may be cut off, keeping you or health care providers from reaching hospitals and clinics. Phone lines may be down, or you may have to evacuate your neighborhood with little notice. For all of those reasons, it’s important to keep medical supplies, records, and prescriptions on hand and to know how to do simple first aid and CPR. Also, in a natural disaster or severe weather, contagious diseases can spread, particularly if basic services like water are out. Fortunately, simple preventive measures can help you avoid getting or spreading diseases. “Stay Healthy” Kit
• Put a week’s supply of medicines in a plastic bag and label it with the family member’s name. Include any needed testing equipment (such as a glucose meter or test strips). (Tip: If you take multiple medications every day, you may want to prepare a pill-a-day container for the week. Note: Talk to your medical provider about getting refills in advance.)
• Also include denture supplies, extra eyeglasses, contact lenses, hearing aids, and related supplies.
• Include a list of prescription medicines, copies of medical insurance, Medicare/Medicaid cards, and a list of medical conditions, known allergies, etc. (See next pages.)
• Place tags on specialized equipment (oxygen, feeding pumps, etc.) with operating instructions so that someone unfamiliar with the items can provide help.
• Include first aid supplies (bandages, cotton washcloths, cleaning agent/soap, hydrogen peroxide/isopropyl alcohol, antiseptic cream, and aspirin or an aspirin substitute).
• Pack all the items in plastic bags or a container to keep them as dry and airtight as possible, and store in an easy-to-find location. Tip: If your medicine needs refrigeration and the power goes out, most medicines can be kept in a closed refrigerator for several hours without a problem. If you’re unsure, contact your physician or pharmacist.

Rx FOR READINESS
September 2011 Page 97
“STAY HEALTHY” KIT: HANDOUT
Preventive Measures
• Make sure everyone in the household is up to date on required vaccinations.
• Clean contaminated surfaces. A recent study found a strain of the flu virus was present on 60% of common household items in homes with just one sick child.
• If possible, avoid crowded places when diseases are going around.
• Ask household members to cover their noses and mouths with a tissue when they cough or sneeze. Throw tissues away after use. If tissues are unavailable, sneeze or cough into the crook of the arm.
• Wash hands often with soap and water, especially after coughing or sneezing. If water is unavailable, use an alcohol-based hand sanitizer. If individuals are sensitive to the odor, try getting unscented wipes. Want to know how long to wash your hands? Hum the “Happy Birthday” song all the way through twice while washing.
• Avoid touching eyes, noses, and mouths. Germs spread this way.

Rx FOR READINESS
September 2011 Page 98
“STAY HEALTHY” KIT: HANDOUT
Household Health Information Sheet
If there is a medical or other emergency, a list of health information will be important. Fill in information for each household member in the space provided. Make copies for your home, your car(s), children’s school(s), and your place(s) of work. 1. Household Member Information
Household Member Allergies/Medical Conditions Medications Dosage

Rx FOR READINESS
September 2011 Page 99
“STAY HEALTHY” KIT: HANDOUT
Household Health Information Sheet
2. Emergency Contacts (You may want to program these contacts into your cell phone
directory!)
Contact Name & Phone Number Local personal emergency contact
Out-of-town personal emergency contact
Hospital near home
Hospital near work
Hospital near school(s)
Physician(s)
Specialist(s) (including counselors)
Local public health office
Pharmacy
Employer(s) contact and emergency information
School(s) contact and emergency information
Veterinarian

Rx FOR READINESS
September 2011 Page 100
GERM BUSTERS ACTIVITIES
What’s a Germ? Germs are very small living things that can cause people to get sick. Germs can cause you to get a stomach ache or make you sneeze. They are so small that you can’t see them unless you use a high-powered microscope. Where Do Germs Live? Germs can live on many common objects, and we spread them around by what we touch. Let’s see how far germs can travel. 1. Rub a thin coating of cooking oil or petroleum jelly on one family member’s hands.
2. Next, sprinkle glitter, nutmeg, or cinnamon on the hands. Be sure to tell your kids not to touch their noses or eyes while the pretend germs are on their hands. Explain that this individual now has pretend germs.
3. Tell the family to continue their activities for the next 10 minutes. As an alternative, you can play cards, catch, or a board game.
4. At the end of the time, ask the family to find all the places where the germs spread.
5. Demonstrate how to clean these areas and objects that now have the germs. Wash Away Germs! 1. If you did not do the above activity, sprinkle glitter, nutmeg, or cinnamon on your children’s
hands. Be sure to tell them not to touch their noses or eyes while the pretend germs are on their hands.
2. Have the children wash their hands without soap. The “germs” won’t come off.
3. Next, add soap—and watch those “germs” disappear. Tell the children they now have learned to be an official germ buster!
4. While they’re washing:
• Teach your children to wash their hands frequently.
• Wash hands with soap and water for 20 seconds—the time it takes to sing the “Happy Birthday” song twice.
• Remind your children to wash their hands at school, too.
5. Consider creating a handwashing chart to track each time your child washes his or her hands. Provide a reward once the goal is met.

Rx FOR READINESS
September 2011 Page 101
GERM BUSTERS ACTIVITIES
Germs in Flight 1. Explain that when you sneeze or cough, germs can also travel through the air like tiny,
invisible flying objects.
2. Hold up a spray bottle with water in it. Spray the water above your family members. Ask who felt the water.
3. Explain that spraying the water shows how germs can be spread by a sneeze or cough.
4. Demonstrate how to use tissues or your elbow to cover a sneeze or cough. Cover your nose and mouth with a tissue every time you cough or sneeze. Throw the used tissue in a wastebasket. If you don’t have a tissue, sneeze or cough into your sleeve. You can learn more at the following Web address: http://www.cdc.gov/flu/protect/covercough.htm
Graphics from the “Cover Your Cough” flyers and posters are property of the Minnesota Department of Health.
September 2011 Page 102
Activity Title: Going Off Grid: Utility Outages Description: Preparing for utility outages Approximate Time: 20 – 40 minutes

GOING OFF GRID: UTILITY OUTAGES
September 2011 Page 103
FACILITATOR GUIDE
ACTIVITY: PREPARING A CHECKLIST FOR GOING OFF GRID Purpose: The purpose of this activity is to educate individuals and families on how to prepare for a utility outage. Objectives: • List the critical items to have and actions to take in a utility outage.
• Identify how to practice for a utility outage. Preparation and Needed Materials: Prior to conducting this activity, you may want to: • Gather information about local utility companies (phone numbers and Web sites) and where
people can find information in the local area when utilities go out (radio stations, phone numbers of local emergency management offices, chapters of the American Red Cross, etc.).
• Try the suggested “Family Off the Grid Night” activity so you can share lessons learned with participants.
• Work with local merchants to get donations of essential items such as flashlights, batteries, appliance thermometers, etc.
Presentation Tips: • Welcome participants to the session.
• Explain that by the end of the session, they will be able to take steps at home to prepare for utility outages.
• Ask the participants the following discussion questions: When was the last time the power went out? How often does it happen? How long does the average power outage last in this area? How long should you plan to take care of yourself until heat or power or water is restored?
• Acknowledge the answers and then present the following key points:
• The length of power outages can really vary, from a few hours to several days. Severe weather can prolong them. Plan to get by without utilities for at least 3 days.
• You can take steps ahead of time in your own home to make life off the grid easier. These basic steps are not time consuming or expensive. Many of the items you need may be found around your home.

GOING OFF GRID: UTILITY OUTAGES
September 2011 Page 104
FACILITATOR GUIDE
ACTIVITY: PREPARING A CHECKLIST FOR GOING OFF GRID Presentation Tips: (Continued) • Distribute the Outage Checklist handout. Briefly review the items, and give the participants
local numbers and information so that they may begin filling in the checklist.
• Suggest that families may want to plan a “Family Off the Grid Night” to practice the steps on a checklist before an actual outage occurs. Besides revealing things you haven’t considered, unplugging for the evening can be fun for the family as well. It is an opportunity to relate to one another without the distractions of phones, computers, and television.
• Optional Activity: If feasible, demonstrate how a “Family Off the Grid Night” might work.
• Divide the groups into teams and have each one pick a type of outage. The outages can also be combined. For example, extreme cold weather or storms can cause electrical outages, which in turn can freeze pipes causing a water outage.
• Ask them to discuss assessing their neighborhoods. How would they handle the tasks on their checklists in their households? Who would do what? What items do they need to find or purchase?
• Reassemble the participants and review what they discovered in exploring the checklist.
• If you’ve done the activity beforehand, share the lessons you learned with the group.
• Optional Demonstrations: If feasible, demonstrate where some of the utility cut-offs are in your meeting place and discuss what tools you might need to shut down service.
• Conclude the session by noting there are other diagrams and handouts they may find helpful. Ask participants if they have any questions about the items on the checklist. Thank the participants for attending the session.

GOING OFF GRID: UTILITY OUTAGES
September 2011 Page 105
OUTAGE CHECKLIST: HANDOUT
Important Phone Numbers
• Electric company phone number/Web site:
• Natural gas company phone number/Web site:
• Water company phone number/Web site
• Plumbing company phone number/Web site:
• Oil/gas heat service phone number/Web site:
• Telephone company phone number/Web site:
• For more information about outages and public shelters, listen to or contact:
If you use medical equipment that requires electricity to operate, register with your power company and health care provider to learn about alternatives. Assess Your Neighborhood • If there is a utility outage, who may need extra support because of their functional or medical
needs?
• Does anyone in the neighborhood have special skills who can help others? Electricity Outages Locate and label utility shutoff (see diagram at the end of this handout).
Post instructions next to fuse box or circuit breaker.
Are there enough flashlights on hand (at least one for each person in the house)? Are the batteries working? (Tip: Store batteries in the refrigerator for longer life.)
Do not use candles. They are a fire hazard.
Keep on hand ready-to-eat meals that don’t require cooking or cooling.

GOING OFF GRID: UTILITY OUTAGES
September 2011 Page 106
OUTAGE CHECKLIST: HANDOUT
Electricity Outages (Continued) Freeze water in plastic water bottles or old milk containers, leaving about an inch at the top
for frozen water to expand. When placed in a refrigerator and freezer, they will keep food cold for several hours.
Know where to get dry ice to keep food cold as necessary.
Are there cordless phones that need electricity to run? If so, what can be used as a backup? (Standard telephone with cord, cell phone, etc.)
Find a new or used battery-operated radio to get updates on information, shelters, etc.
Is there an alternate heating source? Make sure it is properly vented and in good working order. Make sure all chimneys are clean and all flues are operational. Do you have enough wood, pellets, or heating fuel?
If heating system involves an electronic ignition or fan, know who to call for service/restarting assistance.
If there is an electric garage door opener, where is the manual release? Post instructions on how to use it and practice!
When possible, keep car gas tanks at least half full. Gas stations need electricity to power the pumps.
When the power goes out . . . • Are all the pots and pans off the stove? Are the stove range and oven turned off?
• If you have a space heater, make sure it’s at least 3 feet away from furniture or other flammable objects. Keep it unplugged when not in use.
• In cold weather, maximize heat coming from the sun. Open shades, curtains, or louvers so that sun may heat the glass. Close them when the sun is no longer shining directly to hold in the heat. In hot weather, minimize heat by closing shades, curtains, and louvers.
POST THIS PAGE IN YOUR HOME!

GOING OFF GRID: UTILITY OUTAGES
September 2011 Page 107
OUTAGE CHECKLIST: HANDOUT
Natural Gas Outages Locate and label gas shutoff valve(s). There may be more than one (see diagram at the end
of this handout).
Post shutoff instructions near the meter and make sure a nonsparking wrench is stored nearby.
If your gas meter is located inside your home, you should only shut off gas flow when instructed to by local authorities.
Also see “Electricity Outages” above for more tips. Water Outages Locate and label main water cutoff. Make sure any special tools needed are stored nearby.
(Tip: The main water cutoff is usually on the outside wall of the house where the water meter is. With a well, the cutoff is usually on the well pump.)
Have 3 days of drinking water stored (1 gallon of water per person per day). If pipes may freeze . . . • Wrap insulation, tape, newspapers, or rags around them.
• Store water in buckets or bathtubs to flush toilets.
• Leave water trickling out of the faucets. If pipes do freeze . . . • Remove any insulation or newspaper and wrap them in rags.
• Completely open all the faucets. If you can still heat water, pour hot water over the pipes, starting with where they are most cold. If you have electricity, try using a blow dryer.
If pipes burst . . . • Know where circuit breakers and fuses are and how to shut off the power. See “Electricity
Outages” above.
• Never enter a flooded basement or walk through standing water to shut off electrical supply because water conducts electricity.

GOING OFF GRID: UTILITY OUTAGES
September 2011 Page 108
OUTAGE CHECKLIST: HANDOUT
Phone Outages Have on hand a backup way to communicate (cell phone, computer via cable connection,
etc.). Shutting Off Electricity Unscrew individual fuses or switch off smaller breakers first, then pull the main switch or breaker. When restoring power, turn on main switch or breaker, then screw in smaller fuses or turn on smaller breakers, one at a time.
Circuit Breaker Box With Shutoff
Shutoff steps: Step 1: Shut off individual breakers. Step 2: Shut off main breaker.
Fuse Box With Shutoff Shutoff steps: Step 1: Pull out individual fuses. Step 2: Pull out main fuse.

GOING OFF GRID: UTILITY OUTAGES
September 2011 Page 109
OUTAGE CHECKLIST: HANDOUT
Shutting Off Gas The gas meter shutoff diagram indicates the shutoff valve location on the pipe that comes out of the ground. To turn off the valve, use a nonsparking wrench to turn the valve clockwise one-quarter turn. Remember that, in all cases, natural gas flow should only be turned on by a licensed technician. Please note: Some gas meters have automatic shutoff valves that restrict the flow of gas during an earthquake or other emergency. These are installed by a licensed plumber, downstream of the utility point of delivery. If you are unsure whether your home has this shutoff device, contact your gas service company. If this shutoff device is closed, only a qualified professional should restore it. Gas Meter in the Home If you smell gas or see the dials on your meter showing gas is flowing even though appliances are turned off, you should evacuate the premises and call 911. Do not attempt to shut off the gas from inside the building if gas may be in the air. Gas Meter Outside the Home You should turn off the meter from outside the building if you smell gas or you see dials on the meter showing gas is flowing even though appliances are turned off. If there is a fire that you cannot extinguish, call 911 and turn off the gas only if it is safe to do so.

GOING OFF GRID: UTILITY OUTAGES
September 2011 Page 110
OUTAGE CHECKLIST: HANDOUT
Keep the refrigerator and freezer doors closed. Food should be okay for around 4 hours. Refer to the chart below to know when to save food and when to throw it out.
FOOD IN REFRIGERATOR Held above 40 °F for over 2 hours
MEAT, POULTRY, SEAFOOD: Any raw, leftover, or thawing. Also includes soy meat substitutes, salads, lunch meats, pizza, cans that have been opened, fish, or meat sauces.
Discard
CHEESE: Any soft cheeses, shredded cheeses, or low-fat cheeses Discard
Hard cheeses such as cheddar, colby, swiss, parmesan, provolone, romano, or hard cheeses grated in can or jar Safe
DAIRY: Milk, cream, sour cream, buttermilk, evaporated milk, yogurt, eggnog, soy milk, opened baby formula Discard
Butter, margarine Safe
EGGS: All eggs and egg products, such as puddings Discard
CASSEROLES, SOUPS, STEWS Discard
FRUITS: Fresh fruits, cut Discard
Opened fruit juices or canned fruits, along with fresh fruits, coconut, raisins, dried fruits, candied fruits, dates Safe
SAUCES, SPREADS, JAMS: Opened mayonnaise, tartar sauce, horseradish
Discard if above 50 °F for over 8 hours
Other sauces, including soy, barbecue, taco. Also peanut butter, jelly, relish, mustard, catsup, olives, pickles, and vinegar-based dressings.
Safe
Opened creamy-based dressings and opened spaghetti sauce Discard
BREAD, CAKES, COOKIES, PASTA, GRAINS, PASTRY: Bread, rolls, cakes, muffins, quick breads, tortillas, waffles, pancakes, bagels, fruit pies
Safe
All other rolls, dough, cooked pasta, rice, potatoes, pasta salads, fresh pasta, cheesecake, cream-filled pastries or pie Discard
VEGETABLES: Fresh raw vegetables or mushrooms, herbs, spices Safe
All other pre-cut, pre-washed, cooked vegetables, tofu, opened vegetable juice, garlic in oil, potato salad Discard

GOING OFF GRID: UTILITY OUTAGES
September 2011 Page 111
OUTAGE CHECKLIST: HANDOUT
FOOD IN FREEZER Still contains ice crystals
and feels as cold as if refrigerated
Thawed; held above 40 °F for over
2 hours
MEAT, POULTRY, SEAFOOD Refreeze. However, seafood will have some texture and
flavor loss. Discard
DAIRY: Milk and soft or semi-soft cheese
Refreeze. May lose some texture. Discard
Eggs (out of shell) and egg products Refreeze Discard
Ice cream, frozen yogurt Discard Discard
Hard and shredded cheeses, casseroles with dairy products, cheesecake
Refreeze Refreeze
FRUITS: Juices, packaged fruits
Refreeze. However, home or commercially packaged fruits will have texture and flavor
change.
Refreeze. Discard if mold, yeasty smell,
or sliminess develops.
VEGETABLES: Juices, packaged vegetables
Refreeze. Vegetables may suffer texture and flavor loss.
Discard after held above 40 °F for
6 hours
BREADS, PASTRIES: Breads, rolls, muffins, cakes (without custard fillings)
Refreeze Refreeze
Cakes, pies, pastries with custard or cheese filling Refreeze Discard
Pie crusts, commercial and homemade bread dough
Refreeze. Some quality loss may occur.
Refreeze. Quality loss is considerable.
OTHER: Casseroles – pasta, rice based Refreeze Discard
Flour, cornmeal, nuts, waffles, pancakes, bagels Refreeze Refreeze
Frozen meals Refreeze Discard For more information, see http://www.foodsafety.gov/keep/emergency/index.html

September 2011 Page 112
Activity Title: Coming Home After a Disaster Description: Planning for recovery from disaster Approximate Time: 20 minutes

COMING HOME AFTER A DISASTER
September 2011 Page 113
FACILITATOR GUIDE
ACTIVITY: COMING HOME AFTER A DISASTER Purpose: The purpose of this activity is to educate individuals and families about what to consider after their home has been damaged after a disaster – who normally handles what repairs, and what actions to take to begin repairs. Objectives: • Identify actions that are often required upon returning to a home damaged after a disaster.
• Recognize what kind of repairs homeowners may handle themselves.
• Develop a checklist for actions that homeowners can take. Preparation and Needed Materials: Prior to conducting this activity, you may want to: • Contact your local chapter of the American Red Cross and obtain copies of Repairing Your
Flooded Home or access a copy from the following Web site: http://www.fema.gov/library/.
• Search the FEMA Web site for photos of flooded or damaged houses to use for the opening activity: http://www.photolibrary.fema.gov/photolibrary/index.jsp
• Contact local utility companies to ask if they will send a representative to your presentation to answer questions about checking utilities following a disaster.
Presentation Tips: • Welcome participants to the session.
• Explain that by the end of the session, they will have developed a recovery action plan to use if a disaster damages their home.
• Post or pass around photos of flooded or damaged houses and ask participants: Imagine that this is your home. Once the waters go down, what would you do first? What do you have to consider?
• Acknowledge the answers and then present the following key points:
• It can be both physically and emotionally difficult to return your home after a disaster.
• Returning home after a disaster can also be dangerous. Here are a few things to consider:
• Has the neighborhood been cleared by authorities for reentry?
• Are the utilities on? Do you have to worry about electrical or gas hazards?

COMING HOME AFTER A DISASTER
September 2011 Page 114
FACILITATOR GUIDE
ACTIVITY: COMING HOME AFTER A DISASTER Presentation Tips: (Continued)
• Does your home have structural damage?
• What about wildlife, such as poisonous snakes?
• Is the water safe to drink?
• Distribute copies of Repairing Your Flooded Home or refer participants to this Web site for more information: http://www.fema.gov/library/
• Distribute the Who Does What? handout. Encourage participants to get referrals now for the names and numbers of trusted contractors instead of waiting until after an emergency.
• Distribute the Recovery Action Plan handout. Briefly review the main items. Encourage participants to check off the items that apply to their location. Ask participants for input about additional items they would include.
• Optional Activity: If feasible, have representatives from local utilities explain precautions to take when entering a flooded or damaged home and when homeowners should request outside assistance. Conclude the session by emphasizing how important it is to decide what they can handle versus when to call in a professional. Ask participants if they have any questions about what to expect when returning to and repairing a flooded home.
• Thank the participants for attending the session. Explain that more information about disaster preparedness is available in other sessions.

COMING HOME AFTER A DISASTER
September 2011 Page 115
WHO DOES WHAT? HANDOUT
ACTIVITY: WHO HANDLES WHAT KINDS OF REPAIRS? Tasks the Homeowner Can Usually Do: (Tip: Follow the steps outlined in Repairing Your Flooded Home.) Document the damage with photographs.
Sort contents to be repaired or discarded.
Dry the ceiling, walls, and floors.
Dry and clean electrical circuits and boxes (if code allows).
Remove minor debris such as branches and trash.
Check the gas or oil system.
Fix leaky pipes.
Check sewage disposal system.
Clean building and contents.
Check sources of financial assistance.
Raise appliances off the ground and complete other minor floodproofing projects. Jobs That Usually Require Professional Services:
Type of Service/Repair Company Name and Contact Information
Make structural repairs
Restore electrical and/or gas service
Repair, install, tape, and finish wallboard
Check whether water is safe to drink Try contacting local health department. Put phone number here:
Remove major debris such as trees
Clean and repair electrical and gas appliances
Clean furniture and carpeting
PLACE THIS PAGE IN YOUR DISASTER KIT!

COMING HOME AFTER A DISASTER
September 2011 Page 116
RECOVERY ACTION PLAN: HANDOUT
ACTIVITY: RETURNING HOME Check the items that you think would apply to your location. Use a colored highlighter or special mark to indicate any items where you would need assistance from a professional source. Assess the Situation: Walk carefully around the outside and check for loose power lines, gas leaks, and structural
damage. If you have any doubts about safety, have your residence inspected by a qualified building inspector or structural engineer before entering.
Watch out for animals, especially poisonous snakes. Use a stick to poke through debris.
Other: __________________________________________________________________ Do not enter if . . . • You smell gas.
• Floodwaters remain around the building.
• Your home was damaged by fire and the authorities have not declared it safe. Document Damage, Inside and Out: Take pictures of flood damage and your cleanup efforts. Photographs are extremely helpful
in documenting damage for insurance purposes. Keep good records, including how much of your personal time was spent on debris removal and cleanup.
Record the amount of time it took you to clean up.
If you hire cleanup or repair contractors, be sure they are qualified to do the job. Be wary of people who drive through neighborhoods offering help in cleaning up or repairing your home. Check references.
PLACE THIS PAGE IN YOUR DISASTER KIT!
COMING HOME AFTER A DISASTER
September 2011 Page 117
RECOVERY ACTION PLAN: HANDOUT
Check Utilities: When re-entering the building, use flashlights instead of lanterns or candles, in case there's
a gas leak. Use a battery-powered flashlight to inspect a damaged home. The flashlight should be turned on outside before entering. The battery could produce a spark that could ignite leaking gas, if present.
Do not use matches or any type of flame until you are sure there are no gas leaks, and the area has been aired out. Check to see if any pilot lights are out.
Call the gas company to turn the gas back on. Don't try to do it yourself. Check with your propane supplier if you are unsure how to service your propane tank yourself.
Be sure the electricity is turned off. In case of severe flooding, do not use the electricity until a licensed electrician has checked your home.
Have a professional check your heating system and electrical system before using them. In case of flooding . . . • Pump out wells and have the water tested by authorities before drinking. Do not flush toilets
until you know that sewage lines are intact.
• After outside floodwaters have receded, drain only about 1/3 of the water in your basement initially. Outside pressure pushing against your basement walls can cause the basement walls to collapse. Start by pumping the water level down 2-3 feet, then mark the level and wait overnight. If the water level goes up, wait 24 hours, and then repeat the process.
• Septic systems will not work until the groundwater level is below the distribution lines. Check Consumables and Appliances: Destroy all fresh or frozen food, medicine, toiletries, and cosmetics that have been in
contact with floodwater or stored without proper refrigeration.
If you suspect your water supply is contaminated, have it tested.
If any appliances were touched by floodwater, have them checked by a qualified serviceperson before operating them.

COMING HOME AFTER A DISASTER
September 2011 Page 118
RECOVERY ACTION PLAN: HANDOUT
Protect Yourself Because standard homeowners insurance does not cover flooding, it is important to have protection from the floods associated with hurricanes, tropical storms, heavy rains, and other conditions. In 1968, Congress created the National Flood Insurance Program (NFIP) to help provide a means for property owners to financially protect themselves. The NFIP offers flood insurance to homeowners, renters, and business owners if their community participates in the NFIP. Participating communities agree to adopt and enforce ordinances that meet or exceed FEMA requirements to reduce the risk of flooding. Find out more about the NFIP and how it can help you protect yourself at http://www.floodsmart.gov

September 2011 Page 119
Activity Title: Preparedness: The Whole Community Description: Understanding emergency management and response roles and getting involved Approximate Time: 30 – 90 minutes

PREPAREDNESS: THE WHOLE COMMUNITY
September 2011 Page 120
FACILITATOR GUIDE
ACTIVITY: PLANNING FOR AND PRACTICING EVACUATION Purpose: The purpose of this activity is to encourage participants to become involved in community preparedness. Objectives: • Identify the emergency preparedness roles and responsibilities of community members.
• Develop an action plan for becoming involved. Preparation and Needed Materials: Prior to conducting this activity, you may want to: • Invite representatives from all departments involved in local emergency management within
your community.
• Gather literature about volunteer opportunities within your community. Invite representatives of nongovernmental organizations to attend the session.
• Arrange for a tour of the emergency operations center, dispatch center, fire station, or public works facility, if possible.
Presentation Tips: • Welcome participants to the session. Explain that by the end of the session, they will learn
how the whole community contributes to emergency preparedness. In addition, participants will identify how they can become involved.
• Distribute the handout titled “The Whole Community.” Refer to the graphic on the handout.
• Ask the participants the following discussion question: Why is it important for the whole community to be involved in preparedness?
• Acknowledge the answers and then present the following key points:
• If a disaster strikes, people in local communities have the best understanding of what they need to protect themselves and loved ones. Therefore, effective planning for disasters for everyone in a community must include people of all ages and those with various access and functional needs.
• During a crisis, it is unrealistic to expect governments (at the local, State, and Federal levels) to do everything. Governments cannot meet the spectrum of needs without help from all community members.

PREPAREDNESS: THE WHOLE COMMUNITY
September 2011 Page 121
FACILITATOR GUIDE
ACTIVITY: PLANNING FOR AND PRACTICING EVACUATION Presentation Tips: (Continued) • Review the role played by the local government. Have representatives from each function
(emergency management, law enforcement, fire/rescue, emergency medical service, public works, and human services) provide a brief description of their services. Optional: If possible, arrange for tours of each department’s facilities.
• Next, review the roles played by the private and public sectors. Provide examples of how the private sector and nongovernmental organizations have contributed to disaster preparedness, response, and recovery.
• Refer the participants to the roles of individuals and households. Ask the participants if there is anything they would add.
• Present information about how to get involved in the local community. Provide examples of volunteer opportunities in your community. Optional: If you offer Community Emergency Response Team (CERT) Programs, arrange for volunteers to do a demonstration of what they learned in CERT.
• Conclude the session by asking if participants have questions. Ask participants to identify one action they personally plan to take to become involved in disaster preparedness. Thank the participants for attending the session.

PREPAREDNESS: THE WHOLE COMMUNITY
September 2011 Page 122
THE WHOLE COMMUNITY: HANDOUT
Community preparedness is a key priority in lessening the impact of disasters. It is critical that all community members take steps to prepare in advance of an event. Effective community preparedness occurs at all levels including: • Government
• Public and Private Sectors
• Neighborhood
• Individuals and Households Government Government has the responsibility to: • Develop, test, and refine emergency operations plans.
• Ensure emergency responders have adequate skills and resources, and provide services to protect and assist their citizens.
• Involve the community in the planning process.
• Provide reliable, actionable information.
• Encourage training, practicing, and volunteer programs. Government emergency service providers include: • Emergency Management: Prepares for and coordinates response and recovery to
disasters.
• Law Enforcement: Maintains law and order.
• Fire and Rescue: Protects life and property.
• Emergency Medical Services: Provides preventative and emergency medical services.
• Public Works: Maintains and repairs infrastructure such as roads, bridges, water, sewage, utilities, etc.
• Human Services: Provides food, shelter, and counseling following a disaster.
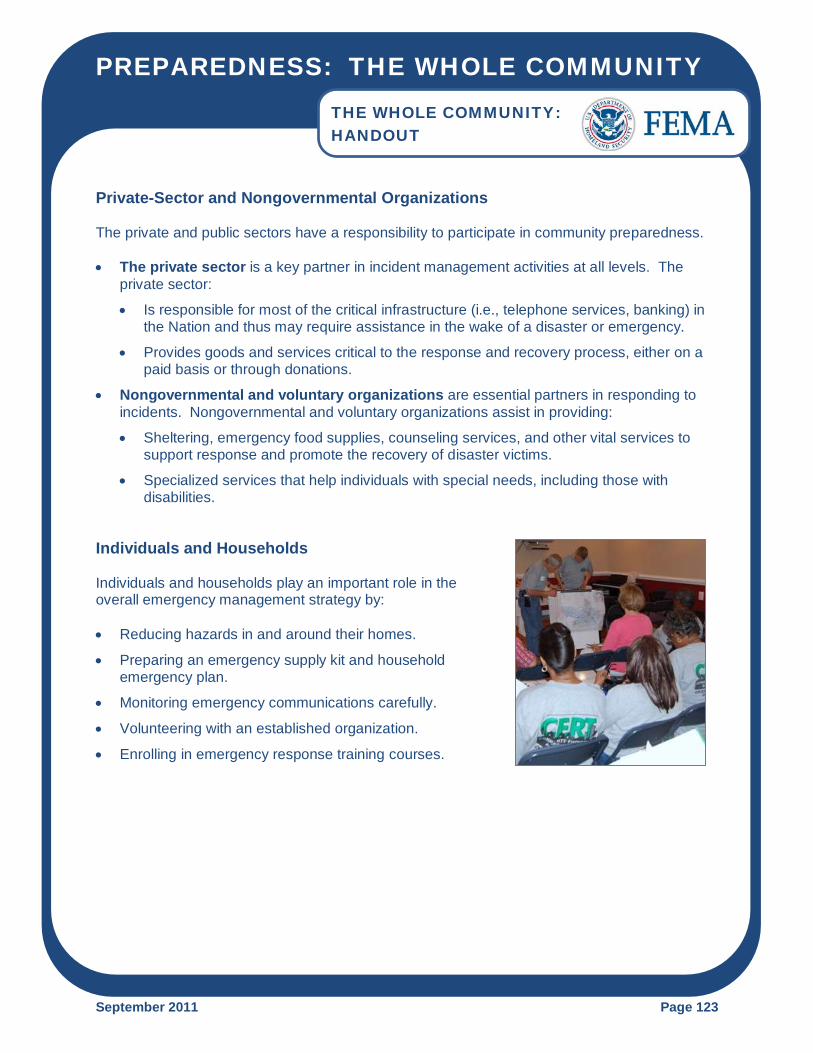
PREPAREDNESS: THE WHOLE COMMUNITY
September 2011 Page 123
THE WHOLE COMMUNITY: HANDOUT
Private-Sector and Nongovernmental Organizations The private and public sectors have a responsibility to participate in community preparedness. • The private sector is a key partner in incident management activities at all levels. The
private sector:
• Is responsible for most of the critical infrastructure (i.e., telephone services, banking) in the Nation and thus may require assistance in the wake of a disaster or emergency.
• Provides goods and services critical to the response and recovery process, either on a paid basis or through donations.
• Nongovernmental and voluntary organizations are essential partners in responding to incidents. Nongovernmental and voluntary organizations assist in providing:
• Sheltering, emergency food supplies, counseling services, and other vital services to support response and promote the recovery of disaster victims.
• Specialized services that help individuals with special needs, including those with disabilities.
Individuals and Households Individuals and households play an important role in the overall emergency management strategy by: • Reducing hazards in and around their homes.
• Preparing an emergency supply kit and household emergency plan.
• Monitoring emergency communications carefully.
• Volunteering with an established organization.
• Enrolling in emergency response training courses.

PREPAREDNESS: THE WHOLE COMMUNITY
September 2011 Page 124
THE WHOLE COMMUNITY: HANDOUT
Individuals and Households (Continued) All members of the community should: • Learn about community alerts and warnings, evacuation routes, and how to get critical
information.
• Take training in preparedness, first aid, and response skills.
• Practice skills and personal plans through periodic drills in multiple settings.
• Network and be able to help others.
• Participate in community feedback opportunities.
• Report suspicious activity.
• Volunteer. Engaging the Whole Community Citizen Corps is the grassroots movement to strengthen community safety and preparedness through increased engagement of all sectors of the community. Citizen Corps is administered by the Federal Emergency Management Agency, but implemented locally. The goal of Citizen Corps is to make communities safer, more prepared, and more resilient when incidents occur. Citizen Corps Councils bring government and community leaders together to ensure emergency plans more effectively reflect the community. The goals of the Councils are to: • Tailor activities to reach all sectors of the community.
• Identify and build on existing strengths.
• Increase collaboration between government and community.
• Expand integration of community resources into plans and protocols.
• Encourage personal/organizational preparedness through outreach, training, and exercises.
• Promote volunteer opportunities for ongoing community safety and surge capacity in disasters.

PREPAREDNESS: THE WHOLE COMMUNITY
September 2011 Page 125
THE WHOLE COMMUNITY: HANDOUT
Get Involved Preparedness requires active participation from all. • Start the process by talking to your friends and family about the hazards in your area and
what steps you all need to take to be able to help each other in a crisis – large or small.
• Ask about emergency planning at your workplace, your schools, your place of worship, and other social settings.
• Make sure government officials have a plan and are connected to community authorities on emergency management and planning.
• Consider volunteer opportunities to get your community better prepared for any emergency, including:
• Become a Community Emergency Response Team (CERT) member. The CERT Program educates people about disaster preparedness for hazards that may affect their area. The program trains team members in basic disaster response skills, such as fire safety, light search and rescue, team organization, and disaster medical operations.
• Using the training learned in the classroom and during exercises, CERT members can assist others in their neighborhood or workplace following an event when professional responders are not immediately available to help. For more information go to: https://www.citizencorps.gov/cert/
• Volunteer with a nonprofit organization and be trained before the next disaster. There are many organizations and faith-based groups in your community that have active disaster programs and need volunteers. The following groups offer a wide range of services following a disaster:
• http://www.nvoad.org/
• http://www.serve.gov/
• http://www.citizencorps.gov/
• http://handsonnetwork.org/
• http://www1.networkforgood.org/
• http://www.redcross.org/en/volunteer