FOR DENTAL USE ONLY - Dentsply Maillefer · FOR DENTAL USE ONLY ... PHASE Inserting the plastic...
7
FISDR / F19 02 31.EN / 11 / 2001 - updated 06/2016 1/7 FOR DENTAL USE ONLY DIRECTIONS FOR USE REF C226U - 0,8 MM / 1 MM EN UNICLIP
Transcript of FOR DENTAL USE ONLY - Dentsply Maillefer · FOR DENTAL USE ONLY ... PHASE Inserting the plastic...
FISDR / F19 02 31.EN / 11 / 2001 - updated 06/2016 1/7
FOR DENTAL USE ONLY
DIRECTIONS FOR USE REF C226U - 0,8 MM / 1 MM
EN
UNICLIP

2/7 FISDR / F19 02 31.EN / 11 / 2001 - updated 06/2016
1) Indications for useThese products have to be used only in hospital environments, clinics or dental offices by qualified dental personne. Application field: Coronal reconstruction of the root filled tooth.
2) ContraindicationsNone known.
3) WarningsThe Uniclip™ are Single Use instruments.
4) PrecautionsThe post must be cleaned with alcohol before insertion into the canal.
5) Adverse reactionsIn the present technical state, no adverse reaction has been reported so far.
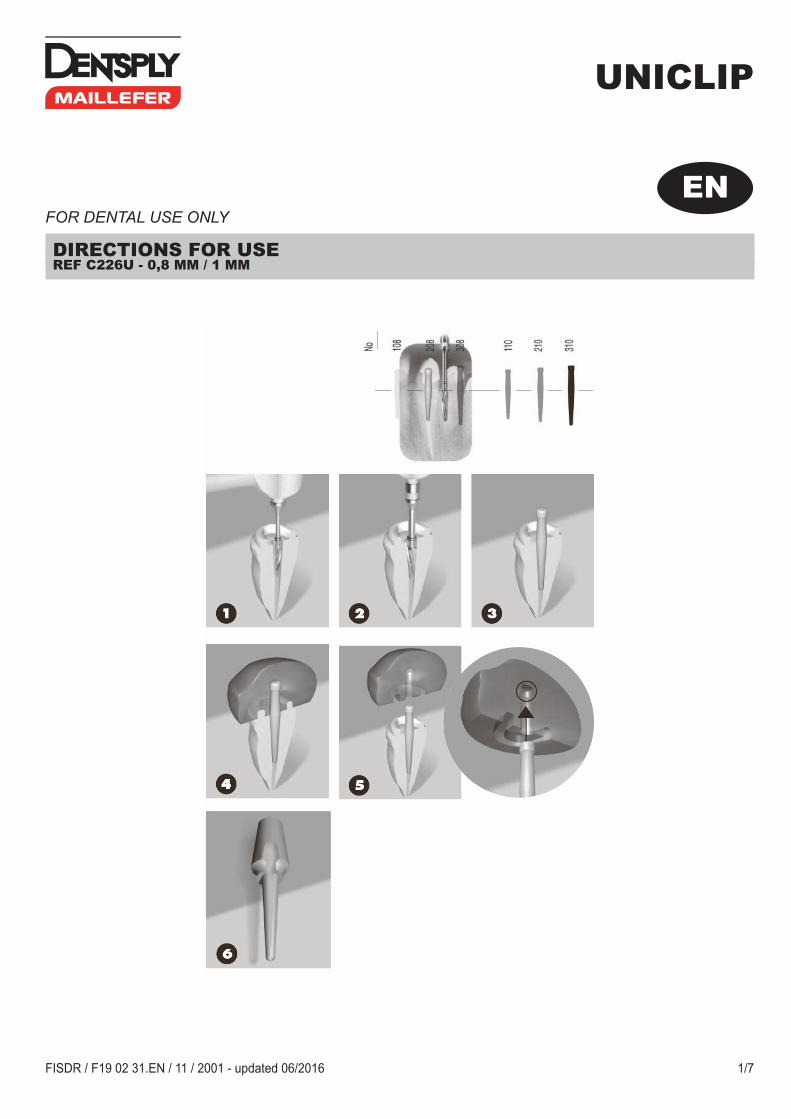
6) Step-by-step instructions for useChoose the correct root 0post (REF C 215U) by placing the transparent drawing (with full size outlines of the different sized root posts) over the radiograph. Note the colour of the indicated post and select a drill set of the same colour.The length of the tapered section of the root canal should be 2⁄3 of the total length. For curved canals, select a root post with a tapered section no longer than the straight section of the coronal portion of the canal.
PHASE Preparatory drillingUsing the special penetration drill (REF C 0212), work at low speed (800-1200 r.p.m.) but high torque. The full length of the cutting section should penetrate the canal.
Intermediate drillingIf necessary, use the special precalibrating drill (REF C 0214). This drill is correct for all lengths of root post with a diameter of 1mm at the tip.
PHASE Precision drillingPrepare the canal to its final size using the special calibrating drill (REF C 0213). Employ the same method as for the special penetration drill. The finished preparation will be 0.2mm longer than the root post, which will prevent over-stressing during tightening.
PHASE Inserting the plastic burn-out postTry each root post in its correctly sized canal, but without pushing in completely. The position of the tapered section of the root post should correspond to the final position of the cutting section of the precision calibrating drill. Push the root post in completely. You are now ready for the final test before taking the impression.

FISDR / F19 02 31.EN / 11 / 2001 - updated 06/2016 3/7
PHASE Before taking the impressionCheck that the heads of all posts cannot interfere with each other during insertion. The impression tray must not touch the head of the post at any time.
PHASE Taking the impressionInject the impression material into the retention boxes and around the posts, covering them completely.
PHASE Trying in the post before lutingCut a flat all the way along the post, extending it by a groove running under the base and along the side of the retaining box. This allows excess cement to escape and ensure perfect sealing of the built up tooth.
ReconstructionBuild up the tooth in the usual way.
7) DISINFECTION, CLEANING AND STERILIZATIONReprocessing procedure for dental instruments and implantable radicular devices.
I - FOREWORDFor hygiene and sanitary safety purposes, all instruments must be cleaned, disinfected and sterilized before each usage to prevent any contamination. This concerns the first use as well as the subsequent ones.Instruments which are marked as “sterile” do not require any specific treatment before the first use, but have to follow this procedure for all subsequent use if not labelled as “single use”.
II - AREA OF APPLICATIONDisinfection and sterilisation before each use (except for the first use of sterile instruments) and reprocessing procedures concerning:
DESINFECTION and STERILIZATION
A. DeviceA1. InstrumentsCutting instruments, (hand and engine driven) such as:• Endodontic instruments (files, broaches, reamers, enlargers, endodontic burs, ultrasonic inserts);• Rotary cutting instruments (Diamond burs, tungsten carbide burs, stainless steel drills, carbon steel
burs).Root canal filling instruments (Pluggers, spreaders, compactors).Hand instruments, clamps and Rubber Dam accessories.
A2. AccessoriesSupports, kits, instrument organisers and other accessories.
4/7 FISDR / F19 02 31.EN / 11 / 2001 - updated 06/2016
DESINFECTION ONLY
B. Filling material and calcinable plastic postsOnly chemical disinfection (no sterilisation) Gutta percha, Obturators, Uniclip and Mooser Calcinable plastic posts.
PRESENT PROCEDURE NOT APPLICABLE
C. Exclusion• Equipment such as Motors, Apex locators and other devices with reprocessing procedures included in
the individual Direction for Use.• MTA, Glyde, TopSeal, Paper Points, Rubber Dam.
III - GENERAL RECOMMENDATION1) Use only a disinfecting solution which is approved for its efficacy (VAH/DGHM-listing, CE marking,
FDA approval) and in accordance with the DFU of the disinfecting solution manufacturer. For all metal instruments, it is recommended to use anticorrosion disinfecting and cleaning agents.
2) For your own safety, please wear personal protective equipment (gloves, glasses, mask). 3) The user is responsible for the sterilization or disinfection of the product for the first cycle and each
further usage as well as for the usage of damaged or dirty instruments where applicable after sterilization.4) It is safest for the practitioner to use our instruments only once. Should our instruments be reused, we
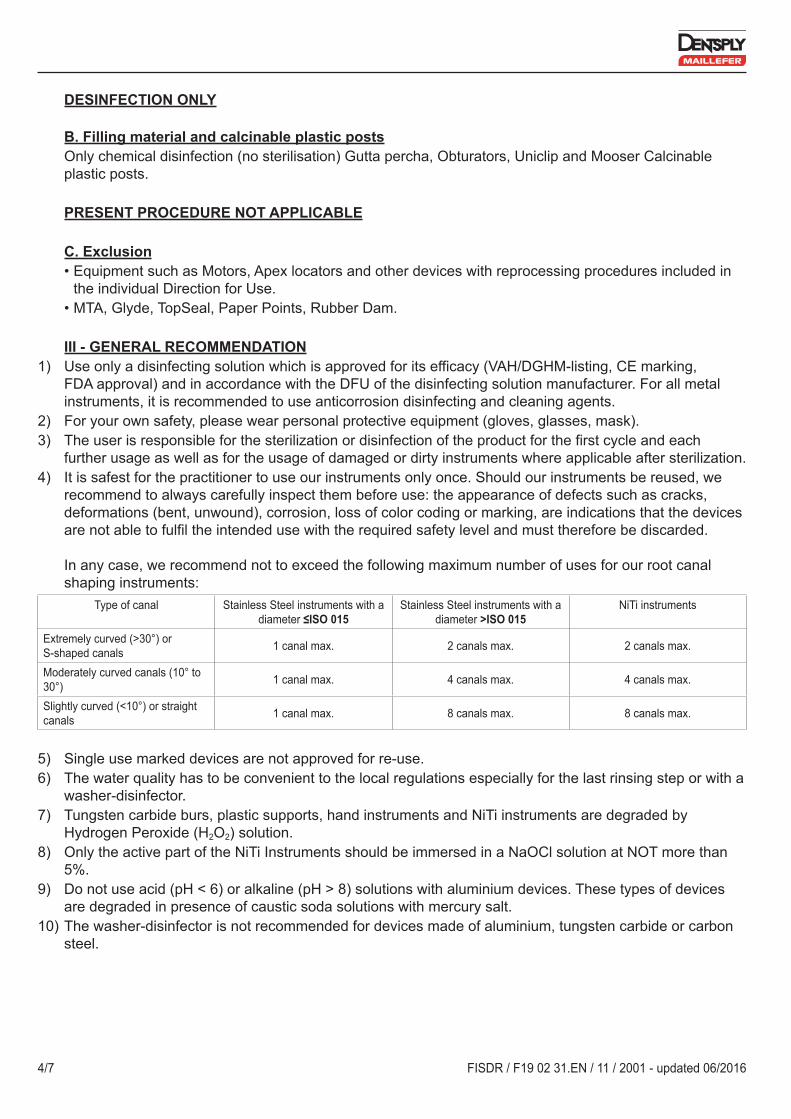
recommend to always carefully inspect them before use: the appearance of defects such as cracks, deformations (bent, unwound), corrosion, loss of color coding or marking, are indications that the devices are not able to fulfil the intended use with the required safety level and must therefore be discarded. In any case, we recommend not to exceed the following maximum number of uses for our root canal shaping instruments:
Type of canal Stainless Steel instruments with a diameter ≤ISO 015
Stainless Steel instruments with a diameter >ISO 015
NiTi instruments
Extremely curved (>30°) or S-shaped canals 1 canal max. 2 canals max. 2 canals max.
Moderately curved canals (10° to 30°) 1 canal max. 4 canals max. 4 canals max.
Slightly curved (<10°) or straight canals 1 canal max. 8 canals max. 8 canals max.
5) Single use marked devices are not approved for re-use.6) The water quality has to be convenient to the local regulations especially for the last rinsing step or with a
washer-disinfector.7) Tungsten carbide burs, plastic supports, hand instruments and NiTi instruments are degraded by
Hydrogen Peroxide (H2O2) solution. 8) Only the active part of the NiTi Instruments should be immersed in a NaOCl solution at NOT more than
5%.9) Do not use acid (pH < 6) or alkaline (pH > 8) solutions with aluminium devices. These types of devices
are degraded in presence of caustic soda solutions with mercury salt.10) The washer-disinfector is not recommended for devices made of aluminium, tungsten carbide or carbon
steel.

FISDR / F19 02 31.EN / 11 / 2001 - updated 06/2016 5/7
IV - STEP-BY-STEP PROCEDURE
A. DevicesA3. Contra AngleA1. Instruments Following usesA2. Accessories First use
Operation Operating mode Warning1. Disassembling - Disassemble the device, if
required.- Silicone stops have to be removed. X
2. Pre-Disinfection - Soak all instruments immediately after use in a detergent and disinfecting solution combined with proteolytic enzyme if possible.
- Follow instructions and observe concentrations and immersion times given by the manufacturer (an excessive concentration may cause corrosion or others defects on instruments).
- The disinfecting solution should be aldehyde free (to avoid blood impurities fixation) and without di- or triethanolamines as corrosion inhibitor.
- Do not use disinfecting solutions containing Phenol or any products which are not compatible with the instruments (See general recommendations).
- For visible impurities observed on instruments a pre-cleaning is recommended by brushing them manually with soft material.
X
3. Rinsing - Abundant rinsing (at least 1 min).
- Use quality water in accordance with local regulations.- If a pre-disinfectant solution contains a corrosion inhibitor, it is
recommended to rinse the instruments just before the cleaning.X
4a Automated Cleaning with washerdisinfector
- Place the devices in a kit, support or container to avoid any contact between instruments or posts.
- Put them in the washer-disinfector (Ao value > 3000 or, at least 5 min at 90 °C).
- Discard any instruments with large obvious defects (broken, bent).- Avoid any contact between instruments or posts when placing in the
washer disinfector use kits, supports or container.- Follow instructions and observe concentrations given by the
manufacturer (see also general recommendations). - Use only approved washer-disinfector according to EN ISO 15883,
maintain and calibrate it regularly.
X X X
OR4b Manual Cleaning
and assisted by an ultrasonic device
- Place the devices in a kit, support or container to avoid any contact between instruments.
- Immerse in the disinfecting solution with cleaning properties, assisted by an ultrasonic device if suitable.
- No visible impurities should be observed on the instruments.- Discard any instruments with large obvious defects (broken, bent,
and twisted).- Follow instructions and observe concentrations and time given by the
manufacturer (see also general recommendations).- The disinfecting solution should be aldehyde free and without di- or
triethanolamines as corrosion inhibitor.
X X
5. Rinsing - Abundant rinsing (at least 1 min).
- Use quality water in accordance with local regulations.- If a disinfecting solution contains a corrosion inhibitor, it is
recommended to rinse the instruments just before the autoclaving.- Dry on a single use non-weaved cloth, or with a drying machine or
filtered compressed air.
X X
6. Inspection - Inspect devices and sort out those with defects.
- Assemble the devices (stops).
- Dirty instruments must be cleaned and disinfected again.- Discard instruments which show any defect as described in the
General Recommendation above.- Protect carbon steel bur with corrosion inhibitor before packaging.- For Contra Angle : lubricate the device with an adequate spray
before packaging
X X X

6/7 FISDR / F19 02 31.EN / 11 / 2001 - updated 06/2016
7. Packaging - Place the devices in a kit, support or container to avoid any contact between instruments or posts and pack the devices in “Sterilisation pouches”.
- Avoid any contact between instruments or posts during sterilization. Use kits, supports or containers.
- Check the validity period of the pouch given by the manufacturer to determine the shelf life.
- Use packaging which are resistant up to a temperature of 141°C (286°F) and in accordance with EN ISO 11607.
X X X
8. Sterilization - Steam sterilisation at: 134 °C / 273°F during 18 min.
- The instruments, posts and the plastic supports must be sterilized according to the packaging labelling.
- Use only autoclaves that are matching the requirements of EN 13060, EN 285.
- Use a validated sterilisation procedure according ISO 17665.- Respect the maintenance procedure of the autoclave device given by
the manufacturer.- Use only this recommended sterilization procedure.- Control the efficiency (packaging integrity, no humidity, colour change
of sterilisation indicators, physico-chemical integrators, digital records of cycles parameters).
- Traceability of procedure records
X X X
9. Storage - Keep devices in sterilization packaging in a dry and clean environment.
- Sterility cannot be guaranteed if packaging is open, damaged or wet.- Check the packaging and the medical devices before using them
(packaging integrity, no humidity and validity period).X X X
B. Filling material and calcinable plastic posts Operation Operating mode Warning
1. Disinfection - Immerse the obturation devices in NaOCl (2,5 % at least) during 5 min. at ambient temperature.
- Do not use disinfecting solutions containing Phenol or any products which are not compatible with the treated filling material (See general recommendation).

Manufacturer
Maillefer Instruments Holding SàrlChemin du Verger, 3CH-1338 BallaiguesSwitzerland
FISDR / F19 02 31.EN / 11 / 2001 - updated 06/2016 7/7
Symbols EN
See directions for use
Opened packages are not replaced
Single use only
Batch number
Assortment
Manufacturer
xxx C°Non sterilizable
P Plastic