Floating-Top Table - Fine Woodworking was to make something quick—just legs, aprons, ... There are...
8
FINE WOODWORKING 28 Floating-Top Table Creative joinery adds spark to this versatile piece BY MICHAEL PEKOVICH COPYRIGHT 2017 by The Taunton Press, Inc. Copying and distribution of this article is not permitted. Fine Woodworking #263 - Sep/Oct 2017
Transcript of Floating-Top Table - Fine Woodworking was to make something quick—just legs, aprons, ... There are...

F I N E w o o d w o r k I N g28
Floating-Top TableCreative joinery adds spark to this versatile piece
B y M i c h a e l P e k o v i c h
W263PE.indd 28 6/27/17 3:53 PM
COPYRIGHT 2017 by The Taunton Press, Inc. Copying and distribution of this article is not permitted. Fine Woodworking #263 - Sep/Oct 2017

S e p t e m b e r / O c t O b e r 2 0 1 7 29Photo, opposite: Michael Pekovich
Drill out the waste and square the end. Use a 1⁄2-in. Forstner bit to drill a hole at the baseline, which frees most of the waste (right). Then square the base of the slot with a chisel (far right). Chop halfway, then rotate the stock to finish squaring from the opposite face.
Then cut the tenon to fit. Establish the shoulders at the tablesaw, then cut the tenon cheeks at the bandsaw, using test pieces to set the fence precisely. A sharp blade and a slow feed rate should yield a glue-quality surface right off the machine.
Start with the slot. Scribe the baseline of the slot, then cut the sides at the bandsaw. Set the fence for one face, then flip the stock to cut the opposite face.
This is one of those projects that almost wasn’t. Rachel, my wife, had asked for a small, por-table table for her sewing machine. My first
thought was to make something quick—just legs, aprons, and a top—so I could move on to something “more important.” Fortunately, I stopped and took a minute to think about how I could make this table a little more interesting to build and a little more enjoy-able to use. The result is a unique little table with a quiet personality that brightens our home every day. While Rachel puts it to use most often as a sewing table, it serves very well as a side table, a small writ-ing desk, or even a TV tray.
Building the table is straightforward, though the joinery is a little unusual. There are some bridle joints and through-tenons, all of which are left proud of the surface. Drawbore pins pull everything together for a clamp-free glue-up. If you’d like, you can leave out the
Quick bridle joint at the bandsaw
glue altogether. Arched rails and a beveled tabletop add lift, but the table remains a stout little thing.
Begin with the baseI used white oak for the table, but I stayed away from the dramatic ray fleck of quartersawn oak on the base, instead turning to the quieter straight grain of riftsawn stock. It helps to reinforce the simple lines of the base.
Start by milling the stock and cutting the parts to final length. Leave the curved rails square for now to make cutting the joinery easier.
The legs are connected to the front and back rails with a bridle joint and that’s a good place to start. I normally turn to the tablesaw and tenoning jig to slot the legs, but when making the original, I worked quickly and intuitively at the bandsaw. That’s the tech-nique I’ll show you here. Set the fence to one face of the slot, and make the first cut. Then flip the leg for the second cut to ensure a centered slot. For a smooth, accurate cut, make sure your blade is sharp
W263PE.indd 29 6/27/17 3:54 PM
COPYRIGHT 2017 by The Taunton Press, Inc. Copying and distribution of this article is not permitted. Fine Woodworking #263 - Sep/Oct 2017
F I N E W O O D W O R K I N G30 Photos, except where noted: Rachel Barclay; drawings: John Hartman
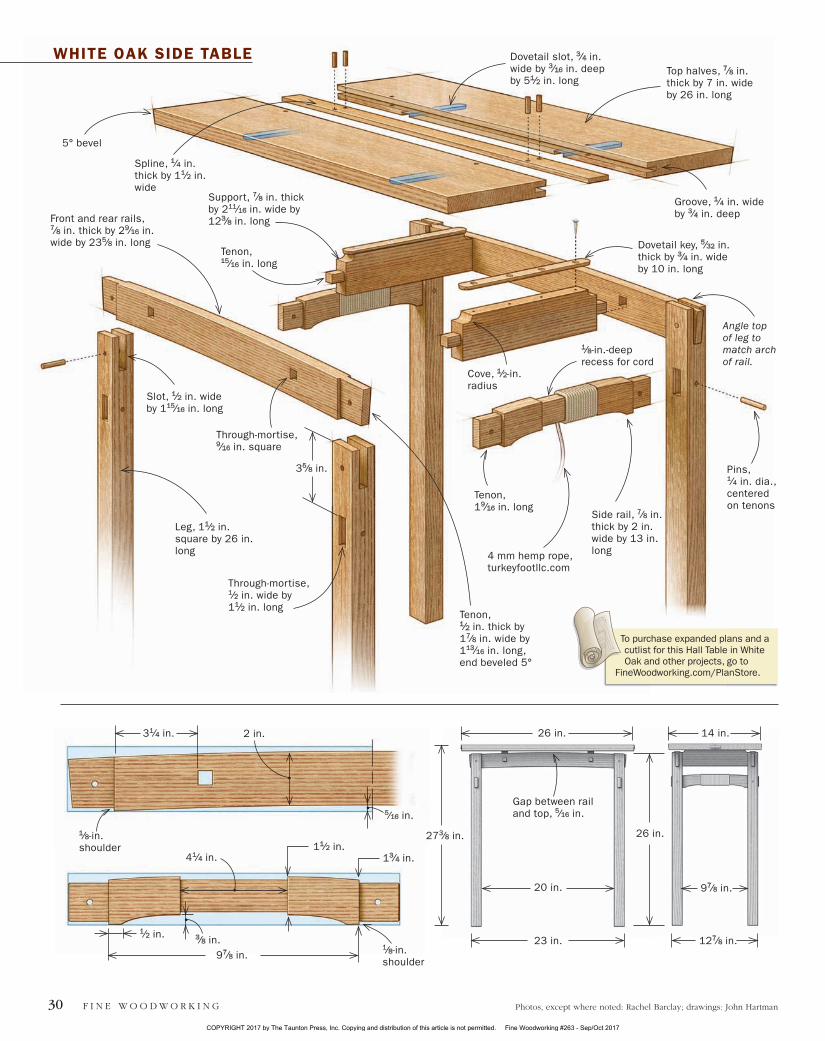
Groove, 1⁄4 in. wide by 3⁄4 in. deep
Through-mortise, 1⁄2 in. wide by 11⁄2 in. long
Through-mortise, 9⁄16 in. square
Slot, 1⁄2 in. wide by 115⁄16 in. long
Leg, 11⁄2 in. square by 26 in. long
Support, 7⁄8 in. thick by 211⁄16 in. wide by 123⁄8 in. long
Cove, 1⁄2-in. radius
1⁄8-in.-deep recess for cord
Side rail, 7⁄8 in. thick by 2 in. wide by 13 in. long
Front and rear rails, 7⁄8 in. thick by 29⁄16 in. wide by 235⁄8 in. long
Tenon, 1⁄2 in. thick by 17⁄8 in. wide by 113⁄16 in. long, end beveled 5°
Tenon, 19⁄16 in. long
Tenon, 15⁄16 in. long
4 mm hemp rope, turkeyfootllc.com
Pins, 1⁄4 in. dia., centered on tenons
Angle top of leg to match arch of rail.
WHITE OAK SIDE TABLE
5° bevel
Top halves, 7⁄8 in. thick by 7 in. wide by 26 in. long
Dovetail slot, 3⁄4 in. wide by 3⁄16 in. deep by 51⁄2 in. long
Dovetail key, 5⁄32 in. thick by 3⁄4 in. wide by 10 in. long
35⁄8 in.
31⁄4 in.
41⁄4 in.11⁄2 in.
13⁄4 in.
97⁄8 in.
97⁄8 in.
127⁄8 in.
273⁄8 in.
2 in. 26 in. 14 in.
Gap between rail and top, 5⁄16 in.
26 in.
1⁄8-in. shoulder
1⁄8-in. shoulder
3⁄8 in.
5⁄16 in.
1⁄2 in.
20 in.
23 in.
Spline, 1⁄4 in. thick by 11⁄2 in. wide
To purchase expanded plans and a cutlist for this Hall Table in White Oak and other projects, go to
FineWoodworking.com/PlanStore.
W263PE.indd 30 6/29/17 2:00 PM
COPYRIGHT 2017 by The Taunton Press, Inc. Copying and distribution of this article is not permitted. Fine Woodworking #263 - Sep/Oct 2017
S E P T E M B E R / O C T O B E R 2 0 1 7 31Photos, except where noted: Rachel Barclay; drawings: John Hartman
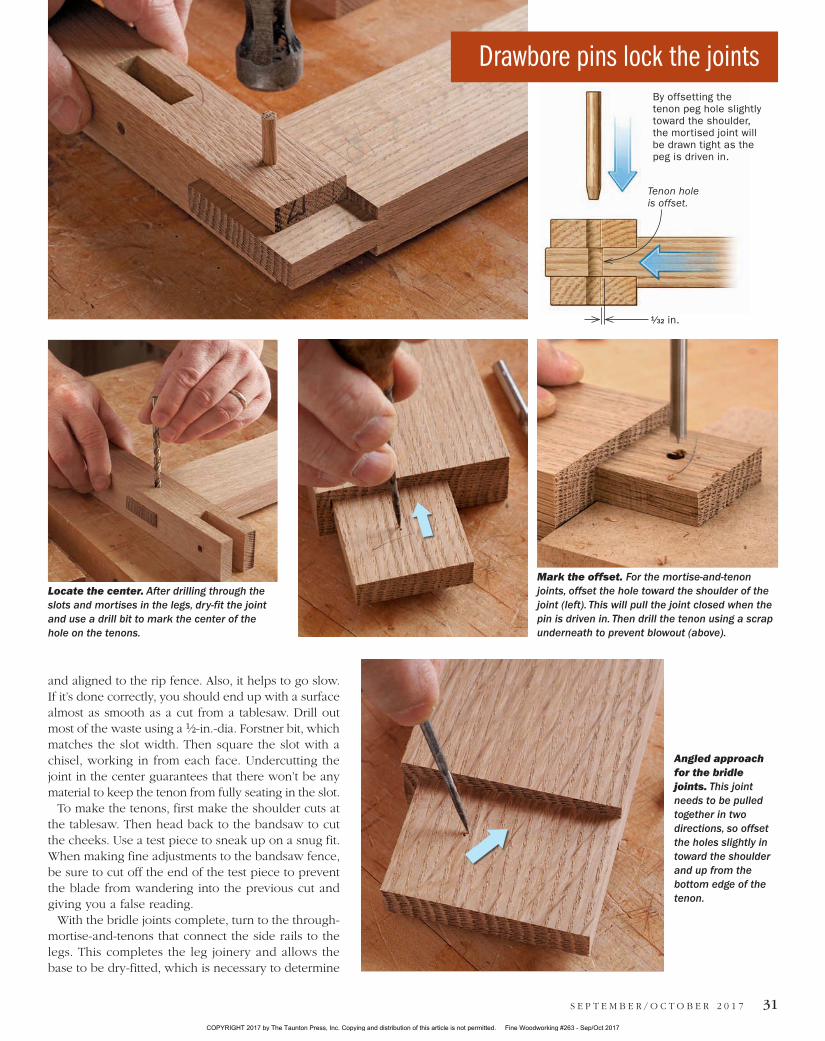
Locate the center. After drilling through the slots and mortises in the legs, dry-fit the joint and use a drill bit to mark the center of the hole on the tenons.
Mark the offset. For the mortise-and-tenon joints, offset the hole toward the shoulder of the joint (left). This will pull the joint closed when the pin is driven in. Then drill the tenon using a scrap underneath to prevent blowout (above).
Angled approach for the bridle joints. This joint needs to be pulled together in two directions, so offset the holes slightly in toward the shoulder and up from the bottom edge of the tenon.
and aligned to the rip fence. Also, it helps to go slow. If it’s done correctly, you should end up with a surface almost as smooth as a cut from a tablesaw. Drill out most of the waste using a 1⁄2-in.-dia. Forstner bit, which matches the slot width. Then square the slot with a chisel, working in from each face. Undercutting the joint in the center guarantees that there won’t be any material to keep the tenon from fully seating in the slot.
To make the tenons, first make the shoulder cuts at the tablesaw. Then head back to the bandsaw to cut the cheeks. Use a test piece to sneak up on a snug fit. When making fine adjustments to the bandsaw fence, be sure to cut off the end of the test piece to prevent the blade from wandering into the previous cut and giving you a false reading.
With the bridle joints complete, turn to the through-mortise-and-tenons that connect the side rails to the legs. This completes the leg joinery and allows the base to be dry-fitted, which is necessary to determine
Drawbore pins lock the jointsBy offsetting the tenon peg hole slightly toward the shoulder, the mortised joint will be drawn tight as the peg is driven in.
Tenon hole is offset.
1⁄32 in.
W263PE.indd 31 6/27/17 3:55 PM
COPYRIGHT 2017 by The Taunton Press, Inc. Copying and distribution of this article is not permitted. Fine Woodworking #263 - Sep/Oct 2017

F I N E w o o d w o r k I N g32 Photos:
the shoulder length of the tabletop supports. To do that, you’ll first have to drill for the drawbore pins that hold everything together.
Drawbore pins pull it together; rails give it a liftThe bridle joint is a difficult joint to clamp because it must be pulled together in two directions. The protruding ends of the parts only complicate the situation. So I turn to drawbore pins, which pull the joint together as they are driven in. I used the technique for the side rail mortise-and-tenons as well. The trick is to drill slightly offset holes through the parts. For the mortise-and-tenons, offset the mark roughly 1⁄32 in. toward the shoulder of the tenon. For the bridle joint, which needs to be clamped both across the joint and down, offset the hole at a 45° angle. This way, the joint is pulled in both directions as the pin is driven in. I use a dowel plate to make the pins, starting with straight-grained stock to keep the pins from breaking under the stress of pulling the joint together.
With the base dry-fitted, measure between the front and back rails to determine the shoulder-to-shoulder length of the sup-port rails. Start by cutting the tenon cheeks, sneaking up on the
Add the tabletop supports
Measure for the supports. Dry-fit the base and measure between the front and back rails to determine the shoulder-to-shoulder distance for the supports. Then cut the tenon cheeks on the supports.
Lay out the mortises and tenons at the same time. Tape the mortise areas on the rails as well as the tenon ends on the supports. Then use a marking gauge to scribe the top and bottom edges of the mortises on both faces of the rails (right). Mark the tenons using the same gauge settings (far right).
Cut the joinery. Use a backsaw to cut the tenon sides. Remove the waste by sawing along the baseline and clean up with a chisel. Drill out most of the waste from the mortises and square the recesses with a chisel (bottom). Work in from each face to avoid cutting past the scribe lines.
W263PE.indd 32 6/27/17 3:56 PM
COPYRIGHT 2017 by The Taunton Press, Inc. Copying and distribution of this article is not permitted. Fine Woodworking #263 - Sep/Oct 2017
S E P T E M B E R / O C T O B E R 2 0 1 7 33Photos: www.finewoodworking.com
shoulder inset until the rail fits snugly in the dry-fitted base. Now you can continue with the rest of the joinery.
The supports are wider than the rails, so register the layout from the bottom edges of the parts. Use a marking gauge to scribe the top and bottom edges of the mortises as well as the tenons, using the same settings to ensure a gap-free fit. One thing to keep in mind when laying out those joints is that an arch will eventually be cut in the rails. So center the mortise on the finished profile, rather than on the square blank. Drill and chop the waste from the mortises and use a handsaw to cut the tenon ends.
Shaping brings the table to lifeOnce the joinery is complete, cut the parts to final shape. I cut the arches in the rails using a steady hand at the bandsaw and a quick cleanup with a spokeshave.
Trim the tops of the legs to match the arch, and cove the ends of the supports that extend above the rails. The last step is to angle the ends of the front and rear rail tenons. This slight flair acts as a small corbel and complements the underbevel on the tabletop. It’s a subtle detail, but on a quiet piece like this, it has a big effect.
I prefinish the parts with shellac before glue-up. I also take the time to wrap the cord handles at this point. It’s much easier now than when everything is together.
A unique tabletopOn the original table, I simply glued up a top and attached it with screws to the supports. That’s a perfectly good solution, but I tried a little different approach this time around. I made the top in halves and joined them to the supports with a dovetailed cleat. Each half has a stopped dovetail slot that slides along the cleat. To keep the halves aligned, I grooved each half where they meet for a full-length spline. Rather than glue the halves together, I pinned them through the spline on both sides of the joint. A light chamfer along the joint highlights the pair of boards.
the shoulder length of the tabletop supports. To do that, you’ll first have to drill for the drawbore pins that hold everything together.
Drawbore pins pull it together; rails give it a liftThe bridle joint is a difficult joint to clamp because it must be pulled together in two directions. The protruding ends of the parts only complicate the situation. So I turn to drawbore pins, which pull the joint together as they are driven in. I used the technique for the side rail mortise-and-tenons as well. The trick is to drill slightly offset holes through the parts. For the mortise-and-tenons, offset the mark roughly 1⁄32 in. toward the shoulder of the tenon. For the bridle joint, which needs to be clamped both across the joint and down, offset the hole at a 45° angle. This way, the joint is pulled in both directions as the pin is driven in. I use a dowel plate to make the pins, starting with straight-grained stock to keep the pins from breaking under the stress of pulling the joint together.
With the base dry-fitted, measure between the front and back rails to determine the shoulder-to-shoulder length of the sup-port rails. Start by cutting the tenon cheeks, sneaking up on the
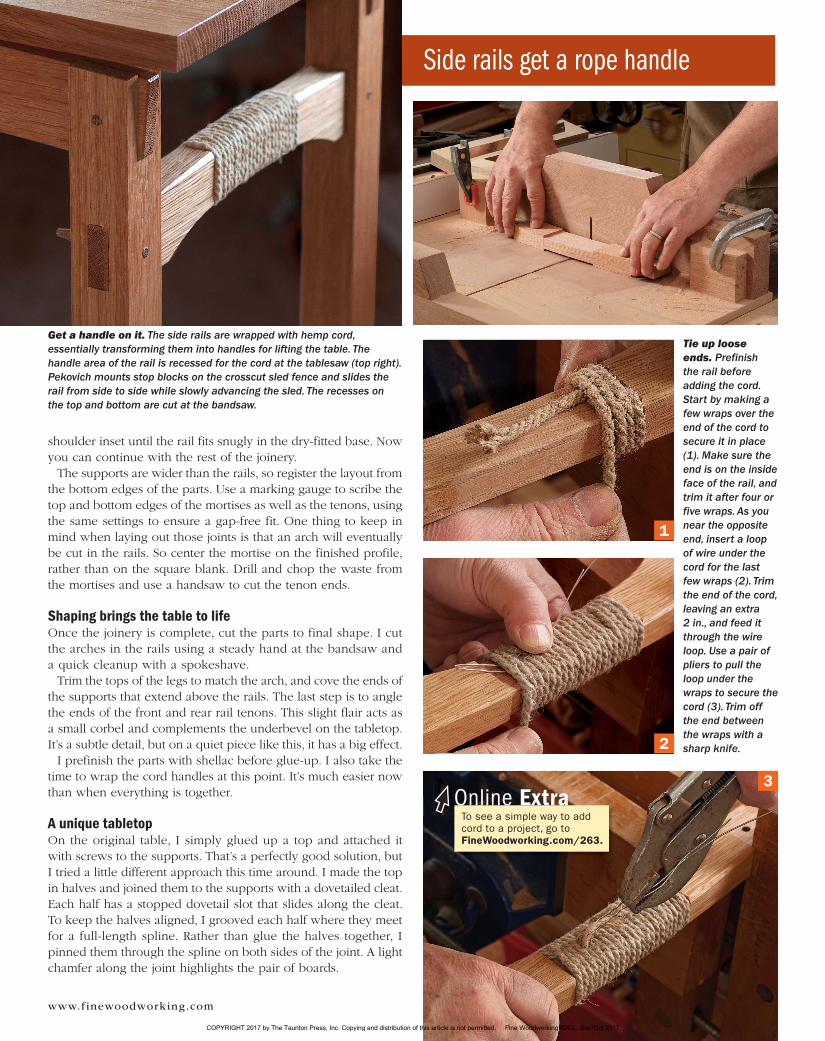
Get a handle on it. The side rails are wrapped with hemp cord, essentially transforming them into handles for lifting the table. The handle area of the rail is recessed for the cord at the tablesaw (top right). Pekovich mounts stop blocks on the crosscut sled fence and slides the rail from side to side while slowly advancing the sled. The recesses on the top and bottom are cut at the bandsaw.
Tie up loose ends. Prefinish the rail before adding the cord. Start by making a few wraps over the end of the cord to secure it in place (1). Make sure the end is on the inside face of the rail, and trim it after four or five wraps. As you near the opposite end, insert a loop of wire under the cord for the last few wraps (2). Trim the end of the cord, leaving an extra 2 in., and feed it through the wire loop. Use a pair of pliers to pull the loop under the wraps to secure the cord (3). Trim off the end between the wraps with a sharp knife.
Side rails get a rope handle
1
2
3
To see a simple way to add cord to a project, go to FineWoodworking.com/263.
Online Extra
W263PE.indd 33 6/30/17 1:22 PM
COPYRIGHT 2017 by The Taunton Press, Inc. Copying and distribution of this article is not permitted. Fine Woodworking #263 - Sep/Oct 2017
F I N E W O O D W O R K I N G34
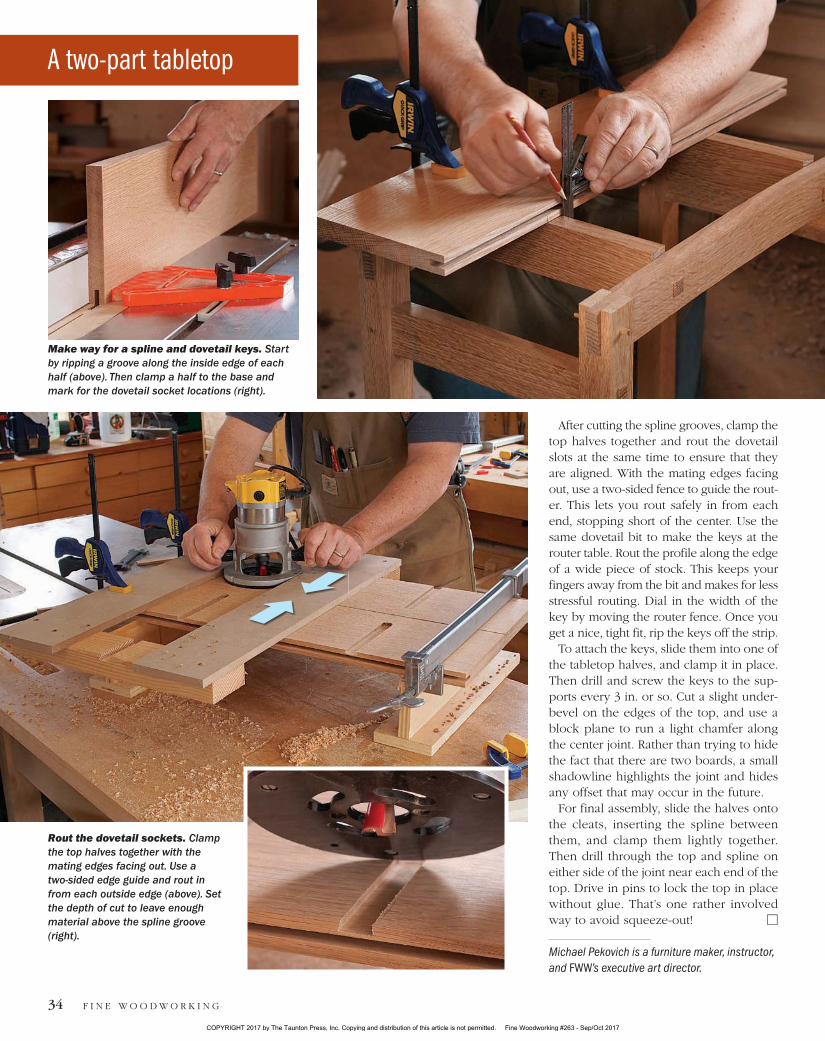
After cutting the spline grooves, clamp the top halves together and rout the dovetail slots at the same time to ensure that they are aligned. With the mating edges facing out, use a two-sided fence to guide the rout-er. This lets you rout safely in from each end, stopping short of the center. Use the same dovetail bit to make the keys at the router table. Rout the profile along the edge of a wide piece of stock. This keeps your fingers away from the bit and makes for less stressful routing. Dial in the width of the key by moving the router fence. Once you get a nice, tight fit, rip the keys off the strip.
To attach the keys, slide them into one of the tabletop halves, and clamp it in place. Then drill and screw the keys to the sup-ports every 3 in. or so. Cut a slight under-bevel on the edges of the top, and use a block plane to run a light chamfer along the center joint. Rather than trying to hide the fact that there are two boards, a small shadowline highlights the joint and hides any offset that may occur in the future.
For final assembly, slide the halves onto the cleats, inserting the spline between them, and clamp them lightly together. Then drill through the top and spline on either side of the joint near each end of the top. Drive in pins to lock the top in place without glue. That’s one rather involved way to avoid squeeze-out! □
Michael Pekovich is a furniture maker, instructor, and FWW’s executive art director.
Make way for a spline and dovetail keys. Start by ripping a groove along the inside edge of each half (above). Then clamp a half to the base and mark for the dovetail socket locations (right).
Rout the dovetail sockets. Clamp the top halves together with the mating edges facing out. Use a two-sided edge guide and rout in from each outside edge (above). Set the depth of cut to leave enough material above the spline groove (right).
A two-part tabletop
W263PE.indd 34 6/27/17 3:55 PM
COPYRIGHT 2017 by The Taunton Press, Inc. Copying and distribution of this article is not permitted. Fine Woodworking #263 - Sep/Oct 2017

S e p t e m b e r / O c t O b e r 2 0 1 7 35www.finewoodworking.com
Make the dovetail keys. Using the same dovetail bit, rout a dovetail profile on the edges of the key stock (left). Dial in the fit by adjusting the router table fence until the key fits snugly in the slot (center). Finally rip the keys off the stock (right) and plane for a final fit. The finished keys should slide easily in the slot because they can be adjusted for a tighter fit later during assembly.
Installing the top. Clamp one half to the base, slide the keys into place, and screw them to the support rails (above). Tighten or loosen the screws to adjust the fit. Remove the first half to drive the remaining screws, then replace it, insert the spline, and slide the second half of the top in place. Clamp them lightly together and drill and drive in pins through the spline to secure the top (right).
Mill the key thinner than the slot depth.
AdjustAble dovetAil key
Adjust the screw to tighten or loosen the fit of the key in the slot.
W263PE.indd 35 6/28/17 9:13 AM
COPYRIGHT 2017 by The Taunton Press, Inc. Copying and distribution of this article is not permitted. Fine Woodworking #263 - Sep/Oct 2017