Aprons Caps Woman 1917
56
;;a*t<4$S$f J»>>*fPWvCi or JJomesvia/ir/s S^Sciences ucranTQfkJzi. is and REFERENCE BOOK *J0nf TO BE REPORTED ON
-
Upload
tallerbioarq -
Category
Documents
-
view
18 -
download
0
description
Metodo de confeccion para delantales y gorras de trabajo domestico
Transcript of Aprons Caps Woman 1917

;;a*t<4$S$f
J»>>*fPWvCi
or JJomesvia/ir/sS^Sciences
ucranTQfkJzi.
is andREFERENCE BOOK
*J0nf TO BE REPORTED ON
~0 THE STUDENT:
Bustles, hoop skirts, and boned bodices comeand go, but aprons, like table napkins, seem
always necessary.
Many modern-type aprons are exploited andmany have much merit, but the home-loving
woman likes the clean, fresh apron to put on for
the ceremony of dinner getting or for the bit of
special sewing. And in between, the apron is a
safeguard, for many, kinds of household work.
Therefore, practically all types are considered so
that one may choose and make that which pleases
her most, and vary the design or idea to suit her
own special fancy.
Frequent laundering requires materials of good
quality and color. Neatness is $ynonymous with
aprons and as a result necessitates careful work-
manship, neat seams, and good finishing.
M.B.P.
Copyright, 1922, by International Educational Publishing CompanyCopyright in Great Britain. All rights reserved
Printed in U. S. A.

APRONS AND CAPS
HOUSE APRONS AND CAPS
STYLES AND MATERIALS1. Aprons, which are really of three types—house aprons, fancy
aprons, and sewing aprons—may truly be called friends of the
housewife. Not only do aprons that are appropriate enable the
home woman to appear clean and tidy around the house, no
matter how much or how little housework she may perform, but
they give her a genuine comfort that is difficult to express.
2. The number of styles of aprons that serve to protect the
clothes from dust and dirt seems to be unlimited. They vary from
small aprons that tie around the waist to aprons that cover the
entire dress, even to the sleeves.
Aprons are known by various names, too, but in many instances
the names are used simply to distinguish styles of different design-
ers, the aprons being much the same in appearance, except, per-
haps, for a little change here and there, more noticeable in the
material and trimming than anywhere else.
3. House aprons, to meet the requirements of the house-
wife, must be serviceable. For this reason, it is always advisable to
use such materials as calico, percale, gingham, and chambray in
their construction. These are all good, common-sense materials,
because they launder easily, appear fresh and clean when laundered,
and have that smooth surface so necessary in housework to prevent
the collection of dust, dirt, and grime. Their superiority over
loosely woven fabrics, which not only are unattractive but collect
dirt readily, is so evident that no mistake is ever made in their
selection for this purpose.
COPYRIGHTED BY INTERNATIONAL EDUCATIONAL PUBLISHING COMPANY. ALL RIGHTS RESERVED
§12
[2]

2 APRONS AND CAPS § 12
4. With house aprons, many women like to wear house caps
that match. Such caps, in most instances, lend greatly to a woman's
appearance, and, at the same time, prove very useful articles. Manyare the designs of such house caps, and when properly and taste-
fully made of material that matches or harmonizes with the apron
material, very pleasing are the effects that result.
5. Several styles of practical house aprons and a simple style
of sweeping cap, as well as the methods of making them, are
here considered. The work in connection with them is simple,
and you will get good results if you are guided by the fact that the
essentials of house-apron construction are simply neat designs,
appropriate materials, and good workmanship. As you will readily
agree, a house apron, if of colored fabric, must be sufficiently strong
in color to bear frequent laundering ; it must not be so firmly woven
that the dirt will not come but with the starch in laundering; and
the workmanship must be so good that the seams and hems will not
roughen out by hard wear or by frequent washing.
Aprons of sheer material are worn in the home, too. But such
aprons are properly classed as fancy aprons and sewing aprons and
are considered later.
VARIETIES OF HOUSE APRONS AND CAPS
BODICE APRON
6. The bodice apron, Fig. 1, is of particular merit because it
so closely resembles the lines of a dress and also gives excellent
protection, a feature that is essential in a house apron. A point
of interest in the design of this apron is that the position of
the waist line, or the length of the bodice, may be varied to make it
individually becoming or in accordance with prevalent styles. Themanner in which the straps are arranged over the back waist portion
prevents any possibility of their slipping off the shoulders.
7. Material and Pattern Requirements.—As illustrated,
the bodice apron is of cretonne, which makes its effect very decora-
tive and attractive. Such material is desirable for garden aprons
and for house aprons intended for only occasional wear, but for an
apron that must withstand common usage and frequent launderings,

§12 APRONS AND CAPS
percale, calico, gingham, and chambray are preferable. For the
average figure, provide 2j yards of material 36 inches wide.
For the development of this apron, you may use a special pattern
of similar design, or if you have a bodice pattern with the front
portion extended from the
under arm to the center back,
you may use this portion and
apply straight straps at the
shoulders to extend across the
back and use a full width of
material for the front skirt
portion of the apron, with a
quarter width on each side.
8. Cutting- Out theMaterial.—Fold the material
lengthwise through the center
;
then, if you have a special
apron pattern, place the front
skirt portion at one end of the
material so that its center-
front edge is along the fold.
Next, place. the bodice, or bib
portion, of the apron so that
its lower edge is next to the
front skirt portion and its
center front is along the fold.
Arrange the remainder of the
pattern pieces so that the
material may be cut to the best
advantage, placing all these
sections lengthwise of the
fabric.
If you have no pattern for
the pocket, strings, and straps,
cut the pocket about 7 inches
long and 9 inches wide, the
strings about 24 inches long and 5 inches wide, and the straps
about 16 inches long and 3^ inches wide, cutting all of these sections
on the straight of the material.
Fig. 1
[2]

4 APRONS AND CAPS § 12
9. Constructing- the Apron.—Join the side seam lines of
the skirt portion by means of machine fells or French seams, and
turn and stitch narrow hems on the back edges of the side portions.
Then gather the waist line, or upper edge.
Next, turn and stitch narrow hems on the lengthwise edges of
the straps and strings. Finish one end of each string with a f- or
1-inch hem and gather the opposite ends.
Next, to determine the correct position for the straps and strings,
place the front bodice section on the figure ; arrange the straps as
you desire to have them and pin them in position. If the bodice
ends at the center back seem too long, turn under as much as you
desire, but do not make the waist line of the apron at all close-
fitting or it will not appear well and, besides, will not prove so
comfortable. Then pin the strings in position at the points pro-
vided for them.
Before removing the bodice, mark the straps with chalk or pins to
indicate the line where they join the bodice section in back; then
loosen them from the bodice at these points, but not at the shoulder.
Finish the shoulder joinings of the straps to the bodice and also
the joinings of the strings to the bodice by means of machine fells
or French seams. Finish all the bodice edges, with the exception of
the waist line, with very narrow bias facings. Turn the waist line
under just once and arrange the gathered portion under this turned
edge, distributing the fulness so that just a little will fall at the
front. Stitch the lower edge of the bodice to the gathered skirt
portion ; then trim the raw edges close on the wrong side and over-
cast them or cover them with a narrow bias facing.
Finish the free ends of the straps with -|-inch hems and sew snap
fasteners to them and to the bodice edge where they are to join.
Complete the apron by making and applying the patch pockets and
turning and stitching a hem at the lower edge of the skirt portion.
10. Applying- Bias Binding.—If you wish, you may finish
the edges of the bodice portion, sash and pockets of the bodice apron
with bias binding. This is an especially desirable trimming for
checked gingham.
Instead of applying the binding by first placing the bias strip over
the right side of the material, stitching it in position, and then
turning it over to the wrong side and whipping it down, you mayfollow the easier method shown in Fig. 2.

§12 APRONS AND CAPS
To bind the edges in this manner, first place the right side of
the bias strip to the wrong side of the apron, and stitch as at a;
that is, with a scant |-inch seam. Then turn the binding over on
the right side, turn under the edge £ inch or a trifle more, and
baste and stitch again, as at b. By turning the binding to the right
side and stitching, you will be assured of catching the turned edge
and also of accurate stitching on the right side.
If ready-made binding is to be used, it should be \ inch wide
when finished, so as to catch enough of the material to hold well.
Baste it in position, as at c, and stitch it in place ; or, better still, pro-
vided )rou have had sufficient experience in using the binder, one
-*;
V
-----
- :
-" : "-': -''" :.-. ..-.....
-.;
'' '"":
"'
' .'.''. "
.:. , ;-:
:
Fig. 2
of the valuable attachments of every sewing machine, bind all the
edges by machine, and in this way save much time. In following
either method, bear in mind that most of the beauty of this apron
depends on neat workmanship.
To become proficient in using the binder, you will do well to
practice first on straight edges and then on such curved edges as
those used for this apron. Owing to the different makes of sewing
machines, explicit directions for using the binder cannot be given
here. In all cases where attachments are to be employed, direc-
tions for their proper use should be ascertained from the book of
instructions that accompanies the sewing machine.
APRONS AND CAPS §12
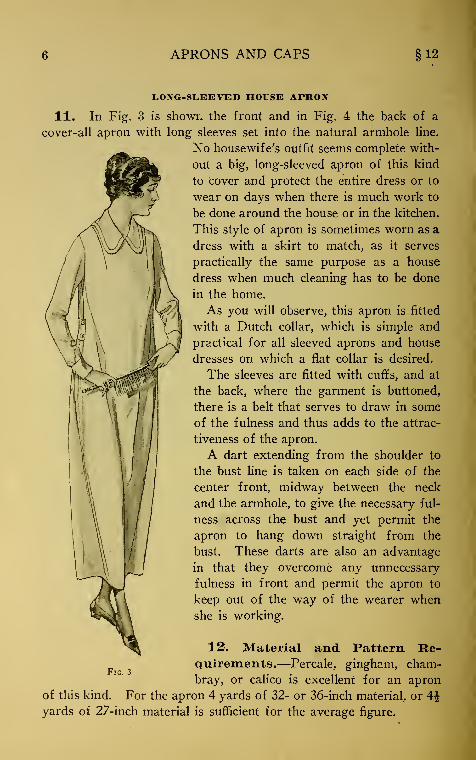
LONG-SLEEVED HOUSE APRON
11. In Fig. 3 is shown the front and in Fig. 4 the back of a
cover-all apron with long sleeves set into the natural armhole line.
No housewife's outfit seems complete with-
out a big, long-sleeved apron of this kind
to cover and protect the entire dress or to
wear on days when there is much work to
be done around the house or in the kitchen.
This style of apron is sometimes worn as a
dress with a skirt to match, as it serves
practically the same purpose as a house
dress when much cleaning has to be done
in the home.
As you will observe, this apron is fitted
with a Dutch collar, which is simple and
practical for all sleeved aprons and house
dresses on which a flat collar is desired.
The sleeves are fitted with cuffs, and at
the back, where the garment is buttoned,
there is a belt that serves to draw in some
of the fulness and thus adds to the attrac-
tiveness of the apron.
A dart extending from the shoulder to
the bust line is taken on each side of the
center front, midway between the neck
and the armhole, to give the necessary ful-
ness across the bust and yet permit the
apron to hang down straight from the
bust. These darts are also an advantage
in that they overcome any unnecessary
fulness in front and permit the apron to
keep out of the way of the wearer whenshe is working.
Fig. 3
12. Material and Pattern Re-quirements.—Percale, gingham, cham-
bray, or calico is excellent for an apron
of this kind. For the apron 4 yards of 32- or 36-inch material, or 4|yards of 27-inch material is sufficient for the average figure.
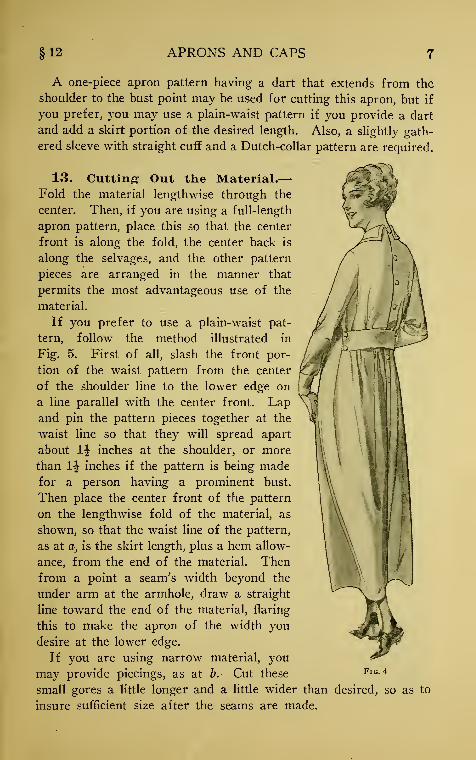
§12 APRONS AND CAPS
A one-piece apron pattern having a dart that extends from the
shoulder to the bust point may be used for cutting this apron, but if
you prefer, you may use a plain-waist pattern if you provide a dart
and add a skirt portion of the desired length. Also, a slightly gath-
ered sleeve with straight cuff and a Dutch-collar pattern are required.
13. Cutting Out the Material.—Fold the material lengthwise through the
center. Then, if you are using a full-length
apron pattern, place this so that the center
front is along the fold, the center back is
along the selvages, and the other pattern
pieces are arranged in the manner that
permits the most advantageous use of the
material.
If you prefer to use a plain-waist pat-
tern, follow the method illustrated in
Fig. 5. First of all, slash the front por-
tion of the waist pattern from the center
of the shoulder line to the lower edge on
a line parallel with the center front. Lapand pin the pattern pieces together at the
waist line so that they will spread apart
about 1^ inches at the shoulder, or more
than 1^ inches if the pattern is being madefor a person having a prominent bust.
Then place the center front of the pattern
on the lengthwise fold of the material, as
shown, so that the waist line of the pattern,
as at a, is the skirt length, plus a hem allow-
ance, from the end of the material. Then
from a point a seam's width beyond the
under arm at the armhole, draw a straight
line toward the end of the material, flaring
this to make the apron of the width you
desire at the lower edge.
If you are using narrow material, you
may provide piecings, as at b. Cut these
small gores a little longer and a little wider than desired, so as to
insure sufficient size after the seams are made.
Fig. 4
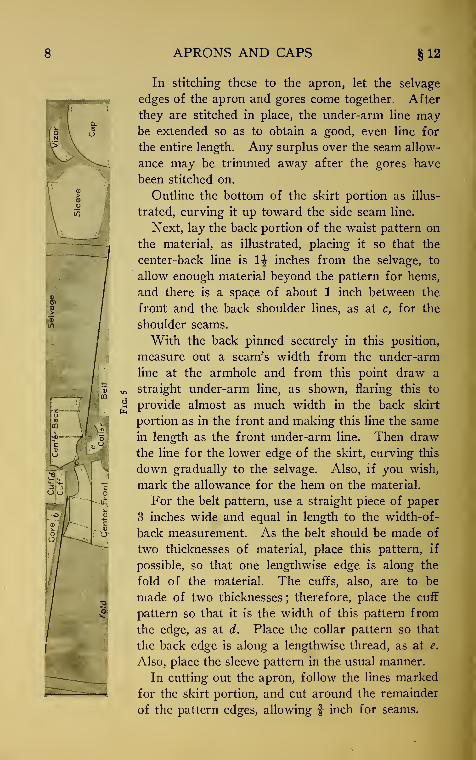
APRONS AND CAPS §12
In stitching these to the apron, let the selvage
edges of the apron and gores come together. After
they are stitched in place, the under-arm line may-
be extended so as to obtain a good, even line for
the entire length. Any surplus over the seam allow-
ance may be trimmed away after the gores have
been stitched on.
Outline the bottom of the skirt portion as illus-
trated, curving it up toward the side seam line.
Next, lay the back portion of the waist pattern on
the material, as illustrated, placing it so that the
center-back line is 1^ inches from the selvage, to
allow enough material beyond the pattern for hems,
and there is a space of about 1 inch between the
front and the back shoulder lines, as at c, for the
shoulder seams.
With the back pinned securely in this position,
measure out a seam's width from the under-arm
line at the armhole and from this point draw a
straight under-arm line, as shown, flaring this to
provide almost as much width in the back skirt
portion as in the front and making this line the same
in length as the front under-arm line. Then draw
the line for the lower edge of the skirt, curving this
down gradually to the selvage. Also, if you wish,
mark the allowance for the hem on the material.
For the belt pattern, use a straight piece of paper
3 inches wide and equal in length to the width-of-
back measurement. As the belt should be made of
two thicknesses of material, place this pattern, if
possible, so that one lengthwise edge is along the
fold of the material. The cuffs, also, are to be
made of two thicknesses ; therefore, place the cuff
pattern so that it is the width of this pattern from
the edge, as at d. Place the collar pattern so that
the back edge is along a lengthwise thread, as at e.
Also, place the sleeve pattern in the usual manner.
In cutting out the apron, follow the lines marked
for the skirt portion, and cut around the remainder
of the pattern edges, allowing $ inch for seams.

§ 12 APRONS AND CAPS 9
14. A sweeping cap made of the same material as the apron andworn with it would add to the utility and attractiveness of the
costume. Pattern pieces for the sweeping cap, which is considered
later in this lesson, are shown as they should be laid in position at
one end of the material on which the apron pattern pieces are placed.
15. Constructing- the Apron.—First, baste the darts in the
front portion and baste the shoulder and under-arm seams together
in the regular way; also turn hems 1 inch wide at the center
back and stitch them in position. As these hems are perfectly
straight when carefully traced, it is rarely necessary to baste them.
Next, gather the lower edge of each sleeve into each cuff band and
stitch these parts together; also, French-seam the sleeve and stitch
through both the sleeve and the cuff, taking care to secure the ends
at the bottom of each cuff so that the seams will not be liable to rip
open. The seams of the apron may be French-seamed or madeinto plain seams and then overcasted, as desired.
To see how the apron fits, baste the sleeves in and then slip the
apron on and pin it together in the back. Notice the neck first; if
it is too high, trim it out a little. However, do not attempt to fit
the apron close, as it is intended to be rather loose. Notice, also,
whether the sleeves are put in so that the lengthwise thread of the
material comes at the shoulder seam, and if there are gathers, see
that they are correctly adjusted. At this time, too, turn the length
at the bottom. An apron of this kind should be sufficiently long
to cover every part of the skirt under it.
With all these points taken care of, remove the garment and pro-
ceed to finish it, remembering that it buttons down the back and
has across the back a belt that buttons in place, two buttons being
used on each side.
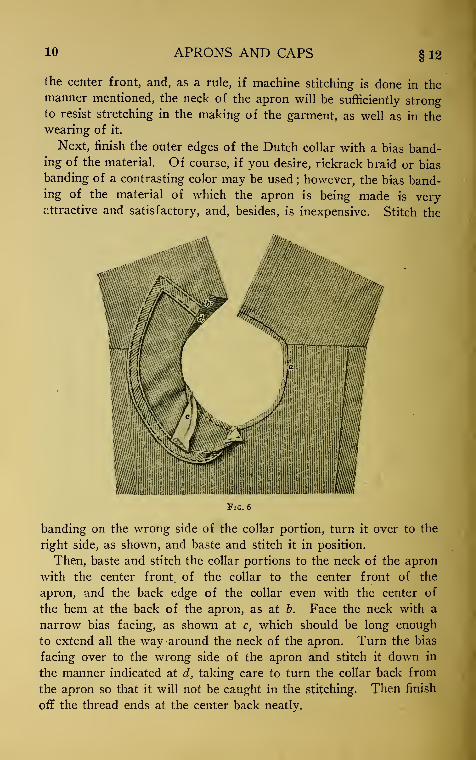
16. Making and Applying a Dutch Collar.—While the
making of this apron is simple and you should be able to perform the
work without explicit directions, it may be well here to give in detail
the applying of the Dutch collar.
If bias banding is to be used, it is well to stitch around the neck
line with the sewing machine, as shown at a, Fig. 6, before putting
the collar on, to prevent the neck of the apron from stretching out
of shape, for no matter how much care is taken in putting the bias
banding on, the neck of the apron is sure to stretch a trifle. Anapron of this kind should fit close to the neck and not pouch out at
10 APRONS AND CAPS §12
the center front, and, as a rule, if machine stitching is done in the
manner mentioned, the neck of the apron will be sufficiently strong
to resist stretching in the making of the garment, as well as in the
wearing of it.
Next, finish the outer edges of the Dutch collar with a bias band-ing of the material. Of course, if you desire, rickrack braid or bias
banding of a contrasting color may be used ; however, the bias band-ing of the material of which the apron is being made is veryattractive and satisfactory, and, besides, is inexpensive. Stitch the
Fig. 6
banding on the wrong side of the collar portion, turn it over to the
right side, as shown, and baste and stitch it in position.
Then, baste and stitch the collar portions to the neck of the apron
with the center front, of the collar to the center front of the
apron, and the back edge of the collar even with the center of
the hem at the back of the apron, as at b. Face the neck with a
narrow bias facing, as shown at c, which should be long enough
to extend all the way around the neck of the apron. Turn the bias
facing over to the wrong side of the apron and stitch it down in
the manner indicated at d, taking care to turn the collar back from
the apron so that it will not be caught in the stitching. Then finish
off the thread ends at the center back neatly.
12 APRONS AND CAPS 11
If the material stretches easily, a very narrow, straight strip of
the material, one that is just wide enough to cover the raw seam, is
preferable to a bias strip for binding the neck. For this strip, the
selvage edge is perhaps best, as it saves one thickness of material
and may be stitched directly on the edge for a finish. Extra care
must be taken where a straight band is employed, for it must be put
on so carefully as not to cause the upper edge to pouch out.
\
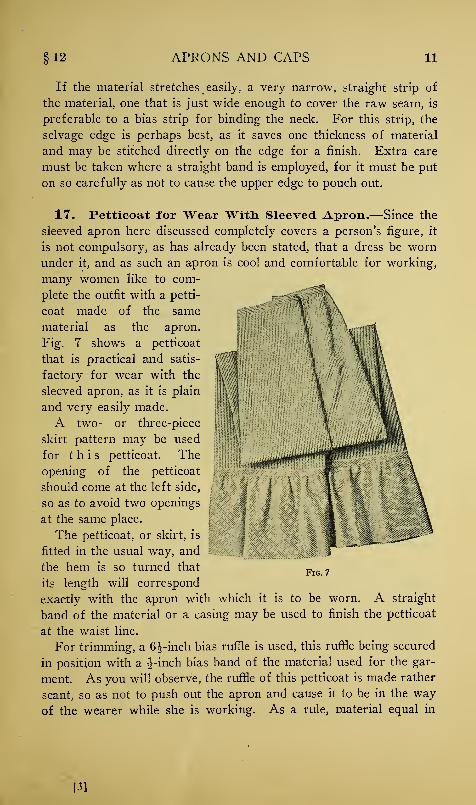
17. Petticoat for Wear With Sleeved Apron.—Since the
sleeved apron here discussed completely covers a person's figure, it
is not compulsory, as has already been stated, that a dress be worn
under it, and as such an apron is cool and comfortable for working,
many women like to com-
plete the outfit with a petti-
coat made of the same
material as the apron.
Fig. 7 shows a petticoat
that is practical and satis-
factory for wear with the
sleeved apron, as it is plain
and very easily made.
A two- or three-piece
skirt pattern may be used
for this petticoat. The
opening of the petticoat
should come at the left side,
so as to avoid two openings
at the same place.
The petticoat, or skirt, is
fitted in the usual way, and
the hem is so turned that
its length will correspond
exactly with the apron with which it is to be worn. A straight
band of the material or a casing may be used to finish the petticoat
at the waist line.
For trimming, a 6|-inch bias ruffle is used, this ruffle being secured
in position with a -|-inch bias band of the material used for the gar-
ment. As you will observe, the ruffle of this petticoat is made rather
scant, so as not to push out the apron and cause it to be in the way
of the wearer while she is working. As a rule, material equal in
Fig. 7
m

12 APRONS AND CAPS 12
length to one and one-half times the width of the skirt at the bottom
is used for a ruffle ; but, in this case, a length equal to just one and
one-third the skirt width is employed.
Finish the flat-stitched placket of this petticoat with two buttons
on the placket and one on the band. If you desire, you may sew
two loops of tape on the inside of the skirt band, so that the petticoat
may be hung up easily when not in use.
SWEEPING CAP
18. Material and Pattern Requirements.—A sweeping
cap that is especially desirable for wear with a long-sleeved apron
is shown in Fig. 8 (a) and
(&). The style of this cap
is such that when it is made
of suitable material it an-
swers very well as an auto-
mobile cap ; in fact, it has
many possibilities and gives
the woman who sews a
chance to develop originality
in trimming it so as to add
to its effectiveness.
For developing the cap,
any one of the materials
suggested for the long-
sleeved apron is suitable, -| yard usually being all that is required.
A pattern in two pieces, one for the crown, or the part of the
cap that rests on the head, and the other for the vizors, or brim
portions, which provide a shield for the eyes, is essential.
19. Constructing the Cap.—Follow the plan illustrated in
Fig. 5 in cutting out the cap, placing the longer straight edge of the
crown portion on a lengthwise thread.
Begin the construction of the cap by finishing the curved, or upper,
edge of the crown portion and the outer curved edge of the vizors
in the manner suggested in connection with the construction of the
apron. If bias banding or braid is used for the apron, it should be
used for the cap, too. Hem the lower edge of the crown piece with
a |-inch hem, as indicated in Fig. 9. Then, beginning at the center
Fig. 8

12 APRONS AND CAPS 13
of the upper part of the crown, fold the crown into tiny plaits, as
shown. Place the points of the vizor pieces ^ inch apart, as at a,
and then pin the crown portion to the vizors all the way down the
side fronts.
Put the cap on next, lap the hems over each other, and then bring
the crown down in a point, as shown in Fig. 8 (o). If the cap is too
large, make the plaits a little deeper on the top of the crown and fold
in the vizor parts, as at b and c, Fig. 9, so that they will appear
shorter. If the cap is too small, make the plaits smaller and the
extension of the crown beyond b and c longer. When the plaits are
properly adjusted, stitch the crown portion to the vizors, stitching
Fig. 9
directly on the edge of the band so that the plaits will be held in
their correct position.
Next, work four buttonholes along the right-hand side of the cap
from the corner d to the center back e, and then, on the left, sew
three buttons to correspond with the first three buttonholes on the
right. Button these three buttons next, and bring the buttonhole e
at the center down over the button and buttonhole at the extreme
edge of the cap to secure it in position and thus get the pointed
effect shown in Fig. 8 (a). The buttons and buttonholes of this cap
make it possible to open out the cap in ironing, a decided advantage
when there is a great deal of fulness in the crown part of a cap.
14 APRONS AND CAPS 12
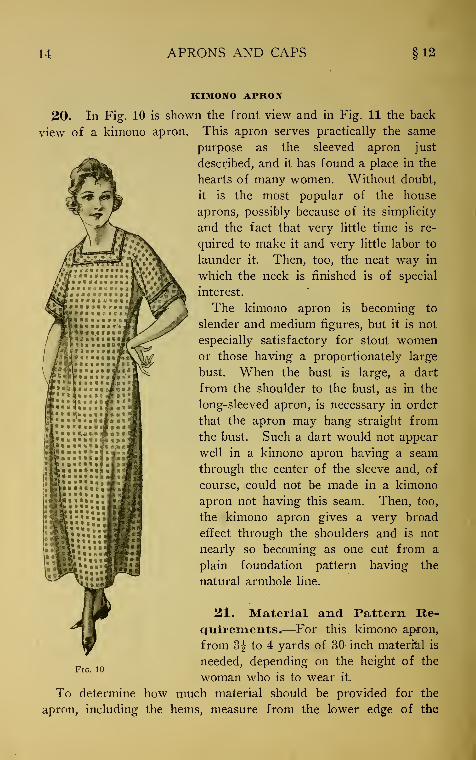
KIMONO APRON
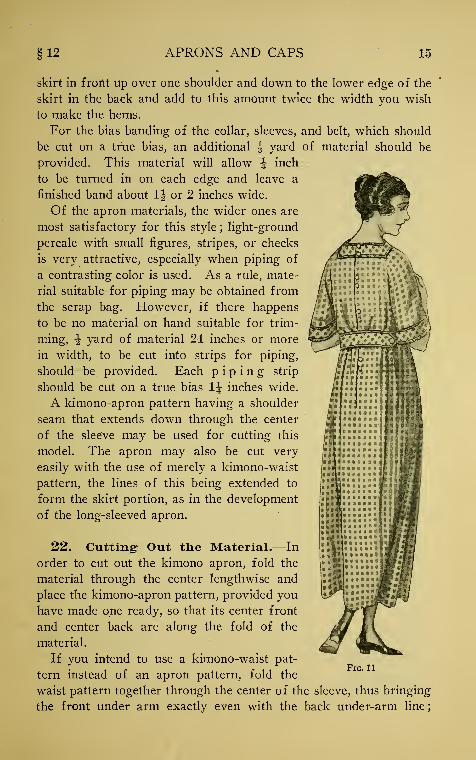
20. In Fig. 10 is shown the front view and in Fig. 11 the back
view of a kimono apron. This apron serves practically the same
purpose as the sleeved apron just
described, and it has found a place in the
hearts of many women. Without doubt,
it is the most popular of the house
aprons, possibly because of its simplicity
and the fact that very little time is re-
quired to make it and very little labor to
launder it. Then, too, the neat way in
which the neck is finished is of special
interest.
The kimono apron is becoming to
slender and medium figures, but it is not
especially satisfactory for stout womenor those having a proportionately large
bust. When the bust is large, a dart
from the shoulder to the bust, as in the
long-sleeved apron, is necessary in order
that the apron may hang straight from
the bust. Such a dart would not appear
well in a kimono apron having a seam
through the center of the sleeve and, of
course, could not be made in a kimono
apron not having this seam. Then, too,
the kimono apron gives a very broad
effect through the shoulders and is not
nearly so becoming as one cut from a
plain foundation pattern having the
natural armhole line.
21. Material and Pattern Re-quirements.—For this kimono apron,
from 3^ to 4 yards of 30-inch material is
needed, depending on the height of the
woman who is to wear it.
To determine how much material should be provided for the
apron, including the hems, measure from the lower edge of the
Fig. 10
12 APRONS AND CAPS 15
skirt in front up over one shoulder and down to the lower edge of the
skirt in the back and add to this amount twice the width you wish
to make the hems.
For the bias banding of the collar, sleeves, and belt, which should
be cut on a true bias, an additional -J yard of material should be
provided. This material will allow J inch
to be turned in on each edge and leave a
finished band about 1| or 2 inches wide.
Of the apron materials, the wider ones are
most satisfactory for this style; light-ground
percale with small figures, stripes, or checks
is very attractive, especially when piping of
a contrasting color is used. As a rule, mate-
rial suitable for piping may be obtained from
the scrap bag. However, if there happens
to be no material on hand suitable for trim-
ming, ^ yard of material 24 inches or more
in width, to be cut into strips for piping,
should be provided. Each piping strip
should be cut on a true bias 1^ inches wide.
A kimono-apron pattern having a shoulder
seam that extends down through the center
of the sleeve may be used for cutting this
model. The apron may also be cut very
easily with the use of merely a kimono-waist
pattern, the lines of this being extended to
form the skirt portion, as in the development
of the long-sleeved apron.
22. Cutting Out the Material.—In
order to cut out the kimono apron, fold the
material through the center lengthwise and
place the kimono-apron pattern, provided you
have made one ready, so that its center front
and center back are along the fold of the
material.
If you intend to use a kimono-waist pat-
tern instead of an apron pattern, fold the
waist pattern together through the center of the sleeve, thus bringing
the front under arm exactly even with the back under-arm line
;
Fig. n

16 APRONS AND CAPS §12
«
// *>
// w// *//
>'
// 4)
C'\ .// "*
,L_/ *«
fas:'
O«5
•'L^ffv- '
'glgggggj
then slash the pattern on this fold from the neck
through the sleeve portion, so that it may be
separated.
The object in making the shoulder seams is to
lift the front up at the under arms so that the
apron will not drop down, as well as to keep the
center back of the apron on a lengthwise thread
of the material. Then, too, an apron cut with
the seam on the shoulder is preferable to one
without a seam, for it will not fall out and be in
your way when you are working.
To determine the right length for the front of
the apron, measure from the center front of the
neck down to the desired skirt length. Withthis length known and the material arranged as
shown in Fig. 12—that is, folded lengthwise
through the center and its selvage edges pinned
together—place the front part of the waist pat-
tern on the material so that its center front is on
the fold and the neck curve, as at a, is the dis-
tance determined for the apron length, plus the
hem allowance, away from the left end of the
material. Pin this part of the pattern securely
to the material, and then proceed to pin the back
part of the kimono-waist pattern on, keeping the
neck edge, as at b, ^ inch from the fold and the
waist line near the bottom of the pattern 2 inches
from the fold, as at c, thus making the back
width correspond more nearly to the front.
Next, measure down from the neck line at the
center back of the pattern to a point correspond-
ing to the length that the apron is desired, plus
allowance for a hem, as at d, and draw a line
across the material at this point. In determin-
ing what this length should be, measure from
the center-back neck line of the figure to the
desired skirt length. Next, extend the under-arm
lines down from the under arms of the waist
pattern, as shown, making the lines in the manner
explained in connection with the sleeved apron.
§ 12 APRONS AND CAPS 17
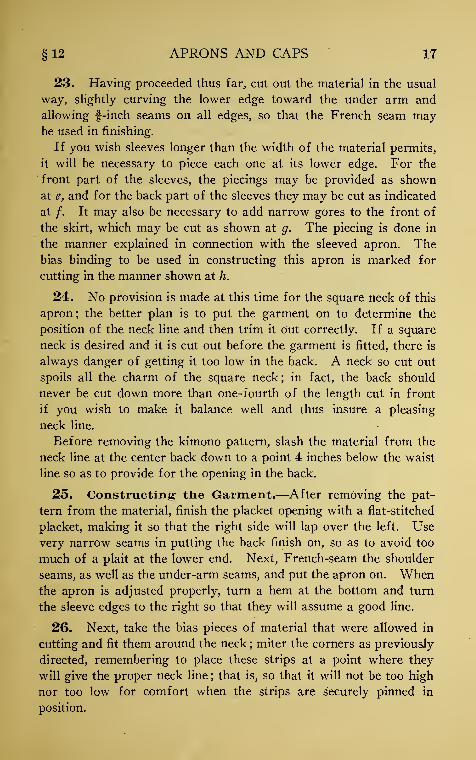
23. Having proceeded thus far, cut out the material in the usual
way, slightly curving the lower edge toward the under arm and
allowing f-inch seams on all edges, so that the French seam maybe used in finishing.
If you wish sleeves longer than the width of the material permits,
it will be necessary to piece each one at its lower edge. For the
front part of the sleeves, the piecings may be provided as shown
at e, and for the back part of the sleeves they may be cut as indicated
at /. It may also be necessary to add narrow gores to the front of
the skirt, which may be cut as shown at g. The piecing is done in
the manner explained in connection with the sleeved apron. Thebias binding to be used in constructing this apron is marked for
cutting in the manner shown at h.
24. No provision is made at this time for the square neck of this
apron ; the better plan is to put the garment on to determine the
position of the neck line and then trim it out correctly. If a square
neck is desired and it is cut out before the garment is fitted, there is
always danger of getting it too low in the back. A neck so cut out
spoils all the charm of the square neck; in fact, the back should
never be cut down more than one-fourth of the length cut in front
if you wish to make it balance well and thus insure a pleasing
neck line.
Before removing the kimono pattern, slash the material from the
neck line at the center back down to a point 4 inches below the waist
line so as to provide for the opening in the back.
25. Constructing the Garment.—After removing the pat-
tern from the material, finish the placket opening with a flat-stitched
placket, making it so that the right side will lap over the left. Use
very narrow seams in putting the back finish on, so as to avoid too
much of a plait at the lower end. Next, French-seam the shoulder
seams, as well as the under-arm seams, and put the apron on. Whenthe apron is adjusted properly, turn a hem at the bottom and turn
the sleeve edges to the right so that they will assume a good line.
26. Next, take the bias pieces of material that were allowed in
cutting and fit them around the neck ; miter the corners as previously
directed, remembering to place these strips at a point where they
will give the proper neck line ; that is, so that it will not be too high
nor too low for comfort when the strips are securely pinned in
position.

18 APRONS AND CAPS 12
Take off the apron, next, and lay it out on a table to make sure
that the pieces around the neck are exactly even. If one side appears
to be a little lower or higher than the other, straighten it, for some-
times, in fitting a bias piece in this way, one corner may drop a little
lower than the other and not be noticeable until it is measured up.
As has been mentioned before, you will always do well to measure
up each side of a garment after fitting to make sure that it is
properly balanced, and especially is this necessary when trimming
is applied in the fitting.
Next, trim away the neck edge even with the upper edge of the bias
facing ; bind the neck edge with piping all the way around, as shown
*yf •
rom f,*?f
~~
HP^-';';.;'-./ ,.;V4\"''''
'
- JT\
'
•••••.-••
Fig. 13
at a, Fig. 13 ; and put on the bias band of the material, which has its
lower, outer edge piped. Then, turn the upper edge of the bias
band over to the wrong side and baste it to the piping, as shown
at b ; also, baste the outer edge to the apron, as at c, taking care to
keep the band the same width all the way around.
27. When this trimming is basted in position, baste the piping
to the upper edge of the bias trimming band that has been provided
for the sleeves. Then bind the lower edge of each sleeve and baste
the banding flat to the sleeve over the piping thus formed.
Next, prepare the belt by cutting two strips of bias banding
3 inches longer than the width-of-back measure and 2 inches wide,

§ 12 APRONS AND CAPS 19
and binding one strip all the way around. Then place over this
the other piece of banding, right side up, and, turning under its
edges, baste it flat. In this way, all the raw edges will be inside of
the belt, and it will appear well finished.
At this stage, try on the apron to see whether the facing fits cor-
rectly at the neck. It should be perfectly smooth and not appear
drawn in any place. Next, pin the belt across the back so as to
mark its position, placing a pin opposite the point where it comes at
the under arms, so that a button may be sewed to the seam at this
place.
28. With the apron thus advanced, proceed with the final stitch-
ing. Stitch directly on each edge of the bias banding at the neck, on
each sleeve, and also on the belt. Have this stitching just as even
and as near the edge of the band as possible, so that it will appear
neat. Then, stitch the hem in and finish the apron by working
buttonholes and sewing on the required buttons.
Fig. 11 shows an attractive way in which to arrange the buttons
for a kimono apron. Four groups of two buttons, making eight
buttons in all, are placed down the center back. Of course, if you
desire, the buttons may be spaced evenly, and then four or five will
be sufficient.
Next, sew a button at each side for the belt and work a button-
hole in each end of the belt, so that it may be buttoned in position.
When buttons must be sewed to the under-arm seam, it is advis-
able to sew a small piece of tape or material underneath the seam,
in order to impart strength to the point at which the button is sewed
and thus keep holes from being torn in the apron. Also, in this
style of apron, if time is very valuable, a buttonhole may be worked
in the left end of the belt only, and the right end secured to the
apron by sewing the button through the belt and the apron.
[4]

20 APRONS AND CAPS § 12
FANCY APRONS AND SUNBONNETS
FANCY AND SEWING APRONS
MATERIALS AND STYLES
29. Besides having house aprons to cover the dress well in doing
housework, the woman in the home always finds it convenient to
have on hand small fancy aprons that she may wear while sewing or
while serving guests, or that she may lend to her guests. Such
aprons in many instances add greatly to a woman's neatness and are
generally a great source of satisfaction. Small aprons can hardly
be considered so necessary as the house aprons, yet no woman really
feels that her wardrobe is complete unless she is the possessor of a
few dainty aprons.
30. Sheer materials, such as dotted Swiss, flaxon, lawn, dimity,
voile, and so on, are principally used in making these dainty aprons,
and many pleasing effects are to be had with the aid of embroidery
stitches, insertion, and lace. Small aprons might be considered
expensive if new material had to be purchased each time a new one
is to be made; but such is not the case. As a rule, remnants of
material or pieces from the scrap bag may be utilized to good
advantage, for such aprons do not require much goods.
31. The shapes and designs of fancy and sewing aprons are
varied, and the fashion magazines, especially at the time of the
Christmas holidays, are usually generous in their display of unique
aprons that may be made up as gifts or for one's own use.
The fancy and sewing aprons here considered have been selected
with the idea of imparting apron-construction, principles. Thevariety is such that once you know how to make them, you should
be qualified to make practically any style of apron you may see, for
the body part of fancy aprons is always similar ; in fact, the real
style difference generally lies in the outline of the apron and the
way in which it is trimmed.
12 APRONS AND CAPS 21
APRON STRINGS AND BANDS
32. Before the making of fancy aprons is discussed, it is
deemed advisable to illustrate and explain several finishes of apron
strings and also the method of attaching strings and bands to aprons,
so that explicit directions will not have to be given concerning these
matters in the treatment of the aprons here considered.
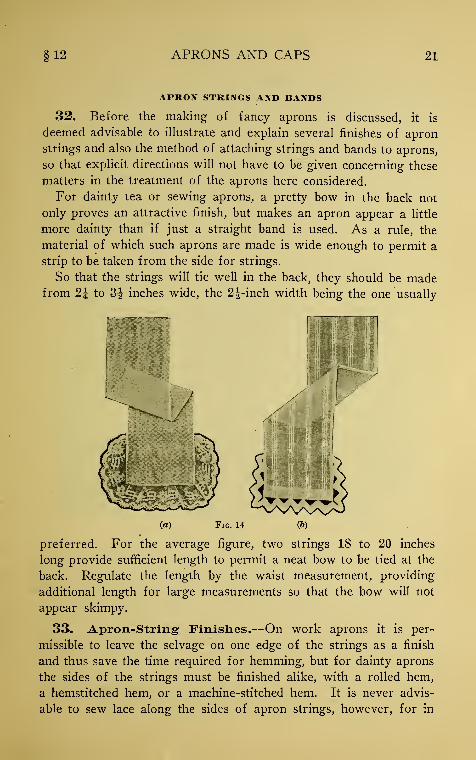
For dainty tea or sewing aprons, a pretty bow in the back not
only proves an attractive finish, but makes an apron appear a little
more dainty than if just a straight band is used. As a rule, the
material of which such aprons are made is wide enough to permit a
strip to be taken from the side for strings.
So that the strings will tie well in the back, they should be madefrom 21 to 3^ inches wide, the 2^-inch width being the one usually
mm nil!
/
(«) Fig. 14 (6)
preferred. For the average figure, two strings 18 to 20 inches
long provide sufficient length to permit a neat bow to be tied at the
back. Regulate the length by the waist measurement, providing
additional length for large measurements so that the bow will not
appear skimpy.
33. Apron-String Finishes.—On work aprons it is per-
missible to leave the selvage on one edge of the strings as a finish
and thus save the time required for hemming, but for dainty aprons
the sides of the strings must be finished alike, with a rolled hem,
a hemstitched hem, or a machine-stitched hem. It is never advis-
able to sew lace along the sides of apron strings, however, for in
22 APRONS AND CAPS 12
tying and untying them the lace becomes torn and wears out so
quickly as not to justify the expenditure of time required to sewit on.
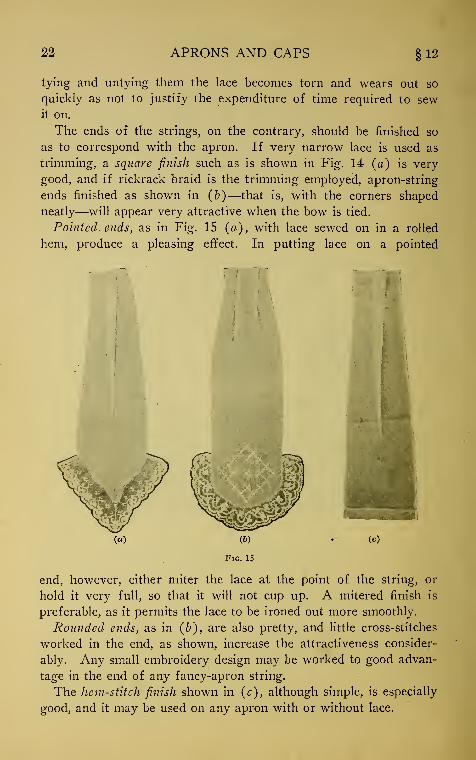
The ends of the strings, on the contrary, should be finished so
as to correspond with the apron. If very narrow lace is used as
trimming, a square finish such as is shown in Fig. 14 (a) is very
good, and if rickrack braid is the trimming employed, apron-string
ends finished as shown in (b)—that is, with the corners shaped
neatly—will appear very attractive when the bow is tied.
Pointed ends, as in Fig. 15 (a), with lace sewed on in a rolled
hem, produce a pleasing effect. In putting lace on a pointed
(c)
end, however, either miter the lace at the point of the string, or
hold it very full, so that it will not cup up. A mitered finish is
preferable, as it permits the lace to be ironed out more smoothly.
Rounded ends, as in (b), are also pretty, and little cross-stitches
worked in the end, as shown, increase the attractiveness consider-
ably. Any small embroidery design may be worked to good advan-
tage in the end of any fancy-apron string.
The hem-stitch finish shown in (c), although simple, is especially
good, and it may be used on any apron with or without lace.

12 APRONS AND CAPS 23
34. Attaching Strings and Bands.—To put the band on an
apron is a simple operation, the chief requirement being neatness.
If the apron is to be gathered to the band and the material is very
sheer, the gathering stitches should be small, so that the fulness will
ease in and not lie in plaits.
If the machine ruffler is used for such work, then the little plaits
formed by the ruffler will be evenly distributed ; in fact, they often
add to the neat appearance of the apron, whereas plaits in hand-run
gathers are rarely attractive. However, there are generally few
gathers around the waist, as the fancy aprons themselves are so
lit**
Fig. 16
small that it is always well to ease the fulness on to the band so
that the band will not appear larger than the apron.
Wide bands are very effective on heavy, large aprons, such as
those worn by nurses, but on dainty aprons with strings the bands
should rarely be more than 1^ inches wide when finished and only
long enough to extend 2 or 3 inches beyond each side of the gath-
ered apron.
35. To get the best results in constructing fancy aprons, always
notch the center of the apron at the waist line and then join it to
the center of the band, placing the right side of the band to the wrong
side of the apron and basting it on, all the while holding the apron
part easy, so as to keep it from drawing in any place.

24 APRONS AND CAPS §12
If lace is sewed to the sides of the apron, always see that it is
caught in the band, as shown at a, Fig. 16. Turn the end of the
band in and fold under the ends of the strings, as at b, or gather
the unfinished end so that it is just as wide as the band will be whenfinished ; secure this end to the inside of the band, as shown ; then
turn the edge, as at c, and stitch the band down on the right side,
taking care to stitch at least twice across the ends where the strings
are sewed, so that they will not pull out in wearing. Turning the
band over on the right side in this way produces
a neat finish, for then it may be extended far
enough below the joining to cover the joining
well.
rOINTED-PANEL APRON
36. In Fig. 17 is shown a fancy apron that
may be called a pointed-panel apron because
each of its panels terminates in a point. This
apron is of a style that lends itself admirably to
scraps from the work bag, and besides being
easy to make it is always attractive.
To develop the pointed-panel apron, f yard
of flaxon, 1 yard of insertion, and 3 yards of
lace are required. As is clearly illustrated, the
insertion is used between the center and side
panels of the apron, and the lace, which is
machine-made Valenciennes, is used to outline
the apron, as well as the two pockets, which,
on account of their graceful shape, are very
pretty.
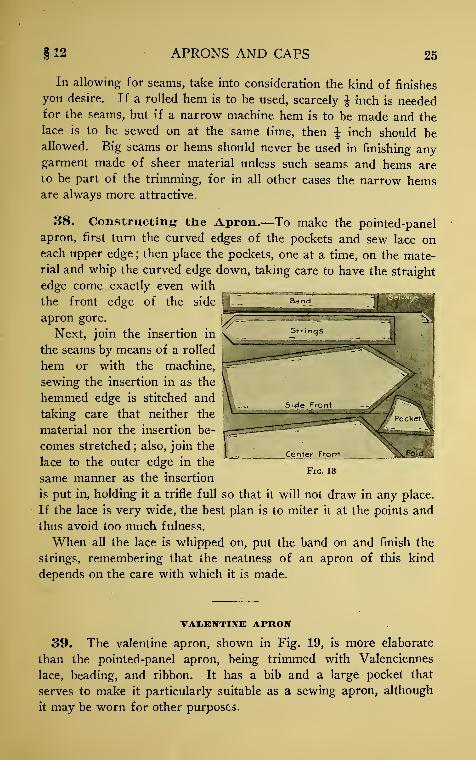
37. Cutting- Out the Material.—For
cutting out this apron, use a specially prepared
pattern and pin the pattern pieces to the fabric in the manner
illustrated in Fig. 18, or, if you are using narrower material, arrange
the pieces for as economical cutting as possible.
If, instead of a whole piece of material, scraps are used in making
the apron, be careful to keep the center of each gore, the center of
each pocket, the strings, and the band on a lengthwise thread of the
material. As all the pieces of the apron are small, it is a very easy
matter to use up pieces of material.
Fig. 17
§12 APRONS AND CAPS 25
In allowing for seams, take into consideration the kind of finishes
you desire. If a rolled hem is to be used, scarcely £ inch is neededfor the seams, but if a narrow machine hem is to be made and the
lace is to be sewed on at the same time, then ^ inch should beallowed. Big seams or hems should never be used in finishing anygarment made of sheer material unless such seams and hems are
to be part of the trimming, for in all other cases the narrow hemsare always more attractive.
38. Constructing the Apron.—To make the pointed-panel
apron, first turn the curved edges of the pockets and sew lace oneach upper edge ; then place the pockets, one at a time, on the mate-rial and whip the curved edge down, taking care to have the straight
edge come exactly even with
the front edge of the side
apron gore.
Next, join the insertion in s.
the seams by means of a rolled
hem or with the machine,
sewing the insertion in as the
hemmed edge is stitched and
taking care that neither the
material nor the insertion be-
comes stretched ; also, join the
lace to the outer edge in the
same manner as the insertion
is put in, holding it a trifle full so that it will not draw in any place.
If the lace is very wide, the best plan is to miter it at the points and
thus avoid too much fulness.
When all the lace is whipped on, put the band on and finish the
strings, remembering that the neatness of an apron of this kind
depends on the care with which it is made.
Fig. 18
VALENTINE APRON
39. The valentine apron, shown in Fig. 19, is more elaborate
than the pointed-panel apron, being trimmed with Valenciennes
lace, beading, and ribbon. It has a bib and a large pocket that
serves to make it particularly suitable as a sewing apron, although
it may be worn for other purposes.

26 APRONS AND CAPS §12
40. Material and Pattern Requirements.—A piece of
figured voile 36 inches wide and 30 inches long is very good for
developing this style of apron. Frequently, such a piece of mate-
rial is left from a blouse or a lingerie dress. In addition to the
material mentioned, 4 yards of lace, 1 yard of beading, and
2| yards of |-inch ribbon of a harmonizing shade are needed to
make the apron just as it is shown in the illustration.
Attractive apron patterns may be purchased, and even if they
should not exactly correspond in outline with the one shown in
Fig. 19, the method of making will be much the
same.
If you wish to develop a pattern for the
apron, procure a piece of paper 25 inches
long and 12 inches wide and cut the sides and
lower end so that it will assume a shape similar
to that shown in Fig. 20. Make the bib part of
the pattern 5 inches high and 3 inches wide at its
|> widest point, and slope the waist line down at
W the front so as to give a good line. Make the
pocket heart-shaped at its lower edge and slope
it downward toward the center at its upper
edge, making it 6^ inches deep at the center and
10 inches wide.
41. Cutting Out the Material.—To cut
out the material for the valentine apron, first
fold it lengthwise through the center, as
shown in Fig. 20, and place the center front of
the apron-and-bib pattern on the fold of the
material.
Provide for the strings, as shown at a, making
them 19 inches long and about 2\ inches wide.
' Next, at the right-hand end of the string, cut
the material across, and fold it over as at b, so
that the center front of the pocket pattern may be placed on a fold.
If rolled hems are to be used in making the apron, allow £ inch
seams in cutting, and if machine hems are to be employed allow
^-inch seams.
42. Constructing the Apron.—To make the valentine apron,
first sew beading across the top of the pocket. Then sew lace around
Fig. 19

§12 APRONS AND CAPS 27
the remaining sides of the pocket, rolling the edge of the material,
if it is sheer, and extending the lace to the top of the beading, as
show in Fig. 21. In aprons of sheer material, it is advisable to
finish the pocket Fo i d" ~ Center Front - - " 7 /with rolled hems so
that there will be no
raw edges to show
through or to catch
the lint that fre-
quently accumulates
in the wearing and
the washing of the
apron.
Next, sew lace
around the ed^es of
'•9-
Selvage
Fig. 20
the apron and the bib, beginning at the waist line in each case and
continuing all the way around, as shown. Put the beading on at
the waist line from one end of the apron, slipping it underneath the
bib and across to the other end. No gathers are to appear in the
front of this apron, but at each side the material should be held
a trifle full when it is whipped to the beading.
With this done, secure the strings to the end of the waist-line
beading, and then run ribbon through the beading and finish with a
tied bow at each end, so
as to cover the joining of
the strings. Put lace at
the end of each string
and extend it up 1£inches on each side.
Proceed, next, to whip
the rolled edge of the
pocket to the apron,
doing this work so that
it will not be the least bit
drawn and yet secure
enough not to pull out.
A pocket as large as this
one is generally used for
many things; so unless it is securely sewed on, there is constantdanger of its being pulled away from the apron.
Fig. 21

28 APRONS AND CAPS §12
MOTHER'S APRON
43. In Fig. 22 is shown an apron that is known by the namemother's apron, because it is of a style that has stood the test of
many years in the home and many women are partial to it. Per-
haps it is well liked because of its ruffle, which, as is generally
known, tends to protect the bottom of the skirt over which it is
worn, for when grease or the like falls on the ruffle, the fulness of
this part of the garment is great enough to
keep such matter away from the skirt.
44. Material and Pattern Require-ments.—To make this apron, 3 yards of
24-inch or 2\ yards of 36-inch material is re-
quired. Calico is perhaps the best material
for it, although percale, dimity, or lawn maybe used. Any of these materials is preferable
to inexpensive gingham, which is a little too
stiff to shape well in the ruffle. If gingham is
used, it should be plain or have only a very
small check; also, the ruffle should not be so
full as for other materials.
For this apron is required a pattern having
a shaped ruffle that extends down the sides and
across the lower edge of the apron. Such a
pattern may be formed by outlining a ruffle of
the desired width on a plain one-piece apron
pattern.
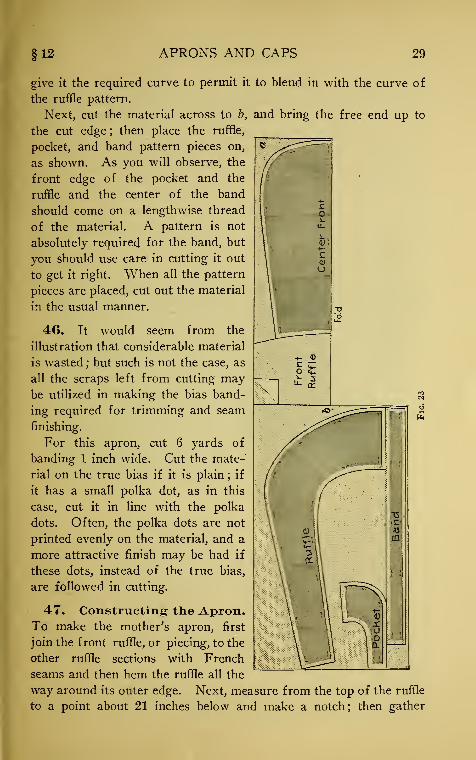
45. Cutting Out the Material.—Tocut out the material for the mother's apron to
the best advantage, place the pattern parts on
it in the manner shown in Fig. 23. Lay the
material out on the cutting table wrong side up and fold one end
over, as at a. On this end place the center front of the pattern on
the fold, as shown. In placing this pattern part, if no fulness is
provided in the ruffle, you may allow the width of the ruffle, plus the
amount necessary for its finishing, at the top of the center-front
gore for a front ruffle portion. You may cut this ruffle piecing
across the fold and without the aid of a pattern, for the top of the
apron pattern will shape the ruffle correctly at its lower edge and
Fig. 22
§12 APRONS AND CAPS 29
give it the required curve to permit it to blend in with the curve of
the ruffle pattern.
Next, cut the material across to b, and bring the free end up to
the cut edge; then place the ruffle,
pocket, and band pattern pieces on,
as shown. As you will observe, the
front edge of the pocket and the
ruffle and the center of the band
should come on a lengthwise thread
of the material. A pattern is not
absolutely required for the band, but
you should use care in cutting it out
to get it right. When all the pattern
pieces are placed, cut out the material
in the usual manner.
46. It would seem from the
illustration that considerable material
is wasted ; but such is not the case, as
all the scraps left from cutting maybe utilized in making the bias band-
ing required for trimming and seam
finishing.
For this apron, cut 6 yards of
banding 1 inch wide. Cut the mate-'
rial on the true bias if it is plain ; if
it has a small polka dot, as in this
case, cut it in line with the polka
dots. Often, the polka dots are not
printed evenly on the material, and a
more attractive finish may be had if
these dots, instead of the true bias,
are followed in cutting.
47. Constructing the Apron.To make the mother's apron, first
join the front ruffle, or piecing, to the
other ruffle sections with French
seams and then hem the ruffle all the
way around its outer edge. Next, measure from the top of the ruffle
to a point about 21 inches below and make a notch; then gather

30 APRONS AND CAPS §12
from this notch around the ruffle to a corresponding notch on the
opposite side. Join the ruffle to the apron, placing the center front
of the ruffle at the center front of the apron, bringing the seam to
the right side, and adjusting the gathers evenly across the bottom.
Prepare each pocket by finishing with bias banding the curved
edge that forms its top. Place the banding on with its right side to
the wrong side of the pocket, and then turn it over to make a finish
on the right side. Turn the edge under so that the banding will be
just -J inch wide, and stitch on the top edges.
With the stitching done, baste the pockets to
the apron, having the top edge of each pocket
come in line with the waist line and the side of
each even with the side of the apron. Cover the
raw edge of the pocket with bias banding that
corresponds in width with that just mentioned.
With the bias finish, cover the seam that joins
the ruffle to the apron, extending this finish all
the way around the apron. Last of all, put the
straight band on, bringing the center of the band
to the center of the apron, the right side of the
band to the wrong side of the apron, carefully
adjusting the gathers on the band in the regular
way, stitching the band from one edge of the
apron to the other, and then turning under all
the free edges of the band and stitching all the
way around the band.
ECONOMY APRON
48. In Fig. 24 is shown an apron known as
Fig. 24 the economy apron because it can be made of
strips and scraps of material that are left from a dress or some
other garment. It consists of three gores that are sufficiently
narrow to be cut out of small strips of material, as may also the
two pockets, the band, and the strings. Although this apron is
simple, its plainness is greatly relieved by the use of rickrack braid,
which serves as trimming for the apron edges, the pockets, and the
ends of the strings.
49. Material and Pattern Requirements.—For the apron
here shown, striped dimity is used, although dotted Swiss, batiste,

§ 12 APRONS AND CAPS 31
chambray, gingham, and even calico may be employed. It requires
only 1 yard of 40-inch material, and 3^ yards of rickrack braid for
the trimming.
A pattern for this apron may be prepared as follows : Use a
piece of paper that is 27 inches long, or as long as the apron is
to be, and about 15 inches wide. Slash this paper lengthwise in
a diagonal line to form two gores, a center-front and a side-front
gore, as shown in Fig. 25. The front gore for half the pattern
should measure about 10 inches at the lower end and 6^ inches
at the upper end, and the side gore about 8-J inches at its lower end
and 5 inches at its upper end. By thus cutting the paper in a
diagonal line, there is formed a pattern that gives a desirable shap-
Fig. 25
ing toward the waist line and reduces the fulness at that place, for
the wide parts of the gores form the lower edge of the apron, and
the narrow parts, the upper edge. Curve the waist-line edge of the
pattern a trifle to make it fit well on the figure, and curve the lower
edge of each pattern section, also, in order to make the seam edges
of the same length as the center front.
The pocket may be made plain or shaped as shown in Fig. 24.
Outline it on the side gore of the apron pattern, making it 9 inches
long on the side seam line, and then trace a separate pattern.
50. Cutting- Out the Material.—To cut out the material for
the economy apron, place the pattern pieces on the material as
shown in Fig. 25. As the gores are shaped a trifle at the top, the

32 APRONS AND CAPS 12
sicle-gore pattern part may be slipped alongside the front-gore part
and the gores cut out with practically no waste of material. Cut
the strings and the band, for which no pattern pieces are really
required, as previously directed. Place the pocket pattern, like the
panel parts of the apron, on two thicknesses of material.
Cut out the material in the manner directed for cutting out the
other aprons, remembering, while cutting, the convenience of straight
seam lines.
51. Sewing on Rickrack by Hand.—In making the econ-
omy apron, first prepare the pocket for application by hemming its
upper edge, including the straight
and curved edges, and applying
the rickrack braid to the hemmededges.
If an especially neat apron is
desired, a better quality of rick-
rack braid may be sewed on in
the manner illustrated in Fig. 26,
that is, by hand. Such work is
rather tedious, but the finish is
attractive and well worth the time
required.
To sew braid on in this manner,
take a stitch, as at a, by slipping
the needle along the inside edge
of the hem and bringing it outFlG - 26 through the hem and the point of
the braid, as at b. Then take a tiny overhand-stitch at this point
before proceeding to take the next stitch through the hem. Thus,
at every point of the braid, there will be two stitches, which will
serve to hold the braid securely. By slipping the needle inside the
hem, all the stitches, except the tiny ones that join the braid to the
hem, will be neatly covered.
Another method of sewing on rickrack is to crease or baste a
narrow hem, then to place the rickrack over the right side of the
hem as directed for sewing it on by machine, and to secure it and at
the same time add a decorative touch with embroidery floss of con-
trasting color. In using the embroidery floss, take overcasting- or
catch-stitches from just outside the indented portion of one scallop

§ 12 APRONS AND CAPS 33
of the rickrack over the rickrack, so that the thread falls just outside
the indented portion of the next scallop ; or, take back-stitches or
seed-stitches in each scallop, continuing the threads from one scallop
to another on the wrong side of the material.
52. Sewing- on Rickrack by Machine.—For a work apron
on which so much braid is used, it is advisable to sew the braid on
by machine.
To do this properly, first turn a narrow hem; then stitch the
rickrack braid to the edge of the ^ ^hem in the manner shown at a,
Fig. 27, placing this over the right \ 1§|
side of the hem if you wish to have ^illHfall the rickrack show, or over the
wrong side of the hem if you prefer (s |-
to have merely one edge of the rick-
rack extend from underneath the
hem. Either method is permissible. . -p(-r
Secure the inner points of the rick-
rack all the way around, with the *
stitching of the hem, as shown at b.
Do this work very carefully, so asv
*c * WMPS^j '
,
not to draw or stretch the braid in ^ , ' )any place and yet catch it well so that• • Fig 27it will not look untidy. Also, take
extreme care to shape the corners well, as at c, and not make them
appear drawn where the braid turns.
53. Constructing- the Apron.—When the braid is sewed to
the pockets, baste them in the position planned for them on the
side gores. Turn the lower edge of the pocket under only once,
as a hem that requires a double turn, would provide a bulky,
undesirable finish. Do not turn under the sides of the pocket as
these edges will be included in the finishing of the apron portion.
Stitch along the straight upper edge of each pocket and across its
lower edge; then stitch the center gore of the apron to the side
gores, using a French seam or a flat fell seam as a finish and taking
care to catch the long, straight edges of the pockets in with the side
seams in stitching.
Next, turn a narrow hem around the sides and the bottom of the
apron, and apply the rickrack braid to the hemmed edges. Then

34 APRONS AND CAPS §12
hem the strings and finish one end of each with rickrack braid.
Before putting on the band, gather the waist line of the apron.
Then apply the band, adjust the strings in each end, and complete
the apron by stitching the band in
position.
MAID'S APROIV
54. In Fig. 28 is shown a maid's
apron. It is neat and attractive in
appearance, and may be made with
little labor.
55. Material and Pattern Re-quirements.—A firm quality of lawn,
the kind that is sometimes referred to
as nurse's lawn, is very satisfactory for
an apron of this kind, as it is a little
coarse and crisp in weave, does not
take up dirt readily, and wears well.
No pattern is required to cut out an
apron of this style. As a rule, just one
width of 40-inch muslin or lawn long
enough for the apron, plus 3^ to 5 inches
for a hem, is used for the apron por-
tion, and 1 yard of additional material
is used for the straps, bib, bands, and
strings.
Two straps pass over the shoulders,
and each of these is cut lengthwise of
the material and 4^ inches wide, a hemthat is about f inch wide being turned
on each side of the straps. Across the
front is a Y-shaped bib that is 5 inches
wide at the top, 3^ inches wide at the
bottom, and about 8 inches long, which
includes allowance for a 2-inch hem.
To determine how long the straps should be, measure from the
back waist line over the shoulder to the front waist line. Each
strap may be cut according to the measurement thus obtained, plus
1 inch for the overlapping of the straps on the band at the waist line.
Fig. 28
§ 12 APRONS AND CAPS 35
The band should be cut about 4 inches shorter than the waist
measure, as it must come well around the figure so that the straps
may be secured to it. Two strips should be provided for this.
56. Constructing- the Apron.—In preparing the piece for
the apron portion, tear both ends of the material, so that it will be
straightened as much as possible. Material so prepared permits
more even adjustment of the gathers around the waist line and also
makes the ironing of the apron easier. Turn a hem 3^ to 5 inches
wide at one end of the apron piece and stitch it in position ; also,
stitch the cpen ends of the hem so that they cannot pull out.
Next, turn and stitch the 2-inch hem at the top of the bib and
join the side edges of the bib to the straps, stitching the bib in with
the hems of the straps and thus concealing the raw edges.
Gather the apron and adjust it to one of the strips provided for
the band, and baste the bib and straps to the center of the upper edge
of this strip, bringing the seams, in each case, to the right side. Then
baste the other strip to the upper edge of the under strip, with the
bib between. At this stage, slip on the apron to make sure that the
bib is in the correct position and the length of the straps is exact.
Then, after stitching the seams basted in the band, turn under the
free edge of the upper strip and baste it flat over the lower seam.
Finish the band and the strings the same as those for other aprons,
and the back ends of the straps with a f-inch hem. Sew two but-
tons to the straps, and work buttonholes to correspond on the band
of the apron so as to secure the straps in position. If the straps
are made narrower than called for here, they will slip off the
shoulder unless they are crossed in the back. In such a case, you
will have to cut them 2 inches longer to permit of the crossing.
57. Some maids' aprons have no bib. In such an event, use the
extra material left from the straps on one side of the straight mate-
rial to make the skirt portion fuller. Also, omit the strings and use a
straight band about 1\ inches wide at the waist line. Make the band
just large enough to extend around the waist and lap it enough to
button. Two buttons and two buttonholes are generally used to
fasten such a band around the waist.

36 APRONS AND CAPS §12
SQUARE SEWING APRON
58. In Fig. 29 is shown another convenient apron, known as the
square sewing apron, that requires very little material. In fact, only
f yard of 40-inch lawn or dimity is needed for the apron, and 3 yards
of Maltese or Valenciennes lace edging for the trimming. This
apron has a big, roomy pocket that is substantially sewed in with
the seams, thus making the apron a very con-
venient one for sewing.
59. Preparing the Pattern.—For this
apron, a pattern made in a manner similar to the
economy-apron pattern but with smaller mea-
surements is required. For instance, use a piece
of paper about 20 inches long and 10 inches
wide. Then slash this diagonally lengthwise to
make the front gore measure about 5 inches at
the upper edge and 7 inches at the lower edge.
Mark for the ruffle portion on the front gore of
the pattern by measuring up about 6 inches from
the lower edge and drawing a line straight
across. Then, for the pocket portion, measure
up 5 inches and draw another line straight
across. Cut off the ruffle portion, but merely
trace the pocket so as to make a separate pat-
tern, for the front gore of the apron must
extend under the pocket to the ruffle.
60. Cutting Out the Material.—In
order to cut out the material for this apron,
place the pattern parts on the material as shown
in Fig. 30. To provide fulness in the ruffle, place the center front
of the ruffle pattern 4 or 5 inches from the fold, as shown. Cut the
band and the strings on the straight grain of the material, making the
band about 2 inches wide and 16 inches long and each of the strings,
2\ inches wide and 18 inches long.
61. Constructing: the Apron.—Begin to make the square
sewing apron by sewing lace to the top of the pocket and then pinning
the pocket very carefully to the bottom part of the front gore of the
apron. Gather the ruffle at its upper edge and join it to the apron;
Fig. 29
12 APRONS AND CAPS 37
then join the side gores to the apron, finishing all of them withFrench seams. Last of all, sew the lace on the outer edge in the
regular way, put the band
on, and finish the strings.
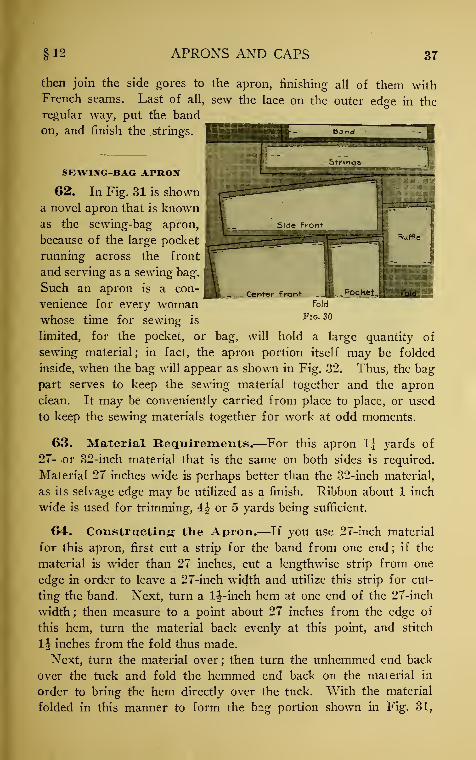
SEWIXG-BAG APRO\
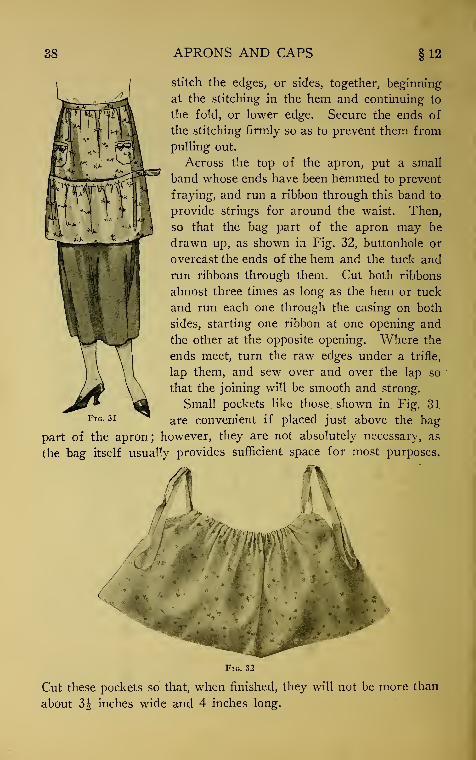
62. In Fig. 31 is showna novel apron that is knownas the sewing-bag apron,
because of the large pocket
running across the front
and serving as a sewing bag.
Such an apron is a con-
venience for every womanwhose time for sewing is
limited, for the pocket, or bag, will hold a large quantity of
sewing material; in fact, the apron portion itself may be folded
inside, when the bag will appear as shown in Fig. 32. Thus, the bag
part serves to keep the sewing material together and the apron
clean. It may be conveniently carried from place to place, or used
to keep the sewing materials together for work at odd moments.
63. Material Requirements.—For this apron 1^ yards of
27- or 32-inch material that is the same on both sides is required.
Material 27 inches wide is perhaps better than the 32-inch material,
as its selvage edge may be utilized as a finish. Ribbon about 1 inch
wide is used for trimming, 4^ or 5 yards being sufficient.
64. Constructing: the Apron.—If you use 27-inch material
for this apron, first cut a strip for the band from one end ; if the
material is wider than 27 inches, cut a lengthwise strip from one
edge in order to leave a 27-inch width and utilize this strip for cut-
ting the band. Next, turn a 1^-inch hem at one end of the 27-inch
width; then measure to a point about 27 inches from the edge of
this hem, turn the material back evenly at this point, and stitch
1^ inches from the fold thus made.
Next, turn the material over; then turn the unhemmed end back
over the tuck and fold the hemmed end back on the material in
order to bring the hem directly over the tuck. With the material
folded in this manner to form the bzg portion shown in Fig. 31,
38 APRONS AND CAPS §12
stitch the edges, or sides, together, beginning
at the stitching in the hem and continuing to
the fold, or lower edge. Secure the ends of
the stitching firmly so as to prevent them from
pulling out.
Across the top of the apron, put a small
band whose ends have been hemmed to prevent
fraying, and run a ribbon through this band to
provide strings for around the waist. Then,
so that the bag part of the apron may be
drawn up, as shown in Fig. 32, buttonhole or
overcast the ends of the hem and the tuck and
run ribbons through them. Cut both ribbons
almost three times as long as the hem or tuck
and run each one through the casing on both
sides, starting one ribbon at one opening and
the other at the opposite opening. Where the
ends meet, turn the raw edges under a trifle,
lap them, and sew over and over the lap so
that the joining will be smooth and strong.
Small pockets like those shown in Fig. 31
are convenient if placed just above the bag
part of the apron; however, they are not absolutely necessary, as
the bag itself usually provides sufficient space for most purposes.
Fig. 31
Fig. 32
Cut these pockets so that, when finished, they will not be more than
about 3£ inches wide and 4 inches long.

§12 APRONS AND CAPS 39
CIRCULAR SEWING APRON
65. In Fig. 33 is shown a circular sewing apron that is practical
and convenient for the woman or the girl who sews a great deal or
for wear in shops, where frills are tabooed and only service is
considered.
Although only 1 yard of 36-inch material is required for this
apron, it is made so as to cover the skirt well, and it has a large
pocket, which is really a necessary part of a sewing or shop apron.
66. Preparing- the Pattern.—A pattern for an apron such
as this may be outlined on a circular-skirt pattern. If you wish to
make such a pattern, follow the waist-line curve of the skirt pattern
for the upper edge ; then,
to draw the lower edge of
the pattern, measure downon the center-front line
about 22 inches, or the
length you wish the apron,
and from this point draw a
curved line to a point on
the center-back line 5 or
6 inches below the waist
line. In drawing this curve,
you may be guided by
Fig. 34, which shows the
apron pattern laid on the
material.
Make the pocket pattern
about 5 inches deep and
5 inches wide, shaping it as illustrated. Make the pattern for the
band about 2 inches wide and 2 inches longer than the waist mea-
surement, or simply cut a strip of material of these dimensions,
plus allowance for seams.
67. Cutting Out the Material and Making the Apron.With the patterns prepared, secure them to the material in the man-
ner illustrated in Fig. 34, and then cut out the apron parts in the
usual manner. Also, cut 2\ yards of bias strip to finish the edge of
the apron and the top of the pocket, following the plan indicated
in the illustration.
Fig. 33

40 APRONS AND CAPS 12
Construct the apron by securing the apron part to the band, easing
it on without gathers. Apply the bias binding to the top of the
pocket and around the outer edge of the apron, and join the pocket
to the skirt of the apron with two rows of stitching, placing these
Fig. 34
i inch apart, but first turning under the edges of the pocket a seam's
width so as to give a good finish. Complete the apron band at the
back by working a buttonhole in the right-hand end and sewing a
button on the other end.
CLOTHES-PBf APRON
68. In Fig. 35 is shown a very neat style of clothes-pin apron.
While it must be admitted that not every woman will be interested
in this style of apron, yet clothes-pin aprons have a definite purpose
in the home, for they serve to keep clothes pins clean and always
in place.
The style of clothes-pin apron here illustrated need not, however,
be restricted to the holding of clothes pins, as it will serve excellently
as a sewing apron, its big pocket proving a decided convenience.
Because of its durability and its convenient pocket, such an apron
also makes a good shop sewing apron.
09. Material Requirements.—To develop the clothes-pin
apron, 1 yard of tan galatea and 2\ to 3 yards of bias binding are
required. Of course, other materials may be used, as, for example,
striped ticking, but the material must be substantial, for when the
pocket is full of clothes pins it is carrying considerable weight.
If the style of apron shown is to be made up as a home or a shop
sewing apron, then sateen, with binding of the same color as the
material, may well be used.

12 APRONS AND CAPS 41
70. Preparing the Pattern.—The pattern for an apron such
as this may be formed by using a one-piece apron pattern of the
length you desire and outlining on this the pocket
portion. By reference to Fig. 36, you will
observe that the apron and pocket sections are
made the same length and width, the pocket pat-
tern differing only in the manner in which it is
shaped at the sides.
71. Cutting . Out the Material andMaking- the Apron.—Arrange the pattern
pieces on the material in the manner indicated in
Fig. 36, so that their center fronts are on the
lengthwise fold. In cutting, allow a ^-inch seam
at the waist line, but omit the seam allowance on
the other edges, as the binding takes care of this.
To make the apron, first bind the curved edges
of the pocket and pin the pocket in position ; then
baste the binding all around the outer apron and
pocket edges and bind them together, taking care
that the binding catches the material well so that
the apron will not be faulty. Put a straight band
on the apron and finish the ends of the band with
a buttonhole and button, securing the button very
firmly so that it will withstand the strain to which
it will be subjected. Fig. 35
If you want a pocket with two compartments, you may place a
Fold
Fig. 36
row of stitching down the center front of the apron, through both
the pocket and the apron.

42 APRONS AND CAPS § 12
SUNBONNETS AND SUN HATS
STYLES AND MATERIALS
72. As sunbonnets and sun hats are invaluable to many womenwho must be out-of-doors a great deal, particularly those who live in
the country, it seems useless to dwell at any length on their merits
and advantages. Some persons object to bonnets on the ground
that they are too warm, and prefer sun hats; others, on the con-
trary, like the protection that sunbonnets give and for this reason
prefer them. To meet all requirements, therefore, both sunbonnets
and sun hats are considered.
With a knowledge of the bonnet and hat here described, you
should be able to develop others to suit your fancy or to agree with
some style you may see brought out elsewhere. If a pattern that
fits well is at hand, the method of trimming is easy, and manyvarieties may be made. For example, you may omit the circular
ruffle, sew the crown to the head-piece without a heading, button
the crown to the head-piece instead of shirring it, and so on.
73. Chambray seems to be the material especially designed for
the making of sunbonnets and sun hats. It not only shapes up nicer
and retains starch longer than any other material, but yields itself
readily to the iron, a very desirable quality in any material that
must be starched, as, for example, the head-piece of a sunbonnet
or a sun hat.
CIRCULAR-RUFFLE SUNBONNET
74. In Fig. 37 (a) and (&) are shown the front and the side
view of a sunbonnet that, because of its circular ruffle, may be
called the circular-ruffle sunbonnet. This bonnet is perhaps as
practical as any style of sunbonnet can be. It is made so as to pro-
tect both the face and the neck, and its head-piece is so curved that
the ruffle attached to it does not obstruct the view at the sides—
a
feature that is very desirable in a sunbonnet. If the head-piece of
a sunbonnet is square, the ruffles at the sides act as blinders, and
thus cause the wearer much discomfort.
In addition to being practical, this bonnet is attractive, the ruffles,
the crown, and the strings being ornamented with linen torchon
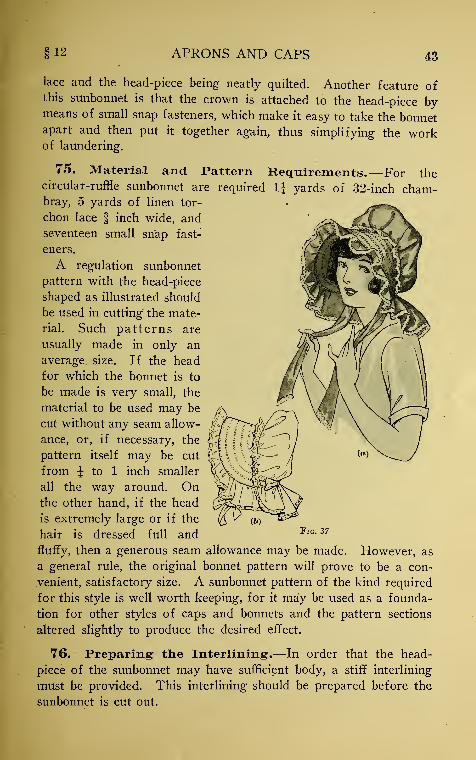
12 APRONS AND CAPS 43
lace and the head-piece being neatly quilted. Another feature ofthis sunbonnet is that the crown is attached to the head-piece bymeans of small snap fasteners, which make it easy to take the bonnetapart and then put it together again, thus simplifying the workof laundering.
75. Material and Pattern Requirements.—For thecircular-ruffle sunbonnet are required 1| yards of 32-inch cham-bray, 5 yards of linen tor-
chon lace § inch wide, and
seventeen small snap fast-
eners.
A regulation sunbonnet
pattern with the head-piece
shaped as illustrated should
be used in cutting the mate-
rial. Such patterns are
usually made in only an
average size. If the head
for which the bonnet is to
be made is very small, the
material to be used may be
cut without any seam allow-
ance, or, if necessary, the
pattern itself may be cut
from | to 1 inch smaller
all the way around. Onthe other hand, if the head
is extremely large or if the
hair is dressed full and
fluffy, then a generous seam allowance may be made. However, as
a general rule, the original bonnet pattern will prove to be a con-
venient, satisfactory size. A sunbonnet pattern of the kind required
for this style is well worth keeping, for it may be used as a founda-
tion for other styles of caps and bonnets and the pattern sections
altered slightly to produce the desired effect.
76. Preparing the Interlining.—In order that the head-
piece of the sunbonnet may have sufficient body, a stiff interlining
must be provided. This interlining should be prepared before the
sunbonnet is cut out.
Fig. 37

44 APRONS AND CAPS § 12
The best material for interlining is that obtained from the skirt
part of an old nainsook nightgown or from the back of a man's
shirt that is worn past mending. If an old shirt is used, though,
it must be free from any cord ; that is, the weave must be even and
smooth. Material of this kind, having been washed so many times
that all the stiffening has been removed, is soft enough to absorb
starch and to be quilted through more evenly than new material.
Sometimes, when new material that is starched is used for this pur-
pose, the needle will have a tendency to cut it; whereas, if the
material is old, there is little danger.
For stiffening, two thicknesses of the material should be used,
provided it is fairly heavy; if it is very thin, then three thicknesses
will serve the purpose better.
In preparing the material for this purpose, tear it rather than cut
it. Tearing tends to straighten the warp and woof threads, making
Fold
Fig. 38
it possible to get a perfectly straight piece of material, which
facilitates stitching and laundering. Also, make sure that the pieces
are 1 or 2 inches longer on all sides than the pattern of the head-
piece of the bonnet, so that the frayed edges may be trimmed away
when the pattern is placed on the fabric.
Mix up, next, for stiffening the material, a small quantity of cold
starch to about the consistency required for starching stiff cuffs or
the neckbands of shirts; that is, use about 2 heaping teaspoonfuls
of cold starch to 1 teacupful of water. If you put 2 or 3 drops of
turpentine into the starch, the ironing will be a little bit easier, as
turpentine has a tendency to keep the starch from sticking to the
iron.
With the material prepared and the starch made, dip the pieces
for the head-piece into the starch and then stretch them out smooth,

§ 12 APRONS AND CAPS 45
placing one piece on top of the other and taking care that not a
wrinkle creeps in at any place. Then iron them together with a hot
iron. The starch will cause them to stick together and they will be
just as one thickness of cloth.
77. Cutting- Out the Material.—Fold through the center,
lengthwise, the chambray or whatever material is to be used for the
sunbonnet, lay it out on the cutting table, and then proceed to pin
to it the pattern parts, following the plan illustrated in Fig. 38.
Have the straight edge of the crown pattern come on the fold of the
material. Place the straight edge of the head-piece along the
selvage, as the selvage will make a finish for the head-piece. Place
the ruffle portion of the pattern with its
center on the fold so as to avoid a seam
in the ruffle, it being always better to
make a finish of this kind without a
seam. If, by chance, you have to piece
the ruffle, roll and whip the edges to-
gether very carefully so that the seam
will show as little as possible.
78. Four strings are needed for this
bonnet, two at the back to make a bow,
and two for tying the bonnet on. Makethem about 2f inches wide and IS inches
long, and cut them on the straight grain
of the cloth, with or without the aid of
a pattern.
79. Having placed the pattern pieces
on the material in the manner illus-
trated, cut the bonnet material out, allowing | inch for seams and
using sharp shears so as to insure the smooth, even edge so neces-
sary where a very narrow hem is used as a finish. Measure up
4 inches on each side of the crown from its lower edge and connect
these points with a traced line to mark the position of the casing
that extends across the back. Also, cut out the stiffened lining for
the head-piece, making it just the same in size as the head-piece
material and allowing the same width of seam.
80. Constructing the Sunbonnet.—Begin the making of
the sunbonnet by hemming the outer edge of the ruffle and also

46 APRONS AND CAPS 12
the crown and sewing on the lace. These parts may be finished
with a rolled hem or with a tiny hem and the lace then whipped
on, or the machine hemmer may be used and the lace sewed on at
the same time the hemming is done.
After finishing the ruffle and the crown, hem the sides of each
string and sew lace on one end of each. Next, gather the ruffle
around its inside edge, keeping the gathering thread a scant \ inch
from the edge. As the ruffle is cut circular, there are very few
gathers to be used ; however, a gathering thread helps to ease in the
fulness and to makethe ruffle fit better on
the head-piece.
Next, place the
wrong side of one piece
of the head-piece over
the starched piece, or
stiffening material, and,
to hold the chambray
securely to the stiffened
interlining, baste every
2 or 3 inches until the
entire head-piece is
covered with basting-
stitches, as in Fig. 39.
Then place the ruffle on
this, with its center
front directly over the
center front of the
head-piece, and baste
all the way around in
a |-inch seam, as
shown in Fig. 40, tak-
ing care to have the
gathers adjusted evenly. When this basting is done, place the
remaining piece of the head-piece material over the ruffle and baste
it in position; then stitch all the way around, as shown.
When the stitching is done, remove the basting thread, trim the
seam edge up to within a little more than $ inch of the stitching,
and turn the ruffle out, taking care in doing this not to crease the
starched piece unnecessarily and thus cause wrinkles to form in it.
Fig. 40

§ 12 APRONS AND CAPS 47
Next, crease the edge of the head-piece back from the ruffle and
baste so that it does not overlap the ruffle at any place.
81. With the top piece of the head-piece basted in position, it
is ready to be stitched, or quilted. There are many attractive ways
in which a head-piece may be stitched, and if you are very handy
at quilting you should be able to work out some unique designs on
this part of the sunbonnet. The quilting shown on the bonnet is
perhaps the simplest of all.ways; but, of course, if you feel capable
of quilting in more elaborate designs, you may work out designs to
suit your fancy. In either case, work out the arrangement by
marking the lines as you desire them, not directly on the material,
however, but on the pattern for the head-piece. Take care to space
the lines equally in order to make the quilting symmetrical.
Then pin the pattern thus prepared to the head-piece and trace
these lines on the material, taking care to keep each line as true
and as even as possible. With this done, stitch the head-piece mate-
rial directly in the traced lines, stitching in double rows if you are
following the plan shown in Fig. 37.
82. When the head-piece is stitched, or quilted, begin at its
center, at a distance of about 1 inch from the edge, as shown in
Fig. 41, and mark for the snap fasteners with pins, using the cross-
slots of the Picken dressmaker's gauge as a marker, so that they
will be spaced 1^ inches apart. The part of the snap fastener that
has the socket should be used on the head-piece. Secure the
fasteners in place, working from the center up and down and
sewing through and through the head-piece material so that they
will be sure to hold well.
With this work done, proceed to put the casings on the crown of
the bonnet. Cut the material for the casings a scant f inch wide,
and make a tiny turn on each edge. Place one casing strip f inch
from the inside edge of the stitching around the crown and stitch
it on both sides, so that it will hold well.
Next, place a similar casing over the traced line near the bottom
part of the crown, which determines where the ruffle part begins.
In stitching this casing on, take care to start it just back of the casing
that goes around the crown, so that the cord that slips through it
may be brought out without any interference.
Run the shirring cord in the casing that passes around the crown
of the bonnet, as well as in that at the bottom. The cord for this

48 APRONS AND CAPS §12
purpose should be firm twine or very narrow linen tape, so that
it will be flat and not too large to go through the casing. Whenthe cord is run all the way around, draw the crown up and adjust
the fulness as it should be, taking care to have more fulness at the
top of the crown than at the sides.
Pin the crown to the head-piece and smooth the gathers out
just as they should be when the bonnet is on the head. By observ-
ing Fig. 37 carefully, you may gain a good idea of how this should be.
Fig. 41
With the cap thus pinned together and adjusted, mark the posi-
tion of each fastener, placing a pin opposite each fastener on the
head-piece, and then sew them in place.
In sewing the snap fasteners on the crown, take care not to catch
the stitches through the cord in the casing, for this would make it
impossible to draw the shirring cords up and to let them out when
the bonnet is laundered. The ends of the cords that are run
through the casing are not tidy if allowed to hang loose. There-
fore, if you desire, you may conceal them by sewing below the
casing across the bottom of the bonnet a tiny bag—say 2 inches
square—into which you may tuck the strings.
§ 12 APRONS AND CAPS 49
83. Next, give attention to the strings. Make two tiny plaits
in the unfinished ends of each string that goes across the back, so
that they will occupy a space not more than 1 inch wide;place them
just above the bottom of the ruffle and sew them on so that when
they are laid back and tied the seam joining will be concealed.
Proceed, next, to sew in place the strings with which to tie the
bonnet on, first putting the bonnet on the head in order to determine
just where the strings should come. If the bonnet is to be tied, put
the strings back from 2 to 2\ inches on each side of the head-piece.
In sewing them in place, overhand them very closely so that they
will not pull away any when the bonnet is worn. In rare instances,
the tie strings are dispensed with and a hat pin is used to hold the
sunbonnet on.
84. If you take care to keep a bonnet of this kind clean
while you are making it, it will not have to be laundered before you
wear it; a very careful pressing in such cases will usually make it
fit for wear for some time. However, to wash and iron it will, as
a rule, add much to its appearance, and laundering in the beginning
is generally worth while.
SISBOSNET VARIATIONS
85. The sunbonnet just described is very pretty when made up
in sheer white muslin and with an embroidery ruffle instead of a
shaped ruffle. Such a bonnet may be finished in the same way as the
circular-ruffle sunbonnet, and as the embroidery ruffle replaces the
shaped ruffle, the time consumed in finishing the bonnet is not so
great.
Another style of dress-up sunbonnet may be developed by using
dotted Swiss for the crown and strings and sheer muslin for the
head-piece with an edging of narrow lace. This style may be made
with square lower corners rather than in cutaway effect.
86. Women who desire a bonnet merely for service will find a
good quality of Japanese straw matting, sometimes called tea strazv,
satisfactory for making bonnets. This material may be purchased
in nearly all stores that sell dry goods or carpets. Sometimes, plain
tea straw such as is used in wrapping chests of tea can be obtained
free of charge in tea or grocery stores. Only ^ yard is required fof
the head-piece of a sunbonnet.

50 APRONS AND CAPS §12
The matting may be combined with dark-colored satin, poplin, per-
caline, or any material that will not soil readily, for it is quite
impossible to launder a bonnet of this kind.
In making this kind of bonnet, place the matting over one thickness
of the bonnet material and then stitch across two or three times
merely to hold the pieces together. Turn up over the matting the
edge of the underneath piece of the head-piece, and then sew a
ruffle to the head-piece with a heading just large enough to cover
the raw seam of the edge that is turned over. If you wish, you mayomit the casing around the crown and finish the edge with a narrow
hem ; in this case you may adjust the fulness to the head-piece of the
crown and stitch it in position with the sewing machine. Put in the
gathers across the back by machine and
hold them securely in place with a few
rows of stitching. Strings may or maynot be used, as you desire.
SUN HAT
87. In Fig. 42 is shown a covering
for the head that so closely resembles a
sunbonnet as to justify calling it a sun
hat. Its crown consists of all-over em-
\ broidery, and the head-piece is made of
Indian linon or a firm quality of lawn,
and then ornamented with a neat quilting
design and trimmed with embroidery edging. Besides being dainty
and attractive, it has the advantage of being easy to make and to
launder ; however, where protection from the sun is absolutely essen-
tial, this hat will not answer so well as a sunbonnet.
Fig. 42
88. Material and Pattern Requirements.—The size of
this hat may be regulated in the same manner as that of the sun-
bonnet, and as it is of a style that is splendid for little folks, it may
be used for this purpose by decreasing the head-size.
It also offers another opportunity to use up left-overs from the
scrap bag, provided such material happens to be at hand, for the
crown simply requires a piece of all-over embroidery 16 inches long
and 23 or 24 inches wide, and the head-piece only \ yard of plain
material, with 1\ yards of embroidery edging for trimming.
§ 12 APRONS AND CAPS 51
For cutting out this hat, provide a pattern having a crown portion
shaped to give the effect shown in Fig. 42 and a head-size, or brim
portion, that will give a drooping effect.
89. Constructing the Hat.—In preparing the stiffening for
the head-piece, use three thicknesses of material, for the head-piece
of a hat made of sheer material requires more stiffening than does
the head-piece of a sunbonnet made of chambray.
Put the ruffle on the head-piece in the same manner as in making
the circular-ruffle sunbonnet, but, as the edge of the ruffle is perfectly-
straight, use more gathers and exercise greater care in so doing.
When the ruffle is in position and the head-piece has been basted
from the right side, proceed to mark for any style of quilting you
desire by placing a marked pattern on the brim and tracing off the
pattern.
When the quilting is finished, gather the curved edge of the
crown and baste it to the head-piece, basting £ inch from the edge.
Bind this edge of the crown and head-piece together with bias bind-
ing of light-weight lawn or muslin, taking care to trim the seam
off close, so that it will not appear bunchy or show through too
much from the right side.
Next, bind or face the lower edge of the crown part of the hat
with ^-inch bias binding and bind the unfinished ends of the head-
piece. Work buttonholes on its right-hand side, one buttonhole at
the top and one at the bottom, and sew buttons on the left-hand
side of the head-piece to correspond with the buttonholes on the
right-hand side, so that the crown of the hat may be opened up in
laundering.
The buttonholes will be rather difficult to make, because the head-
piece is stiff; however, if you sew around each buttonhole with the
sewing machine before you work the buttonhole you will not have
to put the buttonhole stitches close together.
Next, work four buttonholes in the right-hand side of the crown,
and then on the left sew three buttons to correspond with the first
three buttonholes on the right. When the three buttons are but-
toned, the fourth buttonhole buttons down over the button and
buttonhole at the extreme edge of the head-piece, thus forming a
Y-shaped effect.
APRONS AND CAPS
EXAMINATION QUESTIONS(1) (a) What are the essential points in the construction of house
aprons? (&) Why should material of good quality be used for such aprons?
(2) (a) What are the advantages of a sleeved apron? (6) What is the
purpose of the darts in the front of the sleeved apron?
(3) What precautions must be observed in finishing the neck of the
sleeved apron to prevent it from stretching?
(4) What is the object of the seam on the shoulder of the kimono apron?
(5) Why is it best to trim a square neck out in fitting rather than before?
(6) Why should only a narrow seam be taken up in the application of a
placket strip on an opening made in the center of an apron section?
(7) What is the advantage of turning all the seams to the inside in
making a belt like the one shown on the kimono apron?
(8) What regulates the length of apron strings?
(9) Why is it impractical to use lace on the sides of apron strings?
(10) Why is it best to turn and stitch a band on the right side of
an apron?
(11) (a) In stitching in the insertion in an apron like the pointed-panel
apron, of what must one be careful? (&) Why should lace be held full or
mitered at the points in making a pointed-panel apron?
(12) (a) Why is it desirable to use the rolled hem in putting on a pocket
made of sheer material? (b) Why is it necessary to fasten the pocket of the
valentine apron securely in position?
(13) What precautions must be taken in sewing rickrack braid on: (a) by
machine? (&) by hand?
(14) (a) What kind of material is best for a starched interlining such as
that used for a sunbonnet? (b) Why is it advisable to tear the pieces for
such an interlining?
(15) How can the size of a sunbonnet be regulated?
§12

CONTENTS
House Aprons and Caps—Styles and Materials.
Bodice ApronApplying Bias Binding . . .
Long-Sleeved House ApronPetticoat for Wear With Sleeved Apron 11
Sweeping Cape 12
Kimono Apron 14
Fancy and Sewing Aprons-^Materials and Styles 20
Apron Strings and Bands 21
Pointed-Panel Apron 24
Valentine Apron 25
Mother's Apron 28
Economy Apron 30
Sewing on Rkkrack . . . . . 32
Maid's Apron 34
Square Sewing Apron 36
Sewing-Bag Apron . 37
Circular Sewing Apron 39
Clothes-Pin Apron 40
Sunbonnets and Sun Hats—Styles and Materials 42
Circular-Ruffle Sunbonnet 42
Sunbonnet Variations -:
; 49
Sun Hat .50

Bl
*!T'«.
m2P