
FLOATING DOCK ASSEMBLY A - dockinabox.com Instructions.pdfFLOATING DOCK ASSEMBLY B STEP 4 STEP5 Dock...
2
Place frame upside down on a flat surface near the water. Place the floats in position as in the illustrations below. Place floats on top of mid support so bolts stick up through the mounting tab slots in the ends of the floats. For all Bolts 4'x10' 4'x14' 8'x10' 8'x14' 6'x10' 6'x14' 4'x20' 6'x20' Place a small amount of sealant on the threads of each plug and screw into the breather hole of each float Place frame upside down on a flat surface near the water. FLOATING DOCK ASSEMBLY A STEP 3 STEP 1 STEP 2 Dock in a Box TM Toll Free Help Line: 1-877-877-2561 www.dockinabox.com TOOLS REQUIRED 9/16" Wrenches PARTS REQUIRED Dock Frame & Decking PARTS REQUIRED Floats & Plugs PARTS REQUIRED Hardware & End Caps
Transcript of FLOATING DOCK ASSEMBLY A - dockinabox.com Instructions.pdfFLOATING DOCK ASSEMBLY B STEP 4 STEP5 Dock...

Place frame upside down on a flat surface near the water.
Place the floats in position as in the illustrations below. Place floats on top of mid support so bolts stick up through the mounting tab slots in the ends of the floats.
FLOATING DOCK ASSEMBLY A
STEP 3
STEP 1 STEP 2
Dock in a BoxTM Toll Free Help Line: 1-877-877-2561 www.dockinabox.com
TOOLS REQUIRED
9/16" Wrenches
Forall Bolts
PARTS REQUIRED
Dock Frame & Decking
PARTS REQUIRED
Floats & Plugs
PARTS REQUIRED
Hardware & End Caps
4'x10'4'x14'
8'x10'8'x14'
6'x10'6'x14'
4'x20'
6'x20'
Place a small amount ofsealant on the threads ofeach plug and screw intothe breather hole of each float
Place frame upside down on a flat surface near the water.
FLOATING DOCK ASSEMBLY A
STEP 3
STEP 1 STEP 2
Dock in a BoxTM Toll Free Help Line: 1-877-877-2561 www.dockinabox.com
TOOLS REQUIRED
9/16" Wrenches
PARTS REQUIRED
Dock Frame & Decking
PARTS REQUIRED
Floats & Plugs
PARTS REQUIRED
Hardware & End Caps
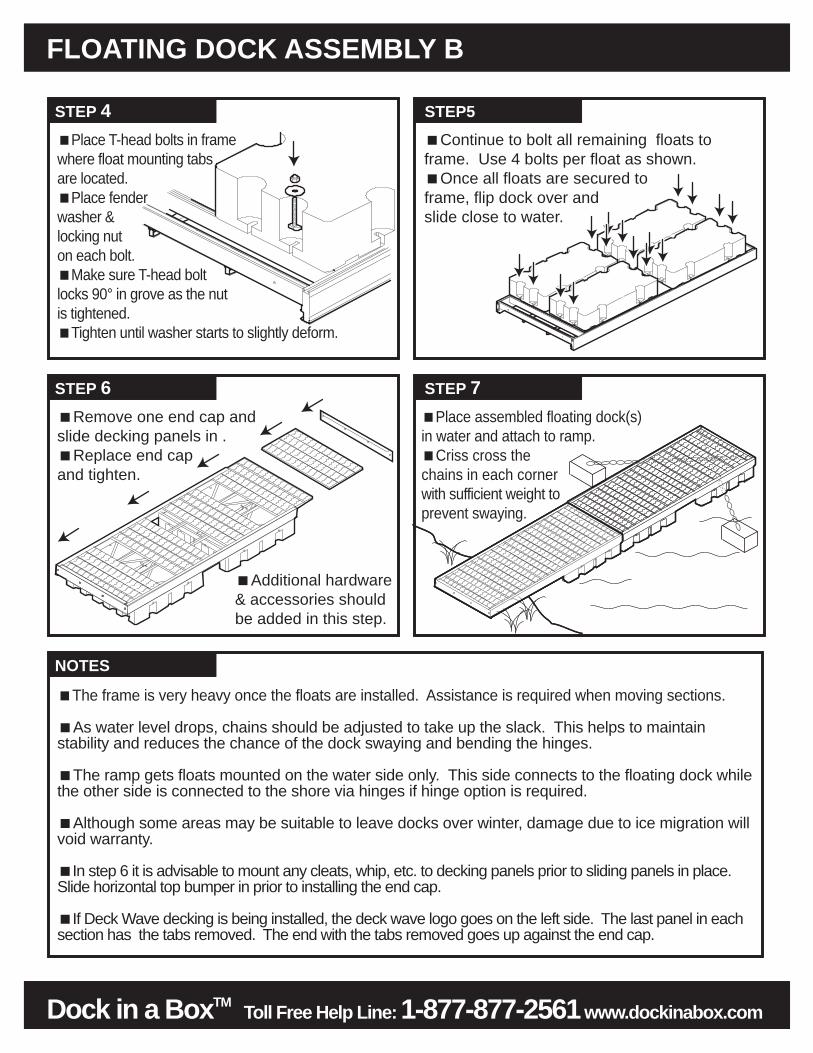
Place T-head bolts in framewhere float mounting tabsare located.
Place fender washer & locking nut on each bolt.
Make sure T-head boltlocks 90° in grove as the nutis tightened.
Tighten until washer starts to slightly deform.
FLOATING DOCK ASSEMBLY B
STEP 4 STEP5
Dock in a BoxTM Toll Free Help Line: 1-877-877-2561 www.dockinabox.com
Continue to bolt all remaining floats to frame. Use 4 bolts per float as shown.
Once all floats are secured toframe, flip dock over andslide close to water.
Remove one end cap andslide decking panels in .
Replace end cap and tighten.
Additional hardware& accessories shouldbe added in this step.
STEP 6 STEP 7
NOTES
FLOATING DOCK ASSEMBLY B
STEP 4 STEP5
Dock in a BoxTM Toll Free Help Line: 1-877-877-2561 www.dockinabox.com
STEP 6 STEP 7
NOTES
Place assembled floating dock(s)in water and attach to ramp.
Criss cross thechains in each cornerwith sufficient weight toprevent swaying.
The frame is very heavy once the floats are installed. Assistance is required when moving sections.
As water level drops, chains should be adjusted to take up the slack. This helps to maintain stability and reduces the chance of the dock swaying and bending the hinges.
The ramp gets floats mounted on the water side only. This side connects to the floating dock while the other side is connected to the shore via hinges if hinge option is required.
Although some areas may be suitable to leave docks over winter, damage due to ice migration will void warranty.
In step 6 it is advisable to mount any cleats, whip, etc. to decking panels prior to sliding panels in place.Slide horizontal top bumper in prior to installing the end cap.
If Deck Wave decking is being installed, the deck wave logo goes on the left side. The last panel in each section has the tabs removed. The end with the tabs removed goes up against the end cap.


![DOCK 6.1 User Manualwiki.docking.org/images/1/16/Dock61.pdf · 09/02/2007 · [user@dock ~] cd test [user@dock ~] make clean [user@dock ~] make test This directory contains the DOCK](https://static.fdocuments.in/doc/165x107/5f6d68232a88f91218253ef3/dock-61-user-09022007-userdock-cd-test-userdock-make-clean-userdock.jpg)