
FlexScanPro - idservicepoint.comidservicepoint.com/_free/FlexScanPro/Manual FlexScanPro.pdf ·...
139
© ID Servicepoint GmbH 2017 www.idservicepoint.com FlexScanPro Flexible Mobile Data Collection Application Manual Version 1.42 Rel.: 23.03.2018
Transcript of FlexScanPro - idservicepoint.comidservicepoint.com/_free/FlexScanPro/Manual FlexScanPro.pdf ·...

© ID Servicepoint GmbH 2017 www.idservicepoint.com
FlexScanPro Flexible Mobile Data Collection Application
Manual Version 1.42 Rel.: 23.03.2018

FlexScanPro
- 2/139 -
1. Index
1. Index ................................................................................................................ 2 2. General information ......................................................................................... 4 2.1. Short description 4 2.2. Text accentuation 5 2.3. Directories 5 2.4. Installation 6 2.5. ActiveSync/Windows Mobile Device Center 8 2.5.1. PC with Active Sync 8 2.5.2. PC with Windows Mobile Device Center 9
2.6. Program Updates 10
3. Operation ...................................................................................................... 11 3.1. General Information 11 3.1.1. Warm Boot 11 3.1.2. Password Input 11 3.1.3. Keyboard Layout 12 3.1.4. Program Start – EULA – Demo-/Full Version – Main Menu 15 3.1.5. Default Settings 18 3.1.6. Status Display and frequent operating elements 19 3.1.7. Keyboard input assistant 20 3.1.8. Color Coding of the Menu / Buttons 21
3.2. Configuration of Programs 22 3.2.1. Example Program Inventory 23 3.2.2. Example Program Incoming 29
3.3. Collect Data 31 3.3.1. Basic Settings 31 3.3.2. Example programs inventory, incoming and camera functionality 32 3.3.3. Field types 41 3.3.4. Running Programs 44
3.4. Send 45 3.5. View 47 3.6. Delete 50 3.7. Other 50 3.8. Load Master Data 51 3.9. Settings 53 3.10. Fields 54 3.11. Field Settings 62 3.11.1. Recommendations for the use of field types 63 3.11.2. Text Field 64 3.11.3. Number Field 95 3.11.4. Quantity Field 96 3.11.5. Display field 100 3.11.6. Selection Field 105 3.11.7. Field array 109
3.12. Language 113 3.13. Printer 114 3.13.1. Label printing during the collection process 114 3.13.2. General Printer Settings 115 3.13.3. Set up the connection to the Bluetooth Printer 116

FlexScanPro
- 3/139 -
3.13.4. Set up the connection to the Ethernet printer 117 3.13.5. Set up the label 118
3.14. Passwords 119 3.15. Connection 120 3.15.1. FTP 121 3.15.2. BaseCOM 122 3.15.3. Tan 123 3.15.4. TanIP 124 3.15.5. Local 125 3.15.6. Connection Options 126
3.16. Info 127
4. Configuration files ........................................................................................ 128 4.1. Overview 128 4.2. CompanyConfig.ini /-.png 128 4.3. DmcSelector.xml 128 4.4. FlexScanPro.ini 129 4.5. KeyMap.ini 130 4.6. StatusSimulation.ini 130 4.7. Language.csv 130
5. Database ...................................................................................................... 131 5.1. General Information 131 5.2. Pictures 132 5.3. InternErfassungN.csv 134 5.4. ErfassungNExport.csv 135 5.5. StammdatenN.csv 136 5.5.1. Structure of the master data 136
5.6. Language file 137
6. Third-party components ............................................................................... 138

FlexScanPro
- 4/139 -
2. General information
2.1. Short description
In the following software or program stands for FlexScanPro application.
FlexScanPro is a flexible and customizable software application to collect data with mobile barcode scanners. Below you will find a brief summary: 8 customizable programs in just one software For each program you can adjust up to 3 collecting loops For each program you can adjust up to 12 input fields (4 per loop) Each program can be named freely Each field can be named freely Available field types: text field, numeric field, amount, display of master data, field array Various data transmission protocols: Local, FTP, 1Tan, TanIP, 1BaseCOM Camera functionality is adjustable (Windows Mobile devices) Signature functionality is adjustable Label printing via Bluetooth- and Ethernet (TPCL and ZPL) Supported languages: German and English (changeable in program) Screen resolution: 240x320, 480x640, 480x800, 600x800, others by interpolation The software runs on the following devices: 2Datalogic Memor X3 with CCD scanner and Windows CE 6.0 2Datalogic Skorpio X3 with laser scanner and Windows CE 6.0 3Datalogic Falcon X3 with laser scanner und Windows Embedded Handheld 6.5 Professional 2Datalogic Falcon X3+ with Imager und Windows CE 6.0 3,5Honeywell Dolphin 60s with Imager and Windows Embedded Handheld 6.5 Professional 3,4,5Motorola MC2180 with Imager and Windows CE 6.0 3,5Generally with devices with Windows Mobile and Windows Embedded Handheld 3,4,5Generally with devices with Windows CE 6PC with Windows 7, 64 Bit 6PC with Windows 10, 64 Bit 1)
The protocols for the serial data transmission are not available with the PC version. 2)
The laser scanner/ Imager of these devices is controlled by the application. 3)
The laser scanner/ Imager of these devices is not controlled by the application. The scan wedge has to be activated. 4)
The Wi-Fi status is not displayed. 5)
The devices have to have a resolution of 320*240 pixels. If necessary the compatibility of the device has to be checked with the application. 6)
The PC version does not have an input by scanner.
The pictures in this documentation are from the PC.

FlexScanPro
- 5/139 -
2.2. Text accentuation
Some elements are accentuated as follows:
Description of the accentuation Example
Normal text This is a text.
note This is a note.
Name or path with variable content applicationpath\data\master dataN.csv
Input with variable content 12.02.2014 , DD.MM.YYYY
Key on the MDE F1
listing x1 ... xN 1, ..., 10 = 1, 2, 3, 4, 5, 6, 7, 8, 9, 10.
1/.../10 = 1/2/3/4/5/6/7/8/9/10.
2.3. Directories
The following names are representative for specific directories in the manual:
● application path:
Default installation path:
PC 1C:\Program Files (x86)\FlexScanPro,
Memor X3 2\BACKUP\FlexScanPro
Falcon X3 2\FlashDisk\FlexScanPro
Falcon X3+ 2\FlashDisk\FlexScanPro
Skorpio X3 2\FlashDisk\FlexScanPro
Honeywell Dolphin 60s 2\IPSM\FlexScanPro
On devices running Windows Mobile Embedded Handheld the installation path could be choosen freely, for the whole system is running in flash memory .
1) The application may not have permission to write in this directory.
2) This directory is cold boot resistant.
● application data path:
For PC it’s the directory C:\Users\user name\AppData\Roaming\FlexScanPro.
For the mobile Terminals it’s the application path.
In the application data path the application has writing permission.

FlexScanPro
- 6/139 -
2.4. Installation
The software is already installed on the MDEs. Nevertheless the following part is about the installation of the FlexScanPro. The provided software package contains the following file structure:
Name Description
FlexScanPro The application
Handbuch.pdf The manual
Installation: Cab-Files, FlexScanPro:
Cab-Files are installation packages and have the file extension cab.
The software package contains the file FlexScanPro_device type_Setup (langauge) version.cab. This
is the installation package of the application.
Since FlexScanPro version 3.2.0 the software installation is made easier. There is now only one
installation file -> FlexScanPro_device type_Setup (langauge) version.cab. All required files (cab-files
and .Net Compact Framework) are included.
Cab-files have to be installed as follows: ● Do not extract the cab-files, just copy them into the root directory. ● The cab-files should be installed in the following order: ● Update files for the device ● The application:
FlexScanPro_device type_Setup (langauge) version.CAB
● Execute each cab-file individually on the device and confirm the installation dialog
● The application is now installed in the 1application path.
1) See chapter General information Directories.

FlexScanPro
- 7/139 -
KeyMap.ini:
Some devices (e.g. the Honeywell Dolphin 60s) require a 1KeyMap.ini file. This file is delivered
together with the application.
1) See chapter Operation KeyMap.ini .
Installation on a PC:
FlexScanPro will be installed via the file \FlexScanPro\setup.exe

FlexScanPro
- 8/139 -
2.5. ActiveSync/Windows Mobile Device Center
To exchange files between a mobile terminal and a PC, Windows XP uses ActiveSync. ActiveSync is available on the internet. Since Windows Vista the WMDC- Windows Mobile Device Center is used instead of ActiveSync. WMDC is also available on the internet.
2.5.1. PC with Active Sync
How to activate the USB connection:
● PC For ActiveSync check allow USB-connections in the connection settings
● MDE with CE Uncheck Connect to the desktop computer as a USB Mass Storage device at
My Device Control Panel PC Connection
● MDE with CE Check Enable direct connections to the desktop computer at
My Device Control Panel PC Connection
● MDE with WM Check Enable advanced network functionality at
Start Settings Connections USB to PC
Check Synchronize all PCs using this connection and choose ’USB at
Start ActiveSync Menu Connection
● Connect the PC with the mobile terminal.

FlexScanPro
- 9/139 -
How to deactivate the USB connection:
● PC For ActiveSync uncheck allow USB-Connection in the configuration settings.
● MDE with CE Uncheck Connect to the desktop computer as a USB Mass Storage device at
My Device Control Panel PC Connection
● MDE with CE Uncheck Enable direct connections to the desktop computer at
My Device Control Panel PC Connection .
● MDE mit WM Uncheck at Synchronize all PCs using this connection at
Start ActiveSync Menu Connection
● MDE mit WM Uncheck Enable advanced network functionality at
Start Settings Connections USB to PC
● Disconnect the mobile terminal from the PC
2.5.2. PC with Windows Mobile Device Center
How to activate the USB connection:
● PC At the device center Settings of the mobile device connection settings
check allow USB-Connection
and allow data connection, if it is connected with the PC
● MDE See chapter General information ActiveSync… PC with Active Sync.
● Connect the PC with the mobile terminal. How to deactivate the USB connection:
● PC At the device center Settings of the mobile device connection settings
uncheck all.
● MDE See chapter General information ActiveSync… PC with Active Sync.
● Disconnect the mobile terminal from the PC

FlexScanPro
- 10/139 -
2.6. Program Updates
Complete installation:
● The previous FlexScanPro_device type_Setup (langauge) version.CAB has to be uninstalled
and afterwards the new FlexScanPro_ device type _Setup (langauge) version.CAB has to be
installed. If there are still other CAB-files involved, then these have to be uninstalled and reinstalled, too.
● Afterwards the program FlexScanPro.exe in the application folder on the mobile terminal can
be started again. Single files: ● The new file(s) has to be copied into the application folder of the mobile device (overwrite if already exists).
● Afterwards the program FlexScanPro.exe in the application folder on the MDE can be started
again.

FlexScanPro
- 11/139 -
3. Operation
3.1. General Information
3.1.1. Warm Boot
During a warm boot the mobile terminal is executing a reset. All running programs are getting stopped immediately (unsecured data is lost in the process).
Warm boot key sequences:
Memor X3: press Escape and On/Off at the same time.
Skorpio X3: press the yellow, blue function key and Escape at the same time.
Falcon X3: press the yellow, blue function key and Escape at the same time.
Falcon X3+: press the yellow, blue function key and Escape at the same time.
Honeywell Dolphin 60s: press the blue function key and hang up key at the same time
for 7 seconds.
3.1.2. Password Input
Some menus are secured with a password. The default password is 04105 and can be changed in
the program settings.

FlexScanPro
- 12/139 -
3.1.3. Keyboard Layout
Below you will find the keyboard layouts for the most important devices:
Memor X3 Key Function
Scan
Escape
Enter
Arrow keys
Function F1
Function F2
+ Function F3
+ Function F4
Alpha
Delete

FlexScanPro
- 13/139 -
Falcon X3 und Falcon X3+ Key Function
Scan
Arrow keys
Enter
Function F1, F2, F3, F4, F5
Yellow function key + Alpha
Escape
Delete
Blue function key

FlexScanPro
- 14/139 -
Skorpio X3 Function and Keys
Numerical Keyboard (28 keys):
Alphanumerical Keyboard (38 keys):
Full-Alphanumerical Keyboard (50 keys):
Scan:
Escape:
Enter:
Arrow keys:
Function F1 – F5:
+ Alpha-key switchover:
Delete:
FlexScanPro
- 15/139 -
3.1.4. Program Start – EULA – Demo-/Full Version – Main Menu
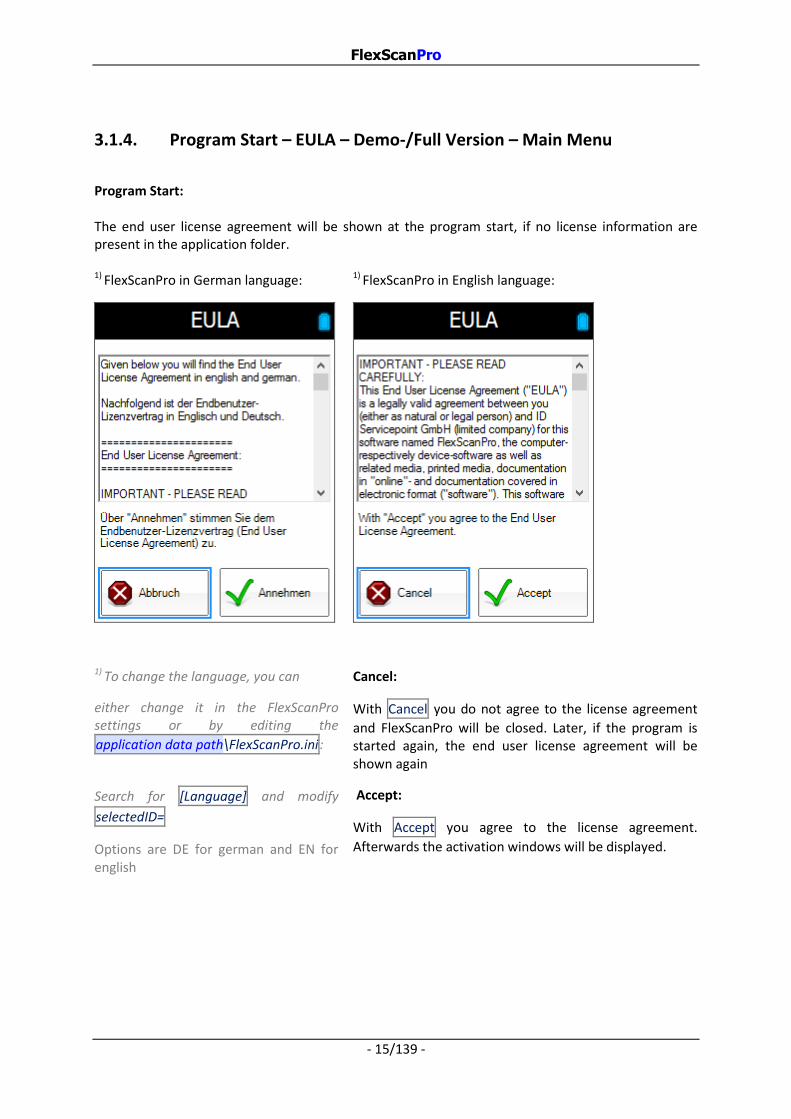
Program Start: The end user license agreement will be shown at the program start, if no license information are present in the application folder. 1) FlexScanPro in German language:
1) FlexScanPro in English language:
1) To change the language, you can
either change it in the FlexScanPro settings or by editing the
application data path\FlexScanPro.ini:
Search for [Language] and modify
selectedID=
Options are DE for german and EN for english
Cancel:
With Cancel you do not agree to the license agreement
and FlexScanPro will be closed. Later, if the program is started again, the end user license agreement will be shown again
Accept:
With Accept you agree to the license agreement.
Afterwards the activation windows will be displayed.

FlexScanPro
- 16/139 -
After accepting the license agreement you need to enter the license key:
How to activate the full version:
The License key can be scanned or put in manualy.
The license key can be requested at your system supplier. The data you need to provide are
Project-Nr and Device-ID.
How to activate the demo version:
Leave the License key empty and confirm with OK. You
will be asked if you want to start the demo version.
Demoversion
Do you want to activate the demoversion now?
Yes No
Cancel:
With Cancel the licensing will be aborted.

FlexScanPro
- 17/139 -
Main menu:
The main menu contains following items:
Hotkey Function
1 Collect
2 Send
3 View
4 Delete
5 Other
6 Info
The menu items can be selected by the keys ▲, ▼
and Tab and opened with Enter or tipping the touch
screen. With the prevailing hotkey menu items can be opened directly.
The menu items can be closed via ESC.
The program can be closed with ESC and after entering
the password.
FlexScanPro
- 18/139 -
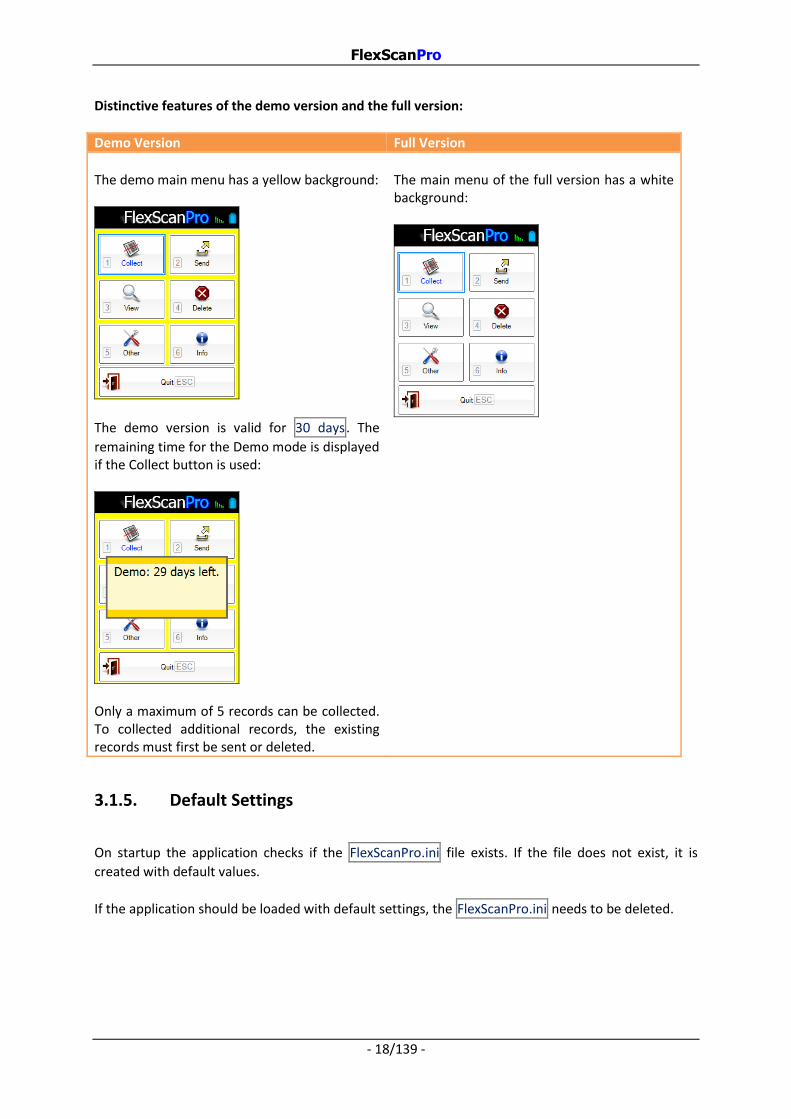
Distinctive features of the demo version and the full version:
Demo Version Full Version
The demo main menu has a yellow background:
The demo version is valid for 30 days. The
remaining time for the Demo mode is displayed if the Collect button is used:
Only a maximum of 5 records can be collected. To collected additional records, the existing records must first be sent or deleted.
The main menu of the full version has a white background:
3.1.5. Default Settings
On startup the application checks if the FlexScanPro.ini file exists. If the file does not exist, it is
created with default values.
If the application should be loaded with default settings, the FlexScanPro.ini needs to be deleted.

FlexScanPro
- 19/139 -
3.1.6. Status Display and frequent operating elements
Status Display: Most of the windows have a title with a status display:
The status display contains the following objects:
Display Object Symbol Description
WI-FI WI-FI is deactivated.
WI-FI with 0%,20%,40%,60%,80%,100% signal power
Battery
State of charge is currently not available
to 0%,20%,40%,60%,80%,100% charged
Battery is currently charging
Frequent operating elements: The following operating elements appear frequently:
Operating elements
Example Description
Back-Button
To close the window press ESC or press
the button.
Input assistant
With pressing the button the input assistant window opens according to the selected text field:
FlexScanPro
- 20/139 -
3.1.7. Keyboard input assistant
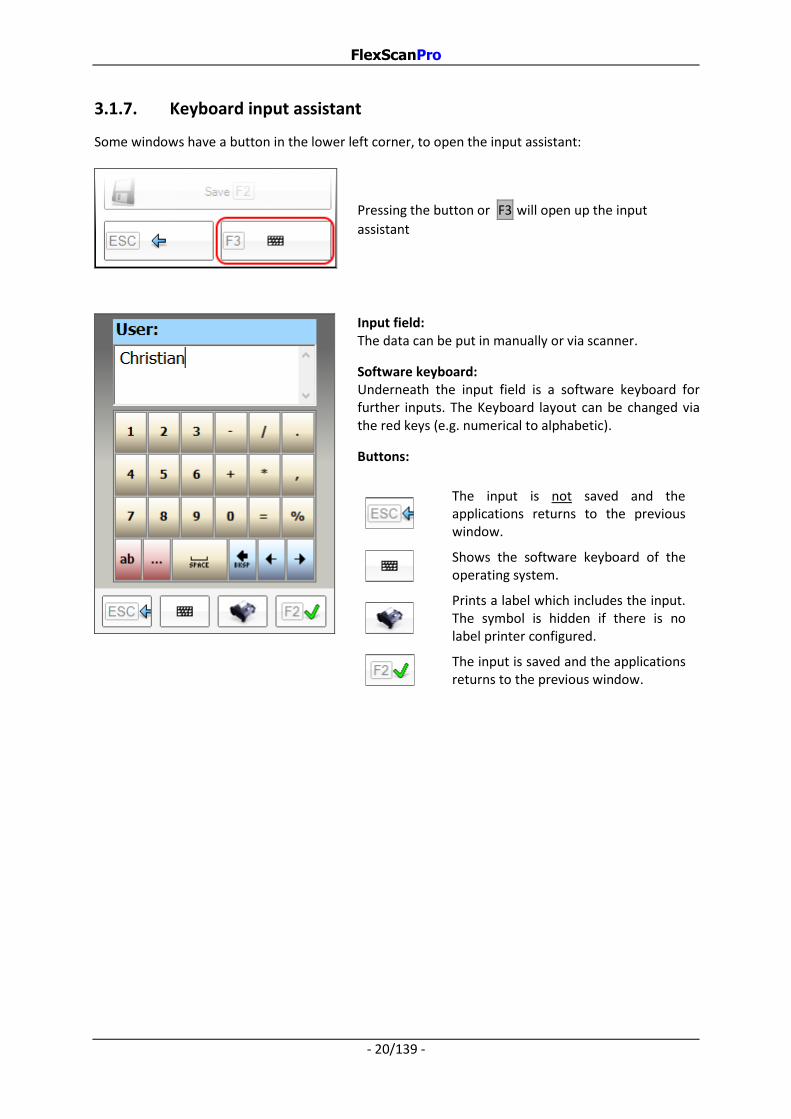
Some windows have a button in the lower left corner, to open the input assistant:
Pressing the button or F3 will open up the input
assistant
Input field: The data can be put in manually or via scanner.
Software keyboard: Underneath the input field is a software keyboard for further inputs. The Keyboard layout can be changed via the red keys (e.g. numerical to alphabetic).
Buttons:
The input is not saved and the applications returns to the previous window.
Shows the software keyboard of the operating system.
Prints a label which includes the input. The symbol is hidden if there is no label printer configured.
The input is saved and the applications returns to the previous window.

FlexScanPro
- 21/139 -
3.1.8. Color Coding of the Menu / Buttons
FlexScanPro contains 8 data collection programs. Some menus and buttons are associated with
these programs. They are highlighted in one of the following colors according to the status of the associated program:
Accentuation
Program closed white background
Program is running green background
No records captured black writing
At least one record captured blue writing
Menu/button deactivated grayed out background
Examples
Function keys: Some buttons can be operated by function keys:

FlexScanPro
- 22/139 -
3.2. Configuration of Programs
Since FlexScanPro version 3.1.0.* all programs are deactivated by default. The collection window
main menu collect is empty:
To change that you have to go through main menu other settings password„04105“
programs to the settings:
All programs are deactivated.
To activate a program at least on field must be activated
(programN) fields.

FlexScanPro
- 23/139 -
3.2.1. Example Program Inventory
Program Inventory:
● In the settings, go to
… programs (program1) common.
● Change the program title to Inventory .
● Press Save.
Field User:
● In … programs (Inventory)
go to … fields (field-0-0).
● Activate field.
● Change the field name to User .
● Press Save.

FlexScanPro
- 24/139 -
Field Location:
● In … programs (Inventory)
go to … fields (field-1-0).
● Activate field.
● Change the field name to Location .
● Press Save.
Field Article:
● In … programs (Inventory)
go to … fields (field-1-1).
● Activate field.
● Change the field name to Article .
● Deactivate Can be empty.
● Deactivate Preserve value after saving.
● Press Save.

FlexScanPro
- 25/139 -
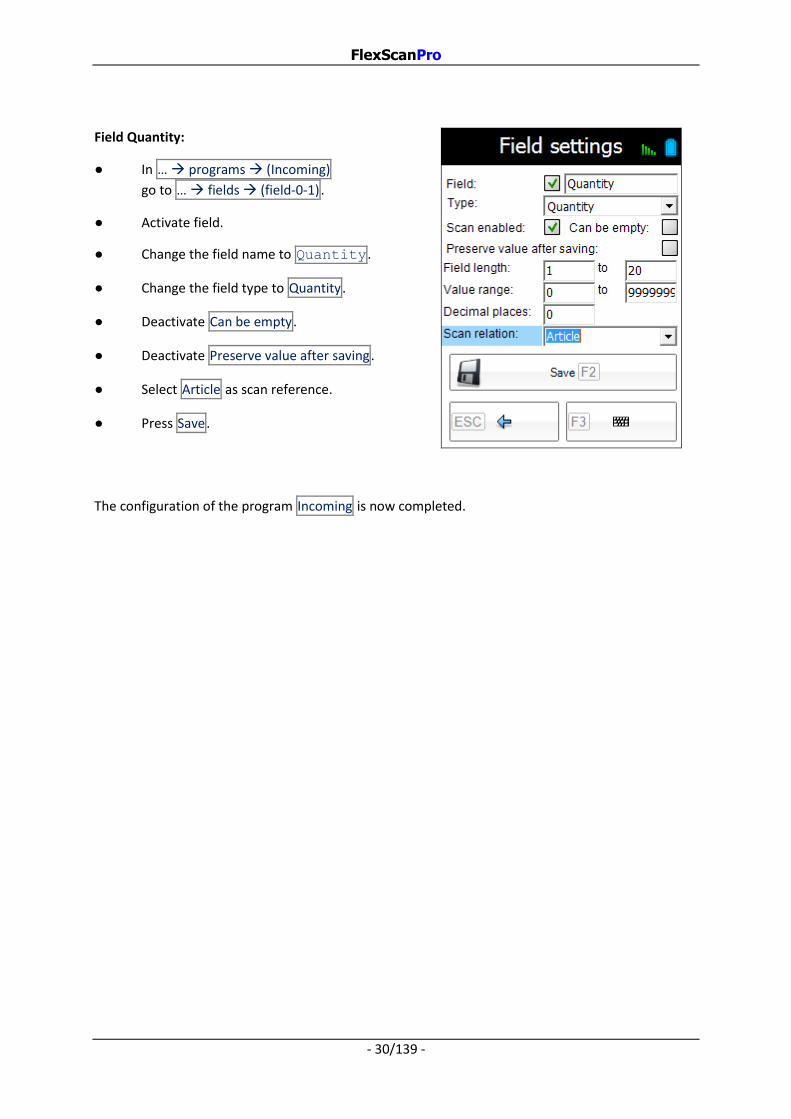
Field Quantity:
● In … programs (Inventory)
go to … fields (field-1-2).
● Activate field.
● Change field name to Quantity .
● Change the field type to Quantity .
Deactivate Can be empty.
● Deactivate Preserve value after saving.
Select Article as scan relation.
● Press Save.
Field Weight:
● In … programs (Inventory)
go to … fields (field-1-3).
● Activate field.
● Change field name to weight .
● Change field type to number.
● Deactivate scanner enabled.
● Deactivate Preserve value after saving.
● Press Save.
The configuration of the program Inventory is now completed.

FlexScanPro
- 26/139 -
The program inventory is now active and is displayed under main menu collect
By selecting inventory the program is started.
The first collection loop is displayed with the field user.
After the input the second collection loop gets displayed.
Label printer:
In the chapter operation printer a label printer can be
set up. If there is a printer type selected you can see a print button in the lower section. Otherwise the button is hidden:
By clicking the print button, the content of the selected field will be printed as a Code 128 barcode:

FlexScanPro
- 27/139 -
For devices without Enter-key exists a button with a
green check icon. This button has the same function as
the Enter-key. It confirms the actual field input.
The second collection loop contains the fields location,
article, quantity and weight.

FlexScanPro
- 28/139 -
After the input of the last field, the record is saved and
the fields article, quantity and weight are emptied.

FlexScanPro
- 29/139 -
3.2.2. Example Program Incoming
Program Incoming:
● In the settings, go to
… programs (program2) common.
● Change the program title to Incoming .
● Press Save.
● Put the tick at Activate camera function.
● Press Save.
Field Article:
● In … programs (Incoming)
go to … fields (field-0-0).
● Change field name to Article .
● Deactivate Can be empty.
● Deactivate Preserve value after saving.
● Press Save.
FlexScanPro
- 30/139 -
Field Quantity:
● In … programs (Incoming)
go to … fields (field-0-1).
● Activate field.
● Change the field name to Quantity .
● Change the field type to Quantity.
● Deactivate Can be empty.
● Deactivate Preserve value after saving.
● Select Article as scan reference.
● Press Save.
The configuration of the program Incoming is now completed.

FlexScanPro
- 31/139 -
3.3. Collect Data
From the main menu the window Collect is activated. The functionality and appearance depends on
the configuration under menu other settings.
3.3.1. Basic Settings
To load the default settings, see chapter operation general information
basic settings.
Since FlexScanPro Version 3.1.0* all programs are deactivated by default. The collection window
main menu collect is empty:
FlexScanPro
- 32/139 -
3.3.2. Example programs inventory, incoming and camera functionality
In the following you can see a description of how the FlexScanPro is set up: ● FlexScanPro is reset to the basic settings.
See chapter operation general information basic settings.
● FlexScanPro was set up with the example programs inventory and incoming.
See chapter operation configuration of programs example program inventory
and operation configuration of programs example program incoming.
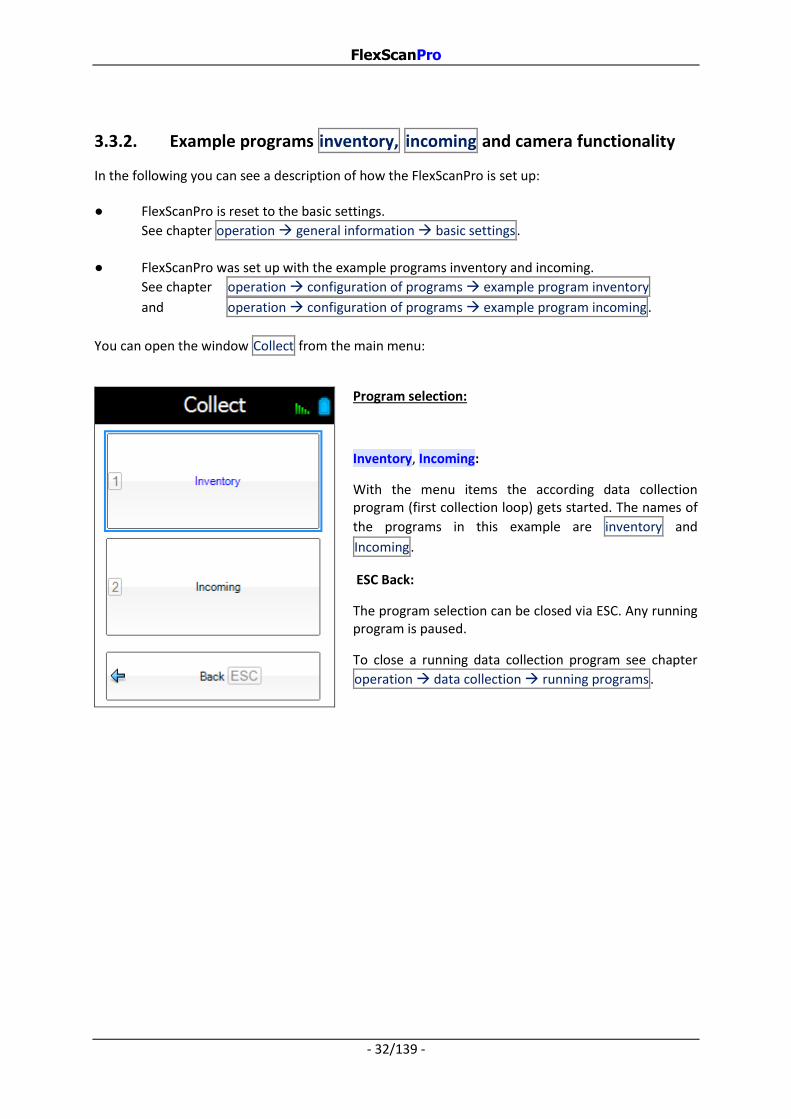
You can open the window Collect from the main menu:
Program selection:
Inventory, Incoming:
With the menu items the according data collection program (first collection loop) gets started. The names of
the programs in this example are inventory and
Incoming.
ESC Back:
The program selection can be closed via ESC. Any running program is paused.
To close a running data collection program see chapter
operation data collection running programs.
FlexScanPro
- 33/139 -
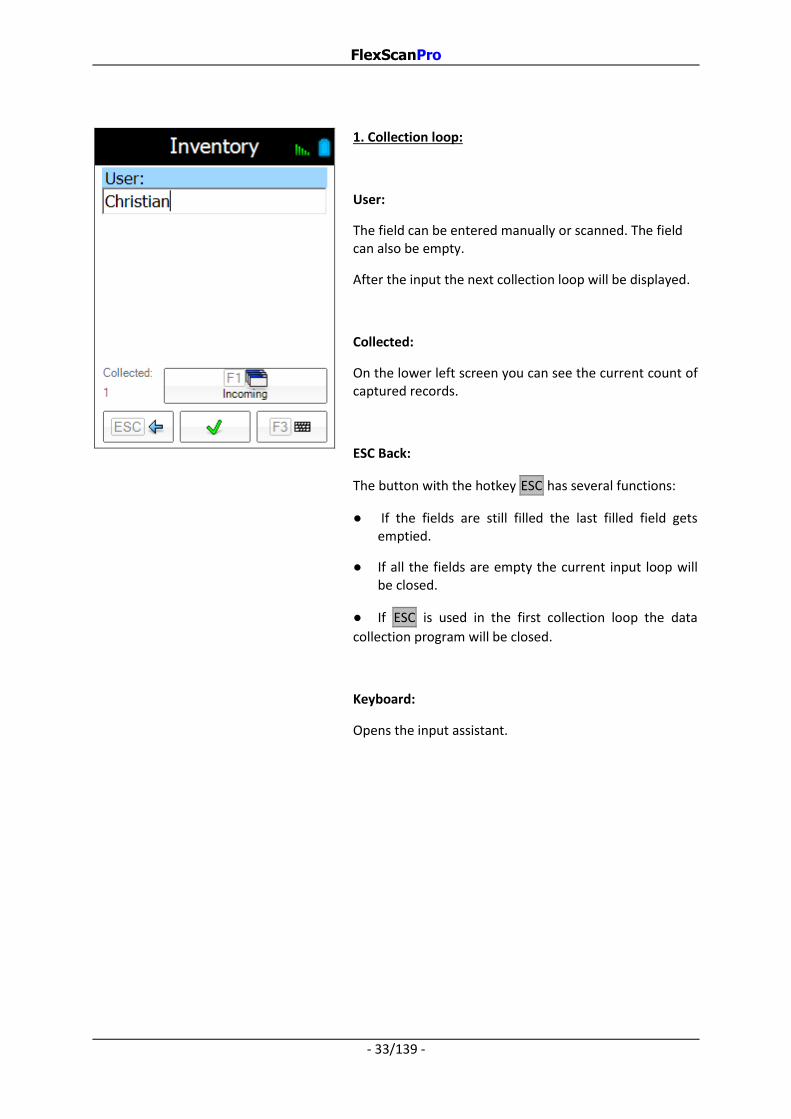
1. Collection loop:
User:
The field can be entered manually or scanned. The field can also be empty.
After the input the next collection loop will be displayed.
Collected:
On the lower left screen you can see the current count of captured records.
ESC Back:
The button with the hotkey ESC has several functions:
● If the fields are still filled the last filled field gets emptied.
● If all the fields are empty the current input loop will be closed.
● If ESC is used in the first collection loop the data
collection program will be closed.
Keyboard:
Opens the input assistant.

FlexScanPro
- 34/139 -
F1 Incoming:
With F1 or by pressing the button the window choice
gets displayed to change the program.
Choice
To go back to the current program the button ESC back
or the hotkey ESC can be used.
By clicking or using the hotkeys 1/.../8 the current active
program gets paused and the selected program gets started.

FlexScanPro
- 35/139 -
2. Collection Loop:
Location:
The field can be entered manually or scanned. The field can also be empty, according to the settings previously taken.
Article:
The field can be entered manually or scanned. The field has to be filled.
Quantity:
The field can be entered manually or scanned. The field has to be filled.
The quantity field is linked with the field Article. If the
same barcode is scanned for the field Quantity as it was
for Article, the quantity increases by 1. If a different
barcode is scanned for the field Quantity, the scan
progress will be rejected.
Weight:
The field Weight is a number field.
The field can be scanned or entered manually. When scanning, the scanned result has to be confirmed with Enter. The field can be left empty.
After the input of the field weight the capturing process is completed and the record will be saved because the weight is the last field in the collection loop.
Capturing Process:
The field Location has the option preserve value after saving activated under main menu other
settings programs Inventory fields location. After a capturing process is completed
the field Location will keep his value. For the fields article, quantity and weight this option is
deactivated and therefore they are cleared after completing a capturing process.

FlexScanPro
- 36/139 -
Camera function:
From main menu collect you can open the program Incoming:
This program contains only one collection loop.
Article:
The field can be entered manually or scanned. The field has to be filled out.
Quantity:
The field can be entered manually or scanned. The field has to be filled out.
The quantity field is linked with the field Article. If the
same barcode is scanned for the field Quantity as it was
for Article, the quantity increases by 1. If a different
barcode is scanned for the field Quantity, the scan
progress will be rejected.
Camera button:
By pressing the button the camera window will be opened. In the camera window, you can take a picture for the actual record. The camera button has a white background, if no picture is taken yet and a blue background if a picture is already taken.
F2 Save:
By pressing the button or the F2 key the actual record
will be saved.
FlexScanPro
- 37/139 -
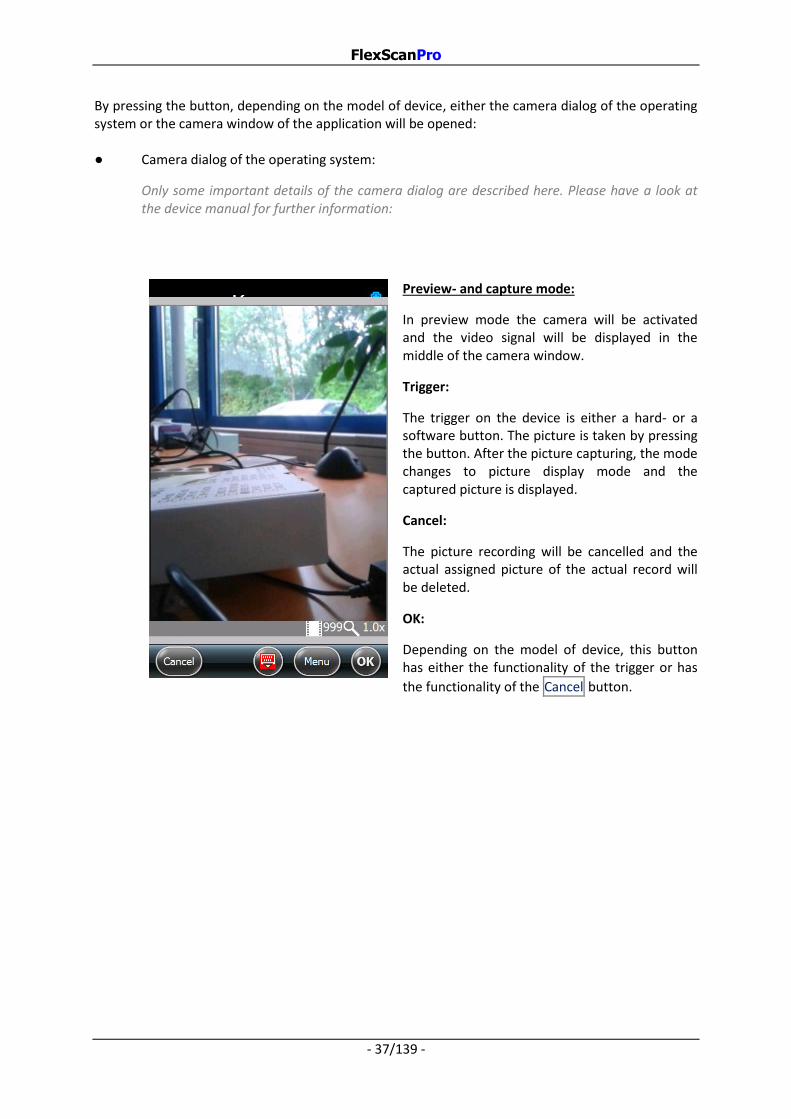
By pressing the button, depending on the model of device, either the camera dialog of the operating system or the camera window of the application will be opened: ● Camera dialog of the operating system:
Only some important details of the camera dialog are described here. Please have a look at the device manual for further information:
Preview- and capture mode:
In preview mode the camera will be activated and the video signal will be displayed in the middle of the camera window.
Trigger:
The trigger on the device is either a hard- or a software button. The picture is taken by pressing the button. After the picture capturing, the mode changes to picture display mode and the captured picture is displayed.
Cancel:
The picture recording will be cancelled and the actual assigned picture of the actual record will be deleted.
OK:
Depending on the model of device, this button has either the functionality of the trigger or has
the functionality of the Cancel button.
FlexScanPro
- 38/139 -
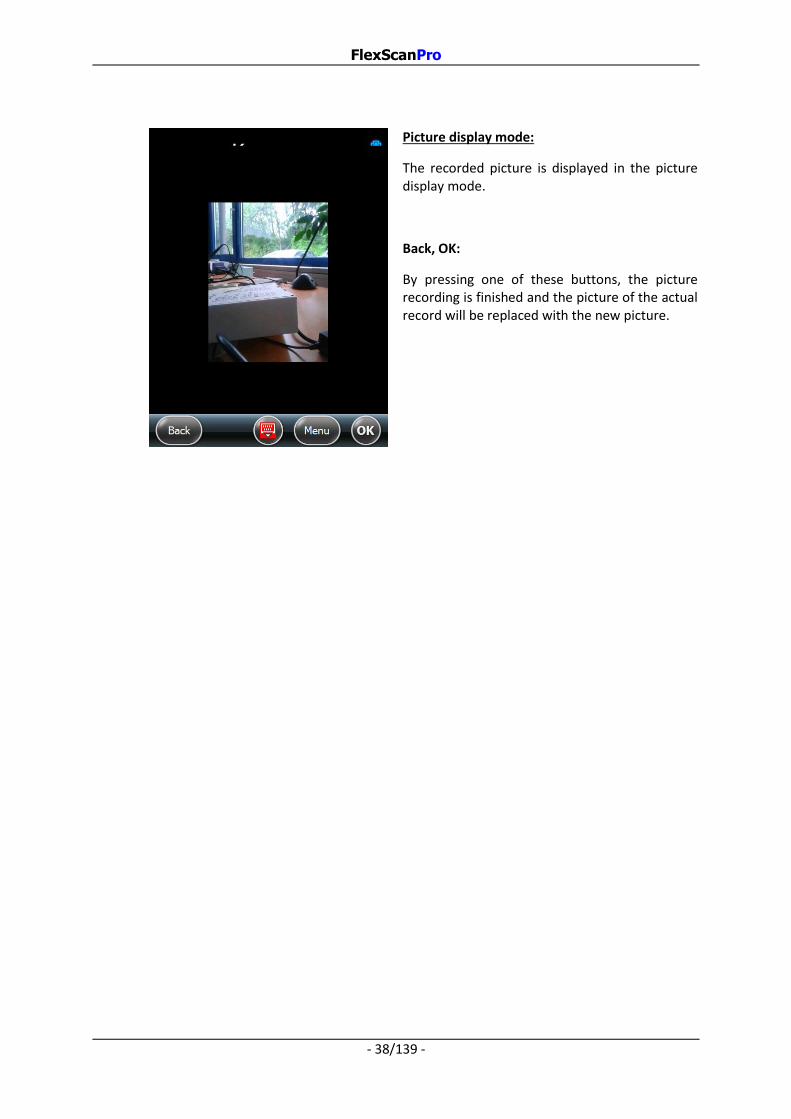
Picture display mode:
The recorded picture is displayed in the picture display mode.
Back, OK:
By pressing one of these buttons, the picture recording is finished and the picture of the actual record will be replaced with the new picture.

FlexScanPro
- 39/139 -
● Camera window:
Preview- and capture mode:
In preview mode the camera will be activated and the video signal will be displayed in the middle of the camera window. Two green bars on the left and right side of the video signal indicate that the preview mode is active.
Flash:
Right beside the video signal is a button to de-/activates the flash.
Trigger:
Pressing the shutter button or 5 the picture
capturing process will start. Two red bars indicate that the picture capturing is in progress. After the picture capturing, the mode changes to picture display mode and the captured picture is displayed.
Back:
The camera mode will be cancelled, without changing the actual captured picture.
OK:
The preview- and capture mode will be canceled without saving the picture.

FlexScanPro
- 40/139 -
Picture display mode:
After a successful recording the picture display mode will appear. The picture resolution will be shown above the recorded picture.
Back:
The picture recording will be cancelled without saving the picture and the application will return to the program.
OK:
The actual shown picture will be saved. Pictures taken prior to this will be overwritten.

FlexScanPro
- 41/139 -
3.3.3. Field types
The following paragraph describes all the field types which can be used in the FlexScanPro appplication: Text Field
Text fields can be scanned or entered manually.
Number fields:
Number fields can be scanned or entered manually. Allowed are numbers, decimal point and the minus sign.
Quantity Fields:
Quantity fields are special number fields. Those are linked with another field, usually an article-text field:
If the same barcode is scanned for the quantity field and the article-text field, the quantity will increase by 1.
A different barcode will be rejected.

FlexScanPro
- 42/139 -
Display Field:
Display fields are for the display of information.
In this example the article 000061 has the
article description counter framework:
4x table legs… .
A small symbol is indicating that there is a display mode available which shows the complete article description if the display field is pressed.
The display mode consists of a yellow close
button and a write-protected text field with a horizontal and a vertical scrollbar. To close the
display mode just hit the close button.
Selection Field:
The selection file is a drop down menu which allows the selection of different given values.

FlexScanPro
- 43/139 -
Field array:
Field arrays can be scanned or entered manually like text fields. The input value can be divided automatically based on the separator (which is configured in the field settings).
For example: The input value 003_1_A212 in a
field array is saved as 003_1_A212 .
At the export, this input value is divided
according to the separator _ and transferred as
003 , 1 and A212 .

FlexScanPro
- 44/139 -
3.3.4. Running Programs
A program can be started via the according menu item .
In the data collection you can switch between the programs
via the F1 key.
If a program gets canceled via
ESC the other programs keep
running in the background. This status is presented green in the program selection.
To close a running program just open the program and close it
with ESC .

FlexScanPro
- 45/139 -
3.4. Send
From the main menu you can select the menu send.
The window has the following menu items:
Hotkey Function
1/.../8 1. Program/ … / 8. Program
9 Send all
If a program is still running or that program has no collected data, the according menu item is grayed out.
Send All:
With this button all the collected data gets send. The function is deactivated, if at least one program is still running.
FlexScanPro
- 46/139 -
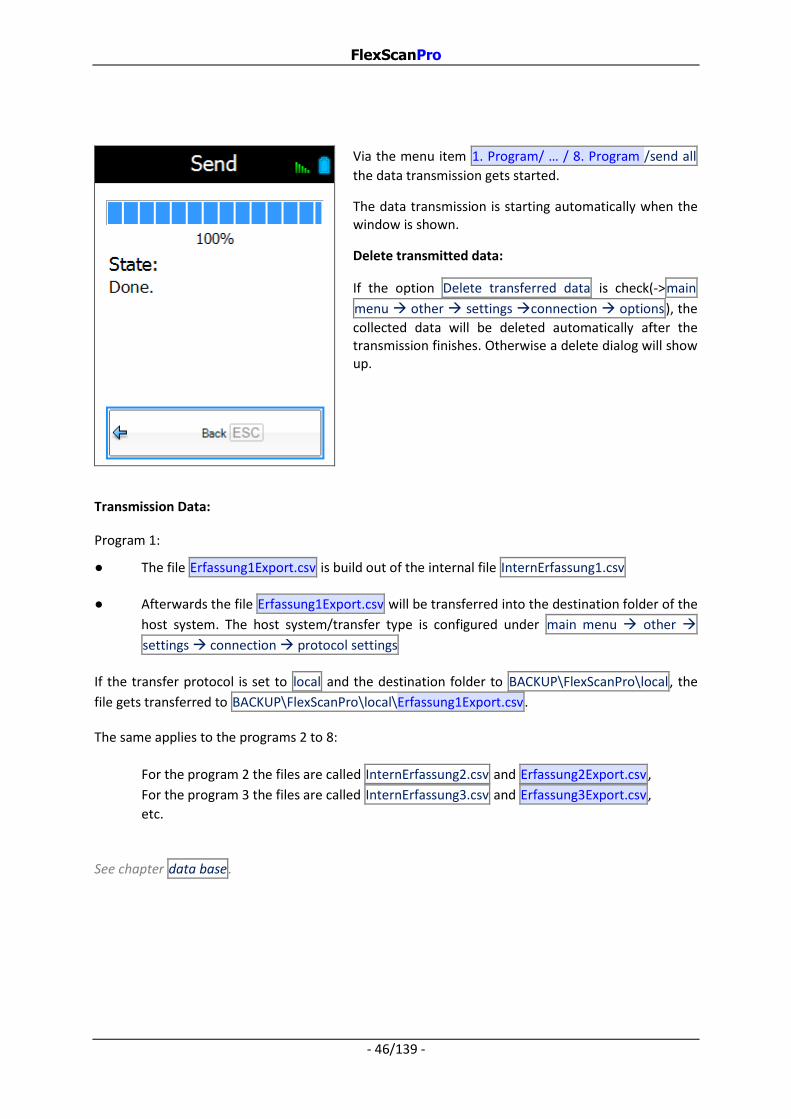
Via the menu item 1. Program/ … / 8. Program /send all
the data transmission gets started.
The data transmission is starting automatically when the window is shown.
Delete transmitted data:
If the option Delete transferred data is check(->main
menu other settings connection options), the
collected data will be deleted automatically after the transmission finishes. Otherwise a delete dialog will show up.
Transmission Data:
Program 1:
● The file Erfassung1Export.csv is build out of the internal file InternErfassung1.csv
● Afterwards the file Erfassung1Export.csv will be transferred into the destination folder of the
host system. The host system/transfer type is configured under main menu other
settings connection protocol settings
If the transfer protocol is set to local and the destination folder to BACKUP\FlexScanPro\local, the
file gets transferred to BACKUP\FlexScanPro\local\Erfassung1Export.csv.
The same applies to the programs 2 to 8:
For the program 2 the files are called InternErfassung2.csv and Erfassung2Export.csv,
For the program 3 the files are called InternErfassung3.csv and Erfassung3Export.csv,
etc.
See chapter data base.

FlexScanPro
- 47/139 -
3.5. View
From the main menu you can select the menu view:
The window has the following menu items:
Hotkey Function
1 1. Program
... ...
8 8. Program
ESC Back
9 Data base
If a program is still running the according menu item can’t be opened.
If the menu item data base is opened while a program is
still running, there will be a notification that a least one program is running in the background.

FlexScanPro
- 48/139 -
Menu Items 1. Program/.../8. Program:
List view mode:
All collected data will be shown here according to the selected program.
Selection:
The record gets selected via mouse click or by scanning an article.
The selected record stands out with an orange background.
[F2] Delete Records:
With F2 and with the red delete button the selected
record can be deleted.
Info:
Additional information and options are being display beneath the table.
Images:
With Images you switch to the image view mode.

FlexScanPro
- 49/139 -
Image view mode:
Type of Image:
You can choose between camera pictures and
signatures.
Image:
By clicking on an existing image, it will be enlarged.
List:
With List you switch back to the privies window.
Menu Item Data Base:
All existing data bases can be displayed here (view only mode).
Selection Field:
Each data base can be selected via the drop down menu.
The contend is displayed tabular.
All possible data bases are listed in the drop down menu, even so they may not be present at the device. If so, they will be empty.
FlexScanPro
- 50/139 -
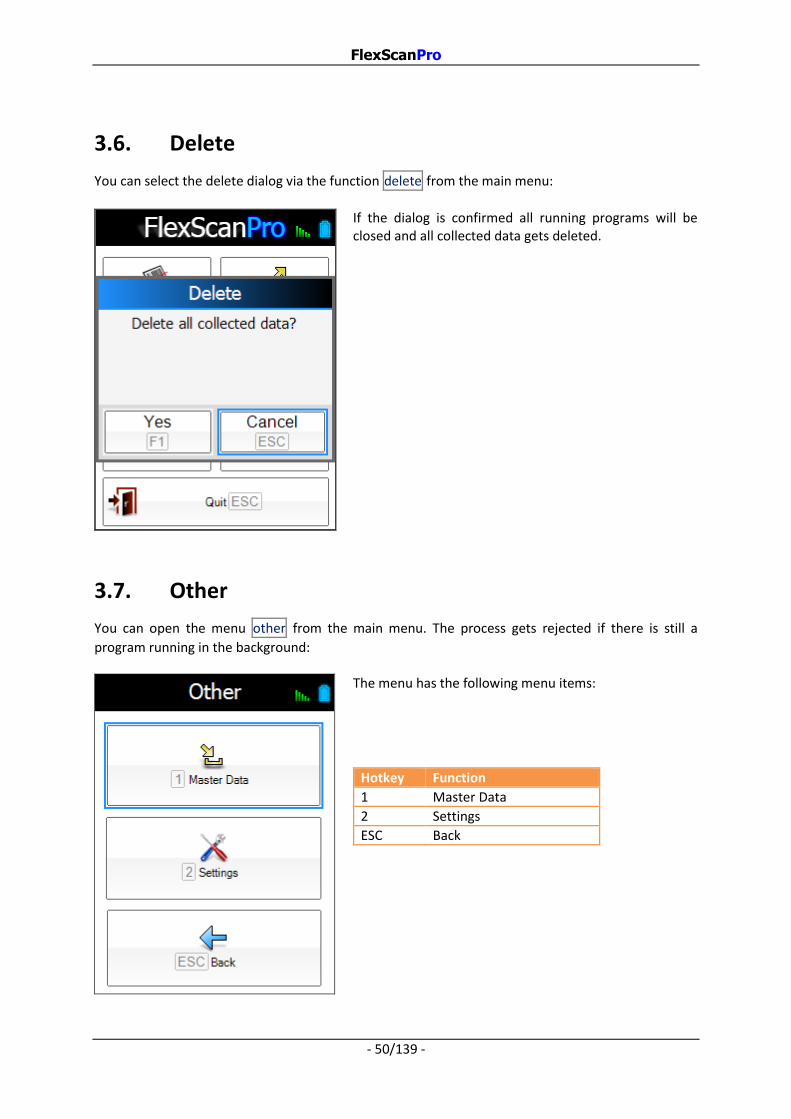
3.6. Delete
You can select the delete dialog via the function delete from the main menu:
If the dialog is confirmed all running programs will be closed and all collected data gets deleted.
3.7. Other
You can open the menu other from the main menu. The process gets rejected if there is still a
program running in the background:
The menu has the following menu items:
Hotkey Function
1 Master Data
2 Settings
ESC Back
FlexScanPro
- 51/139 -
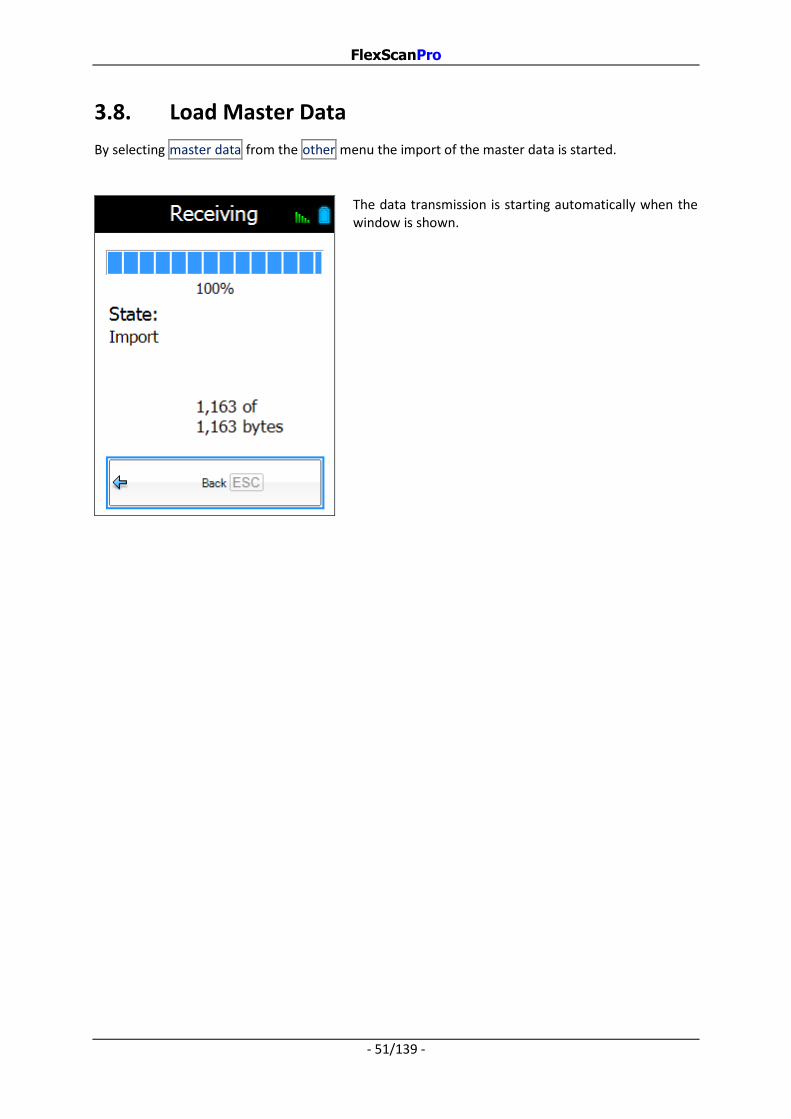
3.8. Load Master Data
By selecting master data from the other menu the import of the master data is started.
The data transmission is starting automatically when the window is shown.

FlexScanPro
- 52/139 -
Master Data:
An attempt is being made to download all master data. If particular master data files are not available they are being skipped and the rest of the master data download carries on.
Program 1:
● The first master data file to be loaded from the host system is Stammdaten1Import.csv.
If the transfer protocol is set to local and the destination folder to
BACKUP\FlexScanPro\local, the file \BACKUP\FlexScanPro\local\ Stammdaten1Import.csv
gets uploaded
● The internal file Stammdaten1.csv is build out of the file Stammdaten1Import.csv
The same applies to the programs 2 to 8:
For the program 2 the files are called Stammdaten2.csv and Stammdaten2Import.csv,
For the program 3 the files are called Stammdaten3.csv and Stammdaten3Import.csv,
etc.
See also chapter record.
Successful Data Transmission:
After a successful data transmission the downloaded master data will be shown.

FlexScanPro
- 53/139 -
3.9. Settings
From the menu other you can select the menu settings. This menu is password protected
The menu has the following menu items:
Hotkey Funktion
0 Programs
1 Language
2 Printer
3 Passwords
4 Connection
ESC Back
5 1License
Current Protocol:
The current selected protocol is shown beneath the
Connection button(e.g. TanIP).
1)License:
With the menu item license the full version can be
activated if you're using an demo version. If the application is running in demo mode, the button has a yellow background. If the application is licensed, the button is deactivated.
Demo version Full version
FlexScanPro
- 54/139 -
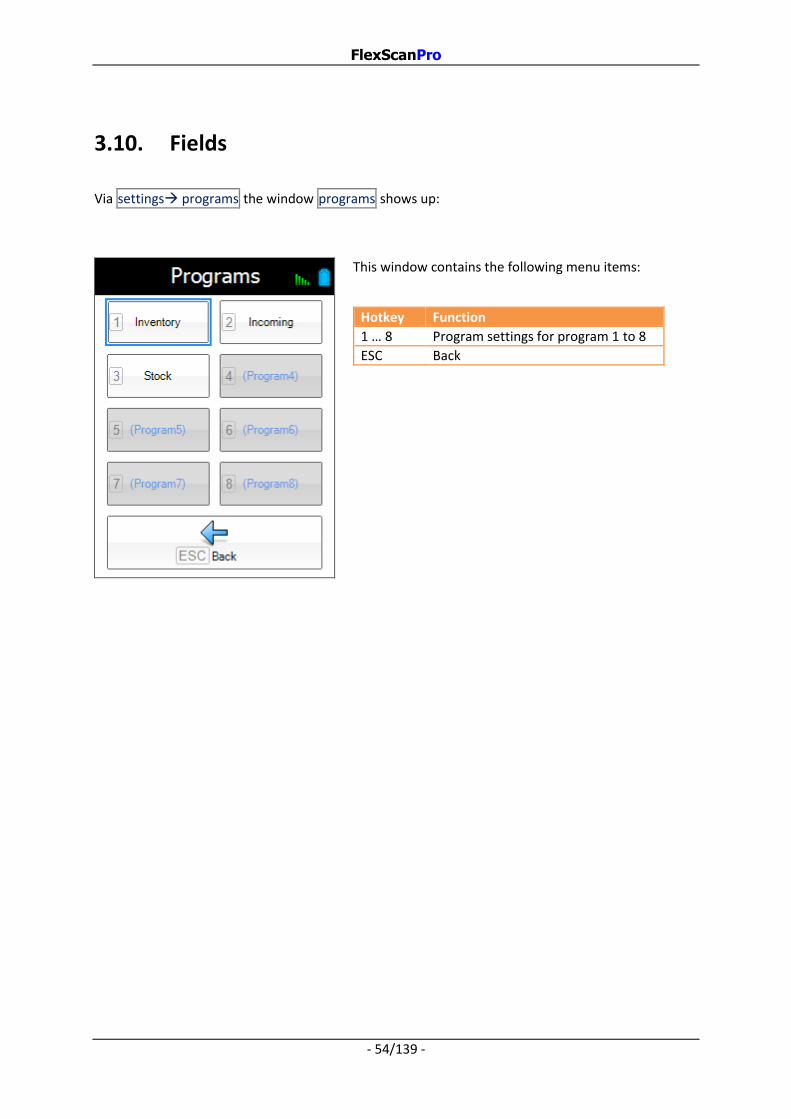
3.10. Fields
Via settings programs the window programs shows up:
This window contains the following menu items:
Hotkey Function
1 … 8 Program settings for program 1 to 8
ESC Back

FlexScanPro
- 55/139 -
Program:
settings programs program name opens the program menu:
In the upper area the name of the program is displayed. Underneath are the following menu items:
Hotkey Funktion
1 Common
2 Fields
ESC Back
3 Data transfer

FlexScanPro
- 56/139 -
Common:
Via program name common you can open the common window:
Program-title:
The name of the program can be chosen freely.
Password:
If a password is assigned, the associated program can only be started after inserting the correct password. If the field remains empty, the program will start without the password request. If the password protection is active or
inactive will be displayed bye or
.
1 You can start the program with main menu collect
program name
Save record:
If the option is checked, the recording is saved after entering the last collection filed (This is useful, if you want to make an inventory as example). If the option is unchecked, the collected data will only be shown but not saved (This is useful, if e.g. you only want to show the article descriptions related to an article number).
Activate camera function:
By checking this option the camera function will be activated. During a collection process in the last collection loop a camera icon is shown. In case that the device has a camera and this camera is supported, a picture can be taken, which will be linked together to the collection record.
Next with [F4]:
After input the last field of a loop, the program will usually switch to the next loop. This will be suppressed by setting the checkbox. In the collect data mask appears the extra button for going to the next loop.
Signature:
In the combo box you can select that a signature should be entered. If selected, the window for capturing the signature appears when you save the document.

FlexScanPro
- 57/139 -
Signature options:
The selection box offers the following options:
● Signature disabled
The collection takes place without 1signature input.
● Signature button
During the collection, the 1signature input is called by the user:
A button is displayed for this purpose, which the user presses to enter a signature.
● Ask for signature
During the collection, the 1signature input is called by the user:
When saving, a dialog
Signature now? [Yes] [No][Cancel] appears.
Choose Yes to enter a signature, select No to save the data record without a
signature, and choose Cancel to discard the action.
● Signature mandatory
The collection takes place with 1signature input.
Options in brackets:
● deny empty
The 1Signature input consists of a writing area and input field. Both must be filled, otherwise the save operation is rejected.
● allow empty
The 1Signature input consists of a writing area and input field. Saving is performed even if one or both fields are empty.
● flip
Rotates the writing area by 180 degrees.
1) The signature input is explained on the next page.

FlexScanPro
- 58/139 -
Effect of the signature option during the collection process:
After completing a data collection, a window to capture the signature will be shown:
Writing area: The signatory makes his sign here. Depending on the settings, the writing area is rotated at 180 degrees. The writing area contains the full name of the signatory and the entry date. Input field: The full name of the signatory can be entered here. F1 Reset: Resets the writing area and input field. ESC Back: The window will be closed and the saving process will be cancelled. F2 Save: The window will be closed and the collected data will be saved
F2 Save:
By pressing the button or the F2 key the actual settings will be saved.

FlexScanPro
- 59/139 -
Fields:
With program name fields you can open the correspondent window:
1) Scrollbar:
On the right-hand side of the screen there is a scrollbar which consists out of two scroll buttons to select the previous or next element.
2) Function Selection, F1, F2:
In a drop down menu the following function keys can be selected:
● Swap fields:
Via F1 the selected field gets moved one field
above. Via F2 the selected field gets moved
one field down. It is also possible to swap fields from different collection loops. The change gets saved immediately.
● Activate field:
F1 activates the field.
With F2 the selected field gets deactivated.
The change gets saved immediately.

FlexScanPro
- 60/139 -
3) Fields:
By deactivating all the fields the program gets deactivated. If all fields are deactivated the program is removed from the collection menu. For each of the twelve fields (3 loops with 4 fields each) there is a button which you can use to edit the according field.
Activated fields get displayed with black writing and a white background.
Example:
Deactivated fields appear in a grayish blue writing and with the field name in round brackets.
Example:
Fields that are related to one another are accentuated with a frame. The fields which are related to one another have the same frame color.
Example:

FlexScanPro
- 61/139 -
Data transfer:
With program name data transfer you can open the correspondent window:
Master data and export data filename:
The master data and export data can be named here.
Since FlexScanPro Version 3.2.8.*, the filenames has to
be set without file extensions. FlexScanPro is adding the file extensions automatically during a file transfer.
● The master data file gets the extension
.csv.
● The export file gets the extension
.csv or .xls. See chapter Operation
Connection Connection Options.
F2 Save:
By pressing the button or the F2 key the actual settings
will be saved.
Export Data variables: Underneath the input field are a drop down menu and a button. Variables can be selected via the drop down menu an inserted at the position of the curser by pressing the + Button:
Example: When sending the collection data the send date gets inserted in
Erfassung1Export[DD-MM-YYYY]. For example the 02/10/2016: The file is exported as
Erfassung1Export10-02-2016.csv.

FlexScanPro
- 62/139 -
3.11. Field Settings
Through the window program name fields field you can call up the window field settings:
Field:
The field will be activated by checking the box. On the right of it you can fill in the field name.
Type:
The field type can be selected here, for example text,
number, quantity etc. By selecting a field type the
according options get displayed.
F2 Save:
By pressing the button or the F2 key the settings get
saved.

FlexScanPro
- 63/139 -
3.11.1. Recommendations for the use of field types
The recommendations for the field types can be seen below:
Objects Recommended field types
Article number Material number EAN User Vendor
Text
Kilogramm Weight Liter Quantity Unit Price
Quantity Number
Article description
Display field
The following combination of field types and Objects should be avoided:
Objects Field types to be avoided Explanation
Article number Material number EAN
Quantity Number
The purpose of field type quantity and number are for numerical entries and therefore they are formatting inputs. Leading zeros are removed (e.g.).
FlexScanPro
- 64/139 -
The different field types are described below:
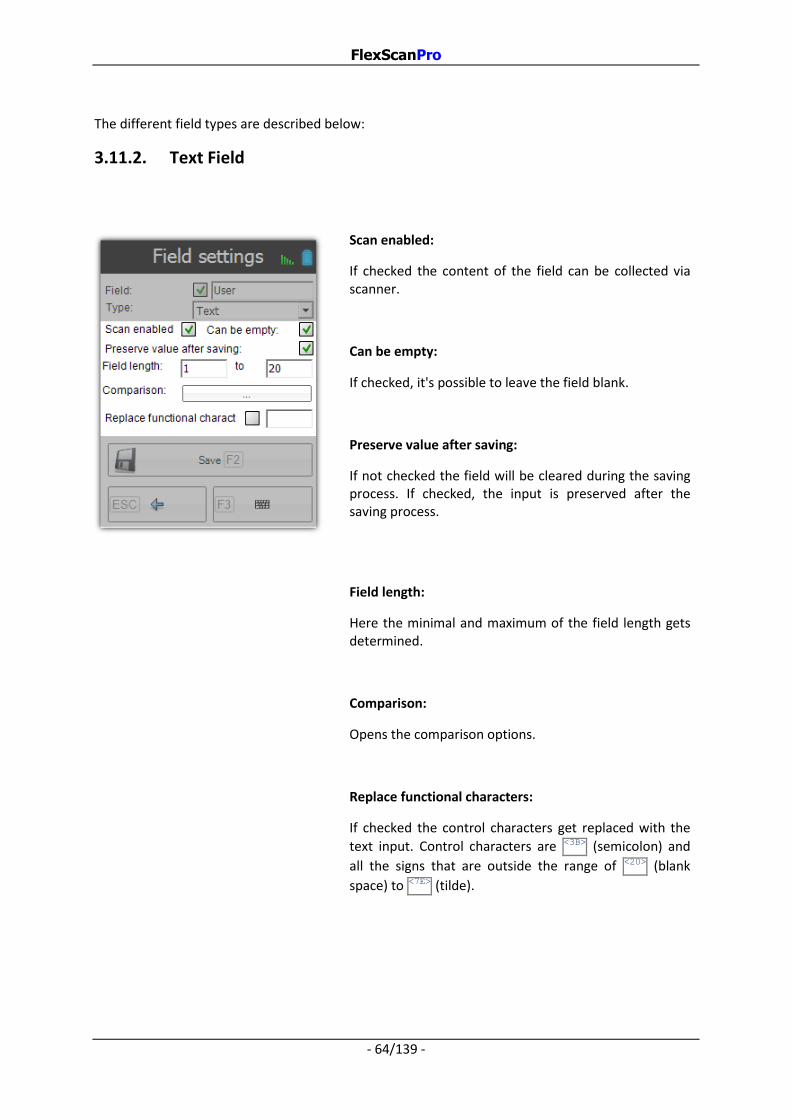
3.11.2. Text Field
Scan enabled:
If checked the content of the field can be collected via scanner.
Can be empty:
If checked, it's possible to leave the field blank.
Preserve value after saving:
If not checked the field will be cleared during the saving process. If checked, the input is preserved after the saving process.
Field length:
Here the minimal and maximum of the field length gets determined.
Comparison:
Opens the comparison options.
Replace functional characters:
If checked the control characters get replaced with the
text input. Control characters are <3B> (semicolon) and
all the signs that are outside the range of <20> (blank
space) to <7E> (tilde).

FlexScanPro
- 65/139 -
Option:
Effect during the collection:
The scan engine can be used during the datacollection.
The scan engine is deactivated and can't be used during the data collection.

FlexScanPro
- 66/139 -
The field can be left empty. The next field gets selected.
The field has to be filled, otherwise its input will be denied.

FlexScanPro
- 67/139 -
The value in the field article is maintained after the
saving process.
The field article is cleared after the saving process.

FlexScanPro
- 68/139 -
If too little or too many signs are entered, the input will be denied with a corresponding message, for example
Article is too short.

FlexScanPro
- 69/139 -
Comparison options text field:
Through the button Comparison you can call up the
window of the same name:
In the upper area of window Comparison is the field
name displayed. The window has the following menu items: ● Cut ● Input ● Database ● Fields - Search ● Fields - Offset ● Fields - Mask
Activated comparisons get displayed with black writing and a white background.
Example:
Deactivated comparisons appear in blue writing, gray background and with the field name in round brackets.
Example:

FlexScanPro
- 70/139 -
Comparison “Cut”:
Through
Comparison Cut you can call the
following window:
In the upper area of the window is the field name displayed.
Active:
If checked, the function is activated.
A start string is searched in the input field. If the start string is found, the input of the field is shortened. The field now contains the part of the text that comes after the start string, and from that, it contains the specified length of characters.
Start string:
The start string specifies a string that is searched in the input field.
Length:
Specifies the number of characters that are to be retained.

FlexScanPro
- 71/139 -
Option:
Effect during the collection:
When scanning or entering with confirmation, the cut function is executed:
● Input 12[CODE]123456789012 contains the start
string [CODE]. The first 10 characters after the
start string are retained. All other characters are discarded. Therefore, the new input value is
1234567890. Afterwards the system switches to
the next field.
● Input 12[CODE]123 contains the start string
[CODE]. The first 10 characters after the
start string should be retained, but there are less than 10 characters. These are retained. All other characters are discarded. Therefore, the new
input value is 123. Afterwards the system
switches to the next field.
● Input 12[code]123456789012 does not contain
the start string [CODE]. The system switches to
the next field without changing the input.

FlexScanPro
- 72/139 -
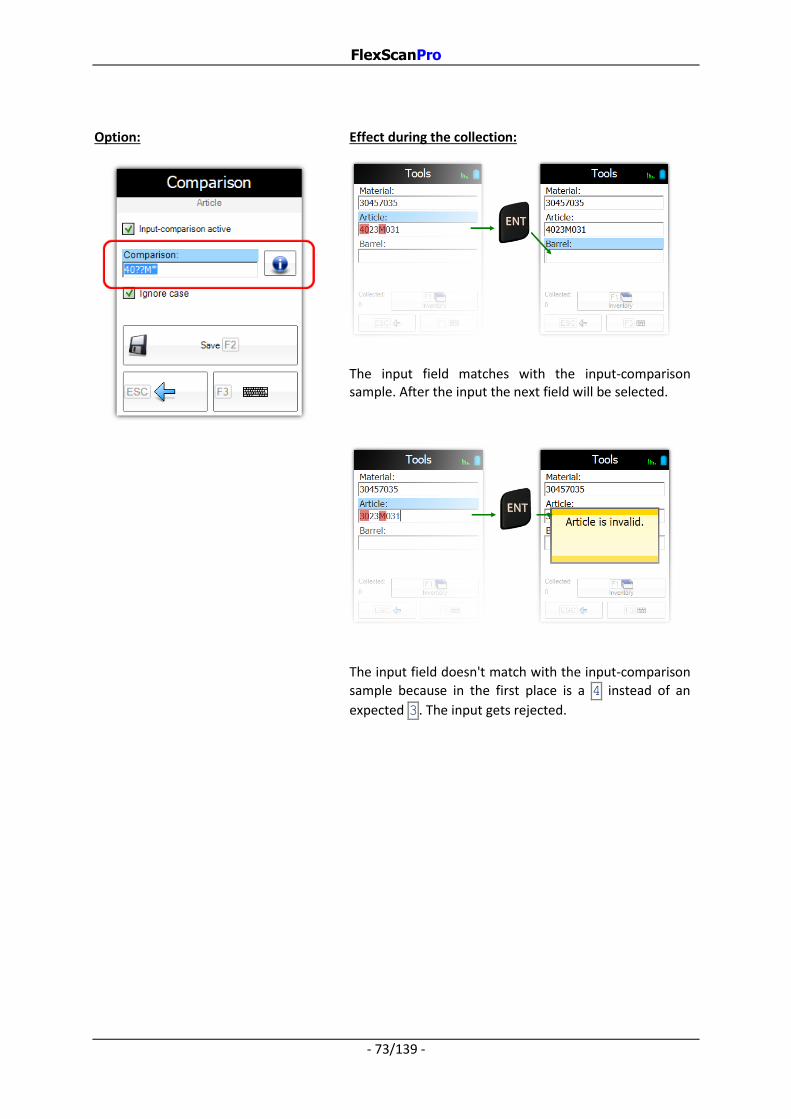
Comparison “Input”:
Through
Comparison Input you can call the
following window:
Input-comparison active:
If checked, the comparison is activated.
Comparison:
The value of the collection field is compared with the
value of field comparison:
● If the comparison differs, then the input gets rejected.
● ? : A question mark in the comparison field is a
wildcard for one character.
● * : An asterisk in the comparison field is a
wildcard for 0, 1 or more of any character.
Ignore case:
If checked the comparison is not case sensitive.
FlexScanPro
- 73/139 -
Option:
Effect during the collection:
The input field matches with the input-comparison sample. After the input the next field will be selected.
The input field doesn't match with the input-comparison
sample because in the first place is a 4 instead of an
expected 3 . The input gets rejected.

FlexScanPro
- 74/139 -
Comparison “database”:
Through
Comparison database you can call
the following window:
Master data-comparison active:
If checked, the comparison is activated.
Relation field:
If no relation field is selected, then the search field is searched for in all records of the master data. If a relation field is selected, the contend of the relation field is first searched for in the master data. If a match is found, the contend of the search field will be searched for in the corresponding row.
The search result of the relation field contains:
● the first match record option
Return first match
● all match records option
Return all matches
Search field:
Through this button the search field settings will be opened.

FlexScanPro
- 75/139 -
The search field has the following options:
Column(s) comparison:
With Column(s) comparison you determine what you
want to compare.
Here you specify one or several master data-columns in which the collection input should be searched. A blank input deactivates the comparison.
The columns can be specified as follows:
● A single column, for example: 1 .
● With a comma , you specify several columns,
for example: 1,2,3,4 .
● With a minus or hyphen – you specify a
from-to-range, for example: 1-4 .
Ignore case:
De-/activates the case sensitivity of the comparison function.

FlexScanPro
- 76/139 -
Columns of mask:
Here you determine how you compare.
You determine either that the exact value will be compared or only a subarea.
In mask, Offset in input and Offset in master data you
determine the columns in the master data, which
contains the actual values for mask, Offset in input and
Offset in master data.
Caution: You need to input the columns of the master data.
Columns of mask - mask:
Select the column in the master data which contains the mask values.
With a blank mask value the exact value will be compared. With a filled mask value only a subset will be
compared. With character 1 in the mask value, the
corresponding characters of the comparison values will
be compared and with character 0 the characters will
not be compared. If the parts to be compared are too short, this result is negative.
Columns of mask – Offset in input / master data:
Select the columns in the master data which contains the offset values.
The offset values determines, on which position of the collection input and on which position of the corresponding comparison column of the master data the comparison begins.

FlexScanPro
- 77/139 -
Options:
Effect during the collection:
The input of article A101 is found in the first record:
Mask: 1111
Input value: A101 with offset 0 = A101
4. column value: A101 with offset 0 = A101
Comparison result: Positive

FlexScanPro
- 78/139 -
The input of article A201 is found in the first record:
Mask: 1111
Input value: A201 with offset 0 = A201
5. column value: A201 with offset 0 = A201
Comparison result: Positive
The input of article A301 is not found. The corresponding value is missed in column 4 and 5.

FlexScanPro
- 79/139 -
The input of article A102 is found in the 2. record:
Mask: 1111
Input value: A102 with offset 0 = A102
4. column value: xA102 with offset 1 = xA102
Comparison result: Positive
The input of article A103 is not found in the 3. record:
Mask: 1111
Input value: A103 with offset 1 = A103∕
4. column value: A103 with offset 0 = A103
Comparison result: Negative

FlexScanPro
- 80/139 -
The input of article yA103 is found in the 3. record:
Mask: 1111
Input value: yA103 with offset 1 = yA103
4. column value: A103 with offset 0 = A103
Comparison result: Positive
The input of article A104 is not found in the 4. record:
Mask: 1111
Input value: A104 with offset 1 = A104∕
4. column value: xA104x with offset 1 = xA104x
Comparison result: Negative

FlexScanPro
- 81/139 -
The input of article yA104 is found in the 4. record:
Mask: 1111
Input value: yA104 with offset 1 = yA104
4. column value: xA104x with offset 1 = xA104x
Comparison result: Positive
The input of article yA105 is not found in the 5. record:
Mask: 011110
Input value: yA105 with offset 0 = yA105∕
4. column value: xA105x with offset 0 = xA105x
Comparison result: Negative

FlexScanPro
- 82/139 -
The input of article yA105y is found in the 5. record:
Mask: 011110
Input value: yA105y with offset 0 = yA105y
4. column value: xA105x with offset 0 = xA105x
Comparison result: Positive
The comparison values are shorter than the mask value. For this reason, no matter what input is made, the 6. record can not be found:
Mask: 11111
Input value: … with offset 0 = …
4. column value: A106 with offset 0 = A106∕
Comparison result: Negative

FlexScanPro
- 83/139 -
The inputs of article A101 and supplier S101 are found in the same record. The comparison result
is positive.
In the settings, the relation field article was selected for the field supplier . When you enter supplier
S101, the input of article A101 in the master data is first searched. In the found record, the input of
supplier S101 is then searched for and found, too.
The inputs of article A101 and supplier S102 are not in the same record. (A101 is in the first and
S102 is in the second record.) The comparison result is negative.
In the settings, the relation field article was selected for the field supplier . When you enter supplier
S102, the input of article A101 in the master data is first searched and forund in the first record. In
this, the input of supplier S101 is then searched for, but not found.

FlexScanPro
- 84/139 -
Option Return first match:
The comparison result for the inputs of article A101 and supplier S107 is negative:
After article A101 is found in the first record, the search is skipped for all the other records. The
comparison result is negative, because supplier S107 is not within the first record.

FlexScanPro
- 85/139 -
Option Return all matches:
The comparison result for the inputs of article A101 and supplier S107 is positive:
After article A101 is found in the first record, the search still continue for all the other records.
A101 is found in the first and seventh record. Supplier S107 is now searched in these records and
found in the seventh record. Therefore, the comparison result is positive.

FlexScanPro
- 86/139 -
Comparison “fields - search”:
Through
Comparison Fields - search you
can call the following window:
Compare with:
If checked, the comparison is activated.
During the collection, the input of the actual field is
searched for in the input of the chosen Compare with
field.
Switch compare:
If checked, the input of the chosen Compare with field is
searched for in the input of the actual field.
Ignore case:
De-/activates the case sensitivity of the comparison function.

FlexScanPro
- 87/139 -
Options:
Effect during the collection:
In the input value 123456789 of Field 1 the input value
456 of Field 2 is searched and found. The input is
therefore accepted.
In the input value 456 of Field 1 the input value
123456789 of Field 2 is searched but not found. The
input is therefore denied.

FlexScanPro
- 88/139 -
The input value 456 of Field 1 is searched and found in
the input value 123456789 of Field 2. The input is
therefore accepted.
The input value 123456789 of Field 1 is searched but
not found in the input value 456 of Field 2. The input is
therefore denied.

FlexScanPro
- 89/139 -
Comparison “fields - offset”:
Through
Comparison Fields - offset you can
call the following window:
Compare with:
If checked, the comparison is activated.
The input of the actual field is compared within the input
of the chosen Compare with field. The beginning of the
comparison is set by the offsets.
The comparison result is positive, if the input of the actual
field and the input of the chosen Compare with field are
the same starting at the their particular offsets.
Switch compare:
If checked, the input of the chosen Compare with field is
searched in the input of the actual field.
Ignore case:
De-/activates the case sensitivity of the comparison function.
Offset input:
Determines the starting position of the comparison for in the input of the actual field.
Offset comparison:
Determines the starting position of the comparison for the
chosen Compare with field.

FlexScanPro
- 90/139 -
Options:
Effect during the collection:
The input is accepted:
Input: Offset: Comparison:
Field 1: xx123yyyy 2 xx123yyyy
Field 2: yyyyy123 5 yyyyy123
Result: Positive
The input is denied:
Input: Offset: Comparison:
Field 1: yyyyy123 2 yyyyy123
Field 2: xx123yyyy 5 xx123yyyy
Result: Negative

FlexScanPro
- 91/139 -
The input is denied:
Input: Offset: Comparison:
Field 1: xx123yy 2 xx123yy
Field 2: yyyyy123 5 yyyyy123∕∕
Result: Negative
The input is accepted:
Input: Offset: Comparison:
Field 1: xx123 2 xx123
Field 2: yyyyy123x 5 yyyyy123x
Result: Positive

FlexScanPro
- 92/139 -
Comparison “fields - mask”:
Through
Comparison Fields - mask you can
call the following window:
Field-comparison active:
If checked, the comparison is activated.
Compare with and mask:
During the collection the input is compared with the contend of the compare with field.
A sign gets compared, if the related sign of the field-comparison mask is 1 . If the related sign is 0, this position
will not be compared.
A description can be displayed via the info symbol.

FlexScanPro
- 93/139 -
Option:
Effect during the collection:
The input field matches with the defined mask here. After the input the next field will be selected.
The input field doesn't match with the defined mask here, because the seventh position of field material differs from the input field. The input gets rejected.

FlexScanPro
- 94/139 -
Option:
Effect during the collection:
If there are control characters in the barcode, they will be maintained.
If there are control characters in the barcode, they will be removed.
If checked, the control characters get replaced with the
chosen text. Control characters are <3B> (semicolon) and
all the signs that are outside the range of <20> (blank
space) to <7E> (tilde).
If there are control characters they get replaced with the
text [GS] .

FlexScanPro
- 95/139 -
3.11.3. Number Field
Scan enabled:
If checked the content of the field can be collected via scanner.
Can be empty:
If checked, it's possible to leave the field blank.
Preserve value after saving:
If not checked the field will be cleared during the saving process. If checked, the input is preserved after the saving process. Field length: The minimal and maximum field length will be defined here. Value range: The smallest and biggest value gets defined. Decimal places: Decimal places get defined.

FlexScanPro
- 96/139 -
3.11.4. Quantity Field
The field type quantity is a number field that is
especially for the input of quantities.
Scan relation:
If ---- is selected, the scan relation function is
deactivated.
If the scan relation is set to a field (e.g. article),
then the scanned barcode will be compared to
the scan relation field (e.g. article).

FlexScanPro
- 97/139 -
Option:
Effects during the collection:
The field quantity is not linked with another field (no scan relation!).
If a barcode is scanned in the field quantity, it has to be has to be confirmed by pressing Enter

FlexScanPro
- 98/139 -
The fields article and quantity are related to each other via the scan relation function.
If a barcode is scanned in the field quantity it will be compared with the input taken in the article field.

FlexScanPro
- 99/139 -
If the input matches the field quantity increases by 1:
If there is a difference between the two inputs the input gets rejected:

FlexScanPro
- 100/139 -
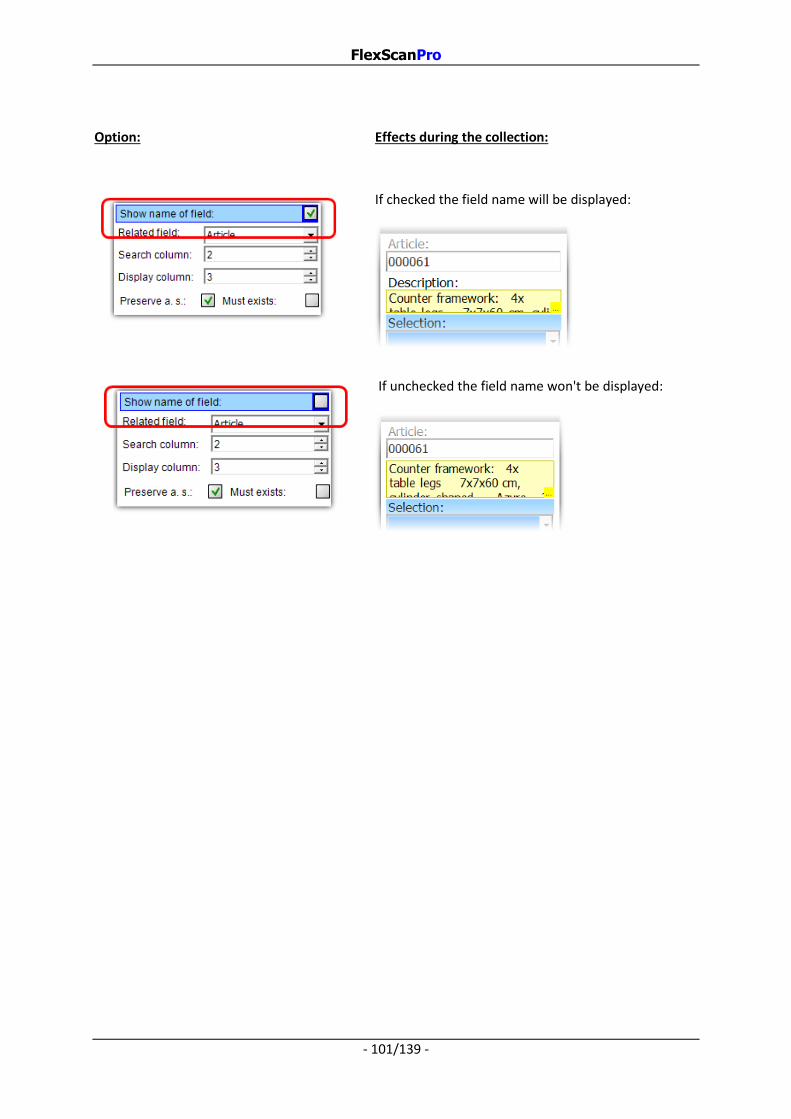
3.11.5. Display field
Show name of field:
If activated the field name gets displayed (e.g.
description). If unchecked the field name is not
displayed and the display field gets accordingly bigger.
Related field:
The field for which the master data should be
displayed is selected here (e.g. article).
Search column:
The column of the master data is selected here, in which the value from the related field gets searched for.
Display column:
The column of the master data is selected here, for the display text to be shown .
Preserve after saving:
If not checked the field will be cleared during the saving process. If checked, the input is preserved after the saving process.
Must exist:
If checked the input data must exist in the master data.
FlexScanPro
- 101/139 -
Option:
Effects during the collection:
If checked the field name will be displayed:
If unchecked the field name won't be displayed:

FlexScanPro
- 102/139 -
The article description is linked with the article. If an article gets entered and confirmed then the article description gets updated automatically.
With entering and confirming an article the article number gets searched in column 2 in the master data. If the input is found the column 3 gets displayed. If nothing is found an empty column gets displayed.

FlexScanPro
- 103/139 -
Example:
In the following the process of a collection is described with an example to illustrate the function of
the field type display master data:
1.) During the collection of the field article it gets checked if the field is linked with another
field. Because it is linked with description which type is display master data a search
process is triggered in the master data.
2.) The selected search column is column 2 an the article number 000061 is found in the
record (...)000061;Counter framework(...) .
3.) The display column is column 3., so out of the record
(...)000061;Counter framework(...) the display text
table frame(...) will be displayed. The description field contains the display text
table frame (...) .
If an article gets collected that doesn’t exist in the master data then the field description
will be empty.
For the structure of the master data, see chapter database.

FlexScanPro
- 104/139 -
If not checked the field will be cleared during the saving process. If checked, the input is preserved after the saving process.
If checked, the input must exist in the master data. Otherwise the input will be rejected.
If unchecked, the data will be accepted even if it doesn't exist in the master data.

FlexScanPro
- 105/139 -
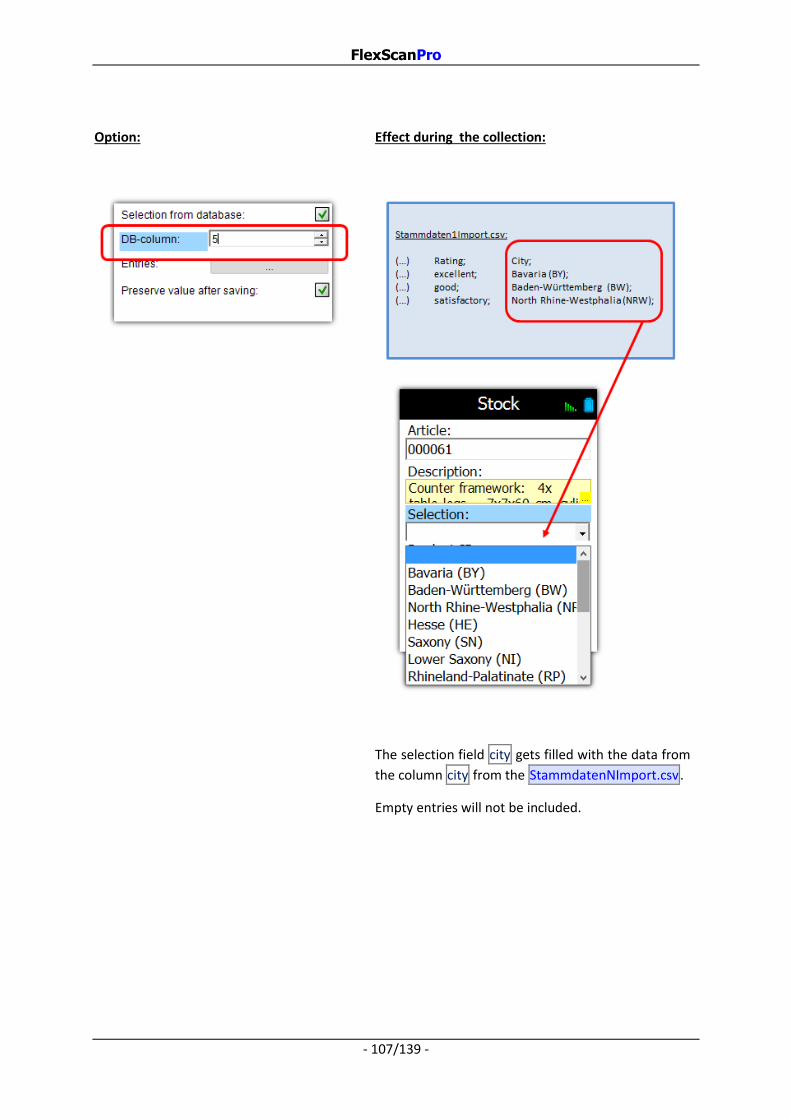
3.11.6. Selection Field
Selection from database:
If checked the option DB-column gets activated and
the entries for the selection gets loaded from the
master data record. If unchecked the option entries
gets activated and user defined entries gets loaded.
DB-column:
The column in the master data is selected from which the entries are loaded.
Entries:
With this button a window shows up in which you can create and edit user defined entries.
Preserve value after saving:
If not checked the field will be cleared during the saving process. If checked, the input is preserved after the saving process.

FlexScanPro
- 106/139 -
With the button entries the window for editing and creating user defined entries is shown:
Input field:
An Entry can be added by filling the text field an confirming the entry.
List:
All entries are shown in this list.
Buttons:
Saves the list
Adds the input to the list
Deletes a selected entry
Rejects the last changes
Opens the input assistant
FlexScanPro
- 107/139 -
Option:
Effect during the collection:
The selection field city gets filled with the data from
the column city from the StammdatenNImport.csv.
Empty entries will not be included.

FlexScanPro
- 108/139 -
The selection field city gets filled with the data from
the user defined entries.

FlexScanPro
- 109/139 -
3.11.7. Field array
Scan enabled: If checked the content of the field can be collected via scanner.
Allow empty: If checked, it's possible to leave the field blank.
Preserve value after saving:
If not checked the field will be cleared during the saving process. If checked, the input is preserved after the saving process. Split BC: The input is getting separated by the predefined
separator. 003_1_A212 is going to be separated into
3 columns with the values 003 , 1 and A212 for the
export data. Add separator: If the tick is put the separator gets added to the data to
be exported. 003_1_A212 is going to be 3 export
columns with the values 003_ , 1_ and A212 for
example. Add BC : Creates one or more additional columns in the export data with the scanned barcode/collected data. Separator: The separator is defined here. Max. count: Determines the maximum number of fields to be separated.

FlexScanPro
- 110/139 -
Option:
Effects during the collection:
Split BC activated:
Split BC deactivated:
Add separator activated:
The separator _ gets added.
Add separator deactivated:
The separator _ gets removed.

FlexScanPro
- 111/139 -
Add barcode no:
Add barcode 1x begin, 1x end:
Selection Added Columns
No None
1x begin The input gets added as the first column.
2x begin The input gets added as the first and the second column.
1x begin, 1x end The input gets added as the first and the last column.
1x end The input gets added as the last column.
2x end The input gets added as the second last and last column.

FlexScanPro
- 112/139 -
Separator = _:
Separator = .:
Max. count = 5 :
Max. count = 3 :

FlexScanPro
- 113/139 -
3.12. Language
With language windows is open via the settings menu:
Current language:
The current language can be selected.
Reset language file:
Herewith, the language file is reset to the factory defaults.
F2 Save:
By pressing the button or the F2 key the settings will be
saved.

FlexScanPro
- 114/139 -
3.13. Printer
3.13.1. Label printing during the collection process
If a label printer is 1configured, a print button is shown in the bottom area of a collection process. Otherwise the print button will not be shown:
A click on the print button will print the value of the selected field as Code 128:
1) The setup of the label printer is described in this chapter.

FlexScanPro
- 115/139 -
3.13.2. General Printer Settings
main menu other settings printer will get you to the printer settings:
Interface, printer language, connection:
For interface you can choose between Bluetooth and
Ethernet (Ethernet = Wi-Fi and LAN connections). The
selected printer type can be set up through connection.
For printer language you can chose between ZPL and
TCPL.
Label: Opens the label settings. F2 Save:
By pressing the button or the F2 key the settings get
saved.

FlexScanPro
- 116/139 -
3.13.3. Set up the connection to the Bluetooth Printer
You can set up the Bluetooth connection if you go via
main menu other settings printer interface = Bluetooth and
main menu other settings printer connection:
COM-Port of the Bluetooth printer:
Select the COM-Port of the Bluetooth label printer. If no printer exists you can also select
output as file for testing purposes. The file application
data path\PrinterEmu.txt will be generated.
Print test:
Prints a label with a Code128 barcode (contend: Print
test).
View file:
Opens the window to display the file of output as file.
The button is activated if for COM-Port output as file is
selected. Otherwise the button is deactivated. F2 Save:
By pressing the button or the F2 key the settings get
saved.

FlexScanPro
- 117/139 -
With view file you open the correspondent window:
Display: The contend of the file output will be shown here. Unprintable characters will be displayed like this:
<0xtwo-digits hexadecimal value> . The value range is
between <0x00> and <0xFF> .
Delete:
By pressing the button the file gets deleted.
3.13.4. Set up the connection to the Ethernet printer
You can set up the Ethernet connection via
main menu other settings printer interface = Ethernet and
main menu other settings printer connection:
IP and Port of the Ethernet printer:
Enter the TCP/IP address and port of the printer. Print test:
Via F1 you can print a label with the (contend: Print
test).
F2 Save, F3 Keyboard:
The settings will be saved by pressing the F2 key.
Pressing F3 will bring up the input assistant.

FlexScanPro
- 118/139 -
3.13.5. Set up the label
With main menu settings printer label you set up the label:
Printer-DPI:
The printhead resolution must be defined here. 1Label and page margin:
The label values must be put in here (mm). Details can be found below F2 Save, F3 keyboard:
The settings will be saved by pressing the F2 key.
Pressing F3 will bring up the input assistant.
1) Label and page margin: ● Type: The following label types are available:
Gap (transmissive): Black mark (reflective): Endless:
● Width, height, gap/space and page margin:

FlexScanPro
- 119/139 -
3.14. Passwords
From the settings you can call up the window passwords:
Main menu:
1De-/activates the password request for:
● Main menu send
● Main menu view
● Main menu delete
● Main menu other
Settings:
1De-/activates the password request for:
● Main menu other settings
Quit:
1De-/activates the password request for:
● Main menu quit
1)Passwords in common:
For every field New the following applies:
If the field is filled, then the password request is activated. Otherwise the password request is deactivated. The activated and deactivated password request is graphically
accentuated with or .
If the field Repeat exists, the password must be filled in a
second time for confirmation.
F2 Save, F3 keyboard:
The settings will be saved by pressing the F2 key.
Pressing F3 will bring up the input assistant.

FlexScanPro
- 120/139 -
3.15. Connection
From the settings you can call up the window connection:
Transfer protocol:
The transfer protocol must be selected here.
Protocol settings:
With this button the settings of the selected protocol will be shown.
Options:
With this button you can select more connection settings.
F2 Save:
By pressing the button or the F2 key the settings get
saved.

FlexScanPro
- 121/139 -
3.15.1. FTP
From the window connection you can call up the setting window for the FTP protocol:
FTP is a common data transmission protocol.
FTP Host, user name, password:
For FTP Host, username and password you have to type in the corresponding FTP data.
In FTP Host you type in the IP-address or the IP-address
with port. By default port 21 is used.
● Example 1: 127.0.0.1
● Example 2: 127.0.0.1:21
Directory:
If the field is empty the data will be uploaded and downloaded to/from the root directory of the FTP server. If a path is specified the data will be uploaded to and downloaded from the corresponding directory.
Mode:
It determines if the device is in an active or passive role during the establishing of the FTP connection.
F2 Save:
By pressing the button or the F2 key the settings get
saved.

FlexScanPro
- 122/139 -
3.15.2. BaseCOM
From the window connection you can call up the setting window for the BaseCOM protocol:
1BaseCOM is a simple connectionless protocol for the serial data transmission. Furthermore BaseCOM can only be used for the sending data.
Each record gets transmitted as record + <CARRIAGE RETURN> + <LINEFEED>.
The port settings are fixed:
Parameter name Value
baud rate 115200
data bits 8
parity N
stop bits 1
COM Port:
Select the serial port.
Save F2:
By pressing the button or the F2 key the settings get
saved.
1) IMPORTANT: ● Before the data transmission you have to disable ActiveSync. Otherwise the data
transmission fails. See chapter ActiveSync.
● This protocol is only capable of transmitting files in CSV format.

FlexScanPro
- 123/139 -
3.15.3. Tan
From the window connection you can call up the setting window for the Tan protocol:
1Tan is a professional connection orientated protocol for the serial data transmission.
COM Port:
Select the serial port.
Since FlexScanPro version 3.1.5, the default value for
COM port is COM6. On most devices, this is the USB
interface. The dropdown item is displayed as COM6:
(Serial on USB) on the Skorpio X3 device. On other type of
devices, the text may differ, but the meaning stays the same.
Timesync:
If checked the time of the device is adjusted to the time of the PC.
Save F2:
By pressing the button or the F2 key the settings get
saved.
1)IMPORTANT: ● A record can't be greater than 240 signs. That applies for the master data and the export data. ● Before the data transmission you have to disable ActiveSync/WMDC. Otherwise the data
transmission fails. See chapter ActiveSync.
● This protocol is only capable of transmitting files in CSV format.

FlexScanPro
- 124/139 -
3.15.4. TanIP
From the window connection you can call up the setting window for the TanIP protocol:
TanIP is a protocol for the data transmission over a network socket.
IP, Port:
Enter the TCP/IP address and port (Default: 51000) for the data transmission.
Timeout, connection:
The field specifies how long the device should try to connect to the PC (in milliseconds). The recommended
values are between 1000 and 10000 milliseconds.
Timeout, transfer:
The field specifies how long the device will wait for an answer from the PC if there is an existing connection (in milliseconds). The recommended values are between
3000 and 20000 milliseconds.
Root folder, receive:
The field specifies the receive root folder of the remote device. An empty input is valid.
Root folder, send:
The field specifies the send root folder of the remote device. An empty input is valid.
F2 Save:
By pressing the button or the F2 key the settings get
saved.

FlexScanPro
- 125/139 -
3.15.5. Local
From the window connection you can call up the setting window for the local protocol:
The local protocol is no protocol in common sense. The
export file is saved in a directory (and the master data is imported from this directory).
Directory:
Select the directory in which the import and export data gets stored.
As soon as the input gets confirmed a note if the selected patch/folder exists (green = exist / red= doesn't exist).
F2 Save:
With F2 save the settings get accepted. The saving
process is refused if the directory doesn't exist.
Important: Before doing the data transmission from or to a SD-card you have to check that ActiveSync is
activated. For this, see chapter ActiveSync. In addition you have to change the following settings:
● MDE check Connect to the desktop computer as a USB Mass Storage device under
My Device Control Panel PC Connection
The MDE must not be connected to the PC during the import or export of data. Only after the import or export the MDE can be connected to the PC because ActiveSync blocks the access to the SD-card.

FlexScanPro
- 126/139 -
3.15.6. Connection Options
From the window connection you can open the following window:
Import-, has header row:
If checked, the import or export files got field names as the first row.
Export as excel file:
If checked, the export file will be send as *.xls and
otherwise as *.csv file.
Add „entry date“:
If checked the entry date is added before each record of
the export data.
Delete transferred data:
If checked the collected data is deleted automatically after a successful data transmission. Otherwise a dialog shows up asking if the collected data should be deleted Automatic transfer:
Every time after saving a record the condition
automatic transfer gets checked. If the condition has
been fulfilled or rather if the number of collected records is reached the collected records will be sent.
F2 Save:
By pressing the button or the F2 key the settings get
saved.

FlexScanPro
- 127/139 -
3.16. Info
From the main menu you can open the window info:
In the window info you will get information about the
contact person and software:
1background image with company logo
1address
1telephone number
Name of program, MDE serial number,
version of program
1) The data of the contact person can get customized. In
the application data folder the files CompanyConfig.ini
and CompanyConfig.png can be modified accordingly .

FlexScanPro
- 128/139 -
4. Configuration files
4.1. Overview FlexScanPro has the following configuration files:
Filepath Applies to Editable in app
application data path\CompanyConfig.ini
application data path\CompanyConfig.png
contact person (logo and contact details)
No
application data path\DmcSelector.xml
application data path\Dmc\Auflösung1
…
application data path\Dmc\AuflösungN
screen display No
application data path\FlexScanPro.ini program settings Yes
application data path\KeyMap.ini function keys No
application data path\StatusSimulation.ini simulation on PC No
application data path\Data\language.csv available languages No
4.2. CompanyConfig.ini /-.png In the application data path\ are the files CompanyConfig.ini and CompanyConfig.png. These
contain the logo and contact.
4.3. DmcSelector.xml In the application data path\ is a DmcSelector.xml file. This file sets the screen resolution for the
application. Example of the content:
DmcSelector.xml
<?xml version="1.0" encoding="UTF-8"?>
<Document>
<!— <SelectedResolution value="240x320" /> -->
<FitToScreen value="1"/>
<Resolutions path="..\Dmc\"/>
</Document>

FlexScanPro
- 129/139 -
Parameter:
Name Description
SelectedResolution value Templates in different sizes do exist for displaying the application. If the parameter is set, the selected template will be used. Otherwise a template will be automatically selected which fits best to the actual display resolution.
The parameter has the format widthxheight (in pixels). If the
parameter is set, then there must be a corresponding directory in
Resolutions path.
FitToScreen value If the parameter is set to 1 , the application, which is based on the
template of SelectedResolution, will be automatically fit to the
screen resolution. Otherwise the application will be displayed unchanged according to the selected template.
Resolutions path This parameter sets the path which contains the templates. The
placeholder ..\ is either labeling the application data path, if it is
placed at the beginning, or otherwise labeling the parent directory.
4.4. FlexScanPro.ini
In the application data path\ is a FlexScanPro.ini file. It contains the program settings of
FlexScanPro.
FlexScanPro.ini contains the following settings (e.g.):
● Programs and their fields ● Import-, export files ● Data transmission ● Passwords ● Selected language
On startup, the software checks if the file FlexScanPro.ini exists in its application path. If it doesn't, it
will be created with default values. Afterwards the software is loaded.
If the default settings of the software should be restored the file FlexScanPro.ini has to be deleted
and the software has to be started again.

FlexScanPro
- 130/139 -
4.5. KeyMap.ini
With the start of the application in application data path\ a KeyMap.ini will be generated.
In this file the function keys are defined.
With changing the values of key and text you can reassign a function key:
Content of KeyMap.ini Consequences in the program
KeyMap]
(…)
KeyMap.back.key = 27
KeyMap.back.text = ESC
(…)
The program is closed with ESC:
KeyMap]
(…)
KeyMap.back.key = 116
KeyMap.back.text = F5
(…)
Now the program is closed with F5:
4.6. StatusSimulation.ini
The PC version of the FlexScanPro creates a StatusSimulation.ini file after the start which is located
in the application data path\.
Usually the PC version doesn’t support the Wi-Fi and battery display so they are hidden. With this ini-file the display can be changed.
4.7. Language.csv The Language.csv contains the languages of FlexScanPro and is described in
chapter Database Language file.

FlexScanPro
- 131/139 -
5. Database
5.1. General Information
The directory application data path\data forms the database.
The following files are created by the application if necessary:
Name Description 1,4,6Stammdaten1Import.csv ... 1,4,6Stammdaten8Import.csv
Master data for 1. /.../8. collection program
1,5Stammdaten1.csv ... 1,5Stammdaten8.csv
Master data internal
1,5InternErfassung1.csv ... 1,5InternErfassung8.csv
Collection internal
2,6Erfassung1Export.csv ... 2,6Erfassung8Export.csv
Export data of the respective collection
Fotos1\ … Fotos8\
Directories with pictures for the 1. /.../8. Collection program
Fotos8\ Signature.20160905-181944-01.Row.Original.bmp Fotos8\ Signature.20160905-181944-01.Row.Thumb.jpg 1,4,5Language.csv Language file
*.sav Backup files
Fotos1.sav\ … FotosN.sav\
Backup files of the pictures
1) The data gets saved in the 3CSV format.
2) The data gets saved in the 3CSV format or excel format.
3) The CSV format has the following composition (CSV = character separated values):
● The records get separated by a new line or rather by <CR><LF> .
● The record fields get separated by a semicolon ; .
4) Signs which are smaller than <0x20> ( = space) or bigger than <0x7F> are represented through
&000000 to &999999 .

FlexScanPro
- 132/139 -
5) The first line consists of field labels. 6) Depending on the setting in the FlexScanPro either the first line is the first record or the first line consists of field labels.
5.2. Pictures
Pictures are saved in the folders Fotos1 to Fotos8.
Example:
Fotos1\Signature.20160905-181944-01.Row.Original.bmp
Fotos1\Signature.20160905-181944-01.Row.Thumb.jpg
The file name of a picture is made of 5 columns with . as separator:
Columns Value
Origin Signature or Camera
Picture-ID Composed of date-time-counter.
Location Row or Temp.
Resolution Original or Thumb
Picture-type Bmp or Jpg
Pictures with resolution = Thumb has the following resolution:
● 320x240 with origin = Signature
● 240x320 with origin = Camera

FlexScanPro
- 133/139 -
Actions by generating pictures: If the user is capturing an image (a signature as example) then the following things happens:
● A new picture-ID will be calculated. For example 20160905-181944-01.
The picture-ID is composed of a timestamp (date and time) and a counter.
The counter increments with every new picture-ID and has a value range from 00 to 99.
It starts with 01. After 99 follows a reset with 00.
● The picture will be saved temporary:
Signature.20160905-181944-01.Temp.Original.Bmp
● Additional to the original, a preview picture resolution =Thumb will be generated as Jpg:
Signature.20160905-181944-01.Temp.Thumb.Jpg
● As soon as the user confirms to save the picture, the picture-ID will be saved in the collection
record field SignatureID:
20160905-181944-01
Thereby the original and preview picture is linked to the actual collection record. The original
and preview picture will be renamed from …Temp… to …Row… simultaneously:
Signature.20160905-181944-01.Row.Original.Bmp
Signature.20160905-181944-01.Row.Thumb.Jpg

FlexScanPro
- 134/139 -
5.3. InternErfassungN.csv
The records of the InternErfassung1.csv/.../ InternErfassung8.csv consist of the following fields,
since version 3.2.1 .*:
Name Type
Version Constant. Value is always 3.
Entry date Date and time
Field11 Text
Field12 Text
Field13 Text
Field14 Text
Field21 Text
Field22 Text
Field23 Text
Field24 Text
Field31 Text
Field32 Text
Field33 Text
Field34 Text
FotoID ID. If the value is empty, then there is no picture recorded.
SignatureID ID. If the value is empty, then there is no signature recorded.
Signature Text
Example content:
Version;Entry date;Field11;Field12;Field13;Field14;Field21;Field22;Field23;Field24;Field31;
Field32;Field33;Field34;FotoID;SignatureID;Signature
2;22.09.2014 16:03:43;Christian;;;;A1-01-01;42143628;12;;;;;;;;
2;22.09.2014 16:04:00;Christian;;;;A1-01-02;42256717;4;;;;;;20160905-181944-01;;
2;22.09.2014 16:04:05;Christian;;;;A1-01-02;P14D01550;3;;;;;;;;
2;22.09.2014 16:04:32;Christian;;;;B2-06-09;20554712;8;;;;;;;;
2;22.09.2014 16:06:55;Jenniffer;;;;A1-02-02;DI150638;11;;;;;;;;

FlexScanPro
- 135/139 -
5.4. ErfassungNExport.csv
The records of the Erfassung1Export.csv/.../ Erfassung8Export.csv consist of the following fields:
Name Type 1entry date Date and time 2Name of Field11 Text 2Name of Field12 Text 2Name of Field13 Text 2Name of Field14 Text 2Name of Field21 Text 2Name of Field22 Text 2Name of Field23 Text 2Name of Field24 Text 2Name of Field31 Text 2Name of Field32 Text 2Name of Field33 Text 2Name of Field34 Text 3FotoID ID 4SignatureID ID 4Signature Text
1) The field only gets transmitted if the option under
main menu other settings connection options is activated.
2) The field only gets transmitted if the option under
main menu other settings programs program1/.../ program8 fields is activated.
3) The field only gets transmitted if the option is set under
main menu other settings programs program1/.../ program8 common
activate camera function is set.
4) The field only gets transmitted if the option is set under
main menu other settings programs program1/.../ program8 common
signature is set.
Example content:
Entry date;user;storage location;article;quantity
22.09.2014 16:03:43;Christian;A1-01-01;42143628;12
22.09.2014 16:04:00;Christian;A1-01-02;42256717;4
22.09.2014 16:04:05;Christian;A1-01-02;P14D01550;3
22.09.2014 16:04:32;Christian;B2-06-09;20554712;8
22.09.2014 16:06:55;Jenniffer;A1-02-02;DI150638;11
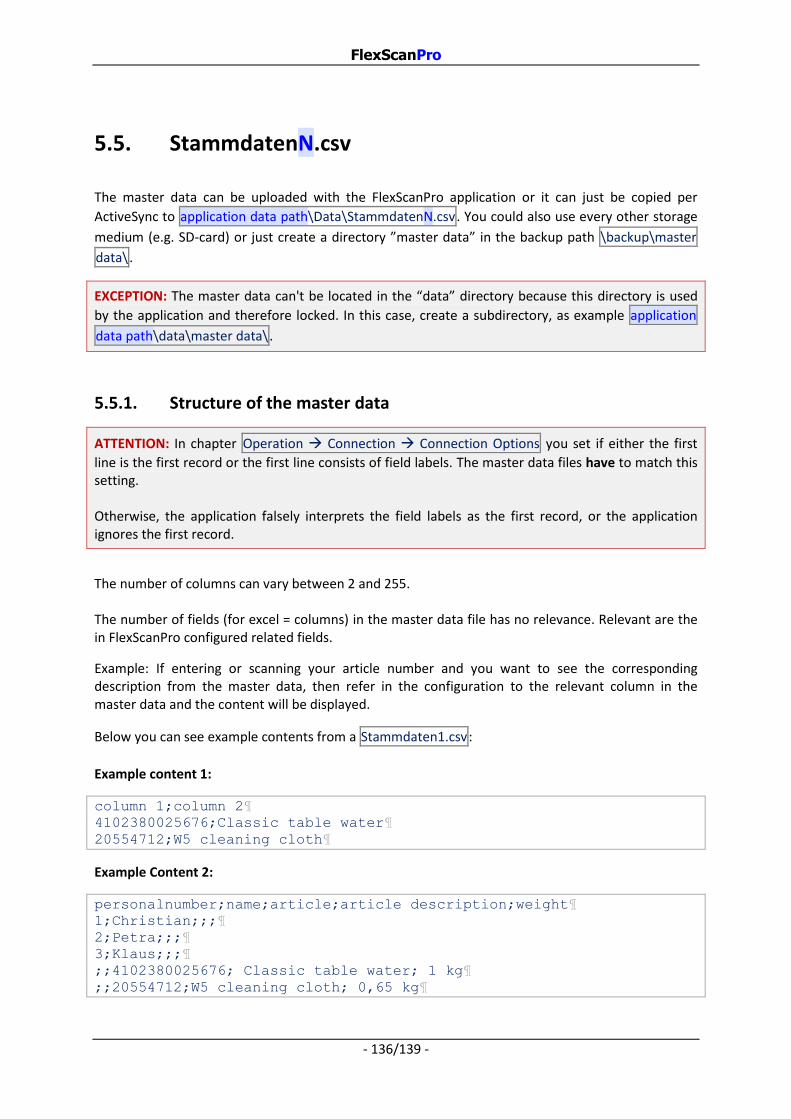
FlexScanPro
- 136/139 -
5.5. StammdatenN.csv
The master data can be uploaded with the FlexScanPro application or it can just be copied per
ActiveSync to application data path\Data\StammdatenN.csv. You could also use every other storage
medium (e.g. SD-card) or just create a directory ”master data” in the backup path \backup\master
data\.
EXCEPTION: The master data can't be located in the “data” directory because this directory is used
by the application and therefore locked. In this case, create a subdirectory, as example application
data path\data\master data\.
5.5.1. Structure of the master data
ATTENTION: In chapter Operation Connection Connection Options you set if either the first
line is the first record or the first line consists of field labels. The master data files have to match this setting. Otherwise, the application falsely interprets the field labels as the first record, or the application ignores the first record.
The number of columns can vary between 2 and 255. The number of fields (for excel = columns) in the master data file has no relevance. Relevant are the in FlexScanPro configured related fields.
Example: If entering or scanning your article number and you want to see the corresponding description from the master data, then refer in the configuration to the relevant column in the master data and the content will be displayed.
Below you can see example contents from a Stammdaten1.csv:
Example content 1:
column 1;column 2
4102380025676;Classic table water
20554712;W5 cleaning cloth
Example Content 2:
personalnumber;name;article;article description;weight
1;Christian;;;
2;Petra;;;
3;Klaus;;;
;;4102380025676; Classic table water; 1 kg
;;20554712;W5 cleaning cloth; 0,65 kg

FlexScanPro
- 137/139 -
5.6. Language file
The records of the language.csv are consisting of the following fields:
Name Type
Sprache Abbreviation of language. DE for German, EN for English.
Modul Modul and ID declare the object, where the text should be.
ID Modul and ID declare the object, where the text should be.
Text The object will have allocated this text here.
Example content:
Sprache;Modul;ID;Text
EN;Allgemein;PasswordDisabled;disabled
DE;Allgemein;PasswordDisabled;deaktiviert
EN;Datentransfer;Title;Data transfer
DE;Datentransfer;Title;Datentransfer
EN;Datentransfer;ButtonBack;Back
DE;Datentransfer;ButtonBack;Zur&000252ck
CAUTION: When the application is starting, it checks if all records of the language file are unique, respectively if
the particular record with the combination of Sprache, Modul and ID does exists only once. If this is
not the case, then there is an error in the language file. The application is going to crash. This crash is intended.

FlexScanPro
- 138/139 -
6. Third-party components
FlexScanPro is using a third-party component which must be mentioned:
Component
Name:
ExcelLibrary.dll
Version 1.0.0.0
Function: Creates *.xls files
License: GNU Lesser General Public License
http://www.gnu.org/licenses/lgpl.html
Owner: flexlabs
Author: Artiom Chilaru
Websites: https://www.nuget.org/packages/ExcelLibrary/
http://code.google.com/p/excellibrary/

FlexScanPro
- 139/139 -
FlexScanPro is using the ExcelLibrary.dll to create *.xls files. The following code is in C# and
describes the function calls of ExcelLibrary.dll during the creation of an export file:
● Start: string filepath = app. data path\data\Erfassung1Export.csv;
Workbook workbook = new Workbook();
Worksheet worksheet = new Worksheet("Export");
//Workaround open issue:
// With Office 2010 there must be at least 100 or more cells
// having values.
for (int i = 0; i < 100; i++)
{
worksheet.Cells[i, 0] = new Cell(string.Empty);
}
● Loop for every record with every field: //from 0 to (header +) records -1: int rowIndex = …
//from 0 to fields -1:
int columnIndex = …
With text field: string stringValue = … Cell cell = new Cell(stringValue);
worksheet.Cells[rowIndex, columnIndex] = cell;
With number field (without formatting): decimal decimalValue = … Cell cell = new Cell(decimalValue);
worksheet.Cells[rowIndex, columnIndex] = cell;
With number field (with formatting): int digits = … string format = "0." + new string('0', digits);
decimal decimalValue = … Cell cell = new Cell(decimalValue, format);
worksheet.Cells[rowIndex, columnIndex] = cell;
With timestamp: DateTime datetimeValue = … Cell cell = new Cell
(
datetimeValue, @"DD.MM.YYYY hh:mm:ss"
);
worksheet.Cells[rowIndex, columnIndex] = cell;
● End: workbook.Worksheets.Add(worksheet);
workbook.Save(filepath);