Resource 2015 Flexgen Payroll Common Issues and New Features.
Upload
sarah-cainCategory
view
223download
2
Flexgen Processing
Payroll

Class Purpose
Payroll Current Pay Scroll
Leave Taken Scroll
Payroll Reports
Check Printing
Direct Deposits
Voiding Checks or Direct Deposits
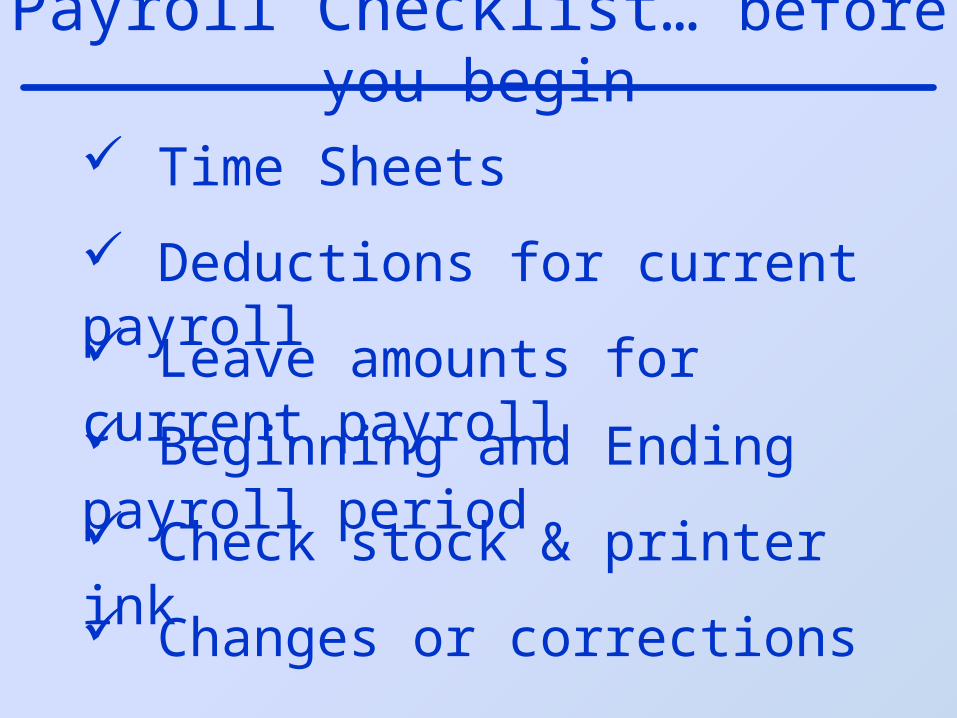
Payroll Checklist… before you begin
Time Sheets
Deductions for current payroll
Leave amounts for current payroll
Beginning and Ending payroll period
Check stock & printer ink
Changes or corrections

Process PayrollFrom the main menu, choose the payroll option
Within the payroll menu, choose “Current Pay”
NOTE: Options on the Current Pay menu help assist generate paychecks. Such as entering hours worked, leave taken, printing checks and generating banking information.

Current Pay MenuPayroll Preparation
- Check Notes or reminders
- Automatically update specified pay adjustments
- Interface with ADP time tracking systems
- Scroll employees and enter hours worked or salary adjustments
- Scroll employees and record leave taken
- Print reports to verify accuracy of information entered
Payroll Run-Select an entire payroll group or just certain individuals to print pay checks and reports
Ach Process-Generate banking ACH files for direct deposits
Ach Process-Generate file for Online Paystub

Beginning the Payroll Process
The payroll process very often begins by viewing the notes report.
Hint: Expanding the date range helps ensure you don’t miss notes aimed at the current pay run.
Current Pay-Note Report
Notice the notes that list employee and pay date that need attention before processing

Current Pay – Auto UpdateAdjustment Pay Auto Update provides a way to apply an adjustment to a large number of employees in one step
Follow the steps to tag the desired payrolls, locations and
adjustments you want to apply; enter the number of hours/days or
a flat dollar amount
Think of the Adjustment Hours/Day field as a multiplication factor to be multiplied against the adjustment line pay rate.
Only the employees that have the selected adjustment type attached to their record will have the amount applied toward their current pay.
After auto updating, you may manually correct employees that were omitted or included by mistake during the scroll payroll process
=
=
=
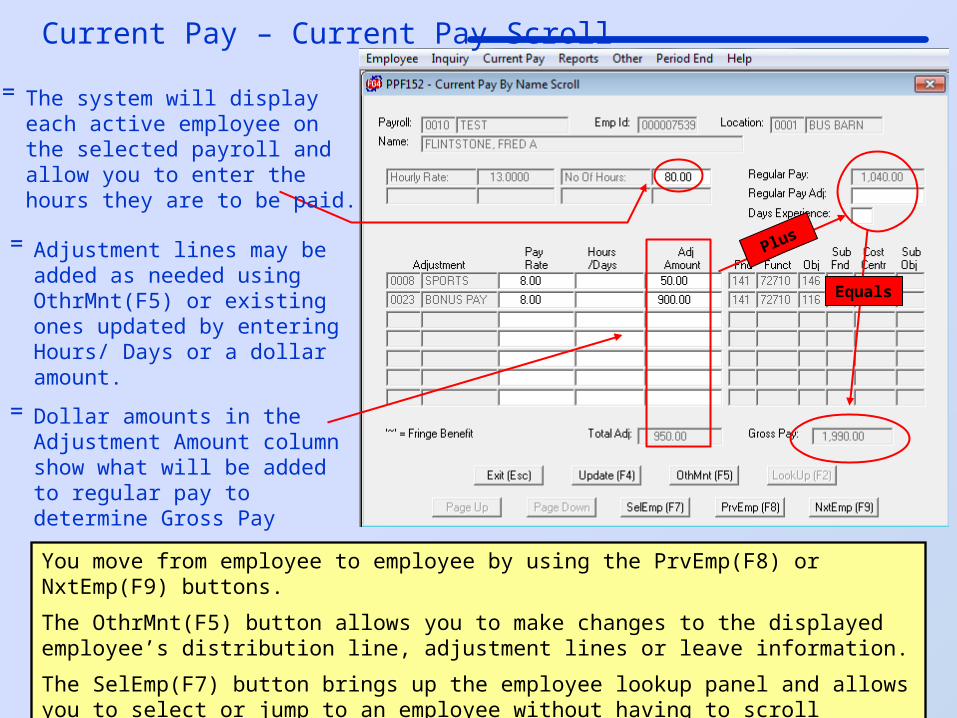
Current Pay – Current Pay Scroll
You move from employee to employee by using the PrvEmp(F8) or NxtEmp(F9) buttons.
The OthrMnt(F5) button allows you to make changes to the displayed employee’s distribution line, adjustment lines or leave information.
The SelEmp(F7) button brings up the employee lookup panel and allows you to select or jump to an employee without having to scroll through all other employees.
Plus
Equals
The system will display each active employee on the selected payroll and allow you to enter the hours they are to be paid.
Adjustment lines may be added as needed using OthrMnt(F5) or existing ones updated by entering Hours/ Days or a dollar amount.
Dollar amounts in the Adjustment Amount column show what will be added to regular pay to determine Gross Pay
=
=
=

Current Pay – Leave Taken Scroll
To record leave taken select the desired payroll, beginning employee, and location
code if you want to scroll by location.
=
=
=
Enter the number of hours or days (positive figures not negative) in the Amount Taken column beside the appropriate leave type that the employee took off.
The Leave(F5) button allows you to enter leave maintenance mode, enter teacher leave information, or enter leave taken dates as needed.
Move from employee to employee using PrvEmp(F8), NxtEmp(F9), or SelEmp(F7) as needed.

Current Pay – Control Totals Report
The Payroll Control Totals report will give you totals by pay type, leave taken by leave type and number of checks or direct deposit to be issued.
Regular Pay will include Hourly and Salary pay amounts
Tip: Pay close attention to Adjustment Pay – If there should not have been bonus pay for the pay period, then investigation would be warranted.
=

If there are questionable totals on the Control Total report, the Individual Combined report will list every employee and the separate data that makes up the totals on the Control Total report.
Current Pay – Individual Combined Report

Current Pay – Payroll Run
Payroll Run has 2 options: “Select by Payroll” or “Select by Employee”
The status of each step will be displayed as it is being processed.
The system will update all payroll history and general ledger records once all steps have been completed.
Step 1 prompts you for the current pay data for the payroll in question.
ALWAYS make sure that the current step finishes properly before moving to the next Step

Current Pay – Select By Payroll - Activate
Zero Salaries will zero out any regular pay or salary amounts thus only paying adjustment items. (most commonly used for career ladder, special bonuses, or retroactive pay increases) If you do zero salaries you will be prompted to enter an FIT & SIT percentage. Leaving it blank instructs the system to take the normal FIT & SIT calculations.
Even though the next check number is displayed on this screen, ignore it for now, you will get a chance to verify and change It later during the check printing process.
Beginning and Ending Pay Period dates are merely informational. Date on Checks is absolutely critical. The check date drives all other reporting mechanisms, TCRS, 941, Employment Security, general ledger entries, etc.
If there is an occasion when you want direct deposit employees to actually receive a check, indicate YES in the appropriate field.
If rather than paying everyone on the given payroll there is a specific group you would like to pay, you may do so.
Memos may be printed on the check & direct deposit stub using this field

Current Pay – Select By Payroll
After entering the data on the first screen you will be prompted to tag the deductions that should be taken. They may be tagged individually or all at one time by using the SelAll(F9) button.
Once tagged the deductions will only be taken on employees who have the deductions added to their master record.
After deductions are tagged you will be given a chance to increment any leave type that may need to be given to employees.
This option ADDS additional leave time (based on their rate) to all employees that have this leave type on their master record.
It has no effect on the process of deducting from accumulated leave for time taken off.

Current Pay – Select By Payroll
=
=
=
After tagging deductions and leave, you are returned to this screen again to allow you to repeat the process for any additional payrolls.
Many organizations will activate multiple payrolls at one time. This allows you run the payroll process once but include numerous groups or payrolls.
If you do not wish to activate additional payrolls simply press the exit key and you will be returned to run the calculation process.
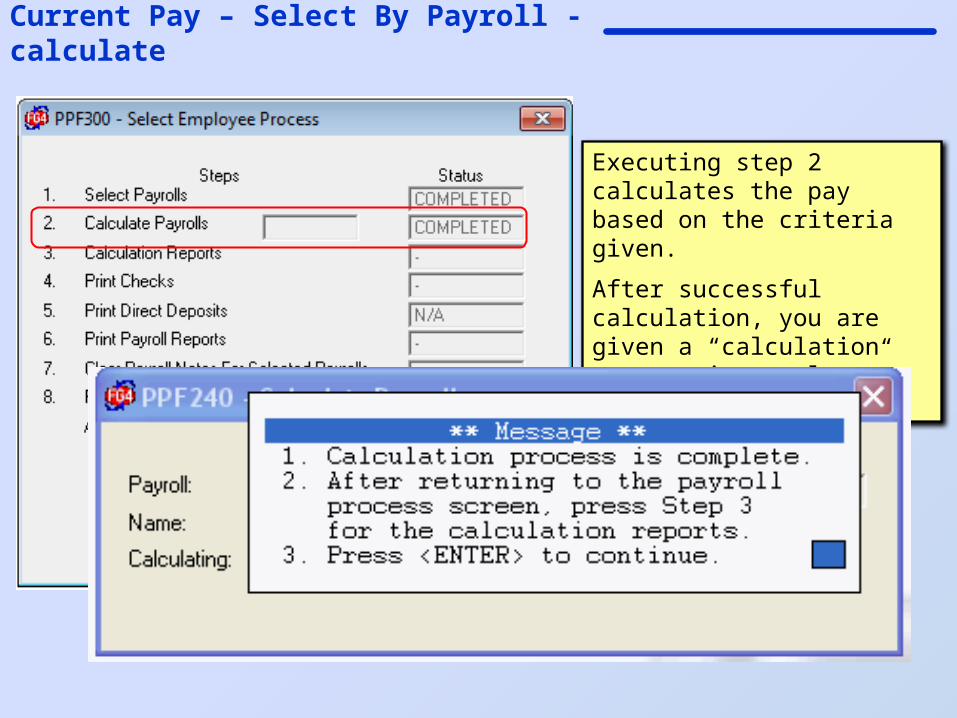
Current Pay – Select By Payroll - calculate
Executing step 2 calculates the pay based on the criteria given.
After successful calculation, you are given a “calculation process is complete” message.

Once corrections have been made, you must re-run the calculation step until you get the “process is complete” message before proceeding to repeat the Edit and Error Report option for corrected reports.
Current Pay – Select By Payroll - calculate
If there are problems, you will get an error message. Even though step 2 shows incomplete, you must continue on and run step 3 to view or print the Edit and Error Reports to determine what needs to be corrected.
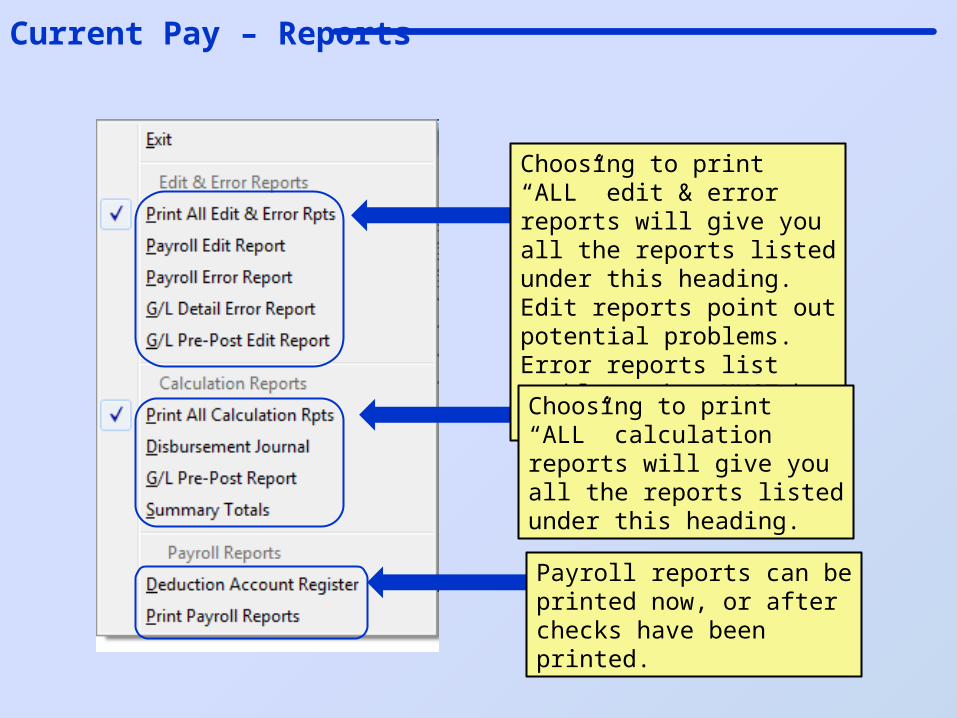
Current Pay – Reports
Choosing to print “ALL” edit & error reports will give you all the reports listed under this heading. Edit reports point out potential problems. Error reports list problems that MUST be corrected.
Choosing to print “ALL” calculation reports will give you all the reports listed under this heading.
Payroll reports can be printed now, or after checks have been printed.

Current Pay – Calculation Reports
Notice the Edit Messages – these messages alert you to potential problems. Payroll can be completed with Edit Messages.
Notice the Error Messages – these errors MUST be corrected before you continue with this payroll. Once corrected the “Calculate Payrolls” step must be executed again.
Current Pay – Reports
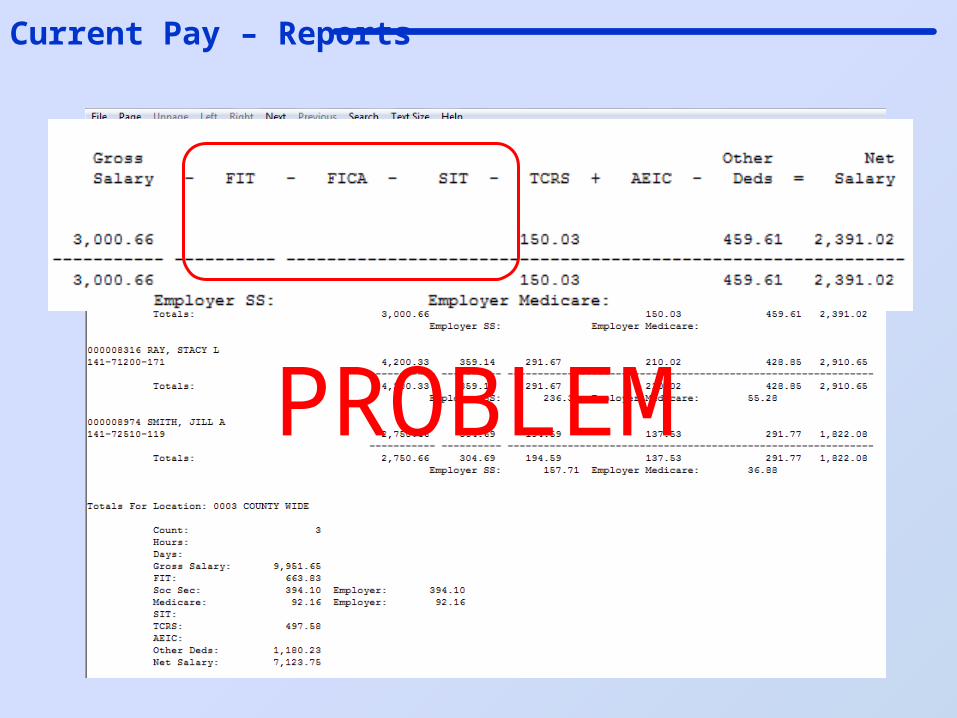
PROBLEM

Current Pay – Reports
G/L Pre-Post Report
Notice this report shows each general ledger account that will be posted to once step 8 “Post Entries to G/L” is completed.
Current Pay – Reports
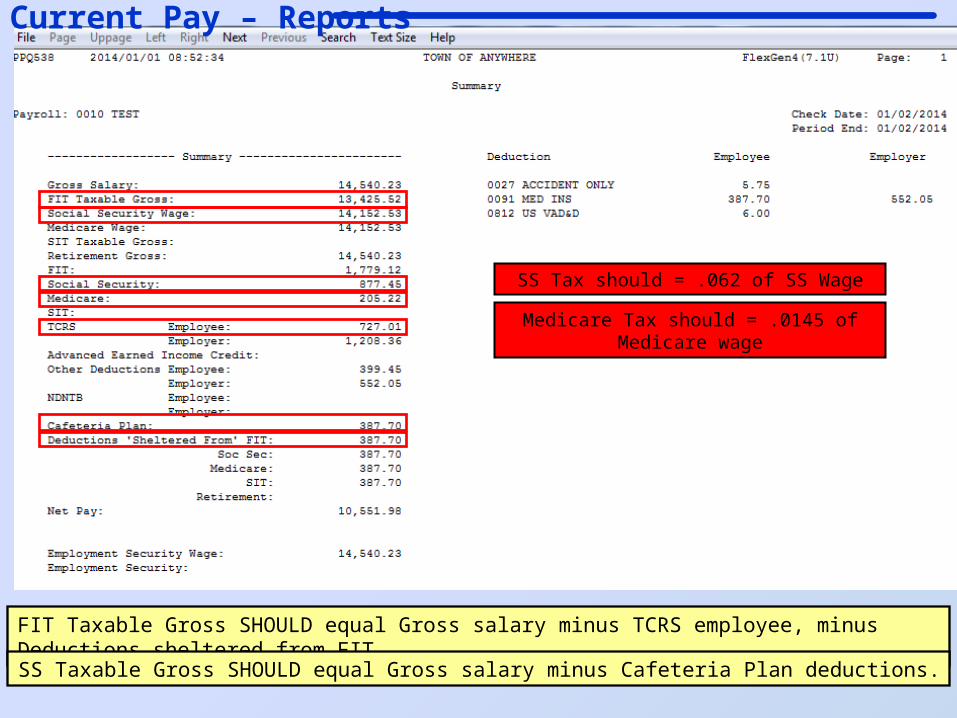
FIT Taxable Gross SHOULD equal Gross salary minus TCRS employee, minus Deductions sheltered from FIT.
SS Taxable Gross SHOULD equal Gross salary minus Cafeteria Plan deductions.
Medicare Tax should = .0145 of Medicare wage
SS Tax should = .062 of SS Wage

Current Pay – Select By Payroll – Print ChecksPrinting Checks
Selecting the option to print checks allows you to verify the correct check stock and check number .
When the system ask if all checks printed properly, it is suggested that you wait until ALL checks have completely printed before answering the question in case of a printer jam.
In the event that all checks are NOT OK, you may reprint all or some of the checks by selecting the appropriate option and the system will prompt you to enter a new beginning check number.
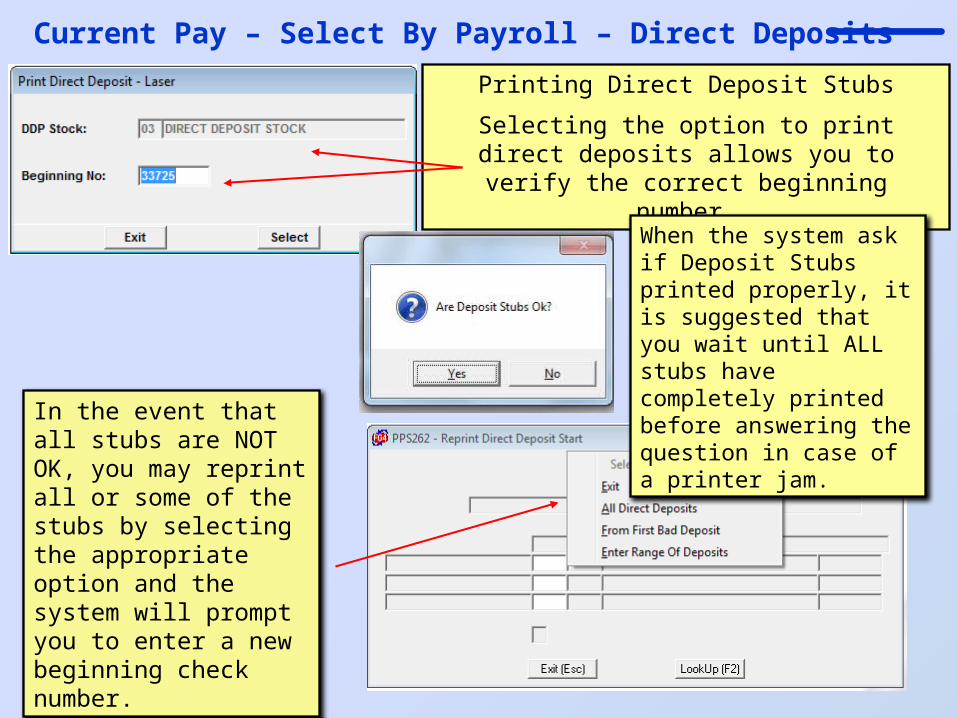
Current Pay – Select By Payroll – Direct DepositsPrinting Direct Deposit Stubs
Selecting the option to print direct deposits allows you to verify the correct beginning number.
When the system ask if Deposit Stubs printed properly, it is suggested that you wait until ALL stubs have completely printed before answering the question in case of a printer jam.
In the event that all stubs are NOT OK, you may reprint all or some of the stubs by selecting the appropriate option and the system will prompt you to enter a new beginning check number.

Current Pay – Select By Payroll - Reports
Print Payroll Reports
Selecting Run Reports will automatically print a wide range of payroll reports. These should be kept in a binder for audit and research purposes.
If for any reason you need to reprint any of the payroll reports, selecting Maintain Reports will allow you to “tag” any desired report using the PrtTag(F5) button.
Depending on the speed of your printer the Print Payroll Reports option may take a while.

Current Pay – Select By Payroll – Final Steps
Clear Payroll Notes
This option will permanently clear all notes associated with the payroll(s) being processed.
Post GL Entries
The final step could is the most critical option of all. It makes all final updates to the General Ledger and payroll history files.
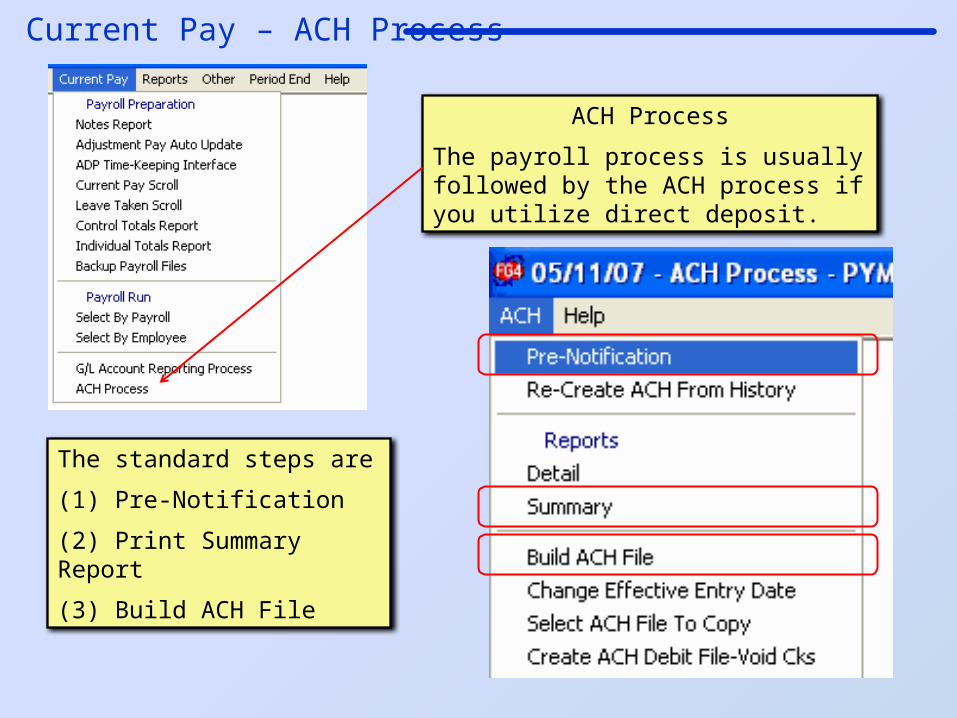
Current Pay – ACH Process
ACH Process
The payroll process is usually followed by the ACH process if you utilize direct deposit.
The standard steps are
(1) Pre-Notification
(2) Print Summary Report
(3) Build ACH File

Current Pay – ACH Process
Create ACH Debit File – Void Cks allows you to create an ACH file to send to the bank if a previous direct deposited check needs to be voided.
The Pre-Notification process sends pertinent data of new direct deposit enrollees through the banking system with zero dollars attached. A test run so to speak. You may create stand alone pre-notification files of new enrollees or include them with normal direct deposit transactions.
Re-Create ACH from History reads check history and creates a brand new ACH file based on check history.
Detailed or summarized reports are available. Most people find the summarized reports sufficient.
Build ACH File actually creates the file that is sent to the bank. It will place the file on a floppy diskette.
Change Effective Entry Date allows you to change the date the file is posted to the employee’s bank account regardless of the check date.
Select ACH File to Copy allows you to recreate files that have been previously generated but may have been lost or damaged in transit.

Current Pay – ACH Process - Summary
The ACH Data Summary report list the information that is contained in the file that is submitted to the bank. Information includes employee names, bank account numbers and deposit amounts.

Current Pay – Online Paystubs

Void Payroll Check or Direct Deposit
From the other menu, choose the Void Check Option
Use Page Up and Page Down options buttons to choose the employee check that needs to be voided.
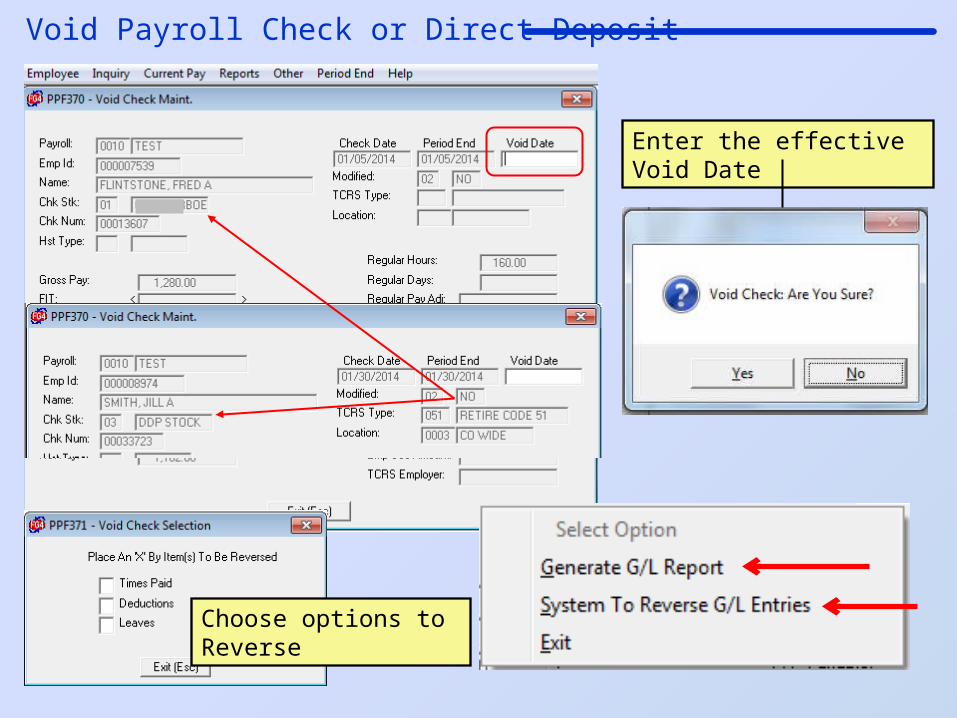
Void Payroll Check or Direct Deposit
Enter the effective Void Date
Choose options to Reverse

Current Pay – Follow-up Reports
Grand Total all payrolls issued within this date range
Total by Fund
There is a report not printed during the payroll process that is helpful in tabulating your 941 deposit for the payrolls just completed.
Under Reports, History, G/L, the Tax Deposit Recap displays 941 totals by fund for all payrolls processed within a given date range.

Reports
Since this is just an overview, we will only discuss the reports most predominantly used. Useful information is presented on all reports and you should investigate all of them to determine their potential application to your needs.
3 Types of Reports
=
=
=
Payroll report focus on Personnel information
History reports focus on actual paycheck data
Control reports focus on software configuration

Reports - Payroll
The Payroll group provides employee personnel information. Although there may be some incidental historical data, it primarily focuses on how the employees are currently configured – the deductions they are set up for, the adjustments added to their records, etc.
The Current Pay reports provide information on how employees are currently configured based on pay rate, leave rates, and adjustments
Reports - Payroll
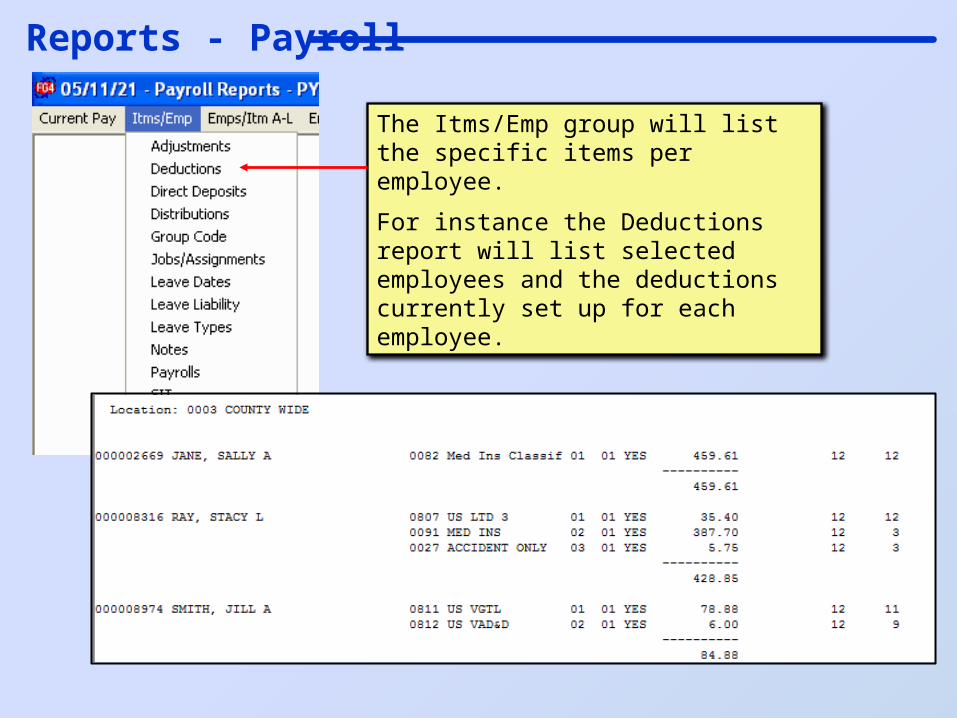
The Itms/Emp group will list the specific items per employee.
For instance the Deductions report will list selected employees and the deductions currently set up for each employee.

Reports - Payroll
The Emp/Itm A-L and M-Z groups will list all employees per item.
For instance the Deduction Code report will list selected deductions and all employees currently set up for that deduction.

Reports - Payroll
The Teacher group prints numerous reports dealing with the kind of information needed to track teacher certification and licensing info.
Reports - Payroll
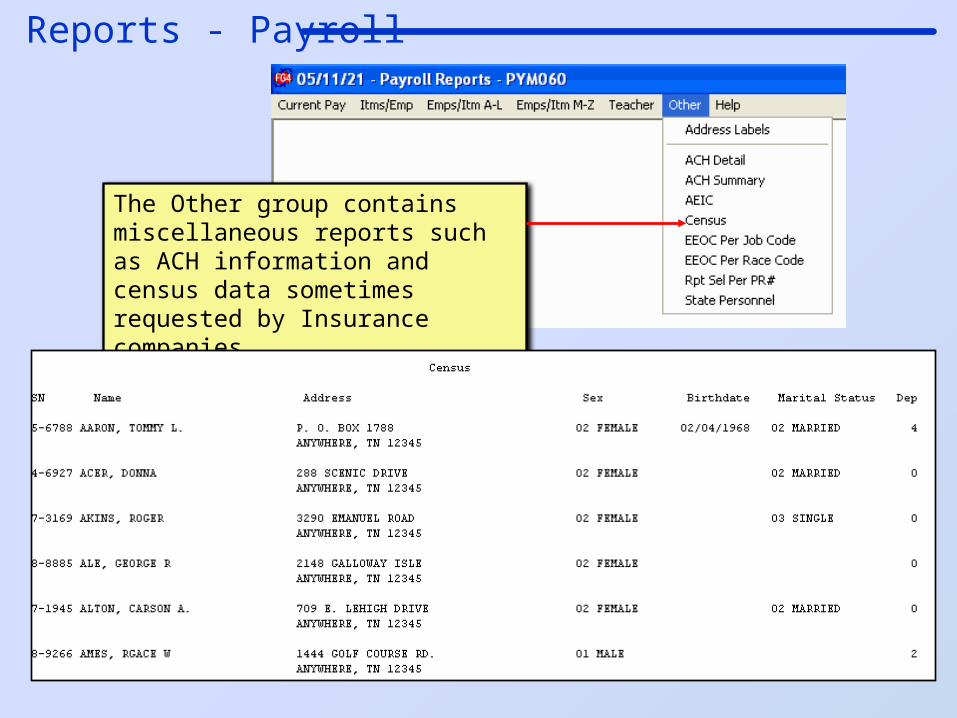
The Other group contains miscellaneous reports such as ACH information and census data sometimes requested by Insurance companies.

Reports - HistoryIn Reports – History you will find reports listing detailed information based on how employees were actually paid. For instance, an employee may have dropped a particular deduction and therefore not included in reports generated in Reports – Payroll. However since it was deducted on a past check it would appear in Reports – History.
Hint: A valuable reason for using numerous adjustment types is to be able to use the History – Adjustment Pay report to track who has been paid a specific adjustment type (say overtime) during a given date range.

Reports - History
The Summary Per employee will give you Month to Date, Quarter to Date, Calendar to Date, and Fiscal to Date paid totals up through a specified ending date for one or multiple employees.

Reports - History
The Earnings Per employee further breakdown the summary totals giving more detail again by month, quarter, calendar and fiscal year to date.

Reports - HistoryThe Summary report is an excellent diagnostic tool giving you totals across a wide range of data. For instance, if there is a problem with cafeteria plans it can easily be seen on this report. The cafeteria plan total should always equal the Soc Sec total. If they are different, the Deduction Flag Comparison report under the Other panel will help you determine who is configured incorrectly.
Should always be the same

Reports – OtherDed Flag Comparison – Checks to see if individual employee’s voluntary deduction tax exempt indicators (flags) are different from the control files. (This is the report mentioned earlier that helps diagnose cafeteria plan problems.)
941 Tax Return – Totals needed for the quarterly 941 report
Worker’s Comp Audit – Totals paid by worker comp codes. (Worker comp codes must be established and assigned to the employee’s job code prior to generating pay checks in order for the totals to be tracked.)
For the employees listed above, the “Sheltered From” indicators on the employee’s record is different from the control file for the corresponding deduction. This is a problem because the deductions are taxed according to the employee records, however the W2 reports the tax shelter info based on the control file setup.
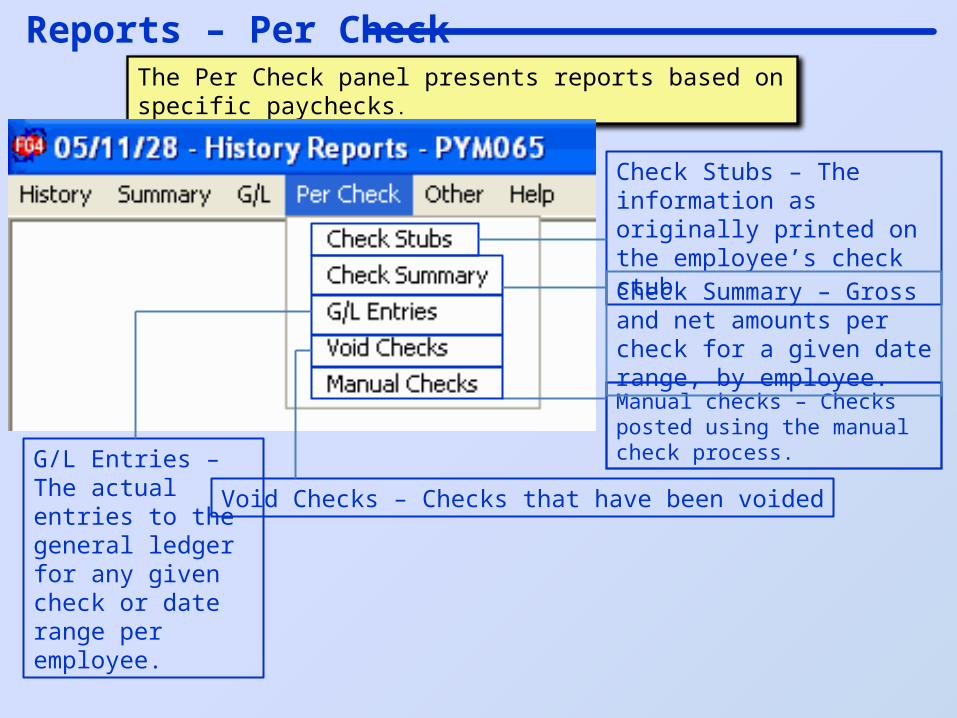
Reports – Per CheckThe Per Check panel presents reports based on specific paychecks.
Manual checks – Checks posted using the manual check process.
Check Stubs – The information as originally printed on the employee’s check stub.
Check Summary – Gross and net amounts per check for a given date range, by employee.
G/L Entries – The actual entries to the general ledger for any given check or date range per employee.
Void Checks – Checks that have been voided

Other – Manual ChecksThe Manual Check option provides a way to enter all the relevant information when manual pay checks are issued.
Additional information such as deductions, leave and adjustment pay is entered on additional screens using the appropriate buttons.
Special care should be taken when entering wages since gross pay, social security wages and FIT taxable can all be different amounts due to cafeteria plans and retirement options.

Any Questions?

This concludes our
Flexgen Gen Processing Payroll session.
Visit our website for full documentation and useful information for other applications on
our website…
www.localgovernmentcorporation.com