Financials Query 9.2 PT. 8 - LSU Health Sciences … · Financials Query 9.2 PT. 8.55 Introduction...
90
Financials Query 9.2 PT. 8.55 Version Date: January 30, 2018
Transcript of Financials Query 9.2 PT. 8 - LSU Health Sciences … · Financials Query 9.2 PT. 8.55 Introduction...

Financials
Query 9.2 PT. 8.55
Version Date: January 30, 2018
Training Guide
Query 9.2 PT. 8.55
Page ii
Table of Contents Financials Query 9.2 PT. 8.55 .......................................................................................... 1
Introduction to Query ................................................................................................................ 1 Navigate to Query Viewer ..................................................................................................................... 1
Exercise 1 .................................................................................................................................... 3 Run a Predefined Query to Query Viewer ............................................................................................. 3
Exercise 2 .................................................................................................................................. 11 Run a Predefined Query to Excel from Query Viewer......................................................................... 11
Exercise 3 .................................................................................................................................. 13 Create and Format a Query .................................................................................................................. 13
Exercise 4 .................................................................................................................................. 37 Create a Query using Criteria Components .......................................................................................... 37 Edit or Delete Criteria .......................................................................................................................... 45 Create a Runtime Prompt ..................................................................................................................... 49
Exercise 5 .................................................................................................................................. 55 Create a Query using Hierarchy Joins .................................................................................................. 55 Create a Query using Standard (Any) Joins ......................................................................................... 59 Create a Query using Related Record Joins ......................................................................................... 65
Exercise 6 .................................................................................................................................. 69 Schedule a Query ................................................................................................................................. 69
Appendix ................................................................................................................................... 73 Copy a Query to Another User............................................................................................................. 73 Rename a Query ................................................................................................................................... 77 Clear, Remove, and/or Delete a Query ................................................................................................ 79
Commonly Used Tables in Query ........................................................................................... 82

Training Guide
Query 9.2 PT. 8.55
Page 1
Financials Query 9.2 PT. 8.55
Introduction to Query
PeopleSoft Query is an end user reporting tool used to retrieve selected data from the
Financials database. PeopleSoft 9.2 pt. 8.55 provides query access in the web-based
application through the Reporting Tools menu.
NOTE: Query will be accessed using the Reports (PS9FSRPT) database.
Navigate to Query Viewer
Procedure
In this topic you will learn how to Navigate to Query Viewer.
Step Action
1. Double-click the PS Launcher button.

Training Guide
Query 9.2 PT. 8.55
Page 2
Step Action
2. If the PeopleSoft System is not Financials, click the drop-down button to the right of
the field and select it.
Click the button to the right of the Database field.
3. Click the PS 9.2 Financials Reports (PS9FSRPT) list item.
4. Click the Start button.
5. Anytime you enter a non-production database (RPT, SND, TRN, etc.), a warning
message displays reminding you any information entered into the database will be
lost.
Click the desired object.
6. Click the Main Menu button.
7. Click the Reporting Tools menu.
8. Click the Query menu.
9. Click the Query Viewer menu.
10. The Query Viewer search page displays. From the Query Viewer search page you
can:
• Search and run existing public or private queries, and/or
• Add a query to Query Favorites or run a Query from the Query Favorites list.
11. This completes Navigate to Query Viewer.
End of Procedure.

Training Guide
Query 9.2 PT. 8.55
Page 3
Exercise 1
Run a Predefined Query to Query Viewer
Procedure
In this topic you will learn how to Run a Predefined Query to Query Viewer.
Step Action
1. Scenario
In this example, you will run the APY3001 _AP_VENDOR_SUMMARY query to
retrieve a list of approved vendors.
2. You can access existing, predefined queries (Public and/or Private) from the Query
Viewer page. Public queries are available to all end users with query access. Private
queries are queries associated only with your UserID. Private queries can be created
or can be amended Public queries. Creating and amending queries are discussed
later in this manual.
3. You must enter all or part of the query name into the Search By field. The Search By
field is not case sensitive. You may enter information in upper, lower or mixed case.
4. The "wildcard" can be utilized to focus your search. The wildcard is a percent (%)
sign. The wildcard may be placed before, in the middle, at the end, or bracket the
query name. For example:
1. If the wildcard is placed at the end of the query name, APY%, the system will
retrieve query names that begin in APY.
2. If the wildcard is placed in the middle of the query name, %APY%AP, the system
will retrieve query names that contain APY somewhere in the name and ends with
AP.
3. If the wildcard brackets the query name %APY%AP%, the system will retrieve
query names that contain APY and AP somewhere in the query name.

Training Guide
Query 9.2 PT. 8.55
Page 4
Step Action
5. Enter the desired information into the begins with field. Enter "APY%".
6. Click the Search button.
7. The system retrieves a list of query names that begins with APY. A total of 104
results were retrieved, with the first 30 displaying at the bottom of the page.
8. The 'begins with' operand cannot be changed on the Query View page, but can be
changed using the Advanced Search link. The Advanced Search link offers an
alternative method of retrieving information.
Click the Advanced Search link.
9. Click the button to the right of the Query Name field.

Training Guide
Query 9.2 PT. 8.55
Page 5
Step Action
10. Click the contains list item.

Training Guide
Query 9.2 PT. 8.55
Page 6
Step Action
11. Enter the desired information into the Query Name field. Enter "APY".
12. Click the Search button.
13. A total of 109 options were returned using the Advanced Search method.
Click the View 100 link.
14. Scroll down through the list of queries to find the
APY3001_AP_VENDOR_SUMMARY query.
Click the Down button of the scrollbar.
15. Query results can be displayed in two formats: HTML and Excel. Both options will
be demonstrated in this example, beginning with the HTML option.
NOTE: Results run to HTML can only be viewed as displayed. If you want to be
able to manipulate the results, download your results directly to Excel.

Training Guide
Query 9.2 PT. 8.55
Page 7
Step Action
16. Click the HTML link.
NOTE: It is recommended that you run your query first to HTML to determine
the number of result rows returned. Running your query to HTML will return all
available results.
17. Enter the desired information into the SetID field. Enter "SHARE".
18. Click the button to the right of the Supplier Status field.
19. Click the Approved list item.
20. Click the View Results button.
NOTE: A list of approved suppliers will be retrieved and displayed below the View
Results button.
21. The total number of approved suppliers retrieved displays above the Description
column. In this example, 31,065 suppliers were retrieved. The first 100 suppliers are
displayed in ascending order by Supplier ID number.
NOTE: The number of approved suppliers will vary as new suppliers are added or
existing suppliers are unapproved.
22. The arrows allow you to navigate from page to page. The right arrow allows you to
view the next 100 suppliers. The Last link allows you to view the last 100 suppliers.
The left arrow allows you the view the previous 100 suppliers, and the First link
displays the first 100 suppliers.
23. The View All link displays all 31,065 suppliers at one time.
NOTE: It may take a few minutes to process your request when you search has
retrieved a large number of results. The Processing indicator will display in the
top right corner of the page.

Training Guide
Query 9.2 PT. 8.55
Page 8
Step Action
24. HTML results can be downloaded to an Excel spreadsheet. Downloading results to
an Excel spreadsheet will allow you to manipulate the data, move columns, hide
columns, etc.
Click the Excel Spreadsheet link. This will open a new window.
25. Click the Open button.
26. If you want to change column widths, sort data, add formulas, or utilize other
features available in Excel, you must enable editing for your spreadsheet.
Click the Enable Editing button.
27. You may save the query results to a network drive for later use, or you may print the
results.
Click the Close Report button.

Training Guide
Query 9.2 PT. 8.55
Page 9
Step Action
28. CSV is an abbreviation for Comma Separated Value file. This type of file is not
generally used by end users, but is available. XML File is not available for general
use.
Click the Close Tab button.
29. This completes Run a Predefined Query to Query Viewer.
End of Procedure.

Training Guide
Query 9.2 PT. 8.55
Page 10

Training Guide
Query 9.2 PT. 8.55
Page 11
Exercise 2
Run a Predefined Query to Excel from Query Viewer
Procedure
In this topic you will learn how to Run a Predefined Query to Excel.
Step Action
1. From the search list results in the navigation Reporting Tools > Query > Query
Viewer, click the APY3001_AP_VENDOR_SUMMARY Excel link.
2. Enter the desired information into the SetID field. Enter "SHARE".
3. Click the button to the right of the Supplier Status field.
4. Click the Approved list item.
5. Click the View Results button.

Training Guide
Query 9.2 PT. 8.55
Page 12
Step Action
6. Click the Open button.
7. If you want to change column widths, sort data, add formulas, or utilize other
features available in Excel, you must enable editing for your spreadsheet.
Click the Enable Editing button.
8. You may save the query results to a network drive for later use, or you may print the
results.
Click the Close Report button.
9. Click the Close Tab button.
10. This completes Run a Predefined Query to Excel.
End of Procedure.

Training Guide
Query 9.2 PT. 8.55
Page 13
Exercise 3
Create and Format a Query
Procedure
In this topic you will learn how to Create and Format a Query.
Step Action
1. Click the Main Menu button.

Training Guide
Query 9.2 PT. 8.55
Page 14
Step Action
2. Click the Reporting Tools menu.
3. Click the Query menu.
4. Click the Query Manager menu.

Training Guide
Query 9.2 PT. 8.55
Page 15
Step Action
5. Click the Create New Query link.
6. The Find an Existing Record page displays.
Across the top of the page are nine tabs that can be used in creating or amending a
query. The system defaults you onto the Records tab.
7. PeopleSoft stores the data entered into the system in tables. The tables are comprised
of rows (records) and columns (fields). You will select the various rows (records)
and columns (fields) you want the system to retrieve to create your query. When you
run your query, the data associated with the selected records and fields will display
in your report.
In this example you will create a query that generates a list of supplier names,
addresses and current status (e.g. Active or Inactive).

Training Guide
Query 9.2 PT. 8.55
Page 16
Step Action
8. You start by selecting a record. Since you are interested in generating a list of
vendor information, it makes sense to first determine what vendor tables (vendor
records) are available.
You must enter all or part of the Record Name into the Search By field. The
wildcard (%) or the Advanced Search link may be utilized to help focus your search.
Enter the desired information into the begins with field. Enter "VEN".
9. Click the Search button.
10. A list of 20 record options display.
If you are unsure of which record to use, you can click a record's Show Fields link to
view the fields that comprise the record.
Click the Show Fields link.

Training Guide
Query 9.2 PT. 8.55
Page 17
Step Action
11. A list of fields displays for your review.
If the fields you are interested in are not listed, simply return to your Search Results
and click on the Show Fields link for another record.
Click the Return button.

Training Guide
Query 9.2 PT. 8.55
Page 18
Step Action
12. For this example, the VENDOR_ADDR - Supplier Address record will be used.
NOTE: Once you select the Add Record option, the system will automatically take
you to the Query tab where you will view the available field options for the
Vendor_ADDR record.
Click the Add Record link.

Training Guide
Query 9.2 PT. 8.55
Page 19
Step Action
13. In this example, an Effective Date message will display. This occurs anytime an
effective dated record is selected. This allows you to modify the date criteria of the
record information. In this case, all data will be retrieved with effective dates prior
to the current date.
Click the OK button.
14. The system takes you to the Query tab.
From the Query tab you can select individual fields within a record. The fields you
select will display as the columns on your report.
15. Field names do no default in alphabetical order. The system provides a Sort fields
alphabetically option to make searching for fields easier.
Click the Sort fields alphabetically button.
16. The fields display in alphabetical order. By clicking the Sort fields alphabetically
button again, the system returns the fields to the original order.
Click the Sort fields alphabetically button.

Training Guide
Query 9.2 PT. 8.55
Page 20
Step Action
17. The Check All button is used if you want to use all the fields associated with the
record in your query.
Click the Check All button.
18. The Uncheck All button deselects all of the fields associated with the record.
Click the Uncheck All button.
19. When a field is selected for use in the query, and the query is run, the system returns
all the data for the field. You can narrow your results by specifying criteria for the
field. The Use as Criteria (funnel) option allows you to add criteria for a particular
field.
For example if you selected the Vendor ID field for your query, all vendors will be
retrieved from the database. If you only wanted to retrieve vendors who have an
Active status, you could specify this by using criteria.
Click the Use as Criteria button.

Training Guide
Query 9.2 PT. 8.55
Page 21
Step Action
20. From the Edit Criteria Properties page, you can Choose Expression, Choose Record
or Field, or Define Constant.
NOTE: See Exercise 4 for information on the Using as Criteria feature.
Click the Cancel button.
21. Joins are used when creating queries using more than one record. Joins allow you to
retrieve data from multiple tables, but present it as if it came from one table. Three
types of joins are used by LSUHSC in PeopleSoft: Hierarchy Join, Standard (Any)
Join, and Related Record Join.
NOTE: Joins are not used when creating a single record query.
NOTE: See Exercise 5 - Hierarchy Joins for additional information.
22. Key symbols identify fields found in multiple records. Key fields provide a link
when joining multiple records.

Training Guide
Query 9.2 PT. 8.55
Page 22
Step Action
23. Selecting Fields
Select a field by clicking the checkbox to the left of the Field Name.
For this example the following fields will be selected: Vendor ID, Effective Status,
Name1, Address1, City, State, and Postal.
Step Action
24. Click the VENDOR_1 - Supplier ID option.
25. Click the ADDRESS 1 - Address Line 1 option.
26. Click the CITY - City option.
27. Click the Eff_Status - Status as of Effective Date option.
28. Click the Name1 - Supplier Name option.

Training Guide
Query 9.2 PT. 8.55
Page 23
Step Action
29. Double-click the Down button of the scrollbar.
30. Click the Postal option.
31. Click the STATE - State option.
32. Click the Up button of the scrollbar.
33. After all fields have been selected, click the Fields tab to view the selected fields
collectively.
Click the Fields tab.
34. The fields display on the Fields tab in the order in which they were selected. Each
field represents a column on your spreadsheet, so this also the order they will
display in your report. Often fields will need to be reordered to make query results
easier to read.
NOTE: If the fields on the Query tab were sorted alphabetically and then selected
as fields, the selection order on the Fields tab will be alphabetical, no matter in
what order the individual fields were selected.
35. NOTE: It is recommended the query be saved when any changes are made. The
Save As option will be used when first saving your query so that a name can be
assigned.
For training purposes only, you will forgo saving the query at this time.

Training Guide
Query 9.2 PT. 8.55
Page 24
Step Action
36. The Reorder/Sort button allows you to change the order of the fields and, therefore,
the order of your query result columns.
Click the Reorder / Sort button.
37. You will use the New Column fields, on the left side of the table, to change the
order of your columns. The New Order By column, on the right side of the table,
will be used to sort your data.
VENDOR_ID will remain as column 1, so you will not need to make an entry for
this field.
38. Reorder columns by entering the column number in the New Column field. If a field
is left blank, that column will remain as originally indicated.
In this example, NAME1 is the third (3rd) column on your query results. Change
NAME1 to column two (2).
Enter the desired information into the New Column NAME1 - Supplier Name
field. Enter "2".
39. Enter the desired information into the New Column ADDRESS1 - Address Line 1
field. Enter "3".
40. Enter the desired information into the New Column CITY - City field. Enter "4".
41. Enter the desired information into the New Column - STATE - State field. Enter
"5".

Training Guide
Query 9.2 PT. 8.55
Page 25
Step Action
42. Enter the desired information into the New Column - POSTAL field. Enter "6".
43. Enter the desired information into the New Column - EFF_STATUS - Status as of
Effective Date field. Enter "7".
Step Action
44. Click the OK button.
45. The Fields are reordered based on the changes you made on the Reorder/Sort panel.
46. The Heading Text displays the text used for each field (column) on your report.
Field titles can be changed using the Edit feature.

Training Guide
Query 9.2 PT. 8.55
Page 26
Step Action
47. In this example you will change the VENDOR_ID Heading Text from Supplier to
Supplier ID.
Click the VENDOR_ID - Supplier ID Edit button.
48. The system defaults to RFT Short (Record Field Text Short). The RFT Short
column title will be up to 10-characters long.
NOTE: The Heading Text field displays the selected column title. In this
example, the column title would display as Vendor since the RFT Short options is
selected.
The RFT Long displays up to a 30-character column title.
The Text option displays the column title as it is entered in the Heading Text field.
No Heading will result in the column title being blank.

Training Guide
Query 9.2 PT. 8.55
Page 27
Step Action
49. Click the RFT Long option.
50. NOTE: The Unique Name Field will always remain as defaulted.
Click the OK button.
51. The Heading Text for the VENDOR_ID field has changed from Supplier to Supplier
ID.
Training Guide
Query 9.2 PT. 8.55
Page 28
Step Action
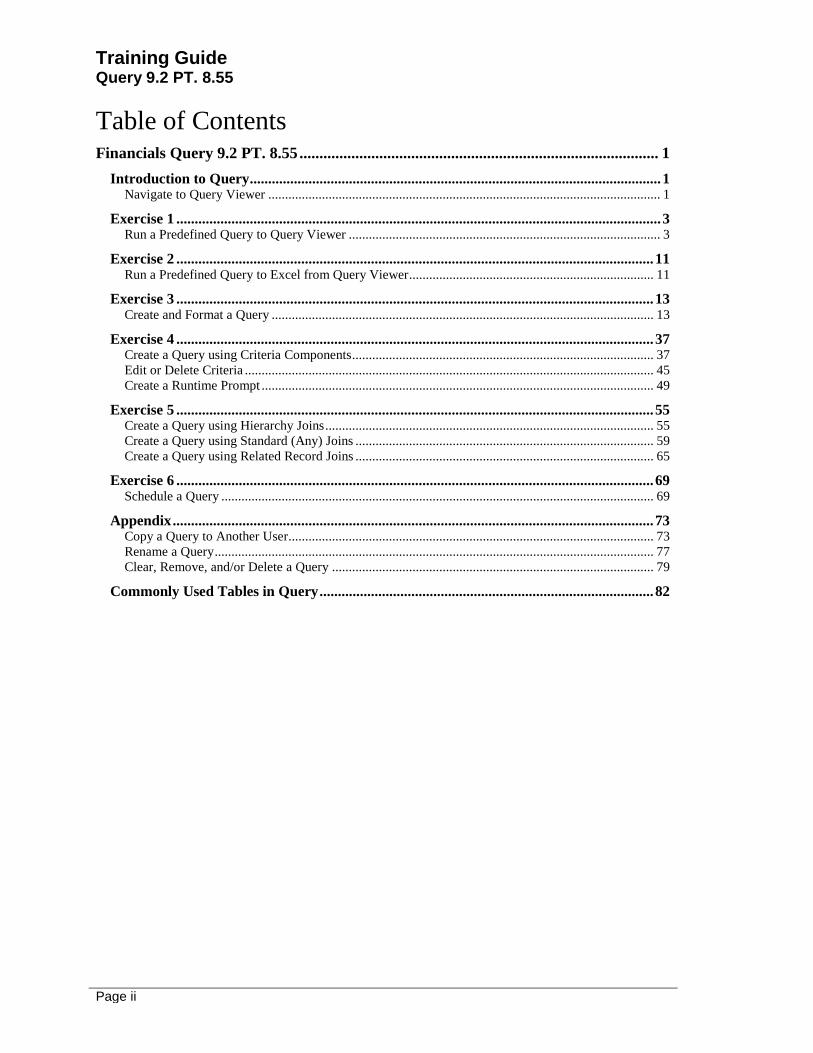
52. Click the NAME1 - Supplier Name Edit button.

Training Guide
Query 9.2 PT. 8.55
Page 29
Step Action
53. Click the Text option.

Training Guide
Query 9.2 PT. 8.55
Page 30
Step Action
54. Enter the desired information into the Heading Text field. Enter "Supplier Name".

Training Guide
Query 9.2 PT. 8.55
Page 31
Step Action
55. Click the OK button.

Training Guide
Query 9.2 PT. 8.55
Page 32
Step Action
56. Click the Address 1 - Address Line 1 Edit button.
57. Click the Text option.
58. Enter the desired information into the Heading Text field. Enter "Address".
59. Click the OK button.
60. Click the STATE - State Edit button.
61. Click the RFT Long option.
62. Click the OK button.

Training Guide
Query 9.2 PT. 8.55
Page 33
Step Action
63. Click the Save As link.
64. When you save the query the first time, you will name your query. Any queries you
create must be saved as a Private query. If you modify a Public query, and wish to
save the changes, you must save the query as a Private query.
65. Query names must be entered in ALL CAPS. Names can be up to thirty (30)
characters long. No spaces or special characters (e.g., #, $, &, etc.) may be used in
the name. An underscore can be used to separate words used in the query name.
Enter the desired information into the Query field. Enter "SUPPLIER_LIST".
66. A Description may be added. The Description can be up to thirty (30) characters
long and is not case sensitive.
Enter the desired information into the Description field. Enter "SUPPLIER
ADDRESS LIST".
67. The Folder field is not used.
The Query Type is always User.
The Owner option defaults to Private and will remain as defaulted, so that your
query cannot accidentally be saved as a Public query.
68. The Query Definition box is used to enter a longer description of the query. The use
of Query Definition is optional but recommended. You can also enter the date you
created your query in the Query Definition box.
Enter the desired information into the Query Definition field. Enter "DATE
CREATED".
69. Click the OK button.
70. The Run tab allows you to preview your query.
Click the Run tab.
71. The query results display in HTML format. Data cannot be manipulated in HTML
format. You can download the results to an Excel spreadsheet if you wish to make
changes to the query results in a spreadsheet. Examples would be filtering data,
grouping, or performing subtotals.
72. The first 100 options of your query results display. You can use the arrows to move
between pages, or use the First or Last links to view additional results.

Training Guide
Query 9.2 PT. 8.55
Page 34
Step Action
73. Click the Fields tab.
74. A value in the XLAT column indicates a Translate Value may be used. The
Translate Value is an abbreviated code for a field description.
75. In this example, the EFF_STATUS has a XLAT value of 'N'. The XLAT column
can contain one of the following values:
N (None) - Displays in the query results as a single character value and assumes a
current date logic (i.e., Effective Date is equal to current date);
S (Short) - Displays in field description in the query results as a 10-character value
and uses a specific effective date logic (i.e., Effective Date is equal to or less that
current date); or
L (Long) - Displays the field description in the query results as a 30-character value
and uses a specified effective date (i.e., Effective Date is equal to or less than current
date).
76. In this example, the XLAT value for the Effective Status field is 'N', so the value
displayed in the query results for the column will display as a single letter in your
query results:
A = Active or
I = Inactive
77. Click the EFF_STATUS - Status as of Effective Date Edit button.
78. Click the Long option.
79. Click the OK button.
80. The EFF_STATUS field now displays an 'L' in the XLAT column. By changing the
Translate Value from 'N' to 'L', the query results will display 'Active or Inactive'
instead of 'A or I' in the query results Status column.
81. Click the Run tab.
82. The status for each Supplier now displays as 'Active or Inactive'.
Click the Fields tab.

Training Guide
Query 9.2 PT. 8.55
Page 35
Step Action
83. Just as you can change the order in which fields (columns) display in your results,
you can also sort the data results for multiple fields.
Click the Reorder/Sort button.
84. If you wish to sort your results in descending order, check the box in the
Descending checkbox for the desired field. If you select 'Descending', the D1 will
display in the Ord column on the Fields tab to denote results will display in
descending order.
85. Enter the desired information into the EFF_STATUS - Status as of Effective Date
New Order By field. Enter "1".
86. Click the OK button.
87. The Ord column now displays a '1' for the EFF_STATUS field.
Your query results will now sort by whether the supplier is Active or Inactive.
88. Click the Save button.
89. Click the Return to Search button.
90. Enter the desired information into the begins with field. Enter "SUPPLIER".
91. Click the Search button.
92. Now that all changes have been made to your query, you will run your query from
the Query Manager page. Notice that when searching, any private queries associated
with your user id will display first in your search results list.
Click the SUPPLIER_LIST HTML link.
93. You can download your results to an Excel spreadsheet if you wish to manipulate
you query results.
Click the Excel Spreadsheet link.
94. Click the Open button.

Training Guide
Query 9.2 PT. 8.55
Page 36
Step Action
95. If you want to change column widths, sort data, add formulas, or utilize other
features available in Excel, you must enable editing for your spreadsheet.
Click the Enable Editing button.
96. You may save the query results to a network drive for later use, or you may print the
results.
Click the Close Report button.
97. Click the Close Tab button.
98. If desired, you may add the SUPPLIER_LIST query to My Favorite Queries for easy
access in the future.
Click the SUPPLIER_LIST option.
99. Click the button to the right of the Action Down field.
100. Click the Add to Favorites list item.
NOTE: Your security permission will determine the options available in the
Actions list.
101. Click the Go button.
102. Your query is added to My Favorite Queries, which displays at the bottom of the
page. When you next navigate to Query, the My Favorite Queries section will
display automatically on the Query Manager or Query Viewer Search page. You
will not need to use the Search by option to run this query in the future.
103. Click the Home link.
104. This completes Create and Format a Query.
End of Procedure.

Training Guide
Query 9.2 PT. 8.55
Page 37
Exercise 4
Create a Query using Criteria Components
Procedure
In this topic you will learn how to Create a Query using Criteria Components.
Step Action
1. Click the Main Menu button.
2. Click the Reporting Tools menu.
3. Click the Query menu.
4. Click the Query Manager menu.
5. Click the Create New Query link.
6. Defining criteria allows you to:
1. Reduce the number of data rows returned in your results, and
2. Retrieve only the data you need at the time the query runs.
7. In this exercise, you will create a query using the VOUCHER - AP Voucher
Header Table record and the following criteria:
1. Business Unit constant = LSUSH;
2. Invoice Date between 11/1/17 and 11/30/17; and
3. Post Status AP of Posted.
NOTE: New Orleans users should use the LSUNO Business Unit when running
this example in RPT or SND. However, if you are using the WBT, the LSUSH
Business Unit must be used.
8. Enter the desired information for the Record Name into the begins with field.
Enter "VOUCHER".
9. Click the Search button.

Training Guide
Query 9.2 PT. 8.55
Page 38
Step Action
10. Click the VOUCHER - AP Voucher Header Table Add Record link.
11. Click the BUSINESS_UNIT - Business Unit option.
12. Click the VOUCHER_ID - Voucher ID option.
13. Click the INVOICE_DT - Invoice Date option.
14. Click the OPRID - User ID option.
15. Click the POST_STATUS_AP - Post Status option.
16. Click the GROSS_AMT - Gross Invoice Amount option.
17. Click the Fields tab.
18. You can return to the Query tab to add or delete fields.
Fields may be deleted on the Fields tab by clicking the Delete button (-). However,
fields cannot be added on the Fields tab.
19. Click the Save As link.
NOTE: You will name the query the first time you save it. The query must be
saved as a Private query. If a Public is modified, you must save the modified query
as a Private query
20. Enter the desired information into the Query field. Enter "AVG_GROSS_VCHR".
21. The Description can be up to thirty (30) characters long.
Enter the desired information into the Description field. Enter "AVERAGE
GROSS VOUCHER".
22. Verify that Owner = Private.
Enter the desired information into the Query Definition field. Enter "DATE
CREATED".

Training Guide
Query 9.2 PT. 8.55
Page 39
Step Action
23. Click the OK button.
24. You add criteria to a query to filter or limit the results based on specified
parameters. There are three (3) methods for adding criteria to a query. Each method
will be demonstrated in this topic. The methods are:
Method 1 - Add criteria from the Fields tab;
Method 2 - Add criteria from the Criteria tab; and
Method 3 - Add criteria from the Query tab.
25. Method 1 - Add criteria from the Fields tab
In this example, you will enter a specific Business Unit value as criteria to filter the
query results.
Click the BUSINESS_UNIT - Business Unit Add Criteria button.
26. Changes can be made to any of the components of the Edit Criteria Properties panel.
For this example, the Choose Expression 1 Type, Choose Expression 2 Type, and
Expression 1 Condition Type will remain as defaulted.
27. By selecting the Add Criteria funnel for the BUSINESS_UNIT field on the Fields
tab, the field name defaults into the Expression 1 Record Alias.Fieldname.
28. The Condition Type determines how a query compares values specified in
Expression 1 and Expression 2. In this example, you want to specify a Business
Unit, so the Condition Type will remain 'equal to'. Other Condition Type options are
available and will be demonstrated later in the topic.
29. Expression 2 defaults to the Constant option. Other options are available for
Expression 2 and will be demonstrated later in this topic. For this example, a single
Business Unit will be specified as a constant, so the system will retrieve data for the
specified Business Unit only. If the Business Unit designation is unknown, click the
Select Constant From List (Magnifying glass) button.
30. Enter the desired information into the Constant field. Enter "LSUSH".
NOTE: New Orleans users should use the LSUNO Business Unit when running
this example in RPT or SND. However, if you are using the WBT, the LSUSH
Business Unit must be used.
31. Based on the criteria selected in Expression 1, Condition Type and Expression 2, the
system will retrieve data for the Business Unit equal to the constant LSUSH
(LSUNO). In other words, only AP voucher data for the Business Unit LSUSH
(LSUNO) will be retrieved.
32. Click the OK button.

Training Guide
Query 9.2 PT. 8.55
Page 40
Step Action
33. Click the Save button.
34. Method 1 Summary:
1. The Business Unit Add Criteria was selected, and
2. A constant Business Unit value was specified on the Edit Criteria Properties
panel.
3. The system will retrieve AP voucher data for LSUSH (LSUNO) only.
This completes the discussion of Method 1 - Add criteria from the Fields tab.
35. Method 2 - Add criteria from the Criteria tab
In this example, you will specify a date range for the INVOICE_DT - Invoice Date.
Click the Criteria tab.
36. As criterion are added to the query, they are listed on the Criteria tab.
The system filters data on the 'Logical' order of added criteria. The Logical
represents how criteria compare to each other.
If only one criteria is added, the Logical field will either be left blank, or the option
'NOT' may be selected. In this example, the field is left blank, so data will be
retrieved for LSUSH (LSUNO) only. If the 'NOT' logical was used, the system
would retrieve all Business Units except LSUSH (LSUNO).
37. Click the Add Criteria button.
38. When selecting Add Criteria on the Fields tab, the Record Alias.Fieldname
defaulted into Expression 1. When adding criteria from the Criteria tab, you must
select the Record Alias.Fieldname using the Select Record and Field (magnifying
glass) button.
Click the Select Record and Field button.
39. Click the A.INVOICE_DT - Invoice Date link.
Training Guide
Query 9.2 PT. 8.55
Page 41
Step Action
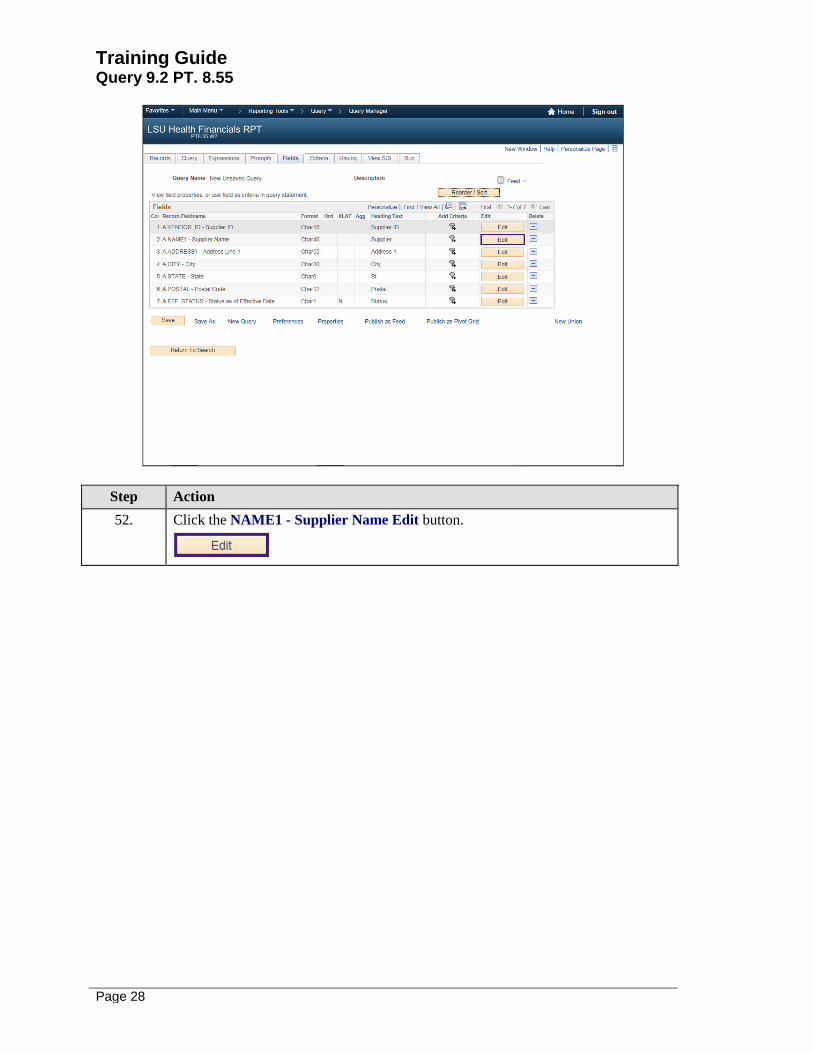
40. In this example, you do not want the INVOICE_DT - Invoice Date to equal a
specific date. You want the system to retrieve data using a specified range therefore,
the Condition Type must be changed from 'equal to' to 'between'.
Click the button to the right of the Condition Type field.
41. Click the between list item.
42. Once the 'between' option is selected, the Expression 2 changes from a single
Constant field to multiple Constant fields so that you may enter a beginning and
ending date for your date range.
Enter the desired information into the Date field. Enter "01012017".
43. Enter the desired information into the Date 2 field. Enter "01312017".
44. Based on the criteria selected in Expression, Condition Type, and Expression 2, the
system will retrieve data for vouchers with an INVOICE_DT between 01/01/2017
and 01/31/2017.
45. Click the OK button.
46. An additional row displays on the Criteria tab for INVOICE_DT.
The Logical field for INVOICE_DT defaults as 'AND', requiring the system to only
retrieve data meeting both criteria. If the Logical had been set to 'OR', the system
would have retrieved data that met either criteria (i.e., the Business Unit does not
equal LSUSH, or the Invoice Date does not fall with the Invoice Date range).
Based on the selected criteria, the system will only retrieve vouchers for LSUSH
(LSUNO) Business Unit with an Invoice Date between 01/01/2017 and 01/31/2017.
47. Click the Save button.
48. Method 2 Summary:
1. Clicked the Add Criteria button on the Criteria tab;
2. Selected INVOICE_DT as the Record Alias.Fieldname for Expression 1;
3. Changed the Condition Type from 'equal to' to 'between';
4. Entered the Invoice Date range 01/01/2017 through 01/31/2017;
5. The system will retrieve vouchers with an Invoice Date between 01/01/2017 and
01/31/2017 for LSUSH.
This completes the discussion of Method 2 - Add criteria from the Criteria tab.
Training Guide
Query 9.2 PT. 8.55
Page 42
Step Action
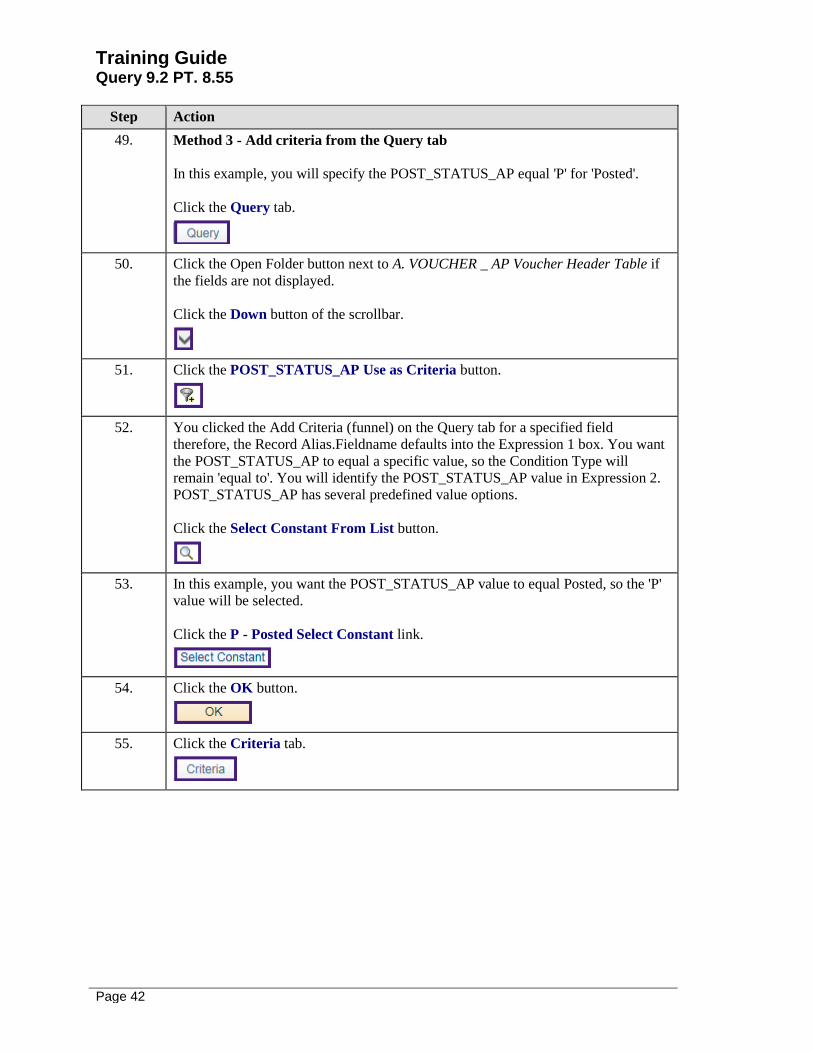
49. Method 3 - Add criteria from the Query tab
In this example, you will specify the POST_STATUS_AP equal 'P' for 'Posted'.
Click the Query tab.
50. Click the Open Folder button next to A. VOUCHER _ AP Voucher Header Table if
the fields are not displayed.
Click the Down button of the scrollbar.
51. Click the POST_STATUS_AP Use as Criteria button.
52. You clicked the Add Criteria (funnel) on the Query tab for a specified field
therefore, the Record Alias.Fieldname defaults into the Expression 1 box. You want
the POST_STATUS_AP to equal a specific value, so the Condition Type will
remain 'equal to'. You will identify the POST_STATUS_AP value in Expression 2.
POST_STATUS_AP has several predefined value options.
Click the Select Constant From List button.
53. In this example, you want the POST_STATUS_AP value to equal Posted, so the 'P'
value will be selected.
Click the P - Posted Select Constant link.
54. Click the OK button.
55. Click the Criteria tab.

Training Guide
Query 9.2 PT. 8.55
Page 43
Step Action
56. An additional row now displays on the Criteria tab for POST_STATUS_AP.
The Logical field for POST_STATUS_AP defaults as 'AND', requiring the system
to only retrieve data meeting all criteria. If the Logical had been set to 'OR', the
system would have retrieved data that met either criteria (i.e., the Business Unit does
not equal LSUSH, or the Invoice Date does not fall with the Invoice Date range, or
the Post Status does not equal Posted).
Based on the selected criteria, the system will only retrieve vouchers for LSUSH
Business Unit with an Invoice Date between 01/01/2015 and 01/31/2015, and having
a Post Status of Posted.
57. Click the Save button.
58. Method 3 Summary:
1. Clicked Query tab;
2. Clicked the Use as Criteria button on the Query tab for the POST_STATUS_AP
option;
3. Selected 'P' for 'Posted' for Expression 2; and
4. The system will retrieve vouchers with a Post Status of Posted.
NOTE: If desired, you may navigate to the Run tab to preview your query.
This completes the discussion of Method 3 - Add criteria from the Query tab.
59. This completes Create a Query using Criteria Components.
End of Procedure.

Training Guide
Query 9.2 PT. 8.55
Page 44

Training Guide
Query 9.2 PT. 8.55
Page 45
Edit or Delete Criteria
Procedure
In this topic you will learn how to Edit and/or Delete Criteria.
Step Action
1. From the Query Manager page, you can Edit and/or Delete Criteria from you query
by utilizing the Edit link.
In this example, you will retrieve all vouchers regardless of whether the voucher has
been Posted for LSUSH (LSUNO) with an INVOICE_DT range of 01/01/2017
through 01/31/2017.
Step Action
2. Click the AVG_GROSS_VCHR Edit link.
3. Click the Criteria tab.

Training Guide
Query 9.2 PT. 8.55
Page 46
Step Action
4. Since you no longer wish to only view vouchers that have been posted, you need to
remove the criteria specifying it from the Criteria panel.
Click the POST_STATUS_AP Delete button.
5. Click the Save button.
6. Click the Run tab.
7. Because our invoices are for January, 2017, and the accounting period has posted to
the general ledger, only posted vouchers display. Generally, if running the query for
current data, some unposted vouchers would also be included. Unposted vouchers
have a status of 'U'.
Click the Criteria tab.
8. Criteria can be edited as well as deleted. In this example, you will edit the
BUSINESS_UNIT criteria to include HPLMC in addition to LSUSH (or LSUNA in
addition to LSUNO).
Click the BUSINESS_UNIT Edit button.
9. The Condition Type must be changed so the system will retrieve vouchers for
LSUSH and HPLMC (LSUNO and LSUNA).
Click the button to the right of the Down field.
10. The 'in list' option allows you to specify multiple values for a field. In this case, the
BUSINESS_UNIT field, rather than a single value. the system will match the
comparison values in the list when compiling results.
Click the in list item.
11. Expression 2 is no longer a Constant value and indicates the comparison values the
system will match when compiling results.
Click the Select List Members button.

Training Guide
Query 9.2 PT. 8.55
Page 47
Step Action
12. On the Edit List panel, you will add the values to be included in your list. In this
example, you are creating a list of Business Units. You must enter the Business Unit
identifiers into the Value field in ALL CAPS.
Enter the desired information into the Value field. Enter "LSUSH".
NOTE: New Orleans users should use the LSUNO Business Unit when running
this example in RPT or SND. However, if you are using the WBT, the LSUSH
Business Unit must be used.
13. The Business Unit is not added to the list until you click the add Value button.
Click the Add Value button.
14. Repeat steps 12 and 13 until all Business Units have been added to the list.
Enter the desired information into the field. Enter "HPLMC".
NOTE: New Orleans users should use the LSUNA Business Unit when running
this example in RPT or SND. However, if you are using the WBT, the HPLMC
Business Unit must be used.
15. Click the Add Value button.
16. Click the OK button.
17. Expression 2 now contains a list of Business Unit values: LSUSH and HPLMC
(LSUNO and LSUNA). The system will retrieve vouchers associated with each of
these Business Units.
Click the OK button.
18. Click the Save button.
19. Click the Return to Search button.
20. Enter the desired information into the begins with field. Enter "AVG%".
21. Click the Search button.

Training Guide
Query 9.2 PT. 8.55
Page 48
Step Action
22. Click the AVG_GROSS_VCHR HTML link.
This will open a new window.
23. The query results display. The results include vouchers for LSUSH and HPLMC
(LSUNO and LSUNA) with Invoice Dates from 01/01/2017 through 01/31/2017.
Click the Last button.
24. Click the Close button.
NOTE: Make sure you are clicking the bottom Close button.
25. This completes Edit and/or Delete Criteria.
End of Procedure.
Training Guide
Query 9.2 PT. 8.55
Page 49
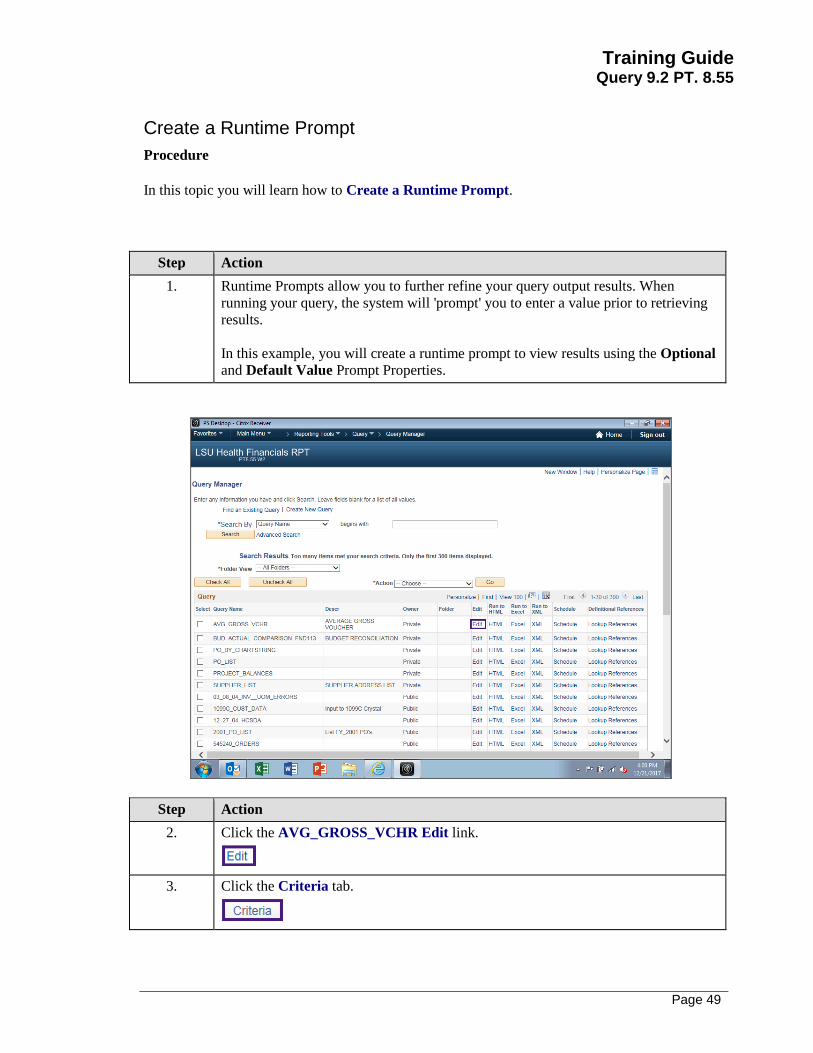
Create a Runtime Prompt
Procedure
In this topic you will learn how to Create a Runtime Prompt.
Step Action
1. Runtime Prompts allow you to further refine your query output results. When
running your query, the system will 'prompt' you to enter a value prior to retrieving
results.
In this example, you will create a runtime prompt to view results using the Optional
and Default Value Prompt Properties.
Step Action
2. Click the AVG_GROSS_VCHR Edit link.
3. Click the Criteria tab.

Training Guide
Query 9.2 PT. 8.55
Page 50
Step Action
4. Click the BUSINESS_UNIT Edit button.
5. You will change the Condition Type to 'equal to' so that you can specify, using a
prompt, which Business Unit you wish to view. In this example, using a prompt is
more efficient that creating a list that includes all Business Units.
Click the button to the right of the Condition Type field.
6. Click the equal to list item.
7. Once the 'equal to' option is selected for the Condition Type, the Expression 2 Type
box displays a new list of options. The Expression 2 changes to define Constant.
Click the Prompt option.
8. When Prompt is selected for Expression 2 Type, the Expression 2 box changes from
Define Constant to Define Prompt. Two (2) links have been added as well to the
Expression 2 box: New Prompt and Edit Prompt. Currently, there are no Prompts
identified, so the Edit Prompt option would not be selected at this time.
Click the New Prompt link.
9. Edit Prompt Properties
The Edit Prompt Properties is where you define prompt parameters and is
comprised of the following fields:
Field Name - The name of the field for which you are creating the prompt;
Type - Indicates the type of field (i.e., Character, Date, Time, Number, etc.); and
Format - Specifies the format (i.e., Upper Case, Mixed Case, Zip Code, etc.) of the
field.
10. Edit Prompt Properties (continued)
Length - The number of available characters for that field;
Decimals - The number, if any, of decimal places allowed; and
Edit Type - Allows you to evaluate a value against a set of tables to determine if the
value is valid.

Training Guide
Query 9.2 PT. 8.55
Page 51
Step Action
11. Edit Prompt Properties (continued)
Heading Type - Defines whether the prompt heading is Text, RFT Short, or RFT
Long;
Heading Text - Displays the label for the prompt box;
Unique Prompt Name - A default value generated by the Query Manager; and
Prompt Table - This field is not used when creating simple queries.
12. The Optional checkbox is used to determine if a prompt is optional or required.
The default is that the box is cleared, indicating that the prompt is a required
value.
13. In this example, the Optional checkbox will remain unchecked requiring a prompt
value be entered. The other prompt values will remain as defaulted.
Click the OK button.
14. The Prompt created displays in the Expression 2 box. Prompts are displayed in the
Criteria format ':number' (i.e., :1). Additional prompts may be created and would be
assigned sequential numbers to be displayed as :2, :3, etc.
15. Click the OK button.
16. Click the Save button.
17. Click the Run tab.
18. A prompt window displays on the page. You will enter the Business Unit identifier
into the Unit field. The system will retrieve only vouchers for the Unit specified.
Enter the desired information into the Unit field. Enter "LSUSH".
19. Click the OK button.
20. Your query results display.
Click the Criteria tab.

Training Guide
Query 9.2 PT. 8.55
Page 52
Step Action
21. You can edit your prompt parameters as your needs require.
Click the BUSINESS_UNIT Edit button.
22. Click the Edit Prompt link.
23. When the Optional box is checked, it indicates the prompt entry for the field is
optional. No value would be required at run time in the prompt box.
CAUTIONARY NOTE: If the prompt value is set to optional, the query result set
may be too large since the results are not limited.
Click the Optional option.
24. Click the OK button.
25. Click the OK button.
26. Click the Run tab.
27. At run-time, a user would not be required to perform an entry in the run-time
prompt dialog for the Unit.
Click the OK button.
28. In this example, the optional dialog would work as if it were a wildcard returning
any Business Unit entries for which you have security access.
Click the Criteria tab.
29. Click the BUSINESS_UNIT Edit button.
30. Click the Edit Prompt link.

Training Guide
Query 9.2 PT. 8.55
Page 53
Step Action
31. Uncheck the Optional box.
Click the Optional option.
32. Default Value
The Default Value box is used to set a default value for the prompt. This value is
used as the prompt value at run-time if not other value is entered. At run-time,
values entered in the Default Value box will display in the prompt entry box. This
may be overwritten if desired.
NOTE: If a Default Value is entered in the box, the query prompt optional
checkbox may not be selected at the same time. Default Values indicate that the
prompt value is required.
Enter the desired information into the field. Enter "HPLMC".
NOTE: New Orleans users should use the LSUNA Business Unit when running
this example in RPT or SND. However, if you are using the WBT, the HPLMC
Business Unit must be used.
33. Click the OK button.
34. Click the OK button.
35. Click the Run tab.
36. The prompt entry box displays the Default Value. As previously noted, this may be
overwritten if another value is desired at run-time.
Enter the desired information into the Unit field. Enter "LSUSH".
NOTE: New Orleans users should use the LSUNO Business Unit when running
this example in RPT or SND. However, if you are using the WBT, the LSUSH
Business Unit must be used.
37. Click the OK button.
Training Guide
Query 9.2 PT. 8.55
Page 54
Step Action
38. When the Default Value is overwritten in the prompt dialog at run-time, the query
results will be limited to the prompt criteria entered.
Click the Rerun Query tab.
39. The Default Value is populated even if the user were to blank out the field value at
run-time. In this example, the default for Business Unit is HPLMC (LSUNA). If
you blank out the field and the query results will still produce results for HPLMC
(LSUNA).
Highlight HPLMC and click the Delete button on your keyboard to blank out the
Unit field.
40. Click the OK button.
41. Query results for the Default Value = HPLMC display.
Click the Home button.
42. This completes Create a Runtime Prompt.
End of Procedure.

Training Guide
Query 9.2 PT. 8.55
Page 55
Exercise 5
Create a Query using Hierarchy Joins
Procedure
In this topic you will learn how to Create a Query using Hierarchy Joins.
Step Action
1. A Hierarchy Join uses tables/records that are related through a parent/child
relationship. A child table is a table that uses all the same key fields as its parent,
plus one or more additional keys. Hierarchy Joins are the strongest of the three joins,
and are predefined in the system. This means the parent child relationships are
already identified and defined within the system.
In this exercise, you will create a Hierarchy Join when the VENDOR_ADDR -
Supplier Address record (child) is joined to the VENDOR - Supplier Header
Table (parent).
2. Click the Main Menu button.
3. Click the Reporting Tools menu.
4. Click the Query menu.
5. Click the Query Manager menu.
6. Click the Create New Query link.
7. You will first search for the parent table/record.
Enter the desired information into the begins with field. Enter "VENDOR".
8. Click the Search button.
9. Click the Add Record link.

Training Guide
Query 9.2 PT. 8.55
Page 56
Step Action
10. When a record is selected, the system assigns an alias name to the record. When
using joins, the alias name determines the order of the joins. In this example, the
VENDOR table is the alias 'A' because it is the first record used.
You will select the following fields from the VENDOR record:
VENDOR_ID, NAME1, and VENDOR_STATUS.
11. Click the VENDOR_ID - Supplier ID option.
12. Click the NAME1 - Supplier Name option.
13. Click the VENDOR_STATUS - Supplier Status option.
14. By clicking the Hierarchy Join link, all of the records that have a parent/child
relationship with the VENDOR table display.
Click the Hierarchy Join link.
15. The VENDOR table is the parent record. The VENDOR_ADDR record is a child of
the VNDR_ADDR_SCROL record. The VNDR_ADDR_SCROL record is a child
of the parent record VENDOR table.
Click the VENDOR_ADDR - Supplier Address link.
16. An effective date message displays when a record is selected. All data will be
retrieved, including addresses with the most recent effective dates prior to the
current date.
Click the OK button.
17. The 'B' alias has been assigned for the VENDOR_ADDR RECORD. The system
will first retrieve data for the 'A' record and then the data for the 'B' record.
18. Click the ADDRESS1 - Address Line 1 option.
19. Click the CITY - City option.
20. Click the STATE - State option.

Training Guide
Query 9.2 PT. 8.55
Page 57
Step Action
21. Click the POSTAL - Postal Code option.
22. Click the Fields tab.
23. The Fields tab displays all the records and fields selected for the current query.
Click the Save As link.
24. Enter the desired information into the Query field. Enter "HIERARCHY JOIN".
25. Enter the desired information into the Description field. Enter "TEST FOR
CLASS".
26. Enter the desired information into the Query Definition field. Enter "DATE
CREATED".
27. Click the OK button.
28. You can preview your query in the Run tab.
Click the Run tab.
29. Your supplier address list displays.
Click the Query Manager button.
30. This completes Create a Query using Hierarchy Joins.
End of Procedure.

Training Guide
Query 9.2 PT. 8.55
Page 58

Training Guide
Query 9.2 PT. 8.55
Page 59
Create a Query using Standard (Any) Joins
Procedure
In this topic you will learn how to Create a Query using Standard (Any) Joins.
Step Action
1. Query Manager allows the creation of a join between two records (any record join)
by selecting your initial base record, then returning to the Record tab to select the
second record.
Unlike Hierarchy Joins, Standard (Any) Joins are not predefined in the system.
You must manually join the tables/records when using a Standard (Any) Join.
NOTE: When creating a Standard (Any) Join, the records you wish to join must
have a common key field for joining. Query will attempt to automatically join the
records based on the keys in each record.
2. In this exercise, you will join the PO_HDR record and the PO_LINE_DISTRIB
record to retrieve Purchase Orders (POs) between a specified date range for a
specified Business Unit. You will also find the merchandise amount of the PO and
Department ID number associated with the PO.

Training Guide
Query 9.2 PT. 8.55
Page 60
Step Action
3. Click the Create New Query link.
4. Enter the desired information into the begins with field. Enter "PO_HDR".
5. Click the Search button.
6. Click the PO_HDR - Purchase Order Header Add Record link.
7. Click the BUSINESS_UNIT - Business Unit option.
8. Click the PO_ID - PO Number option.
9. Click the PO_DT - Purchase Order Date option.
10. Click the Fields tab.

Training Guide
Query 9.2 PT. 8.55
Page 61
Step Action
11. Click the BUSINESS_UNIT - Business Unit Add Criteria button.
12. Enter the desired information into the Constant field. Enter "LSUNO".
NOTE: Shreveport users should use the LSUSH Business Unit when running this
example in RPT or SND. However, if you are using the WBT, the LSUNO
Business Unit must be used.
13. Click the desired object.
14. Click the PO_DT - Purchase Order Date Add Criteria button.
15. Click the button to the right of the Condition Type field.
16. Click the between list item.
17. For this exercise, us the date range 01/01/2017 through 01/31/2017.
NOTE: When creating a query, it is optimal to select a smaller data sample for
testing, such as 01/01/17 - 01/31/17. This will result in a quicker run time, and
make it easier to test and troubleshoot your query.
Enter the desired information into the Date field. Enter "01012017".
18. Enter the desired information into the Date 2 field. Enter "01312017".
19. Click the OK button.
20. Click the Run tab.
21. Your query results display. Now that you have verified that everything is correct
with the current record, you can now join your next record.
Click the Records tab.

Training Guide
Query 9.2 PT. 8.55
Page 62
Step Action
22. Enter the desired information into the begins with field. Enter
"PO_LINE_DISTRIB".
23. Click the Search button.
24. Click the PO_LINE_DISTRIB Join Record link.
25. In the Join Type section, the system defaults to the "Join to filter and get additional
fields (Standard Join)" option. This should remain as defaulted.
Click the A = PO_HDR - Purchase Order Header link.
26. The system displays the detected join conditions.
Click the Add Criteria button.
27. Click the MERCHANDISE_AMT - Merchandise Amount option.
28. Click the DEPTID - Department option.
29. You can preview your query in the Run tab.
Click the Run tab.
30. Your Standard (Any) Joins query displays.
Click the Fields tab.
31. Click the Save As link.
32. Enter the desired information into the Query field. Enter "STANDARD_JOIN".
33. Enter the desired information into the Description field. Enter "TEST FOR
CLASS".
34. Enter the desired information into the Query Definition field. Enter "DATE
CREATED".
Training Guide
Query 9.2 PT. 8.55
Page 63
Step Action
35. Click the OK button.
36. Click the Query Manager button.
37. This completes Create a Query using Standard (Any) Joins.
End of Procedure.

Training Guide
Query 9.2 PT. 8.55
Page 64

Training Guide
Query 9.2 PT. 8.55
Page 65
Create a Query using Related Record Joins
Procedure
In this topic you will learn how to Create a Query using Related Record Joins.
Step Action
1. In a Related Record Join you can automatically join two records based on a
relationship that has been predefined in the record designer. The Related Record
Joins display as a link to the right of the field. The criteria relationship between the
fields has already been identified, so no criteria need to be added.
2. In this exercise, you will create a query to retrieve Inventory Item ID,
Manufacturer's ID, and the Manufacturer's Name.
In order to retrieve the data, you will need to join two records, the ITEM_MFG -
Item Manufacturer Table and the MANUFACTURER - Manufacturer Table.
Step Action
3. Click the Create New Query link.
4. Enter the desired information into the begins with field. Enter "ITEM_MFG".

Training Guide
Query 9.2 PT. 8.55
Page 66
Step Action
5. Click the Search button.
6. Click the ITEM_MFG - Item Manufacturer Table Add Record link.
7. Click the SETID - SetID option.
8. Click the INV_ITEM_ID - Item ID option.
9. Click the MFG_ID - Manufacturer ID option.
10. Click the Fields button.
11. NOTE: Add Criteria to the SETID and INV_ITEM_ID fields to retrieve a small
data sample for testing.
Click the SETID - SetID Add Criteria button.
12. Enter the desired information into the SHARE field. Enter "SHARE".
13. Click the OK button.
14. Click the INV_ITEM_ID Add Criteria button.
15. Click the button to the right of the Condition Type field.
16. Click the between list item.
17. In this exercise you are looking for Inventory Item ID's between 102000 and
102500.
Enter the desired information into the Constant field. Enter "102000".
Training Guide
Query 9.2 PT. 8.55
Page 67
Step Action
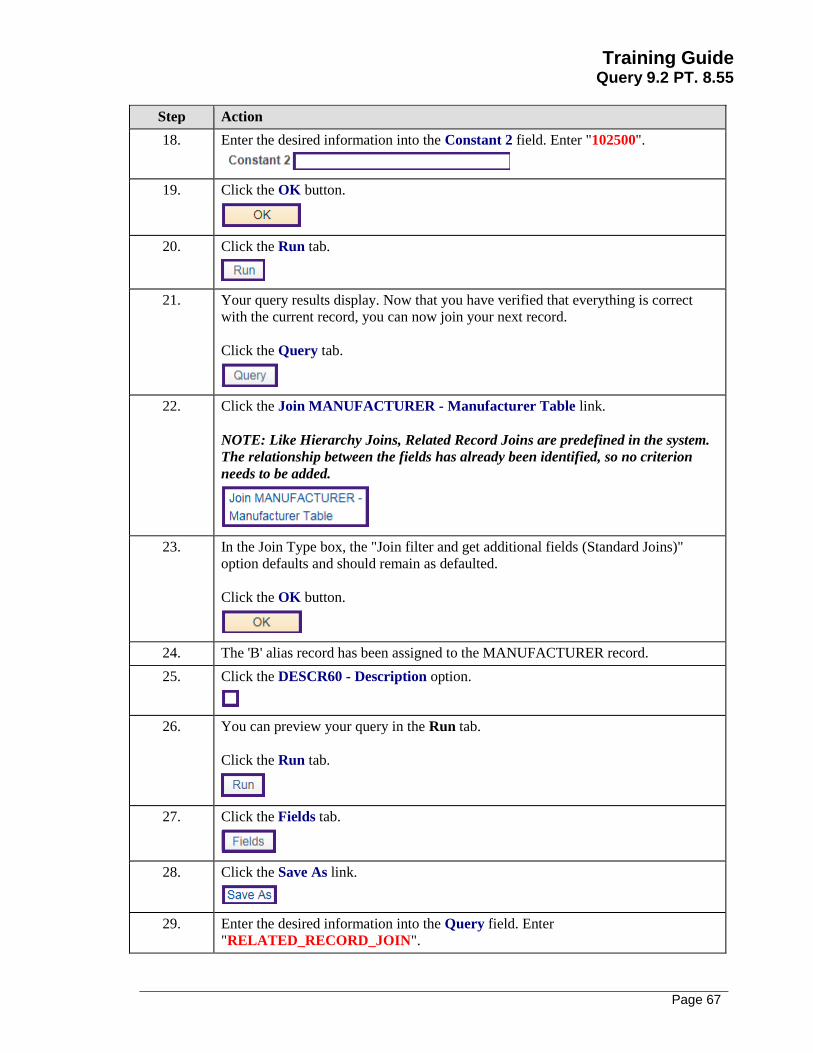
18. Enter the desired information into the Constant 2 field. Enter "102500".
19. Click the OK button.
20. Click the Run tab.
21. Your query results display. Now that you have verified that everything is correct
with the current record, you can now join your next record.
Click the Query tab.
22. Click the Join MANUFACTURER - Manufacturer Table link.
NOTE: Like Hierarchy Joins, Related Record Joins are predefined in the system.
The relationship between the fields has already been identified, so no criterion
needs to be added.
23. In the Join Type box, the "Join filter and get additional fields (Standard Joins)"
option defaults and should remain as defaulted.
Click the OK button.
24. The 'B' alias record has been assigned to the MANUFACTURER record.
25. Click the DESCR60 - Description option.
26. You can preview your query in the Run tab.
Click the Run tab.
27. Click the Fields tab.
28. Click the Save As link.
29. Enter the desired information into the Query field. Enter
"RELATED_RECORD_JOIN".

Training Guide
Query 9.2 PT. 8.55
Page 68
Step Action
30. Enter the desired information into the Description field. Enter "TEST FOR
CLASS".
31. Enter the desired information into the Query Definition field. Enter "DATE
CREATED".
32. Click the OK button.
33. Click the Query Manager button.
34. This completes Create a Query using Related Record Joins.
End of Procedure.

Training Guide
Query 9.2 PT. 8.55
Page 69
Exercise 6
Schedule a Query
Procedure
In this topic you will learn how to Schedule a Query.
Step Action
1. Queries may be scheduled through the use of the Process Scheduler and viewed
through the Report Manager. This is a valuable tool when a query is large and takes
a long time to run. Scheduling your query allows you to run the query at a time
when there is less activity on the system. Another use for scheduling a query is to
produce results weekly for review.
In this exercise, you will schedule the LSU_VENDORS_W_ADDRESS query to
run in 5 minutes.
2. Click the Main Menu button.
3. Click the Reporting Tools menu.
4. Click the Query menu.
5. Click the Query Viewer menu.
6. Enter the desired information into the begins with field. Enter "LSU_VENDORS".
7. Click the Search button.
8. Click the LSU_VENDORS_W_ADDRESS Schedule link.
9. Enter the desired information into the Run Control ID field. Enter
"SCHED_QUERY".

Training Guide
Query 9.2 PT. 8.55
Page 70
Step Action
10. The system defaults you into the Add a New Value tab. A Run Control ID must be
added the first time you schedule a query.
The Run Control ID is used to access the Process Scheduler. The Run Control ID is:
1. Specific to the User ID;
2. Can be entered in upper, lower, or mixed case;
3. Can be up to thirty (30) characters long;
4. Cannot contain any special characters such as &, $, %, etc.; and
5. Must be one continuous string of characters. Cannot contain any blank spaces. An
underscore can be used to link words.
11. Click the Add button.
12. Enter the desired information into the Description field. Enter "SUPPLIER
ADDRESS LIST".
13. Click the OK button.
14. Click the button to the right of the Server Name field.
15. Click the PSNT list item.
16. Enter the desired information into the Run Time field. Enter "1:01 pm".
17. Click the desired object.
18. Once the scheduled time has elapsed, and the query runs, you can view the query
results via the Report Manager.
Click the Reporting Tools button.
19. Click the Report Manager menu.

Training Guide
Query 9.2 PT. 8.55
Page 71
Step Action
20. Click the Link displaying in the Description column to view the results. This will
open a new window.
NOTE: If multiple processes, queries, and/or reports have been run by the user,
the most current will display at the top of the list.
Click the SUPPLIER_ADDRESS_LIST link.
21. Once the results display, you can use any functionality in Excel to manipulate the
results.
Click the Close Report button.
22. Click the Home button.
23. This completes Schedule a Query.
End of Procedure.

Training Guide
Query 9.2 PT. 8.55
Page 72

Training Guide
Query 9.2 PT. 8.55
Page 73
Appendix
Copy a Query to Another User
Procedure
In this topic you will learn how to Copy a Query to Another User.
Step Action
1. Security access permitting, users may select the following from the Action drop-
down menu:
1. Add a query to Favorites;
2. Delete a Query;
3. Copy a query to another user;
4. Move a query to another folder; and/or
5. Rename a selected query.
NOTE: Only Private queries may be Deleted, Copied, Moved, or Renamed. Public
queries can be Added to Favorites.
NOTE: The above Actions can only be accessed and performed in Query
Manager. These options are not available to users in Query Viewer.

Training Guide
Query 9.2 PT. 8.55
Page 74
Step Action
2. In this exercise you will copy the AVG_GROSS_VCHR query to another user.
Enter the desired information into the begins with field. Enter "A".
3. Click the Search button.
4. You must select the query you wish to copy. You will check the Select box to the
left of the Query Name to select the query.
Click the AVG_GROSS_VCHR option.
5. Click the button to the right of the ACTION field.
6. Private queries may be copies to another user and will display at the top of the query
search list. Your private queries will not display in someone else's list.
Click the Copy to User list item.
Training Guide
Query 9.2 PT. 8.55
Page 75
Step Action
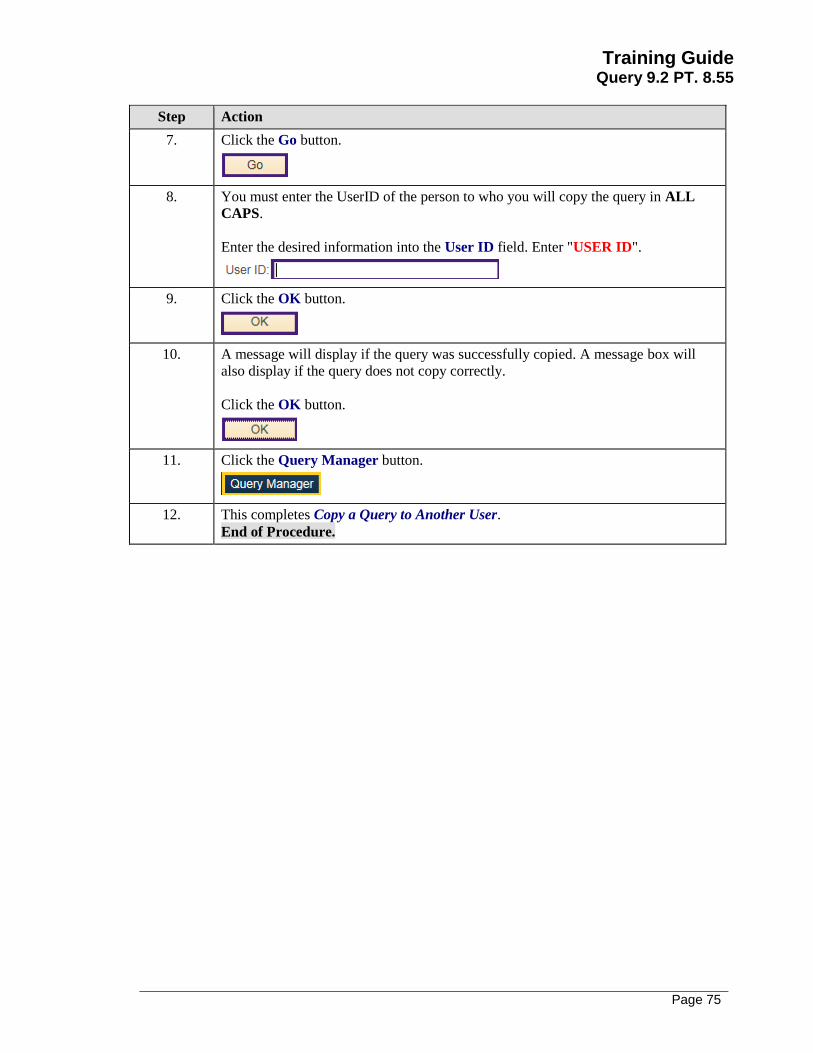
7. Click the Go button.
8. You must enter the UserID of the person to who you will copy the query in ALL
CAPS.
Enter the desired information into the User ID field. Enter "USER ID".
9. Click the OK button.
10. A message will display if the query was successfully copied. A message box will
also display if the query does not copy correctly.
Click the OK button.
11. Click the Query Manager button.
12. This completes Copy a Query to Another User.
End of Procedure.

Training Guide
Query 9.2 PT. 8.55
Page 76

Training Guide
Query 9.2 PT. 8.55
Page 77
Rename a Query
Procedure
In this topic you will learn how to Rename a Query.
Step Action
1. If you security access permits, you can rename your Private queries. In this exercise,
you will rename the AVG_GROSS_VCHR query.
NOTE: The renaming of queries can only be performed in Query Manager.
Step Action
2. Select the query you wish to rename by clicking the checkbox to the left of the
Query Name.
Click the AVG_GROSS_VCHR option.
3. Click the button to the right of the Action field.

Training Guide
Query 9.2 PT. 8.55
Page 78
Step Action
4. Click the Rename Selected list item.
5. Click the Go button.
6. Enter the desired information into the New Name field. Enter
"AVG_GROSS_VOUCHER".
7. Click the OK button.
8. On the Query Manager page, you may confirm the query name has changed from
AVG_GROSS_VCHR to AVG_GROSS_VOUCHER.
9. This completes Rename a Query.
End of Procedure.

Training Guide
Query 9.2 PT. 8.55
Page 79
Clear, Remove, and/or Delete a Query
Procedure
In this topic you will learn how to Clear, Remove, and/or Delete a Query.
Step Action
1. The My Favorites Queries sections displays when a query has been added to your
favorites. You can remove a single query from the list, or you can clear all queries
from the list.
NOTE: Removing or clearing a query from My Favorite Queries does not delete
the query out of the system. It simple removes/clears it from My Favorite Queries.
The original query can still be found by using the Search By option on the Query
Manager page.
2. You can clear all queries from My Favorite Queries. You simply click the Clear
Favorites List button located under the My Favorite Queries section. This will
delete the My Favorite Queries section from the page.

Training Guide
Query 9.2 PT. 8.55
Page 80
Step Action
3. You can remove a single query by clicking the remove (-) button.
Click the AVG_GROSS_VOUCHER Remove button.
4. The My Favorite Queries section was deleted from the page. Had other queries been
saved in My Favorite Queries, removing a single query would not have deleted the
section.
5. From time to time, you should review you Private queries and delete those queries
no longer used from the system. If you do not have the proper security to delete a
query, contact your SuperUser for assistance.
6. Enter the desired information into the begins with field. Enter "AVG".
7. Click the Search button.
8. Private queries will display at the top of the Search Results list.
Click the AVG_GROSS_VOUCHER option.
9. Click the button to the right of the Action field.

Training Guide
Query 9.2 PT. 8.55
Page 81
Step Action
10. Click the Delete Selected list item.
11. Click the GO button.
12. A warning message displays confirming you wish to delete the selected query. Click
'Yes' to delete the query and 'No' to keep the query.
Click the Yes button.
13. The query is deleted and you are returned to the Query Manager Search page.
14. This completes Clear, Remove, and/or Delete a Query.
End of Procedure.

Training Guide
Query 9.2 PT. 8.55
Page 82

Training Guide
Query 9.2 PT. 8.55
Page 83
Commonly Used Tables in Query
LSUHSC
PeopleSoft v9.x Financials
Commonly Used Tables for Query
General Ledger
Table Name Brief Description
LEDGER Ledger Data
JRNL_HEADER Journal Header Data
JRNL_LN Journal Line Data
ZZGL_TRANS_DTL Journal Transaction Detail (RPT only)
ZZGL_TRANS_SUM1 Ledger Data (RPT only)
Commitment Control
Table Name Brief Description
KK_BUDGET_HDR Budget Journal Header Table
KK_BUDGET_LN Budget Journal Line Data
ZZKK_ACT_LOG_VW Commitment Control Budget Activity
LEDGER_KK Commitment Control Ledger Data
Chartfields
Table Name Brief Description
GL_ACCOUNT_TBL Account Numbers
DEPT_TBL Departments

Training Guide
Query 9.2 PT. 8.55
Page 84
CLASS_CF_TBL Class Codes
FUND_TBL Fund Codes
PROGRAM_TBL Program Numbers
PROJECT Project IDs
Asset Management
Table Name Brief Description
ASSET Asset Information
ASSET_ACQ_DET Asset Acquisition Details
ASSET_CUSTODIAN Asset Custodian
ASSET_LOCATION Asset Location
BOOK Asset Financial Book by Asset ID
ASSET_NBV_TBL Asset Net Book Value Reporting Table
COST Asset Cost Information
DEPRECIATION Depreciation Transactions
DEPR_RPT Depreciation Reporting Table
DIST_LN AM Accounting Entries
RETIREMENT Asset Retirements
Accounts Receivable
Table Name Brief Description
ITEM_ACTIVITY Customer Item Activity
ITEM_DST Customer Item Distribution
Billing
Table Name Brief Description
Training Guide
Query 9.2 PT. 8.55
Page 85
BI_ACCT_ENTRY Billing Account Entry Table
BI_HDR Billing Header
BI_LINE Billing Line
BI_LINE_DIST BillingLine Distribution
Grants/ Awards/Contracts/Projects
Table Name Brief Description
ZZGM_AWARD_VW Award Parent Record
GM_AWARD_ATTR Award Attributes
GM_AWARD_FUND_PD Award Funding by Period
ZZCA_CNT_HDR_VW Contract Header
ZZCA_DETAIL_VW Contract Line
ZZCA_DTL_PRJ_VW Contract Line Project Details
CA_DETAIL_UAR Unbilled Accounts Receivable
CA_RATE Contract Rates
PROJECT Projects
PROJ_ACTIVITY Project Activities
PROJ_RESOURCE Project Resources
PROJECT_FS Chartfield Projects View
PROJECT_DESCR Project Description
CUSTOMER Customer Header Information
PC_BUD_DETAIL Project Budget Detail Record
GM_PRJ_DEPT Grants Project Department
GM_PRJ_ACT_FA F&A Rate Type
Inventory
Table Name Brief Description
BU_ITEMS_INV Business Unit Item Table
CART_ATTRIB_INV Par Location Attributes
CART_GROUP_INV Cart Group - Inventory

Training Guide
Query 9.2 PT. 8.55
Page 86
CART_TEMPL_INV Cart Template Inventory
CM_ACCTG_DIST Accounting Distribution
CM_ACCTG_LINE Inventory Accounting Distribution
COUNT_HDR_INV Physical/Cycle Count Header
COUNT_INV Physical/Cycle Count Item
DEMAND_INV Invetory Demand Table
DEMAND_PHYS_INV Demand Picking Locations
INV_ITM_FAM Inventory Families
INV_ITM_GROUP Inventory Groups
INV_ITEM_UOM Inventory Item Unit of Measure Conversion
INV_ITEMS Inventory Items Master
ISSUE_HDR_INV Inventory Issues Header
MASTER_ITEM_TBL Master Item Table
MSR_HDR_INV Material Stock Request Header
PHYSICAL_INV Physical Inventory Table
SHIP_HDR_INV Shipping Header Table
TRANSACTION_INV Inventory Transactions
IN_DEMAND Inventory Demand Fulfillment Table (RPT only)
CM_DEPLETE Inventory Depletions Table
CM_DRILL_INV_VW Inventory Transactions Drill
ITM_MFG Item Manufacturer table
MANUFACTURER Manufacturers table
Requisitions
Table Name Brief Description
REQ_HDR Requisition Header
REQ_LINE Requisition Line
REQ_LINE_SHIP Requisition Line Ship
REQ_LN_DISTRIB Requisition Line Distributions
REQ_APPROVAL Requisition Approval

Training Guide
Query 9.2 PT. 8.55
Page 87
Purchasing
Table Name Brief Description
RFQ_HDR Request for Quote Header
RFQ_LINE Request for Quote Line
PO_HDR Purchase Order Header
PO_LINE Purchase Order Line
PO_LINE_DISTRIB Purchase Order Distribution
PO_LINE_SHIP Purchase Order Line Ship
MASTER_ITEM_TBL Master Item Table
ITEM_VENDOR Vendor Item Table
PO_CHNG_HDR PO Change Header
PO_CHNG_LINE PO Change Line
PO_COMMENTS PO Comments
ITM_CAT_TBL Item Category Codes
RECV_HDR Receiver Header
RECV_LN Receiver Line
CNTRCT_HDR Contract Header
CNTRCT_LINE Contract Line
CNTRCT_LINE_UOM Contract Item Unit of Measure
CNTRCT_LN_SHIP Contract Shipment Table
CNTRCT_MSTR Master Contract
Accounts Payable
Table Name Brief Description
VOUCHER Voucher Header Table

Training Guide
Query 9.2 PT. 8.55
Page 88
VOUCHER_LINE Voucher Line Table
DISTRIB_LINE Voucher Distribution Line
MTCH_RULES Matching Rules
VCHR_MTCH_EXCPT Match Exceptions Detail
ZZPAYMENT_TBLVW AP Disbursements
PYMNT_XREF_VW Payment Voucher Information
PYMNT_VCHR_XREF Voucher Status
Suppliers (Formerly Vendors)
VENDOR Supplier Header Table
VENDOR_ADDR Supplier Address Table
VENDOR_CNTCT Supplier Contact Information
VENDOR_LOC Supplier Location
VENDOR_WTHD Supplier Withholding Information