Final Report for Background Check Website for R4 …...Final Report for Background Check Website for...
49
Final Report for Background Check Website for R4 OpSec, LLC Zachary Tea, Alex Bierly, Philippe Gray, Ted Yang, Tim Springsteen, Tommy Hyres Client: Joe Romagnoli CS4624: Multimedia, Hypertext, and Information Access Professor Edward A. Fox Virginia Tech, Blacksburg, VA 24061 April 28, 2017
Transcript of Final Report for Background Check Website for R4 …...Final Report for Background Check Website for...

Final Report for
Background Check Website
for R4 OpSec, LLC
Zachary Tea, Alex Bierly, Philippe Gray,
Ted Yang, Tim Springsteen, Tommy Hyres
Client: Joe Romagnoli
CS4624: Multimedia, Hypertext, and Information Access
Professor Edward A. Fox
Virginia Tech, Blacksburg, VA 24061
April 28, 2017

1
Table of Contents
Table of Figures ......................................................................................................................... 4
Table of Tables .......................................................................................................................... 5
Executive Summary ................................................................................................................... 6
1 Introduction..…………………………………………………………………………………………….7
1.1 Report Overview ........................................................................................................... 7
2 User Manual............................................................................................................................ 8
2.1 Introduction ................................................................................................................... 8
2.2 R4 OpSec Website Description and Navigation ............................................................ 8
2.3 User Submitting Résumés ............................................................................................ 8
2.4 Administrator User ........................................................................................................ 8
3 Developer Manual ..................................................................................................................12
3.1 Introduction ..................................................................................................................12
3.2 Requirements ..............................................................................................................12
3.2.1 Client Requirements .............................................................................................12
3.2.3 Project Practicality ................................................................................................12
3.2.4 Timeline ...............................................................................................................13
3.2.5 Group Input and Concerns ...................................................................................15
3.2.6 Wireframe Design ................................................................................................15
3.3 Design ............................................................................................................................19
3.3.1 Introduction ..........................................................................................................19
3.3.2 Approach .............................................................................................................19
3.3.2.1 Components and Tools ................................................................................19
3.3.2.2 Data Flow .....................................................................................................19
3.3.2.3 MVC .............................................................................................................19
3.3.3 Front-End .............................................................................................................19
3.3.3.1 UI Constraints ..............................................................................................20
3.3.3.2 Homepage ...................................................................................................20

2
3.3.3.3 Admin Page..................................................................................................20
3.3.4 Back-End .............................................................................................................20
3.3.4.1 Database Design ..........................................................................................20
3.3.4.2 Safety Measures ..........................................................................................21
3.3.4.3 Form Processing and File Uploads ...............................................................21
3.3.4.4 Admin accounts and account sessions .........................................................22
3.3.4.5 Search functionality ......................................................................................22
3.3.4.6 Security Practices.........................................................................................22
3.4 Implementation ...............................................................................................................23
3.4.1 Introduction ..........................................................................................................23
3.4.2 Group Responsibilities .........................................................................................23
3.4.3 Specifications .......................................................................................................24
3.4.4 Technologies ........................................................................................................24
3.4.4.1 Used in website ............................................................................................24
3.4.4.2 Used during development stages .................................................................25
3.4.5 Code Implementation ...........................................................................................25
3.4.5.1 Front-End Code ............................................................................................25
3.4.5.2 Back-end Code ............................................................................................27
3.4.6 Phases & Milestones ............................................................................................30
3.4.7 Progress-to-date ..................................................................................................30
3.5 Prototyping .....................................................................................................................30
3.5.1 Prototyping Introduction .......................................................................................30
3.5.2 Front-end Steps ...................................................................................................30
3.5.3 Back-end Steps ....................................................................................................31
3.6 Refinement .....................................................................................................................32
3.6.1 Prototyping Shortcomings ....................................................................................34
3.7 Testing ...........................................................................................................................34
3.7.1 Website Testing Introduction ................................................................................34
3.7.2 Client Approval Testing ........................................................................................35
3.7.3 Usability Testing ...................................................................................................36
3.7.4 Usability Testing results .......................................................................................37

3
3.7.5 Security Tests ......................................................................................................38
4 Lessons Learned ...................................................................................................................39
4.1 Lessons Learned Introduction ......................................................................................39
4.2 Timeline and Schedule .................................................................................................39
4.3 Problems......................................................................................................................39
4.4 Solutions ......................................................................................................................40
4.5 Future Work and Possible Extensions ..........................................................................40
5 References ............................................................................................................................42
Appendices ...............................................................................................................................44
A.1 Wireframe Design ........................................................................................................44
A.2 Future Applications ......................................................................................................44
A.3 Phases & Milestones ...................................................................................................45
A.4 Progress-to-date ..........................................................................................................46
A.5 Planned Work ..............................................................................................................46
A.6 Planned Changes ........................................................................................................47

4
Table of Figures
1. Top of landing page for r4opsec.com……..…………………………………………..9
2. Middle of landing page for r4opsec.com, showing submission and about us section..9
3. Bottom of landing page for r4opsec.com ………….…………………….....………..10
4. Submission page, navigate to it by pressing “Enter Info” on landing page ………….11
5. Login page for admins, accessible by clicking “Admin” on bottom of landing page…11
6. Admin home page, showing a table view of past submissions…...…………………11
7. Patgroupi.com..………………………………………………………………………16
8a. Wireframe landing page….………………………………………………………17
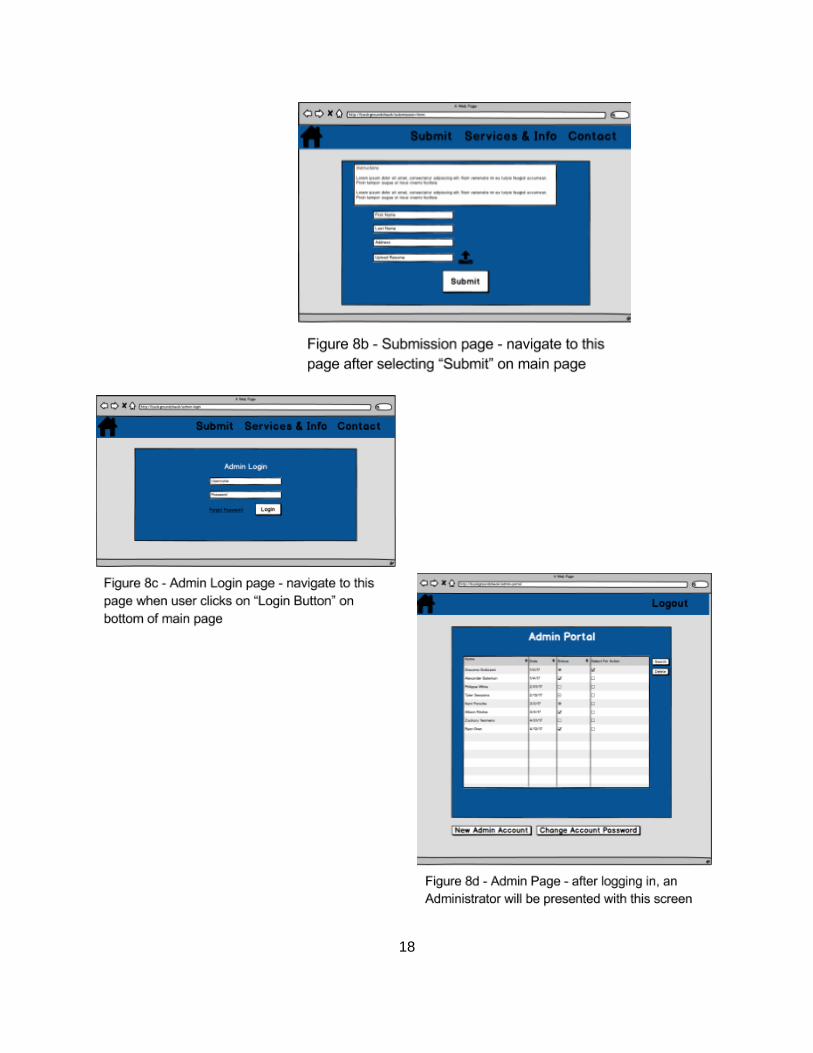
8b. Wireframe submission.……..…….………………………………………………18
8c. Wireframe admin login……………………………………………………………18
8d. Wireframe admin home page……………………………………………………18
9. Container HTML code..……….……………………………………………………25
10. Navigation bar HTML…………..…………………………………………………26
11. Navigation bar HTML change page…….……………………………………….26
12. Submission form HTML……………….………………………………………….26
13. Table view HTML…….……..…………………………………………………….27
14. CAPTCHA response……………………..……………………………………….27
15. Submission back-end code……………..……………………………………….28
16. Session login for admins…...…………………………………………………….29
17. Receive submissions……….…………………………………………………….29
18. Prototype landing page……….………………………………………………….35
19. Landing page…..………………………………………………………………….35
20. Submission page prototype……………..……………………………………….36
21. Usuability test results……….…………………………………………………….37
22. Mobile website view……….………..…………………………………………….41
23. CAPTCHA box……….…………...……………………………………………….48

5
Table of Tables
1. Timeline Table………………………………..………………………………………….14
2. Group Responsibility Breakdown……...……………………………………………….24
3. Client Rating Table……………………...……………………………………………….35
4. Usability Testing Table……..………..………………………………………………...36

6
Executive Summary
The main project deliverable was a website for R4 OpSec (r4opsec.com). The purpose
of this website is to display information about the company’s services and be able to accept
résumés for new hires. The company is owned by Joe Romagnoli and is based in Chantilly, VA.
The company works in the field of background investigation checks for the federal, state, and
local government, as well as the civilian sector. The background investigation process starts
with a company or a government agency reaching out to independent companies that handle an
investigation of a new hire to that company. A background investigation usually includes
verifying identity, past employment, credit history, and criminal history. The process can take
anywhere from a week to a month, depending on how quickly the company is able to verify a
person’s information given what the person provides to the company (i.e., proof of past
education, W2 forms, date of birth, etc.). The website has a home landing page that displays
images and text. There is a section explaining what services the company provides. Another
section to display a simple about-us description. Finally, there is a button that brings a user to
another page to upload a résumé. There is an admin login page, too, where employees at R4
OpSec can view past submissions. An admin can download the résumé, delete the submission
information, search past submissions, or mark submissions as “pending”, “accepted”, or
“rejected”. The admin is also able to create new admin accounts, edit their email address, or
change their password from the same screen. The client needed the website to be fully
functional in about 90 days. The client did not have a basic design in mind. Though, the client
did provide a basic website that we could reference for when we were thinking of designs for
this website. In November, the client had purchased a year subscription from GoDaddy.com to
host his website. We did raise concerns we thought the client should know about when it comes
to shared web hosting, which we shall discuss in the report (Section 3.2.5). Lastly, the client
wanted to make sure that this project would be expandable, and in the future, other groups or
employees of R4 OpSec would be able to build upon what we delivered.

7
1 Introduction
We will give a broad overview of our project and introduce what will be discussed in the
remainder of the report. This section will also discuss who worked on this project, and the client
that proposed this project to the Virginia Tech Multimedia, Hypertext, and Information Access
(CS4624) Computer Science class in Spring of 2017.
1.1 Report Overview
The next sections include the user manual, the developer manual, lessons our group
has learned from the project, acknowledgements, and references. The user manual will be
useful for any end-user to understand how they would use the website for uploading résumés,
or if they are an administrator at R4 OpSec, they can find out how to login to the admin home
page. The developer manual will lay out everything a group that is going to continue this project
needs to know. Finally, the lessons learned section will include some of our experiences
working on this website, and provide future project workers information about how to avoid
some pitfalls we encountered.

8
2 User Manual
2.1 Introduction
The user manual section will be useful for any kind of user that is navigating the website,
including employees at R4 OpSec that need to access résumé submissions on the admin
homepage. Personnel planning to continue working on this project are encouraged to review the
user manual, too.
2.2 R4 OpSec Website Description and Navigation
In order to navigate the website, the user can either scroll through all of the sections, or
click the button on the navigation bar for each section to make the webpage scroll quickly to that
section. The navigation bar and the buttons are pictured in Figure 1. The landing page is
composed of a home, about us, services, careers, and contact-us section. Each of these have
their own sections clearly defined by a title at the beginning of the section, and a wide margin to
help define the start and ending of the next section. Figure 2 is a continuation of Figure 1 (while
Figure 3 is a continuation of Figure 2).
2.3 User Submitting Résumés
Once a user reads about the R4 OpSec company, they can click on the “Enter Info”
button in the careers section if they are looking to apply to work for the company. The “Enter
Info” button appears in the upper-middle of Figure 3. Clicking on the button navigates to a new
webpage, the submission page, pictured in Figure 4. On this page, the user can input their
information, including their first name, last name, and email address. The last field allows a user
to upload their résumé. All fields are required in order to press “Submit”, and the webpage will
notify the user if a field is not filled in. After submitting their information, a confirmation page will
come up and thank the user, then direct them back to the top of the main landing page.
2.4 Administrator User
If an employee (or administrator) from R4 OpSec is accessing the website to view the
past résumé submissions, they can find the login button at the bottom of the page, as seen
circled on the bottom of Figure 3. Once the employee clicks on the button, it will navigate the
employee to the admin login page which is presented in Figure 5. The employee must have an
admin login in order to get to the admin home page. If they have a login, but forgot their
password, they are able to reset their password from this page, too. After logging in, the admin
is presented with a table view as seen partially in Figure 6. They can browse past submissions,
or search by first/last name. The search field also allows the user to look for submissions from a

9
specific day. Each column can be sorted in ascending or descending order. The admin user will
be logged out automatically after 15 minutes of inactivity. If the admin user is finished, they can
logout manually. If an admin user needs to change their email address, they can edit that
information in the admin settings found in the upper right of Figure 6. In the settings section, the
admin is also able to create more admin accounts. In order to assure a backup of the records
are maintained, any admin can click on the “Export Entries” button to the right. This will
download a “.csv” file, which then can be read by the website later to restore the entries in the
future.
Figure 1 – Top of landing page for r4opsec.com
Figure 2 – Middle of landing page for r4opsec.com, showing services section

10
Figure 3 – Middle and bottom of landing page for r4opsec.com, showing careers and contact-us
section, with the admin button in the bottom right

11
Figure 5 – Login page for admins, accessible by clicking “Admin” on bottom of landing page
Figure 6 – Admin home page, showing a table view of past submissions
Figure 4 – Submission page, navigate to it by pressing “Enter
Info” on landing page

12
3 Developer Manual
3.1 Introduction
The Developer Manual sections is useful for personnel who would like to know the inner
workings of the website. The work was split into front-end and back-end teams, so a person
wanting to work on this website will have a good idea of how the two components were done,
and how they work together.
3.2 Requirements
3.2.1 Client Requirements
Once the group and client were in contact at the end of January, the client told us what
he had in mind for a website and what functionality he wanted the website to handle. Firstly, the
website needed to have a home screen/landing page which displayed what the company is, as
well as a company logo. The website also needed to display a link to where candidates can
submit a résumé and contain a way for admins to view the submitted files. A services section is
included to describe what the company provides to potential clients wanting R4 OpSec to run
the background checks. Lastly, basic company contact information needs to be displayed on the
page. Regarding the back-end, the client had already purchased a domain through
GoDaddy.com to host the website [7]. The submission page (which is displayed when a user
clicks “Enter Info” in the careers section of landing page) lets users upload documents which are
then stored on the server, and can be viewed online if an administrator logs in. The client
mentioned the website needs to be expandable; much of potential future work is discussed in
Section 4.5.
3.2.3 Project Practicality
The website was designed with each end-user (including administrators) in mind. We
understood this website will be viewable to any person who comes across it. We assured the
layout is simple and intuitive to navigate.
By the first week of February we had planned we would use a single webpage where the
user is able to scroll through all the sections. Having one webpage with multiple sections makes
navigating simple because users will not have to worry about clicking around to different pages.
The only separate page a user will have to be concerned with is the submission page. This is its
own dedicated webpage to help the user focus on submitting a résumé. In order to get to the
submission page, the user just has to click on the “Enter Info” button in the careers description
section on the landing page.
As for administrator users, we placed the admin login button at the bottom of the landing
webpage so it is out of the way of people browsing the website, but easy to access for

13
employees/administrators. After clicking the admin login button, it brings the administrator to the
login page. The page allows the administrator to log in, or if they forget their password, they will
be able to reset it there. Only administrators need to login; the users do not require logging in or
creating an account to submit a résumé. Once an administrator logs in successfully, they are
presented with a different webpage that displays a table of information. The table of information
includes rows of past submissions. Each row will display the first and last name, the email and
the date they had submitted the PDF file. On the top of the table view, there is a search input
box, which filters out the table rows based on the name typed in the search box.
3.2.4 Timeline
Along with understanding what features the client required for the website, the group had
to come up with a timeline that would realistically lay out how long it would take to develop and
publish all necessary features. The timeline also includes weeks towards the end, when a
feature, needed to be tested. The timeline starts on January 30 when the group received
approval from the client and Professor Edward A. Fox. The client emphasized the need for
having some basic web design up and showing text he provided in the home, services, and
contact sections by February 17. However, due to some required verification steps that the
client had to go through with other coworkers at R4 OpSec, he was unable to provide us with
key information to publish on the website until the week of April 24. Therefore, some items in
Table 1 below were pushed back by a few days. Aside from that, the other deadlines did not
need to change by much because the final website was completed in the background. The
information needed to be displayed on the home page (including services, about us, and contact
sections) was added in later.
Another key point on the timeline is that we agreed to check in with the client every two
weeks. Checking in with the client involved giving an update of what has been finished already
by email or over the phone. These meeting dates were important to assure both the group and
the client are on track to develop features on time, but also make sure that the feature we are
adding at that time is done correctly as per the standards of the client. Unfortunately, it was not
until April 24 that we got most of the feedback we had needed, because the client had been to
busy to respond to our updates. When a new feature was added, we dedicated time to refining
the feature by testing it later on. We confirmed that the feature performs as intended. The
feature testing was wrapped up in the late April, though, as discussed with the client, we
dedicated the rest of April to quality testing as needed.
We made sure the client was aware of the week of Spring Break for all Virginia Tech
students, so the client would know that it was possible that some group members may not be
fully available at that time. Lastly, the timeline also mentions the due dates of assignments for
this project in class. Some assignments required the client's input. For example, at the semester
end the client gave a rating for the quality and quantity of work we delivered by the end of April.
All final improvements, features, and class project reports was to be submitted by May 3.

14
Table 1 - Timeline Table - timeline for project development
Task Original Date Actual Date
Milestone 1: Team Organization
Receive and review client's notes/outline by Feb. 1st February 1 February 1
Check in with client for outline review, break into front-end/back-end
development teams February 3 February 3
Milestone 2: Lay out and Design of Website / Incremental Implementation
Version 1 draft of website with simple home, services, and submission
page February 15 February 17
Check in with client, add image/videos/format text, and make version 1 of
website available for public.
back-end Team: research into document uploads and admin account
management
February 17 February 20
Add pages/sections to Bootstrap layout, start testing for usability, create
submission page February 24 February 28
Check in with client, demo version 2 of website for feedback, submit
project progress report (for class) March 2 March 2
Virginia Tech Spring Break March (4 - 12) -
Have feedback from client implemented, admin login page and admin
homepage complete
back-end team: set up database
March 17 March 22
Check in with client for feedback
back-end Team: File submission acceptance complete March 24 March 24
More usability testing for webpages
back-end Team: Test server up and running, admin home page to display
submissions correctly March 27 March 27
Have additional feedback implemented March 31 March 31
back-end Team: Admin home page completed with search and
management for records, admin account creation and login sessions
implemented
April 3 April 7
Check in with client, second demo for version 3 April 7 April 7
Complete functionality for document uploads, admin home page, search
and management functionality for admins April 14 April 26

15
Milestone 3: Usability, admin login, submission testing
Check in with client, discuss usability testing April 21 April 24
All webpages complete usability testing
back-end Team: Security and search testing completed for the back-end April 30 April 26
Final website live with full functionality, continue working on project report
(for class) May 1 April 28
Milestone 4: Final Client Check / Project Finalization
Final presentation and submission for project report (for class) April 27 / May 2 April 27
Final check with client, send project report to client May 3 April 28
3.2.5 Group Input and Concerns
The group assumed that we would be designing a website that would have to handle
submissions securely, so we started planning to build a secure website that would run on a
private web hosting site. The problem was that the client emailed us during the first week of
February informing us that he had already purchased a domain name and web hosting service
through GoDaddy.com [7]. We were concerned with the issues that many public web hosting
services have had in the past. If one website is effected by heavy traffic or website overloading
attacks, other websites running on the same server would be negatively affected, too. We were
also concerned with the fact that we are forced to use PHP for back-end development because
it is inherently insecure. PHP has been around for a long time; anyone that is an expert in the
language can easily exploit any uncovered loopholes in the code.
We were able to write a letter to the client letting him know of our concerns and provided
alternatives to shared web hosting. We recommended private virtual servers like Linode [9] and
Digital Ocean [10]. We explained simply that using one of the private virtual servers would help
avoid some of the security risks found in public hosting websites. We also let the client know
that the cost of these private servers is relatively the same as what he had paid for the
GoDaddy.com subscription [7]. The client responded to our letter telling us that he would like to
stick with the subscription that he had already purchased because the funds for this new
business were not available yet. Also, because users will only be uploading résumés that
contain public information, security is not as big of a risk as previously indicated.
3.2.6 Wireframe Design
Initially, the client specified a design philosophy that was to be simple, with an example
website being patgroupi.com [1], shown in Figure 7.

16
Figure 7 - Patriot Group International Website - example provided by client (patgroupi.com)
The design of this page is fairly simple, with a navigation bar at the top, and a strong,
eye-catching image on the landing page. The few options on the navigation bar avoids
overwhelming a person that is visiting this website for the first time. The color scheme used
relies on only a few colors. All the text for the paragraphs are in the middle of the page, so the
user’s eyes do not have to read from the left of the screen to the right. Our group took this
structure and applied it to our website plan, and after several iterations, we arrived at this page
structure, shown in Figures 8a, 8b, 8c, and 8d in wireframe form. Every section has been
designed, however only example pages are shown here. The wireframe was designed using a
free license of the software Balsamiq Mockups [5]. Figures 8a, 8b, 8c, and 8d are all made with
the Balsamiq Mockup tool. These designs were meant to act as a starting point for how to
website will look. The final product seen in Figures 1, 2, 3, 4, 5, and 6 represents the final
product.

17
Figure 8a - Main landing page – submission, about us, and contact sections below the
main section
18

19
3.3 Design
3.3.1 Introduction
Now that we have discussed how the website was planned to look, we will go into more
detail about how the website was designed.
3.3.2 Approach
3.3.2.1 Components and Tools
HTML, CSS, and JavaScript accounts for the front-end visual components, PHP for the
back-end, and MySQL for the database software. The client had already set up a host server
with GoDaddy [7]. This restricted us to only basic management options, including FTP file
transfer and viewing usage limits and statistics.
3.3.2.2 Data Flow
Most of the information and text/multimedia on the public webpage is static, including the
contact and services subpage as seen in Figure 8a. The biggest chunk of actual data flow
involves the submissions and admin pages. The submissions page allows the user to upload a
document file, store it in private storage, and keep a copy of the URL in our database. The
admin page reads and write data from our database, primarily involving the submissions.
3.3.2.3 MVC
Following the Model View Controller architectural pattern, our models includes
administrator and file. Our views of the architecture includes pages such as the homepage,
submission form, as well as the administrative portal (administrator login page). After a
submission has been made on the submission page as in Figure 8b, an additional page will be
displayed confirming the submission has been received.
Finally, our controllers allow for data transfer between the MySQL database and our
views. Most of our controllers include displaying submission information and validating an
administrator’s session in the Administrative Portal.
3.3.3 Front-End
When thinking of an initial design, we had to consider the most intuitive way users can
interact with the website efficiently. Ideas included either linking multiple pages to different
components of the website, or having one page which contained all the necessary information.
We also needed to consider how the website would look on a mobile device once the site is
functional.

20
3.3.3.1 UI Constraints
One issue we came across when using multiple pages for each section of the website
was having enough content on each page. Since the company is fairly new, there is a limited
amount of information which can be available to the public. Our other method of using one page
dealt with a security issue. We did not want any user to have access to possibly sensitive
information. To handle the mobile compatibility issue, we decided to use Bootstrap [6] to
account for this. This way, the website will be intuitive to use for both mobile and desktop users.
3.3.3.2 Homepage
For our design, we decided to combine these two ideas to have one page as a landing
page that any user has access to. This page contains a careers section, an about us section, a
services section, and a contact-us section. At the top of this page, there is a toolbar containing
the different sections of the site. When clicked, it will smoothly scroll the user to that section of
the page. The toolbar will also always be displayed at the top of the screen no matter which
section the user has navigated to. We also include a home icon in the top left of the screen
which will link to the homepage.
3.3.3.3 Admin Page
At the bottom of the homepage, a link is provided for admins to log in to view submitted
résumés. An admin will also be able to log in here as well to create new admins or to view
entries in the table. This page is a table which can be sorted by name or date, has the ability to
delete entries, and contains a download résumé option.
3.3.4 Back-End
The client’s decision to use a shared hosting instance requires us to use PHP and
MySQL. Since PHP has many security pitfalls, we were especially careful in implementing the
back-end.
With a simple database design, our main focus was to make the data transfer operations
as secure as possible using a variety of measures, including CAPTCHAs and rate limiting. Most
of our work was done in the middleware with PHP, with occasional linking with our MySQL
database.
3.3.4.1 Database Design
The MySQL database for this website consists of two tables: Admins and Submissions.
The admin users table contains the columns: username, password, email, auth_ip, auth_time,
and is_super_admin. The username and password authenticates a valid administrator’s login
session, and the is_super_admin boolean checks for the “first,” master admin. The

21
is_super_admin boolean is utilized when creating new administrators. Only the “super”
administrator will be able to create new administrators. In the case where the super
administrator is no longer working on the web application, the super administrator will be able to
“promote” other administrators to the super status. The password field is hashed with the Bcrypt
algorithm and salted with the email field [12]. The email field is present so admins can recover
or change their passwords. The auth_ip and auth_time fields are used for added session
security features.
The submissions table contains the columns: email, first name, last name, résumé_path,
submission_date. More fields may be necessary in the future and can be added with complete
backwards compatibility.
3.3.4.2 Safety Measures
There were several approaches to implementing safety procedures for our back-end
database, in terms of backing up our data. There are three primary reasons that we wanted our
database to be backed up frequently.
-Accidental/Intentional Database Wipes
-Recover a specific version of our database
-Unplanned crashes and/or data corruption
A simple and straightforward approach to backing up our database is to have a .csv file
exported saving all of the table entries. This can be done through the admin home page by
clicking on the export option. This provides a plain “.csv” file with the SQL commands that make
up our database. What this essentially does is it deconstructs our database from the bottom up,
providing us with a series of commands that rebuilds our database from scratch. This text file
can also be constructed via SSH. We can create a dump of the SQL database using the
command
$ mysqldump -u admin -p`cat /etc/psa/.psa.shadow` dbname > dbname.sql
Here admin is the username, dbname is the name of our database, and dbname.sql is the
name of the file we want to export.
3.3.4.3 Form Processing and File Uploads
Submitted files are stored in a non-public directory, specifically in a directory located in
the public_html folder, where it is not accessed by the public. When the admin needs to retrieve
a file, PHP file streaming is used to allow the admin to download the file.

22
3.3.4.4 Admin accounts and account sessions
Admin accounts are implemented with PHP sessions. Once the admin enters
correct authentication details, a is_authed boolean is set to true on the server side data store for
their session. PHP sessions use cookies, but actual data is stored on the server side and
cannot be manipulated by the user. Security measures for user sessions are explained in the
security practices, Section 3.3.4.6.All admin related activity will check the current session to
ensure that the user is logged in as an admin. Sensitive functionality will additionally require the
user to type their password again. This includes super admins creating admin accounts and
password changing.
3.3.4.5 Search functionality
Admins are able to search submission results as follows
Partial matches:
● First Name
● Last Name
Range searches:
● Submissions before a given date
● Submissions after a given date
● Submissions between two dates
Results sorting: Search results can be sorted in ascending or descending order based on
submission date, or alphabetically for any of the fields.
3.3.4.6 Security Practices
Prepared statements for database input: SQL injection attacks are eliminated by
requiring all queries to use PHP Data Objects (PDOs). This approach uses parameter binding.
Secure Sessions: Admin sessions are created when a user provides valid login details. For user
actions, the authentication checking function will ensure the IP address the user provided when
logging in matches their current IP address. This prevents session hijacking. Sessions will time
out after fifteen minutes.
Password Hashing: Password hashing ensures that in the case of a database compromise, the
password of the user remains safe [3, 12]. This helps protect the accounts of not only the users
on the site, but also their accounts on other sites by keeping their passwords private.
We use salted Bcrypt hashing [3, 12], as this is a modern algorithm that is still secure
against brute force guessing in the case of a database compromise. We salt the password

23
hashes with a unique string for each admin user, such as username or email, which further
protects the hashes against precomputed dictionary attacks. This, along with a password
complexity requirement would make cracking passwords infeasible, even if the hashes are
publicly known. Admin users have a password complexity requirement, specifically 10 or more
characters, requiring numbers, letters, and special characters.
CAPTCHAs and rate limiting: CAPTCHAs are used on the submission page to prevent
malicious users from using bots to spam the submission form [13]. Rate limiting is used for the
admin login, to prevent brute force password guessing attacks. The rate limiting method is a
“sliding window”, which only allows a certain number of log in attempts per IP in a given time
window.
HTTPS: HTTPS consists of communication over Hypertext Transfer Protocol (HTTP) [14] within
a connection encrypted by Transport Layer Security, or its predecessor, Secure Sockets Layer.
We use HTTPS in order to prevent man in the middle attacks which could compromise user
information in the submitted forms and files. It also protects the authentication system for admin
users.
3.4 Implementation
3.4.1 Introduction
The primary goal of our team was to design and develop a full stack web application
capable of accepting résumés for new hires. As a full stack web application, our product
required several precise steps to be taken in order to ensure the highest achievable quality.
3.4.2 Group Responsibilities
The work for the project was equally split between front-end and back-end development
teams. The teams were decided primarily based on interest/experience to provide as much
efficiency as possible. Each team and role is represented in Table 2.

24
Table 2 - Group responsibility breakdown - each role a group member plays in development
Zachary Tea Manage project communication with client and professor, search support design, meeting note keeper
Ted Yang Web design, back-end web development
Philippe Gray Back-end leader - Designs and implements database structure, authentication, and back-end API. Ensures back-end is scalable, secure, and maintains good data integrity
Alex Bierly Front-end leader - front-end web development, usability design testing, assisting in client communication
Tim Springsteen Back-end web development and design
Tommy Hyres Front-end web development, assisting in client communication, and image/text/video management
3.4.3 Specifications
The most complex feature of the background check web application was securely
uploading a document file to our database and storing it in an easily accessible, yet secure
location. This required knowledge of creating a secure connection with our database and storing
a reference to our file in the form of a primitive data type in our database such as a string that
refers to the file's URL. We had to also weigh the options of storing our files remotely on a cloud
storage service or directly on our hosting service GoDaddy [7].
Another major feature of our application includes accessing and manipulating data
through our administrator portal. This feature required knowledge of displaying data from our
database, as well as writing and overwriting data to our database. In addition to this, every
administrator’s session must be secure and we must take preventive measures to keep
potential hackers from exploiting our login page/process. These required basic knowledge on
SQL database operations and more extensive information on security measures to keep our
administrative page as private as possible.
3.4.4 Technologies
3.4.4.1 Used in website
HTML5 - HTML [15] gives the website its structure. Can be thought of as the basic building
block of the website.
CSS3 - CSS, or Cascading Style Sheets, communicates with the HTML code to provide the
website with design and styling. Without it, the ability to visually customize your website would
be lost and the site would likely not be aesthetically pleasing.
Bootstrap - HTML/CSS service that provides basic tools such as dropdown menus, navigation
bars, etc. [6]

25
PHP - A scripting language used to communicate between the SQL database and the server.
MySQL - MySQL [16] is a database technology and will be used to store and retrieve client
information and documents in addition to storing admin users’ credentials.
3.4.4.2 Used during development stages
Balsamiq [5] - Used in early design stages to create an interactive wireframe form of the
website concept, in order for the front-end team members to view a common visual as they
coded the HTML and CSS.
Github - Web-based Git or version control repository and Internet hosting service [17]. Used to
maintain version control throughout the entire process.
3.4.5 Code Implementation
3.4.5.1 Front-End Code
For the layout of the landing page, we rely on Bootstrap [6] and HTML [15] to divide the
sections up into the home, submission, about us, and contact sections. To make the main
webpage look like Figure 9, we must define each div tag with the class as “container.” In Figure
9 we have an example of what each section looks like in HTML.
Figure 9 – Container HTML code
The purpose of defining each section under the class “container” lets the CSS in
Bootstrap automatically apply the margin spacing around the section. The purpose of assigning
the id property to each div tag is to let the buttons at the top of the screen on the navigation bar,
as can be seen in any of Figures 1, 2, or 3, to jump directly to the correct section. Looking at
Figure 9, we see that the id is “submission_start”, so when we define the navigation bar to have
a button with a href property set to “submission_start”, Bootstrap knows to scroll down to the
start of the submission section. In Figure 10, this is what the navigation bar defined in HTML
looks like, with the four buttons.

26
Figure 10 – Navigation bar declaration in HTML
As for the home button, located to the upper left in Figures 1, 2, or 3, we define the same
kind of elements as for the other sections, except the href property only takes in a forward slash
“/” which represents the start of the webpage.
Figure 11 – Defining how to navigation with home button in HTML
In order to get to the submission page, which is a separate webpage than the home
page, the user can select the “Enter Info” button found in the careers section, see Figure 2. A
simple button tag is defined in HTML, and the property of “onclick” takes in a string that defined
the location of the separate HTML page we are going to display. In Figure 11 above, we see
that one of the last lines includes “href=’html/submission.html” because the submission page is
defined as a file called “submission.html”. Once we get to the submission page, the way we are
able to accept information from a user that wants to send in their résumé is represented by a
few lines of code, at least on the front-end part; the back-end part will be discussed later on in
this section. In Figure 12, we see that the tag “form” is used. This HTML tag lets the browser
know that information will be typed in and then an action will take place. Within the form tag, we
have input tags that represent places to input first name, last name, email, and the résumé to
upload. After the button to Submit is pressed, all the information that was inputted will be sent to
a PHP script called “upload.php” as see in the same Figure 12.
Figure 12 – Submission page form HTML
Finally, we look at the admin login page. The login page is accessible by the login button
at the bottom right of Figure 3. Clicking on that link will display a new webpage. The login HTML

27
code looks similar to the way a file would be submitting, but instead of sending user information,
it takes a login user name and password, and passes that information to the back-end PHP
script. Successfully logging in shows the Admin home page, like in Figure 6 in Section 2. The
HTML includes simple table view tags. After the table tag, every row and its information can be
displayed as tr tag to organize it. Figure 13 shows how the tags look in the HTML file for the
admin login page.
Figure 13 – Displaying table view information in admin home page
3.4.5.2 Back-end Code
As for the back-end code that handles file submissions and admin logins, we relied on
PHP and MySQL. Once the user on the submission page submits their information, the
“upload.php” script is called.
Several checks are in place to make sure the information submitted is acceptable.
Acceptable information includes every field being completed, and the file to be a PDF that is
less than the maximum size (which is currently defined as a little over one gigabyte). If any of
these conditions are not met, we return an error to the user. If the submission is successful,
then the file can be moved to the uploads folder, which is located in the directory above. We
also check for the CAPTCHA Response to be valid in order to prevent spamming submissions.
Figure 14 – CAPTCHA Response code

28
The information from each field is then inserted into our database, followed by a file
upload to a private folder hosted by our server, GoDaddy.com [7]. The servers hosted by
GoDaddy.com are reported to have a 99.96% uptime, guaranteeing minimal server reliability
issues [7].
Figure 15 – Submissions code
Several checks are put into place during the actual uploading phase of the résumé file.
We make sure that the file is both:
1. A PDF format file
2. Less than our desired maximum upload size.

29
As for the admin login process, the admin user starts on the login page. Once they input
their information it can then be sent to a PHP script to check.
Figure 16 – Admin login process check
Once a secure administrator session has been established, we receive all submissions
from the database.
Figure 17 – Receive all submissions to populate table

30
3.4.6 Phases & Milestones
The website project was divided into four milestones. The separation of team
organization, design layout, usability testing, and project handover helps provide structure for
completing the website. The use of milestones not only helps the group know what task is next,
but also helps the client gauge what steps will be taken to complete the project. Table 1 breaks
down each task into one of four milestones.
3.4.7 Progress-to-date
As of April 28, the website is fully functional and made public. We were able to implement
feedback given by the client earlier in the week. The feedback included changing the
“Submissions” section to “Careers” and adding a “Services” section. The client also was able to
provide content for the sections, and a logo for the R4 OpSec company. The client approved of
the home page after the changes were made. The group and the client also reviewed the
submissions process, and the admin login features together. Overall the client was pleased with
the changes.
3.5 Prototyping
3.5.1 Prototyping Introduction
This section will discuss the prototypes that were created during incremental
implementation before the final website could be completed. Versions 1 and 2 of the website did
not have much functionality, only displayed information on the webpage. Not until version 3 we
have file uploads working, admin log in ability, and the admin login page able to populate after
submissions were made.
3.5.2 Front-end Steps
In order to get the prototype up and running on the front-end, our front-end team had to
make sure to complete every HTML document that will be displayed to the public. These images
can be seen in Figure 1. The landing page and its sections are written in a single HTML file. As
in most websites, initial webpage’s file is named “index.html”. The “index.html” rests in the public
folder, while the other webpages exist in a folder named “html”. The submission page, admin
login page, and the page for confirming a submission are their own HTML files inside the “html”
folder.
After the structure of the HTML files was decided, we were able to polish the layout of
webpages to add more style. The choice of blue and light gray color scheme was chosen at the
start because it was a similar color scheme to the patgroupi.com [1] webpage the client wanted

31
the website modeled after. The landing page first started as a simple white background with the
different sections having a thick blue border around them. Though, to make the landing page
more eye-catching, we knew having some high-resolution images in the background would be
better than a simple white background. For version 3 of the prototype, we went with simple
stock photos. The first photo acts as the background for the top of the landing page (home
section). This choice of a server room as a background was not meant to be permanent; it
simply was a placeholder to show the client how the background image he will choose will be
displayed on the website. The second photo is a close up of a pair of glasses, a pen, and a
piece of paper. This background image is behind the services section. The use of the second
image was to help make sure the second half of the landing page was not plain and simple, with
just a white background. In the past, websites would commonly place images or backgrounds
on the webpage so when the user scrolls the image would move as the webpage is scrolled up
or down. But our group found it more aesthetically pleasing to use a form of parallax scrolling
[11]. This type of scrolling is when an image is static in the background, and text that is in the
forefront moves over the background images as you scroll. We define the webpage to show a
different background image after a section of the landing page (the submission section) is
scrolled over the previous image.
Along with images, the information and how it is displayed was crucial, too. As seen in
the services page, we made sure the text was legible by making the immediate background of
the text be a slightly dark color. This did not interfere with seeing the background image,
because it is still transparent, seen in Figure 2.
Now looking at the submission page, we can see the fields all have the placeholder text
that helps tell the user what information must be inputted where. Under the title that says
“submission” is some text in a dark red font that instructs the user exactly what to do. This
assures that the user knows what needs to be done to complete their submission correctly. The
webpage also helps make sure the user does not forget any of the fields because it displays a
small box by the field asking to complete it.
For the last version 3 prototype webpage, we have the admin login page. This page
displays two input fields, a button for logging in, and a button for resetting the password. The
components are centered in the middle of the page to help the admin user focus.
3.5.3 Back-end Steps
In order for our back-end prototyping to start, we required several basic front end pages
to work with, including a simple submission form with the required fields and submit button, as
well as another simple login form with the required fields and submit button for the
administrative page.
As our primary functionality of our website was to securely submit, store, and host user
information and user résumé files, we immediately began with the submission functionality of
our website. To prevent buggy code from reaching our GoDaddy.com server, we maintained a
development GitHub repository, as well as a privately hosted server to test our middleware and
database interactions. When we had the upload portion of the code ready, we first injected
mock data into our database by hard coding user information and calling the method directly.

32
This was done to simply ensure that a connection with the database was being created, and
that our query was correct. After we had this working, we modified the method to receive user
input from the text fields in our submissions page, finishing the text portion of our submissions
functionality.
As we moved onto the actual résumé PDF file submissions, we needed to slowly migrate
back onto our GoDaddy.com host server in order to store a copy of the PDF file in a private
directory. This particular location was chosen because of GoDaddy.com’s inherent security, and
also because of the simplicity of directly storing any relevant files in the same location as our
hosting server. Again, we used direct, hard-coded injections first, ensuring that our logic/code
was up-to-par with our desired functionality, and then modified the code to take the user input
file as a parameter.
Finally, after having the submissions portion of our site completed, we refined the entire
process overall, adding a CAPTCHA [13] verification to prevent quick, multiple submissions
from the same source.
As we moved onto the administrative portion of our web application, we moved back to
our private developmental server to create/modify administrators and to display submissions
made to our database. Again, we took an incremental approach, starting with the administrative
privileges. First, we created a simple login authentication process that utilized the login portal
created by our front-end team. This would check the user inputted username and password and
reference our database for a match. If the SQL query would return a valid administrator, a
secure administrator session will be created, allowing access to the administrative portal. (The
actual code for this can be found in Section 3.4.5.) Again, we implemented the hard coding
technique in order to guarantee that our actual query and logic was correct, then moved on to
actual user input.
Finally, we prototyped our actual administrative page, which was mostly front-end
intensive. The back-end involvement in the administrative page (list view of past submissions)
was limited to retrieving user information, as well as PDF files linked to specific users. This was
accomplished with SQL queries based on the search criteria (SELECT * as default).
3.6 Refinement
In this section we show images of the prototype, which were used for usability testing
discussed in Section 3.7. The prototype was also the main version that was shown to the client.
Also, we talk about some shortcomings of the prototype.

33
Figure 18 – Prototyping landing page - home
Figure 19 – Landing page, scrolled down to submission/about us sections

34
3.6.1 Prototyping Shortcomings
Figure 18 is the first prototype landing page, with a stock photo in the background
representing advanced storage services to give first time users a feeling of security when
submitting their information. You’ll also see the lingering navigation bar which will take you to
the main features of the site (also shown in Figure 19). While we are satisfied with the general
design, the prototype design falls short of a 100% professional appearance. We discuss in
Section 3.7 how to usability tests were run on this design, and the outcome.
Figure 20 - Submission page prototype
There are also several security features that the prototype lacks. Chiefly, the site
prototype is vulnerable to spam and directed attacks that would put servers at risk of crashing.
There are two planned measures to safeguard against this, both of which are discussed in
Section 3.6.2. Lastly, there are several missing admin functionalities such as password reset,
email alerts, admin sub-accounts, etc. These will also be discussed in further detail in the
following section.
3.7 Testing
3.7.1 Website Testing Introduction
A crucial part of the website design project is to assure that certain tests are done on
components including usability, stress testing, privacy/security, and ranking client approval. The
usability test and ranking client approval requires actual meeting with people in person to
discuss their thoughts of the website layout we have designed. While the stress testing and
privacy/security testing can be done with a program.

35
3.7.2 Client Approval Testing
The client approval test consists of several features and parts of the website that the
client requested, which the client has already graded our implementation as of April 28. We
formed Table 3 that lists the components the client will be able to rate on a scale from 1 to 3.
The rating of a 1 tells us that the client disapproves the feature, or does not like how it was
implemented. A rating of a 2 means the feature or component can include some changes. A 3
means the feature or component passes as is. A section for comments was also including, so
the client was able to specify what about the feature needs to be changed. The client was also
consulted with about adding other features or components to be ranked.
Table 3 - Acceptance testing by client
Component Rating (1 - 3) Comments
Ease of updating or making changes to website in the future
Client understands how to website was created and functions
Website represents clean design by client standards
A user’s ability to submit information is simple to do
Website is accessible to all users on desktop or mobile screen
Navigation in website is simple and effective
Admin account login process is functional and easy for employees to use
Admin home page is easy to use and incorporates necessary features

36
3.7.3 Usability Testing
The website was designed by the group’s own layout sketch, as seen in the wireframe in
Figure 8a. This means the layout of the website must be tested for usability to make sure the
layout our group chose is easy for everyone to use. We decided to pick usability testers of all
backgrounds to give feedback on the website overall. We found people from the Multimedia,
Hypertext, and Information Access (CS4624) Computer Science class at Virginia Tech, and
other students at the university, too. The specific people to use for usability testing did not
matter. Anyone that has used a website to upload some of their information and their résumés
before would be able to compare their experience using this website’s submission process
versus other website’s submission portal.
Some of the qualities we wanted to test included rating ease of use of the website. The
usability test group was simply told that the R4OpSec was a background check company that
worked through the private and public sector to investigate a person’s past. The website
currently allows anyone to upload their information to the submission page in order to apply to
the job.
Table 4 - Ranking components for usability testing
Component Rating (0 - 5) Comments
Layout of website home page
Ability to find information about what the company does
Easy to find the contact information for the company
Ease of making a submission of their information
Ease of using and accessing admin login page
Ease of searching for past submissions as an Admin
Layout of Admin homepage
The last three components include usability testing for the admin side of the website.
Most users that will access this website will not be accessing the admin page, only employees
at R4 OpSec. The employees at R4 OpSec who will have admin access for the website are not
expected to have much technical background. We expect that most admins will be able to easily

37
log in, search for a résumé (for simply browse recent ones), and download the résumé if
needed. The three components picked to rank for usability tests include the ease of accessing
the admin login page, searching and browsing past submissions, and finally we asked for a
rating of the overall layout of the admin homepage. Our group decided these three components
were crucial for testing the admin side of the website.
The tables in the usability testing and the client approval test are similar in that we
welcome comments from the tester. The scale includes ranks form 0-5. The rating of a 0 means
they did not agree with the component. A ranking of 5 means they did. Comments were useful
for our group because it provided feedback for our layout design we picked.
3.7.4 Usability Testing results
As of April 24, we compile all of the results into a bar graph showing in Figure 24. The
results show that the home layout, ease of admin login, and admin home layout were lowest
around a rating of 4. The use of a yellow line between the first four bar graphs and the rest
divide up testing of the average user making a submission, and an employee accessing the
admin features.
The most common comment about the home layout was that the first image took up too
much space. We fixed this by making the first image take up only a third of the space as it did
before, see Figure 1 compared to Figure 18. We decided to leave the admin login button where
it is, because we wanted it out of the way of most users simply visiting the website for
information. The admin home page was altered by adding necessary features to make
searching and managing the downloads easier. The status section seen in Figure 6 is editable
with a dropdown box. Or if the user wants to disregard the submission, they can remove it with
the little red “X” to the very right.
Figure 21 – Usability test results graph for all users including admin users

38
3.7.5 Security Tests
In Section 3.3.4, security practices were discussed. It is important to ensure that user
information remains secure, and that database integrity is never compromised. Here we will
ensure that the security practices we discussed previously were properly implemented. This
additional testing was done to ensure nothing was overlooked or forgotten during previous work.
SQL injection is the first issue we tested for. This was done by testing all input fields to
ensure that each is properly protected against such attacks. This ensured that our decision to
use PHP Data Objects (PDOs) has eliminated the possibility of SQL injection attacks as every
field makes use of these.
As an added protection against session hijacking we require that all actions that require
user authentication come from the same IP address that the user logged in from. To test for this,
an account was logged in and then reconnect using a different IP address. Then they attempted
to do an action that requires user authentication such as search through submitted user
information. This attempt was expected to fail, and did. Another similar measure is that sessions
time out after fifteen minutes. This was tested by waiting sixteen minutes after logging in and
then attempting to do an action that requires user authentication. To further test that this is
working as intended a user was logged in, then after ten minutes did an action that requires
user authentication. After waiting six additional minutes they once again attempted to do an
action that requires user authentication. As expected, the user was able to make changes. The
final part of this test was to have the user wait another sixteen minutes and once again attempt
to do an action that requires user authentication. As expected, the user was not able to
complete another action because the timeout occurred.
To ensure that CAPTCHA was working as intended the following two tests were done.
First, information was submitted without using the captcha on the submission page. The
expected result was the form returning a message indicating that the CAPTCHA was not
successfully completed. Second, information was submitted after successfully completing the
captcha on the submission page. As expected, the submission was successful. These two tests
ensured that information can only be submitted after successfully completing the CAPTCHA.

39
4 Lessons Learned
4.1 Lessons Learned Introduction
We will go over our experiences as a group working on this project in this final section. We will give a broad overview of the timeline we had made for working on the website, along with some comments on the change we had to make due to schedule conflicts between the client and our group. We will talk about problems we ran into, along with the solutions we provided. The last subsection will review the future work that we think would be possible for the website.
4.2 Timeline and Schedule
Table 1 shows the updated timeline of scheduled tasks, next to dates we actually completed. As seen there are several entries that had to be pushed back by a few days. One of the main reasons for the differences in the actual and expected dates was the concern our group had with security of the website because it was running on a shared hosting service. Other issues included gauging how long it would take to implement a feature. A few meetings between March and April didn’t happen unfortunately because the client was too busy to meet with our group to provide feedback. Luckily by the end of April we were able to talk with the client over the phone and demo the nearly finished product. This allowed us about two weeks to implement and feedback the client had provided.
4.3 Problems
One of the first issues we encountered is discussed in Section 3.2.5. We simply raised concerns with the GoDaddy web hosting service, which the client did listen, and decided to stay with the web hosting service. Our group agreed it would work fine if we were only accepting résumé submissions.
Some of the problems encountered were due to scheduling conflicts between our group and the client. The client had been managing the steps required to start an independent business. Even though we had planned to meet with the client we did not get to several times. The lack of communication lead to the project not getting incremental feedback. Though, the group was able to work around this, as discussed in section 4.4.
Other issues include inclusion of as much features as possible. The basic idea of the website was to only include the ability to accept résumés from anyone interested in applying for the company. The submission information was to be sent in an email format to the client’s work email. Though we wanted to add in more robust features to the website, we left these features to be possible extensions discussed in Section 4.5.

40
4.4 Solutions
In order to get around the lack of communication with the client, the group decided to continue working on the project, instead of waiting too long for a response from the client. We decided to email the client every two weeks, or leave voice messages over the phone providing the client with an update. The group knew the general features that the client wanted, and implementing the features would not be a heavy task. We were able to get in contact with the client towards the final weeks of April, which we were able to receive all the feedback we needed.
The issue of adding more features to the simple website was somewhat fixed by adding more functionality to the admin homepage. This includes removing submission entries, searching by range, and sorting by names, dates and emails in ascending or descending order.
4.5 Future Work and Possible Extensions
The final product still can accommodate several extensions to add features. These
extensions will be used to enhance the user experience as well as improve the efficiency and
functionality of the site. Some possible extensions include mobile compatibility, optical character
recognition (OCR) pdf scanning and submission of other files.
Bootstrap [6] has the ability to use mobile friendly styles to make the webpage easier to
use for mobile users. Currently, the website on a mobile device, such as a smartphone, looks as
Figure 22.
Figure 22 – Mobile view of R4 OpSec website

41
This version of the website on a mobile screen makes the images and text condense into
smaller sizes. Attempting to read the oddly formatted text becomes difficult as the screen gets
smaller. One future fix could be making sure the text and images do not remain as a fixed size
and display between wide margins.
Another extension which would be helpful to the user would be OCR PDF scanning. By
implementing this, an admin would be able to search not only by name, date, or time of
submission, but instead within the PDF files.
Our last suggestion for a possible extension to the website would be allowing for
submissions of multiple files. Along with submitting a résumé, a user might want to submit a
cover letter, biography, professional pictures, etc. Currently, our website only allows for the
submission of one PDF file per submission. To account for the submission of multiple files, we
could either not limit the number and type of file submission or we could have different
submission pages for different file types and have the files match up to the name of the user
who submitted the files in the admin table.
Time permitting, these features would be a great addition to the website. They would
help the user by allowing them more options within the website, such as mobile users have a
higher quality experience with the collapsing navigation bar and the submitters to have more
choice as to which files they can submit. The administrator users can also benefit from these
features by being able to more accurately search their database of files.

42
5 References [1] Patriot Group. "Patriot Group International (PGI) | Home." August 2009.
Retrieved March 13, 2017, from Patriot Group International: patgroupi.com.
[2] Backgroundchecks.com, "Backgroundchecks.com Learning Center." June 2016.
Retrieved March 13, 2017, from: Backgroundchecks.com.
[3] Greenberg, Andy. Wired "Hacker Lexicon: What Is Password Hashing?". June 8,
2017. Retrieved March 13, 2017, from Wired: https://www.wired.com/2016/06/hacker-
lexicon-password-hashing/
[5] Balsamiq Studios, LLC. "Balsamiq. Rapid, Effective and Fun Wireframing
Software.” July 2008. Retrieved March 13, 2017, from Balsamiq: https://balsamiq.com/
[6] Mark Otto, Jacob Thornton, and Bootstrap Contributors. "Bootstrap · The World's
Most Popular Mobile-first and Responsive Front-end Framework." Bootstrap. June 2017.
Retrieved March13, 2017, from MIT: http://getbootstrap.com/
[7] GoDaddy Operating Company, LLC. "Domain Names | The World's Largest
Domain Name Registrar." 1990. Retrieved March 1, 2017, from godaddy.com
[8] Perceptive Innovations, Inc. “Advanced Technology Solutions.” 2016. Retrieved
April 10, 2017, from Perceptive Innovations: http://www.perceptive-innovations.com/
[9] Linode, LLC. “Linode.” 2015. Retrieved February 7, 2017, from Linode:
http://welcome.linode.com/features/?keyword=%2Blinode&gclid=CP6jh6-
4ndMCFdgNgQodw5oBGA
[10] DigitalOcen, Inc. “Digital Ocean.” 2017. Retrieved February 7, 2017, from Digital
Ocean: https://www.digitalocean.com/
[11] w3schools. “How to – parallax scrolling.” 2017. Retrieved February 18, 2017,
from w3schools: https://www.w3schools.com/howto/howto_css_parallax.asp
[12] The Hacker News. “Securing Passwords with Bcrypt Hashing Functions.” April
1,0 2014. Retrieved April 2, 2017 from The Hacker News:
http://thehackernews.com/2014/04/securing-passwords-with-bcrypt-hashing.html
[13] Carnegie Mellon University. “CAPTCHA: Telling Humans and Computers Apart
Automatically.” 2010. Retrieved April 26, 2017 from Carnegie Mellon University:
http://www.captcha.net/
[14] Comodo CA Limited. “What is HTTPS?” 2017. Retrieved April 2, 2017, from
Comodo CA Limited: https://www.instantssl.com/ssl-certificate-products/https.html

43
[15] Tech Radar. “HTML5: what is it?” December 13, 2011. Retrieved April 2, 2017,
from Tech Radar: http://www.techradar.com/news/internet/web/html5-what-is-it-1047393
[16] Oracle Corporation. “MySQL :: About MySQL.” 2017, Retrieved April 2, 2017,
from Oracle Corporation: https://www.mysql.com/about/
[17] GitHub, Inc. “GitHub” 2017. Retrieved March 13, 2017, from GitHub:
https://github.com/

44
Appendices
A.1 Wireframe Design
The landing page will have a lingering navigation bar (one that stays as you scroll down
the page). Most the site’s information and services are housed on this single page in Figure 8a,
with the navigation bar acting as a quick jump to a lower section. The home icon will return the
user to the top of the landing page, which will display a large image similar to patgroupi’s page,
in Figure 7 [1]. Under the home section is the submission section, which leads to one of the
site’s main features. Below the submission section, users will be able to read about the
company and background check process, as well as find information to contact R4 OpSec.
Figure 2b represents the submission page, where users will enter information into text
fields as well as upload any documents needed. Not shown is an intermediary page that
confirms the user’s submission and redirects them to the home page. At the bottom of the home
page is an admin login button, as seen in the bottom left section of Figure 3. This is the portal
into administrative access, redirecting to the middle-right image above: the login page. Logging
in requires an admin username and password. (Note: only admins can create new admins, via
the admin page.) The first administrator account will be created with a password defined by the
client. Other intermediary pages associated with the login page are a forgot password page,
where you enter an email to send a password reset link to, as well as a password change page
that is accessed via URL sent to the email.
Once logged in, the admin user will be brought to the admin home page, where an
archive of submitted forms can be searched, browsed, filtered, and managed. This page will
have links to a new admin creation page as well as the change password page. There is also a
logout button that links back to the website’s home.
The color scheme of the wire frame is temporary, and currently modeled after the blue
and white seen on patgroupi.com. The ideas behind the website align with the simplicity of the
patgroupi’s website [1].
A.2 Future Applications
The website deliverable due by the beginning of May will be prepared to add potential
features in the future. R4 OpSec needs a basic website to be able to spark growth of the new
company. We plan to make the code simple and easy for anyone with some knowledge of web
design to understand the purpose of each function or method. With many comments, notes, and
a design manual that our group will leave behind, we will make sure that others will be able to
build off our project with ease. Since the background company may require a page to submit
personal information securely, the future programmers will be alerted to our concerns of the use
of PHP, as discussed in Section 3.2.5. Our group will keep in mind the potential future
applications that this website will have so that it can grow with the company it represents.

45
A.3 Phases & Milestones
The website project was divided into four milestones. The separation of team
organization, design layout, usability testing, and project handover helps provide structure for
completing the website. The use of milestones not only helps the group know what task is next,
but also helps the client gauge what steps will be taken to complete the project. Table 1 breaks
down each task into one of four milestones.
Milestone 1: Teams organized and established
The first step was to form our group and open communication with the client to receive
the requirements for the website project. After receiving the project template that outlined the
logistics, our group met to form a timeline and started choosing the tools that would be used for
developing the website. The group did contact the client a second time to clarify the features
that were required. When the group and client all agreed on the deliverable we also planned on
incremental meetings with the client every other week on Friday. The meeting dates can be
seen in Table 1.
Milestone 2: Layout completed, implementation initiated
The group started designing different possible layouts that we would use as the base for
the design of the website. We sketched out what the main homepage would look like, then we
turned the sketches into a wireframe design to better represent our ideas. We also made sure to
keep in mind other features, such as if the website was mobile friendly when pulled up on a
smartphone. Checking with the client, we received approval for the current design.
Milestone 3: Implementation finalized, testing started
The timeline we created broke up the features that needed to be developed. Refer to
Table 1 for which features were to be implemented when. Every two weeks, we checked in with
client to report on the work that was implemented. Any feedback provided by the client was
incorporated into the project as well.
Milestone 4: Testing complete, completed website turnover to client
The final step will be to check in with the client one last time in the middle of April. We
will go over the features that the client required, and match that list to what features we have
completed. We plan to have every requirement finished by mid-April, in time for the meeting with
the client.

46
A.4 Progress-to-date
On February 1, the client emailed a list of specifications for what the website needed.
The list included having the website broken up into three pages, or sections, including the
home, submission, and about sections. Also, the specifications included an example, being a
website URL: patgroupi.com [1]. The group started coming up with different website designs
that conformed to the specifications. After submitting the client project template, we received
feedback from Professor Fox. He suggested having a search feature, images/videos, and plan
for usability testing. Along with those suggestions, the group also agreed to make sure the
website was mobile device friendly.
The very first draft was drawn on a whiteboard, which was eventually turned into a
wireframe design. The wireframe design helped us view how the website should look when we
started writing HTML/CSS. We were able to make the first version of the website by February
17. The first version was a simple HTML file that was meant to display the text (i.e., what is
displayed on home page, about page, etc.) provided by the client. Unfortunately, we have not
received the text information from the client to be posted on the website. We continued
implementing version two of the website, which reflected the layout of the wireframe designs we
made. As of March 13, the second version of the website is viewable to the public at
r4opsec.com. The images of the website can be found in Section 2. There is no meaningful
information to display yet, though it will be simple to easily add the information once the client
has provided it to us.
The back-end team laid out what security issues may arise with the website. Several
issues were laid out in section 3.2.5. After coming up with the different security flaws that
needed to be avoided, we started to come up with methods to avoid them. The use of
CAPTCHAs and rate limiting was decided on. The group also looked into documentation for
PHP, because this is the only language that can be used on the GoDaddy.com domain web
host. The back-end team also formed what attributes will be used for MySQL. Currently the
team is putting together a way to take in the information from the front-end team’s HTML pages,
and store them locally on the web host. Soon, the front-end and back-end will be collaborating
to make sure the login for administrators, and the submission from users, run smoothly.
A.5 Planned Work
In our original timeline, the search feature and a simple submission page was going to
be completed by February 24. However, these features have been delayed to the end of March.
We first want to make sure that the home and the about pages are complete. Then we plan to
move on to the administrator login and submission pages. These two pages require the most
collaboration between the front-end and the back-end teams. We first created a simple HTML
file that has fields for typing in a login name and password, with a login button below. These
fields must be attached to the back-end’s implementation to be able to take in the login
information that was typed and make sure the information is correct. Once logged in, the
administrator is presented with a table of past submissions. This webpage relies on the front-
end team being able to take data from the back-end team’s implementation and display it
correctly to the administrator. Once this is complete, we can then add the search functionality

47
that allows the administrator to search the submissions. Once the search feature is complete,
we can dedicate April to testing the search feature and the table view of the submission to make
sure they operate correctly.
The other main feature is the submission page. As of March 13 the front-end was able to
create a basic HTML file that would have fields to allow the user to submit their name, and
choose a file to upload. The back-end team from March 13 till April will use PHP and SQL to
take in that information and store it to be viewed later in the administrator page. In April we will
also be able to test the submissions page by making sure the submission shows up in the
administrator page.
Even though some of the features we list to be implemented have been delayed, we still
plan to meet with the client and give regular reports. The next check in with the client is March
24, when we will report to the client what has been completed so far, and receive any feedback
of our progress so far. The next check ins include April 7 and April 21, if needed.
A.6 Planned Changes
One of the first and simplest changes planned is the editing of the static content
displayed on the home page. We are currently awaiting a response from the client as to what
specific information he wants on the various sections of the home (“about”, “submit”, “contact-
us”). This will be done by mid-April. Another major overall change we plan to make on the
website is overall polishing of the website’s style. This includes simple edits such as color
palette finalization, and styling pages such as submission, admin home, and admin login to
match the finalized landing page style. The front-end team continues to find inspiration in sites
such as patigroup.com [1] and perceptive-innovations.com [8].
There are two main changes planned to protect the website against spam. The first is
rate limiting for login attempts. In essence this will limit the number of logins allowed per IP
address, protecting the site from spam coming from a single address. This will prevent admin
accounts from malintent. Another concern is bots spamming the submissions. A planned
measure against this is adding a reCAPTCHA feature to the submission page (shown below).
This will prevent bots from overloading our database and records with fake submissions.
Figure 23 – CAPTCHA box
The final changes needed are additional functionalities, most of which are admin
processes. These are: email alerts, submission notes and tags, submission removal, password
reset, and sub-account creation. Email alerts will be an optional setting admin users can enable,
which will notify a given email whenever a submission is completed. This would require adding
an email field as well as a boolean on/off field added to the admin user table in the database.

48
We are also planning to add the ability for admin users to attach personal notes and/or tags to
specific submissions. This would also involve additions to the admin-user table in the database,
as well as an extension to the submission archive table in the admin-homepage, through which
these notes would be readable/writeable. Admins will eventually be able to remove
submissions; this is intended to be used in the event that a submission is no longer relevant the
record of which is no longer needed. This will free up the database routinely, making search and
find tasks faster than if every submission persisted forever. Admins should also be able to reset
their passwords, in the event that they are compromised or simply forgotten. This will be
accessed by a “change password” link on the admin home, as well as a “forgot my password”
option on the login screen. The inclusion of admins linking an email to their account will greatly
help the process of resetting a forgotten password. Lastly, we need admins to be able to create
additional admins, all of which will be sub-accounts to the master admin account, which serves
as the initial admin account when the site is turned over to the client. Without this feature,
manual database edits would be required to add new administrative access.
We are confident that with these planned changes, the site will both look and feel
professional to users, and be easy to maintain by admin users without editing the code or the
database.