Features Test for Arduino - robotshop.com · The test is implemented on the Uno board in the...
12
2/22/2018 PN532 NFC RFID Module - Wiki http://wiki.sunfounder.cc/index.php?title=PN532_NFC_RFID_Module 1/12 Introduction SunFounder PN532 NFC RFID Module is a highly integrated transmission module for Near Field Communication at 13.56MHz. With the mode switch on board, you can change easily between I2C, SPI, and UART modes. The integrated level shifter provides 3.3V or 5V working voltage for your choice. In addition, it supports RFID reading and writing, and NFC function with Android phone, which makes it quite convenient for wireless connection. This module is equipped with two 3mm mounting holes, of which the small dimension makes it easy for using in your project! Note: When your wiring is correct (no short circuit), the module may be a little heated, which is just normal for use. Schematic Diagram The diagram is shown as below: PN532 Schematic.pdf Features Supports I2C, SPI and HSU (High Speed UART), easy to switch between these modes. Works in the NFC mode and RFID reader/writer mode The integrated 3.3V voltage regulator provides 3.3V or 5V working voltage for your choice Maximum distance for communication: 3 cm Equipped with two 3mm mounting holes, easy to use in your project with its small dimension Test for Arduino Preparations Arduino Uno/Mega 2560 board (or compatible SunFounder Uno/Mega 2560) Dupont Jumper Wires Blank NFC card supporting the ISO14443A
Transcript of Features Test for Arduino - robotshop.com · The test is implemented on the Uno board in the...

2/22/2018 PN532 NFC RFID Module - Wiki
http://wiki.sunfounder.cc/index.php?title=PN532_NFC_RFID_Module 1/12
Introduction
SunFounder PN532 NFC RFID Module is a highly integrated transmission module for Near Field Communication at 13.56MHz.With the mode switch on board, you can change easily between I2C, SPI, and UART modes. The integrated level shifterprovides 3.3V or 5V working voltage for your choice. In addition, it supports RFID reading and writing, and NFC function withAndroid phone, which makes it quite convenient for wireless connection. This module is equipped with two 3mm mounting holes,of which the small dimension makes it easy for using in your project!
Note: When your wiring is correct (no short circuit), the module may be a little heated, which is just normal for use.
Schematic DiagramThe diagram is shown as below:
PN532 Schematic.pdf
Features Supports I2C, SPI and HSU (High Speed UART), easy to switch between these modes.
Works in the NFC mode and RFID reader/writer mode The integrated 3.3V voltage regulator provides 3.3V or 5V working voltage for your choice
Maximum distance for communication: 3 cm Equipped with two 3mm mounting holes, easy to use in your project with its small dimension
Test for Arduino
Preparations Arduino Uno/Mega 2560 board (or compatible SunFounder Uno/Mega 2560)
Dupont Jumper Wires Blank NFC card supporting the ISO14443A
2/22/2018 PN532 NFC RFID Module - Wiki
http://wiki.sunfounder.cc/index.php?title=PN532_NFC_RFID_Module 2/12
PC with Arduino software installed PN532 NFC Module
Note: Pay attention to avoid short circuits between the module’s power and the ground, such as the VCC and the GND
ProceduresThe test is implemented on the Uno board in the Arduino IDE V1.6.12.
Install the library
Adafruit has a complete library for this, so we will just use its code to test the module directly. Step 1: In IDE, select Sketch->Including Library->Manage Libraries, type in PN532 to search. Then we can see Adafruit
PN532 searched out, and click INSTALL at the right side to start the installation.
2/22/2018 PN532 NFC RFID Module - Wiki
http://wiki.sunfounder.cc/index.php?title=PN532_NFC_RFID_Module 3/12
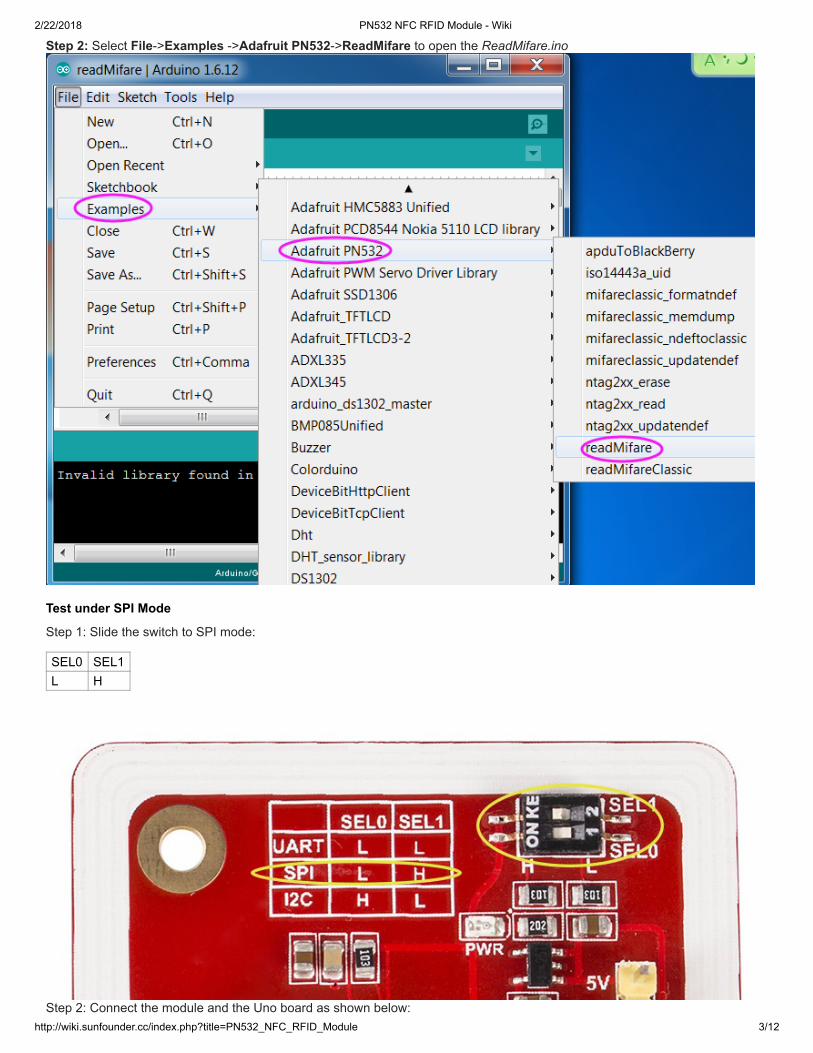
Step 2: Select File->Examples ->Adafruit PN532->ReadMifare to open the ReadMifare.ino
Test under SPI Mode
Step 1: Slide the switch to SPI mode:
SEL0 SEL1L H
Step 2: Connect the module and the Uno board as shown below:

2/22/2018 PN532 NFC RFID Module - Wiki
http://wiki.sunfounder.cc/index.php?title=PN532_NFC_RFID_Module 4/12
PN532 Module SunFounder UnoGND GND5V 5VSCK 2MOSI 3NSS 4MISO 5
Step 3: Select the corresponding board and port, and upload the code to the Uno. Step 4: Click at the upper right corner to open the serial monitor, and select 115200 baud.
2/22/2018 PN532 NFC RFID Module - Wiki
http://wiki.sunfounder.cc/index.php?title=PN532_NFC_RFID_Module 5/12
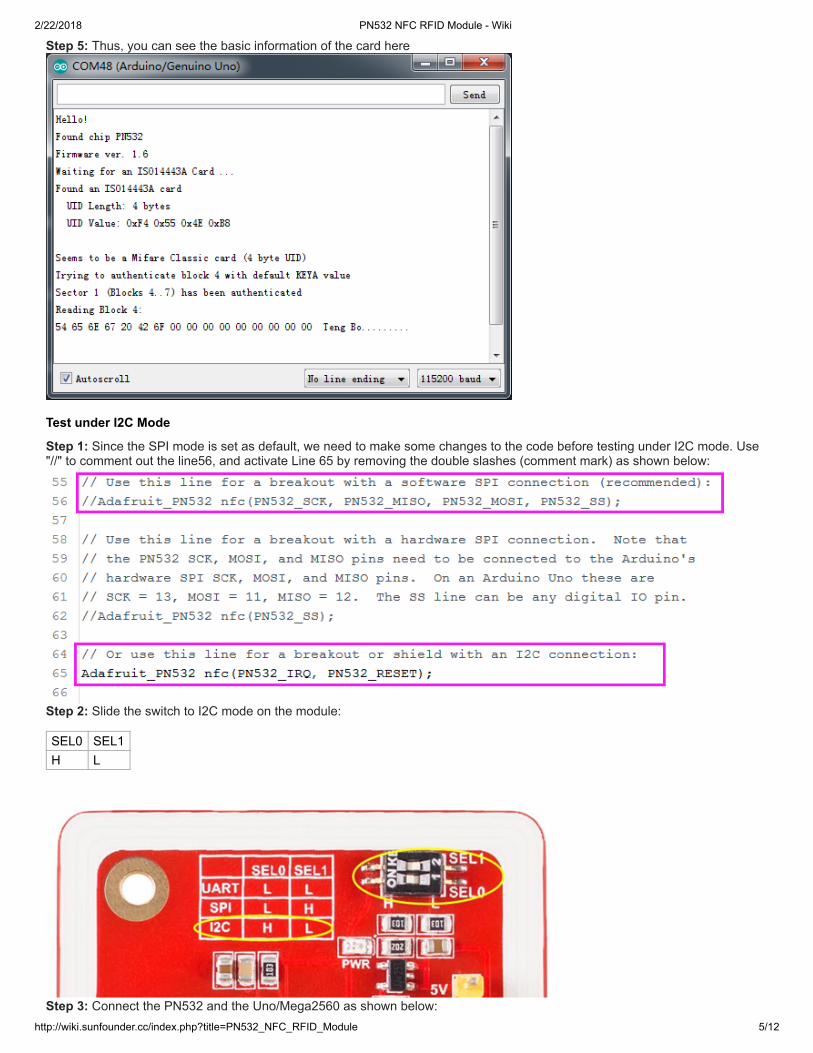
Step 5: Thus, you can see the basic information of the card here
Test under I2C Mode
Step 1: Since the SPI mode is set as default, we need to make some changes to the code before testing under I2C mode. Use"//" to comment out the line56, and activate Line 65 by removing the double slashes (comment mark) as shown below:
Step 2: Slide the switch to I2C mode on the module:
SEL0 SEL1H L
Step 3: Connect the PN532 and the Uno/Mega2560 as shown below:

2/22/2018 PN532 NFC RFID Module - Wiki
http://wiki.sunfounder.cc/index.php?title=PN532_NFC_RFID_Module 6/12
PN532 Module Uno/Mega2560GND GND5V 5VSDA A4/ pin20 Mega2560SCL A5 /pin21 Mega2560RSTO 3IRQ 2
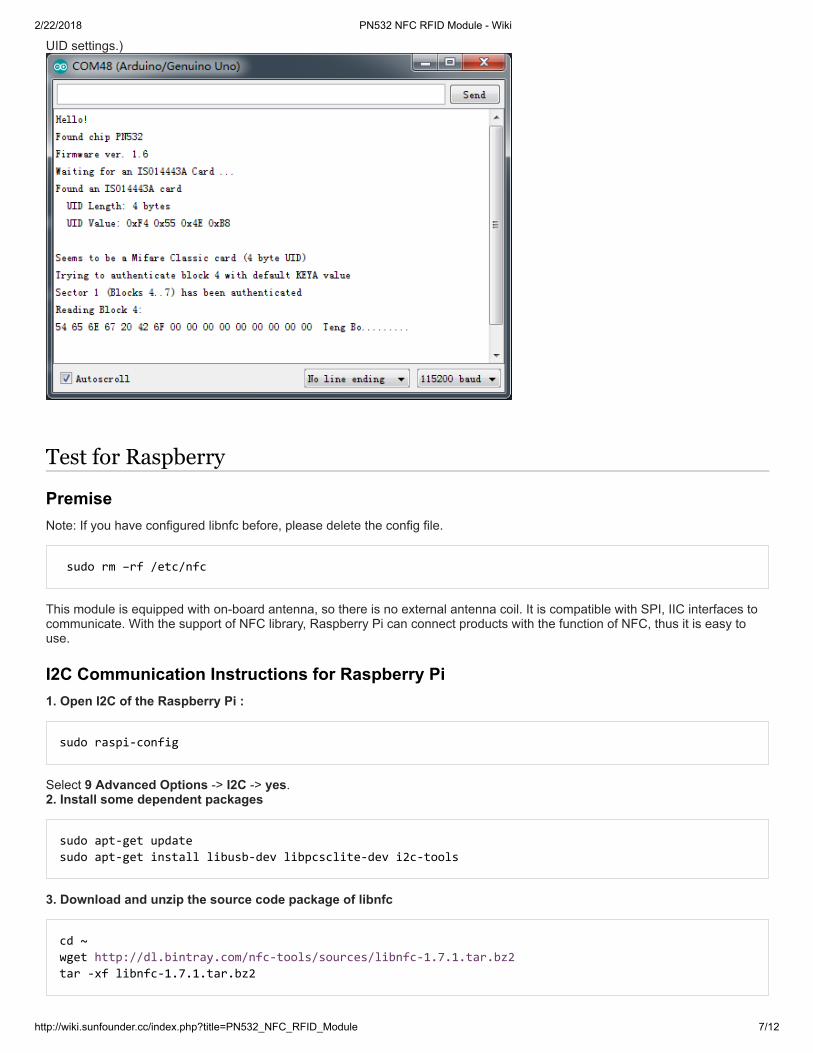
Step 4: Upload the program to the board, and open the Serial Monitor. Change the baud rate to 115200, then put the blank NFCcard on the PN532 NFC Module, and then you can see the data of the card as shown below: (the UID Value varies from different
2/22/2018 PN532 NFC RFID Module - Wiki
http://wiki.sunfounder.cc/index.php?title=PN532_NFC_RFID_Module 7/12
UID settings.)
Test for Raspberry
PremiseNote: If you have configured libnfc before, please delete the config file.
sudo rm –rf /etc/nfc
This module is equipped with on-board antenna, so there is no external antenna coil. It is compatible with SPI, IIC interfaces tocommunicate. With the support of NFC library, Raspberry Pi can connect products with the function of NFC, thus it is easy touse.
I2C Communication Instructions for Raspberry Pi1. Open I2C of the Raspberry Pi :
sudo raspi-config
Select 9 Advanced Options -> I2C -> yes. 2. Install some dependent packages
sudo apt-get update sudo apt-get install libusb-dev libpcsclite-dev i2c-tools
3. Download and unzip the source code package of libnfc
cd ~ wget http://dl.bintray.com/nfc-tools/sources/libnfc-1.7.1.tar.bz2 tar -xf libnfc-1.7.1.tar.bz2

2/22/2018 PN532 NFC RFID Module - Wiki
http://wiki.sunfounder.cc/index.php?title=PN532_NFC_RFID_Module 8/12
4. Compile and install
cd libnfc-1.7.1 ./configure --prefix=/usr --sysconfdir=/etc make sudo make install
5. Write the configuration file for NFC communication
cd /etc sudo mkdir nfc sudo nano /etc/nfc/libnfc.conf
Check the following details of the file etc/nfc/libnfc.conf:
# Allow device auto-detection (default: true) # Note: if this auto-detection is disabled, user has to set manually a device # configuration using file or environment variable allow_autoscan = true
# Allow intrusive auto-detection (default: false) # Warning: intrusive auto-detection can seriously disturb other devices # This option is not recommended, user should prefer to add manually his device. allow_intrusive_scan = false
# Set log level (default: error) # Valid log levels are (in order of verbosity): 0 (none), 1 (error), 2 (info), 3 (debug) # Note: if you compiled with --enable-debug option, the default log level is "debug" log_level = 1
# Manually set default device (no default) # To set a default device, you must set both name and connstring for your device # Note: if autoscan is enabled, default device will be the first device available in device list. #device.name = "_PN532_SPI" #device.connstring = "pn532_spi:/dev/spidev0.0:500000" device.name = "_PN532_I2c" device.connstring = "pn532_i2c:/dev/i2c-1"
6. Wiring Toggle the switch to the I2C mode
SEL0 SEL1H L

2/22/2018 PN532 NFC RFID Module - Wiki
http://wiki.sunfounder.cc/index.php?title=PN532_NFC_RFID_Module 9/12
Pin diagram of Raspberry pi
Connect the devices:
PN532 Raspberry5V 5VGND GNDSDA SDA0SCL SCL0
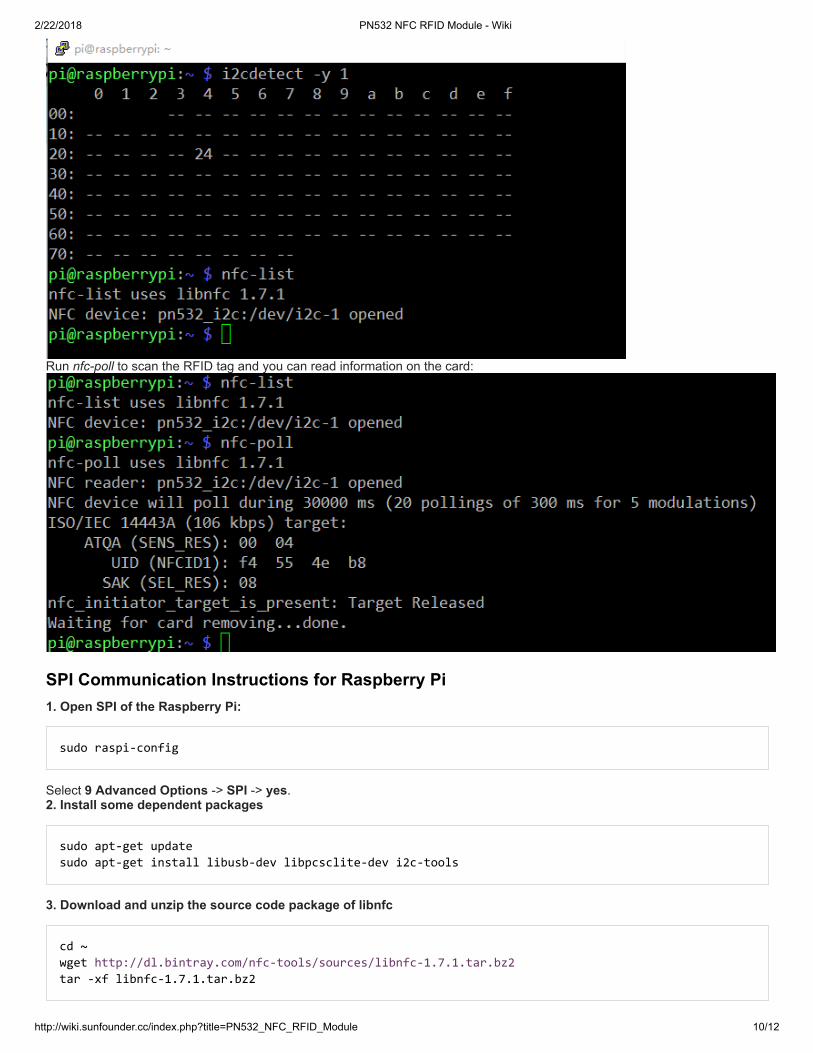
7. Run i2cdetect –y 1 to check whether the I2C device is recognized. If yes, it means both the module and the wiring work well.
Then type in nfc-list to check the NFC module:
2/22/2018 PN532 NFC RFID Module - Wiki
http://wiki.sunfounder.cc/index.php?title=PN532_NFC_RFID_Module 10/12
Run nfc-poll to scan the RFID tag and you can read information on the card:
SPI Communication Instructions for Raspberry Pi1. Open SPI of the Raspberry Pi:
sudo raspi-config
Select 9 Advanced Options -> SPI -> yes. 2. Install some dependent packages
sudo apt-get update sudo apt-get install libusb-dev libpcsclite-dev i2c-tools
3. Download and unzip the source code package of libnfc
cd ~ wget http://dl.bintray.com/nfc-tools/sources/libnfc-1.7.1.tar.bz2 tar -xf libnfc-1.7.1.tar.bz2

2/22/2018 PN532 NFC RFID Module - Wiki
http://wiki.sunfounder.cc/index.php?title=PN532_NFC_RFID_Module 11/12
4. Compile and install
cd libnfc-1.7.1 ./configure --prefix=/usr --sysconfdir=/etc make sudo make install
5. Write the configuration file for NFC communication
cd /etc sudo mkdir nfc sudo nano /etc/nfc/libnfc.conf
Check the following details of the file etc/nfc/libnfc.conf:
# Allow device auto-detection (default: true) # Note: if this auto-detection is disabled, user has to set manually a device # configuration using file or environment variable allow_autoscan = true
# Allow intrusive auto-detection (default: false) # Warning: intrusive auto-detection can seriously disturb other devices # This option is not recommended, user should prefer to add manually his device. allow_intrusive_scan = false
# Set log level (default: error) # Valid log levels are (in order of verbosity): 0 (none), 1 (error), 2 (info), 3 (debug) # Note: if you compiled with --enable-debug option, the default log level is "debug" log_level = 1
# Manually set default device (no default) # To set a default device, you must set both name and connstring for your device # Note: if autoscan is enabled, default device will be the first device available in device list. device.name = "_PN532_SPI" device.connstring = "pn532_spi:/dev/spidev0.0:500000" #device.name = "_PN532_I2c" #device.connstring = "pn532_i2c:/dev/i2c-1"
6. Wiring Toggle the switch to the SPI mode
SEL0 SEL1L H
Connect the devices:
PN532 Raspberry5V 5VSCK SCKLMISO MISOMOSI MOSINSS CE0
7. Run ls /dev/spidev0.* to check whether the SPI is opened or not. If yes, it means both the module and the wiring work well.
Then type in nfc-list to check the NFC module:
2/22/2018 PN532 NFC RFID Module - Wiki
http://wiki.sunfounder.cc/index.php?title=PN532_NFC_RFID_Module 12/12
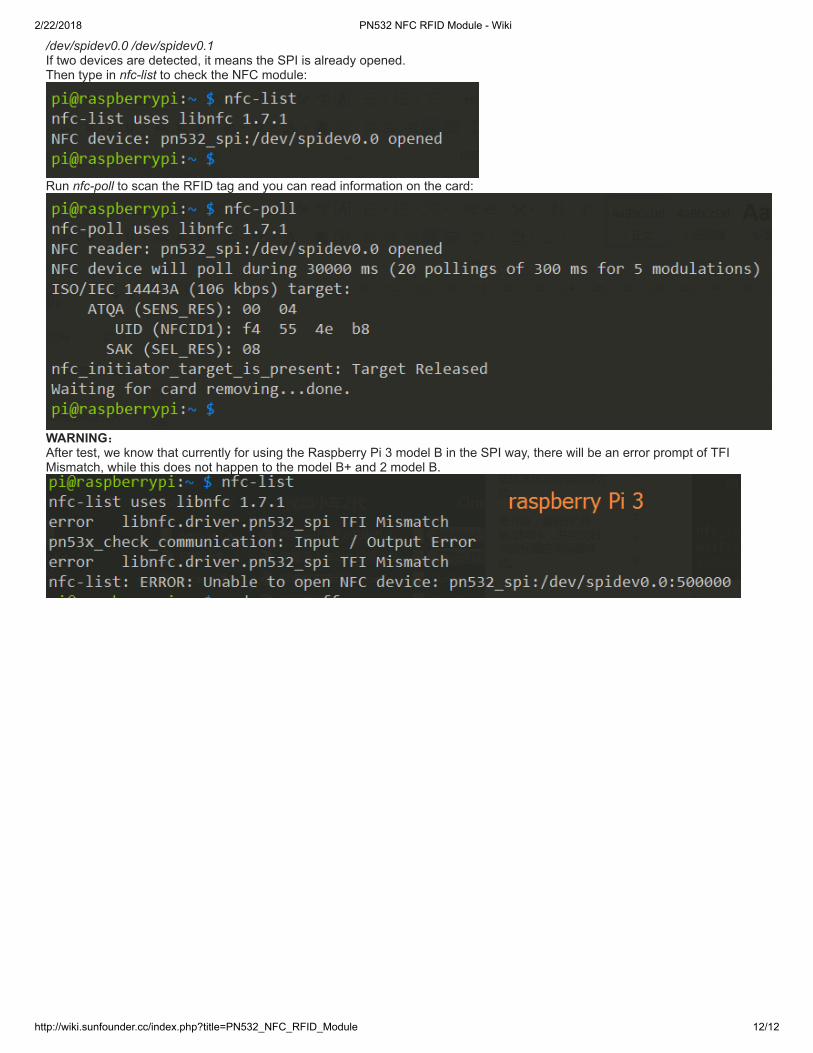
/dev/spidev0.0 /dev/spidev0.1 If two devices are detected, it means the SPI is already opened.
Then type in nfc-list to check the NFC module:
Run nfc-poll to scan the RFID tag and you can read information on the card:
WARNING: After test, we know that currently for using the Raspberry Pi 3 model B in the SPI way, there will be an error prompt of TFI
Mismatch, while this does not happen to the model B+ and 2 model B.