Features and Technology -...
43
Help Desk T hb k H1 Toughbook H1 Product Overview Features and Technology 1
Transcript of Features and Technology -...

Help DeskT hb k H1 Toughbook H1
Product Overview
Features and Technology
1

Table of Contents
• MCA Overview • Feature Overview (continued)– MCA Explained
• H1 IntroductionO i
– Dual Mode Touch/Digitizer Screen• Calibrating the Touch Screen and
Digitizer– Overview– Specifications– Accessories
• Disabling the Touch Screen– Screen Rotation– Barcode Scanner
• Feature Overview– Handle– Hand Strap
– RFID Scanner– Camera– BiometricsHand Strap
– Docking Connector– Power– Sanitization
– Bluetooth• Connecting to a Bluetooth
KeyboardCSanitization
– Action Buttons– Dashboard
Screen Cleaning Utility
• Connecting to a Bluetooth Headset
• Panasonic Technical Support– Contact the Panasonic Technical
2
– Screen Cleaning Utility – Contact the Panasonic Technical Support Team

Introduction
MCAMCAOverviewOverview
3

What is an MCA?
An Idea
• “The mobile clinical assistant (MCA) is a fresh design developed after extensive research to identify clinician needs that are not met by general-purpose laptop computers.
• Intel has spent several years and research money investigating the needs of the mobile clinicianFi d t h t t i d• Find out what core components were required, features that improved workflow, and design to withstand the unique environment of a hospital, office, vehicle, and home.”*
• The Mobile Clinical Assistance is not a “one size fits all” device however, it certainly comes close
4
• The Health Care environments is unique because of the requirements for sanitization and durability*Intel Digital Health Group website

What is an MCA?
A Reference Design
• “The Mobile Clinical Assistant is known as a “reference design”: a set of design guidelines, ideas and cues that companies can use to build an MCA
• The MCA reference architecture focusesThe MCA reference architecture focuses specifically on enabling improvements in patient care features and fitting them into clinician workflows.Along with appropriate software the MCA• Along with appropriate software, the MCA makes a convenient, consolidated view of a patient's clinical data securely available to authorized care providers when and where they need it to improve care and enhance
• Although Intel provided the MCA reference design, the Toughbook H1 is all Panasonic Engineering from top to bottom
need it to improve care and enhance productivity.”
5
bottom• The MCA reference design calls for bar code, RFID, camera, digitizer screen, and universal interface
*Intel Digital Health website

What is an MCA?
Universal Connections
• The MCA Reference design also calls for a “universal interface” for all of the major
MCA C li t A li ti components such as the Bar Code Reader, RFID Reader, Camera, and Programmable Buttons
• A software provider can program their
MCA-Compliant Application
MCA Interface
p p gapplication for a single “interface” using the Intel MCA SDK without having to program for each individual hardware device manufacturer, version, driver, etc
MCA Platform Driver
Button D i
BCR Camera D i
RFID D i
, ,• The MCA manufacturer can change hardware
versions without the need for the software provider to reprogram their application, which has been the case for many years
Driver Driver Driver
Programmable buttons
RFID Reader BCR Reader Camera
Driver
• Typically, a software provider would need to obtain an SDK for every device in order to control it directly• The MCA SDK provides the software provider with a single interface which allows the customer to upgrade
has been the case for many years
6
• The MCA SDK provides the software provider with a single interface , which allows the customer to upgrade MCA platforms without the need for costly programming revisions

Product Overview
IntroducingIntroducingToughbook H1Toughbook H1
7

Toughbook H1
Overview
• The Toughbook H1 is the culmination of Intel’s extensive research and over a decade of Panasonic’s experience b ildi d d li bl d tbuilding rugged and reliable products
• Panasonic has taken Intel’s Reference design and created a product that is truly unique and definitely a Toughbook
• The Toughbook H1 is:• Fully Rugged ((Designed to meet MILSPEC 810F)• Sealed, Water Resistant (IP54)• Resistant to Damage from Sanitizing Products• Ergonomic• Functional• Light weight
• Two battery packs with hot swap capability• Dual Mode Touch and Digitizer screen for use in the OR ER or patient room (gloves bare hand hand writing)
g t e g t
8
• Dual Mode Touch and Digitizer screen for use in the OR, ER, or patient room (gloves, bare hand, hand writing)• Handle and hand strap that is comfortable to hold for long periods of time
Toughbook H1
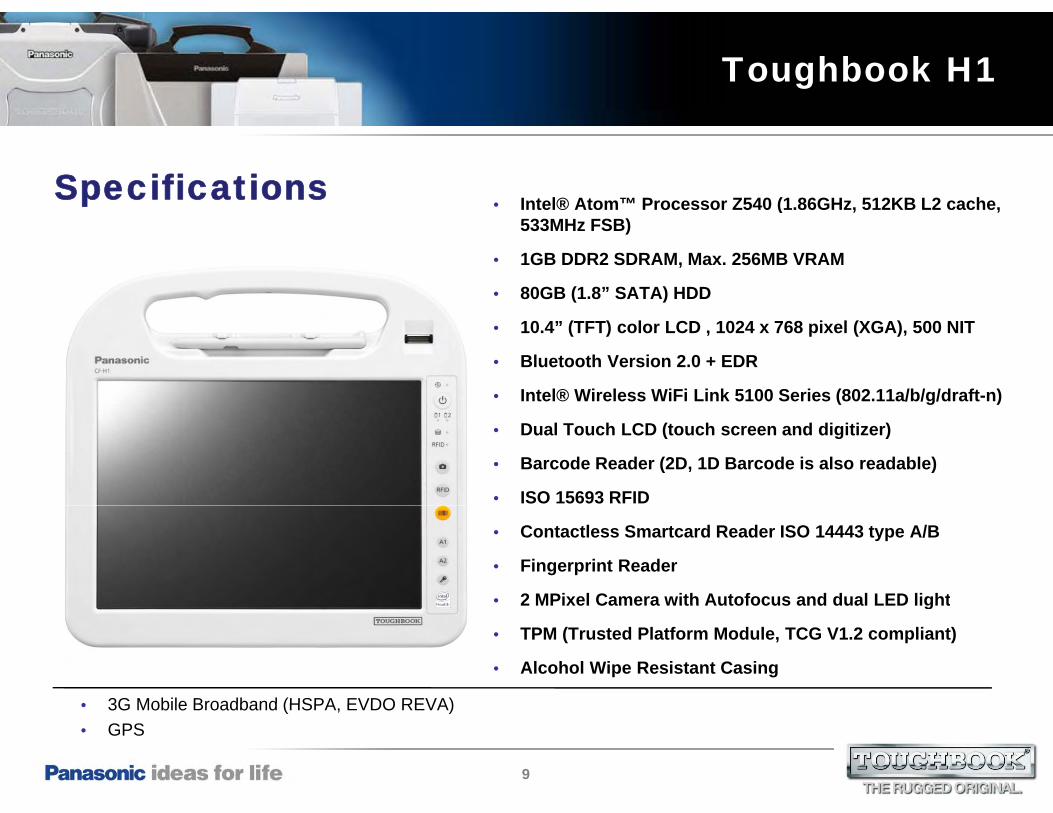
Specifications• Intel® Atom™ Processor Z540 (1.86GHz, 512KB L2 cache,Intel® Atom Processor Z540 (1.86GHz, 512KB L2 cache,
533MHz FSB)
• 1GB DDR2 SDRAM, Max. 256MB VRAM
• 80GB (1.8” SATA) HDD
• 10.4” (TFT) color LCD , 1024 x 768 pixel (XGA), 500 NIT
• Bluetooth Version 2.0 + EDR
• Intel® Wireless WiFi Link 5100 Series (802.11a/b/g/draft-n)
• Dual Touch LCD (touch screen and digitizer)
• Barcode Reader (2D, 1D Barcode is also readable)
• ISO 15693 RFID
• Contactless Smartcard Reader ISO 14443 type A/B
• Fingerprint Reader
• 2 MPixel Camera with Autofocus and dual LED light
• 3G Mobile Broadband (HSPA EVDO REVA)
2 MPixel Camera with Autofocus and dual LED light
• TPM (Trusted Platform Module, TCG V1.2 compliant)
• Alcohol Wipe Resistant Casing
9
• 3G Mobile Broadband (HSPA, EVDO REVA)• GPS

Toughbook H1
Accessories
• TBDCF-VEBH11U Cradle with
integrated twinUSB 2.0 Ports x 3, LAN, Serial VGA DCintegrated twin
battery chargerSerial, VGA, DC, Security Lock
CF-VZSU53W Battery Pack 2900mAH, 7.2V(same as U1)(same as U1)
CF-AA1633A AC Adapter 16V, 3.75A (same as U1)
CF VCBU11U Four bay batteryCF-VCBU11U Four bay battery charger
CF-VNP014U Stylus Pen With tether hole
CF-VNP013U Stylus Pen Without tether hole
CF-VNT003U Tether
10

Feature Overview
FeatureFeatureOverviewOverview
11

Feature Overview
Handle
• Molded, rounded handle for a comfortable gripcomfortable grip
• Integrated RFID and Barcode reader buttons
• Unique design keeps hand from sliding forward and covering b tt h dl *buttons on handle*
12

Feature Overview
Hand Strap
• Over 50 strap designs were considered
• 5 prototypes were chosen and tested extensively for fit, comfort, stability, and support
• Domed shaped back fits the hand naturally and reduces wrist strain while
H d t t t f d d t i• Hand strap cut out for reduced strain on the knuckles
• Can be sanitized repeatedly
13

Feature Overview
Docking Connector
• Contact connectors with no external guide pins
• Connectors do not protrude making it very difficult to bend or break the connector pins
• Even, uniform surface is easy to clean and sanitizesanitize
• No force required to dock or undock, simply drop and dock or grab and go
D ki t H1 “ l d”• Docking connectors on H1 are “cleaned” every time the H1 is inserted in to a docking station
• The spring loaded connector pins of the docking station “scrape” across the connectorsdocking station scrape across the connectors of the H1, removing dirt, debris, and other residueH1 Docking Station
14

Feature Overview
Power
• Twin battery system provides hot swap capabilityp y
• Intelligent battery system• Alerts user when battery door is open or
properly closedproperly closed• Provides battery level information*• Up to 5 hours of battery life**
• Docking station can charge two batteries
• One AC Adapter can power the H1, charge internal batteries and charge external
• Open Door , Green Light blinks 5 times = 100%; Blinking Red = Open Door• Approximate battery level
batteries placed in the station charge bays
15
• Approximate battery level• Total operating time varies with usage pattern

Feature Overview
Sanitizing
Products Tested with the Toughbook H1
• 91% isopropyl alcohol + 9% water
• Alcohol Prep Pads
• Kericide B
• POVIDONE IODINE• Alcohol Prep Pads
• Alkyl Diamino EthylGlycineHydrochloride
• Ammonium chloride
• PVP-I Prep Pads Triad
• SANI-CLOTH HB
• Sodium Hypochlorite
• Cavi Wipes
• Ethylene Glycol
• Iodophors
• SUPER SANI-CLOTH
• Virkon
• Viraguard
• Panasonic does not certify the effectiveness or endorse the use of any of the products listed
Iodophors
16
• Panasonic tests for damage to the outer case, ingress protection seal, external and internal components and does not test the effectiveness of the disinfectants tested

Feature Overview
Action Buttons
There are six (6) Action Buttons on the front of the H1( )
• First button activates the integrated camera
• The second button activates the integrated RFID reader
• The Third button activates the bar code scanner
• The A1 and A2 buttons can launch H1 applications and utilities
The A1 and A2 buttons can also be programmed to launch third party software ( exe files)
17
• The A1 and A2 buttons can also be programmed to launch third party software (.exe files)
• Unit purchased without barcode scanner is configured with a third programmable button (A3)

Feature Overview
Dashboard
Centralized access to environmental settings and information
• Detailed information for each battery (time remaining and percentage)
• Brightness Level Settings• Brightness Level Settings
• Enable/Disable Touch Screen
• Enable / Disable Contactless Smart Card feature
• Cleaning Utility Configuration
• Programmable Button Configuration
• Programmable Dashboard Button Configuration
• The H1 has 5 programmable buttons: 3 Virtual buttons (Dashboard) and 2 actual buttons on the front of the H1• The programmable buttons can be set to launch external programs as well as launch preprogrammed utilities
• Camera external light settings
18
• The programmable buttons can be set to launch external programs as well as launch preprogrammed utilities

Feature Overview
Dashboard
Dashboard Programmable ButtonsDashboard Programmable Buttons
• Change button order
• Change button label and actionChange button label and action
• Display Rotation
• Cleaning Utility
R f M l• Reference Manual
• Launch Application
• Click on the first button labeled “Display Switch” • Click on the “Label” text box and enter the words “Display Rotation” using the virtual keyboard or scribe
19
• Click on the Label text box and enter the words Display Rotation using the virtual keyboard or scribe• Click on the drop down box and choose “Display Switch”
Feature Overview
Dashboard
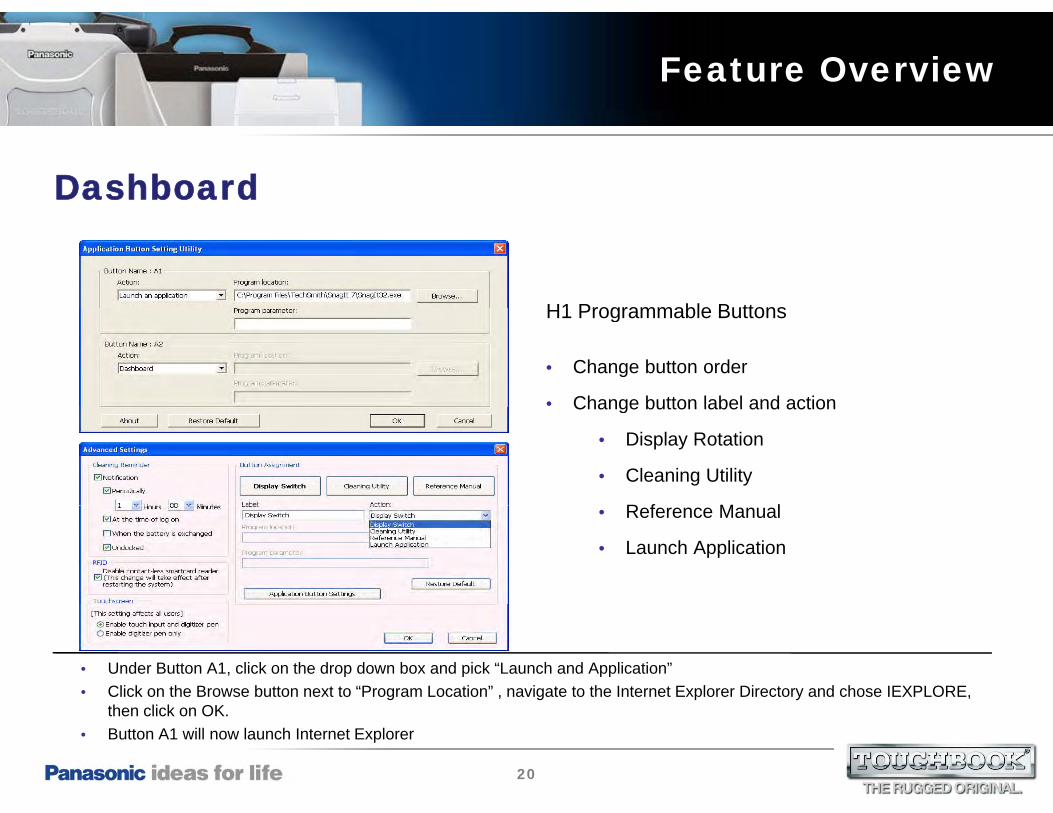
H1 Programmable ButtonsH1 Programmable Buttons
• Change button order
• Change button label and actionChange button label and action
• Display Rotation
• Cleaning Utility
R f M l• Reference Manual
• Launch Application
• Under Button A1, click on the drop down box and pick “Launch and Application”• Click on the Browse button next to “Program Location” , navigate to the Internet Explorer Directory and chose IEXPLORE,
20
then click on OK. • Button A1 will now launch Internet Explorer

Feature Overview
Cleaning Utility• Provides clear, visual indicator of cleaning area
• Customized color patterns and transparency settings that allow end user to “see” areas that have/have not been clean thoroughly
• Provides progress indicator and displays area not cleaned with bright color indicator
• Can be set to launch:• Each time the unit is undocked• When the battery is exchanged• When the unit first powers onWhen the unit first powers on• At a set time interval
• Trigger displays large reminder window
• Click on the check box next to “When the battery is exchanged” and then click on the OK button• Open the right side battery door then close the right side battery door
• Each response is stored in a special log file which can be used for compliance enforcement
21
• Open the right side battery door, then close the right side battery door• Click on the “YES” button to begin cleaning the touch screen

Feature Overview
Cleaning Utility
• The upper left corner displays portion of screen cleaned (percentage)
• The lower right displays the stop button. This button stops the cleaning utility and displays a confirmation box to confirm exit of the utility
• When you wipe the screen, the color under the area touched disappears, showing a clear path of what area has been cleaned.
• Click on the blue and white stop button in the lower right hand corner• Click on Continue
22
• Click on Continue• Clean the screen or use your digitizer pen to finish clearing all of the color from the display
Feature Overview
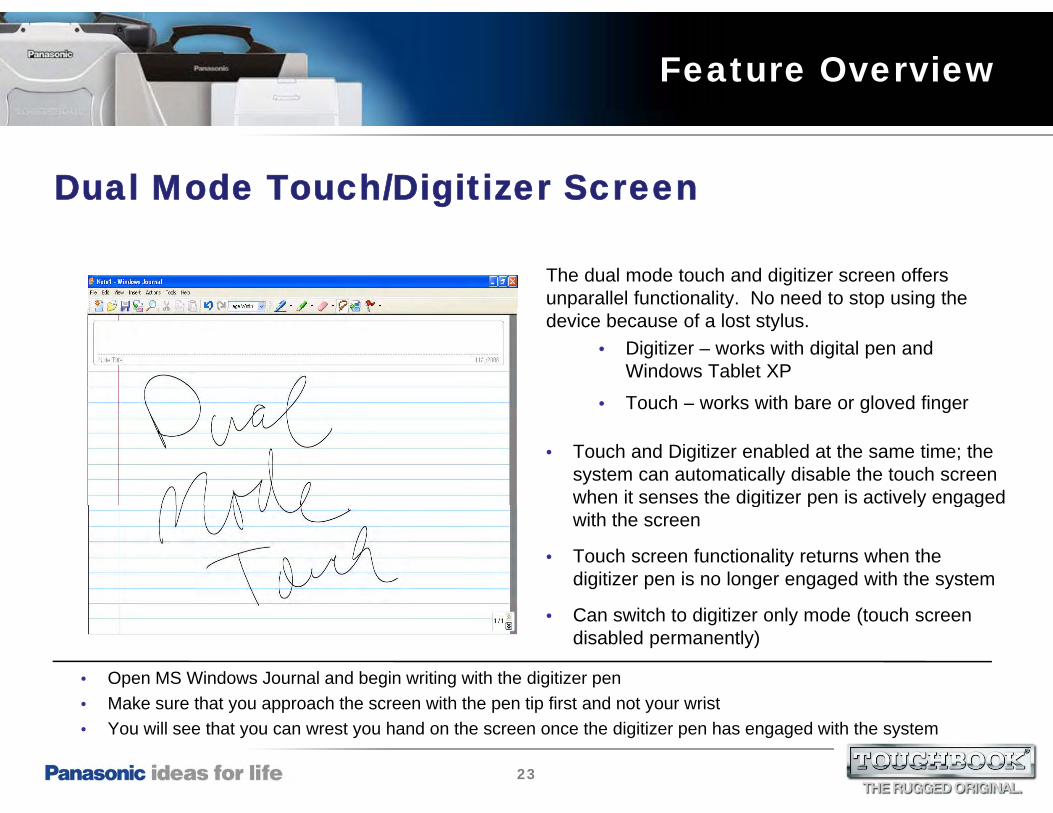
Dual Mode Touch/Digitizer Screen
The dual mode touch and digitizer screen offers unparallel functionality. No need to stop using the p y p gdevice because of a lost stylus.
• Digitizer – works with digital pen and Windows Tablet XP
• Touch – works with bare or gloved fingerTouch works with bare or gloved finger
• Touch and Digitizer enabled at the same time; the system can automatically disable the touch screen when it senses the digitizer pen is actively engaged g p y g gwith the screen
• Touch screen functionality returns when the digitizer pen is no longer engaged with the system
• Open MS Windows Journal and begin writing with the digitizer pen• Make sure that you approach the screen with the pen tip first and not your wrist
• Can switch to digitizer only mode (touch screen disabled permanently)
23
• Make sure that you approach the screen with the pen tip first and not your wrist• You will see that you can wrest you hand on the screen once the digitizer pen has engaged with the system

Feature Overview
Dual Mode Touch/Digitizer Screen
•Touch Screen and Digitizer screens must be calibrated separately
•Touch Screen is calibrated using the InPlayCalibration Utility
Th Di iti i lib t d i th T bl t d P•The Digitizer is calibrated using the Tablet and Pen settings in Control Panel
• The Click Speed and Spatial Tolerance of the Touch Screen (area that responds to touch) are configured with the Inplay Control Panel Utility (located in All Programs – Inplay)
• Right Click - enabled by pressing and holding the
• Click (or tap), using your finger, the Start Button, then click on All Programs, and then Inplay, and finally click on the Control icon
Right Click - enabled by pressing and holding the button on the Digitizer Stylus and then tapping the screen
24
the Control icon• Test the length of time your double tap takes, along with how closely your two taps are to each other

Feature Overview
Calibrating the Touch Screen
Touch Screen is calibrated using the InPlayCCalibration Utility
• Calibrate the Touch Screen using your finger or non-digitizer stylus
Click (or tap) on the Start Button then All• Click (or tap) on the Start Button, then All Programs, then Inplay, and finally click on the Calibration Icon
• Tap on the center of each cross hair until it changes color from black to red (the x moveschanges color from black to red (the x moves to the next section)
• Continue on through all 9 reference points until the OK button is no longer grayed outClick on the OK button to accept all
• Using the digitizer pen included with the H1 will not work with this calibration utility• After calibration is complete and all settings are saved use MS Paint or MS Windows Journal to test the
• Click on the OK button to accept all calibration settings
25
• After calibration is complete and all settings are saved, use MS Paint or MS Windows Journal to test the accuracy of the calibrated touch screen

Feature Overview
Calibrating the Digitizer
Digitizer Screen is calibrated using the Microsoft S CTablet and Pen Settings Utility located in the Control
Panel
• Calibrate the Digitizer using you’re the digitizer stylusstylus
• Click (or tap) on the Start Button, then tap on Control Panel
• Locate and Double Tap on the Tablet and Pen Settings UtilityPen Settings Utility
• Tap on the center of each cross hair until it changes color from black to red (the x moves to the next section)Continue on through all 4 reference points
• Make sure that you use the digitizer pen included with the H1 this calibration utility• After calibration is complete and all settings are saved use MS Windows Journal to test the accuracy of the
• Continue on through all 4 reference points and then tap on the OK button
26
• After calibration is complete and all settings are saved use MS Windows Journal to test the accuracy of the calibrated touch screen
Feature Overview
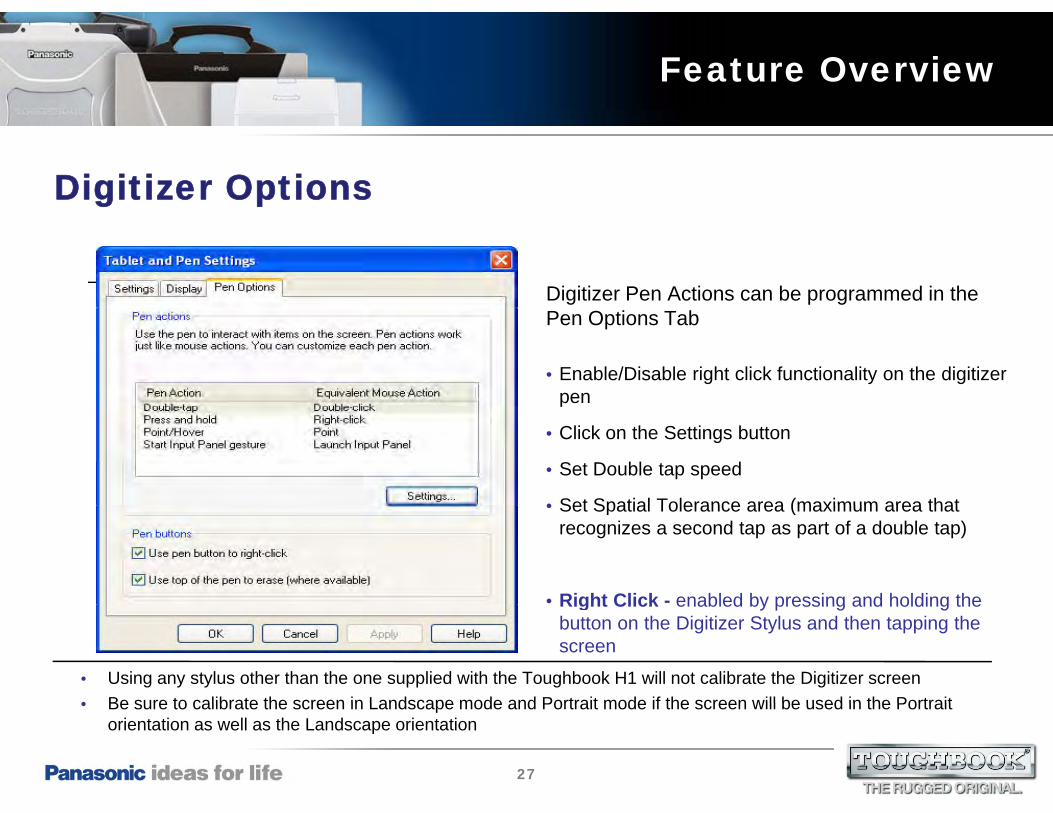
Digitizer Options
Digitizer Pen Actions can be programmed in the Pen Options Tab
• Enable/Disable right click functionality on the digitizer pen
• Click on the Settings button
• Set Double tap speed
• Set Spatial Tolerance area (maximum area that• Set Spatial Tolerance area (maximum area that recognizes a second tap as part of a double tap)
• Right Click - enabled by pressing and holding the
• Using any stylus other than the one supplied with the Toughbook H1 will not calibrate the Digitizer screen• Be sure to calibrate the screen in Landscape mode and Portrait mode if the screen will be used in the Portrait
Right Click enabled by pressing and holding the button on the Digitizer Stylus and then tapping the screen
27
• Be sure to calibrate the screen in Landscape mode and Portrait mode if the screen will be used in the Portrait orientation as well as the Landscape orientation

Feature Overview
Disabling the Touch Screen
How to Disable/Enable the Touch ScreenHow to Disable/Enable the Touch Screen
• Double Click on the Dashboard Icon
• Click on the Advanced ButtonClick on the Advanced Button
• Click on the radio button next to “Enable Digitizer Pen Only”
• Click on the radio button next to Enable Touch Input and Digitizer Pen to enable Dual Touch/Digitizer mode
28
Windows XP Taskbar

Feature Overview
Screen RotationRotate the Screen using the Screen Rotation Utility and the Panasonic H1 Dashboard utility
Screen Rotation Utility• Locate the Screen Rotation Utility on the Windows
Task bar
• Double tap the Screen Rotation Utility to rotate theDouble tap the Screen Rotation Utility to rotate the screen
• Right click on the Screen Rotation Utility icon to choose orientation
Dashboard Utility• Press the A2 button on the H1 to launch the
Panasonic Dashboard utility
T th Di l R t ti B tt ( Di l
• The screen will not rotate while the system is sitting in a powered docking station• The system will automatically orient the screen to Primary Landscape view if set to another view when the
• Tap on the Display Rotation Button (or Display Switch)
29
• The system will automatically orient the screen to Primary Landscape view, if set to another view, when the system is placed in a docking station

Feature Overview
Bar Code Scanner
• 2D barcode scanner: reading 1D and 2D barcodes
• CMOS Imager
• 655 nm Visible light semiconductor LED
• Capable of reading the following code types:• Capable of reading the following code types:• Australian Post, Aztec, BPO, CanadaPost,
Codabar, Codablock, Code11, Code39, Code93, Code128, DataMatrix, DutchPost, GSI C it I2 f 5GSI Composite, I2 of 5
• JapanPost, Maxicode, MSI, PDF417, MicroPDF417, Planet, Plessey Code, G Codr, GS1 Data Bar, Telepen, TLC9,
Minimum Optical Resolution• 1D : 0 127 mm {5 mil}
Codr, GS1 Data Bar, Telepen, TLC9, UPC/EAN
30
• 1D : 0.127 mm {5 mil}• 2D : PDF417, 0.17 mm {6.7 mil}

Feature Overview
Bar Code Scanner
Minimum Optical Resolution• 1D : 0 127 mm {5 mil}
31
• 1D : 0.127 mm {5 mil}• 2D : PDF417, 0.17 mm {6.7 mil}

Feature Overview
Barcode Scanner
Sample BarcodesSample Barcodes
Minimum Optical Resolution• 1D : 0 127 mm {5 mil}
32
• 1D : 0.127 mm {5 mil}• 2D : PDF417, 0.17 mm {6.7 mil}
Feature Overview
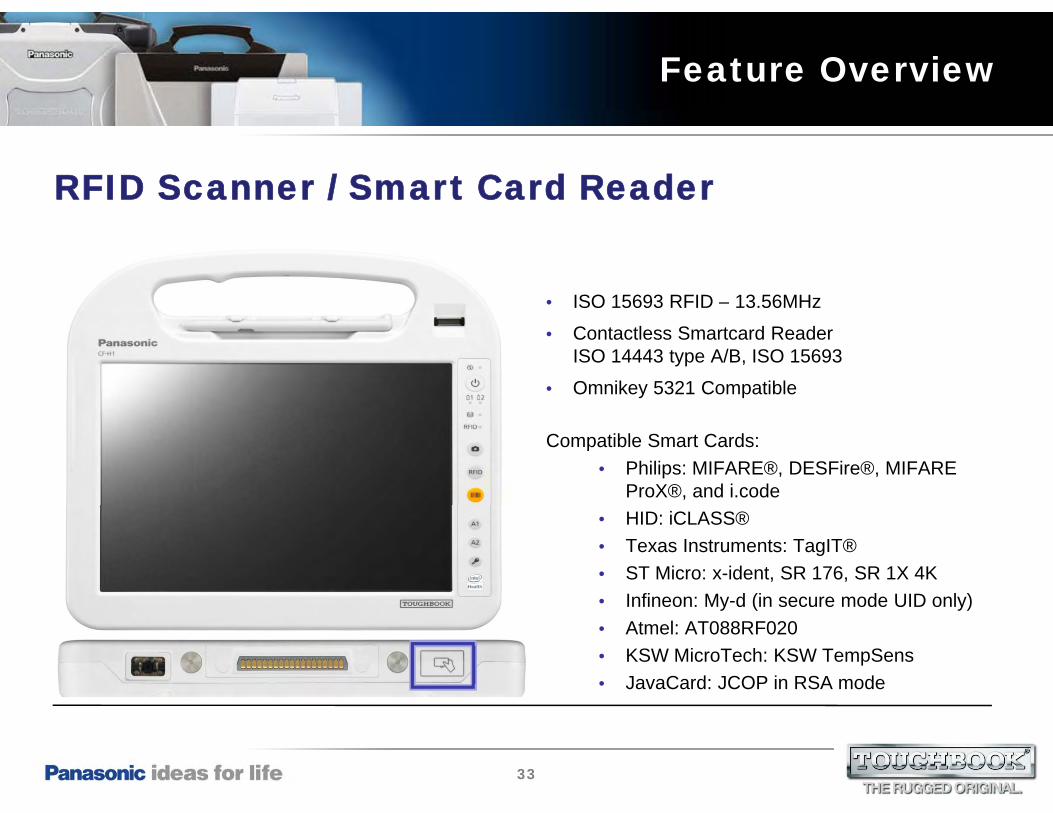
RFID Scanner / Smart Card Reader
• ISO 15693 RFID – 13.56MHz3 3
• Contactless Smartcard Reader ISO 14443 type A/B, ISO 15693
• Omnikey 5321 Compatible
Compatible Smart Cards:• Philips: MIFARE®, DESFire®, MIFARE
ProX®, and i.code• HID: iCLASS® • Texas Instruments: TagIT® • ST Micro: x-ident, SR 176, SR 1X 4K • Infineon: My-d (in secure mode UID only)Infineon: My d (in secure mode UID only) • Atmel: AT088RF020 • KSW MicroTech: KSW TempSens• JavaCard: JCOP in RSA mode
33

Feature Overview
Camera
• 2 Megapixel camera2 Megapixel camera• Native 640x480 pictures• Auto focus• LED Lights used to brighten viewing area• LED Lights used to brighten viewing area
• Activate Camera with button press• Second button press to take pictures• Second button press to take pictures
34

Feature Overview
Biometrics
• Integrated Finger Print ReaderA Si 248 4 i l• Array Size: 248 x 4 pixels
• Image Size: 248 x 360 pixels• Image Resolution: 508 DPI
• Protector Suite Software version 5.8.2
• BIOS Finger Print Lock
File Encryption• File Encryption
• Password management for popular applications
• Store finger print information on the HDD or on th hi t
• Launch the Protector Suite Control Center from All Programs – Protector Suite QL – Control Center• Click or Tap on the Tutorial menu heading; Click the Next button and view the tutorial
the sensor chipset
• Can integrate with the on-board TPM Chipset
35
• Click or Tap on the Tutorial menu heading; Click the Next button and view the tutorial• Click or Tap the Next button and follow the on screen instructions to run a test swipe of your fingerprint

Feature Overview
Bluetooth
• Bluetooth Stack for Windows by Toshiba C tiCorporation
• Version 5.10.14(p)
• HW version Bluetooth 2.0 with EDR
• Supports 15 profiles including:\• Human Interface Device (HID)• Head Set (HSP)• Hands-Free (HFP)
Th i t ti t l f h d t t Bl t th K b d
• Personal Area Network (PAN)
36
• These instructions are meant as an example of how an end user can connect to a Bluetooth Keyboard. • These instructions do not apply to every Bluetooth keyboard manufacturer's product

Feature Overview
Bluetooth – Pairing a BT Keyboard
1. Tap on the Start button, then tap on Bluetooth, and then tap on Bluetooth Settingsand then tap on Bluetooth Settings.
2. If the Bluetooth Stack application does not have a device in its library, the Connection Wizard will launch and you can move on to Step 4.
3. To add a new device, Tap on the Bluetooth Menu, then Tap on “Add new connection…”
4. Press the pairing button on the Bluetooth keyboard until the status light indicates that thekeyboard until the status light indicates that the keyboard is in pairing mode and is advertising itself to other Bluetooth devices.
5. Tap on the Next button to begin searching for h Bl h k b d
Th i t ti t l f h d t t Bl t th K b d
the Bluetooth keyboard.
37
• These instructions are meant as an example of how an end user can connect to a Bluetooth Keyboard. • These instructions do not apply to every Bluetooth keyboard manufacturer's product.

Feature Overview
Bluetooth – Pairing a BT Keyboard
1. When the H1 “finds” the keyboard, it will display the MAC address first and then display anythe MAC address first, and then display any embedded device name that it may be advertising.
2. If the H1 does not “find” the keyboard, the Bl t th St k ill di lBluetooth Stack will display an error.
3. At this point you should check the state of the Bluetooth keyboard and make certain that it is in pairing mode. Turn the keyboard on and off and reset the keyboard to pairing mode if needed.*
4. Once you are certain that the keyboard is in pairing mode, Tap on the OK button to restart the search for the Bluetooth keyboard
Th i t ti t l f h d t t Bl t th K b d
t e sea c o t e uetoot eyboa d
*In the case of the Microsoft Wireless Entertainment Keyboard 7000, the connection status light will alternate between green and red when it is placed in pairing mode
38
• These instructions are meant as an example of how an end user can connect to a Bluetooth Keyboard. • These instructions do not apply to every Bluetooth keyboard manufacturer's product.

Feature Overview
Bluetooth – Pairing a BT Keyboard
1. When the H1 “finds” the keyboard, it will display the MAC address first and then display anythe MAC address first, and then display any embedded device name that it may be advertising.
2. Tap on the Next button.
3. The H1 Bluetooth module will communicate with the Bluetooth keyboard and attempt to authenticate the Bluetooth keyboard
4 The Bluetooth Stack will then ask the end user to4. The Bluetooth Stack will then ask the end user to enter the Bluetooth Passkey displayed in the dialogue using the Bluetooth keyboard.
5. Using the Bluetooth keyboard, enter the Bl h P k di l d i h di l b
Th i t ti t l f h d t t Bl t th K b d
Bluetooth Passkey displayed in the dialogue box and then press the [ENTER] key
39
• These instructions are meant as an example of how an end user can connect to a Bluetooth Keyboard. • These instructions do not apply to every Bluetooth keyboard manufacturer's product.

Feature Overview
Bluetooth – Pairing a BT Keyboard
1. Once the security authentication key has been confirmed the New Connection Wizard willconfirmed, the New Connection Wizard will close.
2. The default view of the Bluetooth Stack application will appear and display a new device
t f th Bl t th K b d Th ientry for the Bluetooth Keyboard. The icon should display the “connected” symbol (green and yellow hooks connected to each other).
3. If the Bluetooth Keyboard is not connected to the H1, double tap on the keyboard device entry to connect the H1 to the Bluetooth Keyboard. (be sure that the Bluetooth Keyboard is powered on before you initiate a connection)
Th i t ti t l f h d t t Bl t th K b d
Note: You can pair a Bluetooth Mouse using a similar process
40
• These instructions are meant as an example of how an end user can connect to a Bluetooth Keyboard. • These instructions do not apply to every Bluetooth keyboard manufacturer's product.

Feature Overview
Bluetooth – Pairing a BT Headset
1. Tap on the Start button, then tap on Bluetooth, and then tap on Bluetooth Settingsand then tap on Bluetooth Settings.
2. If the Bluetooth Stack application does not have a device in its library, the Connection Wizard will launch and you can move on to Step 4.
3. To add a new device, Tap on the Bluetooth Menu, then Tap on “Add new connection…”
4. Press the pairing button on the Bluetooth Headset until the status light indicates that theHeadset until the status light indicates that the Headset is in pairing mode and is advertising itself to other Bluetooth devices.
5. Tap on the Next button to begin searching for h Bl h H d
Th i t ti t l f h d t t Bl t th H d t
the Bluetooth Headset.
41
• These instructions are meant as an example of how an end user can connect to a Bluetooth Headset. • These instructions do not apply to every Bluetooth Headset manufacturer's product.

Feature Overview
Bluetooth – Pairing a BT Headset
1. Enter the Bluetooth Passkey in to the security dialogue box and then press the [ENTER] key
2. The Add New Connection Wizard will continue configuring the new connection.
3. The Add New Connection Wizard will ask you for VoIP application compatibility (optional) ClickVoIP application compatibility (optional). Click on the Next button to continue and complete the pairing of the Headset to the H1
4. The default view of the Bluetooth Stack li ti ill d di l d iapplication will appear and display a new device
entry for the Bluetooth Headset. The icon should display the “connected” symbol (green and yellow hooks connected to each other).
Th i t ti t l f h d t t Bl t th H d t
5. If the Bluetooth Headset is not connected, Double Tap the new Headset icon to connect the H1 to the Bluetooth Headset.
42
• These instructions are meant as an example of how an end user can connect to a Bluetooth Headset. • These instructions do not apply to every Bluetooth Headset manufacturer's product.

Technical Support
Technical Support Team
• The Panasonic Technical Support team is available 24 hours a day, 7 days a week
• The team is also available via e-mail and web chat
• Technical support center is located in Secaucus, NJ
• 1-800-LAPTOP5 or 1-800-527-8675
• Send messages and questions directly from the website
O t l il bl d d t h l
43
• Our teams are always available and ready to help you